

Krups 3 Mix 8008 Combi F 506, 3 Mix 8008 Combi F 507, 3 8008 506 Instructions For Use Manual
Page 1
www.krups.com
Page 2
e
d2
eject
S
d
c
d1
turbo
b
f
a
h
h1
g
h3
h2
i
i5
i2
i1
i3
i4
Page 3
1
2
3
eject
S
a
4
b
5
0
turbo
6
MAX
eject
S
0
turbo
eject
0
S
turbo
eject
S
turbo
0
Page 4
7
8
2
9
1
10
11 12
2
1
13
14
Page 5
15
16 17 18
19 20
Page 6

6
Page 7

7
USA 8
Français 18
Instructions for Use
Warranty
Guarantee of Performance
Mode d’emploi
Garantie
Garantie de rendement
Español 28
Instrucciones de uso
Garantía
Garantía de rendimiento
3 Mix 8008 Combi F 506
3 Mix 8008 Combi F 507
Page 8

8
USA
IMPORTANT SAFEGUARDS
When using electrical appliances, basic safety precautions should
always be followed, including the following :
• Read all instructions carefully.
• To protect against risk of electric shock do not put the appliance,
the cord or the plug in water or other liquid.
• Close supervision is necessary when any appliance is used by or
near children.
• Unplug from outlet when not in use, before putting on or taking
off parts, and before cleaning.
• Avoid contact with moving parts.
• Keep hands, hair, clothing as well as spatulas and other utensils
away from mixer attachments during operation to reduce the risk
of injury to persons and/or damage to the mixer.
• Remove mixer attachments before washing.
• Do not operate any appliance with a damaged cord or plug or
after the appliance malfunctions, or is dropped or damaged in
any manner. Return appliance to the nearest authorized KRUPS
Service Center for examination and/or repair.
•Do not place this mixer on an unstable cart, stand or table. The
mixer may fall, causing injury to a child or adult or serious
damage to the appliance.
• The use of attachments not recommended or sold by KRUPS may
cause fire, electrical shock or injury.
• Do not use outdoors.
• Do not let cord hang over edge of table or counter or come in
contact with hot surfaces including a stove.
Regarding the mini chopper attachment (depending on model):
• Blade is sharp. Handle carefully.
• Keep hands and utensils away from the cutting blade while
chopping food to reduce the risk of severe injury to persons or
damage to the mini chopper. A scraper may be used but only
when the mini chopper is not running.
Page 9

9
• To reduce the risk of injury, never place cutting blade on base
without first putting bowl properly in place.
• Be certain cover is securely locked in place before operating
appliance.
• Do not attempt do defeat the cover interlock mechanism.
SAVE THESE INSTRUCTIONS
CAUTION :
This appliance is intended for household use only. Do not use it for
commercial purposes. Any servicing other than cleaning and user
maintenance should be performed by the nearest authorized
KRUPS Service Center.
Do not immerse the appliance in water.
To reduce the risk of fire or electric shock, do not open the
appliance. No user serviceable parts inside. Repair should be done
by an authorized KRUPS Service Center only.
SPECIAL CORD SET INSTRUCTION :
This appliance has a polarized plug (one blade is wider than the
other). To reduce the risk of electric shock, this plug will fit into a
polarized outlet only one way. If the plug does not fit fully into the
outlet, reverse the plug. If it still does not fit, contact a qualified
electrician. Do not modify the plug in any way.
Page 10

10
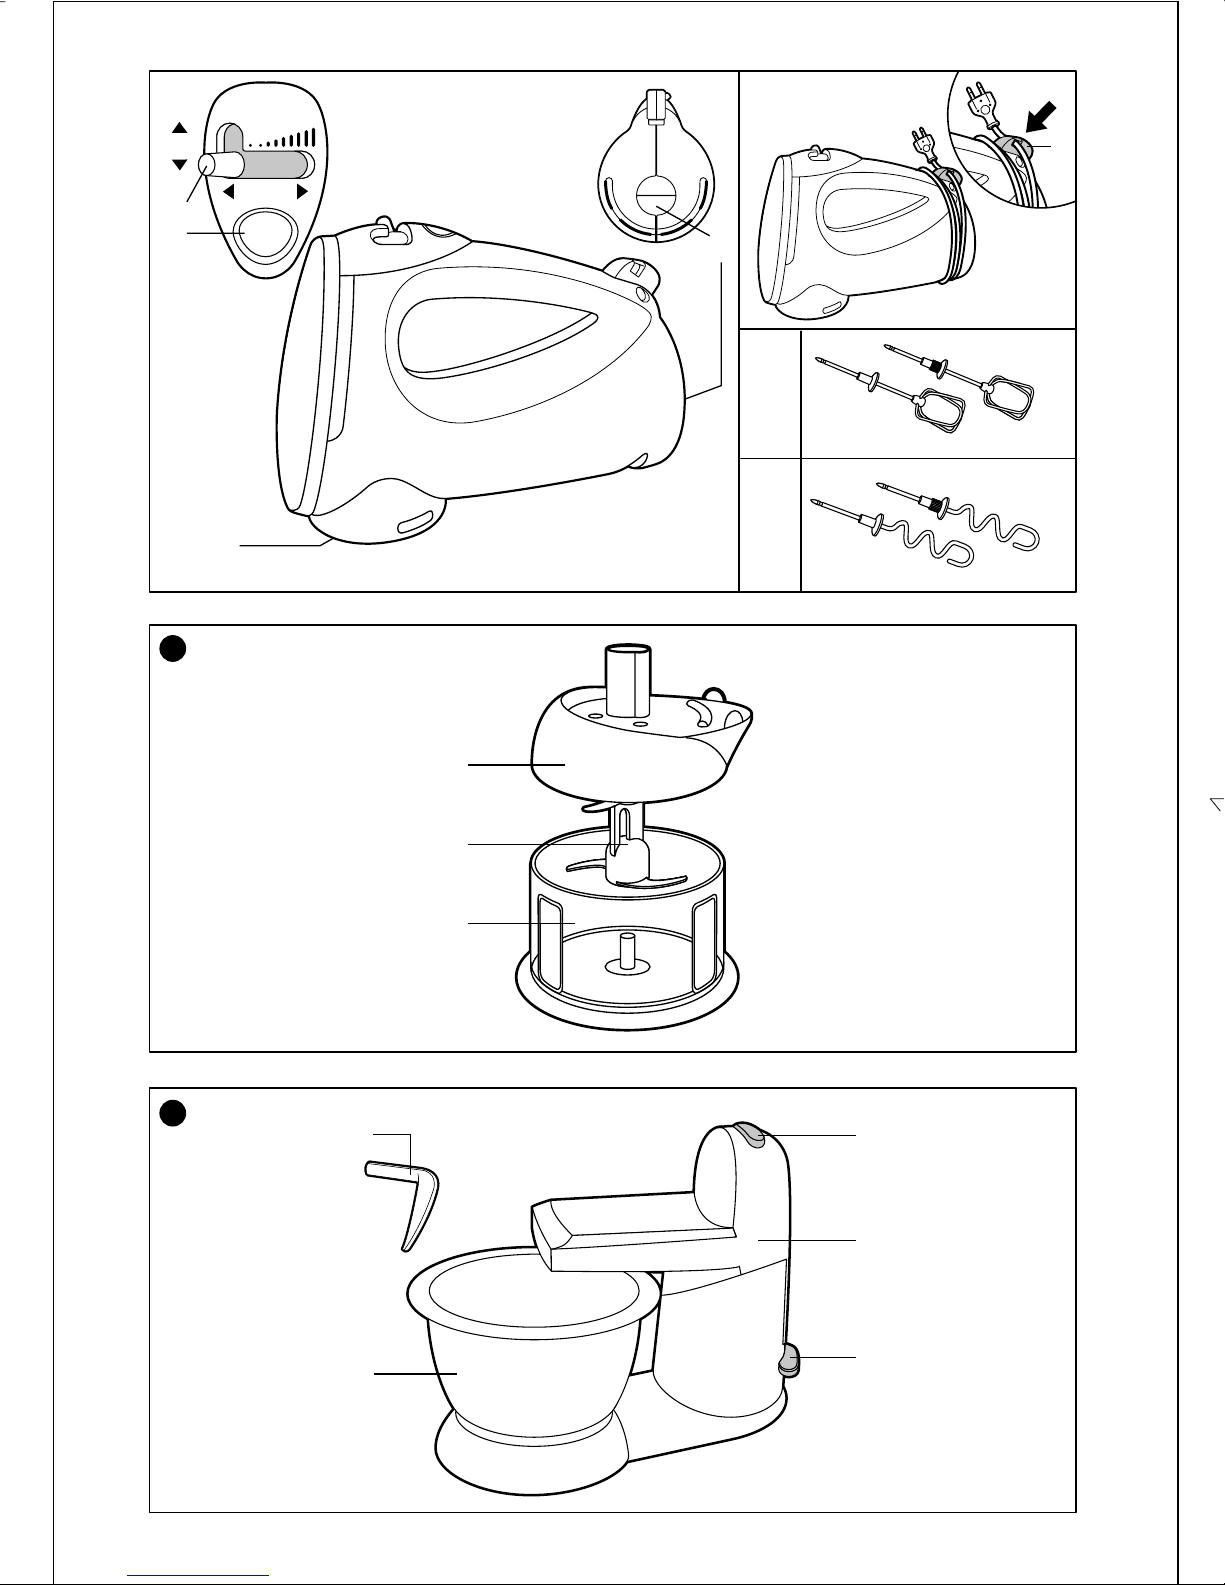
Description
Parts of the hand unit
a Front connector
b Rear connector
c Turbo switch
(for use with front connector)
d Control button:
d1 Start / Stop and electronic speed
control
d2 Ejection (front connector)
e Cord wrap with hanging clip
Depending on model
. Atachment for front connector
f Mixing Beaters
g Dough Hooks
. Attachment for rear connector
(depending on model)
h Mini-chopper
h1 Cover
h2 Bowl
h3 Blade
Stand Unit
i Stand
i1 Adjustable arm
i2 Button for unlocking the hand-mixer
i3 Button for unlocking the adjustable
arm
i4 Bowl
i5 Spatula
Safety recommendations
• Read the instructions for use carefully before
using your appliance for the first time: any
use which does not conform to the instructions will absolve Krups from any liability.
• Never leave the appliance within reach of
children without supervision. The use of this
appliance by children must always be
supervised.
• Ensure that the voltage rating of your
appliance does in fact correspond to that of
your household electrical wiring system.
Any connection error will void the
warranty.
• Any servicing other than cleaning and
normal maintenance by the customer must
be performed by an authorized Krups service
center.
• Do not allow the power cord to hang down
within reach of children.
• If the power cord or the plug are damaged,
do not use the appliance. To avoid any risk,
these must be replaced by an authorized
Krups service center (see Krups Service
Stations booklet).
• Never touch the mixing beaters or
dough hooks when the appliance is
working.
• Never use attachments with different
functions at the same time (e.g. dough
hooks and mixing beaters, etc.).
Important: Your appliance is fitted with two
connectors (1):
• a front connector (a) for fitting the
attachments (f, g,) (depending on model)
• a rear connector (b) for fitting accessory (h)
(depending on model).
. Mini chopper (depending on model):
• Do not put the blade in your mouth.
• Always remove the blade before emptying
the bowl.
• The mini-chopper is suitable for processing
small quantities only. Never exceed the
amounts stated in the instruction booklet
(see p.12).
• Do not run the mini chopper empty.
• Allow cooked foods to cool down before
putting them into the bowl.
• Do not place the bowl in an oven or
microwave.
Page 11

11
Before using your appliance for
the first time
• Clean the various parts of the appliance
(refer to the «Cleaning» section of this
instruction book) with some dish-washing
liquid. Wipe and dry after cleaning.
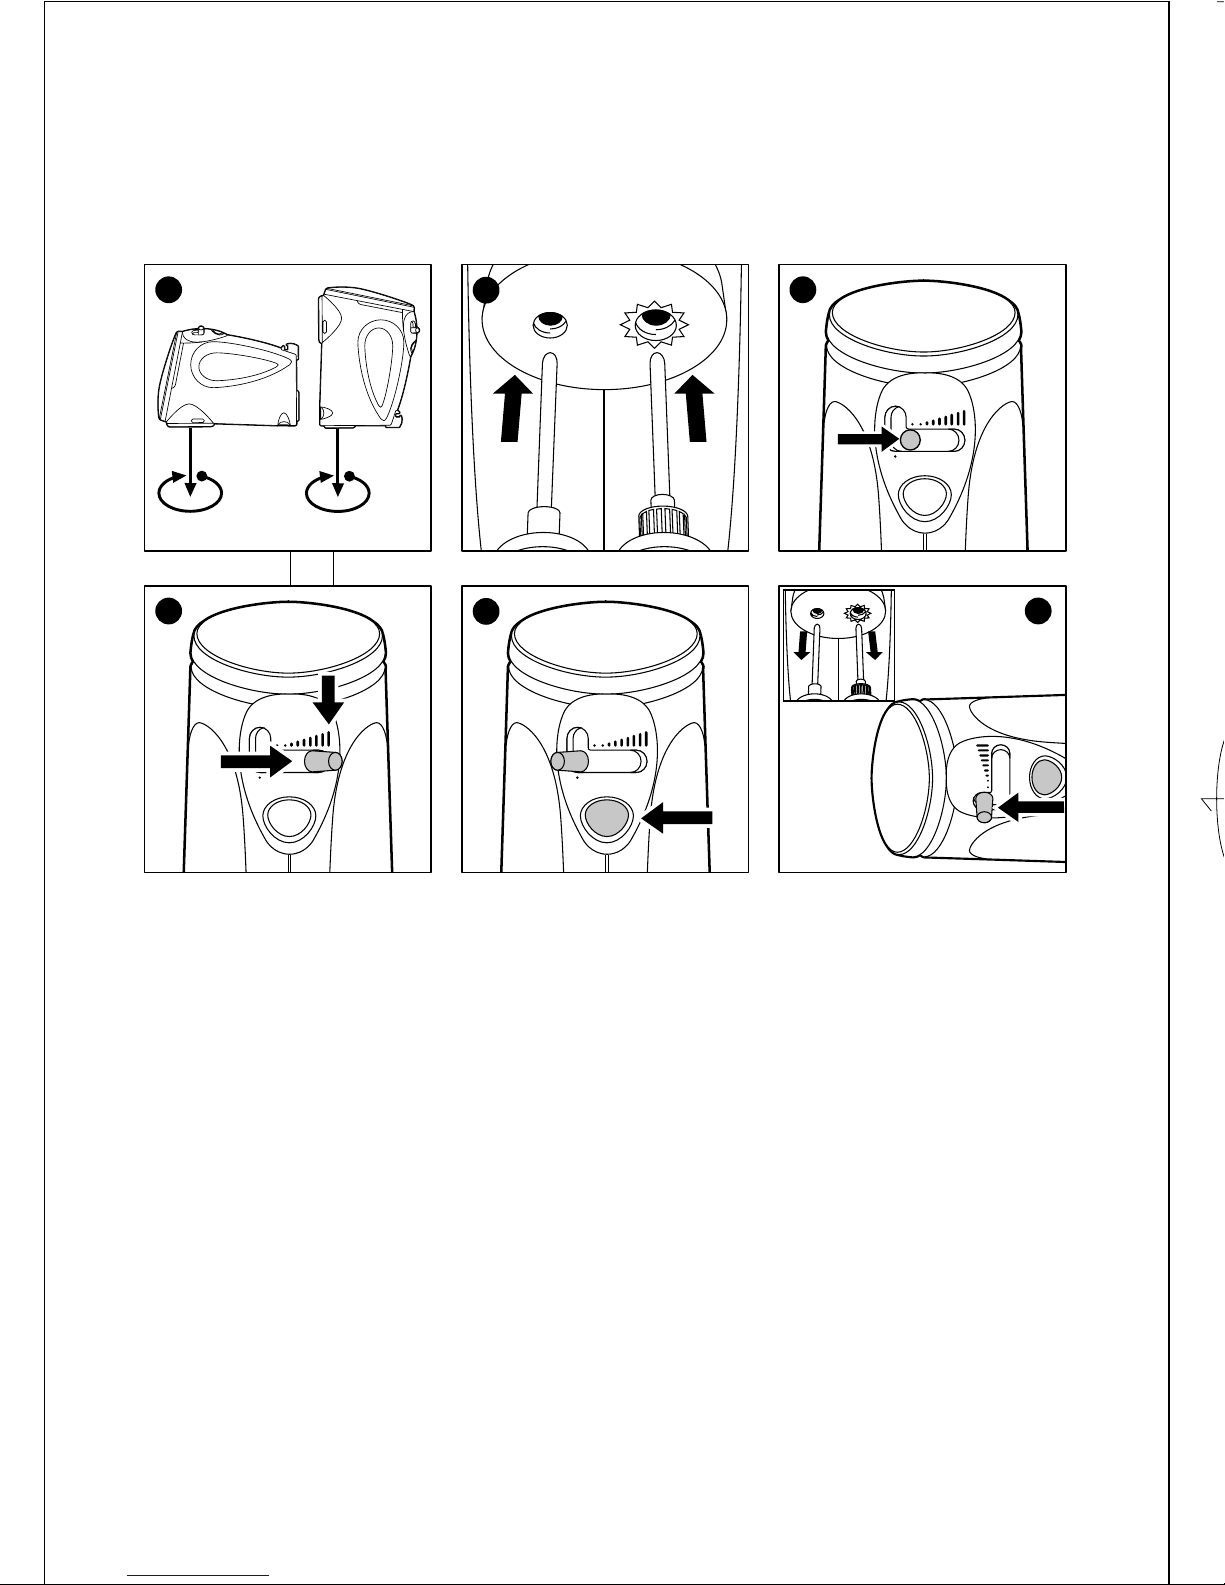
Using attachments on the front
connector :
. MIXING BEATERS AND DOUGH HOOKS
• With the control button (d) in position “0”,
insert the mixing beaters or dough hooks
until they are locked into place. Always
insert the attachment equipped with a
toothed crown into the opening indicated
on the appliance by a crown which is
similarly toothed (2).
• Plug in the appliance.
• Depending on the quantity to be prepared,
place the ingredients in an appropriate
container.
• Insert the mixing beaters or dough hooks
into the container and start the appliance by
turning the control button (d) to the right.
To prevent splashing when starting or for
delicate preparations (creams, sauces), your
appliance is fitted with an anti-splash function
(position “S”). To use this:
• Push the control button (d) to the right in
position “S” (3).
• To continue with the preparation, choose a
faster speed (4).
The appliance is equipped with a Turbo
button (c) which allows you instant access to
the full power of your appliance (5).
• When you have finished using the mixer,
reset the control button (d) to position “0”.
• Unplug the appliance.
• Eject the mixing beaters or dough hooks by
pushing the control button (d) to the “Eject”
position (6).
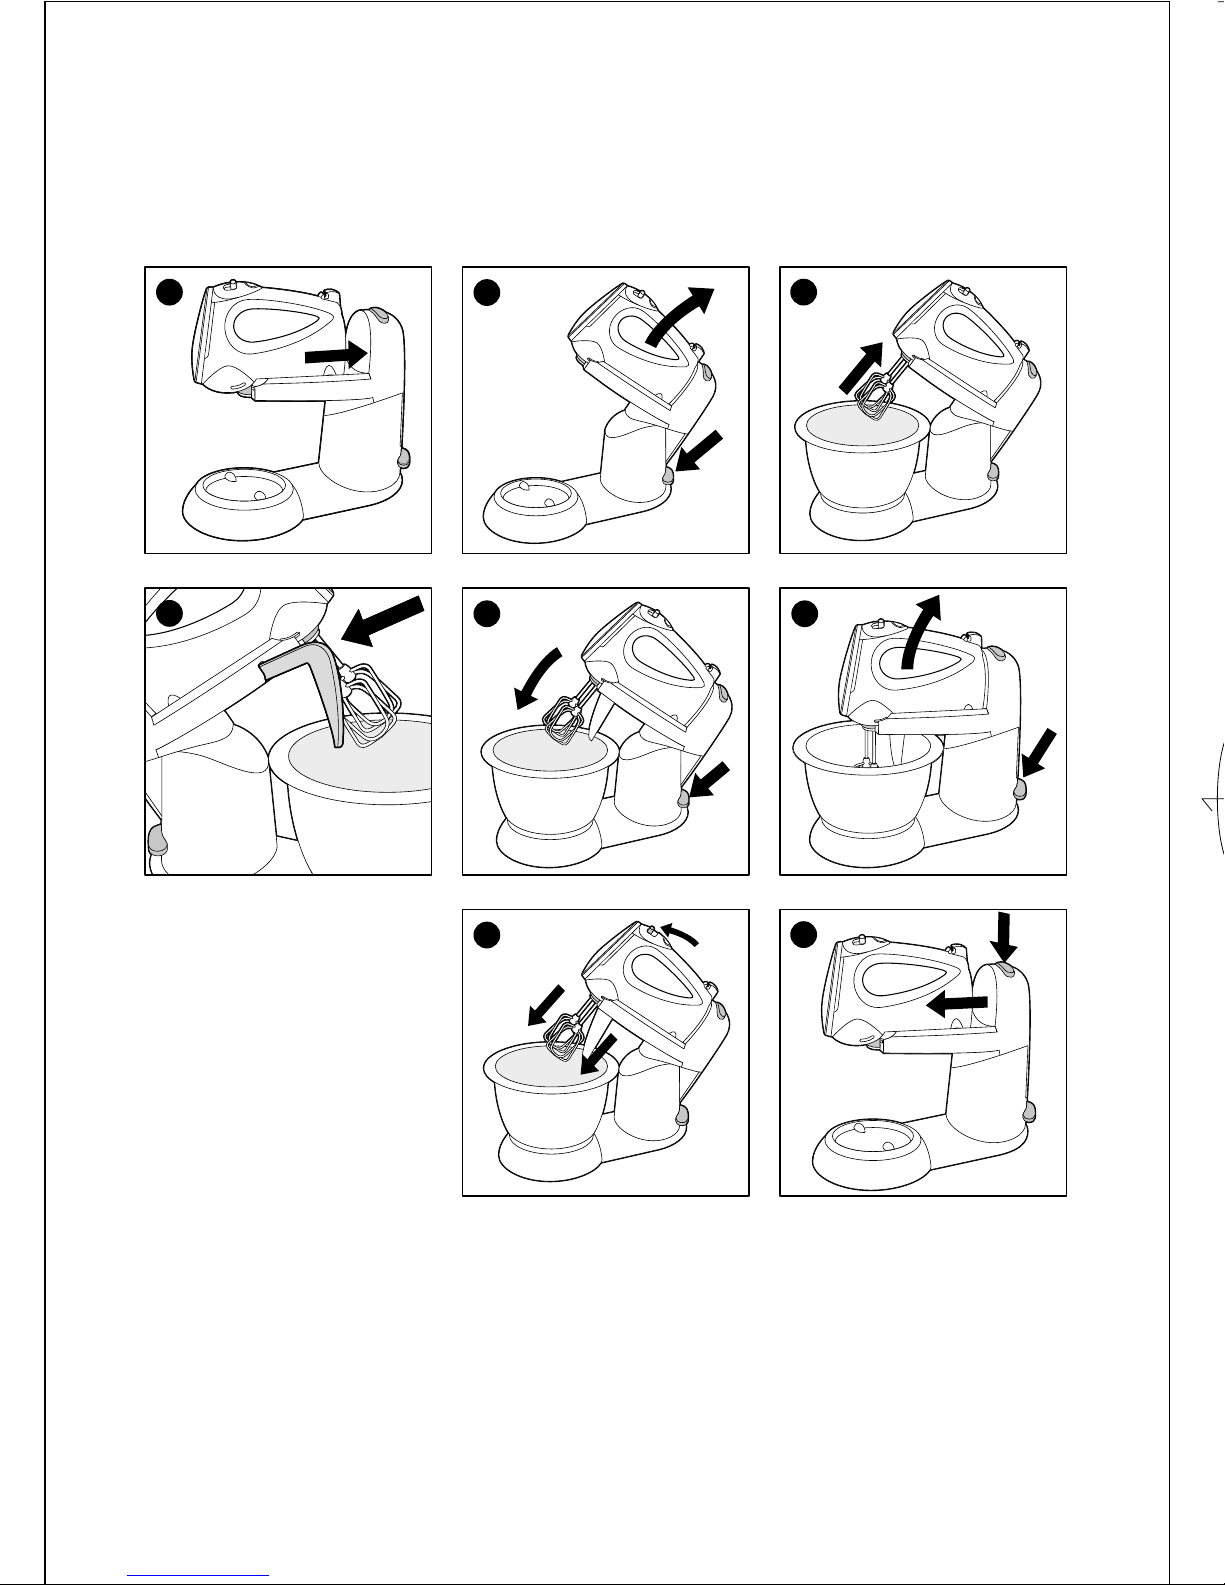
. STAND
• The stand is to be used with the hand-mixer
equipped with mixing beaters or dough
hooks only.
• Engage the hand-mixer on the adjustable
arm (i1) until it clips into place (7).
• While holding the button for unlocking the
adjustable arm (i3), tilt the articulated arm
up with the aid of the hand mixer handle
(8).
• Insert the mixing beaters or the dough
hooks until they are completely locked in
place (9) (notched attachment in notched
outlet).
• Insert the handle of the spatula (i5) into the
slot on the articulated arm (10). This spatula
keeps the ingredients within the mixing zone
of the bowl when using the mixer with the
stand unit.
• Place the bowl in position. The bowl tilts and
rotates to ensure optimum stirring and
mixing.
• While holding the button for unlocking the
adjustable arm (i3), lower the articulated
arm until it engages (11).
• Plug in the hand-mixer.
• After use, unplug the hand-mixer.
• While holding the button for unlocking the
adjustable arm (i3), tilt the articulated arm
up with the aid of the hand mixer handle
(12).
• Eject the mixing beaters or dough hooks
(13).
• Remove the bowl.
• While holding down the button for
unlocking the hand-mixer (i2), disengage the
hand-mixer (14).
Note :
• Never operate the hand-mixer with the
stand arm raised.
• Never run the appliance for more than 10
minutes at a time with the mixing beaters or
for more than 5 minutes with the dough
hooks. This will prevent the appliance from
overheating.
• The maximum quantity of dough or pastry,
including all ingredients, is 4.4Lbs (2 kg)
based on 2.2 Lbs (1 kg) of flour for risen
dough and 1.6 Lbs (750 g) of flour for
shortcrust pastry.
Page 12

12
Using the mini chopper on the
on the rear connector
(depending on model)
This attachment is suitable for chopping:
parsley, fruits, vegetables, lean meat, nuts,
cheese, breadcrumbs, baby foods and for
mixing small quantities of liquids. The
maximum power of your hand-mixer is
reached with the mini-chopper attachment.
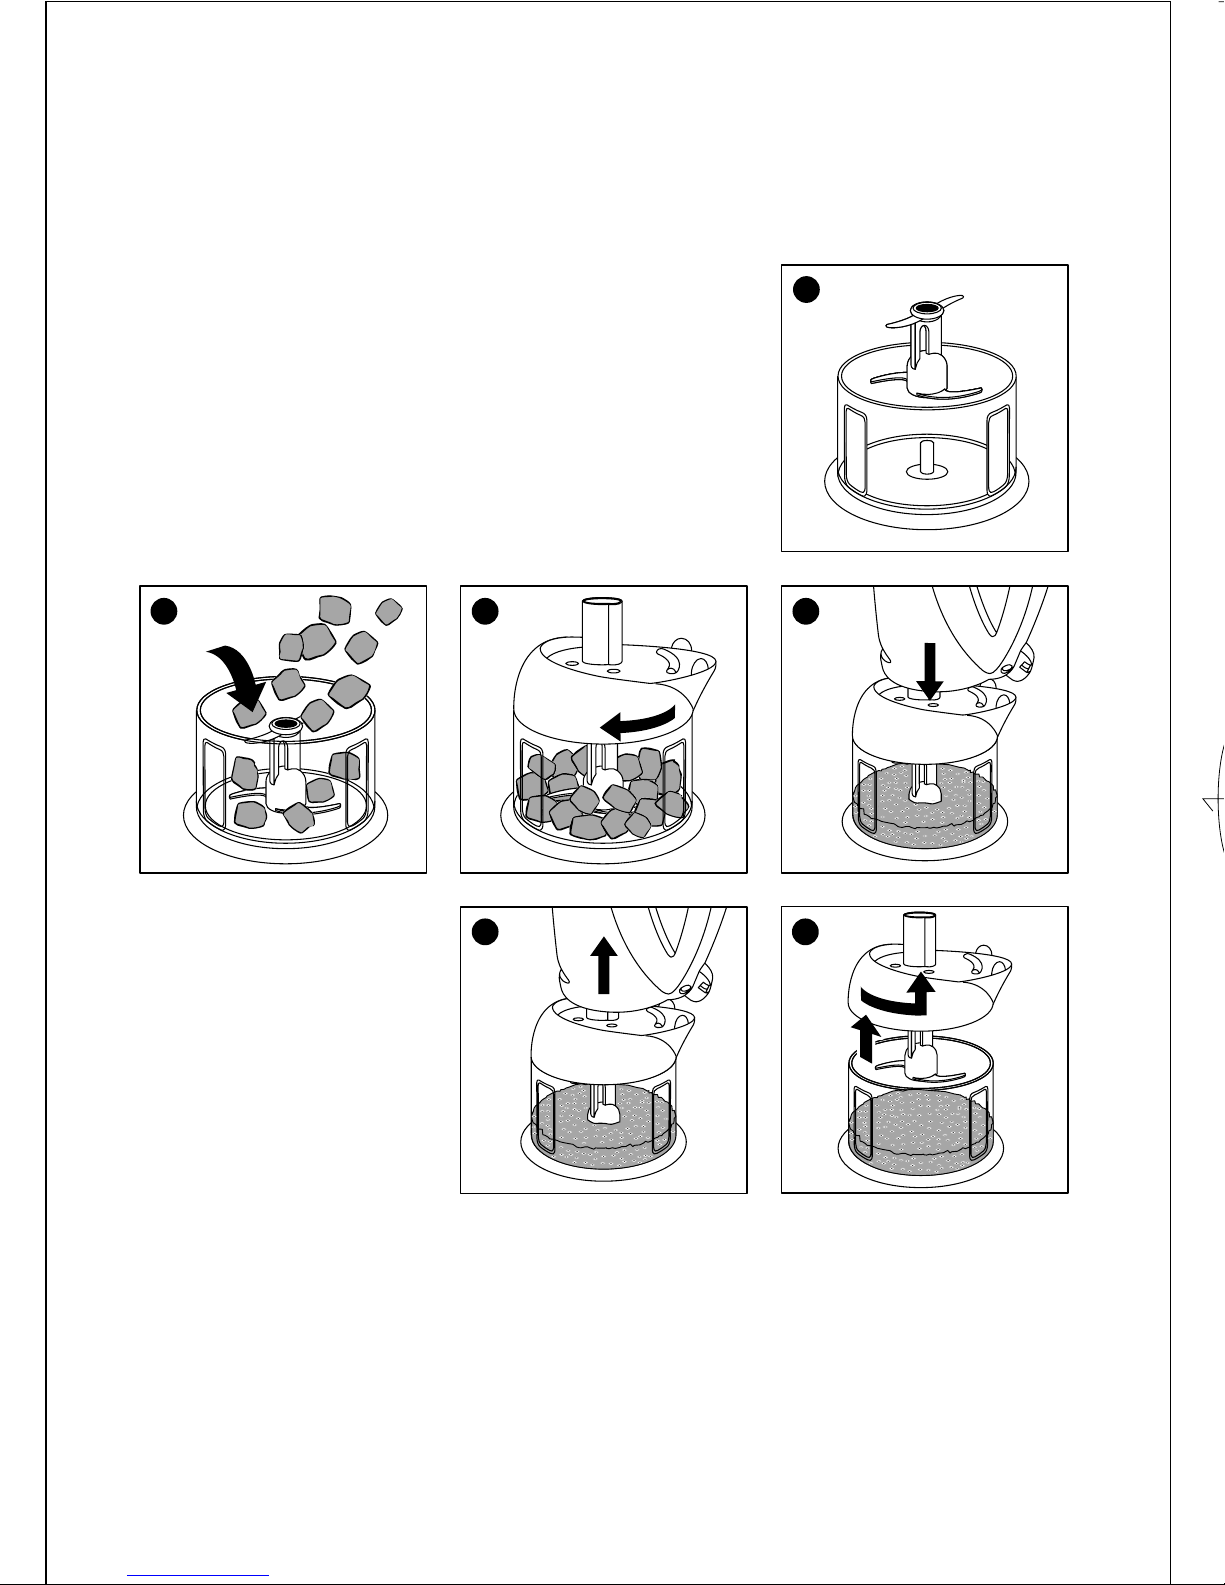
• Wash the blade and the bowl before using
them for the first time.
• Fit the blade (h3) in the bowl (h2) then pour
in the ingredients (15) (16).
• Lock the cover onto the bowl by turning it
(17).
• Put the hand-mixer on the mini-chopper
using rear connector (b) (18).
• Plug in the hand-mixer.
For safety reasons, the hand-mixer detects the
presence of accessories on the rear outlet.
• During use, keep hold of the control button
(d); if you release it, it will automatically
return to the position “0”.
To prevent splashing when starting liquid
preparations , your appliance is fitted with an
anti-splash function. To use this:
• Push and hold the control button (d) in
position “S” (3).
• To continue with the preparation, choose a
faster speed, still holding the control button
(d) (4).
• Unplug the hand-mixer once you have
finished using it.
• Remove the mini-chopper, unscrew the
cover and remove the blade before removing
the minced foods (19) (20).
Important Notice
• In order to prevent any damage to the blade
and to the bowl, do not chop hard foods:
coffee beans, ice cubes, chocolate, cereals,
rice, spices and horseradish.
• Remove bones and sinews from meat before
placing in the bowl.
Instructions for chopping
Max. Time
wt. (secs.)
Parsley Wash, remove stalks,
dry well and put in 30 g (1 oz) 20
chopping bowl
Onions, Peel and cut into
Shallots 2-3 cm (1-2inch ) 150 g by
pieces (5 oz) pulsing
Garlic Peel 150 g by
(5 oz) pulsing
Lean meat Cut into 2 cm (2 250 g
inch ) cubes ( 9 oz ) 30
Apples Peel, core and cut
into 2 cm pieces 200 g
(1 inch) (7 oz ) 20
Carrots Peel and cut into
2 cm ( 1 inch ) 200 g
pieces (7 oz ) 20
Hazeluts, Do not put pieces
peanuts, al- of shell into bowl 125 g
monds, wal- (4.4 oz ) 45
nuts
Rusks Break into pieces 1 slice 20-30
Dry bread Cut into pieces 1 slice 20-30
Cheese Cut into 2 cm
( example : (1 inch ) cube 100 g
Gruyère) (3.5 oz ) 45
Liquids 150 ml
(1/2 cup) 15
When the mini-chopper has run for 45
seconds non-stop, allow it to cool down for 2
minutes.
Cleaning
• Unplug the appliance.
• Do not immerse the body of the appliance,
the stand and the cover of the mini chopper
in water. Use only a damp cloth.
• Clean the mixing beaters and dough hooks,
the blade and the bowls under running
water and dishwashing soap or in the
dishwasher. Rinse and dry.
Page 13

13
What to do if your appliance
does not work
• Make sure the attachments have been
correctly fitted.
• Check the electrical connection.
If your appliance still does not work, contact
an authorized Krups service center (see list in
the Krups Service Stations booklet).
Recipes
. Apple pie
. Shortcrust pastry: 300 g (10 oz) flour, 150 g
(5 oz) butter, 15 ml (1/15 cup) water, 1 pinch
salt.
.Filling: 4 or 5 apples, 2 tbsps sugar, 1 tsp
cinnamon, 1 tsp nutmeg, juice of a lemon,
10g ( 1/3 oz ) butter.
. 1 pie dish: 28 cm in diameter (11” ins.)
. Preparation time: 18 to 20 min.
• Using the whisks, mix the flour, salt and
butter in pieces until it «crumbs» (min.
speed).
• Then, using the dough hooks, gradually add
water while kneading (medium speed, then
max.) until it forms a ball.
• Leave to rest for 1 hour in the fridge.
• In a bowl, mix the finely sliced apples with
the sugar, cinnamon and nutmeg.
• Roll out 2/3 of the pastry, lining the buttered
pie dish above the edges.
• Place the apples on the bottom, sprinkle
with lemon juice and scatter with small
cubes of butter.
• Cover the apples with the rest of the pastry
and seal the edges together.
• Make a small hole in the centre of the dish
and bake for 35 min at 220 °C (400°F ).
You can replace the apples with: 800 g (28 oz)
rhubarb, chopped into pieces, or 500 g (18
oz) rhubarb + 300 g (10 oz) raspberries and 1
tbsp flour, 6 tbsp sugar and 10g (1/3 oz)
butter.
. Strawberry tart
. Shortcrust pastry: 250g (9 oz ) flour, 125g
(4.4 oz ) butter, 125g (4.4 oz) sugar, 1 egg.
. Custard cream: 1/4 l (1/2 Pt) milk, 2 egg
yolks, 50g (2 oz ) sugar, 25g (1 oz ) flour, a
few drops of vanilla essence.
. 800g ( 28 oz )strawberries
. 1 pie dish: 28 cm in diameter (11” ins.)
. Preparation time: 20 min
• Using the whisks, mix the flour, sugar and
butter in pieces until it «crumbs» (min.
speed).
• Then, using the dough hooks, add the egg
and knead until a ball forms (medium speed
at first then max).
• Leave to rest for 1 hour in the fridge.
• Boil the milk with the vanilla.
• During this time, using the whisks, process
the egg yolks and the sugar (medium speed,
then max). The mixture must turn white.
• Add the flour and mix (medium speed).
• Then at min. speed, pour in the boiling milk
with care and mix.
• Heat the preparation, stirring with a spoon
until it thickens. Allow to cool, stirring
continuously.
• Roll out the pastry and use it to line the
buttered pie dish. Pierce the bottom with a
fork, line with aluminium foil and cover with
pulses.
• Bake for 20 min at 180°C (324 °F ).
• Remove the pulses and the aluminium foil
and allow to cool.
• Spread the custard cream on the base of the
tart and fill with strawberries.
• Coat with redcurrant jelly.
. Chocolate cake
. 3 eggs, 170g ( 6 oz) sugar, 170g ( 6 oz)
butter, 150g (5.3 oz ) flour, 2 tbsp cocoa
powder, 6g (1/5 oz ) baking powder
(1/2 sachet).
. 1 loose-bottomed cake tin: 22 cm in
diameter (10” ins.)
. Preparation time: 11 min
Page 14

14
• Using the whisks, mix the eggs and sugar in
a salad bowl (medium speed): the mixture
should be smooth and slightly runny.
• Add the butter (medium speed), then the
flour, the cocoa and the baking powder
(min. speed while adding then medium
speed to smooth it).
• Pour the mixture into the buttered cake tin
and bake for 50 min at 170°C (306 F).
• You can:
. add some pieces of walnut, chocolate
shavings or crystallised orange peel to the
mixture.
. add to the cake mixture 2 tbsp ground
almonds or walnuts.
. coat your cake with chocolate icing made by
melting 100g ( 3.5 oz )plain chocolate with
20g (1 oz ) butter.
. Jam Swiss roll
. 3 eggs, 90g ( 3 oz ) sugar, 40g (1.4 oz ) flour,
30g (1 oz ) potato starch, 1 pot of jam or jelly
(apricot, orange, raspberry, redcurrant, etc.).
. 1 rectangular tin: 33 x 22 cm (12” ins X 10”
ins )
. Preparation time: 10 min
• Using the whisks, process the sugar and the
egg yolks (max. speed): the mixture must
turn white.
• Add the flour and the potato starch then
mix (min. speed).
• Clean the whisks and beat the egg whites
separately until stiff (max. speed).
• Mix the two preparations (min. speed).
• Line the tin with buttered greaseproof paper,
pour in the cake mixture and bake for 15
min at 170°C (306 °F).
• When the cake is slightly browned,
immediately tip it out of the tin onto a damp
cloth sprinkled with sugar. Remove the
greaseproof paper.
• Roll the cake in the cloth and allow to cool.
• Then, unroll the cake and spread it with jam
or jelly.
• Roll it up again and trim the ends.
You can also:
. fill this cake with custard cream,
. replace the potato starch with cocoa powder
and line the roll with whipped cream.
. Almond and apricot tart
. Puff pastry: 200g (7 oz ) flour, 10 ml (1/20
cup ) water, 160g (5.6 oz ) butter, 1 pinch
salt.
. Filling: 1kg fresh apricots or 1 can of apricots
in syrup, 60g (2 oz ) butter, 70g ( 2.5 oz )
sugar, 70g ( 2.5 oz ) ground almonds, 1 whole
egg + 1 yolk, 2 tbsp apricot jam.
. 1 pie tin: 28 cm , in diameter (11” ins.)
. Preparation time: 2 h for the puff pastry +
10 min to complete the tart.
• Place the flour and the salt together in a
bowl. Add water gradually, kneading with
the dough hooks until a ball is formed
(medium speed then max).
• Allow to rest 20 min in a cool place.
• Turning and rolling the pastry:
• Roll out the pastry to a square 1 cm (1/2
inch) thick.
• Process the butter until it has the same
consistency as the pastry and roll it out in
the middle of the square. Enclose the butter
by folding in, 2 by 2, the opposite corners of
the square.
• Roll out the pastry into a rectangle 2 cm (1
inch ) thick and fold it in 3.
• Allow the pastry to rest for 20 min and
repeat the last operation 2 more times.
• Place the pastry in a cool place.
• In a bowl, mix, using the whisks, the sugar,
ground almonds, butter and the eggs
(medium speed then max).
• Turn the pastry twice more before lining the
pie tin. Distribute over the base, after
pricking with a fork, the preparation with
the almonds and place the apricots, sliced in
2, on top.
• Bake for 30 min at 240°C (432 °F ). then
coat with apricot jam.
Page 15

15
. Apple fritters
. Doughnut batter: 125g (4.4 oz ) flour, 1
egg, 1 tbsp oil, 1 pinch salt, 15 ml ( 1/15 cup )
milk, 4 apples, 1 tbsp cinnamon, 75g (2.6 oz)
sugar, the juice of a lemon.
. For frying: oil.
. Preparation time: 5 min for the batter.
• Using the whisks, mix in a bowl the flour,
egg, oil, salt and 2 tbsp. milk until the
mixture is smooth (medium speed then
max).
• Add the milk gradually, at the same time
reducing the speed. Allow to rest for 1 h in a
cool place.
• During this time, mix the sugar and the
cinnamon.
• Keep the apples whole, peel them, remove
the pips and cut them into rounds. Sprinkle
them with the mixture of sugar and
cinnamon, and sprinkle with lemon juice.
Cover and leave to marinate in a cool place
for 30 min.
• Dip the apple rounds into the doughnut
batter until they are completely coated, then
into the hot oil.
• Cook in batches of 4. Serve hot.
You can prepare fritters in the same way with
all sorts of fresh fruits: pineapples, bananas,
apricots, pears, etc.
• Always take extra care when placing foods
into hot oil. Take precautions in case of
splashing, never leave hot oil unattended.
. Bread
. 250g (9 oz ) white flour, 100g (3.5 oz )
wholemeal flour, 1 sachet dry baker’s yeast,
10g ( 1/3 oz ) sugar, 10g ( 1/3 oz ) butter, 200
ml (1 cup ) water, 1g salt.
. 1 cake tin: 24 cm (9” ins.)
. Preparation time: 7 min
• Mix in a salad bowl, using the dough hooks,
the 2 types of flour, salt, butter, sugar and
yeast (medium speed).
• Add water gradually, until a ball is formed
(medium speed then max).
• Cover the salad bowl with a damp cloth and
leave to stand for 30 min in a warm place.
• Place the dough in the buttered and floured
tin. Leave to rise again for 1 h.
• Bake for 25 min at 240°C (432 °F).
You can, if you like, mix into the dough 150g
(5 oz ) walnut pieces, 300g (10 oz ) raisins,
200g (7 oz ) black olives, 200g ( 7 oz )small
bacon cubes, 2 tbsp cumin seeds, etc.
You can also divide the dough into small balls
to make small individual rolls.
. Braided brioche
. 500g (18 oz ) flour, 2 sachets dry baker’s
yeast, 200g ( 7 oz ) butter, 50g ( 2 oz ) sugar,
1 pinch salt, 5 eggs, 2 tbsp warm milk.
. Preparation time: 8 min for the dough + 2 h
to rise.
• In a salad bowl, using the dough hooks,
combine the flour, yeast, warm milk, sugar,
salt and 5 eggs for 2 min (medium speed
then max).
• Add the butter piece by piece until you have
an elastic dough.
• Cover the salad bowl with a damp cloth and
leave to rise for 1 h in a warm place (until
the dough has doubled in volume). Then
divide the dough into 3.
• Roll each piece by hand to form 3 long
«strips» which you then braid.
• Place the braid on a buttered and floured
baking tray and again leave it to rise for 1 h.
Bake for 40 to 45 min at 180°C (324 °F).
You can also leave the dough unbraided and
bake it in a cake tin or create small brioches
by dividing the dough into small balls.
Limited One Year Warranty
Your KRUPS # F506 or F507 is covered by the
following warranty :
If within one year from date of purchase this
KRUPS product fails to function because of
defects in materials or workmanship, KRUPS
North America will, at its option, repair or
replace the unit with out charge, provided the
owner has a proof of date of purchase.
Page 16

16
This warranty will be void if malfunction was
caused by damage to the product by accident,
misuse, use on frequency or voltage other
than marked on the product and/or described
in the instructions, abuse including tampering,
damage in transit, or use for commercial
purposes. This warranty gives you specific
legal rights, and you may also have other
rights which may vary from state to state.
Page 17

17
GUARANTEE OF PERFORMANCE
This fine KRUPS product is manufactured according to a rigid code
of quality standards, and, with minimum care, should give years of
service. However, should the need arise for repairs or for replacement parts within or after the warranty period, please call our
CONSUMER SERVICE DEPARTMENT:
USA :(800) 526-5377
24-hours a day, 7 days a week
Canada : (905) 669-0114
Monday-Friday 8:00 a.m - 4:30 p.m
You will be provided with specific instruction on how to get your
product repaired.
The department will also be able to answer any general product
questions you may have.
Before calling the Consumer Service Department, please have the
type number of your KRUPS appliance available.
You must have this information before calling our Consumer Service Department so that we may better answer your questions. The
type number can be located by looking at the bottom of your
appliance.
This product is Type # F506 or F507
Any general correspondance can be addressed to:
USA :KRUPS North America, Inc.
P.O. Box 3900
Peoria, IL 61612
Canada : KRUPS Service
20 Caldari Rd
Concord, Ontario
L4K 4N8
Page 18

18
IMPORTANTES MISES EN GARDE
L’utilisation d’appareils électriques nécessite le respect de certaines
règles élémentaires de sécurité, parmi lesquelles :
• Lisez attentivement toutes les instructions.
• Pour éviter les risques d’électrocution, ne mettez pas l’appareil, le
cordon d’alimentation ou la prise dans l’eau ou tout autre liquide.
• Surveillez de près vos enfants lorsque ceux-ci utilisent ou sont à
proximité de l’appareil.
• Débranchez l’appareil après utilisation, avant toutes manipulations (montage et démontage des accessoires) et avant nettoyage.
• Evitez de toucher les pièces en mouvement.
• Pendant le fonctionnement de l’appareil, éloignez vos mains, vos
cheveux, vos vêtements ainsi que les spatules et autres ustensiles
des accessoires du batteur pour réduire les risques d’accident et/
ou de détérioration du batteur.
• Retirez les accessoires du batteur avant de les laver.
• N’utilisez pas votre appareil si le cordon d’alimentation ou la fiche
sont endommagés, en cas de dysfonctionnement, après une chute
ou autre dommage de quelque nature que ce soit. Faites examiner
et/ou remplacer l’appareil par le centre service agréé KRUPS le
plus proche.
• Ne posez pas le batteur sur un plateau, un socle ou une table
instable. Il pourrait tomber et blesser quelqu’un ou se détériorer.
• Pour éviter que l’appareil ne prenne feu ainsi que les risques
d’électrocution et de blessure, utilisez exclusivement les accessoires recommandés et vendus par KRUPS.
• N’utilisez pas l’appareil en extérieur.
• Ne laissez pas pendre le cordon d’alimentation sur un angle vif, à
proximité d’une source de chaleur, pas même une cuisinière.
Concernant le mini-hachoir (selon modèle) :
• La lame est tranchante. Manipulez avec précaution.
Page 19

19
• Pour limiter les risques de blessures graves et de détérioration de
l’appareil, gardez vos mains et vos ustensiles à distance de la lame
coupante lorsque vous hachez des aliments. Vous pouvez utiliser
une raclette mais à condition que le mini-hachoir ne soit pas
branché.
• Pour limiter les risques de blessures, ne fixez jamais de lame
tranchante sur le corps de l’appareil sans avoir, au préalable,
installé correctement le bol.
• Assurez-vous que le couvercle est bien fermé avant de faire fonctionner l’appareil.
• N’essayez pas de forcer le mécanisme de verrouillage du couvercle.
CONSERVEZ CES INSTRUCTIONS
ATTENTION :
Cet appareil est destiné à un usage domestique uniquement. Ne
l’utilisez pas à des fins commerciales. Toute intervention autre que
le nettoyage et l’entretien courant par l’utilisateur doit être effectuée par un centre service agréé KRUPS.
Ne mettez pas l’appareil sous l’eau.
Pour éviter que l’appareil prenne feu ainsi que les risques d’électro-
cution, n’ouvrez pas le batteur. Aucune pièce ne peut être réparée
par l’utilisateur. Toute réparation doit être effectuée exclusivement
par un centre service agrée KRUPS.
INSTRUCTIONS SPECIFIQUES AU CORDON D’ALIMENTATION :
Cet appareil est muni d’une fiche polarisée (une des lame est plus
large que l’autre). Pour des raisons de sécurité, cette fiche ne
s’adapte que d’une seule façon à une prise polarisée. Si la fiche ne
s’adapte pas à la prise, retournez-la. Si elle ne s’adapte toujours
pas, adressez-vous un électricien qualifié. Ne tentez en aucun cas
de neutraliser ce dispositif de sécurité.
Page 20

20
Description
Eléments de l’appareil
a Sortie avant
b Sortie arrière
c Bouton Turbo
(à utiliser avec la sortie avant)
d Bouton de commande:
d1 Marche / Arrêt et variation de vitesse
électronique
d2 Ejection (sortie avant)
e Enrouleur du câble avec clip
d’accrochage
En fonction du modèle
. Accessoire sur sortie avant
f Fouets
g Malaxeurs
. Accessoire sur sortie arrière (selon
modèle)
h Mini-hachoir
h1 Couvercle
h2 Bol
h3 Lame
Stand
i Socle
i1 Bras articulé
i2 Bouton de déverrouillage du batteur
i3 Bouton de déverrouillage du bras
articulé
i4 Bol
i5 Spatule
Conseils de sécurité
• Lisez attentivement les instructions
avant d’utiliser votre appareil pour la
première fois : toute utilisation non
conforme aux instructions dégage
KRUPS de toute responsabilité.
• Ne laissez jamais l’appareil à la portée
des enfants sans surveillance. Toute
utilisation de cet appareil par des
enfants doit être faite sous surveillance.
• Assurez-vous que la tension d’alimentation
de votre appareil correspond bien à celle de
votre installation électrique.
Toute erreur de branchement annule la
garantie.
• Toute intervention autre que le nettoyage et
l’entretien courant de l’appareil par l’utilisateur doit être effectuée par un centre service
agréé KRUPS.
• Ne laissez pas pendre le câble d’alimentation
à la portée des enfants.
• Si le câble d’alimentation ou la fiche sont
endommagés, n’utilisez pas votre appareil.
Pour éviter tout risque d’électrocution, ceuxci doivent être remplacés par un centre
service agréé KRUPS (voir liste dans le livret
«KRUPS Service»).
• Ne touchez jamais les fouets ou les
malaxeurs lorsque l’appareil est en
marche.
• N’utilisez jamais les accessoires ayant des
fonctions différentes simultanément (ex :
malaxeurs et fouets, etc.).
Important : Votre appareil est équipé de deux
sorties (1) :
• sortie avant (a) pour accueillir des accessoires
(f, g,) (selon modèle)
• sortie arrière (b) pour accueillir des accessoires (h) (selon modèle).
. Mini hachoir (selon modèle) :
• Ne mettez pas la lame dans votre bouche.
• Retirez toujours la lame avant de vider le bol.
• Le mini-hachoir convient uniquement pour
les petites quantités. Ne dépassez jamais les
quantités mentionnées dans le manuel
d’instructions.
• N’utilisez pas le mini-hachoir à vide.
• Laissez refroidir les aliments cuisinés avant
de les mettre dans le bol.
• Ne mettez pas le bol au four ou au microonde.
Avant la première utilisation
• Nettoyez les différents accessoires (voir le
chapitre «Nettoyage»). Rincez et essuyez.
Page 21

21
Utilisation des accessoires en
sortie avant
. FOUETS ET MALAXEURS
• Après avoir vérifié que le bouton de
commande (d) était en position “0”, insérez
les fouets ou les malaxeurs jusqu’à leur
blocage complet. Introduisez toujours
l’accessoire muni d’une couronne dentée
dans l’ouverture indiquée sur l’appareil par
une couronne également dentée (2).
• Branchez l’appareil.
• Selon la quantité à préparer, placez les
ingrédients dans un récipient approprié.
• Plongez les fouets ou les malaxeurs dans le
récipient et mettez en marche votre appareil
en poussant le bouton de commande (d)
vers la droite.
Pour éviter les projections au démarrage ou
pour les préparations délicates (crèmes,
sauces), votre appareil est équipé d’une
fonction anti-projections (position “S”). Pour
l’utiliser :
• Poussez le bouton de commande (d) vers la
droite en position “S” (3).
• Pour poursuivre la préparation, choisissez
une vitesse supérieure (4).
L’appareil est équipé d’un bouton Turbo (c)
qui vous permet instantanément d’utiliser la
pleine puissance de votre appareil (5).
• En fin d’utilisation, repositionnez le bouton
de commande (d) sur “0”.
• Débranchez l’appareil.
• Ejectez les fouets ou les malaxeurs en
positionnant le bouton de commande (d) sur
“Eject” (6).
. STAND
• Le stand doit uniquement être utilisé avec le
batteur équipé des fouets ou des malaxeurs.
• Engagez (7) le batteur sur le bras articulé
(i1).
• Tout en maintenant le bouton de déverrouillage du bras articulé (i3), basculez le
bras articulé à l’aide de la poignée du
batteur (8).
• Insérez les fouets ou les malaxeurs jusqu’à
leur blocage complet (9) (accessoire cranté
dans ouverture crantée).
• Insérez le manche de la spatule (i5) dans la
fente du bras articulé (10). Cette spatule
permet de conserver les ingrédients dans la
zone de mélange du bol.
• Mettez le bol en place. Le bol s’incline et
tourne pour garantir un brassage et un
malaxage optimal de la préparation.
• Tout en maintenant le bouton de déverrouillage du bras articulé (i3), abaissez le
bras articulé jusqu’à enclenchement (11).
• Branchez le batteur.
• Après utilisation, débranchez le batteur.
• Tout en maintenant le bouton de déverrouillage du bras articulé (i3), basculez le
bras articulé à l’aide de la poignée du
batteur (12).
• Ejectez les fouets ou les malaxeurs (13).
• Retirez le bol.
• Tout en maintenant le bouton de déverrouillage du batteur (i2), désengagez le
batteur (14).
Remarque :
• Ne faites jamais fonctionner le batteur
lorsque le bras du stand est levé.
• N’utilisez jamais l’appareil plus de 10
minutes consécutives avec les fouets ou plus
de 5 minutes avec les malaxeurs. Vous
éviterez ainsi une surchauffe de l’appareil.
• La quantité maximum de pâte, tous ingrédients compris, est de 2 kg, avec pour base
1 kg de farine pour une pâte levée et 750 g
pour une pâte brisée.
Utilisation du mini-hachoir sur
la sortie arrière (selon modèle)
Cet accessoire convient pour : hacher le persil,
les fruits, les légumes, la viande maigre, les
noisettes, le fromage, la panure, les aliments
pour bébés et pour mixer les petites quantités
de liquides. Cet accessoire mini-hachoir vous
permet d’obtenir la puissance maximale de
votre batteur.
• Lavez la lame et le bol avant de les utiliser
pour la première fois.
Page 22

22
• Disposez la lame (h3) dans le bol (h2) puis
versez-y les ingrédients (15) (16).
• Verrouillez le couvercle sur le bol en
tournant (17).
• Mettez le batteur sur le mini-hachoir à l’aide
de la sortie arrière (b) (18).
• Branchez le batteur.
Pour des raisons de sécurité, le batteur
détecte la présence d’accessoires en sortie
arrière.
• Pendant l’utilisation, maintenez le bouton de
commande (d) ; si vous le relâchez, il se
repositionnera automatiquement sur “0”.
Pour éviter les projections au début de vos
préparations liquides, votre appareil est
équipé d’une fonction anti-projections. Pour
l’utiliser :
• Maintenez le bouton de commande (d) en
position “S” (3).
• Pour poursuivre la préparation, choisissez
une vitesse supérieure tout en maintenant le
bouton de commande (d) (4).
• Débranchez le batteur après utilisation.
• Retirez le mini-hachoir, dévissez le couvercle
et retirez la lame avant de retirer les aliments
hachés (19) (20).
Remarques importantes
• Afin de ne pas détériorer la lame ou le bol,
ne pas hachez des aliments durs : café,
glaçons, chocolat, céréales, riz, épices et
raifort.
• Retirez les os et les nerfs de la viande avant
de la mettre dans le bol.
Instructions pour hacher
Quantité Temps
Max. (seconde)
Persil Lavez, retirez les
queues, séchez et
mettez dans le bol 30 g 20
Oignons, Epluchez et couEchalottes pez en morceaux 150 g par
de 2-3 cm impulsion
Ail Epluchez 150 g par
impulsion
Viande Coupez en mormaigre ceaux de 2 cm 250 g 30
Pommes Pelez, retirez les
pépins et coupez 200 g 20
en morceaux de
2 cm
Carottes Epluchez et cou-
pez en morceaux 200 g 20
de 2 cm
Noisettes, Ne mettez pas de
cacahuètes, morceaux de co- 125 g 45
amandes, quilles dans le bol
noix
Biscottes Cassez en mor-
ceaux 1 tranche 20-30
Pain sec Coupez en mor-
ceaux 1 tranche 20-30
Fromage Coupez en petits
(ex.: le dés de 2 cm 100 g 45
Gruyère)
Liquides 150 ml 15
Après 45 secondes d’utilisation sans interruption, laissez reposer votre mini-hachoir
pendant deux minutes.
Nettoyage
• Débranchez l’appareil.
• Ne plongez pas le corps de votre appareil, le
socle ou le couvercle du mini-hachoir dans
l’eau. Utilisez simplement un chiffon
humide.
• Vous pouvez nettoyer les fouets, les
malaxeurs, la lame et les bols à l’eau
courante avec du produit vaisselle ou au
lave-vaisselle. Rincez puis séchez.
Si votre appareil ne fonctionne
pas, que faire ?
• Assurez-vous que les accessoires sont bien
en place.
• Vérifiez le branchement électrique.
Si votre appareil ne fonctionne toujours
pas, contactez un centre service agréé KRUPS
(voir liste dans le livret «KRUPS Service»).
Page 23

23
Recettes
. Tarte aux pommes
. Pâte brisée : 300 g de farine, 150 g de
beurre, 15 ml d’eau, 1 pincée de sel.
.Garniture : 4 ou 5 pommes, 2 cuil. à soupe
de sucre, 1 cuil. à café de cannelle, 1 cuil. à
café de muscade, jus de citron, 10g de beurre.
. 1 moule à tarte : 28 cm de diamètre
. Temps de préparation : 18 à 20 min.
• Avec les fouets, mélangez la farine, le sel et
le beurre en morceaux jusqu’à obtenir des
«miettes» (vitesse mini).
• Ajoutez ensuite progressivement de l’eau en
pétrissant la pâte à l’aide des malaxeurs
(vitesse moyenne puis maxi) jusqu’à obtention d’une boule.
• Laissez reposer pendant une heure au
réfrigérateur.
• Dans un bol, mélangez les pommes coupées
en fines tranches avec le sucre, la cannelle et
la muscade.
• Etalez les 2/3 de la pâte et garnissez-en le
moule que vous aurez pris soin de beurré en
la faisant déborder.
• Disposez les pommes sur le fond, arrosez le
tout de jus de citron et dispersez ça et là les
morceaux de beurre.
• Recouvrez les pommes avec le reste de la
pâte et soudez les bords entre eux.
• Faites un petit trou au centre et faites cuire
au four pendant 35 min à 220 °C.
Vous pouvez remplacer les pommes par 800 g
de rhubarbe coupée en morceaux ou par 500
g de rhubarbe + 300 g de framboises et une
cuil. à soupe de farine, 6 cuil. à soupe de
sucre et 10g de beurre.
. Tarte aux fraises
. Pâte brisée : 250g de farine, 125g de beurre,
125g de sucre, 1 œuf.
. Crème pâtissière : 1/4 l de lait, 2 jaunes
d’œuf, 50g de sucre, 25g de farine, quelques
gouttes de vanille.
. 800g de fraises
. 1 moule à tarte : 28 cm de diamètre
. Temps de préparation : 20 min
• Avec les fouets, mélangez la farine, le sucre
et le beurre en morceaux jusqu’à obtenir des
«miettes» (vitesse mini).
• Ajoutez ensuite les œufs en pétrissant la
pâte à l’aide des malaxeurs jusqu’à obtention d’une boule (vitesse moyenne puis
maxi).
• Laissez reposer pendant une heure au
réfrigérateur.
• Plongez la vanille dans le lait et portez le
tout à ébullition.
• Pendant ce temps, mélangez les jaunes
d’œuf et le sucre avec les fouets (vitesse
moyenne puis maxi). Le mélange doit
tourner au blanc.
• Ajoutez la farine et mélangez (vitesse
moyenne).
• Versez ensuite le lait bouillant avec précaution et mélangez (vitesse mini).
• Faites cuire la préparation en remuant avec
une cuillère jusqu’à épaississement. Laissez
refroidir tout en continuant de remuer.
• Etalez la pâte et garnissez en le moule que
vous aurez pris soin de beurrer. Piquez le
fond avec une fourchette, tapissez-le avec
une feuille d’aluminium et recouvrez le tout
avec des légumes secs.
• Faites cuire au four pendant 20 min à
180°C.
• Retirez les légumes secs ainsi que la feuille
d’aluminium et laissez refroidir.
• Versez la crème pâtissière sur le fond de
tarte et garnissez-le de fraises.
• Nappez le tout avec de la gelée de groseilles.
. Gâteau au chocolat
. 3 œufs, 170g de sucre, 170g de beurre,
150g de farine, 2 cuillères à soupe de
chocolat en poudre, 6g de levure chimique
(1/2 sachet).
. 1 moule à manqué : 22 cm de diamètre
. Temps de préparation : 11 min
• Avec les fouets, mélangez les œufs et le
sucre dans un saladier (vitesse moyenne) : le
mélange doit former un ruban.
Page 24

24
• Ajoutez le beurre (vitesse moyenne), puis la
farine, le chocolat et la levure (vitesse mini
pendant l’adjonction des ingrédients puis
vitesse moyenne pour homogénéiser).
• Versez le mélange dans le moule à gâteau
dont vous aurez pris soin de beurrer le fond
et faites cuire au four pendant 50 min à
170°C.
• Vous pouvez :
. ajouter à la pâte des morceaux de noix, des
éclats de chocolat ou de la peau d’orange
confite.
. ajouter à la préparation 2 cuil. à soupe de
poudre d’amandes ou de noix.
. nappez votre gâteau d’un glaçage au
chocolat obtenu en faisant fondre 100g
chocolat noir avec 20g de beurre.
. Biscuit roulé à la confiture
. 3 œufs, 90g de sucre, 40g de farine, 30g de
fécule de pomme de terre, 1 pot de confiture
ou de gelée (abricots, oranges, framboises,
groseilles, etc.).
. 1 moule rectangulaire : 33 x 22 cm
. Temps de préparation : 10 min
• Avec les fouets, mélangez le sucre et les
jaunes d’œuf (vitesse maxi) : le mélange doit
tourner au blanc.
• Ajoutez la farine et la fécule de pomme de
terre puis mélangez (vitesse mini).
• Nettoyez les fouets et montez les œufs en
neige séparément (vitesse maxi).
• Mélangez les deux préparations (vitesse
mini).
• Garnissez le moule d’une feuille de papier
sulfurisé, versez la pâte et faites cuire au
four pendant 15 min à 170°C.
• Une fois que le gâteau a légèrement doré,
démoulez-le immédiatement et posez le sur
un torchon humide saupoudré de sucre.
Retirez le papier sulfurisé.
• Roulez le gâteau dans le torchon et laissez
refroidir.
• Puis, déroulez le gâteau et fourrez le de
confiture ou de gelée.
• Roulez-le de nouveau et biseautez les
extrémités.
Vous pouvez également :
. garnir le gâteau de crème pâtissière,
. remplacer la fécule de pomme de terre par
du chocolat en poudre et fourrer le roulé de
crème fouettée.
. Tarte aux amandes et aux abricots
. Pâte feuilletée : 200g de farine, 10 ml d’eau,
160g de beurre, 1 pincée de sel.
. Garniture : 1kg d’abricots frais ou 1 boîte
d’abricots au sirop, 60g de beurre, 70g de
sucre, 70g de poudre d’amandes, 1 œuf
entier + 1jaune d’œuf, 2 cuil. à soupe de
confiture d’abricots.
. 1 moule à tarte : 28 cm de diamètre
. Temps de préparation : 2 h pour la pâte
feuilletée + 10 min pour terminer la tarte.
• Mettez la farine et le sel dans un bol.
Ajoutez de l’eau progressivement en
pétrissant avec les malaxeurs jusqu’à obtenir
une boule (vitesse moyenne puis maxi).
• Laissez reposer au frais pendant 20 min.
• Feuilletage :
• Etalez la pâte en un carré d’1 cm d’épaisseur.
• Travaillez le beurre jusqu’à ce qu’il ait la
même consistance que la pâte et étalez-le au
milieu du carré. Enfermez le beurre en
repliant 2 à 2 les coins opposés du carré.
• Etalez la pâte en un rectangle de 2 cm
d’épaisseur et pliez-le en 3.
• Laissez reposer la pâte pendant 20 min et
répétez cette dernière opération 2 autres
fois.
• Mettez la pâte au frais.
• Dans un bol, mélangez, avec les fouets, le
sucre, la poudre d’amandes, le beurre et les
œufs (vitesse moyenne puis maxi).
• Donnez deux tours supplémentaires à la
pâte avant de garnir le moule. Répartissez
sur le fond, après l’avoir piqué avec une
fourchette, la préparation aux amandes et
disposez sur le dessus les abricots coupés en
2.
• Faites cuire au four pendant 30 min à 240°C
puis nappez de confiture d’abricots.
Page 25

25
. Beignets aux pommes
. Pâte à beignets : 125g de farine, 1 œuf, 1
cuil. à soupe d’huile, 1 pincée de sel, 15 ml de
lait, 4 pommes, 1 cuil. à soupe de cannelle,
75g de sucre, jus de citron.
. Bain de friture.
. Temps de préparation : 5 min pour la pâte.
• Avec les fouets, mélangez dans un bol la
farine, l’œuf, l’huile, le sel et 2 cuil. à soupe
de lait jusqu’à ce que le mélange soit
homogène. (vitesse moyenne puis maxi).
• Ajoutez progressivement le lait en diminuant
la vitesse. Laissez reposer au frais pendant
une heure.
• Pendant ce temps, mélangez le sucre et la
cannelle.
• Gardez les pommes entières, pelez-les,
retirez les pépins et coupez les en rondelles.
Saupoudrez-les avec le mélange sucre/
cannelle et arrosez le tout de jus de citron.
Couvrez et laissez macérer au frais pendant
30 min.
• Plongez les rondelles de pommes dans la
pâte à beignets jusqu’à ce qu’elles soient
complètement enrobées, puis dans la friture
chaude.
• Faites cuire 4 par 4. Servez très chaud.
Vous pouvez préparer les beignets de la même
façon avec toutes sortes de fruits frais :
ananas, bananes, abricots, poires, etc.
• Faites toujours extrêmement attention
lorsque vous plongez des aliments dans
l’huile bouillante. Méfiez vous des projections et ne laissez jamais un bain de friture
sans surveillance.
. Pain
. 250g de farine blanche, 100g de farine de
complète, 1 sachet de levure de boulanger
sèche, 10g de sucre, 10g de beurre, 200 ml
d’eau, 1g de sel.
. 1 moule à cake : 24 cm
. Temps de préparation : 7 min
• Dans un saladier, mélangez, avec les
malaxeurs, les deux types de farine, le sel, le
beurre, le sucre et la levure (vitesse
moyenne).
• Ajoutez de l’eau progressivement jusqu’à
obtenir une boule (vitesse moyenne puis
maxi).
• Recouvrez le saladier d’un torchon humide
et laissez reposer pendant 30 min dans un
endroit tiède.
• Mettez la pâte dans le moule que vous aurez
pris soin de beurrer et de fariner. Laissez de
nouveau lever pendant 1 h.
• Faites cuire au four pendant 25 min à
240°C.
Si vous le souhaitez, vous pouvez ajouter à la
pâte 150g de morceaux de noix, 300g de
raisins secs, 200g d’olives noires, 200g de
lardons, 2 cuil. à soupe de graines de cumin,
etc.
Vous pouvez également partager la pâte en
petites boules pour réaliser des petits pains
individuels.
. Brioche tressée
. 500g de farine, 2 sachets de levure de
boulanger sèche, 200g de beurre, 50g de
sucre, 1 pincée de sel, 5 œufs, 2 cuil. à soupe
de lait tiède.
. Temps de préparation : 8 min pour la pâte +
2 h de levée.
• Dans un saladier, mélangez, avec les
malaxeurs, la farine, la levure, le lait tiède, le
sucre, le sel et les 5 œufs pendant 2 min
(vitesse moyenne puis maxi).
• Ajoutez le beurre morceau par morceau
jusqu’à obtenir une pâte élastique.
• Couvrez le saladier d’un torchon humide et
laissez lever pendant 1 h dans un endroit
tiède (jusqu’à ce que la pâte ait doublé de
volume). Puis, divisez la pâte en 3.
• Roulez chaque morceau à la main pour
former 3 longues «lanières» que vous
tresserez.
• Posez la tresse sur une plaque à pâtisserie
que vous aurez pris soin de beurrer et de
fariner et laissez de nouveau lever pendant 1
h. Faites cuire au four pendant 40 à 45 min
à 180°C.
Vous pouvez également ne pas tresser la pâte
et la faire cuire dans un moule à cake ou
Page 26

26
réaliser de petites brioches en divisant la pâte
en petites boules.
Garantie limitée d’un an
Votre appareil n° 506 ou 507 est couvert par
la garantie suivante :
Si dans la période d’un an qui suit la date de
l’achat, le présent appareil KRUPS cesse de
fonctionner du fait de vices de matériaux ou
de fabrication, KRUPS Amérique du Nord, à sa
discrétion, réparera ou remplacera l’appareil
sans facturation, à condition que le propriétaire possède la preuve de la date d’achat.
La présente garantie est nulle si le mauvais
fonctionnement résulte de dégâts causés à
l’appareil par accident, mauvaise utilisation,
utilisation à une fréquence ou à une tension
autres que celles indiquées sur l’appareil ou
décrites dans les instructions, usage abusif y
compris altération, dégâts en cours de
transport ou utilisation à des fins commerciales. La présente garantie vous donne des
droits juridiques déterminés. Vous pouvez
bénéficier également d’autres droits, qui
peuvent varier suivant la province et l’état.
Page 27

27
GARANTIE DE RENDEMENT
Cet appareil KRUPS de qualité est fabriqué suivant un code strict de
normes de qualité et, avec un minimum de soin, devrait vous donner satisfaction pendant de longues années. Toutefois, si des réparations ou des pièces de rechange devaient se révéler nécessaires
pendant ou après la période visée par la garantie, veuillez téléphoner à notre SERVICE À LA CLIENTÈLE :
USA : (800) 526-5377
24 heures sur 24, 7 jours sur 7
Canada : (905) 669-0114
Du lundi au vendredi, de 8h00 à 16h30
Vous recevrez des instructions précises sur la façon de faire réparer
votre appareil.
Le service pourra aussi répondre à toute question générale que
vous aimeriez poser au sujet des appareils.
Avant de téléphoner au Service à la clientèle, veuillez disposer du
numéro du type de votre appareil KRUPS.
Vous devez posséder cette information avant de téléphoner à notre
service à la clientèle pour nous permettre de mieux répondre à vos
questions. Le numéro du type se trouve sur le fond de votre appareil.
Le présent appareil est du type n° 506 ou 507
Veuillez adresser toute correspondance générale à :
USA : KRUPS North America, Inc.
P.O. Box 3900
Peoria, IL 61612
Canada : Service KRUPS
20 Caldari Rd
Concord, Ontario
L4K 4N8
Page 28

28
PRECAUCIONES IMPORTANTES
Al utilizar aparatos eléctricos se han de seguir siempre unas medidas
de seguridad básicas, incluyendo lo siguiente:
• Lea detenidamente todas las instrucciones.
• Para protegerse frente al riesgo de descarga eléctrica, no sumerja el
aparato, el cable o el enchufe en agua o en ningún otro líquido.
• Es necesaria una rigurosa supervisión cuando se utilice cualquier
aparato al lado o cerca de los niños.
• Desenchufe el aparato de la toma de corriente cuando no esté en
uso, antes de instalar o de quitar componentes, y antes de limpiarlo.
• Evite el contacto con piezas móviles.
• Mantenga las manos, el pelo, la ropa, así como espátulas y otros
utensilios alejados de los accesorios de la batidora durante el
funcionamiento para reducir el riesgo de lesiones personales y/o
daños a la batidora.
• Retire los accesorios de la batidora antes de lavarla.
• No encienda ningún aparato que tenga un cable o enchufe
deteriorado, que funcione mal o que presente cualquier tipo de daño
o avería. Lleve el aparato al servicio técnico autorizado KRUPS más
cercano para su revisión y/o reparación.
• No coloque esta batidora en un carrito, plataforma o mesa inestable.
La batidora puede caer, provocando lesiones a algún niño o adulto o
daños al aparato.
• El uso de accesorios no recomendados o vendidos por KRUPS pueden
provocar fuego, descargas eléctricas o lesiones.
• No lo use en el exterior.
• No deje que el cable cuelgue de la mesa o encimera, o que entre en
contacto con superficies calientes, incluyendo hornillos.
Con respecto al accesorio mini-picador (dependiendo del modelo):
• La hoja está afilada. Manéjela con cuidado.
• Mantenga las manos y los utensilios alejados de la hoja afilada
mientras corta los alimentos para reducir el riesgo de lesiones
importantes a las personas o daños en el mini-picador. Se puede
Page 29

29
usar un rascador, pero sólo cuando el mini-picador no esté en
funcionamiento.
• Para reducir el riesgo de lesiones, no coloque nunca la hoja cortante
sobre la base sin antes colocar el bol en su sitio de manera adecuada.
• Asegúrese de que la tapa está fijada de manera segura antes de
poner en funcionamiento el aparato.
• No intente forzar el mecanismo de bloqueo de la tapa.
CONSERVE ESTAS INSTRUCCIONES
PRECAUCIÓN:
Este aparato está pensado para su uso dentro del hogar solamente.
No lo use para fines comerciales. Cualquier manipulación que no sea
la limpieza y el mantenimiento de usuario debe ser realizada por el
Servicio técnico autorizado KRUPS más cercano.
No sumerja el aparato en agua.
Para reducir el riesgo de fuego o descarga eléctrica, no abra el aparato.
No existen piezas utilizables por el usuario dentro. La reparación debe
ser realizada solamente por un servicio técnico autorizado KRUPS.
INSTRUCCIONES PARA EL CONJUNTO DE CABLE ESPECIAL:
Este aparato dispone de un enchufe polarizado (una patilla es más
ancha que la otra). Para reducir el riesgo de descarga eléctrica, este
enchufe encajará en una toma de corriente polarizada sólo de una
manera. Si el enchufe no encaja, déle la vuelta. Si aún así no encaja,
póngase en contacto con un electricista cualificado. No modifique el
enchufe en modo alguno.
Page 30

30
Descripción
Partes de la unidad manual
a Conector delantero
b Conector trasero
c Interruptor Turbo (para su uso con el
conector delantero)
d Botón de mando:
d1 Puesta en marcha / Parada y control
de velocidad electrónica
d2 Expulsión (conector delantero)
e Recogecables con clip de enganche
Dependiendo del modelo
. Accesorios para el conector delantero
f Palas batidoras
g Amasadoras
. Accesorios para el conector trasero
(dependiendo del modelo)
h Mini-picador
h1 Tapa
h2 Bol
h3 Hoja
Soporte
i Pie
i1 Brazo ajustable
i2 Botón para desbloquear la batidora
manual
i3 Botón para desbloquear el brazo
ajustable
i4 Bol
i5 Espátula
Recomendaciones de seguridad
• Lea atentamente las instrucciones de uso antes
de utilizar el aparato por primera vez: un uso
no conforme con dichas instrucciones eximirá
a Krups de cualquier responsabilidad.
• No deje nunca el aparato al alcance de los
niños sin la supervisión de un adulto. La
utilización de este aparato por niños pequeños
debe realizarse siempre bajo vigilancia.
• Asegúrese de que la tensión de su aparato se
corresponde efectivamente con la de la
instalación eléctrica de su casa.
Cualquier error en la conexión anulará la
garantía.
• Cualquier intervención que no sea la limpieza
y el mantenimiento habituales por el cliente
deberá realizarse en un servicio técnico Krups
autorizado.
• No deje colgando el cable de alimentación
donde puedan alcanzarlo los niños.
• Si el cable de alimentación o el enchufe están
dañados, no utilice el aparato. Para evitar
cualquier riesgo, deben reemplazarse en un
servicio técnico oficial Krups (vea el folleto de
Puntos de Reparación Krups).
• No toque nunca las palas batidoras o las
amasadoras cuando el aparato esté en
funcionamiento.
• No utilice nunca al mismo tiempo accesorios
con diferentes funciones (p. ej. amasadoras y
palas batidoras, etc.).
Importante: Su aparato está equipado con dos
conectores (1):
• un conector delantero (a) para acoplar los
accesorios (f, g,) (dependiendo del modelo)
•un conector trasero (b) para acoplar los
accesorios (h) (dependiendo del modelo).
. Mini-picador (dependiendo del modelo):
• No se meta la cuchilla en la boca.
• Retire siempre la cuchilla antes de vaciar el bol.
• El mini-picador es adecuado para elaborar
pequeñas cantidades sólo. No sobrepase
nunca las cantidades indicadas en el folleto
de instrucciones.
• No utilice el mini-picador en vacío.
• Deje que los alimentos cocinados se enfríen
antes de meterlos en el bol.
•No meta el bol en un horno o en un
microondas.
Antes de usar su aparato
por primera vez
• Lave las diferentes piezas del aparato
(refiérase a la sección «Limpieza» de este
Page 31

31
libro de instrucciones) con algún lavavajillas.
Pásele un paño y séquelo después de
limpiarlo.
Utilización de los accesorios
para el conector delantero:
. PALAS BATIDORAS Y AMASADORAS
• Con el botón de mando (d) en la posición “0”,
inserte las palas batidoras o las amasadoras
hasta se queden fijas en su sitio. Introduzca
siempre el accesorio con una corona dentada
en la abertura indicada en el aparato por una
corona igualmente dentada (2).
• Enchufe el aparato.
• Coloque los ingredientes en el recipiente
adecuado dependiendo de la calidad a
preparar.
• Introduzca las palas batidoras o las amasadoras
en el recipiente y ponga en marcha el aparato
girando el botón de mando (d) hacia la
derecha.
Para evitar salpicaduras al poner en marcha el
aparato o para preparaciones delicadas (cremas,
salsas), éste está equipado con una función antisalpicaduras (posición « S »). Para utilizarla:
• Empuje el botón de mando (d) hacia la derecha
hasta la posición « S” (3).
• Para continuar con la preparación, seleccione
una velocidad más rápida (4).
El aparato está equipado con un botón Turbo
(c) que le permite un acceso inmediato a toda
la potencia de su aparato (5).
• Cuando haya acabado de usar la batidora,
vuelva a poner el botón de mando (d) en la
posición “0”.
• Desenchufe el aparato.
• Extraiga las palas batidoras o las amasadoras
presionando el botón de mando (d) en la
posición “Eject” (6).
. SOPORTE
• El soporte se usará con la batidora manual,
que está equipada con palas batidoras o
amasadoras sólo.
• Acople la batidora manual en el brazo ajustable
(i1) hasta que se quede fijada en su sitio (7).
• Mientras se mantiene presionado el botón para
desbloquear el brazo ajustable (i3), bascule el
brazo articulado hacia arriba con la ayuda del
mango de la batidora manual (8).
• Introduzca las palas batidoras o las amasadoras
hasta que estén completamente fijadas en su
posición (9) (accesorio ranurado en la conexión
ranurada).
• Inserte el mango de la espátula (i5) en la ranura
del brazo articulado (10). Esta espátula
mantiene los ingredientes dentro de la zona
de mezclado del bol al usar la batidora con la
unidad de soporte.
• Coloque el bol en su posición. El bol bascula y
gira para asegurar un batido y un mezclado
óptimos.
• Mientras mantiene presionado el botón de
desbloqueo del brazo ajustable (i3), baje el
brazo articulado hasta que acople (11).
• Conecte la batidora manual.
• Después de usarla, desconecte la batidora
manual.
• Mientras mantiene presionado el botón de
desbloqueo del brazo ajustable (i3), bascule el
brazo articulado hacia arriba con la ayuda del
mango de la batidora manual (12).
• Extraiga las palas batidoras o las amasadoras
(13).
• Retire el bol.
• Mientras mantiene presionado el botón de
desbloqueo de la batidora manual (i2),
desacóplela (14).
Nota:
• No manipule nunca la batidora manual con el
brazo de soporte levantado.
• No tenga nunca el aparato funcionando
durante más de 10 minutos seguidos con las
palas batidoras o durante más de 5 minutos
con las amasadoras. Esto impedirá que el
aparato se sobrecaliente.
•La cantidad máxima de pasta o masa,
incluyendo todos los ingredientes, es 4.4Lbs
(2 kg) basada en 2.2 Lbs (1 kg) de harina para
subir la masa y 1.6 Lbs (750 g) de harina para
la masa crujiente.
Page 32

32
Utilización del mini-picador en
el conector de la parte trasera
(dependiendo del modelo)
Este accesorio es adecuado para picar: perejil,
verduras, carne magra, nueces, queso, pan duro,
alimentos para bebés y para mezclar pequeñas
cantidades de líquidos. La potencia máxima de
su batidora se consigue con el accesorio minipicadora.
• Lave la cuchilla y el bol antes de utilizarlos
por primera vez.
• Coloque la cuchilla (h3) en el bol (h2),
después vierta los ingredientes (15) (16).
• Fije la tapa en el bol girándola (17).
• Coloque la batidora manual en el minipicador utilizando el conector trasero (b)
(18).
• Conecte la batidora manual.
Por razones de seguridad, la batidora manual
detecta la presencia de accesorios en la conexión
trasera.
• Durante el uso mantenga presionado el botón
de mando (d); si lo suelta, volverá
automáticamente a la posición “0”.
Su aparato está equipado con una función antisalpicaduras para evitar que éstas se produzcan
al iniciar la preparación de líquidos. Para usarla:
• Presione y mantenga apretado el botón de
mando (d) en la posición “S” (3).
• Para continuar con la preparación seleccione
una velocidad más rápida, con el botón de
mando aún presionado (d) (4).
• Desenchufe la batidora manual una vez que
haya terminado de usarla.
• Retire el mini-picador, desenrosque la tapa y
quite la cuchilla antes de retirar los alimentos
picados (19) (20).
Aviso importante
• A fin de prevenir cualquier tipo de daño en la
cuchilla o en el bol, no pique alimentos duros:
granos de café, cubitos de hielo, chocolate,
cereales, arroz, especias o rábanos.
• Quite los huesos y los tendones de la carne
antes de meterla en el bol.
Instrucciones para el picado
Max. Tiempo
wt. (segs.)
Perejil Lavar, quitar los tallos,
secarlo bien y meterlo
en el bol de picado 30 g 20
Cebollas, Pelar y cortar en
gajos 2-3 cm 150 g pulsar
por piezas
Ajo Pelar 150 g pulsar
Carne magra Cortar en dados
de 2 cm 250 g 30
Manzanas Pelar, descorazo-
nar y cortar en
trozos de 2 cm 200 g 20
Zanahorias Pelar y cortar en
trozos de 2 cm 200 g 20
Avellanas, ¡No meter trozos
cacahuetes, de cáscara dentro
almendras, del bol, 125 g 45
nueces
Tostadas Romper en trozos
1 rebanada
20-30
Pan duro Cortar en trozos
1 rebanada
20-30
Queso Cortar en dados
(excepto de 2 cm 100 g 45
Gruyère)
Líquidos 150 ml
(1/2 taza) 15
Cuando el mini-picador haya estado en
funcionamiento durante 45 segundos sin
interrupción, déjelo enfriarse durante 2 minutos.
Limpieza
• Desenchufe el aparato.
• No sumerja el cuerpo del aparato, ni el soporte
ni la tapa del mini-picador en agua. Use
solamente un trapo húmedo.
• Limpie las palas batidoras y las amasadoras, la
cuchilla y los boles bajo el agua del grifo y con
lavavajillas o directamente en el lavavajillas.
Enjuáguelos y séquelos.
Page 33

33
Qué hacer si su aparato no
funciona
• Asegúrese de que los accesorios están bien
colocados.
• Compruebe la conexión eléctrica.
Si su aparato sigue sin funcionar, póngase en
contacto con un servicio técnico autorizado
Krups (vea el folleto de Puntos de Reparación
Krups).
Recetas
. Pastel de manzana
. Masa crujiente: 300 g (10 oz) de harina, 150 g
(5 oz) de mantequilla, 15 ml (1/15 de taza) de
agua, 1 pizca de sal.
.Relleno: 4 ó 5 manzanas, 2 cucharadas de
azúcar, 1cucharadita de canela, 1 cucharadita
de nuez moscada, el zumo de 1 limón, 10g ( 1/
3 oz ) de mantequilla.
. 1 molde de tarta: 28 cm de diámetro (11”
pulg.)
. Tiempo de preparación: de 18 a 20 min.
• Usando las palas, mezcle la harina, la sal y la
mantequilla, a trozos hasta obtener « migajas
» (velocidad mínima).
• Después, usando las amasadoras, añada agua
gradualmente mientras amasa (velocidad
media, después máxima) hasta que se forme
una bola.
• Deje reposar durante 1 hora en la nevera.
• En un bol, mezcle las manzanas cortadas a
finas rodajas con el azúcar, la canela y la nuez
moscada.
• Extienda 2/3 de la masa y colóquela en el
molde untado con mantequilla, dejando que
sobresalga un poco de masa por el borde.
• Coloque las manzanas en el fondo, rocíe con
zumo de limón y distribuya pequeños dados
de mantequilla.
• Cubra las manzanas con el resto de la masa y
selle los bordes.
• Haga un pequeño agujero en el centro del
molde y cueza en el horno durante 35 minutos
a 220 °C (400°F ).
Puede sustituir las manzanas por: 800 g (28 oz)
ruibarbo cortado a trozos, o por 500 g (18 oz)
de ruibarbo + 300 g (10 oz) de frambuesas y 1
cucharada de harina, 6 cucharadas de azúcar y
10g (1/3 oz) de mantequilla.
. Tarta de fresas
. Masa crujiente: 250g (9 oz ) de harina, 125g
(4.4 oz ) de mantequilla, 125g (4.4 oz) de azúcar ,
1 huevo.
. Crema pastelera: 1/4 l (1/2 Pt) de leche, 2
yemas de huevo, 50g (2 oz ) de azúcar, 25g (1
oz ) de harina, unas gotas de esencia de vainilla.
. 800g ( 28 oz ) de fresas
. 1 molde de tarta: 28 cm de diámetro (11”
pulg.)
. Tiempo de preparación: 20 minutos
• Usando las palas, mezcle la harina, el azúcar y
la mantequilla, a trozos hasta obtener «
migajas » (velocidad mínima).
• Después, utilizando las amasadoras, añada el
huevo y amase hasta que se forme una bola
(velocidad media primero, después máxima).
• Deje reposar durante 1 hora en la nevera.
• Hierva la leche con la vainilla.
• Mientras tanto, utilizando las palas, trabaje las
yemas de huevo y el azúcar (velocidad media,
después máxima). La mezcla debe volverse
blanca.
• Añada la harina y la mezcla (velocidad media).
• A continuación, y a velocidad mínima, vierta
con cuidado la leche hirviendo y mezcle.
• Caliente el preparado, removiendo con una
cuchara hasta que espese. Deje enfriar,
removiendo continuamente.
• Extienda la masa y úsela para recubrir el molde
untado con mantequilla. Pinche el fondo con
un tenedor, fórrelo con papel de aluminio y
cúbralo con legumbres.
• Hornee durante 20 minutos a 180°C (324
°F).
• Retire las legumbres y el papel de aluminio y
déjelo enfriar.
• Extienda la crema pastelera sobre el fondo
de la tarta y cúbrala con fresas.
• Cubra con gelatina de grosellas.
Page 34

34
. Pastel de Chocolate
. 3 huevos, 170g ( 6 oz) de azúcar, 170g ( 6
oz) de mantequilla, 150g (5.3 oz ) de harina,
2 cucharadas de cacao en polvo, 6g (1/5 oz )
de levadura
(1/2 bolsita).
. 1 Molde de tarta con fondo separable: 22 cm
de diámetro (10” pulg.)
. Tiempo de preparación: 11 minutos
• Utilizando las palas, mezcle los huevos y el
azúcar en una ensaladera (velocidad media):
la mezcla debe ser suave y ligeramente líquida.
•Añada la mantequilla (velocidad media),
después la harina, el cacao y la levadura
(velocidad mínima mientras se añade, después
velocidad media para homogeneizar).
• Vierta la mezcla en un molde untado con
mantequilla y hornee durante 50 minutos a
170°C (306 F).
• Puede:
. añadir a la masa nueces troceadas, virutas de
chocolate o ralladura de naranjas confitadas.
. añadir a la masa 2 cucharadas de almendras o
nueces molidas.
. Cubrir el pastel con una capa de chocolate
hecha a base de fundir 100g ( 3.5 oz ) de
chocolate negro con 20g (1 oz ) de
mantequilla.
. Brazo de gitano con mermelada
. 3 huevos, 90g ( 3 oz ) de azúcar, 40g (1.4 oz )
de harina, 30g (1 oz ) de fécula de patata, 1 un
tallo de mermelada o jalea (albaricoque, naranja,
frambuesa, grosella, etc.).
. 1 molde rectangular: 33 x 22 cm (12” pulg.
X 10” pulg.)
. Tiempo de preparación: 10 minutos
• Utilizando las palas, trabaje el azúcar y las
yemas de huevo (velocidad máxima): la mezcla
deberá adquirir un tono blanquecino.
• Añada la harina y la fécula de patata, después
mezcle (velocidad mínima).
• Limpie las paletas y monte las claras a punto
de nieve aparte (velocidad máxima).
•Mezcle las dos preparaciones (velocidad
mínima).
• Cubra el molde con papel apergaminado
untado con mantequilla, vierta la masa y
hornéela durante 15 min a 170°C (306 °F).
• Cuando el bizcocho esté ligeramente dorado,
desmoldéelo inmediatamente sobre un paño
húmedo espolvoreado de azúcar. Retire el
papel apergaminado.
• Enrolle el bizcocho en el paño y déjelo enfriar.
• Después, desenrolle el bizcocho y cubra su
extensión con mermelada o jalea.
• Vuelva a enrollarlo y recorte las puntas.
También puede:
. rellenar este bizcocho con crema pastelera,
. sustituir la fécula de patata por cacao en polvo
y rellenar el brazo de gitano con crema.
. Tarta de almendras y albaricoques
. Masa de hojaldre: 200g (7 oz ) de harina, 10
ml (1/20 taza ) de agua, 160g (5.6 oz ) de
mantequilla, 1 pizca de sal.
. Relleno: 1kg de albaricoques frescos o 1 lata
de albaricoques en almíbar, 60g (2 oz ) de
mantequilla, 70g ( 2.5 oz ) de azúcar, 70g ( 2.5
oz ) de almendras molidas, 1 huevo entero + 1
yema, 2 cucharadas de mermelada de
albaricoque.
. 1 molde de tarta: 28 cm de diámetro (11”
pulg.)
. Tiempo de preparación: 2 h para la masa de
hojaldre + 10 minutos para terminar la tarta.
• Introduzca juntas la harina y la sal en un bol.
Añada agua poco a poco, removiendo con las
amasadoras hasta que se forme una bola
(velocidad media, después máxima).
• Deje reposar 20 minutos en un lugar fresco.
• Trabajo de la masa:
• Extienda la masa en un cuadrado de 1 cm (1/
2 pulg.) de espesor.
• Trabaje la mantequilla hasta que tenga la
misma consistencia que la masa y extiéndala
en el centro del cuadrado. Después cierre la
masa, plegando de 2 en 2 las esquinas
opuestas del cuadrado.
• Vuelva a extender la masa en un cuadrado de
2 cm (1 pulg.) de espesor y haga 3 dobleces.
• Deje que la masa repose durante 20 minutos
y repita la última operación 2 veces más.
Page 35

35
• Coloque la masa en un lugar fresco.
• En un bol, mezcle, usando las palas, el azúcar,
las almendras molidas, la mantequilla y los
huevos (velocidad media, después máxima).
• De otras dos vueltas a la masa antes de cubrir
con ella el molde. Distribúyala sobre la base,
pinche con un tenedor la preparación con las
almendras y disponga por encima los
albaricoques cortados por la mitad.
• Hornee durante 30 minutos a 240°C (432 °F).
Después recubra con mermelada de
albaricoque.
. Buñuelos de manzana
. masa de buñuelos: 125g (4.4 oz ) de harina, 1
huevo, 1 cucharada de aceite, 1 pizca de sal, 15
ml ( 1/15 de taza ) de leche, 4 manzanas, 1
cucharadita de canela, 75g (2.6 oz) de azúcar,
el zumo de un limón.
. Para freír: aceite.
. Tiempo de preparación: 5 minutos para la
masa.
• Usando las palas, mezcle en un bol la harina,
el huevo, el aceite, la sal y 2 cucharadas de
leche hasta que la mezcla sea homogénea
(velocidad media, después máxima).
•Añada leche poco a poco, a la vez que
disminuye la velocidad. Deje reposar durante
1 hora en un lugar fresco.
• Durante este tiempo, mezcle el azúcar y la
canela.
• Pele las manzanas, quite las pepitas y córtelas
en rodajas. Espolvoréelas con la mezcla de
azúcar y canela, y rocíelas con el zumo de
limón. Tápelas y deje macerar en un lugar
fresco durante 30 minutos.
• Introduzca las rodajas de manzana en la masa
de buñuelo hasta cubrirlas por completo,
después fría los buñuelos en aceite caliente.
• Fríalos de 4 en 4. Sírvalos calientes.
Puede preparar buñuelos de la misma manera
con toda clase de frutas frescas: piña, plátano,
albaricoque, pera, etc.
• Preste siempre una atención extra cuando
introduzca alimentos en aceite hirviendo. Tome
precauciones en caso de salpicadura, no deje
nunca desatendido el aceite hirviendo.
. Pan
. 250g (9 oz ) de harina blanca, 100g (3.5 oz )
de harina integral, 1 bolsita de levadura seca de
panadero, 10g ( 1/3 oz ) de azúcar, 10g ( 1/3 oz
) de mantequilla, 200 ml (1 taza ) de agua, 1g
sal.
. 1 molde de pastel: 24 cm (9” pulg.)
. Tiempo de preparación: 7 minutos
•Mezcle en una ensaladera, usando las
amasadoras, los 2 tipos de harina, la sal, la
mantequilla, el azúcar y la levadura (velocidad
media).
• Añada agua poco a poco hasta que se forme
una bola (velocidad media, después máxima).
• Cubra la ensaladera con un paño húmedo y
deje reposar durante 30 minutos en un lugar
templado.
• Coloque la masa en el molde untado con
mantequilla y enharinado. Deje que suba de
nuevo durante 1 hora.
• Hornee durante 25 minutos a 240°C (432 °F).
Si lo desea puede añadir a la masa 150g (5 oz )
de nueces troceadas, 300g (10 oz ) uvas pasas,
200g (7 oz) de olivas negras, 200g ( 7 oz ) de
taquitos de bacon, 2 cucharadas de granos de
comino, etc.
También puede dividir la masa en pequeñas
bolas para hacer panecillos individuales.
. «Brioche» trenzado
. 500g (18 oz ) de harina, 2 bolsitas de levadura
seca de panadero, 200g ( 7 oz ) de mantequilla,
50g ( 2 oz ) de azúcar, 1 pizca de sal, 5 huevos,
2 cucharadas de leche tibia.
. Tiempo de preparación: 8 minutos para la
masa + 2 h para que suba.
• En una ensaladera, usando las amasadoras,
mezcle la harina, la levadura, la leche tibia, el
azúcar, la sal y los 5 huevos durante 2 minutos
(velocidad media, después máxima).
• Añada la mantequilla trozo a trozo hasta que
tenga una masa elástica.
• Cubra la ensaladera con un paño húmedo y
deje que la masa aumente durante 1 hora en
un lugar templado (hasta que la masa haya
doblado su volumen). Después divida la masa
en 3 trozos.
Page 36

36
• Enrolle a mano cada trozo para formar 3 «
tiras » largas que después trenzará.
• Coloque la trenza en una placa de pastelería
untada con mantequilla y enharinada y deje
de nuevo que aumente durante 1 hora. Hornee
durante 40 a 45 minutos a 180°C (324 °F).
También puede dejar la masa sin trenzar y
cocerla en un molde de pastel o confeccionar
pequeños « brioches » dividiendo la masa en
pequeñas bolas.
Garantía por un año.
Su aparato nº 506 o 507 está cubierto por la
siguiente garantía:
Si durante el año siguiente a la fecha de
compra, el presente aparato KRUPS deja de
funcionar debido a defectos de fabricación o
en los materiales, KRUPS Norteamérica,
voluntariamente, reparará o reemplazará el
aparato sin gasto alguno por parte del
comprador, a condición de que éste aporte
prueba de la fecha de compra.
Esta garantía quedará anulada si el mal
funcionamiento se debe a daños en el aparato
debidos a accidente, mala utilización,
utilización a una frecuencia o con una tensión,
distintas a las indicadas en el aparato o a las
descritas en las instrucciones, empleo abusivo
que suponga una alteración, daños durante el
transporte o utilización con fines comerciales.
La presente garantía le otorga a usted
determinados derechos jurídicos pero puede
beneficiarse, igualmente, de otros derechos
que pueden variar en función de la provincia o
el Estado.
Page 37

37
GARANTÍA DE RENDIMIENTO
Éste aparato KRUPS de calidad ha sido fabricado siguiendo un
código estricto de normas de calidad y, con un matenimiento
mínimo, debería satisfacerle durante muchos años. En todo caso, si
se precisaran reparaciones o piezas de recambio durante o después
del periodo de garantía, no dude en llamar a nuestro SERVICIO AL
CLIENTE:
USA: (800) 526 – 5377
Servicio 24 horas, 7 días a la semana.
Canadá: (905) 669 – 0114
De lunes a viernes, de 8 a 16.30 horas.
Usted recibirá las instrucciones necesarias acerca de cómo hacer que
reparen su aparato. Igualmente, éste servicio responderá a
cualquier pregunta que desee formular relativa a los aparatos.
Antes de llamar al Servicio al cliente, asegúrese de que dispone del
número del tipo de su aparato KRUPS.
Usted debe estar en posesión de esta información antes de llamar a
nuestro Servicio al cliente por que así nos permitirá responder
mejor a sus preguntas. El número del tipo se encuentra debajo del
aparato.
Éste aparato en concreto es del tipo nº 506 o 507
Cualquier correspondencia general debe dirigirla a:
USA: KRUPS North America, Inc.
P.O. Box 3900
Peoria IL 61612
Canadá: Service KRUPS
20 Caldari Rd
Concord, Ontario
L4K 4N8
Page 38

Art.506/507 US/F/E 826 508-A
 Loading...