

Page 1

ToastControl
Art. 151
Gebrauchsanweisung
Instructions for use
Mode d’emploi
Gebruiksaanwijzing
NL
F
GB
D
Page 2
Krups ToastControl
a
f
e
g
b
c
d
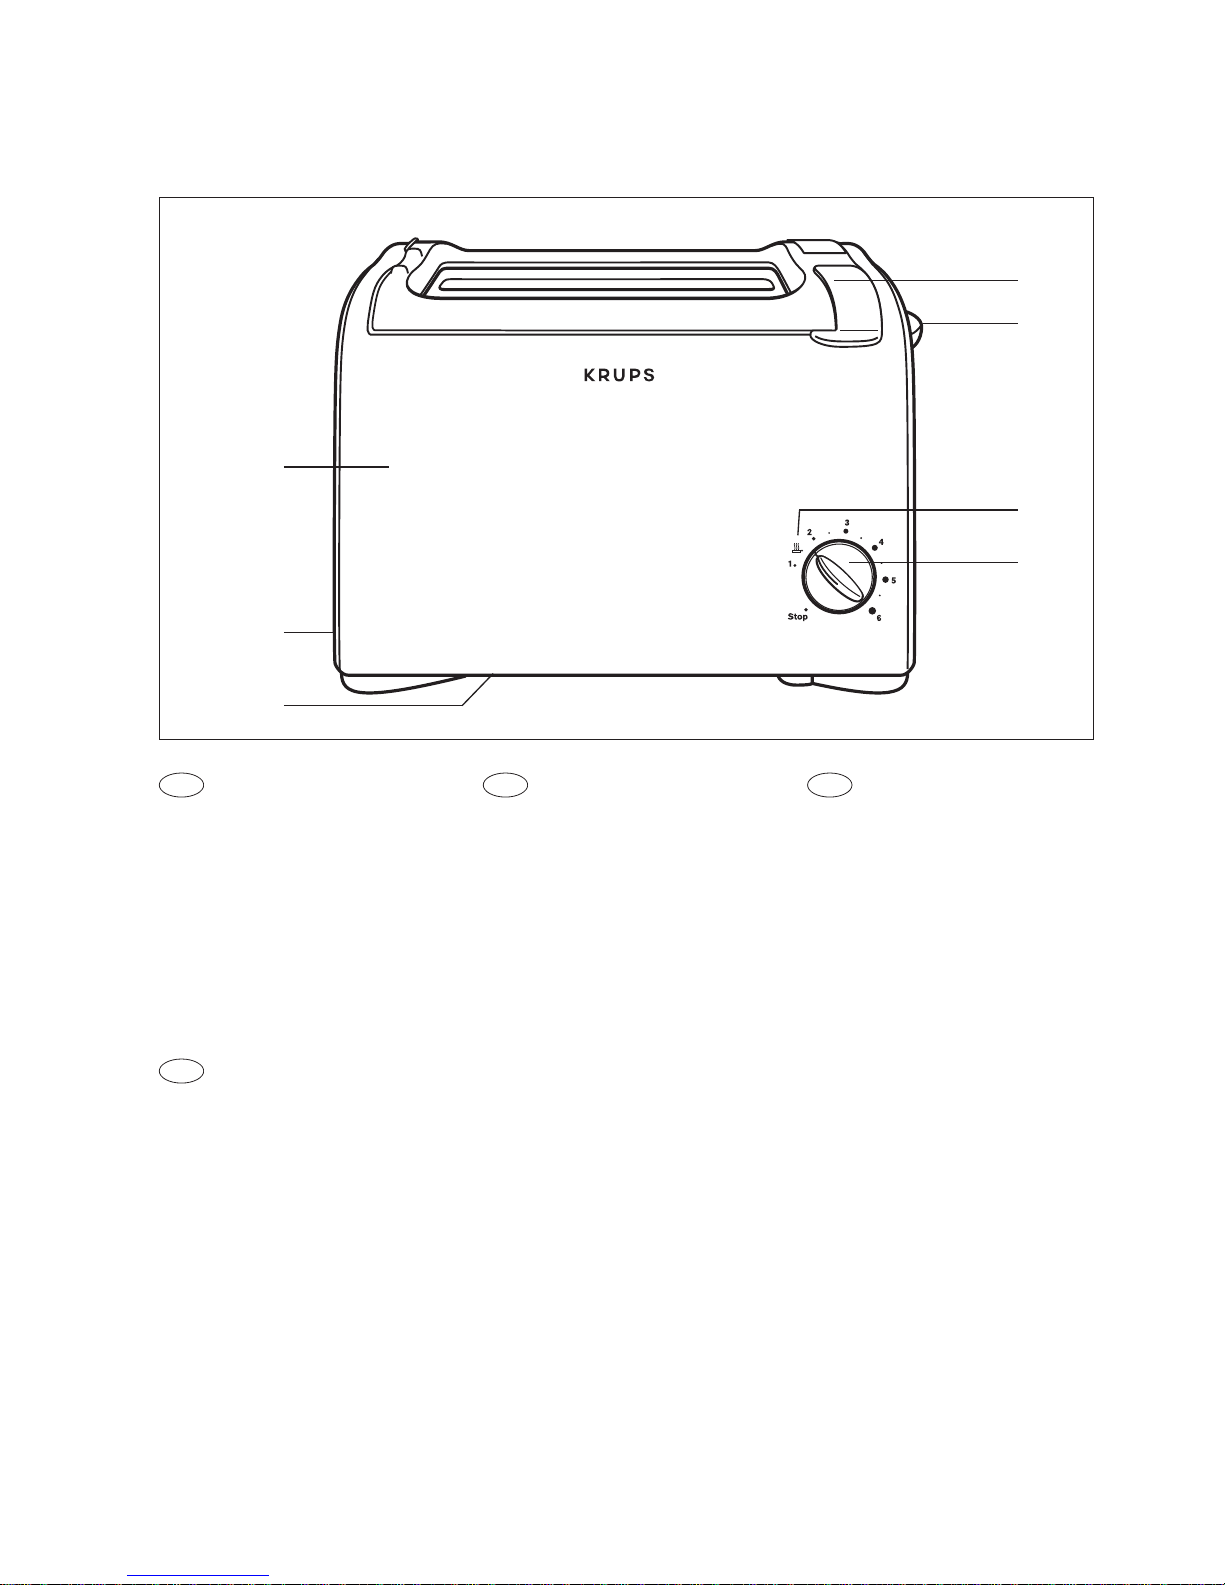
F
a: Revêtement parois froides
b: Tiroir ramasse-miettes
c: Enroulement cordon
d: Commande de mise en
marche
e: Fonction de réchauffage
f: Chauffe-petits pains *
g: Bouton de réglage
D
a: Wärmeschutzmantel
b: Krümelschublade
c: Kabelaufwicklung
d: Absenktaste
e: Wiedererwärm-Funktion
f: Brötchenlift *
g: Röstgradeinsteller
NL
a: Behuizing apparaat
b: Kruimellade
c: Snoeroprolmogelijkheid
d: Broodlift
e: Warmhoudfunctie
f: Broodjes-opzetrekje *
g: Instelling bruiningsgraad
GB
a: Heat insulated casing
b: Crumb drawer
c: Flex storage spool
d: Lowering lever
e: Rewarming function
f: Support for bread rolls *
g: Toasting regulator
* Je nach Modell, Depending on model, Selon modèle, Afhanlelijk van type
Page 3
1
2
3
4
5
6
7
8
9
Page 4
D
Deutsch
Der Toaster ist ein Krups-Qualitätsprodukt.
Das wärmeisolierte Gehäuse sorgt für große
Sicherheit während des Gebrauchs.
Wichtige
Sicherheitshinweise
Lesen Sie die Gebrauchsanweisung vor
Inbetriebnahme sorgfältig durch.
Gerät nur an Wechselstrom anschließen.
Die auf dem Typenschild angegebene
Spannung muß mit der Ihres Stromnetzes übereinstimmen.
Das Gerät während des Gebrauchs nicht
unbeaufsichtigt lassen.
Kinder von dem Gerät fernhalten. Netz-
kabel nicht herunterhängen lassen.
Im Inneren des Gerätes werden sehr hohe
Temperaturen erreicht. Vermeiden Sie,
daß das Netzkabel oder Sie selbst mit
den inneren Teilen des Gerätes in
Berührung kommen.
Decken Sie den Röstschacht während des
Betriebes niemals ab. Brötchen oder Brot
nie direkt auf den Röstschacht legen.
Brotscheiben können sich bei mehrmali-
gem Toasten entzünden. Deshalb den
Toaster nicht in der Nähe oder unterhalb
von brennbaren Gegenständen benutzen.
Sollte sich das Brot doch einmal entzün-
den, ziehen Sie sofort den Netzstecker
und ersticken Sie die Flamme mit einem
feuchten Tuch.
Das Gerät nicht auf heiße Oberflächen
stellen oder in deren Nähe benutzen
(z.B. Herdplatte, Gasflamme).
Bei Störungen während des Röstvor-
gangs, vor der Reinigung und nach jedem
Gebrauch stets den Netzstecker ziehen.
Gerät nicht ins Wasser tauchen.
Heizer nicht mit spitzen oder scharfen
Gegenständen reinigen.
Harte Erschütterungen vermeiden.
Den Stecker nicht am Netzkabel aus der
Steckdose ziehen.
Das Netzkabel nicht über Ecken und
Kanten legen oder hängen.
Das Gerät nicht in Betrieb nehmen, wenn
das Netzkabel oder das Gerät beschädigt
ist.
Das Gerät darf nicht benutzt werden,
wenn:
- das Kabel beschädigt ist.
- das Gerät heruntergefallen ist und dabei
sichtbare Schäden davongetragen hat
oder Funktionsstörungen auftreten. In
diesen Fällen müssen Sie das Gerät zu
Ihrer eigenen Sicherheit bei einem
anerkannten Kundendienstzentrum
überprüfen lassen. Lesen Sie die
Garantiebedingungen.
Dieses Gerät darf nicht von Kindern oder
Personen benutzt werden, deren
körperlicher, kognitiver oder geistiger
Zustand eine sichere Handhabung des
Geräts nicht zulässt.
Das Gerät ist kein Spielzeug und gehört
deshalb nicht in Kinderhände.
Das Gerät gehört nicht in die Hände von
kleinen Kindern.
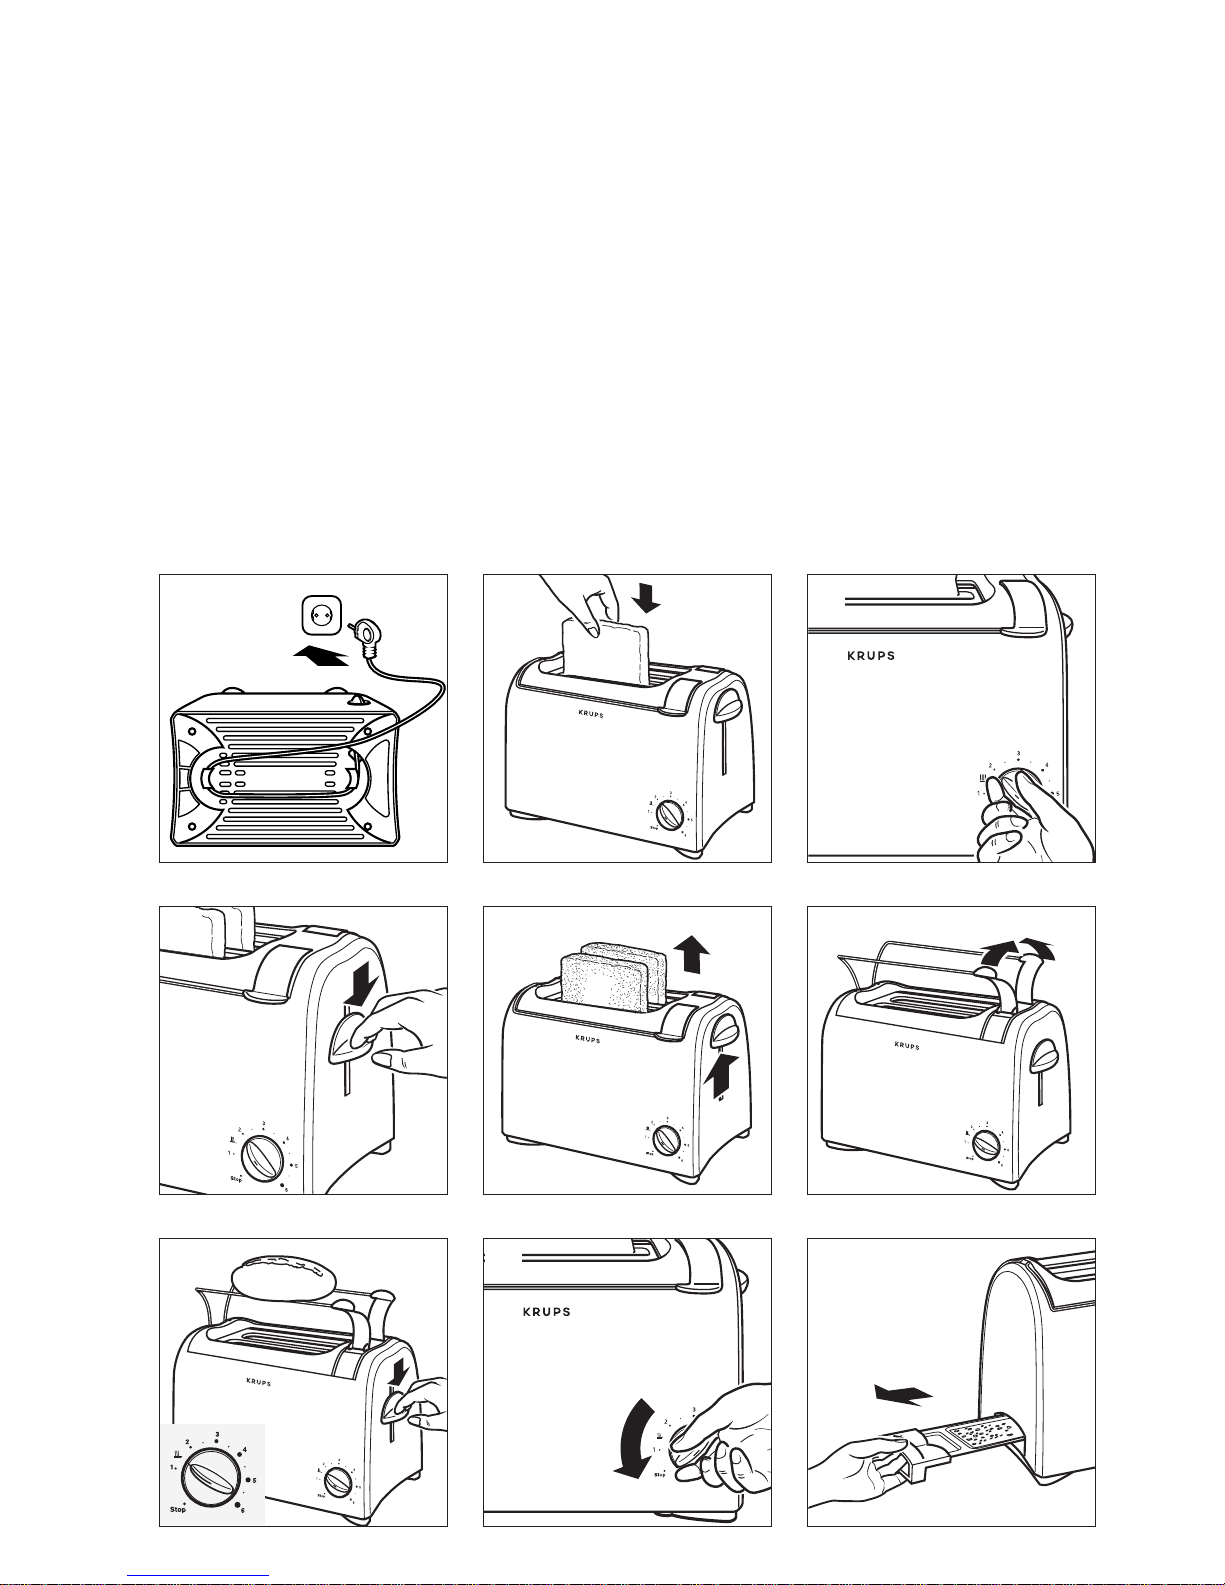
Gerät anschließen
Gewünschte Kabellänge einstellen.
Nicht benötigtes Kabel auf der Unterseite
des Gerätes aufwickeln. Kabel seitlich herausführen. Netzstecker einstecken (1).
Vor dem ersten Gebrauch
Um eventuell vorhandene Fertigungsrückstände zu beseitigen, sollte der Toaster vor
dem Erstgebrauch 1-2 mal auf höchster
Röstgradeinstellung ohne Toastbrot betrieben werden (Raum lüften).
Inbetriebnahme
Toastscheiben in den Toaster geben (2).
Keine zu großen und zu dicken Scheiben
verwenden. Der Toast darf nicht im Schacht
eingeklemmt sein.
Röstgrad einstellen (3).
Wählen Sie zwischen den 6 verschiedenen
Bräunungsstufen aus.
Stellen Sie dementsprechend den Röstgradeinsteller ein:
4
Page 5

5
Position 1 = schwach geröstet
Position 6 = sehr stark geröstet
Erst-Einstellung ausprobieren, da der Röstgrad abhängig vom Toastbrot und dessen
Feuchtegehalt ist. Bei Graubrot generell eine
höhere Röstgradeinstellung wählen als bei
Weißbrot.
Stellen Sie den Röstgradeinsteller auf eine
niedrigere Stufe, wenn Sie z.B. nur eine
Scheibe Brot rösten möchten.
Wichtig:
Trockenere Brotscheiben oder schon einmal
getoastetes Brot bräunt schneller und kann
sich unter Umständen entzünden. Deshalb
niedrigere Röstgradeinstellung wählen und
Gerät nicht unbeaufsichtigt lassen.
Toasten
Absenktaste ganz herunterdrücken (4).
Die Taste rastet ein. Damit wird das Gerät
eingeschaltet.
Toast entnehmen
Nach Beendigung des Toastvorgangs wird
der Toast automatisch angehoben und
das Gerät ausgeschaltet (5).
Toastscheiben entnehmen.
Zur vorzeitigen Unterbrechung des ToastVorgangs die Absenktaste nach oben
drücken oder stellen Sie den
Röstgradeinsteller auf stafe “stop” (8).
Hinweis: Sollte sich eine Brotscheibe im
Röstschacht verklemmt haben, Netzstecker
ziehen, Gerät abkühlen lassen und dann die
Toastscheibe vorsichtig lösen ohne die Heizelemente zu berühren.
Zusätzliche Ausstattung
je nach Modell
Brötchenlift (Art. 151)
Richten Sie die beiden Metallbügel auf,
indem Sie die beiden Griffe des Brötchenlifts nach oben schwenken (6).
Brötchen auflegen und Röstgrad ein-
stellen . Gerät einschalten (7).
Um ein besseres Ergebnis zu erhalten,
empfiehlt es sich, die Brötchen umzudrehen
und den Toastvorgang zu wiederholen.
Nach Gebrauch den Brötchenlift absenken,
indem Sie die beiden Griffe wieder nach
unten schwenken.
Der Brötchenlift sollte nicht länger als 10
Minuten benutzt werden.
Aufknusper-Funktion (Art. 151)
Mit diesem Toaster haben Sie die Möglichkeit bereits getoastetes Brot wieder aufzuwärmen.
Stellen Sie hierzu den Röstgradeinsteller
auf Pos. (7).
Gerät einschalten. Sobald der Wiedererwärm-Vorgang abgeschlossen ist, wird der
Toast automatisch angehoben.
Reinigen
Vor der Reinigung Netzstecker ziehen.
Gerät nicht ins Wasser tauchen.
Den Toaster nie mit einem rauhen
Schwamm reinigen. Reinigen Sie den
Toaster zuerst mit einem feuchten Tuch und
trocknen Sie ihn dann mit einem weichen
Tuch ab, um den Glanz zu erhalten.
Toastreste regelmäßig entfernen.
Vor dem Herausziehen der Krümelschublade den Toaster mindestens 10 Minuten,
nach Beendigung des letzten Toastvorgangs, abkühlen lassen.
Krümelschublade herausziehen und
Krümel ausschütten (9).
Mit einem feuchten Tuch reinigen.
Krümelschublade wieder einsetzen.
Den Toaster nie ohne Krümelschublade
benutzen.
Entsorgung
Die Verpackung besteht ausschließlich
aus-umweltfreundlichen Materialien,
die den örtlichen Recyclestellen
übergeben werden sollten.
Entsorgungsmöglichkeiten für das
ausge diente Gerät erfahren Sie bei
Ihrer Gemeindebzw. Stadtverwaltung.
Denken Sie an den Schutz der
Umwelt !
i Ihr Gerät enthält wertvolle
Rohstoffe, die wieder verwertet
werden können.
Geben Sie Ihr Gerät deshalb bitte
bei einer Sammelstelle Ihrer Stadt
oder Gemeinde ab.
Page 6

6
GB
English
The toaster is a Krups quality product. The
heat-insulated casing makes for increased
safety during use.
Important Safety
Precautions
Carefully read the instructions for use
before operating the appliance.
Connect the appliance only to an
alternating current source. The voltage
stated on the rating plate must correspond with that of your mains supply.
Do not leave the appliance unsupervised
during use.
Keep children away from the appliance.
Do not allow the flex to hang down.
Very high temperatures are generated
inside the appliance. Do not yourself
touch, or allow the flex to touch, any
inner part of the appliance.
Never cover the toasting well when in
use. Never put bread or rolls directly on
the toasting well.
Bread can burn, or in the vicinity of,
anything which is inflammable. Should
the bread catch fire, however, pull out the
mains plug immediately and douse the
flames with a moist cloth.
Do not use or place the appliance on or
near to a source of heat, such as a stove
hotplate or a gas flame.
Always pull out the mains plug if any-
thing untoward happens during the toasting operation, before any cleaning operation and after every time the appliance
has been used.
Do not dip the appliance into water.
Do not clean the heating elements with
pointed or with sharp implements. Avoid
hefty shaking or vibrations.
Do not withdraw the mains plug by
pulling on the flex.
Do not allow the flex to hang over
corners and edges.
Do not use the appliance if either the flex
or the appliance itself is damaged.
Do not use this appliance if:
- The toaster or cord is faulty,
- It has fallen or shows visible damage or
operating problems.
In any of these cases, the appliance must
be sent to the nearest approved after
sales service centre in order to avoid any
risks of danger.
This appliance is not intended for use by
children or other persons without
assistance or supervision if their physical,
sensory or mental capabilities prevent
them from using it safely.
Children should be supervised to ensure
that they do not play with the appliance.
Young children should be supervised to
ensure they do not play with the
appliance.
Connecting the appliance
Use just the right length of flex and store
the unnecessary part on the spool in the
storage recess underneath the appliance.
Lead the flex out at the side of the
appliance and plug in at the mains (1).
Upon first using the toaster
In order to remove any possible remains
from the manufacturing operation, the
toaster should, before being used for the
first lot of toast, be heated up 1 to 2 times to
the highest toasting temperature, without
any bread in the toasting well (ventilate the
room).
Using the toaster
Insert the slices of bread (2).
Do not use slices which are too large or too
thick, as they must not be allowed to stick in
the toasting well.
Selecting the degree of toasting (3).
Choose between 6 different degrees of
browning by setting the selector to the
appropriate position:
Position 1 = lightly toasted
Position 6 = very well toasted
Page 7

7
When first using, try out the toasting
setting, as the result depends upon the type
of bread and the degree of moisture.
Generally speaking, a higher temperature is
required for breads other than white.
Turn the toasting grade selector to a lower
number if, for example, only one slice of
bread is being toasted.
Caution:
Relatively dry slices of bread, or bread that
has already been toasted once, will brown
much more quickly and may under certain
circumstances catch fire. Therefore set the
heat control to a lower setting and do not
leave the toaster unattended.
Toasting
Fully depress the lowering lever, which
will then lock into position (4).
This then causes the appliance to switch on.
Taking out the toast
After completion of the toasting operation,
the toast will automatically be raised and
the appliance will switch itself off (5).
Take out the slices of toast.
To break off the toasting operation before it
is completed, simply press the lowering
lever upwards or turn the toasting regulator
on “stop” position (8).
Note: Should a slice of bread become
trapped in the toasting well, pull out the
mains plug, let the appliance cool down and
then carefully free the toast without
touching the heating elements.
Additional accessories
depending on the model
Roll support (Mod. 151)
Raise the roll support by swivelling the
two lifter grips upwards (6).
Place the rolls on the support and select
the
position
.
Switch on the appliance (7).
To improve the results, turn the rolls over
and repeat the toasting operation.
After use, lower the roll support by
swivelling the two lifter grips downwards.
The roll support should not be used for
longer than 10 minutes.
Rewarming function (Mod. 151)
With this toaster, you have the possibility of
rewarming toast which has already cooled
down.
Do this by setting the selector switch to
the position (7) and then switch on the
appliance.
The toast will be raised automatically as
soon as the rewarming operation is
completed.
Cleaning
Before commencing the cleaning operation,
pull out the mains plug.
Do not dip the appliance into water.
Never use an abrasive sponge to clean the
toaster. Clean it with a moist cloth and then
dry it with a soft cloth to keep it bright.
Regularly remove crumbs and bits of toast.
Before pulling out the crumb drawer, allow
the toaster to cool for at least ten minutes
after completion of the preceding toasting
operation.
Pull out the crumb drawer and shake out
the crumbs (9).
Clean with a moist cloth and then replace
the crumb drawer.
Never use the toaster without the crumb
drawer in position.
Disposal
The packaging comprises exclusively
environmentally-friendly materials
which should be disposed of
according to the local recycling
arrangements.
Disposal methods for the appliance
itself can be found by enquiry at the
appropriate department of the local
authority.
Environnement protection first !
i Your appliance contains valuable
materials which can be recovered or
recycled.
Leave it at a collection point.
Page 8

8
F
Français
Ce grille-pain est un produit de qualité Krups.
Il est équipé de parois froides isolantes.
Consignes de sécurité
importantes
Lire attentivement toutes les consignes
de sécurité avant l'utilisation de
l'appareil.
Ne brancher l'appareil que sur une
alimentation à courant alternatif.
La tension indiquée sur la plaque
signalétique doit correspondre à celle
de l'alimentation secteur.
Ne pas laisser l'appareil sans surveillance
pendant l'utilisation.
Eloigner les enfants de l'appareil.
Ne pas laisser pendre le cordon.
L'intérieur du grille-pain atteint des
températures très élevées, ne pas toucher
les surfaces brûlantes, et ne pas laisser le
cordon entrer en contact avec celles-ci.
Ne pas recouvrir la fente lors de
l'utilisation. Ne jamais mettre du pain ou
des petits pains directement sur la fente.
Le pain peut brûler, aussi ne pas utiliser
le grille-pain au-dessous ou à proximité
de tout objet ou produit inflammable.
Cependant, si le pain prend feu, débrancher immédiatement l'appareil et éteindre
les flammes avec un chiffon humide.
Ne pas utiliser ou placer l'appareil sur ou
à proximité d'une source de chaleur telle
qu'une plaque chauffante ou une
cuisinière à gaz.
Toujours débrancher l'appareil si un
incident survenait lors de l'utilisation,
avant le nettoyage, et après chaque
utilisation.
Ne pas plonger l'appareil dans l'eau.
Ne pas nettoyer les résistances
chauffantes avec des instruments pointus
ou tranchants. Eviter les secousses
brutales ou les vibrations.
Ne pas débrancher en tirant sur le cordon.
Ne pas laisser pendre le cordon aux coins
et aux bords d'une table ou d'un plan de
travail.
Ne pas utiliser l'appareil si le cordon ou
l'appareil lui-même est endommagé.
N’utilisez pas l’appareil si :
- celui-ci a un cordon défectueux,
- l’appareil est tombé et présente des
détériorations visibles ou des anomalies
de fonctionnement.
Dans chacun de ces cas, l’appareil doit
être envoyé au centre de service aprèsvente agréé le plus proche afin d’éviter
tout danger. Consultez la garantie.
Cet appareil n'est pas destiné à être utilisé
par des enfants où d'autres personnes sans
assistance et supervision si leurs capacités
physiques, sensorielles ou mentales les
empêchent d'utiliser l'appareil en toute
sécurité.
Les enfants doivent être surveillés de
façon à ce qu'ils ne jouent pas avec
l'appareil.
Les jeunes enfants doivent être surveillés
afin de s’assurer qu’ils ne jouent pas avec
l’appareil.
Branchement de l'appareil
Régler la longueur de cordon souhaitée.
Enrouler la partie non utilisée sous
l'appareil. Le cordon secteur sort
latéralement. Brancher le grille-pain (1).
Première utilisation
Avant la première utilisation mettre une ou
deux fois le grille-pain en marche sur le
niveau 6 afin d'éliminer l'odeur du neuf.
Cette opération doit être réalisée le grillepain vide (aérer la pièce).
Mode d'utilisation
Placer les toasts ou les tranches de pain
dans le grille-pain (2).
N'insérer pas des tranches trop grandes ou
trop épaisses: la tranche ne doit pas rester
coincée dans la fente.
Sélectionner le niveau de dorage (3).
Choisir entre 6 degrés de dorage différents
en sélectionnant la position souhaitée :
Position 1 = légèrement grillé
Position 6 = très grillé
L'intensité du dorage augmente en même
temps que les chiffres du sélecteur. Pour le
pain complet, mettre le bouton de réglage
Page 9

9
sur un temps de dorage plus long que pour
le pain blanc.
Positionner le bouton de réglage sur un
chiffre inférieur si, par exemple, on souhaite
griller seulement une tranche de pain.
Important:
Les morceaux de pain sec ou qui auraient
été déjà grillés, brunissent plus rapidement
et peuvent même, le cas échéant brûler. Il
est donc recommandé de choisir un niveau
de dorage inférieur pour ce type de pain et
de ne pas laisser l'appareil fonctionner sans
surveillance.
Mise en marche
Après avoir branché l'appareil déplacer la
commande de mise en marche jusqu'à ce
qu'elle soit automatiquement bloquée (4).
L'appareil fonctionne alors.
Remontée du pain
Le pain est ejecté automatiquement et
l'appareil s’arrête une fois que le niveau
de dorage préalablement sélectionné est
atteint (5).
Retirer le pain.
Pour interrompre le fonctionnement de
grillage en cours ramener la commande à
sa position initiale ou tourner le bouton de
réglage sur la position “stop” (8).
Attention: Si une tranche de pain reste
bloquée dans l'appareil, débrancher
immédiatement, laisser refroidir quelques
minutes et dégager le pain délicatement,
sans toucher les éléments chauffants.
Fonctions possibles
Chauffe-petits pains (Mod. 151)
Relever le chauffe-petits pains en pivotant
vers le haut les deux supports (6).
Placer les petits pains sur les supports et
sélectionner la position . Mettre
l'appareil en marche (7).
Pour obtenir de meilleurs résultats, retourner
les petits pains et répéter l'opération de
dorage.
Après utilisation, abaisser le chauffe-petits
pains en pivotant vers le bas les deux
supports.
Le chauffe-petits pains ne doit pas être
utilisé plus de 10 minutes.
Fonction de réchauffage (Mod. 151)
Ce grille-pain offre la possibilité de
réchauffer du pain qui a déjà refroidi.
Pour ce faire, amener le bouton de
réglage sur la position (7) puis
mettre l'appareil en marche.
Le pain remontera automatiquement dès
que le réchauffage sera terminé.
Nettoyage
Avant de nettoyer le grille-pain, s'assurer
qu'il ne soit pas branché.
Le nettoyage est facile et rapide grâce au
tiroir ramasse-miettes qu'il suffit de tirer au
moyen de la poignée prévue à cet effet, en
évitant tout contact avec les parties
métalliques. Réaliser cette opération
régulièrement.
Ne jamais plonger l'appareil dans l'eau pour
le nettoyer.
Ne jamais utiliser une éponge abrasive pour
nettoyer le grille-pain. Le nettoyer avec un
chiffon humide et l'essuyer avec un chiffon
doux et sec pour le faire briller.
Avant de sortir le tiroir ramasse-miettes,
laisser l'appareil refroidir au moins
10 minutes après la dernière utilisation.
Retirer le tiroir ramasse-miettes et enlever
les miettes (9).
Essuyer à l'aide d'un chiffon humide puis
remettre le tiroir ramasse-miettes en place.
Ne jamais utiliser le grille-pain sans le tiroir
ramasse-miettes.
Elimination des matériaux
d'emballage et de l'appareil
L'emballage comprend exclusivement des matériaux sans danger
pour l'environnement, pouvant être
jetés conformément aux dispositions
de recyclage en vigueur. Pour la
mise au rebut de l'appareil, se
renseigner auprès du service
approprié de votre commune.
Participons à la protection de
l’environnement !
i Votre appareil contient de nombreux matériaux valorisables ou
recyclables.
Confiez celui-ci dans un point de
collecte ou à défaut dans un centre
service agrée pour que son
traitement soit effectué.
Page 10

10
NL
Nederlands
Dit broodrooster is een Krups
kwaliteitsproduct.
De warmte-isolerende behuizing maakt het
broodrooster veilig in gebruik.
Belangrijke
veiligheidsinstructies
Lees deze gebruiksaanwijzing aandachtig
door alvorens u het apparaat in gebruik
neemt.
Sluit het broodrooster aan op een
deugdelijk stopcontact met randaarde.
Het voltage dat vermeld staat op de
onderzijde van het apparaat, dient
overeen te komen met de spanning
aangegeven in uw meterkast.
Laat het apparaat niet onbeheerd achter
als het aanstaat.
Houd het apparaat buiten bereik van
kinderen.
Laat het aansluitsnoer niet over
(tafel)randen bungelen.
De binnenkant van het apparaat wordt erg
heet. Raak de binnenkant van het apparaat
niet aan. Zorg ook dat het snoer de
binnenkant van het apparaat niet raakt.
Dek het broodrooster nooit af terwijl het
apparaat aanstaat. Leg brood of broodjes
niet op de sleuven waardoor u de sleuven
afdekt.
Boterhammen kunnen vlam vatten indien
ze meerdere keren achter elkaar
geroosterd worden. Gebruik het
broodrooster daarom niet onder of in de
nabijheid van ontvlambare producten.
Trek, indien het brood vlam vat,
onmiddellijk de stekker uit het stopcontact en doof de vlammen met een
vochtige doek.
Gebruik of plaats het apparat niet in de
nabijheid van een hittebron zoals een
kookplaat of (gas)vlammen.
Trek altijd de stekker uit het stopcontact
indien er tijdens het roosteren iets mis
gaat, alvorens u het apparaat gaat
schoonmaken en na elk gebruik van het
broodrooster.
Dompel het apparaat nooit onder in
water.
Maak de verwarmingselementen
binnenin het apparaat nooit schoon met
scherpe voorwerpen of ander keukengerei. Voorkom dat het apparaat hevig
schudt of vibreert.
Trek niet aan het snoer maar aan de
stekker indien u de stekker uit het
stopcontact haalt. Laat het snoer niet
over randen bungelen.
Gebruik het apparaat niet indien het
apparaat of het aansluitsnoer beschadigd
is.
Gebruick het apparaat niet indien:
- het snoer kapot of beschadigd is,
- het apparaat gevallen is. zichtbare
schade vertoont of niet goed
functioneert. In elk van deze gevallen
dient u het apparaat naar de
dichtstbijzijnde erkende servicedienst
te sturen teneinde gevaarlijke situaties
te vermijden (zie bijgaande servicelijst).
Dit apparaat is niet bedoeld om zonder
hulp en toezicht gebruikt te worden door
kinderen of andere personen indien hun
fysieke, zintuiglijke of mentale vermogens hen niet in staat stellen dit apparaat
op veilige wijze te gebruiken.
Er moet toezicht op kinderen zijn, zodat
zij niet met het apparaat kunnen spelen.
Er moet toezicht op jonge kinderen zijn,
zodat zij niet met het apparaat kunnen
spelen.
Apparaat aansluiten
Rol het snoer uit voor zover u het nodig
heeft. Het overige gedeelte van het snoer
kan aan de onderzijde van het broodrooster opgerold worden. Geleid het
snoer zijdelings naar buiten. Steek de
stekker in het stopcontact (1).
Page 11

11
Voor het eerste gebruik
Zet het broodrooster, voordat u het in
gebruik neemt, eerst 1 of 2 keer aan zonder
brood in het rooster (ventileer de ruimte).
Gebruik
Doe de te roosteren sneetjes brood in het
broodrooster (2).
Duw niet te dikke boterhammen in de
sleuven, daar het geroosterde brood anders
niet vrij omhoog kan springen.
Het instellen van de bruiningsgraad (3).
Kies een van de 6 bruiningsgraden door
de keuzeknop op de juiste stand te zetten:
Stand 1 = licht geroosterd
Stand 6 = donker geroosterd
Probeer de instelling een keer uit. De
bruiningsgraad is mede afhankelijk van het
soort brood en de vochtigheid ervan. Bij
bruin brood moet u in het algemeen een
hogere bruiningsgraad instellen dan bij wit
brood.
Draai de keuzeknop naar een lagere stand
indien u bijvoorbeeld maar één snee brood
roostert.
Belangrijk:
Brood dat wat droger of al eerder geroosterd
is, wordt sneller bruin en kan in bepaalde
omstandigheden verbranden. Zet het
broodrooster op een lagere stand en blijf bij
het broodrooster staan wanneer u brood
roostert.
Roosteren
Duw de broodlift volledig naar beneden
tot hij vasthaakt (4).
Het broodrooster staat nu aan.
Brood uit het apparaat nemen
Het brood springt aan het eind van de
roostertijd automatisch omhoog. Het
broodrooster schakelt dan uit (5).
Neem het brood uit het rooster.
Indien u het roosteren voortijdig wilt
onderbreken, duw dan de broodlift omhoog,
of door de bruiningsgraad in “stop” (8).
Let op: Indien het brood in de sleuf klem zit,
trek de stekker dan uit het stopcontact en
laat het broodrooster afkoelen. Maak het
brood dan voorzichtig los. Kom niet aan het
verwarmingselement!
Extra accessoires
afhankelijk van type
Broodjes-opzetrekje (Mod. 151)
Zet het opzetrekje overeind met behulp
van de twee knoppen aan weerszijden van
het broodrooster (6).
Leg de broodjes op het rekje en stel de
bruiningsgraad in .
Zet het apparaat aan (7).
Voor het beste resultaat draait u de broodjes
een keer om en roostert u ook de andere kant.
Laat na het roosteren van de broodjes, het
rekje zakken met behulp van de twee
knoppen aan weerszijden van het
broodrooster.
Gebruik het broodjes-opzetrekje niet langer
dan 10 minuten achter elkaar.
Opwarmfunctie (Mod. 151)
Deze modellen zijn uitgerust met een functie
waarmee u afgekoeld brood kunt opwarmen.
Stel de keuzeknop in op stand (7) en
zet het apparaat aan.
Het brood komt automatisch omhoog zodra
het brood weer warm is.
Schoonmaken
Trek de stekker uit het stopcontact.
Dompel het broodrooster nooit onder in
water. Houd het ook niet onder de kraan.
Gebruik nooit schuursponsjes om het
broodrooster schoon te maken. Maak het
uitsluitend schoon met een vochtige doek
en droog het met een zachte doek om het
broodrooster blinkend te houden.
Leeg de kruimellade regelmatig.
Laat het broodrooster minimaal 10 minuten
afkoelen alvorens u de kruimellade uittrekt.
Page 12

De kruimellade uittrekken en legen (9).
Maak de kruimellade met een vochtige doek
schoon en schuif hem dan weer terug in het
broodrooster.
Zet het broodrooster nooit aan zonder de
kruimellade.
Afvalverwerking
De verpakking van KRUPS huishoudelijke apparaten is gemaakt van
milieu vriendelijke materialen en kan
in overeenstemming met de
gemeentelijke bepalingen omtrent
afvalverwerking verwerkt worden.
Uw gemeente kan u eveneens informatie verschaffen omtrent de wijze
waarop u zich van uw oude, defecte
huishoudelijke apparaten kunt ontdoen.
Wees vriendelijk voor het milieu !
i Uw apparaat bevat materialen die
geschikt zijn voor hergebruik.
Lever het in bij het milieustation in
uw gemeente of bij onze technische
dienst.
151 D, GB, F, NL,
COD. 3311113c - Janv 2005 - Subject to modifications.
 Loading...