


PV20 P
LUS
Krown
Manufacturing,
Inc.
Porta V
iew
®
MODEL: PV20
2
1
7
8
9
K
M
I
L
.
,
U
J
N
Y
H
B
T
G
V
BA
C
K
SP
AC
E
RE
T
U
RN
SHIF
T
DIAL
S
HIFT
CTRL
GA
0
O
P
3
4
6
5
R
E
D
X
SK
F
C
W
S
Z
Q
A
POW
E
R
ON
OF
F
ON
OF
F
PHON
E
PORTAVIEW PLUS
MODEL: PORTAVIEW 20 PLUS
3rd Edition

PortaView 20 Plus | Instructions | 3rd Edition | March 2003
Krown Manufacturing, Inc.
3408 Indale Road | Fort Worth, Texas 76116
voice: (817) 738-2485 | TTY/TDD: (817) 738-8993
fax: (817) 738-1970 | email: info@krowntty.com www.krowntty.com

INTRODUCTION
Welcome to state-of-the-art Telecommunications Devices for the Deaf
manufactured by the industry pioneer: Krown Manufacturing. For nearly
the decades, Krown has provided a full line of TDDs to meet the many
individual needs of the deaf and hearing-impaired. Expert craftsmanship,
superior design and affordable prices are what Krown Manufacturing
stands for.
Your new PortaView Plus is the very latest in Krown technology. The unit
is compact, lightweight, portable and easy to use. This manual is setup so
that you are able to begin using your PortaView Plus immediately, while
you take your time and become familiar with its many unique features.
A Quick reference Guide is for your convenience. It provides a summary
of the features that your PortaView Plus offer. If you have any questions
that this manual does not answer, feel free to call our Customer Service
Department toll-free at (800) 366-9950.
Your PortaView Plus comes with:
• PortaView Plus
• Power Cord with AC Adapter
• Modular Cord
• Instruction Manual
• Warranty Card Form
The Optional Feature that is checked below is included with your
PortaView Plus:
° ASCII
° Hands-free Voice Carry Over (VCO)
° Hands-free Hearing Carry Over (HCO)
° Cellphone Connector

KROWN MANUFACTURING
K
r
o
w
n
T
T
Y
,
I
n
c
.
GENUINE
Krown Manufacturing
:.:.:.:.:.:.:.SEAL.:.:.:.:.:.:.:.:
–––––––––––––––––––––––
~~~~~~~~~~~~~~~~~~~~~~~~
KR
OWNTTY, INC
––––––––––––––––––––––––––
```````````````````````````````````````
Our Mission is to improve the quality of life for people who are deaf and
hard of hearing by providing excellent telecommunication equipment for
individuals,businesses, and professionals in any place including the homes,
work place, and in all public facilities.
Who are we?
We are the world’s largest and leading Deaf-owned manufacturer of telecommunications devices for the Deaf (TDD). Our headquarters are in Fort
Worth, Texas. (USA)
Krown Manufacturing, Inc. has earned an excellent reputation for
providing consumers, corporations, health care centers, governments,
hotels, schools, universities and many other organizations with outstanding
value and services.
At Krown, we...
• Sell • Rent/Lease
• Repair • Train
• Provide toll-free ordering and a support department
• Include a first rate warranty
Krown Manufacturing will serve you better.

TABLE OF CONTENTS
Introduction ................................................................................................................................1
i. PortaView Plus Keyboard..........................................................................................................5
I. Getting Started ...........................................................................................................................7
• To setup your PortaView Plus
• The Lights and Switches
• Electronic Voice
• Battery Power Information
II Using Your PortaView Plus.......................................................................................................9
• How to Make a TDD call
• Telephone Conversations
• To Answer a TDD Call
• Making an Overseas Call
III. The Memory .............................................................................................................................11
• Memory Areas
• Entering and Saving a Message
• Sending a Stored Message
• Deleting a Stored Message
• Viewing a Stored Message
• Editing a Stored Message
• Using the Phone Directory
• Clearing the Phone Directory
IV. Direct Connect Option - PV20 Plus ........................................................................................16
• Keyboard Dialing
• Auto (Direct) Dialing
• To Display and Print the Entire Phone Directory
• Tone/Pulse Dialing
• Acoustic/Direct Connect Mode Selection
• Using the PortaView Plus Auto-Answer Feature
• To Activate Remote Message Retrieval
V. Optional Features .....................................................................................................................21
• Printer
• Carrying Case
VI. Using the Optional Features ....................................................................................................22
• To Change Mode Settings
• To Make and Receive Your ASCII Call
VII. How to makes a Voice Carry Over (VCO) and Hearing Carry Over (HCO) Call ..............24
VIII. Using your PortaView Plus with wireless phone ....................................................................25
IX. Take Your PortaView Plus with you........................................................................................27
X. Technical Specifications ...........................................................................................................28
XI. Important Information ............................................................................................................29
• Taking Care of your TDD
• Troubleshooting
• Warranty & Repairs
• FCC Required Information
XII. Miscellaneous Information ......................................................................................................31
• Commonly Used TDD Abbreviations
• Special TDD/TYY Operator Services
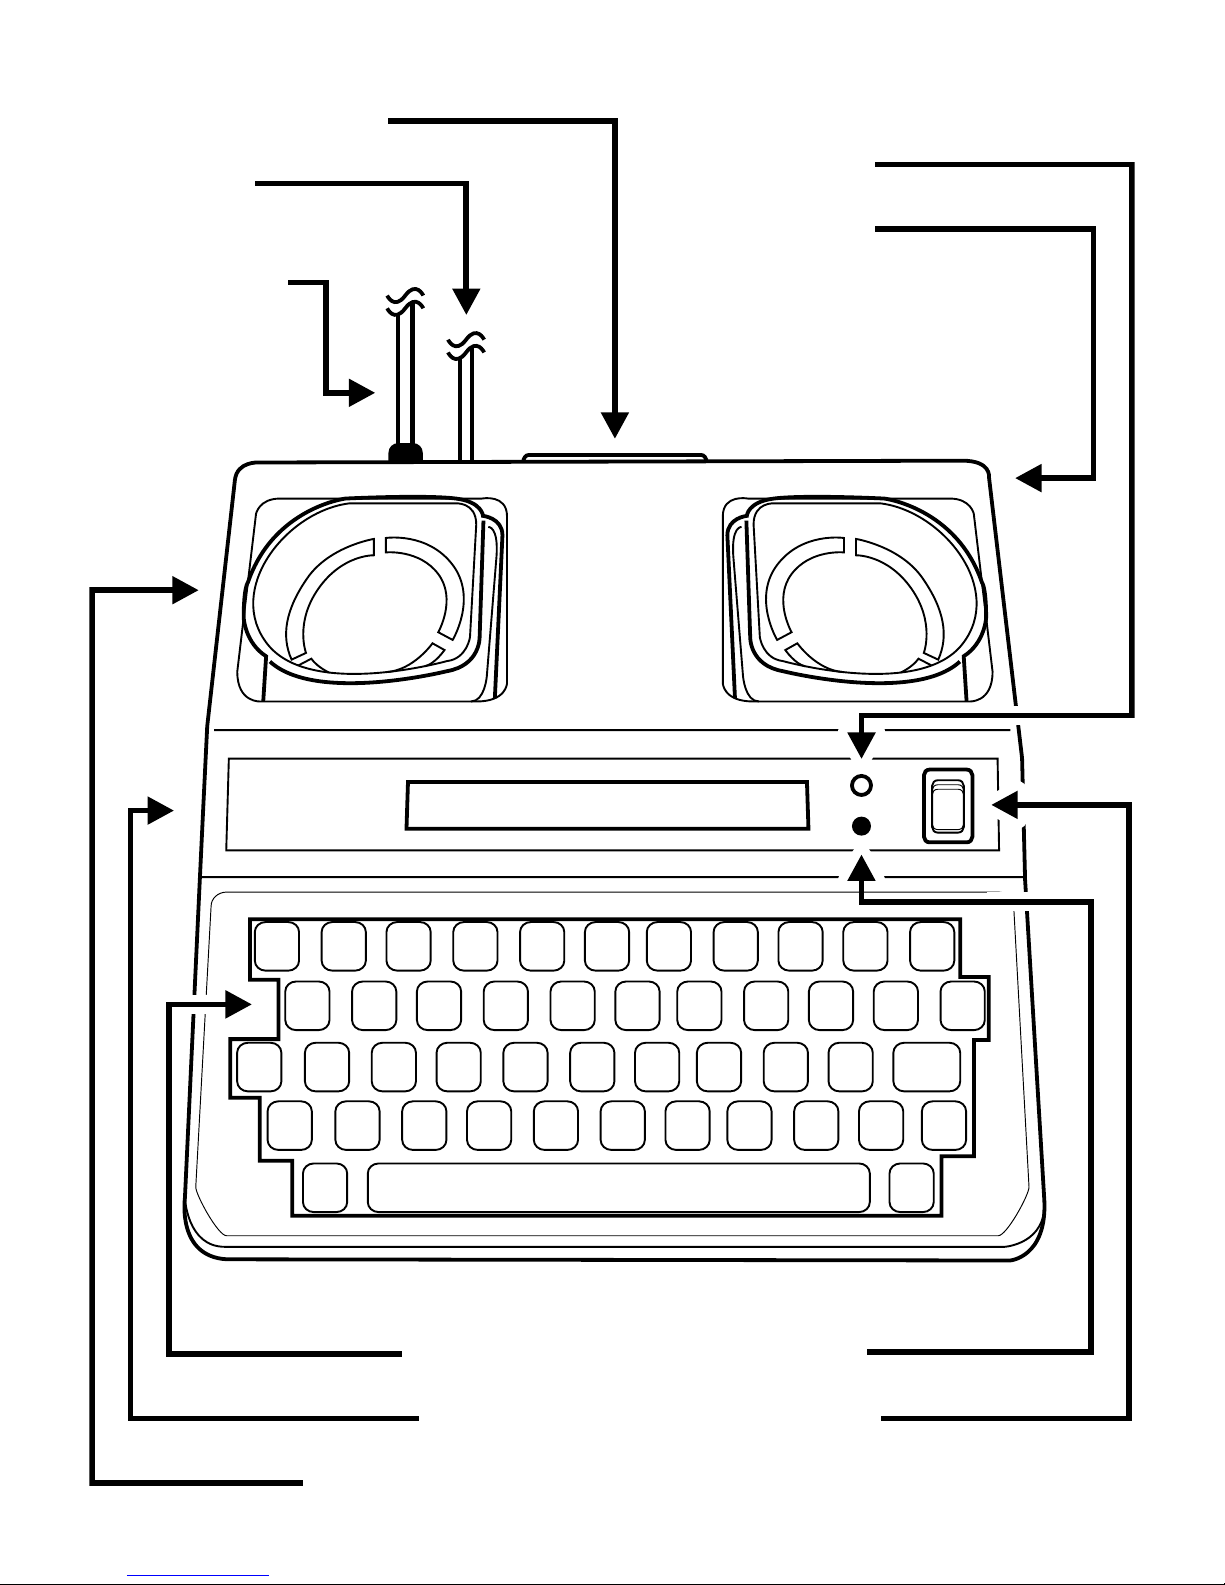
Krown
MANUFACTURING, INC.
PORTA-VIEW®
MODEL PV20
POWER
PHON
E
ON
ON
OFF
OFF
Printer Port (Parallel)
Phone jack
(Direct Connect Models)
AC Power Jack
Po
wer Light
Battery Pack
Keyboard
Display
Acoustic Coupler
Phone Light
Po
wer Switch
HELLO GA_

1
Q
A
-
Z X C V B N M , .
S D
$
" / : ;
?
! + = ' ( )
F G H J K L
W E R T Y U I O
P
BACK
SPACE
REDIA
L
AUTO
ANS
ENTER INSERT DELETE CLEAR
PRIN
T
SAVE/HANG-UP
PULSEFOR THE TELEPHONE COMMUNICATION IN DIRECT CONNECT, PRESS SPACE BAR.INT'L
CODE
SHIF
TSHIFT
SK GA
CTRL
2 3 4 5 6 7 8 9 0
DIAL
RETURN
SEND
MEMORY
i
PORTAVIEW PLUS KEYBOARD
Most of the keys on your PortView Plus are same as the keys used on a typewriter, but some are
special and easily identified and understood.
SPECIAL PURPOSE KEYS
KEY NAME OPERATION DUTIES
CTRL
CONTROL
Used with another key to tell the PortaView Plus to
perform or set a particular feature. The key must be
pressed first and held while another key is pressed.
SHIFT
SK GA
SHIFT
ARROW KEYS
Controls the typing of an upper case figure show on the
key (only upper case letters will appear on the display.)
Moves the cursor (pointer) to the left or right, one
character at a time, for reading and changing stored
messages. During conversations, those keys are also
SPACE BAR
RETURN
BACK
SPACE
SPACE BAR
RETURN
BACK SPACE
used to generate GA and SK
Moves the cursor (pointer) one space forward.
Signals the printer or a TTY to begin a new line on the
paper. Also used to advance the paper.
Moves the cursor one space backward.
* When using the DIAL function, first press the SHIFT key, then press the dial key at the same time.
5

KEY USED WITH CONTROL KEY (Found at top, bottom, and right side of keyboard.)
KEY NAME OPERATION DUTIES
CTRL
CTRL
CTRL
CTRL
CTRL
CTRL
DIALSHIFT
+
+
2
+
5
+
6
+
7
+
8
+
9
DIAL*
SEND 1-4
ENTER
INSERT
DELETE
CLEAR
SAVE
Allows you to call a phone number typed on the
keyboard or stored in the Directory.
Sends a message stored in Memory Banks 1-4 to save you
typing time. Bank #3 is for the Auto Answer
message. (Diagram shows how to send a message from
Memory Bank #2.)
Accesses the Memory Banks. To look at the contents of one
of the Memory Banks, type a number from 1 to 5 after this
command.
Inserts characters into a stored message without having to
retype the entire message.
Deletes the character above the cursor.
Used to erase the contents of an entire Memory Bank or the
Phone Directory.
Saves everything typed into memory. Also used to exit the
Memory Banks and to clear the line when in Direct Connect.
CTRL
CTRL
CTRL
CTRL
CTRL
CTRL
CTRL
+
DIAL
+
+
BACK
+
SPACE
+
+
+
SPACE BAR
DIRECT
CONNECT
0
P
AUTO ANSWER
PRINTER ON/OFF
ASCII
INT’L
(LEFT ARROW)
PULSE
(RIGHT ARROW)
VOICE ON
Used to change between acoustic and direct
connect mode.
Turns the Auto Answer feature on and off.
Turns the external printer on and off
Starts ASCII mode or changes back to Baudot TDD mode.
Used to change the PortView Plus to international (50 Baud)
operation. Also moves cursor for backward scrolling while
reading or changing a message saved in memory.
Used to select Pulse or Tone dial, when available. Also move
cursor for forward scrolling while reading or changing a message saved in memory.
Turns electronic voice on and off
6
NOTE: The [CTRL] and [SHIFT] function keys must be pressed at the same time. Hold the [CTRL], or
[SHIFT] key down first and press the special purchase key at the same time.
8

I
TO SETUP YOUR PORTAVIEW PLUS
Place your PortaView Plus near your telephone. The power unit is connected to a regular power outlet
and the PortaView Plus is used with your telephone.
• Be sure that the ON/OFF switch on the TDD is OFF.
• Plug small end of adapter cord into small hole at back of TDD.
• Plug AC Adapter/Charger into an electrical wall-outlet.
• Keep both ends plugged in even when machine is not being used for a telephone call.
GETTING STARTED
Your PortaView Plus has Direct Connect. Plug one end of your modular cord into the telephone wall
jack. Plug the other end into the hack on the back of your PortaView Plus.
THE LIGHTS AND SWITCHES
Phone Light Shows sounds heard on the telephone line.
Power Light Show status of power. When the light shows:
STEADY = Power is ON
FLASHING = Low battery power
NO LIGHT = Power is OFF
Power Switch This switch turns the power ON and OFF
Print Switch This switch turns the printer ON and OFF.
7

GETTING STARTED (CONT.)
ELECTRONIC VOICE
The Electronic Voice is a single unchangeable voice message that is stored in the memory of your
PortaView Plus. The message is used for calling hearing people at VOICE/TDD number. It tells them
“Please use TDD for hearing-impaired caller.”
The voice message will be repeated until your TDD conversation begins (when your TDD receives a
signal from another TDD). As soon as the other person begins to type, the electronic voice message
stops.
To turn the Electronic Voice ON or OFF
• Press [CTRL] and [SPACE BAR] to turn your Electronic Voice on. VOICE ON will appear
on the display screen.
• Press [CTRL] and [SPACE BAR] to turn your Electronic Voice off again. VOICE OFF will
appear on the display.
+
CTRL
NOTE: It will be necessary to turn your electronic voice off before using any control key operations.
SPACE BAR
BATTERY POWER INFORMATION
Your Krown PortaView Plus is designed to operate from battery or
AC (house electricity) power. To use the battery power, unplug the AC
charger/adapter from the machine AND the wall outlet.
The Ni-Cad battery will operate for approximately 3-1/2 hours when
fully
charged. The batteries will automatically recharge whenever the unit
is plugged into the AC charger/adapter and the TDD is turned OFF. To
help the battery last longer, let it run down until the Power Light starts
to flash BRIGHT-dim-BRIGHT-dim. This means that the battery is running down and needs recharging. The light will flash for several minutes.
Then the PortaView Plug will stop working. When this happens, you
must change over to AC power to continue using your machine until you
recharge the battery.
It’s suggested that you use the PortaView Plus with battery in a regular
cycle. That is, operator the unit on battery power until it needs
recharging. Then recharge the battery by plugging the TDD into the AC
charger/adapter for 12 to 14 hours. (The unit must be turned OFF in
order to recharge.)
CAUTION: The adapter/charge is NOT interchangeable. You MUST use the adapter
that comes with your unit.
10
8

II
PV20 P
LUS
Krown
Manufacturing,
Inc.
Porta V
iew
®
MODEL: PV20
2
1
7
8
9
K
M
I
L
.
,
U
J
N
Y
H
B
T
G
V
BA
C
K
SP
AC
E
RET
U
RN
SHIF
T
DIAL
S
HIFT
CTRL
GA
0
O
P
3
4
6
5
R
E
D
X
SK
F
C
W
S
Z
Q
A
POW
E
R
ON
OF
F
ON
OF
F
PHON
E
USING YOUR PORTAVIEW PLUS
HOW TO MAKE A TDD CALL
1. Turn On the PortaView Plus.
The PVCO display window will show
POWER ON.
2. Place telephone receiver down firmly in
the rubber acoustic cups with telephone
cord on the LEFT.
3. If the Phone Light is on and steady, there
is a dial tone. Dial the telephone number
now on your telephone, not on the
PortaView Plus. If the phone is not steady
nor flashing, your phone extension may
be in use by someone else.
4. Watch the Phone Light after you dial the number. If the light shows:
1. SLOW FLASHING = Telephone is RINGING at the number dialed.
2. FAST FLASHING = Line is BUSY at the number dialed.
3. IRREGULAR FLASHING = (1) Your call cannot be completed as dialed. Hang up, check
number and try again, or call the TDD Operator for assistance. (2) The number dialed is
voice only. (3) Your call has been answered by an answering machine.
TELEPHONE CONVERSATIONS
1. When someone answers your TDD call with his/her TDD,
the person’s response will end with GA (Go Ahead). You now
type back. Typing GA is like saying. “OK it is your turn to
talk now.”
2. When both people are ready to hang up, type SK (instead of
GA) or GA to SK. This means “Stop Keying.” When both
have typed SK the conversation is finished. Hang up the tel
phone by putting the handset back on the phone. Turn the
power switch to off.
TO ANSWER A TDD CALL
1. Turn the Power Switch ON.
• The Power Light glows red.
• “PV20 PLUS-POWER ON” is displayed.
2. Place your telephone handset firmly into the acoustic cups with the cord to the LEFT.
3. Type an answer message.
• Example: “AMY HERE GA”
4. When both people have finished the conversation, place your telephone handset back on
the phone.
5. Turn your PortaView Plus OFF.
9

USING YOUR PORTAVIEW PLUS (CONT.)
MAKING AN OVERSEAS CALL
To place a call outside the United States or Canada, you may need to change the transmission speed
(Baud rate) at which your PortaView Plus sends messages. In the United States and Canada,
the standard rate for TDD/TTY transmissions is 45 Baud, while the international standard is 50 Baud.
PRESS:
CTRL
+
INT’L SPEED? Y/N
Change between Domestic and
International Baud rate.
Y
INTERNATIONAL ON
is displayed.
After confirming that you want to change to the International Baud rate, the display will indicate that
the change has been made. you are ready to go ahead and dial your overseas call.
To change back to the domestic TDD/TTY Code after your call, follow the steps below.
CTRL
+
INT’L SPEED? Y/N
Change between International
and Domestic Baud rate.
N
INT’L OFF
is displayed.
12
10

III
The PortaView Plus has an 8K (8,192 characters) Random Access Memory (RAM). The memory
feature can save you time by letting you save often used messages, prepare a message before making
a call to save on long distance charges, and to save frequently called numbers.
MEMORY AREAS
The PortaView Plus memory is divided into 6 blocks, consisting of 5 “areas” labeled M1 to M5 plus a
directory of phone numbers:
• M1 and M2 can hold 32 characters each. These are suitable for short messages such as a
greeting that might be used for any incoming call.
• M3 holds 256 characters, for somewhat longer messages.
• M4 holds approximately 1,200 characters. This area can be used to store a message that will be
sent as an outgoing call.
• M5 stores all outgoing and incoming data automatically, using the remaining available space. If
the space available to store messages runs out during a conversation, new data will overwrite
the old data in area 5, beginning with the oldest message. This will not affect stored messages in
any other area. Information on area 5 cannot be sent to another TDD/TTY.
• A phone directory (with labels D1 to D9) provides 9 locations plus one password bank of 24
characters each, which can be used to store and view frequently dialed phone numbers.
THE MEMORY
ENTERING AND SAVING A MESSAGE
To store a message, you must first choose one of the numbered memory areas. Pressing [CTRL] and
[5] accesses the available memory areas, so that you can select the one you wat to use.
PRESS:
CTRL
Choose area M1 (for example)
1
Type the message you want to store. It will displayed as you type. To store the message, type [CTRL]
and [9] (SAVE). The message will be stored and the displayed cleared.
CTRL
SENDING A STORED MESSAGE
To send a stored message, turn on the PortaView Plus, connect the phone handset, and dial the
number to which you want to send the message. When you get an answering message and a “GA” (Go
Ahead) from the party you are dialing, press the [CTRL] key and at the same time, the number of the
memory area in which your message is stored. Your message will be sent. Before and after
sending a stored message, you can type messages in the usual manner. To interrupt sending a
message, type [CTRL] and [4].
+
5
+
9
MEM 1-5 OR D(DIR)
Accesses memory areas or
phone directory.
M1
_
Saves message into open area.
11

THE MEMORY (CONT.)
PRESS:
Sends th contents of a memory
CTRL
+
4
A STORED MESSAGE
area. (The diagram shows how to
send the contents of memory
area 4.)
DELETING A STORED MESSAGE
You can erase (or “clear”) all of the information in a memory area by type [CTRL] and [8] (CLEAR).
You will be prompted to enter the number of the area to be cleared, and then asked to confirm that
you really want to erase the message stored there.
If you type [Y], the memory area will be cleared. You can type a new message in the memory area
you just cleared and save it by pressing [CTRL] and [9].
If you type [N], MEMORY SAVED will appear on the display. Press the [RETURN] key to clear the
display.
CTRL
+
8
CLR MEM 1-5, D(DIR)
Asks to clear memory area or
phone directory
1
Y
OR
N
RETURN
CLEAR 1? Y/N
M1
CLEAR1? Y/N N
Choose area M1 (for example)
Yes; clear message.
No; keep the information
in memory.
_
Clear the screen.
VIEWING A STORED MESSAGE
To read a message stored in memory, you must first access the memory areas. Then you should type a
number to tell the PortaView Plus where the message is stored. The area name (for example, M2) will
be shown on the right side of the display, and the message will be shown in the center of the display,
with the cursor on the first character.
PRESS:
Access memory areas or
CTRL
+
5
MEM 1-5 OR D(DIR)
phone directory.
2
You can use the arrow keys to move forward or backward through the text.
14
12
ABCDE M2
BCDEF M2
ABCDE M2
Chooses area M2 (For example).
Moves to the right.
Moves to the left.

THE MEMORY (CONT.)
To move quickly in a stored message, press the [CTRL] key and an arrow key at the same time. The
display will keep showing more text on the side of the arrow until you release the key.
CTRL
CTRL
+
+
EFGHIJKLMNO M2
ABCDEFGHIJ M2
Moves continuously through a
stored message.
When you are done looking at the message, press [CTRL] and [9] (SAVE) to store the message again
and clear the screen.
CTRL
+
9
_
Saves the message.
EDITING A STORED MESSAGE
To change the information in a stored message, you need to access the area in which the message is
stored (see page 11).
Use the arrow keys to move forward or backward in the text to reach the part you want to change.
Whatever you type in a memory area will replace any material unless you turn on the insert mode
first.
CTRL
+
5
MEM 1-5 OR D(DIR)
Accesses memory areas or
phone directory.
1
HELLO M1
Chooses area M1 (for example).
To change an entire message:
Type over an existing message to replace it with new information, then type [CTRL] and [9] to save
the new information. You may also erase all the information in a memory area. (see page 12).
To change part of a message:
Move the cursor the point where you want to make a change, and then delete or insert characters at
the point where you want to make the change.
To delete a character:
Type [CTRL] and [7] (DELETE), and the character above the cursor will be deleted. You must press
[CTRL] and [7] for each character that you want to delete.
PRESS:
CTRL
+
7
ELLO P M1
Deletes a single character.
13

THE MEMORY (CONT.)
To add characters in the middle of a message:
Move to the location where you want to add material and type [CTRL] and [6] (INSERT). This will
put you into “insert” mode. Now whatever you type will be put into the text at the cursor position,
and the text to the right will simply move over to make room for the new material. (If you do not use
insert mode, each character you type will replace the character that was there before.)
Activates (or turns off) insert
CTRL
+
6
HELLO I1
mode; what you type is added to
the message. For example, if you
type “H” at the beginning of the
message shown above, the di
play on the left will be shown.
Type [CTRL] and [6] again to get out of insert mode. To save the changes you have made, type
[CTRL] and [9].
CTRL
+
9
MEMORY SAVED
Saves a new message.
USING THE PHONE DIRECTORY
You can store phone numbers in any of 9 memory locations. Begin by typing [CTRL] and [5] to
access the memory area. Type [D] to indicate that you want the directory, not one of the numbered
areas. Then you’ll be asked to pick a location in the directory. The screen will first show the message
“TYPE NAME & NO. NOW,” then that message will disappear and the location’s label will appear
on the screen.
CTRL
D
1
KEVIN 738-2485
+
5
MEM 1-5 OR D(DIR)
TYPE PHONE LOC 0-9
TYPE NAME & NO. NOW
KEVIN 738-2485 D1
Accesses memory areas.
Chooses the phone directory.
Chooses phone # location 1.
New name and number typed
into directory location 1.
Type the number to be stored, and then save the information by typing [CTRL]+[9]
CTRL
+
9
MEMORY SAVED
Saves the message.
You can view or edit the information in a directory location in the same way as you would a
memory area.
NOTE: Numbers can be separated with dashes (-). Only numbers will be dialed. Letters and dashes will not
affect dialing. If needed for the operation of special business systems, a pause or delay in dialing can be inserted
16
14
between numbers. Type a “+” for each one second delay needed.

THE MEMORY (CONT.)
CLEARING THE PHONE DIRECTORY
When you want to replace your phone directory completely, you can delete all of the numbers in your
phone directory at once:
CTRL
D
Y
OR
N
+
8
CLR MEM 1-5, D(DIR)
CLEAR DIR.? Y/N
TYPE PHONE LOC 0-9
CLEAR DIR.? Y/N N
Asks which area you want to clear.
Chooses the phone directory.
Yes; clear the directory.
No; keep the information in
the directory.
After typing [Y] to clear the directory, you can type the letter of the location in the phone directory
and then enter a new phone number to be stored; or you can type [CTRL] and [9] (SAVE) to save the
changes without entering new information.
CTRL
+
9
MEMORY SAVED
Saves changes.
NOTE: If you wish to change only one phone number in the Phone Directory, follow the instructions for
changing saves information.
15

IV
The Director Connect feature saves you time and gives you a better connection. You can use your PortaView Plus without having to
place the telephone handset into the acoustic cups. It also gives you
the choice of dialing from the keyboard or from numbers stored in the
Phone Directory. (see page 15 for information on storing numbers in
the Directory.)
To connect your PortaView Plus to your telephone line, plug one end
of your modular telephone cord into the telephone wall jack. Plug the
other end into the jack on the back of your PortaView Plus.
After turning the Power Switch ON, it is necessary to press the [SPACE BAR] or [SHIFT]+[DIAL] to
connect with the
telephone line.
KEYBOARD DIALING
Turn the Power Switch ON.
DIRECT CONNECT
• “PV20-DIRECT CONNECT” is displayed when in Direct Connect.
• If in acoustic mode, the PortaView Plus will automatically change to and remain in Direct
Connect when you press [DIAL].
PRESS:
SHIFT
8885551234
If you make a mistake dialing, you must press:
CTRL
SHIFT
AUTO (DIRECT) DIALING
Turn the Power Switch ON.
+
DIAL
+
9
+
DIAL
TYPE NUMBER OR A-Z
8885551234
DISCONNECTED
TYPE NUMBER OR A-Z
TDD is now ready to dial.
The number is displayed and
dialed as it is typed.
The phone line is now cleared
and you may begin dialing again.
TDD is now ready to dial.
If in acoustic mode, the PortaView Plus will automatically change to and remain in Direct Connect
when you press [CTRL] + [DIAL].
16
18
PV20-DIRECT CONNECT
Indicates you are using
Direct Connect

DIRECT CONNECT (CONT.)
SHIFT
M
4
+
DIAL
TYPE NO. OR M(MEM)
PHONE (1-9) OR D(DIR)
DIALING 5551234
TO DISPLAY THE ENTIRE PHONE DIRECTORY
SHIFT
M
D
+
DIAL
TYPE NO. OR M(MEM)
PH(1-9) OR D(DIR)
0 - ABCDE
1-ADRIENNE 555-4321
9-BECKY 555-1234
TDD is now ready to dial.
Chooses memory dialing.
Choose phone number location 4
(for example) and dial.
Choose phone directory.
Password is displayed.
Phone numbers 1 through 9 are
displayed.
PH(1-9), K(KEYBD)
Dial from memory by pressing a
number from 1-9, or K to dial
from the keyboard.
TONE/PULSE DIALING
Telephone companies offer both pulse and tone dialing. The PortaView Plus will use tone dialing
unless you change it. Most tone dialing services will allow you to use rotary (pulse) dialing, but some
rotary service will not allow you to use tone dialing.
To set the PortaView Plus for pulse dialing:
CTRL
Y
+
9
PULSE DIAL? Y/N
PULSE DIAL ON
Chooses pulse dialing.
OR
N
TONE DIAL ON
Chooses tone dialing.
17

DIRECT CONNECT (CONT.)
ACOUSTIC/DIRECT CONNECT MODE SELECTION
The PortaView Plus will automatically select Direct Connect mode when you activate the [DIAL]
(Keyboard or Auto Dialing) or AUTO-ANSWER features. The PortaView Plus will remain in the
mode (Acoustic or Direct Connect) you select until you change it.
PRESS:
To change mode:
CTRL
+
DIAL
ACOUSTIC MODE
The new mode is displayed.
OR
DIRECT CONNECT
The PortaView Plus stores the selected dial mode in memory. Therefore, it is not necessary to change
the dial mode if you want to to use the mode previously selected.
NOTE: When in Direct Connect it is possible to make several phone calls without tuning the PortaView Plus OFF between
each call. To hang-up (disconnect) between calls, press [CTRL] and [9]. The PortaView Plus is then ready for you to
make another call.
USING THE PORTAVIEW PLUS AUTO-ANSWER FEATURE
The PortaView Plus has a built-in answering machine to answer your calls when you are away. To use
Auto-Answer, you must have saved on outgoing message in memory bank 3. (Refer to instructions on
page 11.)
Example “HELLO, THIS IS JOHN’S ANSWERING MACHINE... PLEASE TYPE UR NAME AND
PHONE NBR AND I’LL RETURN UR CALL GA”
To set your PortaView Plus to Auto Answer:
1. Connect your PortaView Plus to the AC charger/adapter
• Make sure your printer is on, if external printer is used.
• Make sure your have connected your PortaView Plus to the telephone line.
2. Turn the Power Switch ON.
• “Power-On” message such as PV20PLUS-DIRECT CONNECT is displayed.
PRESS:
CTRL
+
0
Select the number of times you want the phone to ring before it is automatically answered by
your TDD.
4
20
18
NO. OF RING (1-9)?
AUTO ANSWER ON
Selects Auto Answer mode.
(Ex.) You have chosen 4
rings and Auto-Answer is
now activated.

DIRECT CONNECT (CONT.)
If your TDD has the optional ASCII feature, your TDD will give you the option to answer calls
in ASCII.
ANSWER ASCII Y/N
Y
AUTO ANSWER ON
Your TDD now automatically
answer ASCII and Baudot calls.
OR
N
AUTO ANSWER ON
Your TDD will only automatically
answer Baudot calls.
Your incoming TDD calls will be answered, printed (if used with an external printer - NOT
SUPPLIED) and stored in memory bank 5.
NOTE: The Auto-Answer feature will work with or without an external printer (NOT SUPPLIED).
• If used with an external printer, all calls will be printed as well as saved in memory bank 5.
• If used without an external printer, all calls will be saved in memory bank 5.
To review message, see Viewing a Stored message (page 12)
To answer an Incoming Call when the Auto-Answer is ON:
1. Press the [SPACE BAR] once before or after Auto-Answer message is sent.
• The Auto-Answer is removed.
• The PortaView Plus is now ‘on-line” with caller.
PRESS:
+
X X
X
+
Alerts your caller that you are on
XXX
the line.
HELLO GA
CTRL
+
9
XXX HELLO GA
AUTO ANSWER ON
Type your greeting on the keyboard.
Your TDD is again in Auto-Answer
and ready to answer calls.
NOTE: Your PortaView Plus will automatically disconnect and return to Auto-Answer after 60 seconds if neither person is
typing. If you need to prevent this from
CTRL
+
0
NO TIMEOUT
You will now not be disconnected.
IMPORTANT: To end your call and return to Auto-Answer:
CTRL
+
9
AUTO ANSWER ON
You have now disconnected the
phone line and you are back in
Auto Answer.
To turn Auto-Answer OFF:
CTRL
+
0
AUTO ANSWER OFF
19

DIRECT CONNECT (CONT.)
TO ACTIVATE REMOTE MESSAGE RETRIEVAL
The Remote Message Retrieval feature lets you retrieve your message while away from home.
Be sure to first store a password in location “0” of the Phone Directory (see page 14)
You must also clear memory bank 5 (see page 12.)
Set your PortaView Plus to Auto-Answer (see previous page).
To retrieve your message:
1. Dial your number.
• Auto-Answer will answer with your personalized message.
2. Type your password after the message sent to you.
• Make sure your password is at least 5 letters in length.
• All of your message will be sent to you.
22
18

V
OPTIONAL FEATURES
PRINTER (OPTIONAL)
If you wish to heave a printed copy for your TDD conversations and messages, you may connect an
external printer to the PortaView Plus.
If you already have a parallel (Centronics) compatible printer, you may connect it to your PortaView
Plus using a parallel printer cable available from your local computer dealer. This cable should have a
36-pin (DB) computer connector on the other end.
To activate external printer once parallel printer cable has been connected, press:
CTRL
CTRL
+
P
+
P
PRINTER IS ON
PRINTER IS OFF
is displayed.
is displayed.
Parallel printer cable
CARRYING CASE (OPTIONAL)
You may purchase a carrying case for your PortaView Plus for traveling convenience and extra
protection for your unit. Feel free to contact Krown Manufacturing or an authorized Krown Dealer.
NOTE: Printer and cable are not included. PV20 Plus works with all dotmatrix, inkjet, laser printers through a
parallel port. USB port printer will not work.
21

VI
USING THE OPTIONAL ASCII FEATURE
ASCII CODE
Your TDD has a special feature that allows you to communicate with others who do not have Baudot
TDD, but instead have a home computer or computer terminals and with those who have TDDs
equipped with ASCII. You may also use your TDD to communicate with Relay Service.
The PortaView Plus with ASCII is setup to automatically communicate in ASCII in the following
modes.
• 300 Baud • Half Duplex • Originate
It can also be changed to the following modes:
• 110 or 300 Baud • Half or Full Duplex • Answer or Originate
When calling a computer service to receive information, your TDD should be setup as follows:
• 300 Baud • Full Duplex • Originate
It is best to use your TDD in direct connect, whenever possible. However, acoustically coupled
operation is normally acceptable as well.
TO CHANGE MODE SETTINGS
BACK
CTRL
+
SPACE
CHANGE MODES? Y/N
You will remain in the preset
N
300 BAUD, HALF, ORIG
ASCII mode.
or
Y
HALF DUPLEX? Y/N
You are going to change the
preset mode
Yes; chooses Half Duplex.
Y
Y
or
or
N
N
300 BAUD? Y/N
ORIGINATE? Y/N
No; chooses Full Duplex
Yes; chooses 300 Baud.
No; chooses 110 Baud.
Y
or
N
110 BAUD, FULL, ANS
Yes; chooses Originate mode.
No; chooses Answer mode.
After the three selections have been made, the selected modes are displayed.
Example: If the last three question have been answered with N, the displayed will read 110 BAUD,
FULL, ANS.
NOTE: The display will automatically change form the normal direction (right-to-left) to left-to-right) in the
ASCII mode.
REMEMBER: When using ASCII for TDD-to-TDD, your PortaView Plus is preset in the correct modes; the only
change that may be needed would be the selection of ORIGINATE or ANSWER mode.
24
22

USING THE OPTIONAL ASCII FEATURE (CONT.)
TO MAKE YOUR ASCII CALL
Placing a call with your PortaView Plus ASCII is done the same way as placing a call in Baudot. The
only difference is setting the mode to ASCII.
To make the call acoustically, place the telephone handset in the acoustic cups with the cord to
the LEFT.
To make the call in Direct Connect, connect your TDD as described on page 16.
PRESS:
BACK
CTRL
+
SPACE
CHANGE MODES? Y/N
Y N
or
Yes; if you want to change modes.
No, this answer will keep the TDD in the preset mode: “300
BAUD/HALF/ORIG.”
Dial the number from the telephone set if you are using the acoustic cups, or from the keyboard if
Direct Connect is used.
• The phone light will show you if the phone is ringing or busy.
• CARRIER is displayed when the call is complete and connection has been made.
• Begin your conversation.
After Your Conversation
1. Place the telephone handset back on the phone, or press and hold [CTRL] and [9] if in Direct
Connect in order to hang up.
2. Turn your PortaView Plus OFF.
• The machine will be set to communicate in Baudot (TDD) when you turn it back ON.
TO RECEIVE AND ASCII CALL
Your PortaView Plus with ASCII is setup to automatically receive calls in ASCII with 300 Baud,
Half Duplex and Originate modes. If you have problems receiving as ASCII call, you may have to
change modes. This may be done while receiving a call. See “To Change Mode Settings’ on the
previous page. If may be preferable to discuss the modes directly with the caller before making your
call in ASCII.”
23

HOW TO MAKE A VCO, HCO CALL BY USING
VII
PORTAVIEW PLUS
If you would like to make a call with Voice Carry Over (VCO and wish to receive the Baudot tone
back from or to the Relay Operator), you could use this feature of the PortaView Plus. In order to use
this feature you will need the help from the Relay agent. Follow this procedure to make a call.
1. Plug the external clip microphone to the MIC jack on the right side of the machine. Clip the
microphone to your shirt close with your mouth. If you prefer to use internal microphone, do
not plug the external microphone to the TDD.
2. Turn on the TDD machine.
3. The PortaView Plus is now ready to transfer your voice (or receive the voice from the caller).
Press [SHIFT] and [DIAL] at the same time. After you see the message. “TYPE NUMBER OR
A-Z:” type your state relay number.
4. Press [CTRL] and [V] at the same time. Release both keys. The display will read “VCO ON”
5. When the Relay Operator answers the call, you now may type the request to make the VCO call
to the operator. For example, in type, “I WANT TO MAKE A VCO CALL PLS GA”
6. When the operator is ready to receive voice, he or she will ask you to start voice. From now on,
you can use voice to communicate with the operator and the caller when receiving Baudot
answer on your screen.
7. To end the VCO call, press and hold [CTRL] and [9] at the same time until you see the message
on the screen. “DISCONNECTED”.
To make HCO call, instead of using microphone to talk you use the speaker to hear the caller voice
and type back to the operator.
HCO
Hearing Phone User
Relay Service
speaking
hearing
speaking
typing
OR
speaking
typing
VCO
NOTE: VCO and HCO feature are optional for your PortaView Plus. Please contact your Krow’s Representative to
have it installed.
24

USING PORTAVIEW PLUS WITH
VIII
WIRELESS PHONE
If you order your PV20 Plus with wireless option, use the supplied cable to connect your TDD direct
to a select digital cell phone, or a cordless phone with 2.5mm headset jack. When purchasing a cell
phone and service for your PV20 Plus, make sure you get a TDD compatible unit or look for the
TDD-cell phone symbol.
OR
MAKING A CELLULAR CALL WITH YOUR PORTAVIEW PLUS
Always charge the TDD and your cell phone in full before use. Make sure you get a strong signal
from your provider and your TDD is off. Setup your cell phone to work in TDD mode.
1. Connect the cable from the cell phone to the TDD
2. Turn on your TDD
3. Select TDD mode on your cell phone (refers to your cell
phone manual for more detail).
4. Dial the number you are calling on the cell phone.
5. If the other party’s TDD pick up, the PV20 Plus will display
text and the conversation has been started.
ANSWERING A CELLULAR CALL
Make sure to turn the Ringer of your cell phone to vibrate mode. If your battery doesn’t support this
mode, you may need to order a vibrate battery from your cell phone provider.
1. If the cell phone vibrates, you have an incoming call, connect your PV20 Plus using the cable
that come with your TDD to the cell phone.
2. Answer the call on your cell phone (usually your press “talk” or “send” button on your cell
phone. Refer to your instruction book for how to answer a call for your phone.)
3. Turn on your PV20 Plus and type your greeting message.
When you are ready to hang up, turn off the PV20 Plus and press the button to hang up the call of
your cell phone.
NOTE: Connecting your PV20 Plus to a wireless phone is an option. Please call your Krown’s representative to
have it installed. Cellular is not included.
25

USING YOUR PV20 PLUS WITH WIRELESS PHONE (CONT.)
USING YOUR PV20 PLUS WITH A CORDLESS PHONE
You can connect your PV20 Plus to a cordless phone with a 2.5mm headset jack, and enjoy the
freedom of making a call around the house. Charge the cordless phone and PV20 Plus at night to get
them ready to use next day.
Making a cordless phone call with your TDD.
1. Connect the PV20 Plus to the cordless phone using the
2.5mm audible cable.
2. Turn on your PV20 Plus
3. Press ON or TALK button on your cordless phone and
watch “Phone” light on your TDD to make sure you get
a dial tone.
4. Dial number on your cordless phone.
5. If the other TDD or Relay agent picks up your call, your
PV20 Plus will display text message and the
communication link has begun.
TROUBLESHOOTING FOR TDD-WIRELESS CALL
There are many new technology that has been used to establish the wireless communication link
between your and the other TDD users, you will get some problems sometimes by many causes.
Garbled Text: It may be caused by lost, damaged or late signals sending through the air to the
receiver. It happens with any wireless call, even non-TDD calls, and mainly caused
by nature. Move your TDD and wireless phone to where you can receive a strong
signal. If you use a cordless phone refer to your owner’s manual to know how to
switch channel or move closer to the base to strengthen the signal. Always check
to make sure you have a good connection from the cable to the TDD and the
wireless phone.
“Drop Call”: It happen sometimes when you are moving between 2 call towers or in valleys,
hills, and tunnels. Try to redial when you have a stronger signal from your
cell phone.
Feedback: If you see your “Phone” light on your TDD on constantly, your PV20 Plus is getting
feedback. You may reduce the volume of your cell phone or cordless phone down
until the red light turns off and then increase it for better receiving.
28
26

IX
The PortaView Plus can operate from battery power, making your unit completely portable. To use
battery power, unplug the AC charger/adapter form the unit.
When the batteries are fully charged, the PortaView Plus will operate for about 31/2 hours. The
batteries will automatically recharge whenever the unit is plugged into the AC charger/adapter and the
unit is turned OFF.
If you are using your PortaView Plus on battery power and the red Power Light starts to flash on and
off (BRIGHT-dim-BRIGHT-dim), this shows that the battery needs recharging. The light will flash
for several minutes. Then the PortaView Plus will stop working. When this happens, you must change
over to AC power (house electricity) to continue using your machine until you recharge the battery.
It is suggested that you exercise the battery in your PortaView Plus at least once a month. That is,
operate the unit on battery power until it needs recharging. Then recharge the battery by plugging in
the AC charger/adapter for 12 to 14 hours. (The unit must be turned OFF in order to recharge.) Repeat
this cycle at least once a month. When used regularly in this cycle, the battery should last for about
three years.
The replaceable, sealed battery pack is a single unit that contains the battery, connector and cover.
This unit is located on the underside of the PortaView Plus at the back of the unit. Replacement
battery packs are available from Krown Manufacturing or your local Krown distributor.
TAKE YOUR PORTAVIEW PLUS WITH YOU
To replace the battery pack, depress the thumb notch in the center of the cover and slide the unit to
the back of the TDD. Carefully unplug the connector. Replace with a new battery pack unit.
NOTE: To avoid losing all information stored in memory while changing batteries, make sure the A/C adapter is
plugged in first.
27

X
Key board. . . . . . . . . . . . . . . . . . . . . . . . . . . . . . . . . . . . . . . . . . . . . . . . . . . 47-key, 4-row keyboard
. . . . . . . . . . . . . . . . . . . . . . . . . . . . . . . . . . . . . . . . . . . . . . . . . . . . . . . . . . . . . . . . . . 14 function keys
Display . . . . . . . . . . . . . . . . . . . . . . . . . . . . . . . . . . . . . . . . . . . . . . . . . . . . . . . . . . . . . 20 characters
. . . . . . . . . . . . . . . . . . . . . . . . . . . . . . . . . . . . . . . . . . . . . . . . . . . . . . Blue/green vacuum fluorescent
Direct Connect/Auto Answer . . . . . . . . Connects the PortaView Plus directly to the telephone line
Automatically answers calls and prints incoming messages on external printer (printer not included).
. . . . . . . . . . . . . . . . . . . . . . . . . . . . . . . . . . . . . . . . . . . . . . . . . . . . . Call recorded in internal memory
. . . . . . . . . . . . . . . . . . . . . . . . . . . . . . . . . . . . . . . . . . . . . . . . . . Programmable auto answer message
. . . . . . . . . . . . . . . . . . . . . . . . . . . . . . . . . . . . . . . . . . . . . . . . . . . . . . . . . . . . . . . Modular RJ-11 jack
. . . . . . . . . . . . . . . . . . . . . . . . . . . . . . . . . . . . . . . . . . . . . . . . . . . . . . Keyboard pulse (rotary) dialing
. . . . . . . . . . . . . . . . . . . . . . . . . . . . . . . . . . . . . . . . . . . . . . . . . . . . . . . . . . . . Keyboard pulse dialing
. . . . . . . . . . . . . . . . . . . . . . . . . . . . . . . . . . . . . . . . . . . . . . . . . . . . . . . . . . . . . . Dialing from memory
Printer PortStandard parallel Centronics compatible printer port uses a 36-pin parallel connector on
one end and a 25-pin computer on the other
TECHNICAL SPECIFICATIONS
Communications . . . . . . . . . . . . . . . . . . . . . . . . . . . . . . . . . . . . . . . . . . . . . Baudot code, 45.5 Baud
. . . . . . . . . . . . . . . . . . . . . . . . . . . . . . . . . . . . . . . . . . . . . . . . . . . 1 start bit, 5 data bits, 1.5 stop bits
. . . . . . . . . . . . . . . . . . . . . . . . . . . . . . . . . . . . . . . . . . . . . . . International (50 Baud) speed selectable
. . . . . . . . . . . . . . . . . . . . . . . . . . . . . . . . . . . Acoustically coupled to round and rectangular handsets
Power . . . . . . . . . . . . . . . . . . . . . . . . . . . . . . . . . . . . . . . . . . . . . AC charger/adapter: Model 48DT-7
. . . . . . . . . . . . . . . . . . . . . . . . . . . . . . . . . . . . . . . . . . . . Heavy duty: 9VDC, 13.5VA, UL/CSA listed
. . . . . . . . . . . . . . . . . . . . . . . . . . . . . . . . . . . . . . . . . Ni-Cad rechargeable 1.2 AH, 5 cell battery pack
. . . . . . . . . . . . . . . . . . . . . . . . . . . . . . . . . . . . . . . . . . . . . . . . . . . . Customer replaceable, sealed pack
Physical Dimensions . . . . . . . . . . . . . . . Size: W 10” (25.4 cm), L 10” (25.4cm), H 2 1/1” (6.5 cm)
. . . . . . . . . . . . . . . . . . . . . . . . . . . . . . . . . . . . . . . . . . . . . . . . . Weight: 3 lbs. (1.36 kg) with batteries
ASCII Code Modem Option . . . . . . . . . . . . . . . . . . . . . . . . . . . Computer Code - Bell 103 Modem
. . . . . . . . . . . . . . . . . . . . . . . . . . . . . . . . . . . . . . . . . . . . . . . . . . . . . . . . . . . . . . . . 110 and 300 Baud
. . . . . . . . . . . . . . . . . . . . . . . . . . . . . . . . . . . . . . . . . . . . . . . . . . . . . . . . . . . . . . . . . Half/Full Duplex
. . . . . . . . . . . . . . . . . . . . . . . . . . . . . . . . . . . . . . . . . . . . . . . . . . . . . . . . . . . . . . . . . Answer/Originate
Electronic Voice . . . . . . . . . . . . . . . . . . . . . . . . . . . . Automatically reset with incoming TDD tones
. . . . . . . . . . . . . . . . . . . . . . . . . . . . . . . . . . . . . . . . . . . Signals hearing caller with synthesized voice.
Memory . . . . . . . . . . . . . . . . . . . . . . . . . . . . . . . . . . . . . . . . . . . . . . . . 8,192 (8k) character memory
. . . . . . . . . . . . . . . . . . . . . . . . . . . . . . . . . . . . . . . . . . . . . . . . . . . . . . . . . . . . . . . . . . . . . Non-volatile
. . . . . . . . . . . . . . . . . . . . . . . . . . . . . . . . . . . . . . . . . . . . . 5 message buffers (4 outgoing, 1 overflow)
. . . . . . . . . . . . . . . . . . . . . . . . . . . . . . . . . . . . . . . . . . . . . . . . . . . . . . . . . . . . . . . . . . . Phone Director
. . . . . . . . . . . . . . . . . . . . . . . . . . . . . . . . . . . . . . . . . . . . . . . . . . Remote retrieval of message
. . . . . . . . . . . . . . . . . . . . . . . . . . . . . . . . . . . . . . . . . . . . . . . . . . . . . . Stores all conversations
28

XI
TAKING CARE OF YOUR TDD
• CAUTION: The adapters are NOT interchangeable. You MUST use the adapter that comes with
your TDD.
• Be sure to turn your machine OFF when not in use.
• Keep your machine away from extreme temperatures - HOT or COLD
• Avoid dropping or shaking the unit. Electric devices are very fragile.
• Keep the unit as dust-free as possible. (Dust covers are available from Krown Manufacturing.)
• Be careful not to spill liquids on the PortaView Plus
• When traveling by air, carry your PortaView Plus as hand luggage. At the security check, DO
NOT allow your TDD to go through the X-ray. Ask for visual inspection. DO NOT CHECK IT
AS BAGGAGE.
TROUBLESHOOTING
Q. Sometimes when talking to a friend with an old TDD, I get only numbers and no message.
A. This means that the other unit is in FIGURES mode. Press the [X] key several times. After the
other personal changes from the FIGURES mode to LETTERS mode, try again. It is best not to
end a sentence with the “.” period). Instead, end it with the GA or SK response.
IMPORTANT INFORMATION
Q. Sometimes nothing happens when my TDD is turned ON.
A. Be sure the telephone cord is to your LEFT. Check the AC adapter/charger to make sure it is
properly connected.
Q. The battery runs down very quickly.
A. Exercise the battery often by allowing it to run down completely. Then recharge it overnight.
WARRANTY
Your PortaView Plus is covered for one full year rom the date of purchase against all defects in
materials or workmanship. Please fill out and send in the warranty cards as soon as possible.
REPAIRS
If your PortaView Plus need repair, pack it in the original shipping box along with the
adapter/charger. PLEASE enclose a note describing the problem you are having.
You may send the unit to an authorized repair center to
Krown Manufacturing, Inc. voice: (817) 738-2485
3408 Indale Road TDD: (817) 738-8993
Fort Worth, Texas 76116 fax: (817) 738-1970
29

IMPORTANT INFORMATION (CONT.)
FCC REQUIRED INFORMATION
Your PortaView Plus has been granted a registration number by the Federal Communications
Commission under Part 68 Rules and Regulations for direct connection to the telephone lines. The
FCC requires that you be advised of the requirements involved with owning a telecommunications
device.
1. Connect your PortaView Plus to the nationwide telephone network through a telephone company
provide registered jack.
Your PortaView Plus cannot be plugged into a party line or directly connected to coin telephone
service; you must use the acoustic coupler in these instances.
2. Before connecting your PortaView Plus, the FCC requires that you notify your local phone
company Business Office. Call or write your TDD operator. The phone number and address is in
the front of your phone book.
Your phone company will want to know:
• Your phone number
• Product name: Krown PortaView Plus
• FCC registration number: BG487D-71481-DTE
• Ringer equivalence: 0.4A 0.7B
• Jack: RJII RJI3
The FCC requires that you notify your local telephone company when you move your
phone permanently.
3. Repairs may be made only by Krown Manufacturing or authorized Krown service agencies. This
applies at any time during or after warranty. If such unauthorized repair is performed, registration,
connection to the telephone lines and the remainder of warranty period all become null and void.
4. If your PortaView Plus causes harm to the telephone network, the telephone company may
temporarily discontinue your service. If possible, they will notify your in advance. But if
advanced notice is not practical, you will be notified as soon as possible. You will be given the
opportunity to correct the situation, and you will be informed of your right to file a complaint with
the FCC.
5. Your telephone company may make change in its facilities, equipment, operations or procedures
that could affect the proper functioning of your PortaView Plus. If changes occur, you will be
notified in advance to give you an opportunity to maintain uninterrupted service.
32
30

XII
COMMONLY USED TDD ABBREVIATIONS
Users of TDDs often abbreviate commonly used words or expressions to save time. The following
abbreviations are a sampling of those most frequently used. It is common to omit punctuation.
ANS . . . . . . . . . . Answer R . . . . . . . . . . . . . . . . Are
CUD . . . . . . . . . . . . Could REC. . . . . . . . . . . Receive
GA. . . . . . . . . . Go Ahead SK . . . . . . . . Stop Keying
LTR . . . . . . . . . . . . . Letter THRU . . . . . . . . Through
MSG . . . . . . . . . . Message THX . . . . . . . . Thank You
MIN . . . . . . . . . . . Minute U . . . . . . . . . . . . . . . . You
NITE . . . . . . . . . . . . Night UR . . . . . . . . . . . . . . Your
PLS . . . . . . . . . . . . Please WUD . . . . . . . . . . . Would
QQ . . . . . . . . . . Question XOX . . . . Hugs & Kisses
SPECIAL TTY/TDD OPERATOR SERVICES (800) 833-3232
This special toll free TDD operator number can help you with
• Directory Assistance calls
• Credit card calls
• Collect calls
• Third party telephone calls
• Person to person calls
• Calls from a hotel or motel
• Calls from a coin phone (for collect, third party or credit card calls)
MISCELLANEOUS INFORMATION
The TDD operator can also:
• Reach a number you have a problem getting
• Arrange credit on any misdialed numbers
• Report any problem with your telephone
• Check to see if a TDD is available at the number being dialed
• Tell you what a voice recording says if the number you dialed has an answering machine.
Ask your telephone company for the booklet that tells you how to use TDD/TTY operator services.
31

NOTE
................................................................................................................................................................
................................................................................................................................................................
................................................................................................................................................................
................................................................................................................................................................
................................................................................................................................................................
................................................................................................................................................................
................................................................................................................................................................
................................................................................................................................................................
................................................................................................................................................................
................................................................................................................................................................
................................................................................................................................................................
................................................................................................................................................................
................................................................................................................................................................
................................................................................................................................................................
................................................................................................................................................................
................................................................................................................................................................
................................................................................................................................................................
................................................................................................................................................................
................................................................................................................................................................
................................................................................................................................................................
................................................................................................................................................................
................................................................................................................................................................
................................................................................................................................................................
................................................................................................................................................................
................................................................................................................................................................
................................................................................................................................................................
................................................................................................................................................................
................................................................................................................................................................
................................................................................................................................................................
................................................................................................................................................................
................................................................................................................................................................
................................................................................................................................................................
................................................................................................................................................................
................................................................................................................................................................
................................................................................................................................................................
................................................................................................................................................................
................................................................................................................................................................
................................................................................................................................................................
................................................................................................................................................................
................................................................................................................................................................
................................................................................................................................................................
................................................................................................................................................................
................................................................................................................................................................
................................................................................................................................................................
................................................................................................................................................................
32

3408 Indale Rd. | Fort Worth, TX 76116
Voice: (817) 738-2485
TDD/TTY: (817) 738-8993
Fax: (817) 738-1970
email: info@krowntty.com
ORDERS: 1-(800)-366-9950
www.krowntty.com
 Loading...