

Krown PV20, Portaview PV20 Instructions Manual

MODEL: PV20 JR
INSTRUCTIONS
3rd Edition
4th Edition

TABLE OF CONTENTS
I: Getting started. . . . . . . . . . . . . . . . . . . . . . . . . . . . . . . . . . 2
II: How to make a TTY/TDD call . . . . . . . . . . . . . . . . . . . . . 4
III: How to answer a TTY/TDD call . . . . . . . . . . . . . . . . . . . . 5
IV: Using your PV20JR with wireless phone. . . . . . . . . . . . . . 6
V: TTY/TDD typing abbreviations. . . . . . . . . . . . . . . . . . . . . 9
VI: Use and care of recharge batteries . . . . . . . . . . . . . . . . . 10
VII: Service information. . . . . . . . . . . . . . . . . . . . . . . . . . . . . 12
VIII: Repairs . . . . . . . . . . . . . . . . . . . . . . . . . . . . . . . . . . . . . . 13
IX: Warranty . . . . . . . . . . . . . . . . . . . . . . . . . . . . . . . . . . . . . 13
X: Specifications . . . . . . . . . . . . . . . . . . . . . . . . . . . . . . . . . 13
Portaview PV20 | Instructions | 3rd Edition | July 2002
Krown Manufacturing, Inc.
3408 Indale Rd. | Fort Worth, Texas 76116
voice: (817) 738-2485 | TTY/TDD: (817) 738-8993
fax: (817) 738-1970 | email: info@krowntty.com
www.krowntty.com
4th June 2006
3408 Indale Road, Fort Worth, TX 76116
Voice/VP: (817) 738-2485, TTY: (817) 738-8993
Fax: (817) 738-1970, E-mail: Info@KrownMfg.com www.KrownMfg.com
14
NOTE
.........................................................................................................
.........................................................................................................
.........................................................................................................
.........................................................................................................
.........................................................................................................
.........................................................................................................
.........................................................................................................
.........................................................................................................
.........................................................................................................
.........................................................................................................
.........................................................................................................
.........................................................................................................
.........................................................................................................
.........................................................................................................
.........................................................................................................
.........................................................................................................
.........................................................................................................
.........................................................................................................
.........................................................................................................
.........................................................................................................
.........................................................................................................
.........................................................................................................
.........................................................................................................
.........................................................................................................
.........................................................................................................
.........................................................................................................
.........................................................................................................
.........................................................................................................
.........................................................................................................
.........................................................................................................
.........................................................................................................
.........................................................................................................
.........................................................................................................
.........................................................................................................
.........................................................................................................
.........................................................................................................
.........................................................................................................
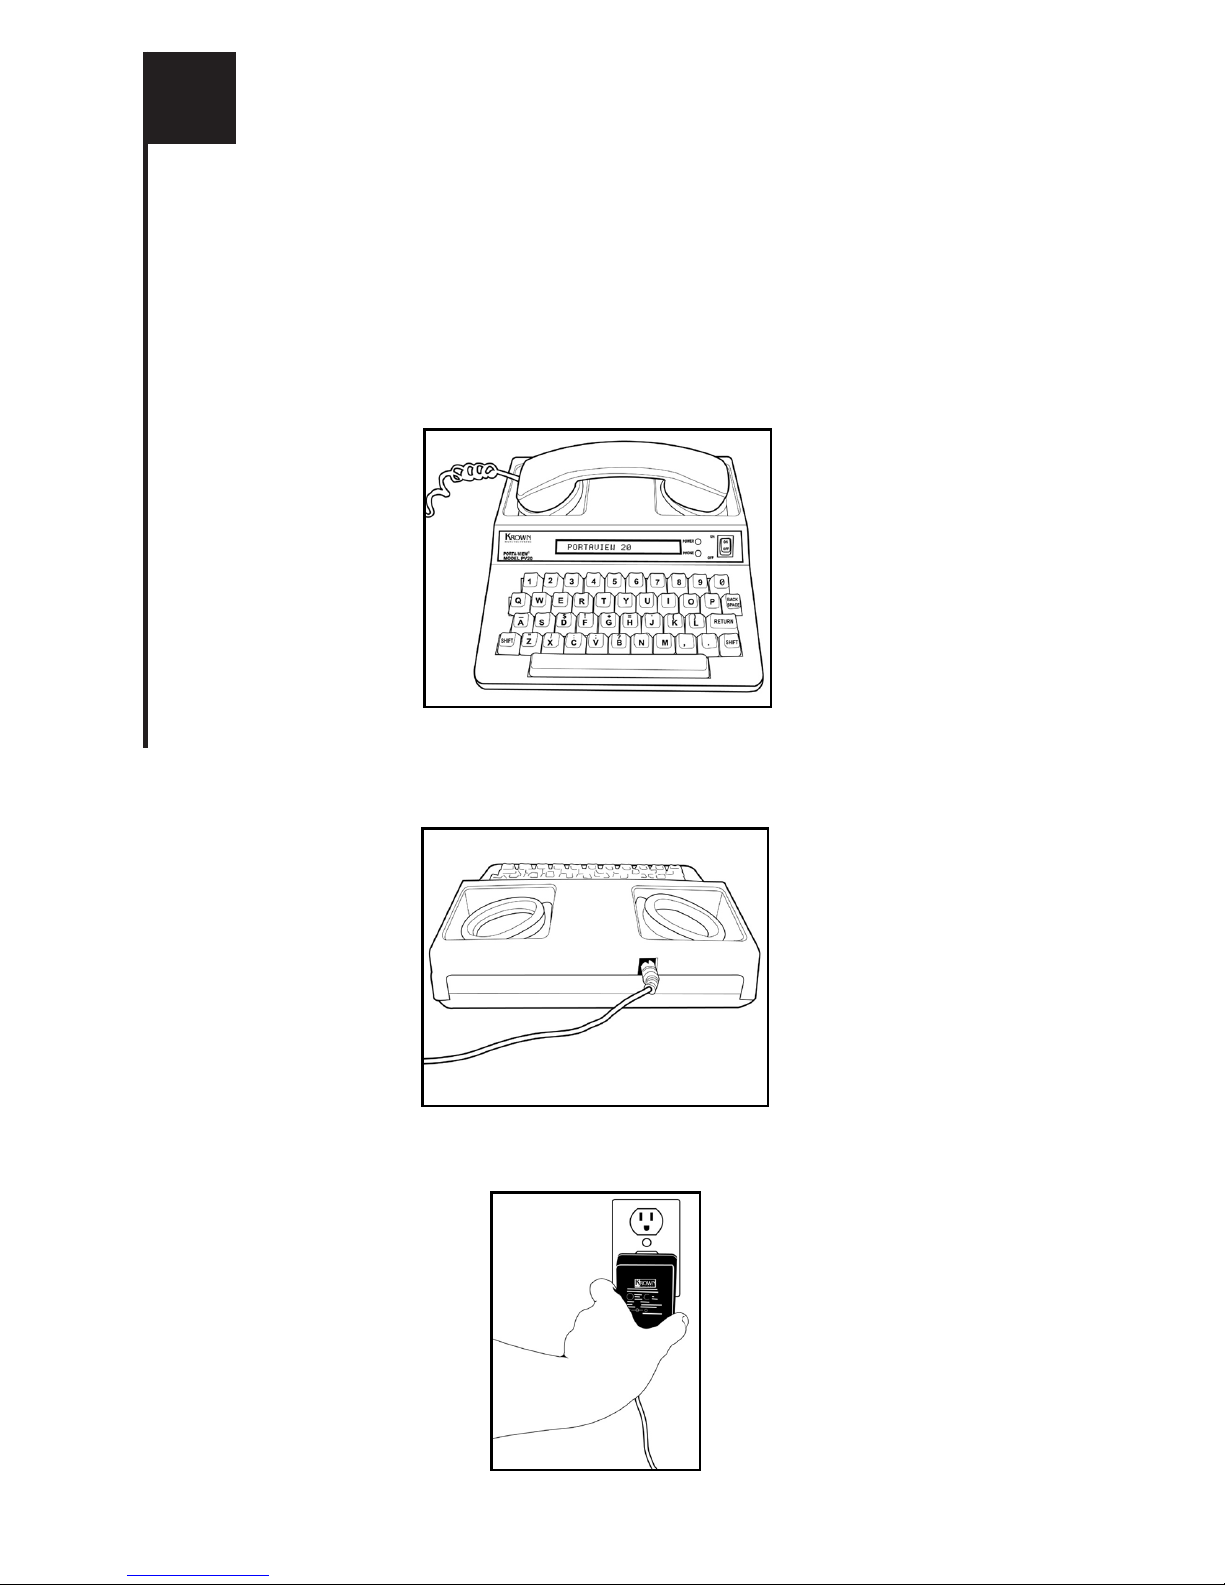
Your new PortaView (PV20) is created by the industry pioneer:
Krown Mfg., Inc. The unit is compact, lightweight, portable and
easy to use. Thereês only a few steps to setup your PV20:
1: Set your PortaView near your telephone and near an electrical
outlet. (see FIG.1)
2: Plug the adapter/charger cord into the jack in back of the
PortaView. (see FIG.2)
3: Plug the adaptor/charger into the electrical outlet. (see FIG.3)
I
GETTING STARTED
FIG.3
FIG.1
FIG.2
2
Plus the adaptor/charger into the electrical outlet. (see FIG.3)

VII
SERVICE INFORMATION
A: HELPFUL HINTS
Ä Be sure to turn o ff your PortaView when not in use.
ÄAvoid exposing your unit to extreme - hot or cold temperatures.
ÄAvoid dropping the unit - It is a delicate electronic instrument.
Ä If you are having trouble sending or receiving messages,
make sure your phone cord is to the left (acoustic mode).
Ä When traveling by a i r, carry your PortaView on as hand
luggage. At the security station, do not allow the unit to be
X-rayed. Ask for a hand inspection instead. DO NOT check in
the unit as baggage.
Ä Be careful not to spill liquids onto the PortaView. Also
protect it from dust and dirt. (Dust Covers are available
from Krown Manufacturing or an authorized distributor. )
Ä Exercise the battery often to ensure years of service.
B: WHAT TO DO IF...
Ä The PortaView wonêt send or receive.
a. Check to make sure the phone cord is to the left
(acoustic mode).
b. If the battery is weak, begin using your adapter/charger.
Ä The battery runs down very quickly.
a. Exercise the battery often by allowing it to run down
completely. Then recharge it overnight.
Ä The unit receives only numbers and figures.
a. Press your çXé key several times to change to letters mode,
then proceed.
12
4: Turn on the PortaView by pushing the on/off switch at the
right of the display. (see FIG.4)
You must let the PV20 charge for 24 hours by leaving the
adaptor plugged in before use. After that, you may choose to
use AC adapter or batteries. A full charged batteries will last
up to 8 hours in use. When you plan to take it with you while
traveling, make sure to charge the battery the night before.
At home, you may keep the adapter plugged in when using the
unit, to make sure you have a strong battery.
To make a call even during a power outage, if it is already
charged, you may turn the unit on by pushing the on/off
switch at the right of the display. (FIG.4) and follow instruction
on secton II with a regular telephone. The battery can last 8
hours if it is fully charaged.
CAUTION!
The adapter/charger is NOT interchangeable.
You MUST use the adapter that comes with your unit.
3
FIG.4
Avoid
Avoid

1: Turn on your PortaView. (see FIG.4)
2: Put the telephone handset into the rubber acoustic cups.
The telephone cord must be on the left. (see FIG.1)
3: Watch the signal light to make sure it glows red steadily .
A steady red glow indicates a dial tone.
If the signal light blinks, press your phone receiver
button to hang up for a few seconds; then release and watch for
a steady red light.
4: Dial the number you want to call.
The signal light lets you know what is happening on the phone
line. If it blinks slowly, the phone is ringing. If it blinks fast, the
line is busy.
5: Wait for the other person to answer you and type GA
(Go Ahead) which is your signal to start typing.
If the signal light flickers, it may be a hearing person answering
by voice. Press the space bar to let the person know it is a
TTY/TDD call.
6: After you respond, type GA to show it is the other
persons turn to type a response.
7: Continue typing back and forth with the other party
remembering to use GA at the end of each statement.
8: When the conversation is finished, type GA TO SK (Go Ahead
if you have more to say; Iêm finished).
9: When both parties type SK (Stop Keying), the conversation
is finished. You can hang up the telephone and turn off
your PortaView.
4
II
HOW TO MAKE A TTY/TDD CALL
I'm
 Loading...