

Kronos 8610K003 User Manual

Kronos InTouch® DX
User Guide
How to use and administer the
Kronos InTouch DX timeclock.
Document Revision: 2

The information in this document is subject to change without notice and should not be construed as a commitment
by Kronos Incorporated. Kronos Incorporated assumes no responsibility for any errors that may appear in this
manual. This document or any part thereof may not be reproduced in any form without the written permission of
Kronos Incorporated. © 2019 Kronos Incorporated. All rights reserved.
Altitude, Altitude Dream, Altitude Pairing, Altitude PBS, CardSaver, Gatekeeper, Gatekeeper Central, Keep.Trac,
Kronos, Kronos InTouch, Kronos Touch ID, the Kronos logo, Kronos Workforce Ready, My Genies, OptiLink,
ShiftLogic, ShopTrac, Timekeeper Central, TimeLink, Unicru, Visionware, Workforce Accruals, Workforce Central,
Workforce Genie, and Workforce TeleTime are registered trademarks of Kronos Incorporated or a related company.
ACA Manager, Altitude BLISS, Altitude Insight, Altitude MPP, Altitude MPPXpress, Altitude Rostering, Altitude VBS,
CMS, Comm.Mgr, CommLink, DKC/Datalink, eDiagnostics, FasTrack, Hireport, HR and Payroll Answerforce,
HyperFind, iBid, Kronos 4500, Kronos 4500 Touch ID, Kronos 4510, Kronos Acquisition, Kronos ByDemand, Kronos
e-Central, Kronos Efficient, Kronos Enterprise Archive, Kronos Essentials, Kronos for Dining Accelerated, Kronos
for Retail Accelerated, Kronos KnowledgePass, Kronos Paragon, Kronos TechKnowledgy, KronosWorks, KVC
ByDemand, KVC OnDemand, Labor Plus, MedSched, MPPXpress, Overall Labor Effectiveness, Schedule
Assistant, Smart Scheduler, Smart View, StaffEasy, Start Quality, Start WIP, Starter Series, StartLabor, Stromberg,
Timekeeper Decisions, Timekeeper Web, VisionPlus, WebStaff, webTA, webTA Mobile, Winstar Elite, WIP Plus,
Workforce Absence Manager, Workforce Acquisition, Workforce Activities, Workforce Analytics, Workforce
Attendance, Workforce Auditor, Workforce Budgeting, Workforce Central Portal, Workforce Connect, Workforce
Device Manager, Workforce Dimensions, Workforce Employee, Workforce ESP, Workforce Forecast Manager,
Workforce HR, Workforce Innovation That Works, Workforce Institute, Workforce Integration Manager, Workforce
IntegrityScreen, Workforce Leave, Workforce Manager, Workforce Mobile, Workforce MobileTime, Workforce
Operations Planner, Workforce Payroll, Workforce Record Manager, Workforce Recruiter, Workforce Scheduler,
Workforce Scheduler with Optimization, Workforce Selection, Workforce Smart Scheduler, Workforce Sourcing
Analytics, Workforce Tablet, Workforce Tablet Analytics, Workforce Talent Acquisition, Workforce Task Management,
Workforce Tax Filing, Workforce TeleStaff, Workforce TeleTime IP, Workforce Timekeeper, Workforce View, and
Workforce Worksheet are trademarks of Kronos Incorporated or a related company.
For a complete list of Kronos trademarks, please visit the "trademarks" page at www.kronos.com. The source code
for Equinox is available for free download at www.eclipse.org. All other trademarks or registered trademarks used
herein are the property of their respective owners and are used for identification purposes only. All specifications are
subject to change.
When using and applying the information generated by Kronos products, customers should ensure that they comply
with the applicable requirements of all applicable law, including federal and state law, such as the Fair Labor
Standards Act. Nothing in this Guide shall be construed as an assurance or guaranty that Kronos products comply
with any such laws.
FCC Notice (for U.S. Customers)—This device complies with Part 15 of the FCC Rules. Operation is subject to the
following conditions: (1) This device may not cause harmful interference, and (2) This device must accept any
interference received, including interference that may cause undesired operation. Changes and modifications not
expressly approved by Kronos Incorporated can void your authority to operate this equipment under Federal
Communications Commissions rules.
Canadian DOC Compliance—This device complies with Industry Cana
Operation is subject to the following two conditions: (1) this device may not cause interference, and (2) this device
must accept any interference, including interference that may cause undesired operation of the device. Le présent
appareil est conforme aux CNR d'Industrie Canada applicables aux appareils radio exempts de licence.
L'exploitation est autorisée aux deux conditions suivantes : (1) l'appareil ne doit pas produire de brouillage, et (2)
l'utilisateur de l'appareil doit accepter tout brouillage radioélectrique subi, même si le brouillage est susceptible d'en
compromettre le fonctionnement.
EN 55022 (CISPR 32) - This product is a Class A product. In a domestic environment, it may cause radio
interference in which case the user may be required to take adequate measures.
da license-exempt RSS standard(s).

RoHS Directive—This data collection device and all hardware options currently qualified to work with this device
are designed in accordance with the restricted substance requirements of Directive 2002/95/EC and 2011/65/EU of
the European Parliament and of the Council of the European Union, including Commission Delegated Directive
(EU) 2015/863 amending Annex II of the Directive. The RoHS directive prohibits the sale of electronic equipment
containing certain hazardous substances such as Cadmium (Cd), lead (Pb), mercury (Hg), hexavalent chromium
(Cr VI), polybrominated biphenyls (PBB), polybrominated diphenyl ethers (PBDE), bis(2-ethylhexyl) phthalate
(DEHP), benzyl butyl phthalate (BBP), dibutyl phthalate (DBP), and diisobutyl phthalate (DIBP) in the European
Union. The manufacturer has a program in place to address the requirements of the RoHS Directive in respect to
the various categories of electronic products.
Published by Kronos Incorporated
900 Chelmsford Street, Lowell, Massachusetts 01851 USA
Kronos Incorporated Global Support: 1-800-394-HELP (1-800-394-4357)
Phone: 978-250-9800, Fax: 978-367-5900
For links to information about international subsidiaries of Kronos Incorporated, go to
Revision Release Date
1 August 2019
2 August 2019
http://www.kronos.com
Document Revision History


Contents
Chapter 1: Overview
Introduction ................................................................................................. 12
How InTouch DX works ............................................................................. 13
How the timeclock operates with the host application ......................... 13
Cross-punching ..................................................................................... 13
Modes of operation ............................................................................... 14
InTouch DX features ................................................................................... 15
Schedule enforcement ...........................................................................15
Default transactions ..............................................................................15
Transaction persistence ......................................................................... 16
Soft key schedules ................................................................................. 17
Language support .................................................................................. 17
Badges ......................................................................................................... 19
Integrated badge readers .......................................................................19
Remote badge readers ...........................................................................21
Navigation ...................................................................................................22
Gesture support ..................................................................................... 22
Home page ............................................................................................ 22
Home and Menu keys ........................................................................... 24
Alphanumeric keypad ........................................................................... 25
Calendar ................................................................................................ 26
Customize the user interface .......................................................................28
Logo ...................................................................................................... 28
Screen saver .......................................................................................... 28
Scrolling messages ................................................................................28
Employee photos ................................................................................... 28
Chapter 2: Employee Mode Transactions
Introduction ................................................................................................. 30

Contents
Access your employee home page ...............................................................31
Community home page ..........................................................................31
Individual home page ............................................................................32
Smart Landing .......................................................................................33
Biometric scanning ................................................................................33
Standard transactions ...................................................................................35
Add Missed Punch .................................................................................36
Add Transfer ..........................................................................................36
Edit Paycode ..........................................................................................37
Enter Gate ..............................................................................................39
Enter Tips ..............................................................................................39
Request Time-Off ..................................................................................40
Review Punches .....................................................................................41
Review Timecard ...................................................................................41
View Attendance Balance .....................................................................42
View Punch Status .................................................................................43
Smart View transactions ...............................................................................44
Edit Paycode (Smart View) ...................................................................45
Message Center (Smart View) ...............................................................46
Move Paycode (Smart View) .................................................................48
Request Open Shift (Smart View) .........................................................49
Request Shift Swap (Smart View) .........................................................50
Respond to Shift Swap Request (Smart View) ......................................51
View Accruals (Smart View) .................................................................51
View My Time (Smart View) ................................................................52
View Schedule (Smart View) ................................................................54
View Timecard (Smart View) ...............................................................55
View Totals (Smart View) .....................................................................55
Chapter 3: Manager Mode Transactions
Introduction ..................................................................................................58
Access manager mode ..................................................................................59
Community home page .......................................................................59
Individual home page ..........................................................................60
Biometric transactions: Kronos Touch ID Plus ............................................61
6

Contents
Templates .............................................................................................. 61
Terminology .......................................................................................... 62
Enroll or Re-Enroll Employee .............................................................. 65
Unenroll Employee ............................................................................... 73
Standard transactions ...................................................................................75
Add Punch ............................................................................................. 75
Delete Punch ......................................................................................... 76
Manage Bell .......................................................................................... 77
Manage Gate ......................................................................................... 79
Override Global Home .......................................................................... 81
Override Global Non-Home ................................................................. 82
Override Single Home Employee Restriction ....................................... 83
Override Single Non-Home Employee Restriction .............................. 84
Override Schedule ................................................................................. 85
View Biometric Template Reports ....................................................... 87
View Employee Information ................................................................. 88
View On or Off Premises Employees ................................................... 89
Chapter 4: Maintenance Mode Functions
Introduction ................................................................................................. 92
Initial setup and configuration ..................................................................... 93
Launch Quick Setup .................................................................................... 94
Step 1: Pick Language ..........................................................................94
Step 2: Maintenance Mode Password ................................................... 94
Step 3: Add Device ID .......................................................................... 95
Step 4: Select Network .......................................................................... 95
Step 5: Connect to Server .....................................................................97
Complete the setup ................................................................................ 97
Access maintenance mode ........................................................................... 99
Use a Maintenance badge ..................................................................... 99
Use the tools menu ..............................................................................100
Use the maintenance mode button ...................................................... 100
Maintenance mode functions ..................................................................... 104
Edit Settings ...............................................................................................105
General Communication ..................................................................... 105
7

Contents
Connect to Network .............................................................................108
Date and Time .....................................................................................111
Audio ...................................................................................................111
Display .................................................................................................112
VNC Remote Access ...........................................................................112
SSH Remote Access ............................................................................113
Bar Code Symbology ..........................................................................114
Remote Readers ...................................................................................114
Strong Passwords .................................................................................115
Edit Advanced Settings ..............................................................................116
Failure Override ...................................................................................116
Employee Enroll Count .......................................................................116
Restart Device .....................................................................................117
Change Maintenance Mode Password .................................................117
Change Database Password .................................................................118
Factory Defaults ..................................................................................118
Delete All Punches ..............................................................................119
Delete All Offline Data .......................................................................119
Biometric Verification .........................................................................119
Configure Smartcard Reader ...............................................................120
View Reports ..............................................................................................121
Software ...............................................................................................121
File System ..........................................................................................121
Database ..............................................................................................122
Hardware .............................................................................................122
Communication Settings .....................................................................122
Network ...............................................................................................123
Device Status .......................................................................................123
Memory ...............................................................................................124
Ethernet ................................................................................................124
Readers ................................................................................................124
Biometric .............................................................................................125
Biometric Templates ...........................................................................126
Diagnostics ..........................................................................................126
8

Contents
Run Tests ................................................................................................... 127
Sequential ............................................................................................ 127
Communications ................................................................................. 127
Integrated Badge ................................................................................. 128
Display ................................................................................................ 129
Tone .................................................................................................... 129
LED ..................................................................................................... 129
GPIO Output Bits ................................................................................ 130
Monitor GPIO Inputs .......................................................................... 130
Microphone ......................................................................................... 130
Remote Badge ..................................................................................... 130
Network Connectivity ......................................................................... 131
9

Contents
10

Chapter 1
Overview
Note: If you are configuring the Kronos InTouch DX for the first time, go to
“Initial setup and configuration” on page 93.

Chapter 1 Overview
Introduction
The InTouch DX is a data collection device that communicates with the Kronos
host applications. The timeclock collects information that employees enter using a
badge reader, biometric device, or keypad. The host application software collects
data from the timeclocks to track and process labor-related data, generate
management reports, and transfer information to the payroll service.
The InTouch DX does the following:
• Enforces schedules, by controlling when specific employees can swipe in and
swipe out for shifts, meals, and breaks.
• Displays accrued vacation, sick time, and messages to individual employees
(depending on the host application).
• Enables users to perform transactions such as labor category transfers,
paycode transactions, and Smart View transactions. Smart View transactions
allow users to access and interact with current information that is not resident
at the device.
Note: This documentation refers to transactions by their default names. Your
administrator can change these names to conform with your business practices.
12

How InTouch DX works
How InTouch DX works
How the timeclock operates with the host application
Administrators: Use the host application to configure employees and
information such as schedules, punch restrictions, and labor categories. The host
application downloads this information to the timeclock, which uses it to accept or
restrict employee punches.
When employees swipe their badges at the timeclock, the punch information is
stored in the timeclock database. The host application collects the stored data and
totals the hours, computes overtime, calculates wages, tracks labor, and generates
reports. In Workforce Dimensions, use
which transactions users can perform, and to monitor the data that the host
application and device exchange.
Note: The device configuration instructions in this document assume that you are
using Workforce Dimensions as the host application.
the Device Configuration page to define
The device supports SSL encryption so that sensitive information about
employees and their timecards is protected on the Internet.
Cross-punching
Cross-punching allows employees (referred to as non-home employees) to punch
at a timeclock to which they are not assigned.
Administrators: To enable the cross-punching feature for a device, access the
Device Configuration page, choose Transaction Settings, and select Allow non-
home employees.
13

Chapter 1 Overview
Modes of operation
InTouch DX operates in three modes:
•Employee
• Manager
• Maintenance
Each mode has its own set of transactions, depending on how the host application
is configured. To access a mode, authorized users can swipe a badge or use other
methods, as described in this document.
Employee mode
The device most often operates in employee mode. It accepts punch data that
employees enter using a badge reader or the touch screen.
Manager mode
Manager mode allows authorized users to perform tasks such as editing employee
punches, adding missed employee punches, and viewing employee information.
Maintenance mode
Maintenance mode allows authorized users to display technical information about
the device, execute diagnostic tests, and define configuration settings.
14

InTouch DX features
Schedule enforcement
Administrators: To configure devices to validate employee punches against their
schedules, use the host application. The punch rules contain a setting that enables
schedule enforcement. You can tailor the complexity of schedule enforcement to
meet your business needs. Depending on your system configuration, the devices
can do the following:
• Limit how early and late employees can punch in or punch out.
• Enable managers to perform punches for employees, and to override punch
restrictions for employees.
• Prevent employees from punching in when they are not scheduled.
• Enforce meal and break schedules for employees, including minors, to satisfy
state and federal labor laws.
To configure a full array of punch restrictions for the device, see the online help
for the host application.
InTouch DX features
Default transactions
Administrators: You can use the device configuration settings to set up default
transactions for InTouch DX users. When an employee swipes a badge or enters a
badge ID, the timeclock automatically initiates the transaction that you designate
as the default. Default transactions include punches, labor category transfers, job
transfers, and so on. If you can assign a transaction to a soft key, you can assign it
to a badge swipe or badge ID entry as a default transaction.
You can assign default transactions to home and non-home employees, and to local
and remote readers. If you assign a default transaction to an internal reader, it also
applies to the external reader.
15

Chapter 1 Overview
When the default transaction for a home employee’s badge swipe is a punch, you
can assign a different default transaction for a badge ID entry. For example, if a
group of home employees routinely change job assignments when they start a
shift, you can set the default transaction to a Job Transfer for a start-of-shift badge
read.
The types of default transactions are:
• Home employee default
• Home employee shift start
• Home employee IN during shift
• Home employee shift end
• Non-home employee default
Transaction persistence
An administrator can configure the host application to repeatedly apply an
employee’s paycode edits and transfers to the employee’s record, for each
scheduled work day. The transaction persists until the employee or manager (on
the employee’s behalf) performs a punch, edit, or transfer—at the device or using
the host application. The repeating transaction generates amounts (for paycode
edits) or punches (for transfers), based on the employee’s daily schedule.
16
A paycode edit is persistent when both of the following are true:
• The employee is assigned to a schedule.
• The host application is configured to repeat the paycode edit on days that the
employee works.
A labor category transfer or work rule transfer is persistent when both of the
following are true:
• The employee is assigned to a schedule.
• The employee’s assigned pay rule is configured to repeat labor category
transfers or work rule transfers on days that the employee works.

If the host application automatically generates punches based on an employee’s
schedule, and a persistent transaction is in effect for that employee, the persistent
transaction takes precedence.
Soft key schedules
Administrators: You can use the device configuration settings to create soft key
schedules, during which certain device transactions are not available to
employees. For example, during periods when many employees punch in or punch
out, you can de-activate the View Totals or View Schedule soft keys. Each soft
key schedule can contain up to eight time intervals for each day of the week.
Language support
The InTouch DX includes pre-installed, translated versions of the user interface
and error messages. The device currently supports the following languages:
• Chinese (Simplified)
InTouch DX features
• Chinese (Traditional)
• Czech
•Danish
•Dutch
• English (G.B.)
• English (U.S)
• French (France)
• French (Canada)
•German
•Hindi
• Italian
• Japanese
• Korean
17

Chapter 1 Overview
• Polish
• Portuguese (Brazil)
• Spanish (Mexico)
• Spanish (Universal)
Administrators: You can translate the user interface into other languages, or
customize the text in any of the supported languages. For details, see the Guide to
Translating and Customizing the InTouch DX Interface.
Multi-language support
Administrators: The timeclock can display the interface in one or more of the
supported interface languages. To choose the languages, and to designate one of
them as the default interface language, access the Device Configuration page, and
select Languages.
Employees: To perform a transaction in a different language, select a language
from the language bar. The home page and the subsequent transaction pages
appear in the selected language. Complete and submit the transaction. The
Employee home page reappears and reverts to the default language.
18
Note: When a user who is in manager mode or maintenance mode chooses a
different language, it remains in effect for all transactions during the current logon
session—unless the user selects another language.
Badges
Integrated badge readers
The InTouch DX is equipped with one of the following integrated badge readers:
•HID
• Smart card: MIFARE/DESFire, iCLASS, or FIPS 201
•Bar code
• Magnetic stripe
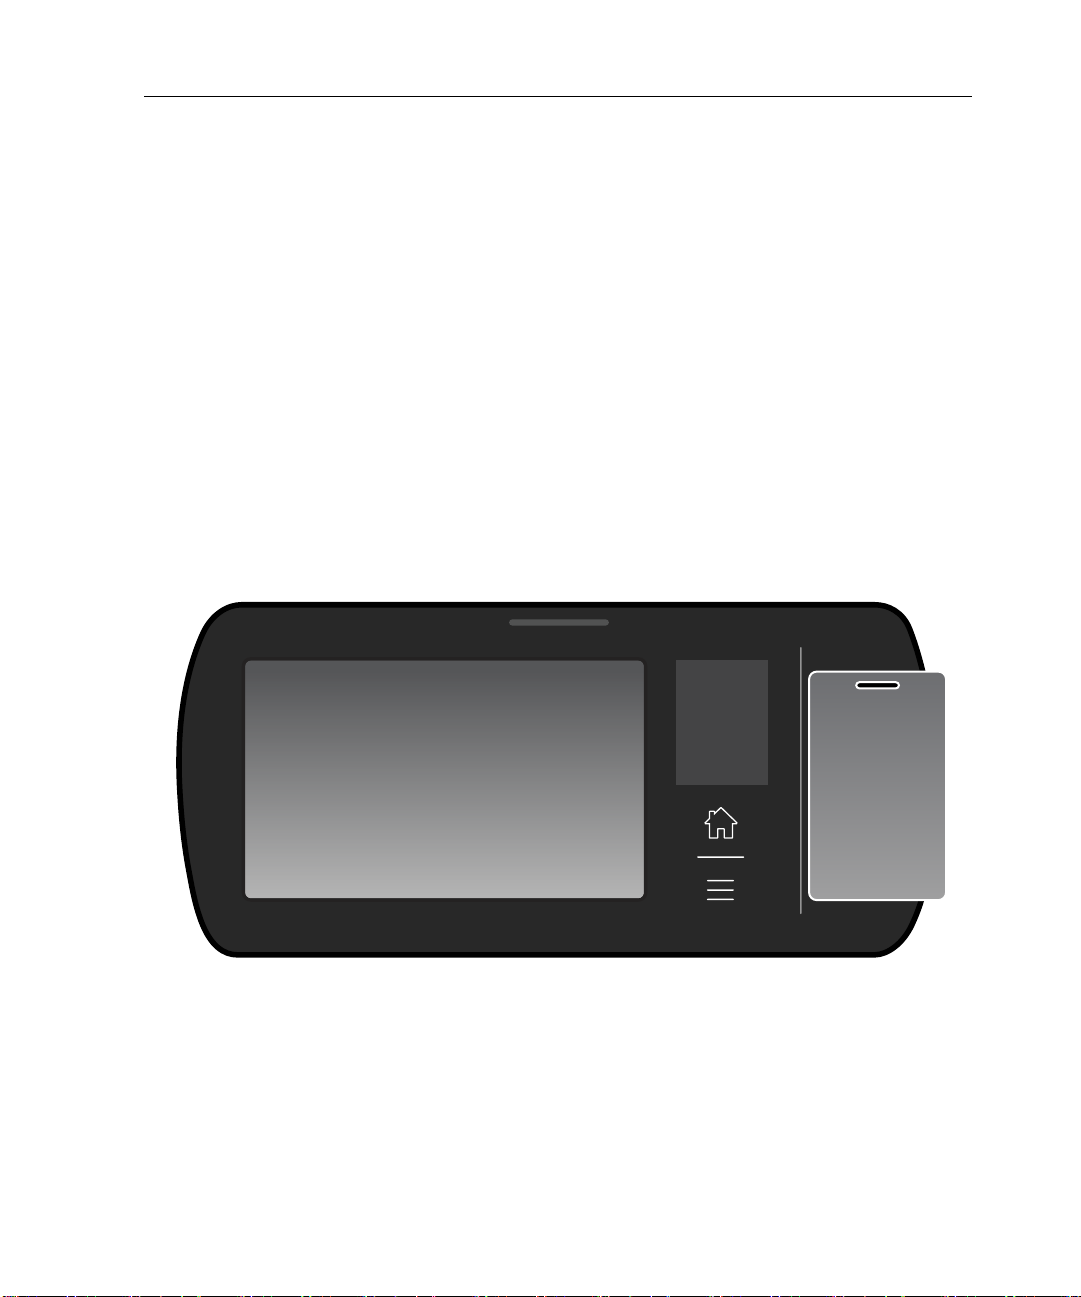
If the timeclock is equipped with a proximity or smart card reader, hold the badge
within one inch of the timeclock, as shown in the following illustration.
®
Prox
Badges
If the device is equipped with a bar code reader or a magnetic stripe reader, swipe
the badge through the reader to perform transactions.
If the device reads the badge successfully, the LED flashes green, and the speaker
emits a tone. If the badge read is unsuccessful, the LED flashes red, the speaker
19

Chapter 1 Overview
emits a different tone, and an error message appears on the screen. Wait until the
message times out or tap the X to close the message. Then re-attempt the badge
read.
FIPS PIV cards
The InTouch DX can read an employee badge number from a FIPS 201 PIV card,
which is a type of smart card issued by the US Federal Government.
As with any non-Kronos-provided credential, contact your Kronos Representative
to evaluate the credential’s compatibility, and to determine the configuration
requirements for reading the appropriate data from the card. After configuration is
completed, you use FIPS 201 PIV cards at the InTouch DX in the same way that
you use other smart cards and proximity cards.
Note: The FIPS 201 PIV card takes slightly longer to be read than most smart
cards, but typically within 1-3 seconds of when you position it.
FIPS 201 PIV card support requires:
20
• InTouch v2.1.0 or later firmware.
• InTouch H3 or later version hardware, with integrated smart card reader.]
There are a variety of US Government-issued credentials that may be (correctly or
incorrectly) referred to as FIPS or PIV cards. The FIPS 201 PIV card supports a
multitude of data elements, but only a portion of them are used by the InTouch
DX to determine the employee badge ID. The technical details of InTouch DX
support for FIPS 201 PIV cards follow.
• Card Type: FIPS 201 PIV Contactless Smart Card.
• Card Data Read: Card Holder Unique Identifier (CHUID) plus the card
expiration date, sometimes referred to as GSA 75 bit format.
• Card Data Used: The InTouch uses the 4-digit Agency Code + 4-digit + 6digit credential number as a 14-digit employee badge number.
Note: The InTouch DX does not use the card expiration date or any other data
on the PIV card.

Federal Government-related card types not supported by the integrated smart card
reader in the InTouch DX include, but are not limited to:
• PIV-I Cards (Personal Identify Verification - Interoperable).
• CIV (Commercial Identity Verification).
• CAC (Common Access Card).
• TWIC (Transportation Worker Identification Credential).
Also, the InTouch DX does not support reading or using additional data from PIV
cards, including:
• Personal Identification Number (PIN) for multi-factor authentication.
• Biometric data for multi-factor identification.
• Global Unique Identifier (GUID).
Remote badge readers
Remote or external readers (for example, Wiegand Proximity) are available, as an
option. For more information, see your Kronos Representative.
Badges
21

Chapter 1 Overview
Navigation
Gesture support
Select
To select an item (for example, a labor category) from a list, press the item with
one finger for at least one second. Release your finger to complete the action. If
you cannot view an item’s description in its entirety (for example, the location
transfer set Hospital A/Nursery/RN1), press and hold the item until all of the text
appears.
Scroll
If a list of items (such as work orders) is too long to be viewed in its entirety, the
interface uses arrows and scroll bars to signify that users can scroll through the
list.
To scroll vertically through a list, press the screen with a single finger and swipe
up or down. You do not have to place your finger on the arrows or scroll bar.
Alternatively, you can tap the arrows to scroll through the items.
To scroll horizontally through a group of items (such as the soft keys on the home
page), press the screen with a single finger and swipe right or left. You do not
have to place your finger on the arrows. Alternatively, you can tap the arrows to
scroll through the items.
Home page
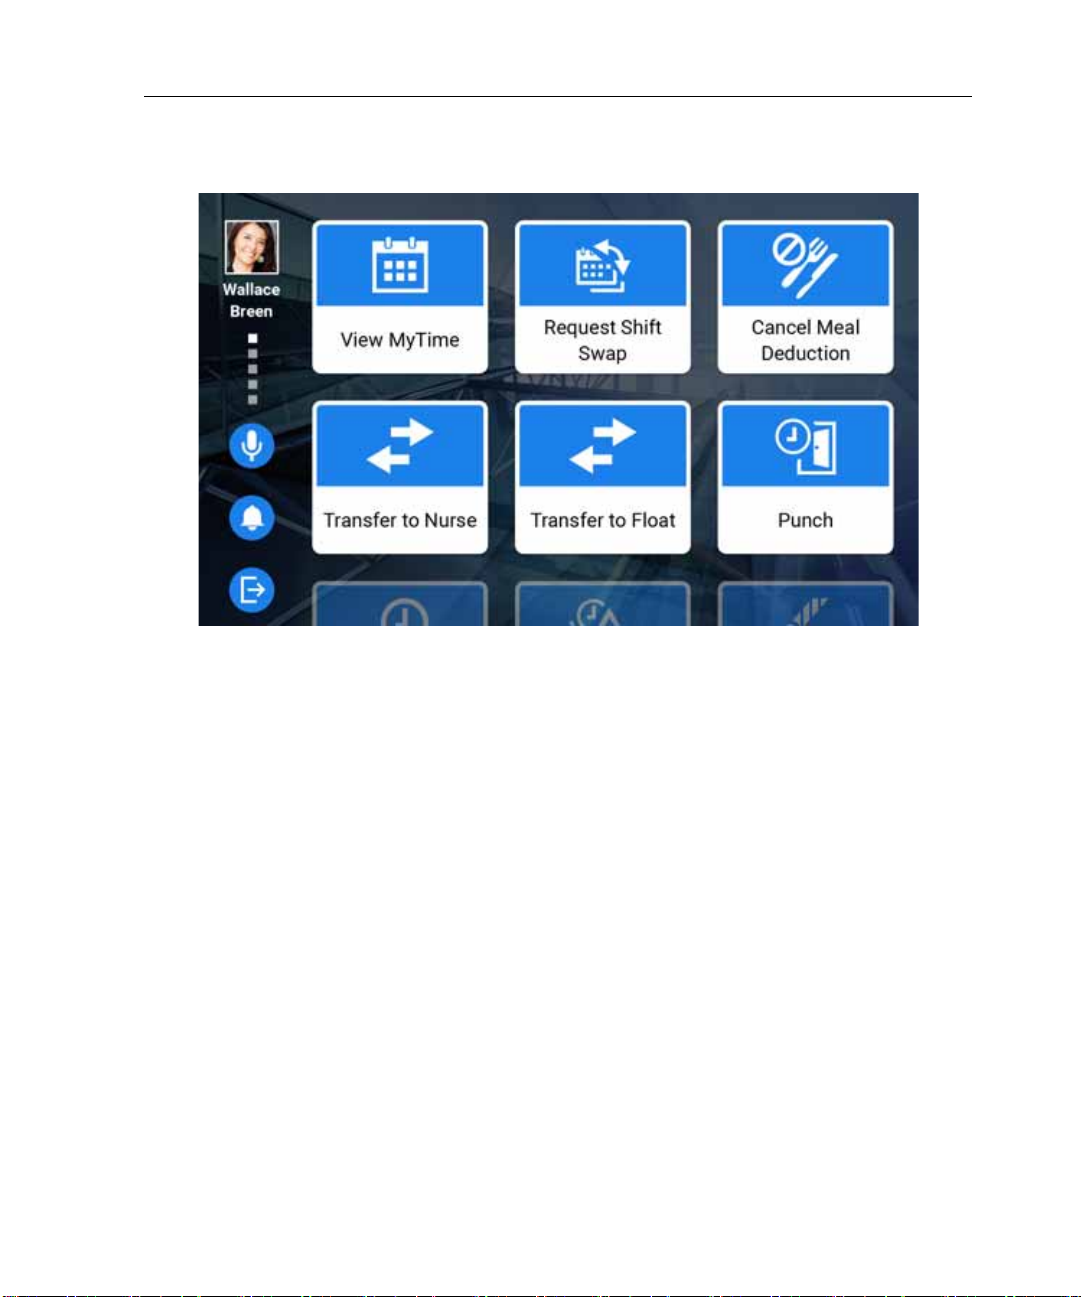
The following illustration is an example of the employee home page.
Administrators: You can configure the employee or manager home page to
display only the date and time. In addition, you can configure the size and shape of
the soft keys, how they are labeled, and the number of them that appear on each
page. For more information, see the device configuration online help.
22
Navigation
23

Chapter 1 Overview
Home and Menu keys
24
The front of the timeclock contains two keys. The Home key returns users to the
respective employee mode, manager mode, or maintenance mode home page. The
Menu key (below the Home key) allows authorized users to access the following:
• Maintenance Mode: Opens the maintenance mode home page.
• Clean Touchscreen: See “Clean the touchscreen” on page 149.
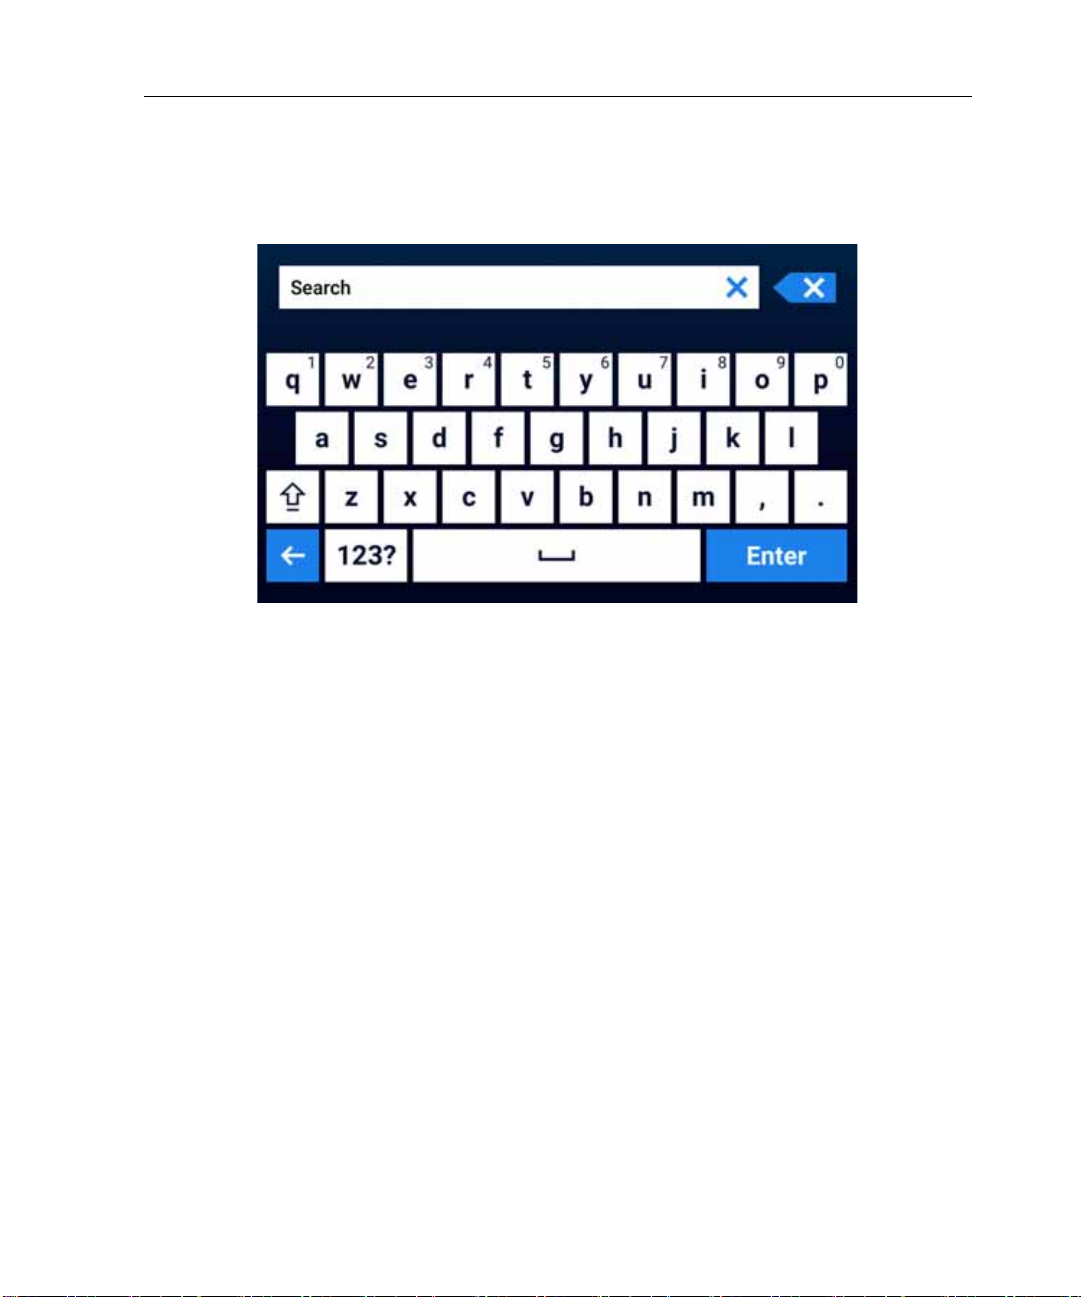
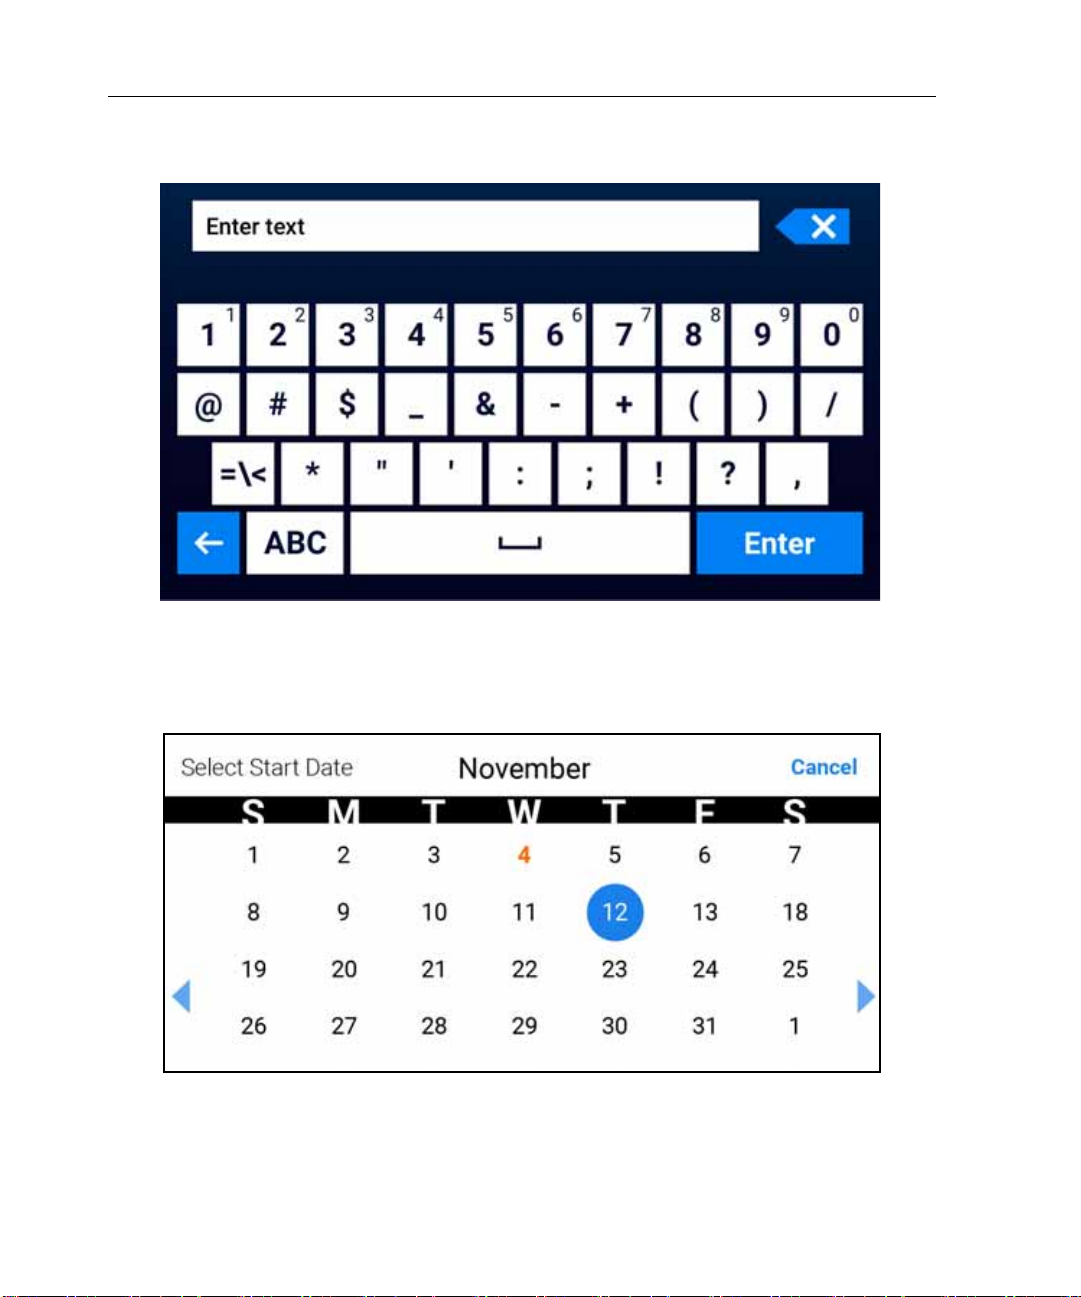
Alphanumeric keypad
Interface standards:
Navigation
• The “X” in the text box clears your entire entry.
• The “X” on far right is the Backspace key.
• To close the keypad without saving, tap the Back icon.
•The 123? key toggles between the alphabetic and numeric keypads.
25
Chapter 1 Overview
Calendar
26

Interface standards:
• The selected date is orange.
• The calendar defaults to the current date, which is in a blue circle.
• The horizontal arrows allow you to scroll through the months.
Navigation
27

Chapter 1 Overview
Customize the user interface
For details about performing these tasks, see the device configuration online help.
Logo
Administrators: Use the device configuration settings to add your company logo
to the home page. First, import your company logo to the device. Access the
Device Configuration page, open the Main Menu, and select Manage Imports >
Logo File. Then, add your logo by selecting General Settings > Logo.
Screen saver
Administrators: Use the device configuration settings to add a screen saver URL
to the timeclock.
To configure the URL and the wait time, access the Device Configuration page,
and select General Settings > Display.
Scrolling messages
Administrators: Use the device configuration settings to configure one or two
messages to periodically appear at the bottom of the page.
Access the Device Configuration page, and select General Settings > Display.
Specify a primary message, alternate message, and the language in which they
appear.
Employee photos
Administrators: Use the device configuration settings to add employee photos to
the confirmation pages that appear after many InTouch transactions. Only home
employee photos can appear on timeclocks.
Access the Device Configuration page, and select Download Option
28

Chapter 2
Employee Mode T ransactions

Chapter 2 Employee Mode Transactions
Introduction
Employee mode enables you to perform activities such as punching in, requesting
time off, or viewing your schedule. When the InTouch DX is in employee mode
(the default mode), you initiate a transaction by tapping the appropriate soft key.
The following sections describe how to perform employee mode transactions.
30
 Loading...