

Page 1
2.1.2 Edition 04.10
F
NL
I
E
D GB F NL I E
TR CZ PL RUS H
DK S N P GR
➔ www.docuthek.com
Operating instructions
Safety shut-off valve JSAV
Translation from the German
© 2008 – 2010 Elster GmbH
Contents
Safety shut-off valve JSAV . . . . . . . . . . . . . . . 1
Contents . . . . . . . . . . . . . . . . . . . . . . . . . . . . . . 1
Safety. . . . . . . . . . . . . . . . . . . . . . . . . . . . . . . . . 1
Checking the usage . . . . . . . . . . . . . . . . . . . . . 2
Type code. . . . . . . . . . . . . . . . . . . . . . . . . . . . . . 2
Part designations. . . . . . . . . . . . . . . . . . . . . . . . 2
Type label . . . . . . . . . . . . . . . . . . . . . . . . . . . . . . 2
Installation . . . . . . . . . . . . . . . . . . . . . . . . . . . .
Connecting the impulse line . . . . . . . . . . . . . .
Tightness test. . . . . . . . . . . . . . . . . . . . . . . . . . 4
Checking the function . . . . . . . . . . . . . . . . . . . 4
Checking the switching pressure p
Checking the tightness of the valve disc. . . . . . . 4
Setting the switching pressure p
Replacing the spring . . . . . . . . . . . . . . . . . . . . 5
Resetting. . . . . . . . . . . . . . . . . . . . . . . . . . . . . . 5
Replacing the measuring unit. . . . . . . . . . . . . 6
Replacing the valve disc . . . . . . . . . . . . . . . . . 7
Maintenance. . . . . . . . . . . . . . . . . . . . . . . . . . . 9
Technical data. . . . . . . . . . . . . . . . . . . . . . . . . . 9
Service life . . . . . . . . . . . . . . . . . . . . . . . . . . . . . 9
Declaration of conformity . . . . . . . . . . . . . . . 10
. . . . . . . . . 4
so
. . . . . . . . 5
so
Safety
Please read and keep in a safe place
Please read through these instructions
carefully before installing or operating. Following the installation, pass the instructions on to the
operator. These instructions can also be found at
www.docuthek.com.
Explanation of symbols
• , 1 , 2 , ... = Action
= Instruction
Liability
We will not be held liable for damages resulting
from non-observance of the instructions and noncompliant use.
Safety instructions
Information that is relevant for safety is indicated in
the instructions as follows:
DANGER
Indicates potentially fatal situations.
WARNING
Indicates possible danger to life and limb.
CAUTION
Indicates possible material damage.
All interventions may only be carried out by qualified
gas technicians. Electrical interventions may only be
carried out by qualified electricians.
Conversion, spare parts
All technical changes are prohibited. Only use OEM
spare parts.
Transport
On receipt of the product, check that the delivery is
complete (see Part designations). Report any transport damage immediately.
Storage
Store the product in a dry place. Ambient temperature: see Technical data.
GB
GB-1
Page 2
F
NL
I
E
Checking the usage
JSAV
Safety shut-off valve for securing downstream fittings
against excess gas pressure.
This function is only guaranteed when used within the
specified limits – see [Technical data – p.9].
Any other use is considered as non-compliant.
Type code
Code Description
JSAV Safety shut-off valve
25 – 100 Nominal size
R
N
GB
F
A
40 Inlet pressure p
0
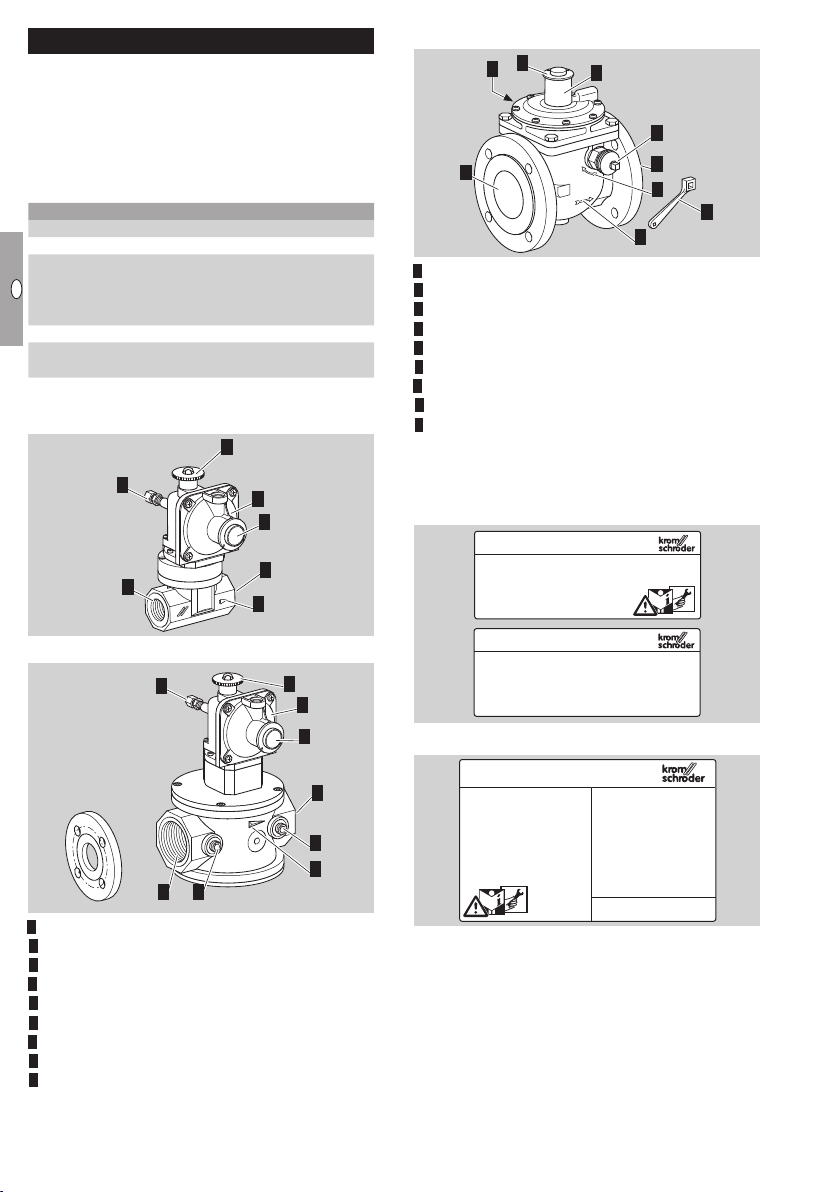
Part designations
JSAV 25
Rp internal thread to ISO 7-1
NPT internal thread
Flange to ISO 7005
ANSI flange
= 4 bar (58 psig)
e max.
Without pressure test point
Screw plug at the inlet and outlet
3
4
1
2
6
5
7
JSAV 50 – 100
2
3
1
7
4
5
8
9
6
1 Measuring unit
2 Breather screw plug
Impulse line connection
4 Inlet
5 Outlet
6 Arrow of direction of flow
7 Reset
8 Arrow of direction of reset
9 Reset lever
Type label
Max. inlet pressure, switching pressure pso, ambient
temperature: see type label.
JSAV 25 – 40
D-49018 Osnabrück, Germany
JSAV
JSAV 40
4
5
8
1 Measuring unit
2 Breather screw plug
Reset cap
4 Impulse line connection
5 Inlet
6 Outlet
7 Arrow of direction of flow
8 Inlet p
9 Outlet p
measuring connection
e
measuring connection
a
D-49018 Osnabrück, Germany
Who:
:
P
3
1
2
JSAV 50 – 100
6
so
AGo: +/- 10%
Sitz:
D-49018 Osnabrück, Germany
JSAV
9
7
p
:
e
P
max:
u
Wh
:
o
P
:
so
AGo: +/- 10%
TS=
GB-2
Page 3
F
NL
I
E
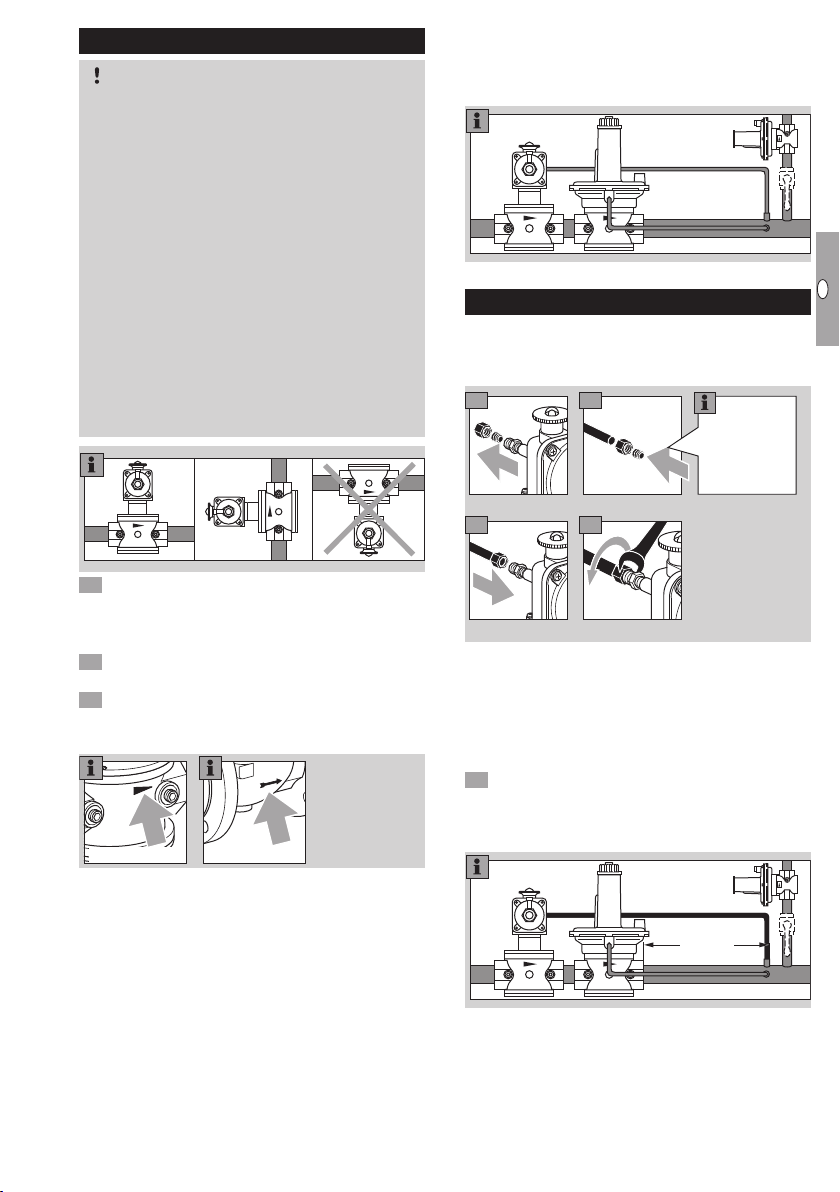
Installation
21
CAUTION
Please observe the following to ensure that the
JSAV is not damaged during installation:
– Sealing material, cuttings and other impurities
must not be allowed to get into the housing.
– We recommend installing a filter upstream of the
JSAV, in order to protect it against impurities in
the pipe.
– The installation location must be dry. Do not
store or install the JSAV in the open air.
– Install the JSAV in the pipe free of mechanical
stress.
– Do not clamp the unit in a vice or use it as a
lever. On the JSAV..R, only secure the valve by
holding the octagon at the inlet or outlet with a
suitable spanner. Risk of external leakage.
– Max. inlet pressure p
– Installation in the vertical or horizontal position,
never upside down.
1 The housing must not be in contact with masonry.
Minimum clearance 20 mm (0.78"). Ensure that
there is sufficient space for installation and adjustment.
2 JSAV..R: seal pipe with approved sealing material.
JSAV..F: insert seal between pipe and unit.
Remove screw caps or adhesive foil from the inlet
and outlet on the JSAV.
Note direction of flow.
JSAV 25 – 40 JSAV 50 –100
We recommend installing a manual valve AKT25
in the pipe leading to the safety relief valve
VSBV25, so that the annual function check of
the safety shut-off valve JSAV can be carried out
without having to remove it.
4bar (58 psig).
e max.
To prevent the VSBV from being unintentionally
shut off, we recommend removing the manual
valve lever after commissioning and attaching
it to the pipe.
JSAV
Connecting the impulse line
JSAV 25 – 40
The connection flange is suitable for an impulse
line with a pipe diameter of 8 mm.
Push union
nut and
compression
fitting onto
the impulse
line.
3 4
On the JSAV..T, remove the blind plug and con-
nect an NPT
JSAV 50 – 100
Remove the blind plug and connect an Rp¼
(NPT ¼) impulse line.
JSAV
5 Install the impulse line and seal with an approved
sealing material.
Ensure that there is sufficient tube length for the
impulse line.
JSAV
1
/
8
impulse line.
_>
5DN
GB
GB-3
Page 4

F
NL
I
E
Tightness test
WARNING
– An additional tightness test must be carried
out on the JSAV at all joints which have been
opened for maintenance work or replacement
of spare parts.
Ensure that the valve seat of the JSAV is open,
see [Resetting – p.5].
1 Block the pipeline at the inlet and outlet.
Note max. test pressure.
JSAV inlet and outlet: max. 6 bar (87psig),
impulse line: max. 750 mbar (10.9 psig).
GB
2 Slowly apply test pressure.
JSAV 25 – 40
3
N2 = max. 6 bar
Checking the function
Checking the switching pressure pso
The JSAV is checked for the required switching pressure pso.
1 Vent the system.
Ensure that the valve seat of the JSAV is open,
see [Resetting – p.5].
Ensure that the breather screw plug is screwed in.
2 Close all manual valves at the inlet and outlet,
and in the relief line.
CAUTION
Please observe the following to ensure that the
regulator is not damaged during the function check:
– Do not exceed the maximum outlet pressure pa
of the regulator.
Increase the outlet pressure pa on the regula-
tor until the required switching pressure pso is
reached.
4
N2 = max. 750 mbar
JSAV 50 – 100
3
N2 = max. 6 bar
4
N2 = max. 750 mbar
0
p
so
p
a
The JSAV closes at the set switching pressure pso.
4 5
klack
The JSAV has closed successfully: to restart the
system, the JSAV must be opened again, see
[Resetting – p.5].
The JSAV does not close at the required switching
pressure pso and must be readjusted, see [Setting
the switching pressure pso – p.5].
Checking the tightness of the valve disc
Ensure that the outlet is closed.
1 Vent the system.
2 Slowly open the manual valve at the inlet.
The outlet pressure p
must not rise.
a
GB-4
Page 5

F
NL
I
E
Setting the switching pressure pso
5
1 Select the switching pressure pso according to
the outlet pressure pa of the pressure regulator.
500
450
400
350
[mbar]
300
so
p
250
200
150
100
50
20040 60 80 100 140 180 220 260 300 340
JSAV
VSBV
pa [mbar]
2 Remove the breather screw plug.
Set the switching pressure pso.
+ –
+
–
JSAV 25 – 40 JSAV 50 –100
4 Reset the JSAV, see [Resetting – p.5].
5 Check the required switching pressure pso again,
see [Checking the function – p.4].
Replacing the spring
Various switching pressure ranges can be reached
by using different springs on the JSAV.
1 Choose a spring according to the required switch-
ing pressure range.
Spring table
Switching pressure
Type
p
so
[mbar] [psig]
18 – 60 0.26 – 0.9 black 0 308 906 8
50 – 80 0.73 – 1.16 orange 0 308 906 9
60 – 110 0.9 – 1.6 red 0 308 907 0
100 – 210*
1.45 – 3.05*
200 – 350 2.9 – 5.08 yellow 0 308 907 2
JSAV 25 – 40
280 – 500 4.06 – 7.25 white 0 308 907 3
35 – 70 0.51 – 1.02 light blue 0 308 906 3
60 – 170* 0.9 – 2.5
120 – 220 1.74 – 3.2 crimson 0 308 906 5
190 – 400 2.8 – 5.8
300 – 550 4.35 – 8
JSAV 50 – 100
* Standard spring
2 Remove the breather screw plug.
Marking Order No.
dark
green
reddish
brown
orange/
yellow
orange/
green
0 308 907 1
0 308 906 4
0 308 906 6
0 308 906 7
JSAV 25 – 40
3 4
JSAV 50 – 100
3 4
5 Insert new spring.
6 Follow the reverse procedure when reassembling.
7 Set the required switching pressure pso, see [Set-
ting the switching pressure pso – p.5].
8 Screw in the breather screw plug.
9 After inserting the spring, take the spring’s label
from the packaging and stick it below the type
label on the JSAV.
10 Clearly mark the adjusted value of the switching
pressure pso on the sticker.
Resetting
Ensure that the impulse line is depressurized.
JSAV 25 – 40
1 Remove the breather screw plug.
2 Open the reset cap and pull it approx. 1 to 2 mm
(0.04 to 0.08") upwards. Pressure equalization
now takes place.
1–2mm
Hold the reset cap in this position until the cap
can be pulled further upwards easily following
pressure equalization.
4 Pull the reset cap upwards until the valve disc
clicks into place. The JSAV is now fully open.
klack
Once the cap has been screwed on, the green pin
in the reset cap must be right at the top.
6 Screw in the breather screw plug.
The JSAV is ready for operation.
GB
GB-5
Page 6

F
NL
I
E
JSAV 50 – 100
4
3
4
5
3
CAUTION
Please observe the following to ensure that the
JSAV is not damaged during resetting:
– Turn the reset lever gently and do not go further
than specified.
1 Remove the breather screw plug.
2 Press the reset lever and turn through 10° until
resistance can be felt.
JSAV 40
The measuring unit is supplied with the valve disc
assembled. 1 O-ring and 4 screws are enclosed.
2 Detach the impulse line from the JSAV.
GB
~10°
Hold the reset lever in this position until the lever
can be easily turned further following pressure
equalization.
4 Press and turn the reset lever until the valve disc
opens and clicks into place.
klack
5
The pin in the measuring unit must be at the top
after the valve disc has clicked into place.
6 Screw in the breather screw plug.
The JSAV is ready for operation.
Replacing the measuring unit
The measuring unit has to be replaced if the JSAV
no longer opens or can no longer be reset.
We recommend cleaning the O-ring seats and
lightly greasing the O-rings with Klüber Nontrop
ZB91 DIN before installation.
1 Depressurize the system.
JSAV 25
The measuring unit is supplied with the valve disc
assembled. 1 O-ring and 4 screws are enclosed.
2 Detach the impulse line from the JSAV.
5
6
7
8
9
Ensure that the O-ring is fitted in the new measuring unit, see Figure 9 .
10 Replace the O-ring on the housing. The O-ring is
part of the seal set.
The seal set is available separately as a spare part.
11 Follow the reverse procedure when reassembling.
12 Connect the impulse line to the JSAV.
1 Check tightness and function, see [Tightness
test – p.4] and [Checking the function – p.4].
JSAV 50 – 100
The measuring unit is supplied with 1 O-ring and
4 screws.
2 Ensure that the JSAV is closed.
Remove the breather screw plug.
Ensure that the O-ring is fitted in the new measuring unit, see Figure 5 .
6 Follow the reverse procedure when reassembling.
7 Connect the impulse line to the JSAV.
8 Check tightness and function, see [Tightness
test – p.4] and [Checking the function – p.4].
The pin in the measuring unit must be at the bot-
tom when the JSAV is closed.
If the JSAV is open, apply pressure to the impulse
line to close the valve.
GB-6
Page 7

F
NL
I
E
4 Detach the impulse line from the JSAV.
5 76
5
9
4
3
6
7
10
8
11
10
12
13
Im Ventil-
teller zuerst
die Scheibe,
dann den
O-Ring
einsetzen.
5
4
3
5
6
11
4
3
8
7
9 10
8 Install the new O-ring in the housing.
9 Follow the reverse procedure when reassembling.
10 Connect the impulse line to the JSAV.
11 Check tightness and function, see [Tightness
test – p.4] and [Checking the function – p.4].
Replacing the valve disc
The valve disc has to be replaced if the JSAV is
leaking or the JSAV 50 – 100 has been damaged
14
Ensure that the O-ring is fitted in the new measur-
15
ing unit, see Figure 16 .
17 Follow the reverse procedure when reassembling.
18 Connect the impulse line to the JSAV.
19 Check tightness and function, see [Tightness
test – p.4] and [Checking the function – p.4].
JSAV 40
The valve disc is supplied with a complete seal
set. We recommend replacing all seals.
2 Detach the impulse line from the JSAV.
16
GB
during resetting.
We recommend cleaning the O-ring seats and
lightly greasing the O-rings with Klüber Nontrop
ZB91 DIN before installation.
1 Depressurize the system.
JSAV 25
The valve disc is supplied with a complete seal
set. We recommend replacing all seals.
6
7
8
2 Detach the impulse line from the JSAV.
3
4
5
6
10
First insert
the washer
into the valve
disc, and then
the O-ring.
11
9 10
7
8
Ensure that the O-ring is fitted in the new measur-
11
ing unit, see Figure 11 .
9
10
12
10
First insert
the washer
into the valve
13
disc, and then
the O-ring.
12
13
14
15
GB-7
Page 8

F
NL
I
E
1716
18
8
Replace the O-rings on the housing and the
valve seat.
19
20
21
WARNING
Risk of injury!
– The spring wire is under high stress.
Press the
spring wire
into the notch
in the plate.
GB
22 Follow the reverse procedure when reassembling
using the O-rings from the seal set.
2 We also recommend replacing the sealing rings
on the pressure test points.
24 Connect the impulse line.
25 Check tightness and function, see [Tightness
test – p.4] and [Checking the function – p.4].
JSAV 50 – 100
We also recommend replacing the entire seal set
and the bellows when replacing the valve disc.
The seal set with bellows is available separately
as a spare part.
Ensure that the JSAV is closed.
The pin in the measuring unit must be at the bot-
tom when the JSAV is closed.
If the JSAV is open, apply pressure to the impulse
line to close the valve.
2 Detach the impulse line from the JSAV.
3
4 5
9
10
11
12 1413
15 16
Insert new
O-rings from
the seal set.
17 Follow the reverse procedure when reassembling
using the new valve disc and the O-rings from the
seal set.
To ensure that the valve disc is pushed onto the
seat by the spring, the spring wire must be released from the notch in the plate and rest against
the housing wall.
18 Connect the impulse line.
19 Check tightness and function, see [Tightness
6
Press the
reset lever and
7
test – p.4] and [Checking the function – p.4].
turn until the
valve disc is
on top.
GB-8
Page 9

F
NL
I
E
Maintenance
In order to ensure smooth operation:
Check the function and tightness of the JSAV every
year, or every six months if operated with biologically
produced methane, see [Checking the function – p.4]
and [Tightness test – p.4].
In the case of malfunctioning, check the
measuring unit and valve disc and replace if
necessary.
Selecting spare parts:
see free PartDetective DVD:
www.kromschroeder.com Products
CD-ROMs/DVDsPartDetective, (D/GB).
Replacing spare parts:
see [Replacing the measuring unit – p.6],
see [Replacing the valve disc – p.7].
After carrying out maintenance work or replacing
spare parts, check for tightness and function, see
[Tightness test – p.4] and [Checking the function – p.4].
Technical data
Gas type: natural gas, town gas, LPG (gaseous),
biologically produced methane (max. 0.02 %-byvol. H2S) or air.
The gas must be dry in all temperature conditions
and must not contain condensate.
Max. inlet presure p
Max. test pressure for testing the JSAV:
temporarily < 15 min. 6 bar (87 psigg).
Max. test pressure for testing the impulse line:
temporarily < 15 min. 750 bar (10.8 psigg).
Switching pressure pso set at the factory:
120 mbar (46.8 "WC).
Adjusting range for switching pressure pso, see
[Replacing the spring – p.5], Spring table.
Accuracy group: AG 10.
Ambient temperature:
-15 to +60°C (5 to 140°F).
Connection for housing:
JSAV..R: Rp internal thread to ISO 7-1,
JSAV..N: NPT internal thread,
JSAV..F: flange to ISO 7005,
JSAV..A: ANSI flange.
Connection for impulse line:
JSAV 25 – 40: DN 8 (NPT
JSAV 50 – 100: Rp ¼ (NPT ¼).
Housing:
JSAV 25 – 40: AlSi,
JSAV 50 – 100: GGG 40.
Diaphragm: NBR,
valve seat: aluminium,
valve stem: stainless steel,
valve disc:
JSAV 25 – 40: steel with vulcanized NBR seal.
JSAV 50 – 100: aluminium with vulcanized NBR
seal.
4 bar (58 psigg).
e max.
1
/
8
),
Service life
The Pressure Equipment Directive (PED) and the
Energy Performance of Buildings Directive (EPBD)
demand regular checks on and maintenance of heating systems, in order to ensure a high level of use
in the long term, a clean method of operation and
safe function.
The service life on which the construction is based,
hereinafter referred to simply as the “service life”, is
compiled from the relevant standards. You can find
further explanations in the applicable rules and regulations and on the afecor website (www.afecor.org).
This information on service life is based on using
the product in accordance with these operating
instructions.
The product must be serviced at regular intervals.
Once the specified service life has been reached,
the safety-related functions must be checked in accordance with the section entitled “Maintenance”.
If the product passes the aforementioned function
tests, you can continue to use it until the next scheduled maintenance operation. At this point, these tests
must be repeated.
If the product fails one of the aforementioned tests,
it must be replaced immediately.
This procedure applies to heating systems. For ther-
moprocessing equipment, observe national regulations.
Service life (based on date of manufacture) in accordance with DIN EN14382 Safety devices for gas
pressure regulating stations and installations:
Service life
Switching cycles Time [years]
JSAV – 15
Long-term use in the upper ambient temperature
range accelerates the ageing of the elastomer materials and reduces the service life (please contact
manufacturer).
GB
GB-9
Page 10

F
NL
I
E
Declaration of conformity
We, the manufacturer, hereby declare that the products JSAV 25 – 40, marked with product ID No.
CE-0085AS0202, and JSAV 50 – 100, marked with
the product ID No. CE-0085AR0246, comply with the
requirements of the listed Directives and Standards.
Directives:
– 90/396/EEC
– 97/23/EC
Standards JSAV 25 – 40:
GB
– DIN 33822 (06/88)
– VP 200 (08/98)
Standards JSAV 50 – 100:
– DIN 3381 (06/84)
The relevant product corresponds to the type tested
by the notified body 0085.
The production is subject to the surveillance pro-
cedure pursuant to DIN EN ISO 9001 according to
annex II, paragraph 3 of Directive 90/396/EEC and
annex III, module D of Directive 97/23/EC.
Elster GmbH
Scan of the Declaration of conformity (D, GB), see
www.docuthek.com.
Contact
If you have any technical questions, please contact
your local branch office/agent. The addresses are
available on the Internet or from ElsterGmbH.
We reserve the right to make technical modifications
in the interests of progress. info@kromschroeder.com, www.kromschroeder.com
Elster GmbH
Postfach 28 09, D-49018 Osnabrück
Strotheweg 1, D-49504 Lotte (Büren)
T +49 541 1214-0
F +49 541 1214-370
GB-10
 Loading...