

KRK 12VDC User Manual
TROUBLESHOOTING
Power LED/knob LEDs do not illuminate when power switch is turned on.
• FireWire port is not supplying enough power for ERGO. Use the 12VDC power adapter to power up
ERGO.
• Is power switch REALLY turned on? Check it again while using the external adapter.
• Is the AC outlet working?
ERGO Cal software does not run.
• Driver is not installed properly
• ERGO is not plugged into a FireWire port
• Power is not applied to ERGO
Microphone does not work.
• You need to have the Calibrate switch on the back of ERGO pushed in in order for the mic to work.
Make sure the calibrate LED on the front panel is illuminated.
• USE ONLY THE KRK MIC! Don't plug in any other mic for calibration. If you lose your KRK mic, you can
buy a new one from KRK customer support at 954.316.1580.
• Check the ERGO control panel to ensure that the mic is turned up.
ERGO Cal software asks for lots of measurements.
• That's OK. It can take between 3 and 9 measurements before you get to 90% or greater Room
Knowledge.
Room Knowledge never gets to 100%.
• Some things in life cannot be fully understood—like your spouse. So, your room may be another
one of these things. As long as Room Knowledge is 90% or greater, your mixes will sound better.
I don't hear a difference between ERGO in bypass and processing modes.
Your room may already be very good, so ERGO isn't doing
effects can range from subtle to extreme, so there should be a difference. In particular, listen for the
following:
much. This is very unlikely, however. ERGO's
quick start guide
BEFORE YOU START... GET TO KNOW ERGO
BACK PANEL
Back here you will find the Power switch, Calibrate button
and all ERGO inputs and outputs
FRONT PANEL
.
RIGHT SIDE PANEL
Headphone Volume Knob – Controls
headphone volume level.
• Improved imaging • Tighter bass • More definition among instruments
ERGO's goal is not to make the mix “sweeter” but to make it more accurate. If you don't think you are
hearing something, finish the mix and see how it translates to other environments. This is proof that
ERGO is working. If you are still not hearing what you believe is an accurate mix, you may have
problems with:
• Your monitors—get a pair of KRK monitors!
• Your ears—Cotton swabs are relatively inexpensive, and can perform wonders.
• Your brain—please refrain from mind altering substances when using and/or evaluating ERGO. Your
auditory faculties and the processing thereof will be greatly enhanced. Also, visit the ERGO forum
and talk to us! We can help! Go to www.krkergo.com and click the Forum link.
The calibration mic level is not loud enough.
• Turn up the volume on your speakers. The speakers need to excite your room in order for ERGO to
measure it accurately.
• Turn up the volume on ERGO. The volume control should point to the word Volume. This is the 0dB
point for the volume control.
• Turn up mic volume on the control panel. Normally, ERGO handles this gain stage, but if your
speakers are on the weak side, turning this up manually can help.
I installed ERGO as a FireWire device, and now my other XYZ FireWire interface is gone.
This should not happen on Macs, since the Mac OS can aggregate, or combine, multiple devices into a
single interface. Windows users have a couple of options:
• Windows systems can only have a single ASIO device. Use your main ASIO device when tracking,
and switch to ERGO ASIO when mixing down.
• Take a SPDIF or analog out from your existing FireWire interface and plug it into ERGO. In this mode,
you can unplug ERGO from its FireWire port and power up using the external power adapter. ERGO's
SPDIF inputs and converters are of the highest quality, so there will be no degradation when using
this approach. I
the only approach to use for Pro Tools rigs.
• Use the WDM drivers. Windows can aggregate WDM devices. Latency may increase when using
WDM instead of ASIO.
n fact, if your DAW is “dialed in”, we suggest that you use this approach. Also, this is
STATUS LEDs
Clip – Lights when the incoming analog signal (Input L/R, Cal Mic) is overloading the system and is
clipped.
IO / FireWire – LED is red when power is applied and ERGO is turned On. LED is green to indicate that
ERGO has established a link to your computer via FireWire.
Calibrate – When the Calibrate pushbutton at the rear panel is depressed, this LED lights. This indicates
that ERGO is in calibration mode (this is to be used with your measurement mic). The IO / FireWire LED
must be green to perform calibration.
VOLUME KNOB
Controls the level of monitor outputs (A, B/Sub).
BUTTONS
A – Controls the “A” speaker outputs. When lit, the A speakers are active. When unlit, they are
muted/deselected.
B/Sub – Controls the “B” speaker outputs. When lit, the B speakers are active. When unlit, they are
muted/deselected.
Special Note: The software control panel selects the speaker mode. In default (non-subwoofer) mode,
only the A or B speaker can be selected. ERGO is smart enough to make the A/B buttons mutually
exclusive. Using ERGO's control panel, it is possible to set ERGO up in subwoofer mode. In subwoofer
mode, ERGO makes the A/B buttons independent, so that you can mute or enable the sub in
conjunction with the A speakers.
Focus/Global – ERGO has two modes of operation—focus and global. In focus mode all of ERGO's
processing power is correcting the focus (sweet spot) position. Use this mode when mixing your
tracks. In global mode, ERGO's processing power is correcting a much larger area, though not as
accurately as when in focus mode. Use this when you want an audience to hear the cor
room.
rected
Using a Mac, I cannot see ERGO as a FireWire device.
• ERGO needs Leopard (10.5.x) or later. Check www.krkergo.com for detailed instructions on how to
enable work-arounds for other OS versions.
ERGO Rocks! But I want to mix in surround. Can I use 2 or more ERGOs for this?
• No. Surround has other issues. Keep checking www.krkergo.com for exciting ERGO developments.
When the Focus/Global button is depressed for two seconds, ERGO enters bypass mode (indicated by
the LED flashing). In this mode, audio is passing straight through with no correction being
performed.
3000 SW 42nd Street • Holly wood, FL 33312 • P 954.316.1580 • F 954.316.1590
www. kr ksys .c o m
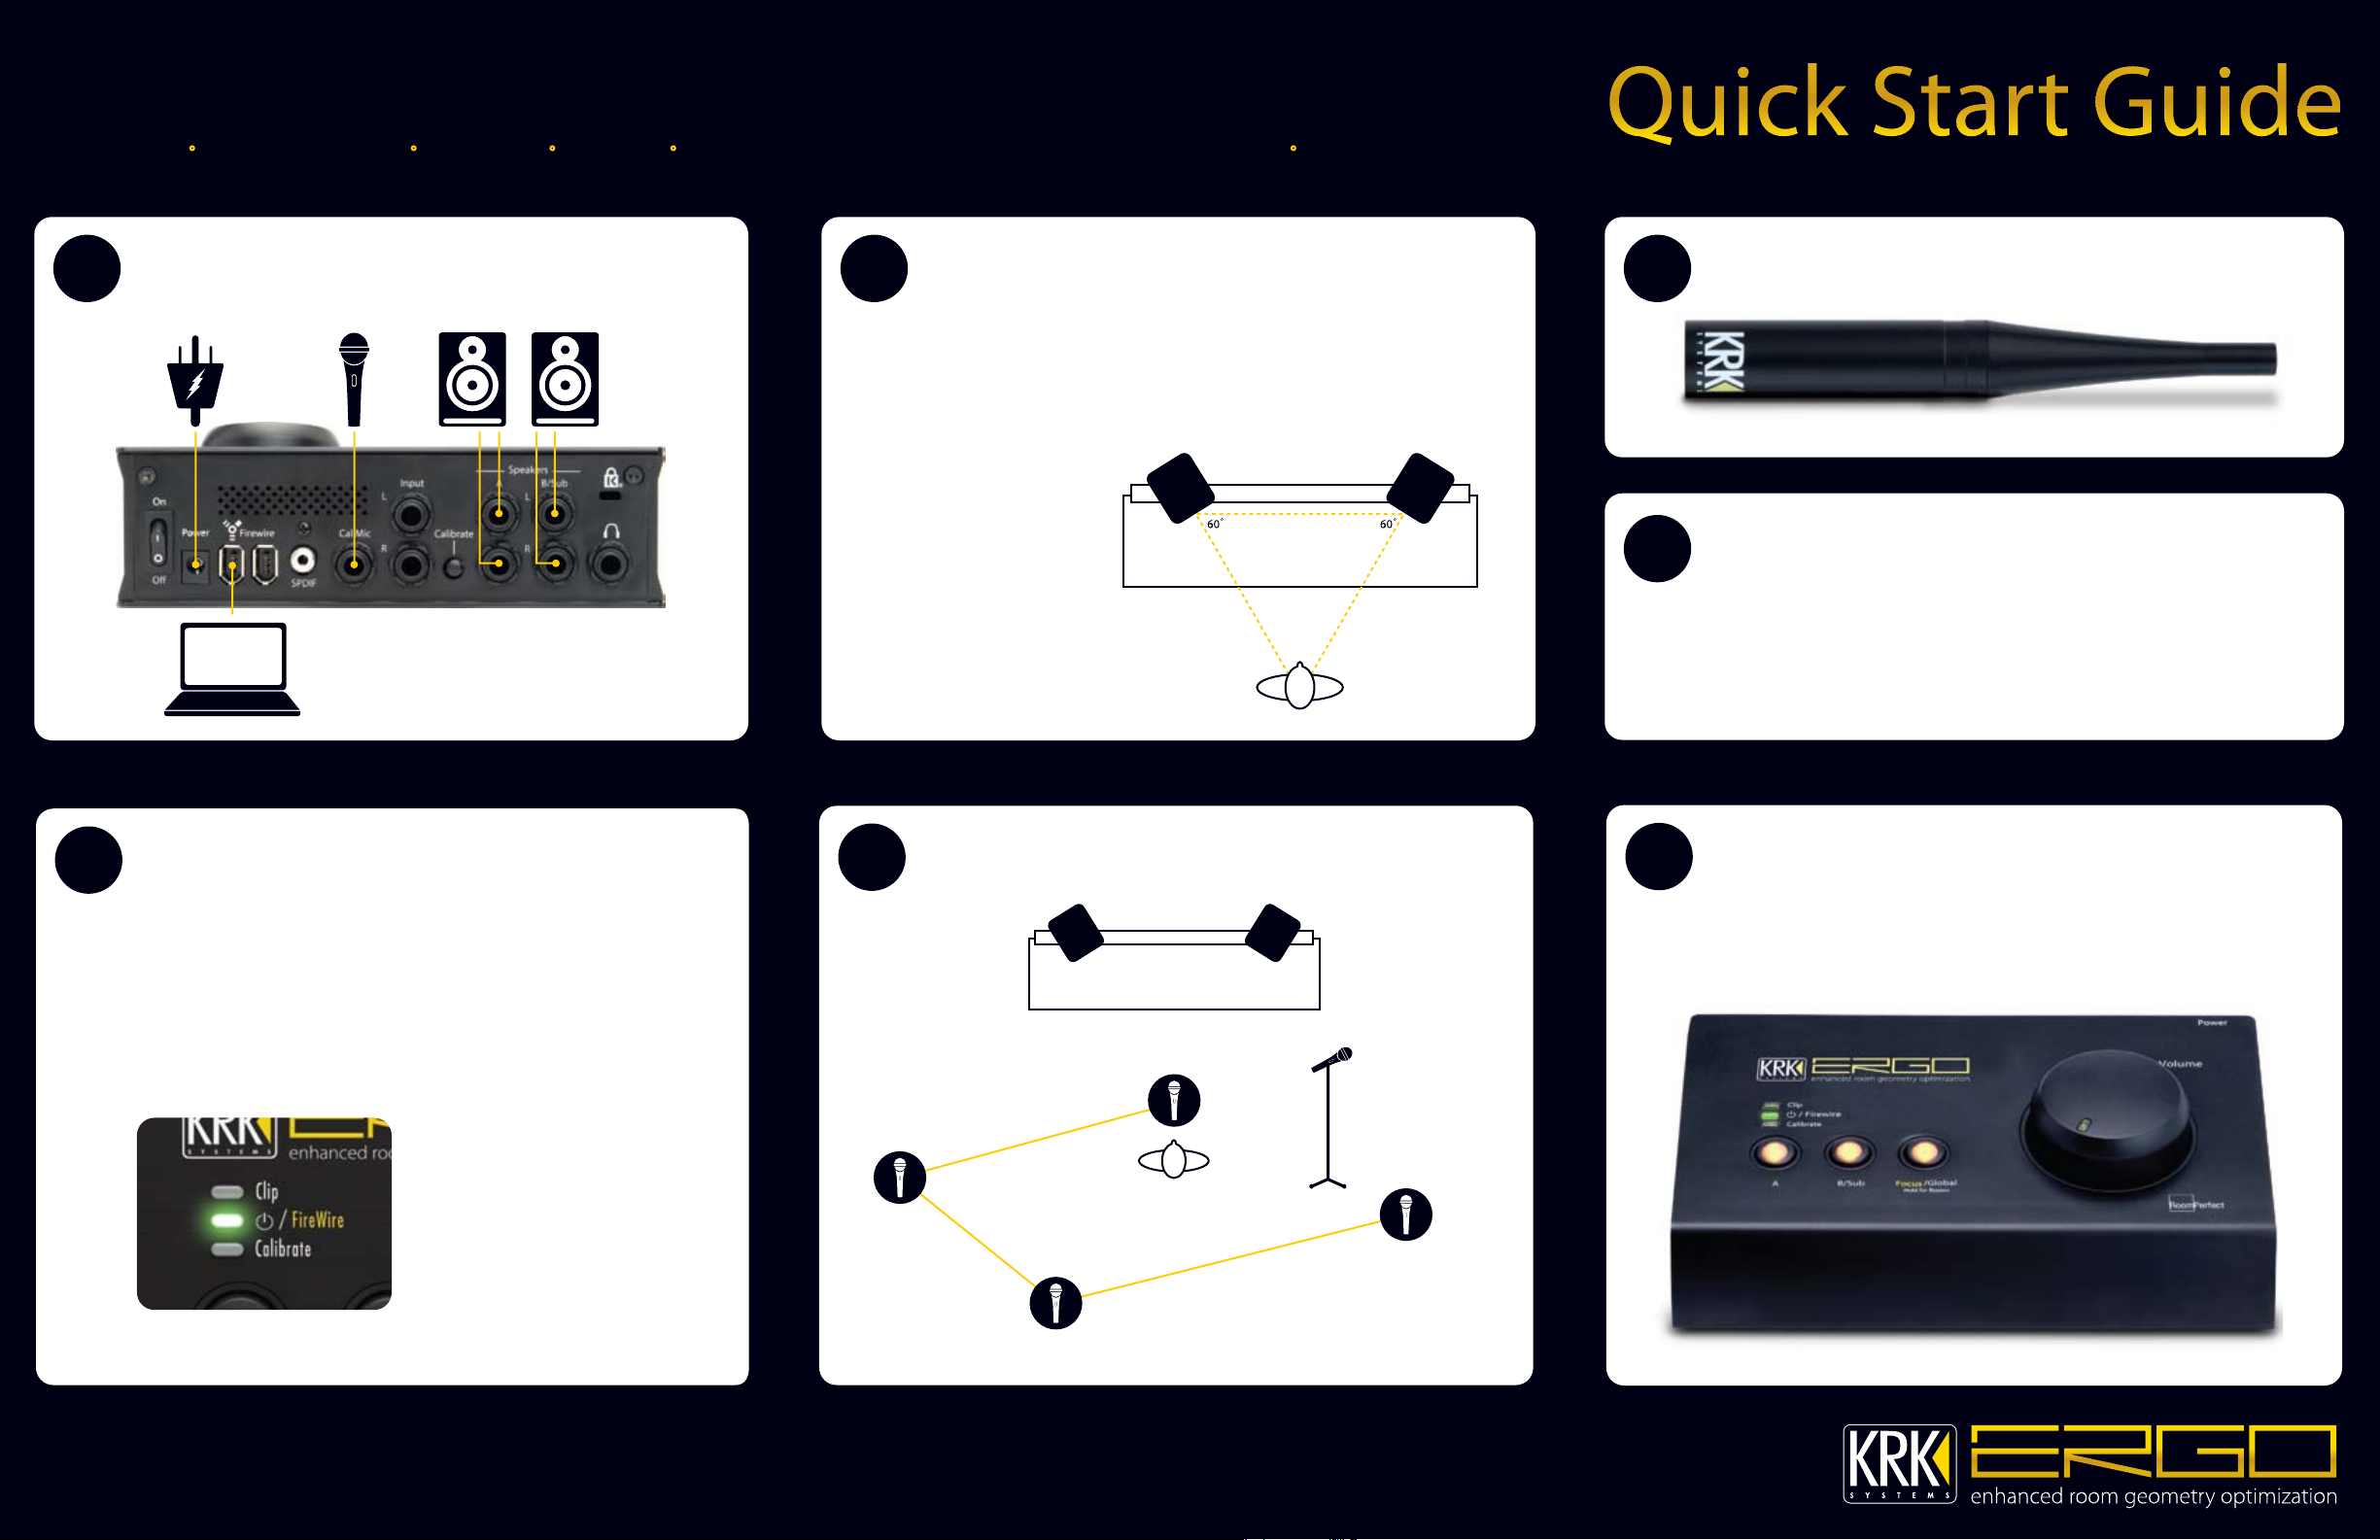
Use these instructions to get your ERGO up and running.
For more detailed information, including instructions for setting up ERGO in your DAW or other software, refer to the ERGO User’s Manual (found on the CD that accompanied this product).
Unpack your ERGO and set it on a stable surface. Make sure that you have the following:
The ERGO base unit •
Measurement Microphone • XLR - ¼” adapter • FireWire cable • XLR cable equal approximately to the longest dimension of your listening room • Software CD
OK. Here we go...
1 2 3
Connect all cables to ERGO. Refer to the user’s manual if connecting more than
one set of speakers.
Place your monitors where you want them—this may not necessarily be the
“correct” room location. Make sure your monitors are set up properly for your
listening position, i.e. an equilateral triangle position for nearfield monitoring
and proper height for ear/tweeter positioning. It is not necessary to take into
account distance from rear walls, side walls, etc., since ERGO will correct for any
issues caused by speaker placement.
Note: If you’re in subwoofer mode (connecting a sub directly to ERGO), refer to
the Connecting Your System–What Goes Where? section in the user’s manual
for more information.
4
Focus / Listening Position
Plug in the calibration (measurement) mic using the supplied cable and place it on a
stand. A boom works best since you will be pointing the microphone toward
different areas of the room.
The ERGO calibration mic
Turn on your computer. Apply power to ERGO, but do not plug in the FireWire cable
yet.
Run the ERGO Install Software. On a PC, it will either AUTORUN, or run the
INSTALL.EXE program from the CD. On a Mac, run the INSTALL program. The install
software will copy drivers, control panel, user’s manual and ERGO Cal (Room
Measurement Software) to your computer. The installation program will tell you
when to plug ERGO into the FireWire port*.
*Windows only
Plug ERGO into your computer by connecting it to the FireWire port; apply
5
power using the switch on the rear panel (when ERGO has completed room
analysis, you can unplug the FireWire interface).
Power is supplied over a 12 VDC input. If you are using a 6-pin FireWire cable,
ERGO can draw power via FireWire. However, if your computer has a small,
4-pin FireWire connector, you will have to plug in the 12 VDC power supply.
If ERGO is drawing power from your computer, you should see the IO / FireWire
light go red. In a few moments (if the software installed properly), this light will
switch to green, indicating that ERGO is ready for a room measurement. If
there is a problem, go to the Troubleshooting section.
A green light indicates that ERGO is ready for a room measurement!
Run ERGO Cal and follow the instructions on the screen.
6
DO NOT take measurements from behind the speakers.
Take measurements >1m (3 feet) from the speakers.
Position 1
Position 2
Take room position measurements from random locations in the room that are at least 1m (3 feet ) apart.
Focus / Listening Position
Position 3
Position 4
After the previous steps have been completed, ERGO will perform its automatic
7
calculation of focus and global filters.
Once room correction is complete, you can use ERGO in stand-alone mode over
SPDIF or Line In (at L and R jacks). Oh, and if you want to use ERGO as your FireWire
recording interface, leave it plugged into your computer—duh!
LITK00026 REV-C
 Loading...