

Unicycle Assembly Instructions
Unicycle Assembly Instructions
KH20 / KH24 / KH26 /KH29 / KH36
KH20 / KH24 / KH26 /KH29 / KH36
Congratulations on purchasing a Kris Holm unicycle!
Your new unicycle has been designed to become a natural, unrestrictive extension of you as you ride.
It is the culmination of over 20 years experience riding some of the World’s most difficult terrain. No
matter where you are in your unicycle journey, it is my hope that it will serve you well in your endeavours.
Assembling your unicycle
Your unicycle comes partially assembled and should only
take a few minutes to put together.
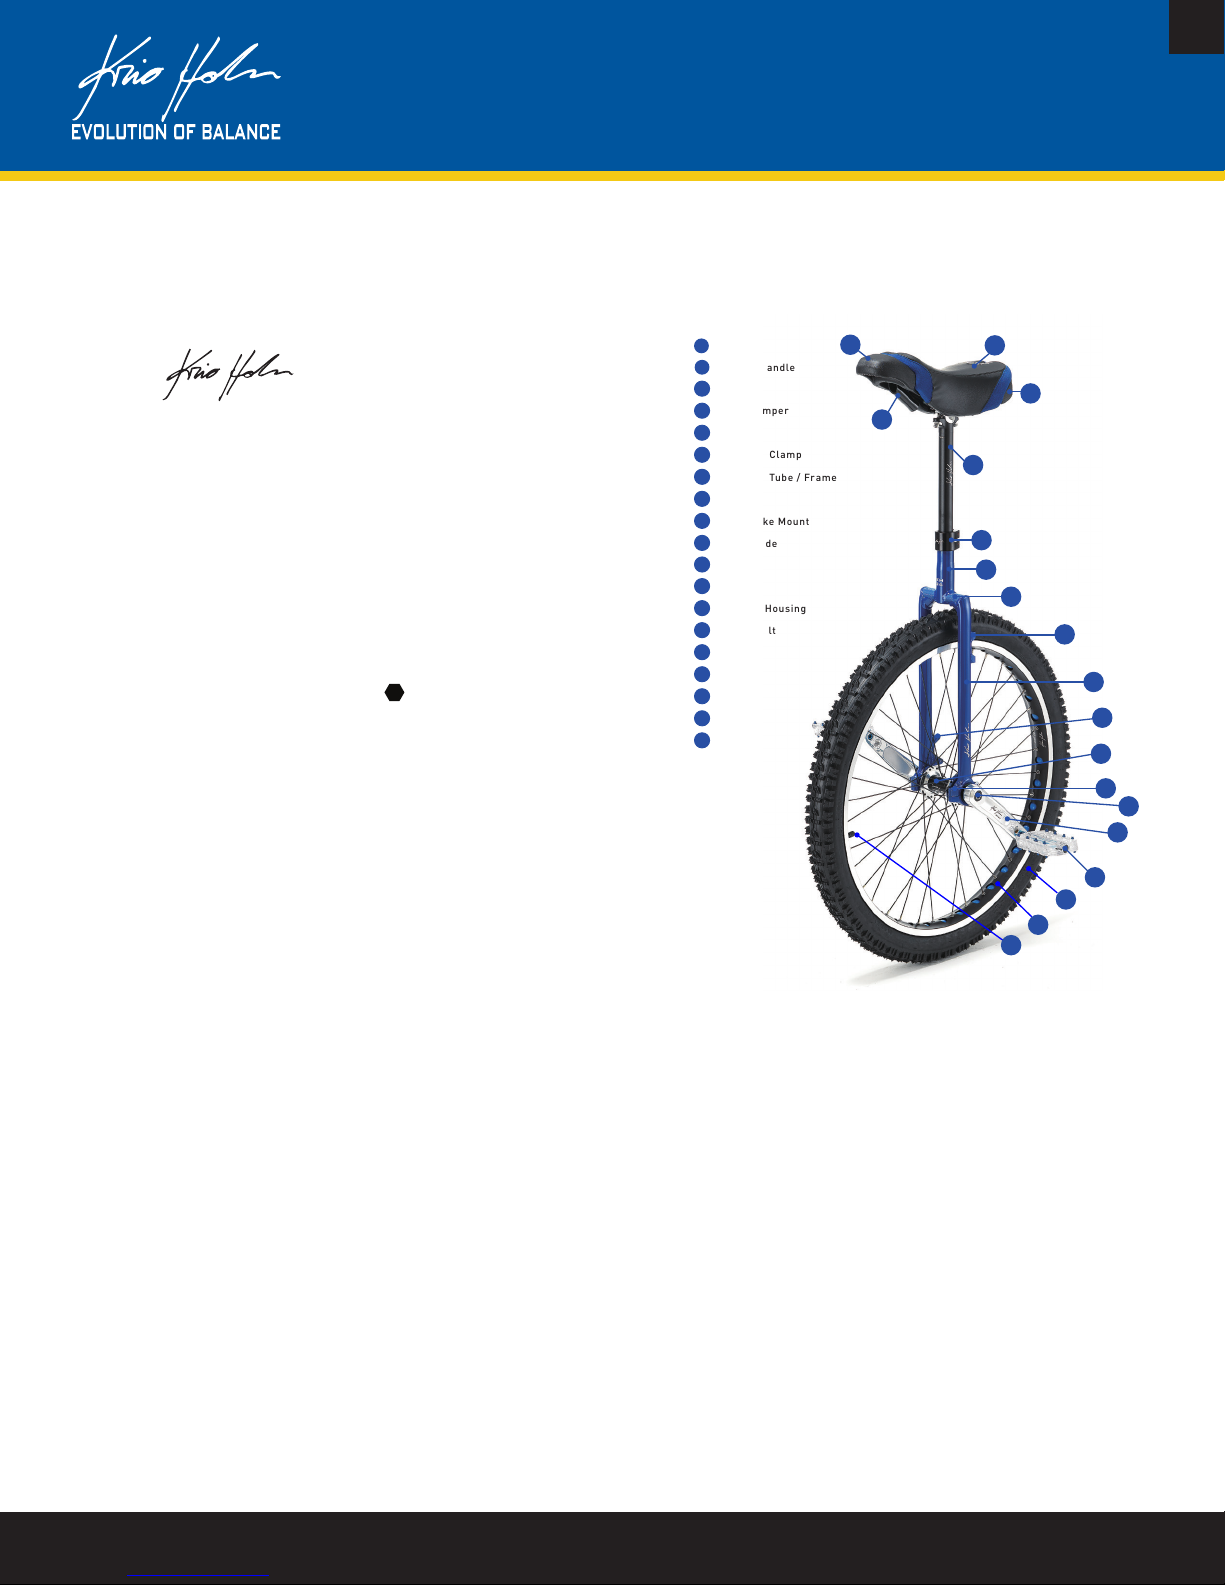
Your kit contains the components shown in the illustration to the right. You will require the following tools to
assemble this unicycle:
✔ 15mm pedal wrench
✔ 4mm, 5mm & 8mm Hex (Allen) keys
✔ Grease
✔ Tire pump
1. Place the seatpost clamp ❻ on the frame ❼. The slots on the clamp and
the frame should line up and face the rear of the unicycle.
2. Insert the seatpost ❺ into the frame ❼ and tighten the seatpost clamp ❻
with medium-firm hand pressure.
3. Smear the pedal holes in the cranks ⓯ with a small amount of grease. Fit
the pedals ⓰ on the correct cranks by matching the Left/Right letter on the
cranks with those on the end of the pedal. Tighten firmly.
4. Firmly tighten the bolts in the ends of the axle ⓮ (on the outside of the cranks).
You will probably need to re-check the tightness of these bolts after the first ride.
5. Fit the wheel assembly in to the frame by seating the hub bearings ⓬ in the bearing housings ⓭. Make sure you have
the right hand crank on the right side of the unicycle. If it is backwards your pedals will undo with extended riding,
potentially damaging the cranks. Fit the second half of the bearing housings on the bottom of the frame and tighten
the bolts with slight hand pressure. To test whether the bearing housing bolts are too tight, give the wheel a spin. The
wheel should spin freely. If it does not turn perfectly freely, the bearing housings are too tight, and should be loosened
slightly. Overly tight bearing housings will damage the bearings, and will not be covered by warranty.
6. Use the valve ⓳ to check that the tire ⓱ is pumped up to the appropriate pressure. Tire pressure depends on personal
preference. In general, tire pressures for freestyle or road riding should be very firm, while tire pressures for Muni and
trials are somewhat lower. Experiment with this until you find a tire pressure(s) that you like.
7. Set your saddle ❸ to the right height. Proper seat height depends on personal preference and the type of riding. For
freestyle or general road riding, sit on the unicycle and move the seat so that your leg is almost straight when your
heel is on the lowest pedal. For Muni and trials, saddle heights are generally somewhat lower. If you cannot get your
saddle low enough you need to shorten the seatpost. This can be done with a pipe cutter or hacksaw. Shorten the
seatpost so that the bottom of the post is touching the bottom of the seatpost tube when your saddle is at the minimum desired height.
8. Adjust your saddle angle by adjusting the seatpost angle adjustment bolts (KH24, KH26, KH29, KH36) or adjusting the
position of the seatpost in the slots in the seatpost plate (KH20). Saddle angle is a matter of personal preference and
you will need to experiment to find the most comfortable angle. Many riders prefer the saddle angled upwards in the
front.
1
Brake Lev er Mount
2
Saddle Handle
3
Saddle
4
Rear Bumpe r
5
Seatpost
6
Seatpost Clamp
7
Seatpost Tube / Fr ame
8
Crown
9
Rim Brake Mount
10
Fork Bl ade
11
Disc Br ake Mount
12
Hub
13
Bearing Housing
14
Crank Bolt
15
Crank
16
Pedal
17
Tire
18
Rim
19
Valve
2
1
3
4
5
6
7
8
9
10
11
12
13
14
15
16
17
18
19
EN
EN
Page 1 of 2
Page 1 of 2
REV: 05-2012 EN
REV: 05-2012 EN
www.krisholm.com
www.krisholm.com
Copyright ©2012 Kris Holm Unicycles
Copyright ©2012 Kris Holm Unicycles

Unicycle Assembly Instructions
KH20 / KH24 / KH26 /KH29 / KH36
Maintenance Tips
Kris Holm unicycles and components will last for many years if maintained properly. Here are some tips to help
keep your unicycle running smoothly.
Before the First Ride
After initial assembly, check to insure that all bolts are tight. Especially check the end bolts on the axle holding
the cranks, the bolts holding the seatpost to the saddle, and the pedals.
After the First 1 - 2 Rides
Following the first couple rides, check that your rim is true and that the spokes are tight. Obtain a spoke
wrench and learn how to true (straighten) your wheel, or bring your wheel into a bikeshop for regular maintenance. This will significantly improve the life of your wheel. After the initial adjustment and after any significant
impact, check your wheel to make sure it stays true.
EN
During Every Ride
Be aware of any creaking noises or “loose” feelings in your unicycle. If you feel any, check the following:
Pedals: If your pedals are loose, check that the wheel is installed the right way around in the frame (e.g. check Left/
Right letter on the cranks). Riding with the wheel backwards will cause the pedals to loosen.
Axle end-bolts: Loose axle end-bolts can lead to small amounts of looseness in the hub/crank assembly.
Bearing housings: Overly loose bearing housings will result in frame movement on the bearings. Overly tight bearing
housings will cause creaking and premature wear on the bearings.
Saddle: Bolts holding the seatpost to the saddle are subject to loosening over time.
After Every Ride
Keep your unicycle clean. Mud and salt are bad for bearings and can cause bolts to seize.
After Every 30 - 40 Rides
Every 30-40 rides, remove the cranks and clean and regrease the axle. Rotate the wheel by 1/4 turn before
reinstalling the cranks, to change the force concentrations on the spokes and increase the life of your wheel.
Clean and re-grease all bolts, and rotate your tire by 1/4 turn to prevent concentrations of wear on one part of
the tire. Check that the wheel is true and there is appropriate tension in your spokes.
Warranty
Kris Holm Unicycles products are warranted to the original owner against manufacturing defects for one (1) year following the original purchase
date. For more details visit http://www.krisholm.com/khu/warranty
Unicycling can be hazardous and can result in injuries. Use common sense, ride within your abilities, and wear safety gear. Disk brake rotors become very hot with use –
avoid contact! Tuck in laces and avoid wearing loose clothing that could catch in brakes, pedals or other parts of the unicycle. Kris Holm Unicycles cannot accept responsibility for any personal
injury that you might sustain or that you might cause to another person as a result of the use, breakage or improper assembly of Kris Holm Unicycles equipment.
Page 2 of 2
REV: 05-2012 EN
www.krisholm.com
Copyright ©2012 Kris Holm Unicycles
 Loading...