

Page 1
Universal Krell
THE LE
ADER IN AUDIO ENGINEERING
Touch Screen
Remote
QUICK START GUIDE
Getting Started
Unpacking
THERE ARE NO USERSERVICEABLE PARTS INSIDE
ANY KRELL PRODUCT.
Thank you for your purchase of the Universal Krell Touch Screen Remote.
This state-of-the-art electronic remote controls all current Krell components, a
selection of vintage Krell products, and many other popular A/V components.
Six Krell components are preprogrammed into the remote. The configuration
of additional devices is easy: simply enter the 4-digit device code.
Please read the information on placement and operation carefully. A thorough
understanding of these details will help ensure satisfactory operation and long
life for your universal Krell remote and related system components.
This Quick Start Guide contains descriptions of the standard functions and settings on the remote. The owner’s reference for the Universal Krell Touch Screen
Remote, including a detailed description of advanced functions and the product
warranty, is available on the web at:
www.krellonline.com
Please contact your authorized dealer, distributor, or Krell if you have any
questions not addressed in this Quick Start Guide or the owner’s reference.
Follow these steps to safely unpack the remote.
1. Open the shipping box. You see these items:
1 Universal Krell Touch Screen Remote
4 AAA NiMH rechargeable batteries
1 connector
1 power adapter
1 Quick Start Guide
(Only one person needed.)
Notes
Placement
IMPORTANT
Modifications not authorized by
the manufacturer may void users
authority to operate this device.
This product complies with the EMC directive (89/336/EEC) and
the low-voltage directive (73/23/EEC).
2. Place the remote in a safe place and remove the protective plastic wrapping.
1. If any of these items are not included in the shipping box, please contact
your authorized Krell dealer, distributor, or Krell for assistance.
Save all packing materials. If you ship your universal Krell remote in the
2.
future, repack the unit in its original packaging to prevent transit damage.
Return Authorization Procedure, in the owner’s reference on the Krell
See
website, for more information.
The Universal Krell
carefully, do not drop it, and set it down gently on a secure surface.
The remote has been tested and found to comply with limits for a Class B digital device, pursuant to Part 15 of the FCC Rules.
to provide reasonable protection against harmful interference in a residential
installation. This equipment generates, uses and can radiate radio frequency
energy and, if not installed and used in accordance with the instructions in this
manual, may cause harmful interference to radio communications.
interference, see
T
ouch Screen Remote is a sensitive instrument. Hold it
These limits are designed
Troubleshooting, on page 8.
Universal Krell Remote 1
To correct
Page 2
VOL
VOL
CH
CH
MUTEMENU HOME
00:25
HOME
VCR
SAT
CD/SACD
DVD
PRE AMP
TV
PRE PRO
AUX
CUST.PGE
INT AMP
SMART
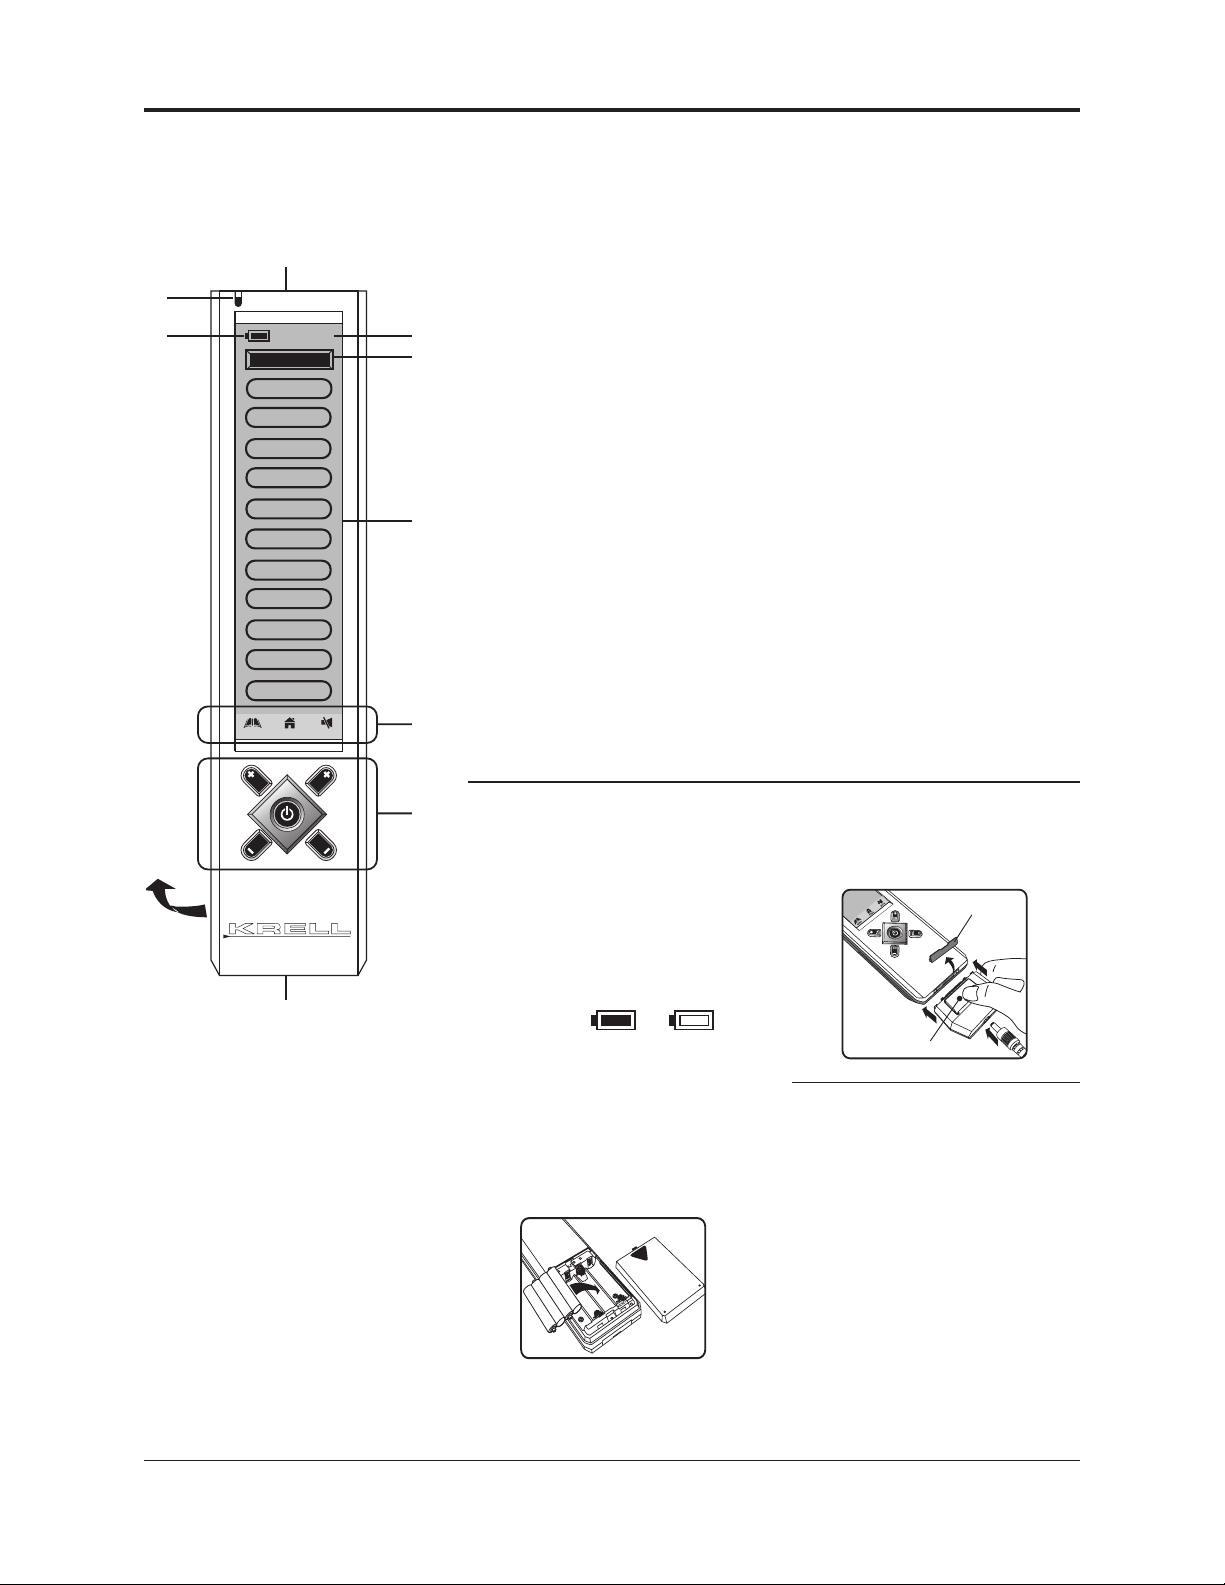
Remote Overview
Press to detach
Remove the rubber
protector
Figure 1 Krell Universal T
Screen Remote, Front Panel
1
2
3
ouch
Standard Functions
• Preprogrammed learning
10-in-1 remote (replaces
•
SAT, CTV ,DVD, LD, CD, AV1, AV2
and AV3 )
Learns up to 240 commands
•
• A maximum of 70 keys per device
4
5
6
7
mode
EL backlit touch screen panel with
•
intelligent light sensor power save
• 5 hard keys for direct access
(power on/of
VOL-)
• 3 touch screen hot keys (
HOME, and MUTE)
• Set up by code name, device
brand name search, and library
code search
• 10 SMART programs, each with a
maximum of 32 steps*
• Device name and function keys
that edit, move, delete, and
restore*
• Custom page for personal setup
and frequently used commands*
• Remote-to-remote copy*
TV, VCR,
f
, CH+, CH, VOL+, and
MENU,
Standard Functions, continued
• Volume punch through control for
TV and AMP*
• Interactive help screen
• Security password lock
Real time clock
•
• Battery level indicator
• Auto power off
AC/DC power charger
•
• Re-chargeable batteries
Optional Functions
• Docking charger for quick
battery charging *
• Computer link (PC link) for
special key layout and function
via USB connection to a PC
computer *
• PC software upload and
download *
*For information on all items marked with
an asterisk, please download the owner’s
reference for the universal remote, on the
Krell website.
10
9
1 Infra-red lens
2 LED indicator
Battery level meter
3
Current time
4
5 Current mode
6 Touch screen panel
Hot keys
7
8 Hard keys
Connection socket
9
10 Battery compartment
(on the back)
8
Battery Changing
and Charging
Charge the batteries 10 hours before
using the remote control for the first
time. Recharge the batteries when
the battery level meter (3) is empty,
indicating weak batteries.
BATTERY
LEVEL
METER
To install the batteries, open the battery cover and follow the polarity
symbols on the battery compartment.
Place the provided 4 AAA NiMH
rechargeable batteries inside, then
replace the cover.
To recharge the batteries, plug the
power adapter into the AC wall outlet,
insert the DC jack into the connector,
FULL
then connect to the socket (9) It
takes approximately 17 hours to fully
charge the batteries.
EMPTY
Notes
1. The battery level meter does not
show when the remote control is
in the menu mode.
2. The remote control is designed
for optimum operation using the
original batteries shipped with the
unit.
3. Do not connect the power
adapter and connector when
using non-original batteries.
4. To avoid data loss, remote setup
is prohibited when the batteries
are weak.
2 Universal Krell Remote
Krell®is a registered trademark of Krell Industries, Inc., and is restricted for use by Krell Industries, Inc., its subsidiaries, and authorized agents. All rights reserved. All other trademarks and trade names are registered to their
respective companies.
© 2004 by Krell Industries, Inc., All rights reserved
Page 3
Getting Started
This section explains basic remote
navigation, the difference between
hot keys (7) and hard keys (8), and
introduces the backlit screens and
IR code library.
IMPORTANT
ou must calibrate the touch
Y
screen panel (6) before configuring the remote.
Panel Calibration
Calibrate the remote touch screen
panel initially to teach the keys to
respond to your touch. The keys
shift their optimum pressure point
slightly during calibration to adjust to
the pressure of your finger tips. This
allows you to press and send a key
command on even the smallest keys
with ease.
In addition, perform this calibration
after you have received an incorrect
response from the touch screen
panel.
1. Press
2. Press REMOTE SETTING
3. Press CALIBRATION
4. Follow the on screen instructions.
5. Press
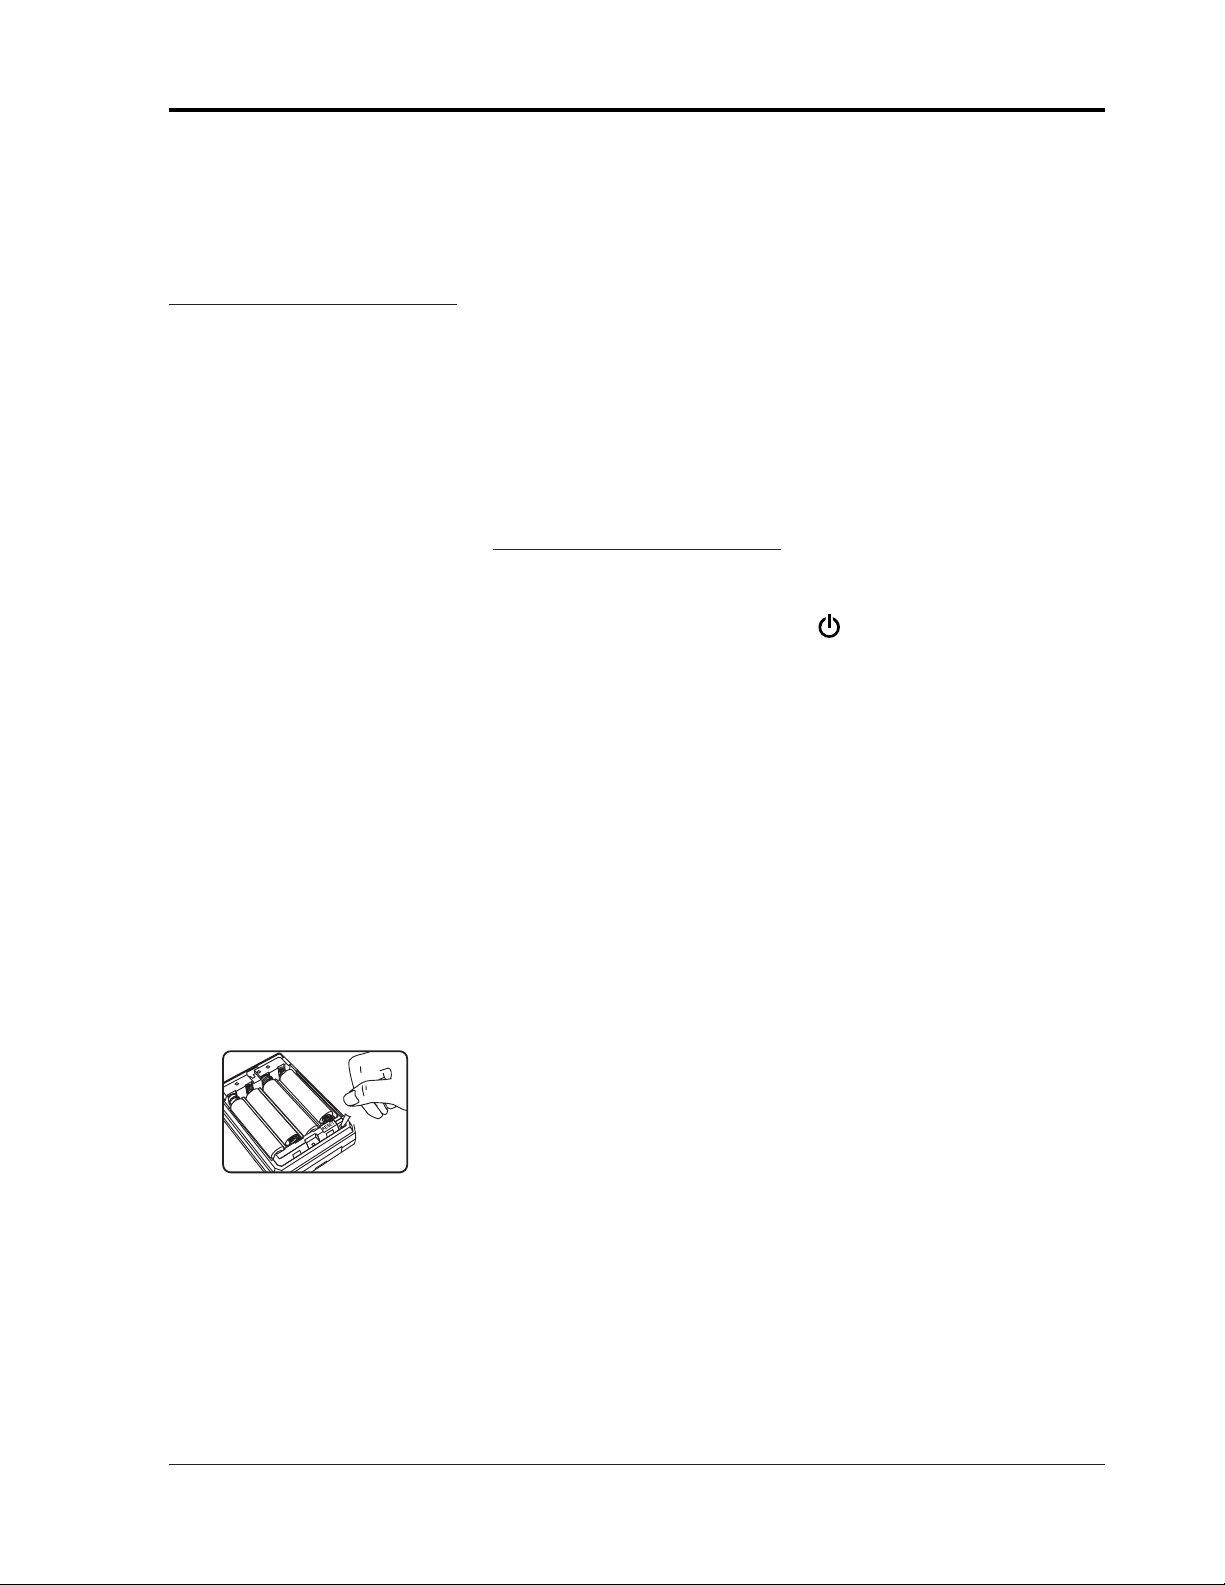
Reset Button
If your remote control has stopped
for any reason, you can reset it by
pressing the reset button inside the
battery compartment.
MENU
BACK to return to the home
page
Home
After inserting the batteries, press
the touch screen. The remote control prompts at the home page,
showing all devices, as well as keys
for setting up custom pages and
SMART keys. Press the
key at any time to return to the
home page.
HOME hot
Sleep Mode
If the remote is inactive for approximately 10 seconds, the screen
reverts to the power save (sleep)
mode and shuts down the display.
Press the screen panel to reactivate
the unit.
Note
When in the sleep mode, the hard
key section of the remote is still
available for commands.
Access a Device Mode
Press any device key on the HOME
screen to access the corresponding
device mode. The device main page
appears, showing the remote control
keys for the device.
Page
Press the PAGE key at the bottom of
the device mode screen to change
command pages for the device.
Send a Command
Point the remote infrared lens (1) at
the IR sensor on the device to which
you want to send a command. Press
a key to send out the corresponding
infrared command.
Empty Key
There is no label or symbol on an
empty key, and the key is available
for learning.
Menu
Press the MENU hot key to access
the main menu page, and configure
the remote settings.
mation
, see Remote Setting, on
page 7.
For more infor-
Interactive Help Screen
Press the question mark, located at
the top right of every menu screen,
and follow the directions on the display.
Hot Keys
There are 3 hot keys on the bottom
of the LCD display:
HOME Jump to the main page for
the device mode selection, for
example
MENU Jump to the main page of
the setup menu to access
and configure settings
Volume mute function
MUTE
TV, VCR, DVD, etc.
Hard Keys
Five hard keys transmit the IR commands for the selected device.
Power on or off
CH+ Program or channel up
CH– Program or channel down
VOL+ Volume up
VOL- Volume down
Key Tone
Press any key, and a short beep
sound occurs.
function
page 7.
To disable this
, see Remote Setting, on
Backlit Screen
The LCD touch screen and hard keys
are illuminated by an EL panel. The
panel stays active for approximately
5 seconds (the factory default) after
a key is pressed.
auto turn off time or to disable this
function
page 7.
, see Remote Setting, on
o change the
T
IR Code Library
The IR Code Library contains a list
of devices which have codes programmed into the Universal Krell
ouch Screen Remote.
T
For information on how to access
and select a programmed code, see
Main Menu Setup Functions, on
page 5.
Universal Krell Remote
3
Page 4

Figure 2 Krell Components
VOL
VOL
CH
CH
MUTEMENU HOME
00:25
HOME
VCR
SAT
CD/SACD
DVD
PRE AMP
TV
PRE PRO
AUX
CUST.PGE
INT AMP
SMART
Preprogrammed into the Remote
KAV–280cd (default)
KAV–250cd/
KAV–300cd
KPS–20i
KPS–20iL
KPS 25sc
SACD Standard
KAV–400xi (default)
KAV–300i
KAV–300iL
KAV–300r
KAV–500i
KPS 28c
KPS 30i
DVD Standard (default)
Showcase Processor
Showcase DVD
KCT(default)
KAV–280p
KRC–2
KRC–3
KRC–HR
HTS 7.1(default)
MRS (default)
Krell Code List
Krell CD/SACD Players CD/SACD
Model Code
KAV–280cd (default) 1426
KAV–250cd/2 1426
KAV–300cd 1436
KPS–20i 1466
KPS–20iL 1476
KPS 25sc 1446
KPS–28c 1436
KPS–30i 1486
SACD Standard 0004
Krell DVD Players DVD
Model Code
DVD Standard (default) 0408
Showcase DVD 0418
Krell Integrated Amplifiers INT AMP
Model Code
KAV–400xi (default) 0007
KAV–300i 0007
KAV–300iL 0007
KAV–300r 0017
KAV–500i 0007
Krell Preamplifiers PRE AMP
Model Code
KCT (default) 0005
KAV–280p 0015
KRC–2 0025
KRC–3 0035
KRC–HR 0025
Krell Preamp/Processors PRE PRO
Model Code
HTS 7.1 (default) 0009
Showcase Processor 0019
Krell Subwoofer
Model Code
Master Reference
Subwoofer (default) 0004
For the complete list of codes preprogrammed into the remote, go to the
universal Krell remote on the website
at www.krellonline.com and download
the manual
IR Code Number List
for Devices.
AUX
4 Universal Krell Remote
Page 5

Main Menu Setup
Functions
There are 7 function categories on
the main menu of the remote:
SETUP
EDIT*
PREFERENCE*
REMOTE SETTING
SMART*
CLONE*
PC LINK*
*For information on all items marked with
an asterisk, please download the owner’s
reference for the universal Krell remote,
on the Krell website.
This section describes the
SETUP
functions on the menu used to set up
device codes on the Universal Krell
Touch Screen Remote.
For a description of the
TING functions for the remote, see
REMOTE SET-
page 7.
Press the MENU hot key and then
press
SETUP on the main menu
page. Select:
NAME, ENTER CODE or AUTO
SEARCH.
LEARNING, BRAND
Use the device code list and the
steps under
the menu quickly and easily
ENTER CODE to set up
.
For a
written description of the steps
involved, see
Enter Code, on page 6.
Learning (Copying)
Copy a key command from an original remote control to the Universal
Krell Touch Screen Remote.
1. Press the
setup menu screen.
2. Select the device to which you
want to copy a command. For
example, select
3. Press the key on the universal
Krell remote, which accepts the
copy command.
4. Aim the original remote at the
front of the universal Krell
remote, from a distance of 5–8
in. or 12.7–20.3 cm.
5. Press and hold the key on the
original remote until the universal
Krell remote responds with a suc
cessful message. This normally
takes a short while.
6. Edit the key name on the universal Krell remote, or press
confirm that you want the key to
retain the copied command.
7. Press another key to continue
copying more commands.
8. Press the
return to the main menu page, or
press the
return to the
DUAL SIGNAL LEARNING
If a learned command works for
A/V equipment only occasional-
your
ly, the original remote control may
LEARNING key on the
TV.
OK to
MENU short cut key to
HOME short cut key to
HOME page.
contain dual signals. Follow steps 1
through 6 under
Learning above,
then add the following steps:
7. Aim the original remote at the
front of the universal Krell remote
a second time. Press and hold the
same key on the original remote
until the universal Krell remote
displays a successful message.
8. Edit the key name on the universal Krell remote, or press
confirm that you want the key to
retain the copied command.
Notes
1. The optimum receiving distance is
5–8 in. or 12.7–20.3 cm for remote
learning. If a problem report is displayed during the learning process,
adjust the distance between the 2
remotes and try again.
2. Check the remaining memory for
learning additional commands,
Status, on page 7.
see
Brand Name
Setup the pre-programmed code by
selecting a brand name.
1. Before starting the setup procedure, turn on the device for the
code you want to install in the
remote. For example, turn on the
Krell DVD Standard.
2. Press
3. Select the device that is on. For
4. A brand name list in alphabetical
-
5. Press the up or down arrows to
6. Press the brand name of your
7. Press TEST, then press the test
8. Press the
BRAND NAME from the
setup menu.
example, select
DVD.
order is displayed.
browse the brand name list, or
press a character to access a
brand name. For example, press
K for KRELL.
choice, and it will be highlighted.
For example, press
keys on the touch screen, or
press any hard key to test the
selected code.
CH+ hard key and then
the
BACK key on the touch screen
to access the brand name search
menu again.
OK to
KRELL.
Universal Krell Remote 5
Page 6

Main Menu Setup
Functions,
continued
Brand Name, continued
9.Search for the next code, and the
power on/of
f command will be
sent at the same time.
10.Press
CH- to skip to the previous
code.
11.Press the
BACK key to cancel
and return to the brand name
search menu page to select
another brand name.
12.Follow steps 1-9 above for the
second brand name.
13.Press
OK to confirm and exit the
setup menu.
Enter Code
Setup a preprogrammed code by
entering the 4-digit code number for
the device. The Universal Krell Touch
Screen Remote is preloaded with a list
of device codes for Krell components
and other popular AV equipment.
Device codes for Krell products are
listed in this document.
plete list of codes preprogrammed into
the remote, go to the universal Krell
remote on the website at www.krellonline.com and download the manual
Code Number List for Devices.
1. Press ENTER CODE on the
setup menu.
2. Select the device. For example,
select DVD.
Press the numeric keys to enter
3.
the 4-digit code number of your
device.
Press OK to confirm the input.
4.
Press DELETE to delete the last
entered digit.
Press
BACK to cancel and return
to the previous menu page
5. Press
TEST KEY on the touch
screen or press any of the hard
keys to test the new key function.
6. Press
OK to confirm and exit the
setup menu.
For the com-
IR
Auto Search
Set up a pre-programmed code by
searching the library of codes.
1. Turn on the device you want to
install before starting the setup
procedure. For example, turn on
the Krell Showcase Processor.
Press
2.
3. Select a device. For example:
4.
5. Press
6. Press
7. Press
8. Press
Notes
1. When a code is assigned to a
2. Some codes do not have the
3. During auto search, you can
AUTO SEARCH on the
setup menu.
Press
CH+ slowly
, patiently, and
repeatedly, until your device is
switched off. Then press
lock the code, or press
OK to
TEST KEY
to test the device during setup.
CH- once to skip backward
one code immediately, if you
have missed the last code.
BACK to cancel and return
to the previous menu page, or
press
OK to confirm and exit the
setup menu.
TEST KEY on the touch
screen or press any of the hard
keys to test the new key function.
OK to confirm and exit the
setup menu.
device, the copied commands
and the key names of that device
will be lost, and restored to the
pre-programmed commands.
power command and may not be
detected using the auto search
function. Use the
TEST KEY to
test these other keys.
access any of the hard keys to
test the command.
TV.
6 Universal Krell Remote
Page 7

Remote Setting
Menu Functions
There are 12 function categories on
the remote settings menu:
CLOCK
BEEP SOUND
LCD
PASSWORD
RESET DEFAULT
KEY RENAME*
DEVICE RENAME*
MOVE KEY*
MOVE DEVICE*
DELETED KEY*
TO DEFAULT
ALL
STATUS
*For information on all items marked with
an asterisk, please download the owner’s
reference for the universal Krell remote,
on the Krell website.
This section describes many of the
functions in the menu used to configure the
REMOTE SETTINGS of the
Universal Krell Touch Screen
Remote. These functions are optional
and may be set up at your convenience to optimize the performance of
the remote.
For a description of the main menu
SETUP functions for the remote, see
page 5.
including
SMART, CLONE, and PC LINK are
described in the owner’s reference
published on the Krell website.
Press
SETTING
following items:
Clock
1. Press CLOCK.
CURRENT TIME
2.
3. Enter four digits. The first two
4. Press
Other main menu items
EDIT, PREFERENCE,
MENU, then press REMOTE
and choose any one of the
Under
CURRENT
TIME,
press SET
to adjust the clock.
digits represent the hour and the
second two digits represent minutes. The 24-hour format is used.
OK to confirm and exit the
clock setting menu.
CLOCK, continued
DAY OF WEEK
Under
5.
DAY OF WEEK, press SET
to adjust the date.
6. Press the up or down arrows to
select the day of the week.
7. Press
OK to confirm and exit the
clock setting menu.
Beep Sound
1. Press BEEP SOUND.
Press
2.
ENABLE to turn on the
beep sound.
3. Press
DISABLE to turn off the
beep sound.
LCD
1. Press LCD.
LIGHT AUTO OFF
2. Under LIGHT AUTO OFF, select
the auto turn off of the back light
for 5 seconds, 10 seconds, or 15
seconds.
BACKLIT CONTROL
3. Under BACKLIT CONTROL, select
an option for controlling the LCD:
BY SENSOR, ALWAYS ON, or
ALWAYS OFF.
Password
Activate the password function to
protect your personal settings.
1. Enter the password, using a
maximum of 5 characters.
2. Re-enter the password for confirmation.
3. Press DELETE to delete last character in the password.
o disable the password, use a
T
4.
blank input (no character input) in
the password field.
The universal password is AAAAA.
Reset Default
Reset the user setting to the factory
default.
ANT
T
IMPOR
Please make sure it is necessary
to perform this function. The uni
versal Krell remote resets to the
pre-loaded factory settings and
the learned signals and custom
settings are erased when this
function is activated.
CLEAR LEARNING. To clear the
learned command and restore keys
to the factory default commands.
One Key. To clear the learned com-
mand of a single key.
1. Select a device.
2. Select the key you want to return
to factory default.
3. Press
YES to confirm or press NO
to abort.
One Device. Clear the learned com-
mands from all the keys for a
device.
1. Select a device.
2. Press
YES to confirm or press NO
to abort.
All Devices. Clear all the learned
commands of all the devices.
1. Select all devices.
2. Press
YES to confirm or press NO
to abort.
ALL TO DEFAULT. To restore all user
settings to the factory default:
1. Press
YES to confirm or press NO
to abort.
Note
All user settings are lost except
clock and password settings when
this function is activated.
Status
Access the software version, the
code number of each device config
ured, active remote settings, available memory (for learning), and
other information about the remote.
1. Press the up and down
arrows to scroll through the
available information.
2. Press
-
BACK to return to the
remote settings menu.
-
PAGE
Universal Krell Remote 7
Page 8

Troubleshooting
Q. How do I identify and prevent interference from my remote?
A. Turn the equipment off and on to determine whether or not the operation of
the remote is interfering with area radio or television reception. Then try:
Reorienting or relocating the receiving antenna.
—
—Increasing the separation between the equipment and receiver
—Connecting the equipment into an outlet on a different circuit than
the circuit to which the receiver is currently connected
If the remote is still causing interference, consult an experienced radio /
TV
technician, your authorized Krell dealer or distributor, or Krell.
Q. Why is my remote not working?
Try one or more of the following measures:
A.
—Inserting the provided rechargeable batteries into the remote with the
correct polarity and charge up the remote
—Pressing the
When I install a code from the provided code list for my device, why isn’t
Q.
RESET key inside the battery compartment
the remote working or only partly working with my device?
A. The selected code does not match your device. Try another code from the
code list. Or, use
AUTO SEARCH to locate another possible code. You can
also use the learning function to teach the universal Krell remote the codes
from your original remote.
Q. I copied my original remote to the universal Krell remote. Why do some of
the commands only function occasionally?
A. Your original remote may carry dual signal commands. Program the
remote for dual signal commands.
Q. Why is the LCD backlit screen not illuminated?
A. Select either
BY SENSOR or ALWAYS ON in the remote setting menu.
Q. How can I prevent someone from editing/changing the setting of my
remote?
A. Activate the password function to lock the remote.
Q. How do I access areas that require my password, if I have forgotten my
password?
A. Use the factory preloaded universal password:
AAAAA
Q. How do I restore my Krell Universal Remote to the factory default?
A. For information on this topic, see
Reset Default, on page 7.
Q. What is SMART?
A, This is an advanced function of the universal Krell remote which enables
you to program a series of commands with time delay. After setup, press
the programmed SMART button to activate the chain of IR signals automatically.
For details, see the universal Krell remote owner’s manual on
the Krell website.
What is Clone?
Q.
A. This is an advanced function of the universal Krell remote which allows
data transfer between 2 universal Krell remotes.
For details, see the uni-
versal Krell remote owner’s manual on the Krell website.
Q. What is PC Link?
A. This advanced function of the universal Krell remote uploads and down-
loads remote setting data to and from a personal computer. You need the
optional docking station for the universal Krell remote and computer soft
ware needs to be installed in your PC.
For details, see the universal Krell
-
remote owner’s manual on the Krell website.
8 Universal Krell Remote
Your universal Krell remote product serial number is:
Krell Industries, Inc., 45 Connair Road,Orange, CT
06477-3650 USA
TEL 203-799-9954, FAX 203-891-2028, E-MAIL krell@krellonline.com
WEB SITE http://www
.krellonline.com
P/N 307471-W
v 04.1
 Loading...