

Page 1
POWER
POWER
BASS
TREBLE
V
OLUME
AUX
INPUT
pecifications
S
KID SPECIFICATIONS
Inputs
1 30-pin iPod-device type
3-conductor 3.5 mm connector
1
Audio Outputs
1 pair balanced via XLR connectors
pair single-ended via RCA connectors
1
Video Outputs
1 S-Video via a DIN connector
Composite via a RCA connector
1
Control Inputs
1 RS-232 input via a 9-pin D-subminiature connector
Control Outputs
1 12 VDC trigger output via 2-conductor
3.5 mm connectors (500 milliamps maximum
per output)
Input impedance
Single-ended:
Output impedance
Balanced:
Single-ended: 25 Ohms
Volume Control
256-step Digital Control
Input Overload
Single-ended:
Output Overload
Balanced:
Single-ended: 8 Vrms
Frequency Response
20 Hz to 20 kHz +0.7 dB, -0.0 dB
0.1 Hz to 90 kHz +0.7, -3 dB
Tone Control Range
+8 dB, -7 dB
Bass:
Treble: +6 dB, -6 dB
Total Harmonic Distortion Plus Noise
Balanced Output:
4 V RMS or 4 mA rms
Signal-to-noise Ratio
Wideband, Unweighted:
“A” Weighted: >97 dB
Power Consumption
Standby:
Power on: 25 W
Dimensions
Inches:
Centimeters: 33.0 W x 7.0 H x 27.7 D
Weight
Unit Only:
Shipped: 14 lb., 6.4 kg
47.5 k Ohms
50 Ohms
4 Vrms
16 Vrms
<0.002%, 20 Hz to 20 kHz,
>94 dB
10 W
13 W x 2.8 H x 10.9 D
10 lb., 4.5 kg
PAPA DOCK SPECIFICATIONS
Frequency Response
0 Hz to 20 kHz, +0, -0.15 dB
2
<0.2 Hz to 110 kHz,+0 dB, -3 dB
Signal-to-noise Ratio
ideband, unweighted, referred to full power output:
W
>108 dB
“A” weighted: >116 dB
ain: 26.2 dB
G
Total Harmonic Distortion (THD)
< 0.03%@ 1 kHz, at 150 W, 8 Ohms
< 0.20%@ 20 kHz, at 150 W, 8 Ohms
Input Impedance
90 kOhms
Input Sensitivity
1.70 Vrms
Output Power, each channel driven:
150 Wrms @ 8 Ohms
300 Wrms @ 4 Ohms
Output voltage
98 V peak-to-peak, 35 Vrms
Output current: 15 A peak
Slew Rate: 50 V/µs
Output Impedance
<0.073 Ohms at 20 Hz
<0.084 Ohms, 20 Hz to 20 kHz<
Dampening Factor
110 at 20 Hz, referred to 8 Ohms
95, 20 Hz to 20 kHz, referred to 8 Ohms
Power Consumption
Stand-by:
Heat Output, BTU/hr.
Stand-by:
Inputs
1 40-pin
1 RS-232 (to control KID) via a 9-pin
D-subminiatur
Outputs
2 channel via 5-way binding posts
Remote Connectors
One 12 VDC output (12 V trigger), 30 mA maxi-
mum, via a 3.5 mm connector
S-V
1 composite video (fr
Dimensions
Inches:
Centimeters: 43.8 W x 14.5 H x 41.3 D
Weight
Unit Only:
Shipped: 49 lb., 22.2 kg
25 W, Idle: 55 W, Maximum: 900 W
85, Idle: 190, Maximum: 1100
KID connector
e connector
ideo (from KID) via mini-DIN connector
om KID) via RCA connector
17.3 W x 5.7 H x 16.3 D
39 lb., 17.6 kg
Krell Interface Dock
Papa Dock
Owner’s Reference
All operational features, functions, specifications, and
policies are subject to change without notification.
12 Krell / Papa Dock
Your KID product serial number is:
P/N 301038 v 08.0
Page 2

Krell / Papa Dock
Owner’s Reference, v 08.0
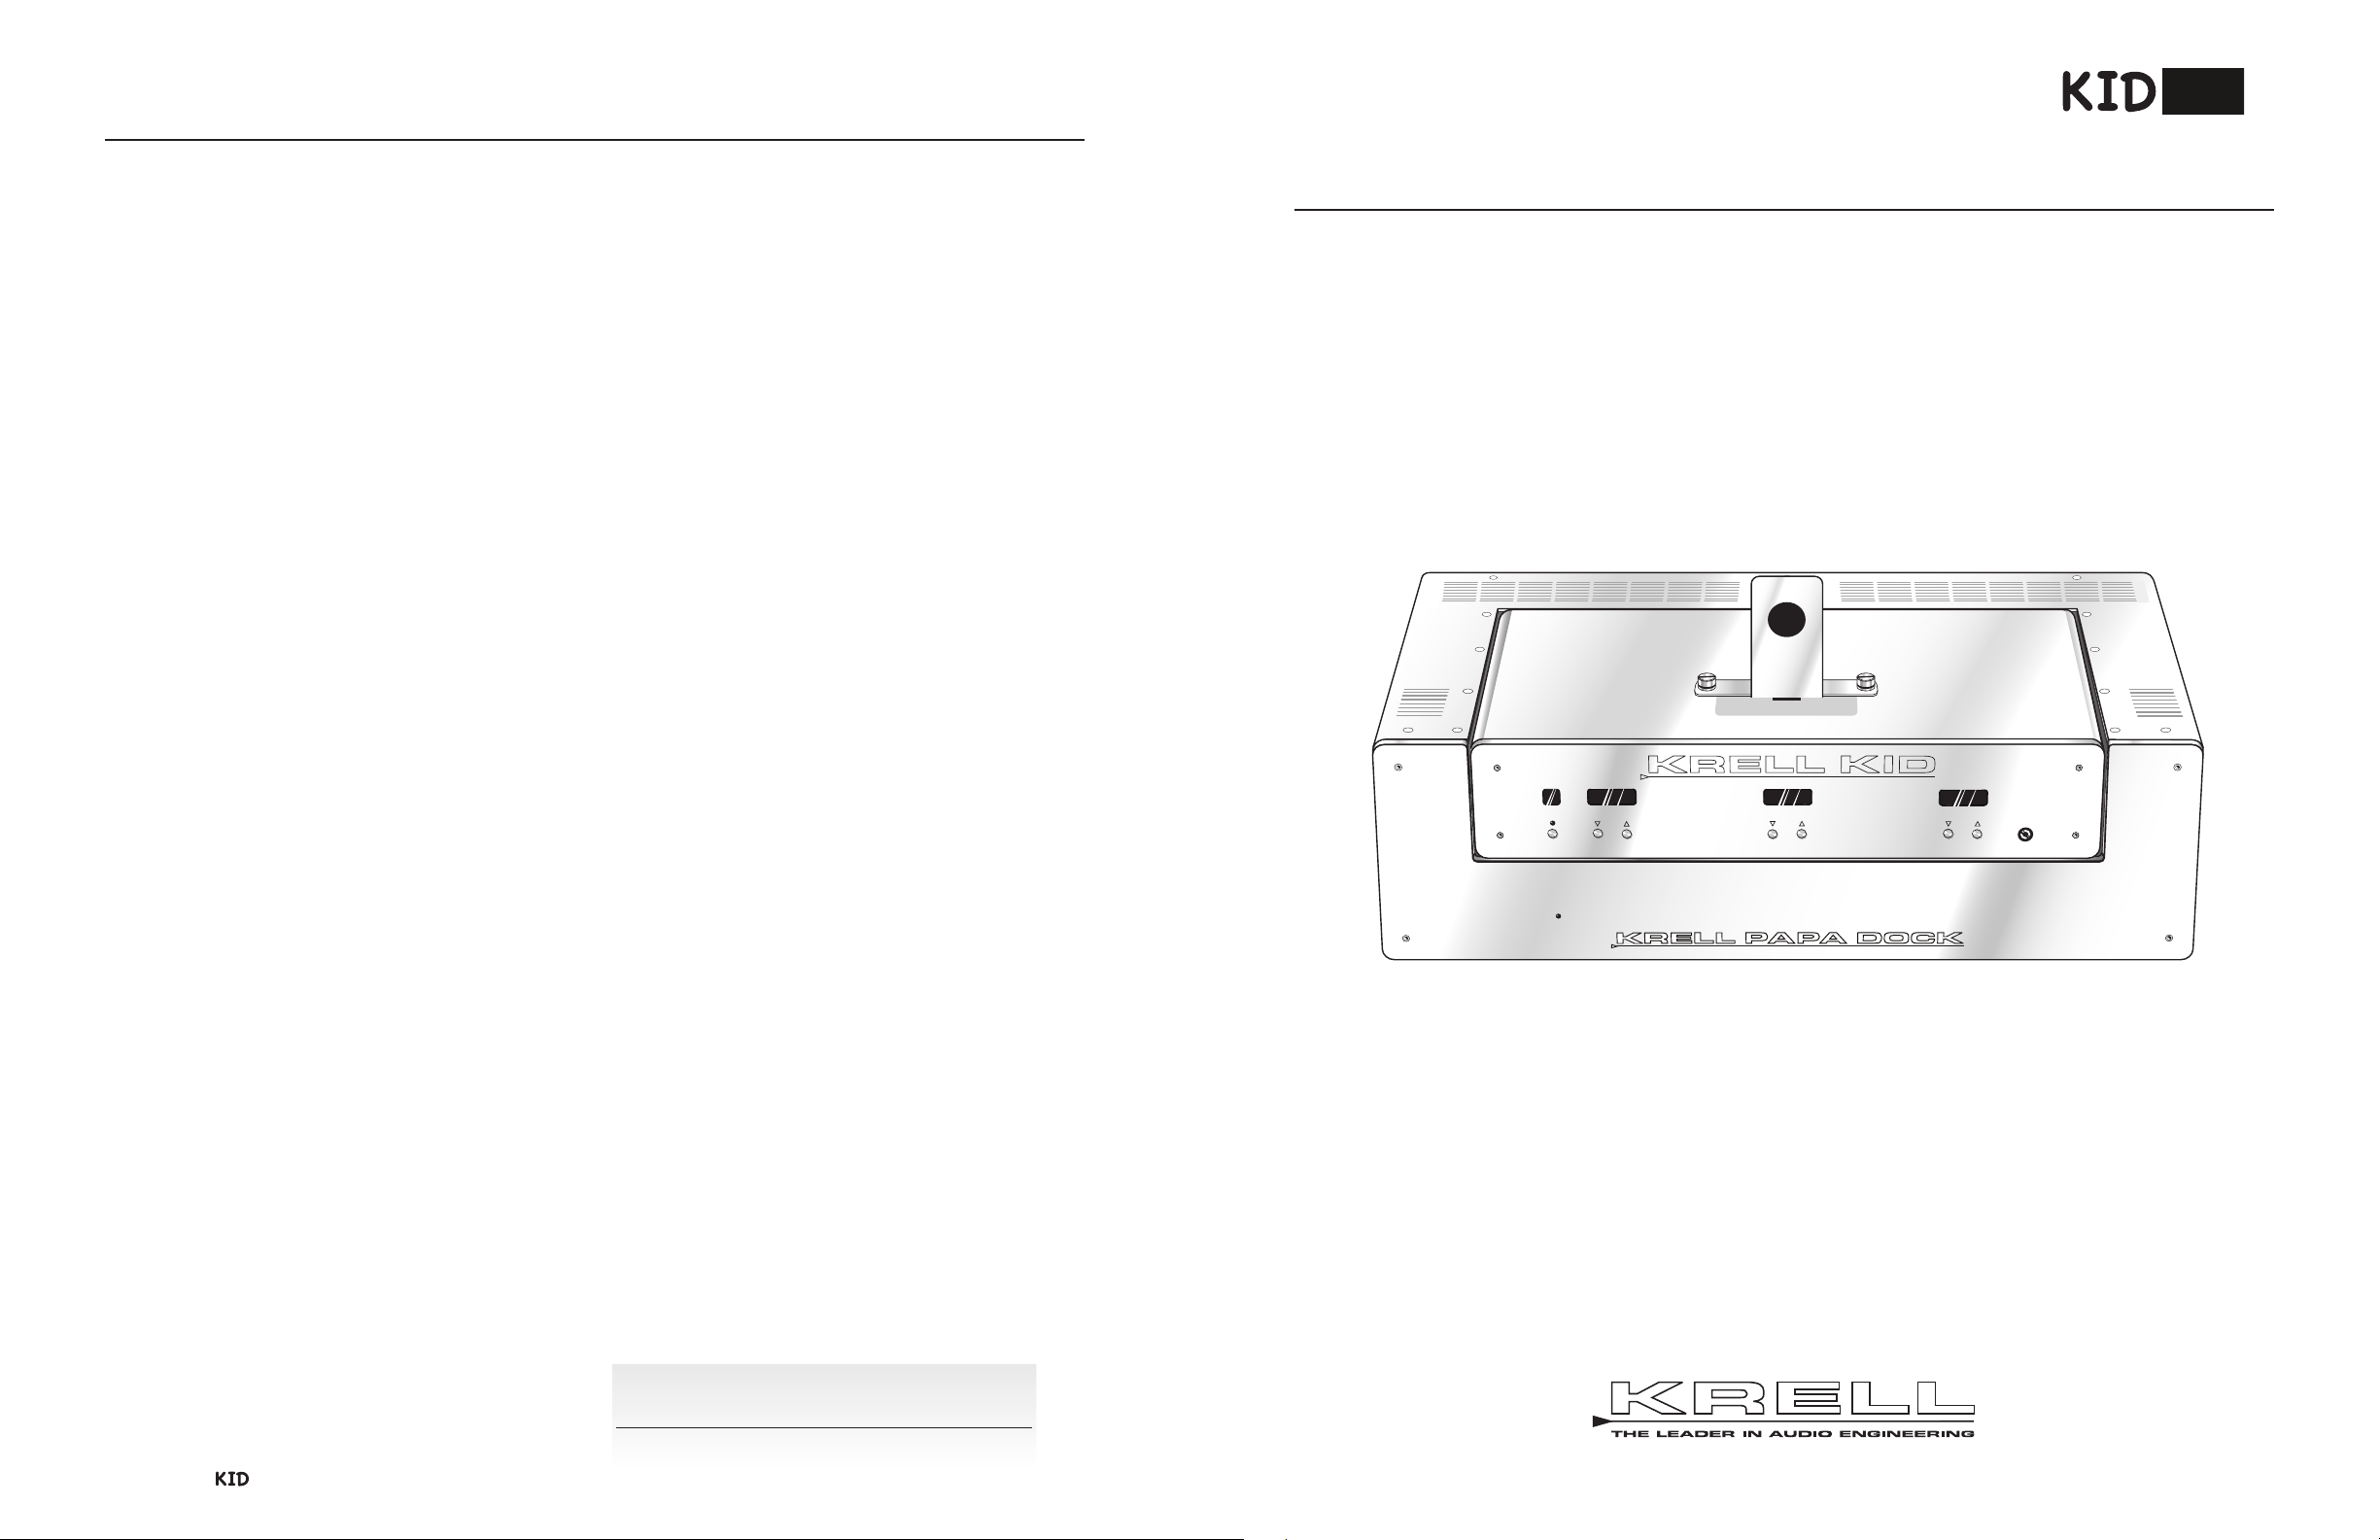
Front Panel and Remote Control Functions for the KID
CONTACT INFORMATION
IMPORTANT SAFETY INSTRUCTIONS
1. Read Instructions.
2. Keep these Instructions.
3. Heed all Warnings.
4. Follow all Instructions.
5. Do not use this apparatus near water.
6. Clean only with dry cloth.
7. Do not install near any heat sources such as
radiators, heat registers, stoves, or other apparatus (including amplifiers) that produce heat.
8. Unplug this apparatus during lightning storms or
when unused for long periods of time.
9. Refer all servicing to qualified service personnel.
Servicing is required when the apparatus has
been damaged in any way, such as a powersupply cord or plug is damaged, liquid has been
spilled or objects have fallen into the apparatus,
the apparatus has been exposed to rain or
moisture, does not operate normally, or has
been dropped.
rell Industries, Inc.
K
5 Connair Road
4
range, CT 06477-3650 USA
O
TEL 203-298-4000
FAX 203-891-2028
E-MAIL krell@krellonline.com
WEBSITE http://www.krellonline.com
10. The KID and the Papa Dock must be placed on a
firm, level surface where it is not exposed to dripping or splashing.
11. The ventilation grids on the bottom of the KID,
and the ventilation grids on the top and bottom of
the Papa Dock must be unobstructed at all times
during operation. Do not place flammable material above or beneath the KID or the Papa Dock.
12. Before making connections to the KID or the Papa
Dock, ensure that the power is off and other components are in mute or stand-by mode. Make sure
all cable terminations are of the highest quality,
free from frayed ends, short circuits, or cold solder
joints.
13. THERE ARE NO USER SERVICEABLE PARTS
INSIDE THE KID OR THE PAPA DOCK.
Please contact Krell if you have questions not addressed in this guide.
TOP AND FRONT PANEL ONLY
22 iPod-device docking station
Connect the iPod-device to the KID by plugging it into the dock connector. The iPoddevice takes the KID in and out of stand-by.
When an iPod-device is connected to the dock
connector, the KID automatically moves to the
operational mode from stand-by.
FRONT PANEL AND REMOTE
24 Power Button
Press the power button or key to take the KID
in and out of stand-by
.
Power LED Color Guide
When the KID is plugged into AC power, the
power LED illuminates:
Red The KID is in stand-by mode.
Blue The KID is on, in the operational mode,
indicating that an iPod-device is connected.
Purple The KID is on, in the operational mode,
and an iPod-device is not connected.
25 Bass Control
Two buttons or keys control the bass tone
control + or - 6 dB. The bass control is within
the KID and not in the iPod-device.
REMOTE ONLY
When an iPod-device is removed from the
dock connector, the KID automatically reverts
to the stand-by mode.
3 Aux Input
2
Use this input instead of the dock connector to
connect any audio source via a 3.5 mm stereo
phone cable.
26 Treble Control
Two buttons or keys control the treble tone
control + or - 6 dB. The treble control is within
the KID and not in the iPod-device.
27 Volume Control
The iPod-device volume control is not active
when the iPod-device is connected to the KID.
Two up or down buttons on the KID, or the
two up or down keys on the KID remote, control the volume, from 0 to 151. Press and hold
both volume buttons or keys at the same time
for 3 seconds. The volume locks, and the KID
can be used as a source in an A/V system.
Press and hold both volume buttons or keys at
the same time, for 3 seconds, to unlock the
volume.
2 Krell / Papa Dock
These pr
(89/336/EEC) and the low-voltage dir
Kr
buy Kr
mark of Apple, Inc., r
© 2008 by Kr
oducts comply with the EMC directive
ective (73/23/EEC).
®
l
el
is a r
ell Industries, Inc., its subsidiaries, and authorized agents. iPod is a trade
ed trademark of Kr
egister
egister
ell Industries, Inc. All rights r
ell Industries, Inc., and is restricted for use
ed in the U.S. and other Countries.
eser
ved.
28 DISP Key
Turns on the iPod-device backlight.
29 Menu Key
Activates the iPod-device menu function. The
remote menu key does not have a held function.
Up Directional Key
30
Performs the iPod-device up arrow function.
31 Down Directional Key
Performs the iPod-device down arrow function.
32 Left and Right Directional Keys
or Track Keys
-
Activate the iPod-device previous and next
track functions r
espectively.
33 Play Key
ms the iPod-device play/r
for
Per
esume function.
34 Stop Key
ms the iPod-device stop function.
for
Per
35 Repeat Key
Performs the iPod-device repeat function.
36 Shuffle Button
Performs the iPod-device shuffle function.
37 Pause Key
forms the iPod-device pause function.
Per
38 Mute Key
Performs the iPod-device mute function.
39 Search Up/Down Keys
Press and hold these keys to perform the
iPod-device search function.
Album Up/Down Keys
40
Perform the iPod-device album up and down
functions.
Playlist Up/Down Keys
41
Perform the iPod-device playlist up and down
functions.
Krell / Papa Dock 11
Page 3

ront Panel Functions
24
25
26
27
23
22
Volume
Disp
Mute
MenuPower
Album
Bass
Treble
Playlist
Track
Search
24
30
29
34
31
32
33
28
38
27
26
37
35
36
25
39
40
32
41
TREBLE
V
F
Remote Control Functions
Introduction
verview
O
List of Illustrations
FIGURE 6 KID Front Panel
Docking station inset:
Inset shows iPOD-device support
affixed to the top cover of the chassis
with the dock connector below
TOP ONLY
22 Docking station (see inset above)
FRONT PANEL ONLY
23 Auxiliary input
FRONT PANEL AND REMOTE
24 Power button/key
25 Bass control button/keys and display window
26 Treble control button /keys and display window
27 Volume level button/keys and display window
REMOTE ONLY
28 DISP key (turns on iPod-device backlight)
29 Menu key
30
31 Down directional keys: iPod-device down arrow key
32 Left and right directional keys/Track keys
33 Play/Resume key
34 Stop key
35 Repeat key
36 Shuffle key
37
38
39
40 Album keys
41 Playlist keys
Button = front panel mechanism
Key = remote function mechanism
Up dir
ectional keys: iPod-device up arrow key
(These keys correspond to iPod-device Previous
and Next keys)
Pause key
Mute key
Search keys
FIGURE 7 KID Remote Control
INTRODUCTION
Thank you for your purchase of the KID, the Krell
Interface Dock, and/or the Papa Dock. The KID can
be operated alone, or docked in the optional Papa
ock, a dedicated 150 W power amplifier designed
D
specifically by Krell for use with the KID.
KID. The KID is designed to deliver maximum sonic
performance from an iPod-device, and is the first
product of its kind to utilize the fully differential output of the internal DAC for iPod-devices.
Additional features include opto-isolated digital connections between the iPod-device and the KID, and
balanced differential Class A circuitry. Ultra low
noise volume control, with digitally-controlled analog
bass and treble controls fine tune your listening experience. A full-function remote control makes operation flexible. Balanced and single-ended outputs,
composite and S-Video outputs, and an RS-232
control allow for a variety of connection options.
VIEW
OVER
To prepare the KID and the Papa Dock for operation, follow the steps below:
STEP 1 Unpack the KID 4
Unpack the Papa Dock 4
STEP 2 Affix the iPod-device Support
to the KID Top Cover 4
STEP 3 Install the Battery in the KID Remote 5
STEP 4 Placement Considerations 5
STEP 5` The KID / Papa Dock Connection 6
ILLUSTRATIONS
OF
LIST
FIGURE 1 The iPod-device Support 5
FIGURE 2 Connecting the KID
to the Papa Dock 6
FIGURE 3
FIGURE 4 Papa Dock Back Panel
KID Back Panel Connections 7
Connections 7
Papa Dock. The Papa Dock is engineered to drive
virtually any loudspeaker to realistic listening levels.
The amplifier has a proprietary connection for the
ID, enabling all KID output functions to route
K
through the Papa Dock back panel. It features a substantial 450 W, 40,000 microfarad power supply. Left
and right channels incorporate discrete, direct coupled topology, 12 high current output devices, and
terminate in WBT loudspeaker connectors.
This owner’s reference contains important information on the placement, installation, and operation of the KID and the Papa Dock. Please read
this information carefully. A thorough understanding of these details will help ensure satisfactory
operation and long life for your KID, the Papa
Dock, and related system components.
STEP 6 Connect to Your System 7
Connect the KID to Your System 7
AC Power Guidelines for the KID 7
Connect the Papa Dock
to Your System 8
AC Power Guidelines
for the Papa Dock 8
STEP 7 Insert the iPod-device
Into the KID Dock Connector 9
KID Power LED Color Guide 9
Papa Dock Power LED Color Guide 9
STEP 8 Operation 9
Front Panel and Remote Functions
for the KID 11
SPECIFICATIONS 12
FIGURE 5 Inserting the iPod-device
Into the Dock Connector 9
FIGURE 6 KID Front Panel 10
FIGURE 7
KID Remote Control 11
10 Krell / Papa Dock
ell
Kr
/ Papa Dock 3
Page 4

npacking the KID
POWER
BASS
TREBLE
VOLUME
A
UX
INPUT
U
Unpacking the Papa Dock
Insert the iPod-device into the KID Dock Connector
ower LED Color Guides
P
Operation
UNPACK THE KID
One person can remove the KID from its shipping
1
ox safely and easily.
b
. Open the shipping carton top flap. You see the
1
iterature pack containing:
l
1 Owner’s Reference
1 Warranty Registration Card
2. Remove the literature pack and the top layer of
foam to view:
1 KID
1 Accessory tray containing:
1 AC power cord
1 KID remote control
1
CR2025 lithium battery
1 iPod-device support (under the accessory tray)
3. Face the front of the shipping box and remove
the foam insert containing the AC power cord
by pulling the insert straight out of the box.
UNPACK THE PAPA DOCK
One person can remove the Papa Dock from its
shipping box safely and easily.
1. Open the shipping carton top flap. You see a
protective cardboard sheet.
2. Remove the protective cardboard sheet to view:
1 Papa Dock
1 Accessory box containing:
1 AC power cord
1 12 VDC (12 V trigger) cable
1 T-10 Torx wrench
1 Literature pack containing the Owner’s
ranty Registration
ence and W
Refer
Card
3. Remove the accessory box by pulling it
straight out of the box.
ITEMS NOT IN THE SHIPPING BOX. If any of the
items listed above are not included in the shipping
box, please contact your authorized Krell dealer or
distributor
4 Krell / Papa Dock
.
ar
4. Set the remote and the AC power cord aside,
for later use.
5. Insert your hands below the left and right foam
nserts surrounding the KID.
i
6. Lift the KID with the foam inserts straight out
of the box.
7. Place the KID on a safe, clean work surface,
on its side, resting on a foam insert.
8. Remove the other foam insert.
9. Reposition the KID on the work surface, with
the remaining attached foam insert tilted up.
Remove the second foam insert.
10.
11. Remove the foam enclosing the component.
12. Place the KID on its feet, right side up, on the
work surface. You are now ready to affix the
iPod-device support to the chassis.
4. Insert your hands below the left and right foam
inserts surrounding the Papa Dock.
5. Lift the Papa Dock with the foam inserts
straight out of the box.
6. Place the Papa Dock on a safe, clean work
surface, on its side, resting on a foam insert.
7. Remove the other foam insert.
8. Reposition the Papa Dock on the work surface, with the r
tilted up.
Remove the second foam inser
9.
10. Remove the foam wrapper from the component.
12. Position the Papa Dock in the listening area.
PACKING MATERIALS. Save all packing materials. To ship the KID or the Pap Dock in the future,
epack the unit in its original packaging to pr
r
shipping damage. For more information, see the
Return Authorization procedure, in the Service section of the Krell website at www.krellonline.com.
emaining attached foam insert
t.
event
FIGURE 4 Inserting the iPod-device Into
the Dock Connector
1
4
INSERT THE IPOD-DEVICE INTO
THE KID DOCK CONNECTOR
7
When the KID or the Papa Dock are plugged into
AC power, connect the iPod-device:
1. Hold the iPod-device in both hands as shown
in the illustration above, using the iPod-device
support (1) as a guide.
KID Power LED Color Guide. When the KID is
plugged into AC power, the power LED illuminates
as follows:
Red The KID is in stand-by mode.
Blue The KID is on, in the operational mode, in-
dicating that an iPod-device is connected.
Purple The KID is on, in the operational mode,
and an iPod-device is not connected.
OPERATION
8
When the iPod-device is connected to the KID,
you are ready to play music. When the KID is connected to the Papa Dock and an iPod-device is
ted into the KID dock connector, the KID pow-
inser
ers on the Papa Dock.
1. Press the play key (33) on the remote.
Adjust the volume (27) using the buttons on the
2.
KID front panel or the keys on the remote.
Numerical values indicating the volume level
appear in the display window.
3. Adjust the bass tone control (25) using the
buttons on the KID front panel or the keys on
2. Center the iPod-device connector against the
KID dock connector (4).
3. Push down on the top of the iPod-device
gently but firmly until its connector plugs into
the KID dock connector.
Papa Dock Power LED Color Guide. When the
Papa Dock is plugged into AC power, the power
LED on the front panel illuminates as follows:
Red The Papa Dock is in stand-by mode.
Blue The Papa Dock is on, in the operational
mode, when the KID is connected to the
Papa Dock and the iPod-device is inserted
into the KID dock connector.
the remote. Numerical values indicating the
bass tone level appear in the display window.
4. Adjust the treble tone control (26) using the buttons on the KID front panel or the keys on the
r
emote. Numerical values indicating the treble
tone level appear in the display window.
5. Press the stop key (34) to end playback.
6. Press the play button or key to begin playback
again.
For a complete list of functions, see page 10.
/ Papa Dock 9
ell
Kr
Page 5

Connecting the Papa Dock to Your System
L
EFT OUTPUT
R
IGHT OUTPUT
R
S-232 IN
12VDC
OUT
30 mA
MAX.
COMPOSITE
S-VIDEO
VIDEO OUT
PAPA DOCKPAPA DOCK
KRELL INDUSTRIES, INC.
45 CONNAIR ROAD
O
RANGE, CT 06477-3650
USA
5
0/60 Hz
N
O USER SERVICEABLE PARTS INSIDE
MADE IN USA
16
16
17
18
19
20
21
C Power Guidelines for the Papa Dock
A
Papa Dock Back Panel Connections
Affix the iPod-device Support to the KID Top Cover
nstall the Battery in the KID Remote
I
Placement Considerations
CONNECTING TO YOUR SYSTEM, continued
C
With the KID docked onto the Papa Dock:
1
FIGURE 7 Papa Dock Back Panel Connections
AMPLIFIER CHANNEL OUTPUTS
16 Left and Right Outputs
VIDEO OUTPUTS
17 Composite Video Output
18
REMOTE CONNECTIONS
19 Comm Port RS-232 Connector
onnect the Papa Dock to Your System
. Connect the loudspeaker cables to the Papa
Dock amplifier channel output binding posts
(16) located on the back panel.
The binding post terminals accept spade lugs,
bare wire, or pins. Use the red terminal for the
positive connection and the black terminal for
the negative connection.
IMPORTANT: Tighten loudspeaker binding
posts by hand only.
wo channel outputs via 5-way binding posts.
T
One composite video output with an RCA connector.
S-Video Output
One S-Video output with a DIN connector.
Sends software updates directly to the KID using an
nal computer contr
exter
ol system.
5. Plug the AC power cord into the amplifier’s IEC
connector (21).
6. Plug the other end of the AC power cord into
the AC wall outlet.
The amplifier is now ready for operation.
AC Power Guidelines for the Papa Dock. Krell
recommends operating the Papa Dock amplifier
from a dedicated 15-amp AC power line. Please
contact your Krell dealer, distributor, or Krell
before using any devices designed to alter or stabilize the AC power for the Papa Dock.
20 12 VDC Out
Sends a 12 V power on/off signal via a 12 V trigger
cable to other Kr
that incorporate 12 V power on/off trigger input.
When the Papa Dock is in the operational mode and
a trigger is enabled, the 12 VDC Out provides 12 V of
DC output. When the Papa Dock is in the stand-by
mode or off, or if a trigger is not enabled, the DC output is 0 V.
POWER CONNECTION
21 IEC Connector
A standar
the AC power cord.
ell components and to other devices
d male IEC power connector
, for use with
AFFIX THE iPOD-DEVICE SUPPORT
TO THE KID TOP COVER
2
IMPORTANT:
ffix the iPod-device support before inserting the
A
Pod-device into the dock connector (4).
i
1. Remove the iPod-device support (1) from its
bubble wrap package.
2. The bracket bar has two thumbscrews (2).
Position these screws over the thumbscrew
holes in the KID top cover.
Orientation: The round black rubber pad (3)
on the iPod-device support faces the front of
the chassis (5).
4. Screw the iPod-device support thumbscrews
into the thumbscr
INSTALL THE BATTERY
IN THE KID REMOTE
3
The KID remote control uses one CR2025 lithium
battery which is included with the shipment.
To open the battery compartment on the back of
the remote control:
1. Place the remote face down on the table.
2. Use your thumbnail or a small jeweler’s or eyeglass screwdriver to move the small tab
toward the center of the remote, while using
your index fingernail or screwdriver to pull
down gently on the slot to the right of the tab.
The battery compartment slides out.
PLACEMENT CONSIDERATIONS
4
Before installing the KID or the Papa Dock into
your system, please review the following guidelines for the proper location of the components.
This will facilitate a clean, trouble-free installation.
Positioning the components
in the listening ar
Place the KID and the Papa Dock on a firm, level
surface, away from excessive heat, humidity, or
moisture. These components do not require a
special rack or cabinet for installation.
Place the Papa Dock as close to the loudspeakers
as possible and keep the loudspeaker cable
ew holes by hand.
ea
FIGURE 1 The iPod-device Support
3
2
2
4
5
3. Place the battery plus side up in the battery tray.
4. Slide battery compartment back into the
remote until you hear a click.
The remote control is ready for operation.
Notes. Do not use a knife or other sharp objects to
open the battery compartment; to avoid scratching
the remote control finish.
Replace batteries when the remote control functions
becomes intermittent. Remove batteries if the remote
control is not to be used for a long period of time.
Battery leakage can damage the remote control.
length to a minimum. Loudspeaker cable adds
impedance to the load that the amplifier must
drive, regardless of the cable's gauge. Krell amplifiers drive the lowest impedances with ease, but
long loudspeaker cables reduce the maximum
power that is deliver
ed to the loudspeakers.
Component Ventilation
The KID requires ventilation clearance:
at least eight inches (20 cm) above (to accom-
—
modate the iPod-device)
— the ventilation grids on the bottom of the KID
chassis must be unobstructed.
1
8 Krell
/ Papa Dock
ell
Kr
/ Papa Dock 5
Page 6

POWER
POWER
BASS
TREBLE
VOLUME
AUX
INPUT
lacement Considerations,
13
12
11
12
9
10
11 14
15
P
The KID / Papa Dock Connection
PLACEMENT CONSIDERATIONS, c
ontinued
c
ontinued
Connect to Your System
C Power Guidelines for the KID
A
KID Back Panel Connections
CONNECT TO YOUR SYSTEM
Component Ventilation, continued
If the KID is placed in a closed cabinet, more than
eight inches (20 cm) of clearance may need to be
provided above and below the component, or
small fans may be needed to increase ventilation.
THE KID / PAPA DOCK CONNECTION
To connect the KID to the Papa Dock:
5
1. Remove the connector plate from the bottom
of the KID, using the T-10 Torx wrench
provided in the Papa Dock accessory box.
2. Place the KID and the Papa Dock side-byside, with the front panel facing toward you.
3. Lift the KID up and position it over the connection well (6) in the Papa Dock.
4. Lower the KID gently but firmly onto the
Papa Dock docking connector (7).
FIGURE 2 Connecting the KID to the Papa Dock
he air space between the chassis and shelf must
T
be unobstructed.
he Papa Dock requires ventilation clearance:
T
— at least two inches (5 cm) above, below, and
on each side.
To disconnect the KID from the Papa Dock:
1. Facing the front of the two components, insert
your fingers in the plunger holes on the bottom
panel of the Papa Dock.
2. Push up both plungers (8) simultaneously. The
plungers elevate the KID, disconnecting it fr
om
the Papa Dock.
3. Lift the KID out of the connection well on the
Papa Dock, and set the KID aside.
Krell recommends using balanced interconnect
6
cables. Balanced interconnect cables not only can
minimize sonic loss but also are immune to
induced noise, especially for installations using
long cables. Balanced connections have 6 dB
more gain than single-ended connections. When
level matching is critical, keep this specification in
mind. Krell recommends using balanced inputs for
components that use the preamplifier mode.
1. Make sure all power sources and components
are off before connecting inputs and outputs.
2. Neatly arrange and organize wiring between the
KI D , the Papa Dock, and all system components. Separate AC wires from audio cables to
prevent hum or other unwanted noise from
being introduced into the system.
Connect the KID to Your System
The KID connects to a preamplifier, processor, or
amplifier as an A/V source, and is equipped with a
balanced and single-ended analog audio output, an
S-Video, and a composite video output. The Papa
Dock is a 150 W amplifier specifically designed by
Krell for use with the KID.
Maintain the correct left/right orientation: balanced
outputs use three-pin XLR connectors. Singleended outputs use RCA connectors.
1. Connect the balanced (12) or single-ended (11)
analog audio outputs to the corresponding
inputs on the preamplifer or processor, or to the
Papa Dock or other amplifier in your system.
2. Connect the S-Video (10) or composite video
(9) outputs to the corresponding input on the
monitor in your system.
3. Plug the AC power cord into the IEC power
connector (15) on the back panel. Then plug
the AC power cord into the wall socket.
The KID is now ready for the iPod-device connection.
AC Power Guidelines for the KID. Use only the
power cord provided with the KID. The use of the
KID with devices designed to alter or stabilize the
AC power may impair the ability of the interface
dock to perform optimally.
6 Krell / Papa Dock
FIGURE 3 KID Back Panel Connections
VIDEO OUTPUTS
9 Composite Video Output
6
8
7
8
One composite video output with an RCA connector.
10 S-Video Output
One S-Video output with a DIN connector.
ANALOG OUTPUTS
Single-ended Audio Outputs
11
Two single-ended analog audio channel outputs
with RCA connectors.
12 Balanced Analog Audio Outputs
Two balanced analog audio channel outputs with
XLR connectors.
REMOTE CONNECTIONS
13 Comm Port RS-232 Connector
Sends softwar
nal computer contr
exter
e updates directly to the KID using an
ol system.
14 12 VDC Out
Sends a 12 V power on/off signal via a 12 V trigger
cable to other Krell components and to other devices
that incorporate 12 V power on/off trigger input.
When the KID is in the operational mode and a trigger is enabled, the 12 VDC Out pr
output. When the KID is in the stand-by mode or off,
or if a trigger is not enabled, the DC
POWER CONNECTION
15 IEC Connector
A standar
the AC power cord.
d male IEC power connector
ovides 12 V of DC
output is 0 V
ell
Kr
, for use with
/ Papa Dock 7
.
 Loading...