

Krell Industries Evolution 525t, Evolution 525v, Evolution 525a, Evolution 525av Quick Setup Manual
Page 1

Note
Save all packing materials.
If you need to ship the Evolution
525 in the future, repack the unit
in its original packaging to
prevent shipping damage.
Evolution 525
CD/DVD Player
QUICK SETUP GUIDE
Getting Started
KRELL
THE LEADER IN AUDIO ENGINEERING
Thank you for your purchase of the Krell Evolution 525. The Evolution 525 CD/DVD Player is
a modular design featuring reference caliber CD playback as well as an optional state-of-theart video engine that provides stunning 1080p performance and video processing controls.
The Evolution 525 can be outfitted with different outputs to match the requirements of any
high performance audio or home theater system.
Configurations include:
• Evolution 525t - audio only transport
• Evolution 525v - 1080p DVD video transport, digital audio output only
• Evolution 525a - High performance CD player with Krell CAST™ and balanced analog
outputs
• Evolution 525av - Complete package including audio and video options
Please contact your authorized dealer, distributor, or Krell if you have any questions not
addressed in the owner’s reference.
Do not place the compact disc player where it could be exposed to dripping or splashing.
Do not remove or bypass the ground pin on the end of the AC cord. This may cause radio frequency
interference (RFI) to be introduced into your playback system.
The ventilation grids on the top and bottom of the Evolution 525 must be unobstructed at all times during
operation. Do not place flammable material on top of or beneath the component.
Turn off all systems' power before connecting the Evolution 525 to any component. Make sure all cable
terminations are of the highest quality, free from frayed ends, short circuits, or cold solder joints.
Caution: Visible and invisible laser radiation. When the cover is open, avoid exposure to beam.
This unit employs a laser. To prevent possible eye injury, only a qualified service person should remove
the cover or attempt to service this device. Use of controls or adjustments or performance of procedures
other than those specified herein may result in hazardous radiation exposure.
THERE ARE NO USER-SERVICEABLE PARTS INSIDE ANY KRELL PRODUCT.
1. Open the shipping box and remove the top layer of foam. You see these items:
2. Grasp the underside of the foam end-caps that encase the Evolution 525 and lift it straight
out of the shipping box.
3. Place the Evolution 525 in a safe location and remove the protective plastic wrapping.
Place the Evolution 525 on a firm, level surface, away from excessive heat, humidity, and
moisture. The Evolution 525 requires at least two inches (5 cm) of clearance on each side and
at least two inches (5 cm) of clearance above and below the component to provide adequate
ventilation. Installations inside cabinetry may need extra ventilation.
Do not place the Evolution 525 near hum sensitive components such as preamplifier phono
stages or turntables. Although the Evolution 525 is well shielded, placing it near these
components could create interference and cause hum.
The Evolution 525 has superb regulation and does not require a dedicated AC circuit. Avoid
connections through extension cords or multiple AC adapters. High
quality 15 amp grounded AC strips are acceptable. High quality AC line conditioners may be
used if they are grounded and meet or exceed the unit's power supply rating of 50 VA.
WARNINGS
Krell Evolution 525 1
Unpacking
Krell Industries, LLC., 45 Connair Road,Orange, CT 06477-3650 USA
TEL 203-799-9954, FAX 203-891-2028, E-MAILkrell@krellonline.com
WEB SITE http://www.krellonline.com
Connecting the
Evolution 525
to Your System
Follow these steps to connect the Evolution 525 to your system.
1. Make sure all power sources and components are off before connecting inputs and
outputs.
2. Neatly organize the wiring between the Evolution 525 and all system components.
Separate AC wires from audio cables to prevent hum or other unwanted noises from
being introduced into the system.
3. Balanced outputs use three-pin XLR connectors. Single-ended outputs use RCA
connectors. Maintain the correct left/right orientation of these outputs (EV 525a and EV
525av).
4. To play DVD discs (EV 525v and EV 525av), connect desired video output to
preamp/processor or display's video input. For use with a preamplifier/processor,
connect digital audio output to digital audio input. Alternatively, connect multi-channel
analog audio outputs to preamplifier/processor multi-channel analog inputs.
5. For two-channel compact disc playback only, connect the Evolution 525 digital audio
outputs (EV 525t) to the D/A convertor or preamplifier/processor digital input or
balanced/single-ended analog audio outputs (EV 525a and EV 525av) to the
preamplifier balanced or single-ended analog audio inputs.
6. Plug the AC power cord into the IEC power connector on the back panel. Then plug
the AC power cord into the wall socket.
Press the back panel power switch (38) labeled “1”. When the Evolution 525 is initialized
and in the stand-by mode, the red stand-by LED (2) on the front panel illuminates. Then
press the power button on the front panel or the power key (1) on the remote control, to
place the Evolution 525 in the operational mode. When the blue power LED (2)
illuminates, the Evolution 525 is in the operational mode.
1. Insert disc into the slot (23)
2. Press the play button or key. The format type is visible in the front panel display. The
format type disappears and the front panel display reads TRACK 1 and the track time,
as the disc begins playing.
3. Adjust the volume level through your system volume control.
4. Press the stop button or key to end disc playback.
5. Press the play button or key (6) to begin playback again, from the first track.
6. To return the Evolution 525 to the stand-by mode, press the power button or key (1).
1. Do not install near any heat sources such as radiators, heat registers, stoves, or other
apparatus (including amplifiers) that produce heat.
2. Unplug this apparatus during lightning storms or when unused for long periods of time.
3. Refer all servicing to qualified service personnel. Servicing is required when the
apparatus has been damaged in any way, such as a power-supply cord or plug is
damaged, liquid has been spilled or objects have fallen into the apparatus, the
apparatus has been exposed to rain or moisture, does not operate normally, or has
been dropped.
4. The apparatus must be placed on a firm, level surface where it is not exposed to
dripping or splashing.
5. The ventilation grids on the top of the apparatus and the space underneath it must be
unobstructed at all times during operation. Do not place flammable material above or
beneath the apparatus.
6. Before making connections to the Evolution 505, ensure that the power is off and other
components are in mute or stand-by mode. Make sure all cable terminations are of the
highest quality, free from frayed ends, short circuits, or cold solder joints.
Please contact Krell if you have questions not addressed in this guide.
4 Krell Evolution 525
Safety notices:
This CLASS I apparatus must be connected to a
MAINS socket outlet with a protective earthing
connection.
Licensing attributions:
Manufactured under license from Dolby Laboratories.
Dolby is a trademark of Dolby Laboratories.
Manufactured under license under U.S. Patent #'s:
5,451,942; 5,956,674; 5,974,380; 5,978,762;
6,487,535 & other U.S. and worldwide patents issued
& pending. DTS and the Symbol are registered
trademarks & DTS Digital Surround and the DTS
logos are trademarks of DTS, Inc. Product includes
software. © DTS, Inc. All Rights Reserved.
Operating the
Evolution 525
IMPORTANT SAFETY
INSTRUCTIONS
This product complies with the EMC directive (89/336/EEC)
and the low-voltage directive (73/23/EEC).
1 Evolution 525
1 Evolution 525 remote control
1 IEC connector (AC power) cord
2 AAA batteries
1 12 VDC (12 V trigger) cable
1 T-10 Torx wrench
1 Quick Setup Guide
Placement
AC POWER GUIDELINES
P/N 310415
v 1.0
Krell recommends using balanced
interconnect cables. Balanced
interconnect cables not only can minimize
sonic loss but are also immune to induced
noise, especially with installations using
long cables. Balanced connections have 6
dB more gain than single-ended
connections. When level matching is
critical, keep this gain value in mind.
Note
The Evolution 525 reads data discs. For example, if
you prepare a CDR or DVR containing MP3 audio
files, you can play the discs on the Evolution 525. The
following terminology appears in the front panel
display, to help you navigate a data disc:
ROOT = The beginning of the disc.
F = A closed folder.
TOP = An open folder.
Press the enter button or key (11) to open a folder,
move to the previous folder, or play a track.
Press the up and down arrows or keys (10) to move
between tracks in a folder.
Pin assignments for XLR
connectors:
Pin 1 Shield (ground)
Pin 2 Non-inverting (hot) (0°)
Pin 3 Inverting (cold) (180°)
Evolution 525
MODEL
SERIAL NUMBER
Page 2
POWER
DIM
DISPLAY
PAUSE
STOP
PLAY
SEARCH
TRACK
EJECT
DEVICE MENU
TITLE
PROG
EQ
1
2
3
4
0
CLEAR
9
7
8
4
5
6
1
2
3
SETUP
MENU
EVOLUTIONEVOLUTION
525525
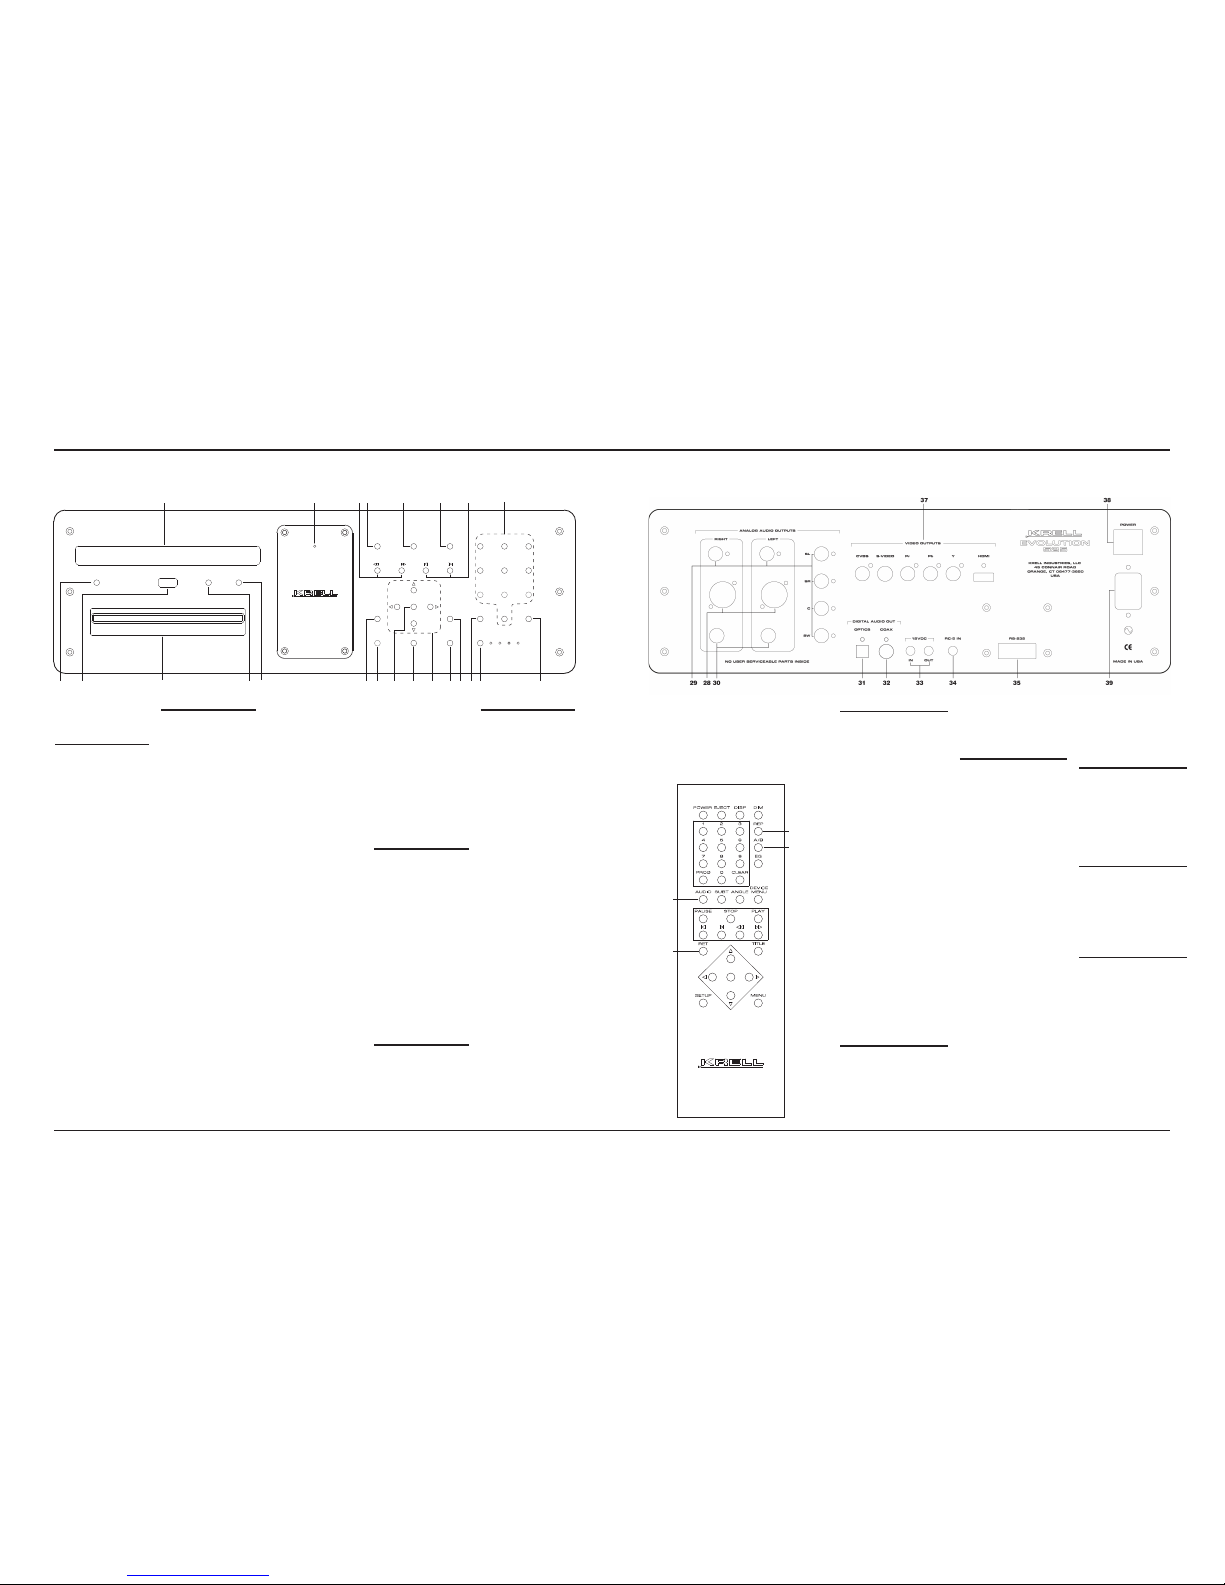
1 3 23 20 21 9 13 11 14 10 15 12 17 19 18
22 2 7 4 5 6 8 16
Figure 1 The Evolution 525 Front Panel
Figure 3 The Evolution 525 Remote
24
25
26
27
Figure 2 The Evolution 525 Back Panel
This product is manufactured in the United States of America. Krell®is a registered trademark of Krell Industries, LLC, and is restricted for
use by Krell Industries, LLC. its subsidiaries, and authorized agents. TosLink
®
is a trademark of Toshiba Corporation. All other trademarks
and trade names are registered to their respective companies.
© 2006 by Krell Industries, LLC, All rights reserved
Back Panel
2 Krell Evolution 525 Krell Evolution 525 3
Front Panel
and Remote
POWER
1 Power
Switches the Evolution
525 between stand-by
and operational modes.
2 Stand-by and
Power LED
Stand-by. The red
stand-by LED
illuminates when the
Evolution 525 is
switched on from the
back panel, indicating
that the player is in the
stand-by mode and
ready to be switched to
the operational mode.
Power. The blue power
LED illuminates when
the Evolution 525 is in
the operational mode.
3 Infrared Sensor
Receives commands
from the Evolution 525
remote control. For
proper remote control
operation, do not
obstruct the infrared
sensor.
TRANSPORT
4 Pause
Temporarily suspends
playback of a track.
To resume playback at
the point pause was
engaged, press play.
5 Stop
Stops disc playback.
6 Play
Starts playback from the
beginning of the disc.
7 Search Forward and
Back
Press to scroll forward
or backward in the
current track. Press play
(6) to re-turn to normal
playback.
8 Track Forward
and Back
Selects the track that
follows or precedes the
current track.
Press repeatedly (do
not hold) to skip multiple
tracks
9 Setup
Basic Setup menu for EV
525v and EV 525av.
10 Directional Arrows
Press the up, down, left,
or right arrows to
navigate the operational
menu and DVD
navigation choices.
11 Enter
Press to select choices
from operational menu
and DVD navigation.
12 Menu
Access DVD menu (EV
525v and EV 525av).
13 Eject
Ejects disc from
transport (23).
14 Device Menu
Access EV 525
operational menu.
15 Title
Selects the active DVD
title (EV 525v and EV
525av).
16 Direct Track Access
Use buttons or keys
1 through 0 to access
each track in a compact
disc directly. If tracks
consist of 2 digits, press
the buttons or keys
within 2 seconds of
each other.
To set up a program.
Press PROG (17) then
enter a track number
and press ENTER (11).
Repeat until all desired
tracks are entered.
Press PLAY (6) to begin
the program.
To exit the program
mode. Eject the disc
(13) or press STOP (5)
and then press PROG
(17) twice.
17 Prog
Press PROG to begin
programming a
sequence of tracks. If a
disc is playing, press
STOP (5) and then
press PROG.
18 Clear
Press to delete an unwanted entry in a
program sequence.
19 EQ
Selects EQ response for
all disc formats.
DISPLAY
20 Dim
Adjusts the illumination
of the front panel display
(22).
21 Display
Cycles the front panel
display between 4
choices: remaining track
time, elapsed track time,
elapsed time on the
disc, and remaining disc
time.
22 Front Panel Display
Shows disc type and
format, and the current
status of the disc.
23 Disc Transport
Holds the disc.
REMOTE ONLY
24 Repeat
Replays selected track
until new feature is
selected.
25 Repeat A/B
Loop between 2
predetermined points
within a single track or
sequential tracks.
26 Audio
Selects desired audio
track on DVD playback
(EV 525v and EV
525av).
27 Ret
Returns to the previous
menu screen.
ANALOG AUDIO
OUTPUTS (EV 525a and
EV 525av)
28 L and R Balanced Analog
Audio Outputs
One pair of balanced
outputs with XLR
connectors.
29 Multi-channel Single-
ended Analog Audio
Outputs
For connection to a multichannel receiver, with RCA
connectors:
L, R = left and right
channel connections.
C = center channel
connection.
SW = subwoofer
connection.
SL, SR = left and right
surround channel
connections.
30 CAST Audio Outputs (EV
525a and EV 525av)
One pair of CAST outputs
with 4-pin bayonet
connectors, for use with
Krell CAST-equipped
preamplifiers.
DIGITALAUDIO
OUTPUTS
31 Optics Output
One EIAJ fiber optical digital
output with a TosLink
connector
32 Coax Output
One S/PDIF coaxial digital
output with an RCA
connector.
BACK PANEL REMOTE
CONNECTIONS
33 12 VDC In/Out
(12 V Trigger)
Out. Sends 12 VDC power
on/off signals to other Krell
components and devices
that incorporate a 12 V
trigger.
In. Receives 12 VDC power
on/off signals from other
components and devices
that incorporate a 12 V
trigger.
34 RC-5 In
Accepts baseband RC-5
input commands from
hardwired remote
controllers.
35 RS-232
The RS-232 communication
port allows you to send and
receive operational
instructions to and from the
Evolution 525 via an external
computer control system.
.
37 Video Outputs (EV 525v
and EV 525av)
One each: composite video,
s-video, analog component
(Y,Pb, Pr), and HDMI.
POWER
38 Back Panel Power Switch
Use this switch to change
the Evolution 525 from off to
stand-by.
39 IEC Connector
Use the provided IEC
standard 15 amp power
cord.
IMPORTANT
Do not attach enhancement
accessories such as rings,
mats, or dampers to
individual discs. These
accessories may interfere
with the disc transport,
resulting in erratic playback
and/or poor sound.
Note
The Evolution 525 incorporates
an advanced suspension
system and does not require
additional mass coupling or
isolation. You may experiment
with feet or cones as long as
they are not permanently
affixed to the unit. Any
unauthorized modification to
the unit or electronics voids the
warranty.
 Loading...