

Page 1
302, 402
403
400, 600,
900
VOLUTION POWER
E
AMPLIFIERS
WITH EVOLUTION CAST
TECHNOLOGY
Quick Setup Guide
TM
OVERVIEW
Getting Started
WARNINGS
This product complies with the
EMC directive (89/336/EEC) and the
low-voltage directive (73/23/EEC).
The Evolution Series consists of six amplifier models. Stereo models include the
volution 302 and 402 amplifiers. The Evolution 403 is a three-channel amplifier
E
and the Evolution 400, 600, and 900 are monaural amplifiers. A pair of Evolution
monaural amplifiers are required for stereo operation.
volution amplifiers can be configured to accommodate any sophisticated music
E
or home theater system. In addition to manual operation, the amplifiers can be
operated remotely by a 12 V trigger, or by using the remote control of other Krell
components. Evolution CAST, voltage balanced, and single-ended inputs are on
the back panel. A protection circuit shuts the amplifier down if short circuit or
over-temperature conditions are detected.
This guide outlines the basic steps for unpacking, placing, connecting, and operating a Evolution Series Power Amplifier. Please contact your authorized dealer, distributor, or Krell if you have any questions not addressed in the owner’s reference.
The Evolution amplifier must be placed on a firm, level surface where it is not exposed to
dripping or splashing.
The ventilation grids on the top of all Evolution amplifiers and the ventilation grids on the back
of the Evolution 302 and 400 amplifiers must be unobstructed at all times during operation. Do
not place flammable material on top of or beneath the component.
Before making connections to the Evolution amplifier, ensure that it is off and the preamplifier is in mute or stand-by mode. Make sure all cable terminations are of the highest
quality and free from frayed ends, short circuits, or cold solder joints.
THERE ARE NO USER-SERVICEABLE PARTS INSIDE ANY KRELL PRODUCT.
Unpacking
Note
Save all packing materials. If you
need to ship the Evolution amplifier
in the future, repack the unit in its
original packaging to prevent shipping damage.
Placement
Two people are needed to remove an Evolution amplifier from its shipping box safely and easily.
1. Open the shipping box and remove the top layer of foam. You see these items:
1 Evolution amplifier
1 20 amp AC power cord
12 VDC (12 V trigger) cable
1
2. Orient the shipping box so that one person stands at the front of the amplifier
and one person stands at the back of the amplifier. Both people need to grab a
pair of the cardboard handle cutouts (one pair located at the front of the amplifier
and one pair located at the back of the amplifier) and simultaneously lift the
amplifier straight up, out of the carton.
Place the amplifier in a safe location and r
3.
Place the amplifier on a firm, level surface, away from excessive heat, humidity, or
moisture. Each Evolution amplifier requires at least two inches (5 cm) of clearance
on each side and at least eight inches (20 cm) of clearance above the component
to provide adequate ventilation. If you place the amplifier in a closed cabinet, you
may need to modify shelf spacing or use small fans to increase ventilation. When
the front and back of a cabinet are open, the air space between the chassis and
shelf must be unobstructed.
Place the amplifier(s) as close to the loudspeakers as possible. While Evolution CAST
technology permits long cable lengths, keep loudspeaker cable lengths to a minimum.
packet containing this quick setup
1
guide and the warranty registration
card
emove the protective plastic wrapping.
Krell Evolution Amplifiers 1
Page 2
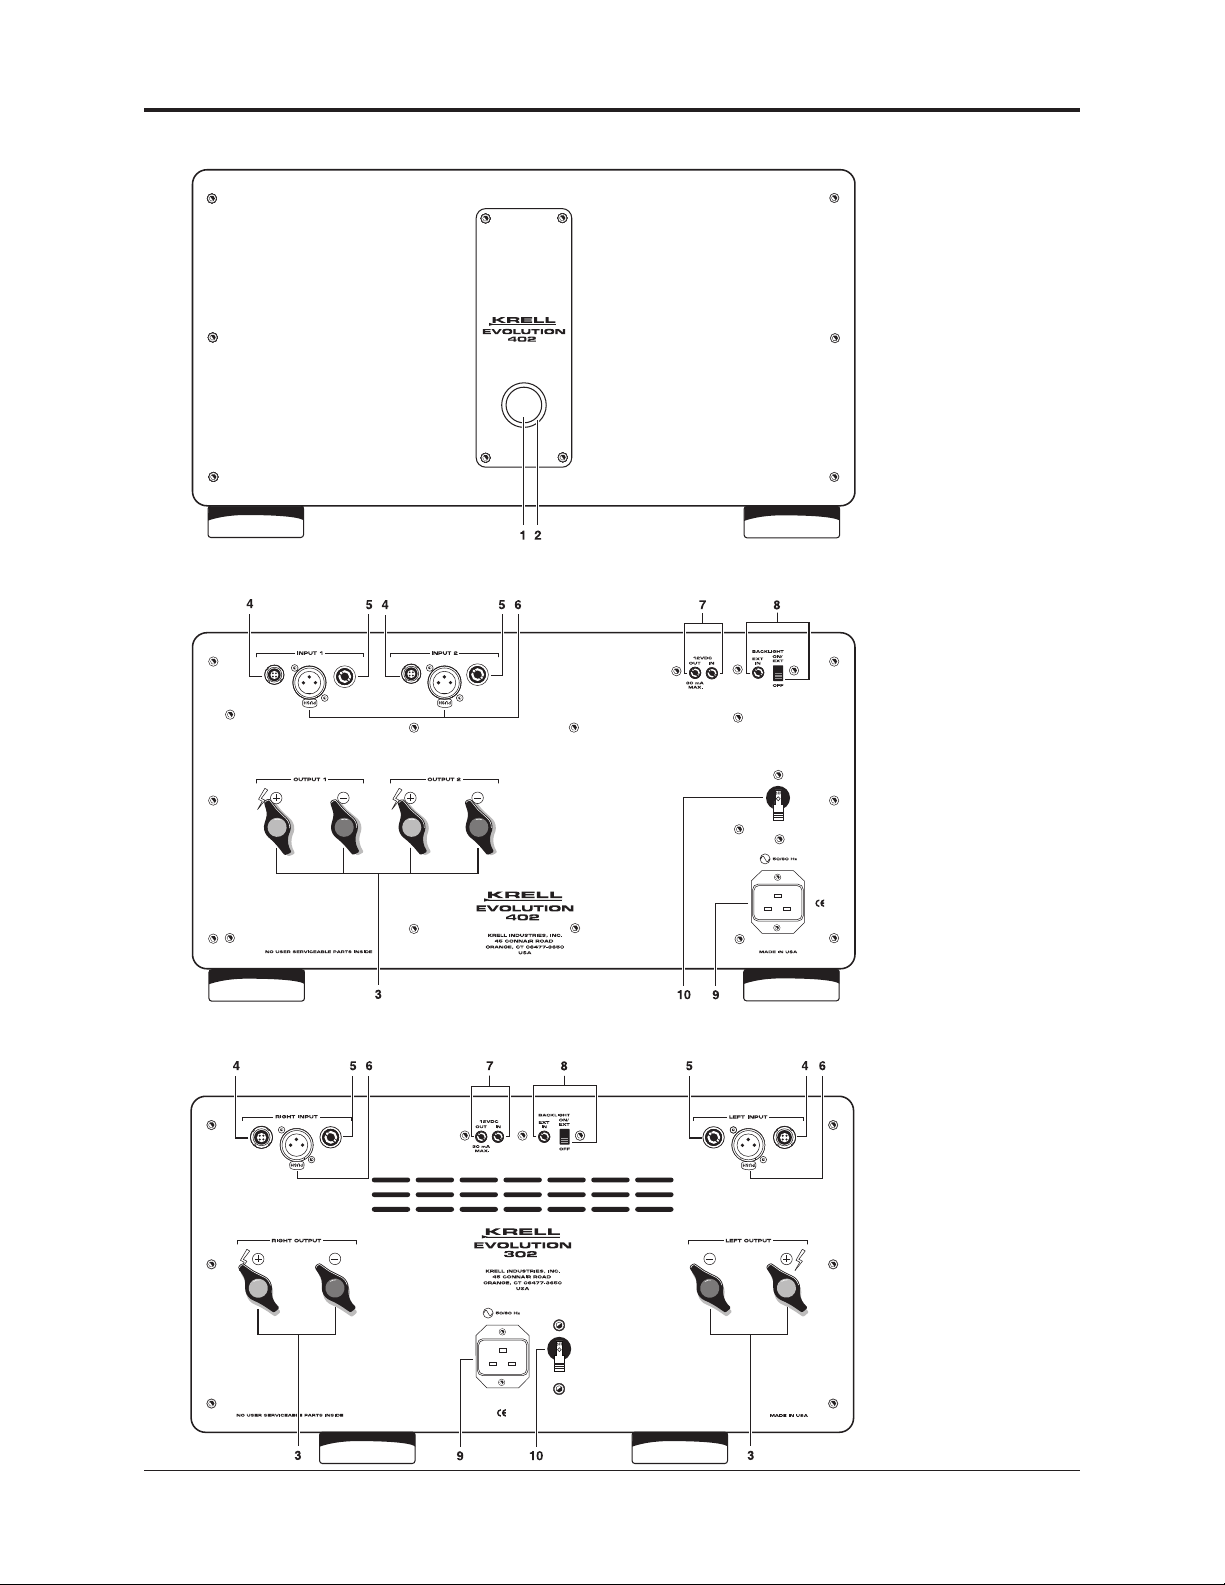
Figure 1
Evolution
tereo or
S
Monaural
Amplifier
Front Panel
(Evolution 402
shown)
Figure 2
Evolution 402
Stereo
Amplifier
Back Panel
e 3
Figur
Evolution 302
Stereo
Amplifier
Back Panel
Front Panel
1 Power Button
Press the power button
to place the amplifier in
operational mode.
Operational mode. The
power status indicator is
illuminated in blue when
the amplifier is in operational mode.
2 Power Status Indicator
Stand-by. The power
status indicator is illuminated in red when the
amplifier is in the standby mode.
Back Panel
3 Loudspeaker Binding
Posts
Stereo. One pair of loud-
speaker binding posts
per channel.
Three-channel. One pair
of loudspeaker binding
posts per channel.
Monaural. One pair of
loudspeaker binding
posts.
4 Evolution CAST Inputs
The Evolution CAST
inputs allow the Evolution
amplifier to be connected
to other CAST-equipped
components.
Stereo. One left
Evolution CAST input
and one right Evolution
CAST input via 4-pin
bayonet connectors.
ee-channel.
Thr
CAST input per channel
via 4-pin bayonet connectors.
Monaural. One Evolution
CAST input via a 4-pin
bayonet connector
One
.
2 Krell Evolution Amplifiers
oduct is manufactur
This pr
estricted for use by Kr
and is r
CAST™ ar
tive companies.
e trademarks of Kr
ed in the United States of America. Kr
© 2007 by Kr
®
l
el
ell Industries, Inc., its subsidiaries, and authorized agents. CAST™ and Evolution
ell Industries, Inc. All other trademarks and trade names ar
ell Industries, Inc., All rights r
eser
is a r
ved.
ed trademark of Kr
egister
e r
ell Industries, Inc.,
ed to their r
egister
espec
-
Page 3

Back Panel, continued
5 Left and Right Single-
ended Inputs
Stereo. One left single-
ended input and one
ight single-ended via
r
RCA connectors.
Three-channel. One
single-ended input per
channel via RCA connectors.
Monaural. One singleended input via an RCA
connector.
6 Left and Right
Balanced Inputs
Stereo. One left bal-
anced input and one
right balanced input via
XLR connectors.
Three-channel. One balanced input per channel
via XLR connectors.
Monaural. One balanced
input via an XLR connector.
7 12 VDC Out/In
(12 V trigger)
The 12 V trigger enables
you to turn the Evolution
amplifier on or to standby from other components.
Out. The output sends 12
VDC (12 V trigger) power
on/off signals to other
Krell components and
other devices that incorporate a 12 V trigger.
8 Backlight
Ext In. Connect a 12 V
trigger to Ext In to tur
the power status indica
tor using a remote control. On/Ext (see below)
must be active in order
for Ext In to function.
On/Ext. Activates the
power status indicator (2).
The factory default is
on/ext.
Off.T
status indicator.
9 IEC Power Connector
Used to connect the provided 20 amp AC power
cord.
10 Back Panel Power
Breaker Switch
Place this switch in the
up position to put the
amplifier in stand-by
mode.
ur
ns of
f the power
n of
Figure 4
volution 403
E
Multi-channel
Amplifier
ack Panel
B
Figure 5
Evolution 400
Monaural
Amplifier
Back Panel
f
-
Figure 6
Evolution
Monaural 600
or 900 Amplifier
Back Panel
(Evolution 600
shown)
Krell Evolution Amplifiers
3
Page 4

C POWER GUIDELINES
A
Connecting
the Amplifier
IMPORTANT
Single-ended inputs on the Evolution amplifier are cap-coupled.
Use these inputs when connecting to a vacuum tube preamplifier.
Pin assignments for the XLR
connectors:
Pin 1 Shield (ground)
Pin 2 Non-inverting (0
Pin 3 Inverting (180
°
) (hot)
°
) (cold)
perate each amplifier from a dedicated AC power line rated at a minimum of 20 amps.
O
Note
Do not operate the Evolution amplifiers with any device designed to alter or stabilize AC power.
ollow these steps to connect the amplifier to your system:
F
1. Turn all power sources and components off before connecting inputs and outputs.
2. Neatly organize the wiring between the amplifier and all system components.
Separate AC wires from audio cables to prevent hum or other unwanted noises
from being introduced into the system.
3. Connect the Evolution CAST cable(s) from your CAST-enabled preamplifier or
source component to the Evolution CAST 4-pin bayonet input(s) (4) on the amplifier back panel. For balanced operation, connect the interconnect cable(s) from
your preamplifier to the balanced XLR input(s) (6) on the amplifier back panel. For
single-ended operation, connect the interconnect cable(s) from your preamplifier
to the single-ended input(s) (5) on the amplifier back panel.
Notes
Krell recommends using proprietary Evolution CAST connections for unparalleled sonic
performance between the Evolution amplifiers and other CAST-equipped components.
Evolution amplifiers also offer balanced operation. The circuitry and connections associated
with balanced operation not only can minimize sonic loss but also are immune to induced
noise, especially for installations using long cables.
4. Connect the loudspeaker cables to the loudspeaker binding posts (3) on the
amplifier back panel. Loudspeaker binding posts for both stereo and monaural
amplifiers only accept spade lugs.
5. Plug the AC power cord into the IEC power connector (9) on the back panel.
6. Plug the other end of the AC power cord into the wall socket.
Operating
the Amplifier
Notes
When powering up any system,
always turn amplifiers on last. When
powering down, always turn amplifiers off first.
To avoid loudspeaker damage, be
e to switch all sour
sur
preamplifier level either muted or
fully attenuated. Do not change
inputs to the amplifier while the
amplifier is on.
Krell amplifiers have large reserves
of clean power and can safely drive
loudspeakers to higher sound pres-
e levels than other amplifiers.
sur
However, use care when setting high
playback levels and lower the volume level at any sign of loudspeaker
distress.
ces with the
Evolution amplifiers are easy to operate:
1. Move the back panel power breaker switch (10) to the up position to place the
amplifier in the stand-by mode. The power status indicator (2) illuminates in red.
2. Press the silver power button (1) on the amplifier front panel. The power status
indicator (2) illuminates in blue. The amplifier is in the operational mode.
Note
The initial power-up phase lasts approximately 30 seconds from the moment the back panel
power breaker switch is placed in the up position. If the power button is pressed during this
period, the power status indicator flashes blue for the remainder of the initial power-up phase.
When the initial power-up phase is complete, the power indicator illuminates in blue and is no
longer flashing.The amplifier is in the operational mode.
3. With the preamplifier muted or volume control completely lowered, select a
source.
4. Increase the volume control to the desired listening level.
5. T
n the amplifier of
o tur
f, place it in the stand-by mode by pr
essing the power
button on the front panel. The power status indicator turns red, and the amplifier
is in the stand-by mode.
It is now safe to turn off the rest of the system.
Powering off
Leave the Evolution amplifiers in the stand-by mode between listening sessions. Turn
the amplifier off using the power breaker switch (10), and disconnect the amplifier
from AC power when the system is not being used for an extended time period.
4 Krell Evolution Amplifiers
MODEL
Krell Industries, Inc., 45 Connair Road,Orange, CT 06477-3650 USA
TEL 203-298-4000, F
WEB SITE www
AX 203-891-2028, E-MAIL kr
ellonline.com
.kr
SERIAL NUMBER
ellonline.com
ell@kr
P/N 309224
v 07.1
 Loading...