

Kreg Rip-Cut KMA2685-INT Owner's Manual
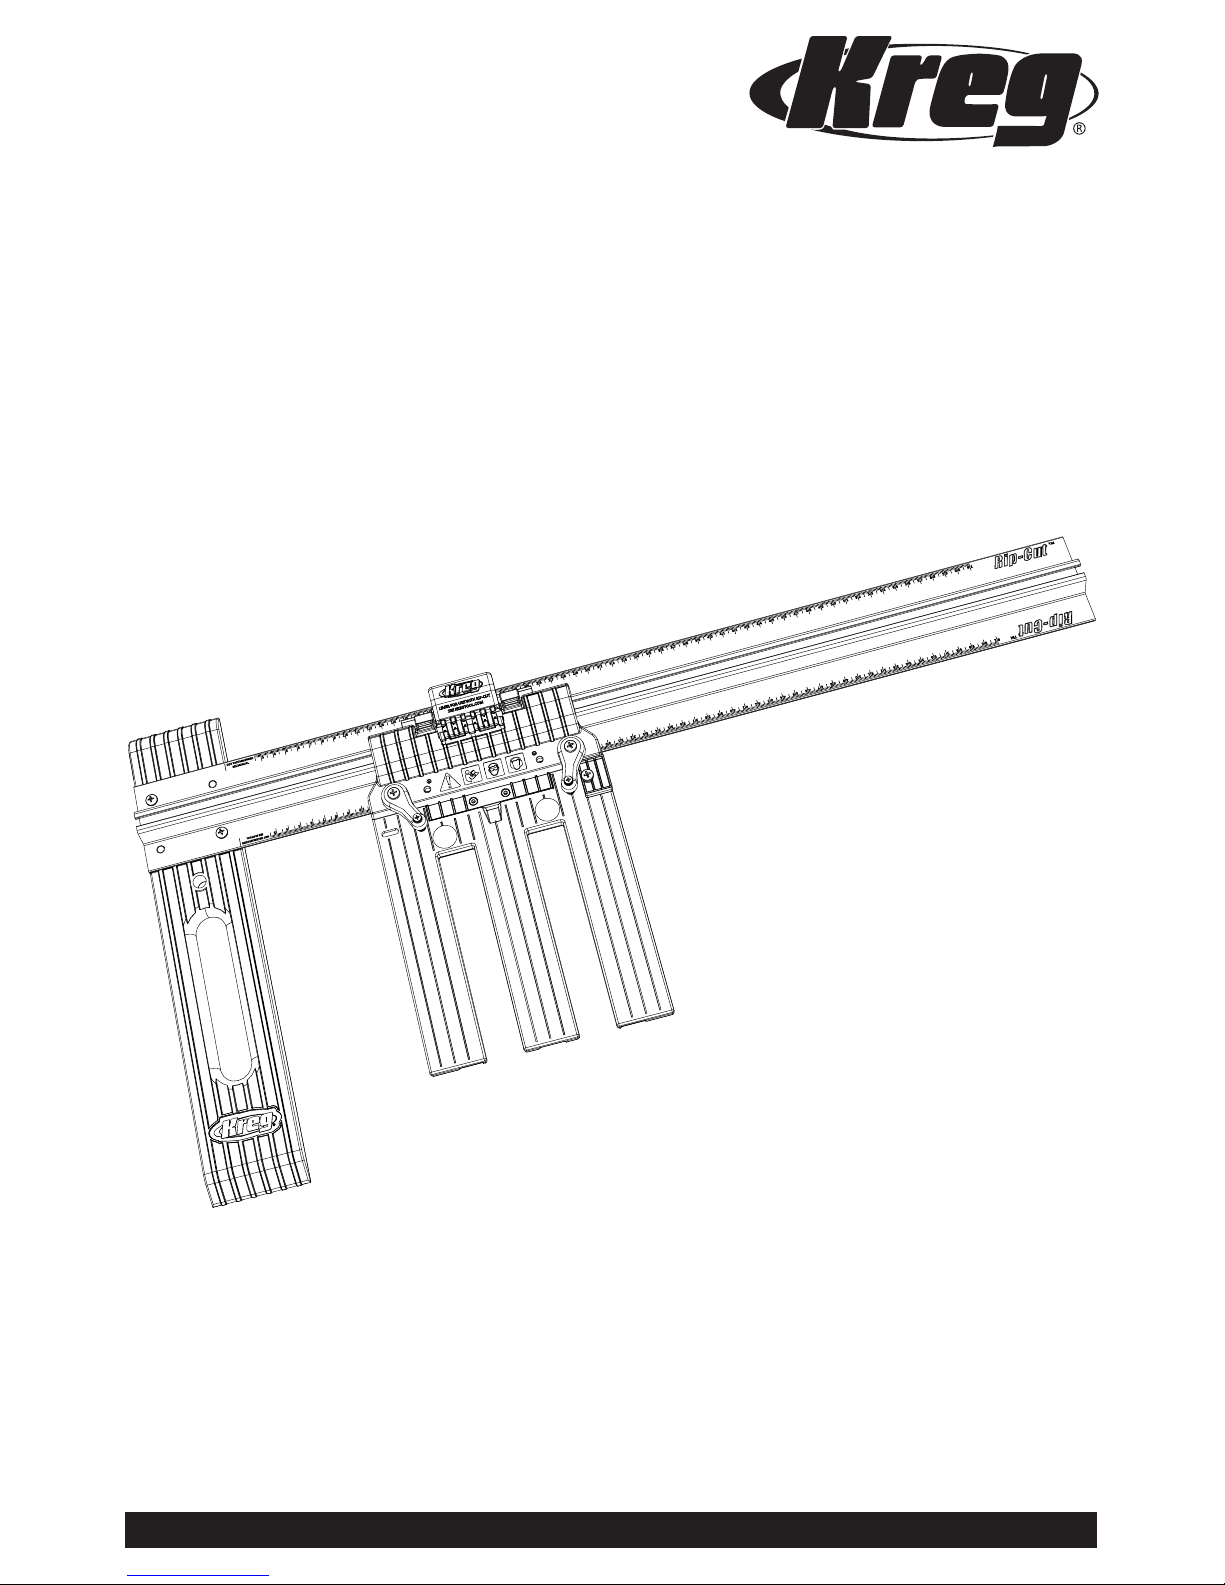
Rip-Cut
™
ITEM No. KMA2685-INT
NK9036
Version 2 - 02/2019
www.kregtool.com • 800.447.8638
Owner’s Manual | Benutzerhandbuch | Guide d’utilisation | Manual del propietario

!
WARNING
When using electric tools, always follow the safety precautions below to reduce the risk of re, electric shock
and personal injury. Read all of these instructions before attempting to operate this product. SAVE THESE INSTRUCTIONS.
General Safety Guidelines
1) Work area safety
a) Keep work area clean and well lit. Cluttered or dark areas
invite accidents.
b) Don’t use power tools in a dangerous environment. Don’t use
power tools in damp or wet locations, or expose them to rain.
c) Do not operate power tools in explosive atmospheres,
such as in the presence of flammable liquids, gases or dust.
Power tools create sparks that can ignite the fumes or dust.
d) Keep children and bystanders away while operating a
power tool. Distractions can cause you to lose control.
e) Make your workshop childproof. Use padlocks or master
switches, or remove starter keys.
2) Electrical safety
a) Earth electric tools. If the tool is equipped with a threeprong plug, it must only be plugged into an earthed threehole electrical socket. If the proper socket is not available,
have one installed by a qualified electrician. Never remove
the third prong or modify the provided plug in any way.
b) Do not expose power tools to rain or wet conditions. Water
entering a power tool increases the risk of electric shock.
c) Do not abuse the cord. Never use the cord for carrying,
pulling or unplugging the power tool. Keep cord away
from heat, oil, sharp edges and moving parts. Damaged or
entangled cords increase the risk of electric shock.
d) Use a proper extension cord and make sure it is in good
condition. When using an extension cord, make sure that you
use one that is heavy enough to carry the current your power
tool draws. An undersized cord causes a drop in line voltage
resulting in loss of power and overheating. Table 1 shows the
correct cord gauge to use depending on cord length and tool
nameplate ampere rating. If in doubt, use the next heavier
gauge. The smaller the gauge number, the heavier the cord.
e) When operating electric tools, avoid body contact with
earthed surfaces such as pipes, radiators, kitchen hobs and
refrigerators. Contact with an earthed surface increases the
risk of electric shock.
3) Personal safety
a) Stay alert, watch what you are doing and use common
sense when operating a power tool. Do not use a power tool
while you are tired or under the influence of drugs, alcohol or
medication. A moment of inattention while operating power
tools can result in serious personal injury.
b) Always wear safety glasses. Everyday glasses are not
safety glasses. Safety glasses have specially constructed
lenses, frames and side shields.
c) Use safety equipment. Use a face or dust mask when the
cutting operation is dusty. Safety equipment such as a dust
mask, non-skid safety shoes, hard hat or hearing protection
used for appropriate conditions reduces personal injuries.
d) Avoid accidental starting. Make sure the switch is in the
off-position before plugging in. Carrying power tools with
your finger on the switch or plugging in power tools that have
the switch on invites accidents.
e) Remove any adjusting key or wrench before turning the
power tool on. A wrench or a key left attached to a rotating
part of the power tool can result in personal injury.
f) Do not overreach. Keep proper footing and balance at
all times. This enables better control of the power tool in
unexpected situations.
g) Secure workpieces. Use clamps or a vice to hold work
when practical. This is safer than using your hand and it frees
both hands to operate the tool.
h) Never stand on the machine. Serious injury can occur if the
tool tips or if the cutting tool is unintentionally contacted.
i) Dress properly. Do not wear loose clothing or jewellery.
Keep your hair, clothing and gloves away from moving parts.
Loose clothes, jewellery or long hair can be caught in moving
parts. Roll up long sleeves to the elbow. Wear protective hair
covering to contain long hair.
j) If devices are provided for the connection of dust extraction
and collection equipment, ensure these are connected and
properly used. Use of these devices reduces dust-related
hazards.
4) Power tool use and care
a) Keep guards in place and in working order.
b) Do not force the power tool. Use the correct power tool for
your application. The correct power tool will do the job better
and more safely at the rate for which it was designed.
c) Use the right tool. Don’t force a tool or attachment to do
a job for which it was not designed.
d) Do not use the power tool if the switch does not turn it on
and off. Any power tool that cannot be controlled with the
switch is dangerous and must be repaired.
e) Disconnect the plug from the power source and/or
the battery pack from the power tool before making any
adjustments, changing accessories or storing power tools.
Such preventive safety measures reduce the risk of starting
the power tool accidentally.
f) Never leave a tool running unattended. Turn power off.
Do not leave the tool until it has come to a complete stop.
g) Store idle power tools out of the reach of children and
do not allow persons unfamiliar with the power tool and
these instructions to operate the power tool. Power tools are
dangerous in the hands of untrained users.
h) Maintain power tools. Check for misalignment or binding
of moving parts, broken parts and any other condition that
can affect power tool operation. If damaged, have the power
tool repaired before use. Many accidents are caused by
poorly maintained power tools.
i) Keep cutting tools sharp and clean. Properly maintained
cutting tools with sharp cutting edges are less likely to bind
and are easier to control.
j) Use the recommended speed for the cutting tool or
accessory and workpiece material.
k) Only use parts and accessories recommended by the
manufacturer. Consult the owner’s manual for recommended
accessories. Using improper accessories can cause personal
injury.
l) Use the power tool, accessories and tool bits in accordance with
these instructions and in the manner intended for the particular
type of power tool, taking into account the working conditions and
the work to be performed. Use of the power tool for operations
different from those intended can result in a hazardous situation.
5) Service
a) Have your power tool serviced by a qualified repair person
using only identical replacement parts. This ensures that the
safety of the power tool is maintained.
6) SAFETY INSTRUCTIONS SPECIFIC TO USING THE RIP-CUT™
a) Before using the Rip-Cut™, read, understand and follow
the safety warnings and operation instructions included with
this product and provided by your saw manufacturer. Keep all
guards and safety devices in place.
b) Wear correct eye, ear and respiratory protection when
operating your saw.
c) Use a sharp blade designed for the type of material you are
cutting.
d) Always disconnect your saw from power before making
adjustments to the saw or Rip-Cut™.

General Safety Guidelines
TABLE 1
Nameplate
Amperes
@120 V
Extension Cord Length
25' 50' 75' 100' 150' 200'
Recommended Wire Gauge
0 -5 16 16 16 14 12 12
5.1 - 8 16 16 14 12 10 NR
8.1 -12 14 14 12 10 NR NR
12.1 - 16 12 12 NR NR NR NR
NR – Not Recommended
WARNING:
!
This product can expose you to chemicals including Acrylonitrile
and other chemicals, which are known to the State of California to cause cancer and
reproductive harm. For more information, go to www.P65Warnings.ca.gov.
e) Check the cursor alignment before you cut.
f) Ensure that the saw blade will not contact the edge guide
during the cut.
g) Do not attempt a cut when any part of the Rip-Cut™ sled
interferes with the operation of the saw blade guard.
h) Fully support both the workpiece and the cut-off piece to
prevent binding and kickback.
i) Adjust the depth of cut so that the saw blade protrudes
1
⁄8” [3 mm] through the workpiece during the cut.
j) Keep your hands away from the saw blade during
operation. Do not reach under the workpiece while cutting.
k) Secure your workpiece to ensure that it doesn’t move
during the cut.
l) Do not use excessive force when cutting.
Maintain a steady and controlled pace.
m) Allow the saw blade to come to a complete stop before
lifting the Rip-Cut from your workpiece.
n) Maintain your tools and accessories.
Check for misalignment or binding of moving parts, loose
fasteners, broken parts and any other condition that may
affect safe operation. If an unsafe condition is discovered,
correct it before use.
7) Kickback
Kickback is a sudden reaction to a pinched, bound or
misaligned saw blade, causing an uncontrolled saw to lift
up and out of the workpiece towards the operator.
8) Causes of kickback
a) When the blade is pinched or bound tightly by the kerf
closing in, the blade stalls and the motor reaction drives the
unit rapidly back towards the operator.
b) If the blade becomes twisted or misaligned in the cut,
the teeth at the back edge of the blade can dig into the top
surface of the wood causing the blade to climb out of the kerf
and propel the saw back towards the operator.
Preventing kickback
Kickback is the result of tool misuse and/or incorrect
operating procedures or conditions and can be avoided
by taking proper precautions.
a) Maintain a firm grip with both hands on the saw and
position your body and arms to resist kickback forces.
Kickback forces can be controlled by the operator if proper
precautions are taken.
b) When the blade starts to bind, or when interrupting
a cut for any reason, release the trigger and hold the
saw motionless in the material until the blade comes to
a complete stop. Never attempt to remove the saw from the
work or pull the saw backwards while the blade is in motion.
Investigate and take corrective actions to eliminate the cause
of blade binding.
c) When restarting a saw in the workpiece, centre the saw
blade in the kerf and check that the saw teeth are not
engaged in the material. If the saw blade is binding, the blade
may climb out of the workpiece and kick back as the saw is
restarted.
d) Support large panels to minimise the risk of blade pinching
and kickback. Large panels tend to sag under their own
weight. Supports must be placed under the panel on both sides
of the cut: near the cutline and near the edge of the panel.
e) Do not use a dull or damaged blade. A dull or improperly
sharpened blade produces a narrow kerf, causing excessive
friction, blade binding and kickback.
f) Blade depth and bevel adjusting locks must be tight and
secure before making a cut. If blade adjustment shifts while
cutting, it may cause binding and kickback.
g) Use extra caution when making a plunge cut into existing
walls, floors or other blind areas. The protruding blade
may come into contact with unseen objects that can cause
kickback.
Guidelines for extension cord use
Extension cords are only to be used for temporary purposes.
They do not replace the need for installation of sockets and
proper wiring where necessary.
In the workshop and on construction sites:
1. Extension cords with an equipment earthing conductor
must be used at all times.
2. Extension cords must be protected from damage, and
not run through doorways or windows where the doors
or windows can close, causing damage to the cord.
3. Extension cords must be a minimum of 16 AWG and be
rated for the equipment in use.
4. Extension cords must be periodically inspected to ensure
that the insulation and conductivity of the wires are not
compromised.
5. Extension cords should not be run through water or
allowed to have connections that may be exposed to
accumulated water.
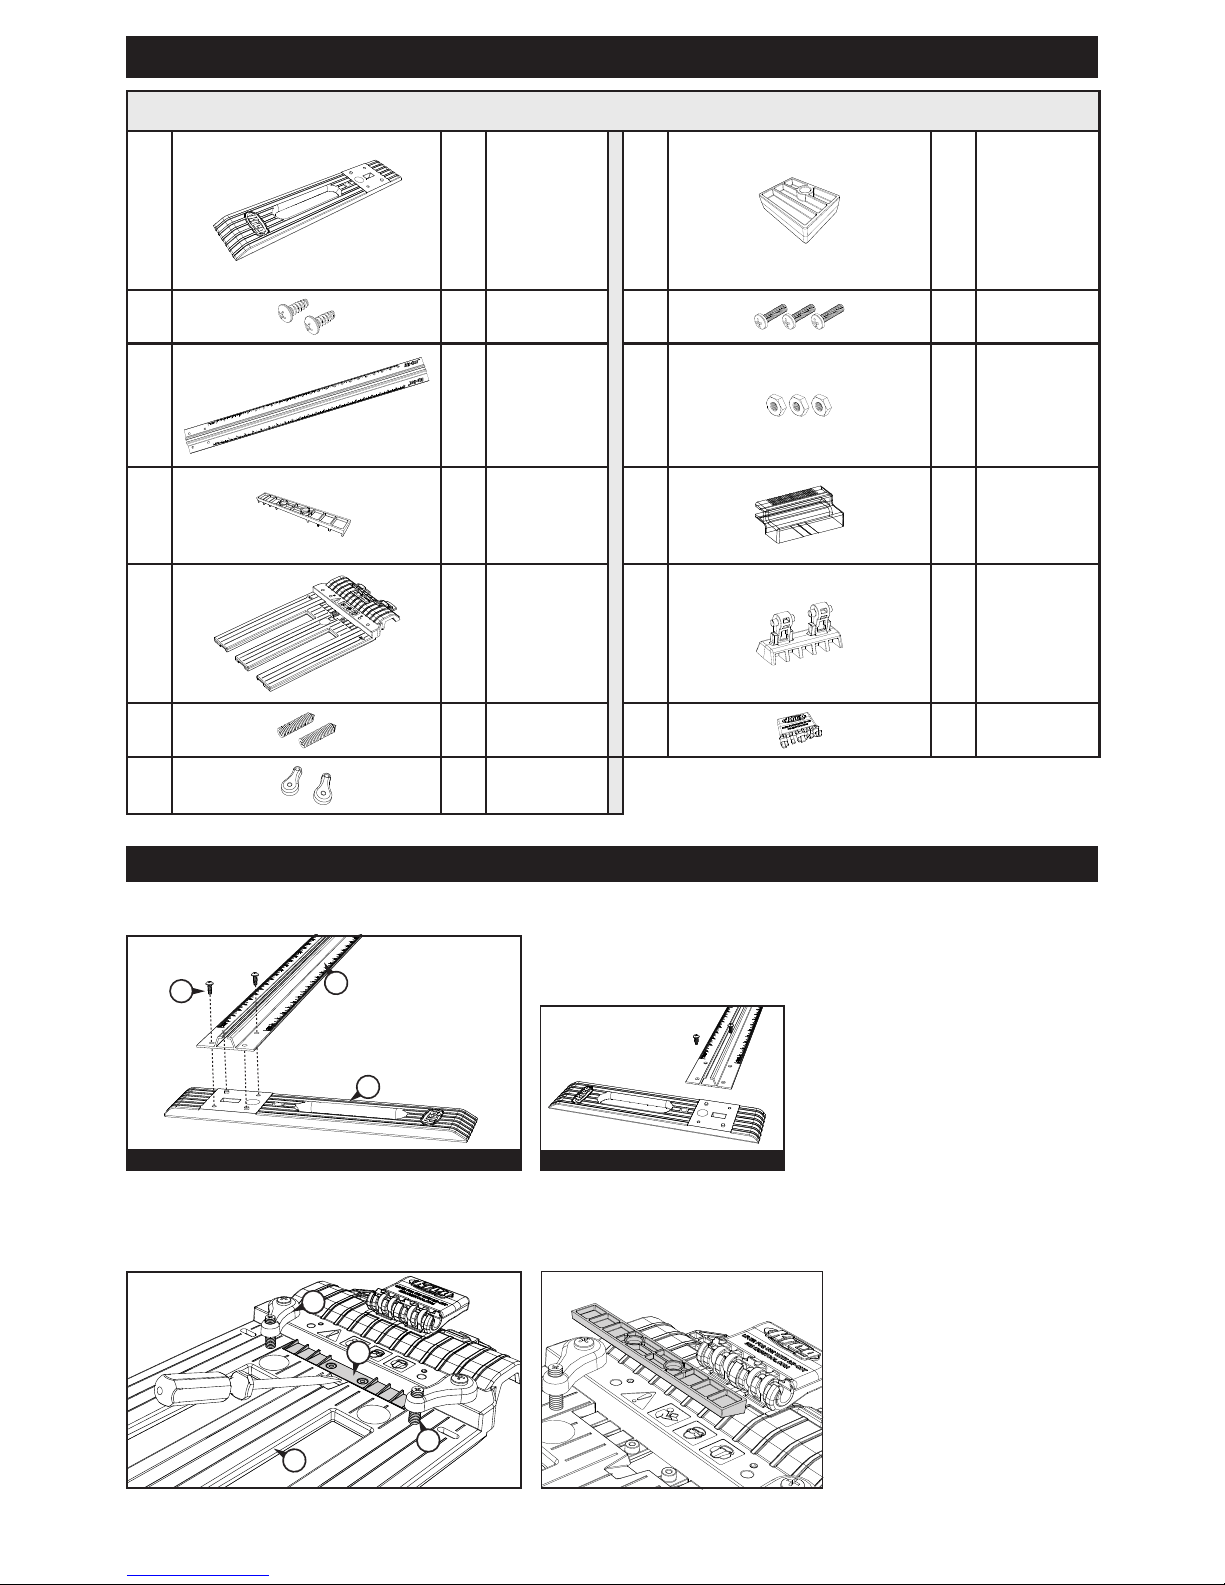
Step 1: Connect the Edge Guide to the Rail
Remove the clear tape covering the recess in the edge guide (A), remove the
two self-tapping screws (B), and use them to secure the edge guide to the rail
(C). Orient the edge guide for right-hand or left-hand operation as shown.
Left-hand operation
Step 2: Orient the Filler Strip
The ller strip (D) on the sled (E)
is supplied with the angled ribs
facing up. These ribs support
a saw base with an angled leading
edge, keeping the saw base at
on the sled when the set screws
(F) in the base-plate clamps (G)
are tightened. For a saw base with
a at leading edge, lift the ller
strip from the sled recess with the
tip of a screwdriver, turn it over
to expose the at face and press
it into the recess.
E
D
F
G
A
C
B
Right-hand operation
Assembly
Rip-Cut (KMA2685-INT) Parts
A 1
Edge guide
H 1
Indexing stop
B 2
Self-tapping
screws
I 3
Machine
screws
C 1
Rail
J 3
Hex nuts
D 1
Filler strip
K 1
Cursor
E 1
Sled
L 1
Wedge
F 2
Set screws
M 1
Handle
G 2
Base-plate
clamps
Rip-Cut Components
Step 4: Check the Position of the Cursor
There are two positions on the sled for the cursor (K) that correspond
to the two sled slots. Position the cursor in the holder in front of the
saw blade. To switch cursor position, press down on the holder lock,
slide the cursor out of the holder and reinstall it in the other holder.
K
With your saw clamped to the sled (E), raise the handle (M) to the
upright position and slide the sled onto the rail (C), inserting the
wedge (L) into the rail channel. The saw and the edge guide (A)
should extend from the same edge of the rail.
Step 6: Slide the Sled onto the Rail
Assembly
Step 3: Mount your Circular Saw on the Sled
Remove the indexing stop (H) from the sled (E). Loosen the set
screws (F) in the base-plate clamps (G) and slide your saw base plate
under them. Position the saw on the sled with the front of the saw
base plate against the step at the front of the sled. For saws with the
blade on the left-hand end of the motor, centre the blade in the left
sled slot. For saws with the blade on the right-hand end of the motor,
centre the blade in the right sled slot. To accommodate dierent saw
base-plate congurations, there are two holes for attaching each
base-plate clamp to the sled. For the most secure clamping, choose
the holes that provide the widest spacing allowed by your saw. The
clamps can be oriented at an angle. Tighten the set screws onto
the saw base plate to securely hold the saw but do not over-tighten.
Make sure the saw-blade guard operates freely.
F
H
E
G
WARNING Disconnect the saw from power before mounting it on the sled.
!
The indexing stop (H) allows you to remove the saw from the sled
assembly and then re-mount it in exactly the same position. Place
the indexing stop against the side of the saw base on the same side
as the cursor (K) and secure it to the sled (E) with the machine screw
(I) and nut (J). For maximum positioning exibility, the sled is slotted
and the indexing stop rotates 180°.
Step 5: Reinstall the Indexing Stop
I
H
J
E
K
ATTENTION
!
The sled assembly is equipped with features that are
functional on the Kreg® Accu-Cut™ family of products. Additional steps, found
in the Accu-Cut product manuals are required to calibrate the sled for use on
Accu-Cut products.
E
A
M
C
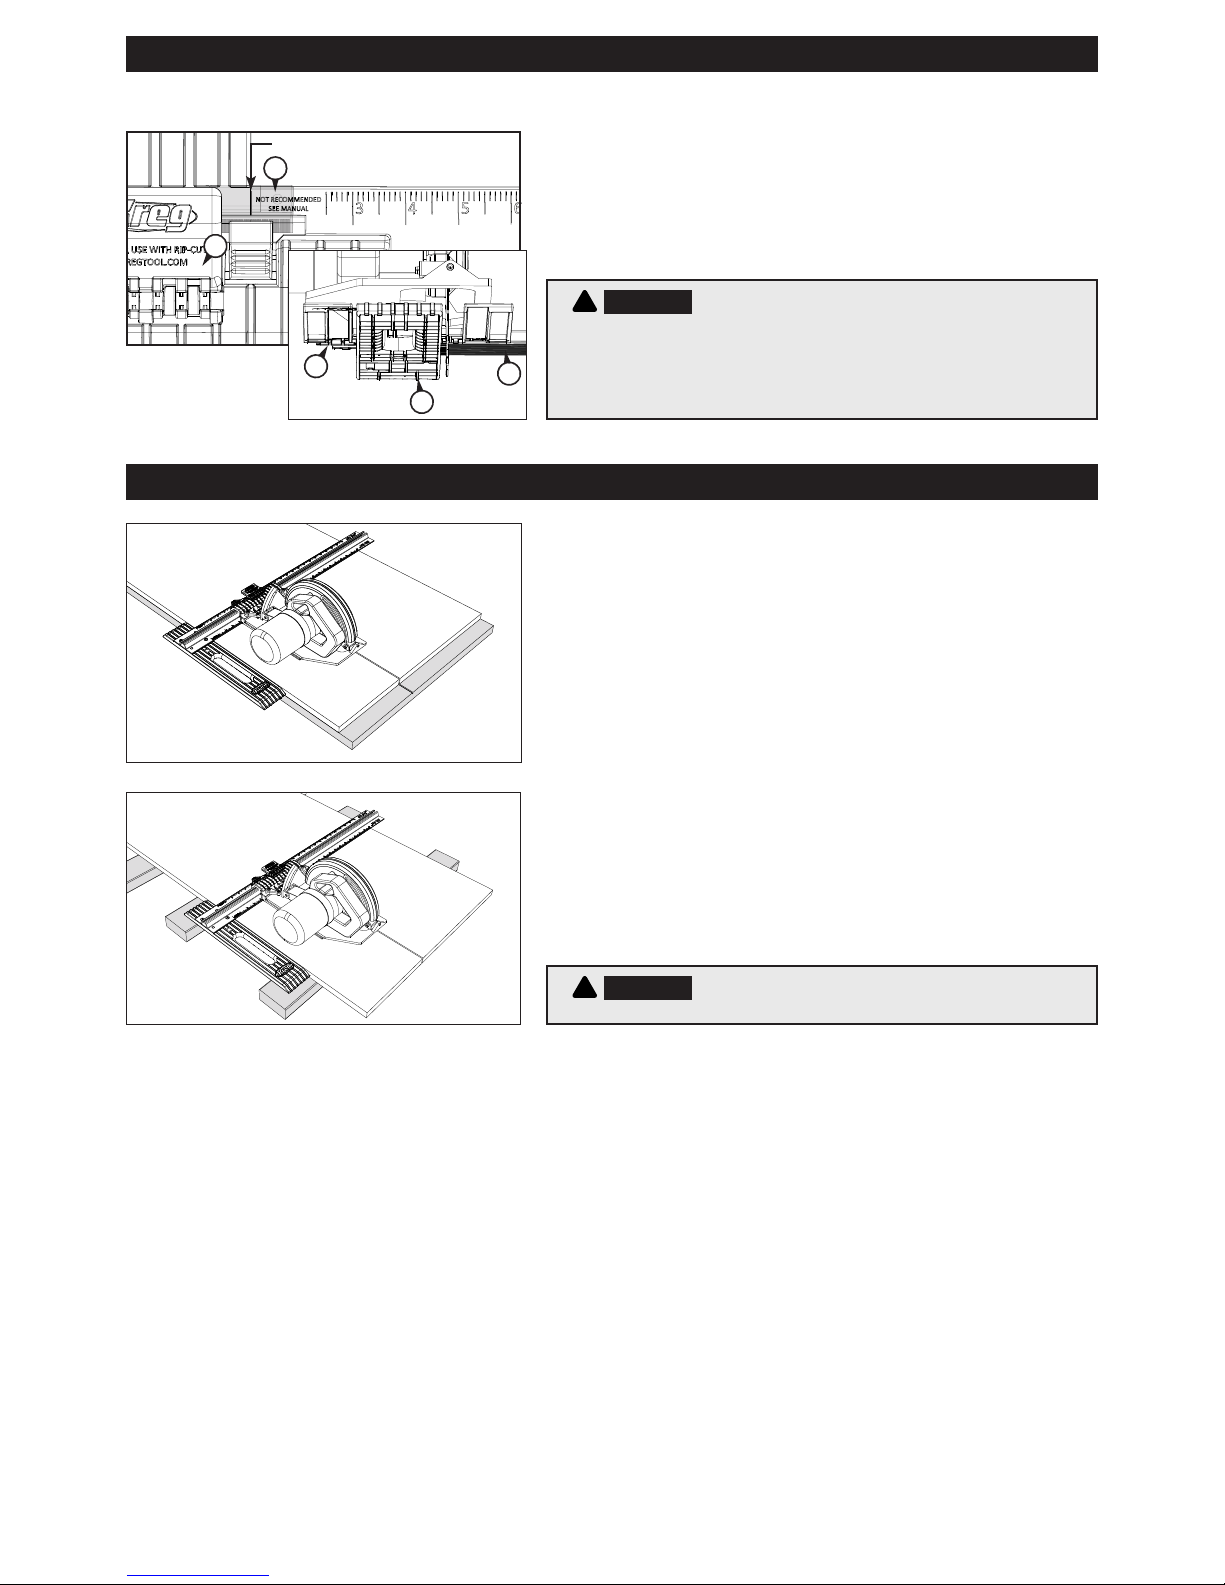
Using your Rip-Cut
™
Assembly
Step 7: Align the Cursor and Determine the Narrowest Cut
Rotate the saw blade guard up and slide the sled (E) along the rail
(C) until the blade just touches the edge guide (A). Lock the sled
in place by pressing down on the handle (M). The handle does not
need to be completely horizontal to lock securely. Press down on
the cursor lock and align the red cursor (K) with the zero mark on
the rail scale. The minimum safe cut may be greater than 25mm [1″].
WARNING On the scale, the area between zero and 25mm [1″] is
marked Not Recommended, See Manual. On most saws, the edge guide
interferes with blade-guard operation on cuts of less than 25mm [1″], so these
cuts should not be attempted. After aligning the cursor, verify the minimum safe
cut width by moving the sled away from the edge guide until the blade guard
functions without interference.
!
1) For the best results, install a 40-tooth blade or better on your saw.
2) With the saw mounted on the sled, adjust the depth of cut so the
blade will protrude 3mm [⅛″] through the workpiece during the cut.
3) Release the wedge lock and slide the sled along the rail until the
cursor aligns with the desired dimension on the scale. Engage the
wedge lock.
4) Completely support the workpiece and cuto with 2x4s or
50mm [2″]-thick rigid foam insulation laid at on the oor.
5) Connect your saw to power. With one hand on the edge guide and
the other holding the saw, press the edge guide against the edge of
your workpiece and make your cut, moving the edge guide and saw
forward at the same speed throughout the entire cut. Allow the saw
blade to come to a complete stop before lifting the Rip-Cut™ from the
workpiece.
WARNING When making narrow cuts, make sure the hand holding
the edge guide does not come into contact with the blade.
!
K
Red Line of Cursor
M
E
A
C

!
WARNUNG
Befolgen Sie bei der Benutzung elektrischer Werkzeuge stets die unten aufgeführten Sicherheitshinweise,
um das Brand-, Stromschlag- und Verletzungsrisiko zu reduzieren. Lesen Sie diese Anweisungen vollständig durch, bevor Sie
versuchen, das Gerät zu bedienen. BEWAHREN SIE DIESE ANWEISUNGEN AUF.
Allgemeine Sicherheitshinweise
1) Arbeitsplatzsicherheit
a) Sorgen Sie dafür, dass der Arbeitsbereich stets sauber und gut
beleuchtet ist. Unordentliche oder dunkle Bereiche begünstigen Unfälle.
b) Verwenden Sie Elektrowerkzeug nicht in gefährlichen Umgebungen.
Verwenden Sie Elektrowerkzeug nicht an feuchten oder nassen Orten,
und setzen Sie es keinesfalls Regen aus.
c) Verwenden Sie Elektrowerkzeug nicht in explosiver Atmosphäre
wie zum Beispiel in Gegenwart entzündlicher Flüssigkeiten, Gase oder
Stäube. Elektrowerkzeug erzeugt Funken, die Dämpfe oder Staub
entzünden können.
d) Halten Sie Kinder und Zuschauer fern, wenn Sie mit einem
Elektrowerkzeug arbeiten. Ablenkungen können dazu führen, dass Sie
die Kontrolle über das Werkzeug verlieren.
e) Machen Sie Ihre Werkstatt kindersicher. Verwenden Sie
Vorhängeschlösser und Generalschalter bzw. entfernen Sie
Zündschlüssel.
2) Elektrische Sicherheit
a) Erden Sie Elektrowerkzeug. Wenn das Werkzeug mit einem
Schutzkontaktstecker ausgestattet ist, darf es nur mit geerdeten
Schutzkontaktsteckdosen verbunden werden. Wenn keine geeignete
Steckdose verfügbar ist, lassen Sie eine solche durch einen qualifizierten
Elektriker installieren. Entfernen Sie niemals den dritten Stift, und
verändern Sie den mitgelieferten Stecker in keiner Weise.
b) Setzen Sie Elektrowerkzeug keinesfalls Regen oder Feuchtigkeit aus.
In das Elektrowerkzeug eindringendes Wasser erhöht das Risiko eines
Stromschlags.
c) Das Kabel darf nicht zweckentfremdet werden. Verwenden Sie das
Kabel nie zum Tragen oder Ziehen des Werkzeugs oder zum Ziehen
des Steckers des Elektrowerkzeugs. Halten Sie das Kabel von Hitze,
Öl, scharfen Kanten und beweglichen Teilen fern. Beschädigte oder
verwickelte Kabel erhöhen das Risiko eines Stromschlags.
d) Verwenden Sie ein geeignetes Verlängerungskabel und stellen
Sie sicher, dass dieses in gutem Zustand ist. Achten Sie bei der
Verwendung eines Verlängerungskabels darauf, dass es stark genug
ist, um den Strom zu leiten, den Ihr Werkzeug benötigt. Ein zu
schwaches Kabel verursacht ein Abfallen der Leitungsspannung, das
zu einem Leistungsverlust und zu Überhitzung führt. Tabelle 1 gibt den
korrekten Kabeldurchmesser je nach Kabellänge und Nennspannung
des Werkzeugs an. Verwenden Sie im Zweifelsfall den nächstgrößeren
Kabeldurchmesser. Je geringer die Lehrennummer, desto stärker das
Kabel.
e) Vermeiden Sie während der Arbeit mit Elektrowerkzeug Körperkontakt
mit geerdeten Oberflächen wie Rohren, Heizkörpern, Küchenherden und
Kühlschränken. Der Kontakt mit einer geerdeten Oberfläche erhöht das
Risiko eines Stromschlags.
3) Personensicherheit
a) Seien Sie stets aufmerksam, achten Sie darauf, was Sie tun, und
nutzen Sie bei der Arbeit mit einem Elektrowerkzeug Ihren gesunden
Menschenverstand. Arbeiten Sie nicht mit Elektrowerkzeug, wenn
Sie müde sind oder unter dem Einfluss von Drogen, Alkohol oder
Medikamenten stehen. Ein Augenblick der Unachtsamkeit während
der Arbeit mit einem Elektrowerkzeug kann zu schweren Verletzungen
führen.
b) Tragen Sie stets eine Schutzbrille. Brillen für den Alltagsgebrauch sind
keine Schutzbrillen. Schutzbrillen haben speziell angefertigte Gläser,
Rahmen und Seitenabschirmungen.
c) Verwenden Sie Sicherheitsausrüstung. Verwenden Sie eine
Gesichts- oder Staubmaske, wenn der Schneidevorgang Staub erzeugt.
Sicherheitsausrüstung wie Schutzmaske, rutschfeste Sicherheitsschuhe,
Helm und Ohrenschützer, die für die entsprechenden Arbeitsumstände
genutzt werden, reduzieren das Verletzungsrisiko.
d) Vermeiden Sie ein unbeabsichtigtes Starten des Geräts. Achten Sie
darauf, dass der Schalter auf „Aus” steht, bevor Sie das Werkzeug an
die Steckdose anschließen. Das Tragen von Elektrowerkzeug mit dem
Finger auf dem Schalter oder das Anschließen von eingeschaltetem
Elektrowerkzeug begünstigt Unfälle.
e) Entfernen Sie alle Einstell- oder Schraubenschlüssel, bevor Sie
das Elektrowerkzeug einschalten. Ein an einem rotierenden Teil
eines Elektrowerkzeugs verbleibender Schraubenschlüssel kann zu
Verletzungen führen.
f) Lehnen Sie sich nicht zu weit vor. Sorgen Sie jederzeit für einen
sicheren Stand und Gleichgewicht. Dies ermöglicht eine bessere
Kontrolle über das Elektrowerkzeug in unerwarteten Situationen.
g) Sichern Sie die Werkstücke. Verwenden Sie wenn möglich
Spannzwingen oder einen Schraubstock, um das Werkstück
festzuhalten. Dies ist sicherer, als es in der Hand zu halten, und lässt
beide Hände für die Bedienung des Werkzeugs frei.
h) Stellen Sie sich niemals auf die Maschine. Wenn das Werkzeug
umkippt oder das Schneidewerkzeug versehentlich berührt wird, kann
dies zu schweren Verletzungen führen.
i) Tragen Sie angemessene Kleidung. Tragen Sie keine lose Kleidung
oder Schmuck. Halten Sie Ihre Haare, Ihre Kleidung und Ihre Handschuhe
von beweglichen Teilen fern. Lose Kleidung, Schmuck oder lange Haare
können sich in beweglichen Teilen verfangen. Krempeln Sie lange Ärmel
bis zum Ellbogen hoch. Tragen Sie einen geeigneten Kopfschutz, um
lange Haare zusammenzuhalten.
j) Wenn Staubabsaug- und -auffangeinrichtungen bereitgestellt
werden, vergewissern Sie sich, dass diese angeschlossen sind und
richtig verwendet werden. Die Verwendung solcher Geräte verringert
Gefährdungen durch Staub.
4) Verwendung und Behandlung des Elektrowerkzeugs
a) Halten Sie Schutzvorrichtungen an ihrem Platz und in gutem Zustand.
b) Überlasten Sie das Gerät nicht. Verwenden Sie für Ihre Arbeit das
dafür bestimmte Elektrowerkzeug. Mit dem passenden Elektrowerkzeug
arbeiten Sie besser und sicherer im angegebenen Leistungsbereich.
c) Verwenden Sie das richtige Werkzeug. Zwingen Sie ein Werkzeug
oder einen Aufsatz nicht zu Arbeiten, für die sie nicht vorgesehen sind.
d) Verwenden Sie das Elektrowerkzeug nicht, wenn es mit dem Schalter
nicht ein- und ausgeschaltet werden kann. Jedes Elektrowerkzeug, das
nicht über den Schalter bedient werden kann, ist gefährlich und muss
repariert werden.
e) Trennen Sie den Stecker von der Stromquelle und/oder den
Akku vom Elektrowerkzeug, bevor Sie Einstellungen vornehmen,
Zubehör austauschen oder das Elektrowerkzeug lagern. Diese
Vorsichtsmaßnahmen reduzieren das Risiko eines unbeabsichtigten
Startens des Elektrowerkzeugs.
f) Lassen Sie das Werkzeug niemals unbeaufsichtigt in Betrieb. Schalten
Sie den Strom aus. Entfernen Sie sich nie vom Werkzeug, ehe es
vollständig zum Stillstand gekommen ist.
g) Bewahren Sie nicht benutztes Elektrowerkzeug außerhalb der
Reichweite von Kindern auf, und lassen Sie Personen, die nicht mit dem
Elektrowerkzeug und dieser Anleitung vertraut sind, das Gerät nicht
bedienen. Elektrowerkzeuge sind in den Händen ungeübter Benutzer
gefährlich.
h) Warten Sie Elektrowerkzeuge ordnungsgemäß. Prüfen Sie die
Geräte auf falsch ausgerichtete oder blockierte bewegliche Elemente,
beschädigte Elemente oder andere Zustände, die sicheres Arbeiten
beeinträchtigen könnten. Falls das Elektrowerkzeug beschädigt ist,
lassen Sie es vor der Verwendung reparieren. Viele Unfälle werden durch
schlecht gewartetes Elektrowerkzeug verursacht.
i) Halten Sie Schneidewerkzeuge scharf und sauber. Ordnungsgemäß
gewartetes Schneidewerkzeug mit scharfen Schneidekanten frisst sich
nicht so leicht fest und ist einfacher zu bedienen.
j) Wählen Sie die Geschwindigkeit, die für das Schneidewerkzeug oder
-zubehör und das Werkstückmaterial empfohlen wird.
k) Verwenden Sie nur Teile und Zubehör, die vom Hersteller empfohlen
werden. Informieren Sie sich im Benutzerhandbuch über das empfohlene
Zubehör. Die Verwendung ungeeigneten Zubehörs kann zu Verletzungen
führen.
l) Verwenden Sie das Werkzeug, das Zubehör und die Werkzeugeinsätze
gemäß dieser Anleitung und auf die Weise, die unter Berücksichtigung
der Arbeitsbedingungen und der auszuführenden Arbeiten für die
jeweilige Art von Elektrowerkzeug vorgesehen ist. Die Verwendung des
Elektrowerkzeugs für andere als die vorgesehenen Tätigkeiten kann zu
gefährlichen Situationen führen.
5) Wartung
a) Lassen Sie Ihre Elektrowerkzeuge von einem qualifizierten Mechaniker
unter ausschließlicher Verwendung identischer Ersatzteile warten. So
gewährleisten Sie die dauerhafte Sicherheit Ihres Elektrowerkzeugs.
6) SPEZIELLE SICHERHEITSHINWEISE FÜR DEN GEBRAUCH DES RIP-CUT™
a) Bevor Sie den Rip-Cut™nutzen, lesen, verstehen und befolgen Sie
die Sicherheitswarnungen und Benutzungsanweisungen, die diesem

Allgemeine Sicherheitshinweise
TABELLE 1
Schild mit Ang-
abe der
Nennspannung
@120 V
Länge des Verlängerungskabels
25' 50' 75' 100' 150' 200'
Empfohlener Kabeldurchmesser
0 - 5 16 16 16 14 12 12
5,1 - 8 16 16 14 12 10 NE
8,1 -12 14 14 12 10 NE NE
12,1 - 16 12 12 NE NE NE NE
NE – Nicht empfohlen
Produkt beigelegt sind, sowie die des Sägenherstellers. Belassen Sie alle
Schutzelemente und -vorrichtungen an ihrem Platz.
b) Tragen Sie während des Bedienens der Säge geeigneten Augen-,
Ohren- und Atemschutz.
c) Nutzen Sie ein scharfes Sägeblatt, das für das zu schneidende
Material geeignet ist.
d) Trennen Sie die Säge stets von der Stromversorgung, bevor Sie
Einstellungen an der Säge oder am Rip-Cut™ vornehmen.
e) Überprüfen Sie die Ausrichtung des Positionsmarkers, bevor Sie
sägen.
f) Stellen Sie sicher, dass das Sägeblatt während des Sägens nicht in
Kontakt mit der Kantenführung kommt.
g) Unternehmen Sie keine Sägeversuche, wenn Teile der
Schlittenvorrichtung des Rip-Cut™ die Beweglichkeit des
Sägeblattschutzes stören.
h) Achten Sie darauf, dass sowohl das Werkstück als auch der Verschnitt
korrekt gestützt sind, um Einklemmen und Rückschlag zu verhindern.
i) Stellen Sie die Schnitttiefe so ein, dass das Sägeblatt 3 mm (1⁄8 Zoll)
über das Werkstück hinausragt.
j) Halten Sie während der Arbeit die Hände vom Sägeblatt fern. Greifen
Sie während des Schneidens nicht unter das Werkstück.
k) Befestigen Sie das Werkstück, damit es sich während des Sägens
nicht bewegt.
I) Verwenden Sie nicht allzu viel Kraft zum Sägen.
Behalten Sie ein gleichmäßiges und kontrolliertes Tempo bei.
m) Warten Sie, bis das Sägeblatt komplett zum Stillstand kommt, bevor
Sie den Rip-Cut vom Werkstück heben.
n) Halten Sie Geräte und Zubehör instand.
Prüfen Sie die Geräte auf falsch ausgerichtete oder verklemmte
bewegliche Elemente, gelöste Verschlüsse, defekte Elemente oder
andere Zustände, die den sicheren Betrieb beeinträchtigen könnten.
Entdecken Sie einen Zustand, der die Sicherheit gefährdet, bringen Sie
ihn vor Benutzung in Ordnung.
7) Rückschlag
Als Rückschlag bezeichnet man eine plötzliche Reaktion auf ein
eingeklemmtes, festgelaufenes oder falsch ausgerichtetes Sägeblatt,
bei der sich das Sägeblatt aus dem Werkstück herausbewegt und
unkontrolliert zur Bedienperson hin nach oben schlägt.
8) Ursachen für Rückschlag
a) Wenn das Blatt durch den sich nähernden Schnittspalt eingeklemmt
wird oder festläuft, blockiert das Sägeblatt und die Motorreaktion schiebt
das Gerät schnell zurück zum Bediener.
b) Wenn das Sägeblatt im Schnitt verdreht oder falsch ausgerichtet
wird, können sich die Zähne an der Hinterkante des Sägeblattes in die
Holzoberfläche fressen, so dass das Blatt sich aus dem Schnittspalt
bewegt und die Säge zurück zum Bediener geschoben wird.
Rückschlag verhindern
Ein Rückschlag ist die Folge von Werkzeugmissbrauch und/oder falschen
Betriebsverfahren oder -bedingungen und kann durch entsprechende
Vorsichtsmaßnahmen vermieden werden.
a) Halten Sie die Säge mit beiden Händen fest und positionieren Sie
Ihren Körper und Ihre Arme so, dass Sie Rückschlagkräften standhalten
können.
Rückschlagkräfte können durch den Bediener kontrolliert werden, wenn
entsprechende Sicherheitsmaßnahmen ergriffen wurden.
b) Wenn das Sägeblatt beginnt festzulaufen oder der Schneidvorgang
aus irgendeinem Grund unterbrochen wird, lassen Sie den Abzugshebel
los und halten Sie die Säge im Material, ohne diese zu bewegen, bis das
Sägeblatt vollständig zum Stillstand kommt. Versuchen Sie nie, die Säge
aus dem Werkstück heraus oder nach hinten zu ziehen, während das
Sägeblatt in Bewegung ist. Untersuchen Sie das Problem und ergreifen
Sie Korrekturmaßnahmen, um die Ursache des verklemmten Sägeblatts
zu beseitigen.
c) Zentrieren Sie beim Neustart einer Säge im Werkstück das Sägeblatt
im Schnittspalt und überprüfen Sie, dass die Sägezähne nicht im
Material stecken. Ist das Sägeblatt festgelaufen, kann sich die Säge aus
dem Werkstück herausbewegen und beim Neustart einen Rückschlag
verursachen.
d) Stützen Sie große Platten gut ab, um das Risiko eines verklemmten
Sägeblatts und eines Rückschlags zu verhindern. Große Platten neigen
dazu, sich durch ihr Eigengewicht zu biegen. Daher müssen unter der
Platte auf beiden Seiten des Schnitts Stützen angebracht werden: im
Bereich der Schnittlinie und des Plattenrands.
e) Verwenden Sie keine stumpfen oder beschädigten Sägeblätter.
Stumpfe oder nicht ausreichend geschärfte Sägeblätter verursachen
einen schmalen Schnittspalt, übermäßige Reibung, ein Festlaufen des
Sägeblatts und Rückschlag.
f) Die Verstellschlösser für Sägeblatt und Abschrägung müssen fest
und sicher sein, bevor ein Schnitt durchgeführt wird. Eine Verstellung
der Sägeblatteinstellung beim Schneiden kann zu Festlaufen und
Rückschlag führen.
g) Gehen Sie beim Tauchsägen in bestehende Wände, Böden oder
andere öffnungslose Flächen besonders vorsichtig vor. Das eindringende
Sägeblatt kann nicht sichtbare Gegenstände berühren und einen
Rückschlag verursachen.
Richtlinien für den Gebrauch von Verlängerungskabeln
Verlängerungskabel dürfen nur vorübergehend verwendet werden. Sie
können keine Installation von Steckdosen und eine ordnungsgemäße
Verkabelung ersetzen, wenn diese erforderlich sind.
Für die Werkstatt und auf Baustellen gilt:
1. Es dürfen nur Verlängerungskabel mit einem Schutzleiter verwendet
werden.
2. Verlängerungskabel müssen vor Beschädigungen geschützt werden
und dürfen nicht durch Türen oder Fenster verlegt werden, wenn die
Türen oder Fenster geschlossen werden und das Kabel beschädigen
können.
3. Verlängerungskabel müssen mindestens 16 AWG (Durchmesser
1,31 mm²) haben und für das damit verwendete Gerät geeignet sein.
4. Verlängerungskabel müssen regelmäßig überprüft werden, um
sicherzustellen, dass die Isolierung und die Leitfähigkeit der Kabel
nicht beeinträchtigt werden.
5. Verlängerungskabel dürfen nicht durch Wasser geführt werden. Ihre
Anschlüsse dürfen keinesfalls angesammeltem Wasser ausgesetzt
sein.
 Loading...