


Operating Instructions
KREBS LM45
(45-L)
KREBS LM25
(25T-L)
2
1
2
3
4
65
Spraying
Dismantling the pump
3
Before start-up
Observe the supply voltage! The voltage specifi ed on the nameplate must conform to the
supply voltage.
Nominal output 60 W 120 W
Delivery rate (water) 260 g/min 350 g/min
Viscosity rate 120 DIN-sec 160 DIN-sec
Dynamic pressure 0 - 160 bar 0 - 180 bar
Vibration level 9 m/s2 9 m/s2
Container capacity approx. 0,7 l approx. 0,7 l
Weight approx. approx. 1,1 kg approx. 1,4 kg
Protection rating / II / II
Technical data LM25 (K25T-L) LM45 (K45-L)
For your safety
This spray gun can only be operated safely when the operating and the safety instructions have been completely read and are strictly adhered to. It is recommended
to receive practical instruction before using the machine for the fi rst time.
Do not use the spray gun if damp or if the surroundings are damp.
Always check the spray gun, power cord and plug before use. In the event of damage, repair
work should only be carried out by specialist.
Ensure that there is adequate ventilation when working in confi ned spaces.
Danger of Explosion!
The spray gun must not be used in locations where explosive gases may occur.
Do not spray infl ammable or explosive liquids (e.g. petrol or spirit).
Never direct the spray jet towards people or animals. The spray material comes out of the
nozzle at high pressure. Danger of injury and infection.
The noise level of the spray gun can exceed 85 dB(A), therefore wear ear protection.
Do not use the spray gun without spray material.
Only connect the power plug when the spray gun is OFF.
Disconnect the power plug after use.
Always disconnect the power plug before performing any work on the spray gun. Do not
carry the spray gun by the power cord.
Always keep the extension cable well away from the workplace.
Keep the spray gun and accessories out of the reach of children.
Only use original accessories and spare parts.

4
Instructions for use
Before switching on the spray gun, ensure that the container is at least 50% full of material
in order that it creates a vaccum. Do not use without material - this will create unnecessary
noise and vibration.
Spray material
Note: for the perfect functioning of the spray gun, clean spray material is of importance.
Products containing granules or bodies must not be sprayed as they act abrasively, may
restrict the movement of the piston and shorten the sprayer’s life, thereby invalidating the
warranty. In case of doubts regarding any impurities, a fi ne-meshed fi ltering of the spray
material is recommended.
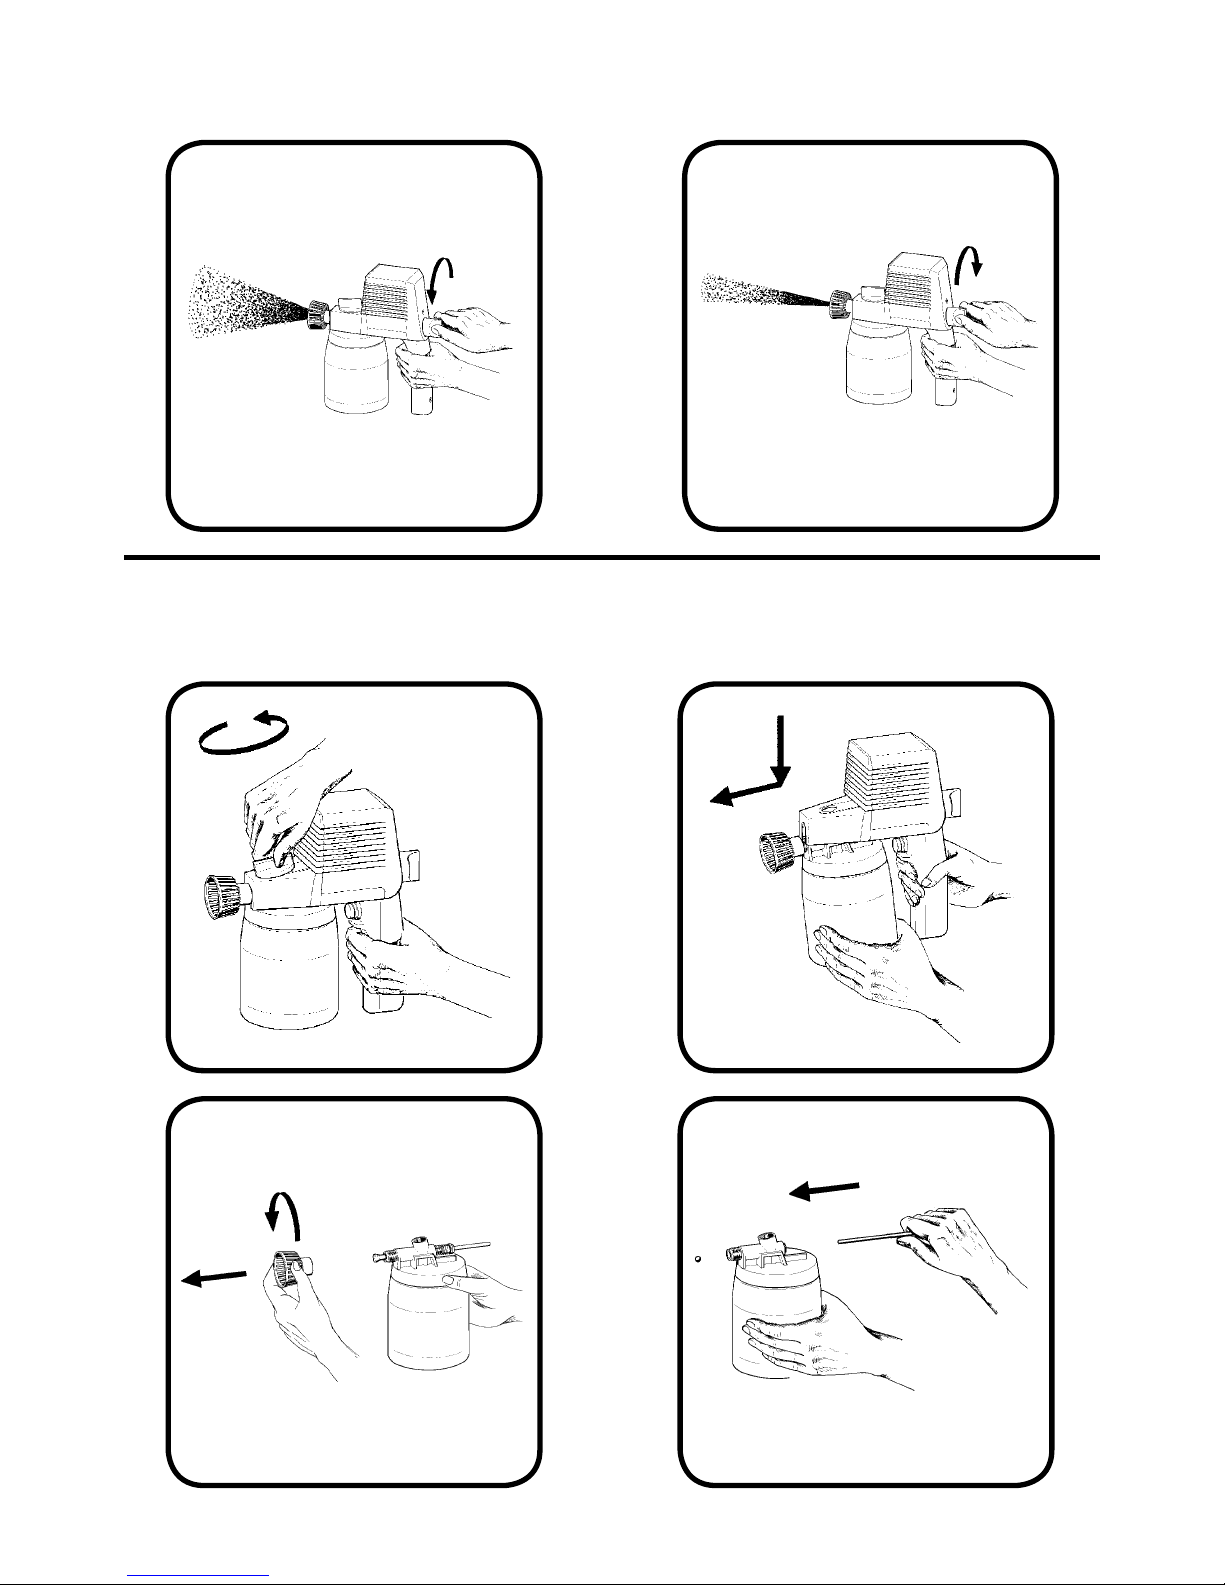
Regulating the Spray Jet
Turn the regulating knob completely to the left. (picture 1)
Switch on the spray gun.
Turn the regulating knob to the right until the spraying cone and atomization are correct.
The spray mist should be even, fi ne and without drops.
Readjust the spray jet similarly before each spraying operation.
Due to the high pressure of the spray gun, if spraying very fi ne liquids such as water, ensure
that the nozzle is fi rmly tightened - use a towel if necessary - and reduce the power setting
utilised. The LM45 is not recommended for spraying water as creates too much pressure for
thin viscosity materials.
Always screw down the container fi rmly. (picture 2)
A test should be carried out to determine the most effective distance from the spraying
surface. Start at a fairly large distance. Ensure that you keep at a constant distance and
that your movements are steady. The distance of the nozzle from the item being sprayed
depends on the spray material (approx. 20-35 cm spraying distance depending on the cone
of the jet and the thickness of the liquid).
Note: Spraying material tends to drip off vertical surfaces. Perform an initial spraying from a
slightly greater distance.
Never spray until the container is empty. The suction pipe must always be immersed in
liquid.
Care and Maintenance
Always disconnect the plug from the power socket before carrying out any work on
the spray gun.
Always keep the spray gun clean.
Never immerse the spray gun in cleaning agent!
Clean the spray gun periodically by spraying through a suitable food safe mild detergent.
Rinse it thoroughly thereafter with fresh water. See instructions of the cleaning agent
manufacturer. When the spray gun is not used for a longer time, spray through a light food oil
for conservation. If the spray gun should happen to fail despite the care taken in manufacture
and testing, repair should be carried out by an authorised representative. For all correspondence and spare parts orders, always include the order number.

Dismantling the Spray Gun
1. Remove screw. (spare part 1, page 15-16) (picture 3, page 2)
2. Separate the motor housing (spare part 6) from the pump section. (picture 4)
3. Unscrew nozzle (spare part 3). Take suction pressure valve (spare part 4) and pump plunger (spare
part 8) with spring (spare part 7) out of the pump section. Do not use force. (picture 5)
4. Remove the valve ball from the pump by using a copper or brass pin to push it through the piston
aperture. (picture 6)
5. Place all parts in the appropriate detergent and clean them.
Never use hard objects for cleaning! The piston (spare part 8) should move easily in the pump
housing.
Assembling the Pump
Assemble the parts in the reverse order.
After cleaning, spray through the spray gun briefl y with vegetable oil as an anticorrosion measure.
Collect cleaning agents in an appropriate receptacle and dispose of in an appropriate manner.
EN Declaration of Conformity CE
We confi rm that this product meets the required standards as set out in the following norms:
EN 50144-1:98 + A1:02 + A2:03, EN 50144-2-7:00, EN 50366:03 + A1:06,
EN 55014-1:06 + A1:09 + A2:11, EN 55014-2:97 + A1:01 + A2:08, EN 61000-3-2:06 + A1:09 + A2:09,
EN 61000-3-3:08, EN 62233:08
5
Guarantee
The spray gun is guaranteed for six months subject to the enclosed terms and on condition that
it is only used for processing products approved for the food industry.
The spray gun must not be operated continuously for longer than 10 minutes at a time.
The guarantee is based on 50 hours of use within a 6-month period.
Only original spare parts may be used in the event of repairs.
The spray gun must be serviced and cleaned as described in the operating instructions.
The guarantee becomes valid with the delivery of the product to the end user.
The duration of the guarantee shall be determined by the end user‘s date of purchase. The
guarantee excludes any damage due to natural wear, overloading or incorrect handling.
Repairs not covered by the guarantee shall be performed by service centres subject to the
applicable price and delivery terms of the country in question.
Product liability
No liability is accepted for damage caused directly or indirectly by the use and spraying of
products. The user assumes full responsibility for the use of the product in accordance with the
laws of food hygiene and other legal regulations.
A. HitschrichDr. S. Kendrick

Accessories
Spare partsIRU LM45 (K45-L)
Pos. Part No.
09-490-007
09-490-004
09-490-006
09-490-008
09-008-015
09-490-012
Fan Nozzle
Round jet nozzle R4
Round jet nozzle R6
Round jet nozzle R8
Bent nozzle extension
Container with lid
11
12
12
12
13
14
09-004-004
09-501-025
09-490-008
09-005-000
09-004-022
09-504-038
09-004-013
09-004-026
06-001-027
09-501-016
1
2
3
4
5
6
7
8
9
10
Wing set screw
Casing
Nozzle R8
Swirl piece
Valve ball
Pump housing
Piston spring
Piston
Sucion tube
Container
6

Theo Krebs AG
Bühlstrasse 72
CH 8583 Sulgen
Tel: +41 (0)71 686 60 40
Fax: +41 (0)71 686 60 43
Mail: info@krebsswitzerland.com
Web: www.krebsswitzerland.com
09-004-004
11-501-045
09-490-006
09-005-000
09-004-014
11-504-023
11-004-013
11-004-014
06-001-027
09-501-016
1
2
3
4
5
6
7
8
9
10
Wing set screw
Casing
Round jet nozzle R6
Swirl piece
Valve ball
Pump housing
Piston spring
Piston
Suction tube
Container
09-490-007
09-490-004
09-490-006
09-490-008
09-008-015
09-490-012
11
12
12
12
13
14
Fan Nozzle
Round jet nozzle R4
Round jet nozzle R6
Round jet nozzle R8
Bent nozzle extension
Container with lid
Accessories
Spare parts IRULM25 (K25T-L)
Pos. Part No.
09-814-009/07.13
 Loading...