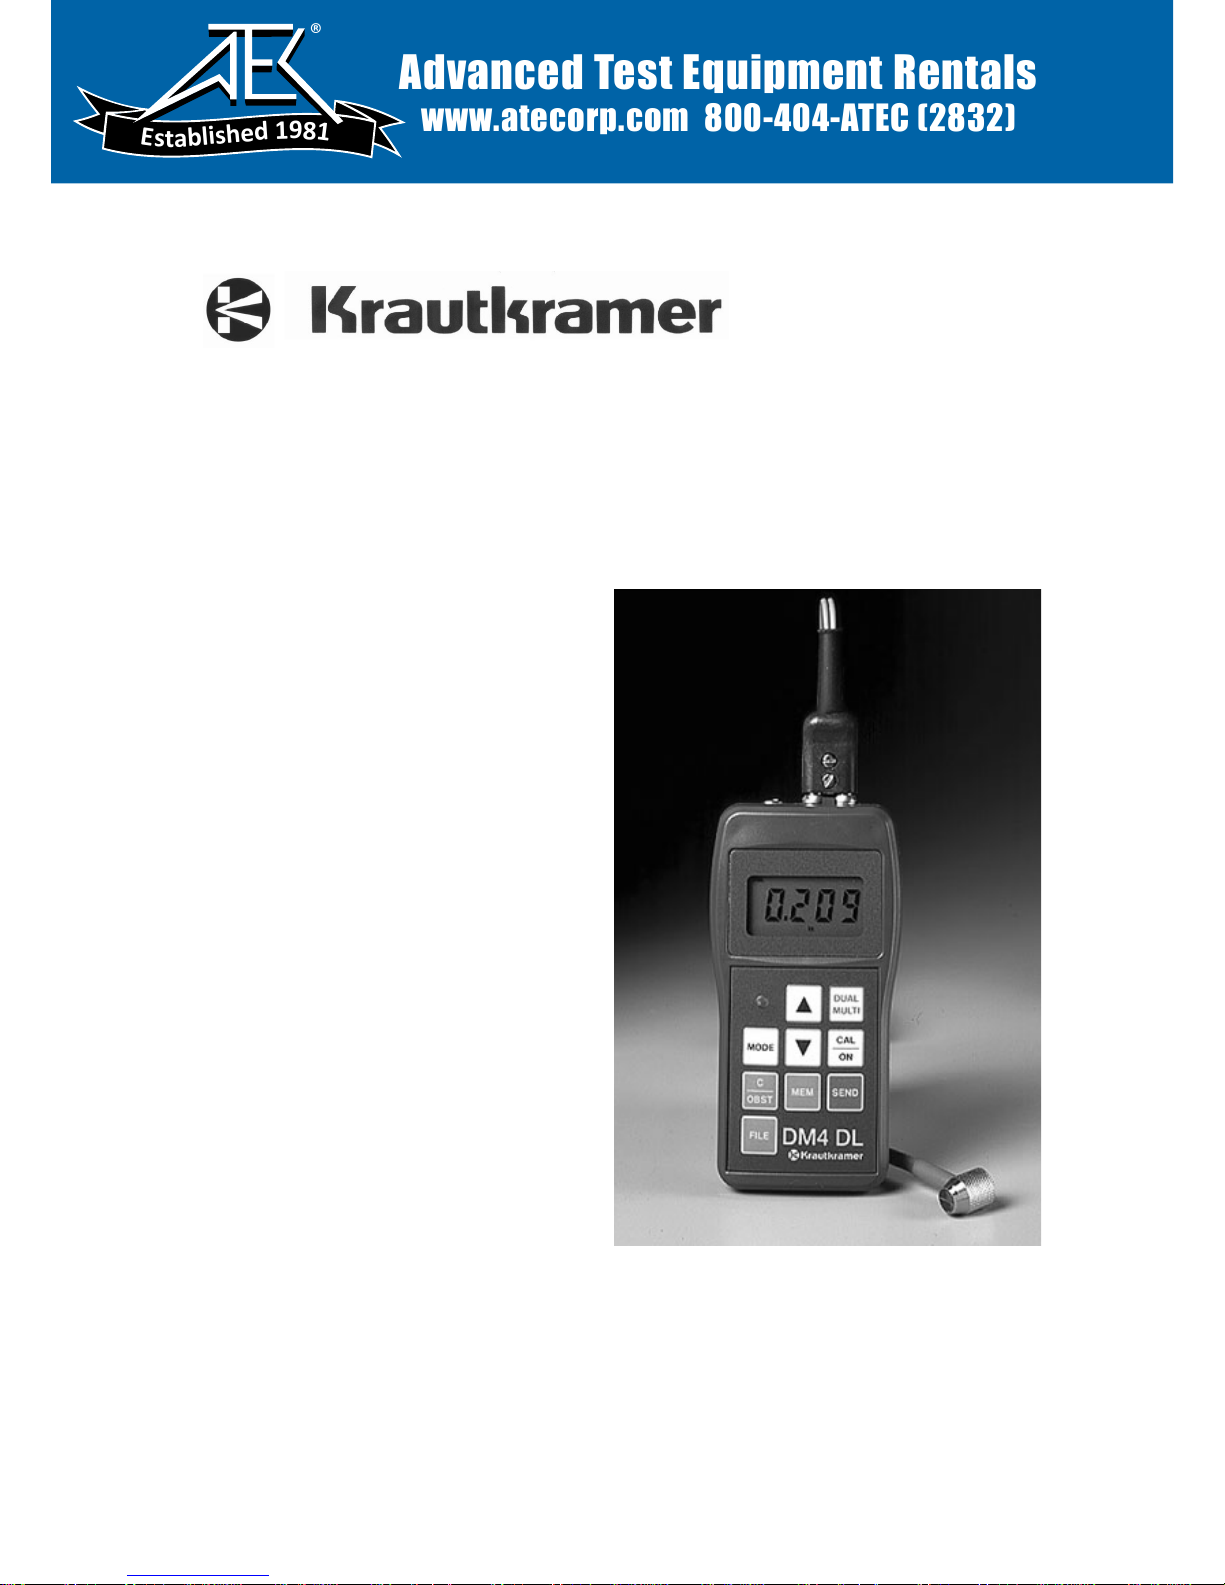
DM4
DM4 DL
Operating Manual
DM4E
Advanced Test Equipment Rentals
www.atecorp.com 800-404-ATEC (2832)
®
E
s
t
a
b
l
i
s
h
e
d
1
9
8
1

Operating Manual
for
Ultrasonic Thickness Gauge
Models DM4E, DM4 and
DM4 DL with On-board data Logger
Manual Part No. 021-002-073 REV. S
Copyright 2002 Agfa NDT Inc.

THIS PAGE INTENTIONALLY BLANK

Important Notice
Important Notice
The following information must be read
and understood by any user of a
Krautkramer ultrasonic thickness
gauge. Failure to follow these instructions can lead to errors in thickness
measurements or other test results.
Decisions based on erroneous results
can, in turn, lead to property damage,
personal injury or death.
General Warnings
Proper use of ultrasonic test equipment
requires three essential elements:
• Selection of the correct test
equipment.
• Knowledge of the specific “test
application requirements.”
• Training on the part of the
instrument operator.
This operating manual provides instruction in the basic set up and operation of the Krautkramer thickness
gauge.
There are, however, additional factors
which affect the use of ultrasonic test
equipment. Specific information regarding these additional factors is beyond the
scope of this manual. The operator
should refer to textbooks on the subject
of ultrasonic testing for more detailed
information.
Operator Training
Operators must receive adequate
training before using ultrasonic test
equipment. Operators must be trained in
general ultrasonic testing procedures and
in the set up and performance required
by a particular test. Operators must
understand:
• Soundwave propagation theory .
• Effects of the velocity of sound of
the test material.
• Behavior of the sound wave
where two different materials are
in contact.
• Areas covered by the sound
beam.
More specific information about operator training, qualification, certification,
and test specifications is available from
various technical societies, industry
groups, and government agencies.
Testing Limitations
In ultrasonic testing, information is
obtained only from within the limits of the
sound beam. Operators must exercise
great caution in making inferences about
the test material outside the limits of the
sound beam. For example, when testing
large materials it may be impossible or
impractical to inspect the entire test
piece. When a less-than-complete
inspection is to be performed, the
operator must be shown the specific
areas to inspect. Inferences about the
condition of areas not inspected, based
on data from the evaluated areas, should
only be attempted by personnel fully
qualified and trained in applicable
standards of statistical evaluation. In
particular, materials subject to erosion or
corrosion, in which conditions can vary
significantly in any given area, should
only be evaluated by fully trained and
experienced operators.
Sound beams reflect from the first
interior surface encountered. Because
of part geometry and overlapped flaws
or overlapped surfaces, thickness
gauges may measure the distance to an
internal flaw rather than to the back wall
of the material. Operators must take
steps to ensure that the entire thickness
of the test material is being examined.
Ultrasonic Thickness Measurement
Critical Operating Procedures
The following operating procedures must
be observed by all users of
ultrasonic thickness gauges in order to
minimize errors in test results.
1.
Calibration of Sound Velocity
The principle of operation of an ultrasonic thickness gauge is that the instrument measures the time of flight of an
ultrasonic pulse through the test piece
and multiplies this time by the velocity of
sound in the material. Thickness
measuring error is minimized by ensuring
that the sound velocity to which the
instrument is calibrated is the sound
velocity of the material being tested.
Actual sound velocities in materials
often vary significantly from the values
found in published tables. In all cases,
best results are obtained if the instrument is calibrated on a velocity reference block made from the same
material as the test piece; this block
should be flat and smooth and as thick
as the maximum thickness of the test
piece.
Operators should also be aware that the
sound velocity may not be constant in the
material being tested; heat treating, for
example, can cause significant changes
in sound velocity . This must be considered when evaluating the accuracy of the
thickness provided by this instrument.
Instruments should always be calibrated
before testing, and the calibration should
be checked after testing, to minimize
testing errors.
2.
Probe Zero Procedure
The probe zero procedure must be
performed as described in this manual.
The probe zero block should be clean, in
good condition and without noticeable
wear. Failure to properly perform the
probe zero procedure will cause inaccurate thickness readings.
3.
Effects of Temperature on
Calibration
T emperature variations change the
sound velocity of materials and transducer delay lines and, therefore, calibrations. All calibrations should be performed on-site, and with test blocks at
the same temperature as the test piece,
to minimize errors due to temperature
variations.
4.
Transducer Selection
The transducer used in testing must be in
good condition without noticeable wear
of the front surface. Badly worn transducers will have a reduced effective
measuring range. The specified range of
the transducer must include the complete
range of thicknesses to be tested. The
temperature of the material to be tested
must be within the transducer’s temperature range.
5.
Use of Couplants
Operators must be familiar with the use
of ultrasonic couplants. Testing skills
DM4E, DM4, DM4 DL Operating Manual
Page 1

Important Notice
must be developed so that couplant is
used and applied in a consistent
manner to minimize variations in
couplant layer thickness and errors in
test results. Calibration and actual
thickness being measured. This effect,
commonly known as “doubling,” can
occur below the minimum specified
range of the transducer. If the transducer being used is worn, doubling is
possible at a thickness greater than the
minimum of the specified range.
When using a new transducer, any
reading which is less than twice the
minimum specified range of the transducer may be a “doubled” reading, and
the thickness of the material being tested
should be verified by the use of other
methods. If the transducer shows any
sign of wear, doubling may occur at a
thickness greater than twice the minimum of the specified range. This
thickness should be determined by
calibrating the instrument/transducer
combination on reference blocks that
represent the complete range of possible
thicknesses that may be encountered in
testing. This is particularly important
when the test piece is being ultrasonically
measured for the first time or in any case
where the history of thickness of the test
specimen is unknown.
Page 2 DM4E, DM4, DM4 DL Operating Manual

Table of Contents
Important Notice ....................................................... 1
Table of Contents ...................................................... 3
Warranty / Service ..................................................... 4
1. Introduction ........................................................... 5
1.1 How To Use This Manual................................. 5
1.2 DM4E, DM4, DM4DL Features....................... 5
1.3 How Instrument Measures Thickness.............. 5
2. Operation ............................................................... 7
2.1 Battery Installation ........................................... 7
2.2 Display Symbols............................................. 7
2.3 Keyboard Controls........................................... 8
2.4 Getting Started ................................................ 9
2.5 Calibration To A Known Thickness,1-Point...... 9
2.6 Calibration To A Known Thickness,2-Point.... 10
2.7 Calibration To A Known Velocity ....................11
2.8 Normal Measurement - THK Mode .............. 12
2.9 Minimum Capture Measurement ................... 12
2.10 Receiver Gain Control
(DM4, DM4 DL) ............................................. 12
2.11 Using LO/HI Thickness Limits
(DM4, DM4 DL) ............................................. 13
2.12 Differential Measurement
(DM4, DM4 DL) ............................................. 13
2.13 Band Pass Filter Control
(DM4, DM4 DL) ............................................. 14
2.14 Resolution And Units of Measure .................. 14
2.15 Display Backlight........................................... 14
2.16 Disabling/Enabling Functions ........................ 14
2.17 Recording Measurements
(DM4 DL)....................................................... 15
2.18 Dual Multi Measurement Mode
(DM4, DM4 DL) ............................................. 15
2.19 DA3 Operating Mode..................................... 16
3. Data Logger Operation ....................................... 17
3.1 The DM4 DL Data Logger ............................. 17
3.3 Selecting A File ............................................. 17
3.4 Logging Readings Into Memory..................... 18
3.4.1 Recording an OBSTRUCT Value ........ 18
3.5 Selecting Locations ....................................... 18
3.6 Reviewing Stored Thickness Readings ......... 18
3.7 Clearing and Replacing Readings ................. 19
3.8 Clearing Selected Files ................................. 19
3.9 Clearing Entire Memory ................................ 19
3.10 Permanent Storage ....................................... 19
4. Serial I/O Interface .............................................. 20
4.1 The DM4 DL Serial Interface......................... 20
4.2 Setting Baud Rate ......................................... 20
4.3 Report Language Selection ........................... 20
4.4 Printing Data ................................................. 20
4.5 Sending Data To A Personal Computer......... 21
4.6 Importing Data Into A Spreadsheet ............... 22
4.7 Interrupted Transmission Procedure ............. 22
5. Specifications...................................................... 23
5.1 Instrument Specifications .............................. 23
5.2 Probe Specifications ...................................... 24
5.3 Dual Multi “Through Coating”Mode Probe.........
Specifications ................................................ 25
6. Application .......................................................... 26
6.1 General Notes ............................................... 26
6.1.1 Flaws ................................................... 26
6.1.2 Surface Conditions .............................. 26
6.1.3 Curved Surfaces ................................. 26
6.2 Thickness Meas. On Hot Test Pieces............. 26
7. Worldwide Service Centers ................................ 28
Appendix A: Displays, Quick Reference ............... 29
Appendix B: Locations Per File ............................. 33
Appendix C: Operational Software Reset ............. 34
Index ...................................................................... 35
3.2 Setting Number of Files ................................. 17
DM4E, DM4, DM4 DL Operating Manual
Page 3

Warranty/Service
Warranty
When used in accordance with the manufacturer’s written
instructions and under normal operating conditions, the
Krautkramer DM4E, DM4, and DM4 DL test instruments
are conditionally guaranteed to be free from defects in
material and workmanship for a period of two (2) years
from date of shipment.
All repair work will be made FOB Lewistown, Pennsylvania, or at a Factory Trained Service Center as advised
by Agfa NDT Inc., provided the defective unit is returned
properly packed with all transportation charges prepaid.
Any and all equipment replacement will be at the sole
discretion of Agfa NDT Inc.
This warranty shall not apply to equipment subjected to
misuse or abuse, improper installation, alteration, neglect,
or accident. Excluded from this warranty are expendable
items such as transducers, interconnecting cables, and
batteries. Accessory items such as printers, etc. will be
covered under the original manufacturer’s warranty as given
to Agfa NDT Inc.
This warranty is limited to the original purchaser and is not
transferable. No other warranty, expressed or implied, is
Service
Every effort has been made to provide you with a reliable product. However, should service become necessary, Agfa NDT Inc.
has established a number of Factory Trained Service Centers.
For the location of the nearest facility, refer to Chapter 7 or
contact:
Agfa NDT Inc.
Krautkramer Ultrasonic Systems
Manager of Customer Service
50 Industrial Park Road
Lewistown, PA 17044
Page 4
DM4E, DM4, DM4 DL Operating Manual

1. Introduction
1.1 How To Use This Manual
This manual describes the features and operation of the DM4E,
DM4, and DM4 DL (with on-board data logger) Ultrasonic Thickness Gauges.
If you are a first time user of the instrument, review Chapter 1 of
this manual to become acquainted with it’s general capabilities.
Follow the instructions in Chapter 2 to prepare the instrument for
operation and perform thickness measurements.
If you are using a model DM4 DL, Chapter 3 provides detailed information and operating instructions for the on-board data logger.
Chapter 4 describes how to interface model DM4 DL with a variety of external devices, such as a printer or personal computer,
via the serial I/O interface.
Chapter 5 provides important specifications, particularly Section
5.2, which lists compatible probes (transducers) and their capabilities.
All users should read “Important Notice” at the beginning of the
manual and Chapter 6, “Application Notes”, for important
information on operator qualification, test conditions, and procedures that affect measurement results.
1.2 DM4E, DM4, DM4 DL Features
The DM4E, DM4, and DM4 DL Ultrasonic Thickness Gauges are
hand-held, microprocessor controlled instruments designed for
general thickness measurements on a variety of equipment having access to one side only. It is especially applicable to the
measurement of remaining wall thickness on tubes, pipes, pressure vessels, and other parts subject to wall thickness loss due to
corrosion or erosion.
The on board Data Logger of the DM4 DL improves the reliability
of recording thickness
and misrecorded data. A total of 5390 readings can be stored in
up to 999 separate data files. Displayed readings are recorded
by simply pressing the SEND key or an optional remote hand or
foot switch. Measurement, statistical and instrument data can
be transmitted via the Serial I/O port, in 80 column format,
to a serial printer or personal computer for documentation,
storage and analysis.
readings by avoiding the errors of misread
Features of the DM4E, DM4, and DM4 DL:
• Rugged, sealed case and keypad for reliability
• Lightweight, ergonomically designed case
• 200 hours on two AA alkaline batteries
• Five keys (nine keys on DM4 DL) control all functions for simple
operation.
• Automatic probe zero for fast calibration
• Automatically recognizes DIALOG Intelligent Transducers.
• Automatic V-path error correction compensates for non-
linearity of dual element probes.
• Resolution of .001 in, .01 in, .1 mm, or .01 mm
• Large, easily read display with backlight
• Automatic gain adjustment
• Measures a wide range of materials
• Minimum Capture mode captures thinnest reading
Advanced Features of the DM4 and DM4 DL:
• Manual gain adjustment
• Dual Multi “Through Coating (Paint)” Measurement Mode
• Programmable HI/LO thickness limits with LED alarm
• Differential mode displays the difference between measured
thickness and user-set nominal thickness value.
• Band Pass Filter selection to match the frequency of the probe
for best performance.
DM4 DL Data Logging and Communications Features:
• Stores up to 5390 readings.
• Memory can be divided into a maximum of 999 separate data
files of equal length.
• Individual readings or files can be accessed
editing, and clearing data.
• Serial I/O port provides output to a serial printer or IBM compatible personal computer.
• Built-in report format includes instrument, inspector, and probe
IDs, settings,
• DM4 DL Data Transfer Utility Software
IBM compatible PC for viewing, printing transfer to other software.
• UltraMATE
ible software programs.
1.3 How DM4E, DM4, DM4 DL Measure Thickness
These instruments operate on the ultrasonic pulse-echo principle,
similar to sonar. A short ultrasonic pulse is transmitted into the
part by a probe (transducer). The pulse travels through the material under test until it encounters an interface, that is a material
with substantially different physical characteristics, such as air or
liquid, at the back surface of the part. At the interface, the pulse
is reflected back to the probe.
statistics, and readings.
®
and UltraPIPE® Windows 95/98/NT compat-
for reviewing,
transfers data to an
DM4E, DM4, DM4 DL Operating Manual
Page 5
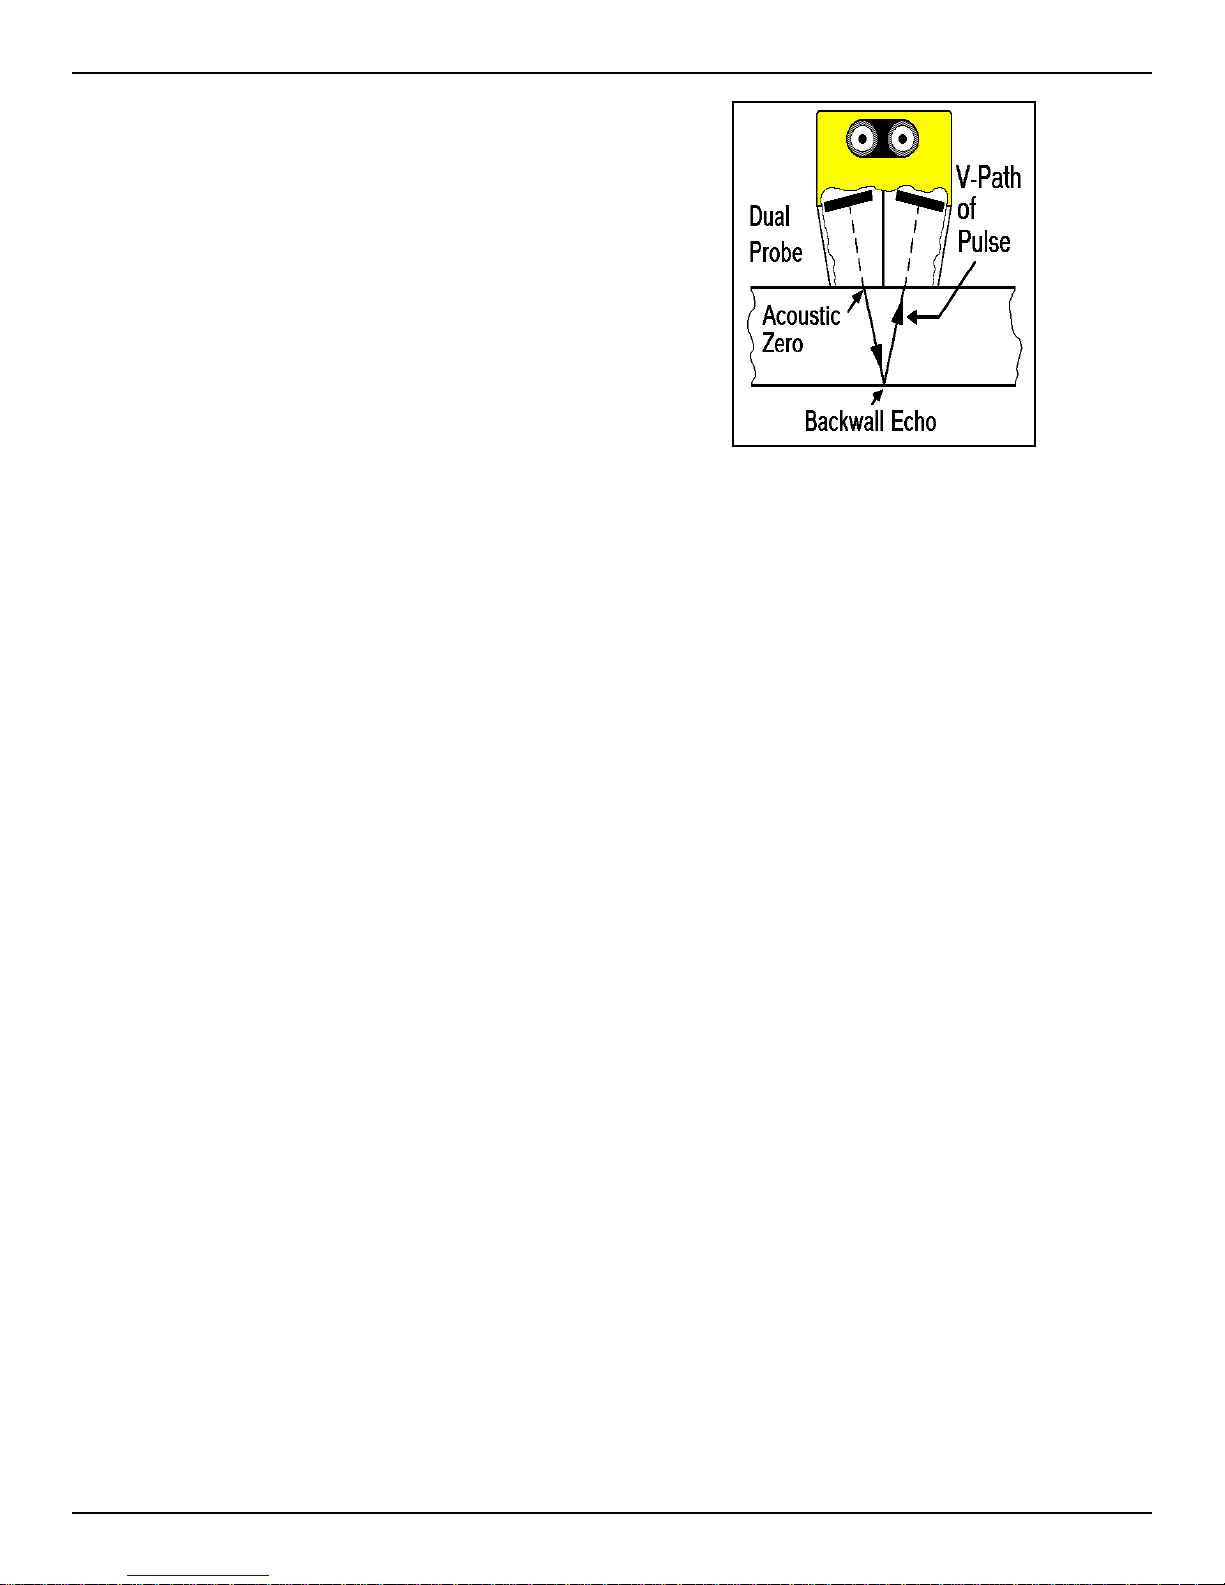
1.0 Introduction
The time needed for the pulse to make this round trip is divided
by two and multiplied by the velocity of sound in the material
under test. The result is the thickness of the material.
The figure at right illustrates the pulse-echo principle of ultrasonic
thickness measurement.
Dual Element Thickness Measurement
Page 6
DM4E, DM4, DM4 DL Operating Manual

2. Operation
2.1 Battery Installation
NOTE: When low battery indicator lights (below), replace batteries as soon as possible. Automatic shutoff occurs when batteries are too weak for reliable
operation. Settings are saved and restored when
turned on. When testing in remote locations, always
carry spare batteries.
Low battery indicator:
To install batteries, loosen the two battery cover screws on the
back of the instrument and remove the battery cover.
Insert 2 “AA” alkaline batteries as shown at right. The instrument
is protected against incorrect battery installation. If the batteries
are installed with polarity reversed, no damage will occur, but the
instrument will not operate.
After batteries have been installed, replace the battery cover and
tighten the screws.
2-PT 2-point calibration mode.
VEL Velocity display and callibration mode.
MIN Minimum capture mode
SPEC Special modes (DM4, DM4 DL) (Sections 2.10
through 2.13 and 2.18)
Display backlight control.
Low barery indicator. Replace batteries when
indicator illuminates as shown.
In dIF mode, reading is greater than nominal.
If HI thickness limit is on, reading exceeds limit.
(DM4, DM4 DL)
In dIF mode, reading is less than nominal. If LO
thickness limit is on, reading violates limit.
(DM4, DM4 DL)
« DIALOGIntelligent Transducer automatically
recognized
2.2 Displays Symbols
CAL Flashes when CAL key is pressed. Scrolling
keys are enabled to adjust displayed value or
control parameter.
Coupling indicator lights when satisfactory
acoustic coupling between the probe and test
piece has been achieved.
in Unit of measure of displayed value is inches
(in/µs in VEL mode).
Mm Unit of measure of displayed value is millimeters
(m/s in VEL mode).
Note:
To charge the unit of measure and display
resolution refer to Section 2.14.
THK Thickness measurement and standard 1-point
calibration mode.
THK Dual Multi “Through Coating (paint)”
SPEC measurement mode.
DM4E, DM4, DM4 DL Operating Manual
Page 7
2.0 Operation
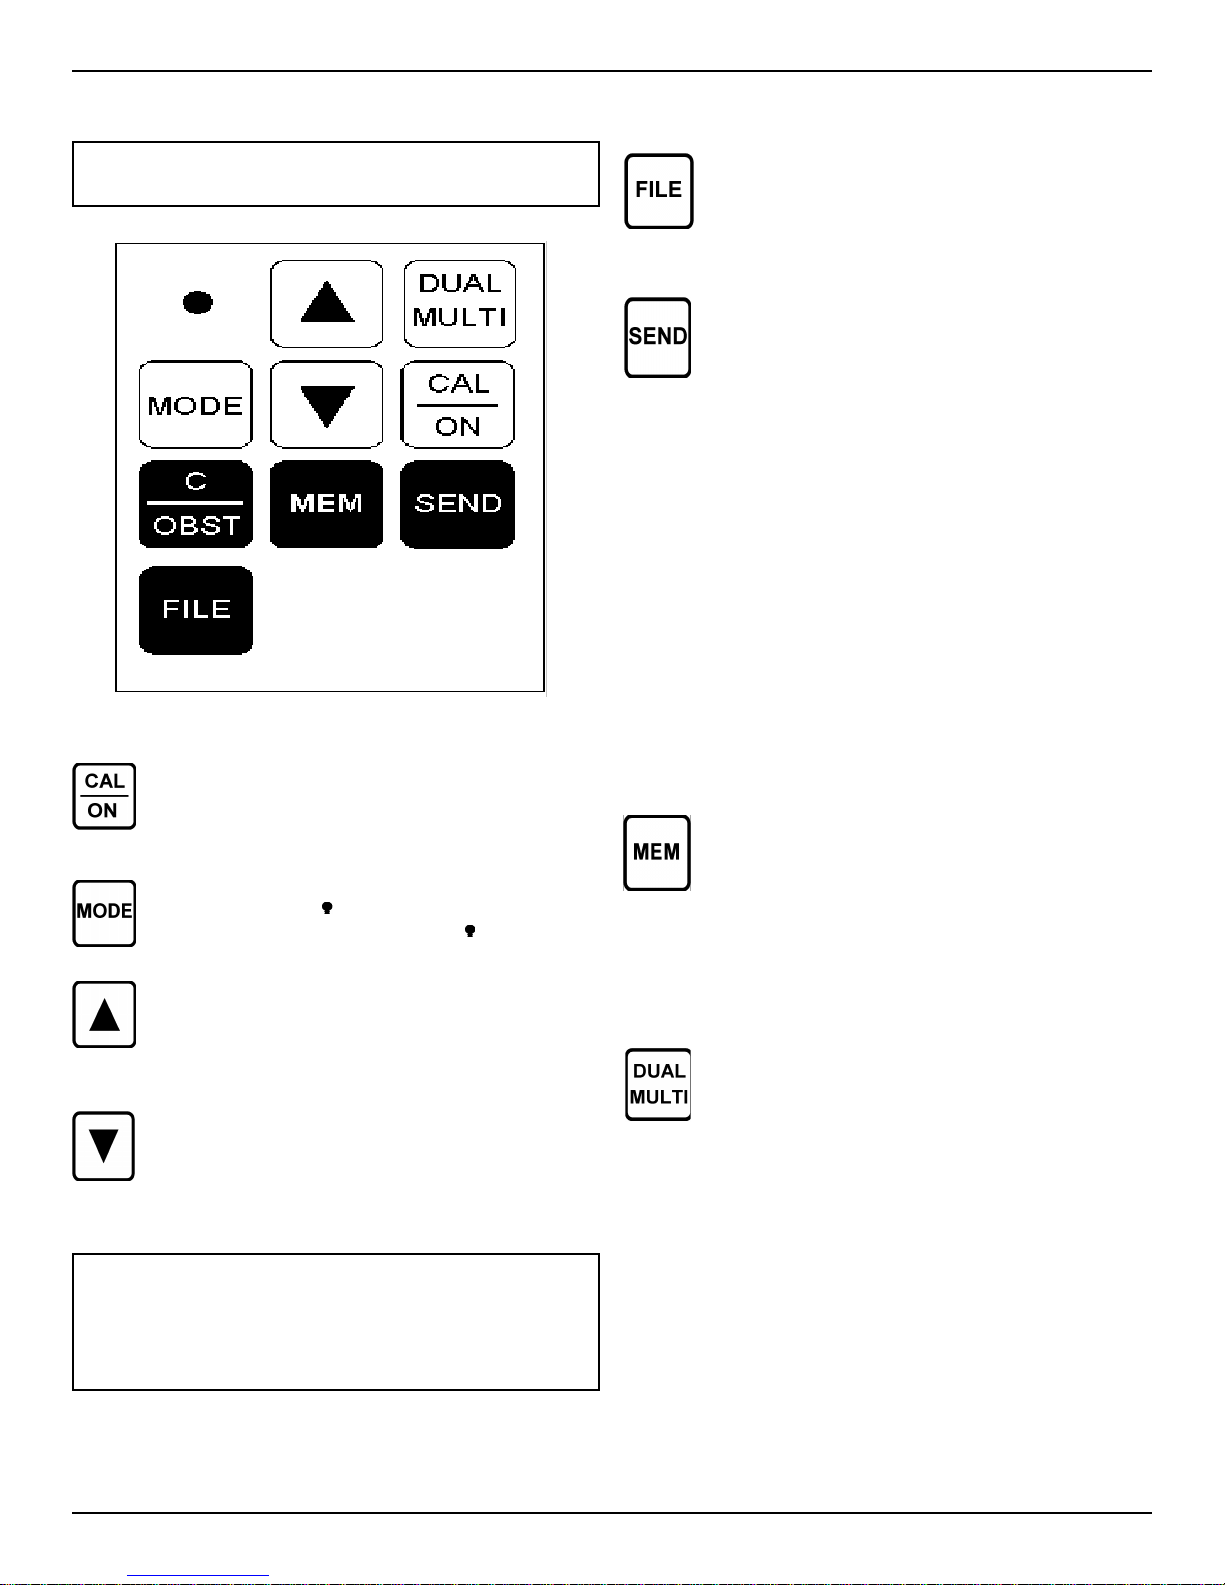
2.3 Keyboard Controls
NOTE: SEND, C/OBST, MEM, and FILE keys
are DM4 DL only.
Instrument Control Keys
Turns on the instrument. When on, activates CAL
(calibration) mode and enables scrolling keys
Selects the operating mode - THK, 2-PT, VEL,
MIN, SPEC, and
modes from left to right, and from
The SCROLLING keys, when enabled by the
CAL key, change the displayed value or instrument control option.
When enabled by the FILE key , they are used to
set the number of Data Logger files and select
files.
. Multiple presses activate
back to THK.
DM4 DL Data Logging and Communication Keys
Activates the scrolling keys to select a file
(File Select) or, if Data Logger memory is
clear, setting the number of files. Setting
number of files can only be performed when
the entire memory is clear.
Transmits data to the on board Data Logger,
or to an external device via the Serial I/O
port. The function of the SEND key is
dependent upon the type of cable connected
to the Serial I/O port:
No connection - SEND is active in all measurement modes. Displayed thickness is sent
to the on board Data Logger, if configured.
DR1 Data Recorder connected - SEND is
active in THK (Thickness), and MIN (Minimum Capture) modes. Displayed thickness
is sent to the DR1.
RS232C peripheral connection (PC/software,
printer, data logger, etc.) - Pressing SEND in
any measurement mode transmits the displayed value. Pressing SEND during the File
Select function transmits the displayed file or
all files. Second push of SEND aborts the transmission.
Provides access to the selected file of the onboard Data Logger for selecting locations and
reviewing stored thickness readings.
Clears the data logger readings, files, or entire
memory. Displays “OBSTRUCT” value, when
probe is uncoupled, to be sent to active data
logger location. Refer to Chapter 3 for detailled
instructions.
Sets the Dual element Multi-echo mode for through
coating measurements. A second press turns off
Dual-Multi mode and returns the instrument to conventional thickness measurement mode.
When enabled by the MEM key , they are used to
select file locations and review readings stored in
memory.
NOTE: The scrolling keys are also used to
change the resolution and unit of measure by
pressing both keys simultaneously in THK
mode (CAL indicator must be off)
Page 8
DM4E, DM4, DM4 DL Operating Manual

2.0 Operation
Model DM4E
2.4 Getting Started
Read “Important Notices” at the beginning of this manual, and
Chapter 6, “Application Notes,” for important information on test
conditions that affect measurement results.
Select a suitable probe (Section 5.2) and connect it to the probe
connector on the top panel. See Section 4.3 to select a report
language other than English.
Press
annunciators are briefly displayed as shown above, followed by
the current software revision number. Then, the operating mode
and settings from the last session are restored. NOTE: If using
a NON-DIALOG KBA560 Family Probe (i.e. KBA560, KBA560WR, KBA560-V) or DA301
Probe, either P560 or P301 may be displayed. If this occurs,
the user must tell the instrument which probe is connected by
toggling with the Up and Down arrow keys to select P560 for a
KBA560 style probe or P301 for the DA301 probe, and press
the CAL/ON key to perform the probe zero procedure and operate the instrument.
Automatic shut-off occurs after 3 minutes of inactivity.
Coupling probe or pressing a key restarts the timing.
To change the unit of measure or select a different display
resolution setting refer to Section 2.14.
to turn on the instrument. The model and display
Model DM4
2.5 Calibration to a Known Thickness, 1-Point
NOTE:
velocity of sound as the material to be measured is required . For best results, the thickness of the calibration
standard should be equal to, or slightly greater than the
thickest part to be measured.
NOTE:
ment or connecting probe to instrument for best Automatic
Probe Zero results.
A calibration standard of the same material and
Wipe face of probe clean before turning on instru-
Model DM4 DL
1-point calibration can only be performed if 2-PT mode is
OFF (Section 2.6).
If necessary , press until THK is displayed.
Press
no action until “PO” disappears indicating Automatic Probe
Zero is complete. With CAL flashing, couple the probe to the
calibration standard. Be sure the coupling indicator (
lights and the reading is stable, as in Figure 2-3. The displayed value may not match the known thickness of the calibration standard at this point. You may keep the probe coupled
or uncouple the probe and wipe the excess couplant from the
probe face.
. All symbols and “PO” are briefly displayed. Take
)
If low light makes the display difficult to read, refer to Section
2.15 for instructions on using the backlight.
Before taking measurements, perform 1-point calibration
(Section 2.5) or 2-point calibration (Section 2.6).
NOTE:
DM4E, DM4 and DM4 DL feature automatic probe
zero for standard probes and automatic probe recognition for
DIALOG Intelligent Transducers.
Figure 2-3
DM4E, DM4, DM4 DL Operating Manual
Use and to adjust the displayed value to match the
thickness of the calibration standard. Scrolling speed accelerates as
the key is held. If a key is released for less than 1 second, scrolling
will resume at the same speed. Figure 2-4 shows how the display
should appear with a 0.200 inch calibration standard.
Press again to end the calibration procedure.
Proceed to Section 2.8 for normal thickness measurement (THK
mode) procedure.
Figure 2-4
Page 9

2.0 Operation
2.6Calibration to a Known Thickness, 2-Point
NOTE:
dard with two thicknesses) of the same material, velocity ,
and curvature as the material under test.
For best results, the thicker standard should be equal to, or
slightly greater than the maximum thickness to be measured.
The thickness of the thin standard should be as close as possible to the lower end of the expected measurement range.
If necessary , press
is displayed.
Press
Requires two calibration standards (or one stan-
until 2-PT (2-point calibration mode)
to display current status, On or Off.
Figure 2-5
Figure 2-7
Press again. The prompt to couple to the “HI” (thick) calibration standard is displayed -
Couple the probe to the thick calibration standard. Again, be
sure the coupling indicator (
Use
thick calibration standard.
Press
remains illuminated (Figure 2-7) to show that the current cali-
bration is 2-point and that automatic probe zero,
and to adjust the displayed value to match the
to exit 2-point calibration mode. The 2-PT indicator
) lights and the reading is stable.
Use or to enable 2-PT (On as in Figure 2-5).
Press
prompt to couple to the “LO” (thin) calibration standard appears,
as shown in Figure 2-6.
again. The 2-PT indicator now flashes and the
Figure 2-6
Couple the probe to the thin calibration standard. Be sure the
coupling indicator (
may keep the probe coupled or uncouple and wipe the excess
couplant from the probe face.
Use and to adjust the displayed value to match the
) lights and the reading is stable. You
Figure 2-8
1-point calibration, and velocity calibration functions are disabled.
The 2-point calibration procedure is complete and the instrument
is ready for thickness measurement (Section 2.8).
To disable 2-PT calibration mode:
T o disable 2-PT calibration, press
to change the status to OFF (Figure 2-8).
The CAL and 2-PT indicators are turned off and the instrument
returns to THK mode.
and use or
thickness of the thin calibration standard.
Page 10
DM4E, DM4, DM4 DL Operating Manual

2.0 Operation
Figure 2-9
2.7 Calibration to a Known Velocity
NOTE:
If you know the velocity of sound of the material to be measured,
the instrument can be calibrated to the known velocity without
the use of a calibration standard. However, the calibration should
always be verified by measuring a known thickness (or calibration standard) of the same material and velocity as the material
to be measured.
T o calibrate to a known velocity , press
The current velocity setting is displayed, as illustrated in
Figure 2-9.
Press
Table 2-1: Typical Sound Velocities in Various Materials (Longitudinal Wave)
2-PT calibration mode must be set to OFF.
until VEL illuminates.
to enable calibration mode.
Material in/µs m/s Material in/µs m/s
Figure 2-10
With the CAL indicator flashing, use and to set the
displayed velocity to that of the material under test.
Figure 2-10 shows how the display would appear for a calibration of .2328 inches per microsecond.
Press
THK mode.
Table 2-1, below, shows typical sound velocities for some common materials. Because processing, exact composition, and temperature affect velocity, the values may not precisely match the
velocity in the material to be measured.
again to exit velocity calibration mode and return to
Aluminum .2500 6300 Nylon .1000 2500
Brass .1700 4300 Phenolic .0560 1400
Cadmium .1100 2800 Platinum .1600 4100
Cast Iron .1800 4600 Plexiglas .1100 2800
Copper .1800 4600 Polyethylene .0700 1800
Epoxy Resin .1100 2800 Polystyrene .0930 2400
Glass (Crown) .2200 5600 Polyurethane .0700 1800
Glass (Window) .2700 6800 Porcelain .2200 5600
Gold .1300 3300 Rubber (Butyl) .0730 1900
Inconel .2200 5600 Rubber (Vulc.) .0900 2300
Lead .0850 2200 Silver .1400 3600
Magnesium .2300 5800 Steel .2300 5800
Manganese .1800 4600 Tin .1300 3300
Molybdenum .2500 6300 Titanium .2400 6100
Monel .2100 5300 Tungsten .2100 5300
Neoprene .0630 1600 Zinc .1600 4100
Nickel .2200 5600 Zircaloy 2 .1900 4700
NOTE: This information is provided for the convenience of the user and Agfa NDT Inc. assumes no responsibility for inaccuracies. Actual velocities depend on exact composition, temperature, and processing of each material.
DM4E, DM4, DM4 DL Operating Manual
DM4E, DM4, DM4 DL Operating Manual
Page 11
2.0 Operation
2.8 Normal Thickness Measurement - THK Mode
This procedure applies to parts with ambient surface temperatures. Refer to Section 6.2 for information on taking measurements on hot surfaces.
Be sure that the instrument is on and that the appropriate calibration procedures in Section 2.5, 2.6, or 2.7 have been completed
for the selected probe type and material to be measured.
If using the alarm feature (DM4 and DM4 DL), make sure the
correct LO and HI limits are set and the alarm is on (Sect. 2.11).
Remove any dirt, loose scale, or flaking from the test surface
and spread a thin layer of couplant on it.
Figure 2-11
Place the probe gently but firmly on the surface. The coupling
indicator ( ) must light, as in Figure 2-11. Use firm, steady pressure to obtain a stable reading.
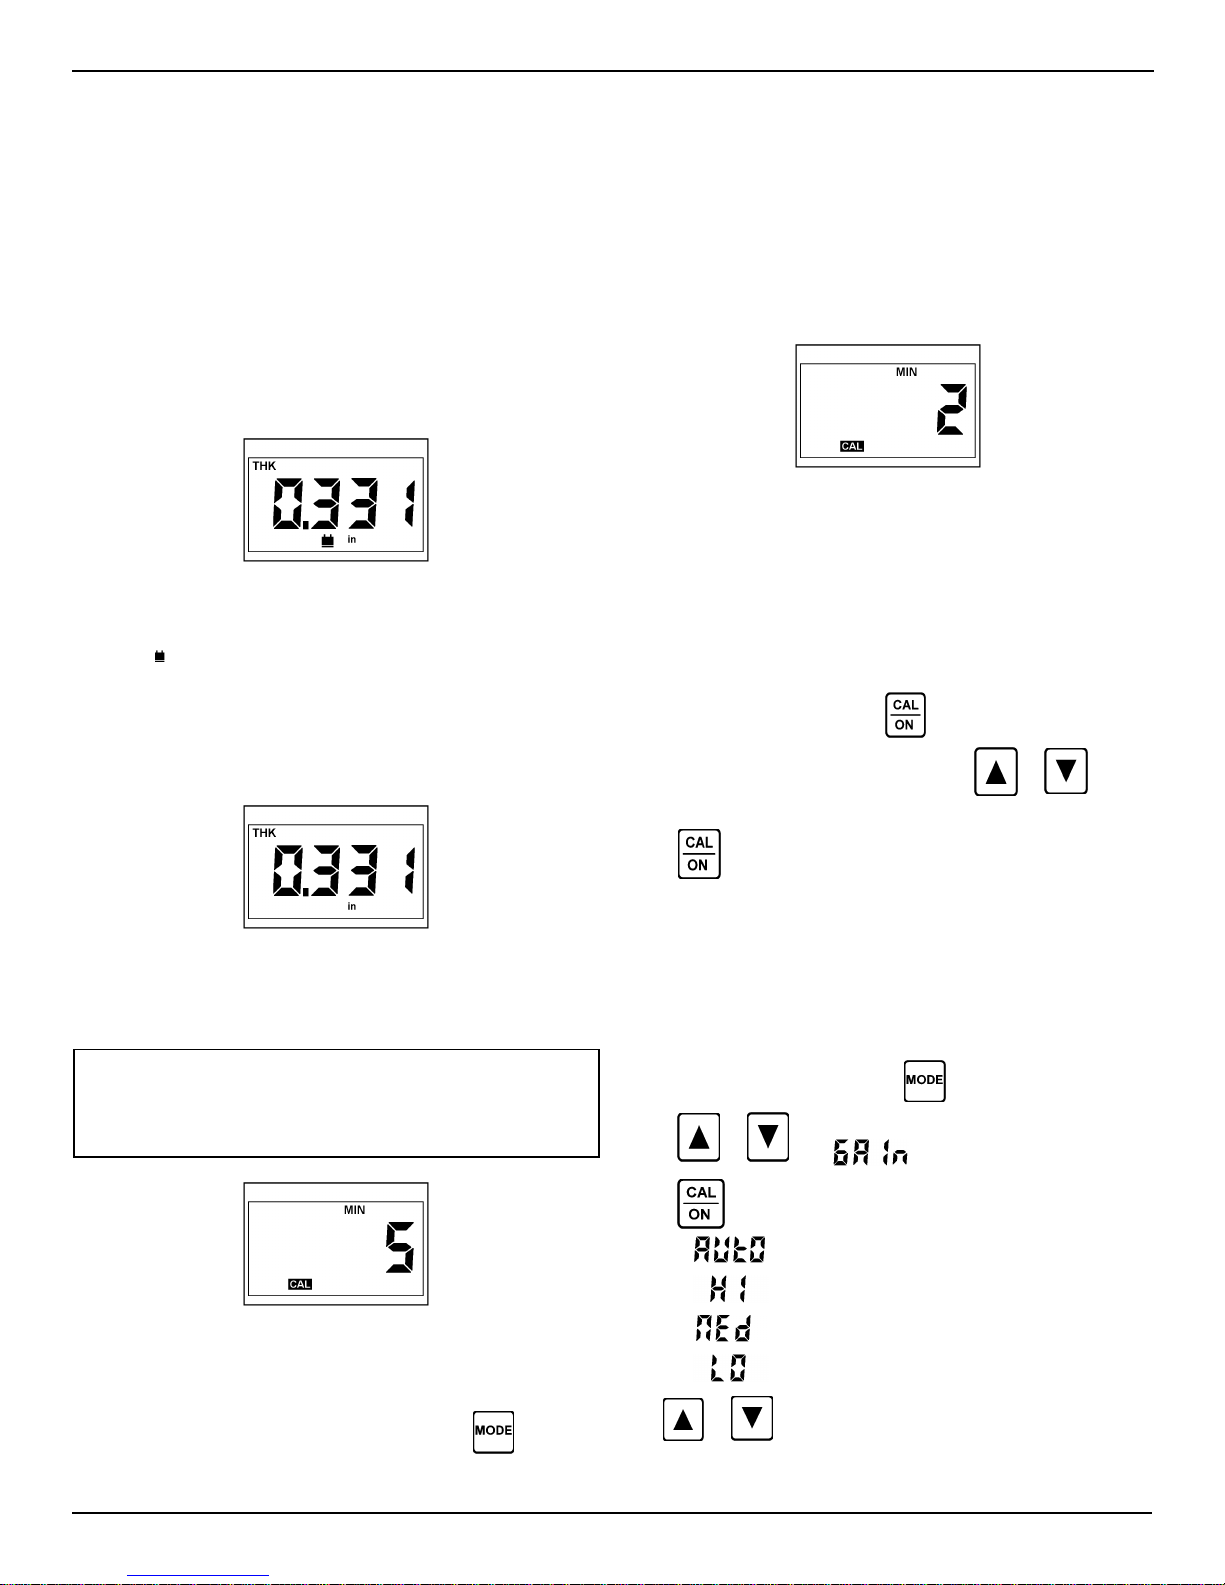
MIN mode is used to capture the thinnest value during a series of
readings or rapid sequence of measurements. The measurement updates at high speed to assure detection of thinnest value
during the cycle.
When the probe is uncoupled, the detected minimum is displayed
and MIN flashes to indicate that the time-out sequence has begun. Recoupling the probe while MIN is flashing allows the capture cycle to continue.
Figure 2-14
To end the capture cycle, uncouple the probe for at least the
number of seconds set in the current time-out setting, that is, until
MIN stops flashing. Coupling the probe begins a new minimum
capture cycle.
Setting MIN Time-Out:
The MIN time-out is adjustable from 1 to 5 seconds. With the
The digital thickness reading can be read from the display while
coupled, or the probe can be uncoupled and the last reading will
be held on the display.
Figure 2-12
If incorrect values occur repeatedly, check probe selection
(Sect. 5.2) or contact your Agfa NDT Inc. representative.
NOTE: If a reading is not possible due to low signal caused
by poor coupling or high material attenuation, or if “doubling”
is detected (see page 3), the coupling indicator will not light
and the display will not update.
instrument in MIN mode, press
out setting in seconds (Figure 2-13). Use
select a new setting (Figure 2-14).
Press again to activate the new time-out setting and
return to MIN mode for minimum capture measurement
2.10 Receiver Gain Control (DM4, DM4 DL)
The DM4 and DM4 DL have four gain setting options, Automatic,
High, Medium, and Low. The default is Automatic, which automatically selects a gain setting based on the velocity value.
T o change the gain setting, press
Press
Press
or until appears in the display .
to display current setting:
Automatic gain
High gain
to display the current time-
or to
until SPEC illuminates.
Figure 2-13
2.9 Minimum Capture Measurement
To enable the minimum capture mode, press
illuminates.
Page 12
until MIN
Use
Medium gain
Low gain
or to select a new setting.
DM4E, DM4, DM4 DL Operating Manual
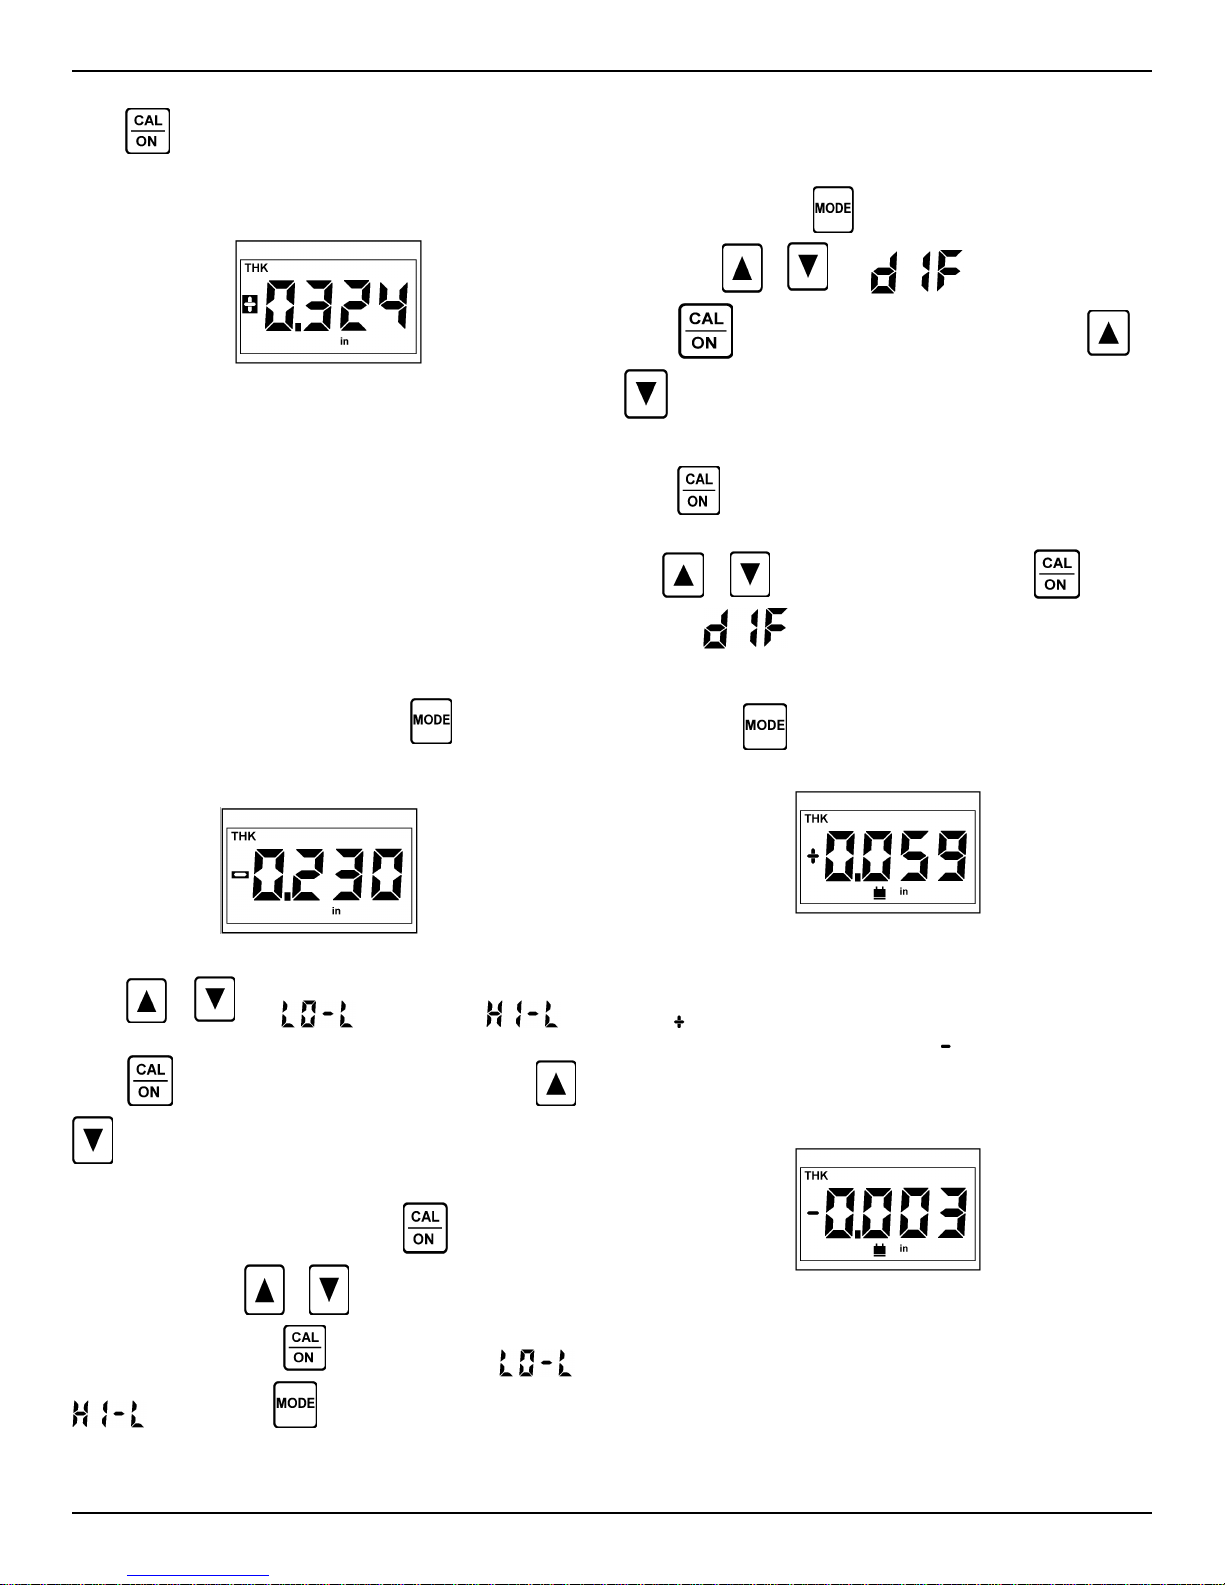
Press again to exit the gain select function.
When the instrument shuts off, current setting is saved and re-
stored when the instrument is turned on again.
2.0 Operation
2.12 Differential Measurement (DM4, DM4 DL)
Differential measurement mode displays the difference between
the measured thickness and a nominal value set by the user. To
enter dIF mode, press
until SPEC illuminates.
Figure 2-15
2.11 Using LO / HI Thickness Limits (DM4, DM4 DL)
WARNING: If a file containing normal thickness (THK) data is
currently active, changing the LO or HI limit replaces any settings previously stored in the file.
LO and HI limits identify readings that violate user set lower and
upper limits. When LO and/or HI limits are set, a reading that
violates either causes the red LED (front panel) to light.
A flashing plus sign (Figure 2-15) indicates the reading exceeds
the HI limit. A flashing minus sign (Figure 2-16) indicates a reading that is less than the LO limit.
T o set and enable LO and HI limits press
nates.
until SPEC illumi-
Then press
Press
to turn differential mode On and Off
Setting the Nominal Value:
Press
Use
return to
To perform differential measurement, with dIF mode On, return
to THK mode
Section 2.8.
or until appears in the display .
to display current status, On or Off. Use or
to display the current nominal value setting.
or to set the desired value. Press again to
display.
and follow the measurement procedure in
Figure 2-16
Press or until (lower limit) or (upper limit) appears in the display .
Press
Setting LO and HI Limits:
With the desired alarm mode On, press
rent limit setting. Use
0.5 to 500 mm). Press
to display current status, On or Off. Use or
to turn either alarm mode On or Off.
to display the cur-
or to set the limit (0.020 to 20.00";
again to return to or
display . Press to return to THK mode.
Figure 2-17
Figure 2-17 shows a differential reading that is 0.059 inch greater
than ( ) the user set nominal value. In Figure 2-18 the actual
measurement is 0.003 inch less than ( ) the nominal.
T o disable dif ferential measurement, follow the procedure at the
beginning of this section.
Figure 2-18
DM4E, DM4, DM4 DL Operating Manual
Page 13
2.0 Operation
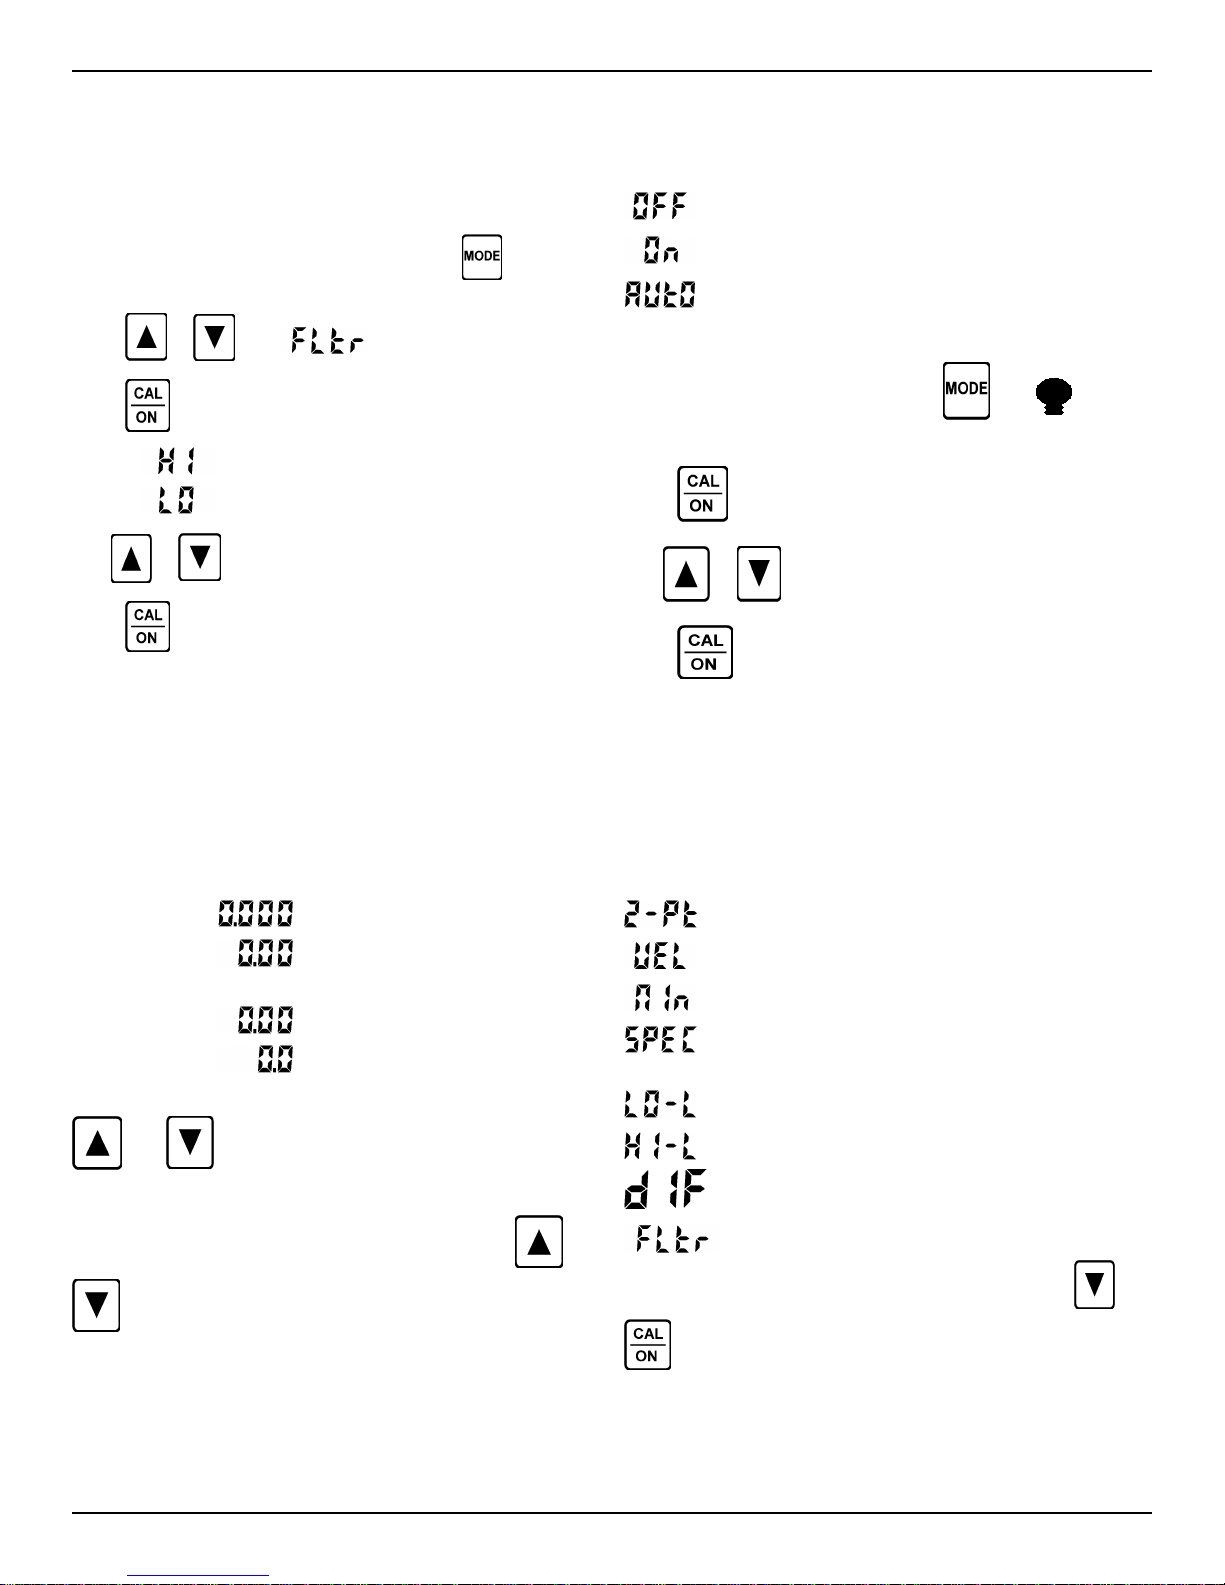
2.13 Band Pass Filter Control (DM4, DM4 DL)
The Band Pass Filter control of the DM4 and DM4 DL sets the
band pass of the instrument receiver for the frequency of the
connected probe. The default setting is HI for probes of 2 MHz
to 10 MHz frequency .
To change the Band Pass Filter setting, press
illuminates.
Press or until appears in the display.
Press
Use
Press
When the instrument shuts off, the current Band Pass Filter setting is saved and restored when the instrument is turned on again.
to display current setting:
High - 2 MHz to 10 MHz
Low - 300 KHz to 2 MHz
or to select the desired setting.
again to exit the gain select function.
until SPEC
2.15 Display Backlight
Three available backlight options are:
Backlight disabled; maximum battery life
Backlight is on continuously; less battery life
Automatic Backlight; backlight activates when probe
is coupled or key is pressed and remains on for 5
seconds
T o change the backlight setting, press until
illuminates.
Press
Use
Press again to exit the backlight function.
When the instrument shuts off, the current backlight setting is
saved and will be restored when the instrument is turned on again
to display the current setting.
or to select a new setting.
2.14 Display Resolution and Unit of Measure
Four display resolution settings are available, two in inch units
and two in metric units, as shown below.
Inch Settings:
(Default)
Metric Settings:
To change display resolution or unit of measure, press both
and at the same time. Keep pressing both keys
until the desired setting is displayed.
In VEL mode, with CAL off, simultaneously pressing
switches between inch and metric units. Velocity will
bedisplayed in the newly selected units.
and
2.16 Disabling/Enabling Functions
Specific instrument functions and modes can be disabled so that
they are not available during normal operation. They can also be
enabled again.
The following functions can be disabled/enabled:
2-point calibration
Velocity mode
Minimum capture mode
Entire SPEC menu (DM4, DM4 DL)
Gain function (DM4, DM4 DL)
Low limit alarm mode (DM4, DM4 DL)
High limit alarm mode (DM4, DM4 DL)
Differential mode (DM4, DM4 DL)
Band Pass Filter Control (DM4, DM4 DL)
To disable or enable one or more of the above, press
simultaneously while the instrument is off and hold both
and
When the instrument shuts off, the resolution setting is saved
and restored when the unit is turned on.
Page 14
keys for 3 seconds..
DM4E, DM4, DM4 DL Operating Manual
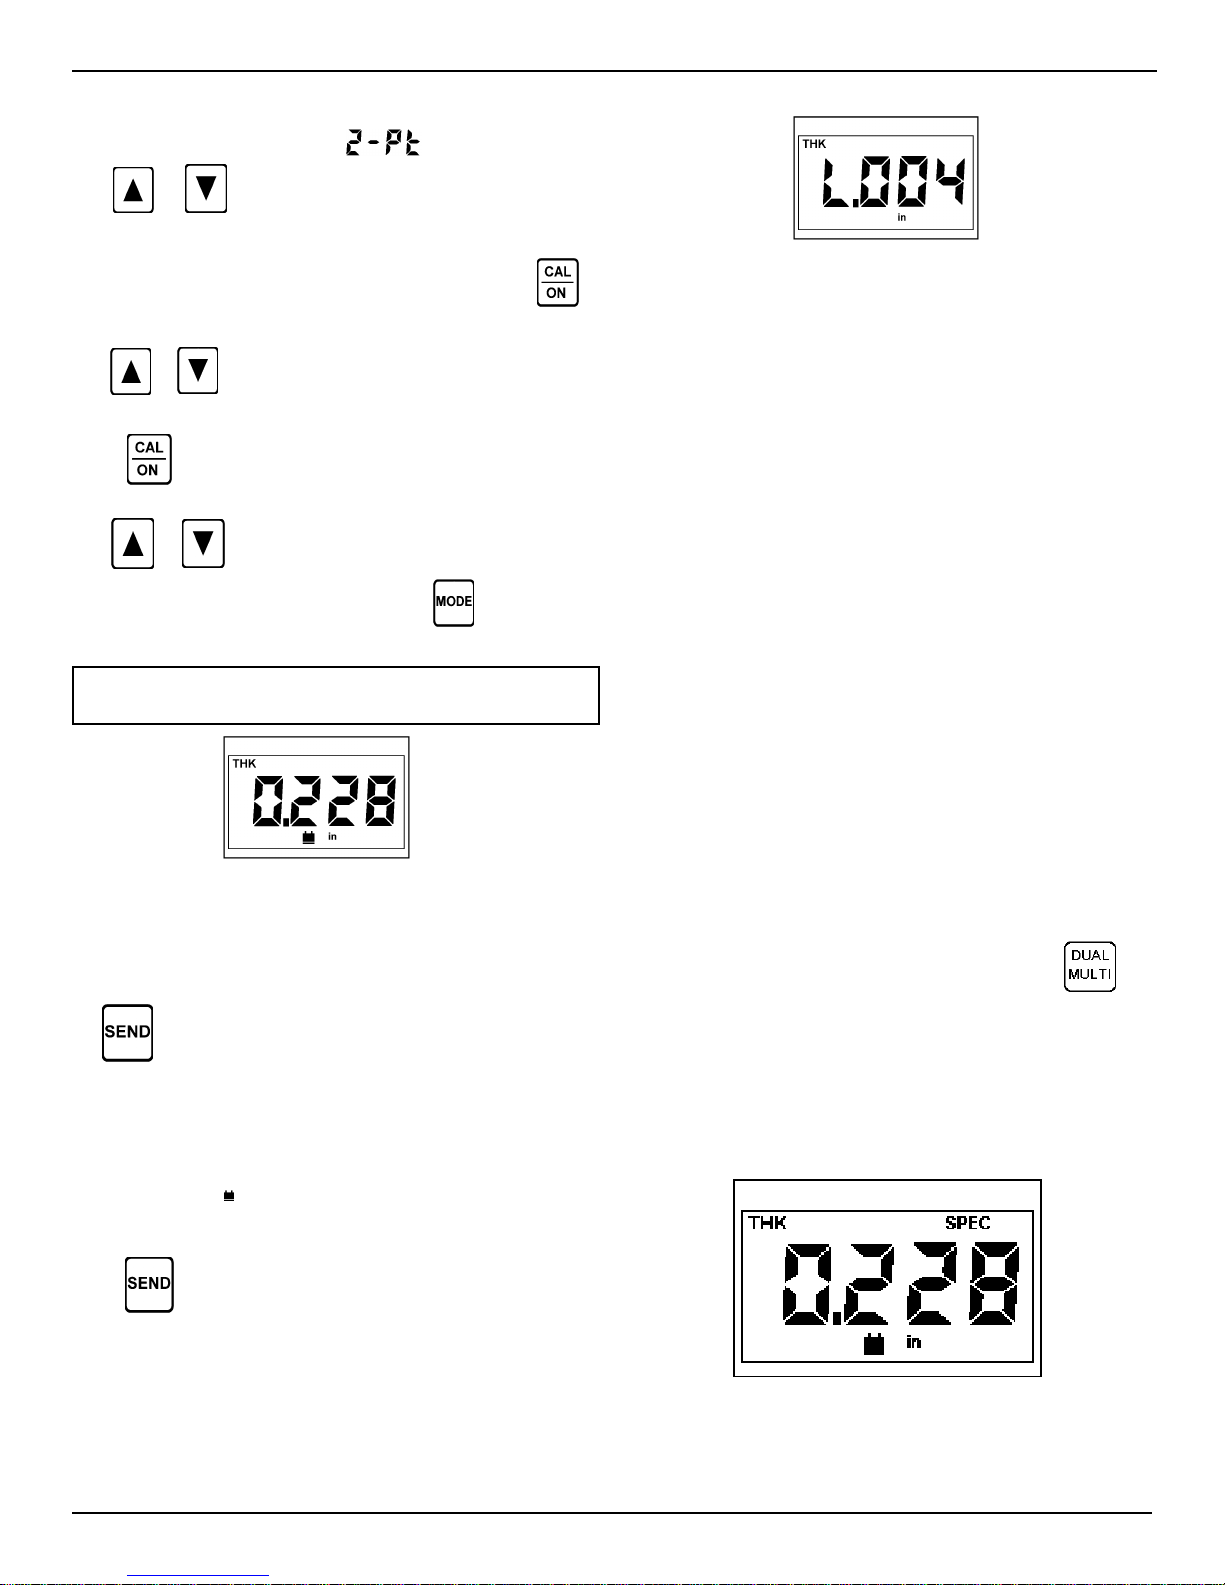
After briefly displaying the instrument version and display indicators, the first mode is displayed:
2.0 Operation
Use or to scroll through and select the function or
mode to be disabled or enabled.
When the desired function or mode is displayed, press
display the current setting, On or OFF.
Use
function or mode.
Press
upon will be displayed.
Use
or mode to be disabled or enabled or press
cedure.
or to disable (OFF) or enable (On) the displayed
again. The function or mode that has been acted
or to scroll through and select another function
to end the pro-
to
NOTE: Disabled modes and functions will automatically
be set to their default settings.
Figure 2-20
When a reading is sent to an empty file, the current settings of
the HI/LO limits are saved with the file. Selecting an existing file
automatically activates the limits saved with the file. The settings
may be changed (Section 2.11). However, the previously saved
settings will be replaced in the file by the new ones.
When a differential reading (Section 2.12) is sent to an empty
file, the current setting of the nominal value is saved with the file.
Selecting a file with differential readings automatically activates
differential measurement mode and restores the saved nominal
value. The nominal value saved in a file may not be changed.
2.18 Dual Multi Measurement Mode (DM4, DM4 DL)
Protective coatings, including paint, contribute significant error to
the thickness measurement of the underlying metal when using
conventional measurement techniques.
The Dual-Multi mode eliminates coating layers from the measurement by measuring between successive backwall reflections
of the metal.
The Dual-Multi mode works with the following standard probes:
Figure 2-19
2.17 Recording Measurements (DM4 DL)
Displayed thickness readings are sent to the on-board Data Logger of the DM4 DL and most external recording devices by press-
ing
vices to the DM4 DL.
To record readings in the on-board Data Logger, follow the in-
structions in Chapter 3 to set up the Data Logger.
To record a reading, first perform the measurement. When the
coupling indicator (
uncouple the probe and wipe the excess couplant from the probe
face.
Press
displayed briefly (Figure 2-20). After a displayed reading has
been sent, the SEND key is disabled until a new reading is taken.
Zero values cannot be recorded.
. See Chapter 4 for details on connecting external de-
) lights (Figure 2-19) and the reading is stable,
. The location where the reading has been stored is
KBA560 Family, DA312, DA301, DA311, DM401
The measurement range for each probe will vary depending upon
the type and thickness of the coating, the thickness of the metal,
and the quality of the bond between the coating and metal.
To activate or deactivate the Dual-Multi mode, press
The THK and SPEC annunciators will illuminate to indicate that
the DUAL MULTI mode is activated. See figure 2-21. NOTE:
The SPEC annunciator will not illuminate unless one of the
above compatible probes is attached. If the DUAL MULTI key
is pressed when a non-compatible probe is connected, “nO”
will briefly be displayed and then the instrument will return to
the standard (THK) thickness mode.
.
DM4E, DM4, DM4 DL Operating Manual
Figure 2-21
Page 15
2.0 Operation
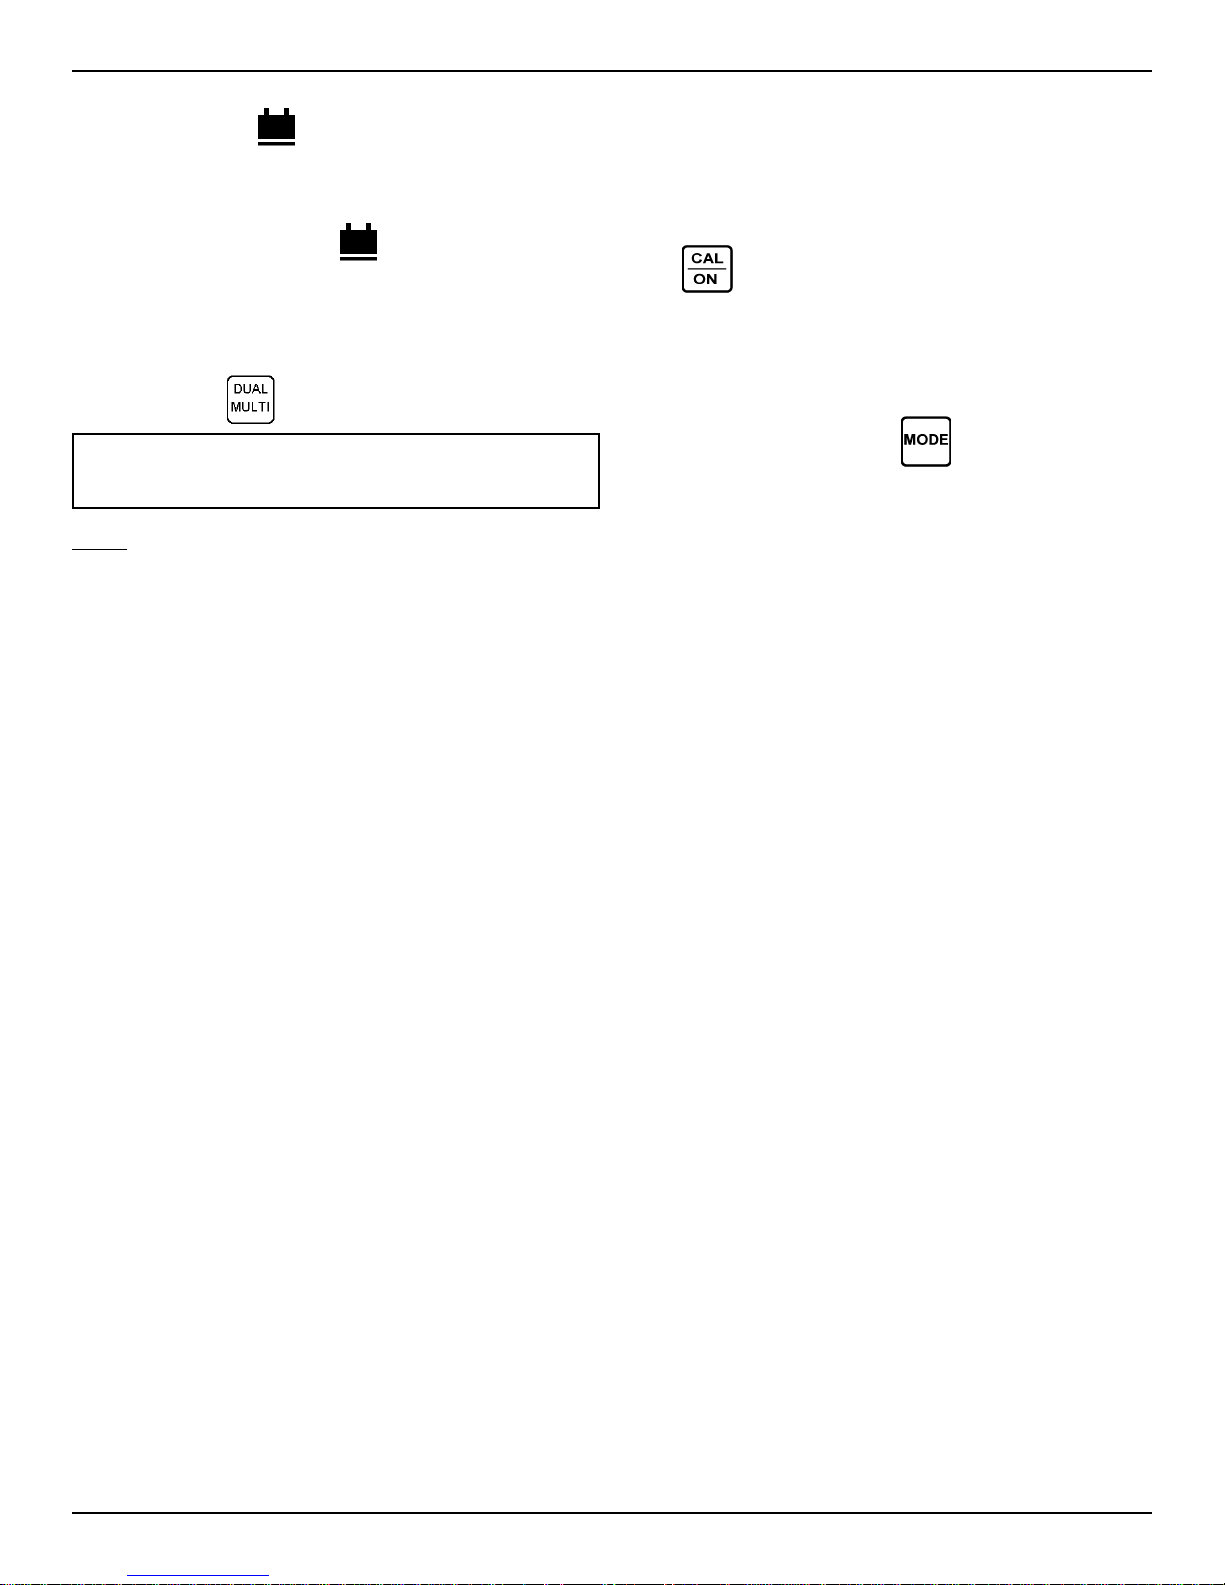
The coupling indicator ( ) will illuminate only when two backwall
echoes are detected.
In the event two backwall reflections are NOT detected:
The coupling indicator (
A row of dashes will be displayed.
The red LED will flash.
If a Dual-Multi measurement is not obtainable, the operator must
return the instrument to the standard thickness measurement
mode by pressing
Note: Complete removal of the coating may not be necessary . First try smoothing the surface and removing any loose
top layers.
and/or remove the coating.
) will not illuminate.
NOTE: If two backwall echoes are attainable on the calibration standard, a 1-Point Calibration can be performed in the
DUAL MULTI Mode. Press the DUAL MULTI key, verify that
both THK and SPEC are illuminated in the display, and refer to
section 2.5 ( 1-PT Calibration) beginning with “Press CAL/ON
KEY.”
The use of a DIALOG Intelligent Probe automatically selects either the standard “AUTO” or “DA3” mode.
T o select the DA3 mode when using non-dialog probes or to override the last selection:
Press
The model and display annunciators are briefly displayed (see
section 2.4 Getting Started), followed by the current software
revision number. Then, the operating mode used from the last
session is displayed. It will flash for approximately 3 seconds.
While the display is flashing, press
mode and DA3 mode.
Press any other key to start instrument operation using the selected mode. If no key is pressed within 3 seconds, the instrument will go into operation with the last selected zero mode.
CAUTION: Only DA Series Probes are to be used in the DA3
Operating Mode.
to turn the instrument on.
to toggle between AUTO
2.19 DA3 Operating Mode
This mode is characterized by the implementation of “on-block
zero”. This means that the acoustic zero point is dynamically
adjusted during the measurement process, compensating for
wear and “growth” during measurements.
This mode may offer advantages for certain applications such as
high temperature measurements.
Page 16
DM4E, DM4, DM4 DL Operating Manual
3. Data Logger Operation
3.1 The DM4 DL Data Logger
The DM4 DL on-board Data Logger provides a simple, reliable
way to record thickness measurements. Readings are stored in
one or more files by pressing the SEND key. A file is a number
of Data Logger memory locations that have been grouped together for storing readings, one reading per location, and reporting measurement data.
File size is determined automatically when the operator sets the
desired number of files, up to a maximum of 999. The DM4 DL
divides the total memory capacity , 5390 readings, by the number
of files specified and creates the maximum number of files, of
equal size, that Data Logger capacity allows.
The first reading is stored in each file starting with location number 1, unless the operator selects a different starting location.
Subsequent readings are stored sequentially until the last location has been filled or another file is selected to receive readings.
Location numbers and stored readings can be viewed and edited in the display . Individual file locations, entire files, or entire
memory can be cleared. Single files, or all files, can be transferred via the Serial I/O port to a printer or IBM compatible PC.
Report format is compatible with most serial printers. A utility
program is available from Agfa NDT Inc. for transferring data to
a PC (Section 4.5). Individual readings and velocity can be
sent to the Krautkramer DR1 Data Recorder. Refer to Chapter
4 for information on connecting external devices.
Stored readings are retained indefinitely in the memory of the
DM4 DL, even when the batteries are removed. However, backup
is recommended whenever possible.
The following Data Logger operations are described in Sections
3.2 through 3.10:
WARNING: Clearing memory permanently erases all readings stored in the DM4 DL Data Logger.
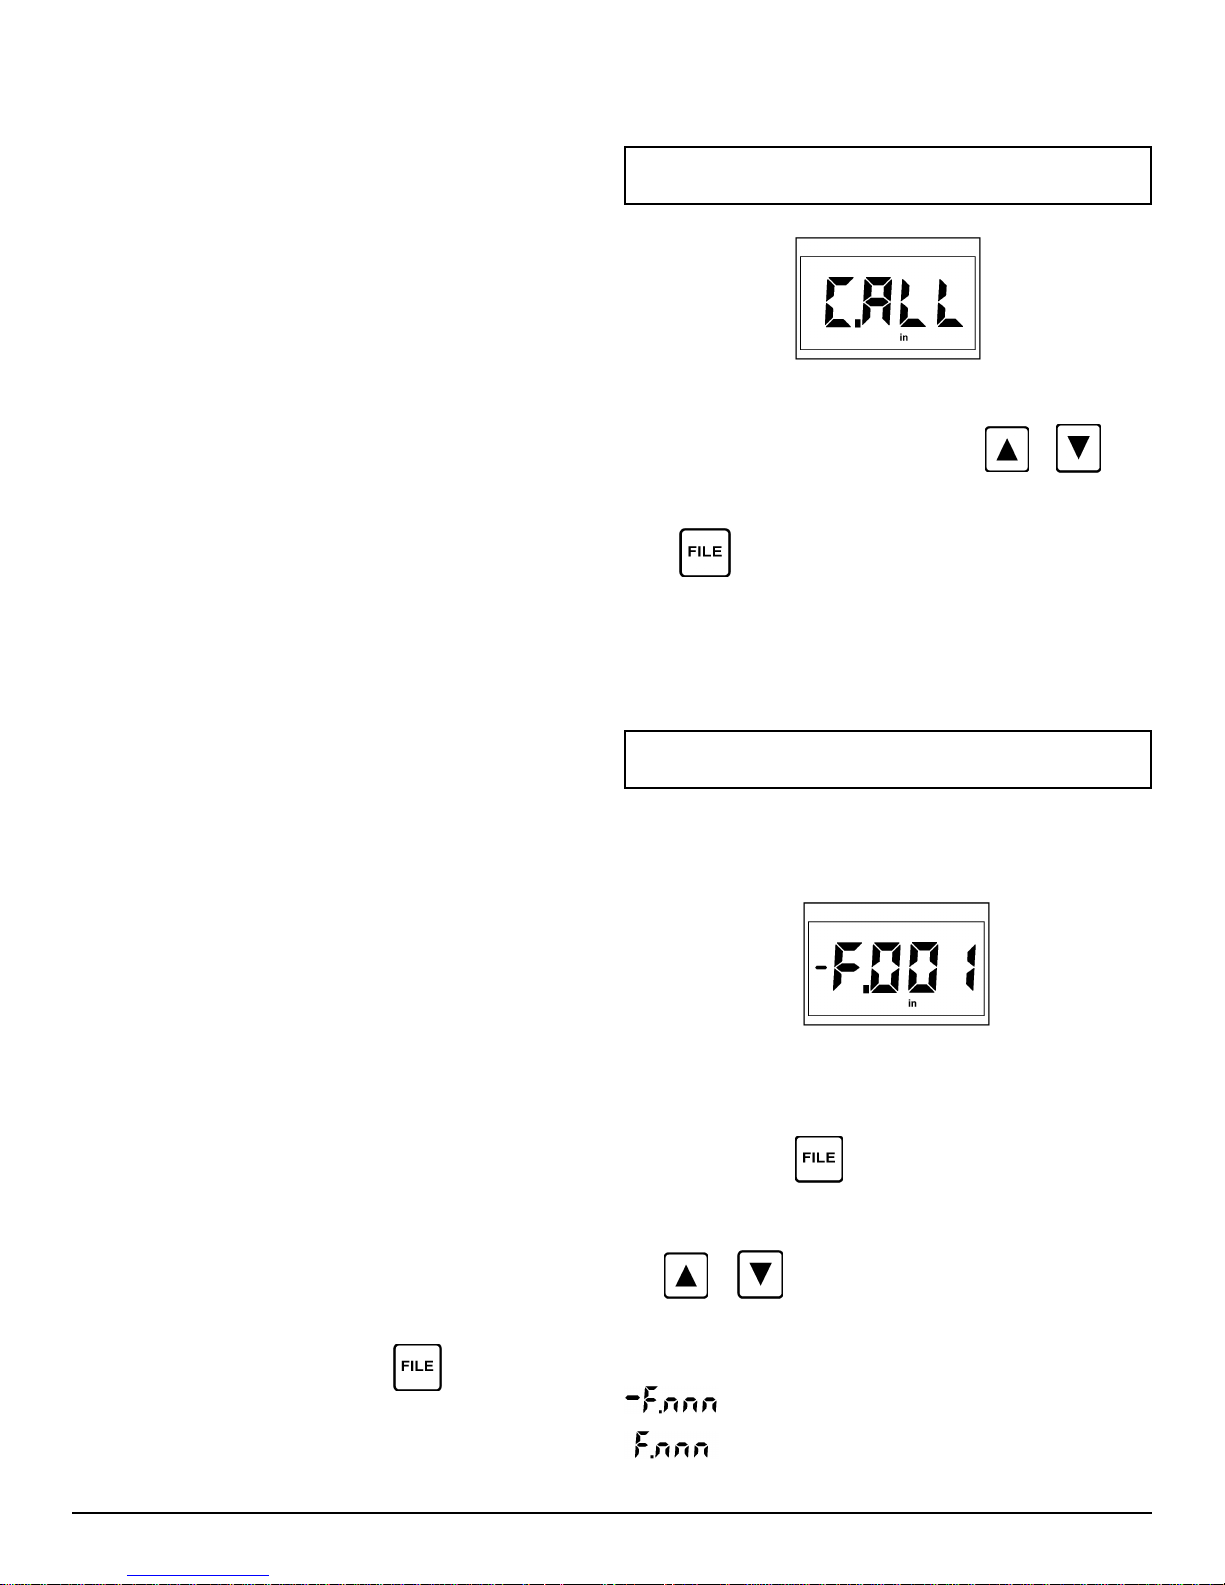
Figure 3-1
While C.ALL (Figure 3-1) is displayed, use or to set
the desired number of files (1 is the minimum): “n.001” = 1 file,
“n.002” = 2 files, etc.
Press
while memory is being configured.
The number of files set determines the size of each file, that is,
the number of available locations. Appendix B provides a table
showing the number of locations per file based on the number of
configured files, 1 through 806.
to terminate the procedure. “ConF” is displayed
NOTE: DIALOG Intelligent Transducer I.D., LO limit, HI
limit, and dIF value are saved with each file.
To log readings a file must be selected (ref. Section 3.3).
Default selection is File 1, Location 1.
Setting Number of Files Section 3.2
Selecting a File Section 3.3
Logging Readings into Memory Section 3.4
Selecting Locations Section 3.5
Reviewing Stored Readings Section 3.6
Clearing and Replacing Readings Section 3.7
Clearing Selected Files Section 3.8
Clearing Entire Memory Section 3.9
Permanent Storage Section 3.10
3.2 Setting Number of Files
Readings can not be stored until the desired number of files has
been set and one file has been selected to receive readings.
Follow the procedure in this section to set the number of files and
the size of each.
Setting number of files can only be done when entire memory is
clear. To check memory status, press
1) indicates memory is clear. If memory is not clear, refer to
Section 3.9 for instructions on clearing memory.
. C.ALL (Figure 3-
Figure 3-2
3.3 Selecting a File
Before measurements can be logged, a file must be selected
(Section 3.2). Press
file has been selected, “-F.001” is displayed (Figure 3-2). If “C.ALL”
is displayed, no files exist. Return to Section 3.2.
Use
above the highest number loops to “.ALL” (all files) and back to
File 1. Scrolling below File 1 loops through “.ALL” to the highest
file number.
or to change the active file number. Scrolling
indicates empty file, no readings.
indicates active file with readings but not full.
to display the active file number. If no
DM4E, DM4, DM4 DL Operating Manual Page 17
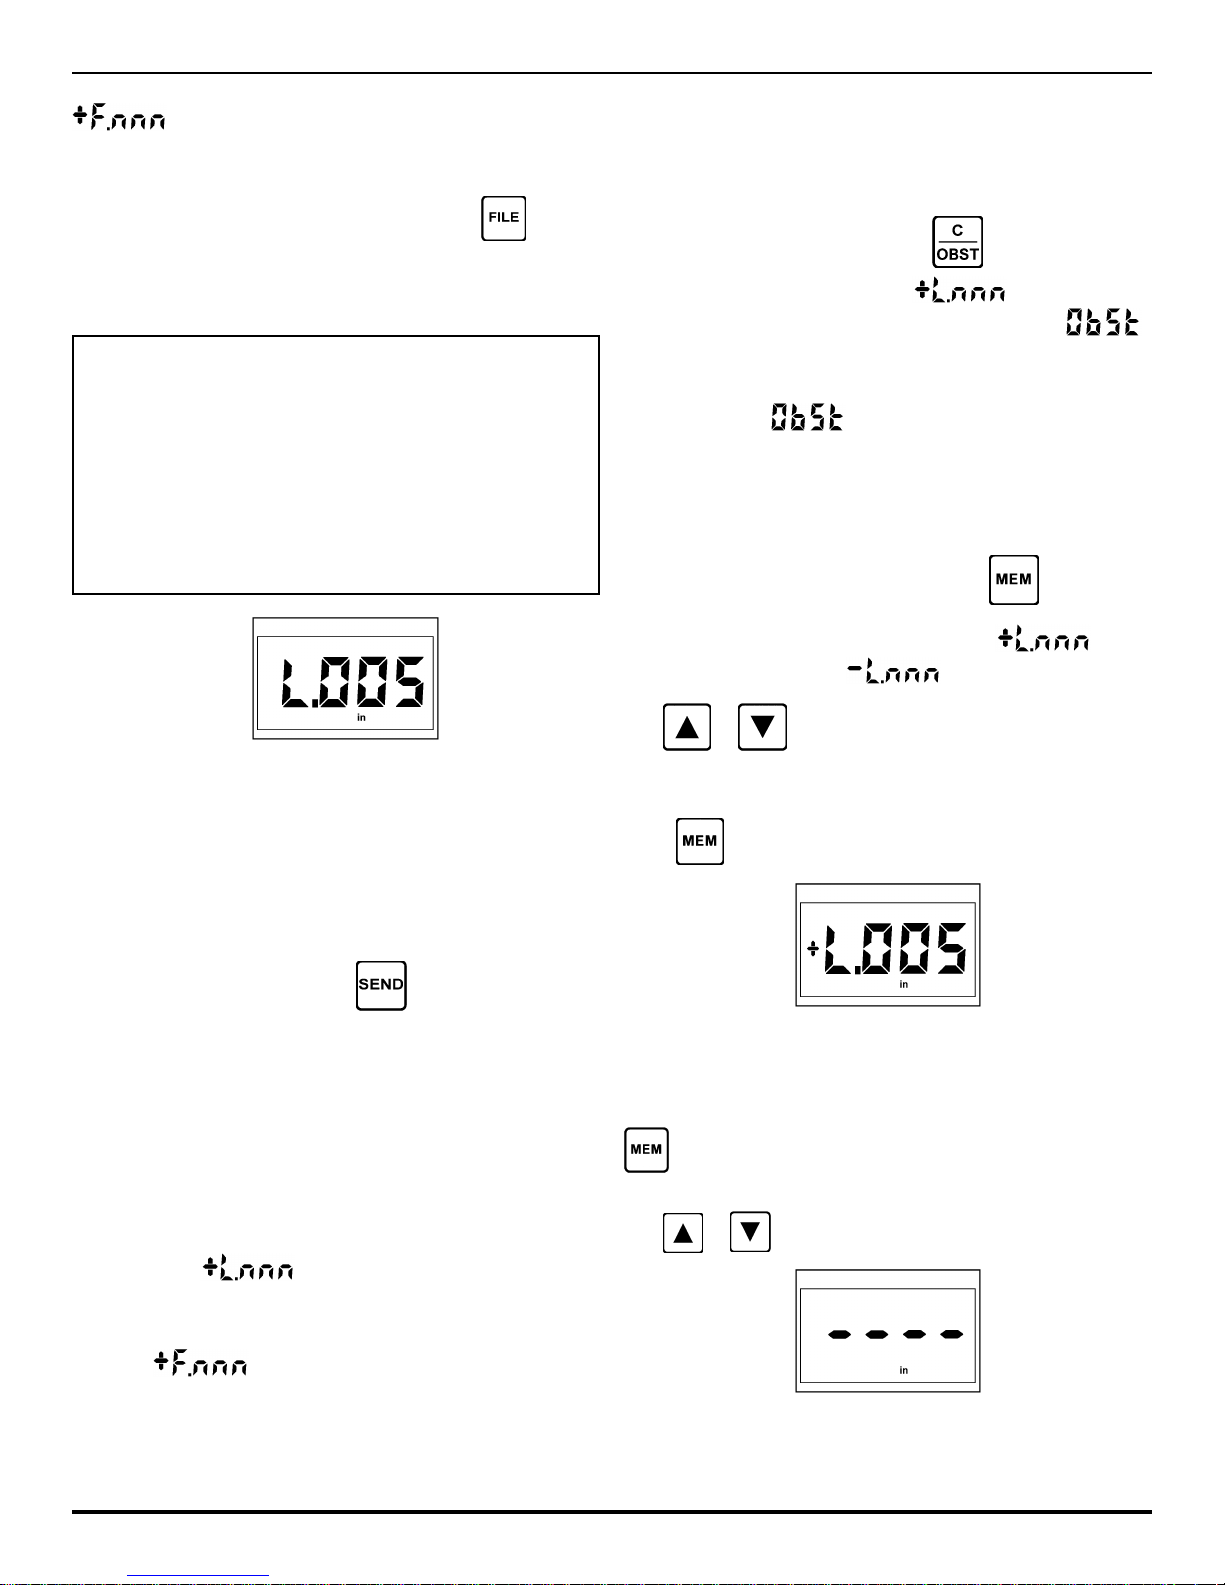
3.0 Data Logger Operation
indicates a full file, no empty locations.
“nnn” (001 to 999) is the number of the selected file.
When the desired file number is displayed, press
again.
The current active location number of the selected file is
displayed briefly . Then the DM4 DL returns to measurement
mode and is ready to log readings
NOTES: When a file containing differential readings is
selected the DM4 DL switches to dIF mode and uses the
nominal value saved in the file as the current nominal value.
When a file containing HI/LO thickness limits is selected the
DM4 DL switches to THK mode and uses the limits saved in
the as the current limits.
When a file contains data collected using a DIALOG Intelligent Transducer, report sent to a printer or computer automatically include the model and serial numbers of the probe.
3.4.1 Recording an OBSTRUCT Value
If a measurement cannot be made or a location is inaccessible,
an “OBSTRUCT” value can be logged into the current active location.
While in THK or MIN mode, press
coupled. The location number,
with the probe un-
, where the OB-
STRUCT was stored is briefly displayed, followed by
An “OBSTRUCT” is stored in the current data logger location.
When reviewing stored readings (Section 3.6) obstructed
locations display .
3.5 Selecting Locations
While in THK or MIN mode, the MEM key is used to select file
locations and review stored readings.
To select a location in the current file, press
The current location number is displayed as
cation, as in Figure 3.4) or
(empty location).
.
(full lo-
.
Figure 3-3
3.4 Logging Readings into Memory
Measurements taken in THK (normal), dlF (differential), and MIN
(minimum capture) modes can be stored in the Data Logger if a
file with at least one empty location has been selected (Section
3.3). The Data Logger is disabled when an external recording
device is connected to the Serial I/O port (Chapter 4).
A reading is logged by pressing
(Section 2.17). If the
current file location is empty, the Data Logger stores the reading
and briefly displays the location number, “L.nnn” (Figure 3.3) as
confirmation.
After a displayed reading has been sent, the SEND key is
disabled until a new reading is taken. Unless a valid thickness
reading is in the display , no action occurs when SEND is
pressed. Zero values will not be logged. All readings in a
given file should be stored at the same resolution to assure
accurate statistics.
Location Full:
displays when trying to log to a loca-
tion that contains a reading. No data is recorded. To select an
empty location see Section 3.5.
Use
or to display the desired location.
To review stored readings, proceed to Section 3.6.
T o select the displayed location and return to THK or MIN mode,
press
two times.
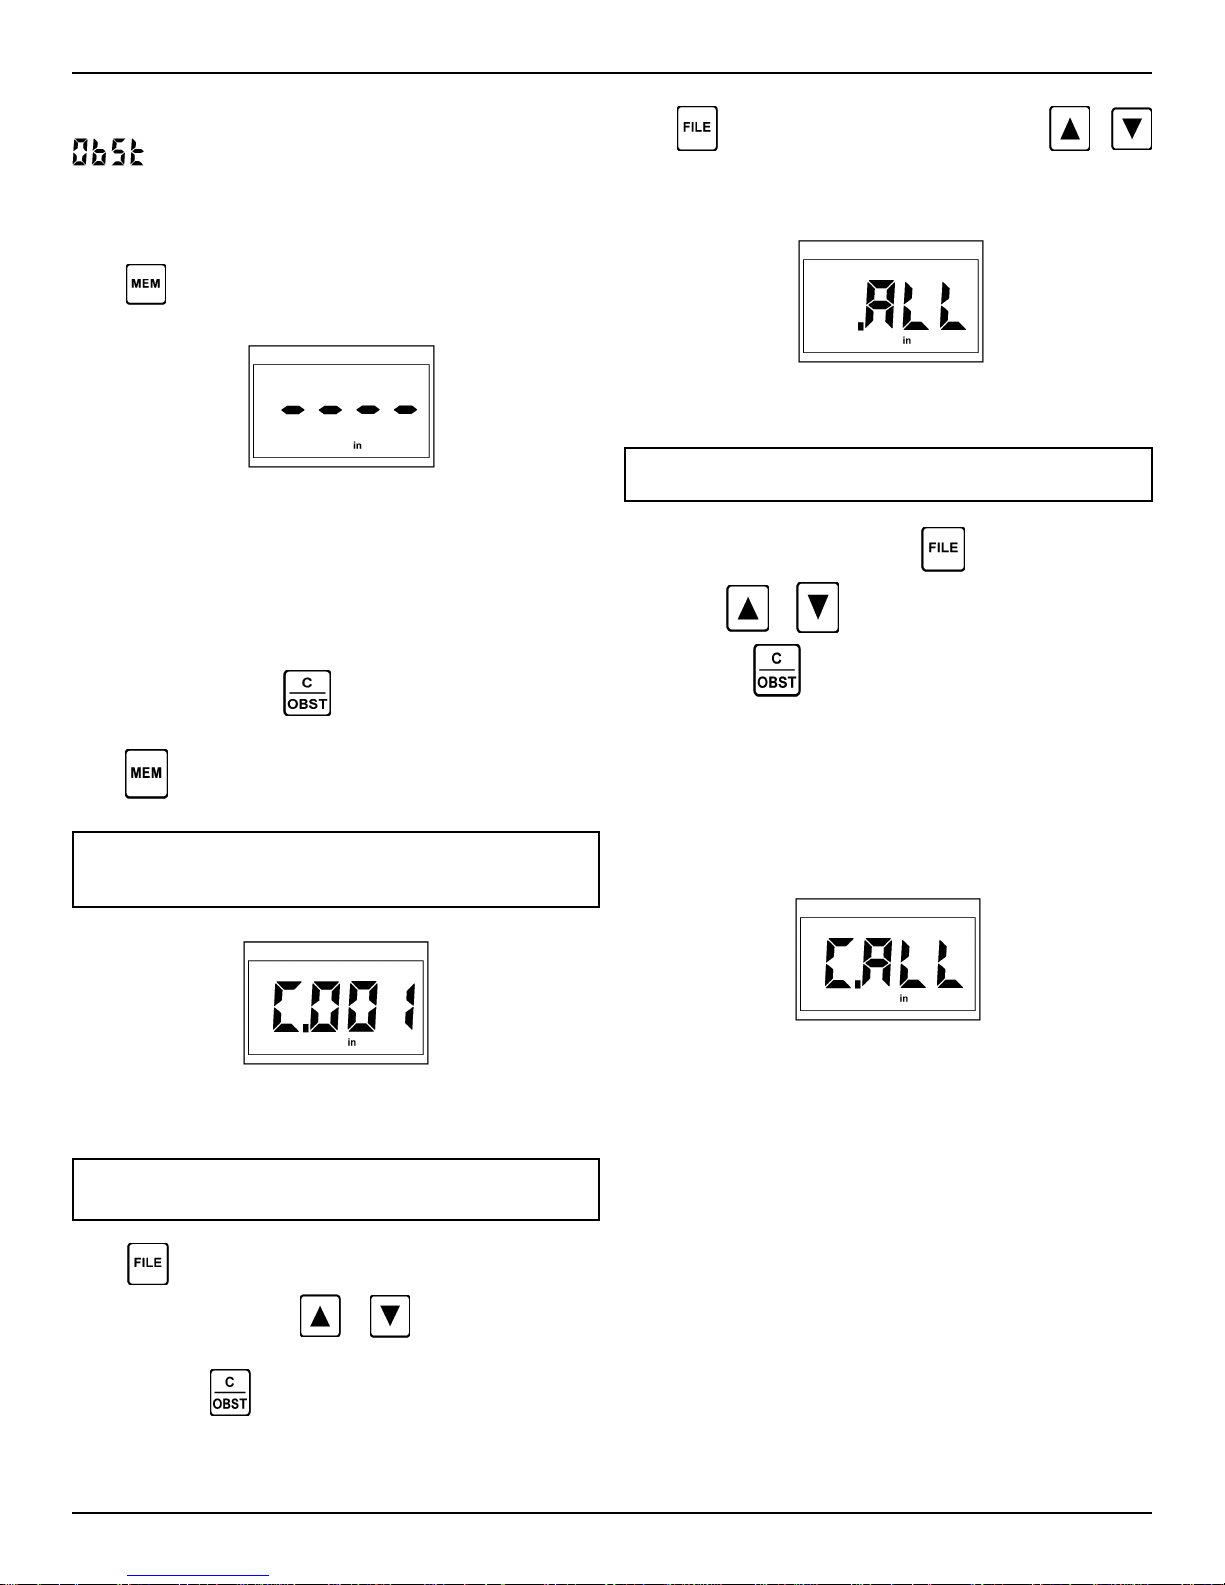
Figure 3-4
3.6 Reviewing Stored Thickness Readings
While a location number is displayed, as in Figure 3-4, press
a second time to display the reading. Readings are dis-
played in the current unit of measure.
Use
or to view readings at other locations.
File Full:
displays when SEND is attempted to a file
with no empty locations. No data is recorded. To select another
file, refer to Section 3.3.
Figure 3-5
DM4E, DM4, DM4 DL Operating ManualPage 18
3.0 Data Logger Operation
A row of dashes (Figure 3-5) indicates an empty location.
indicates an obstructed location. A flashing plus sign
indicates the reading exceeds the HI limit stored with the file. A
flashing minus sign indicates a reading that is less than the LO
limit. “Err” (unlikely to occur) indicates that the reading has
been corrupted in memory and must be retaken.
Press
again to return to measurement mode.
Figure 3-6
3.7 Clearing and Replacing Readings
While a stored thickness reading is displayed (Section 3.6), the
C/OBST key (C = Clear) can be used to erase the reading from
that location.
T o clear a stored reading, display the reading to be cleared (Sect.
3.5 and 3.6) and press
cleared, dashes appear (Figure 3.6).
Press
now be logged to the cleared location.
to return to measurement mode. A new reading can
. When the reading has been
NOTE: “ Obstructed” locations do not need to be cleared.
Sending a thickness value automatically overwrites the
stored ObSt.
Press to return to measurement mode, or use or
to select another file.
Figure 3-8
3.9 Clearing Entire Memory
WARNING: This operation permanently erases all read-
ings stored in the Data Logger of the DM4 DL.
To clear and reset memory, press while in THK or MIN
mode. Use or to display “.ALL” (Fig. 3-8).
Press and hold
display changes to “C.ALL” (Figure 3-9).
Data Logger memory is now clear. Readings can not be recorded until new files have been configured.
Follow the procedure in Section 3.2 to create new files and prepare the Data Logger to record readings.
for 3 seconds. When memory is clear, the
Figure 3-7
3.8 Clearing Selected Files
WARNING: This operation will permanently erase all
readings in the cleared file.
Press while in THK or MIN mode. The active file is dis-
played (Section 3.3). Use
cleared.
Press and hold
“C.nnn” (Figure 3-7). “nnn” is the cleared file number. Then “-
F.nnn” is displayed (empty file, Figure 3-2 on page 31).
DM4E, DM4, DM4 DL Operating Manual Page 19
for 3 seconds. DM4 DL briefly displays
or to select the file to be
Figure 3-9
3.10 Permanent Storage
Stored readings are retained in memory indefinitely , even when
the batteries have been removed. However, data could be lost
or corrupted if the DM4 DL were damaged or exposed to extreme environmental conditions.
For extended storage, files should be transferred to a computer
for storage on disk or tape. The DM4 DL Data Transfer Utility
program is available for this purpose. Contact your local Agfa
NDT Inc. representative for information.
Chapter 4 provides information needed to interface the DM4 DL
with an external device, such as a printer or computer, for file
storage.
4. Serial I/O Interface
4.1 The DM4 DL Serial Interface
The 7-pin Lemo #0B connector the top panel of the DM4 DL, is
the Serial I/O port. It is used to transmit readings and statistical
data to an external device, such as a printer or a personal computer.
For simple communication with a PC, an optional DM4 DL Data
Transfer Utility Program is available for use with any IBM PC, XT,
or A T compatible computer with at least 256K of available memory
and DOS version 3.3 or higher. Contact Agfa NDT Inc., or your
local representative for information.
The type of device connected to the Serial I/O port determines
the status of the on board Data Logger and how the DM4 DL
responds when the SEND key is pressed. Special cables, available from Agfa NDT Inc., must be used when connecting external devices to assure proper operation and transfer of data.
T able 4-1 summarizes the Data Logger and SEND operations of
the DM4 DL, based on the device connected.
Table 4-1: Data Logger and SEND Operation,
Based on Device Connected
Connected Data Logger SEND
Device Operation Operation
No Device Enabled Logs displayed thickness
in DM4 DL memory
DR1 Data Disabled Sends displayed thick-
ness or velocity to DR1
Recorder*
RS232C Device* Read Only Sends displayed
(PC, printer, thickness, material
RS232 data velocity, a selected
logger, etc.) file, or all files to periph-
eral device
*Special cable required; available from Agfa NDT Inc.
Press or to select .
Press
Press
Press
Available RS232 baud rate settings are 1200, 2400, 4800, and
9600.
to display the current setting.
or to select the new setting.
again to exit.
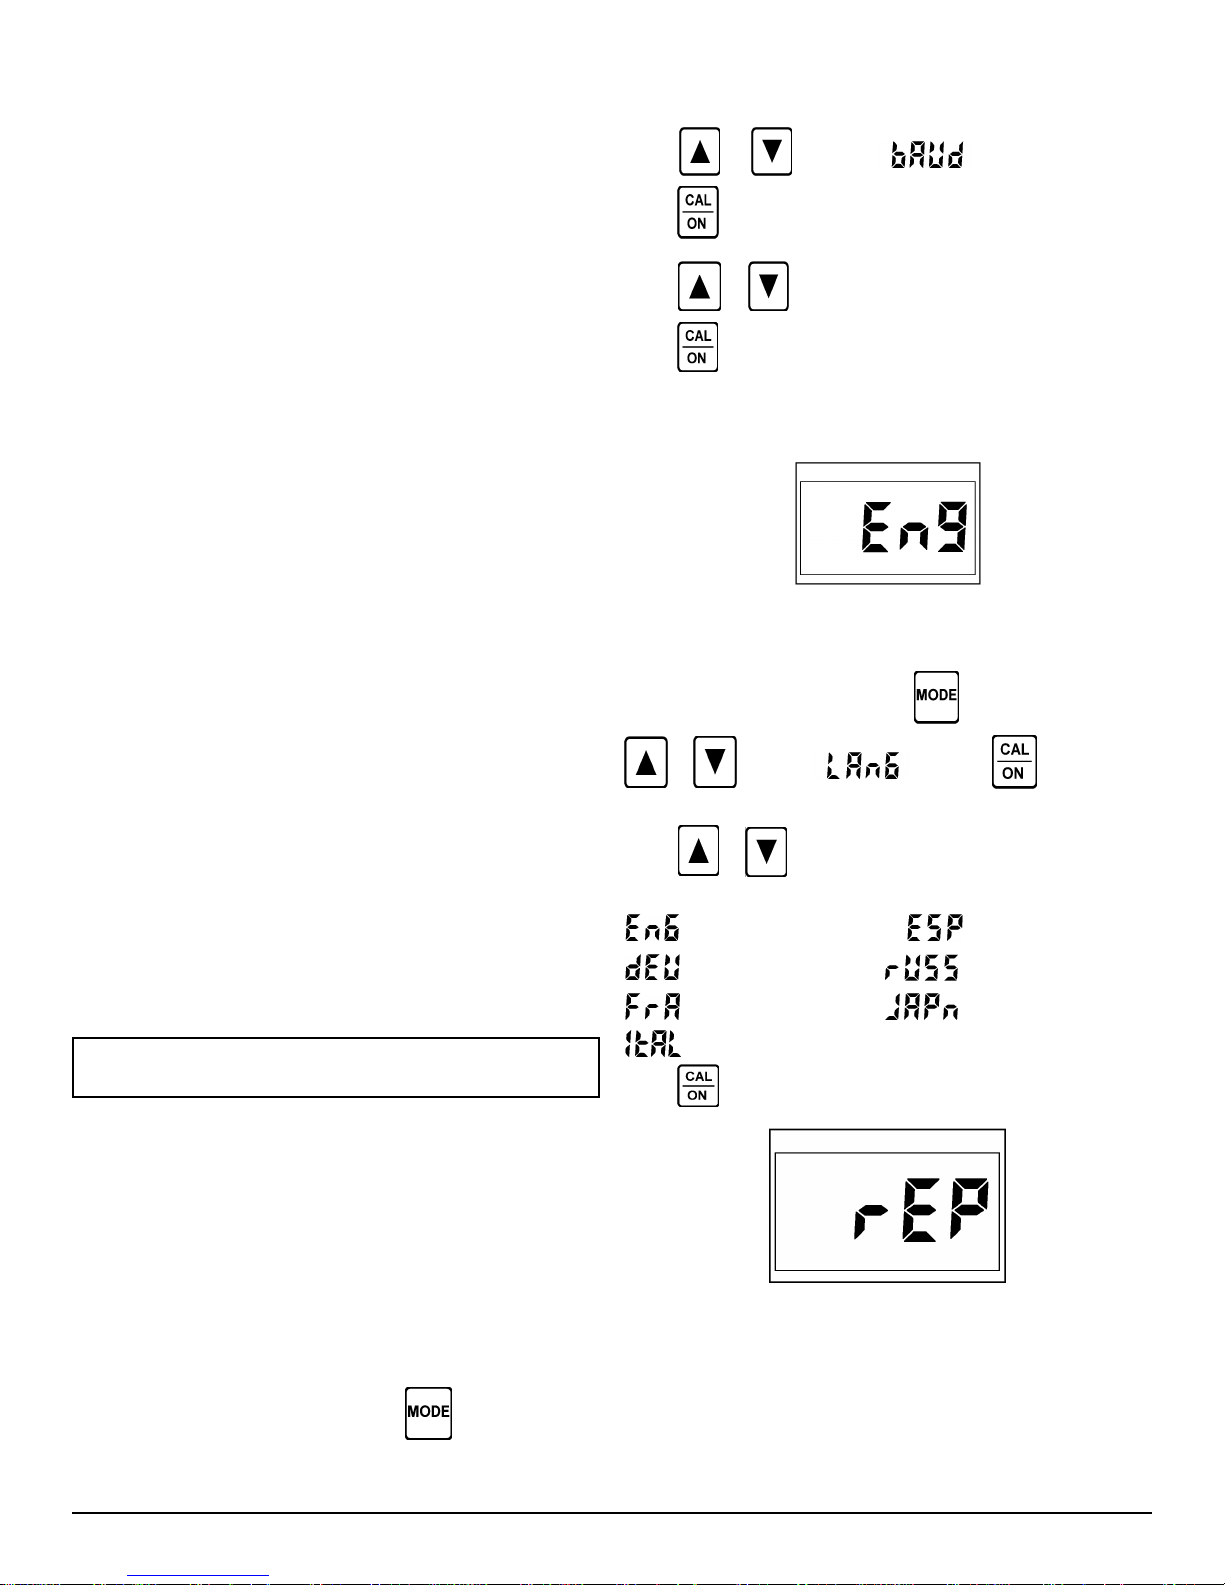
Figure 4-1
4.3 Report Language Selection
To change report language, press
or to select and then to display the
current setting (Fig. 4-1).
Press
Options are:
or to select the new setting.
- English - Spanish(Español)
- German (Deutsch) - Russian
- French (Francais) - Japanese
to display SPEC. Use
NOTE: DM4 DL should be off when connecting a cable
for an external device to the I/O port.
4.2 Setting Baud Rate
To enable communication between the DM4 DL and a printer,
computer, or other device, the baud rate must be set to match
that of the connected device.
Default RS232 protocol of the DM4 DL is as follows:
Baud Rate: 9600
Data Bits: 8
Stop Bits: 1
Parity: NONE
Baud rate is adjustable. All other parameters are fixed.
To change the baud rate setting, press
nates.
Page 20 DM4E, DM4, DM4 DL Operating Manual
until SPEC illumi-
- Italian (Italiano)
Press
again to exit
Figure 4-2
4.4 Printing Data
Data Logger files can be transferred to a printer. Output is compatible with most 80 and 132 column serial printers. With the
DM4 DL off, connect the printer to the I/O port using the DM4 DL
- Printer cable from Agfa NDT Inc. If necessary, follow the
procedure in Section 4.2 to set baud rate to match that of the
printer.
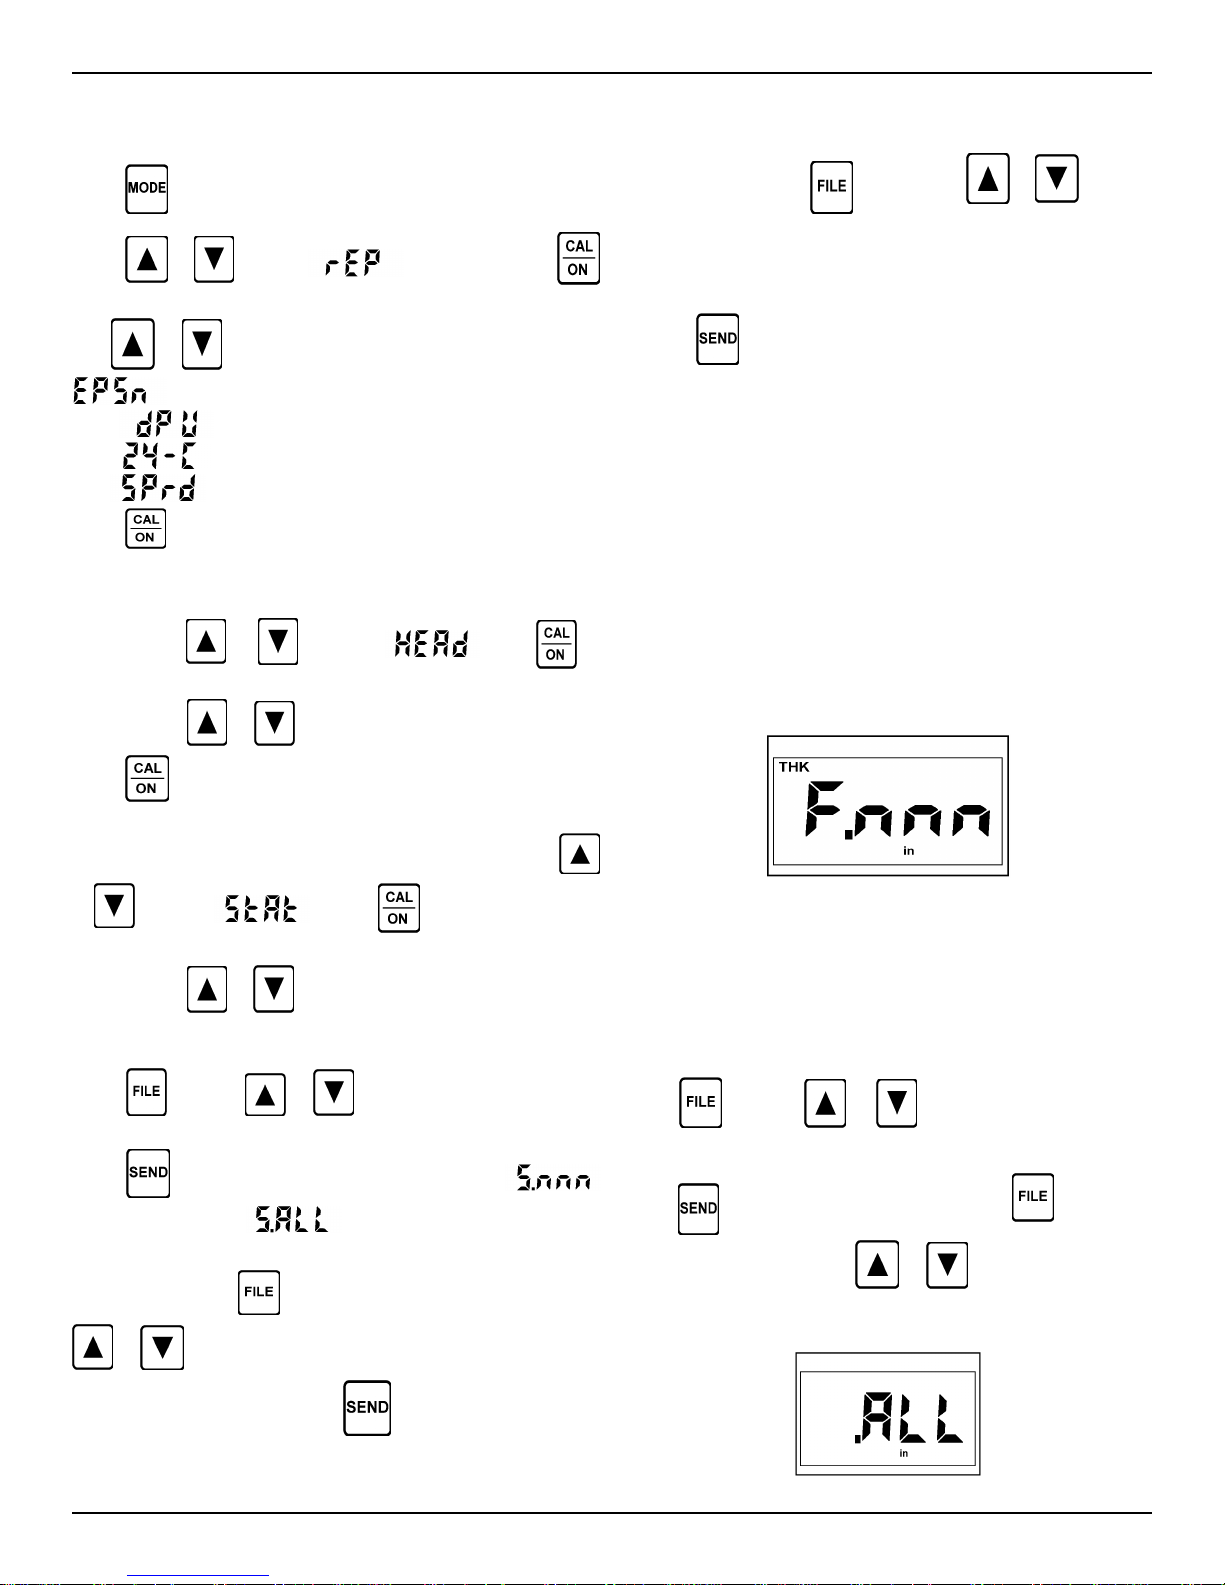
4.0 Serial I/O Interface
Selecting Printer Driver:
Before printing, the appropriate printer driver must be selected.
Press
Press
to display the current setting.
Use
- Spreadsheet
Press
until SPEC illuminates.
or to select (Figure 4-2), then
or to select:
- Epson FX 850 with 8148 serial interface
- Seiko DPU 411
- 24 column DATAMATE format
again to exit.
Printing File Header Information:
To print file header information with the file, with SPEC illuminated, press
display the current setting, On or OFF.
If OFF, press
or to select , then to
or to set file header On.
If the printer is accidentally disconnected during transmission,
follow the procedure in Section 4.7 to avoid losing data. When
printing is done, press to exit or use or to select
another file.
Printed files remain in memory after printing has been completed. Individual readings can be sent to a printer simply be
pressing
4.5 Sending Data to a Personal Computer
Stored thickness data can be transmitted to an IBM compatible
computer. Files are transmitted as ASCII text files. Once saved
on disk, data can be viewed on screen, printed, or transferred to
standard word processing, data base, spreadsheet, and applications software. The ASCII format also simplifies the transfer of
data for users who wish to use standard communications software or write their own.
The DM4 DL Data Transfer Utility Program is available to
simplify the transfer of data to the PC. This simple utility can
be used with any IBM PC, XT, or AT compatible computer with
at least 256K of available memory and DOS version 3.3 or
higher. Contact Agfa NDT Inc. or your local representative for
information.
when the desired thickness value is displayed.
Press
again to exit.
Printing Statistics:
T o print statistics with the file, with SPEC illuminated, press
or to select . Press to display the current
setting, On or OFF.
If OFF, press
To print files DM4 DL must be in THK or MIN mode.
Press
Section 3.3, or scroll to .ALL to print all files that contain data.
Press
(sending file nnn) or (sending all files). Empty files
and file locations will not be printed.
After printing, press
or to select another file to report.
or to set file statistics On.
and use or to select the file to report per
to start printing. The DM4 DL displays
to return to measurement mode or use
Figure 4-3
Connect the DM4 DL to PC cable, available from Agfa NDT
Inc., to the I/O port and to the serial port of the PC. If necessary, follow the procedure in Section 4.2 to set baud rate to
that of the serial port.
To include file header and/or statistical information, see Section
4.4 to enable header and statistics.
Press
.ALL (Fig. 4-4) to transmit all non-empty files.
Press
measurement mode or use
to report. Abort and accidental disconnect procedures are
identical to those at the end of Section 4.4.
and use or to select a file (Fig. 4-3) or
to send file(s). When done, press to return to
or to select another file
To abort the transmission, press
printed. The DM4 DL displays Abor.
DM4E, DM4, DM4 DL Operating Manual Page 21
while readings are being
Figure 4-4
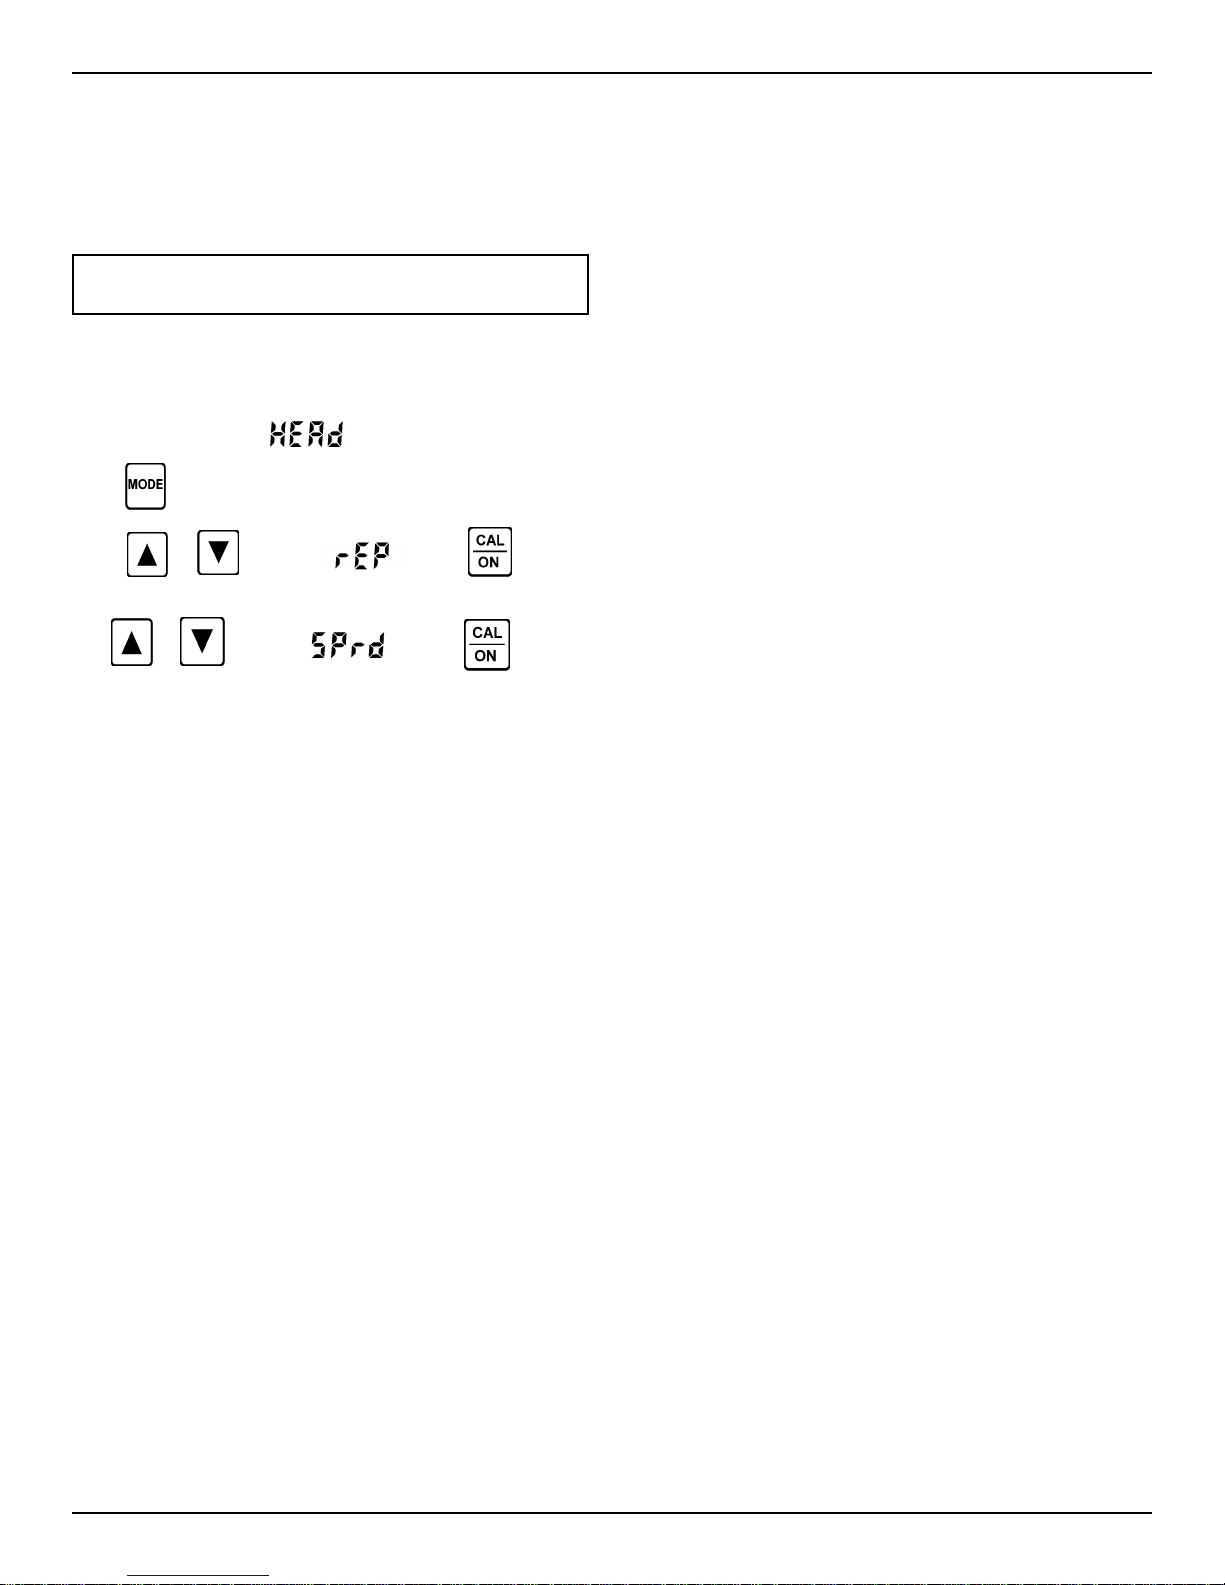
4.0 Serial I/O Interface
4.6 Importing Data Into a Spreadsheet
Stored thickness data can be transferred to an IBM compatible
computer and saved on disk in a format that can be imported
into spreadsheet programs, such as LOTUS 1-2-3
Microsoft EXCELTM.
NOTE: Refer to the operating manual of your speadsheet
program for file import instructions.
Follow procedures in Sections 4.5 and 4.2 to connect the DM4
DL to the computer and set baud rate.
To enable statistics see Section 4.4. File header information is
included regardless of
setting.
TM
and
Press
Press
until SPEC illuminates.
or to select , then to display
the current setting.
Use
or to select . Press to exit.
Select the file or .ALL files and transfer them to the PC by following the procedure at the end of Section 4.5.
4.7 Interrupted Transmission Procedure
If a faulty or disconnected cable, or other problem, causes an
interruption while data is being transmitted to an external device,
the DM4 DL will resume transmission if the connection is restored
within 15 seconds. When the interrupted transmission has been
completed, review the transmitted data carefully to be sure that
no data has been lost or corrupted, or repeat the entire transmission as a precaution.
If the connection is not restored within 15 seconds, DM4 DL will
abort the transmission, briefly display Abor, and return to the currently selected file number.
In this case, the entire transmission must be repeated by
following the procedure in Section 4.4, if printing data, or
Section 4.5
Page 22 DM4E, DM4, DM4 DL Operating Manual

5.1 Instrument Specifications
Operating Principle: Ultrasonic, pulse-echo measurement
Probe Zero Adjustment: Automatic or 2-point calibration
Probe Recognition: Automatic for DIALOG Intelligent Transducers
V-Path Correction: Automatic, microprocessor controlled
AUTO Mode Linearity: ±.002 inch (±.05 mm) when calibration point < 1 inch (25 mm); ±.003 inch
DA3 Mode Linearity: ±.004 inch (± .1 mm)
Measuring Range: .020 to 20.00 inch (.5 to 500 mm) depending on probe and material
Dual Multi Measuring Range: .080 to 1.00 inch (2 to 25 mm) depending on probe, coating and material
Displayed Resolution: .001 or .01 up to 9.999 inches, .01 above 9.999 inches;
Measurement Rate: 4 Hz; 25 Hz in Minimum Capture mode
5. Specifications
(±.075 mm) when calibration point > 1 inch (25 mm)
.01 or .1 up to 99.99 mm, .1 above 99.99 mm
Material Velocity Range: .0394 to .3937 in/µs; 1000 to 9999 m/s
Receiver Gain Level: Three options, selectable via the keypad:
Automatic: High gain enabled for material velocities up to 246,000 in/s
(6,248 m/s). Low gain enabled for velocities over 246,000
in/s.
Manual Low: Low gain enabled over the entire velocity range.
Manual High: High gain enabled over the entire velocity range.
Receiver Bandwidth: 300 KHz to 10 MHz
Reading Stability: Nominal measured value ±0.001 inch (±0.025 mm) over the operating
temperature range of the instrument
Data Logger Capacity: 5,390 readings maximum; 999 readings if number of files is set to 1 through
5; readings are stored sequentially
Number of Data Files: 1 - up to 999; see Appendix B for number of readings per file based on
number of configured files.
Serial Protocol: 1200, 2400, 4800, or 9600 baud; 8 data bits; 1 stop bit; no parity
Data Transfer: Via SEND key
Report Languages: English, German, French, Italian, Spanish, Russian, and Japanese
Memory Retention: Typically 10 years
Display Type: Four digit, 0.5 inch (12.7 mm) high, Liquid Crystal Display with
DM4E, DM4, DM4 DL Operating Manual Page 23
electroluminescent backlight

5.0 Specifications
Power Requirements: 2 each 1.5 volt, AA alkaline cells
Battery Life (Operating Time): 200 hours at 25% duty cycle, without backlight, with steel velocity and .001
Automatic Shut-off: 3 minutes after last probe couple or last press of any key
Operating Temperature
Range: +10°F to +120°F (-10°C to +50°C)
Storage Temperature Range: -40°F to +140°F (-40°C to +60°C) without batteries
Dimensions (L x W x D): 5.75 “ (146.0 mm) x 3.00” (76.2 mm) x 1.35" (34.3 mm) at thickest part of
Weight: 9 ounce (255 grams) with batteries
Probe Connector: Dual Lemo #00 located on top panel
RS232 Serial I/O Connector: 7 pin, Lemo #0B located on top panel
inch displayed resolution
-40°F to +125°F (-40°C to +50°C) with alkaline batteries
case
5.2 Probe Specifications
Model Probe Description Frequency Diameter Range (Steel) Range
DIALOG
Intelligent Transducers
FH2E-D High Sensitivity Fingertip 8 MHz .38" .030" to 2.0" <130°F
KBA560-D General Purpose 5 MHz .625" .060" to 8.0" <250°F
DM401/411 G P 5 MHz .700" .060" to 8.0" <300°F
NOTE: DIALOG
NOTE:
Instrument specifications are subject to change without notice.
Nominal Contact Measurement Temp.
9.6 mm .75 to 50 mm <54°C
15.9 mm 1.5 to 200 mm <121°C
17.8 mm 1.5 to 200 mm <148°C
Intelligent Transducers are recognized automatically for optimium performance
STANDARD PROBES:
FH2E High Sensitivity Fingertip 8 MHz .3 8" .030" to 2.0" <130°F
9.6 mm .75 to 50 mm <54°C
KBA560 General Purpose 5 MHz .625" .060" to 8.0" <450°F
HT400 High Temperature 5 MHz .500" .030" to 10.0" <1000°F
NOTE: HT400
HT400 temperature cycling required with surface temperatures above 400°F per Krautkramer
instruction card.
Page 24 DM4E, DM4, DM4 DL Operating Manual
actual measurement range depends upon surface condition and couplant.
15.9 mm 1.5 to 200 mm <230°C
.
12.7mm .75 to 250 mm <538°C

5.0 Specifications
Nominal Contact Measurement Temp.
Model Probe Description Frequency Diameter Range (Steel) Range
DP-104 High Penetration 1 MHz 1.25" .200" min <130°F
31.8 mm 5.0 mm min <54°C
DA301 General Purpose 5 MHz .475" .0 6 0" to 8.0" <130°F
12.1 mm 1.5 to 200 mm <54°C
DA303 High Penetration 2 MHz .635" .200" min <130°F
16.2 mm 5.0 mm min <54°C
DA312 Thin Materials 10 MHz .30" .025" to 1.0" <130°F
7.6mm .6 to 25 mm <54°C
DA312B16 * Small Footprint 10 MHz .120” .025 to .5” <130°F
3 mm .63 to 12.7mm <54°C
KB550BTH * Boiler Tube 5 MHz .375" .060" to 2.0" <130°F
9.5 mm 1.5 to 50 mm <54°C
KB550FH * Fingertip 5 MHz .375" . 06 0" to 2.0" <130°F
9.5 mm 1.5 to 50 mm <54°C
FH2E-WR High Sensitivity Fingertip 8 MHz .550” .0 3 0" to 2.0" <130°F
Wear Resistant 14.0 mm .75 to 50 mm <54°C
KBA560-WR General Purpose 5 MHz .700" .0 60" to 8.0" <450°F
Wear Resistant 17.8 mm 1.5 to 200 mm <230°C
KBA525 Small Footprint 10 MHz .200” .025” to 1.0” <130°F
5 mm .63 to 25.4 mm <54°C
NOTE:
Probe specifications are subject to change without notice.
5.3 Dual Multi “Through Coating” Mode Probe Specifications
Nominal Contact Through Coating Temp.
Model Description Frequency Diameter Measurement Range Range
KBA560-D Dialog-General Purpose 5 MHz .625” .120” to .800” <250°F
KBA560 General Purpose 5 MHz .625” .120” to .800” <450°F
KBA560-WR General Purpose 5 MHz .700” .120” to .800” <450°F
Wear Resistant 17.8mm 3 to 20mm <230°C
DA312 Thin Materials 10 MHz .30 ” .080” to .50” <130°F
DA301/DA311 General Purpose 5 MHz .475” .120” to .800” <130°F
DM401-GP General Purpose 5 MHz .700” .120” to .800” <300°F
15.9mm 3 to 20 mm <121 °C
15.9mm 3 to 20 mm <230°C
7.6mm 2 to 13 mm < 54°C
12.1mm 3 to 20 mm < 54°C
17.8mm 3 to 20 mm <150°C
NOTE: The Auto Mode Linearity for the DA301 probe is ± 0.005 inch (± 0.13 mm)
NOTE:
Actual “Through Coating” measurement will vary depending upon the
type and thickness of the coating, the thickness of the metal and the quality
of the metal and the quality of the bind between the coating and the metal.
Probe specifications are subject to change without notice.
DM4E, DM4, DM4 DL Operating Manual Page 25

6. Application
6.1 General Notes
The DM4 is easy to use and will produce reliable, consistent
measurements when used correctly and with an understanding of factors that may affect measurement reliability. This
section explains some of the more common considerations.
6.1.1 Flaws
If, during testing, the DM4 suddenly reads a value which is
much thinner than the apparent thickness of the part, it may
be reading the distance to a flaw in the test piece, rather than
the distance to the backwall. See Section 1.3, How the DM4
Measures Thickness, for more information. If the cause is
unclear, further examination of the part with an ultrasonic flaw
detection instrument or other suitable NDT method is recommended.
6.1.2 Surface Conditions
A regular pattern on the surface under test, such as machine
grooves, may cause a false thickness reading when using a
dual element probe. Higher frequency
probes, such as the DA312, are especially sensitive to this
condition. The problem can usually be corrected by rotating
the probe so that the crosstalk barrier is at a right angle to the
grooves, or using the Dual Multi measurement mode.
Crosstalk Barrier Orientation
6.2 Thickness Measurement on Hot Test Pieces
The instrument can be used to measure the thickness of
materials with surface temperatures of up to 1,000°F (538°C)
with special, high temperature, dual element probe Model
HT400. A special couplant, Krautkramer ZGM, and duty
cycle are also required for high temperature use. The
following procedure is recommended
It is possible for the surface of a test piece to be too rough to
permit a good reading. Excess couplant could be trapped
between the probe and surface under test, causing a false
reading. A very rough surface may prevent coupling altogether
(no coupling indicator). This problem can be corrected by grinding the surface until it is smooth enough to permit good coupling.
6.1.3 Curved Surfaces
When measuring on curved surfaces, such as tubes or pipes,
be sure to keep the probe centered on the part and as stable
as possible.
As a rule, smaller diameter probes improve coupling and
minimize “rocking” on curved parts. In some cases, special
probes with contoured faces to match surface curvature may
be needed. Practice may be helpful to develop the proper
technique.
When using a flat dual probe, position the crosstalk barrier at
a right angle to the long axis of the part, as shown in the
following figure
Calibrate the DM4 according to the appropriate procedure in
Section 2.5 or 2.6.
Thoroughly clean the surface to be tested, using a wire
Knead the ZGM high temperature couplant in the tube before
using. Then place a drop, about the size of a pea,
contact face of the probe, not on the test piece
Carefully couple the probe to the surface under test. To prevent damage to the probe face, do not twist the probe while it is
in contact with the test surface. On a curved surface with a
dual probe, orient the crosstalk barrier as described in Section
6.1.3. Allow 2 or 3 seconds for the ZGM couplant to melt and
provide good coupling. At temperatures above 1020°F (550°C),
the ZGM couplant may ignite spontaneously. This will not
affect thequality of the coupling.
Do not allow the probe to be coupled for more than 5 seconds.
If a thickness reading does not appear within 5 seconds, remove the probe and cool it in air. On curved surfaces, gently
rocking the probe may help achieve good coupling.
While coupled, readings tend to drift upward as the probe
warms. Using MIN (minimum capture) mode (Section 2.9)
may be helpful in minimizing this problem.
.
on the
Page 26 DM4E, DM4, DM4 DL Operating Manual

6.0 Application Notes
A 100% duty cycle can be employed when taking measurements below 400°F (204°C). No cooling of the probe is required.
If taking thickness readings at temperatures above 400°F, cool
the probe in air as follows:
• 15 seconds for temperatures from 400°F to 550°F
• 30 to 120 seconds for temperatures from 550°F to 1,000°F
Before taking another reading, carefully remove the remaining
couplant and residue from the probe.
Thickness measurements made at high temperatures must be
corrected for the effect of temperature on the material sound
velocity. Velocity in steel changes at an approximate rate of -
0.5% per 100°F (-1.0% per 100°C).
Some applications may exceed the instrument’s capabilities.
If high temperature measurements are unsatisfactory after several attempts using this procedure, better results may be
achieved by using a high temperature probe with an ultrasonic
flaw detection instrument.
DM4E, DM4, DM4 DL Operating Manual Page 27

Agfa NDT GmbH
Robert-Bosch-Strasse 3
D-50354 Huerth (Efferen)
Cologne, Germany
Phone: (49) 2233-6010
Fax: (49) 2233-601402
E-Mail: hotline@AgfaNDT.de
Krautkramer UK Ltd
Millburn Hill Road
University of Warwick Science Park
Coventry , England CV4 7HS
United Kingdom
Phone: (44) 0845 601 5771
Fax: (44) 0845 130 5775
E-Mail: ndtsales.gb.ng@Agfa.co.uk
Agfa NDT SA
68, Chemin des Ormeaux
F-69760 LIMONEST
France
Phone: (33) 47-217-9220
Fax: (33) 47-847-5698
E-mail: ndt@France.Agfa.com
7. Worldwide Service Centers
Page 28 DM4E, DM4, DM4 DL Operating Manual
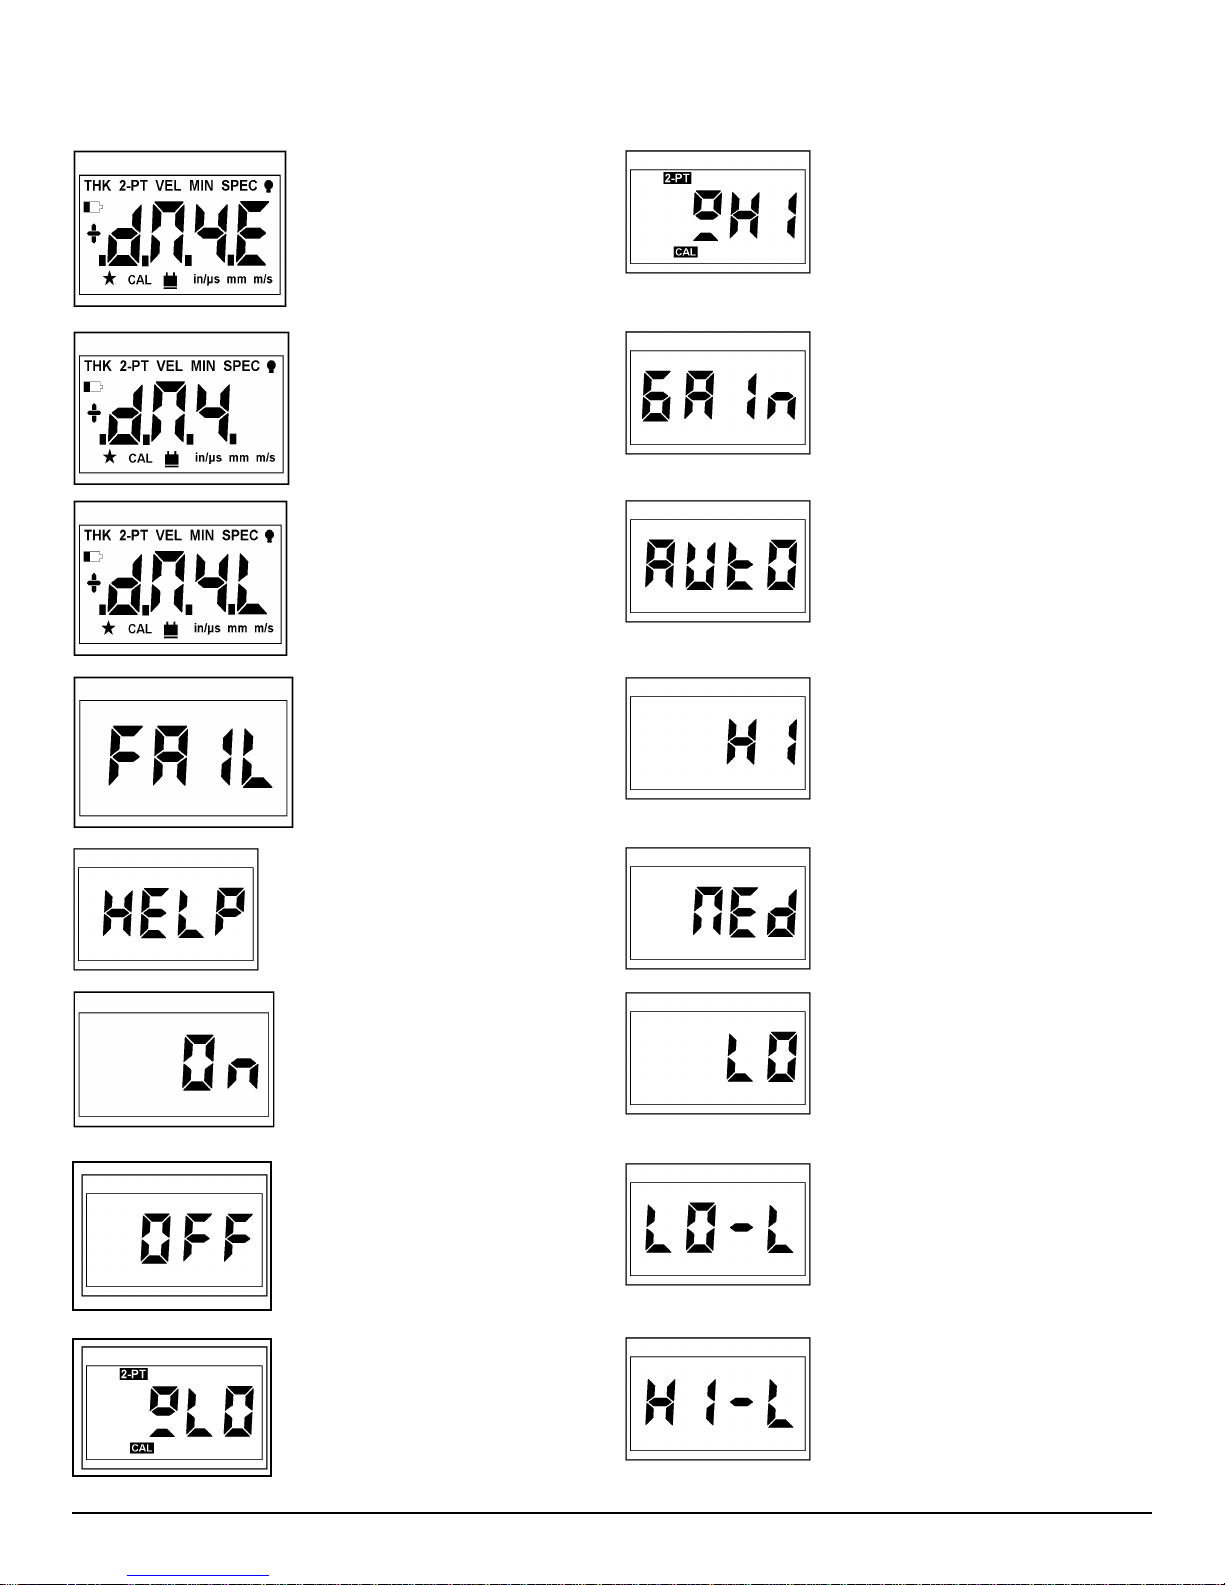
Appendix A: Displays, Quick Reference
Initial display, DM4E
Section 2.4
Initial display, DM4
Section 2.4
Initial display, DM4 DL
Section 2.4
Fatal memory failure!
Call for service
2-point calibration Couple to thick standard.
Section 2.6
Receiver Gain Control
(DM4, DM4 DL)
Section 2.10
Automatic Gain;
Automatic Backlight
Sections 2.10, 2.15
High Gain; High Band
Pass Filter
(DM4, DM4 DL)
Sections 2.10, 2.13
Memory Failure.
Press MODE key to reset
instrument operating
software.
(All data will be erased)
Enable mode or feature;
Backlight on, Statistics on,
Header on
Disable mode or feature;
Backlight off, Statistics off,
Header off
2-point calibration Couple to thin standard
Section 2.6
Medium Gain
(DM4, DM4 DL)
Section 2.10
Low Gain; Low Band Pass
Filter
(DM4, DM4 DL)
Sections 2.10, 2.13
Low limit alarm mode
(DM4, DM4 DL)
Section 2.11
High limit alarm mode
(DM4, DM4 DL)
Section 2.11
DM4E, DM4, DM4 DL Operating Manual Page 29
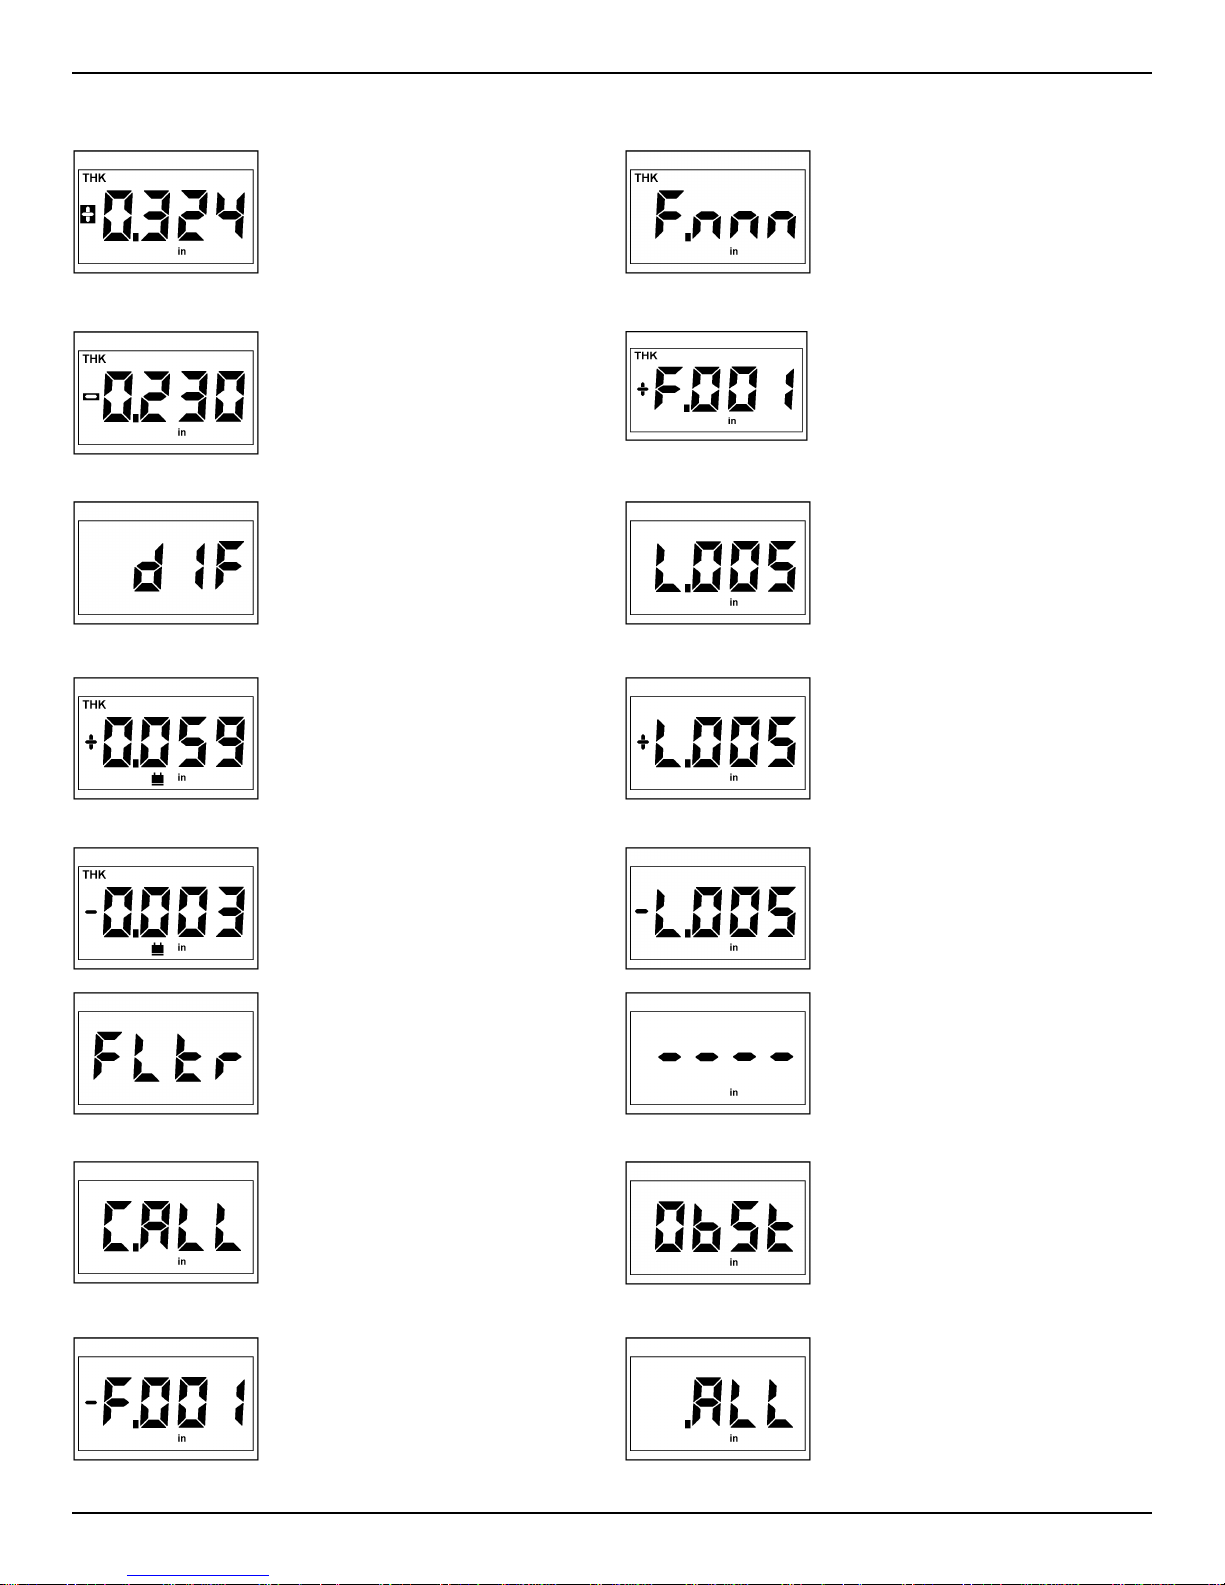
Appendix A: Displays, Quick Reference
Reading exceeds HI Alarm limit
(DM4, DM4 DL)
Section 2.11
Reading less than LO Alarm limit
(DM4, DM4 DL)
Section 2.11
Differential measurement mode
(DM4, DM4 DL)
Section 2.12
Differential reading exceeds
nominal by amount shown.
(DM4, DM4 DL)
Section 2.12
File no. nnn active
Section 3.3 (DM4 DL)
File no. 1 full
Section 3.3 (DM4 DL)
Location no. 5 active
SEND confirmed
Section 3.4 (DM4 DL)
Location no. 5 full
Section 3.5 (DM4 DL
Differential reading less than
nominal amount shown.
(DM4, DM4 DL)
Section 2.12
Band Pass Filter control
(DM4, DM4 DL)
Section 2.13
Memory clear
Section 3.2 (DM4 DL)
File no. 1 empty
File no. 1 empty
Section 3.3 (DM4 DL
Location no. 5 empty
Section 3.5 (DM4 DL)
Viewing empty location
Section 3.6 (DM4 DL) or unable to
measure in the Dual Multi mode
Section 2.18.
Viewing “obstructed” location
Sections 3.4.1, 3.6 (DM4 DL)
All files selected
Ready to transmit or clear
Sections 3.3, 3.9, 4.4, 4.5
(DM4 DL)
Page 30 DM4E, DM4, DM4 DL Operating Manual
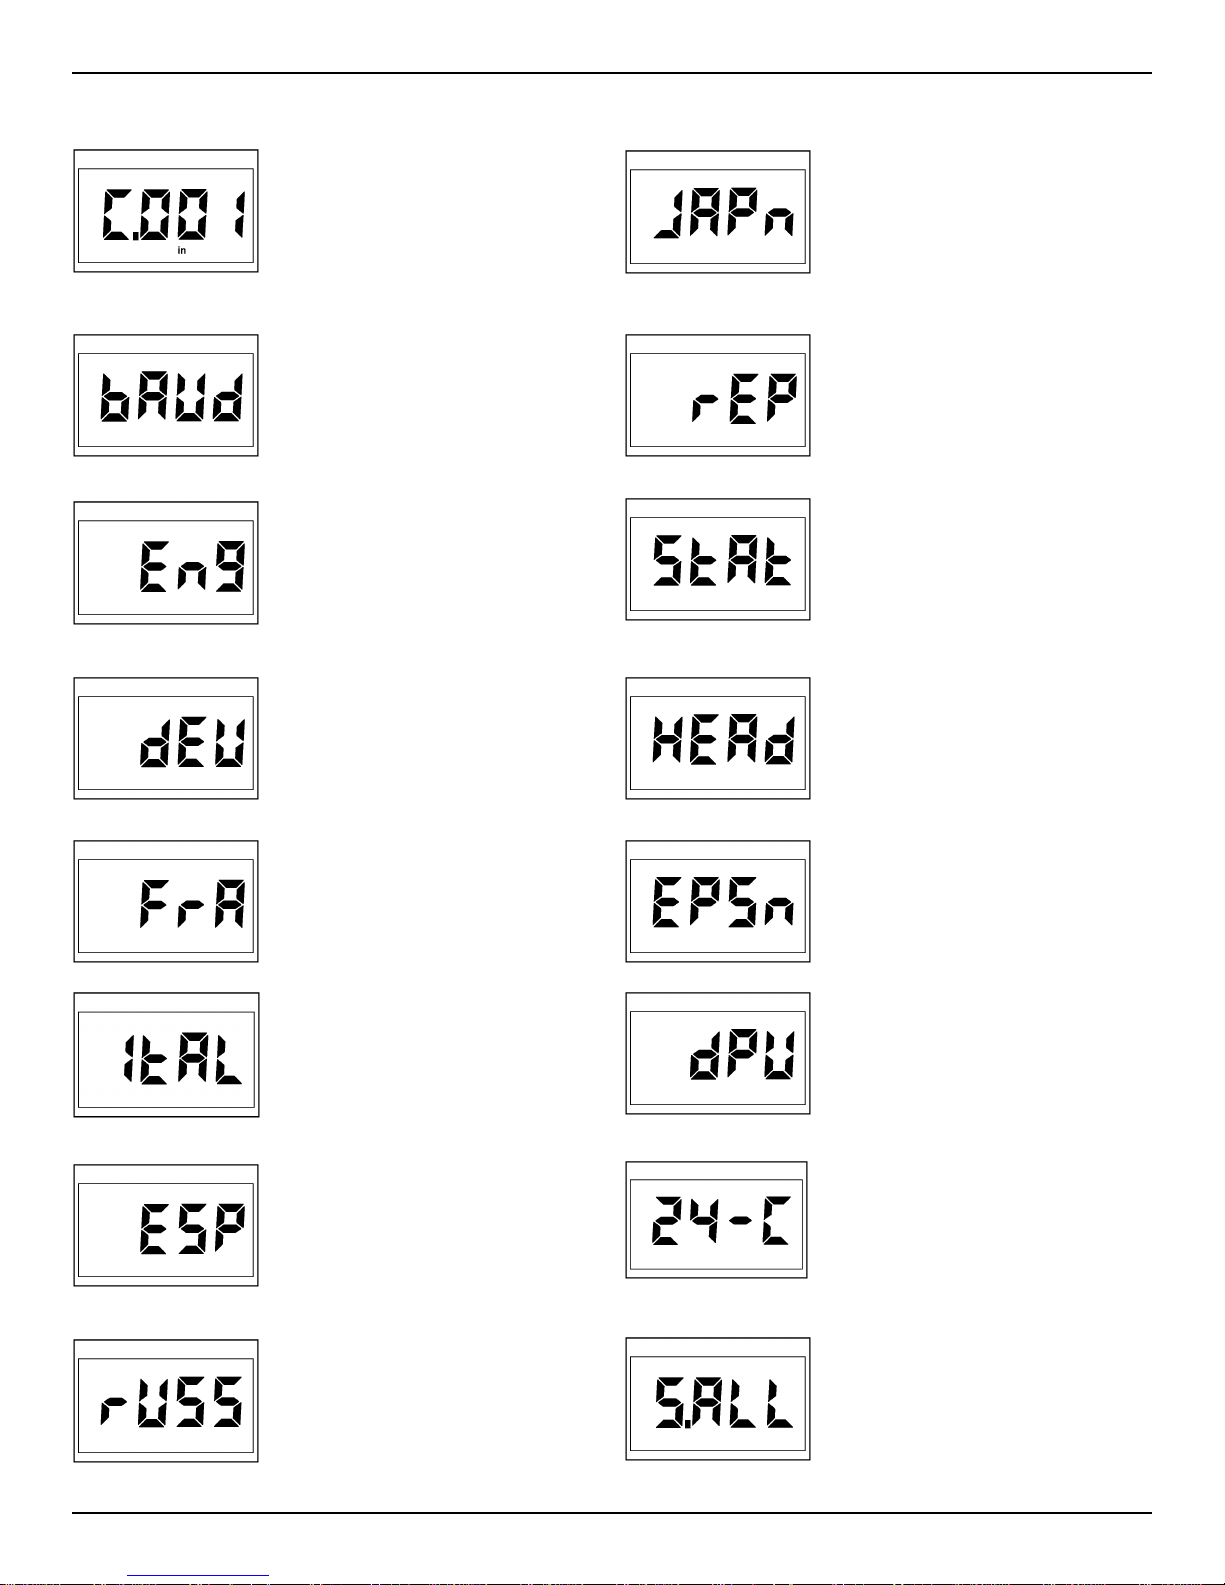
Appendix A: Displays, Quick Reference
Clear file no. 1
Section 3.8 (DM4 DL)
Baud rate selection
Section 4.2 (DM4 DL)
English report language selected
Section 4.3 (DM4 DL)
German report language selected
Section 4.3 (DM4 DL
Japanese report language
selected
Section 4.3 (DM4 DL
Report selection
Section 4.4 (DM4 DL)
Header for report
Section 4.4 (DM4 DL)
Statistics for report
Section 4.4 (DM4 DL
French report language
selected Section 4.3 (DM4 DL
Italian report language selected
Section 4.3 (DM4 DL
Spanish report language
selected Section 4.3 (DM4 DL)
Russian report language
selected Section 4.3 (DM4 DL)
Epson FX 850 printer setting
Section 4.4 (DM4 DL)
Seiko DPU 411 printer setting
Section 4.4 (DM4 DL)
24 column / DATAMATE format
printer setting
Section 4.4 (DM4 DL)
Sending ALL files
Transmission in process
Section 4.4, 4.5 (DM4 DL
DM4E, DM4, DM4 DL Operating Manual Page 31
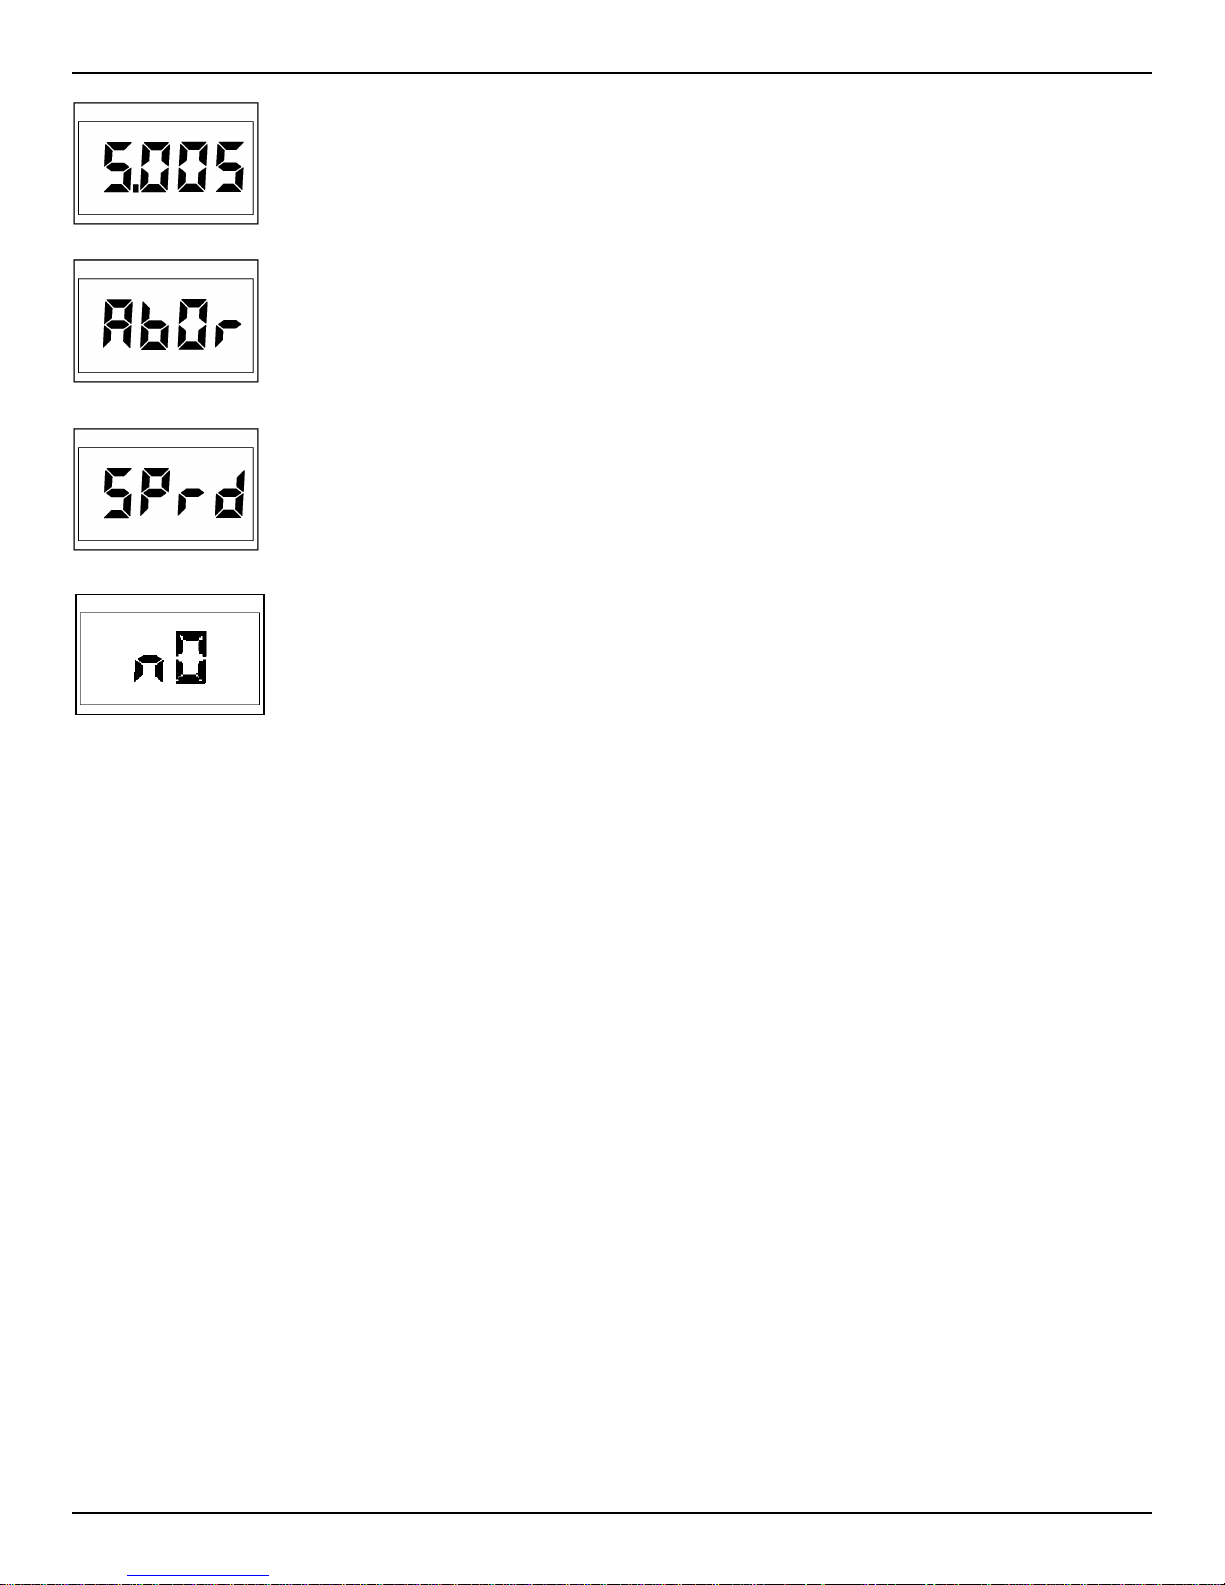
Appendix A: Displays, Quick Reference
Sending file no. 5
Transmission in process
Section 4.4, 4.5 (DM4 DL)
File SEND aborted
Section 4.4, 4.5 (DM4 DL)
Spreadsheet formatted report
Section 4.6 (DM4 DL)
Non-compatible probe for Dual
Multi measurement mode
Section 2.18
Page 32 DM4E, DM4, DM4 DL Operating Manual
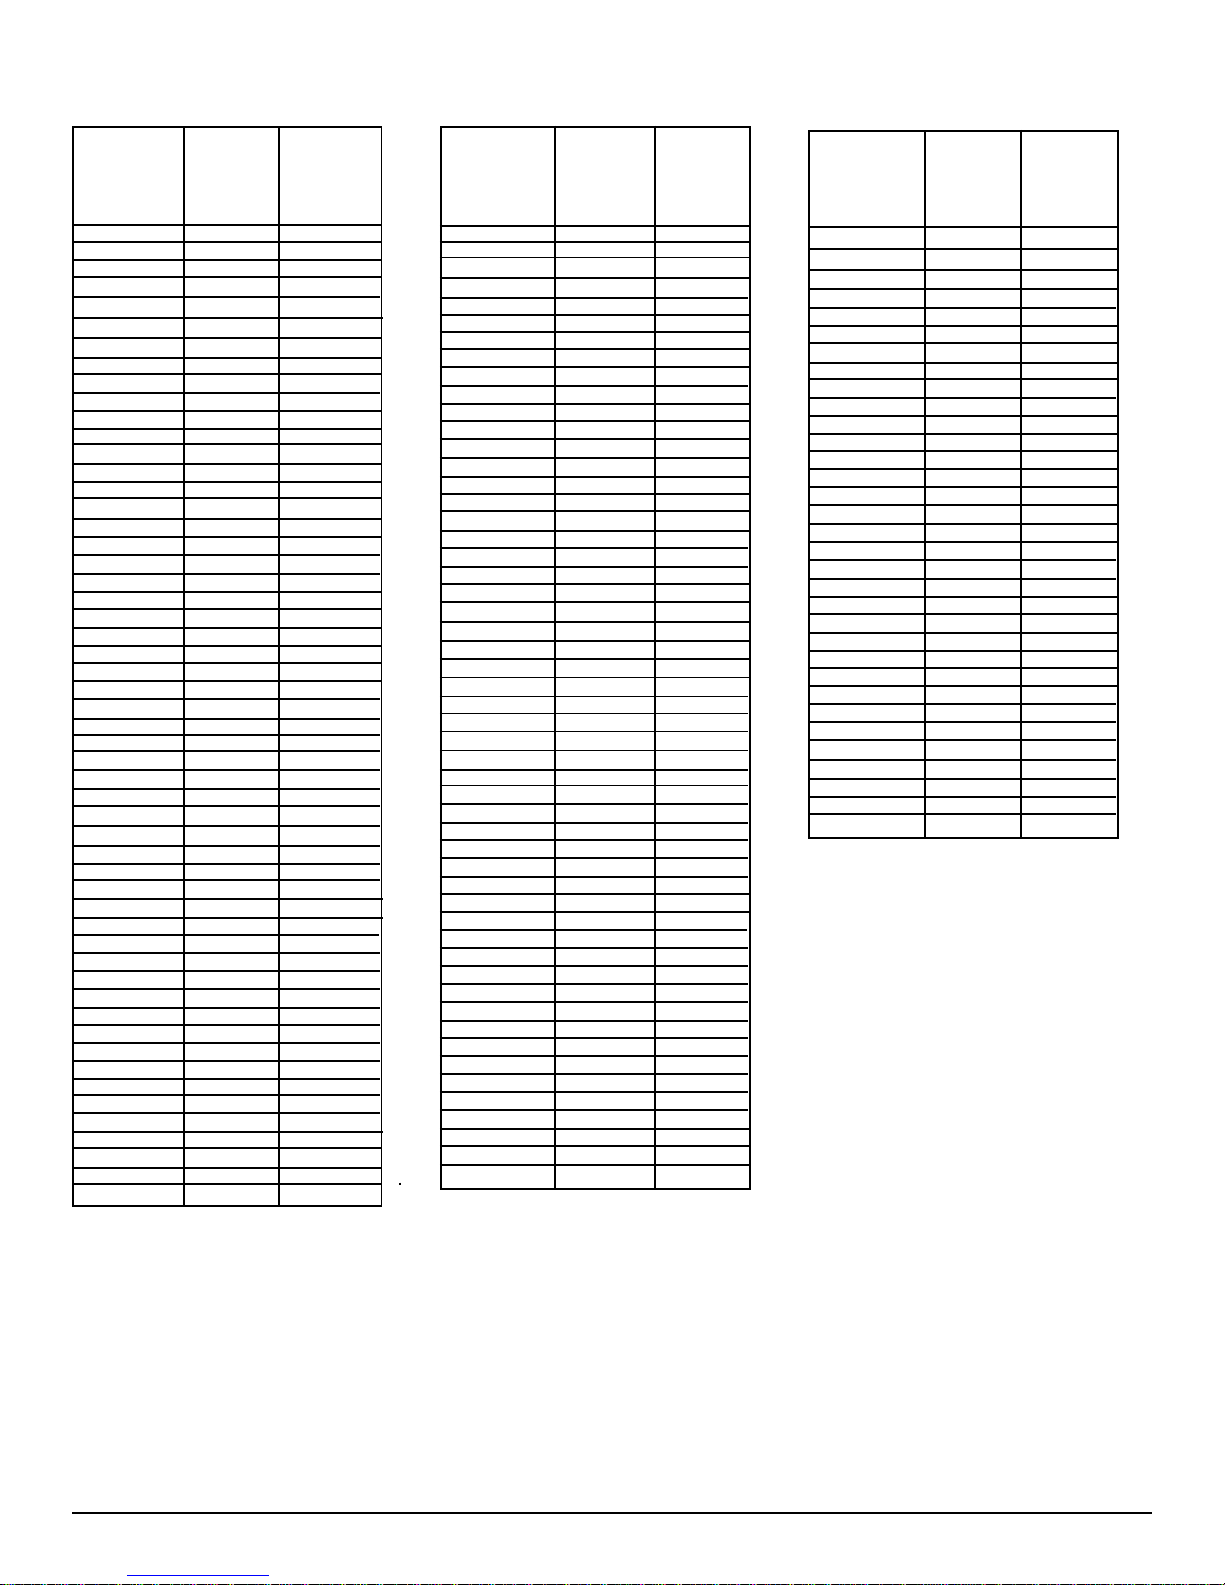
Appendix B: Locations Per File Based on Number of Files
#Of Files #Of Loc Total
Per File Readings
All Files
1 999 999
2 999 1998
3 999 2997
4 999 3996
5 999 4995
6 899 5394
**
7 770 5390
8 673 5384
9 598 5382
10 537 5370
11 488 5368
12 447 5364
13 412 5356
14 383 5362
15 357 5355
16 334 5344
17 314 5338
18 297 5346
19 281 5339
20 266 5320
21 254 5334
22 242 5324
23 231 5313
24 221 5304
25 212 5300
26 204 5304
27 196 5292
28 189 5292
29 182 5278
30 176 5280
31 170 5270
32 165 5280
33 160 5280
34 155 5270
35 150 5250
36 146 5256
37 142 5254
38 138 5244
39 134 5226
40 131 5240
41 128 5248
42 125 5250
43 122 5246
44 119 5236
45 116 5220
46 113 5198
47 111 5217
48 108 5184
49 106 5194
50 104 5200
51 102 5202
52 100 5200
53 98 5194
54 96 5184
#Of Files #Of Loc Total
Per File Readings
All Files
55 94 5170
56 92 5152
57 9 1 5187
58 8 9 5162
59 8 7 5133
60 8 6 5160
61 8 4 5124
62 8 3 5146
63 8 2 5166
64 8 0 5120
65 7 9 5135
66 7 8 5148
67 7 6 5092
68 7 5 5100
69 7 4 5106
70 73 5110
71 72 5112
72 71 5112
73 70 5110
74 6 9 5106
75 6 8 5100
76 6 7 5092
77 6 6 5082
78 6 5 5070
79 6 4 5056
80 6 3 5040
81-82 62 5084
83 6 1 5063
84 6 0 5040
85-86 59 5074
87 5 8 5046
88 5 7 5016
89-90 56 5040
91 5 5 5005
92-93 54 5022
94-95 53 5035
96 5 2 4992
97-98 51 4998
99-100 50 5000
101-102 4 9 4998
103-104 4 8 4992
105-106 4 7 4982
107-108 4 6 4968
109-110 4 5 4950
111-112 44 4928
113-115 43 4945
116-117 42 4914
118-121 41 4961
122-123 4 0 4920
124-126 3 9 4914
127-129 3 8 4902
130-132 3 7 4884
133-135 3 6 4860
#Of Files #Of Loc Total
Per File Readings
All Files
136-138 3 5 4830
139-142 3 4 4828
143-146 3 3 4818
147-150 3 2 4800
151-154 3 1 4774
155-159 3 0 4770
160-164 2 9 4756
165-169 2 8 4732
170-174 2 7 4698
175-180 2 6 4680
181-186 2 5 4650
187-193 2 4 4632
194-200 2 3 4600
201-208 2 2 4576
209-216 2 1 4536
217-225 2 0 4500
226-235 1 9 4465
236-246 1 8 4428
247-258 1 7 4386
259-270 1 6 4320
271-285 1 5 4275
286-301 1 4 4214
302-318 1 3 4134
319-338 1 2 4056
339-361 11 3971
362-387 1 0 3870
388-416 9 3744
417-451 8 3608
452-492 7 3444
493-541 6 3246
542-602 5 3010
603-677 4 2708
678-774 3 2322
DM4E, DM4, DM4 DL Operating Manual Page 33
** Maximum number of Readings
Appendix C: Operational Software Reset
WARNING!
Using this procedure completely resets the
instruments to its factory default settings for
all measurement and data logging parameters.
All readings stored in the on-board data logger
will be permanently erased. To prevent loss of
data, transfer all files to a computer or printer.
This procedure resets all instrument parameters to their
original factory default settings.
While the instrument is off, press and simultaneously and hold both keys for 3 seconds while the instru-
ment powers up.
T o verify that a successful reset has occurred, switch to VEL
(velocity) mode and check the displayed velocity value.
The factory default value of .2313 in/µs should be displayed.
If it is not, repeat the procedure.
Page 34 DM4E, DM4, DM4 DL Operating Manual

Index
Page Page
A
Alarm ............................................................................12
Alarm Limits ................................................................. 11
Automatic shut-off .......................................................... 7
B
Backlight.......................................................................14
Battery Installation ..........................................................7
Baud Rate..................................................................... 20
C
Calibration
Thickness, 1-point .................................................... 9
Thickness, 2-point .................................................. 10
Velocity ...................................................................11
Clearing Files ................................................................ 19
Clearing Memory .......................................................... 19
Clearing Readings ........................................................19
Computer, Sending Data ..............................................21
Curved Surfaces............................................................2 6
D
dIF Mode.......................................................................13
Disabling Functions ...................................................... 14
Dual Multi Mode Operation ........................................... 15
DA3 Operating Mode .................................................... 16
E
Enabling Functions ....................................................... 14
F
File Header ................................................................... 21
Files
Clearing ................................................................... 19
Number of................................................................ 17
Printing ....................................................................21
Selecting ................................................................. 17
Flaws ............................................................................26
Functions Disabling/Enabling .......................................14
G
Gain ..............................................................................12
H
Header, File ...................................................................21
HI Alarm ........................................................................13
High Temperature Measurement .................................. 26
I
Interface, I/O ................................................................. 20
Interrupted Transmission Procedure ............................22
K
Keyboard Controls .......................................................... 8
L
Language ......................................................................20
Limits, LO/HI ................................................................. 13
LO Alarm ....................................................................... 13
Locations
Selecting ..................................................................18
Logging Readings .........................................................18
Low Battery Indicator ...................................................... 7
M
Measurement
Differential.................................................................13
High Temperature .....................................................26
Minimum Capture..................................................... 12
Thickness ................................................................. 12
MIN Mode .....................................................................12
N
Number of Files ............................................................17
P
Paint, See Dual Multi Mode Operation ........................15
Permanent Storage ...................................................... 19
Printer Driver .................................................................21
Printing Data ................................................................. 20
R
Readings
Clearing ................................................................... 19
Replacing ................................................................19
Reviewing ................................................................18
Recording Measurements ..................................... 15, 18
Report Language ..........................................................20
Resolution.....................................................................14
S
Selecting a File ............................................................. 15
Selecting Locations ...................................................... 18
Serial I/O Interface........................................................ 20
Service ............................................................................4
Service Centers ............................................................28
Specifications
Instrument ............................................................... 23
Probes..................................................................... 24
Specifications, Probes ................................................. 24
Spreadsheet, Importing Data ....................................... 22
Statistics, File ..............................................................21
Surface Conditions ....................................................... 26
T
THK Mode.....................................................................12
U
Unit of Measure ............................................................14
V
VEL Mode ..................................................................... 14
W
Warranty .........................................................................4
DM4E, DM4, DM4 DL Operating Manual Page 35
 Loading...