

Page 1

INSTALLATION MANUAL
Kraus Stainless Steel
Undermount Kitchen Sink
KBU10 / KBU11 / KBU12 / KBU14 / KBU15/ KBU16 /
KBU17 / KBU21 / KBU22 / KBU23 / KBU24 / KBU25
/ KBU26 / KBU27 / KBU28 / KBU29
www.kraususa.com I toll free: 1.800.775.0703 I © 2016 Kraus USA Inc.
Page 2

Thank you for your purchase
We would like to take this opportunity to thank you for choosing Kraus.
We hope that you are completely satised with your purchase, and enjoy it for years
to come. If you have any questions, or require technical assistance, please contact
us at 800.775.0703 and one of our representatives will be happy to help.
For more information about Kraus products, please visit:
www.kraususa.com
In order to activate your warranty and get faster access to customer support, please
register your new Kraus product at:
www.kraususa.com/registration
Sincerely,
Kraus USA Customer Service
1
Page 3

Prior to Installation:
Make sure that you have all necessary parts by checking the parts list. If any part is
•
missing or damaged, please contact Kraus Customer Service at 800-775-0703 for a
replacement
• Inspect the sink prior to installation to make sure that it has not been damaged or
during shipping
• Use the cut-out template provided by Kraus
• Observe all plumbing and building codes according to your state requirements
• Not recommended to be installed with laminate countertop
Parts List
• Cut-Out Template • Mounting Hardware • Bottom Grids • Drain
For technical assistance or replacement parts, please contact Kraus
Customer Service and one of our representatives will be happy to help:
Toll-Free: 800-775-0703 or [email protected]
The step-by-step guidelines in the installation instructions are a general reference for installing
a Kraus Sink. Should there be any discrepancies, Kraus cannot be held liable. It is recommended
to install all Kraus products by hiring a licensed professional.
2
Page 4
× ×
× ×
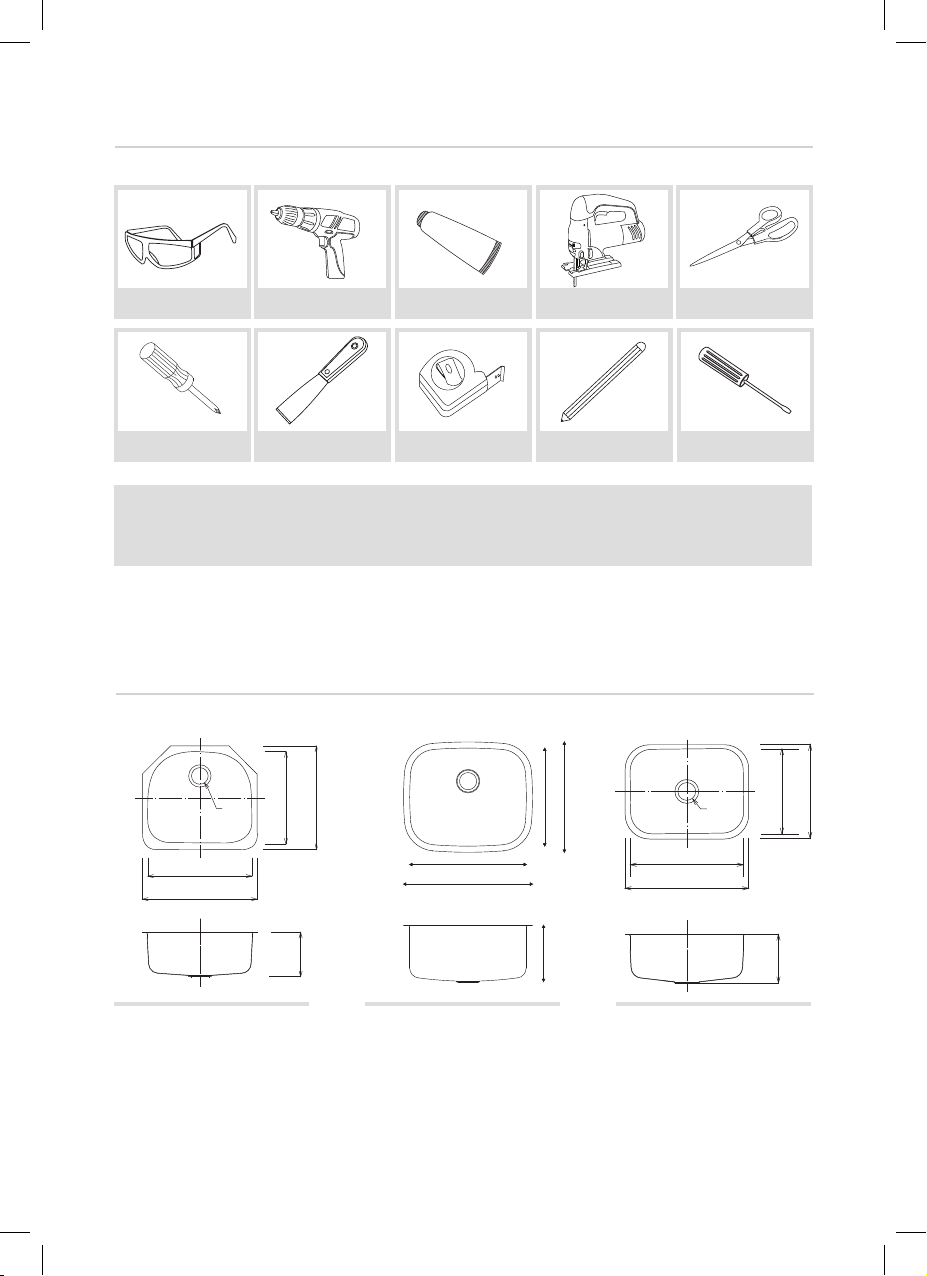
Tools you will need:
Phillips screwdriver
Adjustable wrench
Phillips screwdriver
Hex wrench
Silicone Sealant
I
D
J
F
B
G
C
H
E
21”
535mm
Safety Goggles
Drill
Putty KnifePhillips Screwdriver
Silicone Adhesive Jig Saw
Tape Measure
Pencil
Scissors
Screwdriver
NOTE: Specialized tools may be necessary to install Kraus Stainless Steel Undermount
sinks with countertop materials other than wood, marble, or granite
Dimensions
21-3/8”
542mm
23-3/8”
594mm
Ø3-1/2"
17-3/4”
15-3/4”
450mm
18-3/4”
Ø89
478mm
18-3/4”
476mm
20-3/4”
526mm
400mm
534mm
584mm
Ø3-1/2"
Ø89
21”
23”
17-1/2”
15-7/8”
445mm
403mm
KBU10
23 3/8” x 21” x 9”
Min Cabinet Size: 27”
Matching Grid: KBG-10
Drain Model #: BST-1
3
9”
230mm
KBU11
20 3/4” x 17 3/4” x 9”
Min Cabinet Size: 24”
Matching Grid: KBG-11
Drain Model #: BST-1
9”
229mm
9”
230mm
KBU12
23” x 17 1/2” x 9”
Min Cabinet Size: 27”
Matching Grid: KBG-12
Drain Model #: BST-1
Page 5
Dimensions
× ×
× ×
403mm
19.-1/2"
× ×
× ×
520mm
467mm
470mm
Ø89
Ø89
14
”
368mm
14 ”
368mm
32
”
820mm
16 ”
409mm
18”
457mm
Ø
Ø
Ø
10
”
274mm
13 ”
332mm
15
382mm
12 ”
324mm
Ø89
7”
179mm
Ø
10
”
274mm
13 ”
332mm
15
382mm
12 ”
324mm
Ø89
Ø3-1/2"
Ø89
29-1/2”
750mm
31-1/2”
800mm
Ø3-1/2"
Ø89
16-1/2”
18-1/2”
16-1/4”
18-3/8”
413mm
17-3/4”
450mm
19-3/4”
500mm
20-1/2”
18-1/2"
470mm
13”
330mm
15”
381mm
419mm
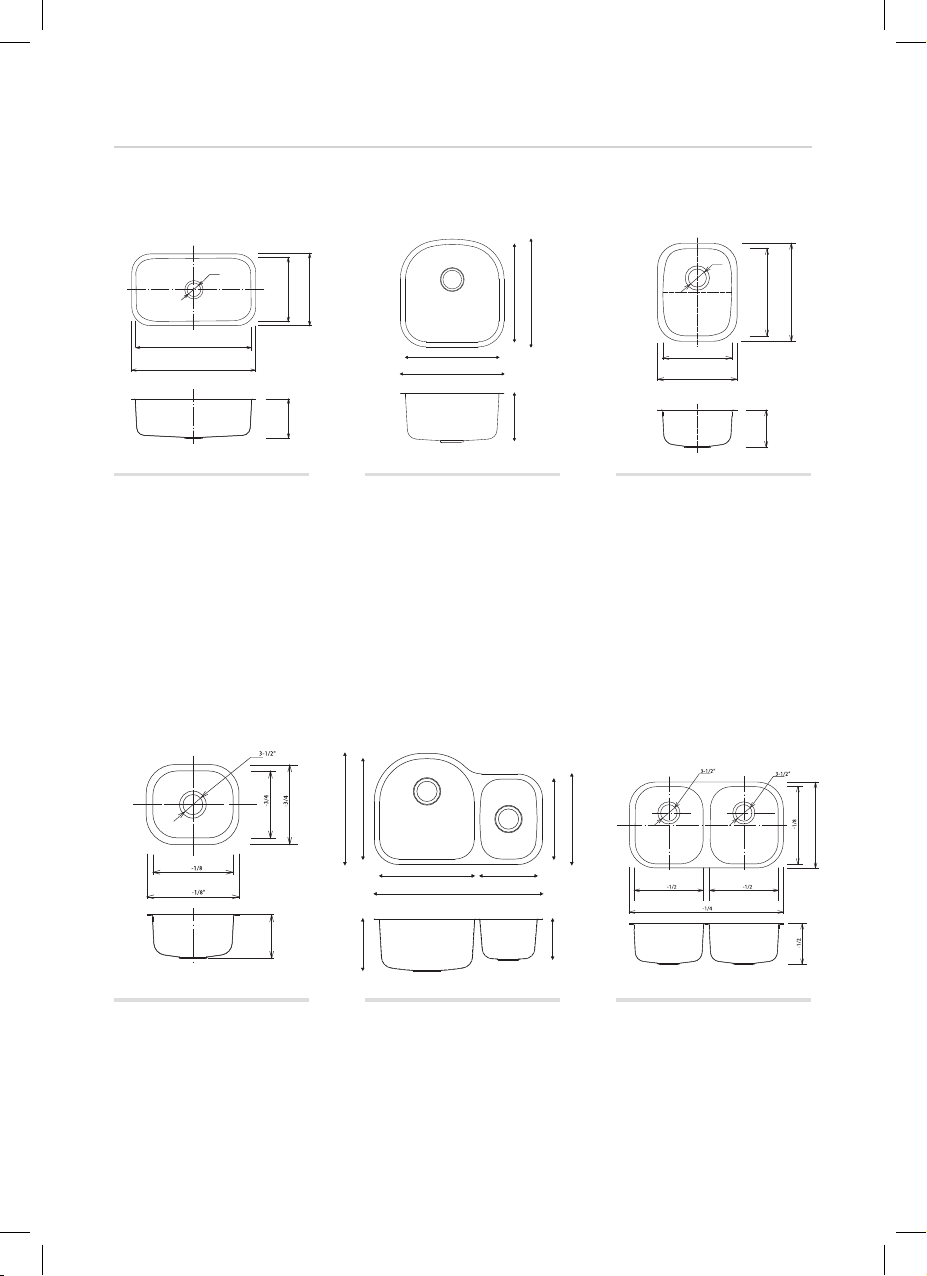
KBU14
31 1/2” x 18 3/8” x 10”
Min Cabinet Size: 36”
Matching Grid: KBG-14
Drain Model #: BST-1
10”
255mm
KBU15
19 3/4” x 20 1/2” x 9”
Min Cabinet Size: 24”
Matching Grid: KBG-15
9”
229mm
7”
181mm
KBU16
15” x 18 1/2” x 7”
Min Cabinet Size: 18”
Drain Model #: ST-1
Drain Model #: BST-1
495mm
Ø
Ø89
17-1/2”
446mm
16-1/2”
420mm
29-1/8”
748mm
9”
228mm
254mm
14”
15-7/8”
356mm
10”
7”
178mm
14
368mm
”
32
820mm
Ø
Ø89
18”
16 ”
409mm
457mm
14 ”
368mm
”
”
8
218mm
KBU17
15 1/8” x 12 3/4” x 7”
Min Cabinet Size: 18”
Drain Model #: ST-1
KBU21
29 1/8” x 19 1/2” x 9”
Min Cabinet Size: 33”
Matching Grid: KBG-21-1
and KBG-21-2
Drain Model #: BST-1 & ST-1
KBU22
32 1/4” x 18” x 8 1/2”
Min Cabinet Size: 36”
Matching Grid: KBG-22-1
and KBG-22-2
Drain Model #: BST-1 & ST-1
4
Page 6
× ×
× ×
450mm
× ×
× ×
228mm
228mm
521mm
× ×
× ×
Dimensions
KBU23
KBU23
18”
457mm
16”
406mm
20-1/2”
521mm
18-1/2”
470mm
17-3/4”
450mm
10-1/2”
266mm
31-1/2"
800mm
Ø89
Ø89
20 ”
524mm
18
”
473mm
20
”
419mm
32”
813mm
15
”
400mm
13”
330mm
20 ”
470mm
Ø
Ø
18-1/2”
471mm
20-1/2”
521mm
Ø89
Ø89
15-3/8”
391mm
17-3/4”
450mm
11-3/8”
290mm
32-3/8”
822mm
Ø3-1/2"
Ø3-1/2"
× ×
× ×
418mm
18-1/2”
20-1/2”
470mm
521mm
Ø3-1/2"
Ø
”
20 ”
524mm
18
18”
16”
457mm
406mm
473mm
Ø
Ø89
Ø89
”
20
419mm
17-3/4”
449mm
15-3/8”
20 ”
470mm
391mm
Ø3-1/2"
Ø89
Ø89
18-1/2”
20-1/2”
471mm
521mm
17-3/4”
450mm
9”
229mm
31-1/2"
800mm
10-1/2”
266mm
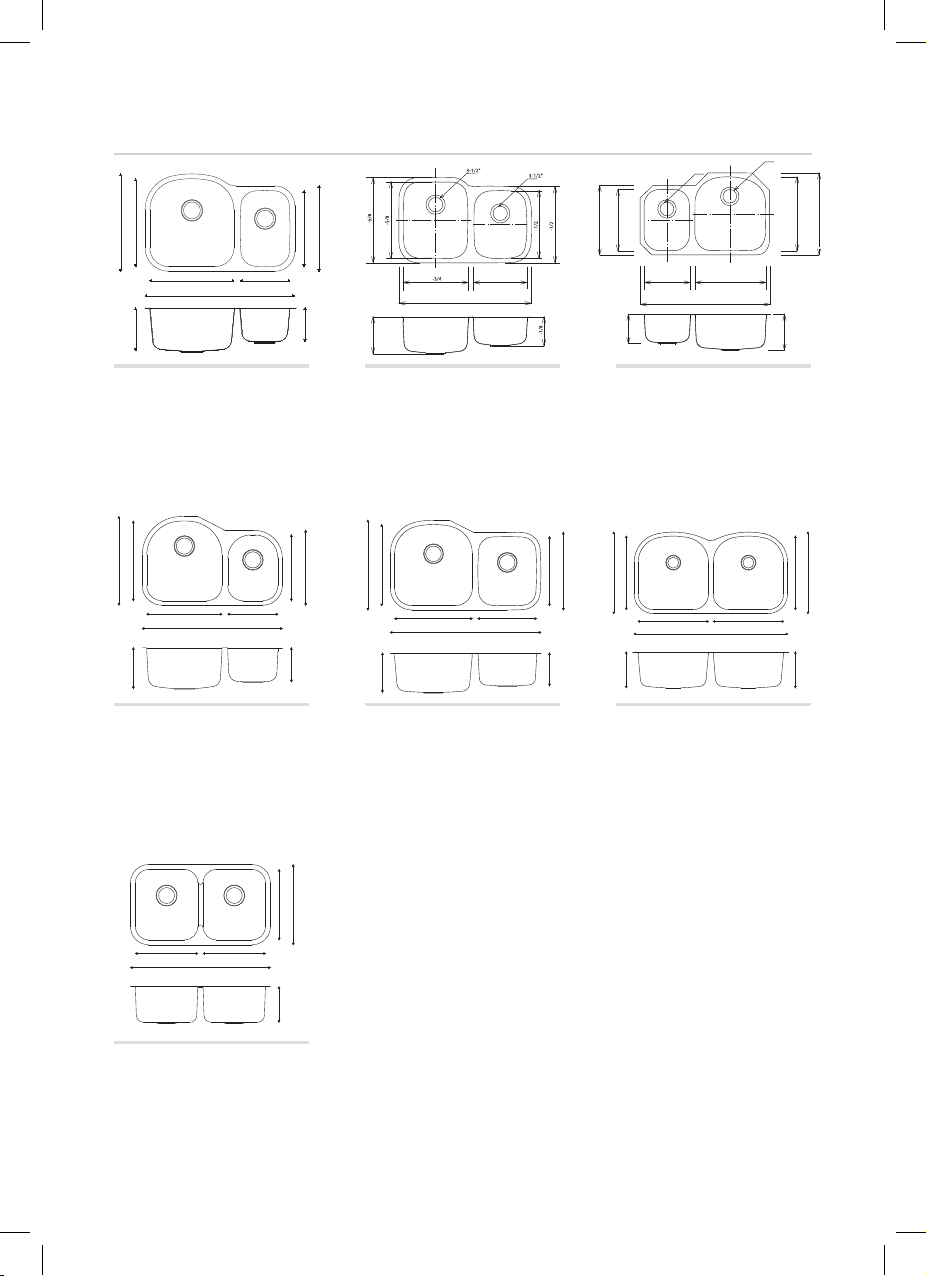
KBU23
31 1/2” x 20 1/2” x 9”
Min Cabinet Size: 36”
Matching Grid: KBG-23-1
and KBG-23-2
Drain Model #: BST-1 & ST-1
17-1/2”
19-1/2”
495mm
444mm
16-1/2”
420mm
9”
228mm
30-3/4"
782mm
280mm
11”
KBU26
30 3/4” x 19 1/2” x 9”
Min Cabinet Size: 36”
Matching Grid: KBG-26-1
and KBG-26-2
Drain Model #: BST-1 & ST-1
15
”
813mm
13”
330mm
32”
”
7
181mm
400mm
7”
178mm
9”
229mm
KBU24
32” x 20 5/8” x 9”
Min Cabinet Size: 36”
Matching Grid: KBG-24-1
and KBG-24-2
Drain Model #: BST-1 & ST-1
20-1/2”
520mm
18-1/2”
14-1/2”
368mm
16-1/2”
7-1/2”
190mm
470mm
17-3/4”
450mm
34-3/8”
872mm
9”
228mm
13-3/8”
340mm
15-3/4”
17-3/4”
400mm
7-1/2"
190mm
KBU27
34 3/8” x 20 1/2” x 9”
Min Cabinet Size: 39”
Matching Grid: KBG-27-1
and KBG-27-2
Drain Model #: BST-1 & ST-1
11-3/8”
290mm
7-3/8”
187mm
KBU25
32 3/8” x 20 1/2” x 9”
Min Cabinet Size: 36”
Matching Grid: KBG-25-1
and KBG-25-2
Drain Model #: BST-1 & ST-1
20-1/2”
18-1/2”
521mm
470mm
9”
KBU28
38 5/8” x 20 1/2” x 9”
Min Cabinet Size: 42”
Matching Grid: KBG-28-1
and KBG-28-2
Drain Model #: BST-1 & ST-1
17-3/4”
450mm
32-3/8”
822mm
38-5/8”
981mm
17-3/4”
450mm
17-3/4”
450mm
9”
229mm
18-1/2”
20-1/2”
470mm
9”
18”
15-3/4”
400mm
456mm
14”
355mm
KBU29
31.5” x 18.5” x 10”
Min Cabinet Size: 36”
Matching Grid: KBG-29-1 and KBG-29-2
Drain Model #: BST-1 & ST-1
5
14”
355mm
31-3/8"
796mm
8”
203mm
Page 7
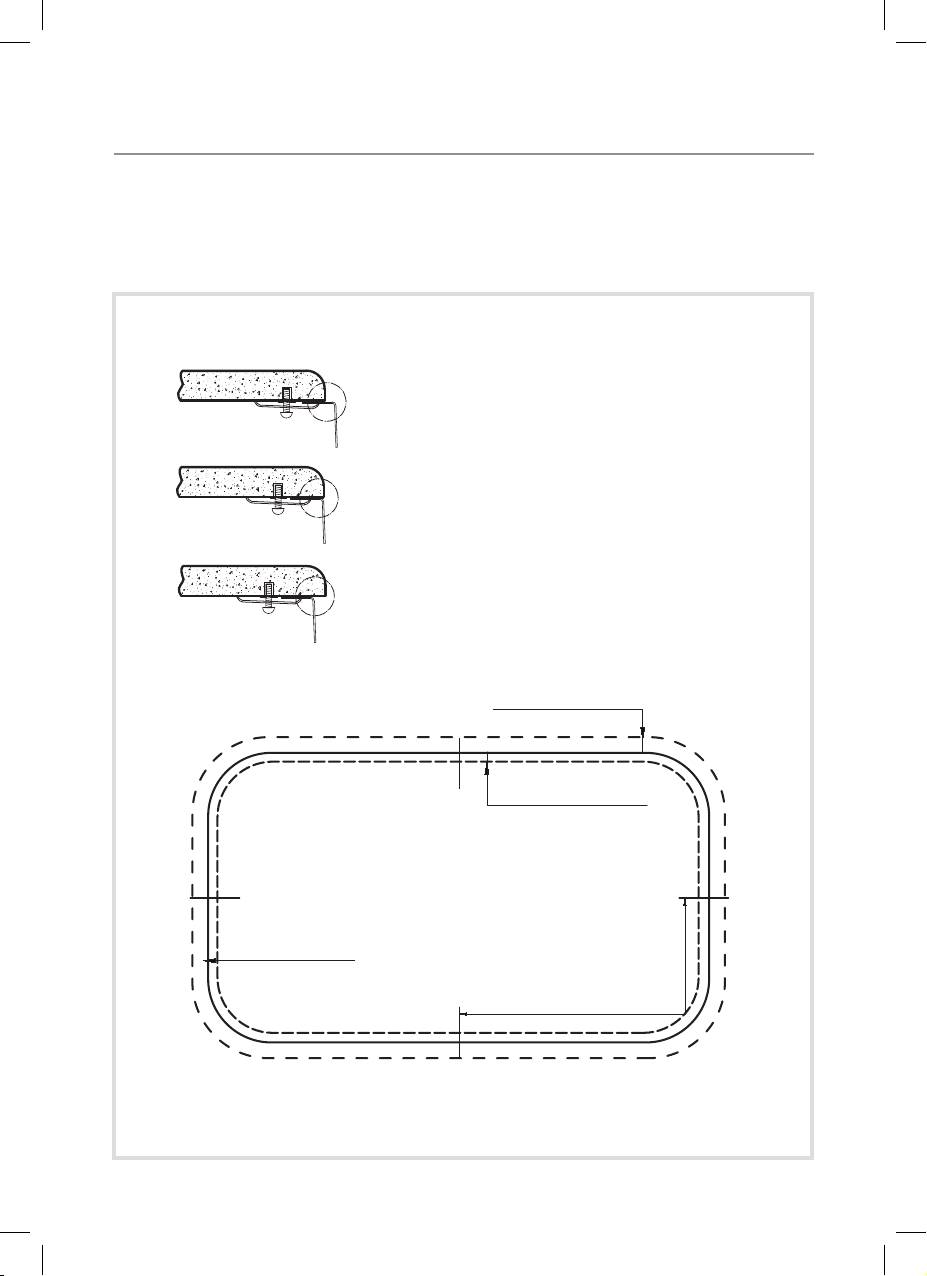
1. Determine Reveal Type
DETERMINE REVEAL TYPE
3/8“ Positive Reveal
DETERMINE REVEAL TYPE
Flushed/Zero Reveal
3/8“ Positive Reveal
DETERMINE REVEAL TYPE
Use scissors to cut along the line of the paper template for your desired
reveal type (Negative, Positive, or Flushed Reveal)
3/8“ Positive Reveal
Flushed/Zero Reveal
1/8“ Negative Reveal
KRAUS Recommended Installation Type
FLUSHED/ZERO
3/8”POSITIVE
1/8”NEGATIVE
Centerline
6
Page 8
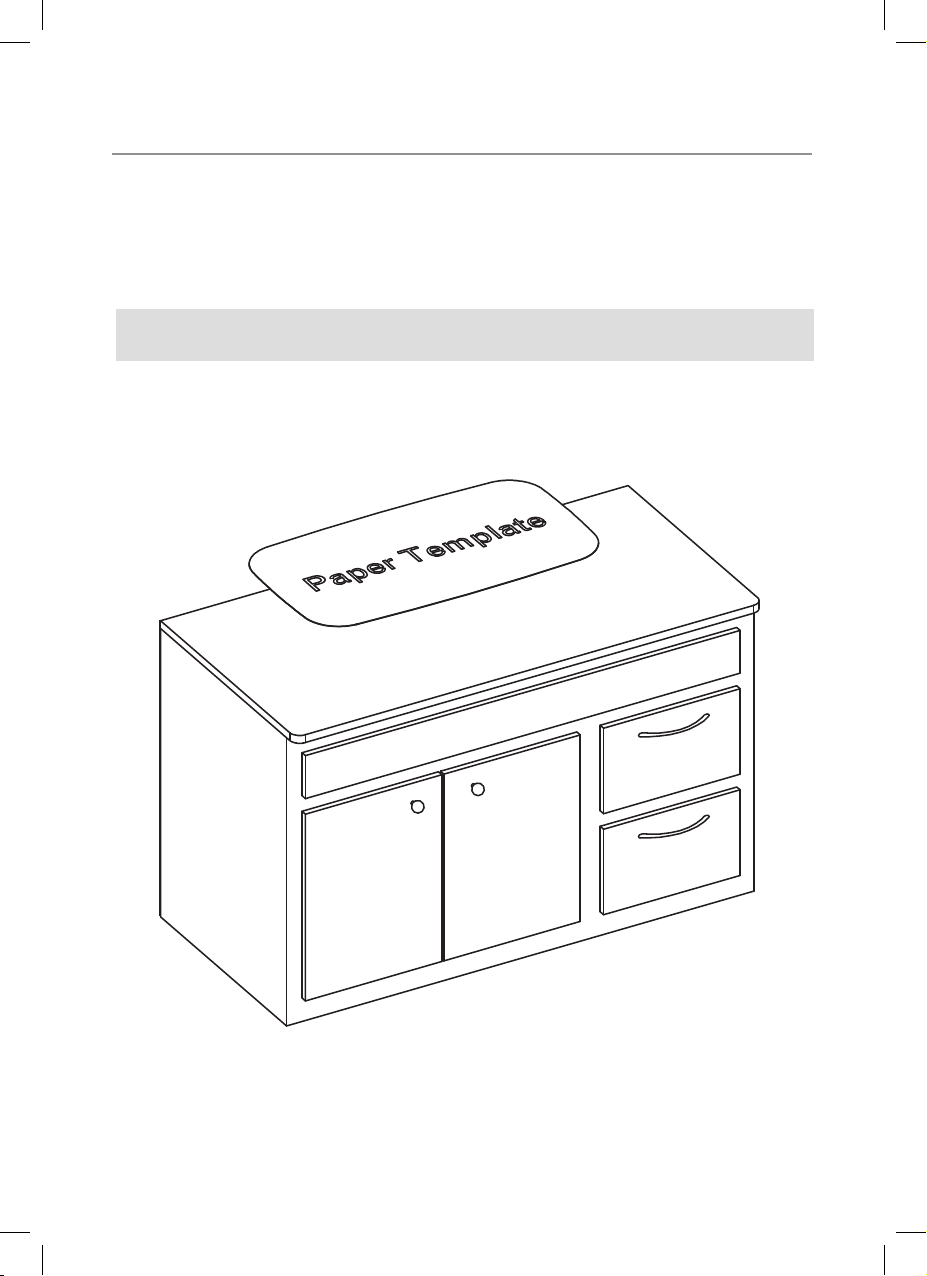
2. Position Template
Step1
• Check the cut-out template against the actual sink to ensure a proper
sized cut-out
• Place the cut-out template in the desired location on the countertop
NOTE: Make sure clearance is suitable for backsplash, faucet, and plumbing for the sink
7
Page 9
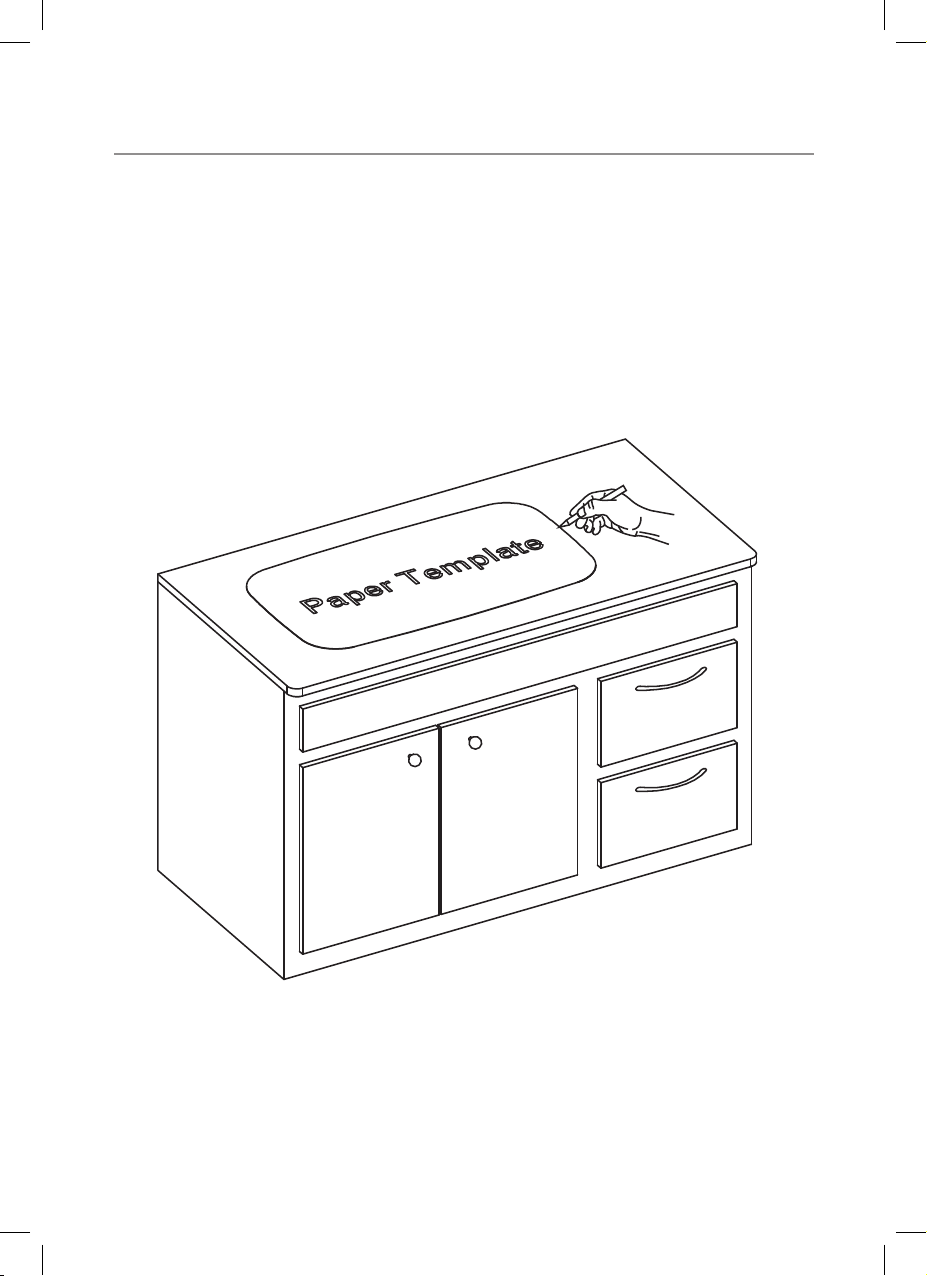
3. Trace Template
Step2
• Trace template on countertop with a pencil
8
Page 10
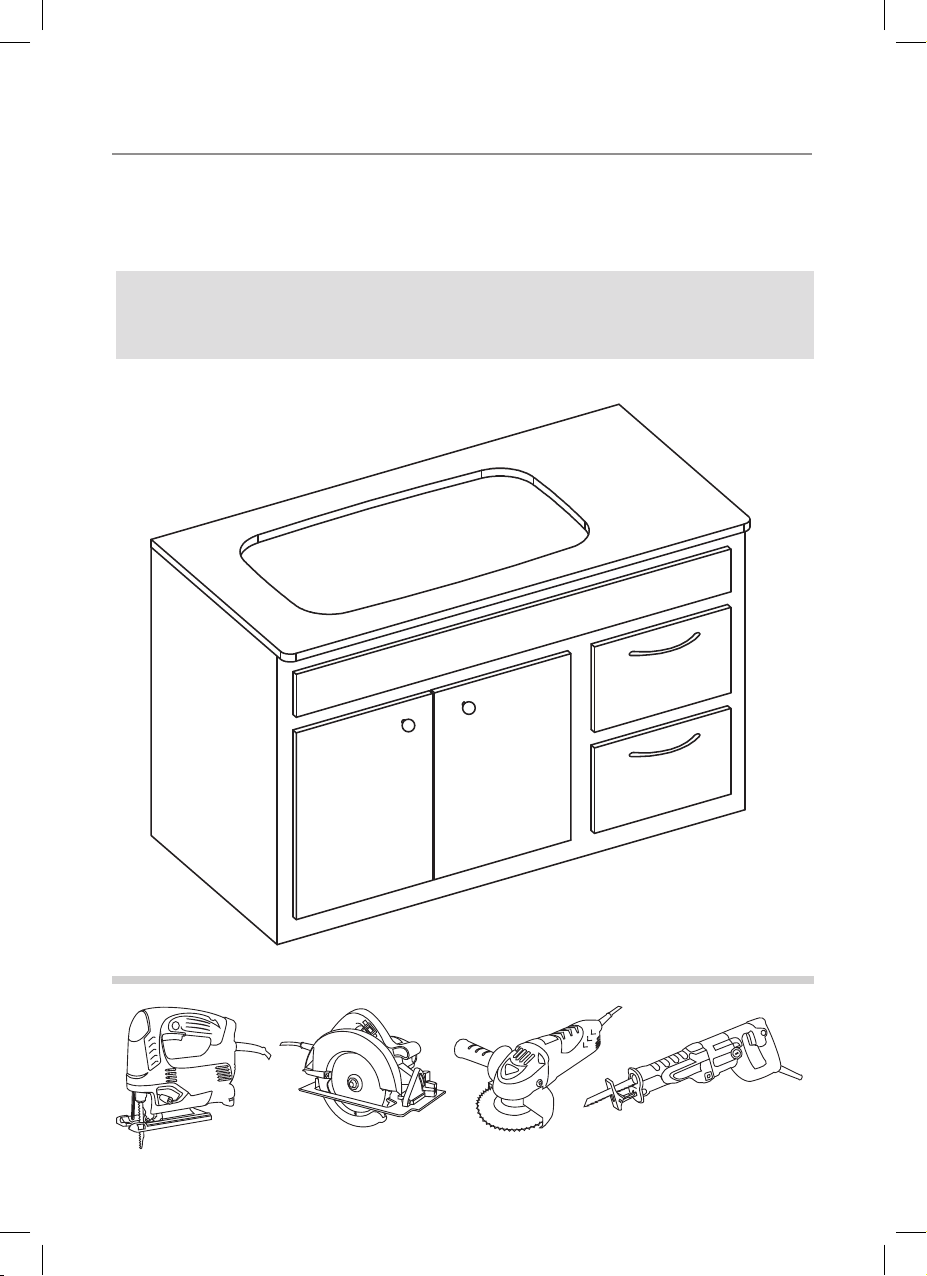
4. Cut Countertop
Step3
• Cut the opening in the countertop by carefully following the traced line
NOTE: Please use the appropriate saw that best ts your countertop
material
9
Page 11
Flushed/Zero Reveal
3/8“ Positive Reveal
1/8“ Negative Reveal
Step5
Determine location for mounting brackets; space
Centerline
3/8”POSITIVE
1/8”NEGATIVE
FLUSHED/ZERO
Step5
3/8
Step6
Step5
3/8
1/2
Step6
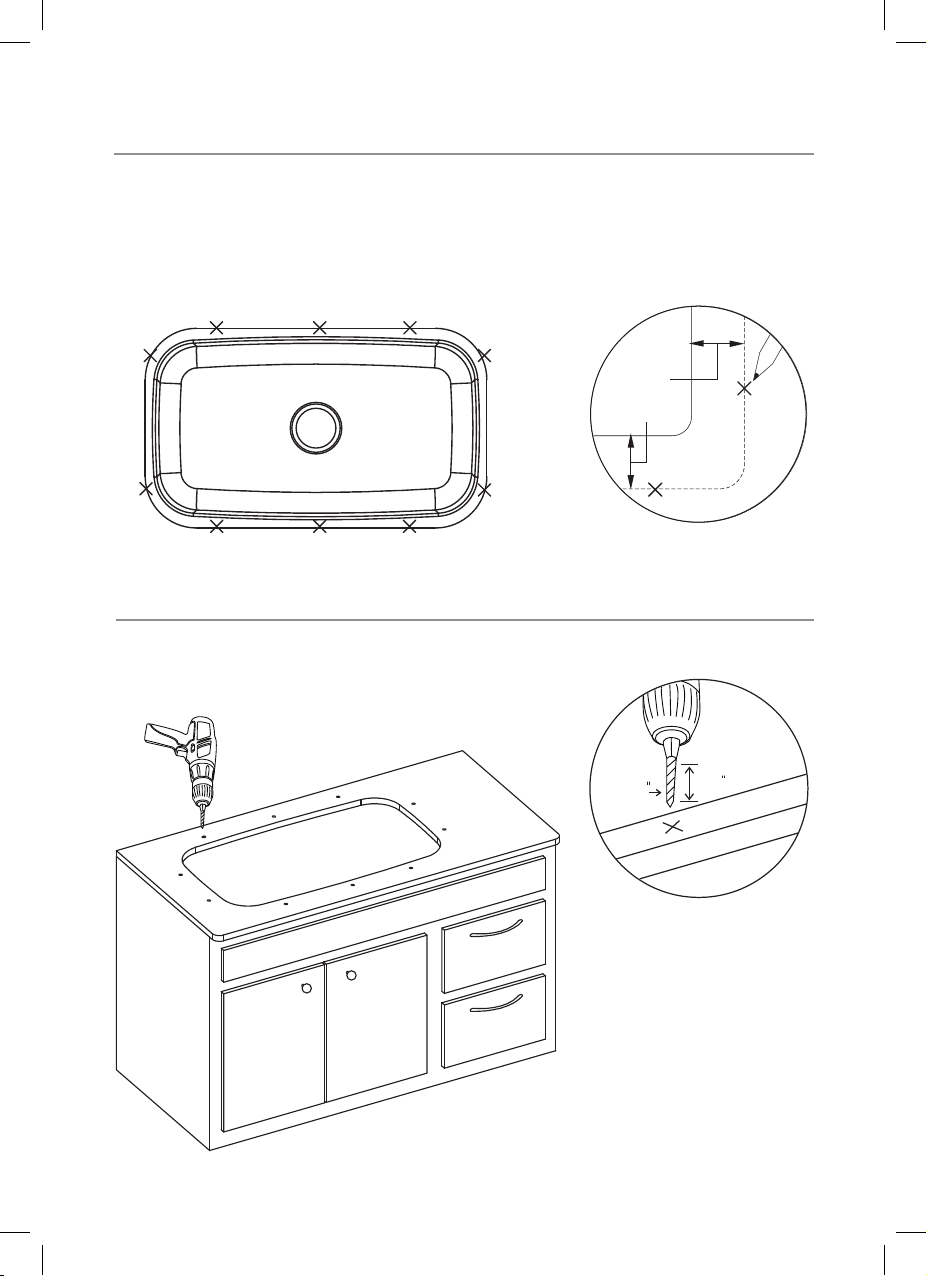
5. Set up Mounting Brackets
• Turn countertop over and align sink with countertop. Decide location for
mounting brackets
• Mounting holes should be ½” from edge of sink
1/2"
(13mm)
6. Drill Hole in Countertop
• Drill 3/8” diameter x 1/2” deep hole in the countertop
3/8
1/2
10
Page 12
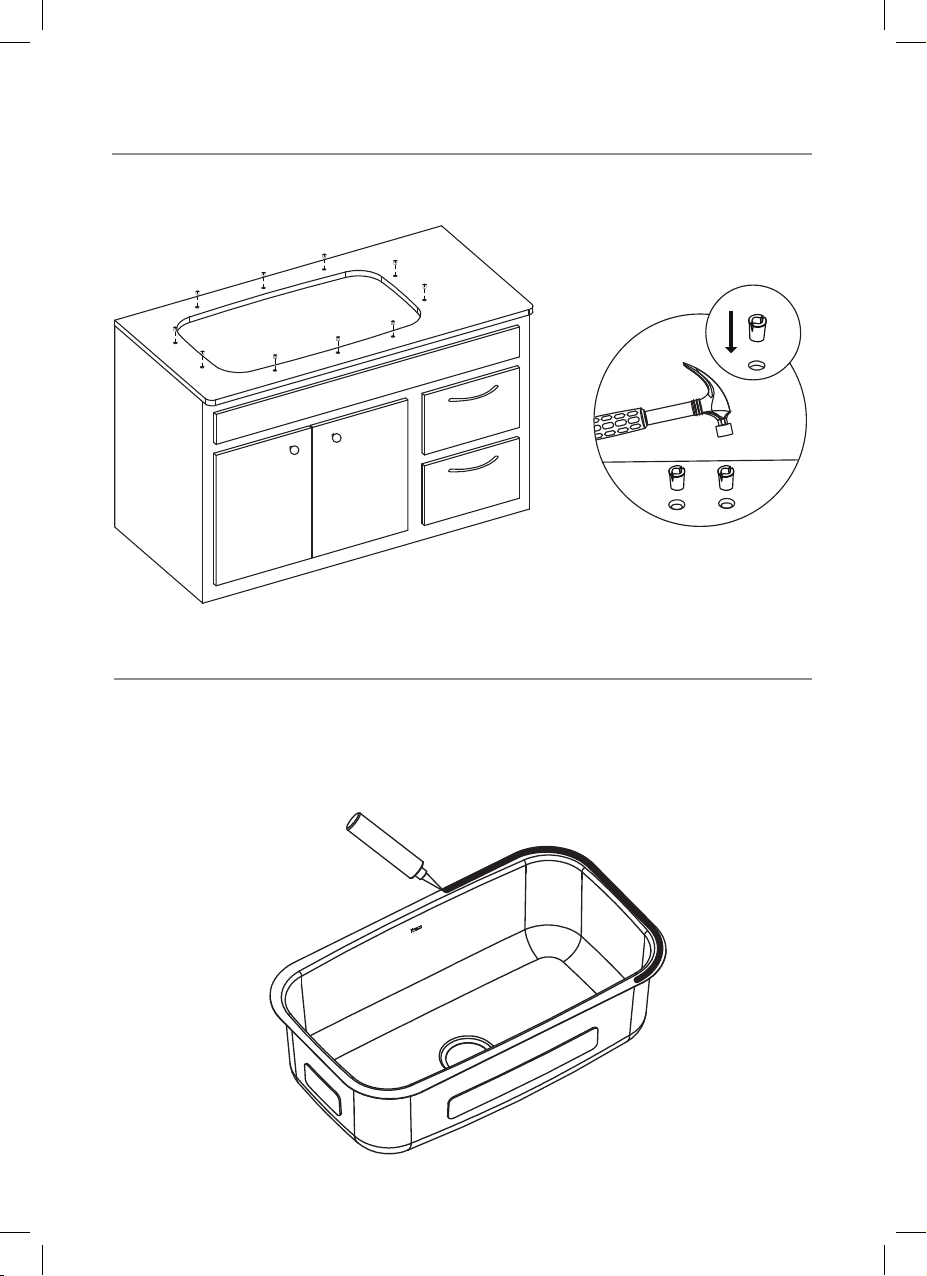
7. Install Anchors
Step7
Step7
Step7
Step8 Step9
• Insert anchors into drilled holes and lightly tap with a hammer until ush
8. Secure Sink to Countertop
• Use a bead of silicone (or preferred adhesive) around the rim of the sink.
Check the alignment of the sink to the cutout in the countertop. Place sink
over cutout hole and press rmly
11
Page 13
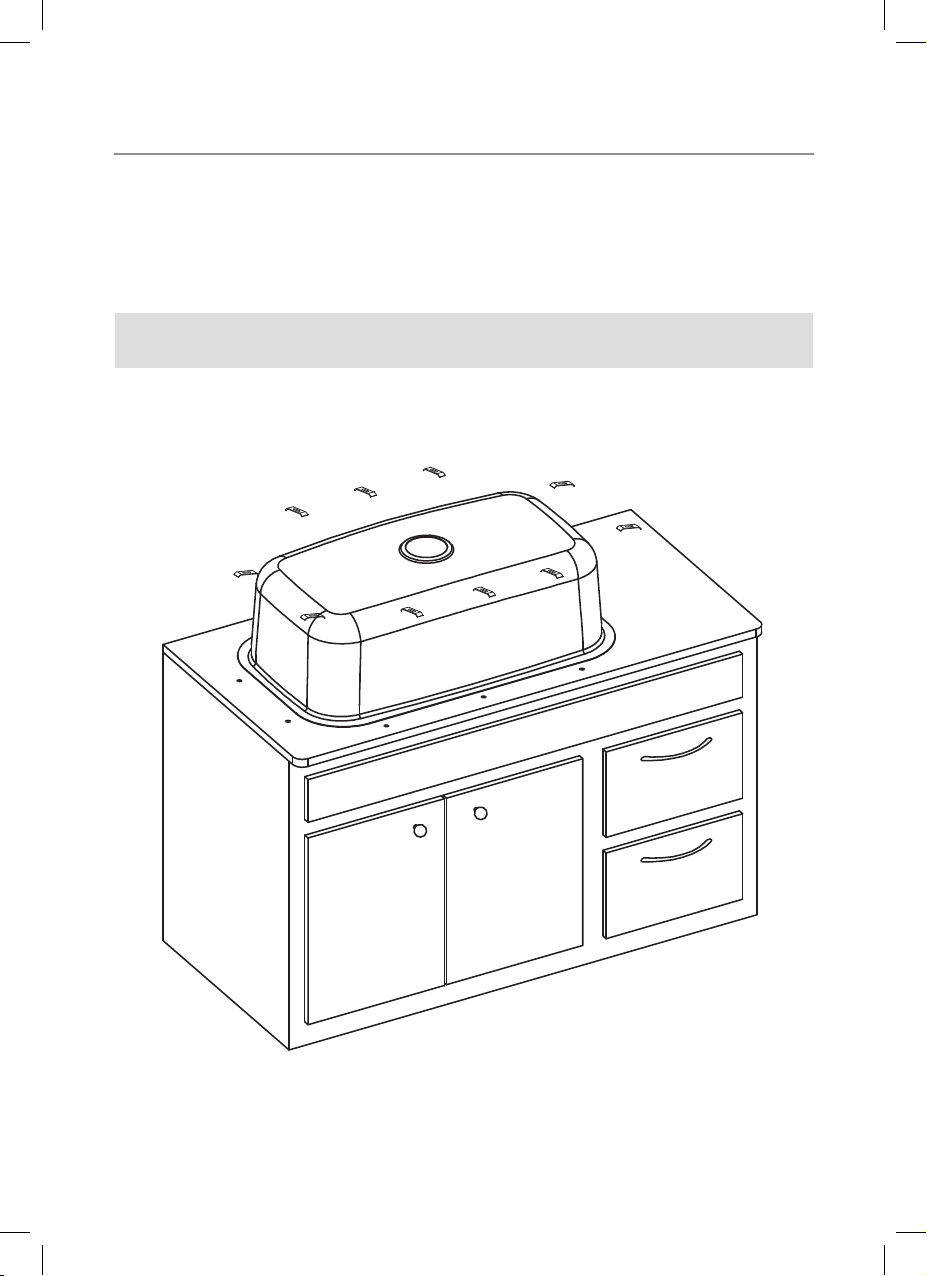
9. Attach Mounting Hardware
Step8 Step9
• Attach mounting hardware to secure bowl. Remove excess sealant
from inside lip
• Allow sealant to set for 30 – 60 minutes
NOTE: Use acetone or rubbing alcohol to remove any excess sealant
12
Page 14
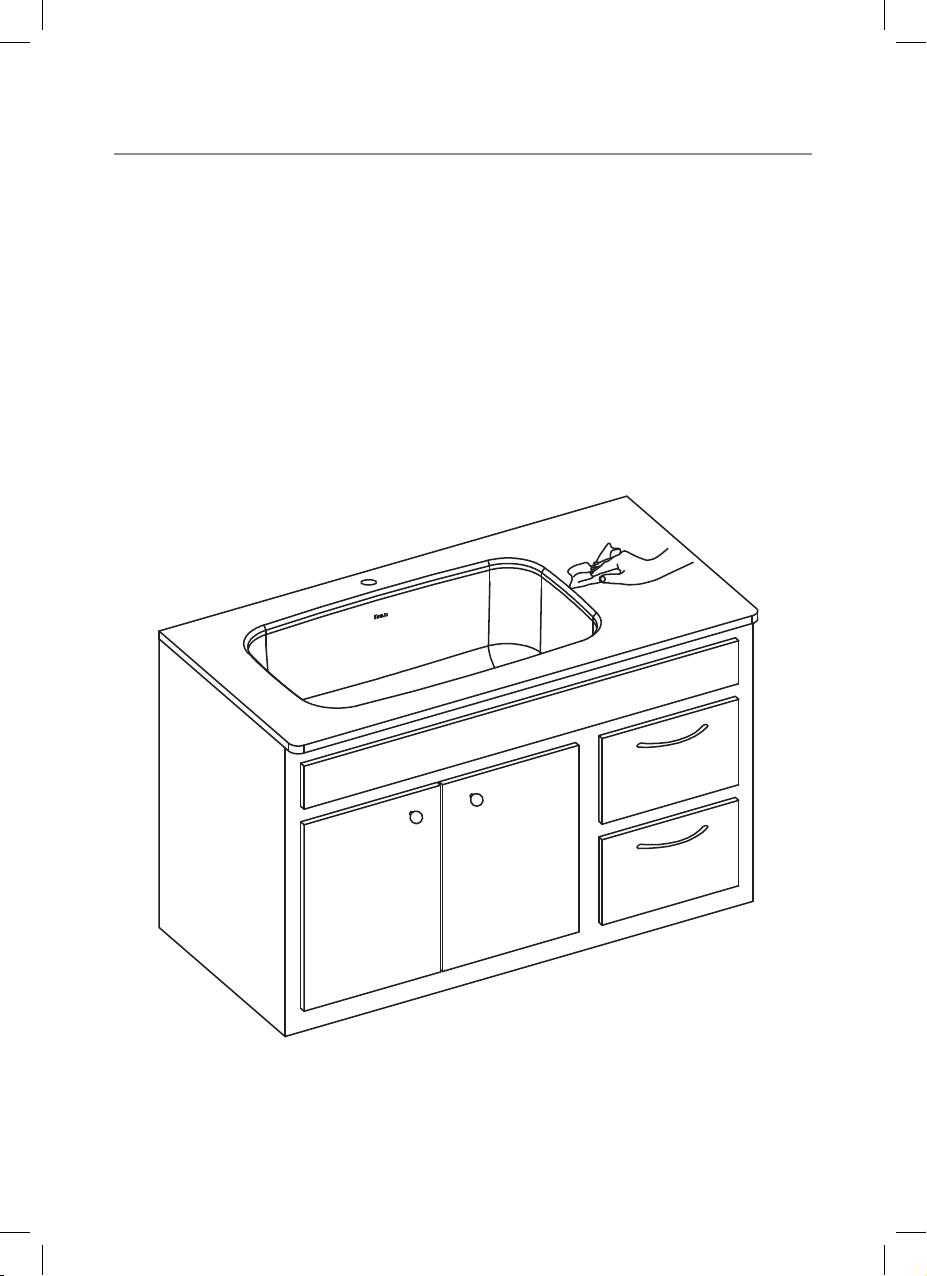
10. Install Plumbing Fixtures
• Connect drain to sink. Connect trap to drain. Connect water supply
connections to faucet according to manufacturer’s instructions
• Run water into sink and check for leaks
13
Page 15

Codes/Standards Applicable:
HELP LINE
Our customer service hours are Monday – Friday, 9am – 8pm EST.
Be sure to visit our website at www.kraususa.com
If you are a HOMEOWNER please contact a Kraus Customer Service Representative at:
Kraus USA, Inc.
12 Harbor Park Drive
Port Washington, NY 11050
Toll-free 800-775-0703
[email protected]
If you are a PLUMBING CONTRACTOR OR TRADE PROFESSIONAL please contact a Kraus
Pro Representative at:
Kraus USA, Inc.
12 Harbor Park Drive
Port Washington, NY 11050
516-801-8955
[email protected]
If you are an AUTHORIZED PARTNER please contact a Partner Support Representative at:
Kraus USA, Inc.
12 Harbor Park Drive
Port Washington, NY 11050
516-801-8954
[email protected]
In requesting warranty service, please be ready to provide:
1. Proof of purchase.
2. A description of the problem.
14
Page 16
REGISTER YOUR PRODUCT TODAY
Receive Proof of Ownership
Access Customer Care & Installation Help
Get Exclusive Kraus Oers & Promotions
Scan to Register Online
or visit http://www.kraususa.com/registration
We’re always looking for ways to improve.
Please take a moment to share your experience.
Visit http://www.kraususa.com/review to let us know what you think
about your new Kraus product.
Contact Us to Learn More
1.800.775.0703 / www.kraususa.com / [email protected]
Like & Follow KrausUSA
Download the Kraus Care & Maintenance Guide at:
http://www.kraususa.com/maintenance
www.kraususa.comwww.kraususa.com
 Loading...