


Wireless ADSL2/2+
Wireless ADSL2/2+Wireless ADSL2/2+
Wireless ADSL2/2+
Modem Router 54Mbps
Modem Router 54MbpsModem Router 54Mbps
Modem Router 54Mbps
User Guide
Cod. KR.KL

Wireless ADSL2/2+ Modem Router 54Mbps
2 www.kraun.it
Contents
1. Hardware Installation 3
1.1 Connection of ADSL Router 3
1.2 USB Installation 4
2 WEB Management Interface 5
2.1 Network Configuration of Your Computer 5
2.2 Verifying the Connection 6
2.3 Logging into the Router 7
3 Quick Installation 8
3.1 Configure PPPoE 8
3.2 Configure PPPoA 9
3.3 Configure MER 11
3.4 Configure IPoA 12
4 Configuration Description 14
4.1 Device information 14
4.2 Advanced settings 15
4.2.1 WAN 15
4.2.2 LAN 23
4.2.3 NAT 23
4.2.4 Security 26
4.2.5 Routing. 29
4.2.6 DNS 30
4.2.7 DSL 31
4.2.8 Port mapping 31
4.3 DHCP 32
4.4 WLAN 32
4.4.1 Basic settings 32
4.4.2 Security 33
4.4.3 MAC address filtering 36
4.4.4 Wireless network bridge 37
4.4.5 Advanced 37
4.4.6 Quality of Service 38
4.4.7 Status information 40
4.5 System Tool 41
4.5.1 Settings 41
4.5.2 System log 41
4.5.3 SNMP Agent 42
4.5.4 Internet time 42
4.5.5 Access control 42
4.5.6 Software update 43
4.5.7 Save/Reboot 43

Wireless ADSL2/2+ Modem Router 54Mbps
3 www.kraun.it
Chapter 1. Hardware Installation
1.1 Connection of ADSL Router
1.1.1 Connect one end of the telephone line to the DSL interface of the WIRELESS ADSL2/2+
MODEM ROUTER 54Mbps and the other end to the MODEM interface of the splitter.
1.1.2 Connect the power adapter to the POWER interface of the WIRELESS ADSL2/2+
MODEM ROUTER 54Mbps.

Wireless ADSL2/2+ Modem Router 54Mbps
4 www.kraun.it
1.1.3 Use a Ethernet cable to connect the LAN interface of the WIRELESS ADSL2/2+
MODEM ROUTER 54Mbps to the NIC of the computer.
1.2 USB Installation
To connect the device to the USB interface of the computer, do the following:
1.2.1 Connect to the USB interface of the DSL gateway through a USB cable.
1.2.2 Connect the other end of the USB cable to the USB interface of the computer.

Wireless ADSL2/2+ Modem Router 54Mbps
5 www.kraun.it
Chapter 2. WEB Management Interface
2.1 Network Configuration of Your Computer
2.1.1 On the desktop of your computer,
right-click “My Network Places”, and then
select “Properties” in the shortcut menu.
2.1.2 In the window that appears, right-
click “Local Area Connection”, and then
select "Properties” in the shortcut menu.
2.1.3 In the pop-up dialog box, check
“Internet Protocol (TCP/IP)” and then click
“Properties”.

Wireless ADSL2/2+ Modem Router 54Mbps
6 www.kraun.it
2.1.4 In the window that appears, select
“Obtain an IP address automatically (O)” or
“Use the following IP address (S)”.
1) When “Obtain an IP address
automatically (O)” is selected, the window is
as shown in the right figure.
2) “Use the following IP address”:
IP address: 192.168.0.XXX
(XXX range 2 ~ 254)
Subnet mask: 255.255.255.0
Default gateway: 192.168.0.1
DNS server: Enter the local DNS server
address (for this address, you can consult
your ISP) or the router as the DNS server.
At the end of the setting, click “OK” to
submit the settings. And then click “OK” in
the “Local Area Connection Properties”
window.
2.2 Verifying the Connection
2.2.1 Select
Start→Programs→Accessories→Command
Prompt”.
This will open a Command Window. At the
Prompt, enter “Ping 192.168.0.1” and press
Enter. If the system gives the result shown
in the right figure, the connection between
your computer and the router is normal.

Wireless ADSL2/2+ Modem Router 54Mbps
7 www.kraun.it
2.3 Logging in to the Router
2.3.1 Open the WEB browser, and enter
“http://192.168.0.1” in the address box.
Press Enter to navigate to the Web
Interface Screen.
2.3.2 In the pop-up login window, enter the
User name and Password and click “OK”.
Default Factory Settings:
User name: admin
Password: admin
2.3.3 If the user name and password
entered are correct, the browser displays
the administrator window.

Wireless ADSL2/2+ Modem Router 54Mbps
8 www.kraun.it
Chapter 3. Quick Installation
For first time installations we recommend to
use the Setup Wizard. Open the Setup
Wizard window by clicking on the
appropriate Menu selection on the left hand
menu. Follow the on-screen instructions
and select the required options from the
drop-down lists or check boxes, such as
“Country”, “Area” and the like.
For proper connection you need to know
the method used by your ISP to connect to
the network. If in doubt, contact your ISP
and get all required connection details
before continuing.
If you cannot find your country or area in
these lists, you may consult your ISP and
manually enter the VPI and VCI values of
your area. After that, click “Next”.
3.1 Configure PPPoE Connection
Mode.
3.1.1 Select “PPP over Ethernet (PPPoE)”.
3.1.2 Click “Next”. Enter the PPP User
name and Password provided by your ISP.
If the ISP also provides the PPPoE service
name, enter the corresponding value or
otherwise, leave this field blank. Use the
default values for other options. Refer to
the advanced settings section for details of
these settings.

Wireless ADSL2/2+ Modem Router 54Mbps
9 www.kraun.it
3.1.3 Click “Next” and enable the WAN
service (it is enabled by default).
3.1.4 Click “Next” to display the window
listing your settings for confirmation.
3.1.5 Click “Save/Reboot” to activate your
settings. The system will reboot and
automatically re-connect in about 2
minutes. A progress window similar to the
shown on the right will appear during the
reboot cycle.
3.2 Configure PPPoA Connection
Mode.
3.2.1 Select “PPP over ATM (PPPoA)”.

Wireless ADSL2/2+ Modem Router 54Mbps
10 www.kraun.it
3.2.2 Click “Next”. Enter the PPP User
name and Password provided by your ISP.
If the ISP also provides the PPPoA service
name, enter the corresponding value or
otherwise, leave this field blank. Use the
default values for other options. Refer to
the advanced settings section for details of
these settings.
3.2.3 Click “Next” and enable the WAN
service (it is enabled by default).
3.2.4 Click “Next” to display the window
listing your settings for confirmation.
3.2.5 Click “Save/Reboot” to activate your
settings. The system will reboot and
automatically re-connect in about 2
minutes. A progress window similar to the
shown on the right will appear during the
reboot cycle.

Wireless ADSL2/2+ Modem Router 54Mbps
11 www.kraun.it
3.3 Configure MER Connection
Mode.
3.3.1 Select “MAC Encapsulation Routing
(MER)”.
3.3.2 Click “Next”. If your ISP provides the
static IP address, you should enter the
corresponding values in “WAN IP Address”
and “WAN Subnet Mask”.
3.3.3 If your ISP provides a dynamic IP
address, select “Obtain an IP address
automatically”.
3.3.4 Click “Next”. In the case of multiple
computers sharing Internet access service,
it is recommended to enable NAT and
firewall.

Wireless ADSL2/2+ Modem Router 54Mbps
12 www.kraun.it
3.3.5 Click “Next” to display the window
listing your settings for confirmation.
3.3.6 Click “Save/Reboot” to activate your
settings. The system will reboot and
automatically re-connect in about 2
minutes. A progress window similar to the
shown on the right will appear during the
reboot cycle.
3.4 Configure IpoA Connection
Mode.
3.4.1 Select “IP over ATM (IPoA)”.
3.4.2 Click “Next” and enter the fixed IP
address and subnet mask.

Wireless ADSL2/2+ Modem Router 54Mbps
13 www.kraun.it
3.4.3 Click “Next”. It is recommended to
enable the NAT and firewall.
3.4.4 Click “Next” to display the window
listing your settings for confirmation.
3.4.5 Click “Save/Reboot” to activate your
settings. The system will reboot and
automatically re-connect in about 2
minutes. A progress window similar to the
shown on the right will appear during the
reboot cycle.

Wireless ADSL2/2+ Modem Router 54Mbps
14 www.kraun.it
Chapter 4. Configuration Description
4.1 Device information
Select “Device Information” -> “Summary”
to display the current system information.
4.1.1 The Device Information shows:
- Hardware version
- Software version
- Boot version
- Wireless driver version
- LAN MAC address
- WAN MAC address
- Running time
- System time
4.1.2 The DSL information shows:
- Upstream link rate
- Downstream link rate
- LAN IP address
- Default gateway: In the pure bridge
mode, there is no gateway; in other
modes such as PPPoE and PPPoA, the
gateway address is the IP address of the
upstream device.
- Primary DNS server: In the
PPPoA/PPPoE mode, the DNS address
is obtained from the upstream device; in
the pure bridge mode, it is not required to
set the DNS address; in other modes,
you can manually enter the DNS
address.
- Secondary DNS server
4.1.3 Click “WAN” to display the WAN
connection status and settings.
4.1.4 Click “Route” to display the window
shown in the right figure, displaying the
default information.

Wireless ADSL2/2+ Modem Router 54Mbps
15 www.kraun.it
4.2 Advanced settings
4.2.1 WAN
Select “WAN Settings’ from the Advanced
Settings Tab in the left hand menu. If the
WAN information has been set, you may
edit the information in this window, or add
new information.
NOTE: After modifying or adding new
information, you need to reboot the device
to activate the setting.
1. VPI (Virtual Path Identifier):
Virtual path between two points in
the ATM network.
Value ranges 0 - 255.
2. VCI (Virtual Channel Identifier):
Virtual channel between two
points in the ATM network. Value
range 32 - 65535 (1 - 31 are
reserved for well-known
protocols).
3. Service category: Select one
from five available service
categories.
4. Enable Quality of Service (QoS):
Allows you to enable or disable
QoS.
a. You may enable the VLAN
Mux and QoS. After the VLAN
Mux is enabled, the window
shown in the right figure is
displayed. You may modify the
VLAN ID here.
b. NOTE: When you click “Next”
after enabling the VLAN Mux,
the window shown in the right
figure is displayed, because
the 802.1 VLAN flag is
supported only in the PPPoE,
MER and bridge modes.

Wireless ADSL2/2+ Modem Router 54Mbps
16 www.kraun.it
PPPoA Mode.
1) Select “PPP over ATM (PPPoA)”.
Encapsulation Mode: VC/MUX/LLC
Once you select a mode, the system
automatically changes the encapsulation
mode into the one matching your setting.
Therefore, it is recommended to keep the
default setting unchanged.
2) Click “Next” to display the window shown
in the right figure.
a. Authentication Method:
AUTO/PAP/CHAP/MSCHAP.
Usually, “AUTO” is selected.
b. Dial on demand:
If you check this option, you need to
manually enter the timeout time. If no
communication is detected when the
timeout setting is reached, the device
will terminate the connection
automatically. If a connection request
is received from the local network the
device automatically establish a dialup connection.
If this option is disabled, the device is
always in online status until the device
is powered off or a connection failure
or other system failures occurs.
c. PPP IP extension:
When the integrated gateway is
connected with a computer, the IP
address obtained through the
upstream link is directly allocated to
this computer connecting with the
device. After the PPP IP extension is
enabled, you can enable the advanced
DMZ. At this time, you need to enter
your DMZ host and subnet mask.
d. Use Static IP Address:
After this option is checked, the device
uses this IP address as the WAB IP
address and does not need to obtain it
through the upstream link.
e. Retry PPP password on authentication
error
f. Enable PPP debugging mode

Wireless ADSL2/2+ Modem Router 54Mbps
17 www.kraun.it
3) Click “Next” to display the window shown
in the right figure.
a. Enable IGMP Multicast: IGMP agent.
To enable the IPTV in the PPPoE
mode, you need to check this option.
b. Enable WAN Service: Checked by
default. It is recommended to keep this
default setting, unless you do not need
to activate your WAN.
4) Click “Next” to display the window shown
in the right figure. This window lists your
settings.
5) Click “Save/Reboot” to activate your
settings.
PPPoE Mode.
1) Select “PPP over Ethernet (PPPoE)”.
Encapsulation Mode:
VC/MUX/LLC/SNAP-BRIDGING
Once you select a mode, the system
automatically changes the encapsulation
mode into the one matching your setting.
Therefore, it is recommended to keep the
default setting unchanged.
2) Click “Next” to display the window shown
in the right figure.
a. Authentication Method:
AUTO/PAP/CHAP/MSCHAP.
Usually, “AUTO” is selected.
b. Dial on demand:
If you check this option, you need to
manually enter the timeout time. If no
communication is detected when the
timeout setting is reached, the device

Wireless ADSL2/2+ Modem Router 54Mbps
18 www.kraun.it
will terminate the connection
automatically. If a connection request
is received from the local network the
device automatically establish a dial-
up connection.
c. PPP IP extension:
When the device is connected with a
computer, the IP address obtained
through the upstream link is directly
allocated to this computer connecting
with the device. After the PPP IP
extension is enabled, you can enable
the advanced DMZ. At this time, you
need to enter your DMZ host and
subnet mask.
d. Use Static IP Address:
After this option is checked, the device
uses this IP address as the WAB IP
address and does not need to obtain it
through the upstream link.
e. Retry PPP password on authentication
error.
f. Enable PPP debugging mode.
3) Click “Next” to display the window shown
on the right.
b. Enable IGMP Multicast: IGMP agent.
To enable IPTV in the PPPoE mode,
you need to check this option.
c. Enable WAN Service: Checked by
default. It is recommended to keep this
default setting, unless you do not need
to activate your WAN.
d. Click “Next” to display the window
shown on the right. This window lists
your settings.
4) Click “Save/Reboot” to activate your
settings.

Wireless ADSL2/2+ Modem Router 54Mbps
19 www.kraun.it
MER mode.
1) Select “MAC Encapsulation Routing
(MER)”.
Encapsulation Mode: VC/MUX/LLC/
SNAP-BRIDGING
Once you select a mode, the system
automatically changes the encapsulation
mode into the one matching your setting.
Therefore, it is recommended to keep the
default setting unchanged.
2) Click “Next” to display the window shown
in the right figure.
a. Obtain an IP address automatically:
If your device automatically obtains the
IP address, the DHCP client mode is
enabled already.
b. Use the following IP address:
To manually specify an address, you
need to check this option and enter
your static IP address and subnet
mask.
c. Advanced DMZ:
Enter the IP address and subnet mask
for the DMZ host.
d. Obtain default gateway automatically:
If this option is checked, the device
automatically obtains the default
gateway address from the upstream
device.
3) Use the following default gateway: To
manually enter a gateway, check this
option.
a. Use IP Address:
After checking “Use the following
default gateway”, you can enter a
value here.
b. Use WAN Interface:
For the broadband access device, you
need to enter the IP address of the
downstream link interface.
4) Obtain DNS server address
automatically:
If this option is checked, the device
automatically obtains the DNS address.

Wireless ADSL2/2+ Modem Router 54Mbps
20 www.kraun.it
5) Use the following DNS server address:
To manually enter a DNS address, check
this option and enter the IP addresses of:
a. Primary DNS server
b. Secondary DNS server
6) Click “Next”.
a. Enable IGMP Multicast:
IGMP agent. For example, to enable
the IPTV in the PPPoE mode, you
need to check this option.
b. Enable WAN Service:
Checked by default. It is
recommended to keep this default
setting, unless you do not need to
activate your WAN.
7) Click “Next” to display the window shown
in the right figure. This window lists your
settings.
8) Click “Save/Reboot” to activate your
settings.
IPoA mode.
1) Select “IP over ATM (IPoA)”.
Encapsulation Mode: VC/MUX
LLC/SNAP-ROUTING
Once you select a mode, the system
automatically changes the encapsulation
mode into the one matching your setting.
Therefore, it is recommended to keep the
default setting unchanged.

Wireless ADSL2/2+ Modem Router 54Mbps
21 www.kraun.it
2) Click “Next” to display the window shown
in the right figure.
a. WAN IP Address:
Enter the IP address provided by your
ISP.
b. WAN Subnet Mask:
Enter the subnet mask provided by
your ISP.
c. Use the following default gateway:
You can check this option.
d. Use IP Address:
Enter the IP address provided by your
ISP.
e. Use WAN Interface:
For the broadband access device, you
need to enter the IP address of the
downstream link interface.
3) Use the following DNS server address:
You may check this option.
a. Primary DNS server
b. Secondary DNS server
NOTE: In the IPoA mode, DHCP is not
supported, so you need to manually
enter the WAN IP address, subnet
mask, default gateway, DNS server
and other settings.
4) Click “Next”.
a. Enable NAT:
NAT enables multiple computers in
your LAN to use the same WAN IP
address for Internet access. It is
recommended to check this option.
b. Enable Firewall
It is recommended to check this option
to avoid some attacks.
c. Enable IGMP Multicast:
IGMP agent. For example, to enable
the IPTV in the PPPoE mode, you
need to check this option.
d. Enable WAN Service:
Checked by default. It is
recommended to keep this default
setting, unless you do not need to
activate your WAN.

Wireless ADSL2/2+ Modem Router 54Mbps
22 www.kraun.it
e. Click “Next” to display the window
shown in the right figure. This window
lists your settings.
5. Click “Save/Reboot” to activate your
settings.
Bridging mode.
1) Select “Bridging”.
Encapsulation Mode:
VC/MUX/LLC/SNAP-BRIDGING
Once you select a mode, the system
automatically changes the encapsulation
mode into the one matching your setting.
Therefore, it is recommended to keep the
default setting unchanged.
2) Enable Bridge Service:
To select the bridge mode, you need to
check this option. By default, this option
is checked.
3) Click “Next” to display the window shown
in the right figure. This window lists your
settings.
4) Click “Save/Reboot” to activate your
settings.

Wireless ADSL2/2+ Modem Router 54Mbps
23 www.kraun.it
4.2.2 LAN
4.2.2.1 IP Address:
IP address used by the router to connect to
the LAN. This option is set to 192.168.0.1
upon device delivery. You may change it as
required.
NOTE: After changing this IP address, you
need to use the new IP address to access
the WEB management window when next
accessing the Web interface of the router.
In addition, you must set the default
gateway for each computer in your LAN to
this IP address, to ensure normal Internet
access.
4.2.2.2 Subnet Mask:
Enter the Subnet Mask.
4.2.2.3 Enable IGMP Snooping:
Used in Bridging Mode.
4.2.2.4 Standard Mode
4.2.2.5 Blocking Mode
Configure the second IP Address and
Subnet Mask for LAN interface.
Click “Save/Reboot” to save and activate
the new settings.
4.2.3 NAT
4.2.3.1 Virtual server
1) Click “NAT” → “Virtual Server” to display
the window shown in the right figure. Here,
you can add or delete your virtual server
settings.
By default, the external networks cannot
access the IP address of your internal
network. However, if you need such access
by the external networks (for example, you
need to set up the server or support some
special applications), you should enable
this function to allow the access by external
networks.

Wireless ADSL2/2+ Modem Router 54Mbps
24 www.kraun.it
2) Click “Add” to display the window
shown in the right figure.
a. Select a Service: Selecting the service
to be enabled.
b. Custom Server: Manually enter the
server name.
c. Server IP Address: LAN IP address for
the server.
NOTE: After a well-known service is
selected, the system automatically opens
the corresponding port. After manually
entering a customized service, you need to
manually enter the port to be opened.
d. Click “Save/Apply” to display the
service added, as shown in the right
figure.
4.2.3.2 Port triggering
1) Click “Port Triggering” to display the
window shown in the right figure. Here, you
can add or delete your port triggering
service settings.
For some special applications, you need to
enable some ports required by the
application to function. Through port
triggering, you can automatically enable the
ports as required by a particular application.
2) Click “Add” to display the window shown
in the right figure.
a. Select an application: Select the name
of the service to be enabled.
b. Custom application: Manually enter
the service name.

Wireless ADSL2/2+ Modem Router 54Mbps
25 www.kraun.it
NOTE: After a well-known service is
selected, the system automatically opens
the corresponding port. If you manually
enter a customized service, you also need
to manually enter the port to be triggered.
3) Click “Save/Apply” to display the service
added, as shown in the right figure.
4.2.3.3 DMZ Host
Click “DMZ Host” to display the window
shown in the right figure.
1. DMZ Host IP Address:
Enter the LAN IP address for the device
to be placed into the DMZ.
NOTE: Opening DMZ means to open all
ports. In this case, your computer is
totally exposed to the public network. Be
cautions to use this function.
Click “Save/Apply” to activate the settings.
4.2.3.4 ALG
Click “ALG” to display the window shown in
the right figure.
SIP Enabled: Enabling or disabling the SIP
(Session Initiation Protocol) function.
SIP is an application-layer control protocol,
used for creating / modifying / terminating
multimedia sessions, such as Internet
Phone (VoIP) calls.
Click “Save/Apply” to activate the settings.

Wireless ADSL2/2+ Modem Router 54Mbps
26 www.kraun.it
4.2.3.5 UPNP
Click “UPNP” to display the window shown
in the right figure. Enable UPnP: Enabling
or disabling the UPnP (Universal Plug and
Play) function.
UPnP is a kind of architecture of common
network connection between the computer
and intelligent devices/instruments. It is
especially common in the home
applications. Based on the Internet
standards and technologies (such as
TCP/IP, HTTP and XML), UPnP enables
automatic connection and cooperation
between such devices.
Click “Save/Apply” to activate the settings.
4.2.4 Security
4.2.4.1 IP filtering
1) Click “Security” → “IP Filtering” to display
the window shown in the right figure.
By default, all outgoing traffic is allowed.
However, you can set IP filtering to restrict
external network access by some
computers in the internal network.
2) Click “Add” to display the window shown
in the right figure.
a. Filter Name: Setting the filter name to
facilitate identification.
b. Protocol: Selecting one from four
available protocols: TCP/UDP; TCP;
UDP; ICMP.
c. Source IP address: Entering the
internal network IP address to be
filtered.
d. Source Subnet Mask: Enter the subnet
mask corresponding to the internal
network IP address to be filtered.
e. Source Port: Enter the port number of
the internal network IP address to be
filtered.

Wireless ADSL2/2+ Modem Router 54Mbps
27 www.kraun.it
f. Destination IP address: Enter the
external network IP address to be
filtered.
g. Destination Subnet Mask: Enter the
subnet mask corresponding to the
external network IP address to be
filtered.
h. Destination Port: Enter the port
number of the external network IP
address to be filtered.
Based on the above settings, you can
add your filtering rules.
You can select your WAN interface.
However, it is recommended to keep the
default setting unchanged.
3) Click “Save/Apply”.
4) Click “Incoming” to display the window
shown in the right figure.
By default, all incoming traffic is restricted.
However, you can set IP filtering to allow
internal network access by some external
computers.
5) Click “Add” to display the window shown
in the right figure.
a. Filter Name: Setting the filtering name
to facilitate identification.
b. Protocol: Selecting one from four
available protocols: TCP/UDP; TCP;
UDP; ICMP.
c. Source IP address: Enter the external
network IP address to be filtered.
d. Source Subnet Mask: Enter the subnet
mask corresponding to the external
network IP address to be filtered.

Wireless ADSL2/2+ Modem Router 54Mbps
28 www.kraun.it
e. Source Port: Enter the port number of
the external network IP address to be
filtered.
f. Destination IP address: Enter the
internal network IP address to be
filtered.
h. Destination Subnet Mask: Enter the
subnet mask corresponding to the
internal network IP address to be
filtered.
i. Destination Port: Enter the port
number of the internal network IP
address to be filtered.
Based on the above settings, you can
add your filtering rules.
You may select your WAN interface.
However, it is recommended to keep the
default setting unchanged.
5) Click “Save/Apply”.
4.2.4.2. Parental control
1) Click “Time of Day Restriction” to display
the window shown in the right figure.
2) Click “Add” to display the window shown
in the right figure. Here, you can set a
specific period to restrict Internet access
of a MAC address.
3) Click “Save/Apply”.
Wireless ADSL2/2+ Modem Router 54Mbps
29 www.kraun.it
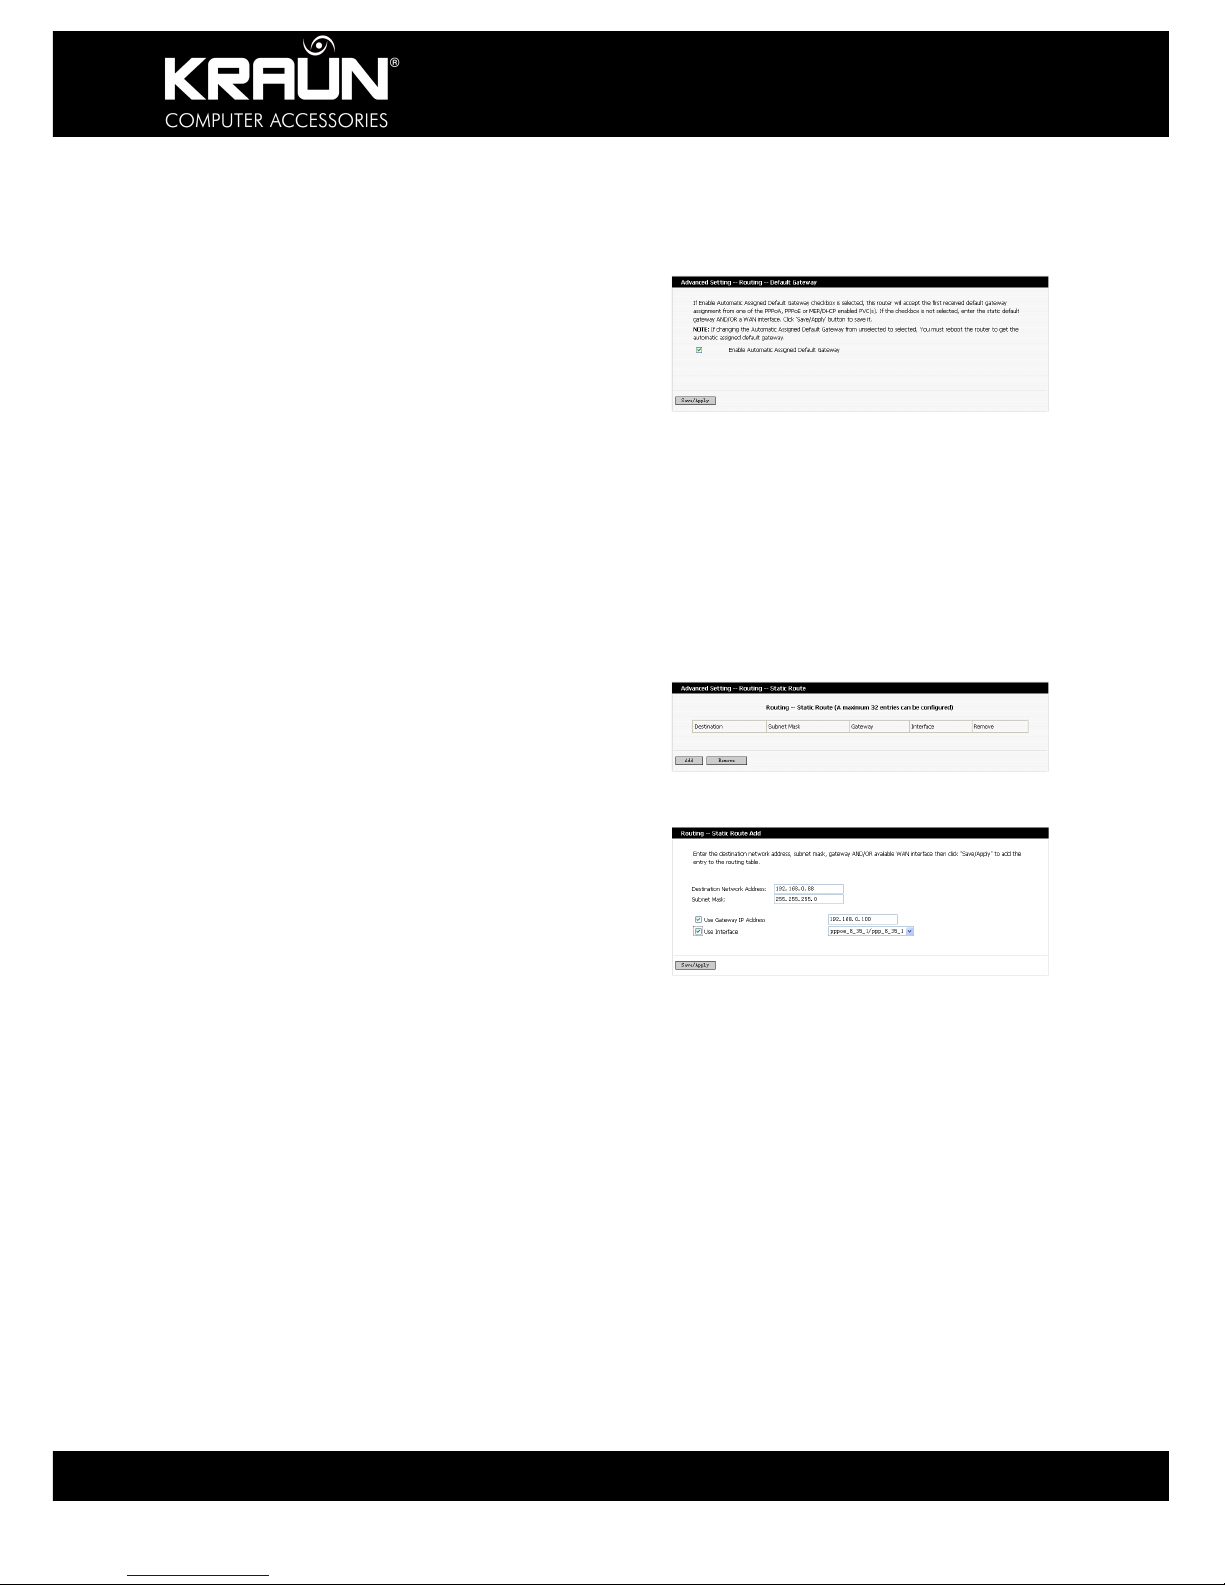
4.2.5 Routing
4.2.5.1 Default gateway
1) Click “Routing” → “Default Gateway” to
display the window shown in the right
figure.
Enable Automatic Assigned Default
Gateway:
You may check/uncheck this option. If
you uncheck this option, you need to
manually enter the default gateway
address and WAN service. It is
recommended to keep the default setting
unchanged.
2) Click “Save/Apply”.
4.2.5.2 Static routing
1) Click “Static Route” to display the
window shown in the right figure.
Here, you can add/delete the items of the
static route.
2) Click “Add” to display the window
shown in the right figure. Destination
Network Address: Enter the network or
host for static route.
Subnet Mask: Enter the subnet mask
corresponding to the network or host for
static route.
Use Gateway IP Address: Enter the
gateway address to be passed by the
static route.
Use Interface: Select the interface
corresponding to your connection mode.
Click “Save/Apply”.
3) Click “RIP” to display the window shown
in the right figure. Here, you may enable
or disable the global RIP mode. To
enable this mode, you can select the
version: 1, 2 or both. You may also select
the operation mode: Active or Passive.
Click “Save/Apply”.

Wireless ADSL2/2+ Modem Router 54Mbps
30 www.kraun.it
4.2.6 DNS
4.2.6.1 DNS server
1) Click “DNS Server” to display the window
shown in the right figure.
2) Enable Automatic Assigned DNS: After
checking it, the DNS settings are
activated. And the DHCP server of the
router allocates the added DNS address
to the client submitting the request.
4) Primary DNS server: Enter the DNS
address provided by the ISP.
5) Secondary DNS server: If your ISP
provides two DNS addresses, you may
enter the other address here.
4.2.6.2 Dynamic DNS
1) Click “Dynamic DNS” to display the
window shown in the right figure. Here,
you may add/delete the dynamic DNS
settings.
Dynamic DNS can make your applied
domain name correspond to your IP
address, so that the other users only
need to remember your domain name for
accessing your server.
2) Click “Add” to display the window shown
in the right figure.
D-DNS provider: Select a provider of a
Dynamic Domain Name Service (DDNS).
Hostname: Enter the Domain name
applied by you.
Interface: Select one from two available
interface modes.
Username: Enter your user name or
domain name registered with the
Dynamic DNS provider.
Password: Enter the Password
registered with your user name for the
domain name registered with the DDNS
provider.
3) Click “Save/Apply”.

Wireless ADSL2/2+ Modem Router 54Mbps
31 www.kraun.it
4.2.7 DSL
Click “DSL” to display the window shown in
the right figure.
Here you may enable a service as required.
By default, the system checks the status of
G.dmt, G.lite, T1.413, ADSL2, ADSL2+,
READSL2, Bitswap and SRA services. The
device can automatically negotiate with the
upstream device.
4.2.8 Port mapping
4.2.8.1 Click “Port Mapping” to display the
window shown in the right figure.
4.2.8.2 Enable virtual ports on: Select or
clear it.
Port mapping supports the mapping from
multiple ports to PVC and bridging group.
Each group will serve as an independent
network.
4.2.8.3 Click “Add” to display the window
shown in the right figure.
Group Name: Customizing a name.
Select the interface to be added into
the group and click “Add”.
To automatically add a LAN client to
the PVC of a new group, you need
to add the ID character string of a
DHCP provider. After configuring
the ID character string for the DHCP
provider, the request of any
customer with the specified provider
ID (DHCP as “60”) from the IP
address from the local DHCP server
will be rejected.
NOTE: The client possibly obtains the IP
address of the public network. In this case,
the selected interface is removed from the
existing groups and added into a new
group.

Wireless ADSL2/2+ Modem Router 54Mbps
32 www.kraun.it
4.2.8.4 Click “Save/Apply” to activate the
settings.
4.3 DHCP
4.3.1 Click “DHCP Server” to display the
window shown in the right figure.
4.3.1.1 You can click “Disable DHCP
Server” or “Enable DHCP Server”.
4.3.1.2 Start IP Address: Start address of
the DHCP server IP pool
4.3.1.3 End IP Address: End address of the
DHCP server IP pool
4.3.1.4 Leased Time: Validity period of the
IP address obtained. Click “Save”.
4.3.2 Click “DHCP Client List” to view
the list of the clients with allocated
DHCP service.
4.4 WLAN
4.4.1Basic settings
4.4.1.1 Click “WLAN” to display the window
shown in the right figure.
(1) Enable Wireless: Enable or disable
the wireless feature.
(2) Hide Access Point: Hide your
access point to avoid detection by
passive scanning.
(3) SSID: Service Set ID. It is the
network name of the wireless
signal. Change to suit your needs.
(4) Country: The device will
automatically adopt the channel
frequency specifications for each
country.

Wireless ADSL2/2+ Modem Router 54Mbps
33 www.kraun.it
(5) BSSID: Physical address of
wireless signals.
Enable Wireless Guest Network
(6) Guest SSID: This value should be
unique and same in the shared
guest network.
4.4.1.2 Click “Save/Apply”.
4.4.2 Security
4.4.2.1 Click “Security” to display the
window shown in the right figure.
(1) Select SSID
(2) Network Authentication:
Open, Shared, 802.1X, WPA, WPA-
PSK, WPA2, WPA2-PSK, Mixed
WAP/WPA2, Mixed WPA2/WPA-
PSK.
(3) WEP Encryption:
Enabled, Disabled
Authentication Settings
(1) If “Network Authentication” is set
as “Shared”, the system displays
the window shown in the right
figure.
a. Encryption Strength: 64-bit, 128-bit
b. Key description: Enter 10 hexa-
decimal digits or 5 ASCII characters
for 64-bit encryption keys. Enter 26
hexadecimal digits or 13 ASCII
characters for 128-bit encryption
keys.
c. Current Network Key: Only one key
can be selected for activation, but
up to 4 keys can be saved.
d. Network Key 1 - 4: Enter the key
with proper length and within the
valid character range.

Wireless ADSL2/2+ Modem Router 54Mbps
34 www.kraun.it
(2) If “Network Authentication” is set
as “802.1X”, the system displays
the window shown in the right
figure.
a. RADIUS Server IP Address: IP
address of the target server of
802.1X authentication
b. RADIUS Port: Port number of the
target server of 802.1X
authentication
c. RADIUS Key
d. Encryption Strength: 64-bit; 128-bit.
e. Key description: You need to enter
10 hexadecimal digits or 5 ASCII
characters for 64-bit encryption
keys. You need to enter 26
hexadecimal digits or 13 ASCII
characters for 128-bit encryption
keys.
f. Current Network Key: Only one key
can be selected for activation, but
up to 4 keys can be saved.
g. Network Key 1 ~ 4: Enter the key
with proper length and within the
valid character range.
4.4.2.2 If “Network Authentication” is set to
“WPA”, the system displays the
window shown in the right figure.
(1) WPA Group Rekey
Interval: Once this interval times
out, the key will change. If this value
is set to 0, the key will not change.
(2) RADIUS Server IP Address: IP
address of the target server of
802.1X authentication
(3) RADIUS Port: Port number of the
target server of 802.1X
authentication
(4) RADIUS Key
(5) WPA Encryption: TKIP, AES,
TKIP+AES
(6) WEP Encryption: Enabled, Disabled

Wireless ADSL2/2+ Modem Router 54Mbps
35 www.kraun.it
4.4.2.3 If “Network Authentication” is set as
“WPA-PSK”, the system displays
the window shown in the right
figure.
(1) WPA Group Rekey Interval: Once
this interval times out, the key will
change. If this value is set to 0, the
key will not change.
(2) WPA Encryption: TKIP, AES,
TKIP+AES
(3) WEP Encryption:
Enabled, Disabled
(4) WPA Pre-Shared Key: Enter a key
or pass phrase here.
4.4.2.4 If “Network Authentication” is set to
“WPA2”, the system displays the
window shown in the right figure.
(1) WPA2 Pre-authentication: Enabled,
Disabled
(2) Network Re-auth Interval: Once this
interval times out, the system make
authentication again.
(3) RADIUS Server IP Address: IP
address of the target server of
802.1X authentication
(4) RADIUS Port: Port number of the
target server of 802.1X
authentication
(5) RADIUS Key
(6) WPA Encryption: TKIP, AES,
TKIP+AES
(7) WEP Encryption: Enabled, Disabled
4.4.2.5 If “Network Authentication” is set
to “WPA2-PSK”, the system
displays the window shown in the
right figure.
(1) WPA Group Rekey Interval: Once
this interval times out, the key will
change. If this value is set to 0, the
key will not change.
(2) WPA Encryption: TKIP, AES,
TKIP+AES
(3) WEP Encryption: Enabled, Disabled
(4) WPA Pre-Shared Key: Enter a key
or pass phrase here.

Wireless ADSL2/2+ Modem Router 54Mbps
36 www.kraun.it
4.4.2.6 If “Network Authentication” is set as
“Mixed WPA2/WPA”, the system displays
the window shown in the right figure.
(1) WPA2 Pre-authentication: Enabled,
Disabled
Network Re-auth Interval
(2) WPA Group Rekey Interval
(3) RADIUS Server IP Address: IP
address of the target server of
802.1X authentication
(4) RADIUS Port: Port number of the
target server of 802.1X
authentication
(5) RADIUS Key
(6) WPA Encryption: TKIP, AES,
TKIP+AES
(7) WEP Encryption: Enabled, Disabled
4.4.2.7 If “Network Authentication” is set as
“Mixed WPA2/WPA-PSK”, the system
displays the window shown in the right
figure.
1) WPA Pre-Shared Key
2) WPA Group Rekey Interval: Once
this interval times out, the key will
change. If this value is set to 0, the
key will not change.
3) WPA Encryption: TKIP, AES,
TKIP+AES
4) WEP Encryption: Enabled, Disabled
4.4.3. MAC address filtering
4.4.3.1 Click “MAC Filter” to display the
window shown in the right figure.
MAC Restrict Mode: Disabled, Allow, Deny.
Here you may add/delete devices to either
allow of deny access to the network.
4.4.3.2 Click “Add” to display the window
shown in the right figure. MAC
Address: Enter the MAC address to
be controlled.
Click “Save/Apply”.

Wireless ADSL2/2+ Modem Router 54Mbps
37 www.kraun.it
4.4.4 Wireless Network Bridge
4.4.4.1 Click “WLAN Bridge” to display the
window shown in the right figure.
(1) AP Mode: Access Point; WLAN
Bridge. The default setting is
“Access Point”.
(2) Bridge Restrict: Enabling or
disabling the automatic search for
the wireless network bridge within
the area.
WDS (Wireless Distribution System):
This function will assist you enlarging
your network. However, you can only set
up a WDS link with devices that are WDS
enabled.
4.4.5 Advanced Settings
4.4.5.1 Click “Advanced” to display the
window shown in the right figure.
4.4.5.2 AP Isolation: On; Off. When you
enable this function, each
wireless client connected to this
device can form a virtual network,
which cannot access another
virtual network.
4.4.5.3 Band: 2.4 GHz by default
4.4.5.4 Channel: Auto; any channel
among set channels 1 ~ 13
4.4.5.5 Auto Channel Timer: Available
when “Auto” is selected in
“Channel”
4.4.5.6 54g Rate: Auto by default. You
may select another rate.
4.4.5.7 Multicast Rate: Auto by default.
You may select another rate.
4.4.5.8 Basic Rate: Default by default.
Device will broadcast this value
to other wireless devices within
the LAN to select the optimal
transmission rate.
4.4.5.9 Fragmentation Threshold: 2346
by default. It is the size of the
fragments of each packet.

Wireless ADSL2/2+ Modem Router 54Mbps
38 www.kraun.it
4.4.5.10 RTS Threshold: 2347 by default.
Once the packet exceeds this
value, the CTS/RTS mechanism
is adopted to lower the conflict
possibility.
4.4.5.11 DTIM Interval: Interval of AP
sending the broadcast channel
4.4.5.12 Beacon Interval: Frequency of
the device sending broadcast
packets to the wireless network
4.4.5.13 Maximum Associated Clients:
128 by default. You can change it
as required.
4.4.5.14 XPressTM Technology: Enabled,
Disabled
4.4.5.15 54g Protection: 54 g Auto by
default
4.4.5.16 Preamble Type: long; short. It
indicates the type of the
preamble adopted by the
network. “long” means 128-bit
synchronization field; “short”
means 56-bit synchronization
field.
4.4.5.17 Transmit Power: 100% by
default. You can change it as
required. A higher power means
longer transmission.
Click “Save/Apply”.
4.4.6 Quality of Service
4.4.6.1 Click “Quality of Service” to display
the window shown in the right
figure.
WMM (Wi-Fi Multimedia):
Enable, Disabled
WMM No Acknowledgement:
Enabled, Disabled
WMM (Wi-Fi Multimedia) comprehensively
defines 4 types of connection contents:
Voice, video, best effort and background,
thus improving the network communication
quality and ensure stable connection
between such applications and network
resources.

Wireless ADSL2/2+ Modem Router 54Mbps
39 www.kraun.it
4.4.6.2 After “WMM (Wi-Fi Multimedia)” is
set as “Enabled”, the system displays the
window shown in the right figure.
4.4.6.3 Click “Add QoS Entry” to display the
window shown in the right figure.
Traffic Class Name: Setting the traffic name
to facilitate identification.
Wireless Transmit Priority: 0 by default. You
can change it as required.
Protocol: TCP/UDP; TCP; UDP; ICMP
Source IP Address: Enter the source IP
address
Source Subnet Mask: Enter the subnet
mask corresponding to the source IP
address
TCP/UDP Source Port: Enter the port
number of the source IP address
Destination IP Address: Enter the
destination IP address
Destination Subnet Mask: Enter the subnet
mask corresponding to the destination IP
address
TCP/UDP Destination Port: Enter the port
number of the destination IP address
4.4.6.3 Click “Add QoS Entry” to display
thewindow shown in the right figure.
Traffic Class Name: Set the traffic name to
facilitate identification.
Wireless Transmit Priority: 0 by default. You
may change it as required.
Protocol: TCP/UDP; TCP; UDP; ICMP
Source IP Address: Enter the source IP
address
Source Subnet Mask: Enter the subnet
mask corresponding to the source IP
address

Wireless ADSL2/2+ Modem Router 54Mbps
40 www.kraun.it
TCP/UDP Source Port: Enter the port
number of the source IP address
Destination IP Address: Enter the
destination IP address
Destination Subnet Mask: Enter the subnet
mask corresponding to the destination IP
address
TCP/UDP Destination Port: Enter the port
number of the destination IP address
4.4.6.4 Click “Save/Apply” to view the
saved status information.
4.4.7 Status information
4.4.7.1 Click “Authenticated Station” to
display the window shown in the
right figure.
Here the settings of connected devices are
displayed.

Wireless ADSL2/2+ Modem Router 54Mbps
41 www.kraun.it
4.5 System Tools
4.5.1 Settings
4.5.1.1 Click “Backup” to display the
window shown in the right figure.
This function allows you to backup the
current settings of your device.
4.5.1.2 Click “Update” to display the
window shown in the right figure. This
function allows you to restore the device
settings from a backup file.
4.5.1.3 Click “Restore Default” to display
the window shown in the right figure.
Click “Restore Default Settings” to restore
the device to the factory default settings.
NOTE: After restoring the default settings,
you need to reboot the router to activate
this modification.
4.5.2 System log
4.5.2.1 Click “System Log” to display the
window shown in the right figure.
4.5.2.2 Click “View System Log” to display
the window shown in the right figure.
4.5.2.3 Click “Configure System Log” to
display the window shown in the
right figure.
(1) Log: Enable, Disable
(2) Log Level: Select the desired log
level, Debugging is enabled by
default.

Wireless ADSL2/2+ Modem Router 54Mbps
42 www.kraun.it
(3) Display Level: Error logging is
enabled by default.
(4) Mode: Local by default. If
“Remote” or “Local/Remote” is
selected, the system transmits the
log UDP packets to your log server.
Click “Save/Apply”.
4.5.3 SNMP Agent
4.5.3.1 Click “SNMP Agent” to display
the window shown in the right figure. You
can enable or disable the SNMP agent
here.
If you click “Enable”, you need to set the
values in “Read Community”, “Set
Community”, “System Name”, “System
Location”, “System Contact” and “Trap
Manager IP”.
4.5.4 Internet Time
4.5.4.1 Click “Internet Time” to display the
window shown in the right figure.
If you enable this function, the system will
automatically obtain the time when access
to the Internet is available.
4.5.5 Access control
4.5.5.1 Service
(1) Click “Access Control” to display
the window shown in the right
figure.
You may enable/disable
FTP/HTTP/ICMP/SNMP/SSH/
TELNET/TFTP services.
(2) Click “Save/Apply” to activate the
settings

Wireless ADSL2/2+ Modem Router 54Mbps
43 www.kraun.it
4.5.5.2 IP address
(1) Click “IP Address” to display the
window shown in the right figure.
Here you may add/delete addresses
or address ranges permitted to
access the device remotely.
Access Control Mode: Enable, Disable.
When enabled, the IP address allowed may
access the web management page.
(2) Click “Add” to display the window
shown in the right figure.
You may enter an IP address or address
range permitted by the system to access
the web management page.
Click “Save/Apply” to activate the settings.
4.5.5.3 Password
(1) Click “Password” to display the
window shown in the right figure.
Here, you can modify the password
for logging in to the Management
page.
Enter the old login password, and
then the new login password. If the
former login password is correctly
entered, click “Save/Apply” to
modify the login password.
NOTE: For the sake of security, we
highly recommend you to change
the initial user name and password.
(2) Click “Save/Apply” to activate the
modification.
4.5.6 Software update
4.5.6.1 Click “Update Software” to display
the window shown in the right figure. Click
“Browse” to select your update file, and
then click “Update Software”.
4.5.7. Save/Reboot
4.5.7.1 Click “Save/Reboot” to display the
window shown in the right figure.
Rebooting device will activate modified
settings. Note that network connections are
disrupted during the reboot process.

Wireless ADSL2/2+ Modem Router 54Mbps
44 www.kraun.it

Wireless ADSL2/2+ Modem Router 54Mbps
45 www.kraun.it
 Loading...