


I
www.kraun.it
Cod. KN.2D
Warning
The manufacturer is under no circumstances liable for any unauthorised modifications made to
the product by the user or any other parties which may compromise its conformity and safety.
User’s Manual
Wireless-N DUAL ANTENNA
adapter 300Mbps

2 www.kraun.it www.kraun.it 3
Chapter 1. Product Introduction . . . . . . . . . . . . . . . . . . . . . . . . . . . . 5
1.1 LED Indicator Description 5
1.2 Product Features 5
1.3 Before Installation 5
1.4 Disable other manufacturers’ wireless network adapters 6
1.5 Product Maintenance 7
Chapter 2. Installation Guide. . . . . . . . . . . . . . . . . . . . . . . . . . . . . . . 8
2.1 Hardware Installation 8
2.1.1 Install the USB network adapter 8
Chapter 3. How to use the Windows Built-in Wireless Conguration. . . . . 12
3.1 Wireless Network Connection under Windows 12
Chapter 4. Kraun Wireless Utility . . . . . . . . . . . . . . . . . . . . . . . . . . . 14
4.1 Station mode (Client Mode) 14
Main interface for station mode 14
4.1.1 Site Survey 15
4.1.2 Link Information 17
4.1.3 Prole 19
1. Infrastructure Prole Management 21
2. Ad-Hoc Prole management 23
4.1.4 Advanced 28
4.1.5 About 29
4.1.6 Help 29
4.2 AP mode 29
4.2.1 Cong AP 31
4.2.2 Advanced 33
4.2.3 Access Control List 34
Access Policy: 34
4.2.4 Associate List 35
4.2.5 AP Mode under Windows 7 36
Chapter 5. Appendix 1: Acronyms and Terms . . . . . . . . . . . . . . . . . . . 37
Chapter 6. Appendix 2: How to Set WPS. . . . . . . . . . . . . . . . . . . . . . . 38
Chapter 7. Appendix 3: FAQ . . . . . . . . . . . . . . . . . . . . . . . . . . . . . . 44

4 www.kraun.it
Manual
www.kraun.it 5
Chapter 1. Product Introduction
1.1 LED Indicator Description
There is one status LED indicator on the side of the wireless network adapter. It lights
up and stays ON when working correctly, and ashes when transferring data.
1.2 Product Features
h Supports soft AP feature
h Detects wireless network and adjusts transmitting rate automatically
h Provides two working modes: Infrastructure and Ad-Hoc
h Supports WEP data encryption and WPA-PSK/WPA2-PSK encryption methods
h Supports WPS (Wi-Fi Protected Setup) encryption to secure your wireless
network
h Complies with Windows 7/XP/ 2000/Vista, Linux, etc.
1.3 Before Installation
1. Please read through the whole user guide before you install and use this
product.
2. Please close or uninstall the conguration programs of other manufacturers’
before you install the conguration programs of Kraun network adapters to
avoid possible UI (user interface) conict.
3. To avoid possible network conicts between this Kraun network adapter and
those of other manufactures’, we recommend that you rst disable the network
adapters of other manufacturers before installaing the driver.

6 www.kraun.it
Manual Manual
www.kraun.it 7
1.4 Disable other manufacturers’ wireless network adapters
1. Right click “My Computer” and select “Manage”
2. On the Computer Management screen ,select“Device Manager” - “Network
adapters”, and right click the network adapter you want to disable and click
“Disable”
3. Click the “Yes” button on the dialogue box to disable the network adapter.
1.5 Product Maintenance
1. Please keep the product away from water and humid environment to guarantee
its normal performance
2. Protect it against hazardous substances (such as acids, alkalis etc).
3. Please don’t directly expose the adapter to the sunlight or excessive heat.
4. Please contact Kraun tech support if any problems occur.

8 www.kraun.it
Manual Manual
www.kraun.it 9
Chapter 2. Installation Guide
This chapter will guide you through the process of installing the network adapter
software package, with the included software CD. The package integrates driver
and conguration software. Thus, when you are installing the driver, the conguration software will be installed automatically as well.
The software installation steps and operating guide in this user guide are explained
under Windows XP, Installation steps for other operating systems are similar.
2.1 Hardware Installation
2.1.1 Install the USB network adapter
Please insert the Wireless USB Adapter into the USB port of your computer.
2.2. When The “Found New Hardware Wizard” system dialogue pops up, we rec-
ommend that you select” Cancel” and use the included Setup Wizard software
CD for fast installation.
2.3 Put the included software CD into the CD drive of your computer ,and the
driver should run automatically , a Welcome screen should pop up, just click
the “RUN” button.( Double click “Kraun.exe”in the software CD and manually
install when it doesn’t auto-run).
USB

10 www.kraun.it
Manual Manual
www.kraun.it 11
2.4 Select “I accept the terms of the license agreement” and click “Next”.
2.5 Two set up types are provided: one is “Install driver only” ,the other is “Install
driver and Kraun WLAN Cong Tool”.
NOTE: you may select the rst method when you are accustomed to use the
WINDOWS built-in wireless conguration program.However, this program
doesn’t support AP mode, WPS, and the WPS button on the wireless adapter. To use these advanced features, the second method is recommended.
2.6. Click “Install” to begin the driver installation.
2.7 Click “Finish” to complete the installation.

12 www.kraun.it
Manual Manual
www.kraun.it 13
Chapter 3. How to use the Windows
Built-in Wireless Conguration
This chapter explains to users who don’t install Kraun conguration program how
to use Windows Built-in Wireless Conguration to connect to the wireless network .
Use of the Windows Built-in Wireless Conguration requires enabling Wireless Zero
Conguration service(the default is enabled).
3.1 Wireless Network Connection under Windows
1. Click the wireless connection in the lower right corner of the computer’s desktop
to view the available wireless networks. Select the wireless network you wish to
connect and click “Connect” or double click the wireless network to connect. If you
don’t nd the specied one, please click the refresh icon in the upper right corner
to update the list.
2. If the wireless network you are connecting is encrypted, you’ll be prompted to
enter the key. Click “Ok” after you enter the correct key.
3. It shows “Connected” after successfully connected. You can disconnect it, view its
status or modify the wireless network properties by right click the wireless network

14 www.kraun.it
Manual Manual
www.kraun.it 15
Chapter 4. Kraun Wireless Utility
When you are installing the driver, select “Install driver and Kraun WLAN Cong
Tool” and the adapter driver and client utility will be installed. All functions of this
adapter can be congured via Kraun’s utility interface (in the following text it is abbreviated as UI).
Select “Start”—“All Programs” —“Kraun Wireless”— Kraun Wireless Utility”, or click
the “Kraun Wireless Utility” shortcut on your PC’s desktop to start the UI.
4.1 Station mode (Client Mode)
Station mode (Client Mode) Overview
It is a common solution to use the wireless network adapter as a client to receive
signals.
Main interface for station mode
The function buttons on the top(From L to R )are respectively Site Survey, Link Information, Prole, Advanced, About, Help, and MiniSize. While the left column displays Turn On/O RF, Security /No security, and Signal status.
4.1.1 Site Survey
The “Site Survey” screen displays currently scanned wireless signals and you can
click one to connect the signal. Select one and you may view the AP’s MAC address, wireless mode (A/B/G/N), authentication type, and encryption type, or WPS
authentication and signal strength.
Before you connect to a wireless network, please click the “Rescan” button to update the wireless network list and select the one you wish to connect, then click the
“Connect” icon.
For the networks that are not encrypted, you can directly click “Connect”. However,
for the encrypted wireless networks,a “Prole” dialog will pop up and you must select the corresponding authentication type and encryption type,and then click the
“Next” button to input the correct key.Please note that this type of connection will
not create a prole ,thus next time connect to this network you still need to select
it manually.

16 www.kraun.it
Manual Manual
www.kraun.it 17
The detailed explanations about the authentication and encryption are as follows:
WEP: Supports 10/26-bit Hex characters and 5/13-bit ASCII.
WPA-PSK: Supports 8-63-bit ASCII and 8-64-bit Hex characters.
WPA2-PSK: Supports 8-63-bit ASCII and 8-64-bit Hex characters.
WPA-PSK/WPA2-PSK: Supports 8-63-bit ASCII and 8-64 -bit hex characters.
NOTE:
The Hex characters consist of numbers 0~9 and letters a-f.
ASCII characters consist of any Arabic digitals/letters and characters.
4.1.2 Link Information
After successfully connected to one wireless network, you can view its detailed information by clicking the “Link Information” on the main interface.
1. “Link Status” screen displays the detailed information of the connected AP including its SSID,MAC address, authentication type, encryption type, network type
and channel.

18 www.kraun.it
Manual Manual
www.kraun.it 19
2. “Throughput” screen displays the signal strength of each of the wireless adapt-
er’s antennas and the link quality.
3.”Statistics” screen is used to count the total Rx and Tx data packets, including
transmitted,retransmitted and fail to receive ACK after all retries.You can click the
“Reset Counter” button to clear the count.
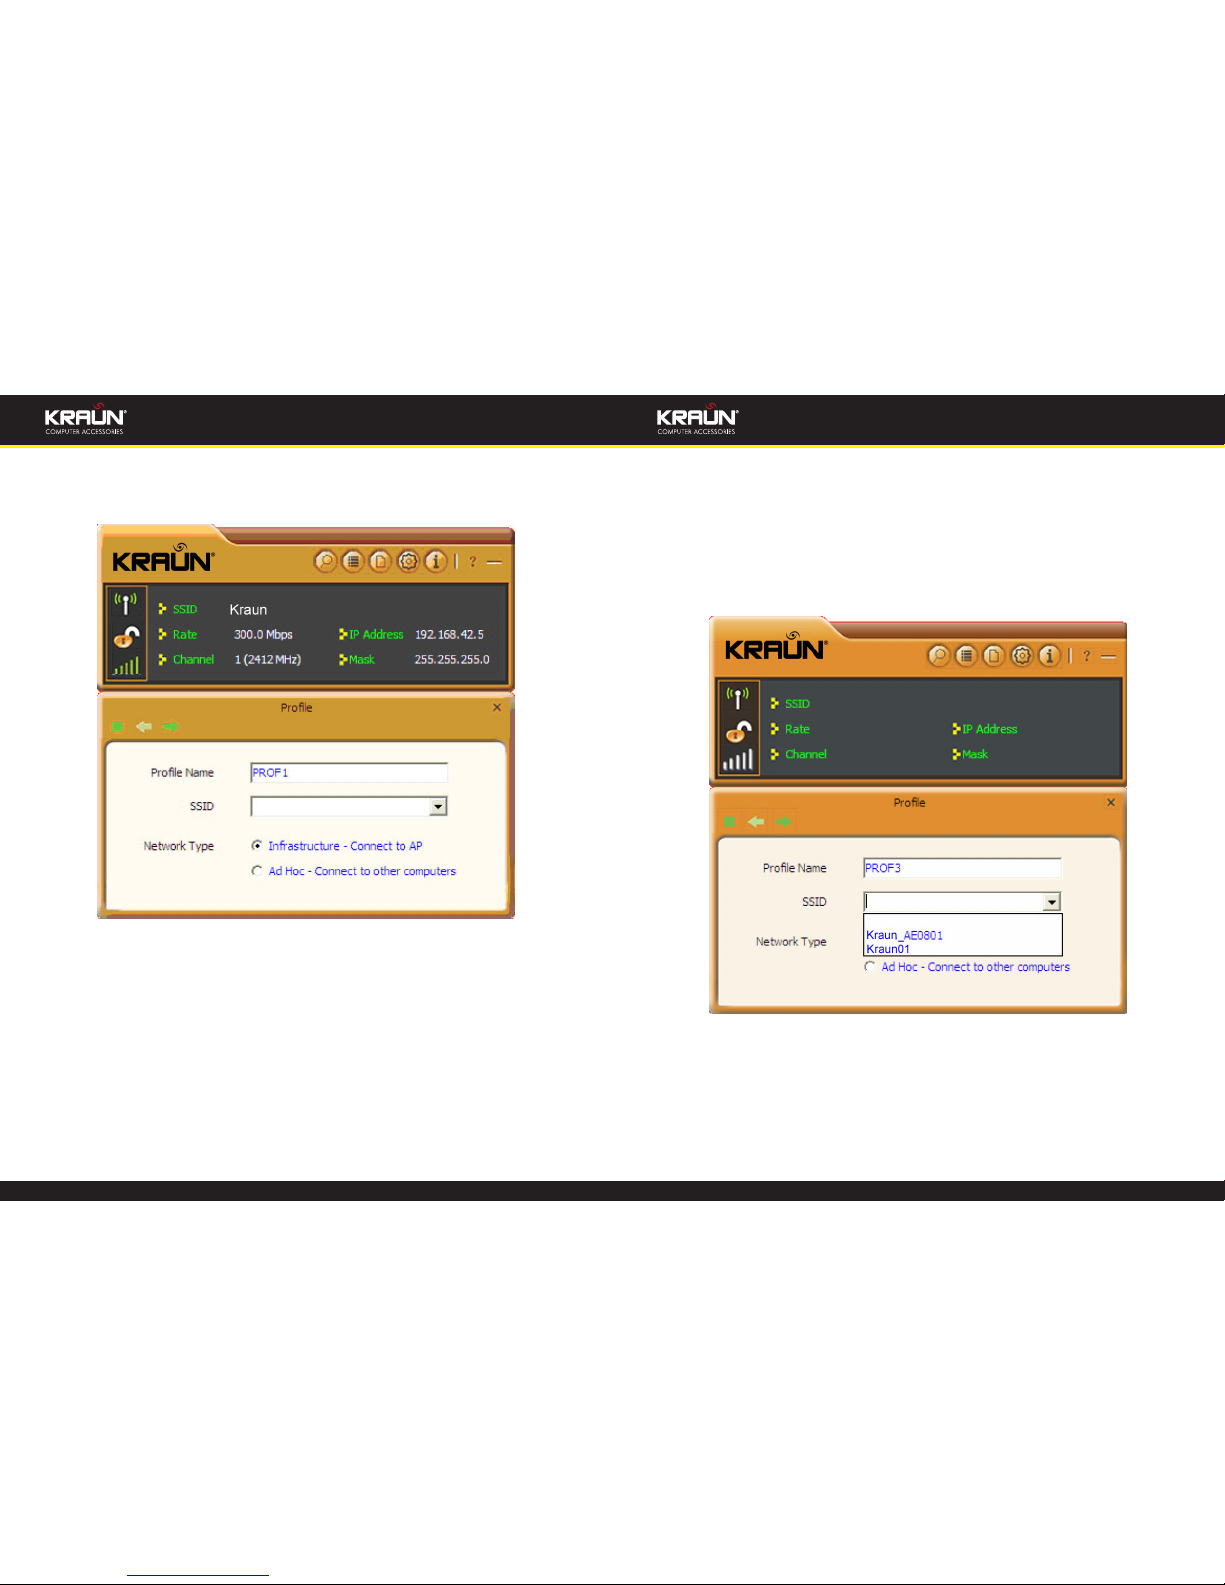
4.1.3 Prole
Except the above common connection type, you can also connect to the wireless
network by adding a prole on the “Prole“screen.The Prole screen is used to save
the wireless network parameters. When the adapter is successfully connected to a
network, the prole name of this network will automatically be added here, which
helps the adapter to quickly connect to the wireless network next time. However,
there’s one exception that when you have set the hidden SSID,namely the SSID can
not be scanned,then you must manually connect by adding the prole name.The
main interface is as shown below.
Add: create a new prole
Delete: delete the existing prole
Edit: modify the existing prole
Add WPS Prole: WPS setting requires that the connecting wireless device
support WPS function. WPS helps you to fulll wireless encryption fast as well as
secure your wireless network. For detailed setting steps, refer to appendix2.
20 www.kraun.it
Manual Manual
www.kraun.it 21
There are two network types for your option when clicking the “Add” button to add
wireless adapter connection: Infrastructure and Ad-Hoc.
Infrastructure is an application mode that integrates the wired and wireless LAN
architectures. It is dierent from Ad-Hoc in that in this mode the computer installed
with the wireless network adapter has to fulll the wireless communication via AP
or wireless router. It can be devided into two modes:“wireless AP + wireless network adapter” and “wireless router + wireless network adapter”.
Ad-Hoc is a special wireless mobile network application mode. All nodes in the
network are equal.Usually it is used to share resources by connecting the opposing
computer’s wireless adapter.
1. Infrastructure Prole Management
When you are connecting the wireless adapter to an AP or a wireless router, please
select the Infrastructure mode.
Click the “Add”button and select the network type as”
Infrastructure”,and enter the prole name and SSID or you can nd the SSID you
wish to connect from the drop-down list.
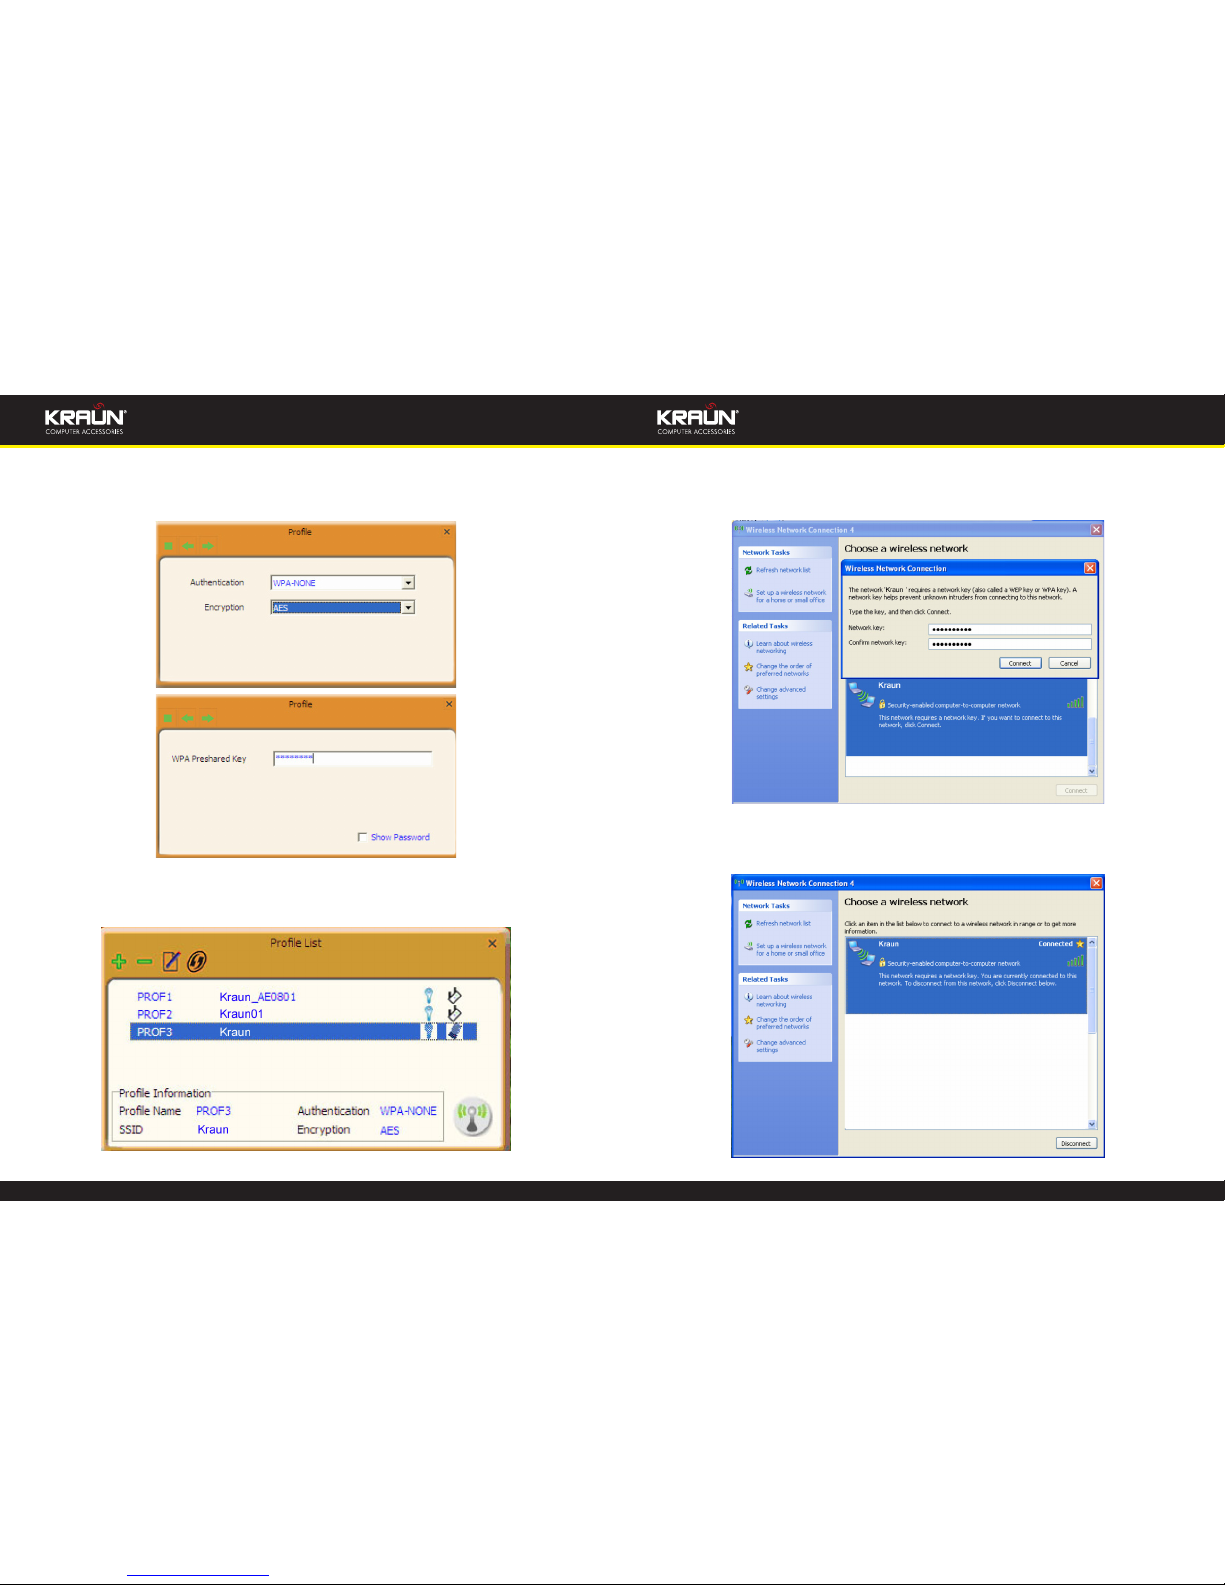
Click the next button to select the authentication type and encryption type such as
WPA, PSK and AES, and then input the key and click next.

22 www.kraun.it
Manual Manual
www.kraun.it 23
After a prole is successfully added, the prole name can be seen on the prole list,you can edit , import or export the prole,click “Active” to nish the
connection,now you can also view the detailed connection status on the “Link
Information”screen.
NOTE: If the SSID broadcast function of the wireless router or AP you wish to con-
nect is disabled, then the wireless adapter can not scan the SSID, thus you
need to connect by creating the corresponding prole.
2. Ad-Hoc Prole management
Using the Ad-hoc mode to establish a wireless network requires that each computer should be equipped with a wireless network adapter. By connecting these
wireless adapters, computers are able to share the resources. The detailed setting
steps are as follows:
1) Firstly you’ll have to allocate a static IP to each wireless adapter to be connected
in Ad-hoc mode.
a. Right click “My Network Places” on your computer’s desktop and select
“Properties”.

24 www.kraun.it
Manual Manual
www.kraun.it 25
b. Right click “Wireless Network Connection”, and select “Properties”
c. Select “Internet Protocol(TCP/IP)”and click “Properties”.
d. Please enter the IP address and subnet mask, and make sure this IP address
is not used by other devices in the network.For example: if your wireless
adapter’s IP address is 192.168.0.1, then set other wireless adapters’ IP addresses within the range of 192.168.0.2—192.168.0.254.Click “Ok” to save
the settings.
2) Create a new Ad-hoc prole
Click the “Add” button and enter the network name in the SSID eld to identify the
wireless network, and select Ad-hoc as the network type and then select the channel.
26 www.kraun.it
Manual Manual
www.kraun.it 27
Click the “Next” button to select the authentication type and encryption type and
then input the correct key and click “Next”.
After a prole is successfully added,the prole can be seen on the prole list ,select
it and click the “Active” icon on the lower right corner.
And then search for the wireless network on other clients. Double click the wireless
network you have congured and you’ll be prompted for the key .After entering
the key, click “Connect”.
When the highlighted part shows “Connected“ ,it indicates the connection is successful.
28 www.kraun.it
Manual Manual
www.kraun.it 29
4.1.4 Advanced
This section is used to set the wireless mode and country region code for the current wireless adapter. You have three options to choose from: 2.4G, 5G or 2.4G+5G.
The widely used is 2.4G wireless adapter. To use the 5G mode of 802.11a technology, please set it here.
4.1.5 About
This screen mainly displays the version information of the UI’s dierent programs
as well as Kraun’s copyright statement.
4.1.6 Help
Click the help button to open the user manual.
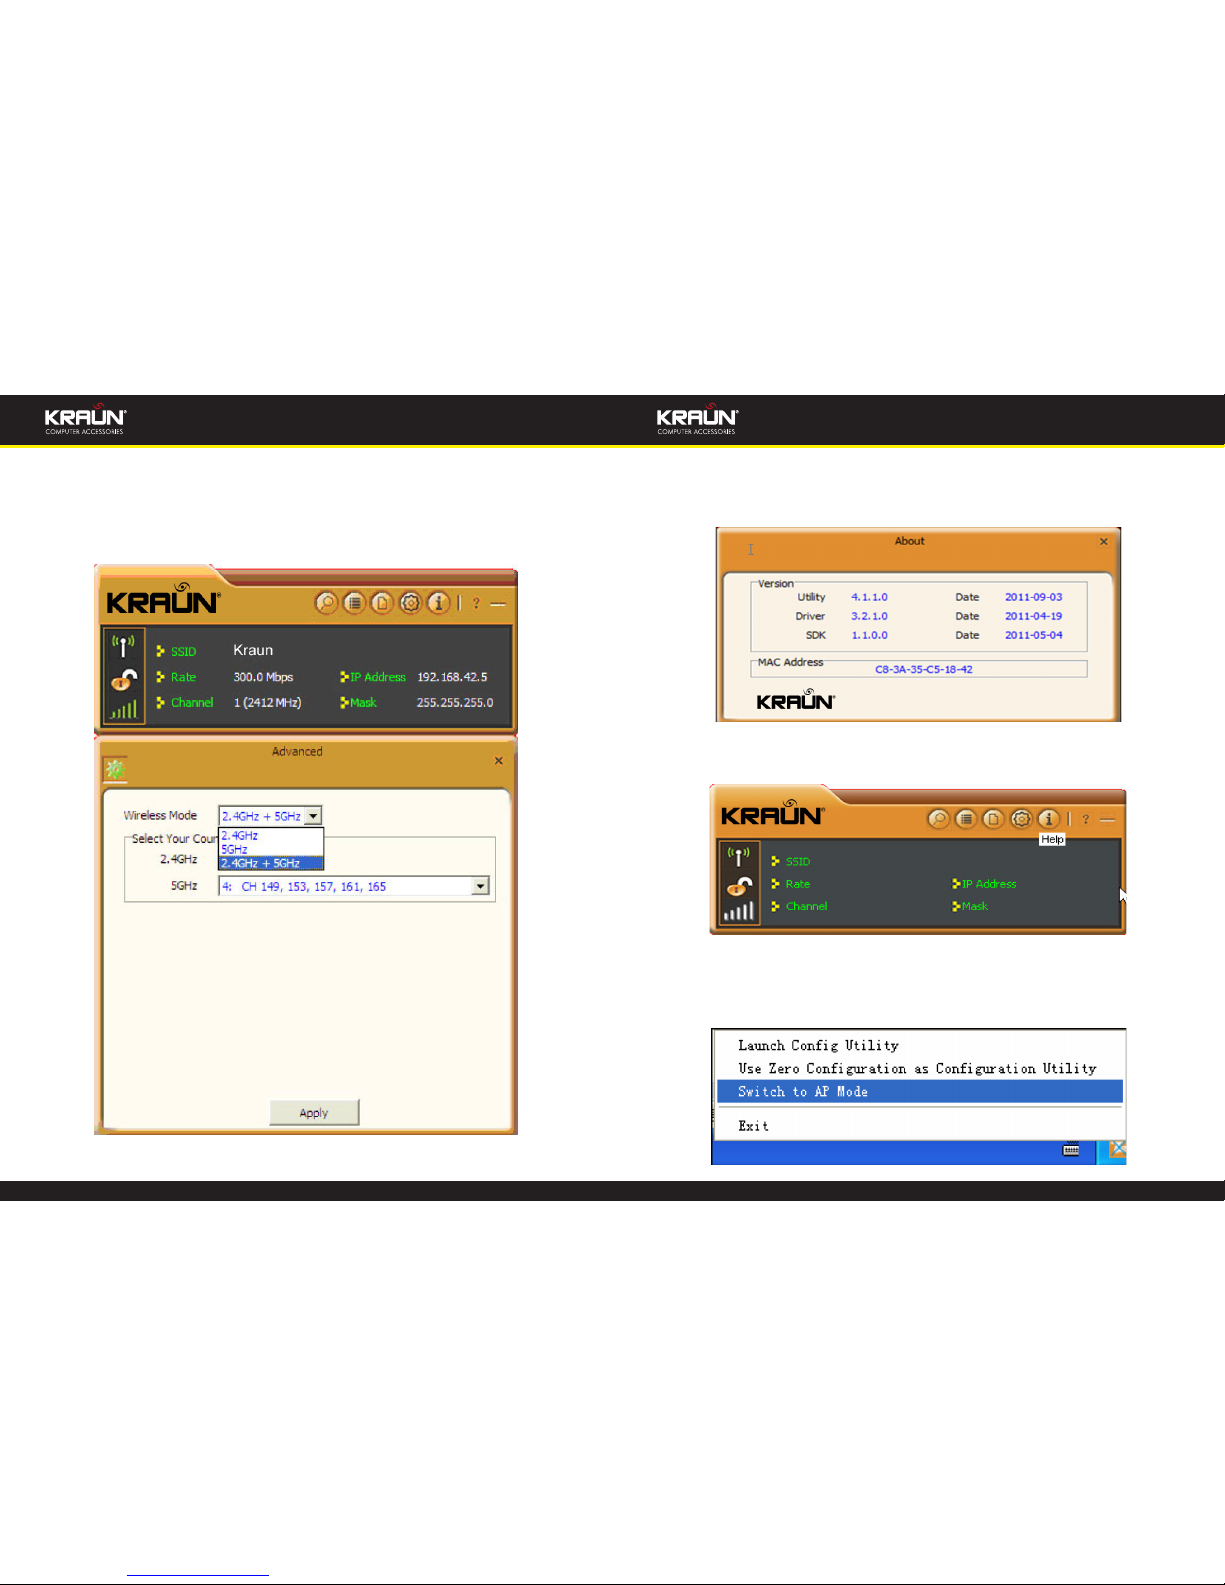
4.2 AP mode
When you want to use the wireless adapter’s AP function, please right click the UI
icon on the taskbar of your computer desktop and select “Switch to AP Mode”.
30 www.kraun.it
Manual Manual
www.kraun.it 31
In this mode, the wireless adapter acts as an AP to transmit wireless signal and create a wireless network, while allowing other wireless clients to access this network.
As shown in the diagram below: The PC in the left has already accessed to the Internet by using a wired network adapter, meanwhile, you install a Kraun wireless
adapter (take a USB wireless adapter as an example) and its UI on this computer,
and set the adapter to AP mode.
By using the wireless adapters to scan the AP’S SSID to connect, the computers in
the right can also access to the Internet after successfully connected
In this mode, the client utility diers from that in station mode, and the main interface is as shown below.
When it is switched to AP mode, the wireless adapter will automatically set its IP
address as 192.168.123.1, and other clients that connected to this AP will automatically obtain the IP addresses of: 192.168.123.X(X is any integer from 2 to 254).The
function buttons on the top (From L to R )are respectively Cong AP, Advanced,
Access Control List, Associate List, About, Help, and MiniSize, while the left column
displays Turn On/O RF, Security /No security, and AP mode icon.
4.2.1 Cong AP
This screen is used to set the AP’s general parameters including SSID, wireless mode,
channel, authentication type and encryption type, as shown in the picture below.

32 www.kraun.it
Manual Manual
www.kraun.it 33
Here the authentication type is set as “Open” and the encryption type “Not Use”.
4.2.2 Advanced
This screen is used to set the advanced parameters of the wireless adapter when
working in AP mode, such as No forwarding among wireless clients and TX power.
No forwarding among wireless clients: This feature isolates the communications
among the wireless clients that are connected to the wireless adapter in AP mode.
TX power: To adjust the transmit power for the wireless adapter

34 www.kraun.it
Manual Manual
www.kraun.it 35
4.2.3 Access Control List
Access Control is based on the wireless adapter’ MAC addresses to allow or reject a
specied client’s access to this wireless network.
Access Policy:
Disable: To disable the lter function.
Allow All: To permit all hosts whose wireless MAC addresses are included in the
list to access the wireless network, other hosts whose wireless MAC addresses have
not been added to the list will be prohibited by default.
Reject All: To prohibit all hosts whose wireless MAC addresses are included in the
list from accessing the wireless network, other hosts whose wireless MAC addresses have not been added to the list will be permitted by default.
MAC Address: To input the client’s wireless MAC address you want to lter in the
physical address eld.
: to add the entered wireless client MAC address to the list.
: to delete an existing MAC address in the list.
: to delete all clients’ wireless MAC addresses in the list.
Add the MAC address of the client’s wireless network adapter to the list and select
“All Allow” in the access policy drop-down list, computers whose wireless MAC addresses are not included in the list will be rejected by default. Select “All reject”, and
only the host computers whose wireless MAC addresses are included in the list can
not access the AP wireless network.
4.2.4 Associate List
When there’s client connected to this AP and has successfully obtained the IP address ,then the client’s MAC address, AID and Status can be seen on the list.

36 www.kraun.it
Manual Manual
www.kraun.it 37
4.2.5 AP Mode under Windows 7
1. Under Windows 7, wireless adapters are allowed to work in both STA and AP
modes. Here, the wireless adapter acts not only as a client, but also an AP to send
wireless signal, which equals to an amplier. Right click the UI icon on the lower
right corner of the computer desktop and select “Switch to STA+AP Mode”.
2. You can change the SSID on the Cong AP screen and control the number of the
connected clients by modifying the max number of peers. AP mode has only one
encryption method which is WPA2-AES by default and cannot be modied.
Chapter 5. Appendix 1: Acronyms and
Terms
WLAN Wireless Local Area Network
802.11 A family of specications developed by the IEEE for WLAN technology.
802.11a An extension to 802.11 WLAN standards that provides up to 54 Mbps
transmission in the 5 GHz UNI radio band.
802.11b An extension to 802.11 WLAN standard that provides up to 11 Mbps
transmission in the 2.4 GHz ISM radio band. 802.11b uses DSSS modulation.
802.11g An extension to 802.11 WLAN standard that provides up to 54 Mbps
transmission in the 2.4 GHz ISM radio band. 802.11b uses OFDM modulation and is backwards compatible with 802.11b.
802.11n higher transmission rate, supports Multi-Input Multi-Output(MIMO)
technology.
WEP Wired Equivalent Privacy. A security protocol for WLANs dened in the
IEEE 802.11 standard.
WPA Wireless Protected Access, adopts rotating keys.
RSN Robust Security Network. A substitute for WPA, and it adopts 802.1x
standard and advanced encryption
ICS Microsoft Internet Connection Sharing enables multi-computer to share
access to Internet via one PC.

38 www.kraun.it
Manual Manual
www.kraun.it 39
Chapter 6. Appendix 2: How to Set WPS
WPS setting supports two modes :PBC and PIN. The detailed setting steps are as
follows:
1. Wireless Connection in PBC Mode
1.1 Enable the router’s WPS-PBC feature.
If your router provides WPS button, just press and hold it for about 1 second, then
the WPS LED will be ashing for about 2 minutes, which indicates the router’s WPS
feature has been enabled. Otherwise, you can also log on to the router’s web-based
utility to enable the PBC mode in WPS settings screen(For detailed settings,please
refer to your router’s user guide).
1.2 Perform PBC connection on the UI of the wireless adapter
1) On the main interface of Kraun’s UI, click “Prole”—“Add WPS Prole”.
2) On the Prole screen, select “Push-Button Conguration”(PBC) and then click
the “Next” button, select “Start PBC” two minutes after the router enables the
WPS function. The connection is established when the negotiating process nishes.
Start PBC:
Negotiating process:

40 www.kraun.it
Manual Manual
www.kraun.it 41
A prole forms automatically after the connection is successfully established.
1.3 Using the wireless adapter’s WPS button to perform PBC connection.
If your wireless adapter provides a WPS button,you may use the button to perform
PBC connection.
a). Run the adapter’s UI and switch to STATION mode
b). Two minutes after the router’s WPS-PBC is enabled,press the adapter’s WPS but-
ton to connect in PBC mode.
c). You may view the PBC connection process on the UI’s PBC screen.
2. Wireless Connections in PIN Mode
On the “Add WPS Prole” screen, select “PIN ” as the WPS Method. You may select
the wireless AP to be connected in WPS mode on the WPS AP drop-down List,or
select “Auto “and then click the next button.
2.1 Enrollee Mode
The PIN code eld lists the adapter’s current PIN code, when you select “Enrollee” as
the Cong Mode, you need to copy this PIN code and input it in the PIN code eld
of the router’s WPS setting screen.
First enter its WPS conguration screen,enable WPS settings and select PIN for WPS
mode and then input 18686791 in the PIN code eld,and then click the “Save” button. When the WPS indicator of the Router starts ashing,it indicates that WPS feature is enabled.

42 www.kraun.it
Manual Manual
www.kraun.it 43
Click the next button on the Prole screen and click “Start PIN” to start the PIN code
negotiation.
2.2 Registrar Mode
On the “Add WPS Prole” screen, select the SSID of the AP that need to negotiate in
WPS mode instead of selecting”Auto”.Then select”PIN” as the WPS method and click
the next button to display the folowing screen:
Select “Registrar” as the cong mode and enter the router’s PIN code,such as
35475088 that displays on the router’s WPS screen in section 2.1, in the PIN code
eld here.
Now you can view the SSID ,authenticaiton type,and encrytion type that need to
be negotiated by the WPS in registrar mode.These values can be modied but we
recommend using the default.Here we use the defaut setting and then click the
next buton.
You can view the negotiation key on the screen below ,but you are not recommended to modify it,just click the next buton.
Then click “Start PIN” on the screen below to perform WPS connection.
NOTE:
1. Under the WPS connection mode, when multiple routers simultaneously en-
able the WPS function, it may cause connection failure.
2. If the router connect to the adapter using the WPS, only one client can be con-
nected at one time, and so if the router need to connect to multiple clients
through WPS, you should repeat the WPS operation.

44 www.kraun.it
Manual Manual
www.kraun.it 45
Chapter 7. Appendix 3: FAQ
Q1: Microsoft ICS service is pending.
A1: If ICS service cannot be enabled after a long time, please re-switch from Sta-
tion Mode to AP Mode ,if not successful ,please restart the computer.
Q2: ICS is already bound by another network device.
A2: Microsoft ICS service can only combine one group of WAN and LAN. This
message indicates ICS may have been enabled by other network adapters.
Please manually cancel ICS and re-switch to AP mode.
Manually enable or cancel ISC.
Q3: Failed to enable ICS.
A3: Microsoft ICS service can only combine one group of WAN and LAN. This
message indicates ICS may have been enabled by other network adapters.
1. Please manually cancel or restart and cancel ICS, then re-switch to AP mode.
2. This dialogue box appears because virtual wi- miniport adapter can only be
used by one wireless network adapter at a time. Please disable any other nonKraun wireless network adapters and re-switch to AP mode.
Q4: Under Windows 7,when I switch from station mode to AP mode ,the screen
ashes“Disabling ICS, please wait……”and immediately return to station
screen.
A4: This is because you have disabled “Microsoft Virtual WiFi Miniport
Adapter”,please re-enable it and then switch to AP mode.
Q5: Client cannot obtain IP when connected to soft AP of the wireless network
adapter.
A5: Manually set an IP address at the same net segment as that of the AP and
the gateway and DNS at the IP address of AP.Thus, communication can be
achieved.
Q6: The SSID is not fully displayed on the wireless network list, what should I
do?
A6: Keep the mouse on the displayed SSID for about 2 seconds, as the below
picture shows,and you’ll see the full SSID on the appearing box.

46 www.kraun.it
Manual Manual
www.kraun.it 47
Q7: Under Windows 2000 system, IP address can not be obtained when it is
switched to AP Mode.
A7: Under Windows 2000 system, you have to manually congure sharing and
then switch to AP. And an IP address of 192.168.0.1 will be obtained.
If you still have any problem, please contact our customer service or visit our
website: http://www.Kraun.it
Q8: Sometimes the UI can not be moved by the mouse and also can not be
minisized,why?
A8: when you are performing some congurations or connections ,the UI only
activates the currently operating window,other windows are locked and can
not be operated,but it will restore to normal when you close or nish the current conguration and connection .
Q9: How to exit the UI?
A9: Right click the system tray icon and click “Exit” on the appearing dialog.

48 www.kraun.it
Manual
 Loading...