

Page 1

Operating Instructions
Read and conform
safety instructions
before use
Wet and dry vacuum cleaner
Ventos 25
Ventos 35
GB
Page 2

2
Power intake
Mains voltage
Admissible voltage range
Power intake
Fusing
Volume flow (air) max.,
Turbine
Vacuum max., Turbine
Filter surface
Suction hose
sound pressure level acc.
to DIN 45 635
Container volume
Dimensions
Weight
(without accessories)
Length of power line
Protection type
Order no.:
Dear Customer
We would like to congratulate you on the purchase of your new wet/dry
vacuum cleaner with integrated chassis and accessories box and thank
you for buying it!
For ease of use, the device is described on the following pages.
It will help you with all types of cleaning work , eg:
Technical
specifications
Kränzle
Ventos 25
350 - 1.200 W
230V 50/60 Hz
220 - 240 V; 50/60 Hz
6,1 - 5,6 A
16 A
228 m³/h
23.000 Pa
14.000 cm²
36mm x 3,5m
62 dB(A)
25 l
625 x 380 x 440 mm
12 kg
7,5
IP X4
58 380 0
Description
- Machinery
- Building sites
- Buildings
- Vehicles
- Furniture
- Containers, etc.
Kränzle
Ventos 35
350 - 1.200 W
230V 50/60 Hz
220 - 240 V; 50/60 Hz
6,1 - 5,6 A
16 A
228 m³/h
23.000 Pa
14.000 cm²
36mm x 3,5m
62 dB(A)
35 l
625 x 380 x 550 mm
12 kg
7,5
IP X4
58 380 1
Page 3
3
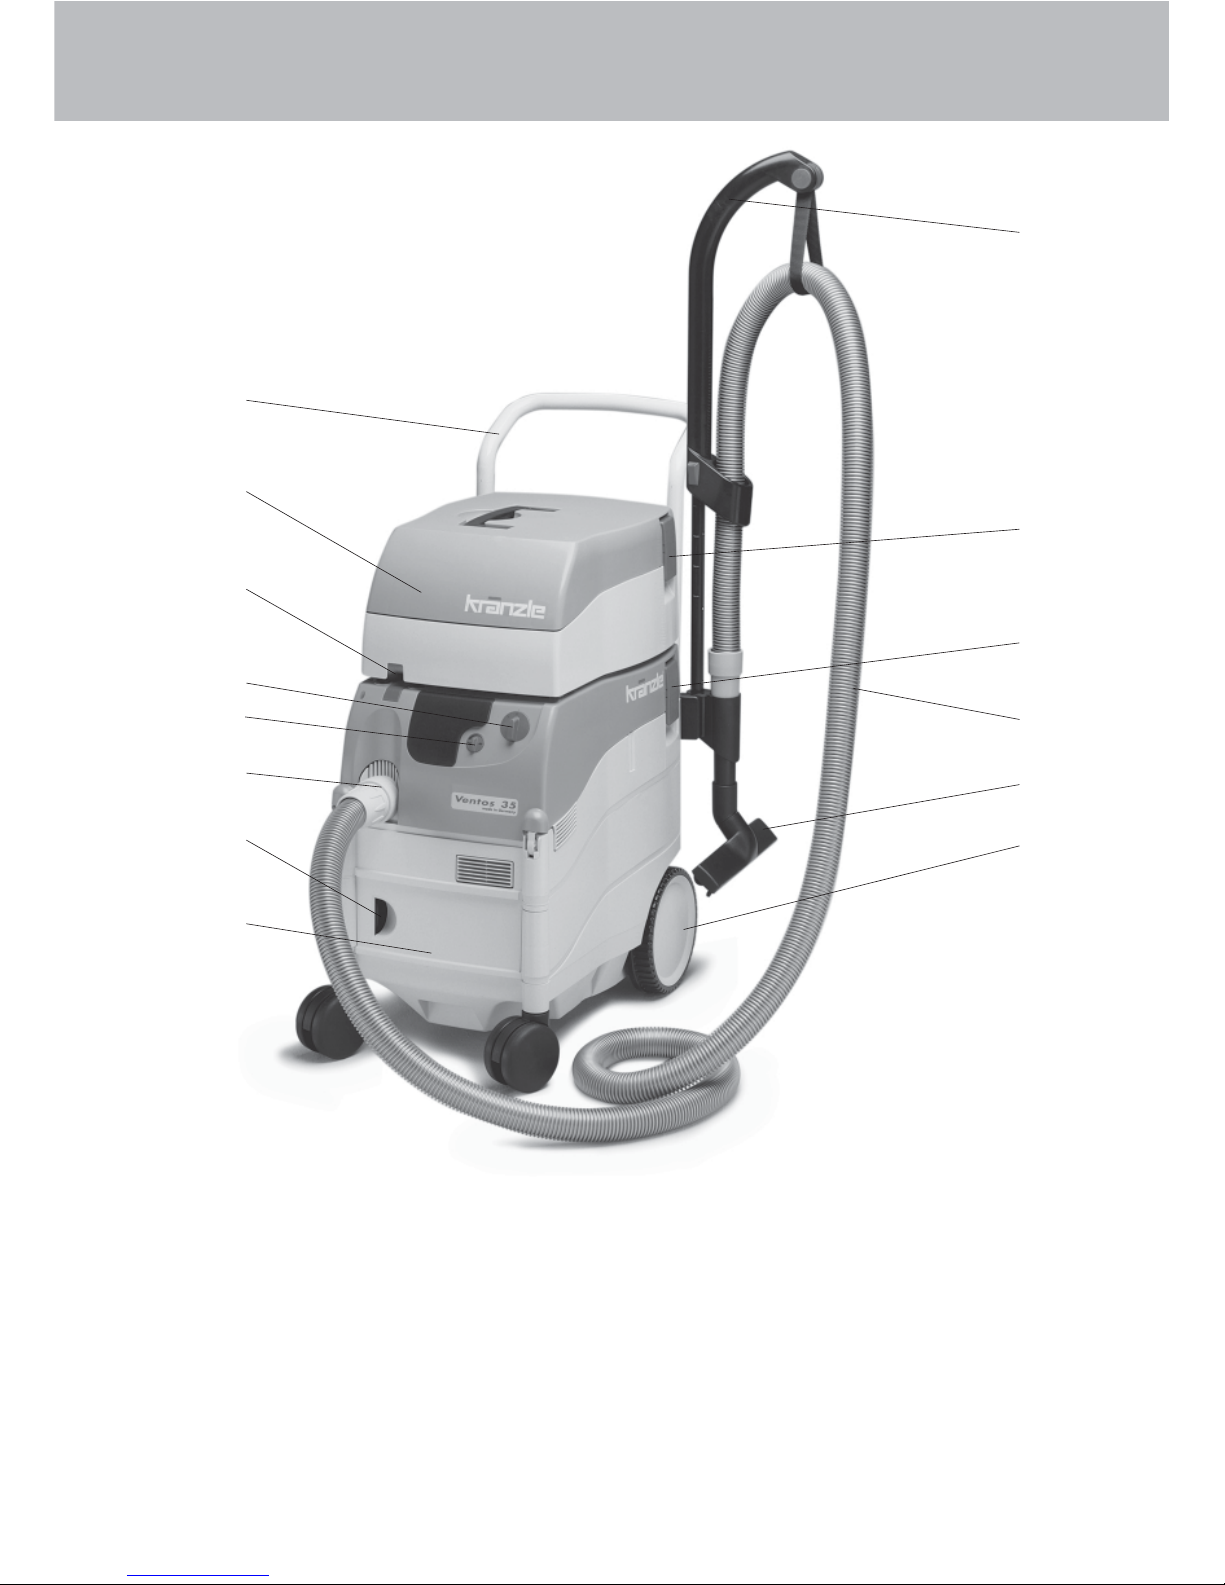
Construction
The KRÄNZLE VENTOS 25 / 35 are mobile machines. The construction is
shown in the plan.
Function
1 Suction hose
2 Suction handle
3 Front nozzles
4 Suction aperture
5 ON/OFF switch
6 Vacuum regulator
7 Storage bin (only on Ventos 35)
7.1 Handle for storage bin
8 Accessories box
9 Brake
1 0 Lock slide for accessories box
11 Lock bracket for accessories box
1 2 Lock bracket for suction head
1 3 Pushbar (optional, only on
Ventos 35)
Description
8
6
4
2
5
1
9
10
12
11
7.1
3
13
7
Page 4
4
Correct use
The vacuum cleaners are designed for vacuuming non-hazardous dust, dirt,
sand, chips etc.
The cleaners are also suitable for vacuuming water.
The cleaners are suitable for heavy-duty use as set forth in EN 60335-1 and
EN 60335-2-69.
The appliances have been inspected by TÜV Eschenborn in accordance
with the CB procedure and also bear the GS and CE symbols.
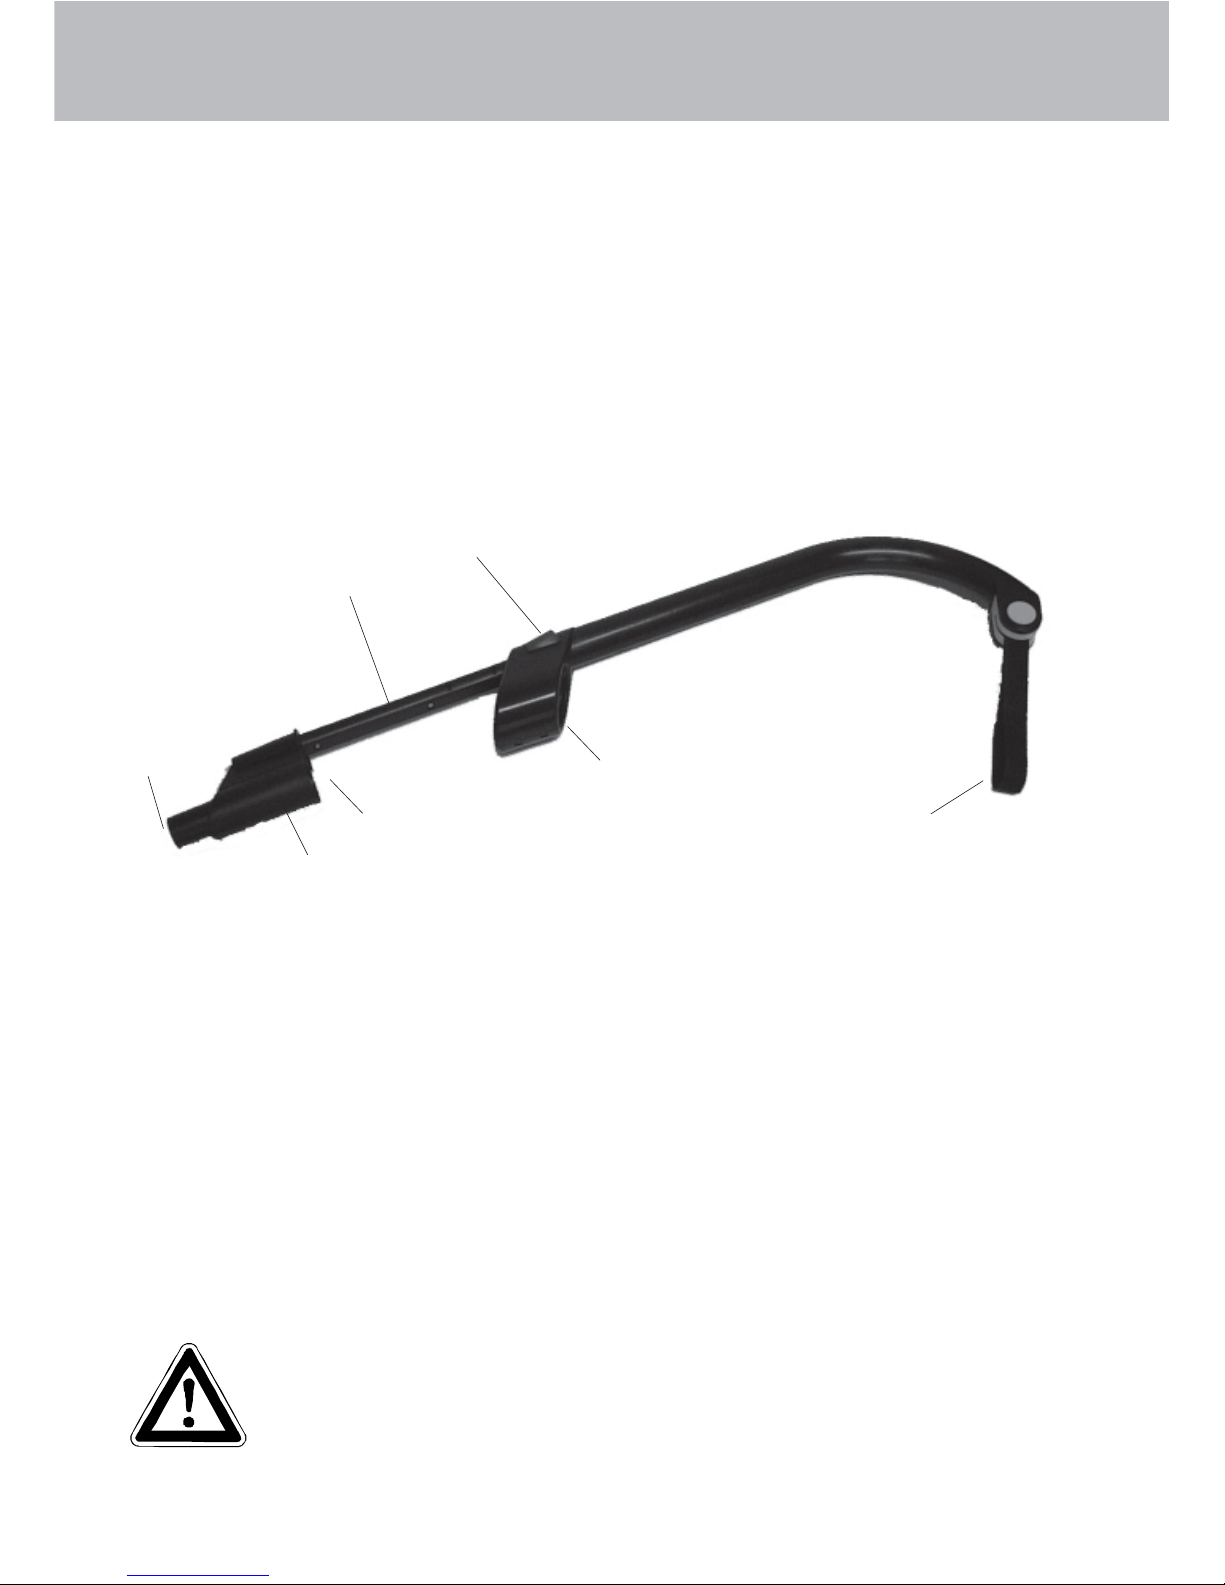
Suction handle
The equipment is fitted with a new type of suction handle to allow a relaxed
style of work. This handle is ergonomically designed and can be adjusted in
length for different vacuuming tasks. The cleaner is therefore comfortable to
use whether you are vacuuming the floor or using it in an overhead position.
To adjust the length of the handle, slide the red locking button (1) forwards
and pull out the extension (2). The telescopic tube can engage in 6 different
positions.
The handle offers a belt sling (3) and a tunnel (4) for clean guidance of the
hose, and a nozzle holder (5), various front nozzles can be attached to the
the reverse side (A) of the suction hose and the front side (B).
The suction handle is developed for front nozzles
only and not for heavy-duty work such as
scratching off stubborn dirt. Do not pull the
extension further than the last lock-in position.
Description
1
2
3
4
5
A
B
Page 5

5
Accessories box
All Ventos 25 and Ventos models are equipped with an accessories box (8)
for convenient storage of both the vacuum accessories and the power cable.
The box has two locking slides (10) - one on the front side and the other at
the rear of the cleaner - fitted to the open surface of the suction head.
To open them, slacken the two locking brackets (11).
The side opening is for putting in the suction hose and the power cable.
Collecting vacuumed material
The cleaner offers 3 possibilities for collecting vacuumed material.
1.) Filter bag
The filter bag should only be used for vacuuming dry material. To empty,
simply flip open the suction head until the lug engages.
2.) Dirt container
The dirt container can be used for vacuuming dry and wet material. To
empty, simply flip open the suction head until the lug engages. The cover of
the container with integrated front filter must be taken off and then the
container can easily be lifted out of the cleaner.
3.) Dirt chamber in chassis
The dirt chamber in the chassis can take wet and dry materials.
CAUTION!
Always remove the top part of the vacuum cleaner before emptying the dirt chamber!
Description
Page 6
6
Storage bin (only on Ventos 35)
The Ventos 35 is equipped with a storage bin (7). This offers convenient
space for vacuuming utilities and other work materials.
This bin is opened with a handle (7.1).
Brake
The brake (9) is used to lock the wheels and prevent th cleaner from rolling
away out of control.
ON/OFF Switch
The cleaner is OFF when the switch is in the "0" position. Turn the switch (5)
to position "1" to start the machine.
Vacuum regulation
The vacuum regulator (6) is used to steplessly adjust the power of the
vacuum. It allows precise adjustment for the task in hand.
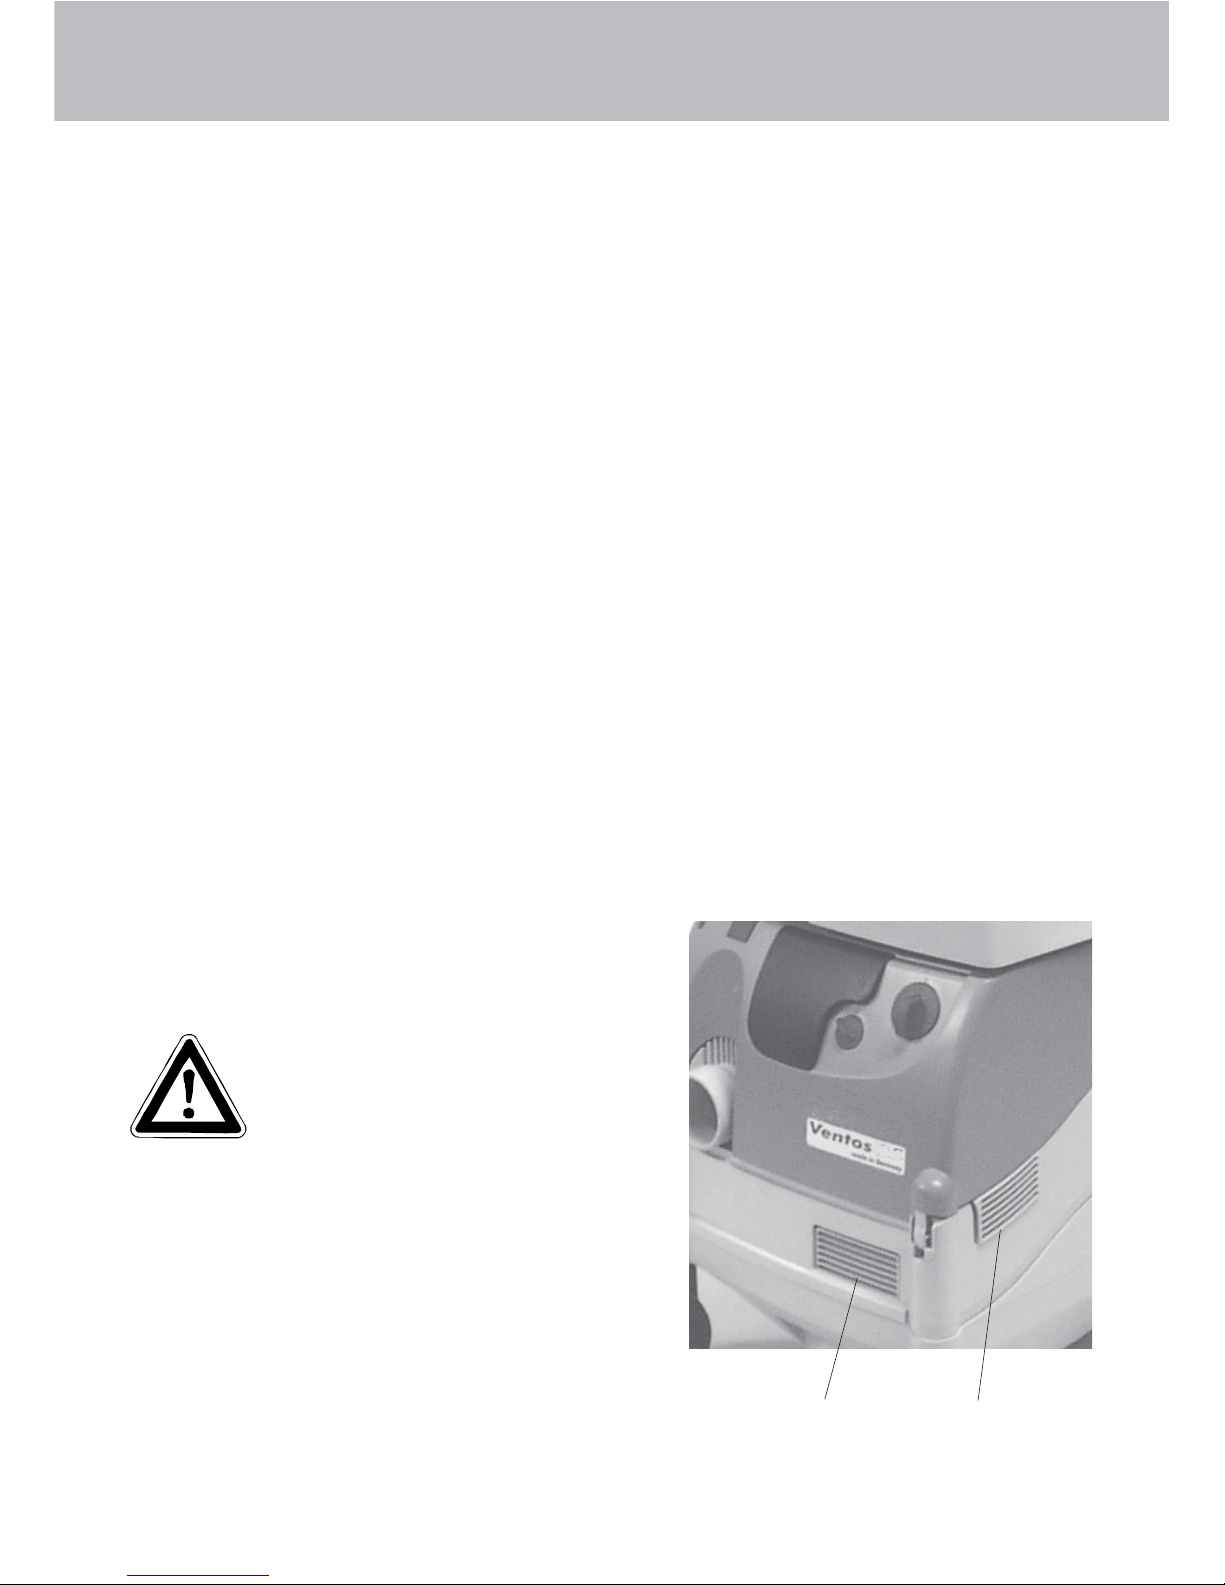
Cooling apertures
The cooling apertures (1) and (2) serve to cool the turbine.
CAUTION!!!
Never close or cover
the cooling
apertures.
Description
12
Page 7
7
Description
Suction hose
The standard suction hose (1) is 3.5 m long and has a coupling at both
ends. The larger coupling is fitted into the suction opening (4) of the
vacuum. The somewhat thinner coupling is used to accommodate the
suction nozzles or to connect the suction pipe.
The couplings can be removed more easily from
the vacuum or nozzle by light turning and pulling.
Motor protection
To prevent overheating, the motor has a temperature overload switch which
cuts out the motor automatically if a critical temperature is reached.
If the overload switch cuts out the motor, the motor must be allowed to cool
down for approx. 5 minutes before restarting.
A customer service workshop should be contacted if the motor does not
restart automatically.
Component replacement and inspection work may only be
performed by trained personnel, with the eqipment
disconnected from the power mains ie, with the plug
removed from the power socket.
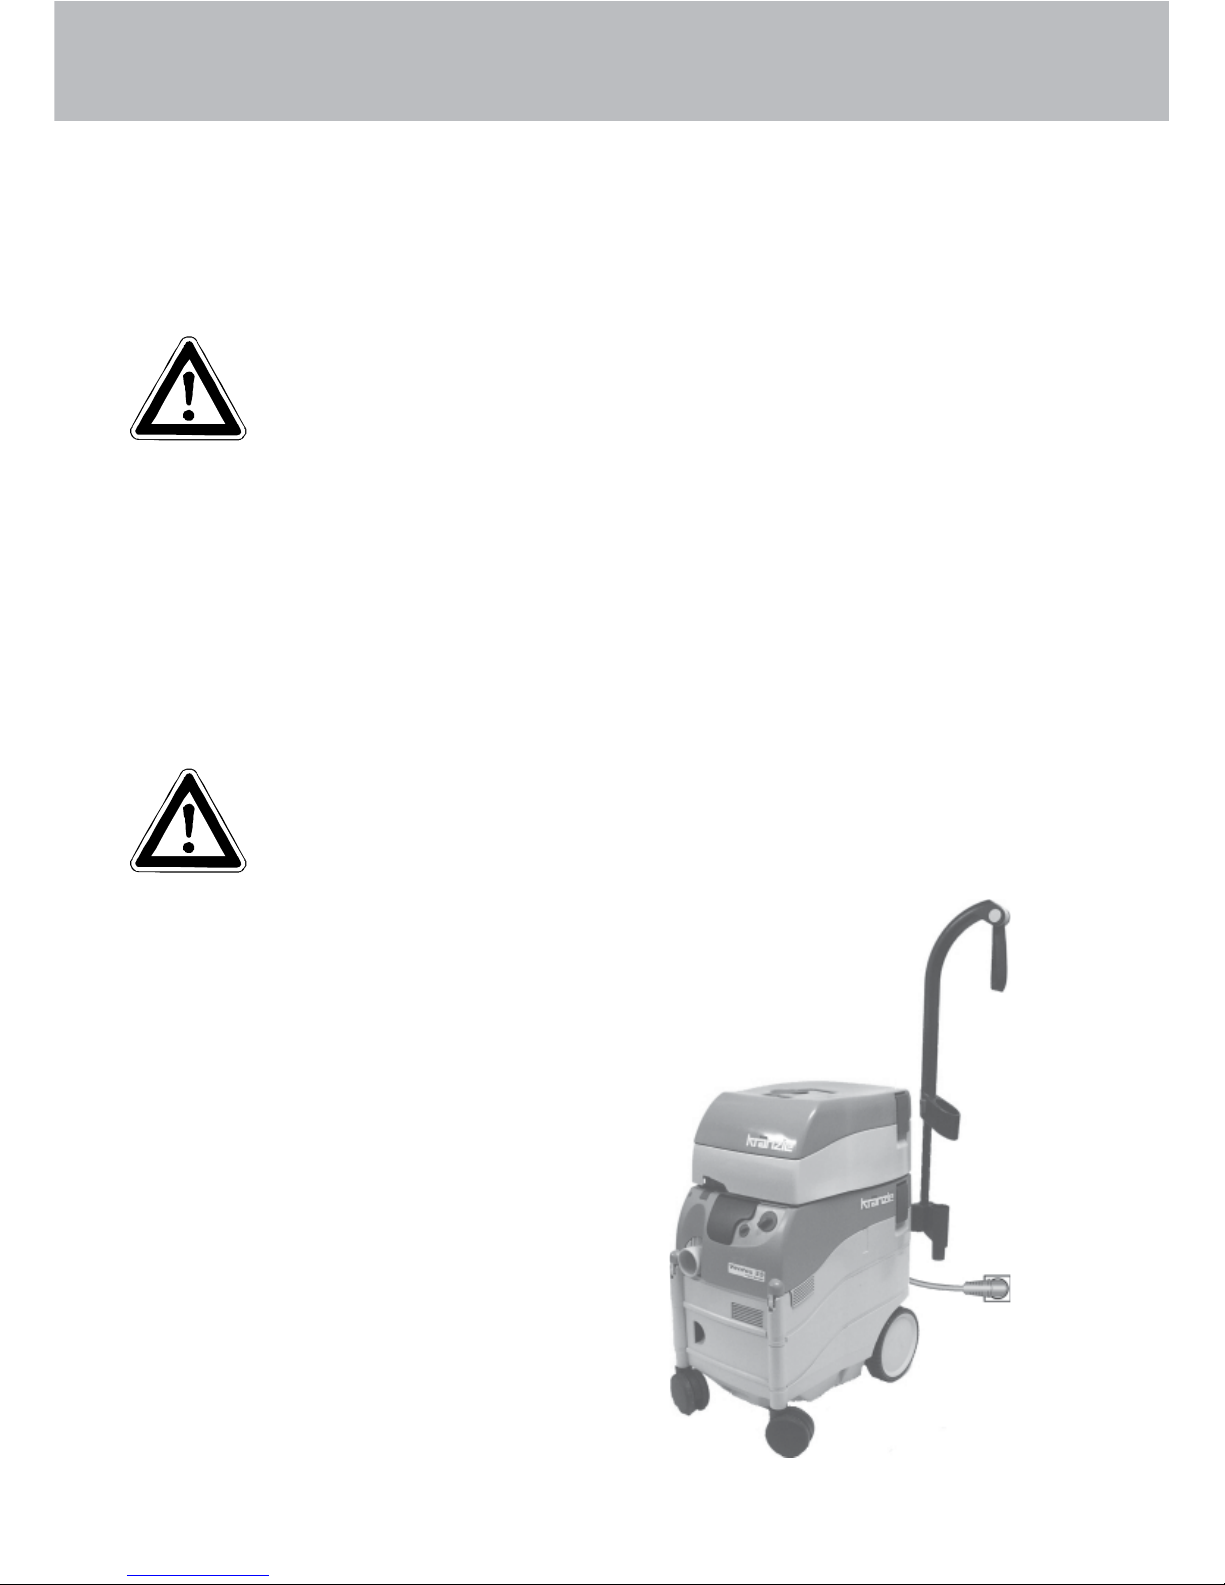
Electrical connection
The cleaner is supplied with a 7.5 m power cable and plug.
The plug must be put into a properly fitted
power socket. The voltage on the
specification plate must match that of the
power source.
The socket must be protected by a
16 A slow-acting fuse.
When using an extension cable the
connections must be correct. Plug-type
connections must be splashproof and may
not lie on a wet or moist surface.
220 V 240 V
Page 8

8
Safety Instructions
Safety Instructions
- Only use accessories approved by Kränzle
- Never vacuum combustible or explosive dust (eg, magnesium, aluminium
etc.)
- RISK OF EXPLOSION!!!
- Never vacuum combustible or explosive liquids (eg, petrol, paint thinners
etc.)
- RISK OF EXPLOSION!!!
- Never vacuum aggressive liquids or solid matter (acides, lyes, solvents
etc.).
- Never vacuum hot, glowing embers (hot ash, cinder etc.).
- Always pull the plug out of the power socket when the cleaner is not in use
and before servicing.
- Protect the cable from heat, oil and sharp edges. Do not drive over, kink or
distort the cable, etc.
- Do not touch the plug with wet hands.
- Check the plug and cable regularly and have it replaced by an authorised
customer-service workshop if damaged.
- Do not leave the cleaner out in the rain.
- Never clean the cleaner with a water sprayer.
- Do not lift or transport the cleaner by the handle with a crane hook or hoist.
- Never allow the nozzles, pipes and hose close to your eyes or ears when
the cleaner is in operation.
Page 9
9
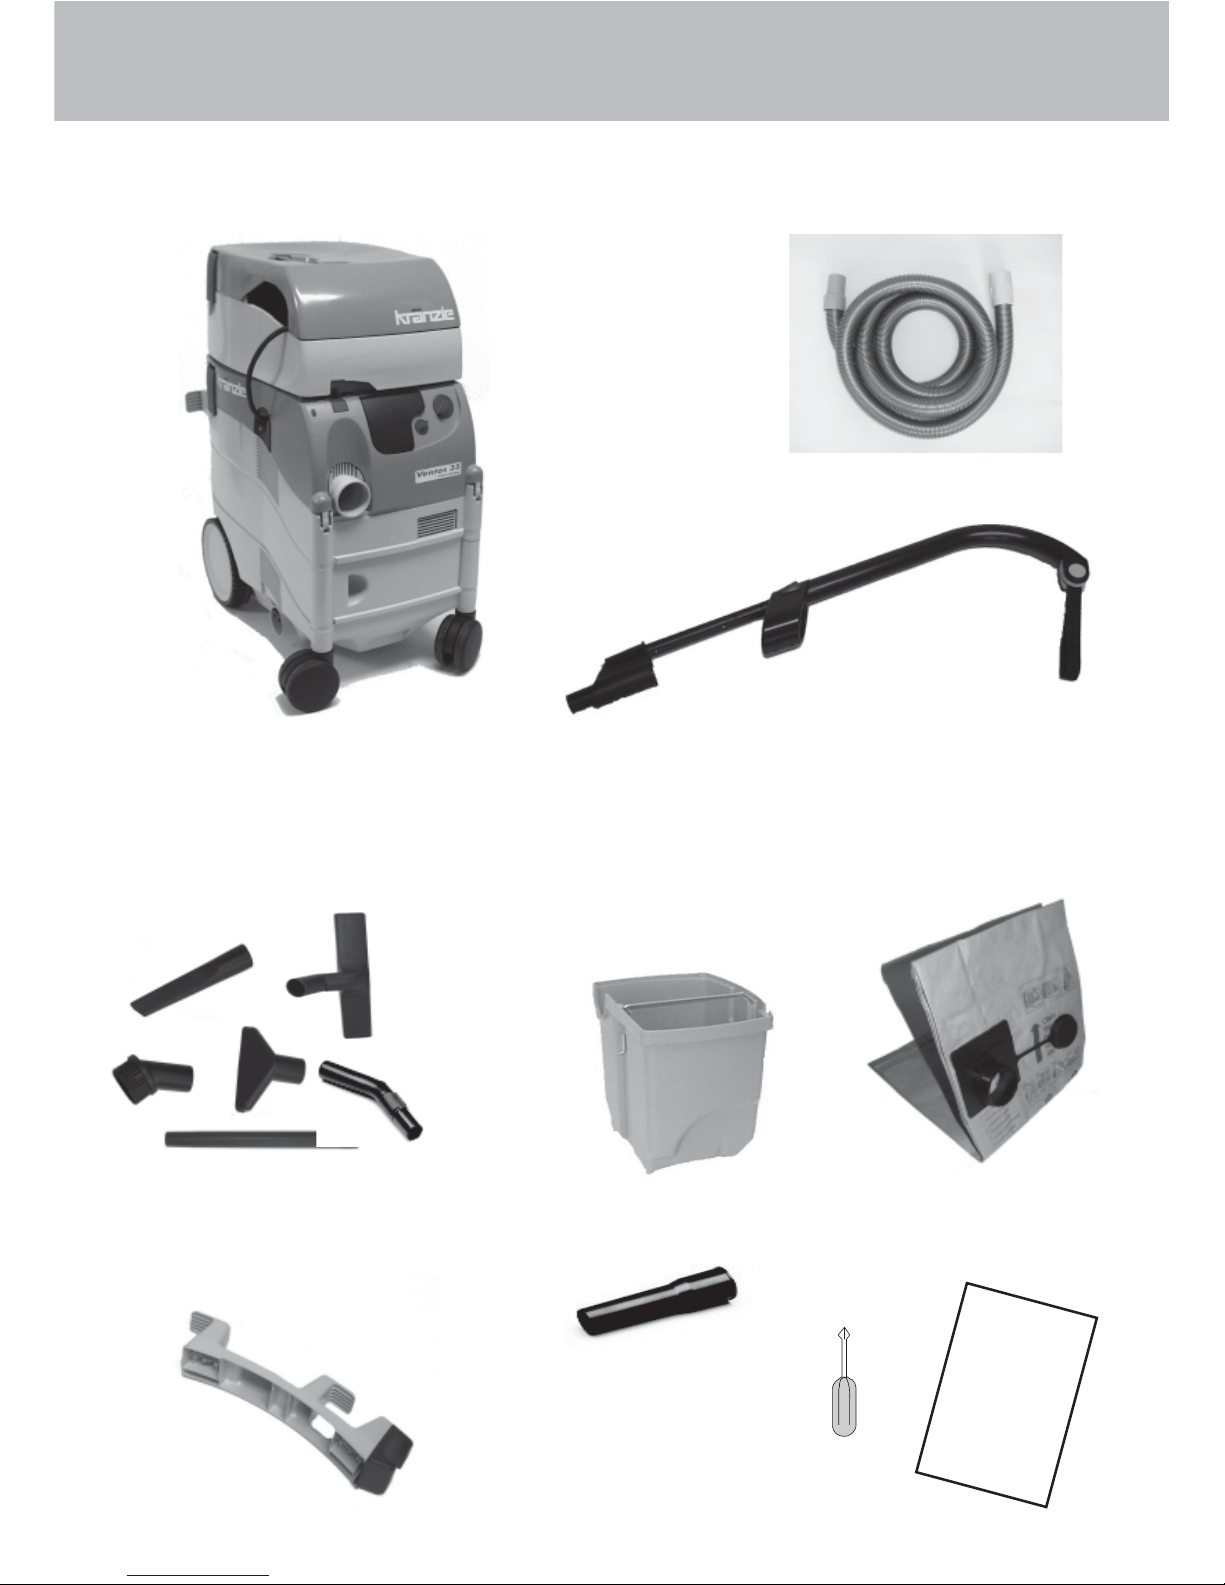
1. Suction hose
36mm x
3.5m
1. KRÄNZLE - Wet/dry vacuum
cleaner Ventos 25 / Ventos 35
with accessories box
3. Suction nozzle set
comprising upholstery nozzle,
vacuum brush, corner nozzle,
floor nozzle with 2 inserts, hand
pipe and 50 cm extension
9. Operating
instructions
5. Filter bag
You have purchased all this:
4. Dirt container
with lid and
front filter
integrated
in lid
8. Phillips screwdriver
7. Cable holder with
fastening screws
6. Adapter
suction hose nozzles
2. Suction handle
Page 10

10
Assemble and configure the cleaner
Fit a square nut (E) into the
outer recess (F) on the rear of
the cleaner.
E
F
Hold the suction handle holder
from behind against the cleaner
and screw it in twice.
Attach the suction handle holder
Fit extension
Unlock suction handle by pushing
red button into direction of arrow
(1).
Insert the extension into the suction
handle (2).
1
2
Page 11
11
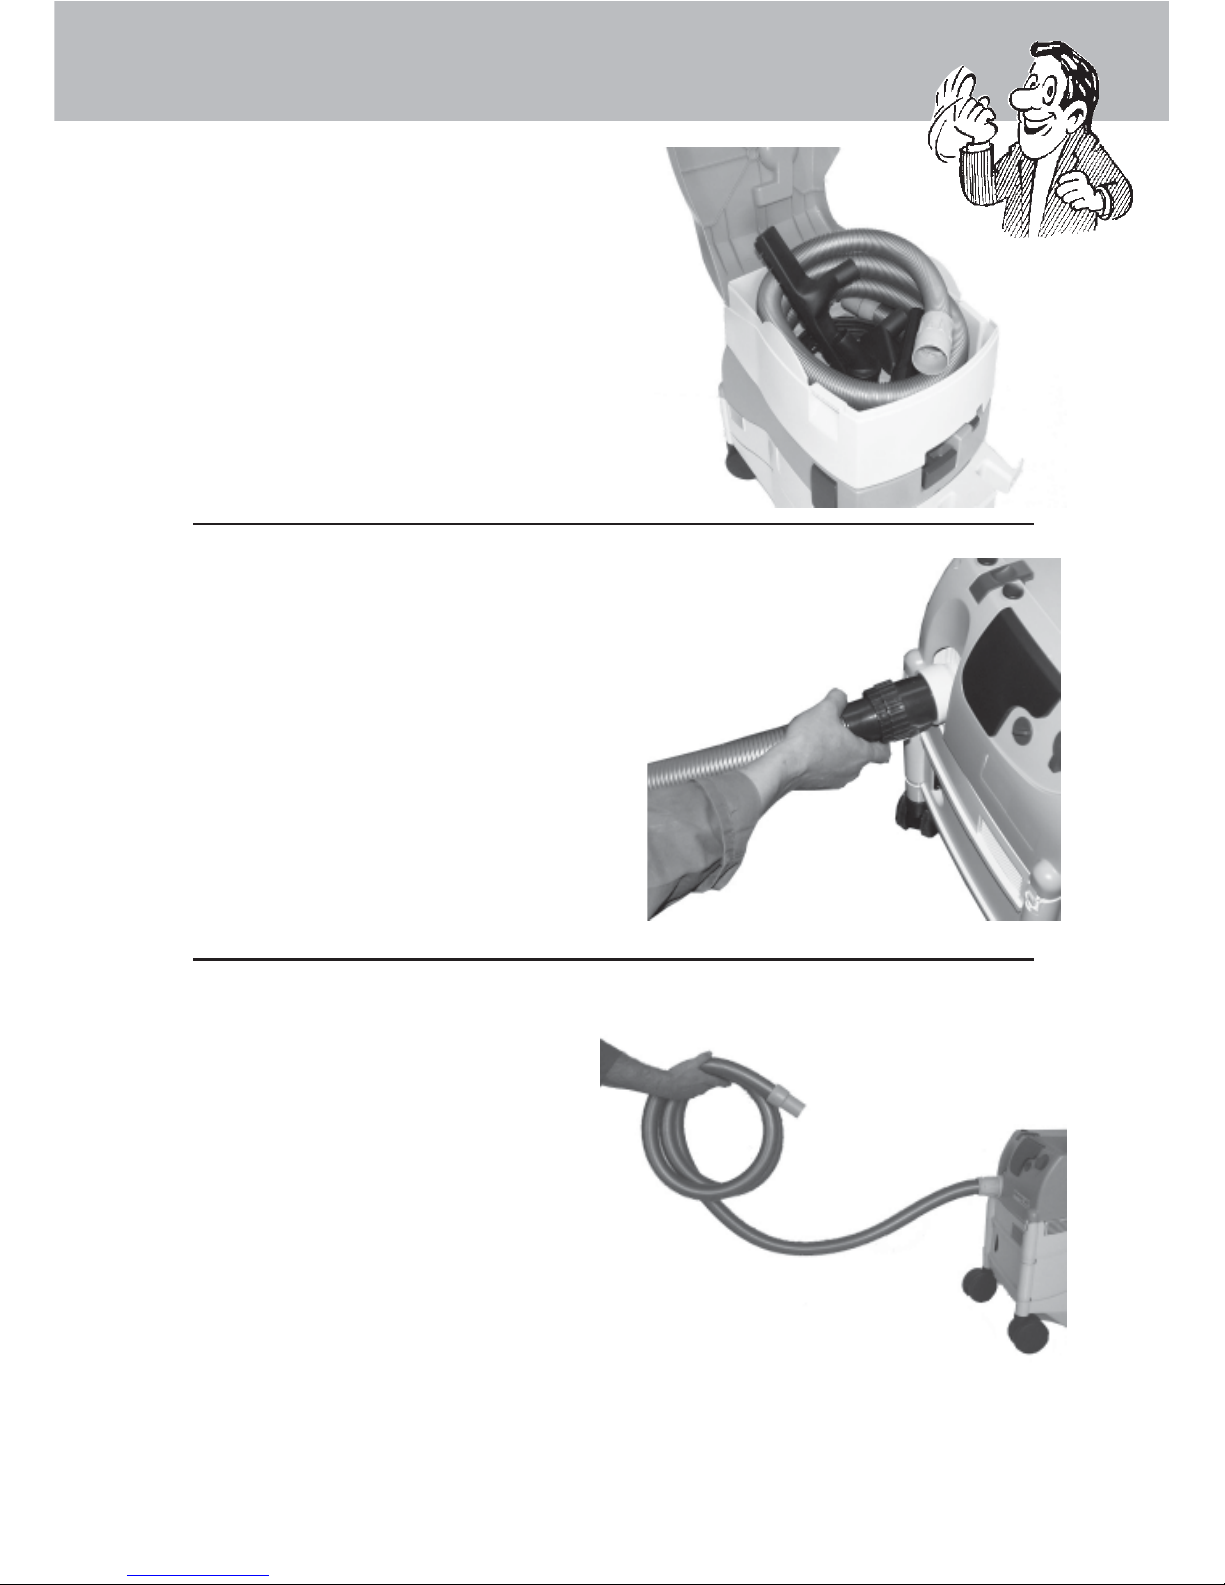
Start-up
2. Connect the suction
hose to the suction
aperture
3. Lay out the
suction hose
without kinks
1. Take the power cable,
suction hose and
nozzles out of the
accessories box
Page 12
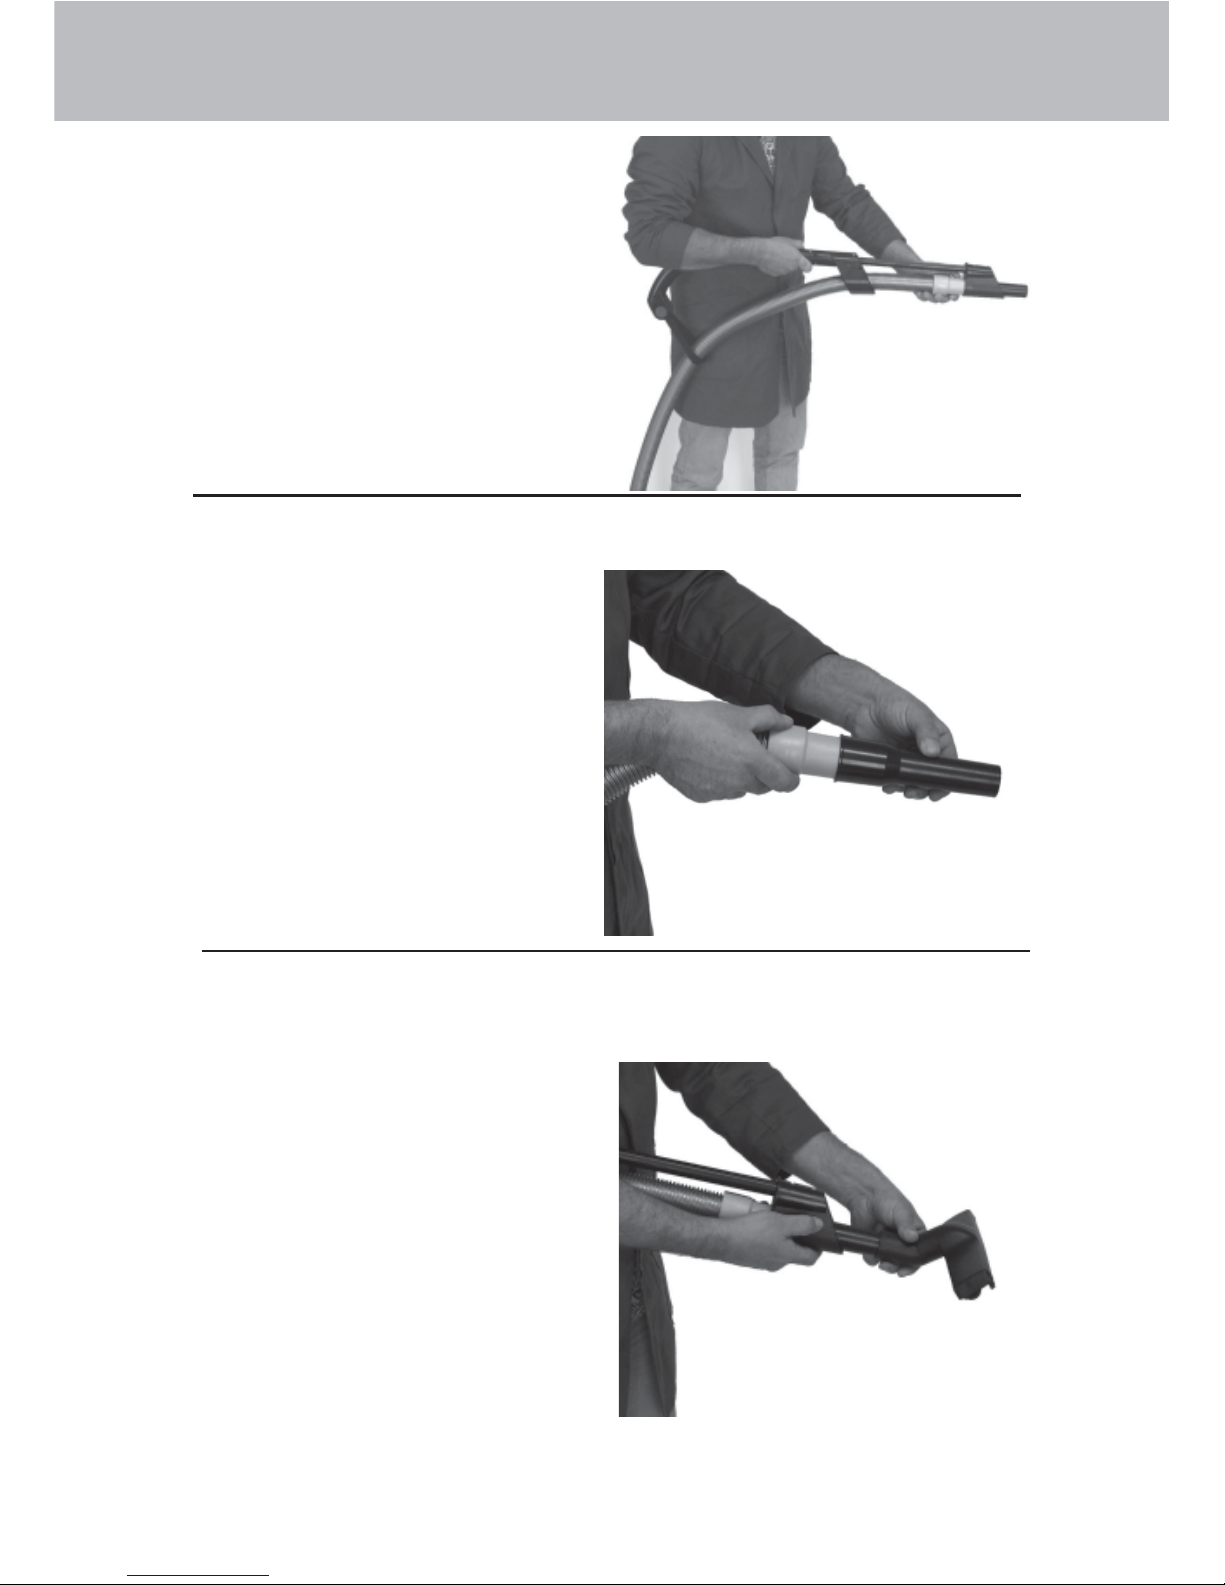
12
4. Connect the hose to the
suction handle
First put the hose through
the sling, then pull it through
the guide tunnel and plug it
into the nozzle holder.
or 4 a) Connect the hose to the reduction piece
5. Fit the suction nozzle to the nozzle holder
Start-up
Page 13

13
Start-up
Vacuuming dry material
Put a filter bag in the container before starting the cleaner.
The filter element will be wet after vacuuming wet material.
A damp filter element blocks quicker when vacuuming dry matter.
For this reason you should always use a dry filter element when vacuuming
dry material.
Do not vacuum aggressive solid matter.
Do not vacuum smoldering objects (hot ash,
embers etc.).
Do not vacuum combustible or explosive matter
(eg, magnesium, aluminium etc.).
Vacuuming liquids and mud
Always remove the filter bag before vacuuming liquids.
The use of special wet filter elements (order number 58 400 5) is
recommended.
The sensors will automatically shut down the vacuum when maximum
capacity is reached.
Do not vacuum combustible or explosive liquids
(eg, petrol, paint thinners etc.).
Do not vacuum aggressive liquids or solid matter
(acides, lyes, solvents etc.).
Compressed air
All cleaners have a compressed air aperture.
A suction hose can be fitted to this aperture.
The aperture has a cap which automatically
opens when the suction hose is fitted.
The cap closes when the hose is removed
and the cleaner switched off.
Page 14

14
Handling
Opening/closing the cleaner
To change the filter bag or remove the dirt
container you must first open the cleaner.
To open the cleaner, slacken the
locking brackets (13) on both sides of
the cleaner and swivel the top part (23)
upwards until the lug (20) engages.
Always clean the upper
rim (21) of the dirt
chamber before closing
the cleaner, in order
that the vacuum seals
(22) can function properly.
To close the cleaner, lift the top part (23) slightly and press it
sideways onto the lug (20) until it engages. Swivel the top part until it is back
on the chamber rim (21). Close the locking brackets (13).
Cleaning filter elements
When the cleaner is used without a filter bag, dust and dirt is deposited in
the filter elements.
The filter elements should be cleaned each time before the cleaner is
opened or when vacuuming performance drops.
To clean, move the handle (24) with the cleaner closed approx. 10 times
backwards and forwards. This vibrates the filter ribs and the dust will fall into
the dirt container. Slide the handle back into the cleaner when you are
finished.
The filter should be cleaned off each time before
the cleaner is opened when vacuuming without a
filter bag.
13
22
20
21
23
24
Page 15

15
Handling
Changing the filter bag
To change the filter bag first open the cleaner.
Remove filter bag cap
from suction orifice
(see print on bag).
Close the opening with
the plastic cap.
Lift the bag out of the dirt
chamber and dispose of it
responsibly.
Clean the dirt
chamber and the
space around the
vacuum turbine
thoroughly (wipe with
a damp cloth).
Put in a new filter
bag.
Fit the black plastic
cap into the
aperture.
Important!
Press the rim of the filter
bag tightly onto the
aperture.
Close the cleaner.
Page 16

16
Emptying the dirt container
To empty the dirt container, first open the cleaner.
Handling
Replace the container in the cleaner.
Put the lid back on the container, fitting the rim
through the aperture in the container and
pressing it into the fitting.
Close the cleaner.
Important!
Press the rim hard into the
fitting.
Lift the lid slightly from
the rear ...
... and pull it backwards
out of the container.
Take out the container
and dispose of the
contents responsibly.
Clean the dirt
container and the
space around the
vacuum turbine
thoroughly (wipe with
a damp cloth).
Page 17

17
Handling
Removing the suction head
To empty the dirt chamber, first take off
the top part of the cleaner - the suction
head.
Taking off the suction head
Open the cleaner (see page 11). Lift the
top part (23) slightly and press the lug
(20) from the side. Swivel the top part
further until it reaches the stop (vertical
position) and take it off horizontally
forwards.
Replacing the suction head
Slide the suction head from the front onto
the base. Make sure that both bolts in the
top part slide properly into the recesses.
Emptying the dirt chamber
Take off the suction head as described above. Dispose of the contents
responsibly. Clean the top rim of the dirt chamber and the space around the
suction turbine.
20
23
Page 18

18
Close the cleaner.
Handling
Place a new filter
element into the
cassette.
Hang the cassette in the
holder and tilt it upwards until
the locking buttons engage.
Press the locking buttons
of the filter cassette. Tilt
the cassette downwards.
Remove the filter
element and dispose
of it responsibly.
Clean the dirt chamber
and the space around
the suction turbine
(wipe with a damp
cloth).
Changing the filter elements
Open the cleaner.
Page 19

19
Do not damage the
cable or repair it
incorrectly!
Do not loop or kink the
hose or cable!
Never pull the hose or
cable over sharp edges!
W hat you must never do
Never put the nozzles,
suction pipes and
hose close to your
eyes or ears when
using the cleaner!
Page 20

20
Oblique nozzle rubberOblique nozzle rubber
Oblique nozzle rubberOblique nozzle rubber
Oblique nozzle rubber
Order number 58 402 2
Animal care nozzlesAnimal care nozzles
Animal care nozzlesAnimal care nozzles
Animal care nozzles
VV
VV
V
acuum combacuum comb
acuum combacuum comb
acuum comb
Order number 58 401 9
VV
VV
V
acuum brushacuum brush
acuum brushacuum brush
acuum brush
Order number 58 402 0
Extension pipeExtension pipe
Extension pipeExtension pipe
Extension pipe
1x 50cm plastic, order number 58 401 1
3x 33cm stainless steel,
order number 58 401 4
Hand pipe, angularHand pipe, angular
Hand pipe, angularHand pipe, angular
Hand pipe, angular
Plastic, order number 58 401 3
Stainless steel, order number 58 401 5
Gap nozzle 300 mm longGap nozzle 300 mm long
Gap nozzle 300 mm longGap nozzle 300 mm long
Gap nozzle 300 mm long
Order number 58 402 3
Additional dirt containerAdditional dirt container
Additional dirt containerAdditional dirt container
Additional dirt container
Ventos 25, order number: 45 302 9
Ventos 35, order number: 45 303 0
Additional KRÄNZLE-accessories for ...
Universal brush nozzleUniversal brush nozzle
Universal brush nozzleUniversal brush nozzle
Universal brush nozzle
Order number 58 401 7
Capet nozzleCapet nozzle
Capet nozzleCapet nozzle
Capet nozzle
Order number 58 401 8
Automatic power-upAutomatic power-up
Automatic power-upAutomatic power-up
Automatic power-up
Order number 58 405 1
Page 21

21
Cleaning carpets and other floor surfaces
with the carpet nozzle
(order number 58 401 8)
Cleaning of irregular and coarse surfaces
using oblique type rubber nozzle (order
number: 58 402 2)
Separate vacuuming of machinery using
different work materials (eg, brass and
aluminium) by simply changing the dirt
container. (Ventos 25 order number: 45 302
9 Ventos 35 order number: 45 303 0)
Vacuuming dust when working with
electrical tools controlled by power-up of
the vacuum when the electrical tool starts.
(order number 58 405 1)
with other KRÄNZLE - accessories
Vacuuming in tight and and deep crevices
eg, between car seats, or cleaning
machinery with the 300 mm long gap
nozzle (order number: 58 402 3)
Page 22

22
Complete cleaner
Page 23

23
Item Description Qty Order no.
1 Saugschlauch DN 36 x 3,5 m 1 45 281 9
2 Sauggriff 1 45 477 8
3 Zubehörbox 1 45 473 1
4 Typenschild für Ventos 25 1 45 236 1
4.1 Typenschild für Ventos 35 1 45 236 2
6 Filtersack für Ventos 25 (5 Stück) 45 413 9
6.1 Filtersack für Ventos 35 (5 Stück) 45 414 0
12 Faltenfilter (2 Stück) 45 470 0
13 Schmutzeimer Ventos 25 kpl. mit Deckel 1 45 280 6
13.1 Schmutzeimer Ventos 35 kpl. mit Deckel 1 45 280 5
14 Netzanschlußkabel 1 45 235 7
16 Bodendüse mit 2 Einsätzen 1 58 402 1
17 Polsterdüse 1 58 400 9
18 Saugpinsel 1 58 400 8
19 Fugendüse 200 mm 1 58 400 7
20 Adapter Saugschlauch auf Zubehör 1 58 400 6
21 Verlängerung 50 cm 1 58 401 1
22 Handrohr gebogen mit Luftschieber 1 58 401 3
Spare parts list KRÄNZLE VENTOS 25 / 35
Complete cleaner
KRÄNZLE VENTOS 25 / 35
Page 24

24
Cover
Page 25

25
Item Description Qty Order no.
1 Haube mit Pos. 3 1 45 305 3
3 Klammern 1 45 305 4
5 Verschlußklammer 2 45 220 9
6 Griff 1 45 300 5
12 Drehknopf Saugleistung 1 45 305 5
13 Blende 1 45 300 8
16 Schalter EIN / AUS 1 45 305 6
18 Steuerplatine 1 45 305 7
20 Griff Abreinigung 1 45 301 2
22 Abreinigungsgabel 1 45 305 8
23 Lagerbolzensatz 1 45 301 8
26 Filtergehäuse 1 45 305 9
28 Dichtungssatz Haube 1 45 306 0
30 Wasserkontakt (2x) 1 45 306 1
31 Filterkasette 2 45 202 0
32 Litzensatz 1 45 306 2
34 Filter element main filter (2 pcs.) 45 470 0
Spare parts list KRÄNZLE VENTOS 25 / 35
Cover
KRÄNZLE VENTOS 25 / 35
Page 26

26
Turbine
Page 27

27
Item Description Qty Order no.
Spare parts list KRÄNZLE VENTOS 25 / 35
Turbine
KRÄNZLE VENTOS 25 / 35
1 Turbinengehäuse 1 45 306 3
4 Dämmatten Turbine (5-teilig) 1 45 277 9
6 Netzanschlußkabel 1 45 235 7
8 Zugentlastungsschelle 1 45 306 4
9 Anschlußklemme 1 45 209 9
10 Deckel Klemmkasten 1 45 306 5
11 Turbinengehäuse 1 45 306 6
12 Dichtungen Luftkanal (3-teilig) 1 45 306 7
15 Turbine mit Motor 1 45 306 8
18 Bürstensatz für Turbinenmotor 1 45 302 3
19 Turbinenhaube 1 45 306 9
25 Stütze Saugkopf 1 45 224 5
Page 28

28
Chassis
Page 29

29
Item Description Qty Order no.
1 Fahrwerk mit Dichtung 1 45 302 5
2 Lenkrolle D100 Tandem 2 45 208 3
3 Drehachse 2 45 307 0
5 Radkappe 2 45 200 8
7 Bremshebel 2 45 221 1
10 Scheibe 40 x 6 x 1,5 (Stahl) 2 45 216 7
11 Rad komplett 2 45 303 6
12 Dämmklotz 2 45 236 7
14 Blasluftklappe 1 45 200 4
15 Abluftboden 1 45 200 3
17 Winkelhutze 1 45 307 1
31 Behälteroberteil 1 45 303 8
32 Lagerschalensatz 1 45 303 4
38 Ansaugrohr mit Dichtring 1 45 307 2
40 Kabelhalter mit Schraube und Mutter 1 45 303 5
41 Steckhalter 1 45 225 7
42 Vierkantmutter M 6 2 45 245 3
43 Schraube M 6 x 25 DIN 7985 2 45 217 0
Spare parts list KRÄNZLE VENTOS 25
Chassis
KRÄNZLE VENTOS 25
Page 30

30
Chassis
Page 31

31
Item Description Qty Order no.
1 Fahrwerk mit Dichtung 1 45 302 5
2 Lenkrolle D100 Tandem 2 45 208 3
3 Drehachse 2 45 307 3
5 Radkappe 2 45 200 8
7 Bremshebel 2 45 221 1
10 Scheibe 40 x 6 x 1,5 (Stahl) 2 45 216 7
11 Rad komplett 2 45 303 6
12 Dämmklotz 2 45 236 7
14 Blasluftklappe 1 45 200 4
15 Abluftboden 1 45 200 3
17 Winkelhutze 1 45 307 1
21 Behältermodul 1 45 307 4
22 Türe Staufach 1 45 307 5
23 Riegel für Türe 1 45 206 8
31 Behälteroberteil 1 45 303 8
32 Lagerschalensatz 1 45 303 4
38 Ansaugrohr mit Dichtring 1 45 307 2
40 Kabelhalter mit Schraube und Mutter 1 45 303 5
41 Steckhalter 1 45 225 7
42 Vierkantmutter M 6 2 45 245 3
43 Schraube M 6 x 25 DIN 7985 2 45 217 0
Spare parts list KRÄNZLE VENTOS 35
Chassis
KRÄNZLE VENTOS 35
Page 32

32
Dirt container
Page 33

33
Item Description Qty Order no.
1 Schmutzeimer Ventos 25 1 45 206 1
1.1 Schmutzeimer Ventos 35 1 45 206 0
2 Griff für Schmutzeimer 1 45 600 7
3 Halteklotz li + re für Eimergriff 1 45 305 2
4 Kunststoffschraube 5,0 x 25 2 41 414
5 Deckel für Schmutzeimer 1 45 409 1
6 Saugstutzen 1 45 411 9
7 Griff für Eimerdeckel 1 45 409 2
8 Kunststoffschraube 4 45 245 0
9 Vorfilter (Edelstahl) 4 45 411 8
Container Ventos 25 kpl. 45 302 9
consisting of items 1 - 4
Container Ventos 35 kpl. 45 303 0
consisting of items 1.1 - 4
Lid compl. 45 473 0
consisting of items 5 - 9
Spare parts list KRÄNZLE VENTOS 25 / 35
Dirt container with lid and integrated front filter
KRÄNZLE VENTOS 25 / 35
Page 34

34
Suction handle
Page 35

35
Item Description Qty Order no.
1 Schale links 1 45 420 2
2 Schale rechts 1 45 420 3
3 Schlaufenteil 1 45 420 4
4 Gurtschlaufe 1 45 411 5
5 Deckel 1 1 45 420 5
6 Deckel 2 1 45 420 6
7 Kunststoffschraube 3,5 x 12 10 45 429 6
8 Schieber 1 45 420 7
9 Gleitstück 1 45 420 8
10 Kunststoffschraube 3,5 x 8 1 45 421 7
11 Druckfeder 1 45 420 9
12 Zylinderstift 3,0 x 21 1 45 421 0
13 Verlängerung 1 45 478 6
14 Düsenhalter 1 45 407 8
15 Kunststoffsenkschraube 5,0 x 22 2 45 421 1
16 Steckführung 1 45 423 1
17 Gummifeder 1 45 437 3
Handle compl. 45 477 9
consisting of items 1- 12
Suction handle compl. 45 477 8
consisting of items 1- 16
Spare parts list KRÄNZLE VENTOS 25 / 35
Suction handle
KRÄNZLE VENTOS 25 / 35
Page 36

36
Item Description Qty Order no.
1 Base with item 4 1 45 302 6
2 Cover with items 3, 4, 5 1 45 302 7
3 Handle with item 4 1 45 473 4
4 Bolts 4 45 411 4
5 Locking brackets 2 45 220 9
Box complete 45 473 1
Items 1 - 5
Spare parts list KRÄNZLE VENTOS 25 / 35
Accessories box
KRÄNZLE VENTOS 25 / 35
Page 37

37
Circuit diagram
Code Colour
A Black
B Black
E Red
G Blue
H Black
K Black
M Black
N Black
PTC White
Master
switch
Terminal
Power cable
Water contacts
Temperature overload
switch Turbine
Control board
Turbine motor
Vacuum regulator
Page 38

38
Servicing and Care
CAUTION!!!
Always remove the plug from the electrical socket
before carrying out servicing and care work!!!
Servicing and care
All servicing and repair work requiring the cover of the motor to be opened
may only be carried out by authorised customer-service workshops.
Electrical inspections must be carried out in accordance with the accident
prevention rules (VBG 4) and DIN VDE 0701 parts 1 and 3.
These inspections must be carried out at regular intervals, as set forth in
DIN VDE 0702 and are necessary after commissioning or modifications.
Warranty
This warranty covers material and/or workmanship related defects only and does not
extend to ordinary wear.
Machine must be operated according to enclosed operating instructions which are part of
present warranty conditions.
A
ll products sold directly to private customers are warrantied for a period of 24 months,
whereas the warranty period for industrial purchases is limited to 12 months.
In case of any warranty claims, please have your HP cleaner together with accessories
and your purchase document ready and contact your nearest dealer or authorized service
point which can also be looked up in the internet at www.kraenzle.com
.
Page 39

39
I. Kränzle GmbH
Elpke 97 . 33605 Bielefeld
Hochdruckreiniger
High-pressure-cleaners
Nettoyeurs À Haute Pression
Herewith we declare
that
comply with the following
provisions applying to it
Applied
harmonized standards
in particular
EC declaration of conformity
Bielefeld, den 23.11.04
(Managing Director)
Kränzle Ventos 25
Kränzle Ventos 35
Maschinenrichtlinie 89/392/EWG
Niederspannungsrichtlinie 73/23 EWG
EMV -Richtlinie 89/336 EWG
Lärmrichtlinie 2000/14/EG
EN 60 335-2-79:2004
EN 55 014-1 / A2:2002
EN 55 014-2 / A1:2001
EN 61 000-3-2 / A14:2000
EN 61 000-3-3 / A1:2001
Page 40

Reprint only allowed with the authorization of
As date of 23. 11. 2004
Best.-Nr.: 30 280 1
R
 Loading...