

Kranzle Therm 870-1, therm 635-1, therm 875-1, therm 895-1, therm 1165-1 Operating Manual
...Page 1

DIN EN
ISO 9001
Operating manual
Hot Water High-Pressure Cleaners
Read and conform safety instructions before use!
- GB -
Page 2

2
therm 870-1
Operating pressure,
continuously adjustable
30 - 170 bar
Admissible overpressure 190 bar
Water output Qmax 870 l/h
Nozzle size, flat jet nozzle
D25045
Hot water output temperature (water supply 12 °C)
max. 80 °C
Steam level max. 140 °C
Heating oil jet - Oil pressure
1,5 Gph-10 bar
Heating oil consumption
at max. heating output
5,3 kg/h = 6,3 l/h
Heating output 55 kW
Exhaust gas mass flow 0,035 kg/s
Fuel tank 25 l
High pressure hose for
machines without hose
drum
10 m
High pressure hose for
machines with hose
drum
20 m
Connected load
400 V, 8,7 A, 50 Hz
Power input P 1 - 4,8 kW
Power output P 2 - 4,0 kW
Weight 220 kg
Dimensions without
reel, L x W x H in mm
1050 x 800 x
1000
Sound level acc. to DIN
45 635
86 dB (A)
Guaranteed sound level L
WA
89 dB (A)
Vibrations at lance ca. 21 N
Recoil at lance
2,2 m/s
2
Order No.
without hose drum
41.340
Order No.
with hose drum
41.340 1
Tecnical data
Permissible tolerance for figures ± 5 % in acc. with VDMA uniform sheet 24411
Page 3

Tecnical data ..........................................................................................................................2
Contents ..........................................................................................................................3
Overview “This is what you have purchased” ............................................................................4
Description of appliance ............................................................................................................5
General rules ..........................................................................................................................6
Safety precautions – accident prevention ..................................................................................7
That's what you have to observe ...........................................................................................9
Kränzle- technology ...............................................................................................................10
Water and cleaning system .............................................................................10
Lance and spray gun ...................................................................................... 11
High pressure hose and spray device ............................................................. 11
Total stop system ............................................................................................12
Pressure control valve – safety valve .............................................................12
Motor protecting switch ..................................................................................12
Thermostat ......................................................................................................12
Heat exchanger ...............................................................................................13
Commissioning ......................................................................................................................14
Usage as a cold water high pressure cleaner .................................................16
Usage as a hot water high pressure cleaner ..................................................17
Steam level .....................................................................................................17
When using detergents ...................................................................................18
Decommissioning - frost protection ..........................................................................................19
Care and Maintenance (weekly/yearly) ..................................................................................20
Changing the oil ..............................................................................................21
Decalcifying the heating coil ...........................................................................21
Fuel System ....................................................................................................22
Ignition electrodes ........................................................................................... 22
Particular rules, directives and inspections ..............................................................................23
Circuit diagramme ....................................................................................................................24
Troubleshooting .....................................................................................................................26
Pipeline plan ........................................................................................................................33
Inspections – inspection reports ..............................................................................................34
EG – Declaration of Conformity ............................................................................................... 36
Guarantee ........................................................................................................................37
Inspection sheet .......................................................................................................................38
3
Contents
Page
Page 4
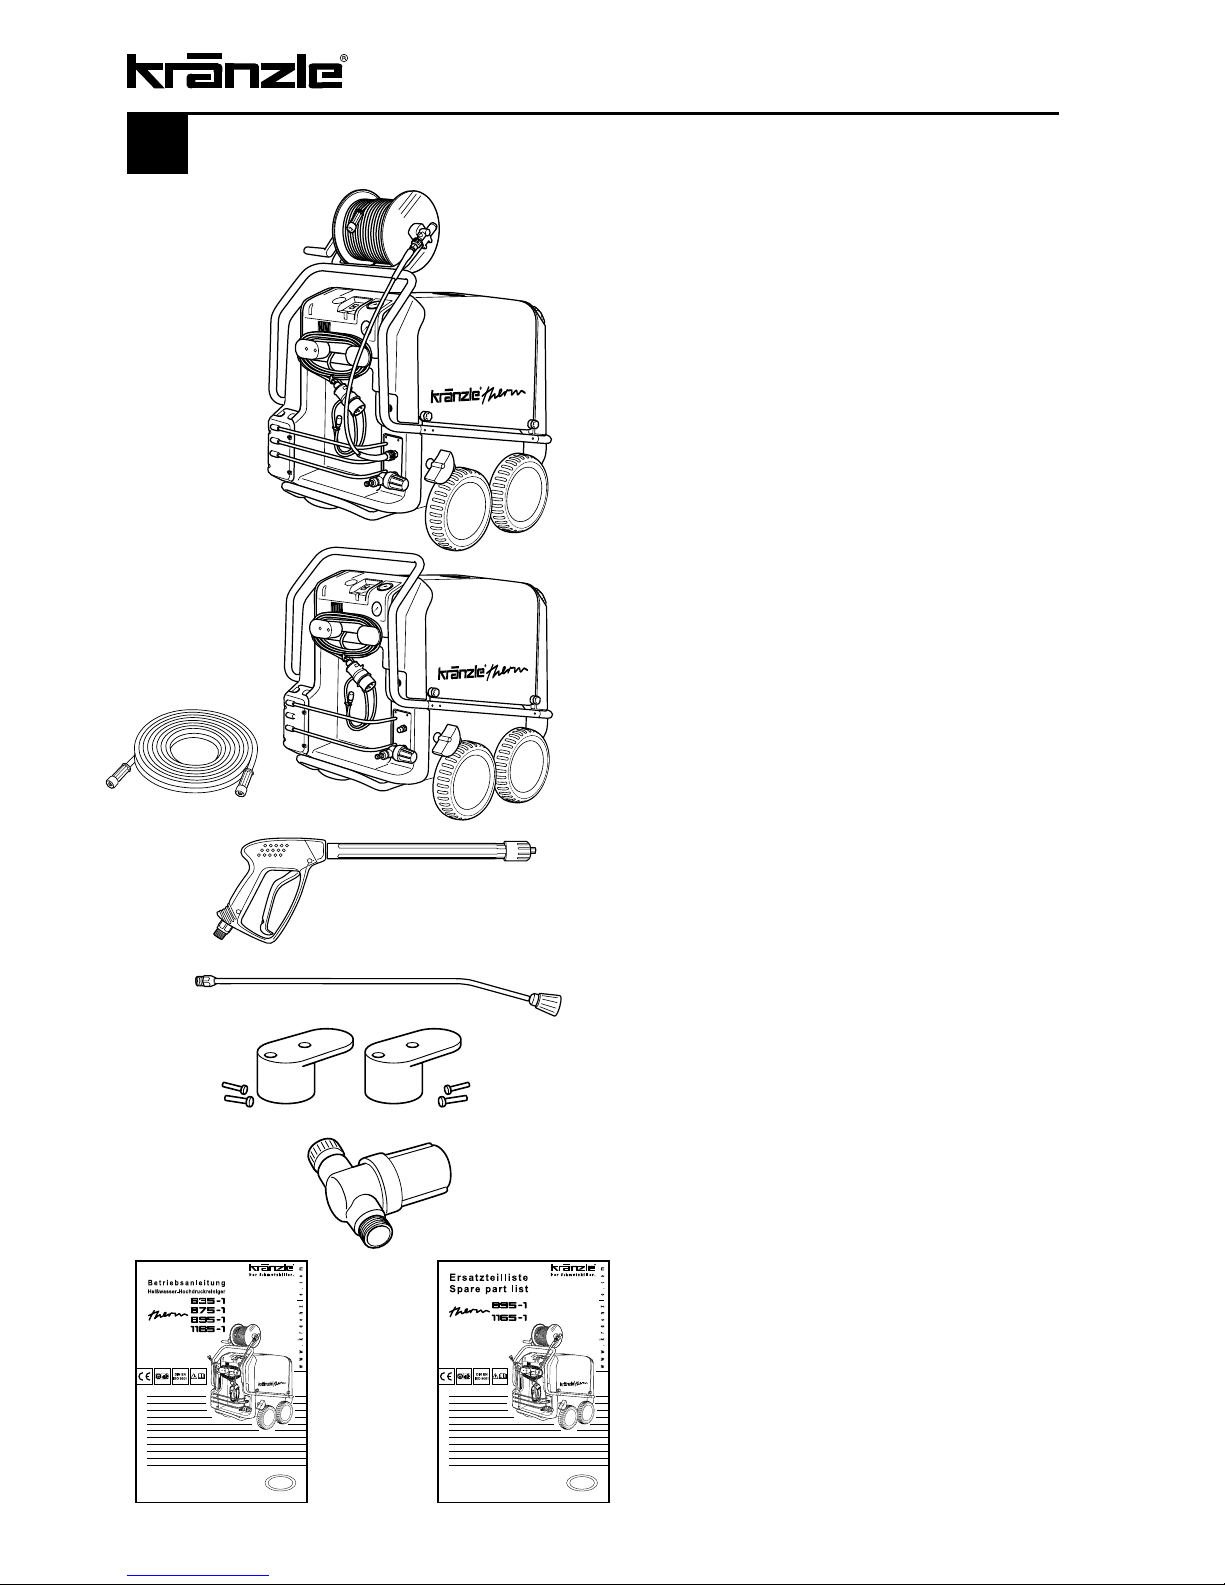
1.
Kränzle high-pressure cleaner therm
with hose drum and 20 m steel-weave
high-pressure hose NW 8
or
Kränzle high-pressure cleaner therm
without hose drum but with 10 m steel-
weave high-pressure hose NW 8
2.
Safety spray gun with insulated handle
and screw connection
6.
Operating manual + Spare parts list
4.
Holding devices for cable with screws
5.
Water intake filter
3.
Lance with flat-jet nozzle
+
4
This is what you have purchased
Page 5
1 Waterinletconnectionwithlter
2 Power cable
3 Winder for cable
4 Suction hose for detergent
5 Hose drum (option)
6 Spray gun
7 Spray pipe attachment
5
Description of appliance
Master switch (appliance ON-OFF)
Heating switch (burner ON/OFF
)
Brief operating instructions
Pressure gauge – water pressure
Digital thermostat for adjusting
water temperature
Pressure gauge - fuel
8 Storage bin for spray gun and pipe
9 Brake
10 Storage bin for accessories
11 Fuel tank
12 Filler aperture for fuel
13 High pressure outlet
14 Fuel drainage screw
5
9
1
13
2
4
6
7
8
10
12
3
11
14
Page 6

Range of application
This machine may only be used for cleaning facades, vehicles, containers, pavement
slabs, stables, machines and smilar objects.
Inspections
The machine must be inspected according to the “Guidelines for Liquid Spray Devices”
at least once every 12 months by a qualified person, to ensure that continued safe
operation is guaranteed. The results of the inspection are to be recorded in writing. This
may be done in any form. For inspection reports see pages 34 - 35.
High-pressure cleaners used for commercial purposes have to be
checked by a qualified person at least every 12 months!
Accident prevention
The machine is designed for accidents to be impossible (if used according to these
instructions). Please read safety notes included in these instructions carefully before
using the machine and act correspondingly. Operating staff has to be instructed according to this manual. The “Guidelines for Liquid Spray Devices” must be complied with.
Setting up - Location
Neither set up and operate the machine in rooms where there is a risk
of fire or explosion nor put it into puddles. Do not use the machine
under water.
During the combustion process air is needed and exhaust gas emerges. If the
machine is operated in a confined space, precautions have to be taken to safely
exhaust the fumes. Furthermore a sufficient ventilation has to be provided for.
Never shut the exhaust gas outlet on top of the machine. Never stoop over this
aperture and never reach into it. Emerging gases are extremely hot!
Do not jam the trigger of the gun during operation!
When carrying through service and maitenance tasks the machine has to be cut off
the power supply system. Put main switch to "0" and pull plug out of socket.
Never operate the machine if cables or other safety-relevant parts (e.g. excess pressure valve, high-pressure hose, spraying devices, etc.) are defective.
6
General rules
Safety notes
Page 7
7
Safety notes
Never operate the machine without supervision.
The machine may only be operated by persons who have been instructed accordingly.
Some parts inside the machine, all water conducting components and all metal parts
of gun and lance are hot during hot water operation. Keep all hoods and protective
covers closed during operation and never touch any metal parts of gun or lance.
Persons operating the machine should wear the necessary protective clothing, i.e.
waterproof clothing, rubber boots, safety goggles, headwear etc. It is prohibited to
use the machine in close vicinity to people lacking suitable protective clothing.
The high pressure spray can generate a high level of noise. If noise exceeds the
maximum allowed levels, users and others in the vicinity must wear suitable ear
protection
.
Do not spray against matter containing asbestos or other hazardous substances.
Only use light heating oil EL (DIN 51 603) or diesel (DIN EN 590). The use of any other
fuel may be hazardous and dangerous (risk of explosion).
For safety reasons always switch the main switch to "0"- postion after having finished the cleaning task (disconnection from power supply).
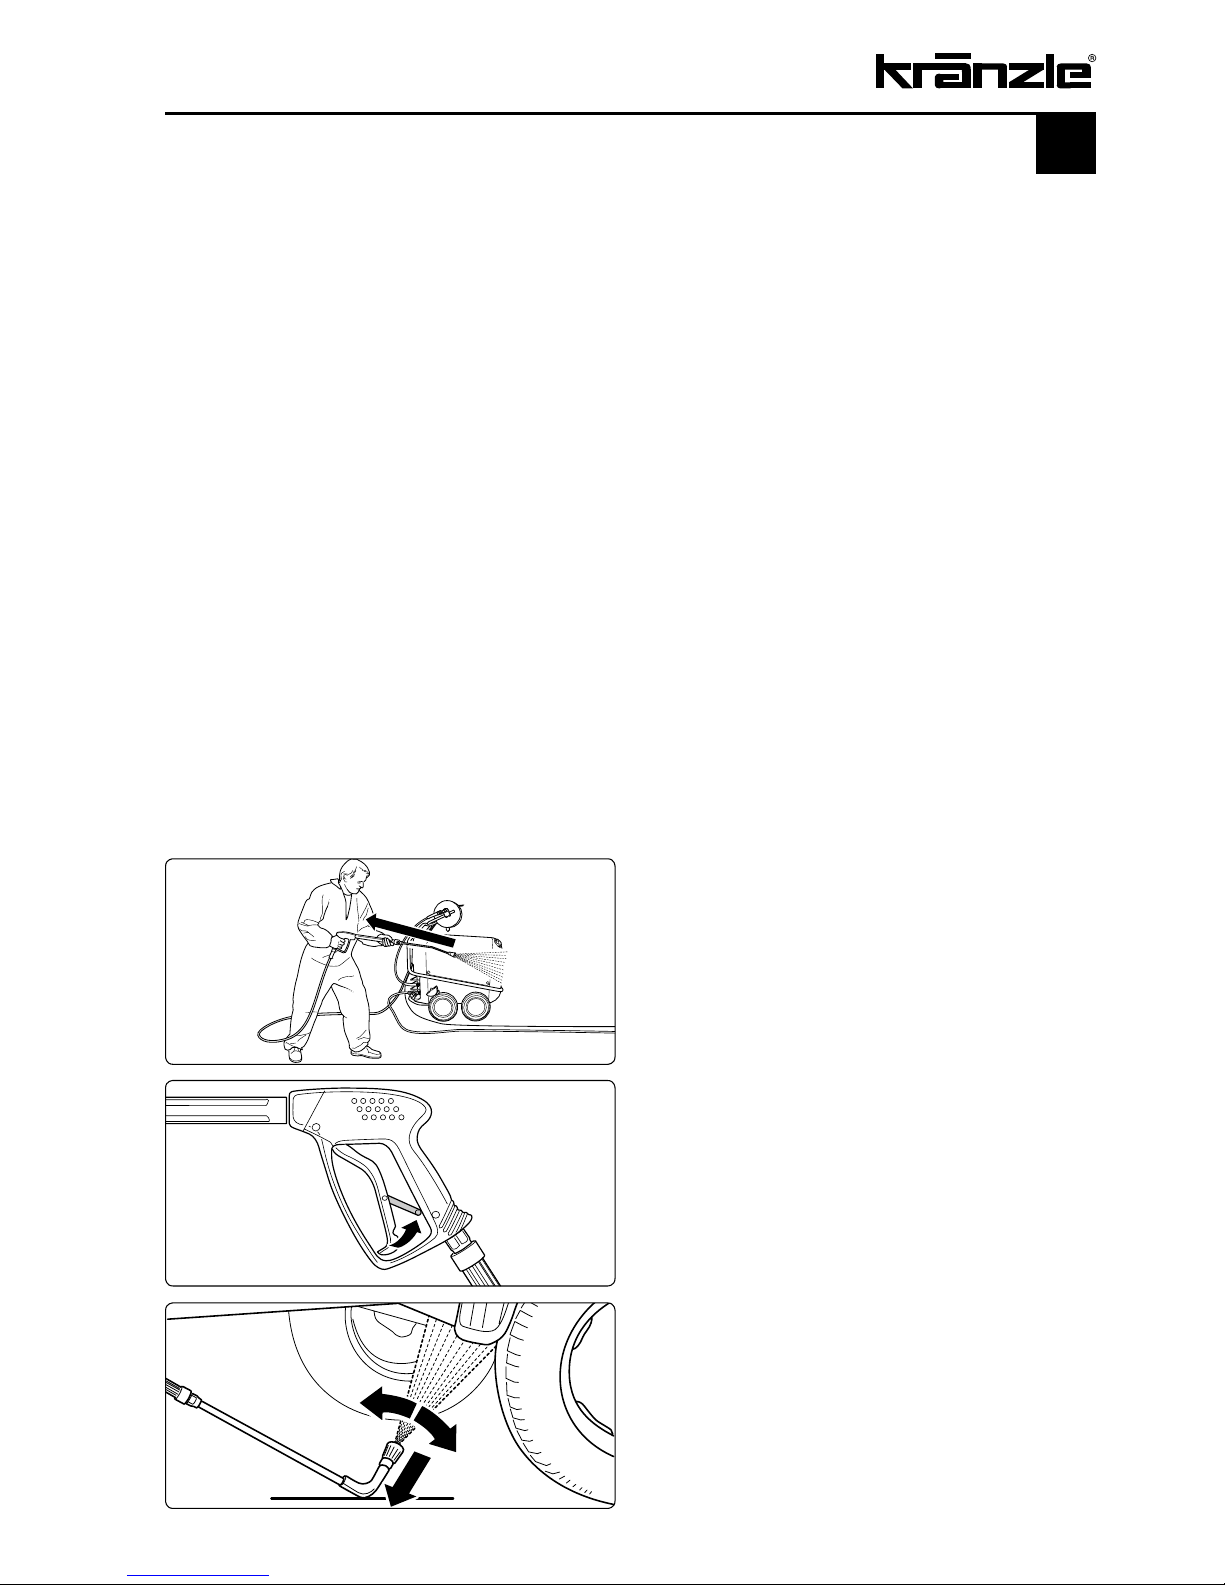
Bear in mind that during cleaning tasks
with a high-pressure water jet a significant
recoil at the lance arises (see technical
data on page 2).
Apply the safety catch on the spray gun
after each use, in order to prevent
unintentional spraying!
Always aim the underbody lance! Bear in
mind when using a curved or angled
spraying lance that there is a significant
amount of torque in the recoil!
Page 8
8
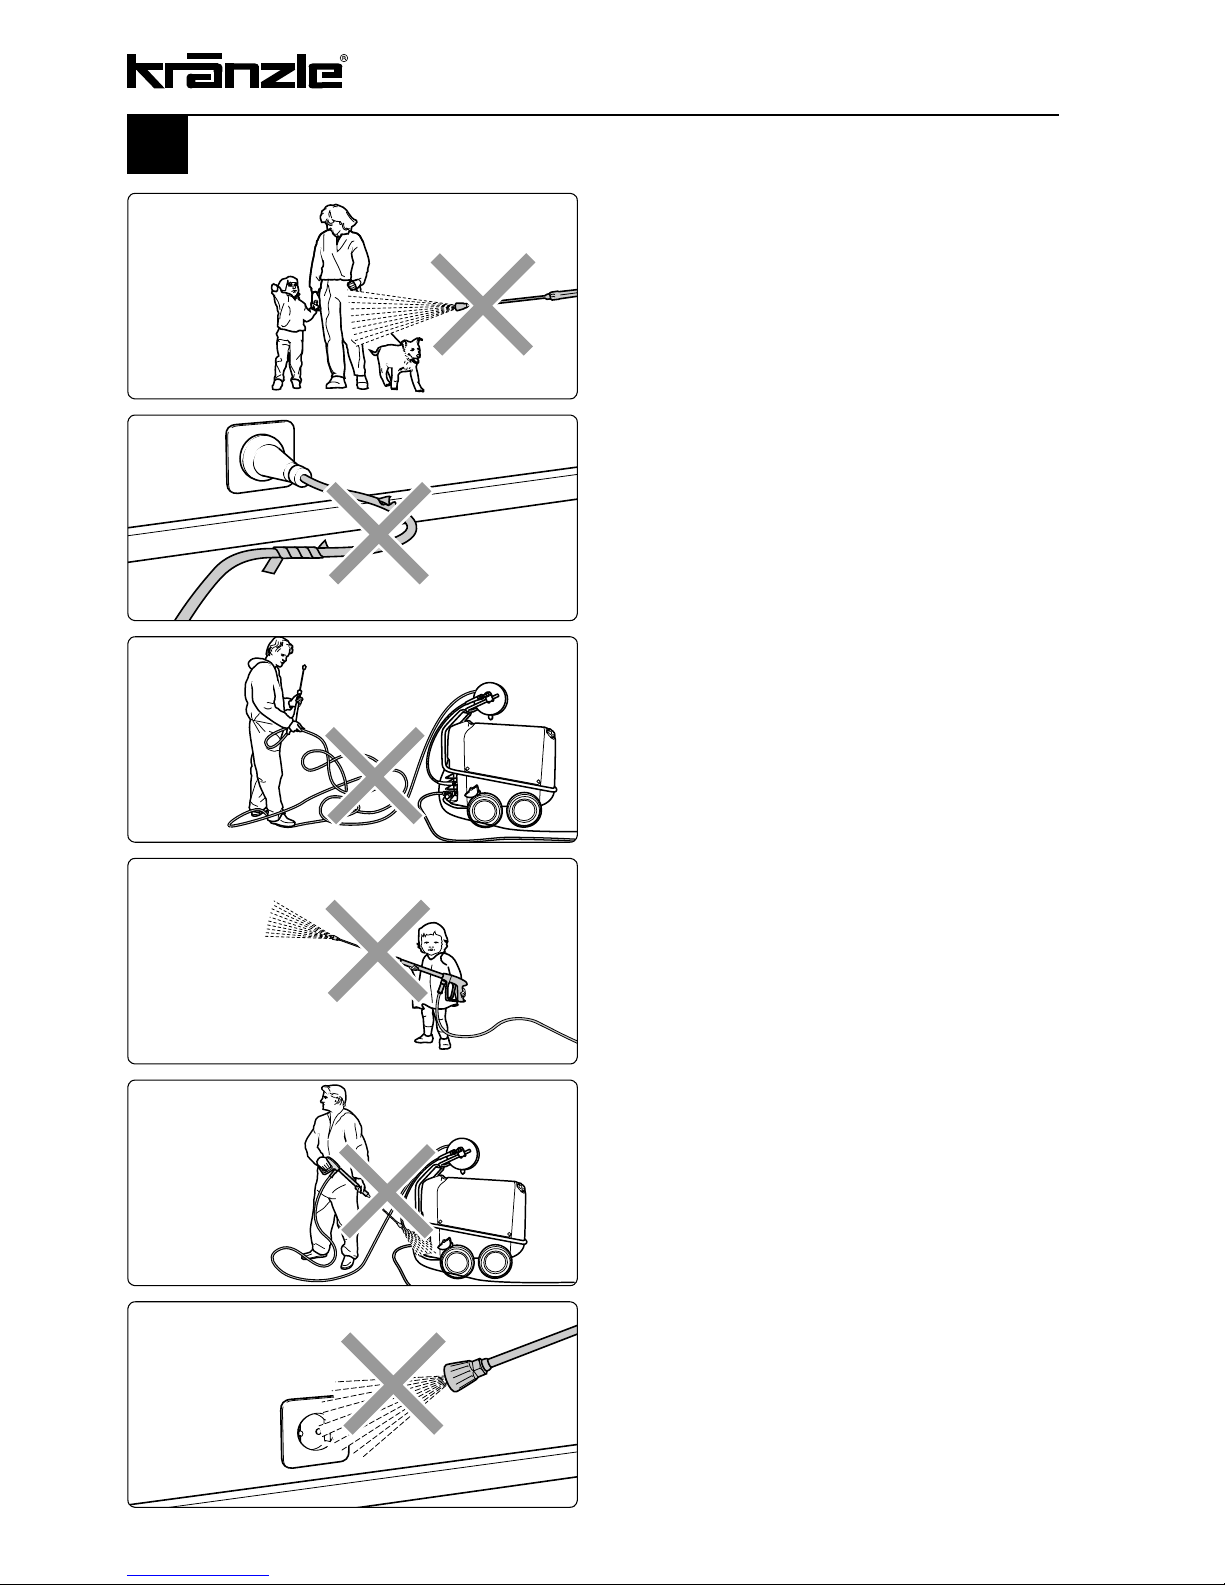
Safety notes - This is prohibited!
Never allow children to use the high
pressure cleaner!
Never direct the water jet at the
machine itself!
The machine may not be placed within
reach of the water jet spray mist!
Never direct the water jet at a power
socket!
Never direct the high-pressure water jet
towards the operator him-/herself or
towards other persons, not even for
cleaning clothing or shoes.
Never direct the water jet at animals!
Only use power cables which are in
perfect working order! Do not damage
the power cable or repair it incorrectly!
Never pull the high pressure hose if it
has formed kinks or “nooses”!
Never pull the hose over sharp edges!
Page 9
9
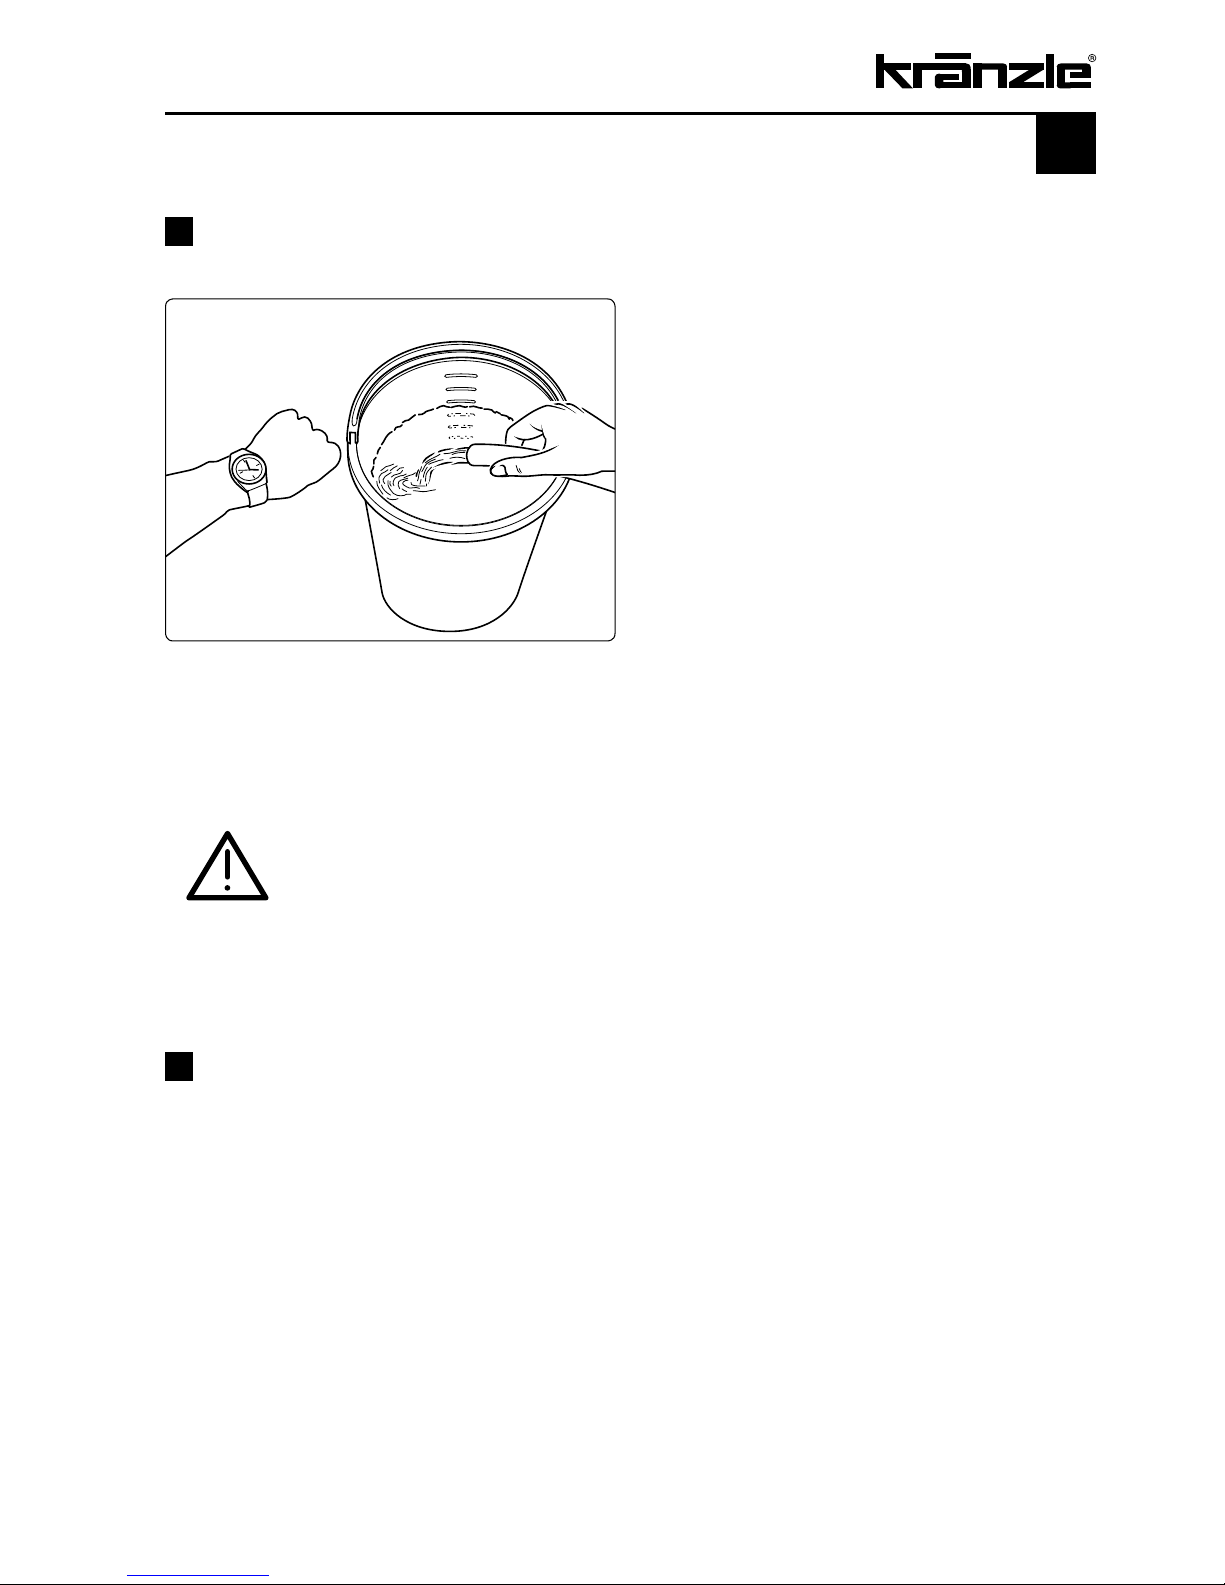
Please note - important!
Lack of water
Lack of water occurs more often than you
probably believe. The more powerful a
high-cleaner is the greater is the danger
that a lack of water occurs. If there is only
an insufficient amount of water available,
cavitation arises inside the pump, which is
normally noticed too late or even not at all.
The pump will be destroyed!
Please check the available quantity of
water by filling a bucket with litre scale for
half a minute
.
Required minimum quantities: see technical data
If the metered quantity of water is too small, you have to use a
different water connection, guaranteeing the necessary output.
Lack of water leads to an accelerated wear of the joints (no
guarantee)
Connection to water supply
Please pay attention to the regulations of your waterworks company! In accordance
with DIN EN 61770, the machine may not be directly connected to the public drinking
water supply lines. A brief connection however is permissible according to DVGW
(German Association for Gas and Water Affairs) if a tube ventilator with check valve
(Kränzle Order-No. 41.016 4) is built into the water supply. Also indirect connection to
the public drinking water supply lines is permissible by way of free emission in
accordance with EN 61 770; e.g. by using a reservoir with a float valve.
Direct connection to a non-drinking water supply line is permissible.
Page 10
10
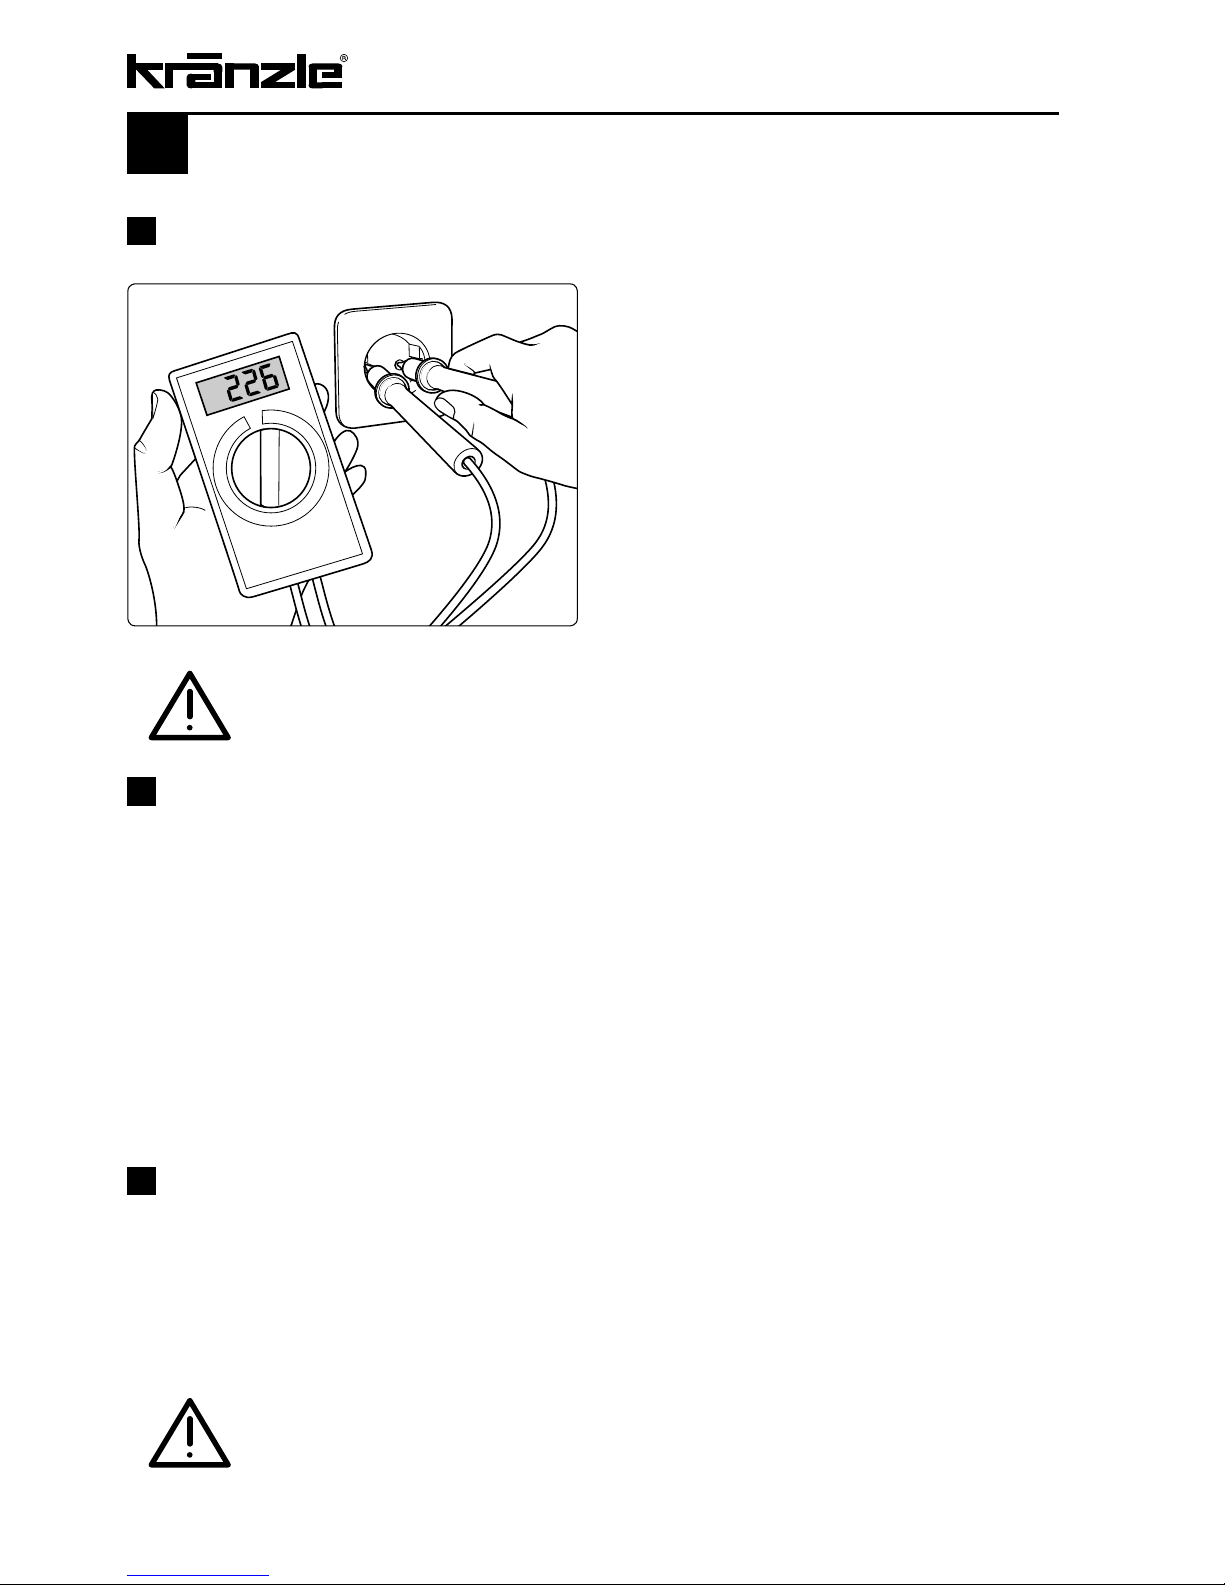
Please note - important!
Insufficient quantity of electricity
If there are too many collectors in your
proximity connected to the network at the
same time, the available voltage and the
current intensity may decline.
Consequently the motor of the high-pressure cleaner does not start or even blows.
The power supply may also be insufficient
if the power cable is too long or too thin. If
extension cables are too long, this may
lead to a voltage drop causing
malfunctions or start-up difficulties
Electrical connection
The machine is supplied with an electrical power cable with plug. The mains plug must
be fitted to a standard grounded socket with a 30 mA residual current operated device.
The socket must be protected with a 16A delay action fuse on the mains side. When
using an extension cable, this must have an earthed lead which is properly connected to
the socket. The conductors in the extension cable must have a minimum cross section of
1.5 mm². Plug connections must be of a spray-proof design, and may not be located on
a wet floor. With extension cables of more than 10 m the minimum cross section must
be 2.5 mm! When using a cable drum, always keep the cable wound as far as possible
.
Check the line fusing and have the voltage and the available current
intensity checked by an expert in case of uncertainty.
Water and Cleaning System
The water is fed to the high-pressure cleaner under pressure (2-8 bar pre-pressure). A
float valve regulates the water flow in the storage tank. Then the water is sucked directly
from the storage tank by the high-pressure pump and forced with the adusted pressure
through the heat exchanger to the safety spray lance. The high pressure jet is formed by
the nozzle at the end of the safety lance.
Environmental, refuse disposal and water protection regulations
must be observed!
Kränzle technology
Page 11
11
Kränzle technology
Lance with trigger gun
The machine can only be operated when the safety trigger is squeezed. When the lever
is squeezed, the spray gun opens. The liquid is then pumped to the nozzle. The spray
pressure increases and quickly reaches the selected operating pressure. When the trigger is released, the trigger gun closes and any further spraying of liquid from the lance is
stopped. The motor stops.
When actuating the gun once more the pressure control valve - safety valve closes and
the motor is started again. The pump resumes feeding water to the spraying lance with
the selected operating pressure. When the gun is closed, the water hammer opens the
pressure control valve - safety valve and the motor is switched off by the pressure
switch.
The trigger gun is a safety device. Repairs should only be performed
by qualified persons. Should replacement parts be required, use only
components authorized by the manufacturer.
High pressure hose and spraying device
The high pressure hose and spraying device supplied with the machine are made of high
grade material, they are also optimized for the machine and marked as required by the
appropriate regulations.
If replacement parts are required, only such parts that are authorized by the manufacturer and which bear the markings required by the appropriate regulations may be used.
The high pressure hose and spray device must be connected in a pressure-tight
manner.
The high pressure hose may not be driven over, pulled excessively, or twisted. The
hose may under no circumstances be pulled over sharp edges, since otherwise the
guarantee is automatically void.
Hoses are wearing parts. The guarantee only covers defects of fabrication no
external damages whatsoever.
Defective high-pressure hoses and spraying devices may not be repaired. They
always have to be replaced.
Page 12
12
Kränzle technology
Pressure control valve-safety valve
The pressure control valve allows full adjustment of the quantity and pressure of the
water. The safety valve protects the machine from excessive pressure and cannot be
adjusted beyond the admissible operating pressure. The setting nuts are sealed with
lacquer.
Replacements, repairs, new adjustments and sealing operations may
only be performed by trained personnel.
Motor protection switch
The pump motor is protected from overload by a motor protection switch, which cuts out
the motor in the event of overload. To start the motor again the main switch has to be
switched off and then on again. However should the switch trip frequently, the cause of
the malfunction should be located and rectified.
Replacements and inspection work should only be performed by
qualified persons when the machine is disconnected from the power
supply, i.e. with plug pulled out from the electrical socket.
Total stop system
The machine is fitted with a Total-Stop-System. If the gun is closed for longer than
approx. 20 seconds, the machine switches off automatically, after 20 minutes the
machine moves to safety switch off and you must use the main switch to turn it back on.
The machine restarts automatically when the gun is operated, provided that the master
switch is on.
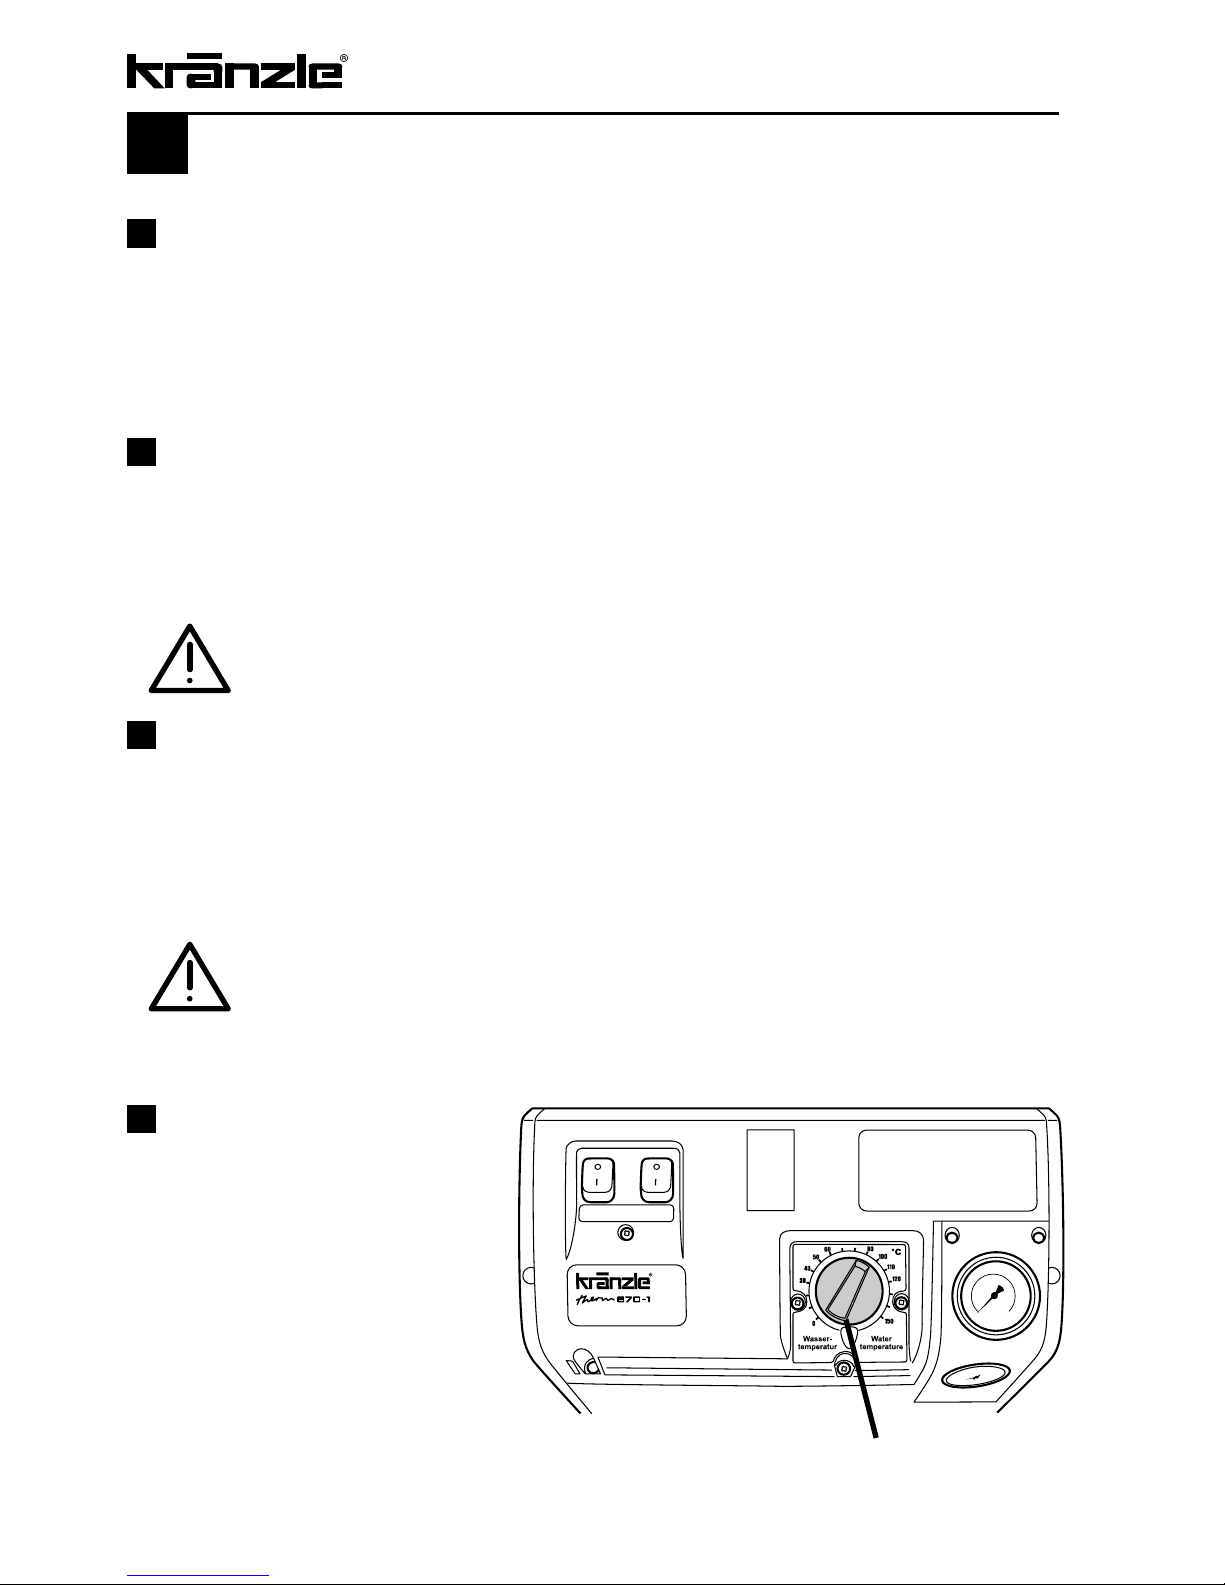
Thermostat
The thermostat with rotary control
switch controls the temperature
of the spray water.
Use the rotary control switch to
adjust the desired water
temperature.
Thermostat with
rotary control switch
Page 13

13
Heat exchanger
The water is forced through a heating coil by the high pressure pump. Heating coil: 38 m
long - Content: 5 l of water - Heating capacity: max. 90 kW
The fuel pump draws the oil from the tank through a filter and pumps it to the injector
nozzle. The oil pressure is shown on the fuel manometer.
The heat exchanger is heated by a high pressure fan heater.
A ventilator draws in the cold, fresh air from the bottom end of the machine and forces it
upwards between the outer mantle and the inner mantle. In the process, the fresh air is
pre-heated and the outer mantle of the heat exchanger is cooled.
The pre-heated air is pressed through a mixing unit. Here finely atomized fuel is injected
via a nozzle and mixed with the air. The electrodes located below then ignite the fuel-air
mixture.
The flame burns from top to bottom, turns round and the hot gas flows past the heating
coil on its way back up. The burned gases collect in the exhaust chamber and are emit-
ted from the chimney.
Chimney
Mixing unit
Nozzle
Electrodes
Inner cladding
Outer cladding
Oil filter
Fuel manometer
Fuel pump
Heating coil
Fan
Page 14

14
Commissioning
3.
Fill fuel tank with fuel. (Light heating oil
EL DIN 51 603 or diesel fuel)
Max. quantity 25 litres.
4
. Check water inlet filter for
cleanliness prior to putting the
machine into operation! Unscrew
glass body of the inlet filter and check
if metal sieve is soiled.
5.
Each time check oil!
Do not start the machine if there is no oil
visible in the sight glass. Refill with oil if
necessary. See page 20
1.
Install holding devices for power cable.
2.
Install water inlet filter.
6.
Release fixing brake.
Page 15

15
8.
Steering the machine: To change
direction tilt machine by pressing a foot
against the footrest and pull the handle
at the same time. Then turn machine
into desired direction.
9.
Connect machine to water mains
(2 - 8 bar pre-pressure).
Inside diameter of hose minimum
1/2 ". The water storage tank is filled
with water. The float valve shuts
the water intake as soon as the tank is
full.
10.
Connect to power circuit
. Make sure
that the main switch is on the "OFF"
position.
T
he socket must be protected with a
16A delay action fuse on the mains
side
.
7.
Move machine to job site.
Kränzle-therm appliances are movable
machines with a sturdy chassis.
11.
Release fixation of hose drum.
12.
Unwind HP hose from hose drum
without kinks and nooses.
Open gun before reeling up or
unreeling the hose in order to bleed
pressure from hose.
Page 16

16
Commissioning
13.
Push on HP hose to gun.
14.
Screw together HP hose and gun
pressure-tightly.
Take care that all screw connections are pressure-tight. A leakage of
gun, high-pressure hose or hose drum has to be repaired at once.
Leakages lead to an increased wear and to a possible malfunction of
the delayed motor cut-out.
1.
Ignition switch to -OFF- position
Usage as a cold water high-pressure cleaner
When starting the cleaning process do
not aim the water jet towards the object
you want to clean for at least 30 seconds.
Maybe the water inside the combustion
chamber has changed colour due to the rest
time.
Start cleaning process.
2.
Switch on main switch with disen gaged spray gun. Vent high-pressure
cleaner: Pull and release trigger of
spray gun various times.
Detergent valve must be closed!
(Turn knob to extreme right position
"close")
Page 17

17
During high-pressure operation (above 30 bars) the temperature
may not exceed 90 °C.
Steam level (90 °C - 150 °C)
During steam operation the pressure may not exceed 30 bar!
To reach the steam level (above 90 °C water temperature) adjust the
pressure below 30 bar and choose by means of the thermostat the
desired temperature of up to max. 150 °C.
In the case of machines with hose drums, the high pressure hose
must always be unwound completely.
Usage as a hot water high pressure cleaner
Start cleaning.
4.
Start ignition. The water is heated up
and constantly kept at the set
temperature.
3.
Switch on main switch with disen gaged
spray gun. Vent high-pressure cleaner:
Pull and release trigger of spray gun
various times.
Detergent valve must be closed!
(Turn knob to extreme right position
"close")
Method same as with cold water
high-pressure cleaner, then ...
1.
Set desired temperature at
the thermostat.
(Min. temperature 40 °C)
2.
Engage fixing brake before starting the
cleaning process!
Page 18

18
Suction of detergents
with detergent supply from the suction side:
Detergent injection on the pressur side, as you probably know it from other HP cleaners,
consume approx. 30 % of the cleaning energy, no matter if they are used or not. Due to the
water tank fitted to the Kränzle therm cleaners it is now possible to directly suck the
detergent into the pump thus reducing output loss and increasing the efficency considerably.
The detergents are applied without having to reduce the working pressure
.
1.
Place detergent filter into detergent
container
.
2.
Dosing of detergent is done by turning
the detergent valve
.
3.
By closing the detergent valve the supply of
detergent is stopped
.
4.
After having used detergents rinse the
appliance with open spray gun and clear
water for at least 2 minutes.
Only open the dosing valve, if the detergent sieve is placed in a liquid.
Sucked air leads to destruction of the pump seals! No guarantee!
Keep detergent-ph-value neutral 7 - 9!
Observe specifications of detergent manufacturer!
e.g.: protective equipment, rules for waste water treatment etc.
Never suck in liquids containing solvents like varnish solvents, petrol,
oil or similar liquid! Observe specifications of detergent manufacturers
!
Seals inside the appliance are no resistant against solvents! The spray
mist of solvents is highly inflammable, explosive and poisonous.
Page 19

19
Decommissioning - frost protection
01. Switch off the machine - main switch to „0“- position
02. Cut off the water supply
03. Open the spray gun briefly until the pressure is released
04. Apply the safety catch on the spray gun
05. Remove the water hose and spray gun
06. Drain the pump: switch on the motor for approx. 20 seconds
07. Pull the plug from the socket
08. Clean HP hose and wind up; fix drum
09. Clean power cable and wind up
10. Clean water filter
Frost protection
The machine is normally still partially filled with water after work has been completed.
To protect the appliance from frost, completely empty it of water:
Disconnect the machine from the water supply and switch off the ignition. Switch on the
master switch and open the gun. The pump now presses the remaining water out of the
water tank, the pump and the heating coil.
Do not allow the machine to run for longer than a minute without water.
If the machine is not in use for lengthy frosty periods of time, it is advisable to pump
anti-freeze into the machine: For this purpose, fill the antifreeze agent into the water
tank and switch on the machine without ignition. Wait with opened gun, until the agent
comes from the nozzle.
However, the best protection against frost is to keep the machine in a place that is
safe from frost.
Page 20

20
Weekly, or after approx. 40 hours of operation:
- Check the oil level of the high pressure pump. If the oil level is too low, add oil until
the oil level is between the two markings on the oil measuring rod.
Change the oil if it has a grey or whitish appearance. The oil should be
disposed of responsibly.
- Check the water filter in front of the float valve in the water tank and the fuel filter
in front of the solenoid valve. Clean the filters if necessary.
Yearly, or after approx. 500 hours of operation:
- Desulphurise and decarbonize the heating coil.
- Check heating coil for calcification, decalcify if necessary.
- Check the oil burner and ignition system.
- Clean the oil nozzle, oil filter, solenoid valve and filter, clean and adjust the ignition
transformer, ignition cable and ignition electrodes and replace defective parts.
- Change the oil
Oil leakage: If oil leaks out, go to the nearest customer service (dealer) immediately. (Environmental damages, transmission damages,
loss of guarantee.)
In case of increased humidity or fluctuations in temperature development of condensed water is possible; if the oil turns grey, you must
change it.
Care and Maintenance
The machine must be disconnected from the power supply when servicing work is being carried out. The main switch should be in
position "0" and the plug out of the socket.
Page 21

21
Changing the oil:
First oil change after approximately
50 operating hours. Thereafter the oil
should be changed every 500 operating
hours or yearly.
Take the oil drainage hose, which is
connected to the oil drainage screw from the
inside of the appliance.
Opentheredoilllerplugatthetopsideofthe
black oil housing.
Open the cap at the end of the hose.
Drain off the oil into an oil pan and dispose of it responsibly. Close the end of the
hose.Rellwithnewoil.
Decalcifying the heating coil:
Calcified machines use an unnecessary amount of energy because the water can only
be heated slowly and the excess pressure valve feeds a part of the water back into the
pump circuit.
Calcified machines can be recognised by increased pipeline resistance.
Check pipeline resistance by disconnecting the high pressure lance from the gun and
switching the machine on. A full jet of water emerges from the gun. The machine must be
decalcified if the pressure shown on the manometer is greater than 25 bar.
Proceed as follows to decalcify the machine:
1. Unscrew the high pressure hose from the machine and decalcify it separately.
2. Put the detergent suction hose into a container of decalcifying solution.
3. Set the dispenser valve to the maximum concentration.
4. Switch on the machine.
Page 22

22
5. Hold the gun in a separate container and press the trigger.
6. Wait for about a minute until the decalcifier comes out of the gun
(recognisable by its whitish colour)
7. Switch off the machine and allow the solution to act for about 15-20 minutes.
8. Switch the machine back on and rinse it through with clear water for about 2
minutes.
9. Now check whether pipeline resistance is back to an acceptable level.
Repeat the decalcifying process if the pressure without the high pressure lance is
still above 25 bars.
Decalcifiers are caustic!
Observe the instructions for usage and accident prevention. Wear
protective clothing to prevent the decalcifying agent from contacting
your skin, eyes and clothing (e.g. gloves, safety mask etc.)
Detergent and dirty fuel must be disposed of responsibly.
Adjusting ignition electrodes:
For a smooth ignition, the setting of the ignition electrode must be controlled regularly
(after 500 operating hours at the latest).
Care and Maintenance
Fuel System:
Your fuel may contain particles of dirt, or impurities or water may get into the tank during
refuelling. To protect the fuel pump the machine is equipped with a fuel filter. Check this
filter regularly for impurities and clean if necessary.
Check the tank for impurities on a regular basis. Clean the tank when necessary. Empty
the fuel tank using the drainage screw at the bottom of the tank. Clean tank and fuel
pipes thoroughly. Screw drainage screw back in.
Page 23

23
Particular rules, directives and
inspections
Inspections performed by Kränzle
- measurement of earth line resistance
- measurement of voltage and current
- inspection of tension consistency with +/- 1530 V
- pressure check of heating coil at 300 bar
- visual and functional check as per the inspection sheet provided
- exhaust fume analysis (see test strips provided)
Guidelines for liquid sprayers
The machine conforms with the "Guidelines for liquid sprayers". These guidelines are
issued by the organisation of trade associations and may be obtained from Carl
Heymann-Verlag KG, Luxemburger Str. 49, 50939 Köln. These guidelines specify that
this machine is to be inspected by qualified personnel whenever necessary, but no less
than once every 12 months. These inspections must be recorded in the inspection log at
the end of this manual.
Pressure container and steam boiler directives
Kränzle high pressure cleaning equipment conforms to the pressure container and steam
boiler directive. No construction approval, notification of licence and takeover inspection
are required. The water capacity is less than 10 l.
Duties of owner
The owner is to ensure that all safety-relevant components are in a serviceable
condition before the sprayer is used. (e.g., safety valves, hose and electric cables, spray
equipment etc).
Emission control legislation
With stationary installation, the emission levels of the machine must be checked once a
year by a qualified organisation or person according to German law. The first inspection
must be carried out four weeks after the machine is commissioned. The owner is responsible for having the inspection performed.
Page 24

24
Circuit diagramme 400 V, 50 HZ
Connection via
CEE 4 x 16 A
380 V, 50 Hz
+ MP
Master switch
Switch
Heating
Three-Phase motor
High pressure pump
Burner
motor
Ignition
trans-
former
Fuel valve
Thermostat with
rotary control switch
Excess
current actua-
tor 15 A
Sensor
Excess temp.
F1
F2
Pressure switch
Burner release
Flow controller
Burner release
Pressure switch
Motor Start/Stop
Sensor
Water temperature
Photo cell
Flame monitoring
Float switch
Lack of fuel
Page 25

25
Notes
Page 26

Malfunction
Water supply
Water tank runs over.
Water tank does not fill completely.
Pump does not suck.
Test: check water and chemical
system for tightness.
High-pressure pump
Pump makes loud noises. Operating
pressure is not reached.
Water drops from the pump.
Oil drops from the transmission.
Pressure is too low.
Machine does not switch off
Test: Bridge pressure switch (red)
Appliance does not start or
stopps during operation
Cause of malfunction / remedy
Float valve is dirty or defect.
Float valve is defect. Water filter is dirty.
Insufficient water inlet quantity.
Valves stick or are dirty. Suction hose leaks.
Chemistry valve is open or leaks. Check hose
clips (connections).
High-pressure nozzle is clogged.
Connect water inlet directly to the pump (2-4 bar
pre-pressure). Disconnect suction lines below
the pump
Pump sucks air. Check suction connections.
Check high-pressure nozzle. Check valves. Check
O-rings under valves. Check sleeves. Manometer
is defect. Unloader: check stainless steel seat and
ball. Check seals on the control piston.
Replace sleeves in the pump.
Replace O-rings.
Check oil seals (replace). Check plunger and
plunger guides. Check water supply, since water
deficiency or air suction can cause damage to
seals and O-rings (chemistry valve leaks?)
Worn high pressure nozzle. Stainless steel seat,
ball, O-ring in unloader is dirty or defect.
Manometer is defect.
Check return body and O-ring in unloader of the
valve housing.
Check pressure switch (red). Check micro
switch.
Check cable connections. Board is defect.
Check electricity supply. Check main switch.
Check cable connections. Check board.
Check pressure switch. Switch off by overcurrent
release.
26
Troubleshooting
Page 27

27
Troubleshooting
Excess temperature release
As an additional safety device the appliance is equipped
with an excess temperature sensor inside the chimney. Should
the safety devices as e.g. the float monitoring device be defectice and the burner continues to heat although the heating coil
does not conduct away heat a destruction of the heating coil
would be inevitable. As soon as the temperature inside the
chimney exceeds 260 °C the excess temperature release triggers and cuts out the appliance.
The display of the excess temperature release is located on the
back of the switchbox inside the appliance.
RED: Excess temperature released, let appliance cool down, no hot water operation possible
YELLOW: Appliance cooled down, activation of hot water opertion possible by pressing
the RESET-button
ATTENTION !!!
Immediately contact service in case of recurrence
Heißwasserbetrieb erst
nach Abkühlung möglich.
Hot-water operation only possible
after cooling down phase.
Gerät abgekühlt , Heißwa sserbetrieb
nach RESET w ieder mö glich.
Machin e cooled down, hot-water
operat ion possi ble afte r RESET.
Überhitzung / Overheating
R
Page 28

28
Troubleshooting
Hot water mode
The fuel manometer shows the fuel pressure.
If no pressure is shown, check if
- there is heating oil in the tank.
- the fuse in the electric box (below the operating panel) for the motor has blown.
- the fuel sieve or the fuel sieve in the pump is dirty.
- the fuel pump does no operate smoothly or is blocked.
- the ventilator jams.
The thermostat grants permission to open the solenoid valve. The burner starts and
heats the water to the temperature preset by you. As soon as the temperature is reached
the burner switches off.
If the temperature drops again, the burner switches on automatically, so that the desired
temperature is constantly kept.
The thermostat is controlled by a thermosensor, mounted to the outlet of the heating coil.
In the electro distributor box (below the operating panel), there is a fuse (Circuit diagramme, F1) on the PCB which protects the motor for fuel pump and ventilator. If the motor is
overloaded, the fuse blows. This can happen when the fuel pump is blocked or does not
work freely, when the ventilator is blocked or does not operate freely or when there is an
electrical problem.
A second fuse (Circuit diagramme, F2) on the PCB triggers, if the ignition transformer is
faulty.
The transformer on the PCB is protected by two fuses (32 mA, 630 mA).
To avoid an overheating of the combustion chamber, a flow monitoring device is installed
between high-pressure pump and combustion chamber, which only permits fuel injection
if water is running through the heating coil at the same time.
Page 29

Malfunction
Heating (burner)
Fuel pump/blower operates, but
burner does not heat.
Fuel pump/blower does not operate.
- Pump makes loud noises
Fuel operating press. is not reached
Smoke during operation.
Smoke after switching off.
Solenoid valve on the fuel pump
does not open
Test: Pressure switch (black)
Bridge in terminal box between
terminal 3 +4
Test: Connect solenoid valve 230 V
externally.
Oil pressure on the fuel pump is
too low/too high.
Ignition does not function.
Ventilator does not operate.
Leakage
Gun drips. High pressure hose drips.
Manometer shows pressure
but no water comes out.
Sucking detergent
Detergent is not sucked.
Cause of malfunction / remedy
Set water temperature is reached. Increase
temperature on thermostat with rotary control
switch. Open gun, until temperature drops. Fuel
tank is empty. Fuel filter is dirty. Fuel nozzle is dirty.
Coupling between burner motor and fuel pump is
defect. Blower/fuel pump motor is defect. Check
electrical equipment. Check fuse in electric box.
Water in fuel tank.
Dirt or rust in the fuel pump. Clean tank.
Replace fuel pump.
Fuel is dirty. Nozzle or nozzle stock leaks.
Water in tank.
Check pressure switch (black). Solenoid valve is
defect or dirty. Clean filter, clean supply line,
clean
fuel pump. Setting is wrong. Clean fuel nozzle,
or replace it.
Check ignition cable. Charring of plug-in contacts
by moisture. Cable is broken. Check ignition
transformer connections. Transformer is defect
Ignition electrode has been falsely set or burnt up.
Blower-/fuel pump motor is defect. Check electrical equipment. Check fuse in terminal box.
Coupling between burner motor and fuel pump is
defect.
Clean nozzle. Replace seals.
Replace O-ring under screwed connection.
Clean nozzle.
Pump sucks air. Check hose clips.
Test: Connect water line to the pump.
Water inlet: 2 - 8 bar pre-pressure. No water
must come from the detergent hose.
29
Troubleshooting
Page 30

30
Small repairs
do it yourself
No water from the nozzle but the
gauge shows full pressure: Most likely
the nozzle is blocked.
(Inside the pressure gauge there is no water but a
filling with glycerin to damp the vibration of the pointer.)
Proceeding
:
Switch off the cleaner. Pull plug from the socket.
Operate gun seveal times to decrease the pressure.
First unscrew gun and lance, then rinse hose from
any residues.
Check water inlet filter for soiling. If the problem still
exists, take wire (paper clip) and push cautiously
through nozzle opening.
If this procedure is not successful, the nozzle has to
be dismantled and cleaned (from the backside) or
even replaced, if necessary.
Page 31

31
The pressure gauge shows full
pressure although the gun has been
closed. The pressure switch valve
switches constantly.
Possible cause no.1: Leakage
Having closed th gun, the HP cleaner must shut
down and the pressure gauge must show „0“
bar. If the pressure gauge still shows full pressure and the motor constantly switches on and
off, the possible reason for this can be a leakage of the pump, the HP hose or the lance.
Proceeding:
Check the connections from the HP cleaner to
the the HP hose, from the hose to the gun and
also the connection between lance and gun for
tightness. Switch off the cleaner. Shortly press
the trigger of the gun to decrease the pressure.
Unscrew HP hose, gun and lance and check
the O-rings. If the O-rings are damaged they
have to be replaced.
In case of a leakage there is no guarantee
for possible consequential damages.
Possible cause no. 2:
The non-return valve is soiled or
defective
Proceeding:
Unscrew pump outlet.
Take out non-return valve body and check for
soiling or damage of the O-ring.
Replace non-return valve if necessary.
There is no guarantee if the pump is
damaged by defective O-rings due to air
induction or lack of water (cavitation).
Page 32

32
Small repairs
do it yourself
Pressure gauge shows little
pressure, the water from the nozzle
comes in squirts
,
The high-pressure hose vibrates.
Most likely the valves are soiled
.
Proceeding
:
Unscrew all 6 valves, one after the other
(hexagonal brass screws, 3 in a row,
vertically and horizontally)
Take out valve body (with green or red plastic
coating) and O-ring by means of needle nose
pliers. Check O-ring for damage. In case of a
damage the O-ring has to be replaced.
Take a wire (paper clip) and clean valves under
running water. Also clean valve seating inside
the pump.
Do not forget the O-ring during reassembly!
Page 33

33
Pipeline plan
1 Float valve, water inlet
2 Water tank
3 Control valve detergent
4 High pressure pump with integrated unloader valve
5 Flow-Safety-Block with integrated
safety valve for heating coil and flow monitoring device
6 By-Pass line
7 Fuel pump with solenoid valve
8 Fuel filter
9 Fuel tank
Detergent
High pressure
connection
Water inlet
Safety valve, number 5 must be set approx. 15 % higher than
the unloader valve on the HP pump.
Page 34

34
Inspection report for HP cleaners
Type plate (on hand)
Operating manual (on hand)
Protective covering, -device
Pressure line (tightness)
Pressure gauge (function)
Float valve (tightness)
Spraying device (marking)
HP-hose/ connector (damage, marking)
Safety valve opens at 10% / 20% excess
Pressure reservoir
Heating oil line (tightness)
Solenoid valve (function)
Thermostat (function)
Flow controller (function)
Power cable (damage)
Power plug (damage)
Protective conductor (connected)
Emergency Off Switch (function)
On/Off-switch
Water quantity safety device (function)
Used chemicals
Allowed chemicals
High-pressure nozzle
Operating pressure ............bar
Cutting-off pressure.............bar
Smoke spot number...........acc. to Bacharach scale
CO²-value...................% CO²
Efficiency rating.............%
Conductor resist. not exceeded / value:
Insulation
Leakage current:
Gun locked
Inspection report on annually carried out Labour Safety Inspection (UVV) according to the
Guidelines for Liquid Spray Equipment. (This inspection sheet serves as proof for the completion of
the retest and must be kept carefully!) Kränzle-Test Stamp Mark: Order Number UVV200106
Scope of inspection:
ok yes no repaired
Inspection data
determ. value set value
Owner:
Address:
Type therm:
Serial no.:
Rep.-order-no.:
The appliance was checked by an expert according to the Guidelines for Liquid Spray
Equipment, the defects found have been rectified so that the Labour Safety can be confirmed
.
The appliance was checked by an expert according to the Guidelines for Liquid Spray
Equipment. The Labour Safety cannot be confirmed unless the defects found are rectified by
repair or replacement of the faulty parts
.
The next retest according to the Guidelines for Liquid Spray Equipment has to be carried out
by:
Month Year
Place, Date Signature
Inspection result (tick)
Page 35

35
Inspection report for HP cleaners
Type plate (on hand)
Operating manual (on hand)
Protective covering, -device
Pressure line (tightness)
Pressure gauge (function)
Float valve (tightness)
Spraying device (marking)
HP-hose/ connector (damage, marking)
Safety valve opens at 10% / 20% excess
Pressure reservoir
Heating oil line (tightness)
Solenoid valve (function)
Thermostat (function)
Flow controller (function)
Power cable (damage)
Power plug (damage)
Protective conductor (connected)
Emergency Off Switch (function)
On/Off-switch
Water quantity safety device (function)
Used chemicals
Allowed chemicals
High-pressure nozzle
Operating pressure ............bar
Cutting-off pressure.............bar
Smoke spot number...........acc. to Bacharach scale
CO²-value...................% CO²
Efficiency rating.............%
Conductor resist. not exceeded / value:
Insulation
Leakage current:
Gun locked
Inspection report on annually carried out Labour Safety Inspection (UVV) according to the
Guidelines for Liquid Spray Equipment. (This inspection sheet serves as proof for the completion of
the retest and must be kept carefully!) Kränzle-Test Stamp Mark: Order Number UVV200106
Scope of inspection:
ok yes no repaired
Inspection data
determ. value set value
Owner:
Address:
Type therm:
Serial no.:
Rep.-order-no.:
The appliance was checked by an expert according to the Guidelines for Liquid Spray
Equipment, the defects found have been rectified so that the Labour Safety can be confirmed
.
The appliance was checked by an expert according to the Guidelines for Liquid Spray
Equipment. The Labour Safety cannot be confirmed unless the defects found are rectified by
repair or replacement of the faulty parts
.
The next retest according to the Guidelines for Liquid Spray Equipment has to be carried out
by:
Month Year
Place, Date Signature
Inspection result (tick)
Page 36

Kränzle therm 870-1
Manfred Bauer, Fa. Josef Kränzle
Rudolf-Diesel-Str. 20, 89257 Illertissen
machinery directive 89/392/EEC,
low-voltage directive 73/23 EEC,
EMV-directive 89/336 EEC,
noise directive 2000/14/EC, Art. 13,
HP water spraying machines
annex 3, part B, chapter 27
86 dB (A)
89 dB (A)
EN 60 335-2-79:2004
EN 55 014-1 / A2:2002
EN 55 014-2 / A1:2001
EN 61 000-3-2 / A14:2000
EN 61 000-3-3 / A1:2001
36
EC declaration of conformity
Hereby we declare that:
technical specifications available from:
comply with the following guidelines
and their amendments for high-pressure
cleaners:
Sound level measured:
Sound level guaranteed:
Applied specifications and standards
I. Kränzle GmbH
Elpke 97
D - 33605 Bielefeld
Bielefeld, den 08.09.2005
Droitsch
(Managing director)
Page 37

Guarantee
The guarantee is only valid for material and manufacturing errors.
Wearing does not fall within this gurantee.
The instructions in our operating manual must be complied with..
The operating instructions form part of the guarantee.
T
he guarantee period is 12 month from date of purchase.
In the case of a guarantee please contact your dealer or authorized seller delivering
accessories and your purchase receipt. You can fin them in the internet under
www.kraenzle.com.
The guarantee is also void if the machine is used with exceeding the temperature and
speed limits, a voltage below the required rating, with less than the required amount of
water or with dirty water.
Pressure gauge, nozzle, valves, sleeves, high pressure hose and spray equipment are
wear parts and are not covered by the warranty.
37
Page 38

38
Inspection sheet Kränzle therm
All lines connected
Hose clamps tight
Screws all installed and tightened
Ignition cable plugged in
Visual check carried out
Brake function checked
Leak test
Water tank filled and checked
Water inlet checked for tightness
Float valve function checked
Machine checked for tightness under pressure
Electrical check
Earth line checked
Current intake
Operating pressure
Switch-off pressure
Customer
Page 39

Steam phase checked
Chemical valve checked
Start/Stop automatic and re-run
delay checked
Fuel shortage switch checked
Thermostat function checked
Burner function checked
Water inlet temperature
Water outlet temperature
Fuel pressure bar
Measured smoke spot number
39
70072174
9
2
76
9,5 10
10,51111,5
12
3
78 80 82 84 86 88 90
°C
bar
12,5
13
13,5
14
Safety equipment sealed with lacquer
The appliance fulfills all requirements according
to this inspection sheet
Name of inspector
Date
Signature
Result of flue gas analysis
5 6 7 8 9 10 11 12 13 14 15
°C
Page 40

Kränzle - world-wide:
Technical perfection at its best.
I. Kränzle GmbH
Elpke 97
D - 33605 Bielefeld
Reprint only allowed with the authorization of Kränzle.
As of 08-07-2008
Subject to technical modifications. Order no. 30.768 0
 Loading...