

Kramp WS1040KR User Manual
EN
DE
FR
NL
KRA30001312006
Professionelle Wetterstation mit PC-Verbindung
Station météo professionnelle avec liaison PC
Professioneel weerstation met pc-koppeling
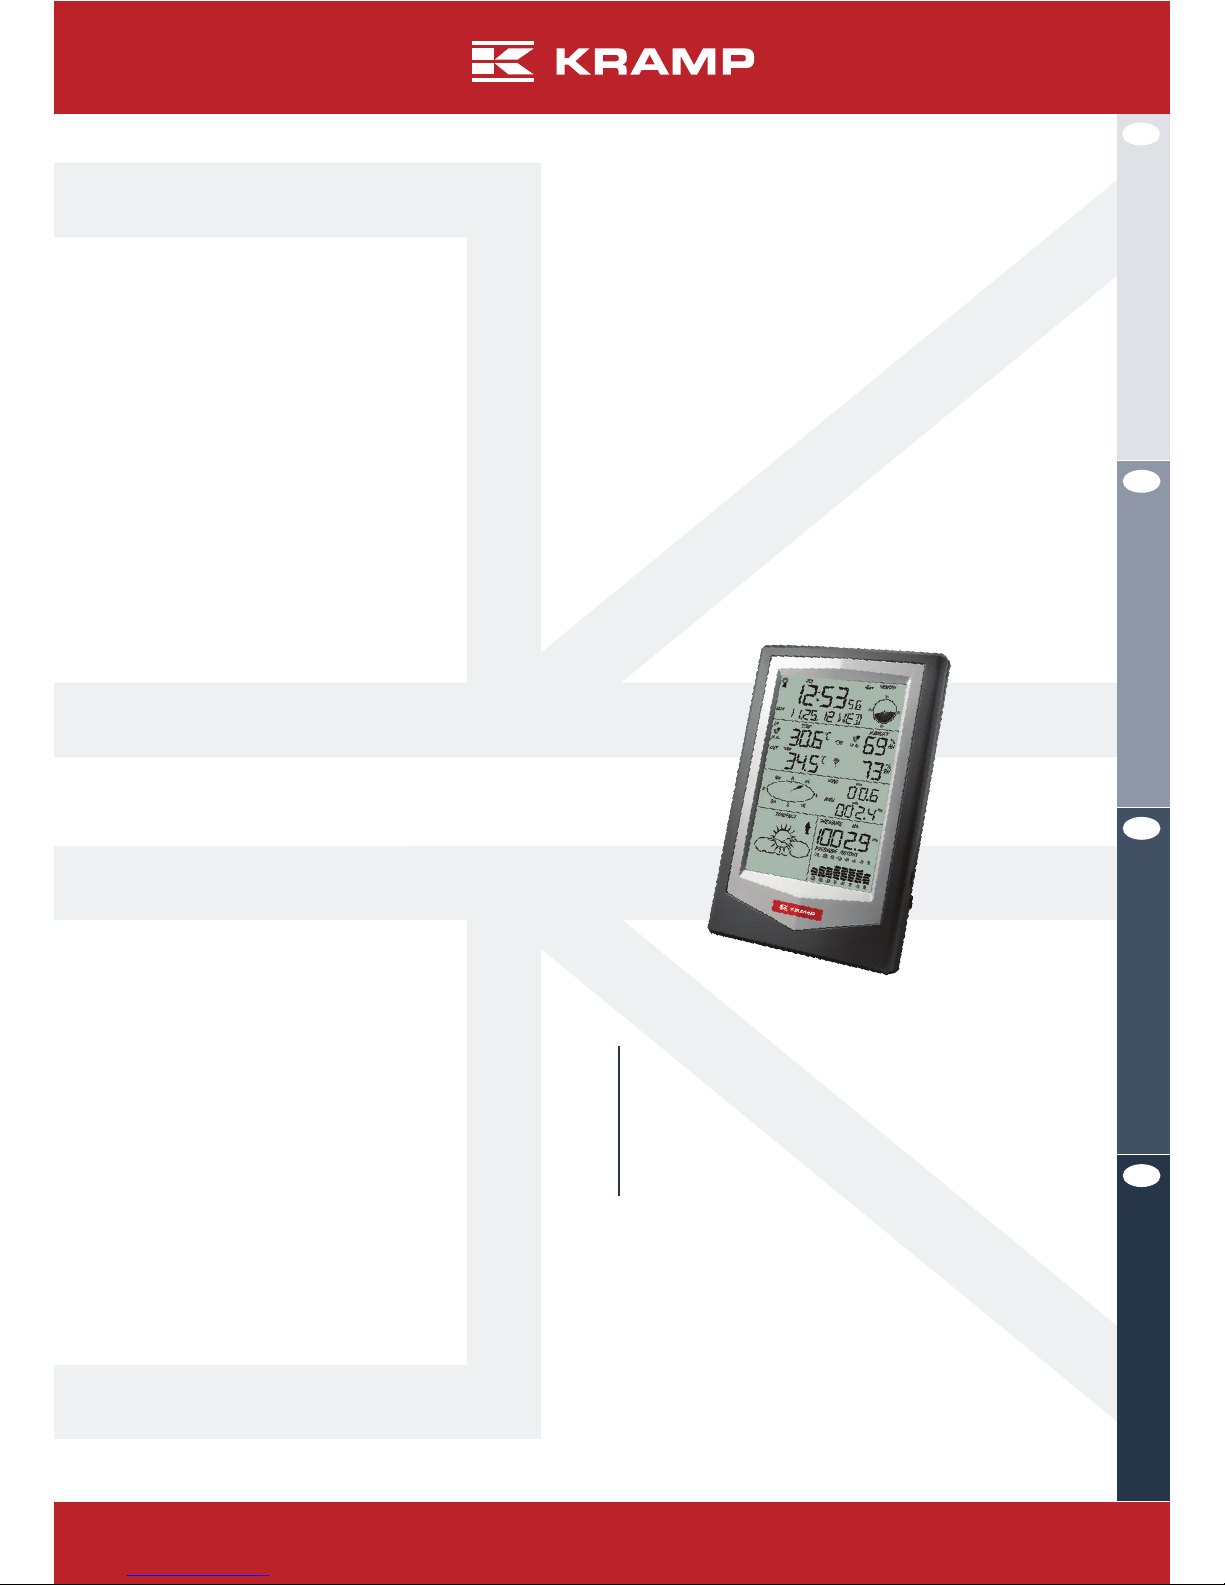
With PC link (WS1040kR)
Professional weather station
User GUiDe

EN
2
Contents
Setting Up Guide 3 - 5
Descriptions 6
oPerations 7
RCC (Radio Control Clock signal) 7 - 8
Clock Mode 8 - 9
Date Mode 10
Wind speed Mode 11 - 12
Historical record mode 12
Rainfall Mode 12 - 13
Indoor Temperature Mode 13 - 14
Indoor Humidity Mode 14
Outdoor Temperature Mode 14 - 15
Outdoor Humidity Mode 16
Weather Forecast Mode 16 - 17
Barometric Pressure Mode 17 - 18
Pressure Histogram Mode 18
Smart Weather software 19 - 20
sPeCifiCation: 21
1. Receiver 21
2. Outdoor transmitter 21
3. Scope of delivery 22
EN
3
www.kramp.com
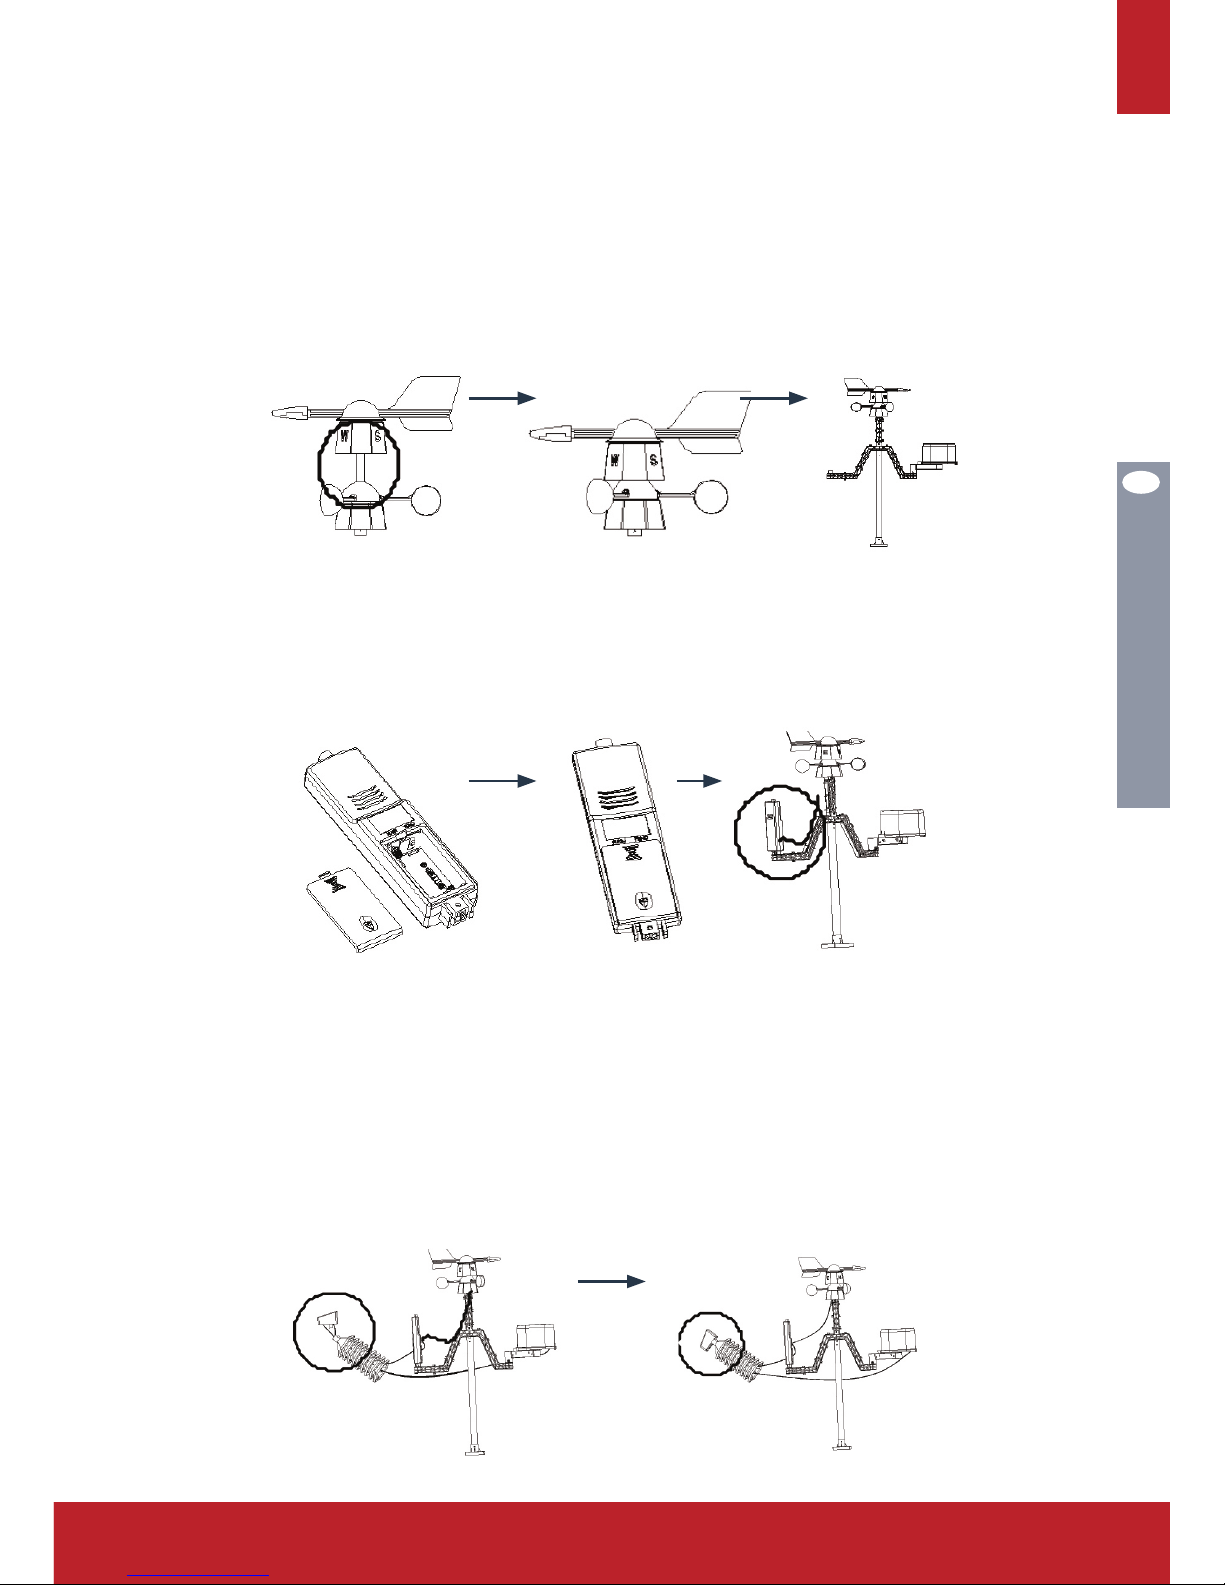
settinG UP GUiDe
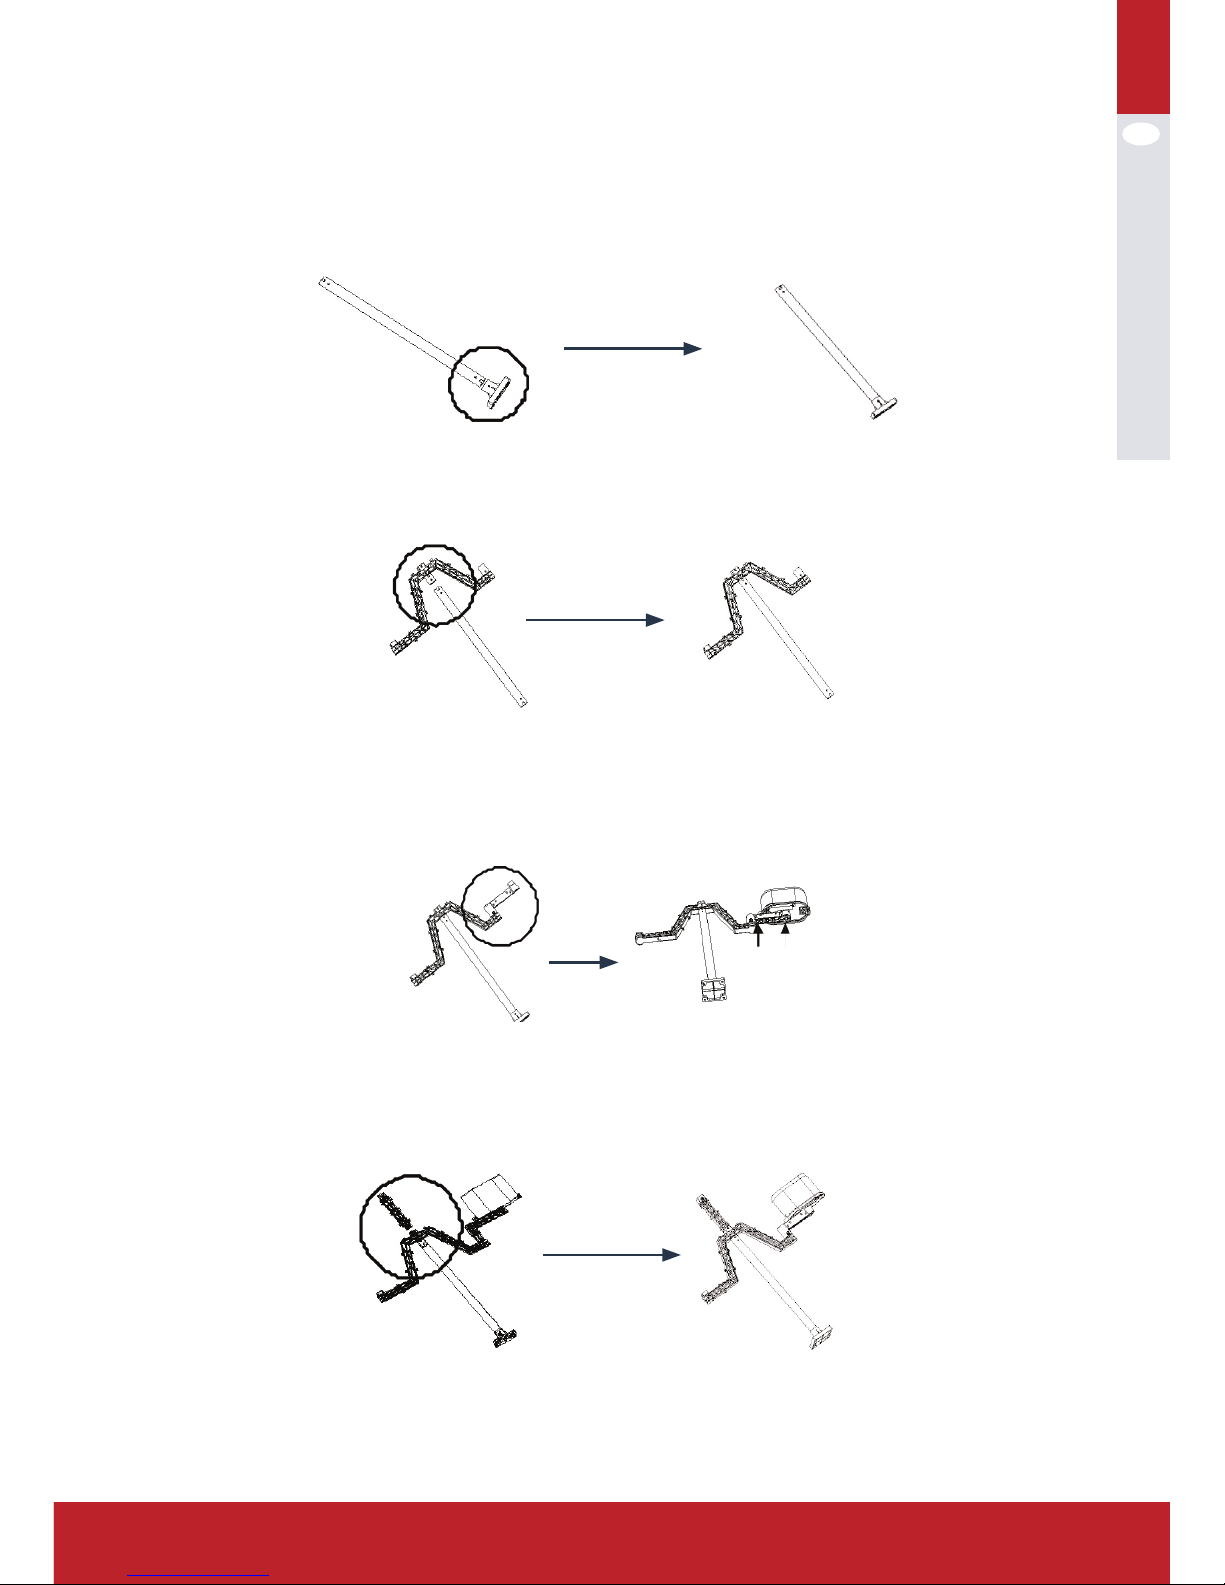
1. Insert the stainless steel pipe into the base(1). Press a M3 screw nut into the
nut slot(2), and then estblish them with a PM3.0x25mm screw.
2. Insert the transmitter holder into the stainless steel pipe, establish them
with a PM3.0x22mm screw and a M3 screw nut.
3. Insert the rain gauge holder onto the short side of the transmitter holder.
Establish them via a PM3.0x25mm screw and a M3 screw nut. Then install
the rain gauge onto the rain gauge holder and establish them with two
PA3.0x8mm screws.
4. Press a M3 screw nut into the nut slot(2) of the small side of the wind sensor
holder, insert wind sensor holder onto the transmitter holder, establish them
with a PM3.0x22mm screw.
EN
4
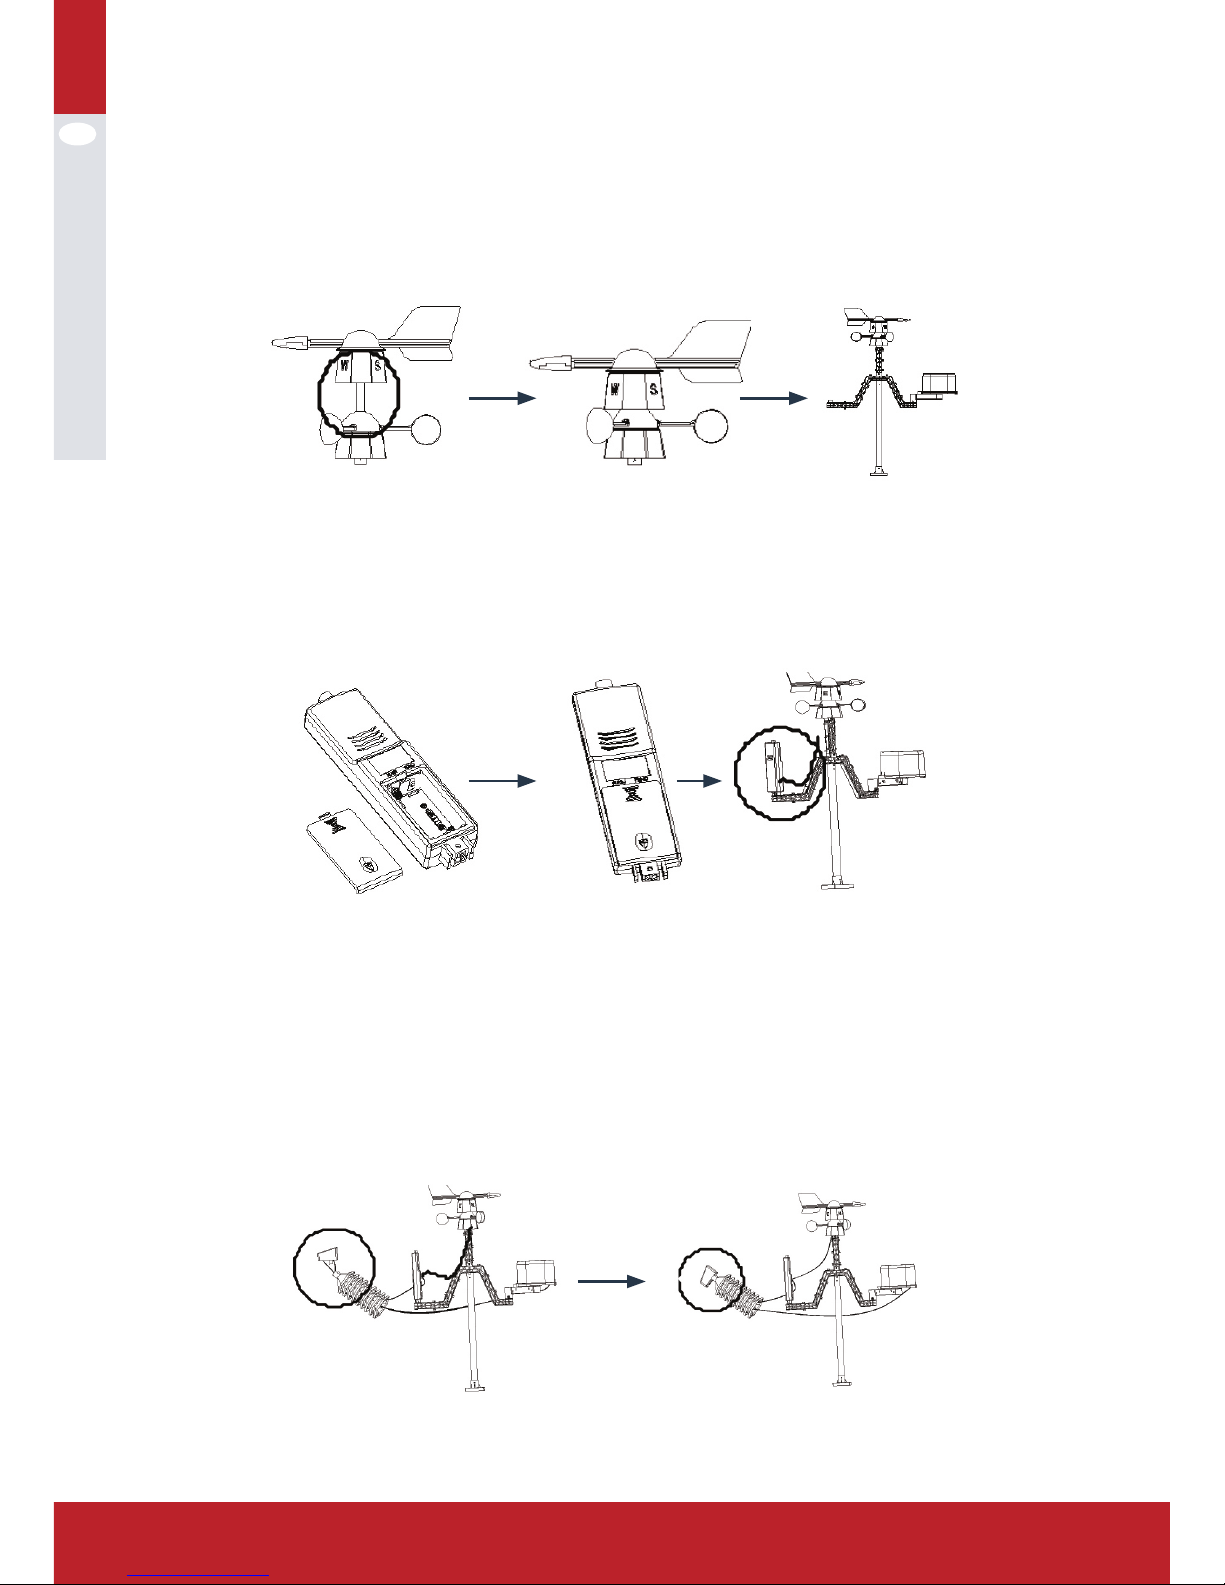
5. Insert the wind direction component into the wind speed component and
then insert the wind direction RJ45 connector in to the 623K hole of the wind
speed component. Insert a M3 screw nut into the big side if the wind sensor
holder and then install the whole wind sensor onto the holder, establish
them with a PM3.0x22m. Remind the position of the wind direction component with “N” towards the NORTH (use kompas - not included)
6. Open the battery compartment, install the rechargeable batteries, then
cover the battery door. Insert the whole transmitter onto the long side of the
transmitter holder and establish them with a PM3.0x18mm screw. At last,
insert the wind spreed wire with RJ45 connector into the “WIND” 623K hole
the transmitter.
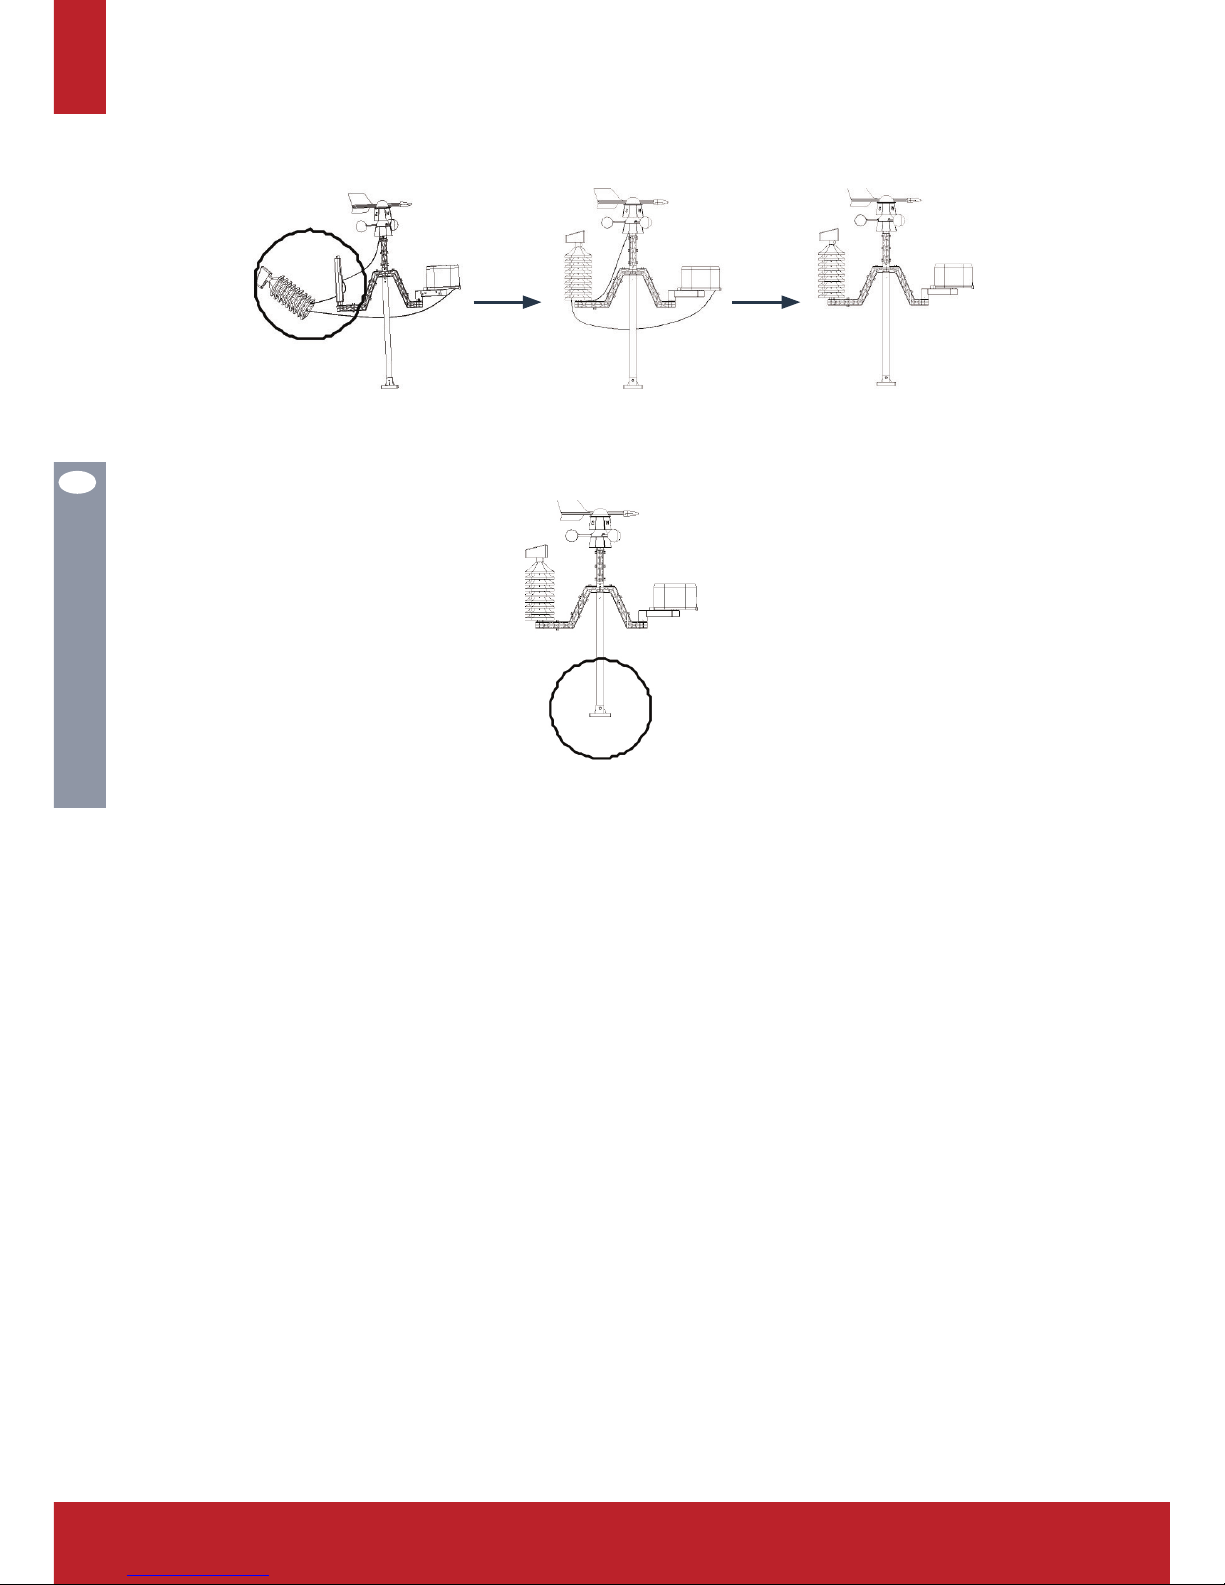
7.A Put the rain gauge wire across the waterproof tower case and the insert the
RJ45 connector into the 623K hole of the solar compartment.
7 B Put the solar wire across the waterproof tower case and then insert the RJ45
into the “RAIN” 623K hole of the transmitter.
7 C. Insert a M3 screw nut into the top nut slot(2) of the waterproof tower case
then insert the solar component into the top of the waterproof tower case.
Establish them with a PM3.0x8mm screw (note; insert the screw from the
screw nut side of the solar compartment).

EN
5
www.kramp.com
8. Suit the assembled waterproof tower case onto the assembled transmitter,
and then suit the wires onto the slots of the transmitter holder
9. Suit four plastic screw nuts into the base, and then establish the base and
ground with four KA4.0x40mm screws
(1) Alternatively the stainless steel pipe can be mounted with pipe clamps to a
wall or construction (not included).
(2) In some cases it might be helpful to fix the m3 screw nut into the nut slot
with a little drop of glue (not included).
Special notes;
• Dew point temperature display -40 °C , indicating dew point termparature is
already very low and do not represent the actual dew point temperature.
• When battery low voltage warning, in order to protect the system, some
features may not be normal use, to prevent the system crash. Please replace
with new battery.
• When the battery low voltage warning avoid connecting the unit to the PC to
prevent the memory data loss. User can replace the new battery and connect
again to guarantuee reliable communication.
• When data communication is completed, disconnect the PC connection, in
order to avoid data communications may influence normal operation.

EN
6
DesCriPtions
1. The date display format can be set as:
YYYY-MM-DD, MM-DD- YYYY, DD-MM-YYYY (user setting)
2. The hour display format can be set between 12 hour format or 24 hour format. The time zone can be set from-12 to +12 (user setting);
3. The RCC time function will be set automaticly (DCF/MSF) for EU; Wireless
433 MHZ receiving. Available distance: max 100 meter in open field.
4. Alarm function: alarm sound gradually enhanced to remind user, alarm time
is 2 minutes;
5. Indoor humidity: relative humidity display, high humidity alarm value and low
humidity alarm, value can be set independently, you can query the maximum
humidity value and the minimum humidity values;
6. Indoor temperature: relative temperature display, high temperature alarm
value and low temperature alarm value can be set independently, you can
query the maximum temperature value and the minimum temperature values, °C/°F (user setting);
7. Outdoor humidity: relative humidity display, high humidity alarm value and
low humidity alarm, value can be set independently, you can query the maximum humidity value and the minimum humidity values;
8. Outdoor temperature: relative temperature display, high temperature alarm
value and low temperature alarm value can be set independently, you can
query the maximum temperature value and the minimum temperature values, °C/°F (user setting);
9. Wind speed: user can set average wind speed or gust wind speed, the wind
speed high alarm value can be set independently, you can query the corresponding maximum value, the display unit can be set to m/s, km/h, mph,
knots or bft;
10. Rainfall: the user can set as time period shows hours, 24 hours, week,
month rainfall or total rainfall, hours and 24 hours of heavy rainfall alarm
value can be set independently, you can query the corresponding maximum
display, units mm or inch;
11. Wind direction: N, NE, E, SE, S-, SW, W, NW eight wind direction can be displayed, setting up a wind as the alarm direction;
12. Air pressure: the user can set to show the absolute pressure or relative
pressure, can independently set high pressure alarm values and low pressure alarm value, the display unit can be set to Hpa or Inhg or mmhg;
13. Barometric pressure changing trends: the user can set to show 12 hours or
24 hours of changing trend;
14. Weather forecast can be sunny, cloudy, overcast, rainy, snowy, storms six
states icons and weather trends;
15. Low-voltage detection: If the receiver and transmitter battery voltage is low,
it reminds user to replace the batteries as soon as possible;
16. Backlight: press any key or the top touch light, the backlight will be lit and
duration 10 seconds;
17. Buzzer: alarm duration of two minutes, the alarm clock alarm sound intensity gradually increased of 30 seconds as units;
18. Data storage: user can store up to two years of meteorological data user can
also adjust PC data recording cycle:

EN
7
www.kramp.com
oPerations
I. Power-on LCD Fully display two seconds into the normal operating mode.
1. RCC Mode
II. Radio control clock signal: support DCF, WWVB, MSF, three wireless control
clock signal mode, as follows:
1). DCF is German wireless control clock signal standard, location of the transmitting station in Frankfurt, the transmit power is 30 kilowatts, it can cover
most areas of Europe within the range of 2000 km; DCF
(2).WWVB is America wireless control clock signal standard, location of the
transmitting station in Colorado, the transmit power is 50 kilowatts, it can
cover most areas of America within the range of 2000 km;
(3).MSF is Britain wireless control clock signal standard, location of the transmit-
ting station in middle of Britain, the transmit power is 17 kilowatts, it can
cover Britain within the range of 1000 km, also part of western Europe and
northern Europe area;

EN
8
III. RF signal receiver: means this unit is able to receive outdoor sensor data
sent via RF as follows: User insert the battery, the unit completed initialization, immediately began to search for the outdoor sensor, if in three minutes
no signal receiving then search fails, once receive singal the unit will only
work with the sensor establishing a data link, 48 seconds of cycle synchronization to receive the sensor data, so in order to ensure that machine can
work, be sure to install outdoor sensor fistly, then mount the receiver bat-
tery, icon
in the search process will remain flashing until search the
outdoor sensor or search fails, the search process, please do not carry out
any operation of this machine;
IV. Automatic Calibration time: by receiving radio control clock signal (RCC) to
achieve the automatic Calibration time function, the unit will in 2:00:00 and
12:00:00 in the daily timing receiving radio controlled clock signal, in receiv-
ing procession
icon will remain flashing until the completion of reception
at the receiver, please do not carry out any operation of this machine. If you
receive successfully, then Display
icon, otherwise the icon will disap-
pear, the longest time to receive is 8 minutes.
V. Data storage: user via USB cable connect to the PC, the
icon is displayed, indicating that the USB is ready, users can query maximum/minimum on the computer, setting the alarm value, set all corresponding kinds
of parameters, the user via the computer in 5 minutes to 240 minutes to set
up data logging cycle, you can save up to two years of meteorological data,
users can also download meteorological data to the computer to save.
Keys operation
The Machine has MODE, NEXT, SET, INC/+, DEC/- five buttons, In addition to
normal mode, time mode, date mode, wind speed mode, memory historical data
mode, rainfall patterns, indoor temperature patterns. Indoor humidity mode, outdoor temperature mode, outdoor humidity mode, weather forecast patterns, Air
pressure mode, pressure histogram mode, in any operating mode, short press
MODE button to enter next work mode, short press NEXT button to enter next
work item, if pressing key it is alarming, or outdoor sensor data is being received
or is receiving the wireless control clock signal, then pressing key just close the
corresponding function and will not implement the key functions. the detailed
operation of the various operating modes are described as follows:
2. Clock Mode
In normal mode, press MODE button to enter time mode, the user can carry out
time-related settings in this mode, press the NEXT button to enter the next item:
(1) Time zone setting:
Users according to their geographical location to adjust time zone settings, short
press INC/+ button to increase the value of the time zone setting, short press
the DEC/- button to decrease the time zone setting, press and hold INC/+ button

EN
9
www.kramp.com
more than 3seconds can quickly increase the time zone setting values, press and
hold the DEC/- buttons more than 3 seconds can quickly decrease the time zone
setting value;
(2) Hour display format setting:
User can adjust hour display format for 12 hours or 24 hours, short press INC/+
or DEC/- buttons to switch;
(3) Daylight Saving Time setting:
Daylight Saving Time set in short-circuit point selection for Europe automatically skip, only short-circuit point selection for U.S version valid, according to the
actual situation, short press INC/+ or DEC/- button to enable or disable daylight
saving time automatically adjust function;
(4) hour setting:
In this mode user can adjust the current hours time and short press INC/+ button
to increase the hours, short press DEC/- buttons to decrease the hours, press
and hold the INC/+ button over 3 seconds you can quickly increase the hours,
press and hold DEC/- buttons more than 3 seconds you can quickly decrease the
hours;
(5) Minutes setting:
In this mode user can adjust the current minutes time and short press INC/+
button to increase the minutes, short press DEC/- buttons to decrease the minutes, press and hold the INC/+ button over 3 seconds you can quickly increase
the minutes, press and hold DEC/- buttons more than 3 seconds you can quickly
decrease the minutes;
(6) Alarm clock hours setting:
User to adjust the hour setting of the alarm clock in this mode, short press SET
button to enable or disable the alarm clock, short press INC/+ button to increase
the hour setting, press the DEC/- button to decrease hours set, press and hold
INC/+ button over 3 seconds you can quickly increase the hour setting, press and
hold the DEC/- button more than 3 seconds can quickly decrease the hours set;
(7) Alarm clock minutes setting:
User to adjust the minutes setting of the alarm clock in this mode, short press
SET button to enable or disable the alarm clock, short press INC/+ button to
increase the minutes setting, press the DEC/- button to decrease minutes set,
press and hold INC/+ button over 3 seconds you can quickly increase the minutes
setting, press and hold the DEC/- button more than 3 seconds can quickly decrease the minutes set:
EN
10
3. Date Mode
In time mode, short press MODE button to enter date mode, users can be daterelated settings, press the NEXT button to enter the next item:
(1) Contrast setting
In this mode user can adjust the display contrast, press INC/+ button to increase
contrast, press the
DEC/- button to decrease contrast;
(2) Date display format settings
Users can adjust Date display format settings in this mode, press INC/+ or DEC/button to adjust the date display format, instruction as follows:
(3) Year setting
User can adjust the year in this mode, short press the INC/+ button to increase
the year, short press the DEC/- button to decrease the year, hold down INC/+ button over 3 seconds you can quickly
increase the year, press and hold the DEC/- button over 3 seconds you can
quickly decrease the year;
(4) Month setting
User can adjust the month in this mode, short press the INC/+ button to increase
the month, short press the DEC/- button to decrease the month, hold down INC/+
button over 3 seconds you can quickly increase the month, press and hold the
DEC/- button over 3 seconds you can quickly decrease the month;
(5) Date setting
User can adjust the date in this mode, short press the INC/+ button to increase
the date, short press the DEC/- button to decrease the date, hold down INC/+
button over 3 seconds you can quickly increase the date, press and hold the
DEC/- button over 3 seconds you can quickly decrease the date:
INC/+
YYYYMMDD
MMDDYYYY
INC/+
DDMMYYYY
INC/+
DEC/-
YYYYMMDD
DDMMYYYY
DEC/-
MMDDYYYY
DEC/-
EN
11
www.kramp.com
4. Wind Speed Mode
In date mode, short press MODE button to enter wind speed mode, User can be
related setting of wind speed, press the NEXT button to enter the next item:
(1) Wind speed display setting
Users can adjust wind speed display setting in this mode, press INC/+ or DEC/button can switch between average and gust wind speed;
(2) Wind speed unit setting
Users can adjust wind speed unit setting in this mode, press INC/+ increase wind
speed unit value, press DEC/- button decrease wind speed unit value, instruction
as follows;
(3) High wind speed alarm setting
Users can adjust the high wind speed alarm set in this mode, press the SET
button to allow or prohibit the high wind speed alarm, press the INC/+ button to
increase the high wind speed alarm value, press the DEC/- button to decrease
the high wind speed alarm value, Press and hold INC/+ button over 3 seconds you
can quickly increase the wind speed high alarm value, press and hold the DEC/button more than 3 seconds you can quickly decrease the wind speed high alarm
value;
(4) Wind direction alarm setting
Users can adjust wind direction in this mode, press the SET button to allow or
prohibit wind direction alarm, INC/+ button to increase the wind direction alarm
value, press the DEC/- button to decrease the wind direction alarm value;
INC/+
m/s
km/h
INC/+
knots
INC/+
mph
beaufort
INC/+ INC/+
DEC/-
m/s
beaufort
DEC/-
mph
DEC/-
knots
km/h
DEC/- DEC/-
INC/+
N
NE
INC/+
SE
INC/+
E
S
INC/+ INC/+
INC/+
INC/+
INC/+
NW SW
W
DEC/-
N
NW
DEC/-
SW
DEC/-
W
S
DEC/- DEC/-
DEC/-
DEC/-
DEC/-
NE SE
E

EN
12
5) Maximum wind speed display
In this mode you can view the maximum wind speed and time records, press and
hold the SET button over 3 seconds to clear the maximum record:
5. Historical record mode
In Wind speed mode, short press MODE button to enter the storage of historical
data mode, user can proceed related operation of data memory, press the NEXT
button to enter the next item:
(1) Storage of historical data view
In this mode, users can view the memory of historical data records, press the
INC/+ button to view a recent historical data records, press the DEC/- button to
view older historical data records;
(2) Memory historical data clear
In this mode, user can clear all the historical data records in the data memory,
press and hold the SET button over 3 seconds to clear all the historical data
records:
6. Rainfall Mode
Mode of memory historical data, press the MODE button to enter the rainfall
pattern, user can be rainfall-related settings, press the NEXT button to enter the
next item:
(1) Rainfall display setting
Users can adjust the rainfall display setting in this mode, short press the INC/+
button to increase rainfall display settings, press DEC/- button to decrease rainfall display settings, instruction as follow:
(2) Rainfall unit setting
Users can adjust rainfall unit in this mode, press the INC/+ or DEC/- button to
switch between mm and inch;
INC/+
1h
24h
INC/+
month
INC/+
week
total
INC/+ INC/+
DEC/-
1h
total
DEC/-
week
DEC/-
month
24h
DEC/- DEC/-

EN
13
www.kramp.com
(3) high Rainfall alarm setting
In this mode user can adjust 1 hour or 24 hours high rainfall alarm set, if rainfall
display is set for the week, month, total, then the high rainfall alarm for 1 hour
high rainfall alarm settings, press the SET button to allow or prohibit high rainfall
alarm, press the INC/+ button to increase the high rainfall alarm value, press the
DEC/- button to decrease high rainfall alarm value, press and hold INC/+ button
over 3 seconds you can quickly increase high rainfall alarm value, press and hold
the DEC/- button more than 3 seconds you can quickly decrease high rainfall
alarm value;
(4) Maximum rainfall display
In this mode user can view maximum rainfall and time records, press and hold
the SET button over 3 seconds to clear the maximum record;
(5) Rainfall full reset
In this mode, clear all the rainfall data from the current time, recalculated 1h,
24h, week, month, total rainfall:
7. Indoor Temperature Mode
Rainfall mode, short press MODE button to enter indoor temperature mode, user
can be related indoor temperature setting, press the NEXT button to enter the
next item:
(1) Indoor temperature setting
In this mode to adjust the indoor temperature units, press the INC/+ or DEC/button to switch between °C and °F;
(2) Indoor temperature high alarm setting
In this mode user can adjust high indoor temperature alarm set, press the SET
button to allow or prohibit high indoor temperature alarm, short press the INC/+
button to increase the high indoor temperature alarm values, short press the
DEC/- buttons to decrease high indoor temperature alarm value, press and hold
the INC/+ button over 3 seconds you can quickly increase the high indoor temperature alarm value, press and hold the DEC/- button more than 3 seconds you can
quickly decrease high indoor temperature alarm values;
(3) Low Indoor temperature alarm setting
In this mode user can adjust low indoor temperature alarm set, press the SET
button to allow or prohibit low indoor temperature alarm, short press the INC/+
button to increase the low indoor temperature alarm values, short press the
DEC/- buttons to decrease indoor low temperature alarm value, press and hold
the INC/+ button over 3 seconds you can quickly increase the low indoor temperature alarm value, press and hold the DEC/- button more than 3 seconds you
can quickly decrease low indoor temperature alarm values;

EN
14
(4) Maximum indoor temperature display
In this mode, user can view the maximum indoor temperature and time records,
press and hold the SET button over 3 seconds to clear the maximum record;
In this mode, user can view the minimum indoor temperature and time records,
press and hold the SET button over 3 seconds to clear the maximum record;
(5) Minimum indoor temperature display
8. Indoor Humidity Mode
Indoor temperature mode, short press MODE button to enter indoor humidity
mode, user can be related indoor humidity settings, press the NEXT button to
enter the next item:
(1) High indoor humidity alarm setting
In this mode user can adjust high indoor humidity alarm set, press the SET button to allow or prohibit high indoor humidity alarm, short press the INC/+ button
to increase the high indoor humidity alarm values, short press the DEC/- buttons
to decrease high indoor humidity alarm value, press and hold the INC/+ button
over 3 seconds you can quickly increase the high indoor humidity alarm value,
press and hold the DEC/- button more than 3 seconds you can quickly decrease
high indoor humidity alarm values;
(2) Low indoor humidity alarm setting
In this mode user can adjust low indoor humidity alarm set, press the SET button
to allow or prohibit low indoor humidity alarm, short press the INC/+ button to
increase the low indoor humidity alarm values, short press the DEC/- buttons to
decrease low indoor humidity alarm value, press and hold the INC/+ button over
3 seconds you can quickly increase the low indoor humidity alarm value,
press and hold the DEC/- button more than 3 seconds you can quickly decrease
low indoor humidity alarm values;
(3) Maximum Indoor humidity display
In this mode, user can view maximum indoor humidity and time records, press
and hold the SET button over 3 seconds to clear the maximum record;
(4) Minimum Indoor humidity display
In this mode, user can view minimum indoor humidity and time records, press
and hold the SET button over 3 seconds to clear the minimum record:
9. Outdoor Temperature Mode
Outdoor temperature mode, short press MODE button to enter Outdoor temperature mode, user can be related Outdoor temperature settings, press the NEXT
button to enter the next item:
(1) Outdoor temperature setting
In this mode user can adjust outdoor temperature display settings, press the

EN
15
www.kramp.com
INC/+ button to increase the value of outdoor temperature display , press the
DEC/- button to decrease the value of outdoor temperature display, instruction
as follows:
(2) Outdoor temperature units setting
In this mode to adjust the outdoor temperature units, press INC/+ or DEC/- buttons to switch between °C and °F;
(3) High outdoor temperature alarm setting
In this mode user can adjust the high outdoor temperature alarm setting, press
SET button to allow or prohibit the high outdoor temperature alarm, press the
INC/+ button to increase the high outdoor temperature alarm values, short press
the DEC/- button to reduce high outdoor temperature alarm value, press and
hold INC/+ button over 3 seconds you can quickly increase the high outdoor temperature alarm value, press and hold the DEC/- button more than 3 seconds you
can quickly reduce the high outdoor temperature alarm values;
(4) Low outdoor temperature alarm setting
In this mode user can adjust the Low outdoor temperature alarm setting, press
SET button to allow or prohibit the Low outdoor temperature alarm, press the
INC/+ button to increase the Low outdoor temperature alarm values, short press
the DEC/- button to reduce Low outdoor temperature alarm value, press and
hold INC/+ button over 3 seconds you can quickly increase the Low outdoor temperature alarm value, press and hold the DEC/- button more than 3 seconds you
can quickly reduce the Low outdoor temperature alarm values;
(5) Maximum outdoor temperature display
In this mode, user can view maximum outdoor temperature and time records,
press and hold the SET button over 3 seconds to clear the maximum record;
(6) Minimum outdoor temperature display
In this mode, user can view minimum outdoor temperature and time records,
press and hold the SET button over 3 seconds to clear the minimum record:
INC/+
TEMPERATURE
WIND CHILL
INC/+
DEW POINT
INC/+
DEC/-
TEMPERATURE
DEW POINT
DEC/-
WIND CHILL
DEC/-

EN
16
10. Outdoor Humidity Mode
Outdoor humidity mode, short press MODE button to enter Outdoor humidity
mode, user can be related humidity temperature settings, press the NEXT button
to enter the next item:
(1) High outdoor humidity alarm setting
In this mode user can adjust the high outdoor humidity alarm setting, press SET
button to allow or prohibit the high outdoor humidity alarm, press the INC/+
button to increase the high outdoor humidity alarm values, short press the DEC/button to reduce high outdoor humidity alarm value, press and hold INC/+ button
over 3 seconds you can quickly increase the high outdoor humidity alarm value,
press and hold the DEC/- button more than 3 seconds you can quickly reduce the
high outdoor humidity alarm values;
(2) Low outdoor humidity alarm setting
In this mode user can adjust the Low outdoor humidity alarm setting, press SET
button to allow or prohibit the Low outdoor humidity alarm, press the INC/+
button to increase the Low outdoor humidity alarm values, short press the DEC/button to reduce Low outdoor humidity alarm value, press and hold INC/+ button
over 3 seconds you can quickly increase the Low outdoor humidity alarm value,
press and hold the DEC/- button more than 3 seconds you can quickly reduce the
Low outdoor humidity alarm values;
(3) Maximum Outdoor humidity display
In this mode, user can view maximum outdoor humidity and time records, press
and hold the SET button over 3 seconds to clear the maximum record;
(4) Minimum Outdoor humidity display
In this mode, user can view minimum outdoor humidity and time records, press
and hold the SET button over 3 seconds to clear the minimum record:
11. Weather Forecast Mode
In Outdoor humidity mode, short press MODE key to enter the weather prediction
mode, user can be related weather conditions setting in this mode, press the
NEXT button to enter the next item:
(1) Weather conditions setting
In this mode to adjust the current weather conditions, instruction as follows:
INC/+
Sunny
INC/+
Overcast
INC/+
Cloudy
Rainy
INC/+
DEC/-
Sunny
DEC/-
Overcast
DEC/-
Cloudy
Rainy
DEC/-
EN
17
www.kramp.com
(2) Weather forecast threshold value setting
In this mode to adjust the current weather conditions changing threshold settings, press INC/+ button to increase the weather forecast threshold value, press
DEC/- buttons to decrease the weather forecast threshold value, hold down INC/+
button more than 3seconds can quickly increase the weather forecast threshold
value, press and hold the DEC/- more than 3 seconds can quickly decrease the
weather forecast threshold value;
(3) Storm alarm threshold value settings
In this mode, adjustable storm alarm threshold value settings, press the INC/+
button to increase the storm alarm threshold value, according to the DEC/- button to decrease the storm alarm threshold value, hold down the INC/+ button
more than 3 seconds to quickly increase the storm alarm threshold value press
and hold the DEC/- button over 3 seconds you can quickly decrease storm alarm
threshold value:
12. Barometric Pressure Mode
In air pressure mode, short press MODE key to enter the air pressure mode, user
can be related pressure setting in this mode, press the NEXT button to enter the
next item:
(1) Air pressure display setting
In this mode, user can adjust the air pressure settings, press INC/+ or the DEC/button to switch between absolute pressure and relative pressure;
(2) Air pressure units setting
Users can adjust the air pressure unit in this mode, short press the INC/+ button
to increase the pressure unit setting value, press the DEC/- button to decrease
the set value of the pressure unit, instruction as following:
(3) Relative pressure value setting
Relative pressure value set in the pressure display settings is absolute air pressure automatically skipped, relative pressure can be adjusted in this mode, press
INC/+ button to increase the relative pressure, press the DEC/- button to decrease the relative pressure, press and hold INC/+ button over 3 seconds you can
quickly increase the relative pressure, press and hold the DEC/- buttons more
than 3 seconds you can quickly decrease the relative air pressure;
INC/+
hpa
inhg
INC/+
mmhg
INC/+
DEC/-
hpa
mmhg
DEC/-
inhg
DEC/-

EN
18
(4) High air pressure alarm setting
In this mode, adjust high air pressure alarm settings, press SET button to allow
or prohibit high pressure alarm, press INC/+ button to increase high pressure
alarm value, press the DEC/- button to decrease high pressure alarm value,
Press and hold INC/+ button you can quickly increase the high pressure alarm
value, press and hold the DEC/- button more than 3 seconds you can quickly
decrease high pressure alarm value;
(5) Low air pressure alarm setting
In this mode, adjust low air pressure alarm settings, press SET button to allow or
prohibit Low pressure alarm, press INC/+ button to increase low pressure alarm
value, press the DEC/- button to decrease low pressure alarm value, Press and
hold INC/+ button you can quickly increase the low pressure alarm value, press
and hold the DEC/- button more than 3 seconds you can quickly decrease low
pressure alarm value;
(6) Maximum air pressure display
In this mode, user can view maximum air pressure and time records, press and
hold SET button over 3 seconds to clear the maximum record;
(7) Minimum air pressure display
In this mode, user can view minimum air pressure and time records, press and
hold SET button over 3 seconds to clear the minimum record:
13. Pressure Histogram Mode
In pressure mode, press MODE button to enter the pressure histogram mode, in
this modet user can proceed pressure histogram timeline set:
In this mode user can adjust pressure histogram timeline settings, press INC/+
or DEC/- button can switch in 12 hours display and 24 hours display;
EN
19
www.kramp.com
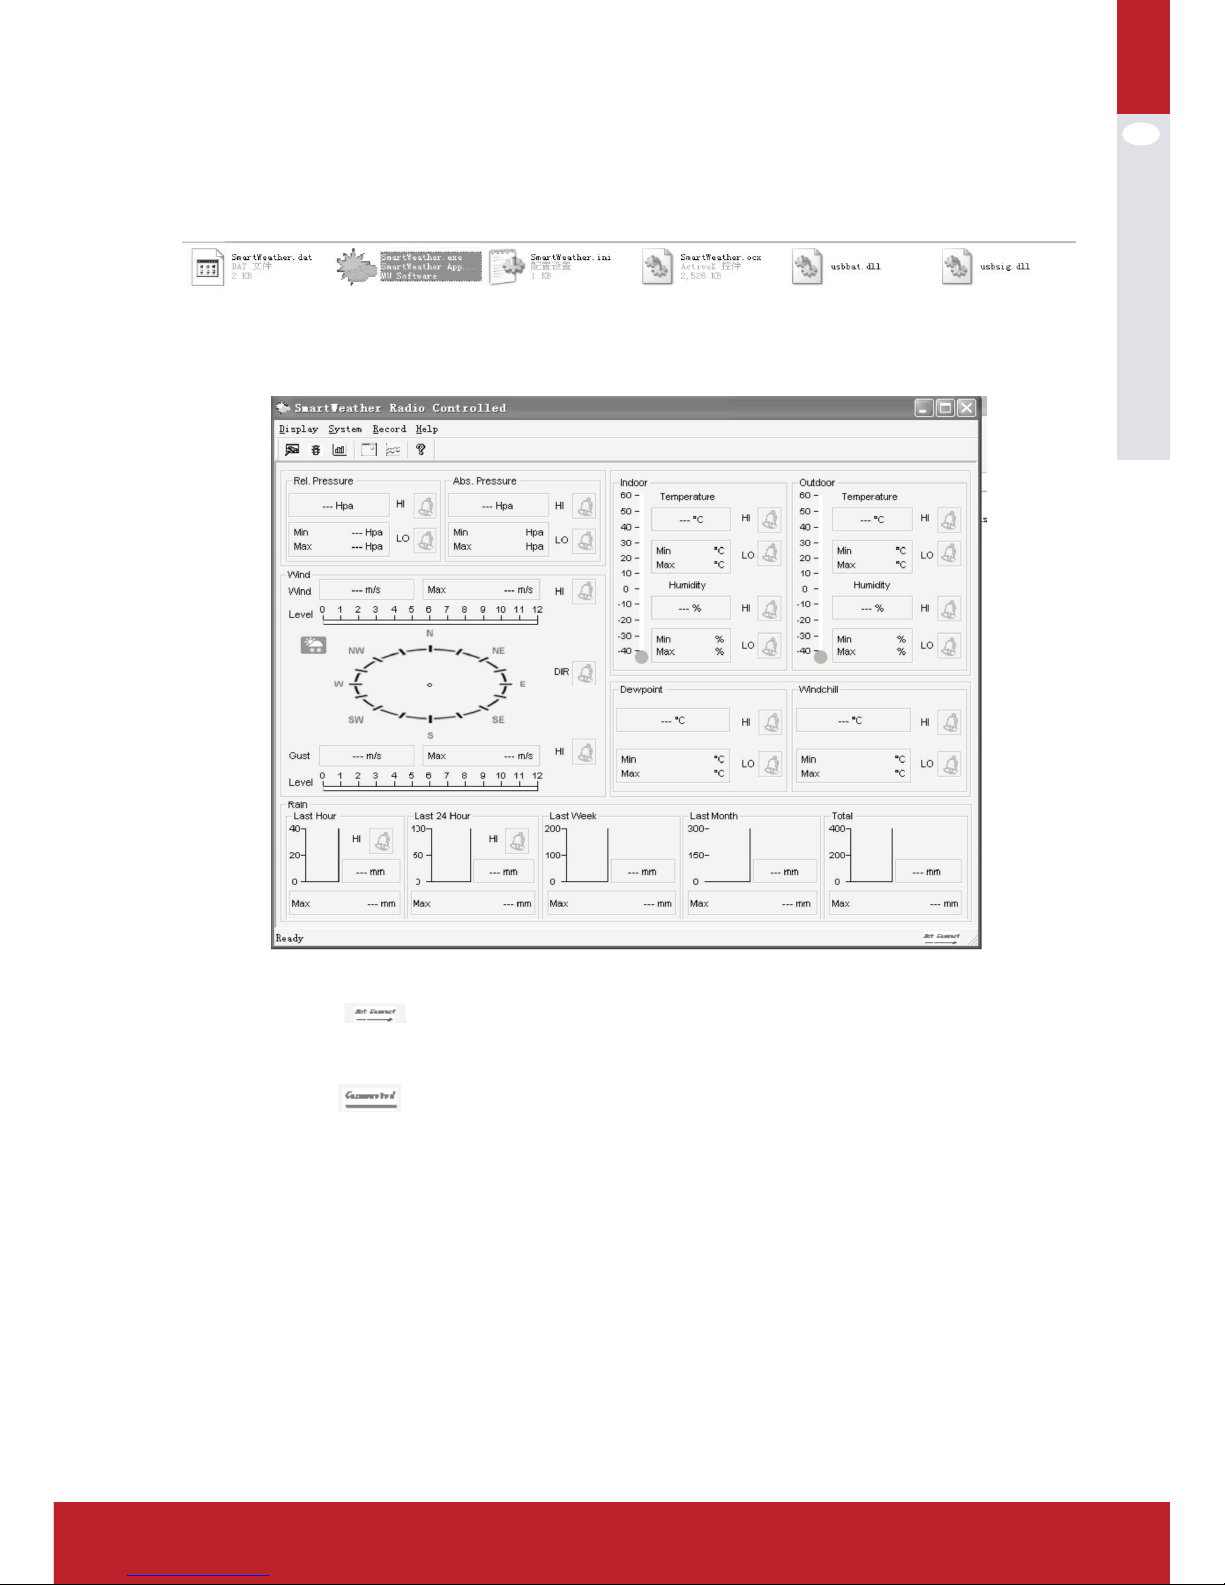
14. SmartWeather software (only in english language available)
SmartWeather software is, users just need to copy it to your PC, double-click the
package SmartWeather.exe file can start SmartWeather software.
SmartWeather software starts as follows:
If base station connect failure through USB cable to your computer, then right
corner display
if connecting successfully, you can hear computer issued a “drip” sound and right
corner display
indicating communication successfully, software will read current data from base
station and display on software screen, also automatically download all historical
data records, the bottom of the screen display the download time of historical
data and number of records historical data downloading, as following.
EN
20
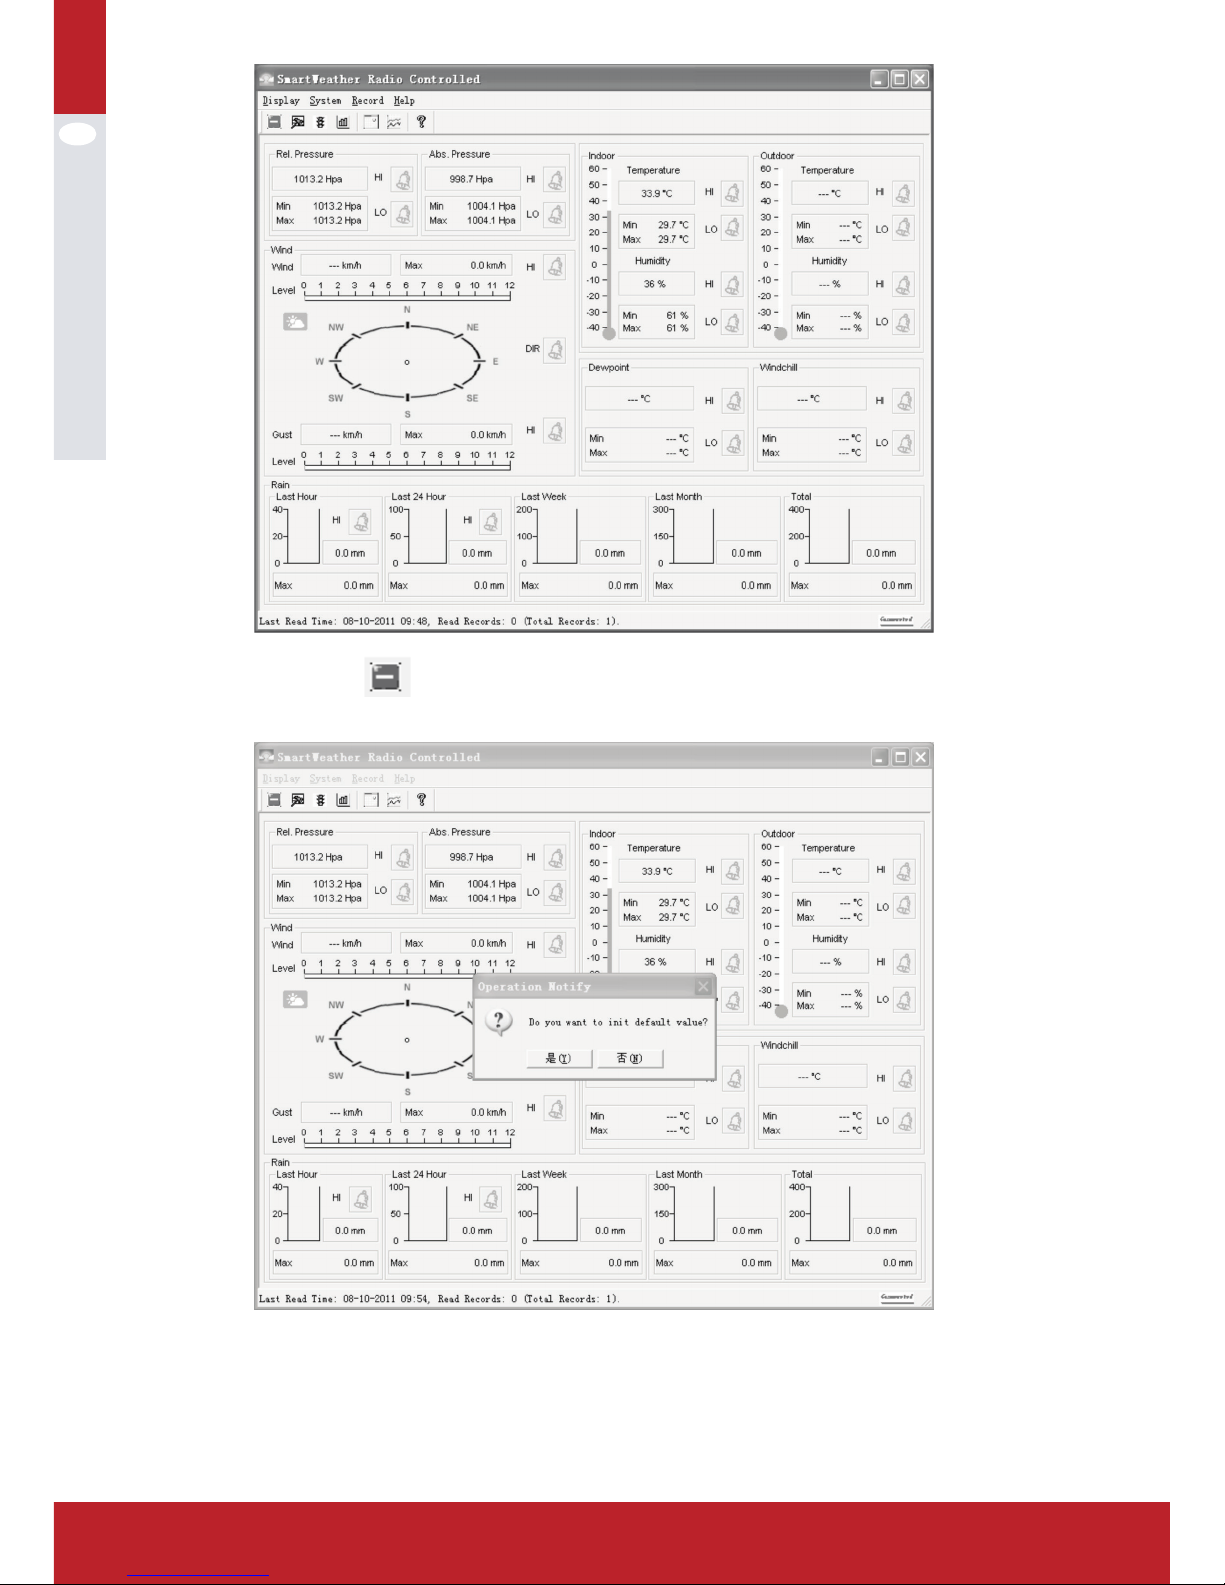
Click the icon of , user can enter the restore default parameters confirmation screen, as shown below:
Note: this function only use in receiver appear abnormal conditions. After clicking ok button to choose restore default value, continue to put receiver connected
to computer, waiting for two minutes later restore default completed, receiver
will remove previous history data.

EN
21
www.kramp.com
sPeCifiCation:
1. Receiver:
(1) Temperature range: 0°C ~ 50°C (32°F ~ 122°F);
Temperature accuracy: ±1°C
Temperature resolution: 0.1°C;
(2) Humidity range: 20%~99%;
Humidity accuracy: ±5%
Humidity resolution:1%(condition: temperature 25°C, humidity 50%);
(3) Pressure range: 920~1080hPa;
Pressure accuracy: ±5hPa
Pressure resolution: 0.1 hPa;
(4) Transmission data update: 48s;
(5) Alarm: 2 minutes
(6) Power: 3*1.5V AA battery;
(7) Battery life: about 12 months
(8) Low battery check: power-on check, 00:00 check every day.
(9) Work temperature: 0°C to 50°C
2. Outdoor transmitter:
(1) Temperature range: -40°C ~ 60°C (-104°F ~ 140°F);
Temperature accuracy: ±1°C
Temperature resolution: 0.1°C;
(2) Humidity range: 20%~99%;
Humidity accuracy: ±5%
Humidity resolution: 1%
(3) Wind speed range: 0~50m/s; Wind speed resolution: 0.1 m/s;
(4) Rain range: 0~9999mm;
Rain resolution: 0.1mm(rainfall<1000 mm);
1 mm(rainfall>1000 mm);
(5) Data update: 48s;
(6) Power: 2*1.5V AA battery (RECHARGEABLE);
(7) Battery life: about 24months;
(8) Low battery check: power-on check, 00:00 check evey day.
(9) Work temperature: -40°C ~ 60°C (-104°F ~ 140°F);
(10) Anti-rainy

22EN22
3.Scope of delivery
Printed manual
LCD Display (3x1.5V AA battery not included)
Stainless steel pipe (Ø20mmx360mm)
Base
Transmitter holder
Rain gauge holder
Wind sensor holder
Wind direction compenent + wind speed component
Transmitter with battery compartment (rechargeable batteries 2x1.5v - not
included)!
Waterproof tower case
Rain gauge with wire incl RJ45 connector
Solar component with wire incl RJ45 connector
USB cable to dowload data from display to pc
Small bag with screws and nuts
CD with SmartWeather software (english)
Safety:
This product is not a toy! -Keep away from childeren. Mount it safe and solid, out
of reach from children.
Disclaimer:
The values from this device should be treated as indicative.
Find more information and video instruction about this item at:
www.kramp.com (search on WS1040KR)

DE
23
23
www.kramp.comwww.kramp.com
Contents
Einrichtungsanleitung 24 - 26
Beschreibungen 27
BetrieB 28
RCC (Funkuhrensignal) 28 - 29
Uhrmodus 30 - 31
Datumsmodus 31 - 32
Windgeschwindigkeitsmodus 32 - 33
Modus Erfassungshistorie 33
Regenfallmodus 34
Modus Innenraumtemperatur 35
Modus Innenraum-Luftfeuchtigkeit 36
Modus Außenbereichstemperatur 36 - 38
Modus Außenbereichs-Luftfeuchtigkeit 38 - 39
Wettervorhersagemodus 39
Luftdruckmodus 40 - 41
Druckhistogrammmodus 41
Intelligente Wettersoftware 42 - 43
teChnisChe Daten: 44
1. Empfänger 44
2. Außenbereichssender 44
3. Lieferumfang 45

DE
24
einriChtUnGsanleitUnG
1. Fügen Sie das Edelstahlrohr in den Sockel ein (1). Drücken Sie eine M3Schraubenmutter in die Nut (2), und befestigen Sie sie mit einer PM-3,0x25mm-Schraube.
2. Führen Sie den Sender-Halter in das Edelstahlrohr ein, und befestigen Sie
ihn mit einer PM-3,0x22-mm-Schraube und einer M3-Schraubenmutter.
3. Führen Sie den Regenmesserhalter auf der kurzen Seite des Senderhalters
ein. Befestigen Sie ihn mit einer PM-3,0x25-mm-Schraube und einer M3Schraubenmutter. Installieren Sie dann den Regenmesser auf dem Regenmesserhalter, und befestigen Sie ihn mit zwei PA-3,0x8-mm-Schrauben.
4. Drücken Sie eine M3-Schraubenmutter in die Nut (2) auf der schmalen Seite
des Windsensorhalters, fügen Sie den Windsensorhalter auf dem Senderhalter ein, und befestigen Sie ihn mit einer PM-3,0x22-mm-Schraube.
DE
25
www.kramp.com
5. Fügen Sie die Windrichtungskomponente in die Windgeschwindigkeitskomponente ein, und fügen Sie dann den Windrichtungsstecker RJ45 in die
623-K-Öffnung der Windgeschwindigkeitskomponente ein. Fügen Sie eine
M3-Schraubenmutter in die große Seite des Windsensorhalters ein, und installieren Sie dann den vollständigen Windsensor auf dem Halter. Befestigen
Sie ihn mit einer PM-3,0x22-mm-Schraube. Positionieren Sie das “N” der
Windrichtungskomponente Richtung NORDEN (Kompass verwenden, nicht
im Lieferumfang enthalten)
6. Öffnen Sie das Batteriefach, legen Sie die Batterien ein, und bringen Sie die
Abdeckung wieder an. Fügen Sie den vollständigen Sender auf der langen
Seite des Senderhalters ein, und befestigen Sie ihn mit einer PM-3,0x18mm-Schraube. Schließlich fügen Sie den Windgeschwindigkeitsdraht mit
dem RJ45-Stecker in die 623-K-WIND-Öffnung des Senders ein.
7. A. Führen Sie den Regenmesserdraht durch das wasserfeste Towergehäuse,
und stecken Sie den RJ45-Stecker in die 623-K-Öffnung des Solarfachs ein.
7 B. Führen Sie den Solardraht durch das wasserfeste Towergehäuse, und
stecken Sie den RJ45-Stecker in die 623-K-RAIN-Öffnung des Senders ein.
7 C. Fügen Sie eine M3-Schraubenmutter in die obere Nut (2) des wasserfesten
Towergehäuses ein, und fügen Sie dann das Solarfach in die Oberseite des
wasserfesten Towergehäuses ein. Befestigen Sie sie mit einer PM-3,0x8mm-Schraube (Hinweis: fügen Sie die Schraube von der Schraubenmutterseite des Solarfachs ein).
DE
26
8. Passen Sie das montierte wasserfeste Towergehäuse auf den montierten
Sender, und passen Sie die Drähte in die Nuten des Senderhalters ein.
9. Passen Sie vier Kunststoff-Schraubenmuttern in den Sockel ein, und befestigen Sie den Sockel mit vier KA-4,0x40-mm-Schrauben am Boden.
(1) Alternativ kann das Edelstahlrohr mit Rohrschellen an einer Wand oder
Konstruktion (nicht im Lieferumfang enthalten) befestigt werden.
(2) In einigen Fällen kann es hilfreich sein, die M3-Schraubenmutter mit einem
Tropfen Klebstoff (nicht im Lieferumfang enthalten) in der Nut zu fixieren.
Spezielle Hinweise;
• Eine Taupunkttemperaturanzeige von -40 °C weist darauf hin, dass die
Taupunkttemperatur bereits sehr niedrig ist und nicht die tatsächliche Taupunkttemperatur darstellt.
• Bei einer Batterie-Niedrigspannungswarnung können einige Funktionen
möglicherweise nicht verwendet werden, um das System zu schützen. Bitte
tauschen Sie die Batterie aus.
• Schließen Sie bei einer Batterie-Niedrigspannungswarnung die Einheit nicht
an einen PC an, um Datenverluste zu vermeiden. Der Benutzer kann eine
neue Batterie einsetzen und das Gerät wieder anschließen, um eine zuverlässige Kommunikation zu gewährleisten.
• Wenn die Datenkommunikation abgeschlossen ist, trennen Sie die PC-
Verbindung, um zu vermeiden, dass die Datenkommunikation den normalen
Betrieb beeinflusst.

DE
27
www.kramp.com
BesChreiBUnGen
1. Das Anzeigeformat des Datums kann folgendermaßen eingestellt werden:
JJJJ-MM-TT, MM-TT-JJJJTT-MM-JJJJ (benutzerdefiniert)
2. Die Stundenanzeige kann auf 12- und 24-Stunden-Format eingestellt
werden. Die Zeitzone kann von -12 bis +12 eingestellt werden (benutzerdefiniert);
3. Die RCC-Zeitfunktion wird automatisch (DCF/MSF) für EU, WLAN 433 MHzEmpfang eingestellt. Möglicher Abstand: max. 100 Meter im offenen Feld.
4. Alarmfunktion: Alarmton schrittweise ansteigend, um den Benutzer zu erinnern, Alarmzeit beträgt 2 Minuten;
5. Innenraum-Luftfeuchtigkeit: Anzeige der relativen Luftfeuchtigkeit, Alarm
bei hoher Luftfeuchtigkeit, Wert und Alarm bei niedriger Luftfeuchtigkeit,
Wert kann individuell eingestellt werden, die Werte der maximalen und minimalen Luftfeuchtigkeit können abgefragt werden;
6. Innenraumtemperatur: Anzeige der relativen Temperatur, Werte für den
Alarm bei hoher und niedriger Temperatur können individuell eingestellt
werden, Werte für maximale und minimale Temperatur können abgefragt
werden /benutzerdefiniert;
7. Außenbereichs-Luftfeuchtigkeit: Anzeige der relativen Luftfeuchtigkeit,
Alarm bei hoher Luftfeuchtigkeit, Wert und Alarm bei niedriger Luftfeuchtigkeit, Wert kann individuell eingestellt werden, die Werte der maximalen und
minimalen Luftfeuchtigkeit können abgefragt werden;
8. Außenbereichstemperatur: Anzeige der relativen Temperatur, Werte für den
Alarm bei hoher und niedriger Temperatur können individuell eingestellt
werden, Werte für maximale und minimale Temperatur können abgefragt
werden °C/°F (benutzerdefiniert);
9. Windgeschwindigkeit: Der Benutzer kann die durchschnittliche Windgeschwindigkeit oder Böen-Windgeschwindigkeit einstellen, der Alarmwert für
hohe Windgeschwindigkeit kann individuell eingestellt werden, die entsprechenden Maximalwerte können abgefragt werden, die Anzeigeeinheit kann
auf m/s, km/h, mph, Knoten oder bft eingestellt werden;
10. Regenfall: Der Benutzer kann einstellen, ob die Regenfalldauer über den
Verlauf von 24 Stunden, von Wochen oder Monaten oder ob der Regenfall insgesamt angezeigt werden soll. Alarm für Stunden und 24 Stunden Starkregen können individuell eingestellt werden, Sie können die entsprechende
Maximalanzeige abfragen, Einheiten mm oder Zoll;
11. Windrichtung: N, NE, E, SE, S-, SW, W, NW, acht Windrichtungen können
angezeigt werden, eine Windrichtung als Alarmrichtung einstellen;
12. Luftdruck: Der Benutzer kann einstellen, ob der Absolutdruck oder der relative Druck angezeigt werden, er kann individuelle Hoch- und Niederdruckalarmwerte einstellen, die Anzeigeeinheit kann auf hPa, Inhg oder mmHg
eingestellt werden;
13. Luftdruckänderungstrends: Der Benutzer kann einstellen, ob der Änderungstrend über 12 oder 24 Stunden angezeigt wird;
14. Die Wettervorhersage bietet sechs Zustandssymbole und Wettertrends: sonnig, bewölkt, bedeckt, Regen, Schnee, Sturm;
15. Niederspannungserkennung: Wenn die Batteriespannung des Senders und
Empfängers niedrig ist, wird der Benutzer daran erinnert, die Batterien
baldmöglichst auszutauschen;
 Loading...