

Page 1

Kramer Electronics, Ltd.
USER MANUAL
Model:
FC-8
Wi-Fi - RS-232 Bridge
Page 2

Page 3

Contents
Contents
1
Introduction 1
2
Getting Started 1
2.1 Quick Start 2
3
Overview 3
4
Your FC-8 Wi-Fi - RS-232 Bridge 3
5
Connecting the FC-8 Wi-Fi - RS-232 Bridge 5
5.1 Connecting the Controlled Device to the FC-8 5
5.2 Connecting the FC-8 to a Network 6
6
Configuring the FC-8 Wi-Fi - RS-232 Bridge 6
6.1 Using the Default Network Configuration 7
6.2 Configuring the Host System to Operate with FC-8 7
6.3 Changing the FC-8 Configuration 8
6.4 Configuring an Active Station 12
7
Operating the FC-8 12
8
Technical Specifications 13
Figures
Figure 1: FC-8 Wi-Fi - RS-232 Bridge Front and Back Views 4
Figure 2: Connecting the FC-8 Wi-Fi - RS-232 Bridge (Ad-Hoc Network) 5
Figure 3: Connecting the FC-8 Wi-Fi - RS-232 Bridge (Access Point) 6
Figure 4: Wireless Network Connection Window 8
Figure 5: Serial Net Configuration Screen of the FC-8 9
Tables
Table 1: FC-8 Wi-Fi - RS-232 Bridge Front and Back Functions 4
Table 2: FC-8 Default Network Configuration 7
Table 3: FC-8 Serial Net Configuration Parameters 10
Table 4: Baud Rate Settings 11
Table 5: FC-8 Technical Specifications 13
i
Page 4

Page 5

Introduction
1 Introduction
Welcome to Kramer Electronics! Since 1981, Kramer Electronics has been
providing a world of unique, creative, and affordable solutions to the vast
range of problems that confront the video, audio, presentation, and
broadcasting professional on a daily basis. In recent years, we have
redesigned and upgraded most of our line, making the best even better! Our
1,000-plus different models now appear in 11 groups1 that are clearly
defined by function.
Thank you for purchasing the Kramer TOOLS FC-8 Wi-Fi - RS-232 Bridge,
which is ideal for controlling any Kramer device with an RS-232 port in a
wireless network environment.
Each package includes the following items:
The FC-8 Wi-Fi - RS-232 Bridge
12V DC Power supply
This user manual2
2 Getting Started
We recommend that you:
Unpack the equipment carefully and save the original box and
packaging materials for possible future shipment
Review the contents of this user manual
Use Kramer high performance high resolution cables3
1 GROUP 1: Distribution Amplifiers; GROUP 2: Switchers a nd Matrix Switchers; GROUP 3: Control Systems;
GROUP 4: Format/Standards Converters; GROUP 5: Range Extenders and Repeaters; GROUP 6: Specialty AV Products;
GROUP 7: Scan Converters and Scalers; GROUP 8: Cables and Connectors; GROUP 9: Room Connectivity;
GROUP 10: Accessories and Rack Adapters; GROUP 11: Sierra Products
2 Download up-to-date Kramer user manuals from our Web site at http://www.kramerelectronics.com
3 The complete list of Kramer cables is on our Web site at http://www.kramerelectronics.com
1
Page 6
Getting Started
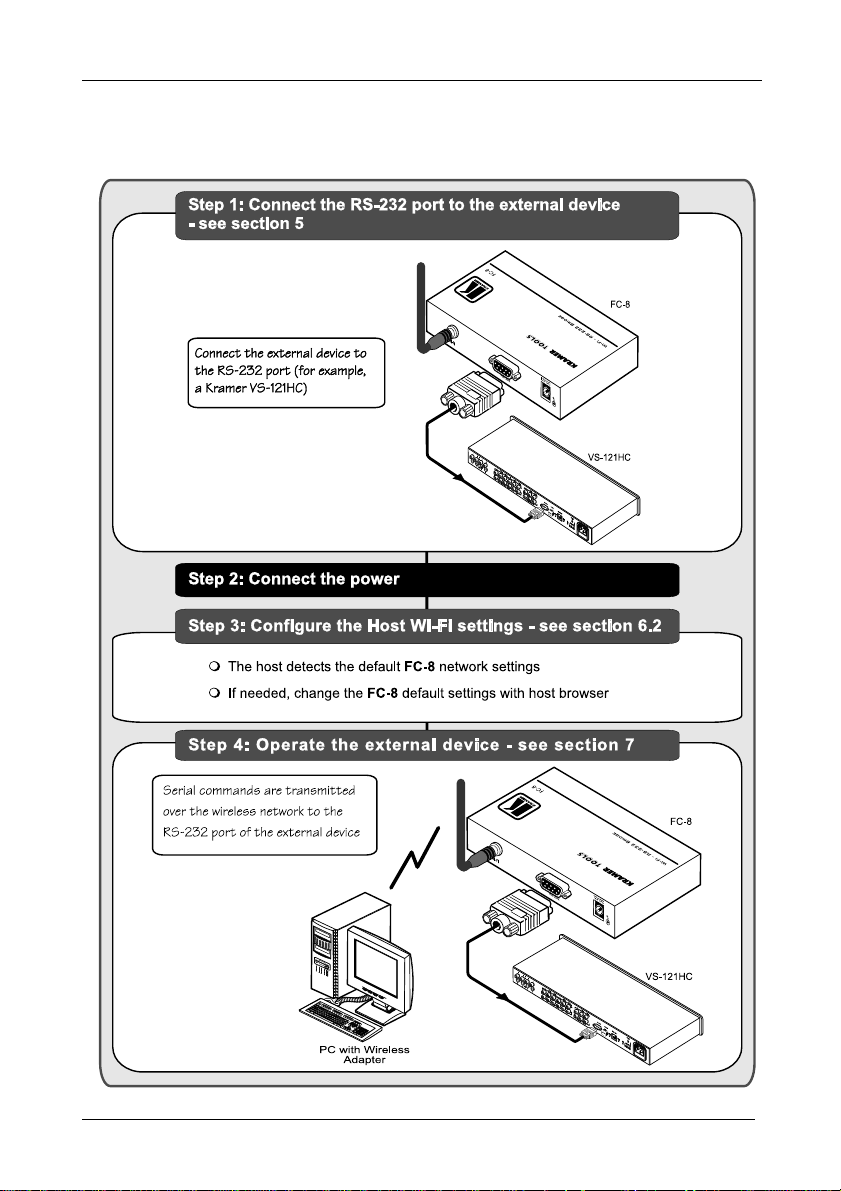
2.1 Quick Start
This quick start chart summarizes the basic setup and operation steps.
2
KRAMER: SIMPLE CREATIVE TECHNOLOGY
Page 7

Overview
3 Overview
The Kramer FC-8 is a serial-to-wireless and wireless-to-serial LAN device
server that acts as a bridge for connecting serial devices to an 802.11b/g
wireless LAN.
The FC-8 supports TCP/UDP sockets, a Web server with Web site, and
WEP, WPA, WPA2 Wi-Fi encryption. The FC-8 is housed in a Kramer
TOOLS enclosure, and is powered by a 12V DC power supply.
Any legacy Kramer device that has an RS-232 connection can be wirelessly
controlled over the customer’s LAN or the Internet with an FC-8 using
serial commands or Kramer control software.
The FC-8 is available in two models: a European model that supports 13
channels over the 2.412–2.472GHz spectrum and an American model that
supports 11 channels over the 2.412–2.462GHz spectrum.
To achieve the best performance:
Use only good quality connection cables1 to avoid interference,
deterioration in signal quality due to poor matching, and elevated
noise levels (often associated with low quality cables).
Avoid interference from neighboring electrical appliances that
may adversely influence signal quality and position your Kramer
FC-8 away from moisture, excessive sunlight and dust
Caution – No operator-serviceable parts inside unit.
Warning – Use only the Kramer Electronics input power
wall adapter that is provided with this unit2.
Warning – Disconnect power and unplug unit from wall
before installing or removing device or servicing unit.
4 Your FC-8 Wi-Fi - RS-232 Bridge
Figure 1 and Table 1 define the unit.
1 Available from Kramer Electronics on our Web site at http://www.kramerelectronics.com
2 For example, part number 2535-000251
3
Page 8

Your FC-8 Wi-Fi - RS-232 Bridge
Figure 1: FC-8 Wi-Fi - RS-232 Bridge Front and Back Views
Table 1: FC-8 Wi-Fi - RS-232 Bridge Front and Back Functions
# Feature Function
1 12V DC Connector +12V DC for powering the unit
2 FACTORY RESET Button When pressed, erases all configuration data. Use only under the guidance
3 RS-232 DB-9F Port Connects to the controlled device via a null-modem connection
4 WI-FI Antenna Transmits and receives signals over the wireless network
5 LINK LED Illuminates green when there is a link
6 TX LED Illuminates green when transmitting data over the wireless connection
7 RX LED Illuminates green when receiving data over the wireless connection
8 ON LED Illuminates green when power is supplied
4
of Kramer Technical Support.
KRAMER: SIMPLE CREATIVE TECHNOLOGY
Page 9

Connecting the FC-8 Wi-Fi - RS-232 Bridge
5 Connecting the FC-8 Wi-Fi - RS-232 Bridge
The FC-8 can be used to wirelessly control an RS-232-based device from a PC
via an ad-hoc network (see Figure 2) or via an access point (router) to a larger
network or the Internet (see Figure 3).
5.1 Connecting the Controlled Device to the FC-8
To connect a controlled device to the FC-8, as the example in Figure 2
illustrates1, connect the RS-232 DB-9 rear panel port on the FC-8 to the
attached device2:
Figure 2: Connecting the FC-8 Wi-Fi - RS-232 Bridge (Ad-Hoc Network)
1 Switch OFF the power on each device before connecting it to your FC-8. After connecting your FC-8, switch on its power
and then switch on the power on each device
2 Use the same RS-232 wiring as for a connection to the PC
5
Page 10

Configuring the FC-8 Wi-Fi - RS-232 Bridge
Figure 3: Connecting the FC-8 Wi-Fi - RS-232 Bridge (Access Point)
5.2 Connecting the FC-8 to a Network
The FC-8 is connected to the network by software configuration as
described in Section 6.
6 Configuring the FC-8 Wi-Fi - RS-232 Bridge
This section explains how to configure the FC-8 and the host system for
operation. The section includes:
Using the Default Network Configuration, see section 6.1
Configuring the Host System, see section 6.2
Changing the FC-8 Configuration, see section 6.3
Configuring an Active Station, see section 6.4
6
KRAMER: SIMPLE CREATIVE TECHNOLOGY
Page 11

Configuring the FC-8 Wi-Fi - RS-232 Bridge
6.1 Using the Default Network Configuration
The FC-8 is configured in the factory with the following default
configuration that can be used immediately in an ad-hoc network:
Table 2: FC-8 Default Network Configuration
Parameter Value
Network Name !Kramer-FC8 (ad hoc network)
IP Address 192.168.3.2
Subnet Mask 255.255.255.0
Mode Serial Net
Port 10000
6.2 Configuring the Host System to Operate with FC-8
The wireless connection on the host system must be configured to
communicate with the FC-8. (It is assumed that a wireless network adapter
is installed and operating on the host system.)
To configure the host system for first-time wireless operation:
1. Power on the FC-8 by connecting its 12V DC power supply.
Verify that the ON LED lights.
2. The host automatically detects the wireless adapter and displays an icon in
the lower-right corner showing that a wireless network was detected.
3. Click the wireless network icon, then click View Available Wireless
Networks.
The Wireless Network Connection window appears (see Figure 4). You
should see your wireless network listed with the network name
Kramer-FC8. If you don't see the network, click Refresh network list in
the upper-left corner.
4. Make sure the status Connected is shown.
If the network status is not Connected, click Kramer-FC8, and click
Connect in the lower-right corner.
7
Page 12

Configuring the FC-8 Wi-Fi - RS-232 Bridge
Figure 4: Wireless Network Connection Window
5. If the Kramer-FC8 network does not connect:
Click on Kramer-FC8 to open the network and
click Change Advanced Settings.
Choose to highlight Internet Protocol (TCP/IP)
and click Properties.
Make sure Obtain an IP address automatically is
selected.
6. Begin operating the device as described in section 7 or if necessary, change
the FC-8 configuration as described in section 6.3.
6.3 Changing the FC-8 Configuration
The FC-8 is normally configured to work as a listening station in an ad-hoc,
peer-to-peer network or over an access point such as a router to connect to
the Internet. (To configure the FC-8 as an active station, see section 6.4.)
To connect the FC-8 to another network you must change its configuration
using a built-in Web page configuration program over an Internet browser.
8
KRAMER: SIMPLE CREATIVE TECHNOLOGY
Page 13

Configuring the FC-8 Wi-Fi - RS-232 Bridge
To change the FC-8 configuration, do the following:
1. In the Internet browser of a PC attached to the FC-8 network, enter the IP
address of the FC-8 (for example, using the default IP address:
192.168.3.2).
The Serial Net setup page appears (see Figure 5). Table 3 explains the
fields.
Figure 5: Serial Net Configuration Screen of the FC-8
9
Page 14

Configuring the FC-8 Wi-Fi - RS-232 Bridge
Table 3: FC-8 Serial Net Configuration Parameters
Parameter Possible Values Notes
MAC Address Ethernet hardware address (read-only)
Bootblock Version For technical use (read-only)
Serial Number Factory serial number of the device (read-
Web Server Status Message Must be I/OK (read-only)
Firmware Version Must end with b17 or above (read-only)
Hardware Version For technical use (read-only)
Active IP Address 192.168.3.2 (Default)
Subnet Address 255.255.255.0 (Default)
IP Gateway 0.0.0.0 (Default)
Wireless LAN SSID Alpha-numeric
IP Registration Host Server
Name
SerialNet Listening Port 0 to 64000
Socket Type 0 – TCP (Default)
Host Server & Port nnn.nnn.nnn.nnn:ppp
Security Type 0 – N
Kramer-FC8 (Default)
An ad-hoc network must
begin with the character “!”
nnn.nnn.nnn.nnn:ppp
Where:
nnn.nnn.nnn.nnn =
a server name or IP address
ppp = 0..65535
If Registration Host Server
Name is empty, no IP
registration server name is
defined.
192.168.3.1 (Default)
10000 (Default)
1 – UDP
1 – WEP64
2 – WEP128
3 – WPA
4 – WPA2
only)
Active IP address of the FC-8
Network name (SSID)
The Registration Host Server Name is used
to locate and establish a connection after
FC-8 establishes an Internet session
connection as a result of an explicit
command or as a result of automated
Internet session establishment procedures.
The dynamically assigned IP address is sent
to the server in ASCII form, after which the
socket is closed. See Socket IP Registration.
It is assumed that the host server is
"listening" on port number.
FC-8 registers itself by opening a socket to a
registration server and sending its ID
information and current IP address. When
the Registration Host Server Name
parameter contains a value, the FC-8
establishes a socket to the server defined in
Registration Host Server Name during the
registration procedure. When a socket is
established, FC-8 transmits its ID information
and current IP address in the following
format:
FC-8-<D/L/S> S/N:<RP5> version: <RP1>
HN:<HSTN> IP:<IPA or RRRL> Port:<LPRT
or 80 or 0>”
The registration socket is then closed.
To configure the FC-8 as an active station,
see section 6.4.
No security
10
KRAMER: SIMPLE CREATIVE TECHNOLOGY
Page 15

Configuring the FC-8 Wi-Fi - RS-232 Bridge
Parameter Possible Values Notes
Wireless LAN WEP Key1 WEP64 – no more than 10
characters (5 bytes) allowed
(hex 0-9 A-F)
WEP128 – no more than 26
characters (13 bytes)allowed
(hex 0-9 A-F)
Wireless LAN WEP Key2 Same as WEP Key1
Wireless LAN WEP Key3 Same as WEP Key1
Wireless LAN WEP Key4 Same as WEP Key1
Pre-shared Key Passphrase WPA – ASCII string must be
between 8-63 alphameric
characters
SerialNet Serial Parameters <b, d, p, s, f >
5, 8, N, 1, 0 (Default)
Default IP 192.168.3.2
Set to 0.0.0.0 to receive IP
address from a DHCP server
[Submit] Enters the changes made in the
[Refresh] Redisplays values of the configuration
Where:
b = baud [1–9 or h] (see Table 4)
d = data bits [7 or 8]
p = parity [N, E, O]
s = stop bits [1]
f = flow [0, 1]
Factory default address
configuration table
screen
Table 4: Baud Rate Settings
Baud Code Baud Rate Baud Code Baud Rate
1 600 6 19200
2 1200 7 38400
3 2400 8 57600
4 4800 9 115200
5 9600 h 230400
2. Change the parameters as needed to attach the FC-8 to the new network and
press Submit.
Important: When changing the IP address, input the same new address into
both the Active IP Address field and in Default IP field.
Note: It may take a few minutes for the update to complete.
Warning: You must enter the correct network parameters. If the parameters
are incorrect, the network will not recognize the unit and you will not be able to
access the device until it is reconfigured using a special program1, which can
be downloaded from the Kramer Web site.
1 The FC-8 must be connected to a PC over the serial port while running the program
11
Page 16

Operating the FC-8
3. After submitting the new parameters, reset the FC-8 by clicking the Reset
iChip link at the bottom of the window. The new window with the message
“iChip is performing reset” opens. Wait about 1 minute and close this new
window.
Note: To start using the new settings, disconnect the wireless connection
from the FC-8 and reconnect it again with new parameters.
Note: If you made changes to the name of the wireless network (Wireless
LAN SSD) after clicking the submit button, the connection with the FC-8 is
lost and the connection error message appears. In this case do not perform
the Reset iChip procedure. Reconnect the FC-8 with the new parameters.
6.4 Configuring an Active Station
The FC-8 can also be configured as an active station to communicate with
another listening station.
To configure an active station:
1. Set the other station as a listener if necessary. (This is the normal default
setting for the FC-8.)
2. In the active station, under Host Server and Port, set the remote IP address
and remote port (example, 192.168.5.10:3000).
3. Click Reset iChip.
4. The actual connection begins when the active station starts transmitting data
on the serial port.
7 Operating the FC-8
After the FC-8 is fully configured it works transparently as a bridge
between the network and the attached device. The attached device can then
be operated using RS-232 serial commands transmitted by a touch screen
system, PC, or other serial controller.
To operate the attached device using serial commands, install Kramer's
control software that can be downloaded from the Kramer Electronics Web
site1.
For an explanation of all control commands, see the Kramer Protocol 2000
commands in the User Manual of the attached device.
1 Available from our Web site at http://www.kramerelectronics.com
12
KRAMER: SIMPLE CREATIVE TECHNOLOGY
Page 17

Technical Specifications
8 Technical Specifications
The FC-8 technical specifications are shown in Table 5:
Table 5: FC-8 Technical Specifications1
INPUT: RS-232 DB9F connector
OUTPUT: Antenna
HARDWARE DESCRIPTION: Core CPU: 32-bit RISC ARM7TDMI, low-leakage, 0.13 micron, running at
PERFORMANCE
SPECIFICATIONS:
STANDARDS SUPPORTED: IEEE 802.11b, IEEE 802.11g
FREQUENCY: Europe: 2.412 to 2.472GHz
CHANNELS: Europe: 13 channels
TRANSMIT POWER LEVELS: 802.11b: 17dBm
RECEIVE MINIMUM INPUT
LEVEL SENSITIVITY:
INTERNET PROTOCOLS:
SECURITY PROTOCOLS: WEP, WPA and WPA2
PROTOCOLS ACCELERATED
IN HW:
APPLICATION PROGRAM
INTERFACE:
PROTOCOLS: HTTP web server with two on-chip websites: configuration site and
OPERATING HUMIDITY: 90% max., non-condensing
OPERATING
TEMPERATURE:
DIMENSIONS: 12cm x 7.5cm x 2.5cm (4.7" x 3.0" x 1.0") W, D, H
WEIGHT: 0.3kg (0.7lbs)
ACCESSORIES: 12V DC power supply, antenna, null-modem adapter
48MHz
Operating Voltage (input): 12VDC 70mA
RoHS-compliant; lead-free
RS-232: Asynchronous character; binary; 7 or 8 data bits; odd, even, or no
parity; 1 stop bit
Flow Control: Hardware (RTSH, CTSH) and software flow control
USA: 2.412 to 2.462GHz
USA: 11 channels
802.11g: 17dBm
11Mbps: -86dBm
54Mbps: -72dBm
ARP, ICMP, IP, UDP, TCP, DHCP, DNS, NTP, SMTP
AES, 3DES and SHA
Kramer configuration program – Configure a factory default: Ad hoc net,
permanent IP, DHCP server and serialNET mode.
Kramer application Web page, enabling changing Net details, Security and IP
application site.
DHCP client and server
-40° to 85°C (-40° to 185°F)
1 Specifications are subject to change without notice
13
Page 18

14
Page 19

For the latest information on our products and a list of Kramer
distributors, visit our Web site: www.kramerelectronics.com
where updates to this user manual may be found.
We welcome your questions, comments and feedback.
Safety Warning:
Disconnect the unit from the power supply before
opening/servicing.
Caution
Kramer Electronics, Ltd.
Web site: www.kramerelectronics.com
E-mail: info@kramerel.com
P/N: 2900-000358 REV 3
 Loading...