

Page 1

Kramer Electronics, Ltd.
USER MANUAL
Model:
FC-1ETHN
Ethernet Controller
Page 2

Contents
Contents
1 Introduction 1
2 Getting Started 1
3 Overview 1
3.1 Terminology Used in this User Manual 2
3.2 Achieving the Best Performance 3
4 Your FC-1ETHN Ethernet Controller 3
5 Using the Kramer Configuration Manager Software 4
5.1 Installing and Running the Kramer Configuration Manager Software 4
5.2 Understanding the Kramer Configuration Manager Window 4
6 Configuring the FC-1ETHN Ethernet Controller 7
6.1 Configuring the FC-1ETHN via its Serial Port 7
6.2 Configuring the FC-1ETHN via its ETHERNET port 8
6.3 Routing Data in the Slave and Master Routing Modes 9
6.3.1 Slave Routing Mode 9
6.3.2 Master Routing Mode 10
7 Controlling Kramer Machines via Ethernet using the FC-1ETHN 10
7.1 Controlling a Kramer Machine via a Computer 11
7.2 Controlling a Kramer Machine via a Controller 12
8 Flash Memory Upgrade 12
8.1 Downloading from the Internet 12
8.2 Connecting the PC to the RS-232 Port 13
8.3 Upgrading Firmware 13
9 Technical Specifications 16
Figures
Figure 1: FC-1ETHN Ethernet Controller 3
Figure 2: Choose Port Window 4
Figure 3: FC-1ETHN Configuration Manager Window 5
Figure 4: Connectin g the FC-1ETHN in the Slave Routing Mode 9
Figure 5: Connecting the FC-1ETHN in the Master Routing Mode 10
Figure 6: Connecting the FC-1ETHN in the Master Routing Mode 11
Figure 7: Splash Screen 13
Figure 8: Atmel – Flip Window 14
Figure 9: Open Configuration File Select Window 14
Figure 10: Atmel – Flip Window (RS-232 Communication) 14
Figure 11: RS-232 Window 15
Figure 12: Atmel – Flip Window (Connected) 15
Figure 13: Atmel – Flip Window (Operation Completed) 16
i
Page 3

Contents
Tables
Table 1: Terminology Used in this User Manual 2
Table 2: Features and Functions of the FC-1ETHN Ethernet Controller 3
Table 3: FC-1ETHN Configuration Manager Window Functionality 6
Table 4: Crossover Cable RJ-45 PINOUT 8
Table 5: Straight-through Cable RJ-45 PINOUT 8
Table 6: Technical Specifications of the FC-1ETHN Ethernet Controller 16
ii
KRAMER ELECTRONICS, LTD.
Page 4

ADDENDUM: FC-1ETHN
This addendum describes an upgrade to the FC-1ETHN: the Virtual Serial Port.
Amendment to Section 3
The following text on page 2 is deleted:
Is compatible with the latest Kramer K-Router Windows®-based control
software (version 4.0 or higher) whose user-friendly interface now allows
Kramer switchers to be controlled via Ethernet
The following text is inserted immediately prior to section 3.1:
The FC-1ETHN now includes the Virtual Serial Port Driver for compatibility
with applications based on COM-port communication. The Virtual Serial Port:
Makes the FC-1ETHN compatible with all Windows®-based
applications which work through an actual COM port. This includes all versions
of K-Router and other Kramer control applications. It lets you operate all RS-232
and RS-485 controllable devices via Ethernet LAN using their existing PC
software
Operates like an actual hardware port, that is, a logical COM that behaves
like a standard hardware COM but in reality transparently reroutes the data using
the TCP/IP network to the FC-1ETHN interface via a Virtual Null-modem
connection, which you can emulate over the Ethernet or Internet
Can be created in any quantity on your PC and does not occupy an actual
serial port
Amendment to Section 5
In Table 3: “FC-1ETHN Configuration Manager Window Functionality” (on page 6),
item 6 is replaced as follows:
6 Serial Setting In the serial setting speed list, click the appropriate baud speed1 (1200, 2400, 4800, 9600,
19200, 38400, 57600).
Note: the FC-1ETHN does not support 115200 baud rate.
Amendment to Section 6
The following new section, section 6.4 “Configuring the FC-1ETHN via its Virtual Port”,
is inserted immediately prior to section 7:
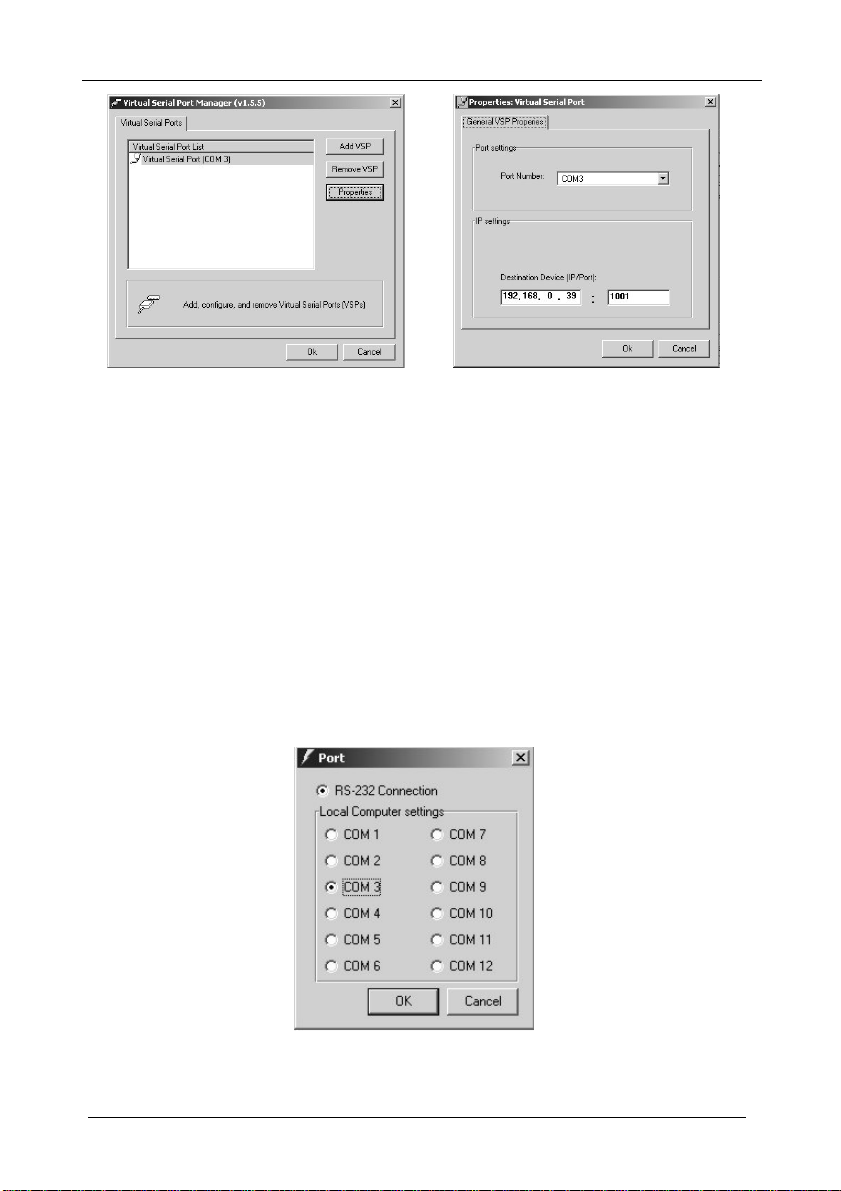
To configure the FC-1ETHN via the Virtual Port, do the following:
Download the Virtual Serial Port Driver at this URL:
http://www.kramerelectronics.com/support/bottom1.htm and follow the on-screen
instructions:
1 The configuration baud is factory preset, and fixed, at 9600
P/N: 2900 – 1040202 A1
Page 5
ADDENDUM: FC-1ETHN
Figure A1: Virtual Serial Port Manager Figure A2: Virtual Serial Port Properties
Amendment to Section 7
In section 7.1 (on page 11) steps 5, 6, and 7 are replaced by the following:
5. Connect the ETHERNET port of your FC-1ETHN to a LAN, using a
straight-through cable with RJ-45 connectors.
You can control from up to three computers (each with the Kramer
Windows®-control software).
6. Run the Kramer Windows®-control software to control the Kramer
machine from each computer.
When working with a non-Kramer device, use their existing PC software
or the Microsoft HyperTerminal.
7. In the K-Router Port window, choose the COM port according to the
number of your virtual Serial port:
In section 7.1 (on page 11) Figure 6 is replaced by the following:
Figure A3: Choosing the COM Port
A2
KRAMER: SIMPLE CREATIVE TECHNOLOGY
Page 6
9999992 A1
ADDENDUM (this data is included at the end of the Overview section)
This addendum adds the following information to the user manual:
Caution – No operator-serviceable parts inside unit.
Warning – Use only the Kramer Electronics input power
wall adapter that is provided with this unit1.
Warning – Disconnect power and unplug unit from wall
before installing or removing device or servicing unit.
1 For example: model number AD2512C, part number 2535-000251
2900-
Page 7
ADDENDUM: Ethernet Cross Cable Wiring Connection
1 8
TOP
FRONT
1 8
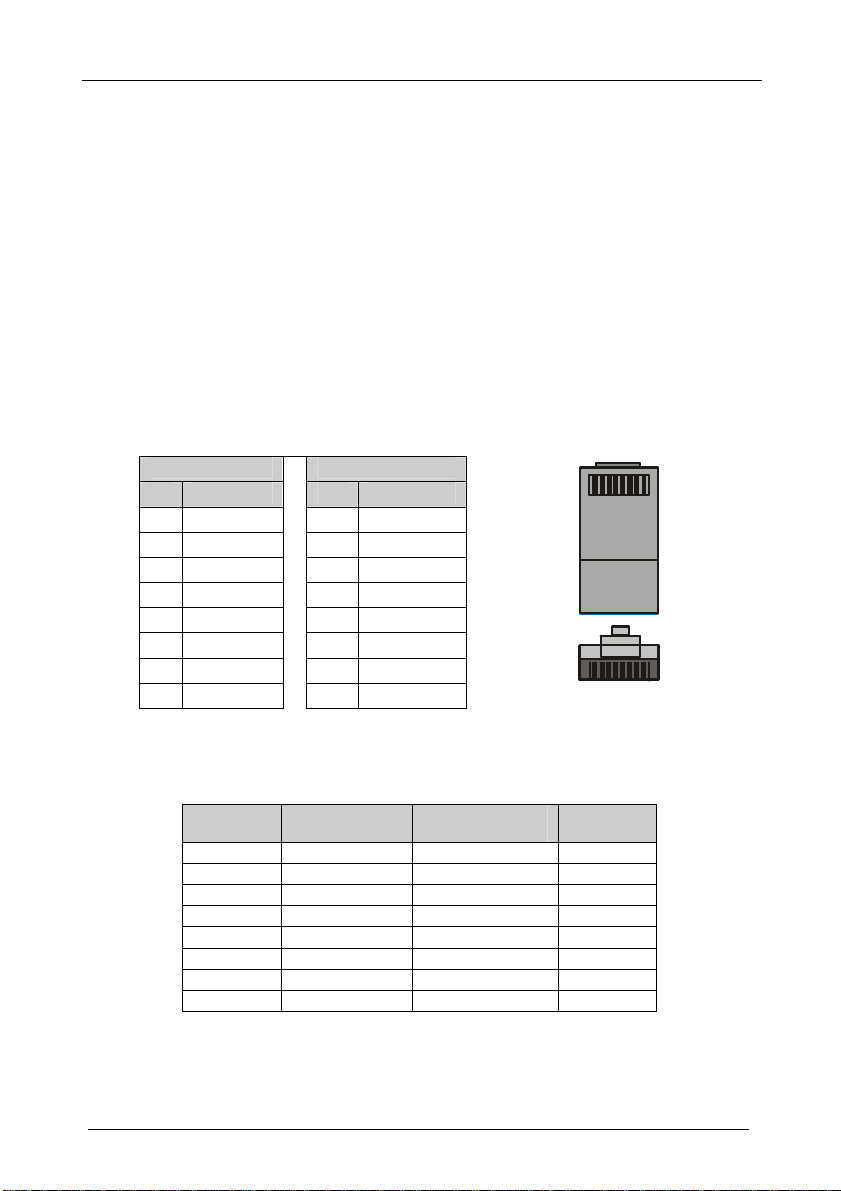
This addendum describes the correct wiring for crossover cable connections
and replaces the opening paragraph in the "Connecting the ETHERNET Port
directly to a PC (Crossover Cable)" section in the User Manual as follows:
Connecting the ETHERNET Port directly to a PC (Crossover Cable)
You can connect the Ethernet port of the machine to the Ethernet port on your
PC, via a crossover cable with RJ-45 connectors.
Table 1 and Figure 1 define the color codes for the two existing standard types
of cross cables used in the industry. Table 2 defines how to connect the wires
to the connectors on both ends of the cable.
When manually connecting the ends of a cable, both connectors must follow
the same standard (either EIA /TIA 568A or EIA /TIA 568B).
Table 1: Crossover Cable RJ-45 Types
EIA /TIA 568B
PIN Wire Color
1 White-orange
2 Orange
3 White-green
4 Blue
5 White-blue
6 Green
7 White-brown
8 Brown
EIA /TIA 568A
PIN Wire Color
1 White-green
2 Green
3 White-orange
4 Blue
5 White-blue
6 Orange
7 White-brown
8 Brown
Figure 1: RJ-45 PINOUT
Table 2: Wiring between Connector One and Two of the Cable
Signal Pairs PINs on
Connector One
TX_D1+ 1 3 RX_D2+
TX_D1- 2 6 RX_D2-
RX_D2+ 3 1 TX_D1+
RX_D2- 6 2 TX_D1-
BI_D3+ 4 7 BI_D4+
BI_D3- 5 8 BI_D4-
BI_D4+ 7 4 BI_D3+
BI_D4- 8 5 BI_D3-
PINs on Connector
Two
P/N: 2900 - 9999993 A1
Signal Pairs
Page 8

Introduction
1 Introduction
Dedication by Kramer Electronics since 1981, to the development and
manufacture of high quality video/audio equipment, makes the Kramer line
an integral part of the finest production and presentation facilities in the
world. In recent years, Kramer has redesigned and upgraded most of the line,
making the best even better! The Kramer line of professional video/audio
electronics is one of the most versatile and complete available, and is a true
leader in terms of quality, workmanship, price/performance ratio and
innovation. In addition to the FC-1ETHN Ethernet Controller, we also offer
excellent switchers and matrices, distribution amplifiers, presentation
processors, interfaces, remote controllers and computer-related products.
Congratulations on purchasing your Kramer TOOLS FC-1ETHN Ethernet
Controller, which is ideal for use with Ethernet / RS-232 interface and
Ethernet / RS-485 interface. The package includes the following items:
• FC-1ETHN Ethernet Controller
• Po wer adapter (12V DC Input)
• Windows®-b ased control software, a nd Configur ation Manager software
• Null-modem adapter
• This user manual
1
and the Kramer concise product catalog/CD
2 Getting Started
We recommend that you:
• Unpack the equipment carefully and save the original box and packaging
materials for possible future shipment
• Review the contents of this user manual
• Use Kramer high performance high resolution cables
2
3 Overview
The high performance FC-1ETHN Ethernet Controller—an upgrade on the
FC-1ETH—is an easy-to-use, compact, bi-directional hardware and software
interface system for controlling most Kramer RS-232 and/or RS-485
controllable machines via Ethernet LAN, as well as via the Internet.
1 Download up-to-date Kramer user manuals from the Internet at this URL: http://www.kramerelectronics.com/manuals.html
2 The complete list of Kramer cables is on our Web site at http://www.kramerelectronics.com (click “Cables and Connectors”
in the Products section)
1
Page 9

Overview
In particular, the FC-1ETHN:
• Offers network connectivity that lets you connect a Kramer (or other)
device via its RS-232 or RS-485 port to the Ethernet LAN network
• Lets you control an RS-232 / RS-485 device via Ethernet, from a PC (set
to Slave routing mode) or other protocol compatible remote controller
1
• Le t s you control a device fr om up to three Ethernet points (PCs or remote
controllers)
• I ncludes Windows®-based Configuration Mana gement software for seri al
and network programming (including routing mode settings, network settings,
serial settings, and d e stination device settings)
• Is compatible with the latest Kramer K-Router Windows®-based control
software (ve rsion 4.0 or higher) whose user-friendly inte rface now allows
Kramer switchers to be controlled via Ethernet
• Supports easy dial-up and Internet system remote control (requiring only
a dedicated IP address and a modem in the remote location) whether it is a
standalone PC or a LAN system
• Supports using wireless, 802.11b standard based LAN systems for control
• Has capability to facilitate a built-in Web page server
3.1 Terminology Used in this User Manual
Table 1 defines some terms that are used in this user manual:
Table 1: Terminology Used in this User Manual
Term Definition
802.3 The standard specification for ETHERNET that is maintained by the Institute of
Dynamic Host
Configuration Protocol
(DHCP)
Gateway A network position serving as an entry to another network. On the Internet, a
IP Address A 32-binary digit number that identifies each sender or receiver (within a
Local Area Network
(LAN)
Media Access Control
(MAC) Address
Transmission Control
Protocol/Internet
Protocol (TCP/IP)
Electrical and Electronics Engineers (IEEE).
Allows the network administrator to distribute IP addresses from a central point
and automatically send a new IP address when an Ethernet point is plugged
into a different network location.
node or stopping point can be either a gateway node or a host (end-point) node.
network via a particular serv er or w ork station) of data (HTML pages or e-m ai ls)
that is sent in packets across the Internet.
Computers sharing a common communications line or wireless link, which often
share a server within a defined geog ra phic ar ea.
A computer's unique hardware number in a LAN or other network. On an
Ethernet LAN, the (MAC) address is identical to the Ethernet address.
The basic communication language or protocol of the Internet that breaks the
message into appropriately sized packets for the network, and can be used as a
communications protocol in an intr anet or an extranet.
1 When using two FC-1ETHN units, both set to Master routing mode
2
KRAMER ELECTRONICS, LTD.
Page 10

Your FC-1ETHN Ethernet Controller
3.2 Achieving the Best Performance
Achieving the best performance means:
• Connecting only good quality connection cables, thus avoiding
interference, deterioration in signal quality due to poor matching, and elevated
noise levels (often associated with low quality cables)
• Avoiding interference from neighboring electrical appliances and
positioning your FC-1ETHN away from moistur e, excessive sunlight and dust
4 Your FC-1ETHN Ethernet Controller
Figure 1 and Table 2 define the FC-1ETHN Ethernet Controller:
Figure 1: FC-1ETHN Ethernet Controller
Table 2: Features and Functions of the FC-1ETHN Ethernet Controller
# Feature Function
1 12V DC +12V DC connector for powering the unit
2 ETHERNET port Connects to your LAN
3
4 RS-232 port Connects to the RS-232 DB 9 port on a Kramer (or other) device or PC
5 A B G (RS-485) port Connects to the RS-485 port on a Kramer (or other) device
6 ON LED Illuminates when receiving power
7 100M LED Lights when the speed is 100M
8 10M LED Lights when the speed is 10M
9 STATUS LED
10 STATUS LED
4 CONFIG Used to configure the system
3 485 TERM Used to terminate the RS-485 line
2 RESET Used to reset the unit
1 REPROG Used to upgrade the firm war e
Dipswitches
PIN A connects to the “A” (+) PIN; PIN B connects to the “B” (–) PIN; and
PIN G connects to the “G (Ground)” PIN
Ready for communication if one STATUS LED flashes; communication
already exists if both STATUS LEDs flash
3
Page 11

Using the Kramer Configuration Manager Software
5 Using the Kramer Configuration Manager Software
This section describes:
• How to install and run the Configuration Manager software, see section 5.1
• The Configur ation Manager Windo w fe atures, see section 5.2
5.1 Installing and Running the Kramer Configuration Manager Software
To install the Kramer Configuration Manager soft ware:
• Insert the CD-ROM in the CD-ROM drive, double click the Setup.exe file
and follow the on-screen instructions
To run the Kramer Confi guration Manager software (for the first time):
1. Click the appropriate shortcut in the Start menu’s Pr ograms folder.
The Choose Port window appears as follows:
Figure 2: Choose Port Window
2. Choose the LAN port for configuration via Ethernet, or the appropriate
COM port for configuration via serial cable (see section 6.1) and click OK.
The FC-1ETHN Configuration Manager window (see Fi gure 3) opens.
To run the Kramer Configuration Manager software (subseque ntly):
• Click the appropriate shortcut in the Start menu’s Programs folder.
The FC-1ETHN Configuration Manager window (see Fi gure 3) opens
5.2 Understanding the Kramer Configuration Manager Window
Figure 3 and Table 3 define the FC-1ETHN Configuration Ma nage r wind ow:
4
KRAMER ELECTRONICS, LTD.
Page 12

Using the Kramer Configuration Manager Software
5
Figure 3: FC-1ETHN Configuration Manager Window
Page 13

Using the Kramer Configuration Manager Software
Table 3: FC-1ETHN Configuration Manager Window Functionality
# Feature Function
1 Device List Displays the MAC Addresses for the FC-1ETHN devices, connected via the selected
2 Master Mode
Check Box
3 DHCP1
Mode Check
Box
4 Network
Settings
5 Destination
Device
Settings
6 Serial
Setting
7 Action
Buttons
8 Progress Bar Shows the progress
9 Status Bar Shows the status
10 Exit Button Closes the Configuration Manager application
11 Version Displays the firmware version number
12 Menu bar
port (LAN or COM).
When selected, activates the Master mode (see section 6.3.2).
When cleared, activates the Slave mode (see section 6.3.1).
When selected, automatically configures the FC-1ETHN to obtain an IP address from
the network administrator via the Dynamic Host Configuration Protocol (DHCP)
When cleared, manual configuration of the FC-1ETHN is required to obtain an IP
address (Static IP)
IP Address: A 32-binary digit number obtained
from your Network Administrator that identifies the
FC-1ETHN device that is currently being
configured in the Ethernet or Internet.
Subnet: A 32-binary digit number obtained from
your Network Administrator, which combined with
the IP Address, identifies which network your
FC-1ETHN device is on.
Gateway: A network position serving as an entry
to another network or to the Internet (only relevant
in the Master Routing mode).
Local Port is an address of the FC-1ETHN device
that is currently being configured that provides a
direct route from another Ethernet point application.
Destin. IP A 32-binary digit number that identifies
the destination FC-1ETHN device in the Ethernet
or Internet.
Port is a pre-assigned address of the destinatio n
FC-1ETHN device that provides a direct route to
its Transport layer.
In the serial setting speed list, click the appropriate baud speed2 (1200, 2400, 4800,
9600, 19200, 38400, 5760 0, 115 20 0).
Search: seeks the FC-1ETHN devices that connect to the PC via the chosen LAN or
COM port, and displays them and their corresponding settings.
Setting: adjusts the FC-1E T HN acco rdi ng to the di spl a yed data .
File menu’s Exit command closes the Configuration Manager appl ic ati o n.
Action menu’s Search Board command seeks the FC-1ETHN devices that connect to
the PC via the chosen LAN or COM port, and displays them and their corresponding
settings.
Action menu’s Setting command adjusts the FC-1ETHN according to the displayed
data.
Port menu displays the Choose Port window.
1
Set MAC
password).
menu is for factory use only (click the Password command to enter the
For example:
For example:
1 See definition in Table 1
2 The configuration baud is factory preset, and fixed, at 9600
6
KRAMER ELECTRONICS, LTD.
Page 14

Configuring the FC-1ETHN Ethernet Controller
6 Configuring the FC-1ETHN Ethernet Controller
This section describes how to configure the FC-1ETHN via its:
• Serial
• ETHERNET
1
port, see section 6.1
1
port, see section 6.2
6.1 Configuring the FC-1ETHN via its Serial Port
You can configure the FC-1ETHN via its RS-232 port.
To configure the FC-1ETHN via RS-232, do the following:
1. Set the CONFIG DIP
Leave the other three DIPs
2
(DIP 4) to ON.
3
set to OFF.
2. Connect the RS-232 port of the FC-1ETHN to the Null-modem adapter
and connect the Null-modem adapter with a 9 wire flat cable to the
RS-232 DB9 COM port on your PC.
3. Run the Kramer Configuration Manager software (see section 5.1) and
choose the COM port that is appropriate for your computer from the
FC-1ETHN Con figuration Manager window (see section 5.2).
4. Click the Search button (or the Action menu’s, Search Board command).
The MAC Address for the found “FC-1ETHN” appears in the Device List.
5. Change the settings and then click the Settin g button (or the Action
menu’s, Setting command) to apply the settings.
Note: be aware that this will alter the IP settings in the FC-1ETHN.
6. Set the CONFIG DIP
Leave the other three DIPs
2
(DIP 4) to OFF.
3
set to OFF.
7. Disconnect the power to the FC-1ETHN, and then reconnect it.
1 The serial mode is always available even if the FC-1ETHN is not correctly setup, whereas the Ethernet mode is not a
separate mode and can proceed in parallel with the normal operation of the FC-1ETHN
2 See item 3 in Table 2
3 485 TERM (DIP 3), RESET (DIP 2), and REPROG (DIP 1)
7
Page 15

Configuring the FC-1ETHN Ethernet Controller
6.2 Configuring the FC-1ETHN via its ETHERNET port
You can configure the FC-1ETHN via its ETHERNET port.
To configure the FC-1ETHN via ETHERNET, do the following:
1. Connect the ETHERNET port of the FC-1ETHN to the LAN port on
your PC, via a crossover cable with RJ-45 connectors, as Table 4 defines:
Table 4: Crossover Cable RJ-45 PINOUT
Side 1 Side 2
PIN Wire Color PIN Wire Color
1 White-orange 1 White-green
2 Orange 2 Green
3 White-green 3 White-orange
4 Blue 4 Blue
5 White-blue 5 White-blue
6 Green 6 Orange
7 White-brown 7 White-brown
8 Brown
8 Brown
If connecting the ETHERNET port of the FC-1ETHN to the LAN port on
a network hub or network router, use a straight-through cable with RJ-45
connectors, as Table 5 defines:
Table 5: Straight-thro ug h Cable RJ -45 PINOU T
Side 1 Side 2
PIN Wire Color PIN Wire Color
1 White-orange 1 White-orange
2 Orange 2 Orange
3 White-green 3 White-green
4 Blue 4 Blue
5 White-blue 5 White-blue
6 Green 6 Green
7 White-brown 7 White-brown
8 Brown
8 Brown
2. Run the Kramer Configuration Manager software (see section 5.1) and
choose the LAN port (see Figure 2).
3. Click the Search button (or the Action menu’s, Search Board command).
The MAC Address for the found “FC-1ETHN” appears in the Device List.
4. Change the settings and then click the Settin g button (or the Action
menu’s, Setting command) to apply the settings.
Note: be aware that this will alter the IP settings in the FC-1ETHN.
8
KRAMER ELECTRONICS, LTD.
Page 16

Configuring the FC-1ETHN Ethernet Controller
6.3 Routing Data in the Slave and Master Routing Modes
The FC-1ETHN routes data in either the Slave Routing Mode (see section
6.3.1) or the Master Routing Mode (see section 6.3.2).
6.3.1 Slave Routing Mode
In the Slave Routing Mode, the FC-1ETHN never sends any data in the serial
port-Ethernet direction before it first receives some data from the remote
station (that is, the data in the Ethernet-serial direction). Serial data that is
received at the serial port of the FC-1ETHN before the remote station
contacts the FC-1ETHN is discarded. In the Slave Mode, the FC-1ETHN
will work with any station on the network that contacts it (but not more than
three stations simultaneously), as the example in Figure 4 illustrates:
Figure 4: Connecting the FC-1ETHN in the Slave Routing Mode
9
Page 17

Controlling Kramer Machines via Ethernet using the FC-1ETHN
10
6.3.2 Master Routing Mode
In the Master Routing Mode, the FC-1ETHN does not wait for the remote
station to send the data first, and routes the data in the destination device
direction as soon as there is data to be sent. The data is always sent to a
specific destination (as defined by the Destination IP address and Destination
Data Port Number Settings of the FC-1ETHN). Also, the FC-1ETHN only
accepts the data sent from the remote station whose IP address matches the
one set in the Destination IP address. The FC-1ETHN will discard the data
sent from any other IP. See the example illustrated in Figure 5:
Figure 5: Connecting the FC-1ETHN in the Master Routing Mode
7 Controlling Kramer Machines via Ethernet using the FC-1ETHN
You can use your FC-1ETHN to control a Kramer machine from computers
that connect to a LAN
1
(see section 7.1) or via a controller1 (see section 7.2).
1 As well as via an Internet connection
KRAMER ELECTRONICS, LTD.
Page 18

Controlling Kramer Machines via Ethernet using the FC-1ETHN
7.1 Controlling a Kramer Machine via a Computer
To control a Kramer machine via three computers, as the example i n Figure 4
illustrates, do the following:
1. Configure the FC-1ETHN to the Slave Routing Mode (see section 6).
2. Set all the DIPs to OFF.
3. Connect the 12V DC power adapter to the power socket and connect the
adapter to the mains electricity.
4. Connect t he RS-232 port of your Kramer machine to the RS-232 port of
the FC-1ETHN via a Null modem (alternatively, c onnect the RS-485 port
of your Kramer machine to the ABG port
1
of the FC-1ETHN).
5. Connect the ETH ERNET por t of your FC-1ETHN to a LAN, using a
straight-through cable with RJ-45 connectors.
You can control from up to three computers (each with the Kramer
K-Router Windows®-control software (version 4.0 or higher)).
6. Run the Kramer K-Router Windows®-control software (version 4.0 or
higher) to control the Kramer machine from each computer.
Use the Microsoft HyperTerminal if working with a non-Kramer device.
7. In the K-Router Port window, click the Remote Connection option and set
the RemoteHost and RemotePort, as p e r the FC-1ETHN configuration:
Figure 6: Connecting the FC-1ETHN in the Master Routing Mode
1 Connect PIN A to the “A” (+) PIN, PIN B to the “B” (–) PIN, and PIN G to the “G (Ground)” PIN
11
Page 19

Flash Memory Upgrade
12
7.2 Controlling a Kramer Machine via a Controller
To control a Kramer machine via two VS-3000 controllers, as the Master
Mode exam p le in Figure 5 illustrates, do the following:
1. Configure each FC-1ETHN to the Master Routing Mode (see section 6).
2. Set all the DIPs to OFF on each FC-1ETHN.
3. Connect the RS-232 port of your Kramer machine to the RS-232 port of a
FC-1ETHN via a Null modem (alternatively, connect the RS-485 port of
your Kramer machine to the ABG port
1
of the FC-1ETHN) and connect
the ETHERNET port of that FC-1ETHN to a LAN.
4. Connect the ETHERNET port of another FC-1ETHN to the same LAN
and connect the RS-232 port of the controller to the RS-232 port of that
FC-1ETHN (alternatively, connect the RS-485 port of the controller to the
ABG port
1
of the FC-1ETHN).
5. Connect the ETHERNET port of another FC-1ETHN to the same LAN
and connect the RS-232 port of the controller to the RS-232 port of that
FC-1ETHN via a Null modem (alternatively, connect the RS-485 port of
the controller to the ABG port
1
of the FC-1ETHN).
6. On each FC-1ETHN, connect the 12V DC power adapter to the power
socket and connect the adapter to the mains electricity.
8 Flash Memory Upgrade
The FC-1ETHN firmware is located in FLASH memory, which lets you
upgrade to the latest Kramer firmware version in minutes! The pro cess
involves:
• Downloading from the Internet (see section 8.1)
• Connecting the PC to the RS-232 port (see section 8.2)
• Upgrading Firmware (see section 8.3)
8.1 Downloading from the Internet
You can download the up-to-date file from the Internet. To do so:
1. Go to our Web site at http://www.kramerelectronics.com and download
the file: “FLIP_ FC1ETHN.zip” from the Technical Support section.
2. Extract the file: “FLIP_ FC1ETHN.zip” to a folder (for example,
1 Connect PIN A to the “A” (+) PIN, PIN B to the “B” (–) PIN, and PIN G to the “G (Ground)” PIN
KRAMER ELECTRONICS, LTD.
Page 20

Flash Memory Upgrade
C:\Program Files\Kramer Flash).
3. Create a shortcut on your desktop to the file: “FLIP.EXE”.
8.2 Connecting the PC to the RS-232 Port
Before installing the latest Kramer firmware version on a FC-1ETHN unit,
do the following:
1. Connect the RS-232 DB9 port on the FC-1ETHN to the Null-modem
adapter and connect the Null-modem adapter with a 9 wire flat cable to the
RS-232 DB9 COM port on your PC.
It is recommended that you use COM port
1
2. However, i f your computer has
only one COM port, open the file: “FC1ETHN.cfg” (located at C:\Program
Files\Kramer Flash\ FC1ETHN.cfg) in Notepad, and change “set port
COM2” to “set port COM1”.
2. Connect the power on the FC-1ETHN unit.
3. Set the DIP 1 REPROG to ON.
8.3 Upgrading Firmw are
Follow these steps to upgrade the firmware:
1. Double click the desktop icon: “Shortcut to FLIP.EXE”.
The Splash screen appears as follows:
Figure 7: Splash Scree n
2. After a few seconds, the Splash screen is replaced by the “Atmel – Flip”
window:
1 The software is preset for use with COM port 2
13
Page 21

Flash Memory Upgrade
14
Figure 8: Atmel – Flip Window
3. Press the keyboard shor t cut key F4 (or select the “Read Configuration
File” command from the File menu, or press the keys: Alt FR).
The “Open Configuration File” window appears:
FC1ETHN.CFG
Figure 9: Open Configuration File Select Window
4. Choose the file: “FC1ETHN.cfg” (by double-clicking it).
If COM 2 was not selected (see section 8.2), an RS-232 error message
appears. In the “Atmel – Flip” window, the Operations Flow column is
disabled, and crosses appear in the third column.
Figure 10: Atmel – Flip Window (RS- 232 Com m u nic ati on)
KRAMER ELECTRONICS, LTD.
Page 22

Flash Memory Upgrade
5. Click OK and press the keyboard shortcut key F3 (or select the
“Communication / RS232” command from the Settings menu, or press the
keys: Alt SCR).
The “RS232” window appears. Change the COM port:
Figure 11: RS-232 Window
6. Click Connect.
In the “Atmel – Flip” window, in the Operations Flow column, the Run
button is active, and the name of the chip appears as the name of the third
column: AT89C51RD2.
Verify that in the Buffer Information column, the “HEX File: FC1ETHN.hex”
appears.
FC1ETHN.hex
Figure 12: Atmel – Flip Window (C onnec t ed)
7. Click Run.
After each stage in the operation is completed, the check-box for that stage
becomes colored green
When the operation is completed, all 4 check-boxes will be colored green and
the status bar message: Memory Verify Pass appears
1
.
2
:
1 See also the blue progress indicator on the status bar
2 If an error message: “Not Finished” shows, click Run again
15
Page 23

Technical Specifications
16
FC1ETHN.hex
Figure 13: Atmel – Flip Window (Ope r ation Com plete d)
8. Close the “Atmel – Flip” window.
9. Disconnect the power on the FC-1ETHN.
10. Disconnect the RS-232 port on the FC-1ETHN from the Null-modem
adapter.
11. Set DIP 1 REPROG to OFF.
12. Reconnect the power on the FC-1ETHN.
9 Technical Specifications
Table 6 includes the technical specifications:
Table 6: Technical Specifications1 of the FC-1ETHN Ethernet Controller
ETHERNET INTERFACE: 10/100 BaseT Ethernet
SERIAL INTERFACES: RS-232, DB9M, signals: RX, TX, RTS, CTS, Ground
RS-485
NETWORK PROTOCOLS: ICMP (ping), ARP, TCP, UDP
POWER SOURCE: 12 VDC, <80mA
DIMENSIONS: 12cm x 7.5cm x 2.5cm (4.7" x 2.95" x 0.98"), W, D, H
WEIGHT: 0.3 kg. (0.66 lbs.) approx.
ACCESSORIES: Power supply, mounting bracket
1 Specifications are subject to change without notice
KRAMER ELECTRONICS, LTD.
Page 24

LIMITED WARRANTY
Kramer Electronics (hereafter Kramer) warrants this product free from defects in material and workmanship under the
following terms.
HOW LONG IS THE WARRANTY
Labor and parts are warranted for three years from the date of the first customer purchase.
WHO IS PROTECTED?
Only the first purchase customer may enforce this warranty.
WHAT IS COVERED AND WHAT IS NOT COVERED
Except as below, this warranty covers all defects in material or workmanship in this product. The following are not covered
by the warranty:
1. Any product which is not distributed by Kramer, or which is not purchased from an authorized Kramer dealer. If you are
uncertain as to whether a dealer is authorized, please contact Kramer at one of the agents listed in the web site
www.kramerelectronics.com.
2. Any product, on which the serial number has been defaced, modified or removed.
3. Damage, deterioration or malfunction resulting from:
i) Accident, misuse, abuse, neglect, fire, water, lightning or other acts of nature
ii) Product modification, or failure to follow instructions supplied with the product
iii) Repair or attempted repair by anyone not authorized by Kramer
iv) Any shipment of the product (claims must be presented to the carrier)
v) Removal or installation of the product
vi) Any other cause, which does not r elate to a product defect
vii) Cartons, equipment enclosures, cables or accessories used in conjunction with the product
WHAT WE WILL PAY FOR AND WHAT WE WILL NOT PAY FOR
We will pay labor and material expenses for covered items. We will not pay for the following:
1. Removal or installations charges.
2. Costs of initial t echnical adjustments (set-up), including adjustment of user controls or programming. These costs are t he
responsibility of the Kramer dealer from whom the product was purchased.
3. Shipping charges.
HOW YOU CAN GET WARRANTY SERVICE
1. To obtain service on you product, you must take or ship it prepaid to any authorized Kramer service center.
2. Whenever warrant y service is r equired, t he original dat ed invoice (or a co py) must be prese nted as pr oof of warrant y coverage,
and should be included in any shipment of the product. Please also include in any mailing a contact name, company, address, and
a description of the problem(s).
3. For the name of the nearest Kramer authorized service center, consult your authorized dealer.
LIMITATION OF IMPLIED WARRANTIES
All implied warranties, including warranties of merchantability and fitness for a particular purpose, are limited in duration to
the length of this warranty.
EXCLUSION OF DAMAGES
The liability of Kramer for any effective products is limited to the repair or replacement of the product at our option. Kramer
shall not be liable for:
1. Damage t o other pro perty caused by defects in this pro duct, da mages based upon inconvenience, loss of use of the product, loss
of time, c ommercial loss; or:
2. An y ot her d amag es, whet her inc ide ntal, con sequ ent ial o r ot her wise. So me co unt ries may not allow lim itat ions on how long a n
implied warranty lasts and/or do not allow the exclusion or limitation of incidental or co nsequential damages, so the above
limitations and exclusions may not apply to you.
This warranty gives you specific legal rights, and you may also have other rights, which vary from place to place.
NOTE: All products returned to Kramer for service must have prior approval. This may be obtained from your dealer.
This equipment has been tested to determine compliance with the requirements of:
EN-50081: "Electromagnetic compatibility (EMC);
EN-50082: "Electromagnetic compatibility (EMC) generic immunity standard.
CFR-47: FCC Rules and Regulations:
CAUTION!
⌦ Servicing the machines can only be done by an authorized Kramer technician. Any user who makes changes or modifications to
the unit without the expressed approval of the manufacturer will void user authority to operate the equipment.
⌦ Use the supplied DC power supply to feed power to the machine.
⌦ Please use recommended interconnection cables to connect the machine to ot her components.
generic emission standard.
Part 1: Residential, commercial and light industry"
Part 1: Residential, commercial and light industry environment".
Part 15: “Radio frequency devices
Subpart B – Unintentional radiators”
17
Page 25

Page 26

For the latest information on our products and a list of Kramer
distributors, visit our Web site: www.kramerelectronics.com.
Updates to this user manual may be found at
http://www.kramerelectronics.com/manuals.html.
We welcome your questions, comments and feedback.
Kramer Electronics, Ltd.
3 Am VeOlamo Street. Jerusalem 95463, Israel Tel: (+972-2)-654-4000
Fax: (+972-2)-653-5369, E-mail: info@kramerel.com
P/N: 2900-104020 REV 1
 Loading...