

Page 1

KRAMER ELECTRONIC S LTD.
USER GUIDE
EDID Designer Guide
Version 4.0
Preliminary
P/N: 2900-300246 Rev 1
Page 2

EDID Designer - Introduction
i
Contents
1 Introduction 1
1.1 Application 1
1.2 Minimum System Requirements 2
2 Installing EDID Designer 3
3 Defining the EDID Designer 6
4 Using the EDID Designer 10
4.1 Connecting to Saved EDID Files 10
4.2 Connecting to a Device 11
4.3 Writing an EDID to an Input 12
4.4 Opening an EDID 13
4.5 Editing an EDID 13
4.6 Copying or Deleting an EDID to/from the Disk 14
5 Editing an EDID 16
5.1 Using the Simplified Tab 17
5.2 Simplified - General Information 18
5.3 Using the Advanced Tab 24
5.4 Using CEA Extensions 27
Figures
Figure 1: Main Screen 6
Figure 2: Full Screen 7
Figure 3: EDID Sources 9
Page 3

EDID Designer - Introduction
1
Warning:
This application is for trained and experienced
personnel who are familiar with EDID concepts and
their use. Using this application improperly might
lead to loss of picture, sound or other system issues.
!
1 Introduction
Welcome to Kramer Electronics! Since 1981, Kramer Electronics has been
providing a world of unique, creative, and affordable solutions to the vast range of
problems that confront video, audio, presentation, and broadcasting professionals
on a daily basis. In recent years, we have redesigned and upgraded most of our
line, making the best even better!
Our 1,000-plus different models now appear in 11 groups that are clearly defined
by function: GROUP 1: Distribution Amplifiers; GROUP 2: Switchers and Routers;
GROUP 3: Control Systems; GROUP 4: Format/Standards Converters; GROUP 5:
Range Extenders and Repeaters; GROUP 6: Specialty AV Products; GROUP 7:
Scan Converters and Scalers; GROUP 8: Cables and Connectors; GROUP 9:
Room Connectivity; GROUP 10: Accessories and Rack Adapters and GROUP 11:
Sierra Products.
1.1 Application
Kramer's EDID Designer is a powerful and versatile software application for
viewing and editing extended display identification data (EDID) that is used in most
of today's HDMI and DVI systems.
The EDID block described in the EDID Designer advanced mode follows the white
paper that provides the industry standard for EDID: VESA Enhanced Extended
Display Identification Data Standard (Defines EDID Structure Version 1, Revision
4) Release A, Revision 2, September 25, 2006.
The application is intended for installers during product installation for
troubleshooting and fixing EDID information.
Page 4

2
EDID Designer - Introduction
1.2 Minimum System Requirements
Operating system: Win 7 or higher, 32 or 64 bit.
Minimum HW requirements (same as for running Win7):
1GHz (gigahertz) or faster 32-bit (x86) or 64-bit (x64) processor
1GB (gigabyte) RAM (32-bit) or 2GB RAM (64-bit)
16GB available hard disk space (32-bit) or 20GB (64-bit)
DirectX 9 graphics device with WDDM 1.0 or higher driver
For getting the most of the application we recommend using screens with a
minimal resolution of 1024x768, higher resolutions are preferred.
Page 5
EDID Designer - Installing EDID Designer
3
2 Installing EDID Designer
EDID Designer features one-click installation for a fast and trouble-free setup.
To install EDID Designer:
1. Navigate to the Kramer’s EDID Designer Web site and click the install link:
www.kramerelectronics.com/downloads/setups/ediddesigner/setup.exe
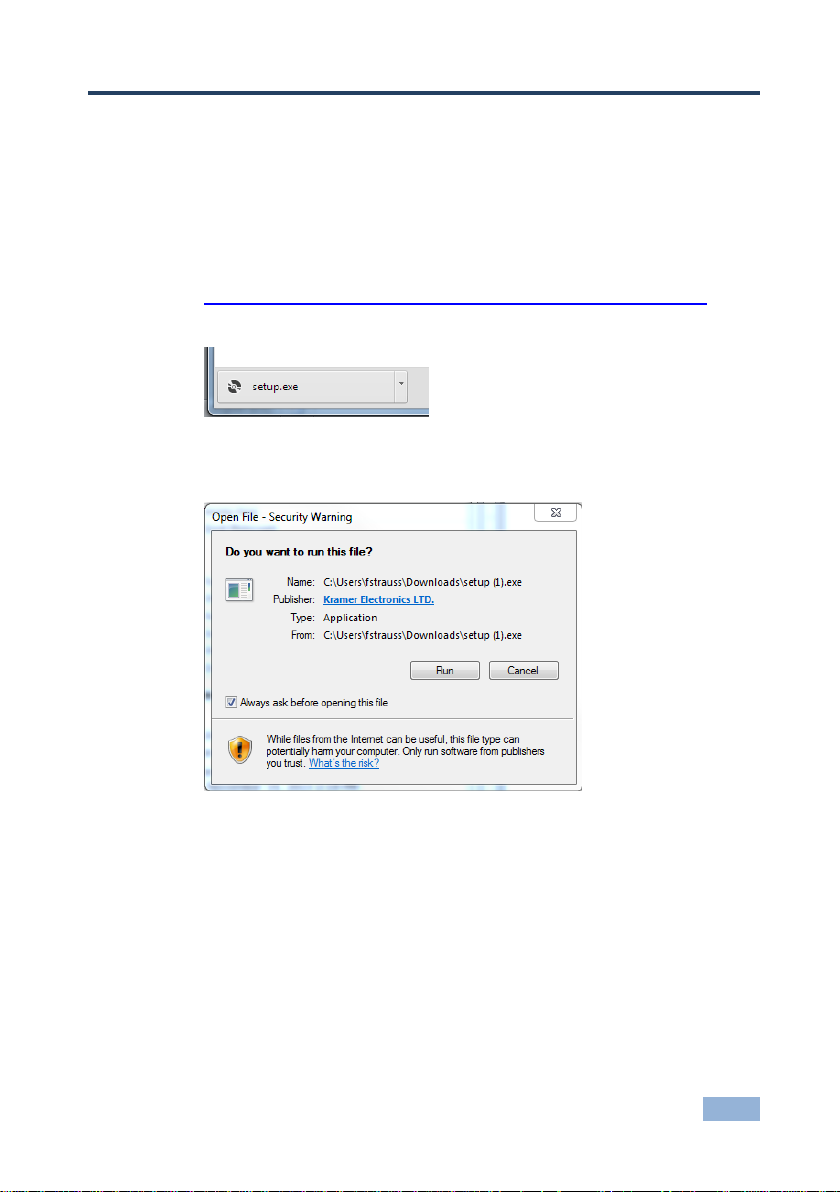
The file downloads to the lower left corner of your browser:
2. Click setup.exe.
A security warning opens:
3. Click Run.
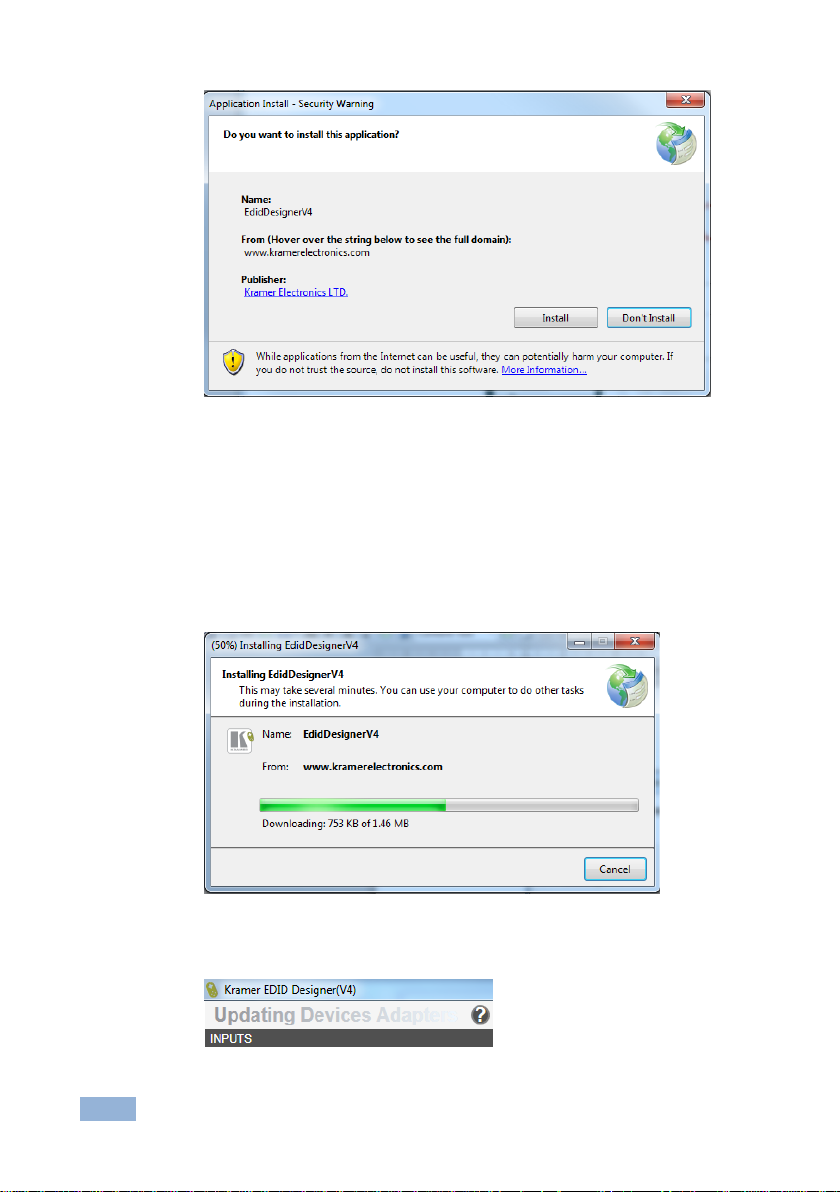
An application installation warning appears:
Page 6
4
EDID Designer - Installing EDID Designer
4. Click Install.
Note: At this stage, a message appears if DotNet 4.5 is not installed on your
computer. Follow the instructions to install DotNet 4.5. After installation you
may be required to reset the computer. Perform the reset and do not take
any further action. EDID Designer continues to install automatically.
The installation progress window appears:
5. When complete, the application opens and the following message appears
in the upper-left corner of the app:
Page 7

EDID Designer - Installing EDID Designer
5
The latest version of the device adapters downloads from the Web. Allow it
to run to completion the first time otherwise device adapters or their latest
versions might not be available for use.
To launch EDID Designer:
Click Start and click on the application.
The EDID Designer main screen opens (see Figure 1) and automatically
updates device adapters.
Page 8
6
EDID Designer - Defining the EDID Designer
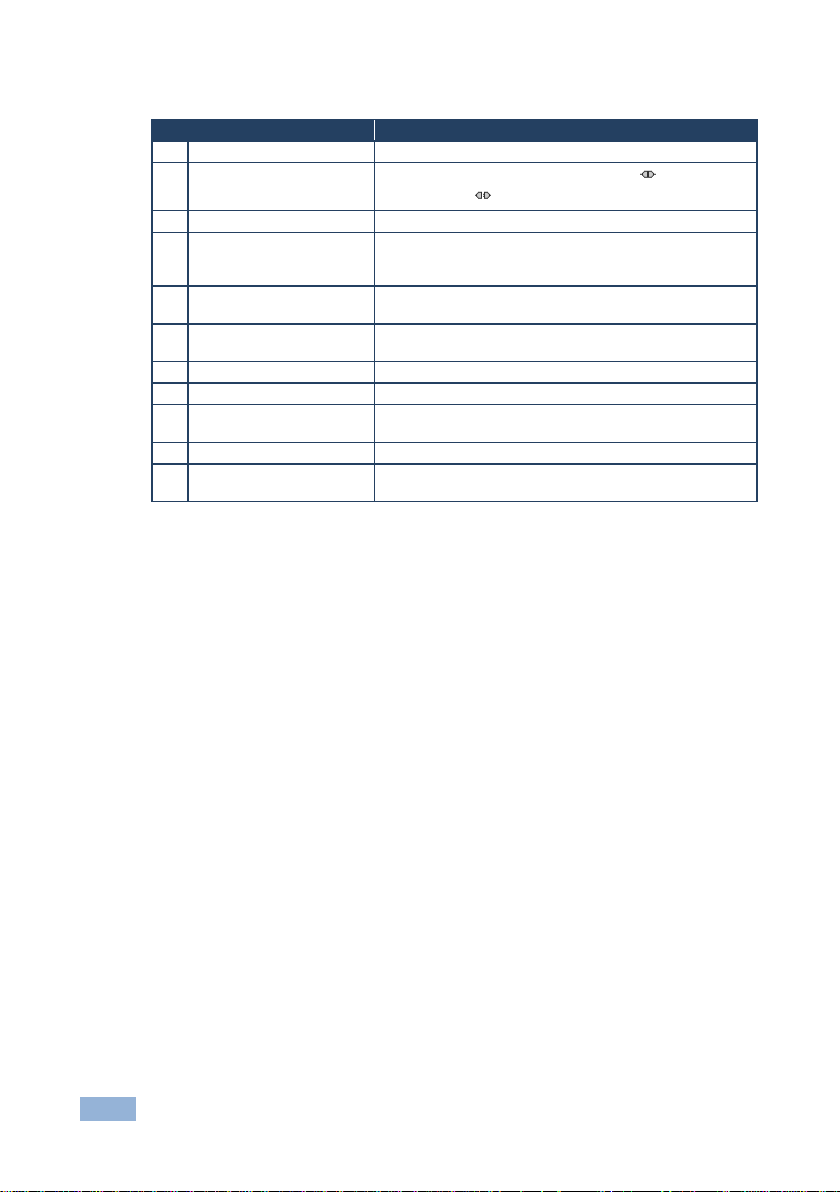
#
Feature
Function
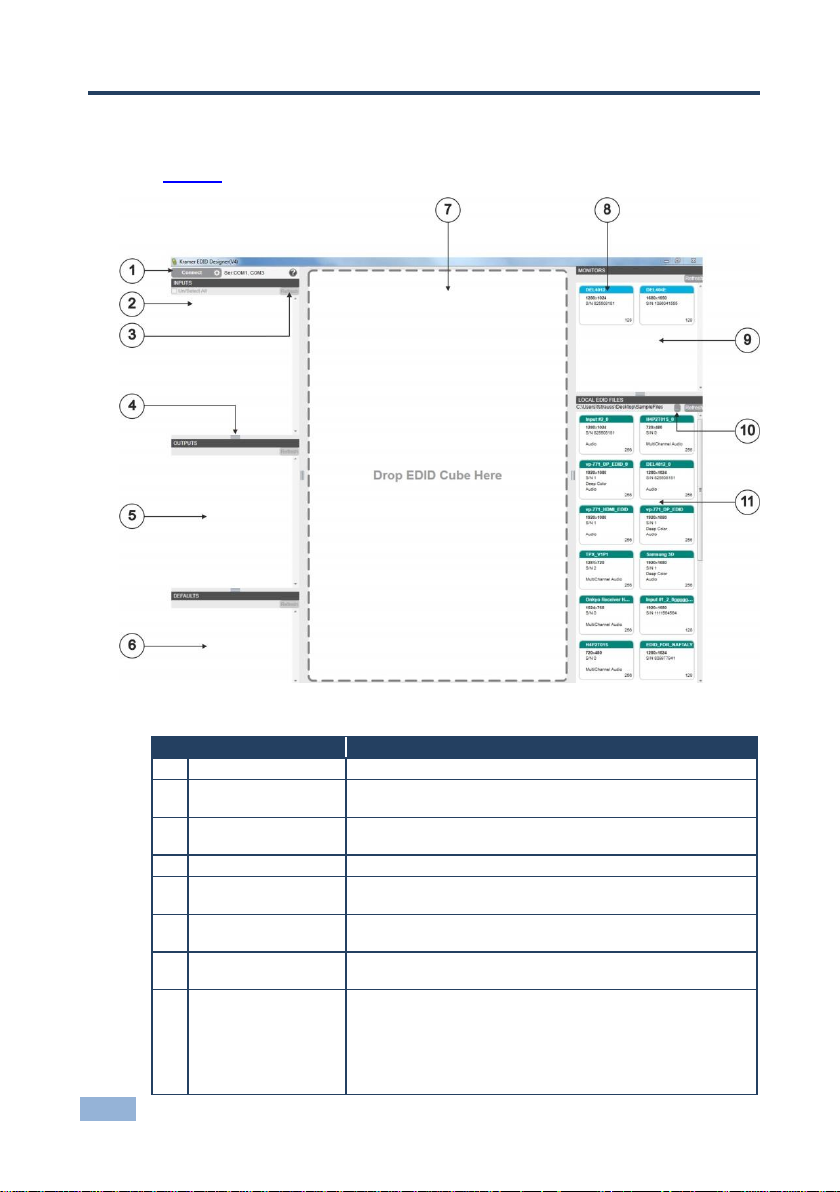
1
CONNECT Bar
Connects an attached device (serial or Ethernet)
2
INPUT Panel
Displays all available EDIDs on EEPROM of the relevant input
channel of the connected device
3
REFRESH Button
Reloads all EDID information from the chosen source to the
panel 4 Resizing Handle
Drag any handle to resize the desired panel
5
OUTPUT Panel
Displays all EDIDs of the devices/monitors connected to the
outputs of the connected device
6
DEFAULT EDID
DEFINITIONS Panel
Displays all available default Kramer’s EDID definitions
7
EDID Display Panel
Displays the chosen EDID for editing or viewing (of read-only
EDIDs)
8
EDID Cube
The graphic representation of an available EDID, showing title,
resolution, manufacturer and serial number taken from the
General Information tab
Since EDID blocks saved on a device input’s EEPROM have no file
name, we recommend using the serial number field as a file
identifier when editing an EDID block
3 Defining the EDID Designer
Figure 1 defines the basic elements of the EDID Designer main screen.
Figure 1: Main Screen
Page 9
EDID Designer - Defining the EDID Designer
7
#
Feature
Function
9
MONITOR Panel
Displays the EDID of any monitor connected to the PC running
the application
10
Browse Button
Click to browse the disk for EDID files
11
LOCAL EDID FILE
Panel
Displays all saved EDID files from a disk location
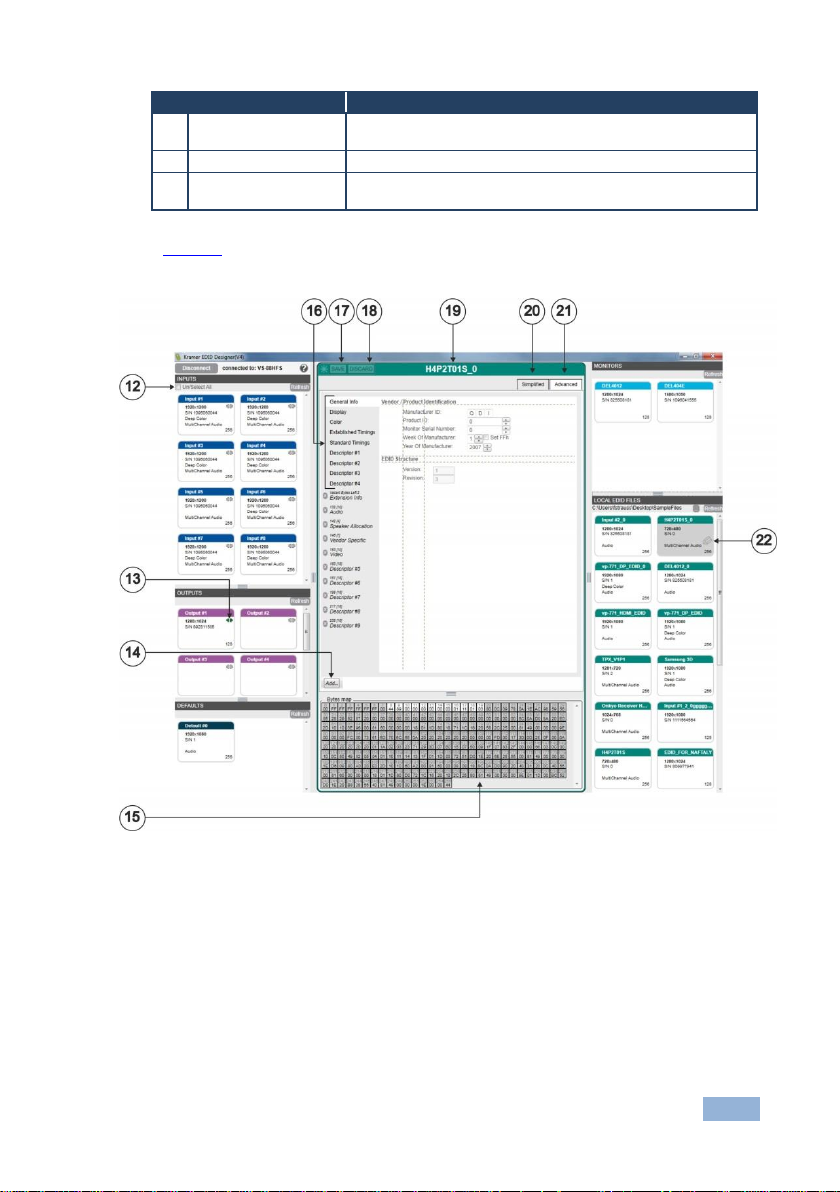
Figure 2 shows EDID Designer with a connected device, monitors, files, and an
EDID open for editing with the following additional elements:
Figure 2: Full Screen
Page 10
8
EDID Designer - Defining the EDID Designer
#
Feature
Function
12
Select All Checkbox
Check to select all inputs
13
Connection Status Icon
Shows if the input or output is connected or
disconnected
14
ADD Button
Click to add and specify a CEA Extension
15
Binary EDID Map
Displays the binary representation of the EDID being
viewed or edited. The highlighted bytes represent the
selected descriptor tab
16
Descriptor Tabs
Click each tab to open a list of descriptor-specific
parameters
17
SAVE Button
Click to save the changes to the source of the EDID being
edited (disk file or device)
18
DISCARD Button
Click to throw away all unsaved changes
19
EDID Title
Title of the EDID being edited
20
SIMPLIFIED Tab
Displays a shortened form of the EDID based on a
summary of commonly accessed functions
21
ADVANCED tab
Displays the full version of the EDID
22
Active EDID status
Displays the status of the EDID dragged to EDID Display
Panel (On Drag, On Edit, On View)
Page 11

EDID Designer - Defining the EDID Designer
9
Figure 3 shows the sources of the EDIDs that are used by EDID Designer and
whether they are read-only (R/O) or read/write (R/W).
Note: To edit an EDID from a R/O source (for example, a local PC monitor), save
it locally on your PC. This changes it to a locally saved file that can be edited.
Figure 3: EDID Sources
Page 12

10
EDID Designer - Using the EDID Designer
4 Using the EDID Designer
EDID Designer is designed using drag-and-drop technology to make EDID file
manipulation very easy and intuitive.
Any active EDID cube is dragged to the desktop panel for viewing or editing and
when saved, it is saved to the source from which it was taken.
Legal drags are symbolized by a green cross + in the dragged cube and when
dropped, the action is completed. Illegal drags are symbolized by a red no-entry
symbol Ø in the cube and when dropped, the action is discarded.
4.1 Connecting to Saved EDID Files
EDID files are taken from and saved to the disk of the PC.
To load EDID files from the disk:
1. On the Local EDID Files panel, click the icon.
2. A Browse for Folder window opens.
3. Navigate to the desired folder and click OK.
The EDID files appear as cubes in the Local EDID Files panel.
Note: When saving an EDID file on your PC, you give it a file name.
However, EDID files saved on display devices or Kramer matrices and other
routing products have no file names. To match and compare EDID files from
different sources we advise using the SN field of the EDID file. When editing
an EDID file, change the SN field and use it as “file identifier” field.
Page 13

EDID Designer - Using the EDID Designer
11
4.2 Connecting to a Device
Connect to a Kramer device (for example, a matrix switcher) to view, edit and copy
its EDIDs. The list of supported Kramer devices updates each time you launch the
software and your PC is connected to the Internet.
Note: When a new version of EDID Designer is available for installation, a new
version notification appears upon launch.
Important: When your Kramer device supports both Protocol 2000 and Protocol
3000 communication protocols, make sure it is set to Protocol 3000 mode.
To connect a device:
1. Choose the connection method by clicking gear icon on the Connect button.
The parameter window opens.
2. For Ethernet, enter the correct IP address and port number.
3. For Serial, check the desired port(s).
4. Click the Apply button to save the changes.
Note: For serial connections, after pressing the Connect button, EDID
Designer scans all the checked ports and connects to the first one that
responds with an active device. If multiple devices are connected, check only
the port of the desired device.
Page 14

12
EDID Designer - Using the EDID Designer
After successfully connecting to the device the Connect button becomes
Disconnect and next to it, the device type is displayed.
All inputs, outputs and default EDIDs are displayed in the appropriate panel.
4.3 Writing an EDID to an Input
Changing the EDID block on your Kramer device input channels is a powerful way
to take control of the signal your sources output. You can do that by writing an
EDID block EDID from a file, a default EDID, a local monitor or from an output to
an input.
Important: Before writing an EDID cube to an input, make sure to first sync
(save) the EDID to its source.
To copy an EDID to an input:
1. Click and drag the selected EDID from a saved EDID file, a local EDID File,
a default EDID or an Output to the desired input or several inputs.
When dropped, a warning message appears:
Page 15

EDID Designer - Using the EDID Designer
13
Note: Some devices, by default, manipulate the written EDID to better suit
their device properties. If desired, click the checkbox to prevent the device
from modifying the data. In devices not supporting this prevention, the
checkbox is grayed out. Note that modification of the written EDID might
occur.
2. Click Yes to write the EDID to the input or No to discard and exit the action.
4.4 Opening an EDID
Monitor, output and default EDIDs are read-only. Local EDID files and inputs are
read-write and editable.
To open (read or edit) an EDID:
Drag the selected EDID cube to the desktop panel and drop it.
While writing to the desktop, the source cube shows +.
After writing, the source cube shows an eye icon (read-only) or a
pencil icon (read-write) (see Figure 2).
4.5 Editing an EDID
To edit an EDID:
1. Click the desired EDID cube and drag it to the central EDID panel.
The EDID opens for viewing or editing.
Only Input and Local EDID files (from the disk) are editable. Monitor, Output and
Default EDIDs are read-only.
2. Click on the desired tab, make any necessary changes. For a detailed
description of tabs and their parameters, see Section 5.
Note: After making any change, the Save and Discard buttons and their
reminder asterisk are enabled.
Note also that editing a new EDID before saving or discarding a previous
EDID leaves the asterisk reminder on the source file. Before writing this
EDID to an input, it must be recalled and saved, otherwise the unchanged
source file will be written to the input.
Page 16

14
EDID Designer - Using the EDID Designer
3. Click Save to write the EDID to its source or Discard to throw out any
changes made since the last save.
4.6 Copying or Deleting an EDID to/from the Disk
You can make additional copies of an EDID file on the disk or delete the file from
the disk.
To make an additional copy of an EDID on the disk:
1. In the Local EDID file panel, right-click the desired EDID cube.
The Delete/Copy window opens.
2. Click Create a Copy. A warning message appears:
Only this message appears when copying an input EDID to local files on the disk.
3. Click Yes to make a copy or No to exit.
The copied file appears as a new cube in the upper-left corner of the Local
EDID file panel with an _0 extension.
Page 17

EDID Designer - Using the EDID Designer
15
To delete an EDID from the disk:
1. In the Local EDID file panel, right-click the desired EDID cube.
The Delete/Copy window opens.
2. Click Delete. A warning message appears:
3. Click Yes to delete or No to exit.
Page 18

16
EDID Designer - Editing an EDID
5 Editing an EDID
EDID Designer allows the user to manipulate the full EDID, with all its parameters
and extensions using the Advanced tab (see Section 5.3). The Advanced tab is a
full representation of the EDID according the White Paper referenced in Section 1,
and uses the exact field names used in the EDID white paper.
The Simplified tab (see Section 5.1) provides a summary view of the EDID
showing the most frequently changed parameters based on the most commonly
used functions. The Simplified tab takes its information from the Advanced tab.
Changing any parameter changes the value in both tabs. Various logical operators
also try to ensure that certain combinations of parameters cause only valid options
to display for selection.
This guide does not provide a detailed explanation of all the EDID parameters.
The user must be familiar with EDID structure and the meanings of fields in the
descriptors and is referred to the White Paper for full explanations of the fields in
the EDID.
Page 19

EDID Designer - Editing an EDID
17
5.1 Using the Simplified Tab
The Simplified mode is used for easy editing of the frequently used EDID
properties. Since the EDID block structure includes many cross references
between data fields, the Simplified mode prevents the user from creating EDID
blocks that might cause signal compatibility issues and the application does NOT
alter the EDID data block structure.
This means that in the Simplified mode the application denies any editing actions
that might change the total size or order of the block. Adding or removing CEA
extensions is prohibited. To make changes to the structure of the EDID block, use
the Advanced mode.
Simplified mode rearranges the displayed data in convenient and logical groups
with shared functionality. This is in direct contrast to the advanced mode, where
the exact block structure and content is maintained and displayed as it appears in
the EDID.
Page 20

18
EDID Designer - Editing an EDID
5.2 Simplified - General Information
General information of the EDID block has no real functional meaning. We suggest
using the SN as a cross-platform file identifier.
Page 21

EDID Designer - Editing an EDID
19
5.2.1 Simplified – Video - Established Timings
Video-Established-Timings are collected from established timing 1 & 2, the most
common and standard resolutions. The source outputs the highest possible
resolution checked from this list, only if there are not compatible resolutions under
the standard and detailed timing.
The same or similar established timings lists may be located in several sections of
the EDID block. In the simple mode, since we display only one aggregated list,
following rules apply:
If a resolution is checked in the list, it is “checked” in at least one place in the
block
If a user checks a resolution, it is checked in all relevant resolution lists
If a user unchecks a resolution from the list, it is unchecked from all relevant
places in all lists
As an example, if the resolution 640x480@60Hz is marked in two lists out of three,
and the user unchecks and rechecks it in the simple mode, the EDID block
changes since the 640x480@60Hz resolution is now checked in all three lists.
Page 22

20
EDID Designer - Editing an EDID
5.2.2 Simplified – Video - Standard Timings
Video-Standard-Timings gathers any standard timings (regular and from all
descriptors) set to display as ‘Standard-Timing’. The source outputs the highest
possible resolution defined in this list, only if there no compatible resolutions under
the detailed timing resolutions. The user can locally save a standard timing from
the EDID block or import to it a standard resolution from the working directory.
Import function: Standard timings are in fact detailed timing with exact screen
ratios. Under the import option you see only saved detailed timing, which is
mapped to a valid standard-timing. Standard timings already in use in this EDID
are marked as checked.
Page 23

EDID Designer - Editing an EDID
21
5.2.3 Simplified – Video - Detailed Timings
Video-Detailed-Timing gathers details from all descriptors set to display as
“detailed-timing”. The source outputs the highest possible resolution defined on
this list.
Import/Export – from/to attached Detailed Timings list. “In-use” list items are
marked as checked.
Page 24

22
EDID Designer - Editing an EDID
5.2.4 Simplified – HDMI Audio
HDMI Audio screen is shown if a CEA extension block exists and one of its
descriptors is AUDIO.
If any of a particularly defined audio configuration (see advanced-ext’-audio)
exists, check the block
If none exists, uncheck the block
If not checked, this sets all the matching “short-audio-blocks” to a “place-
holder” setting – pcm/192kHz/24-bit. This is considered a vacant block. The
user can now check other settings and apply them to the “vacant” shortblock
If checked, the corresponding “vacant” block receives the matching set
corresponding to place in the table
The number of blocks you can check is restricted to the number of vacant
“short-audio-blocks”. To add additional short blocks, do it in the advanced
mode.
Page 25

EDID Designer - Editing an EDID
23
5.2.5 Simplified – HDMI-Spec-Features
HDMI-Spec-Features screen are shown if a CEA extension block exists and one of
its descriptors is a Vendor-Specific CEA block.
If bytes representing the options exist in the Vendor-Spec CEA block,
checkboxes are enabled
If 3D is checked, 3D is shown in advanced
Deep Color Enable means DC 48/36/30
Page 26

24
EDID Designer - Editing an EDID
5.3 Using the Advanced Tab
The following sections describe several workflow aid features found in the
advanced mode.
5.3.1 Advanced - Established Timings
Advanced mode does not aggregate the established timing lists as in simple
mode, so to remove compatibility from a certain resolution you must uncheck it
manually from all lists (in case the standard timing list also exists in the
descriptors).
Page 27

EDID Designer - Editing an EDID
25
5.3.2 Advanced – Editing Descriptors
Some descriptors can be set to one of several types. We suggest in most cases
that the user not change the descriptor type.
If you do change a descriptor type, it is important to note that the content of the
descriptor does not change, only the way the source treats this data block
changes. Therefore, when changing a descriptor type, make sure to check that the
data after the change still has a meaningful interpretation under the new
descriptor.
Also, several types of descriptors contain compulsory byte values. They must
contain a certain value to maintain correct block structure. As a workflow aid, all
the compulsory bits for the specified descriptor type are displayed in the
Compulsory Byte Value area. The application informs you if their value is valid or
not and if needed, their value can be changed to the recommended ones by
clicking Fix on the window frame.
Page 28

26
EDID Designer - Editing an EDID
Page 29

EDID Designer - Editing an EDID
27
5.4 Using CEA Extensions
CEA extensions are used for specifying additional parameters or information on
other interfaces.
5.4.1 Adding a CEA Extension in the Advanced Mode
To add a CEA extension:
1. Click the ADD button at the bottom left of the desktop panel.
2. Select CEA Ext.
An Extension Info tab opens and 128 bytes are added to the byte map.
To specify the CEA extension block type:
1. After opening a CEA extension, click the ADD button.
2. Select CEA Ext Block.
The Ext Block drop down box opens:
3. Click the type of extension block you want to add.
A descriptor tab is added for each extension and the appropriate number of
bytes are reserved for configuration.
Note: Though it is theoretically possible to configure 256 CEA extension blocks,
only one is allowed in the EDID Designer.
Page 30

28
EDID Designer - Editing an EDID
5.4.2 Extension – Audio
To configure the Audio Format code:
Click the dropdown box and select the desired code. The bitrate information
automatically matches the selected code.
To configure the number of channels:
Click the dropdown box and select the number of channels.
To add another audio descriptor:
1. Click the AddShortAudioDescriptor button.
Another configurable audio descriptor opens. (Only one additional descriptor
is allowed.)
2. Configure it as described in the previous two steps.
To delete an audio descriptor:
Click the X button.
The descriptor is removed.
Page 31

EDID Designer - Editing an EDID
29
5.4.3 Extension – Video
This allows you to specify all custom or non-standard resolutions and indicate
whether the resolution is native.
To specify the video identification code:
Click the video identification code dropdown box and select the desired
resolution. (To remove, click the Remove button.)
Native resolution defines ONE additional native video resolution in addition
to the one specified in the Detailed timing of the first block. Although the
software does not prevent this, we recommend setting only one video
resolution as a Native one. If you do so, change the value of “total number of
native DTD” field to 1.
Page 32

30
EDID Designer - Editing an EDID
5.4.4 Extension – Vendor Specific
This allows you to specify the vendor specific CEC address.
Click the up and down arrows to increment or decrement the value shown.
5.4.5 Extension – Speaker Allocation
This allows you to specify the speaker configuration according to front, rear, left,
right, center, woofer and high.
Page 33

EDID Designer - Editing an EDID
31
5.4.6 Extension – Additional Descriptors
These descriptors allow you to include additional video specifications.
 Loading...