

Page 1

KRAMER ELECTRONIC S LTD.
USER MANUAL
MODEL:
Yard en I H- 1
Hidden In-wall Speaker
P/N: 2900-300472 Rev 2
Page 2
Page 3
Page 4

Yarden IH-1 – Contents
i
Contents
1 Introduction 1
2 Getting Started 2
2.1 Achieving the Best Performance 2
2.2 Recycling Kramer Products 3
3 Overview 4
4 Defining the Yarden IH-1 5
5 Installing the Speaker 6
5.1 Installation Recommendations 6
5.2 Installing the Speaker 9
5.3 Setting up an Array Installation 11
6 Technical Specifications 12
Figures
Figure 1: Yarden IH-1 Hidden In-wall Speaker 5
Figure 2: Yarden IH-1 in a Stereo Setup 7
Figure 3: Yarden IH-1 in a Theater Setup 8
Figure 4: Adjust Tap Selector 9
Figure 5: Yarden IH-1 In-wall Installation 10
Figure 6: Array Layout Parallel Wiring 11
Page 5

Yarden IH-1 - Introduction
1
1
Home theater
Stereo applications
Luxurious boardrooms
Lecture venues
Boutique shops
Cafes and Restaurants
Architectural applications
1 Introduction
Welcome to Kramer Electronics! Since 1981, Kramer Electronics has been
providing a world of unique, creative, and affordable solutions to the vast range of
problems that confront video, audio, presentation, and broadcasting professionals
on a daily basis. In recent years, we have redesigned and upgraded most of our
line, making the best even better!
Our 1,000-plus different models now appear in 14 groups that are clearly defined by
function: GROUP 1: Distribution Amplifiers; GROUP 2: Switchers and Routers;
GROUP 3: Control Systems; GROUP 4: Format/Standards Converters; GROUP 5:
Range Extenders and Repeaters; GROUP 6: Specialty AV Products; GROUP 7:
Scan Converters and Scalers; GROUP 8: Cables and Connectors; GROUP 9:
Room Connectivity; GROUP 10: Accessories and Rack Adapters; GROUP 11:
Sierra Video Products; GROUP 12: Digital Signage; GROUP 13: Audio; and
GROUP 14: Collaboration.
Congratulations on purchasing your Kramer Yarden IH-1 Hidden In-wall Speaker,
which is ideal for the following typical applications:
Page 6
2
Yarden IH-1 - Getting Started
Go to http://www.kramerelectronics.com/support/product_downloads.asp
to check for up-to-date user manuals, application programs, and to check if
firmware upgrades are available (where appropriate).
This equipment is to be used only inside a building. It may only be
connected to other equipment that is installed inside a building.
Do not open the housing of the speaker; doing so may reduce the
quality of the sound.
i
!
i
2 Getting Started
We recommend that you:
Unpack the equipment carefully and save the original box and packaging
materials for possible future shipment
Review the contents of this user manual
2.1 Achieving the Best Performance
To achieve the best performance:
Use only good quality connection cables (such as the Kramer BC-2S) to avoid
interference, deterioration in signal quality due to poor matching, and elevated
noise levels (often associated with low quality cables)
Do not secure the cables in tight bundles or roll the slack into tight coils
Avoid interference from neighboring electrical appliances that may adversely
influence signal quality
Position your Kramer Yarden IH-1 away from moisture, excessive sunlight
and dust
Page 7

Yarden IH-1 - Getting Started
3
3
2.2 Recycling Kramer Products
The Waste Electrical and Electronic Equipment (WEEE) Directive 2002/96/EC aims
to reduce the amount of WEEE sent for disposal to landfill or incineration by
requiring it to be collected and recycled. To comply with the WEEE Directive,
Kramer Electronics has made arrangements with the European Advanced
Recycling Network (EARN) and will cover any costs of treatment, recycling and
recovery of waste Kramer Electronics branded equipment on arrival at the EARN
facility. For details of Kramer’s recycling arrangements in your particular country go
to our recycling pages at http://www.kramerelectronics.com/support/recycling/.
Page 8

4
Yarden IH-1 - Overview
To avoid distortion of the Yarden IH-1 surface, do not use solvent based
materials such as thinner when painting it.
i
3 Overview
The Yarden IH-1 is an open-back speaker designed for mounting invisibly in the
wall. It is designed for infinite baffle environments, high-power handling and
excellent acoustic performance. The Yarden IH-1 can be hidden in the wall and
covered with regular water-based wall paint.
The Yarden IH-1 features:
Polypropylene flat membrane, 2" voice coil and double magnet drive units
A neodymium motor
A 120Hz to 20kHz @±3dB frequency response
8Ω/70V/100V transformer taps
A sensitivity of 83dB, 1W @1m
40W RMS, 90W continuous program power handling
2nd level @120Hz, high pass crossover
Mounting Brackets equipped with special “insert and drop”
Brackets for quick, easy and intuitive installation
Page 9

Yarden IH-1 - Defining the Yarden IH-1
5
5
#
Feature
Function
1
Top Mounting Clamps
Are inserted first to grip the wall
2
Tap Selector
Adjust each speaker to the appropriate tap setting:
For 70V: 3W, 6W, 12W or 25W
For 100V: 6W, 12W, 25W or 50W
Or select 8 (to bypass the transformer when connecting
directly to an amplifier without using the 70/100V array
option)
3
Speaker Inputs
Connect the black (-) speaker input to the receiver (-)
Connect the red (+) speaker input to the receiver (+)
4
Lower Mounting Clamps
For gripping onto the wall
4 Defining the Yarden IH-1
This section defines the powered Yarden IH-1:
Figure 1: Yarden IH-1 Hidden In-wall Speaker
The front panel can be leveled with the wall surface and then painted.
Page 10

6
Yarden IH-1 - Installing the Speaker
5 Installing the Speaker
This section describes:
The optimal installation recommendations (see Section 5.1)
How to install and mount the speaker (see Section 5.2)
How to set up an array installation (see Section 5.3)
5.1 Installation Recommendations
For optimum installation:
Make sure that there are no objects that may block the area between the
listener and the speakers
Fill the wall cavity behind the speakers with fiberglass insulation or mineral-
wool. Keep the same amount of insulation for each of the speakers to achieve
a true consistent bass response
Page 11

Yarden IH-1 - Installing the Speaker
7
7
Note that even though the illustration in Figure 2 shows two
speakers, each Yarden IH-1 package includes one speaker.
i
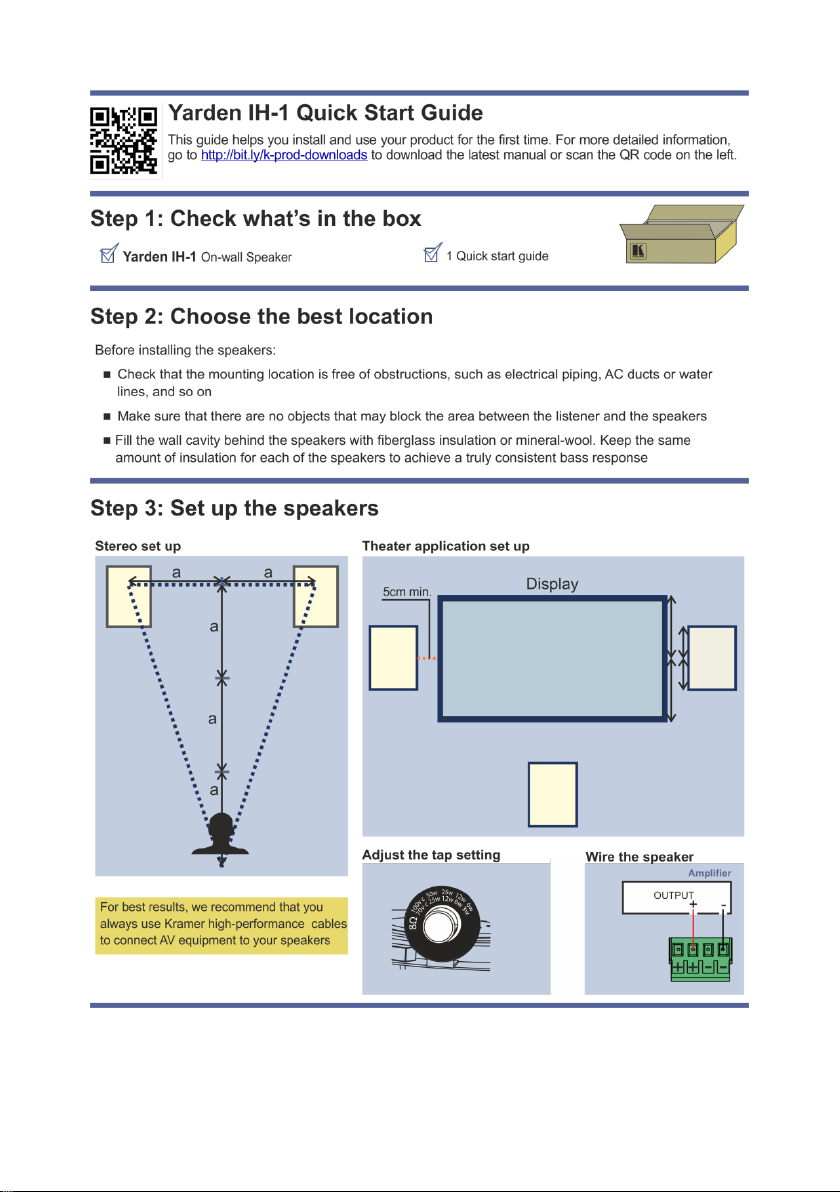
5.1.1 Setting up a Stereo System
When setting the system in a stereo setup (as shown in Figure 2):
Install the Yarden IH-1 so that the top half of the speaker is at ear level
Keep the distance between the speakers at 2/3
listener
rds
of the distance from the
Figure 2: Yarden IH-1 in a Stereo Setup
Page 12

8
Yarden IH-1 - Installing the Speaker
Note that even though the illustration in Figure 3 shows three
speakers, each Yarden IH-1 package includes one speaker.
i
5.1.2 Setting up a Theater Application
When setting the system in a theater setup (as shown in Figure 3):
Place the main front speakers on each side of the display at a minimal
distance of 5cm from the edge of the display
Center the speakers to the display screen
Locate the center speaker under the display screen
If you want to add additional speakers on the side walls, we recommend that
you place them at the same height of the main front speakers
Figure 3: Yarden IH-1 in a Theater Setup
Page 13

Yarden IH-1 - Installing the Speaker
9
9
Do not nail or staple the speaker wires.
!
5.2 Installing the Speaker
To install the hidden speaker inside the wall:
1. Check that there is no infrastructure or studs behind the wall where you want
to locate your speaker.
2. Place the cut out template on the wall in the correct location.
3. Mark the opening in the correct location by tracing the template.
4. Cut out a hole or small area within the marked template.
Initially, you can cut a smaller area inside the marked hole just to be sure that the area
behind the wall is clear. To do so insert a piece of “L-shaped” wire into the smaller
opening and rotate it. If the wire hits any obstacle which prevents you from installing the
speakers, you will need to move the template and test the area behind the wall again.
5. Cut out the full-sized opening according to the template.
6. Route the wiring from the amplifier to the speakers’ cut out holes, taking care
not to place them next to electrical wires or at least at a distance of about two
feet from an AC line.
7. Adjust each speaker to the appropriate tap setting (see Figure 4).
Set the tap according to the power requirements of the speaker based on its location in the
room (for example, a speaker located in a remote corner may require additional power)
Figure 4: Adjust Tap Selector
8. Connect the + (red) and – (black) wires to the + and – terminal block
connectors of the speaker.
Page 14

10
Yarden IH-1 - Installing the Speaker
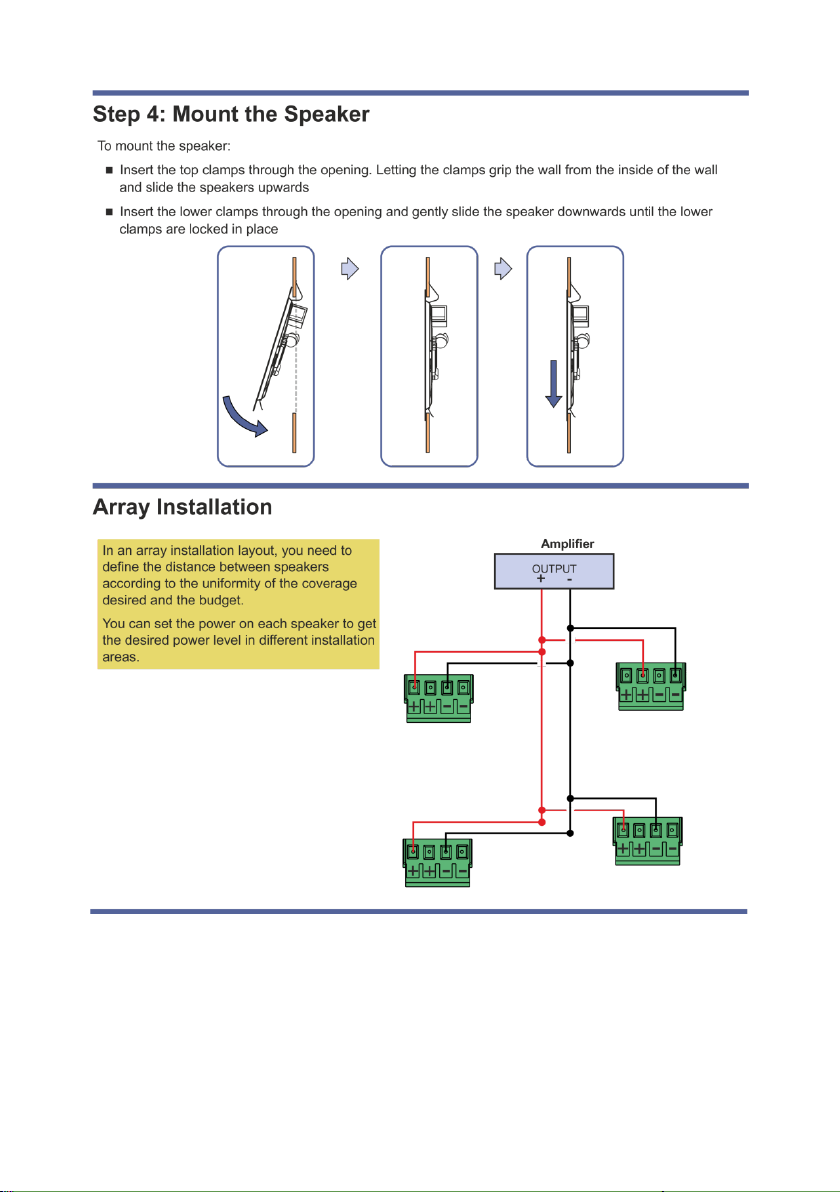
9. Insert the top clamps through the opening, letting the clamps grip the wall
from the inside of the wall and slide the speakers upwards.
10. Insert the lower clamps through the opening and gently slide the speaker
downwards until the lower clamps are locked in place.
Figure 5: Yarden IH-1 In-wall Installation
Page 15

Yarden IH-1 - Installing the Speaker
11
11
5.3 Setting up an Array Installation
When installing the Yarden IH-1 in an array installation layout, you need to define
the distance between speakers according to the uniformity of the coverage desired
and the budget. You can set the power on each speaker to get the desired power
level in different installation areas.
Figure 6 shows an example of parallel wiring in a square array installation:
Figure 6: Array Layout Parallel Wiring
Page 16

12
Yarden IH-1 - Technical Specifications
Yarden IH-1
Audio and Power
DESCRIPTION:
Hidden In-wall speaker
FREQUENCY RESPONSE:
120Hz to 20kHz @ ±3dB
DRIVE UNITS:
Polypropylene 1.34mm flat membrane
2” voice coil
Double Magnet Neodymium motor
VOICE COIL DIAMETER:
50mm
VOICE COIL WIRE:
Hexatech™ aluminum
IMPEDANCE:
8Ω (transformer tap in off position)
TRANSFORMER TAPS:
70V – 25W / 12W / 6W / 3W / Off (Lo-Z)
100V – 50W / 25W / 12W / 6W / Off (Lo-Z)
SENSITIVITY:
83dB SPL, 1W@1m
MAX SPL:
Continuous: 97dB
Peak: 100dB
POWER HANDLING:
90W (40W RMS)
CROSSOVER FREQUENCY:
6dB – 120Hz high pass
RESONANCE FREQUENCY:
95Hz
INPUT CONNECTOR:
Terminal block
Shipping and Installation
MATERIALS:
Steel body
OPERATING TEMPERATURE:
0° to +40°C (32° to 104°F)
STORAGE TEMPERATURE:
-40° to +70°C (-40° to 158°F)
HUMIDITY:
10% to 90%, RHL non-condensing
WEIGHT:
1.62kg (3.57lb) approx.
SHIPPING WEIGHT:
2.16kg (4.76lbs) approx.
DIMENSIONS:
External: 35cm x 26cm (13.7” x 10.2”)
Cutout: 31.8cm x 23.8cm (12.52"x9.37")
INSTALLATION CLEARANCE:
Mounting depth: 5.7cm (2.2”)
OPTIONS:
Kramer BC-2S speaker cable
COLORS:
White
Specifications are within a 10% tolerance and are subject to change without notice at
http://www.kramerelectronics.com
6 Technical Specifications
Page 17

Page 18

For the latest information on our products and a list of Kramer distributors,
visit our Web site where updates to this user manual may be found.
We welcome your questions, comments, and feedback.
Web site: www.kramerelectronics.com
E-mail: info@kramerel.com
SAFETY WARNING
Disconnect the unit from the power
supply before opening and servicing
P/N:
2900-300472
Rev:
2
!
 Loading...