

Page 1
USER MANUAL
MODEL:
VP-732
Presentation Switcher/Dual Scaler
P/N: 2900-300327 Rev 1
www.kramerAV.com
Page 2
Page 3
Page 4

VP-732 – Contents
i
Contents
1 Introduction 1
2 Getting Started 2
2.1 Achieving the Best Performance 2
2.2 Safety Instructions 2
2.3 Recycling Kramer Products 3
3 Overview 4
3.1 Defining the VP-732 Presentation Switcher/Dual Scaler 6
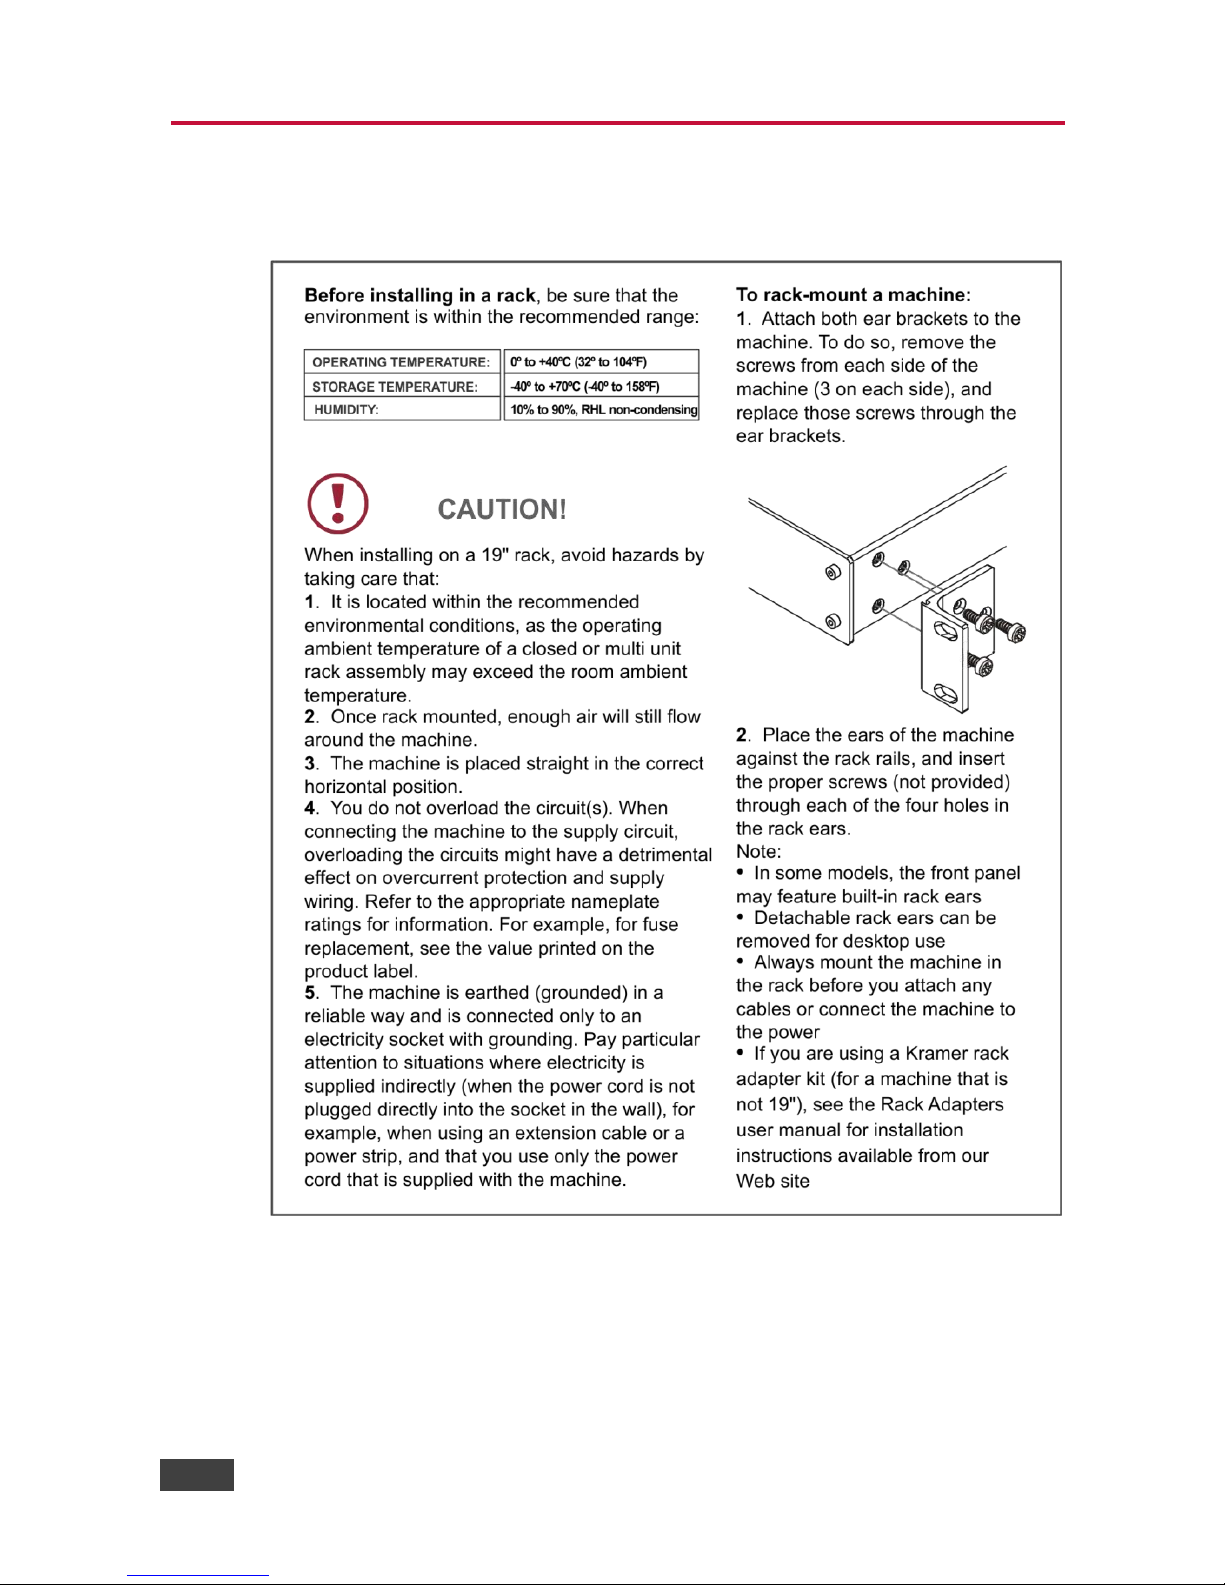
4 Installing in a Rack 10
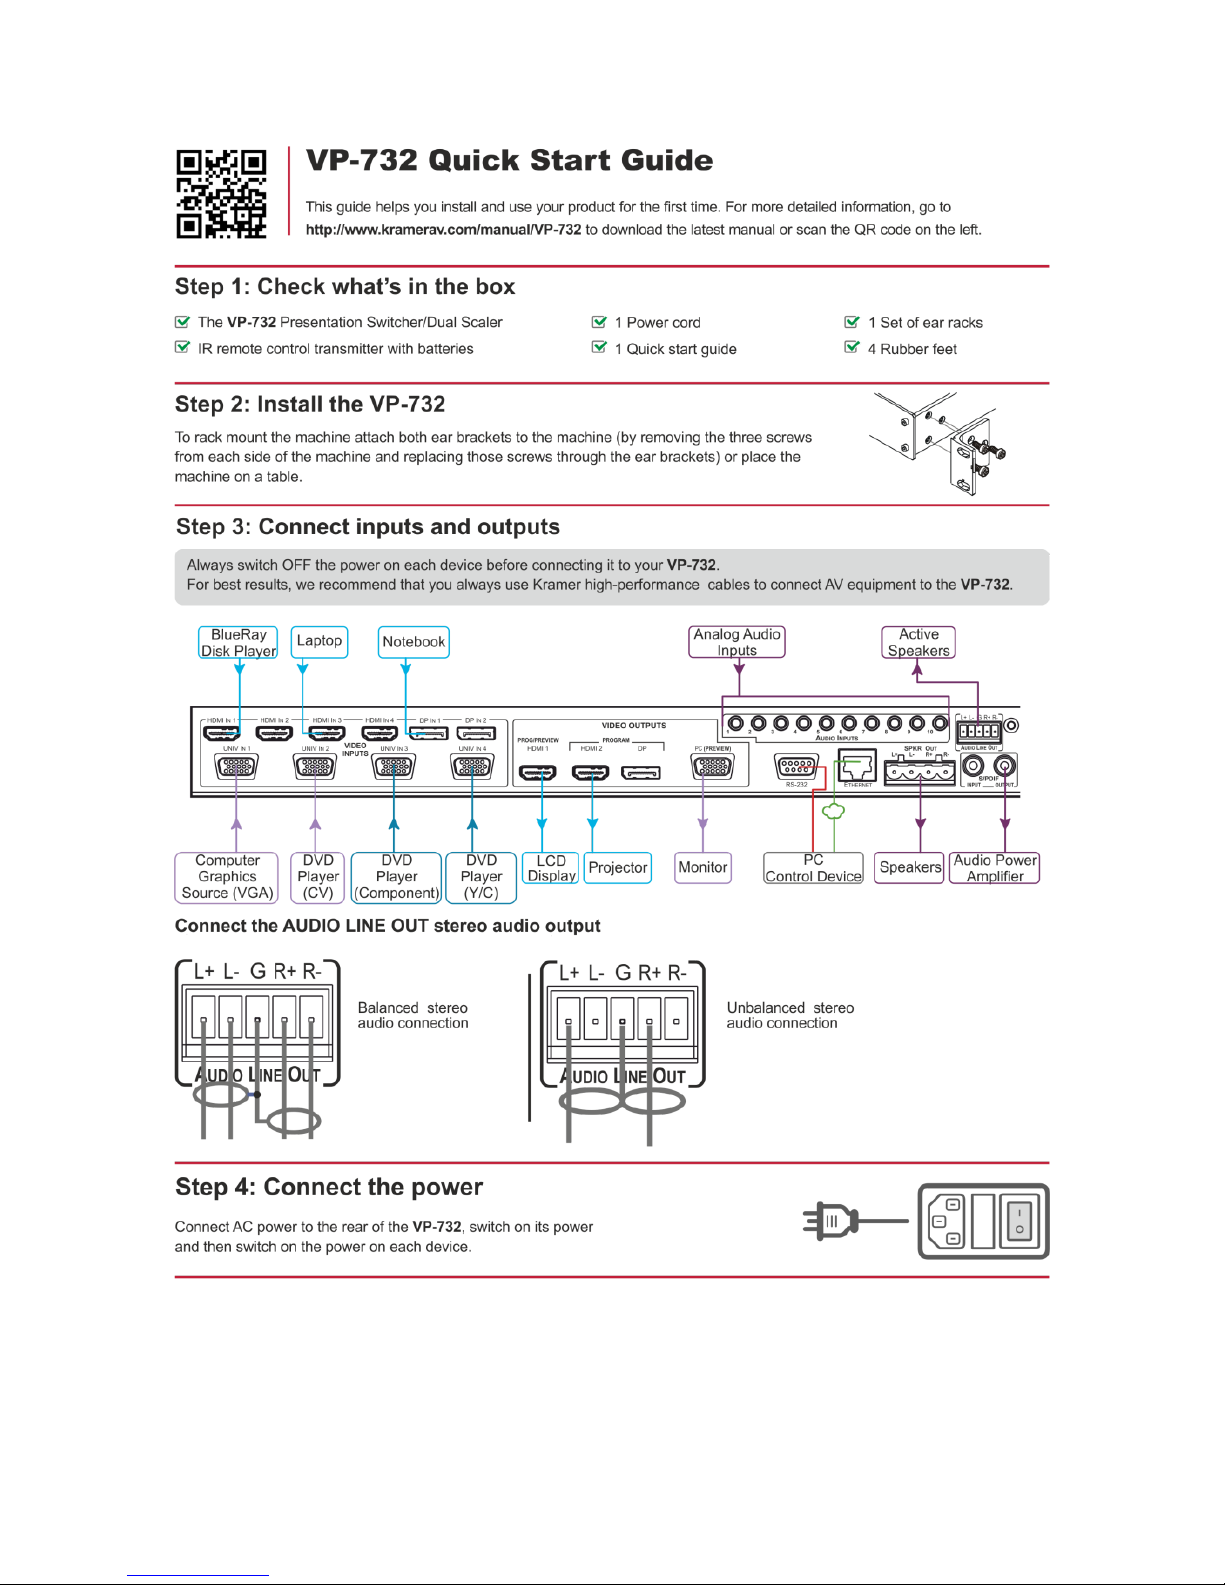
5 Connecting the VP-732 11
5.1 Universal Connector Pinout 14
5.2 Connecting to the VP-732 via RS-232 14
5.3 Connecting the VP-732 via the ETHERNET Port 15
5.4 Connecting the Balanced/Unbalanced Stereo Audio Output 19
6 Presentation Switcher / Scaler Buttons 20
6.1 Switching the Inputs 20
6.2 Preview/Program Operation Mode 21
6.3 The PIP Operation Mode 21
6.4 Locking and Unlocking the Front Panel 23
6.5 The Infrared Remote Control Transmitter 24
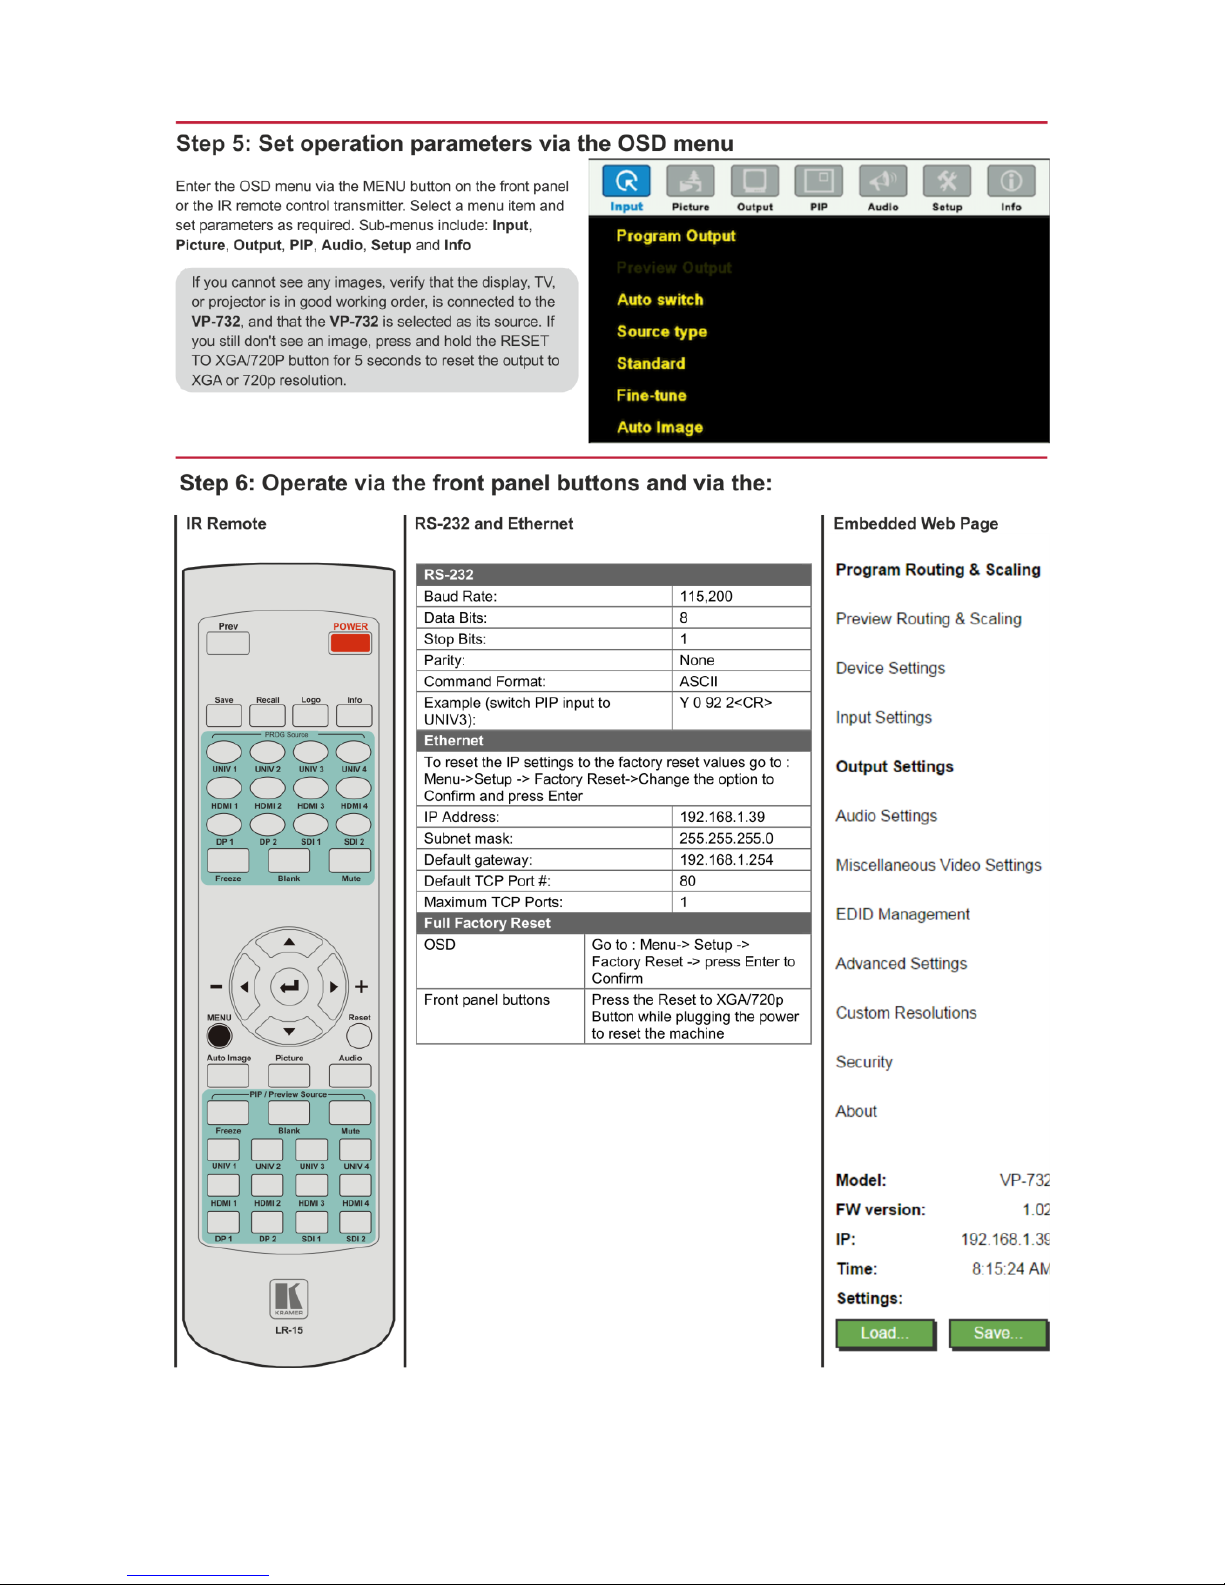
7 Configuring the VP-732 via the OSD MENU Screens 25
7.1 The Input Screen 26
7.2 The Picture Screen 27
7.3 The Output Screen 28
7.4 The PIP Screen 31
7.5 The Audio Screen 32
7.6 The Setup Screen 33
7.7 The Info Screen 41
8 Firmware Upgrade 42
9 Using the Embedded Web Pages 43
9.1 Browsing the VP-732 Web Pages 43
9.2 The Routing & Scaling Page 45
9.3 The Device Settings Page 55
9.4 The Input Settings Page 57
9.5 The Output Settings Page 59
9.6 The Audio Settings Page 60
9.7 The Miscellaneous Video Settings Page 61
9.8 The EDID Management Page 62
9.9 The Advanced Settings Page 65
9.10 The Custom Resolutions Page 66
9.11 The Security Page 67
9.12 The About Page 67
10 Technical Specifications 68
10.1 Default Communication Parameters 69
10.2 Tables of Supported Input Resolutions 69
10.3 Tables of Supported Output Resolutions 71
11 VP-732 Communication Protocol 73
11.1 Command list 74
Page 5

ii
VP-732 - Contents
Figures
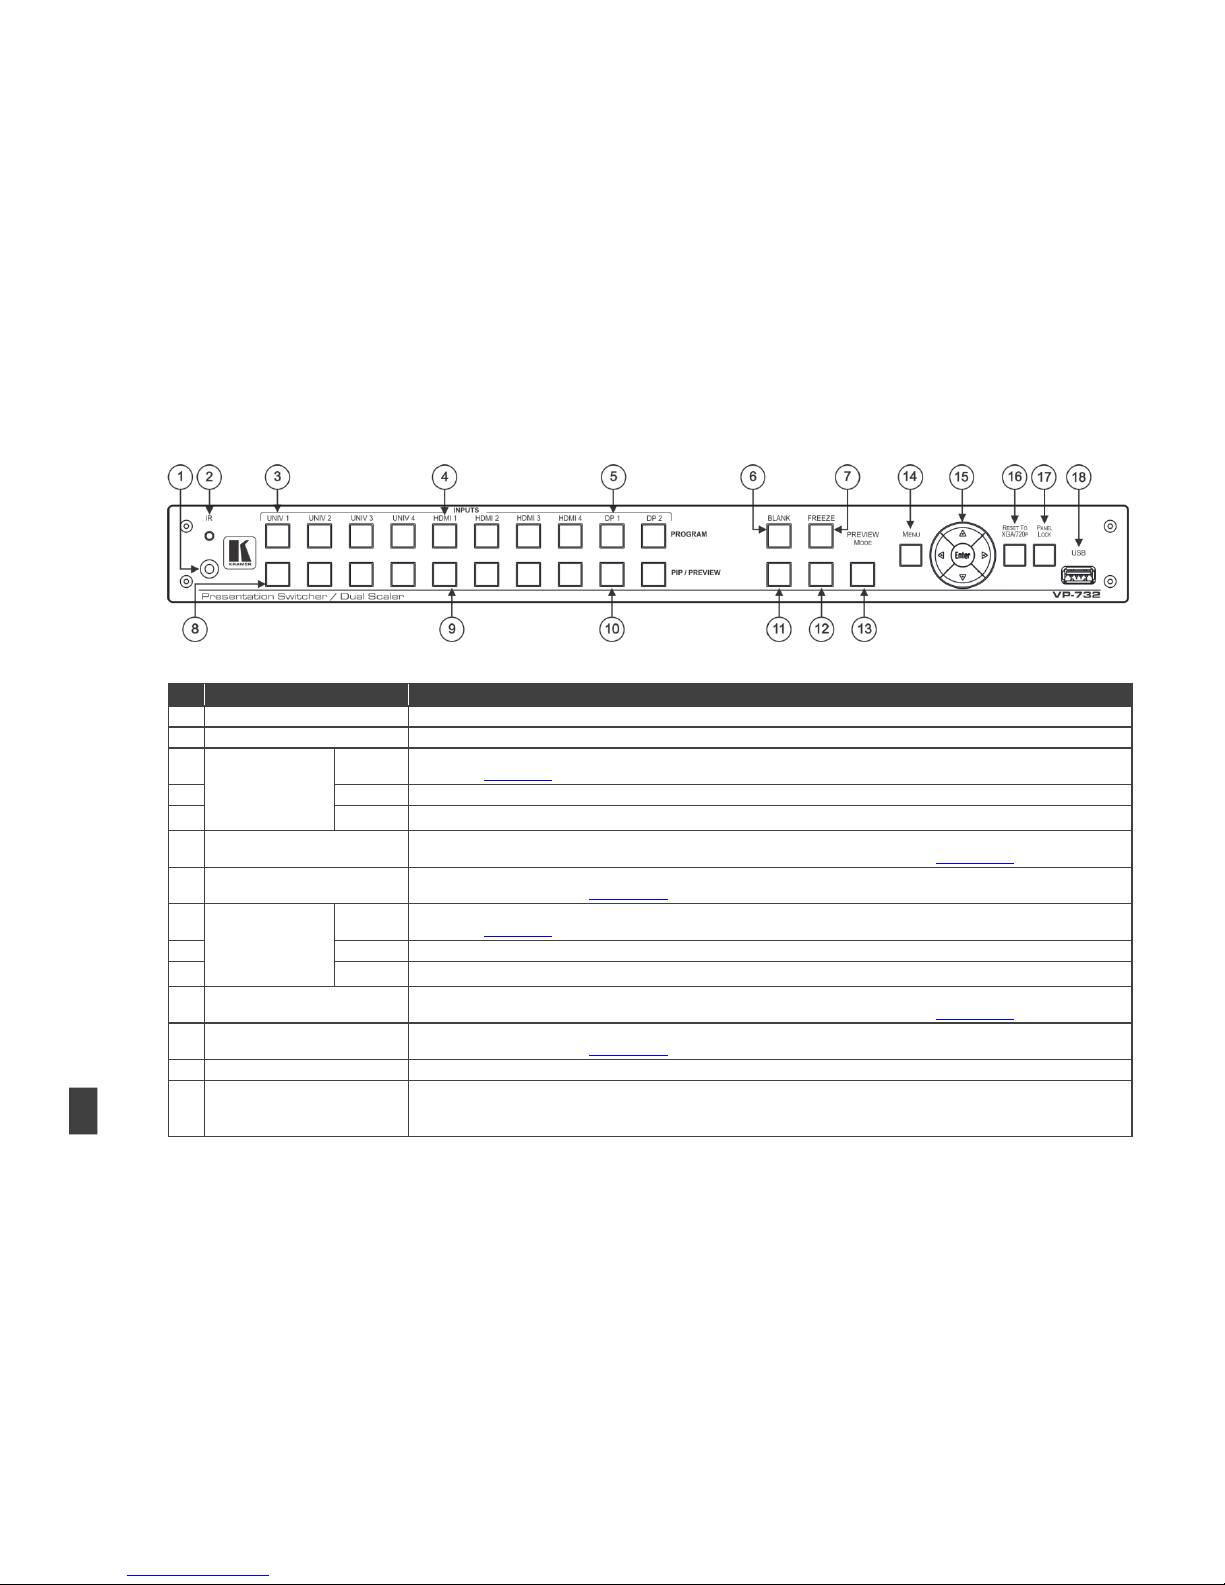
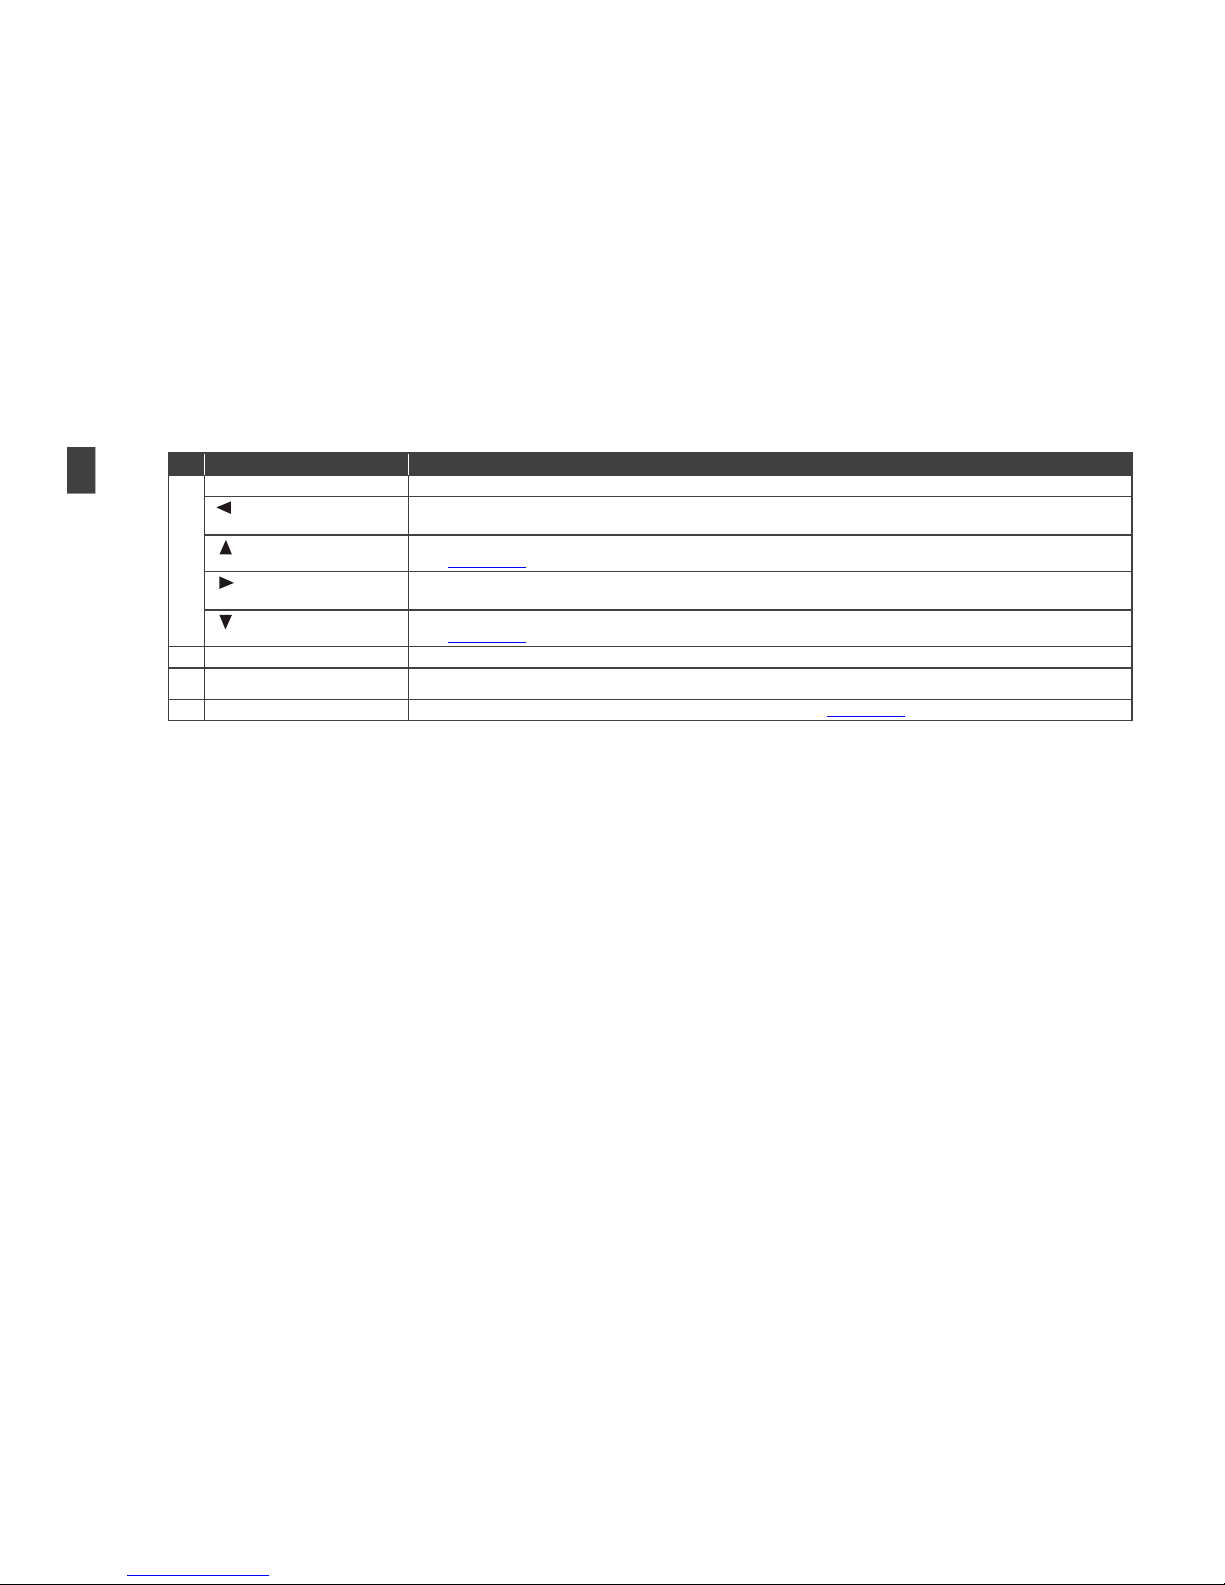
Figure 1: VP-732 Presentation Switcher/Dual Scaler Front Panel 7
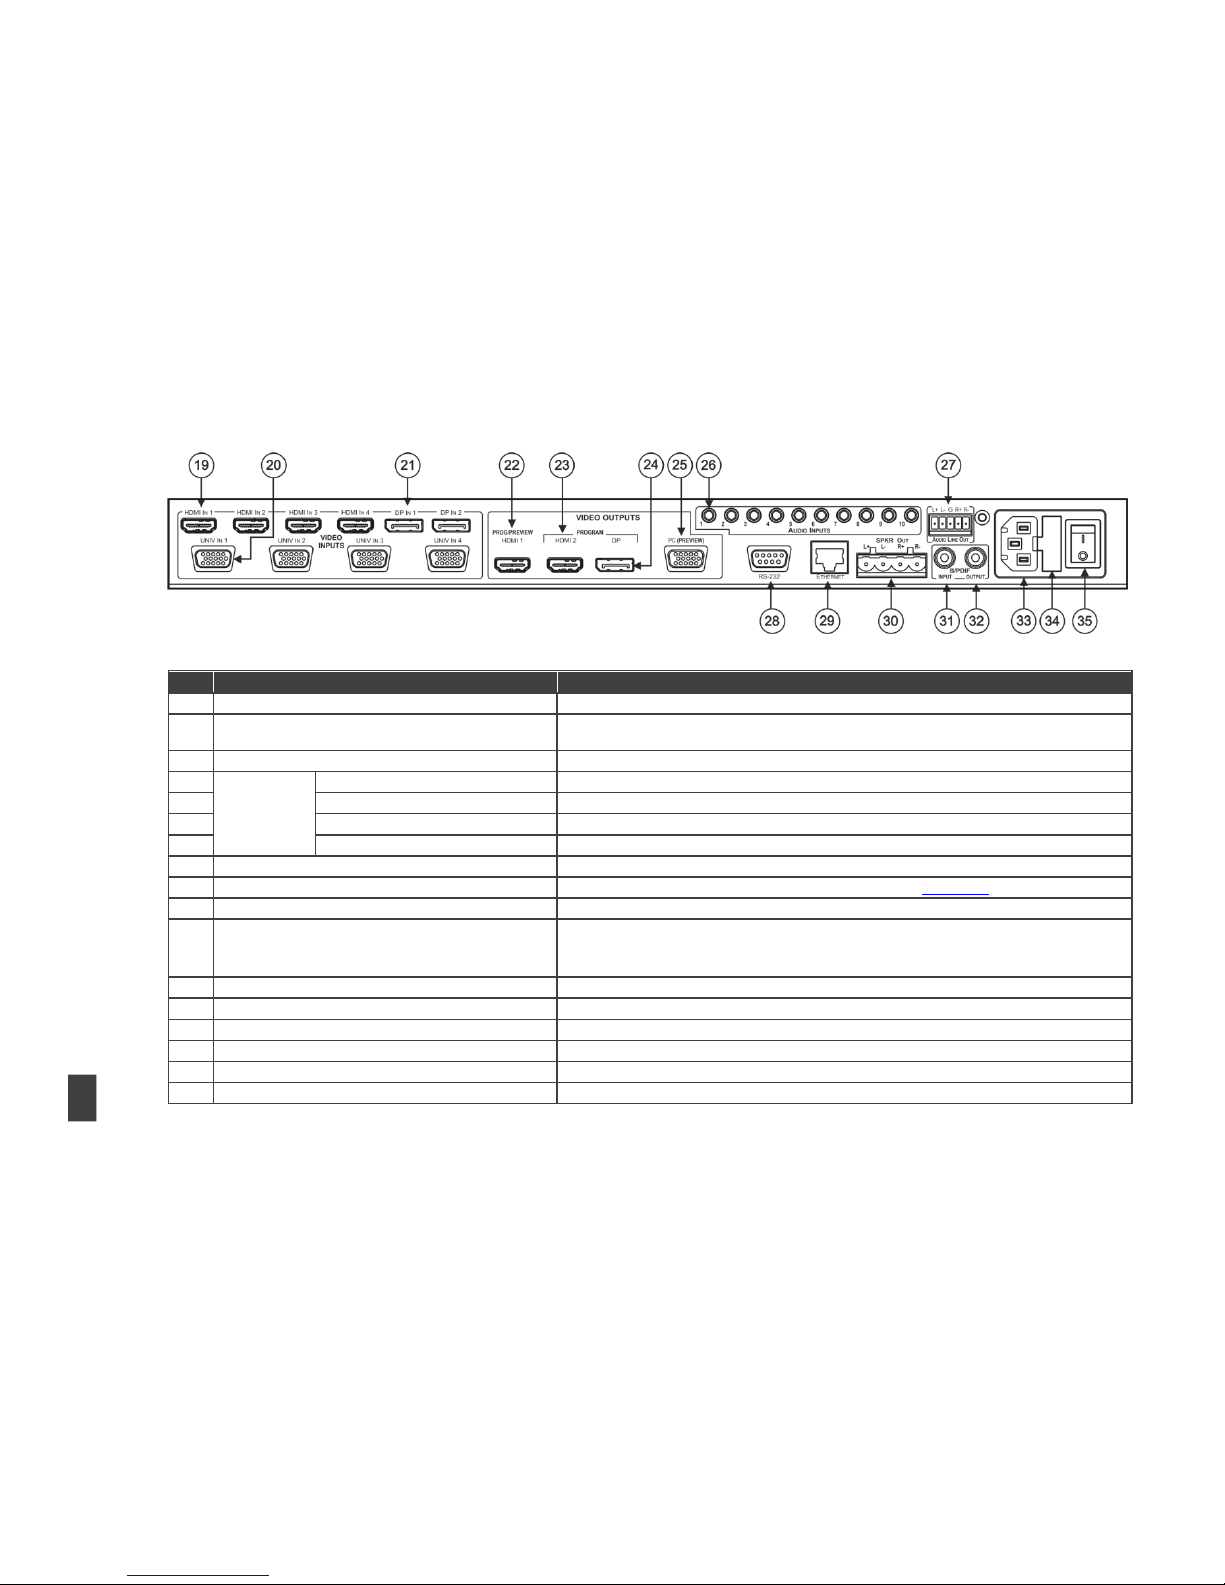
Figure 2: VP-732 Presentation Switcher/Dual Scaler Rear Panel 9
Figure 3: Connecting to the VP-732 Rear Panel 13
Figure 4: UNIV 15-pin HD Connector Pinout 14
Figure 5: Local Area Connection Properties Window 16
Figure 6: Internet Protocol Version 4 Properties Window 17
Figure 7: Internet Protocol Version 6 Properties Window 17
Figure 8: Internet Protocol Properties Window 18
Figure 9: Connecting the Balanced Stereo Audio Output 19
Figure 10: Connecting an Unbalanced Stereo Audio Acceptor to the Balanced Output 19
Figure 11: PIP Source over Background 23
Figure 12: IR Remote Control Transmitter 24
Figure 13: MENU Items 25
Figure 14: Input Screen 26
Figure 15: Picture Screen 27
Figure 16: Output Screen 28
Figure 17: PIP Screen 31
Figure 18: Audio Screen 32
Figure 19: Setup Screen 33
Figure 20: Text Overlay Application Screen 37
Figure 21: Active Video Functions 40
Figure 22: Information Screen 41
Figure 23: Firmware Upgrade – the VP Download Tool 42
Figure 24: The Routing & Scaling Page with Web page list on the left 45
Figure 25: The Routing & Scaling Page – Program Window 46
Figure 26: The Routing & Scaling Page – Main and PIP Windows 47
Figure 27: The Preview Routing & Scaling Page – Disabled in PIP Mode 48
Figure 28: The Preview Routing & Scaling Page – Preview Mode 48
Figure 29: The Routing & Scaling Page – Single Program/Preview Window 50
Figure 30: The Routing & Scaling Page – Moving the PIP Window 50
Figure 31: The Routing & Scaling Page – Selecting the output Resolution 51
Figure 32: The Routing & Scaling Page –Swapping Inputs 52
Figure 33: The Routing & Scaling Page – Program Lower Buttons Bar 53
Figure 34: The Routing & Scaling Page – Preview Lower Buttons Bar 53
Figure 35: The Routing & Scaling Page – Storing and Recalling a Preset 54
Figure 36: The Routing & Scaling Page – Muting the Audio Level 54
Figure 37: The Routing & Scaling Page – Editing an Input 54
Figure 38: The Device Settings Page 55
Figure 39: The Device Settings Page – the Information Window 56
Figure 40: The Device Settings Page – Factory Reset 56
Figure 41: The Input Settings Page 57
Figure 42: The Output Settings Page 59
Figure 43: The Audio Settings Page 60
Figure 44: The Audio Settings Page (PIP Mode) 60
Figure 45: The Miscellaneous Video Settings Page 61
Figure 46: The EDID Page 62
Figure 47: The EDID Page – Selecting a Resolution to copy to an Input 63
Figure 48: The EDID Page – Copying the EDID 63
Figure 49: The EDID Page – Copying from an output 64
Figure 50: The Advanced Settings Page 65
Figure 51: The Custom Resolutions Page 66
Figure 52: The Custom Resolutions Page – Current Parameters 66
Page 6

VP-732 – Contents
iii
Figure 53: The Security Page 67
Figure 54: The About Page 67
Page 7

VP-732 – Introduction
1
1 Introduction
Welcome to Kramer Electronics! Since 1981, Kramer Electronics has been
providing a world of unique, creative, and affordable solutions to the vast range of
problems that confront the video, audio, presentation, and broadcasting
professional on a daily basis. In recent years, we have redesigned and upgraded
most of our line, making the best even better!
Our 1,000-plus different models now appear in 14 groups that are clearly defined by
function: GROUP 1: Distribution Amplifiers; GROUP 2: Switchers and Routers;
GROUP 3: Control Systems; GROUP 4: Format/Standards Converters; GROUP 5:
Range Extenders and Repeaters; GROUP 6: Specialty AV Products; GROUP 7:
Scan Converters and Scalers; GROUP 8: Cables and Connectors; GROUP 9:
Room Connectivity; GROUP 10: Accessories and Rack Adapters; GROUP 11:
Sierra Video Products; GROUP 12: Digital Signage; GROUP 13: Audio; and
GROUP 14: Collaboration.
Congratulations on purchasing your Kramer VP-732 Presentation Switcher/Dual
Scaler, which is ideal for the following typical applications:
Presentation applications that require a preview option
Projection systems in conference rooms, boardrooms, auditoriums, hotels and
churches, production studios, rental and staging
Any application where high quality conversion and switching of multiple and
different video signals to graphical data signals is required for display or
projection purposes
Page 8
2
VP-732 - Getting Started
2 Getting Started
We recommend that you:
Unpack the equipment carefully and save the original box and packaging
materials for possible future shipment
Review the contents of this user manual
Go to http://www.kramerav.com/downloads/VP-732 to check for up-to-date
user manuals, application programs, and to check if firmware upgrades are
available (where appropriate).
2.1 Achieving the Best Performance
Use only good quality connection cables (we recommend Kramer high-
performance, high-resolution cables) to avoid interference, deterioration in
signal quality due to poor matching, and elevated noise levels (often
associated with low quality cables)
Do not secure the cables in tight bundles or roll the slack into tight coils
Avoid interference from neighbouring electrical appliances that may adversely
influence signal quality
Position your Kramer VP-732 away from moisture, excessive sunlight and
dust
This equipment is to be used only inside a building. It may only be
connected to other equipment that is installed inside a building.
2.2 Safety Instructions
Caution:
There are no operator serviceable parts inside the unit
Warning:
Use only the power cord that is supplied with the unit
Warning:
Do not open the unit. High voltages can cause electrical
shock! Servicing by qualified personnel only
Warning:
Disconnect the power and unplug the unit from the wall
before installing
Page 9

VP-732 – Getting Started
3
2.3 Recycling Kramer Products
The Waste Electrical and Electronic Equipment (WEEE) Directive 2002/96/EC aims
to reduce the amount of WEEE sent for disposal to landfill or incineration by
requiring it to be collected and recycled. To comply with the WEEE Directive,
Kramer Electronics has made arrangements with the European Advanced
Recycling Network (EARN) and will cover any costs of treatment, recycling and
recovery of waste Kramer Electronics branded equipment on arrival at the EARN
facility. For details of Kramer’s recycling arrangements in your particular country go
to our recycling pages at http://www.kramerelectronics.com/support/recycling/.
Page 10

4
VP-732 - Overview
3 Overview
The Kramer VP-732 is a 10-input Presentation Matrix Switcher / Dual Scaler for a
wide variety of presentation and multimedia applications. The VP-732 has four
HDMI, two DisplayPort and four user definable (universal) analog video inputs
(each can be set as computer graphics, composite video, s-Video (Y/C) or
component video). It up- or down scales to selectable output resolutions (up to
4K/UHD) and provides glitch-free switching between sources through fast FTB™
(fade-thru-black) switching technology. Independent Program and Preview outputs
are available simultaneously: A DP and an HDMI connector show the Program
Output; a 15-pin HD computer graphics video connector shows the Preview Output;
while an additional HDMI connector can show either of the 2 outputs. Alternatively,
all 4 outputs are identical, and can include a PIP window showing any one of the
input sources. Rich audio support is also included, with digital audio embedding and
de-embedding, as well as 10 analog stereo inputs; and analog, S/PDIF, and
speaker outputs.
The VP-732 features:
PixPerfect™ Scaling Technology – Kramer’s precision pixel mapping and high
quality scaling technology
Fast Fade-Thru-Black (FTB™) Switching - Video switching transitions are
clean and fast. The video fades to black and the new input fades from black
for smooth, glitch-free switching. The output signal provides constant sync so
the display never glitches
K-IIT XL™ Picture-in-Picture Image Insertion Technology - ultra stable picture-
in-picture, picture-and-picture, and split screen capability. Any video source
can be inserted into or positioned next to any other video source with window
positioning and sizing controls
Dual scalers—with independent outputs
A PREVIEW MODE button that toggles between the PIP mode and the
PREVIEW mode. When pressed (button is illuminated), the selected
PREVIEW input is scaled to the PREVIEW outputs. When in the PIP mode, it
can be inserted in a picture-in-picture window on all the outputs
Page 11

VP-732 – Overview
5
Features 10 PREVIEW input buttons for switching a selected input to the
PREVIEW output (in PREVIEW mode) and 10 PROGRAM input buttons for
switching a selected input to the PROGRAM output. In PIP mode, the 10
PREVIEW input buttons select the PIP source. There is no limitation on the
PIP and main window source combinations
Output resolutions - supports up to 4K@30Hz/UHD on the Program output
(and up to 720P on the Preview output)
Scaled video outputs – 2xHDMI, DP and 15-pin HD computer graphics video
Multiple computer graphics output resolutions – including a user-defined
output resolution
Multiple aspect ratio selections
Audio breakaway and AFV (audio-follow-video) operation support
Embedded audio on the HDMI and DisplayPort inputs and outputs
Built-in noise reduction and picture enhancement features
Powerful audio features via DSP technology including audio equalization,
mixing, delay and so on
One stereo speaker output, 10W per channel into 8Ω, on a 4-pin terminal
block connector
Auto-switching and auto-scanning of inputs
Efficient power-saving features
Built-in Time Base Corrector - stabilizes video sources with unstable sync
Built-in video Proc-Amp - color, hue, sharpness, contrast, and brightness are
set individually for each input
BLANK and FREEZE buttons for the preview and program modes, a RESET
TO XGA/720P button (to hardware-reset the output resolution); and a PANEL
LOCK button
User-friendly AP for Text Overlay support
Firmware Upgrade – Ethernet-based, via a user-friendly software upgrade tool
An OSD (On-Screen Display) – for making adjustments
Page 12

6
VP-732 - Overview
A USB port – for downloading splash-screen logo; and for storing /
downloading the machine configurations via a flash drive
In addition, the VP-732:
Includes non-volatile memory that retains the last settings, after switching the
power off and then on again
Is specifically designed to improve video quality by reducing chroma noise
Includes numerous filters and algorithms for eliminating picture artifacts
Scales and zooms (to up to 400% of the original size)
Features advanced EDID management per input
Control your VP-732 directly via the front panel push buttons (with on-screen
menus), or:
By RS-232 serial commands transmitted by a touch screen system, PC, or
other serial controller
Remotely, from the infrared remote control transmitter
Via the Ethernet using built-in user-friendly Web pages
The VP-732 is housed in a 19” 1U rack mountable enclosure, with rack “ears”
included, and is fed from a 100-240 VAC universal switching power supply.
3.1 Defining the VP-732 Presentation Switcher/Dual Scaler
This section defines the VP-732.
Page 13
VP-732 – Overview
7
Figure 1: VP-732 Presentation Switcher/Dual Scaler Front Panel
#
Feature
Function
1
IR Receiver
Receives signals from the remote control transmitter
2
LED
Lights red when the unit accepts IR remote commands
3
PROGRAM
INPUT Selector
Buttons
(illuminated green
when selected)
UNIV 1
Press to select the computer graphics/composite video / s-Video / component video source (configured via the OSD
menu, see Section 7.1) and the appropriate audio source (from 1 to 4)
4
HDMI 1
Press to select the HDMI source (from 1 to 4)
5
DP 1
Press to select the DP source (from 1 to 2)
6
Program BLANK Button
Press to toggle between a blank screen (blue or black) and the program display.
The BLANK button can be programmed to mute the audio signal at the same time (see Section 7.6.3)
7
Program FREEZE Button
Press to freeze/unfreeze the program output video image, The FREEZE button can be programmed to mute the audio
signal at the same time (see Section 7.6.3)
8
PIP / PREVIEW
INPUT Selector
Buttons
illuminated yellow
when selected)
UNIV 1
Press to select the computer graphics/composite video / s-Video / component video source (configured via the OSD
menu, see Section 7.1) and the appropriate audio source (from 1 to 4)
9
HDMI 1
Press to select the HDMI source (from 1 to 4)
10
DP 1
Press to select the HDMI source (from 1 to 2)
11
Preview BLANK Button
Press to toggle between a blank screen (blue or black) and the preview display.
The BLANK button can be programmed to mute the audio signal at the same time (see Section 7.6.3)
12
Preview FREEZE Button
Press to freeze/unfreeze the preview output video image, The FREEZE button can be programmed to mute the audio
signal at the same time (see Section 7.6.3)
13
PREVIEW MODE Button
Press to toggle between PIP and Preview Mode operation
14
MENU Button
Press to display the OSD menu screen. Press again to return to normal operation
Page 14
#
Feature
Function
15
ENTER Button
Press to move to the next level in the OSD screen or to accept a new parameter
Button
Decreases the range by one step in the OSD screen or moves to the previous level in the OSD screen.
Decreases the volume level, when not in the OSD menu
Button
Moves up one step (in the same level) in the OSD screen, or moves to the previous slide when running a slideshow
(see Section 7.6.1)
Button
Increases the range by one step in the OSD screen
Increases the volume level, when not in the OSD menu
Button
Moves down one step (in the same level) in the OSD screen, or moves to the next slide when running a slideshow
(see Section 7.6.1)
16
RESET TO XGA/720p Button
Press and hold to reset to the default resolution (toggles between RESET TO XGA and 720p)
17
PANEL LOCK Button
Press and hold to lock/unlock the front panel to prevent unintentional operation
18
USB Connector
Connects to a USB drive to download a Logo and save settings (see Section 7.6.3)
8
VP-732 – Overview
Page 15
VP-732 – Overview
9
Figure 2: VP-732 Presentation Switcher/Dual Scaler Rear Panel
#
Feature
Function
19
HDMI IN 1 Connector
Connect to the HDMI 1 source (from 1 to 4)
20
UNIV IN 1 15-pin HD Connector
Connects to the video source that can be computer graphics, composite video, s-Video (Y/C)
or component video (from 1 to 4)
21
DP IN 1 DisplayPort Connector
Connect to the DP 1 source (from 1 to 2)
22
VIDEO
OUTPUTS
PROG/PREVIEW HDMI 1 Connector
Connect to an HDMI acceptor (selectable PREVIEW or PROGRAM)
23
PROGRAM HDMI 2 Connector
Connect to a PROGRAM HDMI 2 acceptor
24
PROGRAM DP Connector
Connect to a PROGRAM DP acceptor
25
PREVIEW PC 15-pin HD Connector
Connect to a PREVIEW computer graphics acceptor
26
AUDIO INPUTS 3.5 Mini Jack Connectors
Connect to the unbalanced stereo analog audio sources from 1 to 10
27
AUDIO LINE OUT 5-pin Terminal Block
Connect to the balanced stereo analog audio acceptor (see Section 5.4)
28
RS-232 9-pin D-sub Connector
Connect to PC or Serial Controller
29
ETHERNET Port
Connect to your LAN
Local Area Network – that is computers sharing a common communications line or wireless
link, which often share a server within a defined geographic area
30
SPKR OUT 4-pin Terminal Block
Connect to a pair of loudspeakers
31
S/PDIF INPUT 3.5 Mini Jack Connector
Connect to a digital audio source
32
S/PDIF OUTPUT 3.5 Mini Jack Connector
Connect to a digital audio acceptor
33
Mains Power Connector
Connect to the mains power
34
Mains Power Fuse
Fuse for protecting the device
35
Mains power switch
Switch for turning the unit ON or OFF
Page 16
10
VP-732 - Installing in a Rack
4 Installing in a Rack
This section provides instructions for rack mounting the unit.
Page 17

VP-732 – Connecting the VP-732
11
5 Connecting the VP-732
Always switch off the power to each device before connecting it to your
VP-732. After connecting your VP-732, connect its power and then
switch on the power to each device.
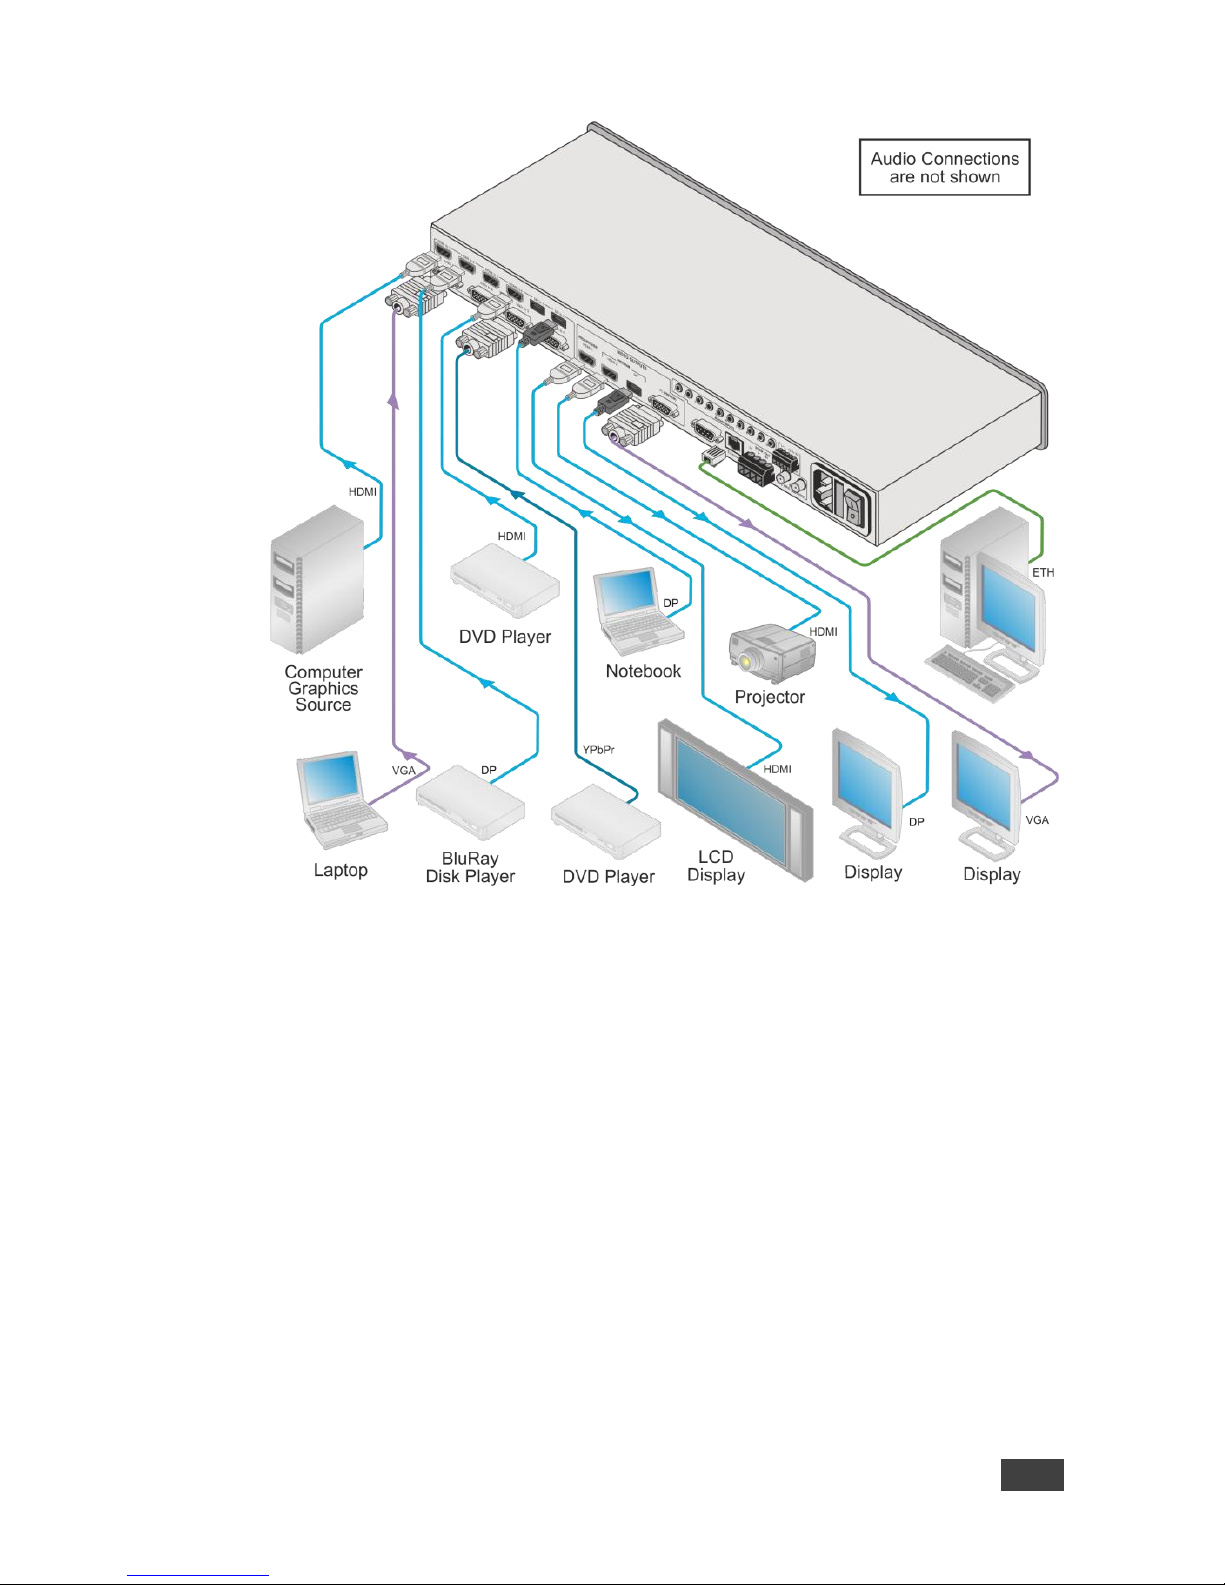
To connect the VP-732 as illustrated in the example in Figure 3, do the following:
1. Connect the video sources:
A laptop to the UNIV IN 1 15-pin HD computer graphics video
connector
Note that the UNIV IN 15-pin HD connector pinout is defined in
Section 5.1).
A computer graphics source to the HDMI 1 connector.
An HDMI source (for example, a DVD player) to the HDMI 3 IN
connector
Alternatively, you can connect the DVI connector on the DVD player to the HDMI
connector on the VP-732 via a DVI-HDMI adapter
A DisplayPort video source (for example, a notebook) to the DP IN
connector
Although this connecting example shows only several inputs that are
connected, you can connect all the inputs simultaneously.
2. Connect the analog stereo inputs (from 1 to 10), not shown in Figure 3.
3. Connect the video outputs:
The HDMI 1 PROGRAM/PREVIEW connector (can be configured via
the OSD menu, Section 7.3) to an HDMI acceptor (for example, an
LCD display)
The HDMI 2 PROGRAM connector to an HDMI acceptor (for example,
an LCD display)
Note that the HDMI 1 and HDMI 2 can be set to output HDMI, DVI or
can be set to Auto, see Section 7.3.
Page 18

12
VP-732 - Connecting the VP-732
The DP program connector to an HDMI acceptor (for example, a
display)
The PC PREVIEW 15-pin HD computer graphics video connector to a
video acceptor (for example, an analog display)
In the HDTV mode, the signal is outputted as a component video signal (YPbPr) and
goes out via three PINS: PIN 1 is Red or Pr, PIN 2 is Green or Y, PIN 3 is Blue or Pb. In
other modes, it is outputted as a VGA signal (RGBHV) (see Section 5.1)
4. Connect the S/PDIF INPUT RCA connector to a digital audio source (for
example, a DVD player.
5. Connect the AUDIO LINE OUT Terminal Block connector to a balanced audio
acceptor and the S/PDIF OUTPUT RCA connector to a digital audio
acceptor.
6. Connect the SPKR OUT block connector to a pair of loudspeakers, by
connecting the left loudspeaker to the “L+” and the “L-” terminal block
connectors, and the right loudspeaker to the “R+” and the “R-” terminal block
connectors. Do not Ground the loudspeakers.
7. Connect the power cord.
We recommend that you use only the power cord that is supplied with this machine
8. If required, connect:
A PC via RS-232, see Section 5.2
The ETHERNET port, see Section 5.3
The USB connector, audio sources and acceptors, and power cord are
not shown in Figure 3.
Page 19
VP-732 – Connecting the VP-732
13
Figure 3: Connecting to the VP-732 Rear Panel
Page 20
14
VP-732 - Connecting the VP-732
5.1 Universal Connector Pinout
This section describes the UNIV connectors from 1 to 4. Each connector can be set
as computer graphics, composite video, s-Video (Y/C) or component video.
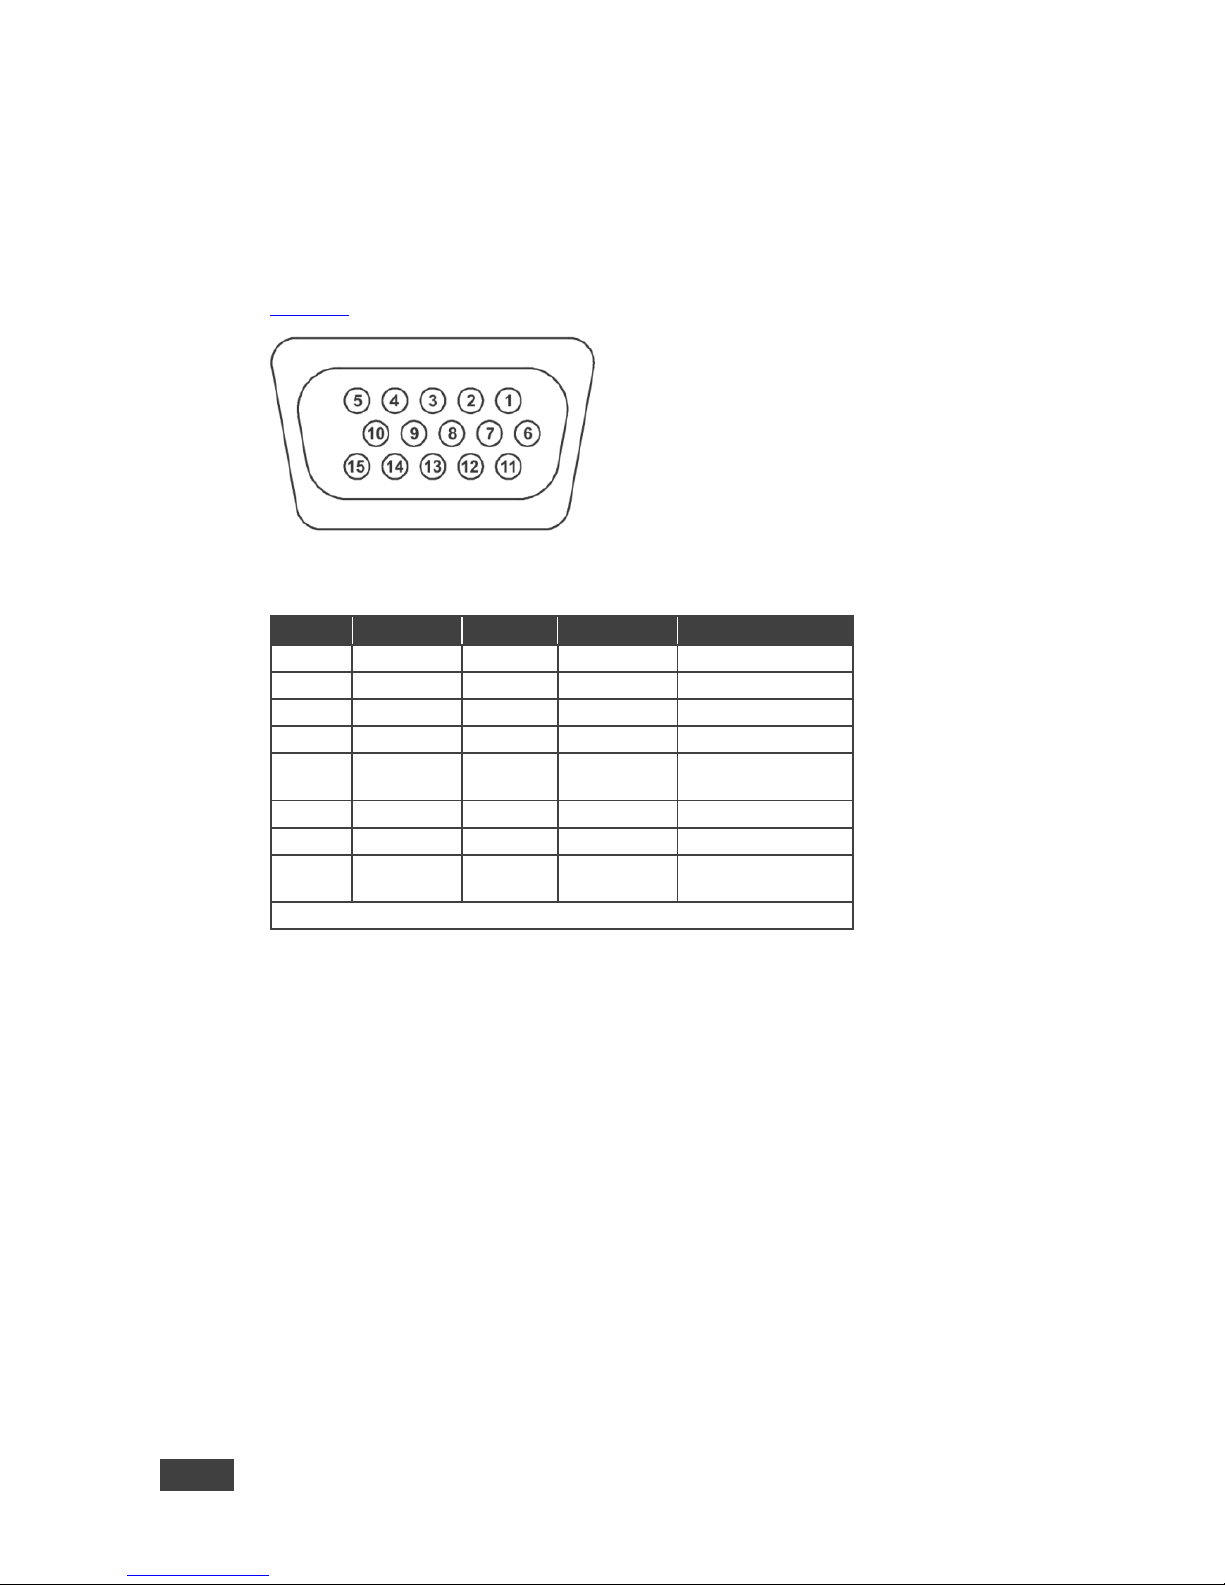
Figure 4 and the table below define the connector pinout:
Figure 4: UNIV 15-pin HD Connector Pinout
PIN #
VGA
COMP
s-Video
CV
1 R Pr 2 G Y S_Y
Composite video
3 B Pb
S_C 9
+5VD
12
EDID_SD
A
13
H_Sync
14
V_Sync
15
EDID_SC
L
Note that PINs 5, 6, 7, 8 and 10 are GND
5.2 Connecting to the VP-732 via RS-232
You can connect to the VP-732 via an RS-232 connection using, for example, a PC.
Note that a null-modem adapter/connection is not required.
To connect to the VP-732 via RS-232:
Connect the RS-232 9-pin D-sub rear panel port on the VP-732 unit via a
9-wire straight cable (only pin 2 to pin 2, pin 3 to pin 3, and pin 5 to pin 5 need
to be connected) to the RS-232 9-pin D-sub port on your PC
Page 21

VP-732 – Connecting the VP-732
15
5.3 Connecting the VP-732 via the ETHERNET Port
You can connect to the VP-732 via Ethernet using either of the following methods:
Directly to the PC using a crossover cable (see Section 5.3.1)
Via a network hub, switch, or router, using a straight-through cable (see
Section 5.3.2)
Note: If you want to connect via a router and your IT system is based on IPv6,
speak to your IT department for specific installation instructions.
5.3.1 Connecting the Ethernet Port Directly to a PC
You can connect the Ethernet port of the VP-732 directly to the Ethernet port on
your PC using a crossover cable with RJ-45 connectors.
This type of connection is recommended for identifying the VP-732
with the factory configured default IP address.
After connecting the VP-732 to the Ethernet port, configure your PC as follows:
1. Click Start > Control Panel > Network and Sharing Center.
2. Click Change Adapter Settings.
3. Highlight the network adapter you want to use to connect to the device and
click Change settings of this connection.
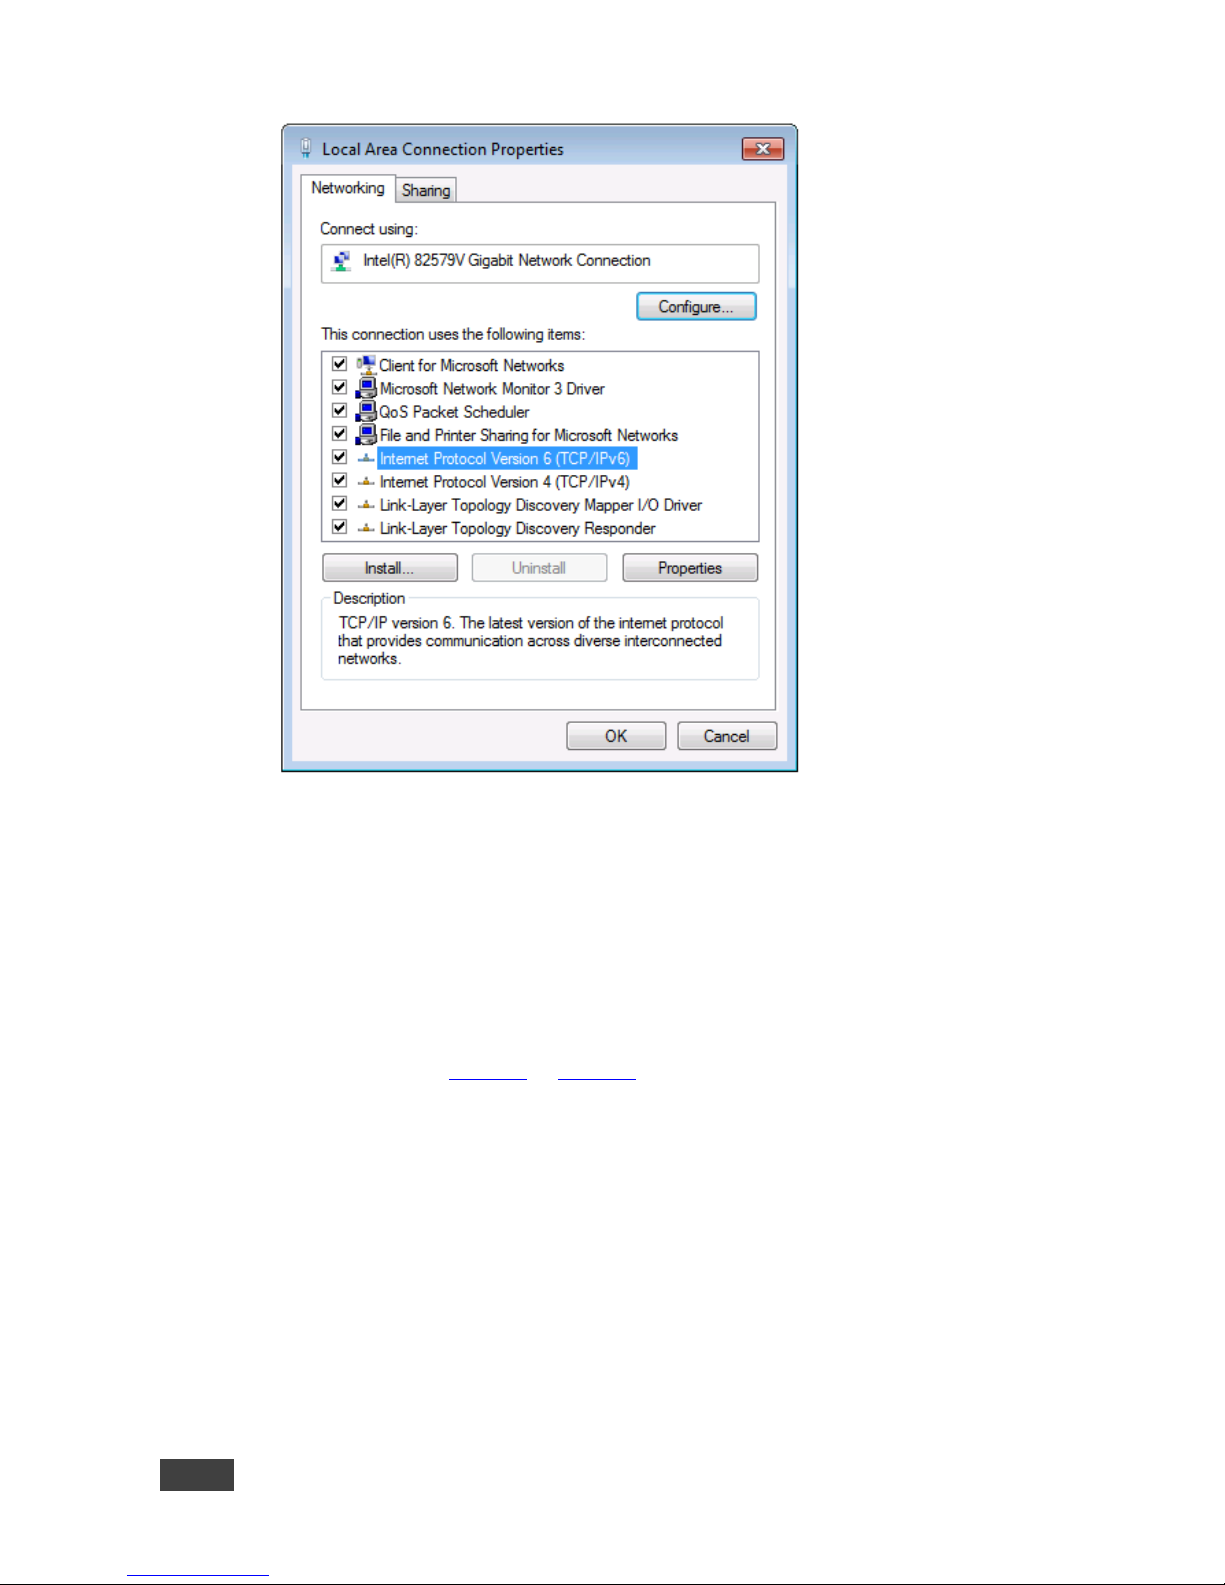
The Local Area Connection Properties window for the selected network
adapter appears as shown in Figure 5.
Page 22
16
VP-732 - Connecting the VP-732
Figure 5: Local Area Connection Properties Window
4. Highlight either Internet Protocol Version 6 (TCP/IPv6) or Internet
Protocol Version 4 (TCP/IPv4) depending on the requirements of your IT
system.
5. Click Properties.
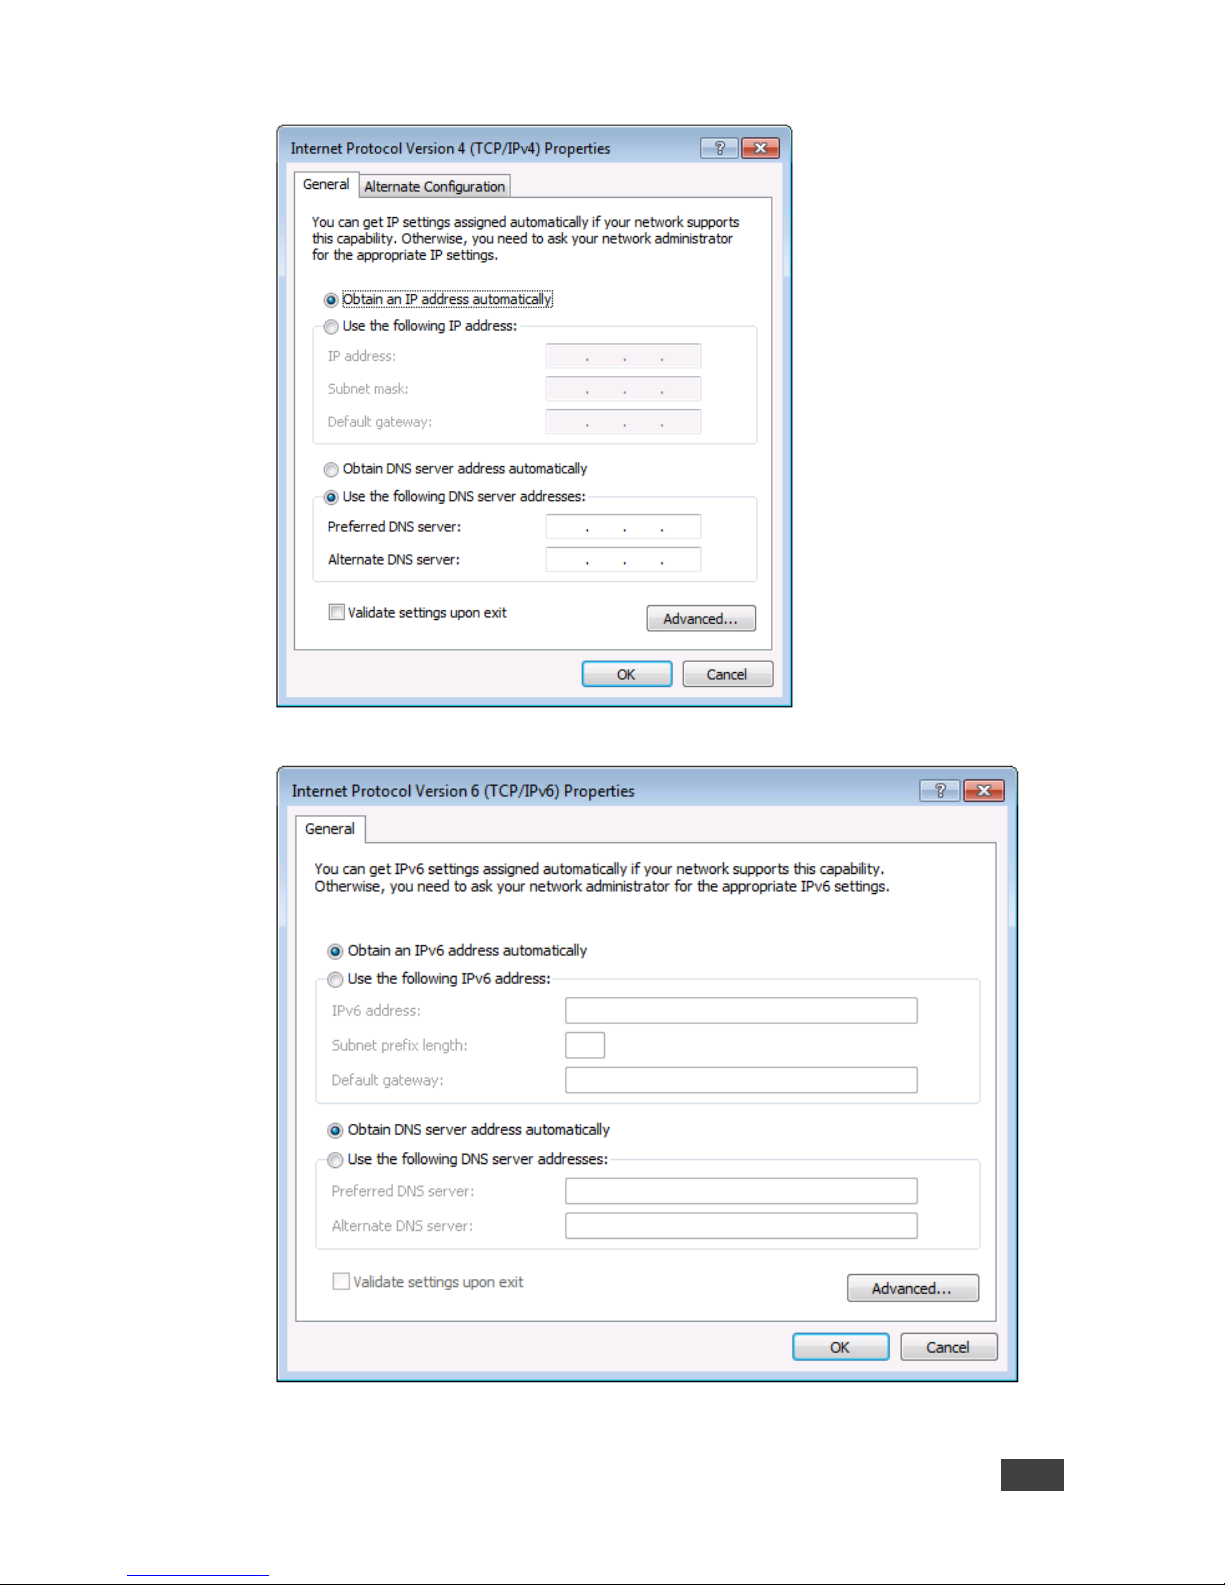
The Internet Protocol Properties window relevant to your IT system appears
as shown in Figure 6 or Figure 7.
Page 23
VP-732 – Connecting the VP-732
17
Figure 6: Internet Protocol Version 4 Properties Window
Figure 7: Internet Protocol Version 6 Properties Window
Page 24
18
VP-732 - Connecting the VP-732
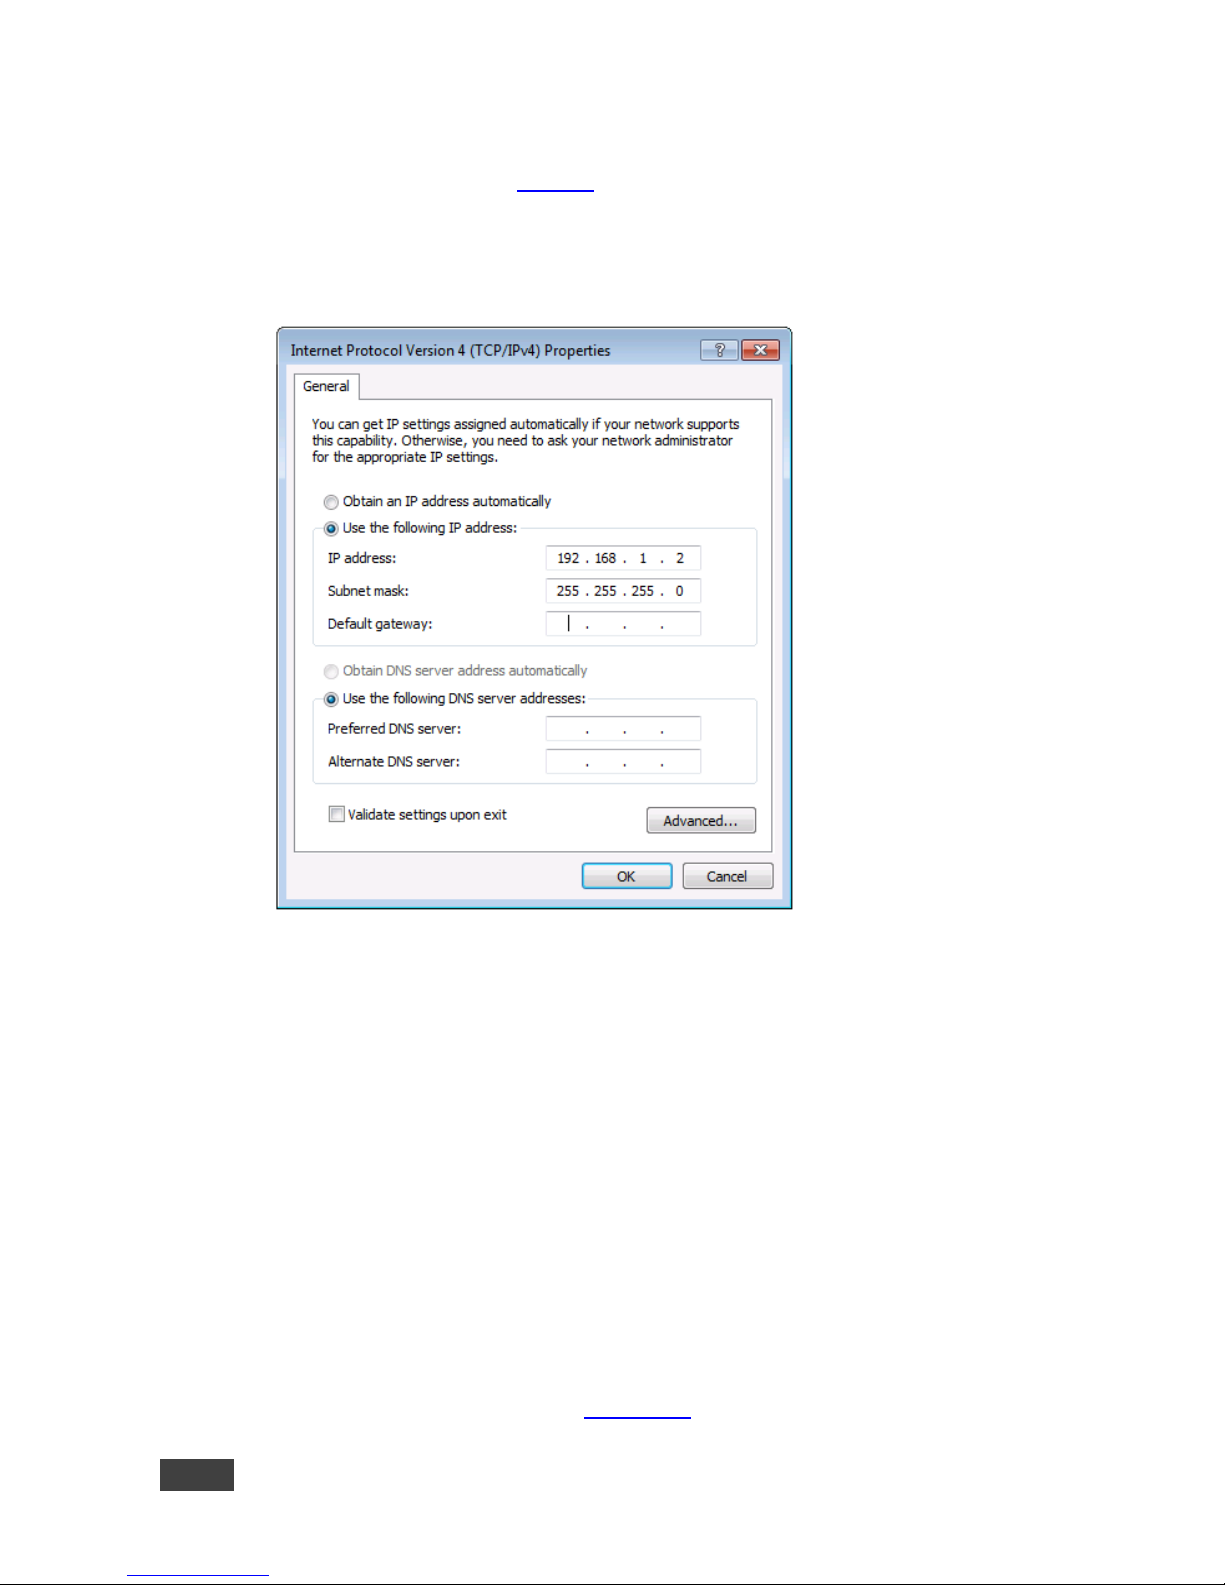
6. Select Use the following IP Address for static IP addressing and fill in the
details as shown in Figure 8.
For TCP/IPv4 you can use any IP address in the range 192.168.1.1 to
192.168.1.255 (excluding 192.168.1.39) that is provided by your IT
department.
Figure 8: Internet Protocol Properties Window
7. Click OK.
8. Click Close.
5.3.2 Connecting the Ethernet Port via a Network Hub or Switch
You can connect the Ethernet port of the VP-732 to the Ethernet port on a network
hub or using a straight-through cable with RJ-45 connectors.
5.3.3 Control Configuration via the Ethernet Port
To control several units via Ethernet, connect the Master unit (Device 1) via the
Ethernet port to the Ethernet port of your PC. Use your PC provide initial
configuration of the settings (see Section 5.3).
Page 25
VP-732 – Connecting the VP-732
19
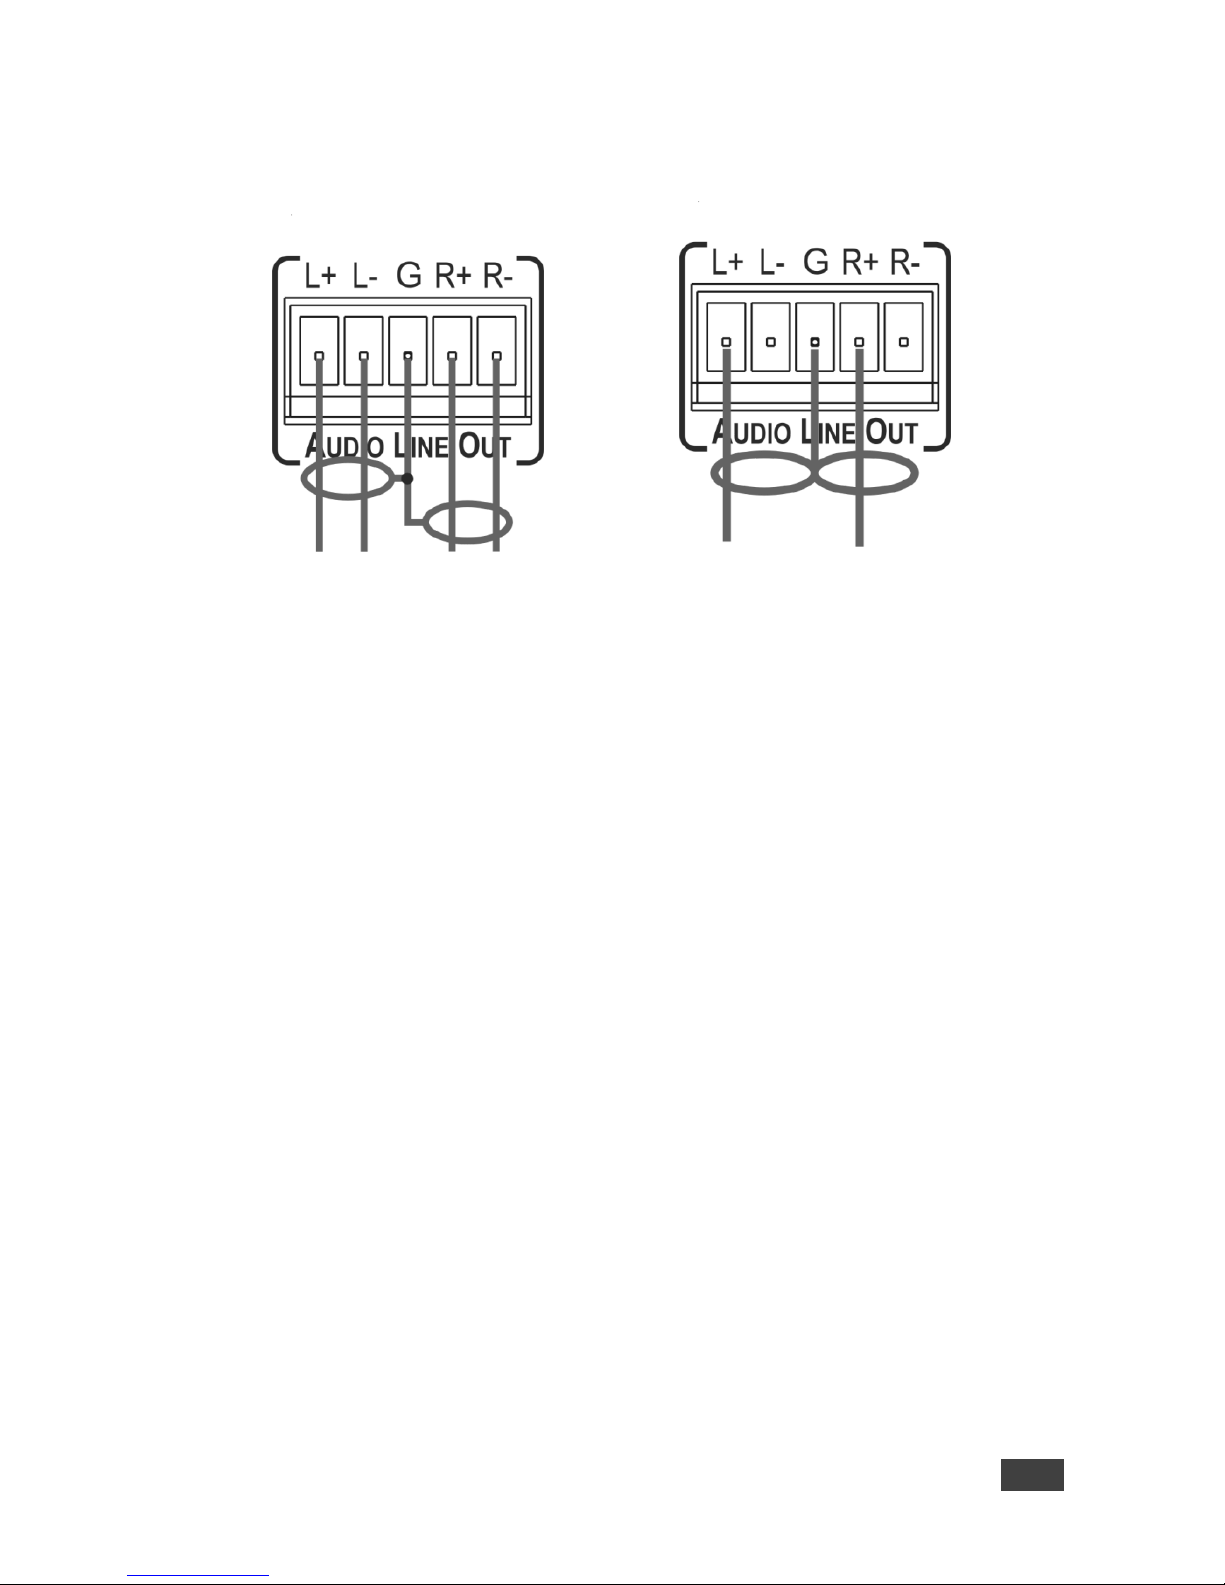
5.4 Connecting the Balanced/Unbalanced Stereo Audio
Output
Figure 9: Connecting the Balanced
Stereo Audio Output
Figure 10: Connecting an Unbalanced
Stereo Audio Acceptor to the Balanced
Output
Page 26

20
VP-732 - Presentation Switcher / Scaler Buttons
6 Presentation Switcher / Scaler Buttons
The VP-732 includes the following front panel buttons:
Ten PROGRAM INPUT selector buttons
Ten PIP/PREVIEW INPUT selector buttons
A PREVIEW MODE button to toggle between the PIP and PREVIEW modes
PROGRAM and PREVIEW separate BLANK and FREEZE buttons
Menu navigation buttons
A RESET TO XGA/720p button
A PANEL LOCK button
6.1 Switching the Inputs
This section defines the PROGRAM and PREVIEW buttons.
6.1.1 Program Buttons
You can switch an input to the program outputs by pressing the relevant
PROGRAM INPUT front panel button. The PROGRAM BLANK and FREEZE
buttons are dedicated to the PROGRAM outputs only.
6.1.2 PIP / Preview Buttons
To toggle the PIP / Preview operation mode, press the PREVIEW MODE button:
When in the PREVIEW operation mode, the PREVIEW MODE button
illuminates
When in the PIP operation mode, the PREVIEW MODE button does not
illuminate
The PIP / PREVIEW BLANK and FREEZE buttons are dedicated to the
PREVIEW/PIP outputs only.
Page 27

VP-732 – Presentation Switcher / Scaler Buttons
21
6.2 Preview/Program Operation Mode
The PREVIEW input buttons can be used to output scaled images (up to 720p)
when the PREVIEW MODE button is illuminated. The selected PREVIEW input is
routed to the PREVIEW output(s) in this case. When not illuminated, the selected
PIP input appears as an insert over the program display when the PIP is ON (see
Section 6.3).
The VP-732 has several outputs: two PROGRAM outputs (HDMI 2 and DP) one
PREVIEW output (PC) and HDMI 1 which can be assigned to be either PROGRAM
or PREVIEW (see Section 7.3).
The HDMI signal is usually HDCP protected. We recommend using
an HDCP compliant display, otherwise the HDMI output may not
appear on the screen
6.3 The PIP Operation Mode
The Picture-in-Picture inserter (PIP) uses K-IIT XL™ image insertion technology to
present any input image over any other main image. The main and PIP images
appear simultaneously on all outputs (both PREVIEW and PROGRAM outputs).
The VP-732 supports four PIP layouts:
Picture-in-Picture, with a smaller window superimposed over a full screen
image
Picture + Picture, where both images are placed side-by-side with the same
height
Split, where both images appear side-by-side and the aspect ratios of both
images are maintained
A single window showing the Program image only
Page 28

22
VP-732 - Presentation Switcher / Scaler Buttons
6.3.1 Activating the PIP Feature
Activate the PIP feature in any of the following ways:
Press the PREVIEW MODE front panel button until it no longer illuminates
and then select the PIP input by pressing a PIP/PREVIEW input button
Press the PREV key on the IR remote control transmitter (see Section 6.5)
and then select the PIP input by pressing a PIP/Preview Source input button check
Access the OSD PIP menu (see Figure 17) and select PIP On
6.3.2 Selecting the PIP Source
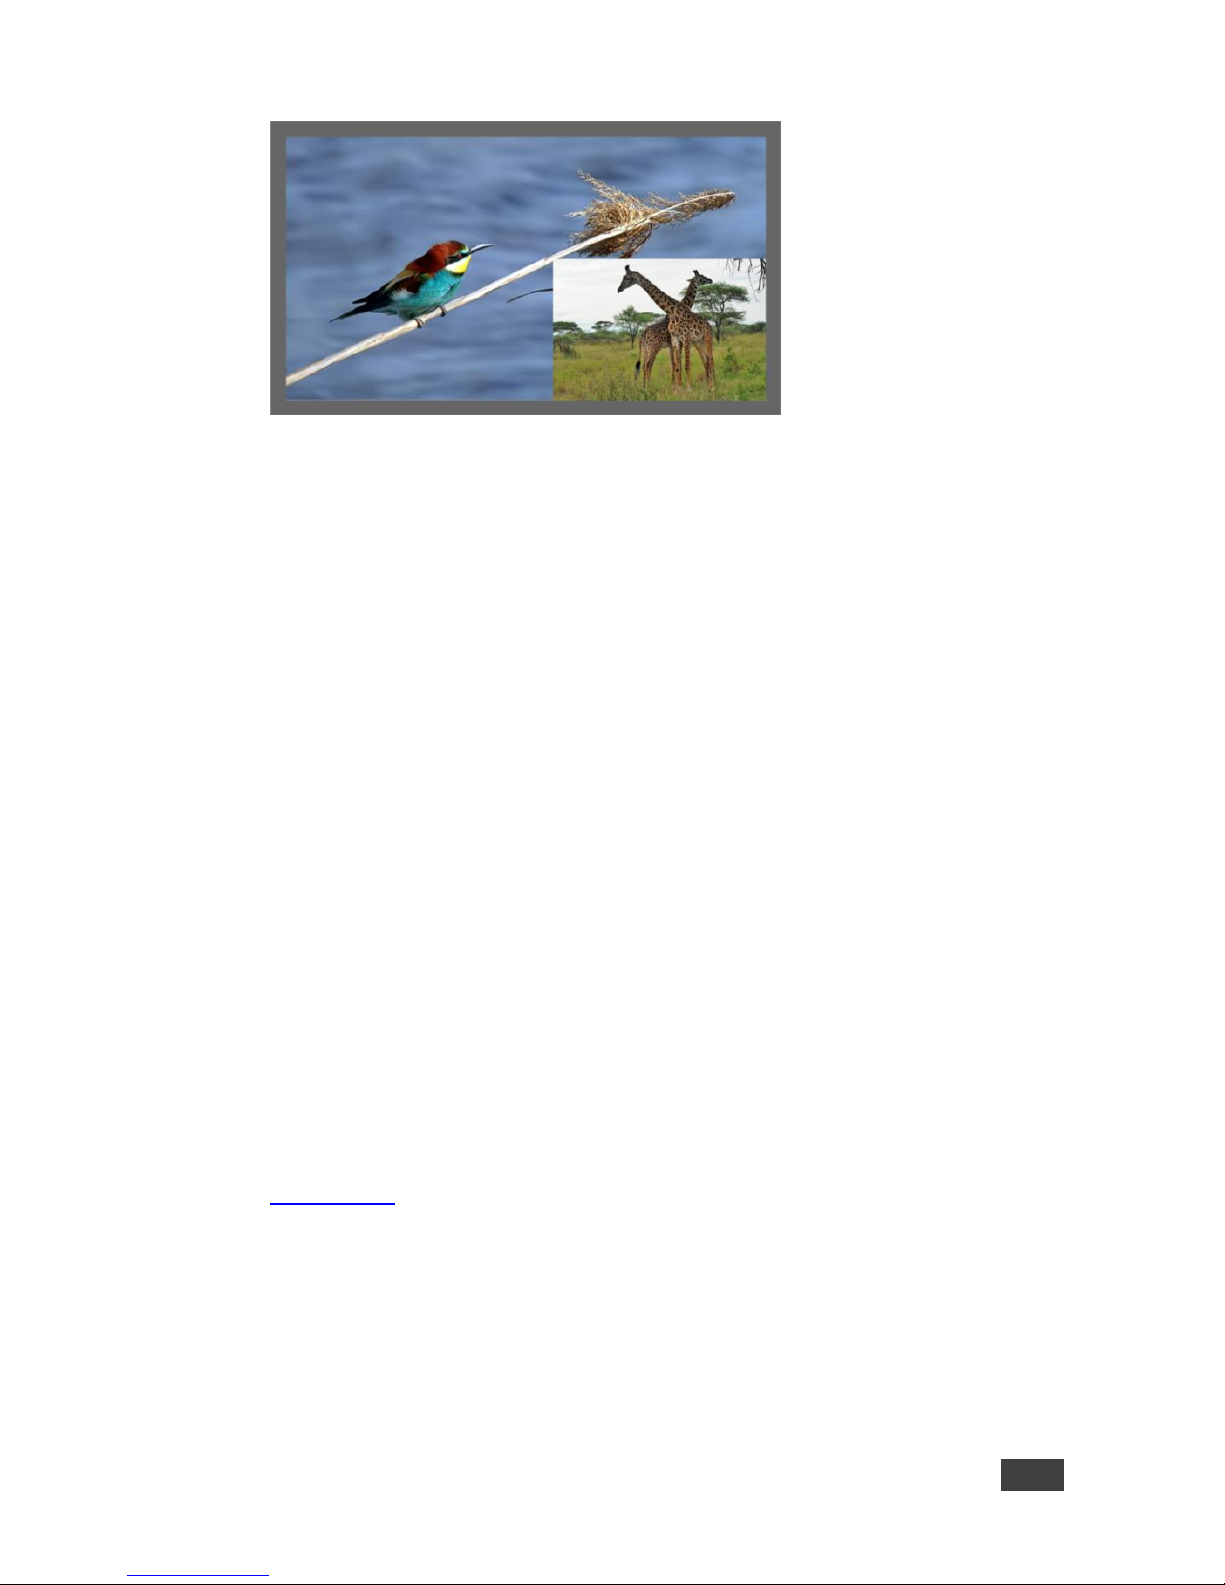
To easily select the PIP source, press a PREVIEW INPUT front panel button.
For example, to select DP 2 as the graphic PIP source over an HDMI background,
make sure that the PREVIEW MODE button is not illuminated and press the DP 2
PIP/PREVIEW front panel button.
To select the PIP source using the IR remote controller, press the desired PIP
source on the remote controller.
For example, if you want to select HDMI 2 as the PIP source, press the HDMI 2
button in the PIP/Preview Source area on the IR remote controller.
To set the PIP source via the OSD menu, do the following:
1. Press the MENU button to enter the OSD menu.
2. Press the button to move to the PIP icon (see Figure 17).
3. Select On/Off and set the PIP to ON.
4. Select Source and press ENTER.
5. Use the or buttons to select the PIP Source from the drop-down list
box, and press ENTER.
6. To exit the OSD menu, press the MENU button.
Page 29
VP-732 – Presentation Switcher / Scaler Buttons
23
Figure 11: PIP Source over Background
To replace a PIP source, press the required PIP Source on the remote control
transmitter and the PIP display will change accordingly.
6.4 Locking and Unlocking the Front Panel
To prevent changing the settings accidentally or tampering with the unit via the front
panel buttons or the remote control transmitter, lock your VP-732. Unlocking
releases the protection mechanism. When the front panel is locked, control is still
available via RS-232 and/or the Ethernet.
To lock the VP-732:
Press and hold the PANEL LOCK button on the front panel.
The front panel is locked and the PANEL LOCK button is illuminated.
Pressing any button other than the PANEL LOCK button has no effect
To unlock the VP-732:
Press and hold the illuminated PANEL LOCK button on the front panel
The front panel unlocks and the PANEL LOCK button is no longer illuminated
The Save Lock and Input Lock OSD functions are defined in the table in
Section 7.6.3.
Page 30
24
VP-732 - Presentation Switcher / Scaler Buttons
6.5 The Infrared Remote Control Transmitter
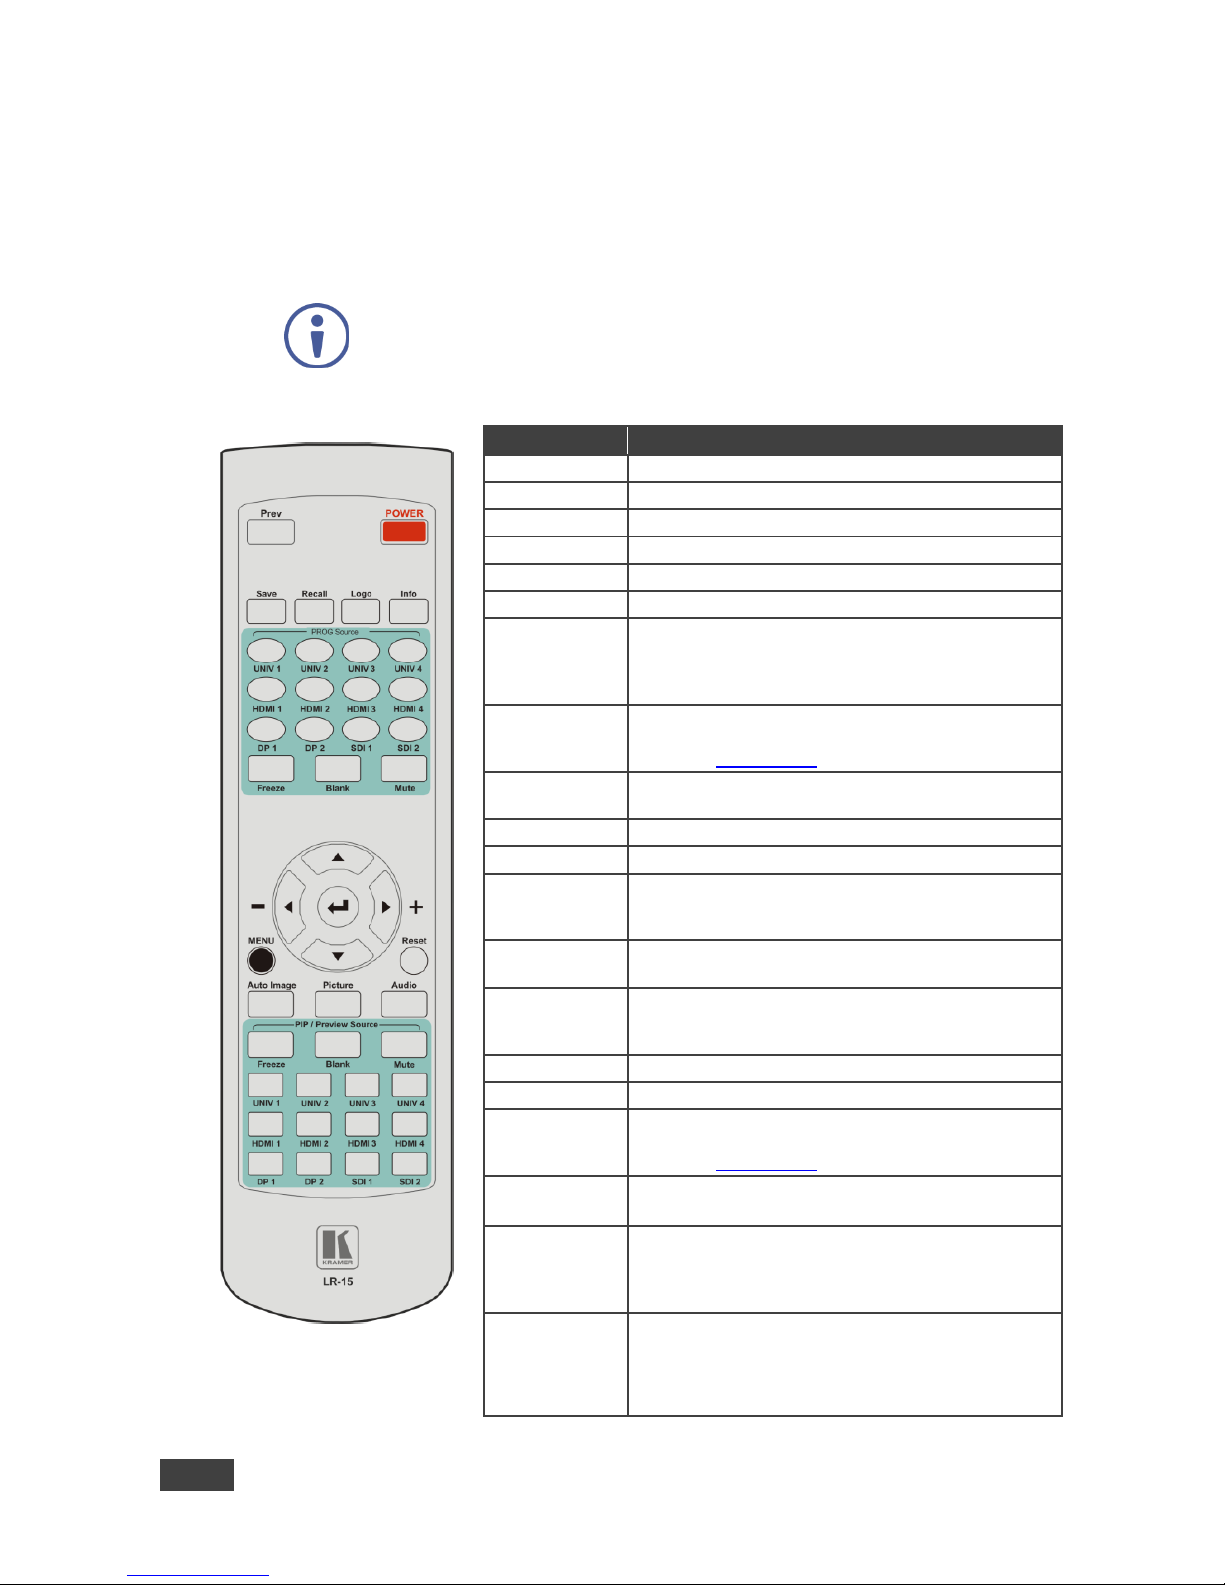
You can control the VP-732 remotely from the infrared remote control transmitter
which is powered by two AAA size 1.5V DC batteries. The IR remote control
transmitter has a range of up to 15 meters and delivers instantaneous results
This IR remote control transmitter is compatible with various Kramer
machines, therefore not all its buttons are applicable to the VP-732. The
table below defines only the buttons that are relevant to the VP-732; the
functionality of the other buttons is marked N/A.
Figure 12: IR Remote
Control Transmitter
Key
Function
Prev
Toggle between the Preview/PIP modes
POWER
Toggle the VP-732 ON or OFF (standby)
Save
Press to save a profile
Recall
Press to recall a profile
Logo
Press to display the logo
Info
Press to toggle the Info OSD menu
PROG Source
10 keys for selecting one of the following PROG
sources: HDMI 1, HDMI 2, HDMI 3, HDMI 4, UNIV 1,
UNIV 2, UNIV 3, UNIV 4, DP 1 and DP 2; SDI 1and
SDI 2 are N/A
PROG Freeze
Pauses the PROGRAM output video and can be
programmed to mute the audio signal at the same
time (see Section 7.6.3)
PROG Blank
Toggles between a PROGRAM blank screen (blue or
black) and the display
PROG Mute
Press to mute the PROGRAM audio signal
MENU
Shows the main OSD Menu
Navigation
arrows
Allows maneuvering within an OSD screen (left,
right, up and down, as well as the ENTER arrow at
the center)
Reset
Press and hold to reset to the default resolution
(toggles between RESET TO XGA and 720p)
Auto Image
Press to assess the image and improve the quality
accordingly, by automatically adjusting the phase,
frequency and position
Picture
Press to display the Picture OSD menu
Audio
Press to display the Audio OSD menu
PIP/Preview
Freeze
Pauses the Preview output video and can be
programmed to mute the audio signal at the same
time (see Section 7.6.3)
PIP/Preview
Blank
Toggles between a Preview blank screen (blue or
black) and the display
PIP/Preview
source
10 keys for selecting one of the following
PIP/Preview sources: HDMI 1, HDMI 2, HDMI 3,
HDMI 4, UNIV 1, UNIV 2, UNIV 3, UNIV 4, DP 1 and
DP 2; note that SDI 1and SDI 2 are N/A
PIP/Preview
Mute
Press to mute the PREVIEW audio signal
Page 31
VP-732 – Configuring the VP-732 via the OSD MENU Screens
25
7 Configuring the VP-732 via the OSD MENU
Screens
The VP-732 uses an on-screen display (OSD) menu for system configuration. The
menu appears as an overlay over any images that are output from the VP-732.
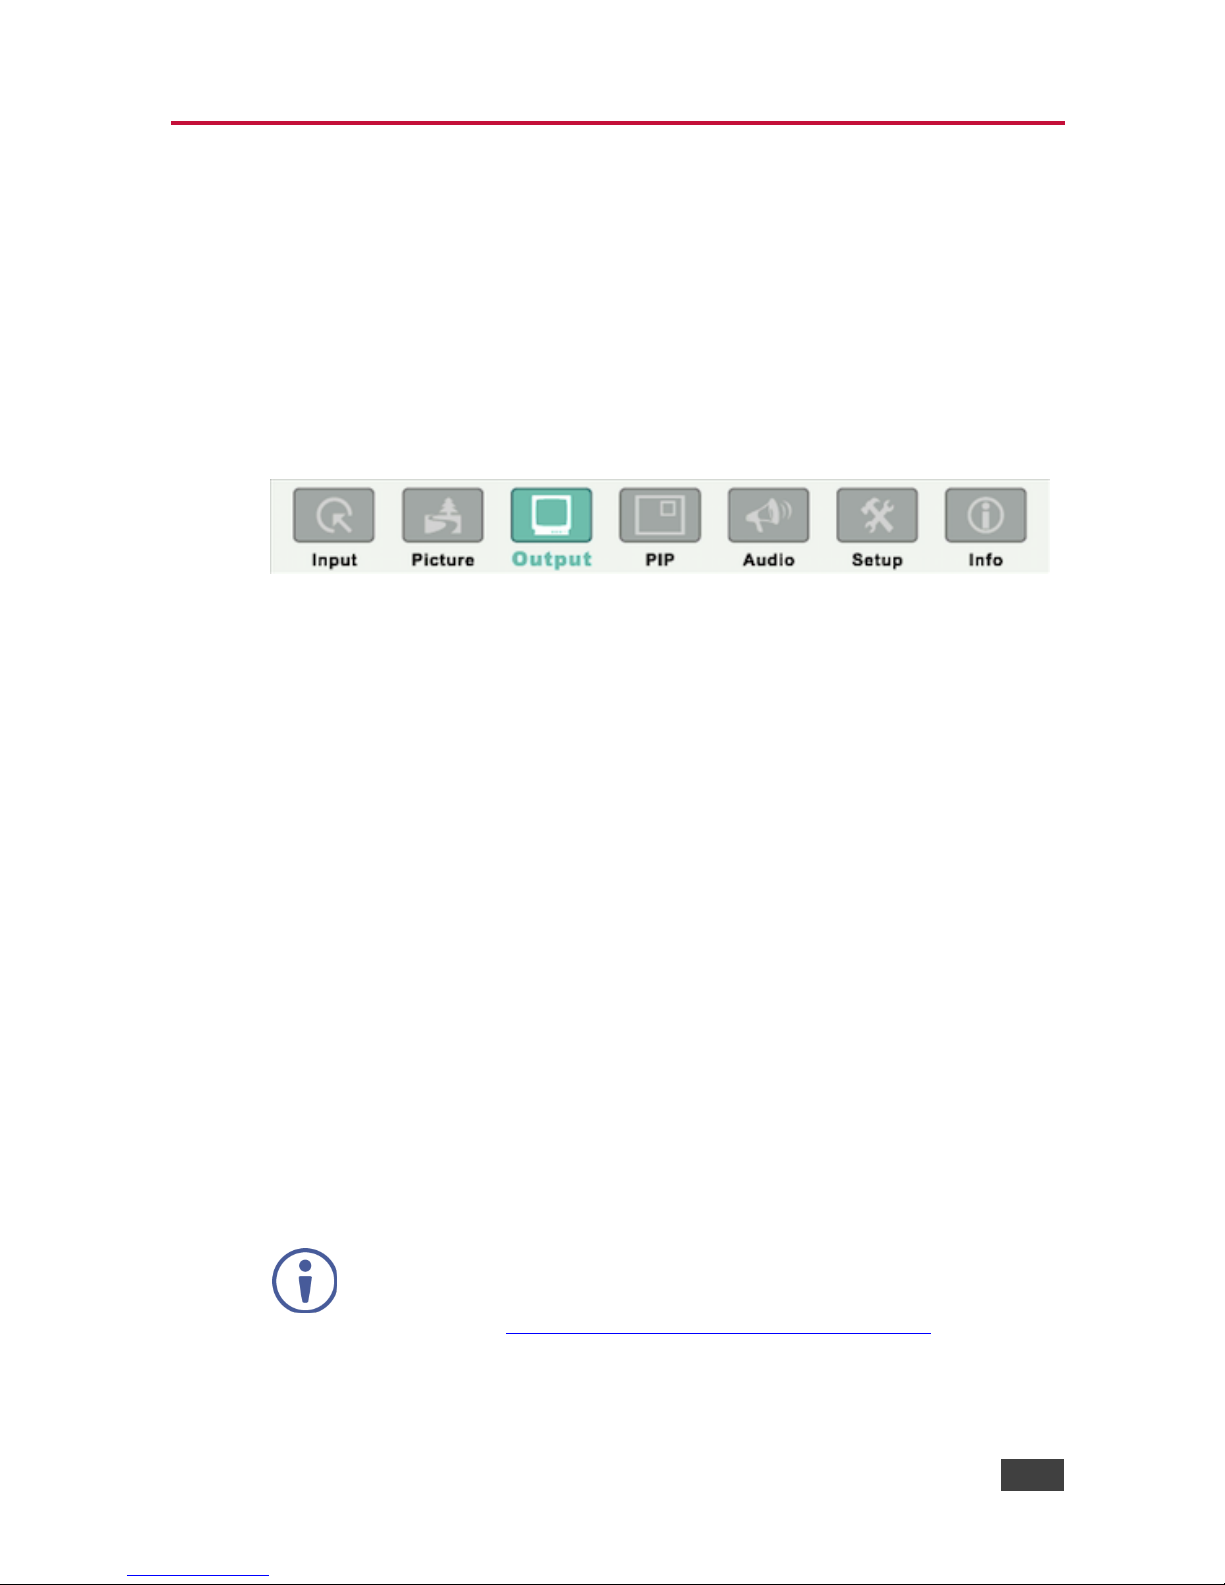
There are seven sub-menus that are used to configure the VP-732. You can
activate and navigate these menus from the front panel buttons, or from the IR
remote control.
Figure 13: MENU Items
To access and use the OSD menus, push the button for the desired input signal,
then press the MENU front panel OSD button or the MENU key on the infrared
remote control transmitter to display the main MENU screen which shows the eight
interactive icons.
Press the or buttons to select the desired sub-menu, and then press
ENTER
Press the or buttons to select the menu item to be adjusted, and then
press ENTER
Press the or buttons to make the adjustment and then press ENTER, or
Press the or buttons to increase or decrease the (numerical) value as
needed
To return to the previous menu level, press the front panel MENU button or the
MENU key on the remote control. All settings and adjustments are automatically
saved in non-volatile memory for each of the inputs (except USB).
The values defined in the different menus may change according to the
firmware version (you can download the up-to-date firmware version from
our Web site at http://www.kramerav.com/downloads/VP-732).
Page 32
26
VP-732 - Configuring the VP-732 via the OSD MENU Screens
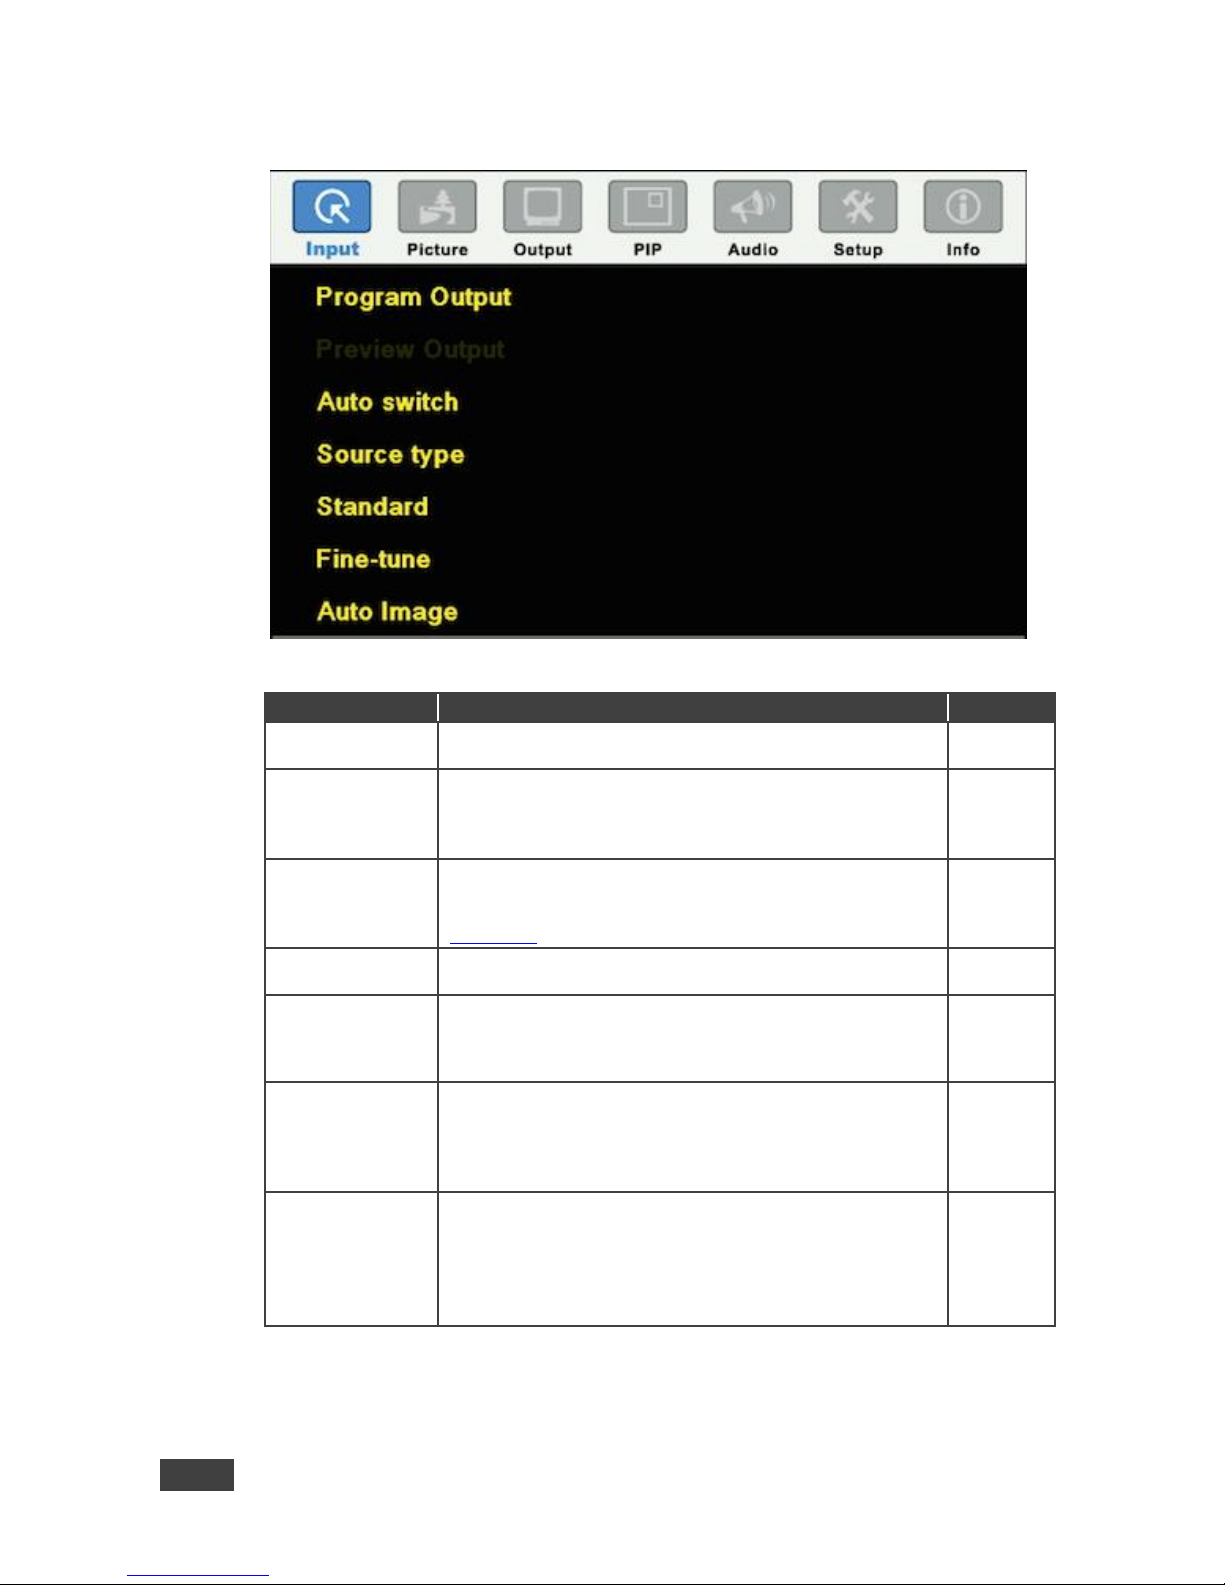
7.1 The Input Screen
Figure 14: Input Screen
Setting
Function
Default
Program Output
Select the input to switch to the Program output: UNIV 1 to
UNIV 4, HDMI 1 to HDMI 4, DP 1 or DP 2
UNIV 1
Preview Output
Select the input to switch to the Preview output: Follow
Program, UNIV 1 to UNIV 4, HDMI 1 to HDMI 4, DP 1 or DP 2
Note that if the preview output resolution is set to Single
Picture, this function will be grayed and set to Follow Program
Follow
Program
Auto switching
Set auto switching to Off or On
Set to On to have the system scan for a valid input in
accordance with the Auto-switch priority setup (see
Section 7.6)
Off
Source type
Set the source type for each universal input: VGA, Component,
YC or Video
VGA
Standard
Select the color format to Auto/RGB/YUV (for HDMI and DP
inputs) and the video standard to Auto/NTSC/PAL/PAL-M/PALN/NTSC 4.43/SECAM/PAL-60 (for YC and composite video
inputs)
Auto
Fine-tune
Set the H-Position, V-Position, Frequency and Phase for VGA
inputs only
We recommend that you update the Hpos, Vpos, Frequency
and Phase values (in the Fine-tune OSD menu) only after Auto
Image is complete (if necessary).
Auto Image
Assesses the image and improves the quality accordingly, by
automatically adjusting the phase, frequency and position
We recommend that you update the Hpos, Vpos, Frequency
and Phase values (in the Fine-tune OSD menu) only after Auto
Image is complete (if necessary).
Enabled for VGA
Page 33
VP-732 – Configuring the VP-732 via the OSD MENU Screens
27
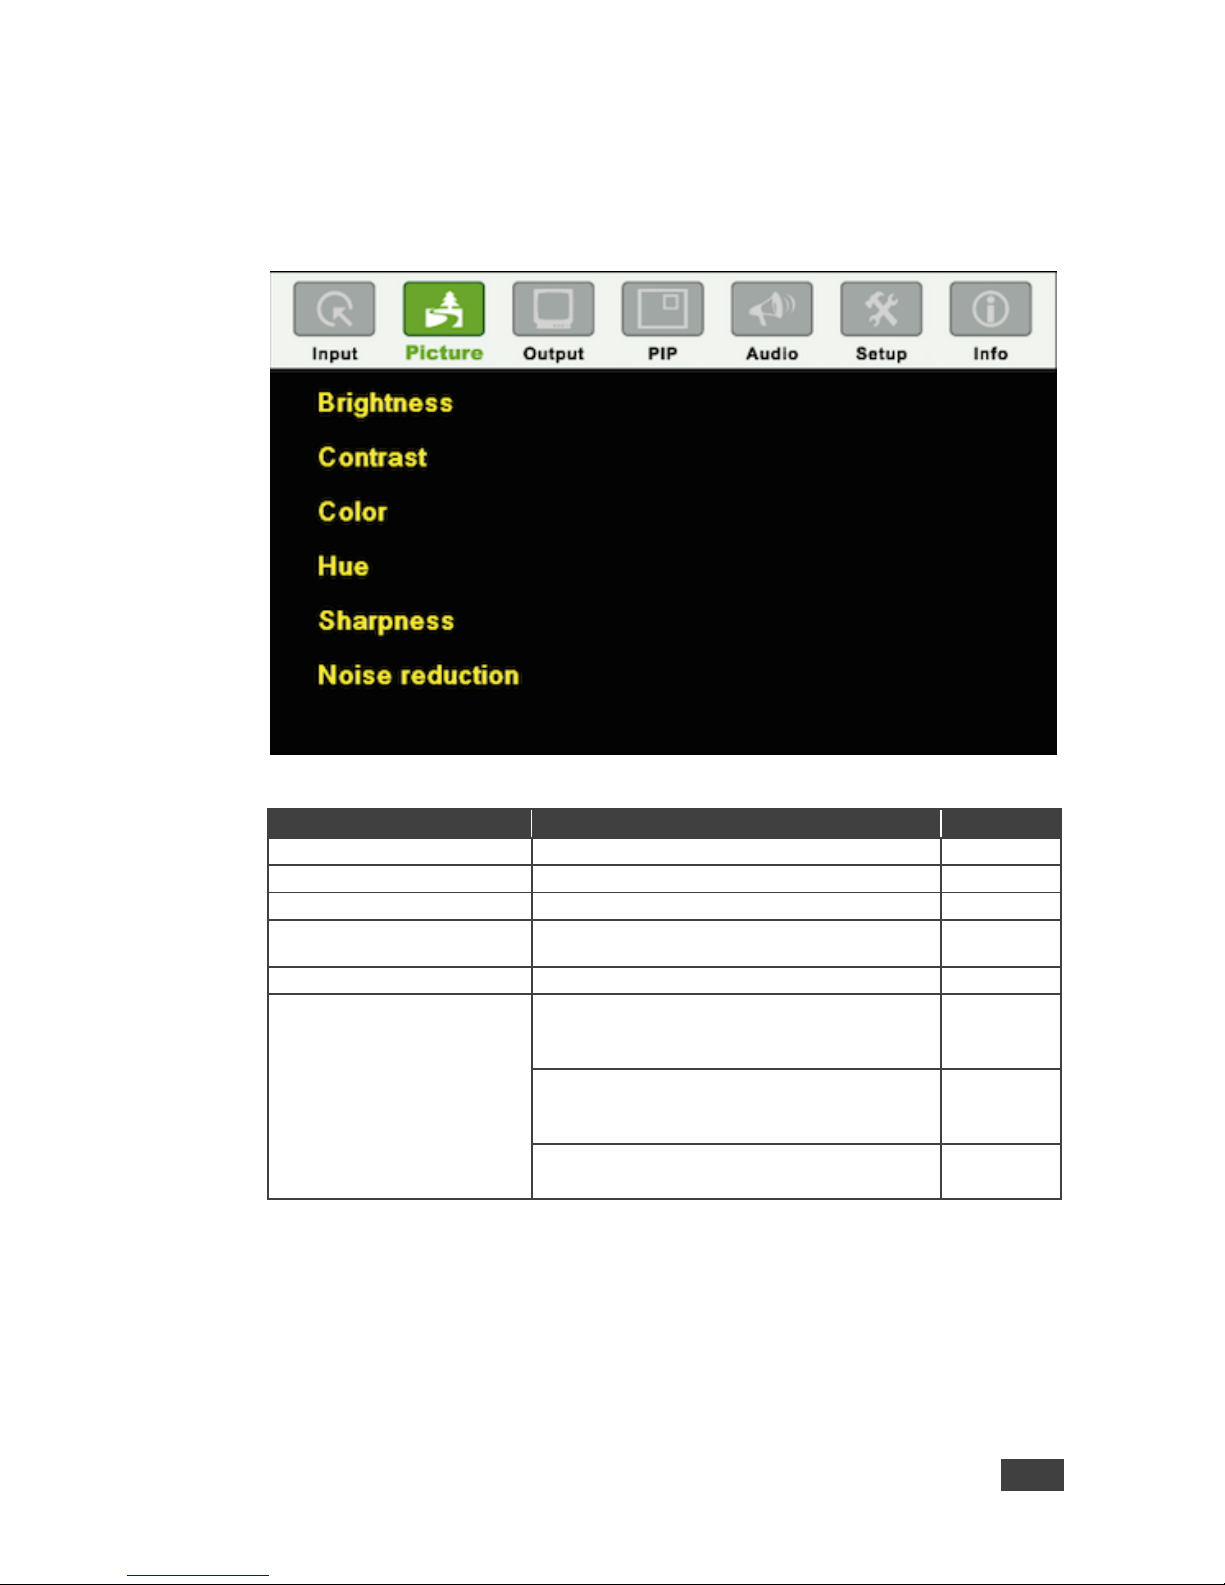
7.2 The Picture Screen
The Brightness, Contrast, Color and Hue picture settings are saved individually for
each input (except USB).
Figure 15: Picture Screen
Setting
Function
Default
Brightness
Adjust the brightness: 0 to 100
50
Contrast
Adjust the contrast: 0 to 100
47/50
Color
Adjust the color: 0 to 100
50
Hue
Adjust the hue: 0 to 360 (for CV and YC) or 0 to
240 for (HDMI, VGA, component)
180/0
Sharpness
Adjust the sharpness: 0 to 100
50
Noise reduction
Temporal NR – Set the temporal noise reduction
level: Off, Low, Medium, High
Enabled for analog inputs only
High
Mosquito NR – Set the Mosquito noise reduction
level: Off, Low, Medium, High
Enabled for analog inputs only
Low
Set the block noise reduction level: Off, On
Enabled for analog inputs only
Off
Page 34
28
VP-732 - Configuring the VP-732 via the OSD MENU Screens
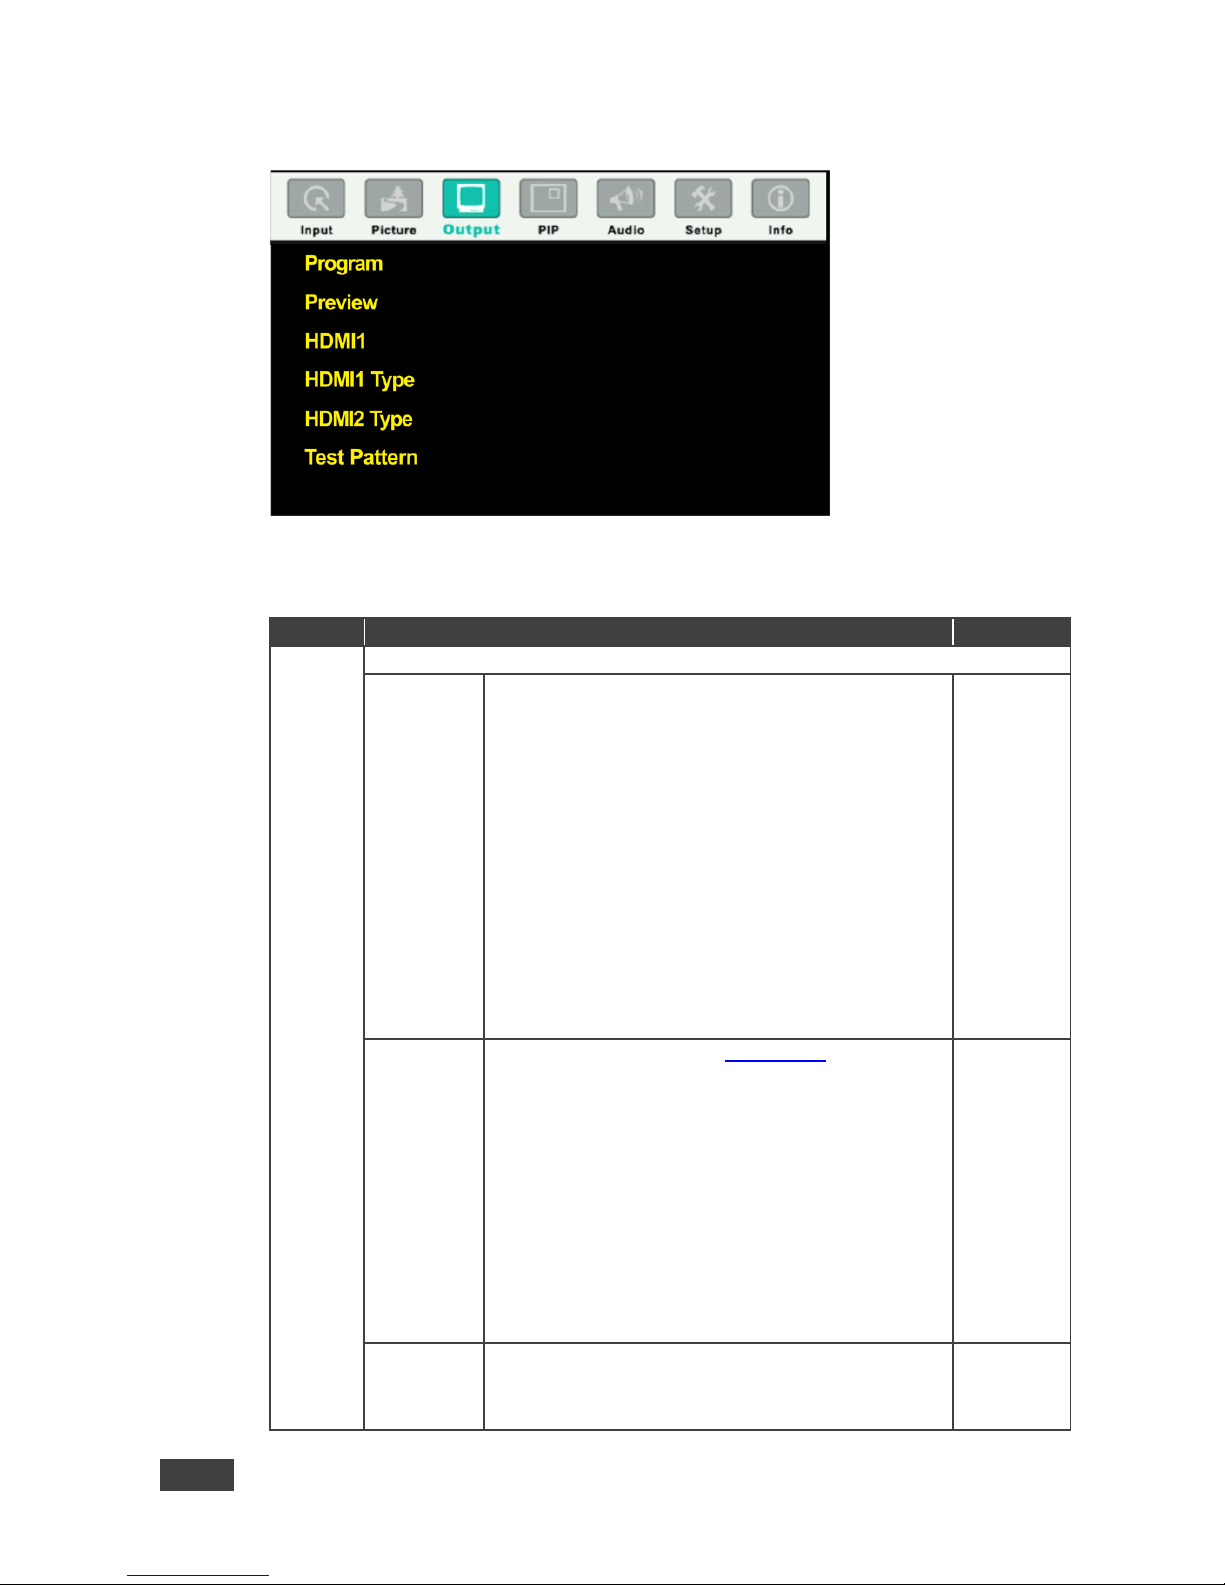
7.3 The Output Screen
Figure 16: Output Screen
Setting
Function
Default
Program
Define the program settings:
Resolution
Native HDMI1, Native HDMI2, Native DP, Native VGA,
640x480x60Hz, 640x480x75Hz, 800x600x50Hz,
800x600x60Hz, 800x600x75Hz, 1024x768x50Hz,
1024x768x60Hz, 1024x768x75Hz, 1280x768x50Hz,
1280x768x60Hz, 1280x720x60Hz, 1280x800x60Hz,
1280x1024x50Hz, 1280x1024x60Hz, 1280x1024x75Hz,
1366x768x50Hz, 1366x768x60Hz, 1400x1050x50Hz,
1400x1050x60Hz, 1600x900x60Hz ( R ),
1600x1200x50Hz, 1600x1200x60Hz, 1680x1050x60Hz,
1920x1080x60Hz, 1920x1200x60Hz (R),
2048x1080x50Hz, 2048x1080x60Hz, 3840x2160@24Hz,
3840x2160@25Hz, [email protected],
3840x2160@30Hz, 4096x2160@24Hz, 480px60Hz,
576px50Hz, 720px50Hz, 720px60Hz, 1080i/1080px50Hz,
1080i/1080px60Hz, 1080px50Hz, 1080px60Hz,
1080px24Hz, 480px59.94Hz, 720px59.94Hz,
1080i/1080px59.94Hz, 1080px23.98, 1080px29.97,
1080px59.94, Custom 1 to Custom 4
1024x768x
60Hz
Aspect
Ratio
Set the aspect ratio (also see Section 7.3.1):
Best Fit
Letterbox
Follow Output – If input resolution ≤ output resolution it
scales up picture and fills the display (with warp); if input
resolution ≥ than output resolution, scales down the
picture and fills the display (with warp)
Virtual Wide
Follow Input – If input resolution ≤ output resolution,
displays with a blank border. If the input resolution ≥
output resolution, crops the image
Custom – Click to enable custom aspect ratio
Custom Aspect Ratio – Set H-Pan, V-Pan, H-Zoom and
V-Zoom
Follow
Output
Zoom
Set zoom to 100% 150%, 200%, 225%, 250%, 275%,
300%, 325%, 350%, 375%, 400% or click custom to set
the custom zoom and enable Zoom H-Pan and Zoom VPan
100%
Page 35
VP-732 – Configuring the VP-732 via the OSD MENU Screens
29
Setting
Function
Default
Positioning
Set H_Start, H_End, H_Position, H_Size, V_Start,
V_End, V_Position, V_Size
Note that positioning is disabled when custom or native
resolutions are selected
Available in the follow output mode and 100% zoom
Preview
Define the preview settings:
Resolution
Single Picture, 640x480x60Hz, 640x480x75Hz,
800x600x50Hz, 800x600x60Hz, 800x600x75Hz,
1024x768x50Hz, 1024x768x60Hz, 1024x768x75Hz,
1280x768x50Hz, 1280x768x60Hz, 1280x720x60Hz,
1280x800x60Hz, 1280x1024x50Hz, 1280x1024x60Hz,
1280x1024x75Hz, 480px60Hz, 576px50Hz, 720px50Hz,
720px60Hz, 480px59.94Hz, 720px59.94Hz, Custom 1 to
Custom 4
Single
Picture
Setting the Preview resolution to Single Picture means
that the PREVIEW mode is disabled.
In the PIP mode the preview resolution will automatically
be set to Single Picture and when changing it to a
different resolution, a message will appear to confirm that
PIP will be closed.
Zoom
Set zoom to 100% 150%, 200%, 225%, 250% or select
custom and use Zoom H-Pan and Zoom V-Pan to set a
custom image size
100%
Positioning
Set H_Start, H_End, H_Position, H_Size, V_Start,
V_End, V_Position, V_Size
Note that positioning is disabled when custom or single
picture resolutions are selected
Available in the follow output mode and 100% zoom
HDMI1
Select the output for HDMI 1 to Follow Program or Follow Preview
Follow
Program
HDMI1
Type
Set the HDMI1 output type to Auto, HDMI or DVI
Auto
HDMI2
Type
Set the HDMI 2 output type to Auto, HDMI or DVI
Test
Pattern
Set the test pattern to Colorbar, SMPTE, Greyscale, Picture Border,
Multiburst, Ramps, H-pattern, Setup, or set to Off
Off
Page 36
30
VP-732 - Configuring the VP-732 via the OSD MENU Screens
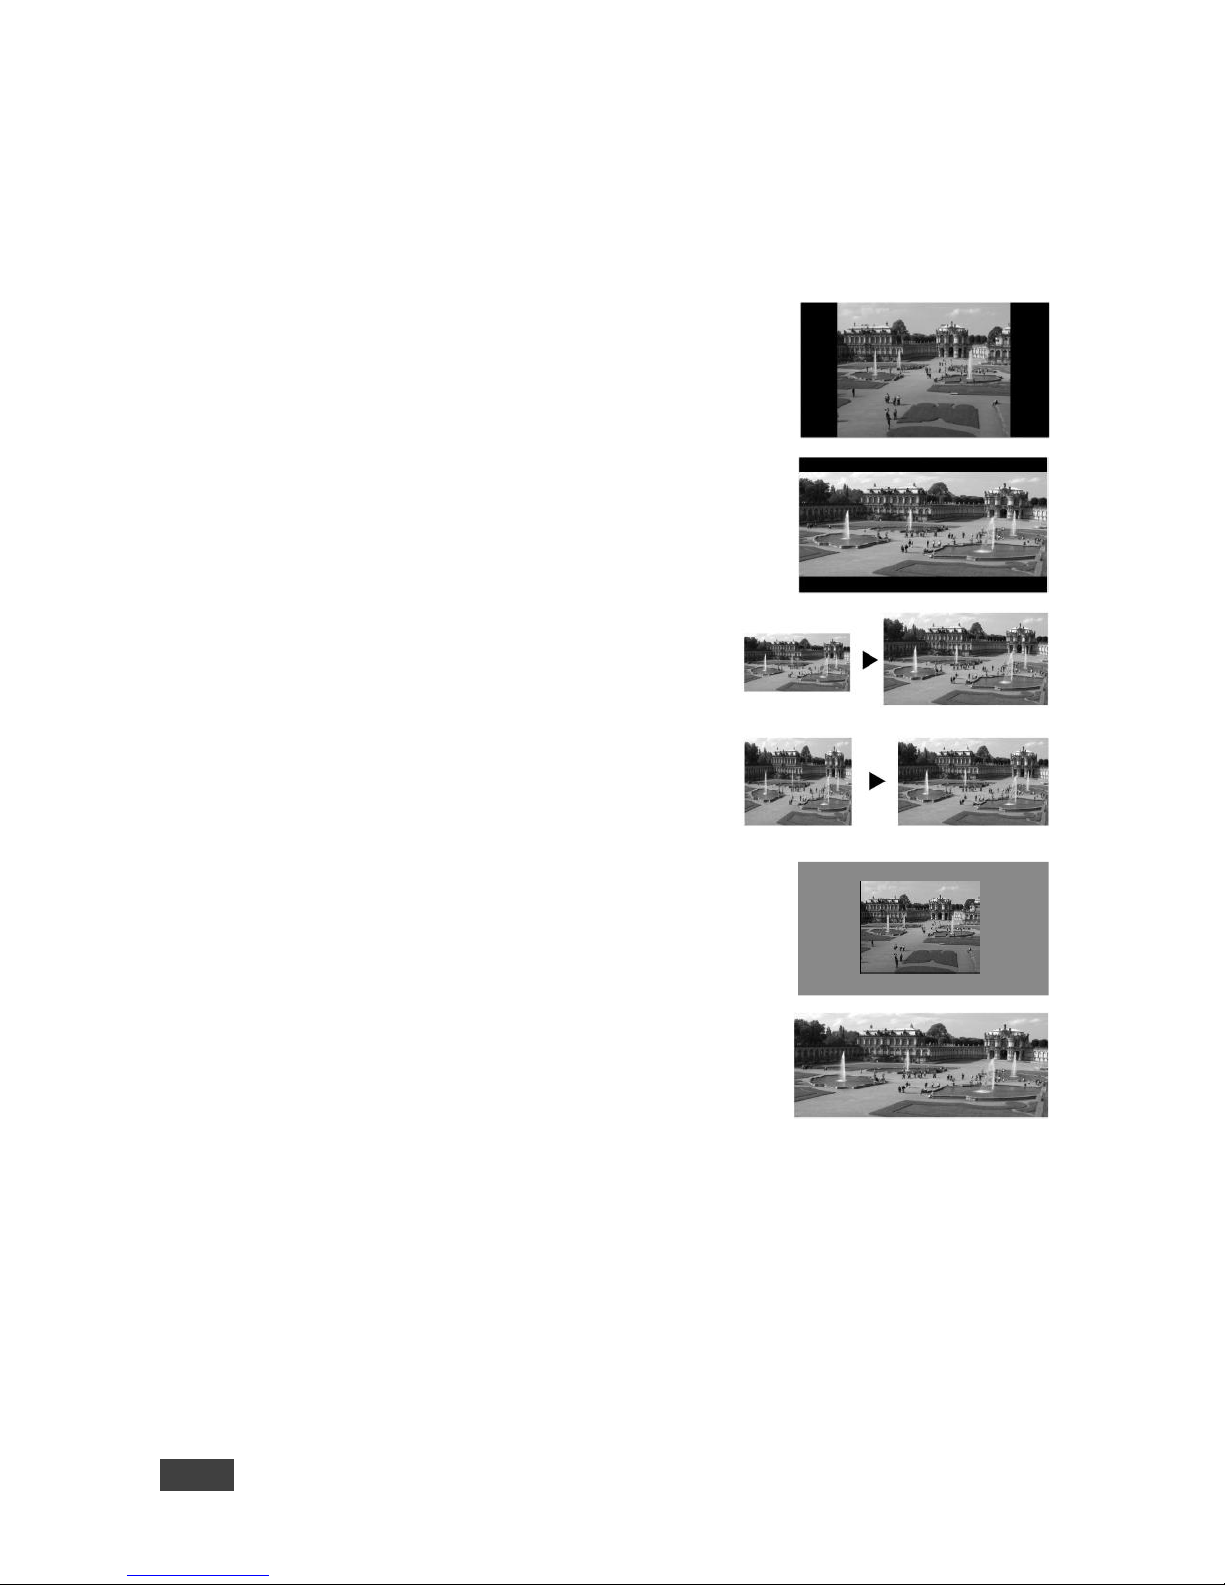
7.3.1 Selecting the Correct Aspect Ratio
You can configure the aspect ratio of any output image to fit your application. The
VP-732 offers six different aspect ratio settings: Best Fit, Letterbox, Follow Output,
Virtual Wide, Follow Input, and Custom. Here is how each of these settings works.
BEST FIT – This setting re-sizes the video or graphics
input signal to “best fit” the output resolution while
maintaining the aspect ratio of the input signal. For
example, a composite video signal (4:3 aspect ratio) will
“best fit” to the top and bottom of a widescreen output
image, resulting in black pillars on either side.
LETTERBOX – This setting compresses the top and
bottom edges of the input signal, but fills the width of
the screen. For example, to preserve a widescreen
film image on a 4:3 display.
FOLLOW OUTPUT – The aspect ratio and resolution
of the input signal is re-sized to precisely match the
aspect ratio and resolution of the VP-732 output
signal. This may result in some distortion to the input
signal images
VIRTUAL WIDE – The input signal is stretched
horizontally to fit the width of a widescreen output
image from the VP-732. This setting is used to
expand anamorphic (horizontally compressed) video
images from DVDs
FOLLOW INPUT – The aspect ratio and resolution of
the input video or graphics signal are both preserved.
For example, a composite video image with a 4:3
aspect ratio will appear with the same aspect ratio on
a 1080p (16:9) output image, surrounded by black
bars
CUSTOM – Use this menu to define a custom aspect
ratio by adjusting the output image horizontal size
(width) and vertical size (height)
Page 37
VP-732 – Configuring the VP-732 via the OSD MENU Screens
31
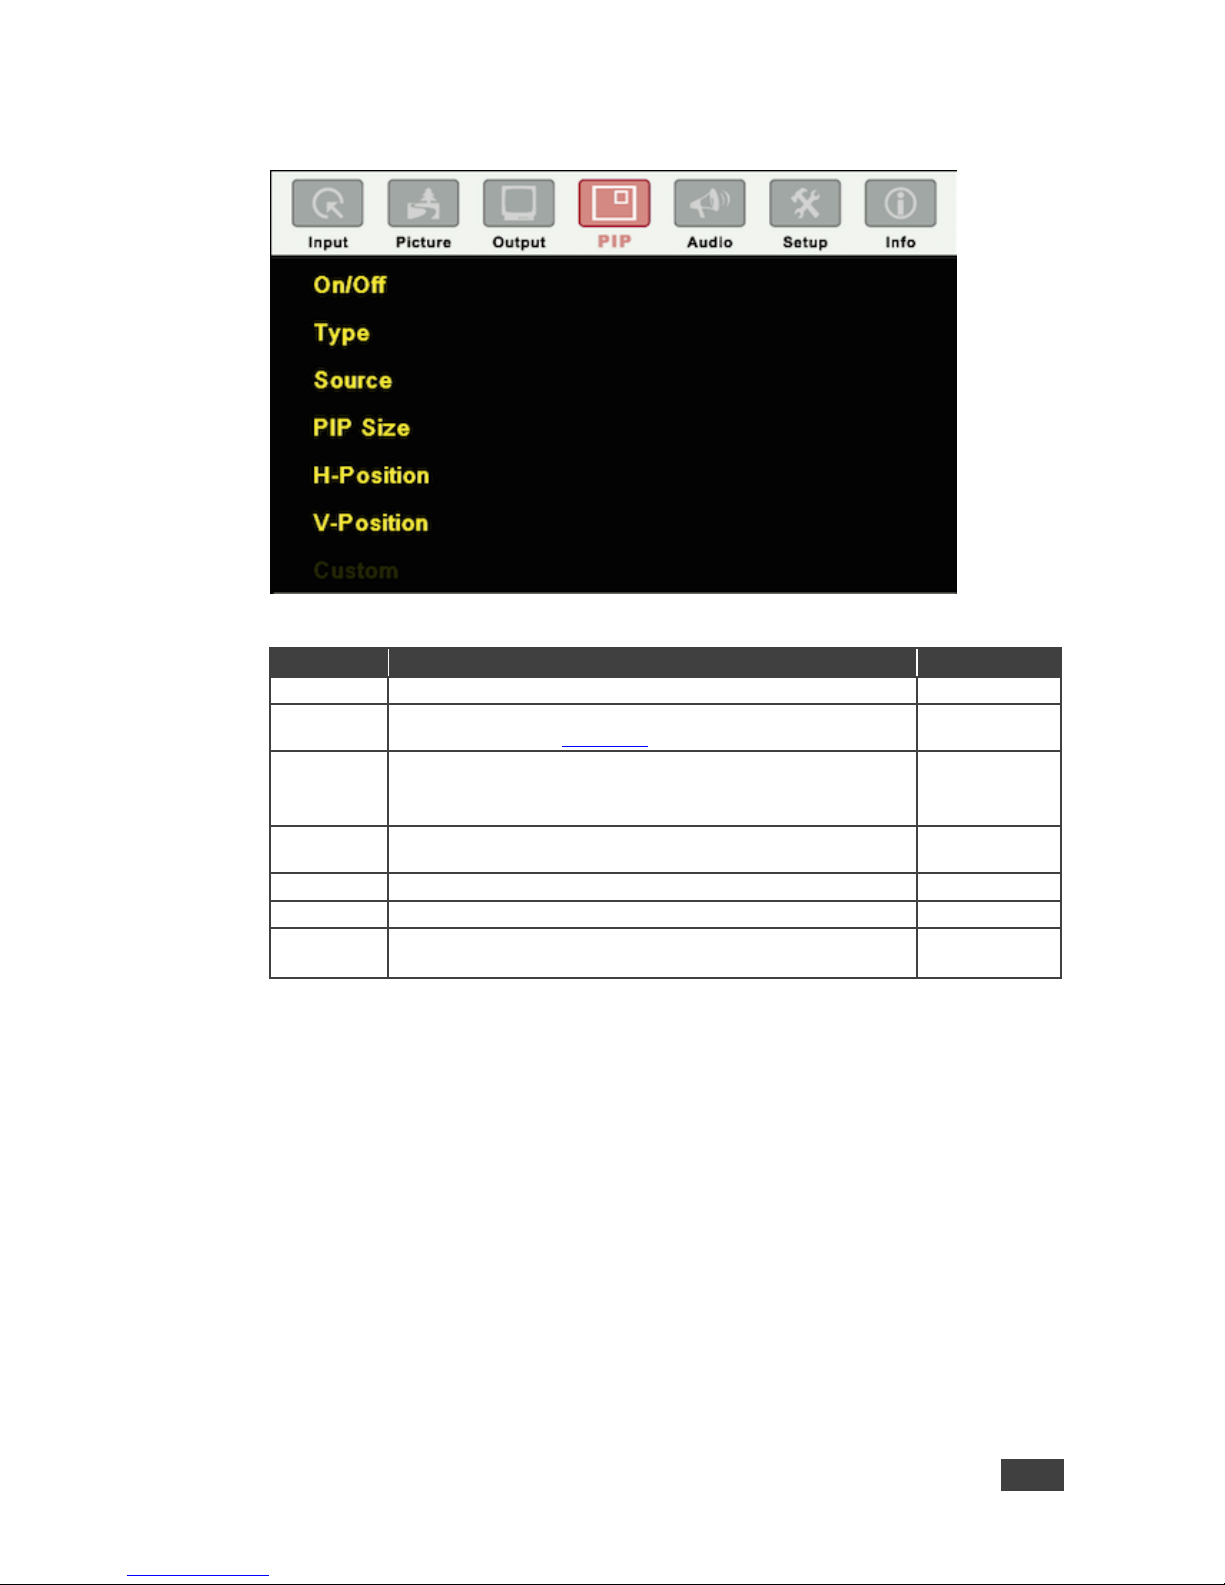
7.4 The PIP Screen
Figure 17: PIP Screen
Setting
Function
Default
On/Off
Activate/deactivate the PIP feature: On/Off
Off
Type
Select the PIP type: PIP (Picture-In-Picture), P+P (Picture +
Picture) or Split (see Section 6.3)
Picture-InPicture
Source
Select the PIP source: UNIV 1 to UNIV 4, HDMI 1 to HDMI 4,
DP1 or DP 2
When changing the PIP source, the display fades through black
UNIV 1
PIP Size
Select the PIP size: 1/25, 1/16, 1/9, 1/4, or select Custom to
enable the Custom item in the PIP OSD menu
1/4
H-Position
Set the horizontal position of the PIP on the display: 0 – 128
0
V-Position
Set the vertical position of the PIP on the display: 0 – 128
0
Custom
H-Size – Set custom size: 1 – 255 (up to 960 pixels)
V-Size – Set custom size: 1 – 255 (up to 540 pixels)
Page 38
32
VP-732 - Configuring the VP-732 via the OSD MENU Screens
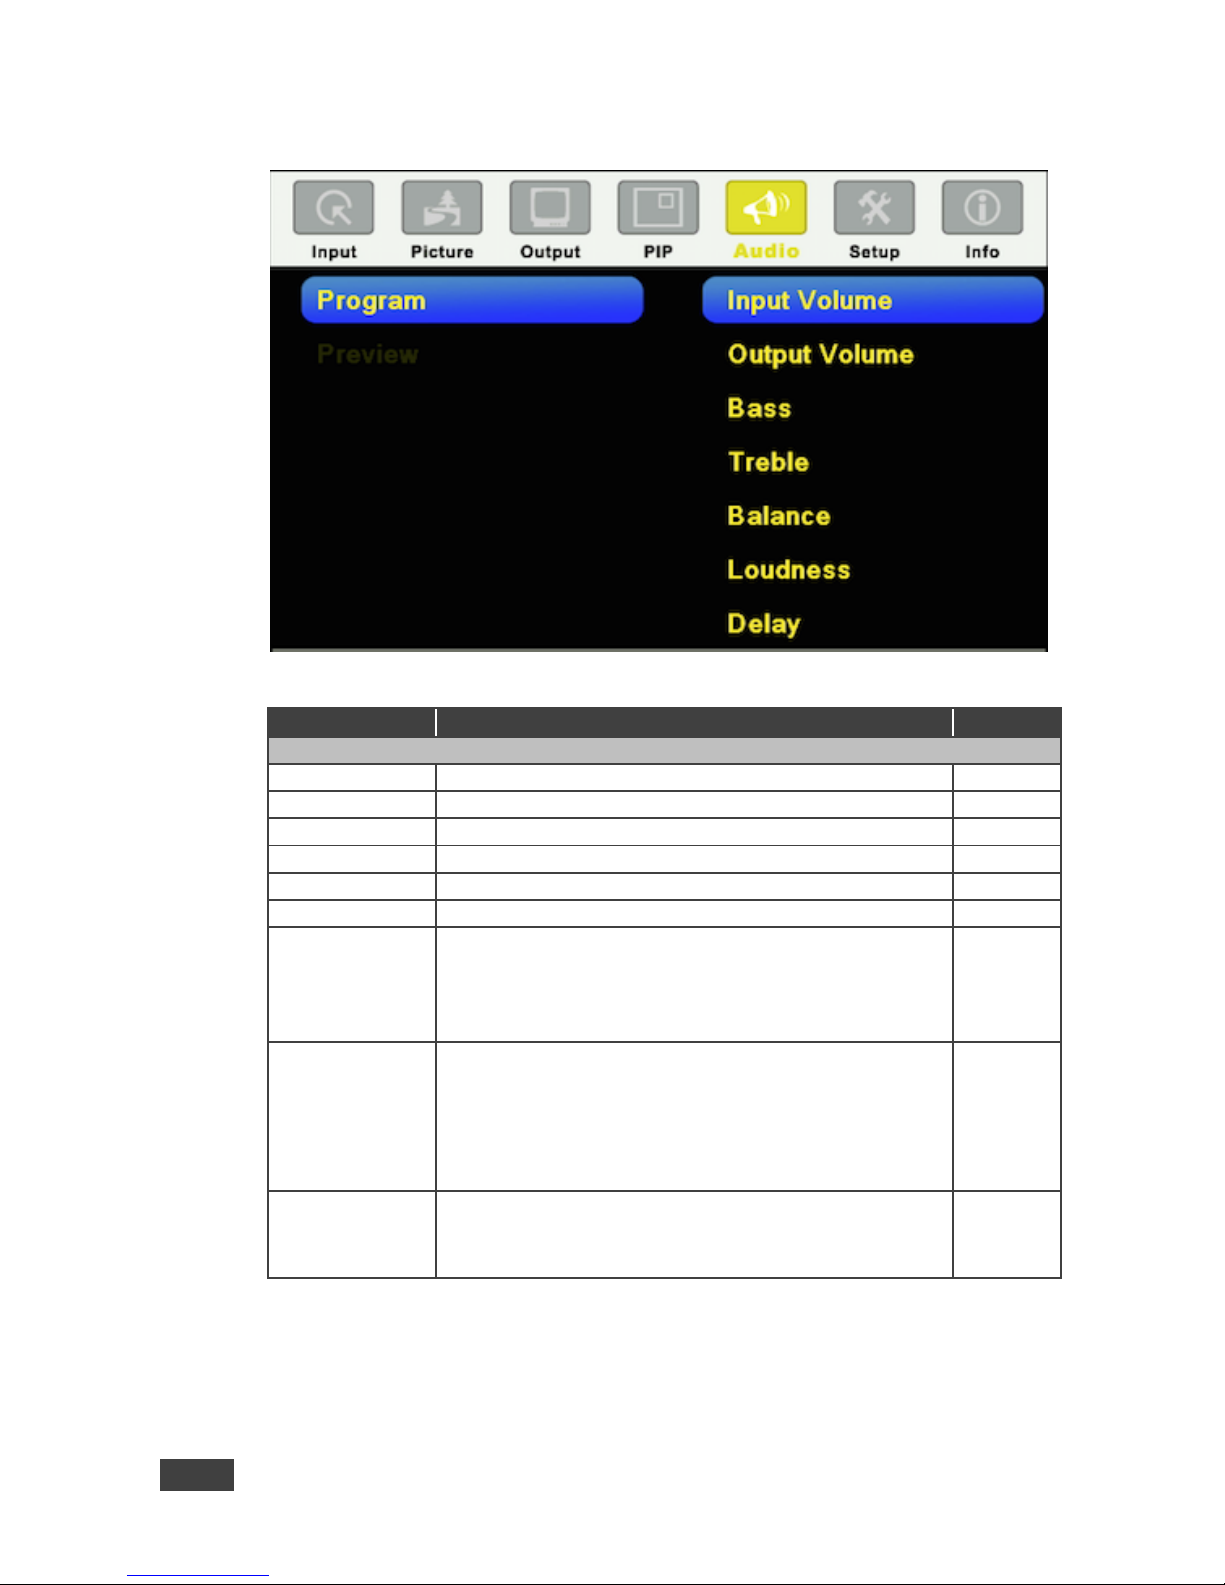
7.5 The Audio Screen
Figure 18: Audio Screen
Setting
Function
Default
Program/Preview
Input Volume
Adjust the input volume: -22 to 22
0
Output Volume
Adjust the output volume: -100 to 24
0
Bass
Adjust the bass: -24 to 24
0
Treble
Adjust the treble: -24 to 24
0
Balance
Adjust the balance: -10 to 10
0
Loudness
Set loudness Off or On
Off
Delay
Select Dynamic (the audio delay equals the pipeline video
delay), User Define or Off
If User Define is selected, set the delay time:
Program: 0 to 170ms
Preview: 0 to 70ms
Dynamic
Input Source
Select the audio input: Analog 1 to Analog 10, S/PDIF or
Embedded (for HDMI and DP inputs).
For each video input you can assign an analog audio source,
the digital audio source or embedded this input will be switched
along with the video input.
For example, if Analog 1 is assigned to UNIV 3, then whenever
UNIV 3 is selected, Analog 1 will be selected too
Analog 1
Audio-FollowVideo
Set to Off or On. When on, the audio will follow the video, as set
in the Input Source menu. When Off selecting a different video
signal will not change the audio setting and it can be selected
via the Input Source menu separately
On
Page 39
VP-732 – Configuring the VP-732 via the OSD MENU Screens
33
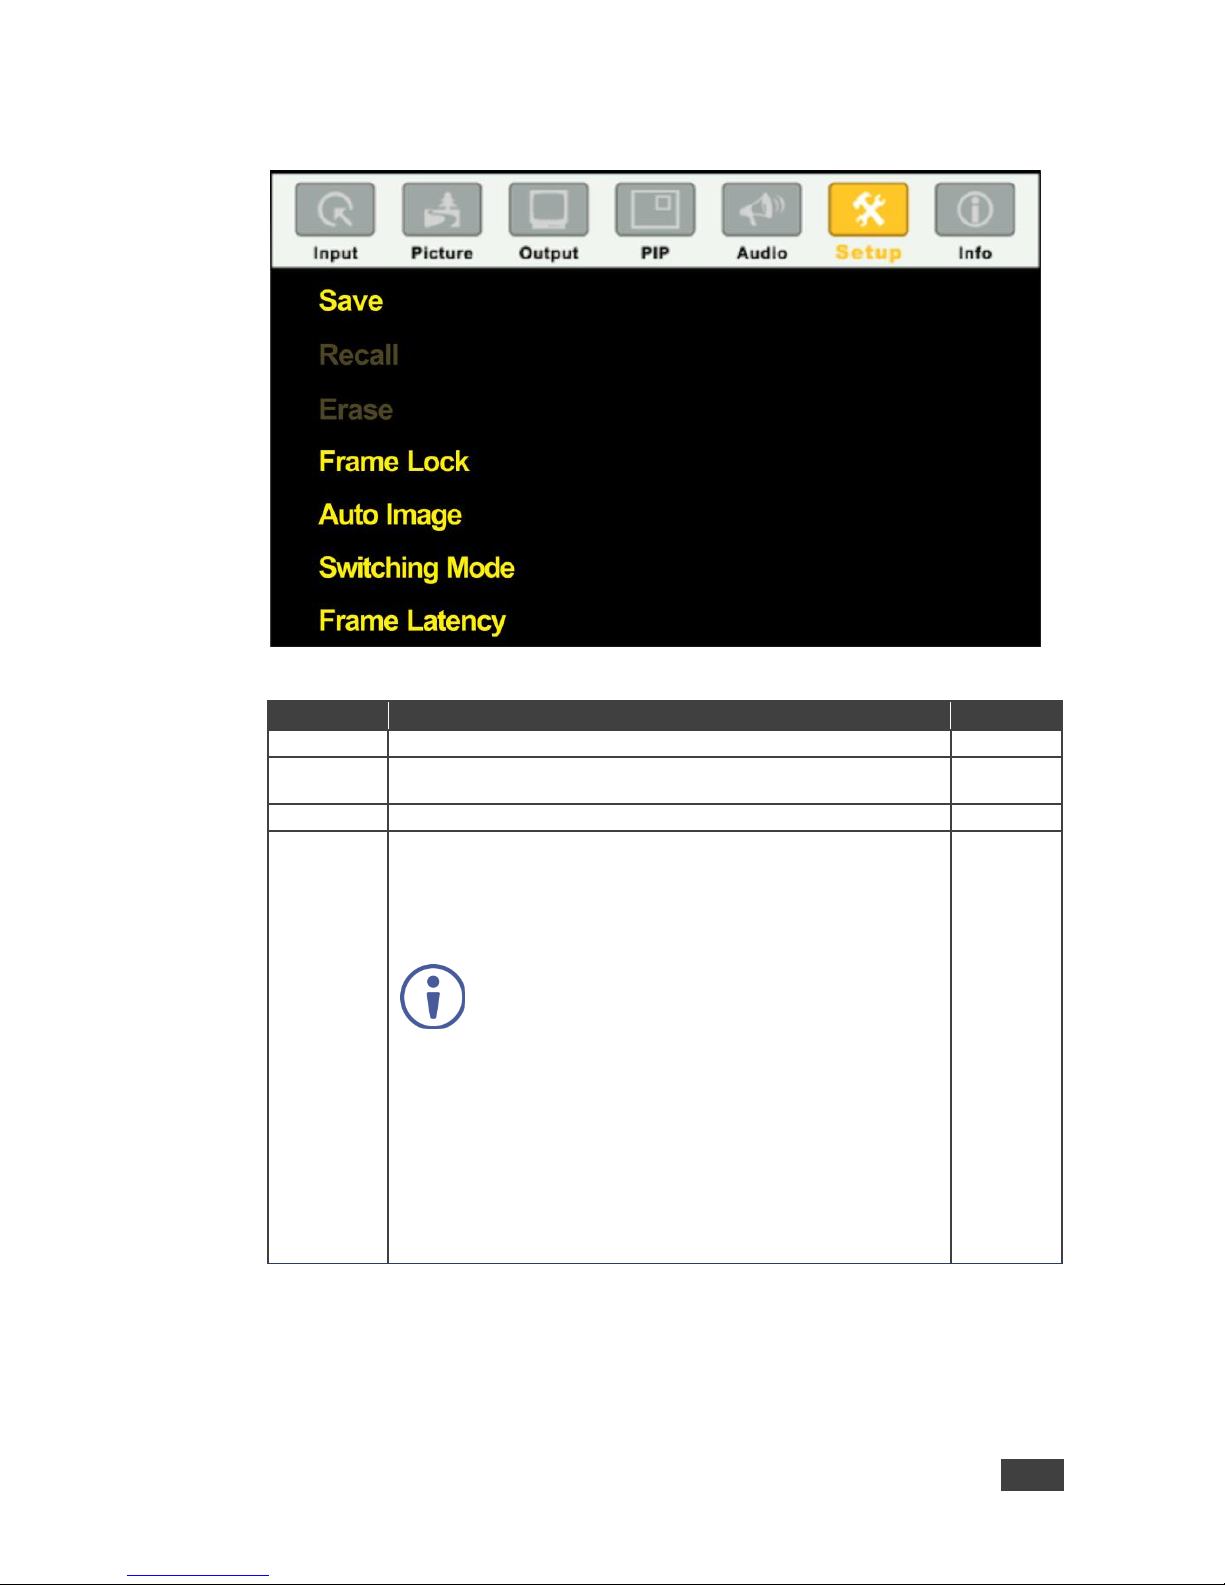
7.6 The Setup Screen
Figure 19: Setup Screen
Setting
Function
Default
Save
Save setup to Profile 1 to Profile 8 or via USB to a memory stick
Recall
Recall setup from Profile 1 to Profile 8 or from a memory stick via
USB port
Erase
Erase a setup from Profile 1 to Profile 8
Frame Lock
Set to On or Off.
Frame Lock locks the vertical refresh rate of the output to that of the
input. Frame Lock only locks 50Hz or 60Hz / 59.94Hz
In cases where the output resolution can support the vertical refresh
rate of the input, the output refresh rate will change according to the
input refresh rate
Off
Note that:
Seamless switching is not possible when working in
the Frame Lock mode unless all sources are frame
synchronized
If VP-732 can lock the input then the output will follow
If VP-732 cannot lock the input, then the output will
not change. The info menu will display one of the
following:
Sync Mode: Free Run (Frame Lock Off) or
Sync Mode: Frame Lock (Frame Lock On)
When resetting the resolution to XGA or 720p, Frame
Lock will be turned off automatically and if required
you will need to turn Frame Lock on
Page 40
34
VP-732 - Configuring the VP-732 via the OSD MENU Screens
Setting
Function
Default
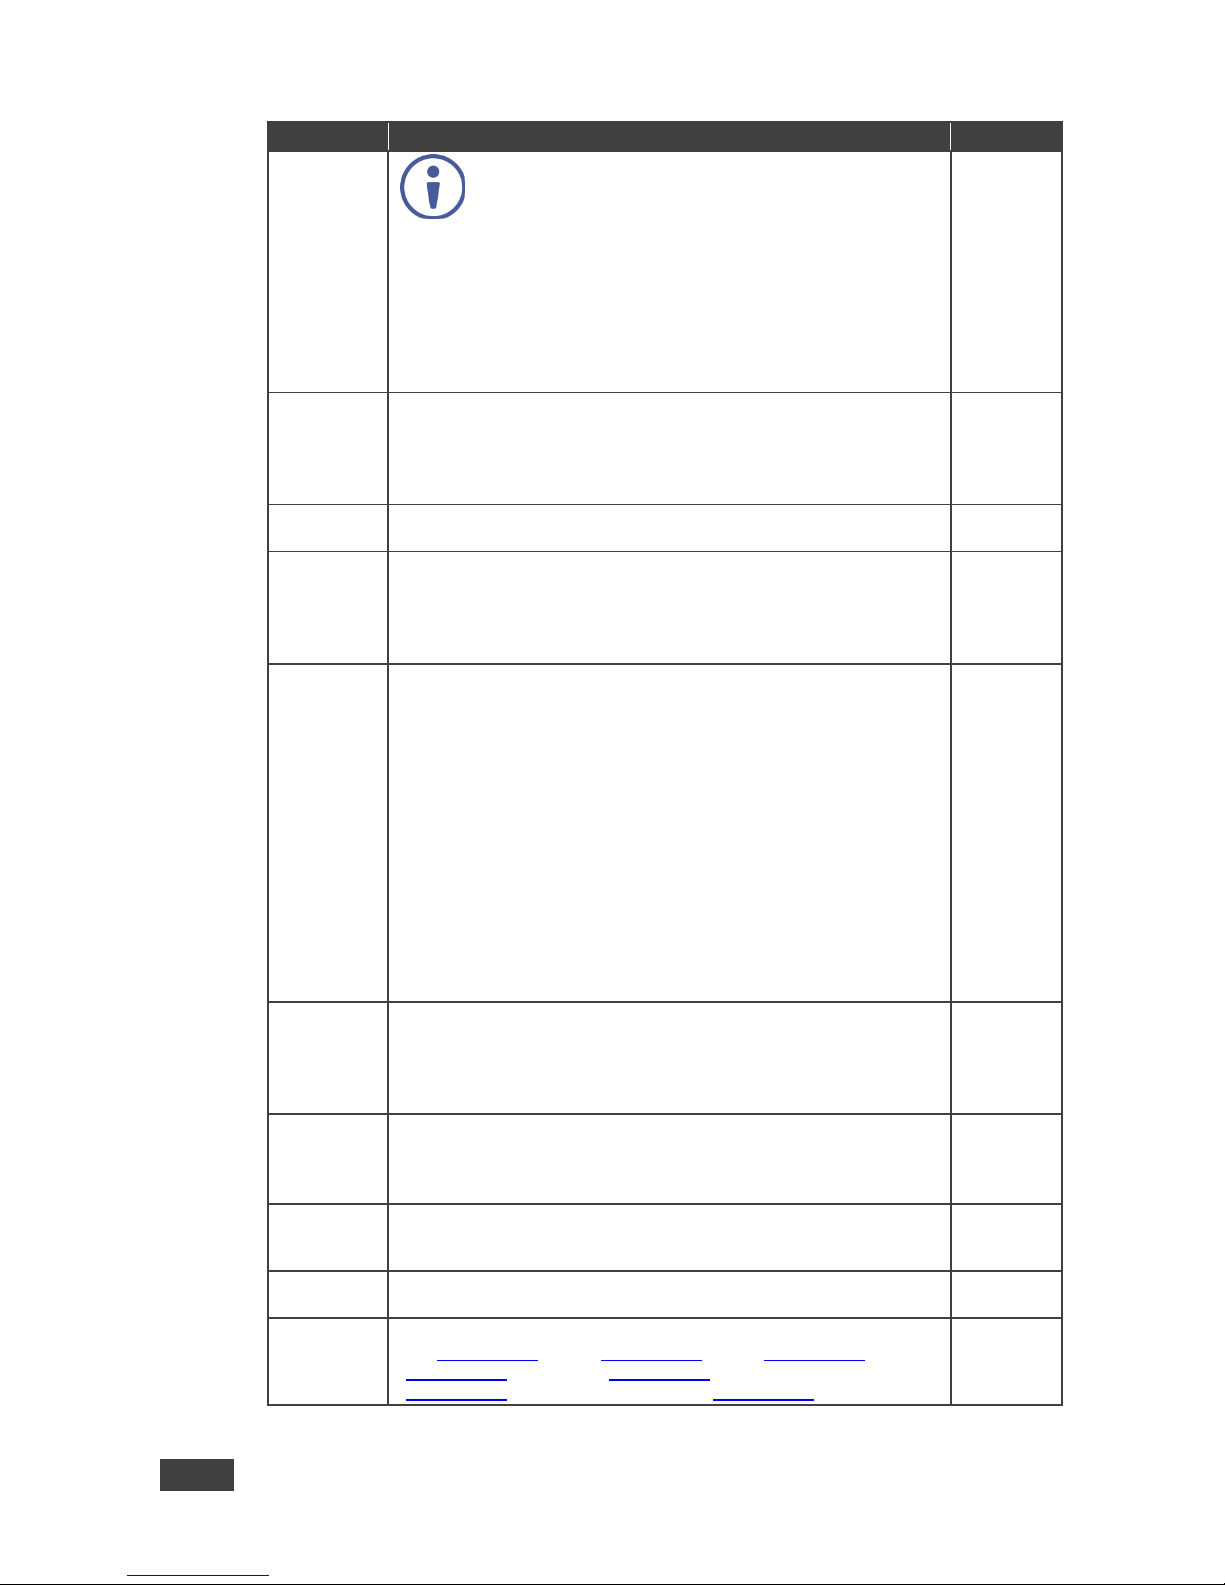
When changing the output resolution (not including
Native HDMI and Custom 1 to 4), if the new output
resolution can be locked, VP-732 locks it. If not, it will
be unlocked
When changing the output resolution to Native, HDMI
or Custom1 to 4, Frame Lock turns off and is disabled
(grayed out)
Auto Image
Set to Manual or Auto
Set to Manual to adjust and align the picture.
Set to Auto to automatically adjust and align the picture each time
one of the UXGA inputs is selected or if the UXGA input resolution
has changed
Manual
Switching
Mode
Selects Seamless switching (fade-through-Black) or Fast switching
which is faster but may cause glitches on the output
Seamless
Frame
Latency
Select:
Best Quality – Does not consider the latency; all the options (and
filters) are allowed in order to achieve the highest quality picture.
Fast – disables most of the filters, but allows some of the more
important processing, such as frame rate conversion and cropping
Best
Quality
Auto-switch
priority
Auto-Switch Priority lets you set the order of inputs to be scanned
when searching for a new active source, 5 seconds after losing the
input signal.
Set the scanning order of the following inputs from Priority 1 to Priority
10: UNIV 1, UNIV 2, UNIV 3, UNIV 4, HDMI 1, HDMI 2, HDMI 3,
HDMI 4, DP1 and DP2.
Set the priority list from First priority to the 10th priority. For example,
select First Priority and then select the input that will be first in priority
from the list of inputs.
Set the second input you want scanned into the Second Priority, and
so on.
By default, the priority order is as follows: HDMI 1 (First Priority 1)
HDMI 2 (Second Priority 2), HDMI 3 (Third Priority 3), HDMI 4 (4th
Priority), DP 1 (5th Priority 5) DP 2 (6th Priority), UNIV 1 (7th Priority),
UNIV 2 (8th Priority), UNIV 3 (9th Priority), UNIV 4 (10th Priority).
Hot Plug
Handshaking
Set Hot Plug On or Off for the following inputs: HDMI1, HDMI 2, HDMI
3, HDMI 4, DP 1 and DP 2
On – Sends a hot plug handshake to the source when switching to an
HDMI or DP input.
Off – No hot plug handshake is sent when switching to an input
Off
Input HDCP
Set to On or Off for each of the HDMI inputs as well as DP1 and DP2
HDCP support can be enabled (On) or disabled (Off) for each of the
HDMI/DP inputs, allowing the source to transmit a non-HDCP signal if
required (for example, when working with a Mac computer)
On
Ethernet
Setting
Set the following Ethernet settings: DHCP (DHCP will automatically
assign an IP address) On or Off, IP Address, Subnet Mask and
Gateway
Factory
Reset
Select Yes to reset your VP-732 to its preset default settings
Advanced
Setup
Opens the advanced setup menu screen, which includes the: Mode
Set (Section 7.6.1), OSD (Section 7.6.2), Misc (Section 7.6.3), Input
(Section 7.6.4)and Output (Section 7.6.5), Input EDID Setup
(Section 7.6.6) and the Max Volume Limit (Section 7.6.7)
Page 41
VP-732 – Configuring the VP-732 via the OSD MENU Screens
35
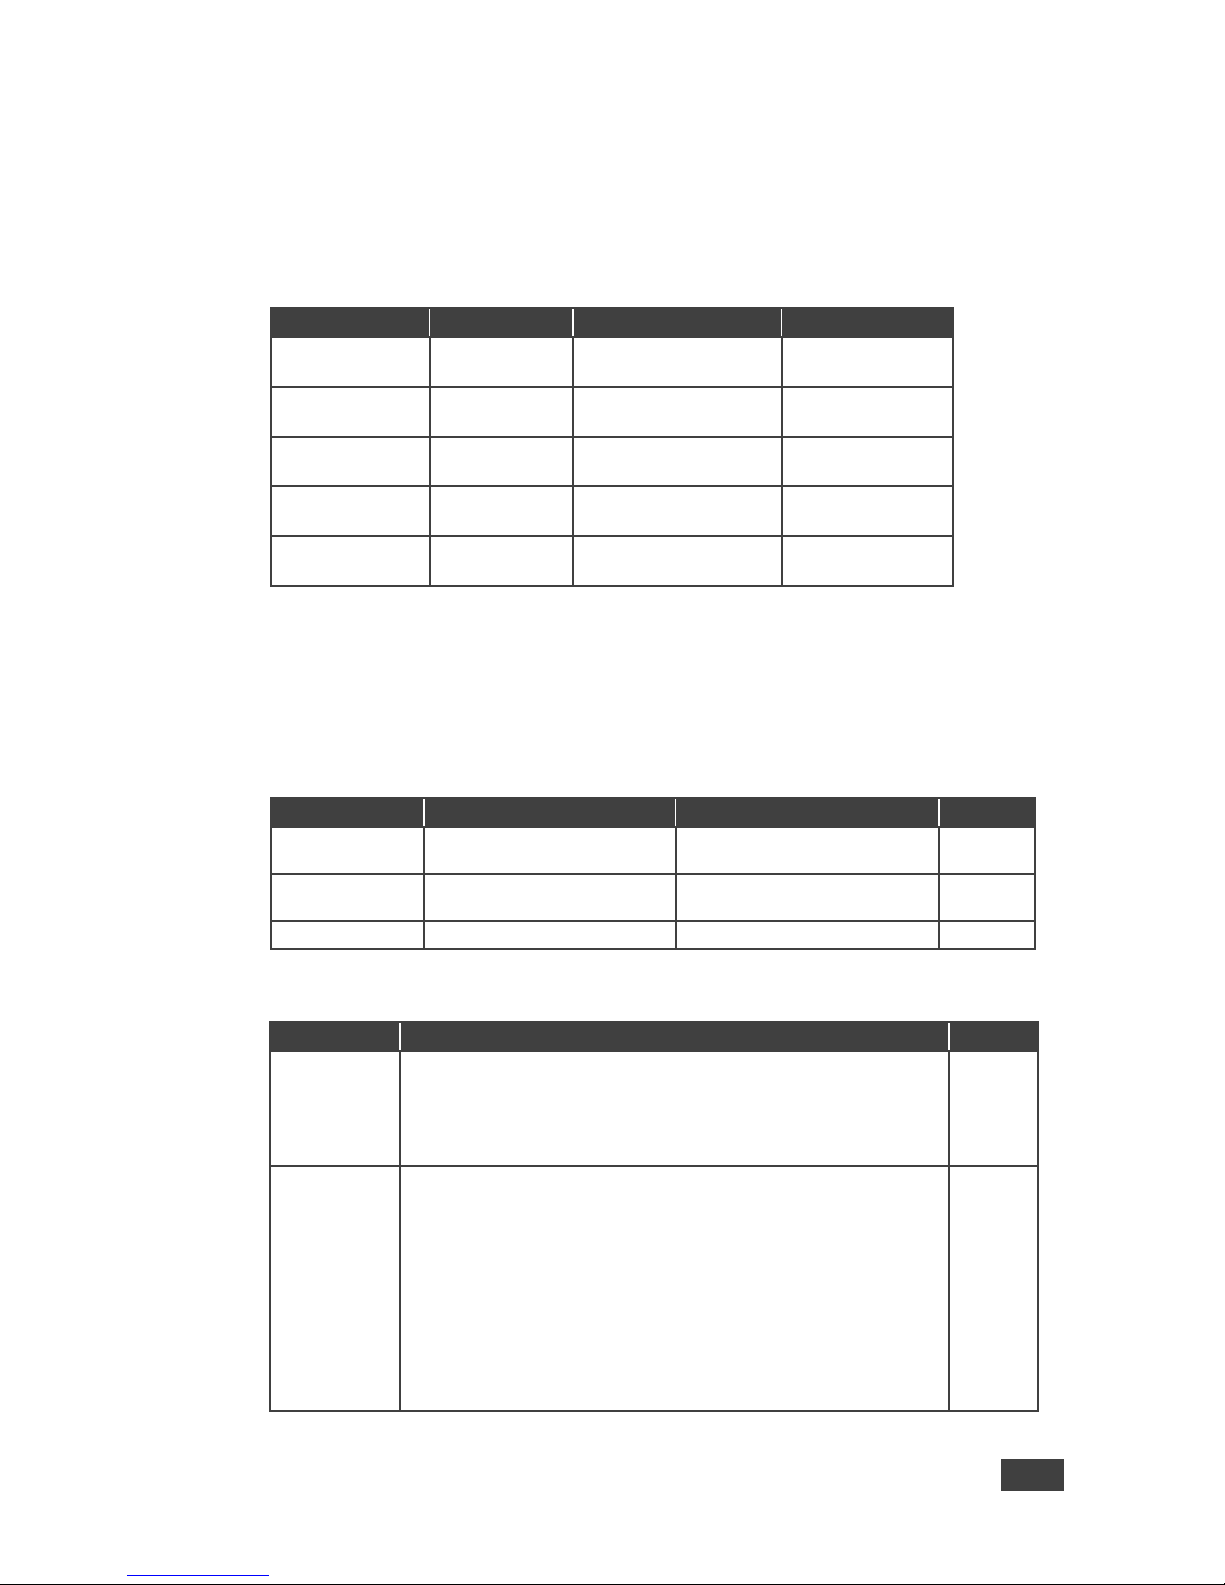
7.6.1 The Mode Set Screen
The Mode Set functions define the desired working resolution and refresh rate when
the system cannot distinguish between similar resolutions (for example, resolutions
that have the same number of lines can be defined to identify refresh rate values).
Setting
Function
Selection/Range
Default
Mode 1
Set mode 1
1400x1050x60Hz
1680x1050x60Hz
1680x1050x60Hz
Mode 2
Set mode 2
1280x1024x75Hz
1280x1024x76Hz
1280x1024x75Hz
Mode 3
Set mode 3
1280x768x60Hz
1366x768x60Hz
1280x768x60Hz
Mode 4
Set mode 4
1024x768x75Hz
1024x768x75Hz-Mac
1024x768x75Hz
Mode 5
Set mode 5
1280x960x60Hz
1600x900x60Hz(R)
1280x960x60Hz
For example, if two resolutions have the same number of lines (for example, 1050),
we can define them so that the unit identifies the resolution as 1400x1050 or as
1680x1050.
7.6.2 The OSD Screen Functions
Setting
Function
Selection/Range
Default
OSD Position
Select the location of the
OSD
Program or Preview
Preview
Menu Position
Set the location of the OSD
menu
Center, Top Left, Top Right,
Bottom Left, Bottom Right
Center
Time Out (sec)
Set the OSD menu timeout
5, 10, 20, 30, 60, 90 or Off
30
7.6.3 The Misc Screen Functions
Setting
Function
Default
Logo
Select On, Off or Custom
Choose ON for the start-up logo to appear on the screen
Choose OFF for it not to appear
Custom – to select a custom logo (a BMP file with a resolution of up
to 640x400) downloaded via the item below
Kramer
Logo
Logo
Download
Shows NA unless a memory stick is connected to the USB port.
To download a logo:
1. Load the BMP image (or images) to the root folder of the USB
(note that the file should not exceed a resolution of 640x400)
2. Connect the Memory stick to the USB connector on the front
panel.
3. Click Logo Download item. The BMP image appears
4. Select the BMP file and press the Enter button
When Custom is selected in the Logo item menu this logo will
appear after powering up the device
Page 42
36
VP-732 - Configuring the VP-732 via the OSD MENU Screens
Setting
Function
Default
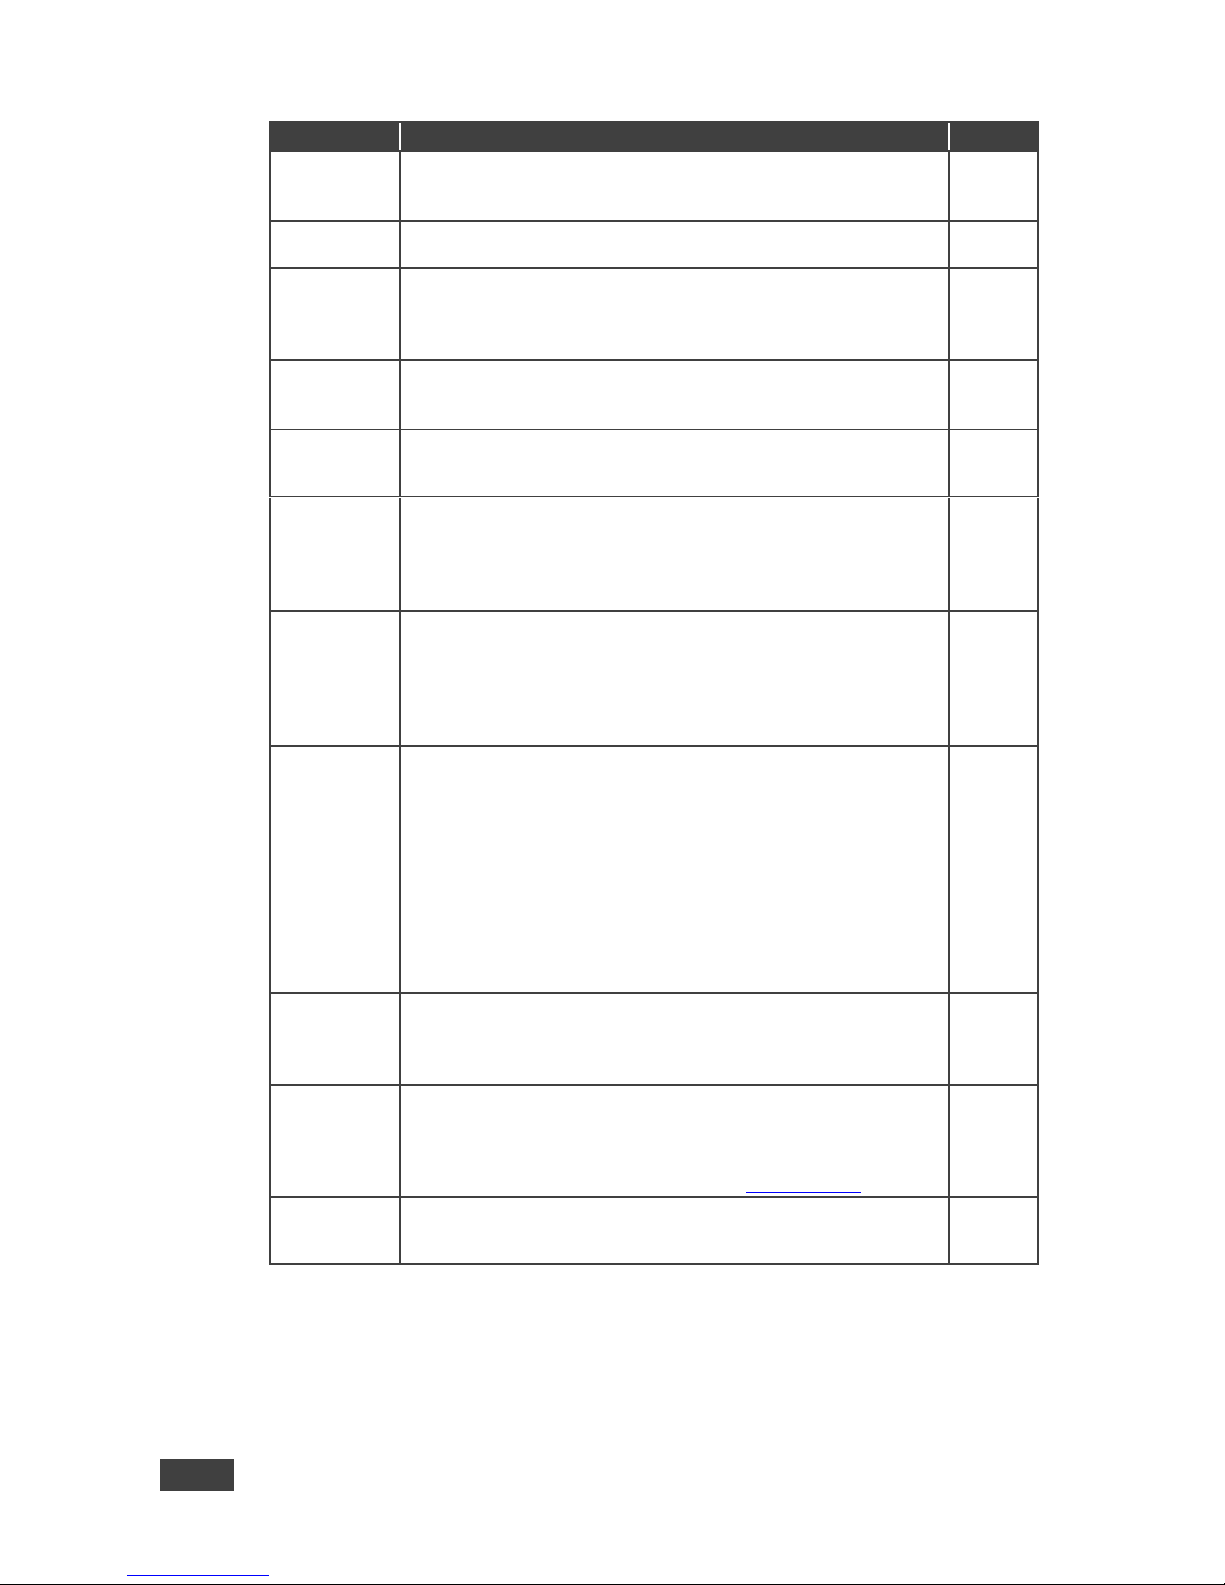
Blank Color
Select Black or Blue
Set the blank color (the color that appears on the screen when the
blank button is pressed)
Blue
Background
Select a Blue or Black background if no signal is detected or a file
cannot be displayed
Black
Low Power
Saving
Select Off, Sleep or Powerdown; will be activated after an input
signal is not detected for 5 minutes
When set to Sleep, press any key to reactivate the machine.
When set to Powerdown, press any key to reboot the machine
On
Lock Save
Select On or Off
Set to On to save the lock status when the machine is powered
down
Lock Mode
Select MENU ONLY (locks only the menu) so you can still use the
INPUT buttons on the front panel even when the lock button is on.
select ALL to also lock the INPUT buttons
Blank
Select Blank & Mute, Blank or Mute to determine the behavior of the
BLANK front panel button
Set to Blank & Mute to blank the output image and mute the audio
Set to Blank to blank the output
Set to Mute to mute the audio
Blank &
Mute
Freeze
Select Freeze & Mute, Freeze or Mute to determine the behavior of
the FREEZE front panel button
Set to Freeze & Mute to Freeze the output image and mute the
audio
Set to Freeze to freeze the output
Set to Mute to mute the audio
Freeze
& Mute
HDCP
Setting
Select Follow Input or Follow Output to define whether the HDCP
will follow the input or the output
When Follow Input is selected, the scaler changes its HDCP output
setting (for the HDMI output) according to the HDCP of the input.
This option is recommended when the HDMI scaler output is
connected to a splitter/switcher (in this mode, switching may not be
glitch-free)
When Follow Output is selected, the scaler matches its HDCP
output to the HDCP setting of the HDMI acceptor to which it is
connected.
This ensures smooth switching, regardless of the input
Follow
Output
Over Scan
Select On or Off
Set to On to Allow stretching of the outputted picture
This feature is enabled only for CV, Y/C and component video
inputs
Off
Overlay
Select Off, Text or Logo
When selecting Text you need to download TextOvl.ini to a USB
memory stick and then connect it to the VP-732
When selecting Logo you need to download the Txtlogo.BMP file to
the USB and connect it to the VP-732 (See Section 7.6.3.1)
Off
Firmware
Download
Path
For factory use
Default
Page 43
VP-732 – Configuring the VP-732 via the OSD MENU Screens
37
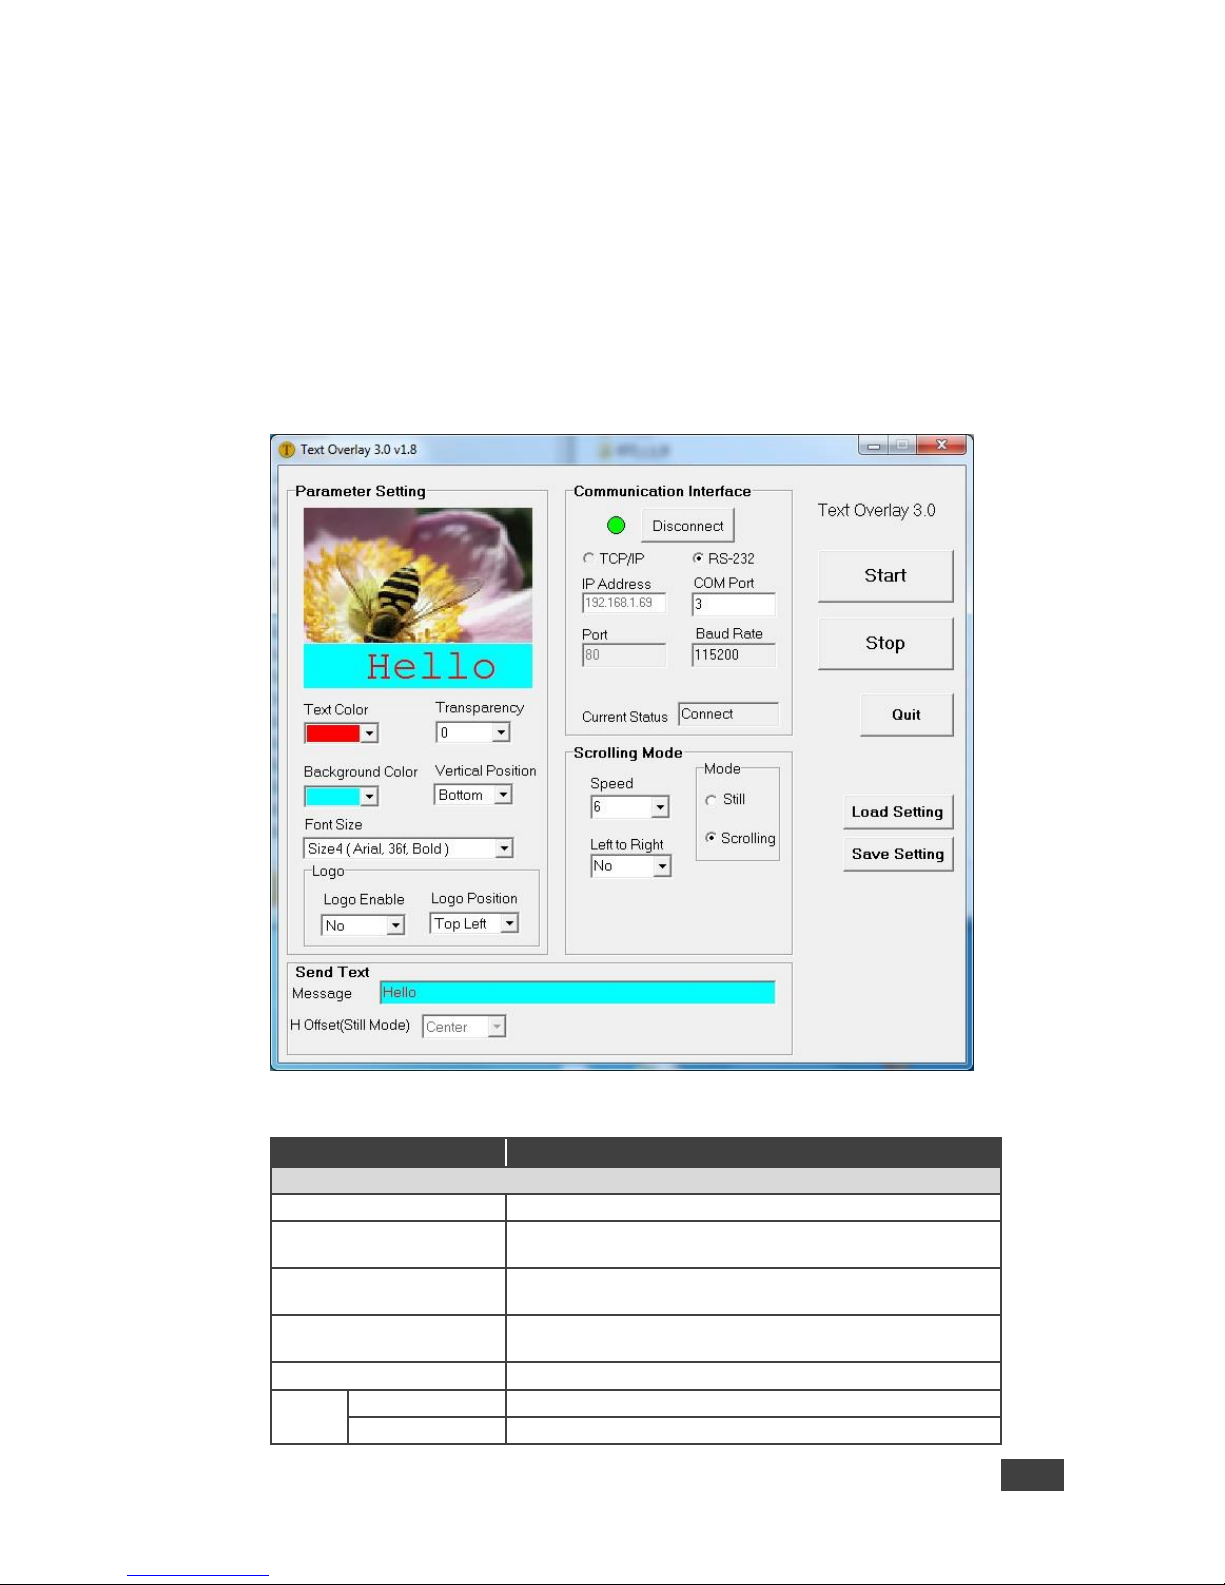
7.6.3.1 Using Text Overlay
The text overlay feature is accessed via the Application Program (AP).
Running this AP with the PC connected to the VP-732 lets you display text over the
screen, with features including text color and speed, transparency, text position and
repetition. Current text overlay settings can be saved and loaded to the AP.
Note that currently you can connect to the machine via RS-232 only.
Figure 20: Text Overlay Application Screen
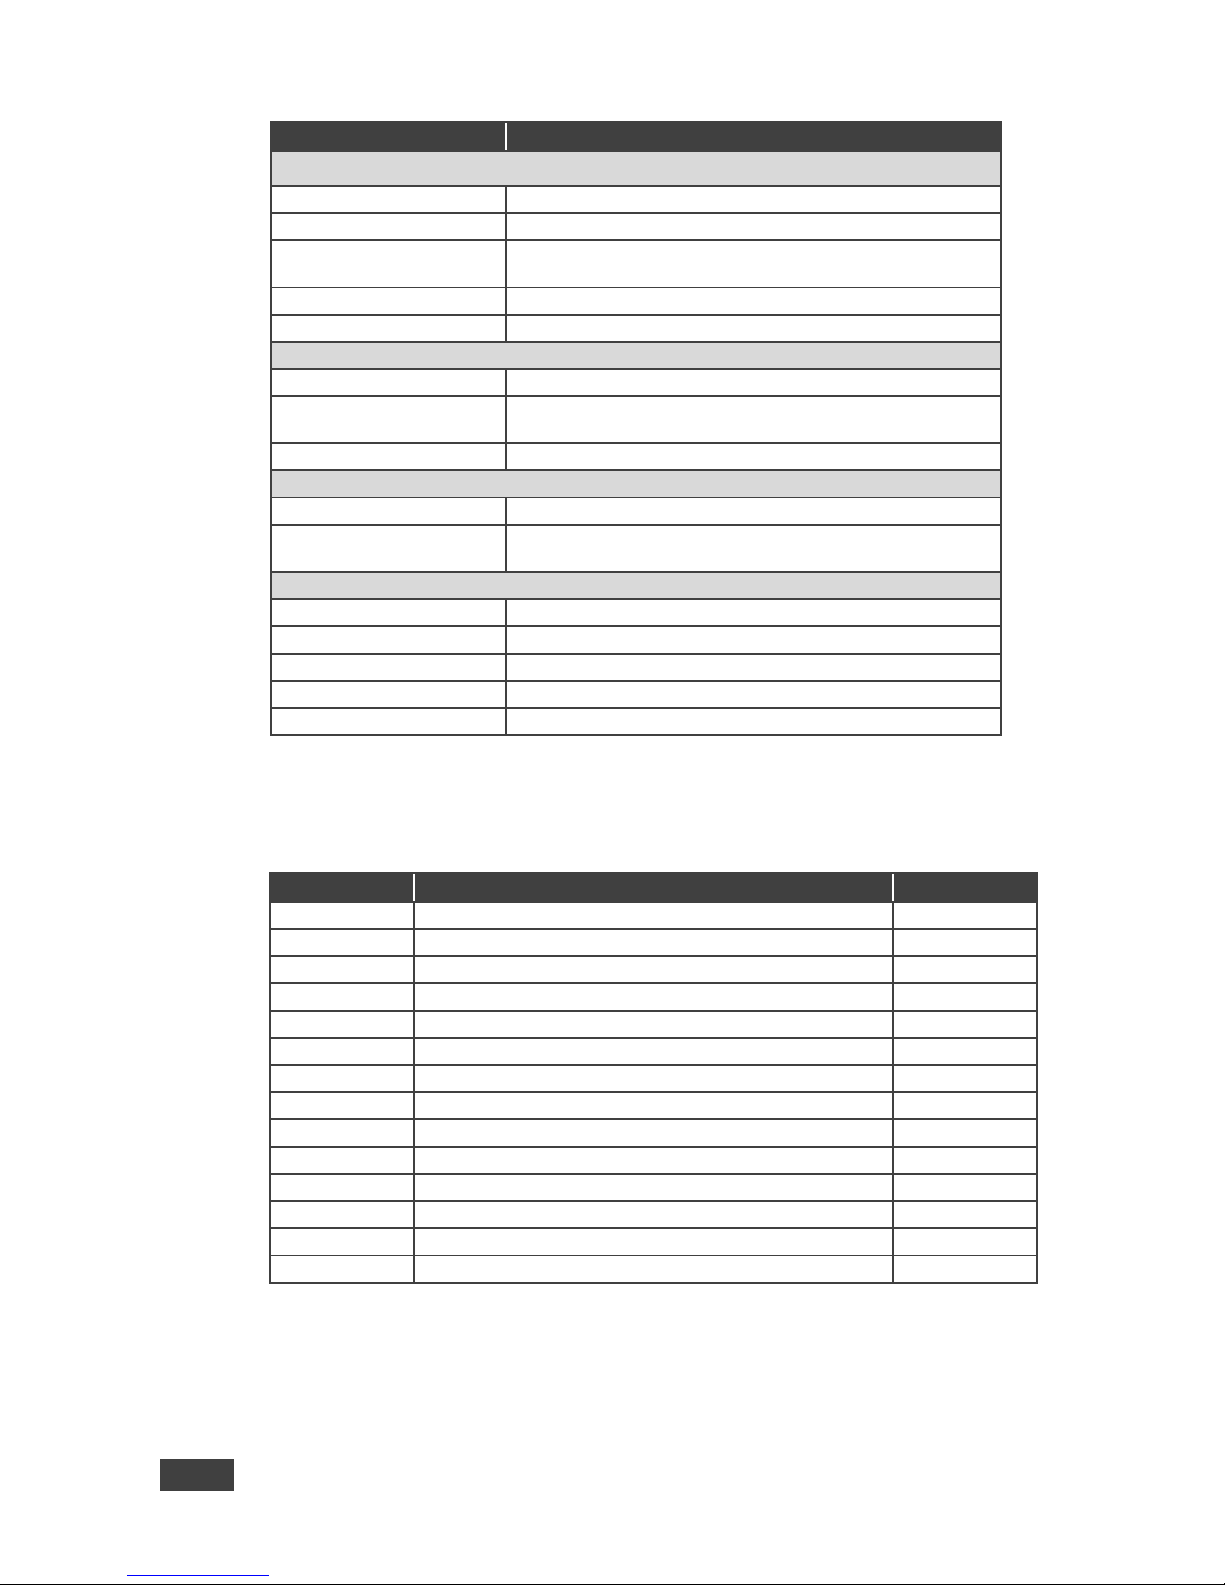
Feature
Function
Parameter Setting Area
Text Color Dropdown Box
Select the Text color
Transparency Dropdown
Box
Select the transparency level (0 to 7)
Background Color
Dropdown Box
Set the text background color
Vertical Position
Set the vertical position of the text background on the display
screen (Top, Center or Bottom)
Font Size
Select the text overlay font size
Logo
Logo Enable
Enable the logo to appear on screen
Logo Position
Set the position of the logo
Page 44
38
VP-732 - Configuring the VP-732 via the OSD MENU Screens
Feature
Function
Communication Interface Area
Connect/Disconnect
Connect the machine or disconnect
TCP/IP Check box
Not available
RS-232 Check box
When selected, set the COM port and Baud Rate (9600) to
connect via the RS-232 connector
IP Address
When selected Set the IP address of the device and the port
Current Status
Indicates whether there is a valid connection to the VP-732
Scrolling Mode Area
Speed Dropdown Box
Set the speed at which the text moves on the display
Mode
Set to Still (fixed text) or Scrolling (text moves across the
display)
Left to Right
Set direction of the scrolling text
Send Text Area
Message
Type the desired text in the Message box
H-Offset (Still
Mode)Dropdown Box
After selecting the Still mode, use the H-Offset box to select
the horizontal position of the text (Left Center or Right)
Operation Buttons
Start Button
Click to display the text on screen
Stop Button
Click to stop scrolling on screen
Quit Button
Click to quit the program
Load Setting Button
Click to load a previously saved setting
Save Setting Button
Click to save the current setting
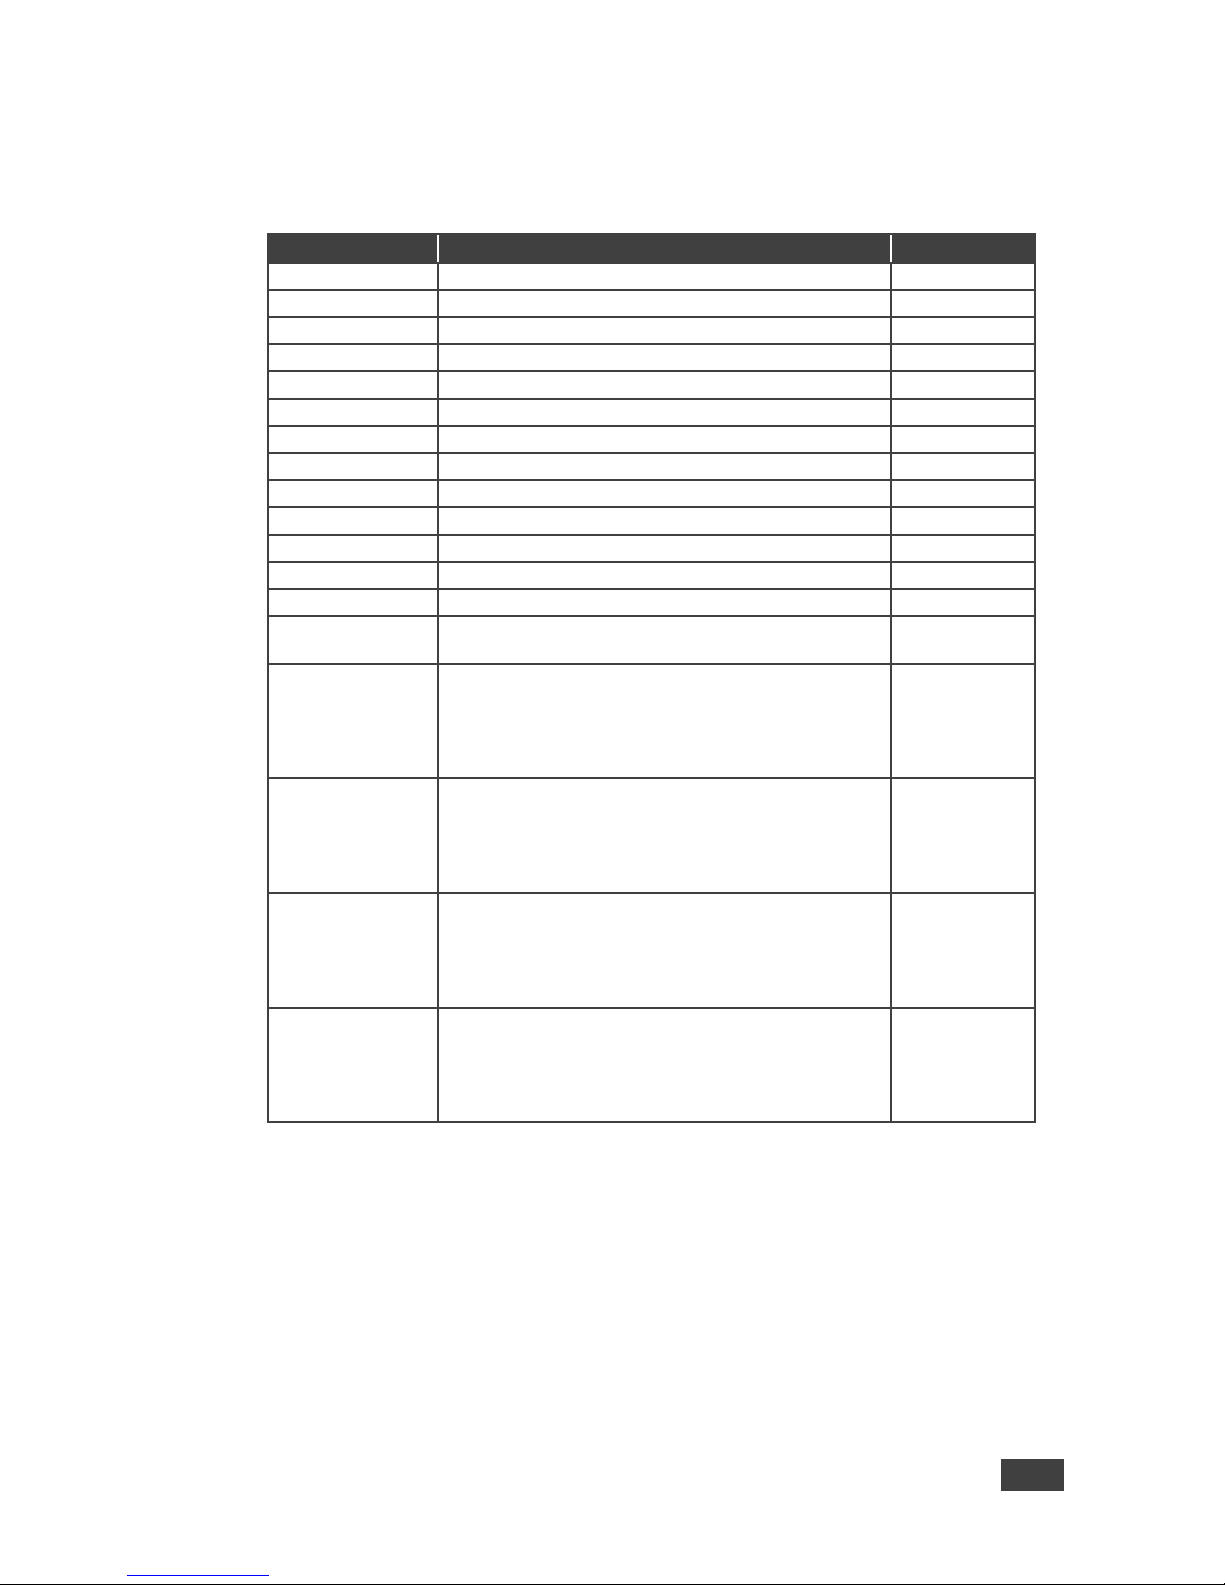
7.6.4 The Input Functions Screen
The following table defines the input settings:
Setting
Function
Default
Custom
Custom Input from Custom 1 to custom 4
Custom 1
HT
Horizontal Total
HW
Horizontal sync pulse width
HS
Horizontal active start point
HA
Horizontal active region
HP
Horizontal polarity
VT
Vertical Total
VW
Vertical sync pulse width
VS
Vertical active start point
VA
Vertical active region
VP
Vertical polarity
OCLK
Output clock
Enable
Set to On to enable parameter change
Off
Save
Apply settings
N/A
Page 45
VP-732 – Configuring the VP-732 via the OSD MENU Screens
39
7.6.5 The Output Functions Screen
The following table defines the output settings:
Setting
Function
Default
Custom Output
Custom 1 to Custom 4
HT
Horizontal total
1344
HW
Horizontal sync pulse width
136
HS
Horizontal active start point
296
HA
Horizontal active region
1024
HP
Horizontal polarity
VT
Vertical total
806
VW
Vertical sync pulse width
6
VS
Vertical active start point
35
VA
Vertical active region
768
VP
Vertical polarity
OCLK
Output clock
65
Save
Save setup
Get Current
Import the values of the currently selected output
resolution into the User Mode Setting
Read HDMI1
EDID
Reads the EDID file from the acceptor that is
connected to the HDMI 1 output. The EDID is stored as
a custom output resolution.
This allows, for example, automatic handling of LED
screens that support very low non-standard resolutions
N/A
Read HDMI2
EDID
Reads the EDID file from the acceptor that is
connected to the HDMI 2 output. The EDID is stored as
a custom output resolution.
This allows, for example, automatic handling of LED
screens that support very low non-standard resolutions
N/A
Read DP EDID
Reads the EDID file from the acceptor that is
connected to the DP output. The EDID is stored as a
custom output resolution.
This allows, for example, automatic handling of LED
screens that support very low non-standard resolutions
N/A
Read VGA EDID
Reads the EDID file from the acceptor that is
connected to the VGA output. The EDID is stored as a
custom output resolution.
This allows, for example, automatic handling of LED
screens that support very low non-standard resolutions
N/A
Page 46
40
VP-732 - Configuring the VP-732 via the OSD MENU Screens
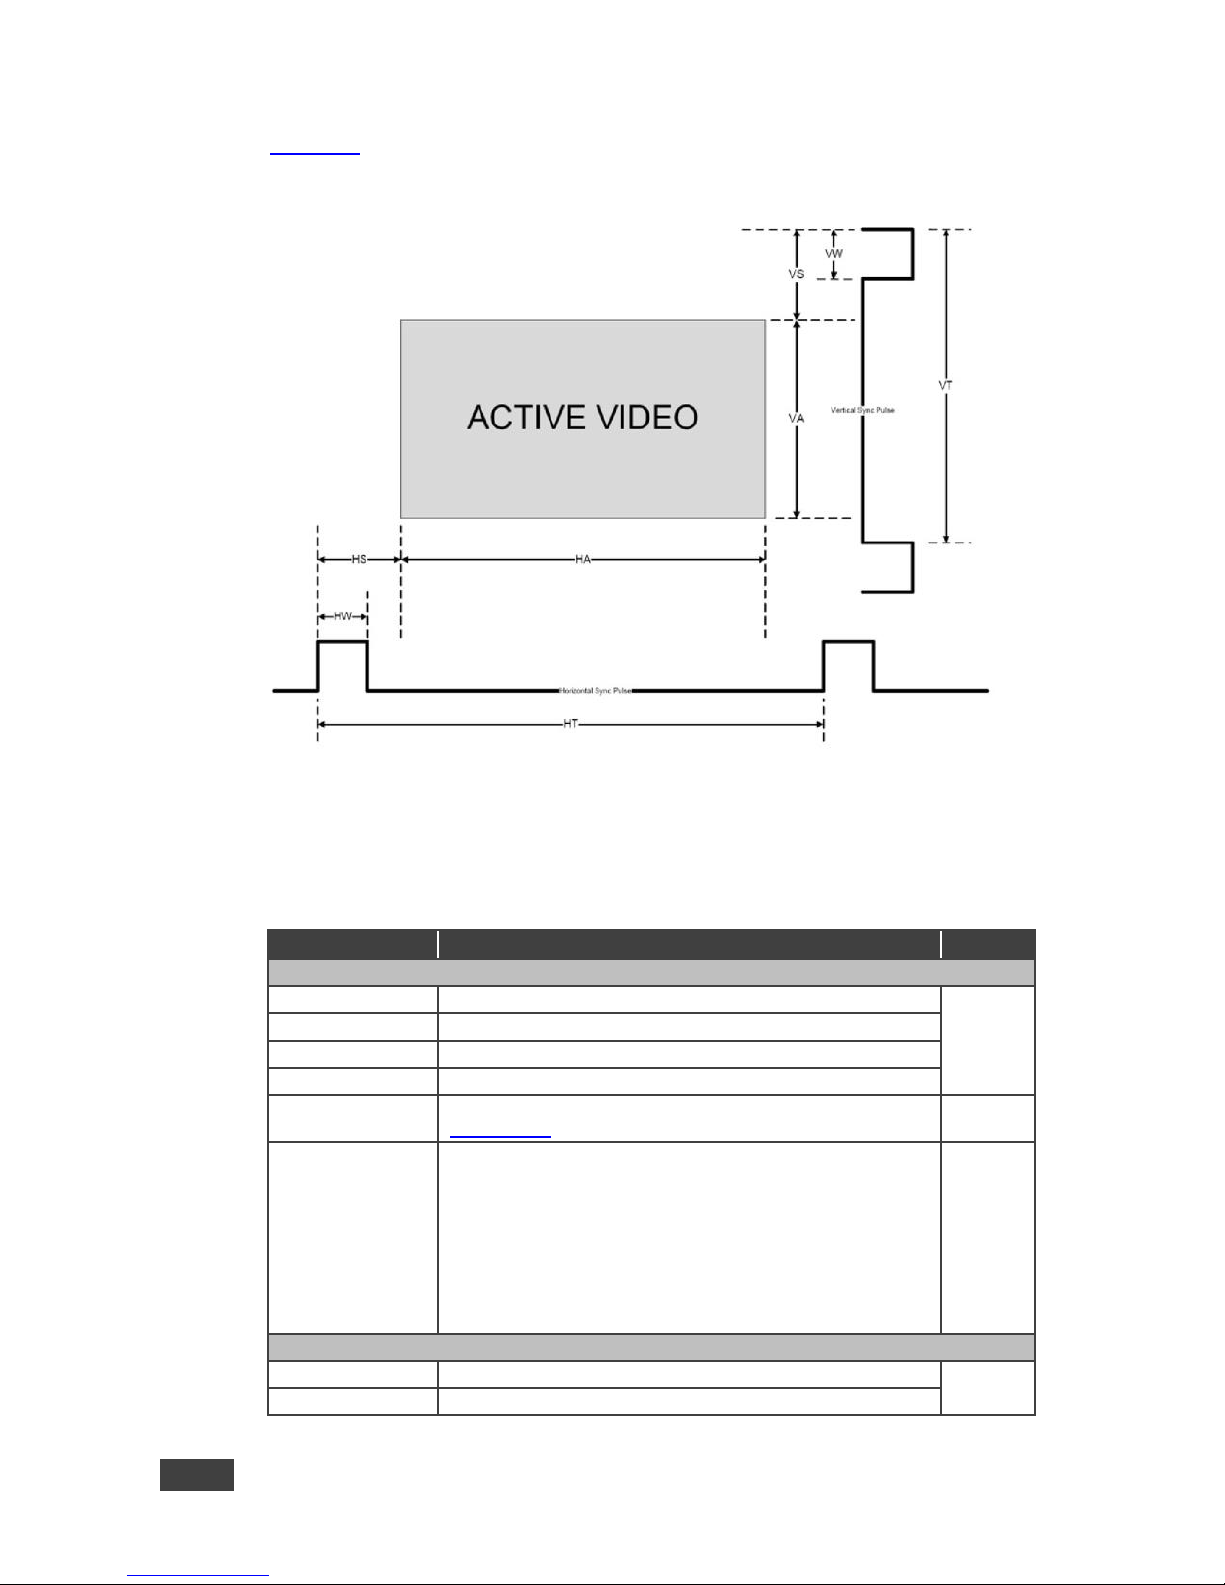
Figure 21 illustrates horizontal and vertical sync pulse width, timing and active video
area for a typical frame of video.
Figure 21: Active Video Functions
7.6.6 The Input EDID Setup Screen
The following table defines the input EDID settings:
Setting
Function
Default
For HDMI 1, HDMI 2, HDMI 3, HDMI 4, DP 1, DP 2
Default
Set to the factory default configuration
Default
Copy HDMI 1 Out
Copy the EDID from the HDMI 1 output to the input
Copy HDMI 2 Out
Copy the EDID from the HDMI 2 output to the input
Copy DP Out
Copy the EDID from the DP output to the input
User Define
Select a previously stored EDID (see Read HDMI EDID in
Section 7.6.5 above)
Select Modeline
This feature is available only if Default is selected. Otherwise
it is disabled.
Select the native resolution: Default
1024x768@60, 1280x800@60, 1280x1024@60,
1366x768@60, 1440x900@60, 1400x1050@60,
1600x900@60 (R), 1600x1200@60, 1680x1050@60,
1920x1080@60, 1920x1200@60Hz (R), 720p50, 720p60,
1080p50, 1080p60, 2048x1080@50Hz, 2048x1080@60Hz,
3840x2160x30Hz
Default
For UNIV 1, UNIV 2, UNIV 3, UNIV 4
Default
Set the default EDIDs on the inputs
Default
Copy VGA Out
Copy the EDID from the sink on the PC output to the input
Page 47
VP-732 – Configuring the VP-732 via the OSD MENU Screens
41
Setting
Function
Default
User Define
Setup a user defined EDID
Select a previously stored EDID (see Read VGA EDID in
Section 7.6.5 above)
Select Modeline
Select the native resolution: Default (1920x1080@60),
1024x768@60, 1280x800@60, 1280x1024@60,
1366x768@60, 1440x900@60, 1400x1050@60,
1600x900@60 (R), 1600x1200@60, 1680x1050@60,
1920x1080@60, 1920x1200@60Hz (R)
Default
7.6.7 The Maximum Volume Limit Screen
Set the maximum program output volume and the maximum preview output volume
from -100 to 24 (default = 24). Doing this allows you to limit the maximum volume
level that the user can set.
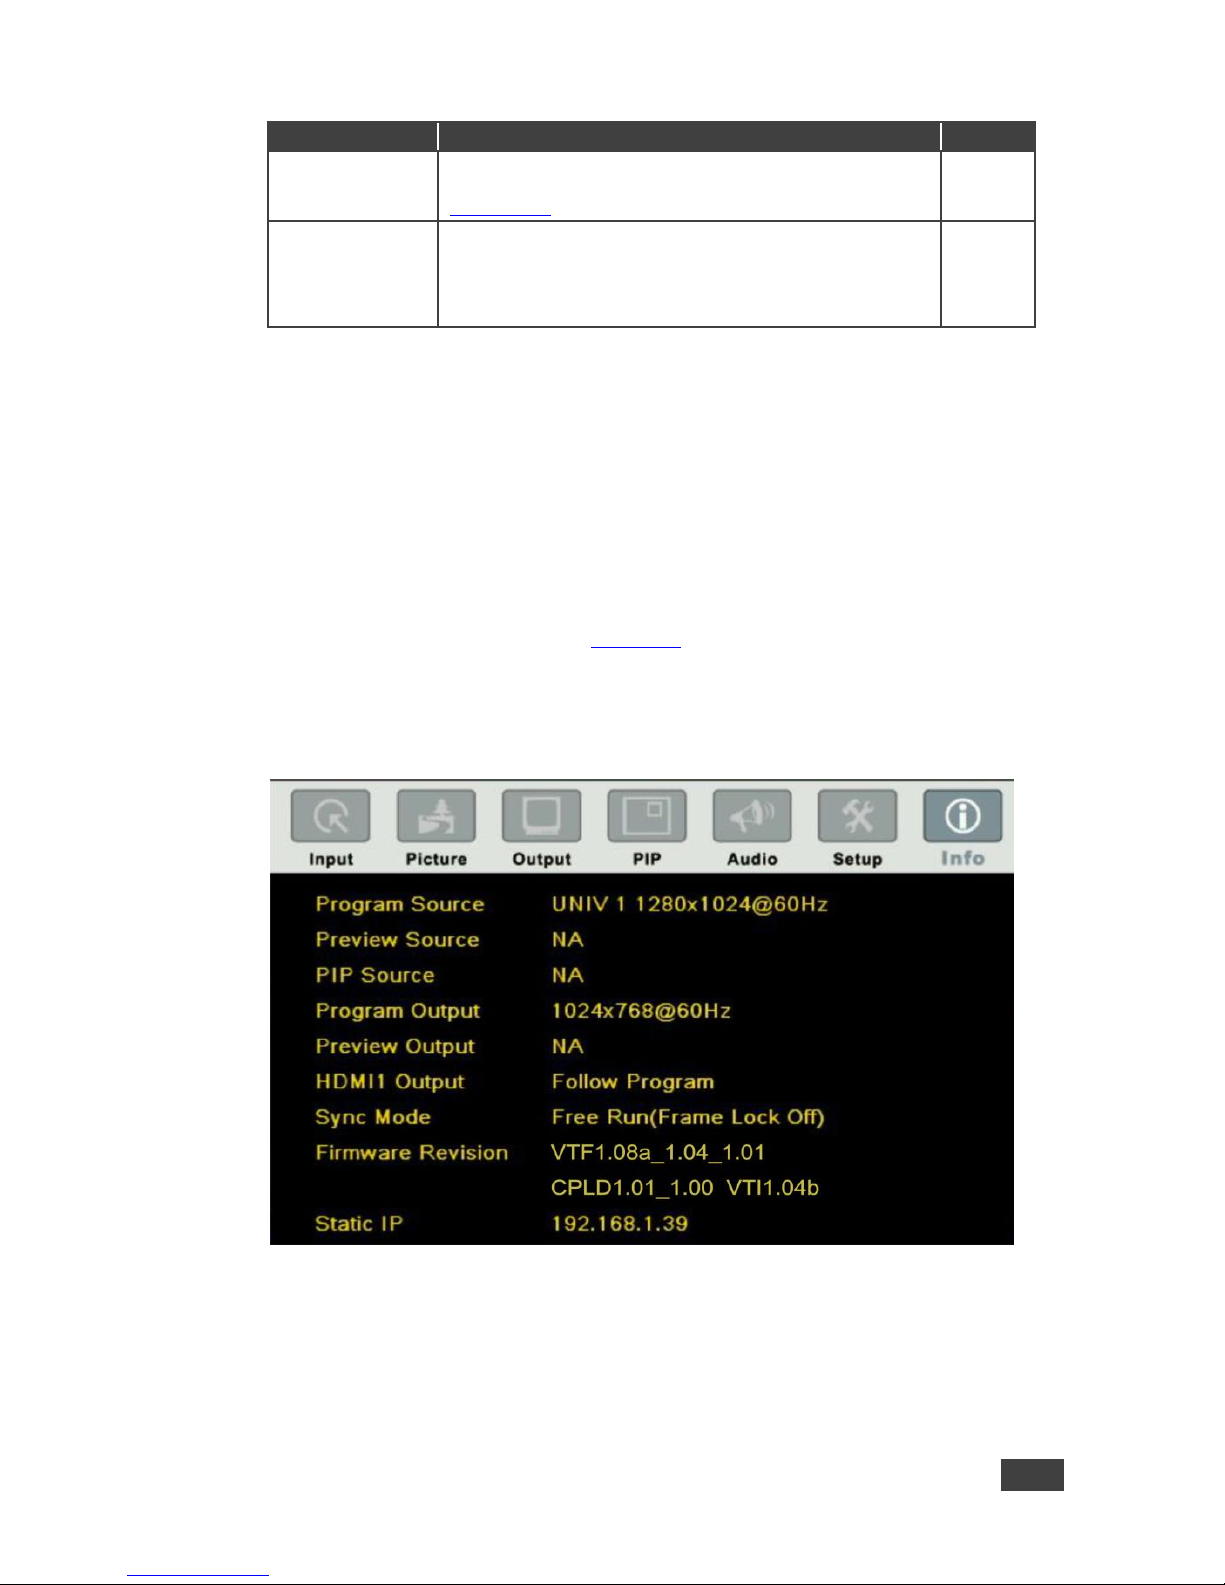
7.7 The Info Screen
From the Information screen (see Figure 22), you can verify the Program Source,
Preview Source, PIP Source, Program Output, Preview Output, HDMI Output, Sync
Mode, MCU Version, OSD Version, FPGA Version, Slave Version CPLD IO
Version, CPLD KPD Version, Dynamic IP/Static IP.
Figure 22: Information Screen
Page 48
42
VP-732 - Firmware Upgrade
8 Firmware Upgrade
The latest firmware version as well as the VP-Download Tool, can be
downloaded from the Kramer Web site at
http://www.kramerelectronics.com/support/downloads.asp
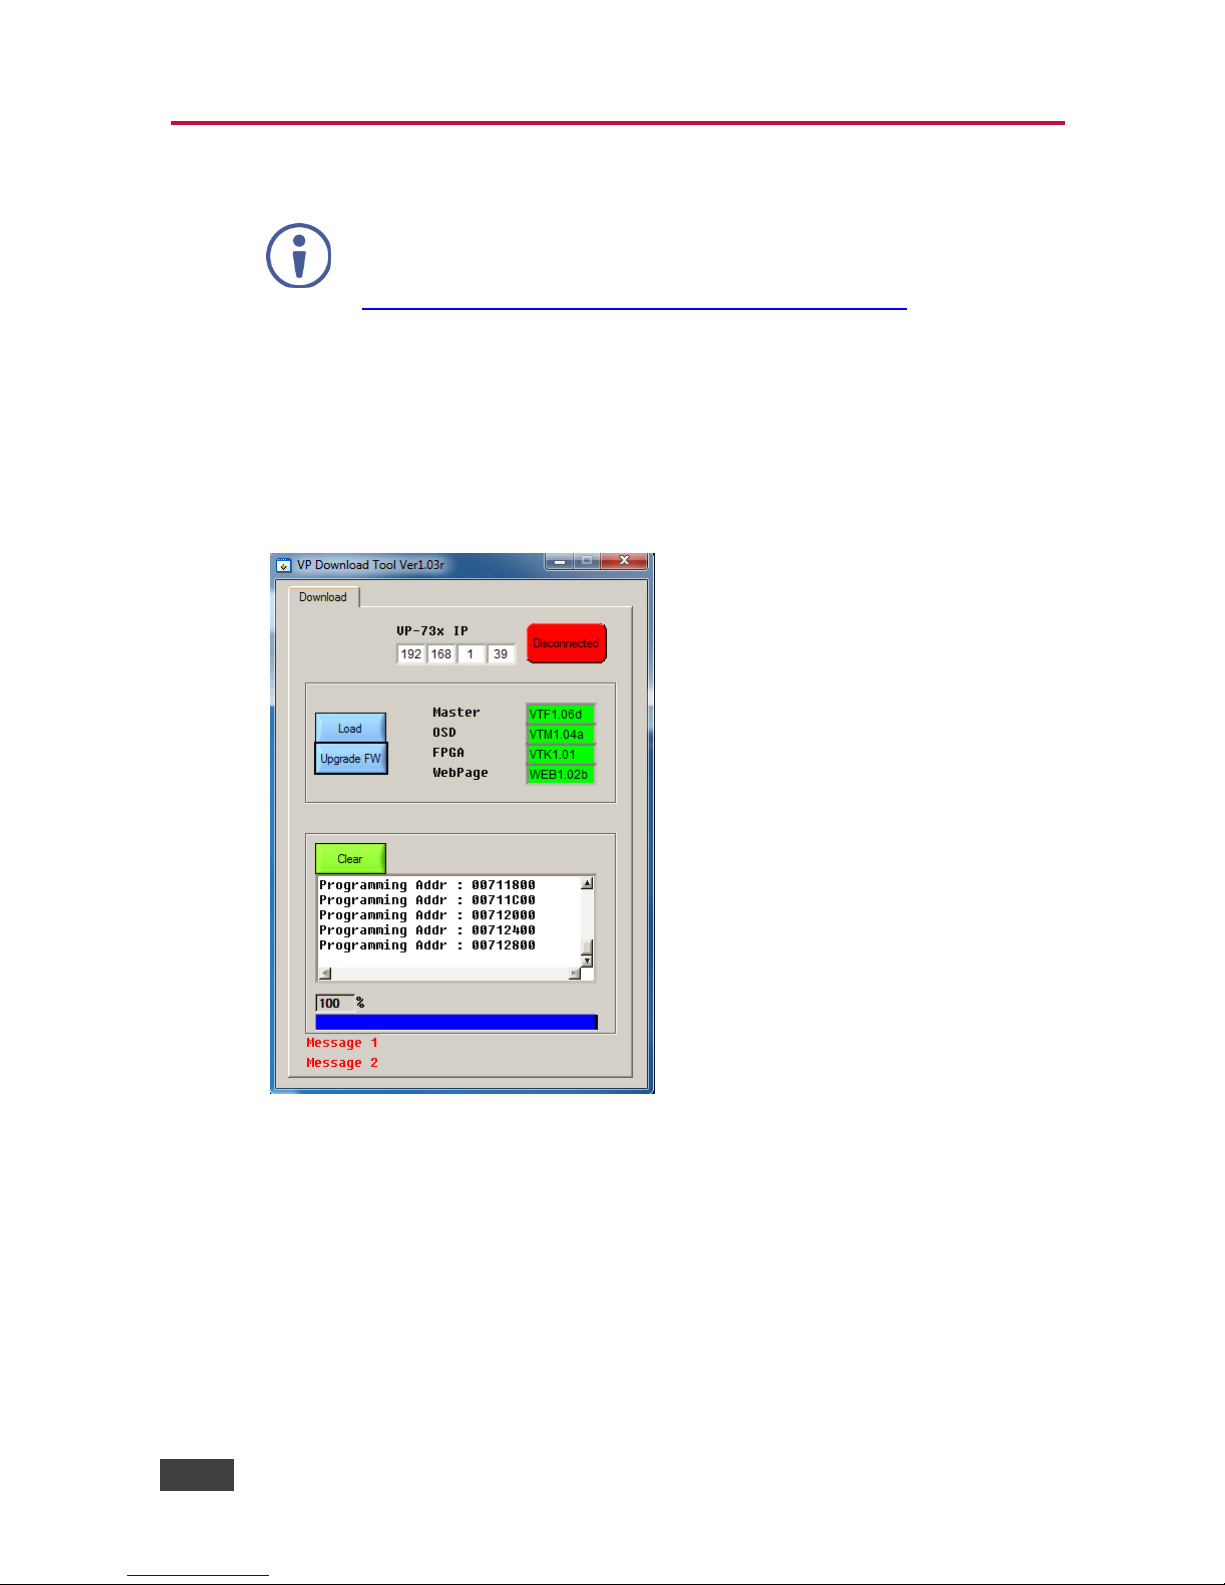
You can upgrade the VP-732 via the VP Download tool, which can be downloaded
from our Web site. After downloading this upgrade tool:
1. Connect the VP-732 to your PC via the Ethernet.
2. Open VP Download Tool. The Download screen appears:
Figure 23: Firmware Upgrade – the VP Download Tool
3. Type in the IP number of the machine.
4. Click the Disconnected button.
5. Click the Load button and select the latest firmware file.
6. Click the Upgrade FW button and wait for the completion of the procedure.
7. Turn off the power on the VP-732 and then turn it on again.
Page 49
VP-732 – Using the Embedded Web Pages
43
9 Using the Embedded Web Pages
The Web pages let you control the VP-732 via the Ethernet. The Web pages
include all the OSD items and more, and are accessed using a Web browser and
an Ethernet connection.
Note that the Web page features are described in more detail in the OSD
Menu, Section 7.
Before attempting to connect:
Perform the procedures in Section 5.3.
Ensure that your browser is supported
The following operating systems and Web browsers are supported:
Operating Systems
Applicable Browser Versions and Higher
Windows 7
Chrome: 25
Internet Explorer: 9
Firefox 19
Opera: 11
Mac (PC)
Chrome: 25
Firefox: 19
Opera: 11
iOS
Chrome: 25
Safari (depends on the IOS version)
Opera: 11
Android OS
Chrome: 25
Opera: 11
9.1 Browsing the VP-732 Web Pages
To browse the VP-732 Web pages:
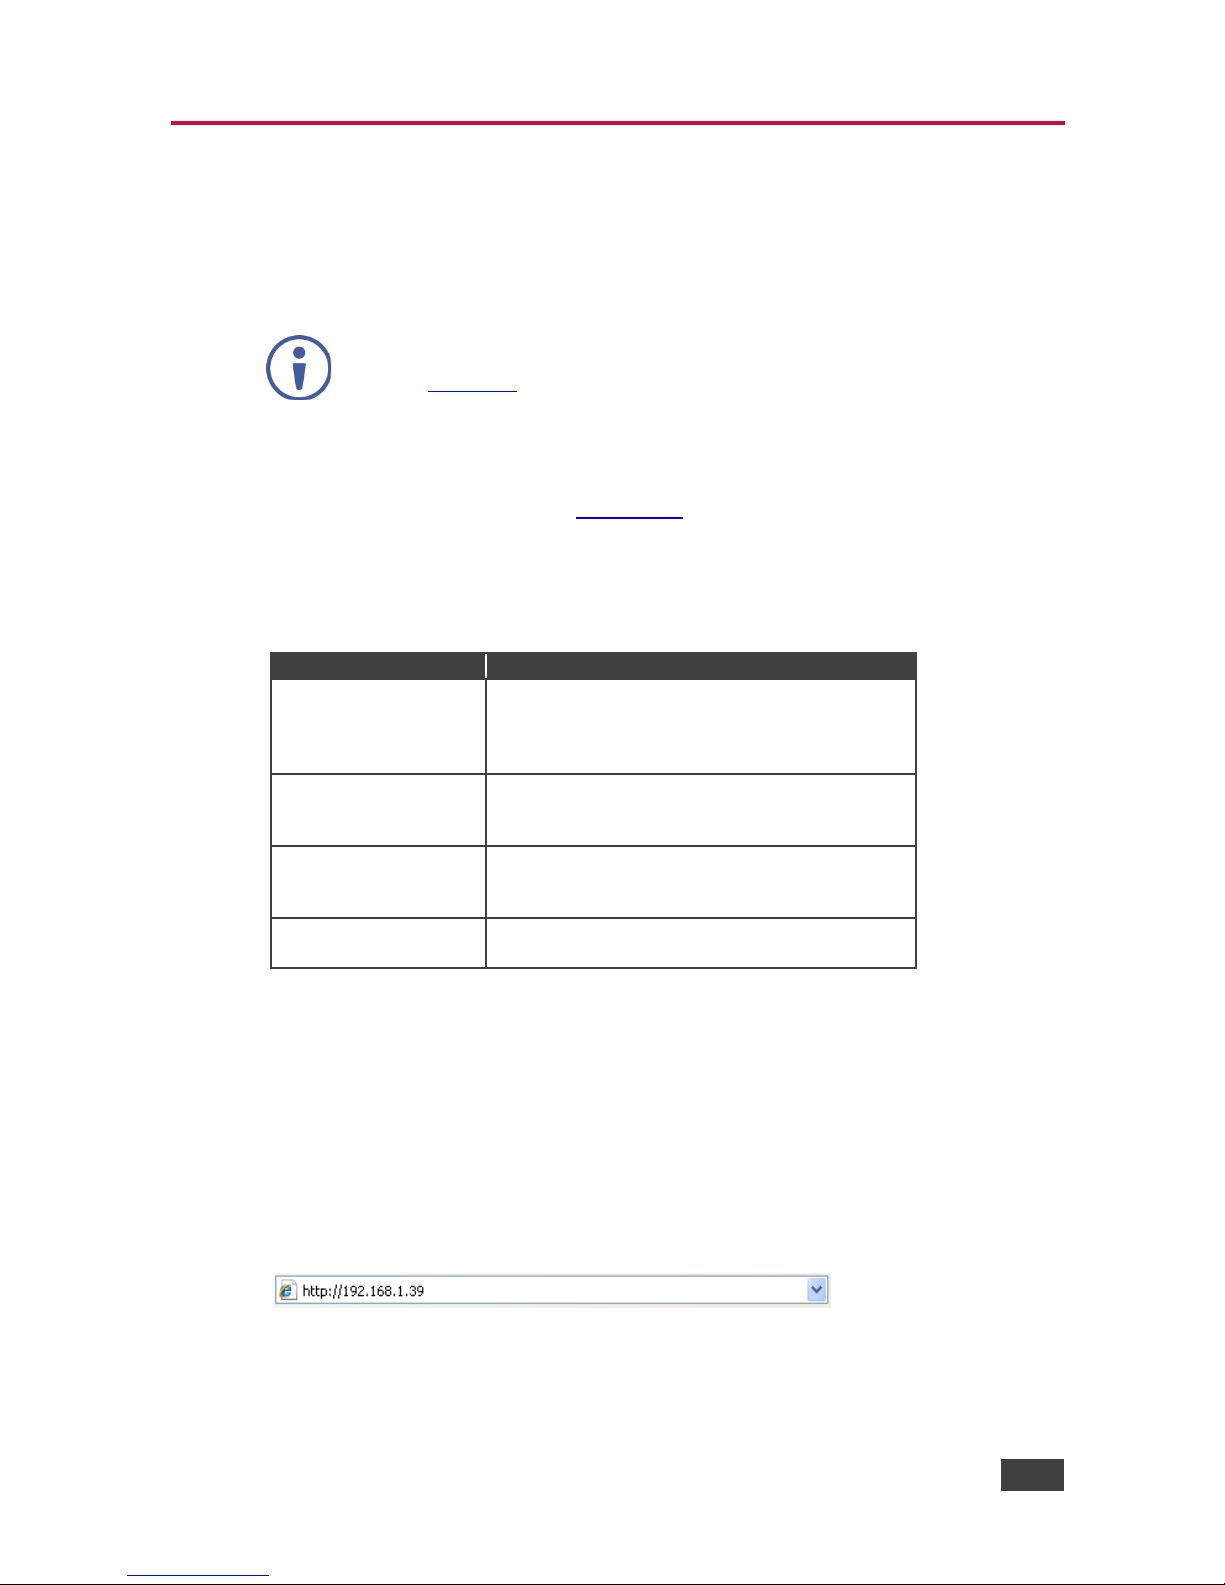
1. Open your Internet browser.
2. Type the IP number of the device in the Address bar of your browser. For
example, the default IP number:
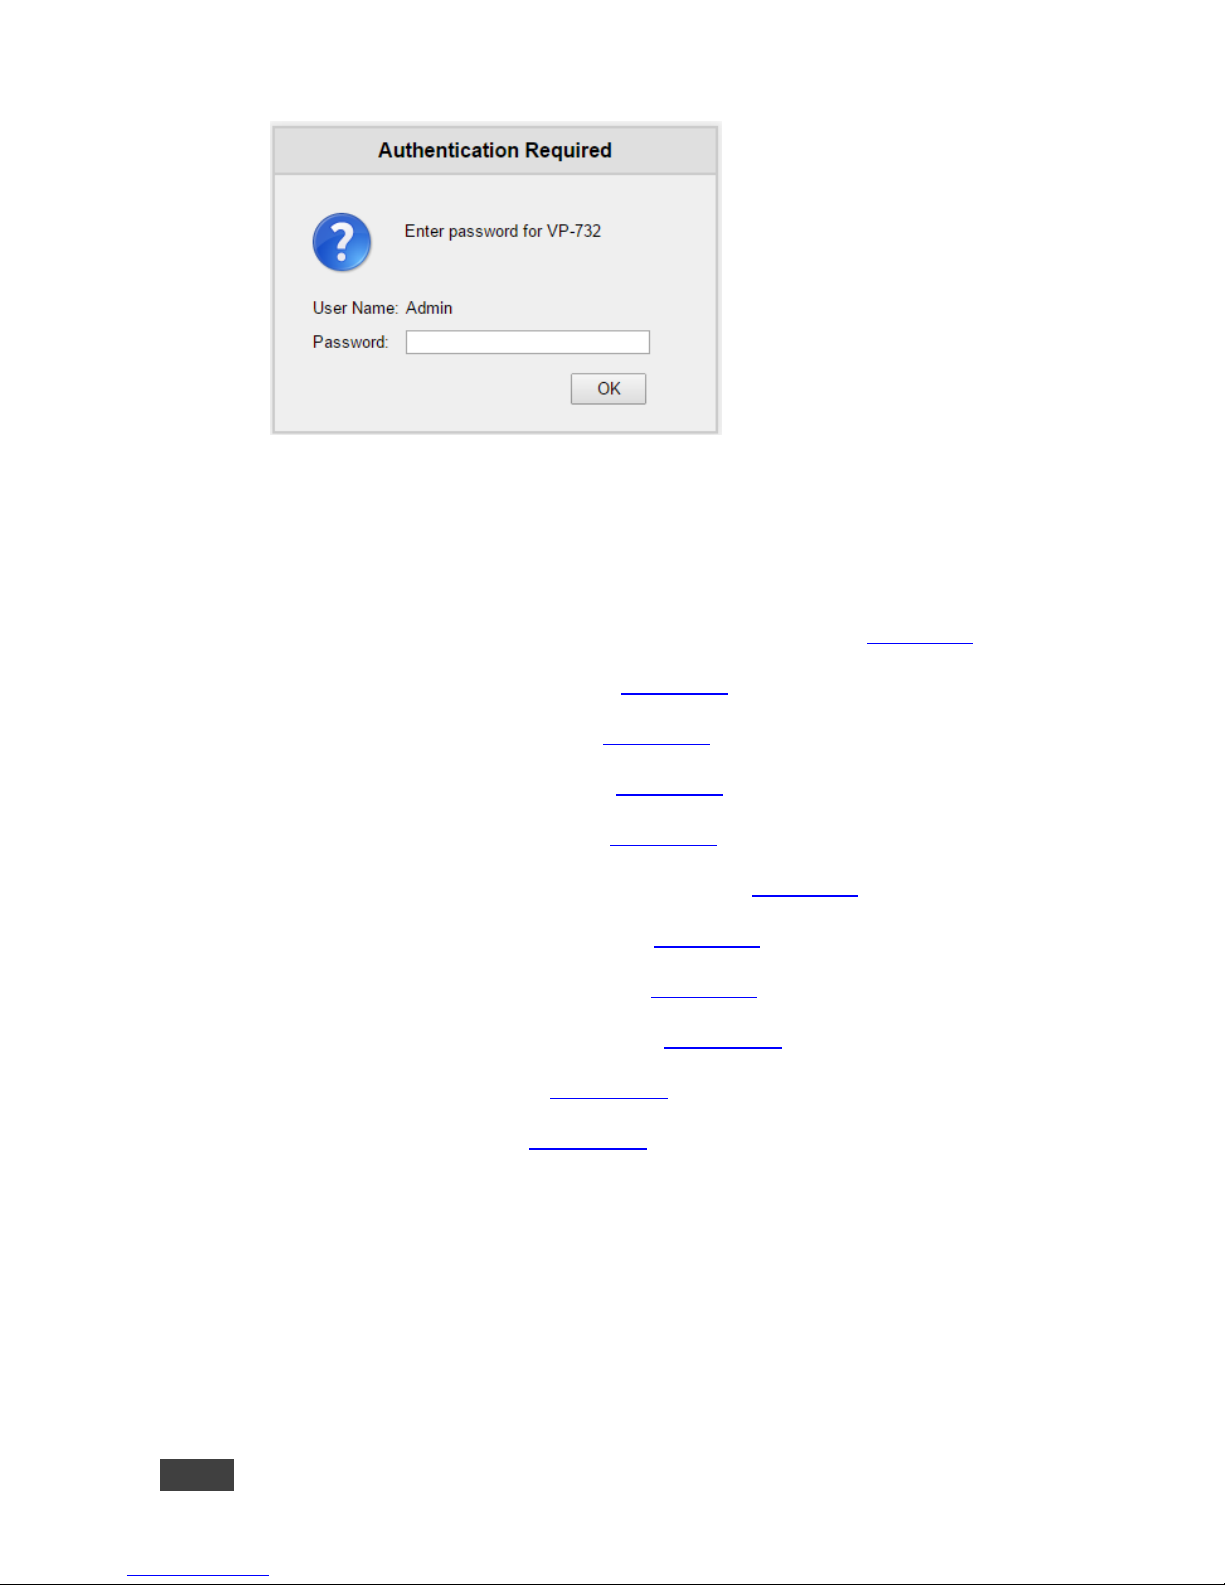
The Authentication window appears:
Page 50
44
VP-732 - Using the Embedded Web Pages
3. Enter the password and click OK.
The Routing & Scaling (first) page loads.
There are 11 Web pages:
The Routing & Scaling (Program and Preview) page (see Section 9.2)
The Device settings page (See Section 9.3)
The Input Settings page (see Section 9.4)
The Output settings page (see Section 9.5)
The Audio Settings page (see Section 9.6)
The Miscellaneous Video Settings page (see Section 9.7)
The EDID management page (see Section 9.8)
The Advanced Settings page (see Section 9.9)
The Custom Resolutions page (see Section 9.10)
The Security page (see Section 9.11)
The About page (see Section 9.12)
Page 51
VP-732 – Using the Embedded Web Pages
45
9.2 The Routing & Scaling Page
The Routing & Scaling page includes Program and Preview tabs.
The main area shows the size of the image and its location. The list of available
inputs appears on the right side of the main area. The selected input appears green
when its image is selected. For example, in Figure 25 the HDMI 2 1 input is
selected and appears green on the list. On the far right side in the Program tab you
can use the slider to set the output volume (see Section 9.2.9).
9.2.1 The Program Routing and Scaling Page
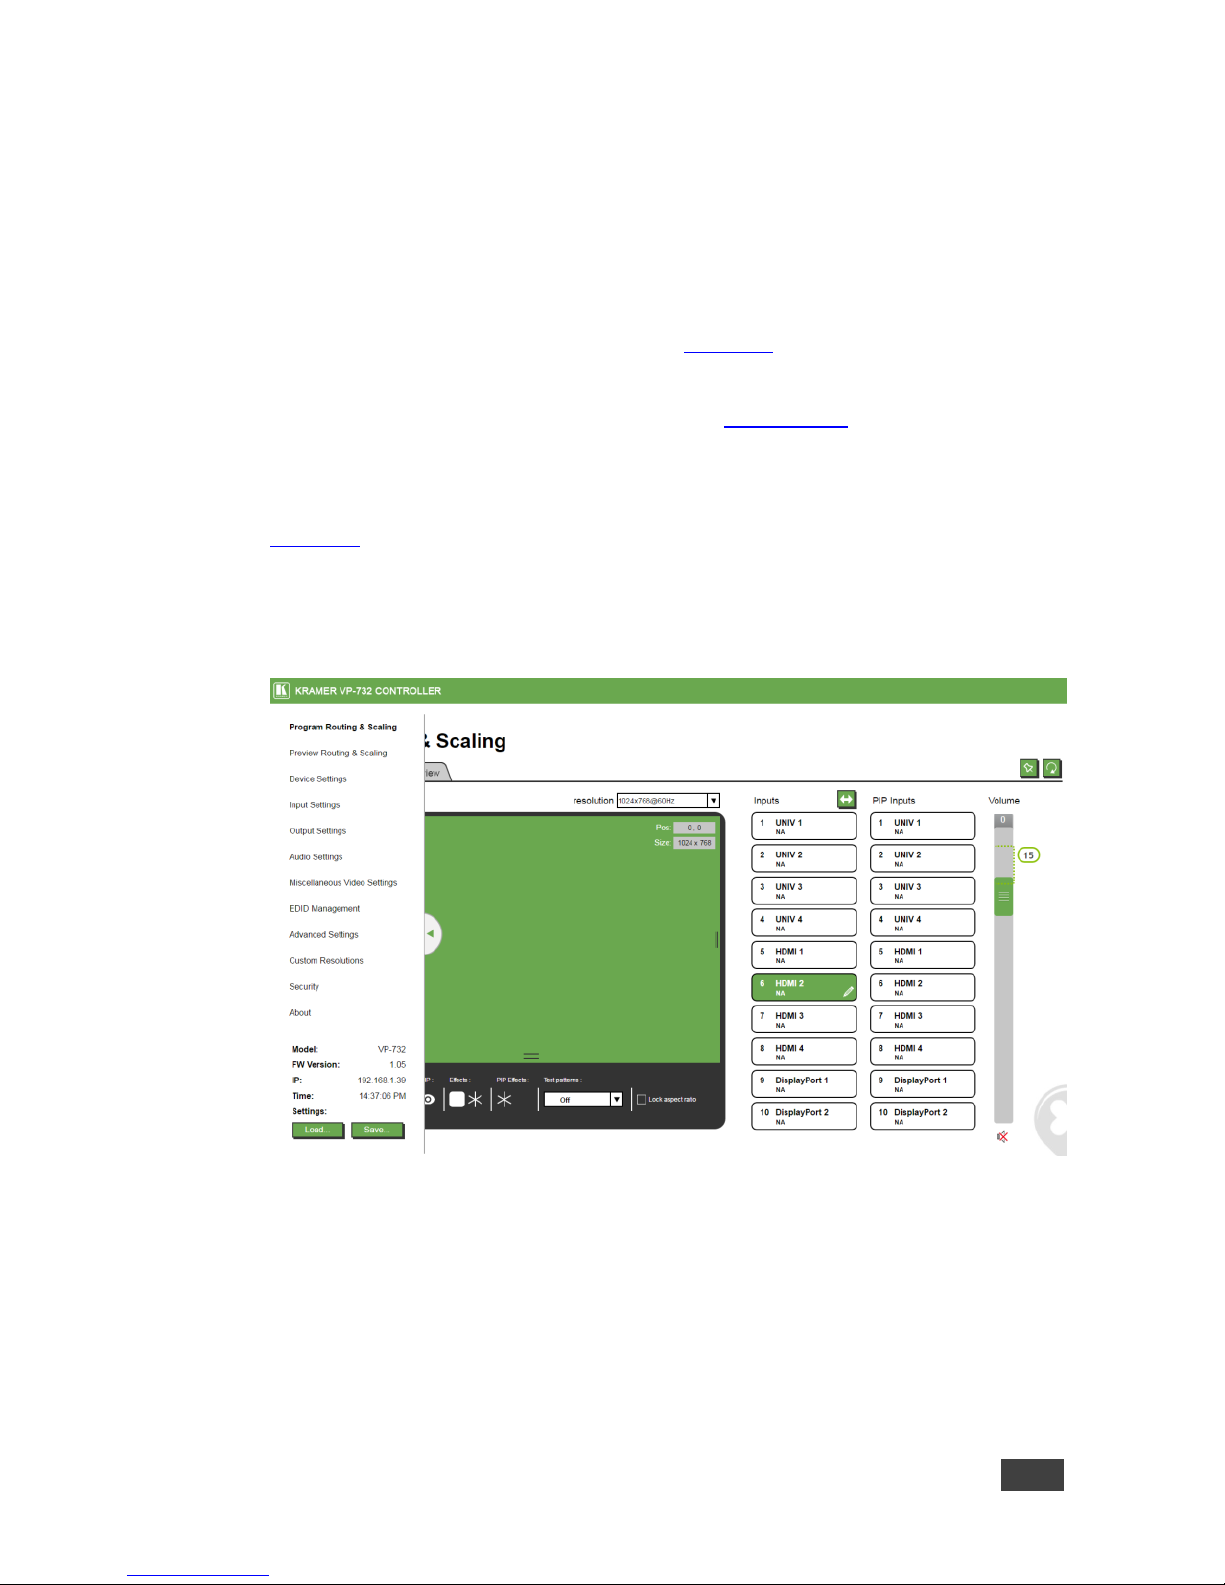
Figure 24 shows the Program Routing & Scaling page that is also the first page that
appears following the loading page. The column on the left shows the Program
Routing & Scaling page selected and below a list of all the other available Web
pages.
Figure 24: The Routing & Scaling Page with Web page list on the left
Note that the Web pages list on the left automatically hides itself when the page is
accessed:
Page 52
46
VP-732 - Using the Embedded Web Pages
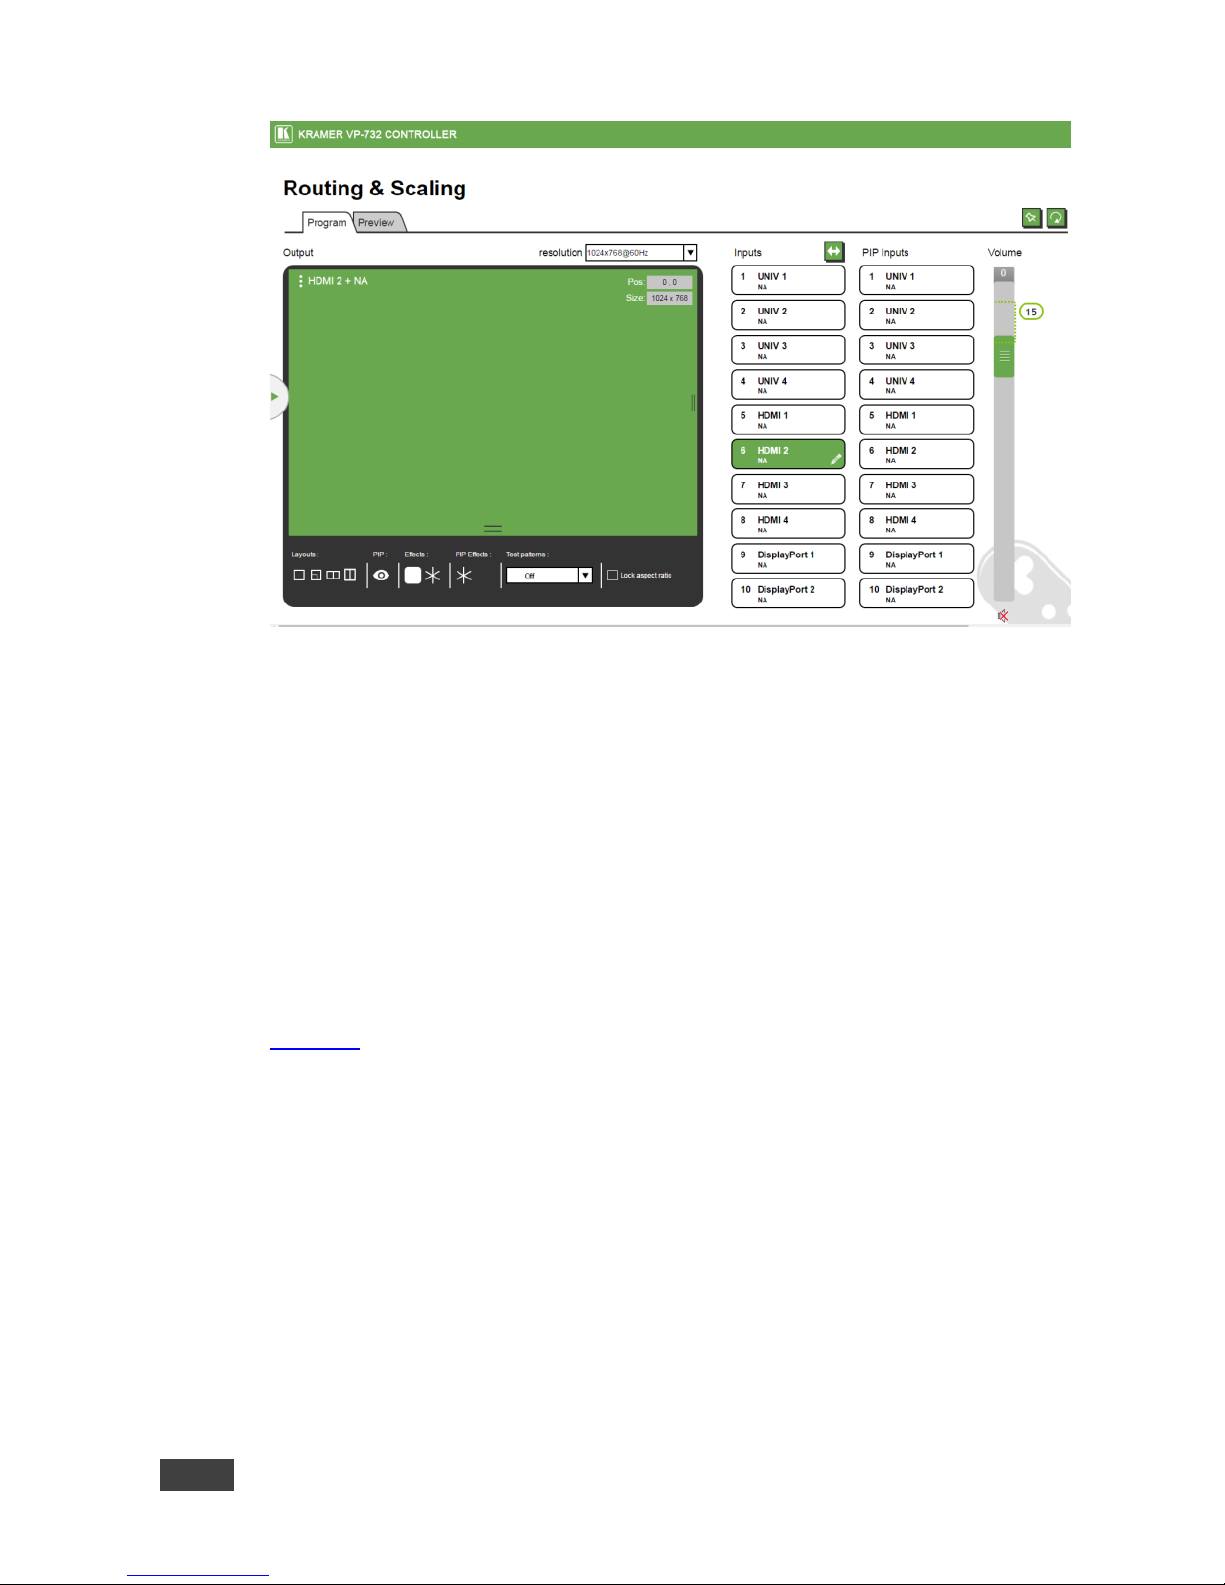
Figure 25: The Routing & Scaling Page – Program Window
The program tab shows the program display. The selected input (from the Inputs list
on the right side) appears on the top left and the image size and position
coordinates appear on the top right. You can change the size and position of the
image on the display by pressing and holding the image adjusters on the lower and
right sides of the image (If the Lock aspect ratio check box is clear).
Set the output volume using the volume slider. You can set the maximum value of
the Output Volume by using the pre-limiter on the Volume slider. Slide the prelimiter up or down to determine the maximum allowed volume. The example in
Figure 25 value below shows the maximum allowed value 15 selected which lets
you set the volume up to 15 only.
Page 53
VP-732 – Using the Embedded Web Pages
47
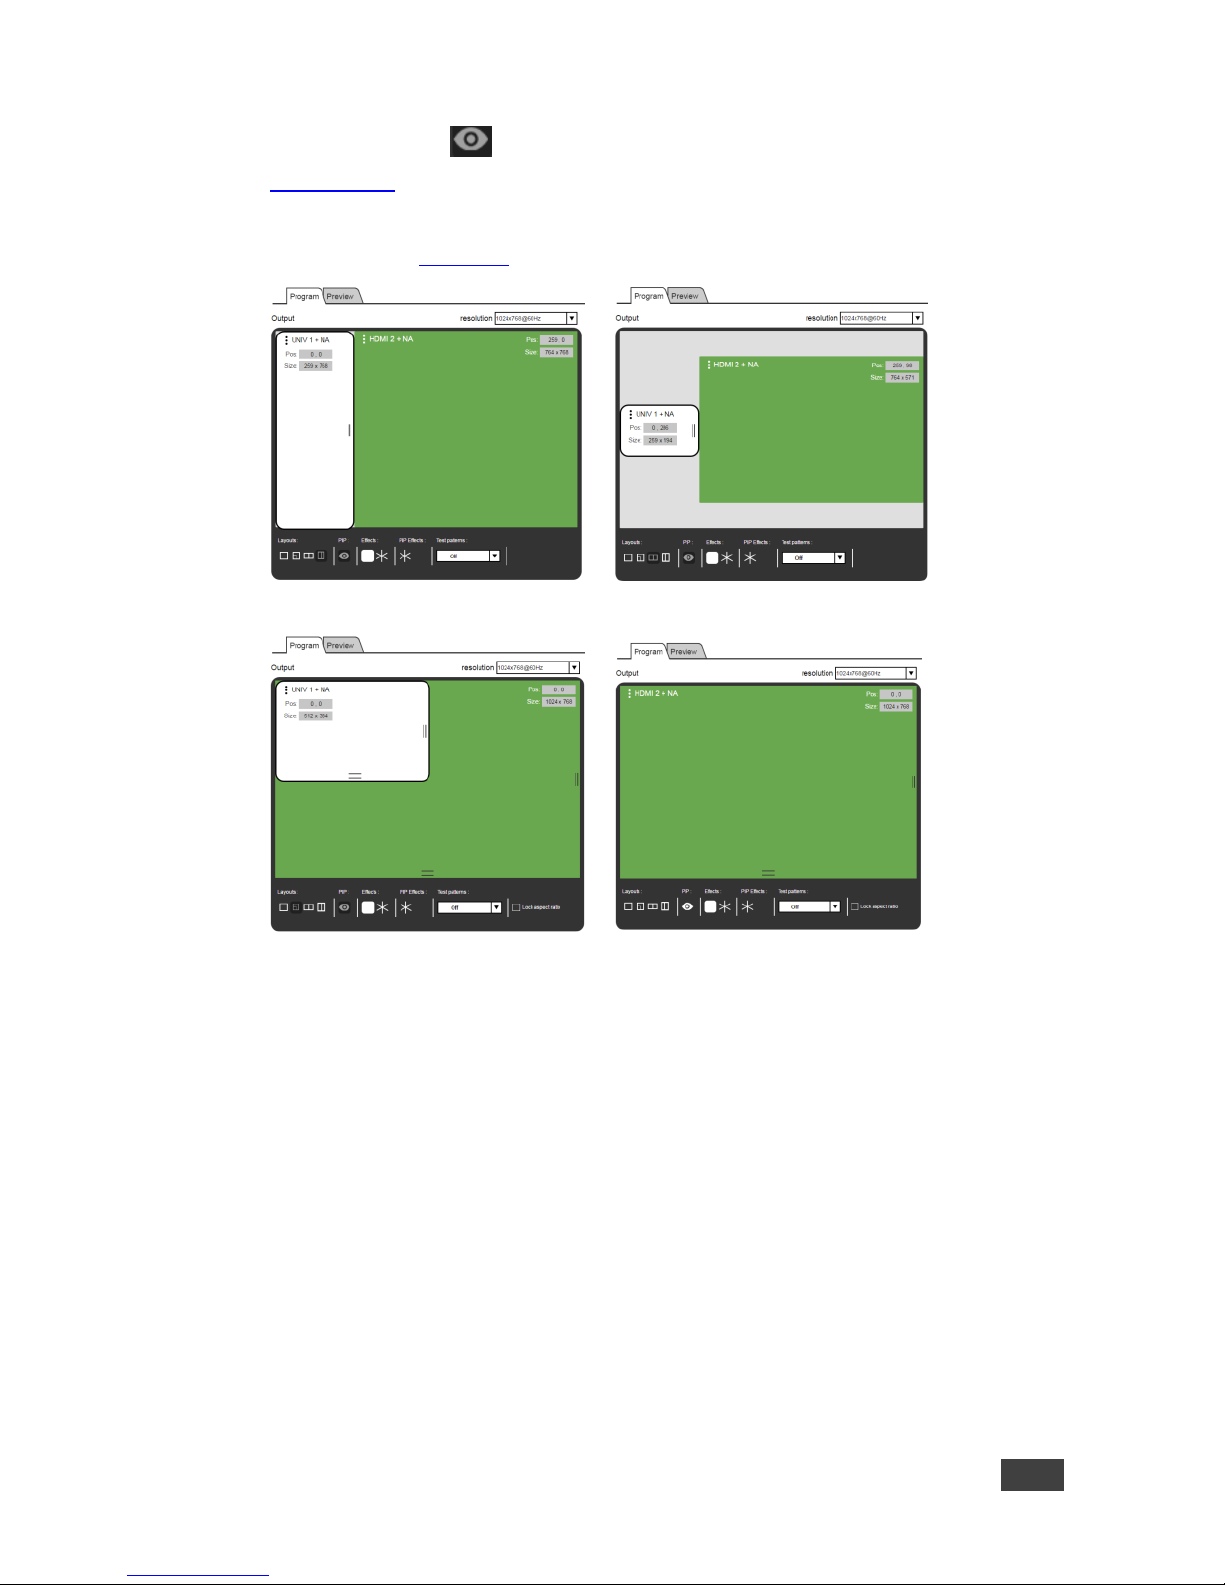
Click the PIP icon ( ) to exit the Preview mode and enter the PIP mode (see
Section 9.2.3). Select an input from the PIP Inputs list. When in the PIP mode, the
Program tab shows the various PIP options or a single window with no PIP
displaying (see Figure 26).
Split Picture + Picture
Picture in Picture Single Picture
Figure 26: The Routing & Scaling Page – Main and PIP Windows
Note that when in the PIP mode the preview output resolution will always be Single
Picture.
9.2.2 The Preview Routing and Scaling Page
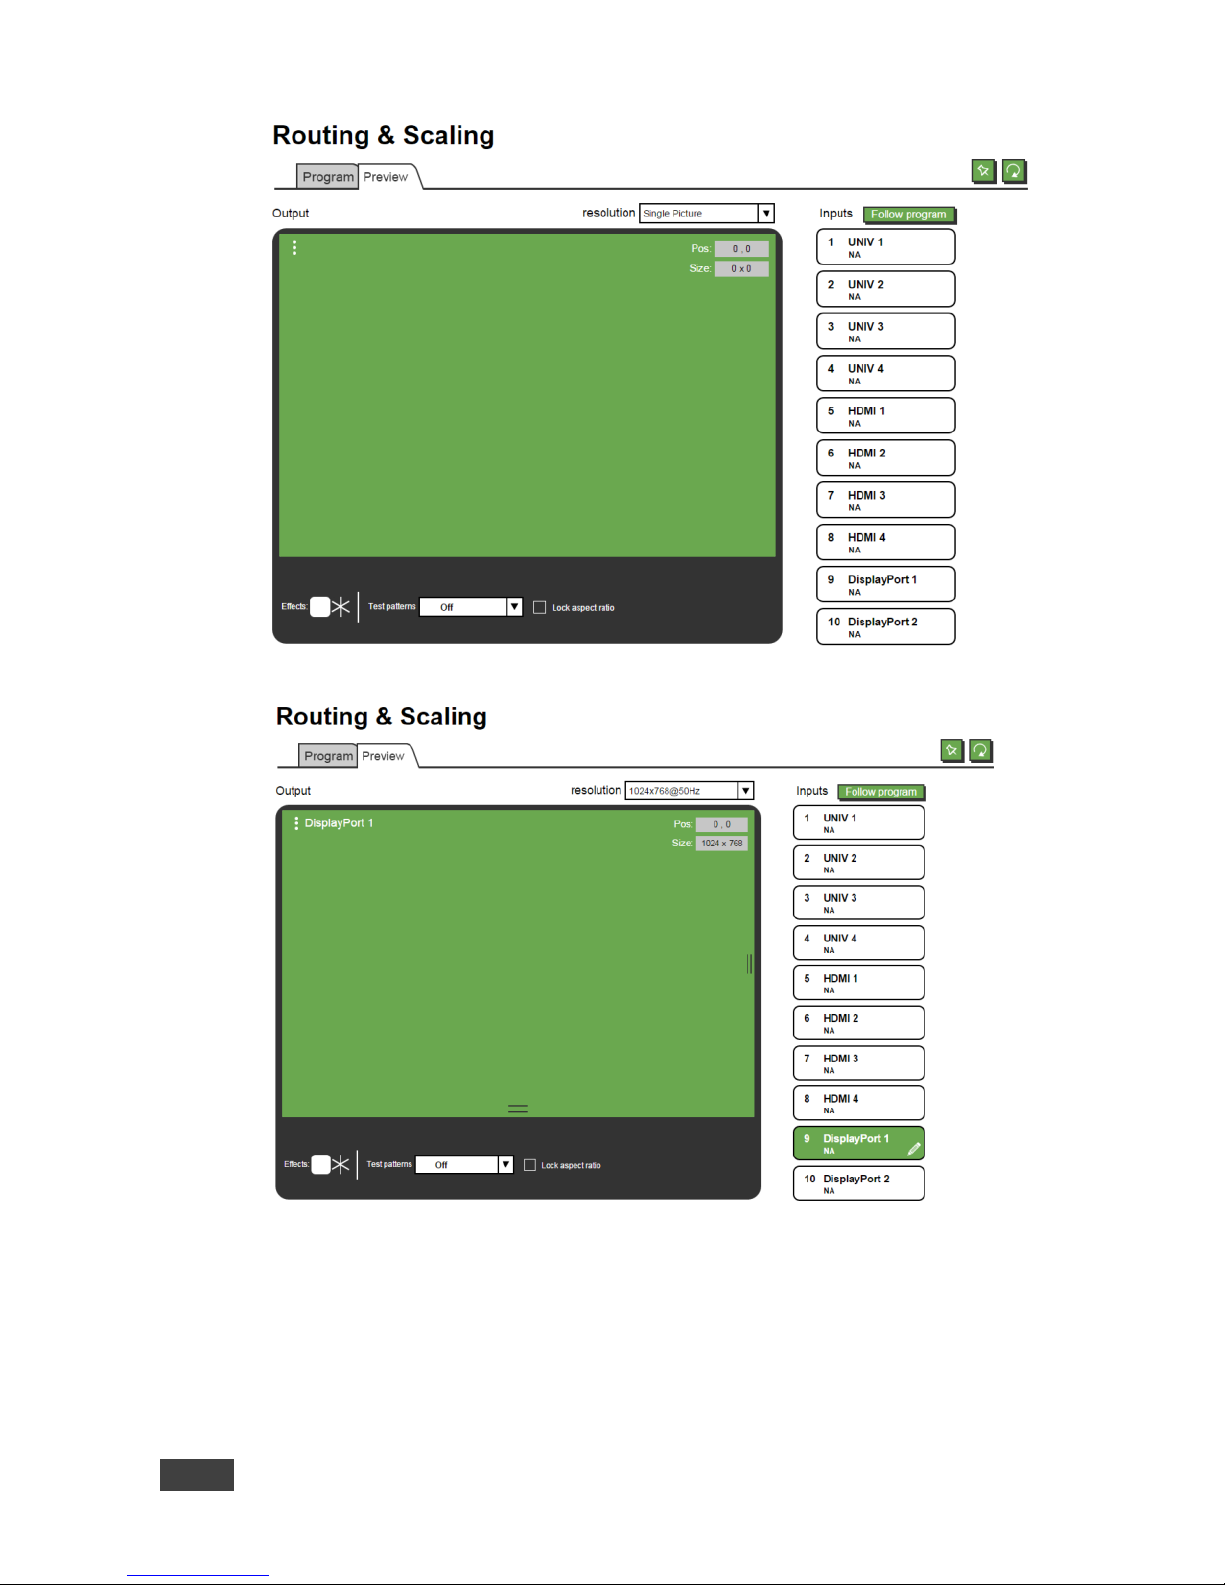
The Preview Router & Scaling page lets you set the PREVIEW display. It is enabled
when the device is in the Preview mode (PREVIEW front panel button is
illuminated). In the Preview mode you can select the preview input, set the size and
position of the Preview image and so on.
Page 54
48
VP-732 - Using the Embedded Web Pages
Figure 27: The Preview Routing & Scaling Page – Disabled in PIP Mode
Figure 28: The Preview Routing & Scaling Page – Preview Mode
Click the Follow program button to have the preview follow the program input.
Page 55

VP-732 – Using the Embedded Web Pages
49
9.2.3 Switching between PIP and Preview modes
To switch from the Preview to the PIP mode via the Web pages:
1. In the Program Routing & Scaling page, click the PIP button and select the
desired layout (split, picture + picture, picture in picture or single window).
2. The machine is now in the PIP mode and the PREVIEW front panel button no
longer illuminates.
To switch from the PIP mode back to the Preview mode:
1. In the Preview Routing & Scaling page, set the preview resolution (in the PIP
mode the Preview resolution was the same as the Main/Program resolution).
After selected resolution is loaded, the PREVIEW front panel button
illuminates.
The preview and program outputs can now show separate images.
9.2.4 Setting the Image Size
You can set the size of the Program/Preview window by moving the right and
bottom edges of the image while pressing the mouse button. You can also move
the image by pressing the mouse button and moving the image about. The image
size and position are indicated at the image top right and for each window, the top
left side area shows the selected input.
When checking Lock aspect ratio, the image aspect ratio is kept when setting to
different sizes.
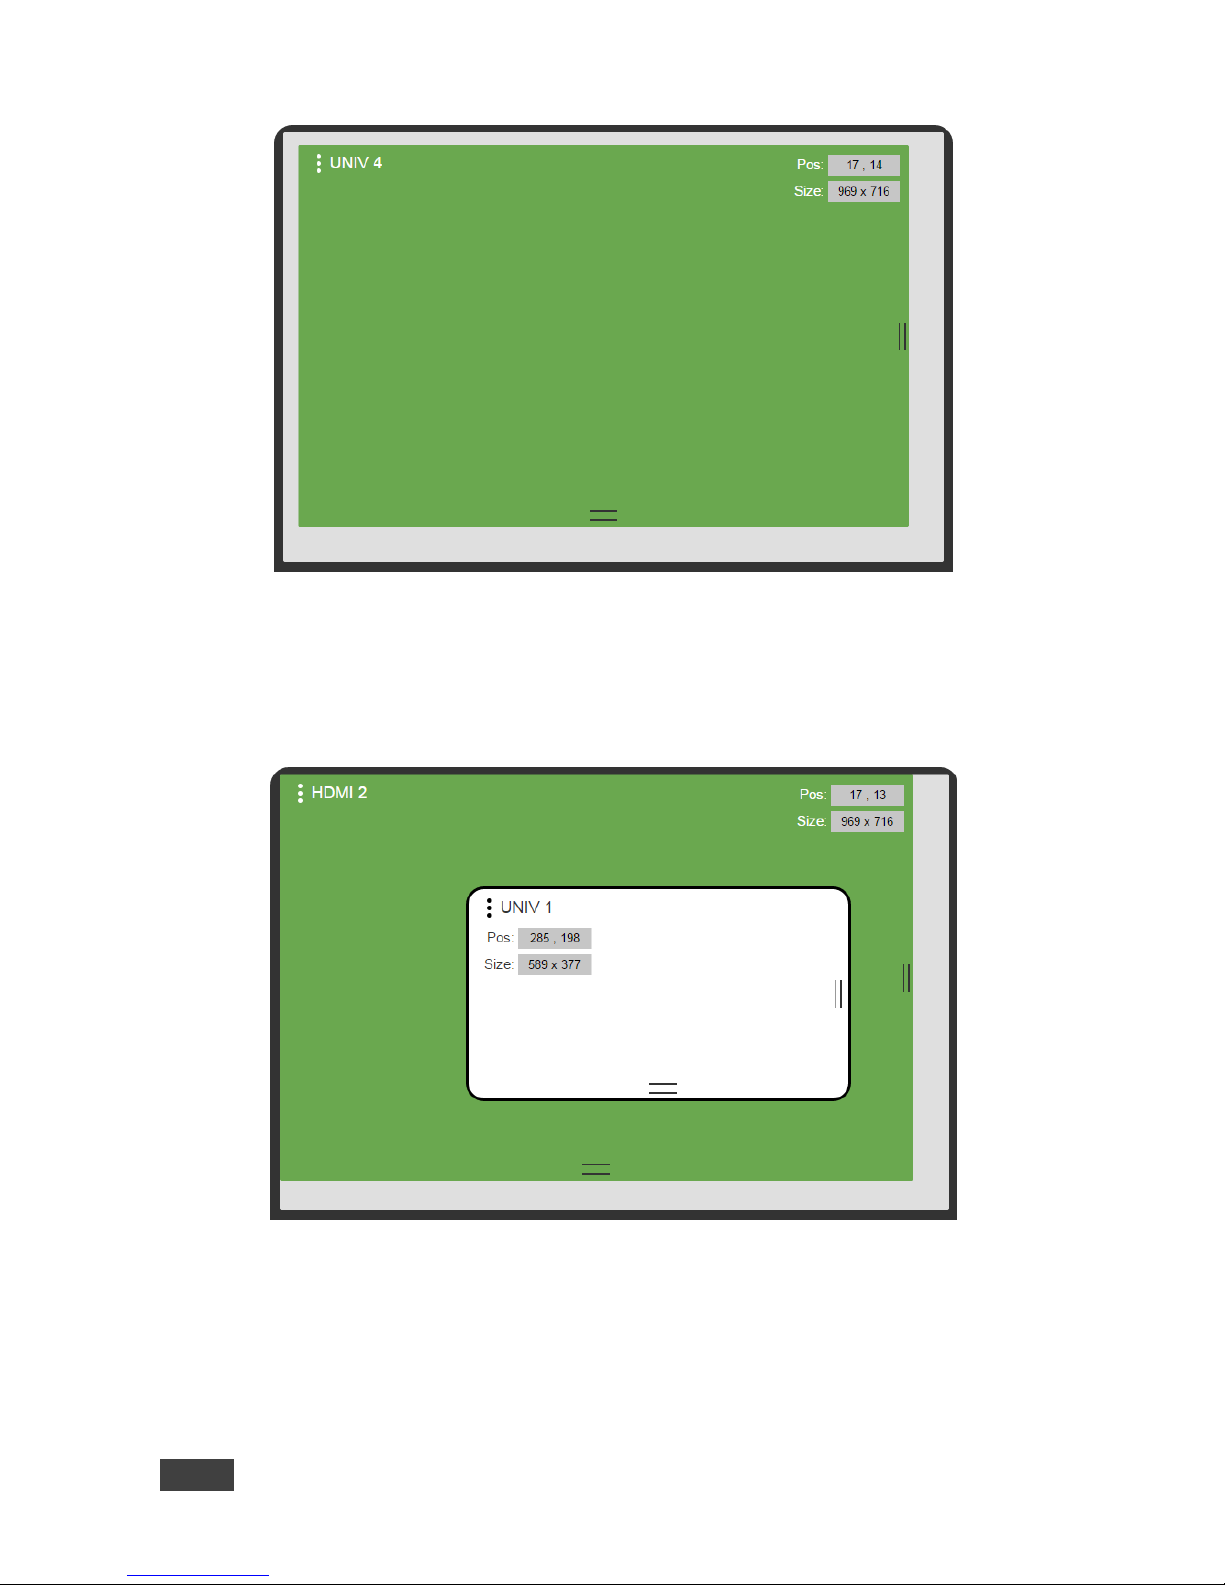
The Routing & Scaling main area shows a depiction of the display which can show
a single window (shown in Figure 25) or some variation of a MAIN window and a
PIP window (one image over another), as illustrated in Figure 30.
Page 56
50
VP-732 - Using the Embedded Web Pages
Figure 29: The Routing & Scaling Page – Single Program/Preview Window
When in the PIP mode, the PIP image can be moved in any direction by clicking
and moving the mouse and sized by moving the right and bottom edges of the
image.
Figure 30: The Routing & Scaling Page – Moving the PIP Window
Page 57
VP-732 – Using the Embedded Web Pages
51
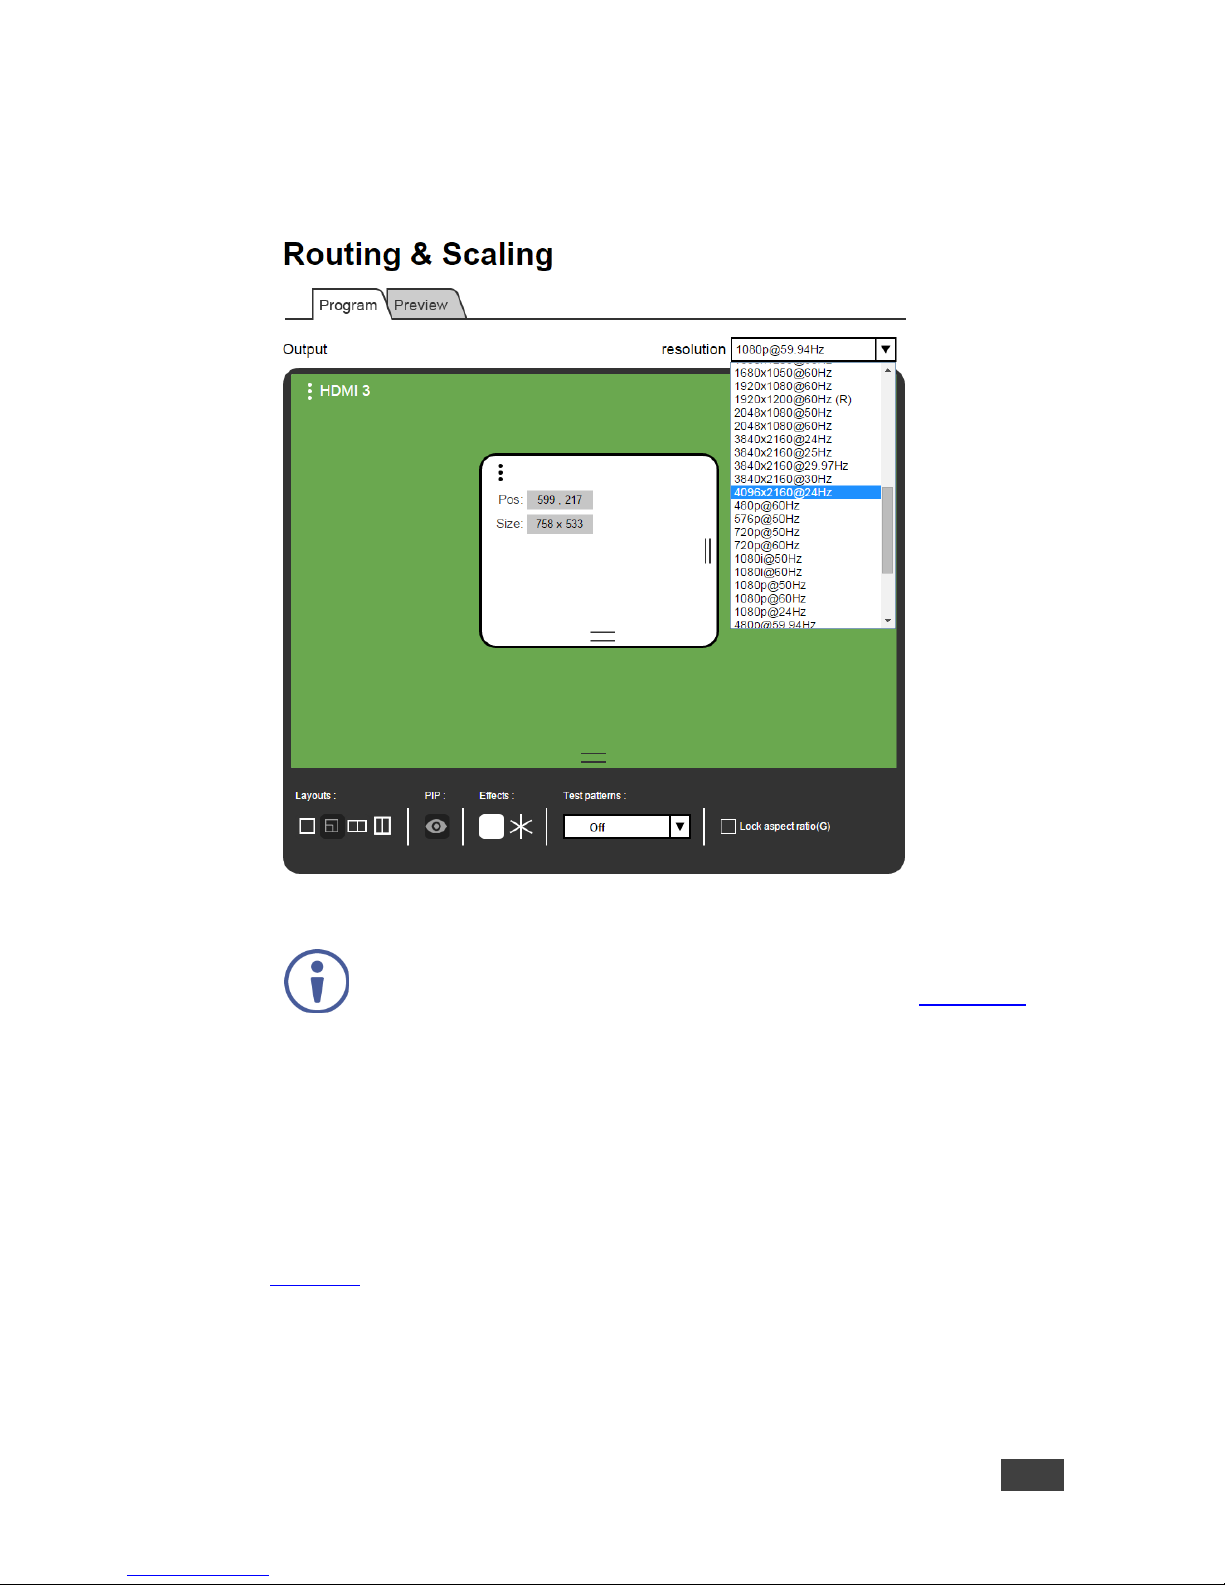
9.2.5 Setting the Output Resolution
The output resolution can be selected from the Resolution drop-down box:
Figure 31: The Routing & Scaling Page – Selecting the output Resolution
The Preview tab shows the list of resolutions available for the Preview
output (including Single Picture to set the PIP mode, see Section 7.3).
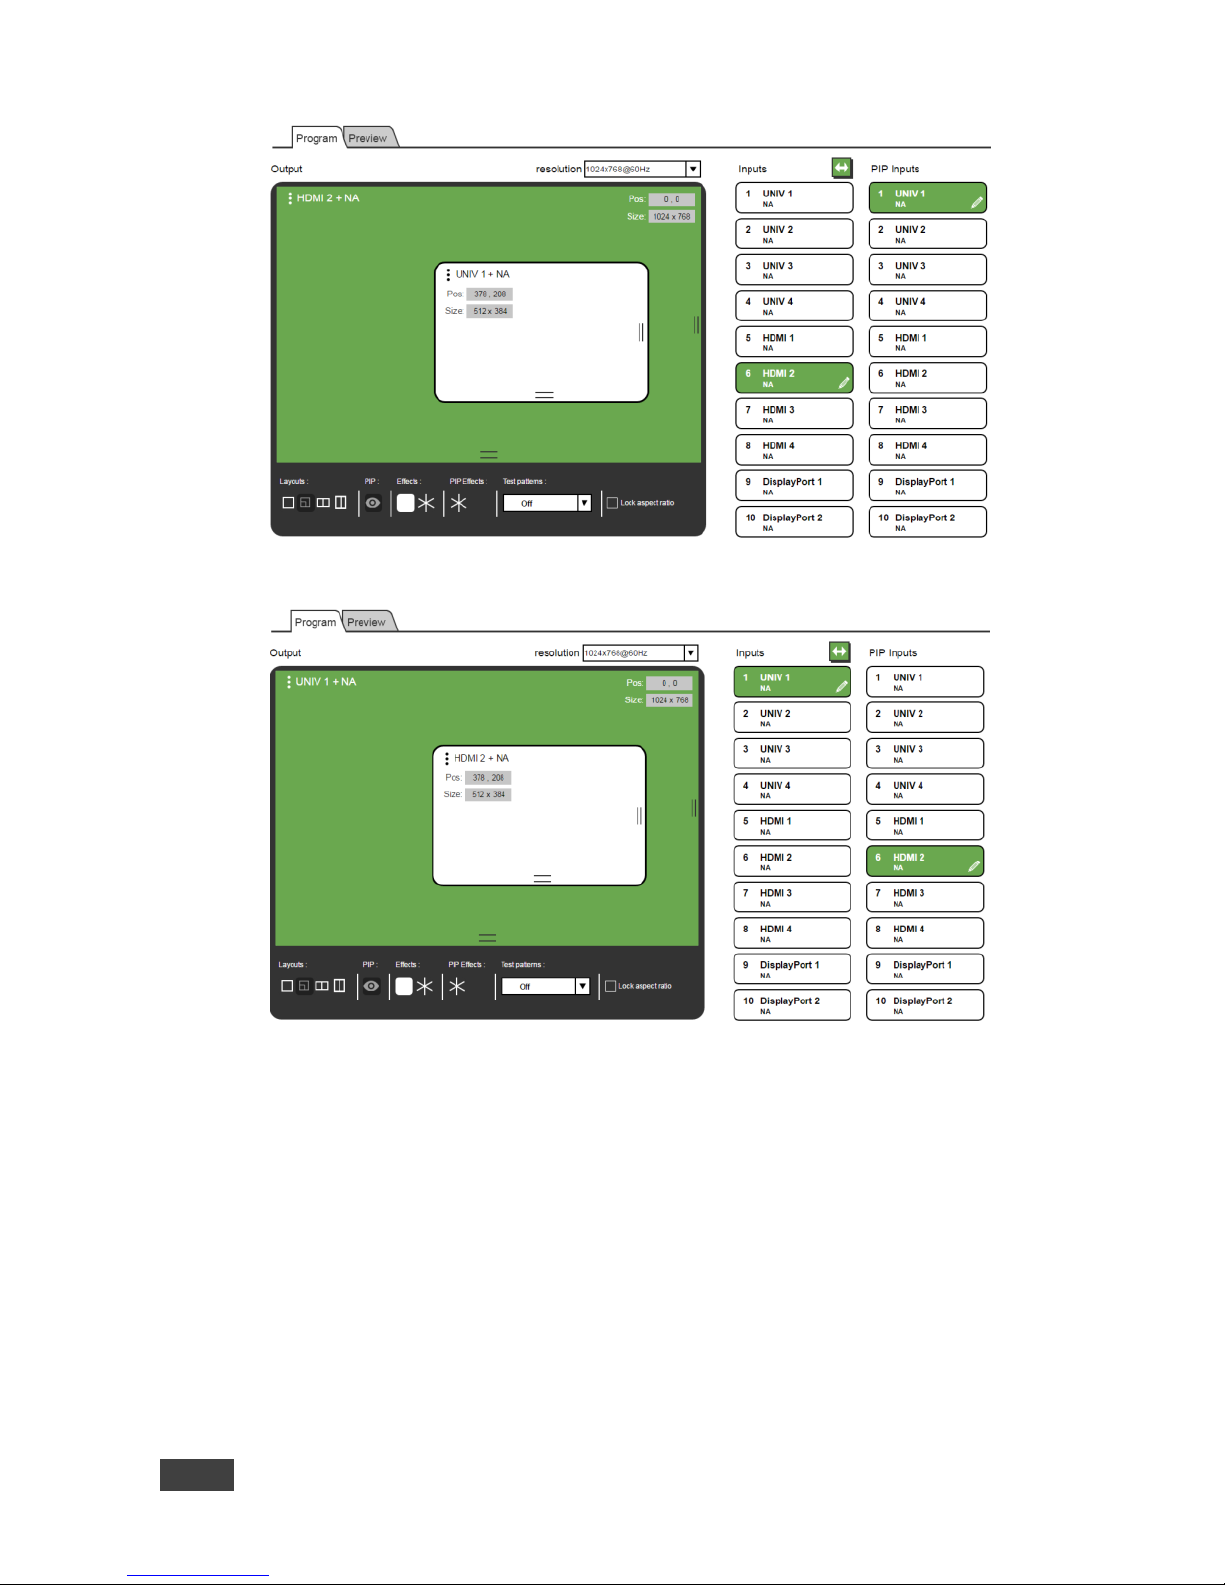
9.2.6 Swapping Inputs in the PIP Mode
Press the Swap Inputs button to swap between MAIN and PIP inputs (in the PIP
mode). For example, if the MAIN window displays HDMI 2 and the PIP window
displays UNIV 1, these inputs swap places when clicking the SWAP button, so the
MAIN window will now show UNIV 1 and the PIP window will show HDMI 2 (see
Figure 32.
Page 58
52
VP-732 - Using the Embedded Web Pages
Figure 32: The Routing & Scaling Page –Swapping Inputs
Page 59
VP-732 – Using the Embedded Web Pages
53
9.2.7 The Lower Buttons Bar
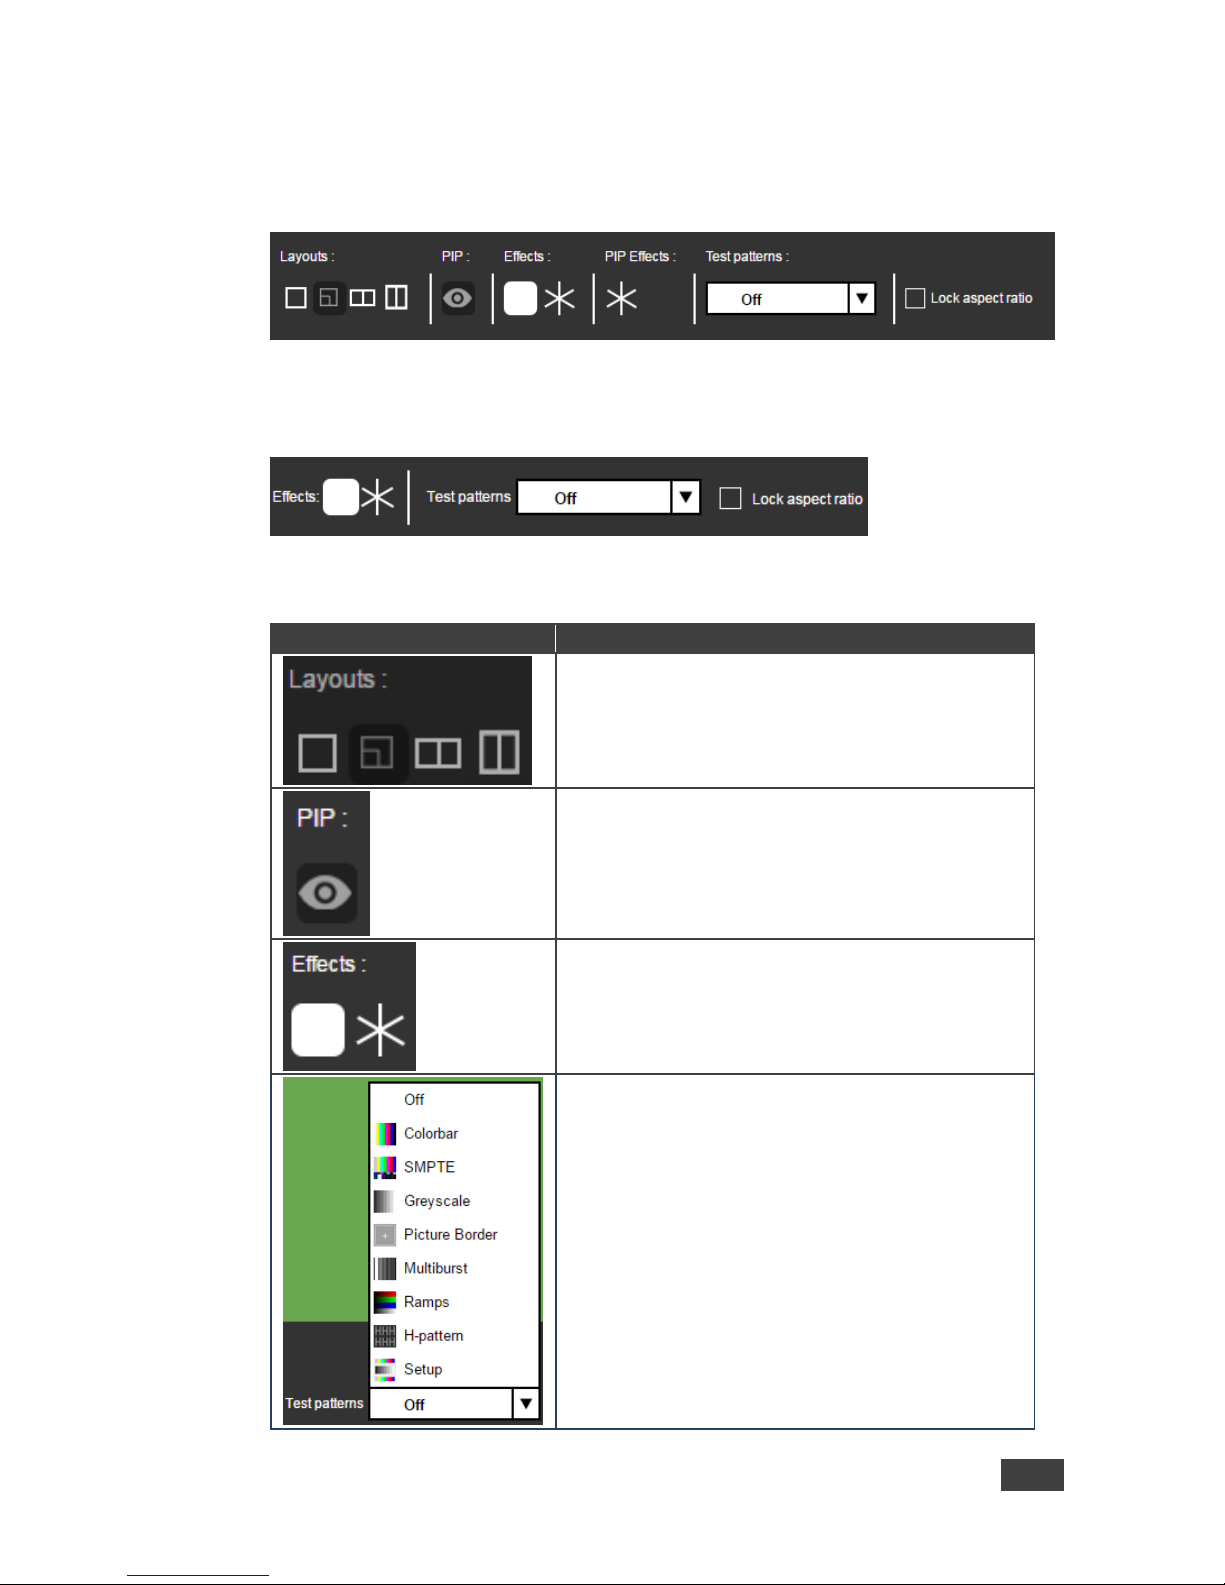
The lower buttons bar lets you perform quick and easy setups:
Figure 33: The Routing & Scaling Page – Program Lower Buttons Bar
The Preview buttons bar includes effects and test patterns only:
Figure 34: The Routing & Scaling Page – Preview Lower Buttons Bar
Button
Function
Select one of the four standard setups.
You can customize the size of each window by using
the arrows.
Click to toggle between PIP and single window
Select freeze and/or blank effects
Select a test pattern
Page 60
54
VP-732 - Using the Embedded Web Pages
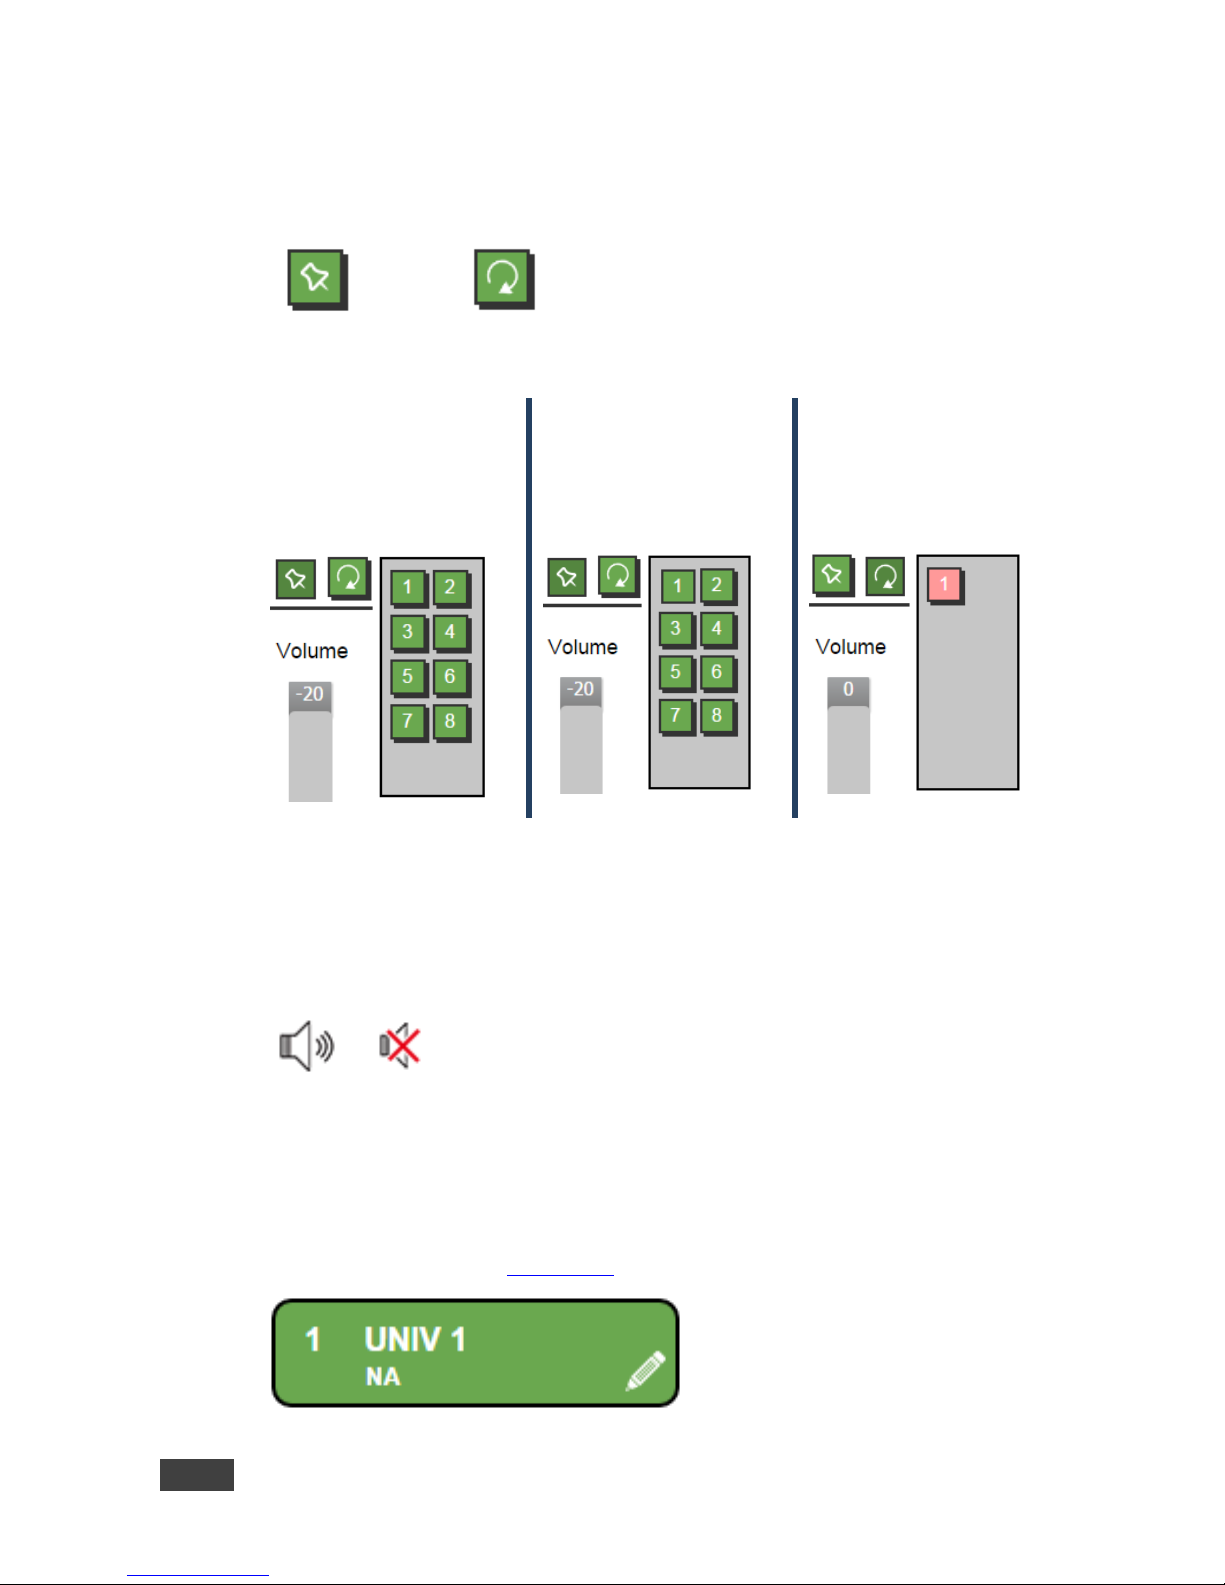
9.2.8 Store and Recall a Setup
You can store or recall a setup via the store and recall buttons:
Store button
Recall button
To save a preset:.
Click the preset button. the
save preset window appears:
Click a preset button (1 to 8),
for example, click 1.
Click the Recall button to
recall a preset. Only the
buttons with stored presets
appear.
Click the button to recall the
settings.
Figure 35: The Routing & Scaling Page – Storing and Recalling a Preset
9.2.9 Audio Level Slider
The volume audio slider appears on the right side of the page and can be toggled to
mute and unmute, if required.
or
Figure 36: The Routing & Scaling Page – Muting the Audio Level
9.2.10 Editing an Input
Click the pen icon on the input label to edit the input. The Web page moves to the
Input Settings page (see Section 9.4).
Figure 37: The Routing & Scaling Page – Editing an Input
Page 61
VP-732 – Using the Embedded Web Pages
55
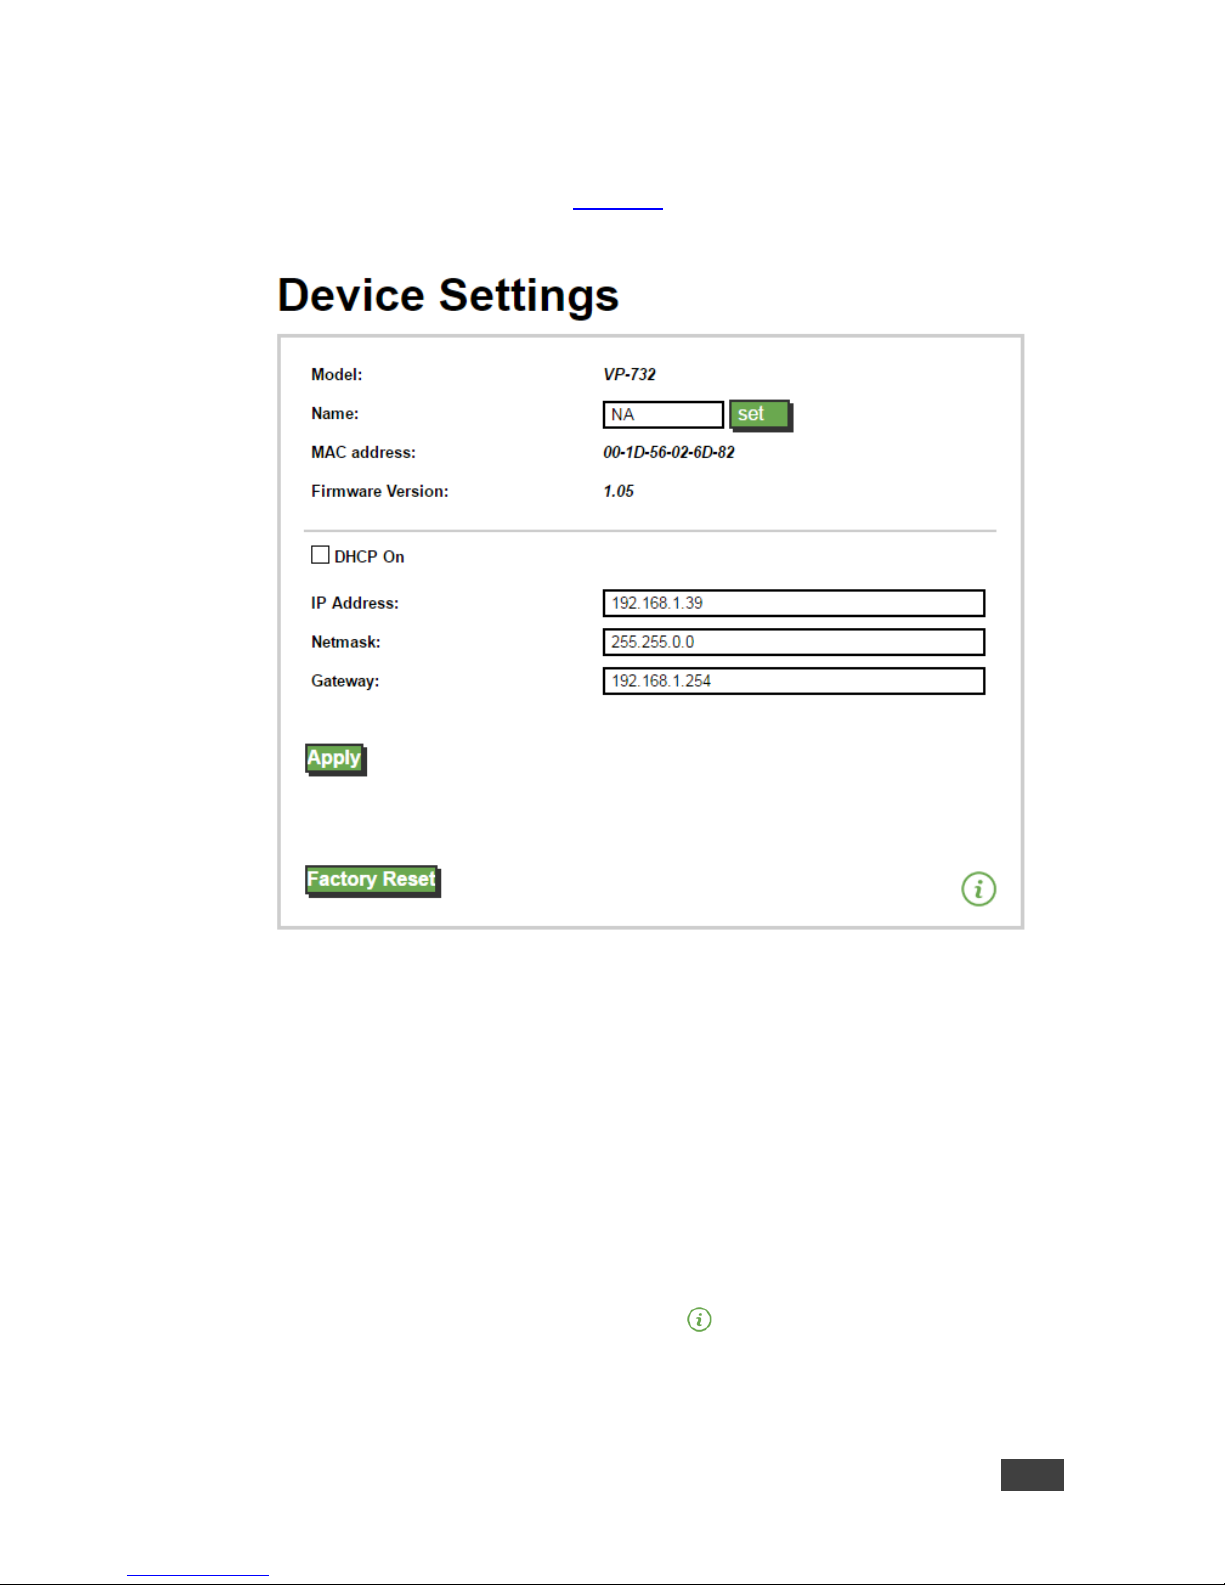
9.3 The Device Settings Page
The Device Settings window (in Figure 38) lets you set the device name, change
the Ethernet parameters, perform factory reset and view the information data.
Figure 38: The Device Settings Page
9.3.1 Changing the Ethernet Settings
You can change the Ethernet parameters (DHCP box needs to be checked) by
typing the change and clicking the Apply button. Note that:
After changing the IP number, you need to reload the Web page with the new
IP number
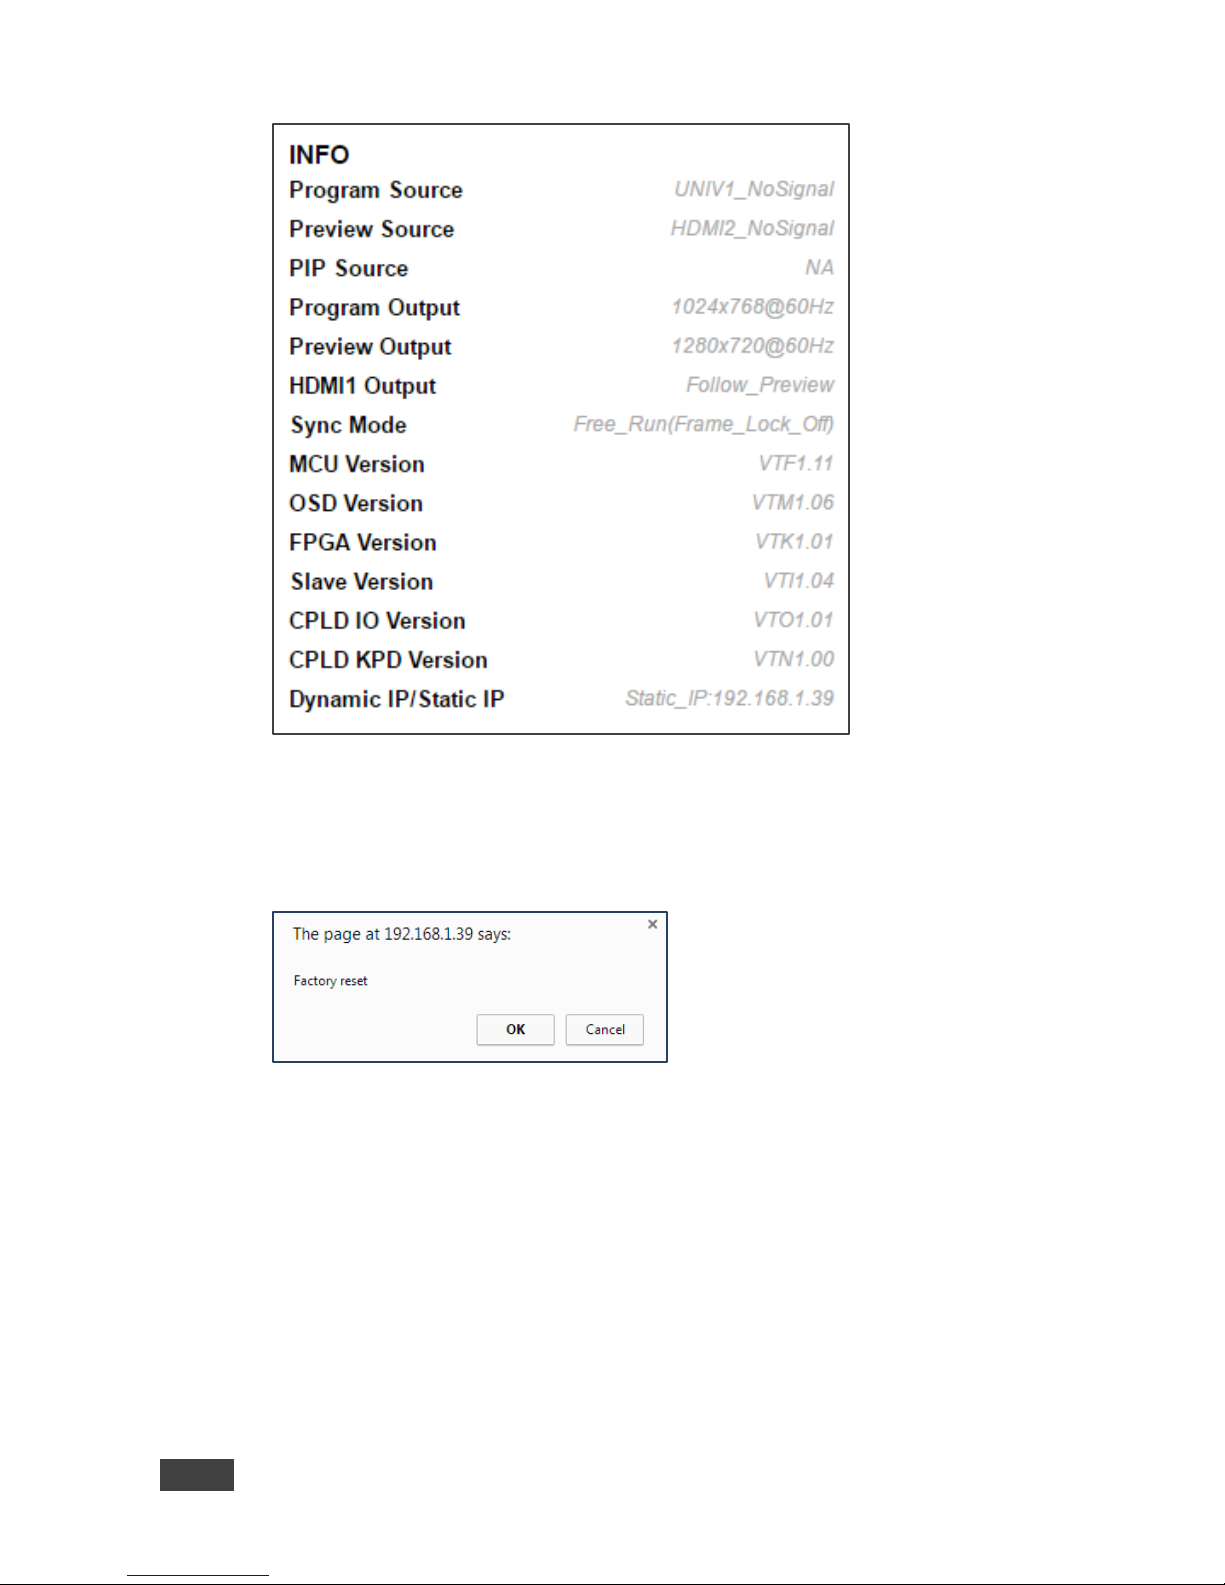
9.3.2 The Information Window
To access the information window, click the icon on the lower right side of the
page. Click it once more to close the INFO window.
Page 62
56
VP-732 - Using the Embedded Web Pages
Figure 39: The Device Settings Page – the Information Window
9.3.3 Factory Reset
Click the Factory reset button to reset the device. The following window appears:
Figure 40: The Device Settings Page – Factory Reset
Click OK to start factory reset.
Page 63
VP-732 – Using the Embedded Web Pages
57
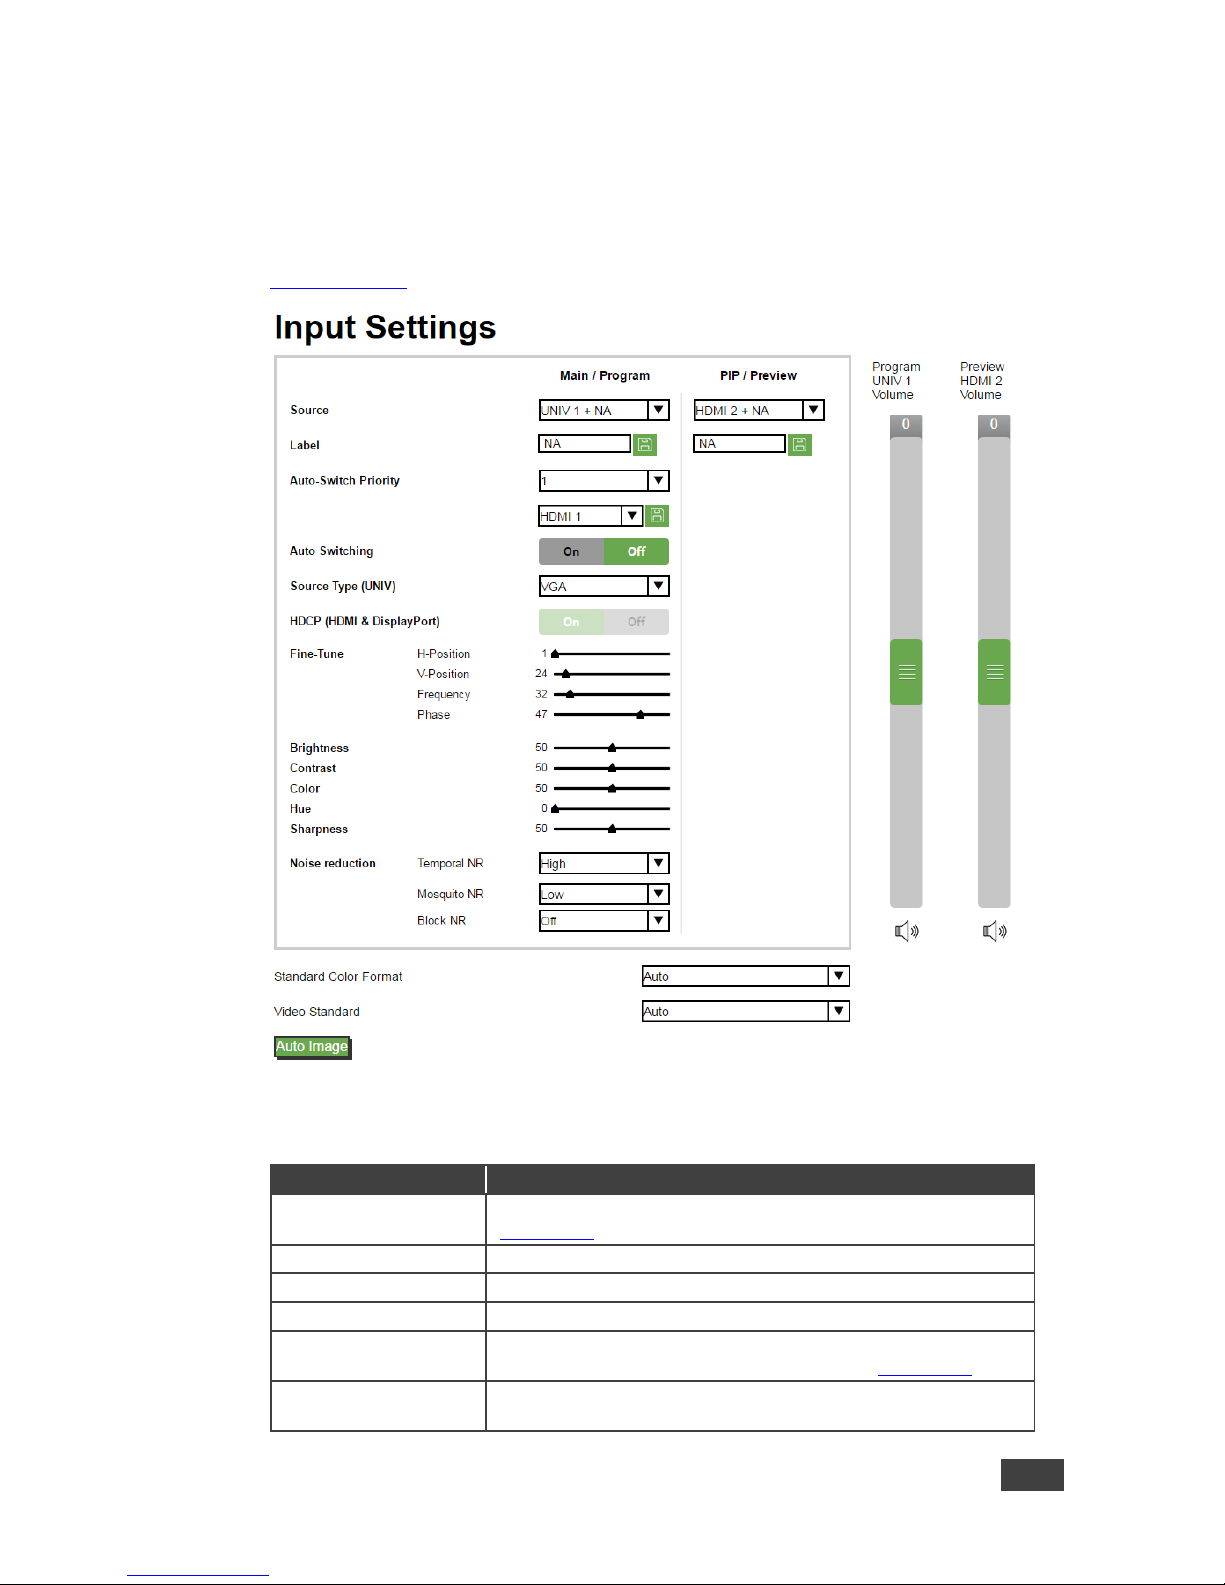
9.4 The Input Settings Page
The Input Settings page lets you setup the Program and PIP/Preview inputs and
can also be accessed via the edit icon in the Scaling & Routing page, see
Section 9.2.10.
Figure 41: The Input Settings Page
The following table defines the Input Settings page items:
Button
Function
Source
Select the input source (appears with the label), see
Section 7.1
Label
Label the input
Auto Switch Priority
Set the auto switching priority for each input
Auto Switching
Set auto switching to On or Off
Source type (UNIV)
Set the type of the analog source (VGA/Component/YC/Video),
disabled if the selected input is not UNIV, see Section 7.1
HDCP (HDMI &
DisplayPort)
Set to ON or OFF
Page 64
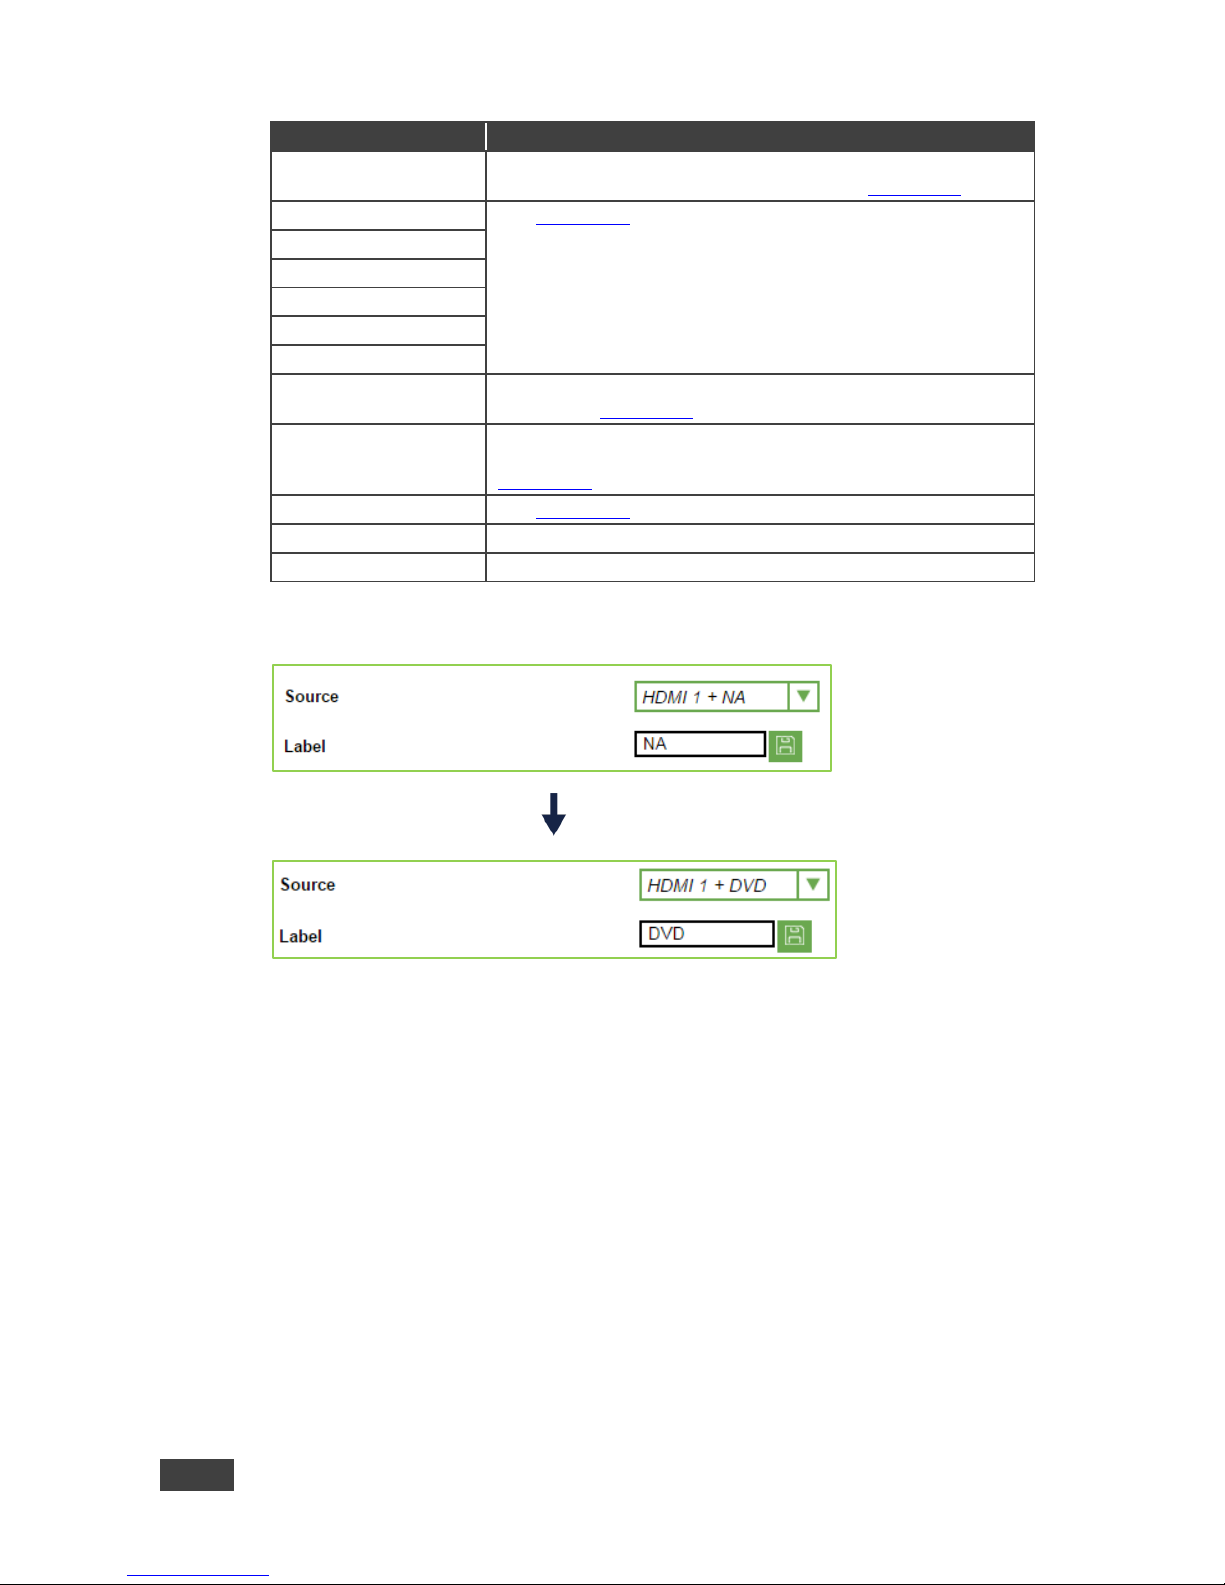
58
VP-732 - Using the Embedded Web Pages
Button
Function
Fine-Tune
Adjust the image parameters Horizontal and Vertical Position,
Frequency and Phase, for VGA images, see Section 7.2
Brightness
See Section 7.2
Contrast
Color
Hue Sharpness
Noise Reduction
Standard Color
Format
Select the color format to Auto/RGB/YUV (for HDMI and DP
inputs), see Section 7.1
Video Standard
Select the video standard to Auto/NTSC/PAL/PAL-M/PALN/NTSC 4.43/SECAM/PAL-60 (for YC and video inputs), see
Section 7.1
Auto Image
See Section 7.6
Program Volume
Set the selected input program volume
Preview Volume
Set the selected input preview volume
You can set the source label by typing the label name and saving it:
Page 65
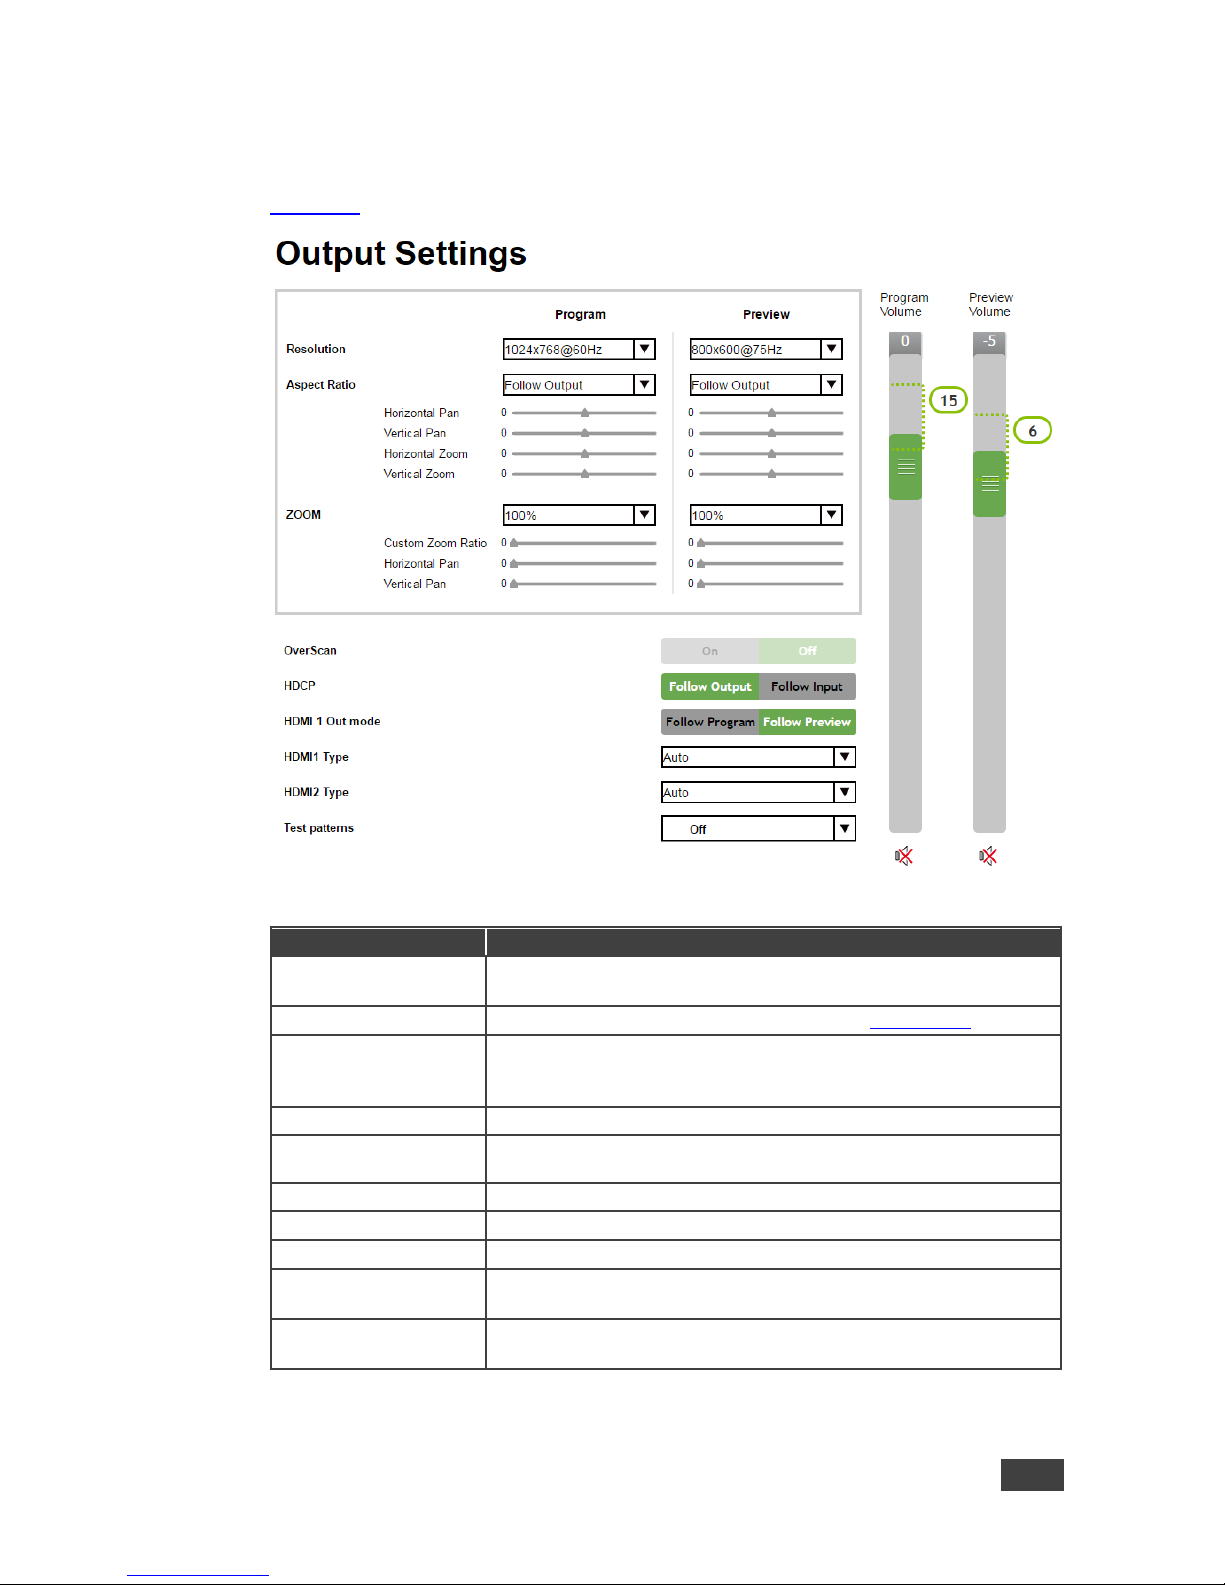
VP-732 – Using the Embedded Web Pages
59
9.5 The Output Settings Page
Figure 42 shows the Program and Preview Output Settings page.
Figure 42: The Output Settings Page
Button
Function
Resolution
Define the Program and Preview resolutions (setting to single
picture sets the PIP mode)
Aspect ratio
Set the Program and Preview aspect ratios (see Section 7.3.1)
Zoom
Set the Program zoom from 100% to 400% and Preview zoom
from 100% to 250%, or click custom to set the custom zoom and
enable Zoom Horizontal Pan and Zoom Vertical Pan
Overscan
Select On or Off; set to On to stretch the output picture
HDCP
Select Follow Input or Follow Output to define whether the HDCP will
follow the input or the output
HDMI 1 Out Mode
Select the output for HDMI 1 to Follow Program or Follow Preview
HDMI 1 Type
Set the HDMI1 output type to Auto, HDMI or DVI
HDMI 2 Type
Set the HDMI 2 output type to Auto, HDMI or DVI
Test Patterns
Set the test pattern to Colorbar, SMPTE, Greyscale, Picture
Border, Multiburst, Ramps, H-pattern, Setup, or set to Off
Program/Preview
audio sliders
Use to set the Program/Preview output volume.
note that in the PIP mode only the Program audio slider appears
Page 66
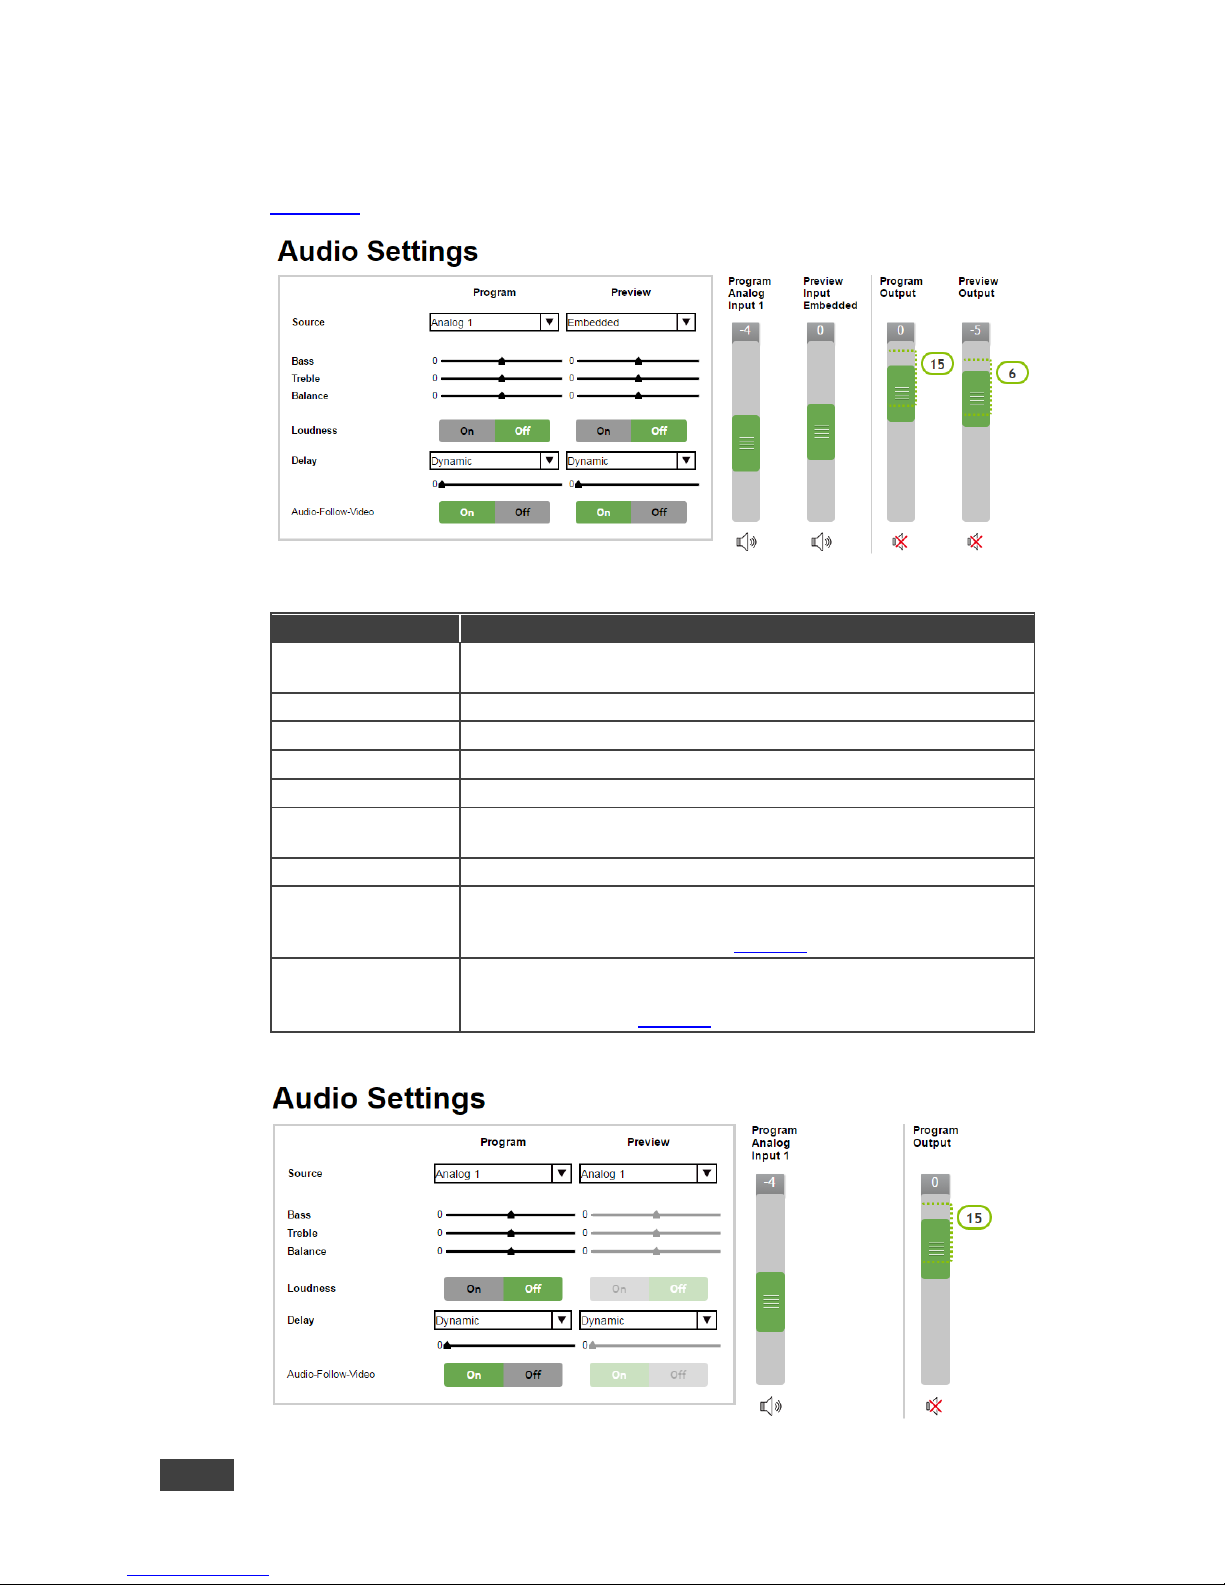
60
VP-732 - Using the Embedded Web Pages
9.6 The Audio Settings Page
Figure 43 shows the Program and Preview Output Settings page.
Figure 43: The Audio Settings Page
Button
Function
Source
Set the Program and Preview audio sources (Analog 1 to Analog
10, S/PDIF or Embedded – for HDMI and DP inputs)
Bass
Adjust the bass
Treble
Adjust the treble
Balance
Adjust the balance
Loudness
Set loudness OFF or ON
Delay
Select the Program and Preview delay to dynamic, User Define or
Off. Set the delay time (in ms)
Audio Follow Video
Set to Off or On
Program input
Volume
Set the Program/Preview input volume (analog, S/PDIF or
embedded). Note that when in the PIP mode only the Program
audio input slider appears (see Figure 44)
Program Output
Volume
Set the program output volume
Note that when in the PIP mode only the Program audio output
slider appears (see Figure 44)
Figure 44: The Audio Settings Page (PIP Mode)
Page 67
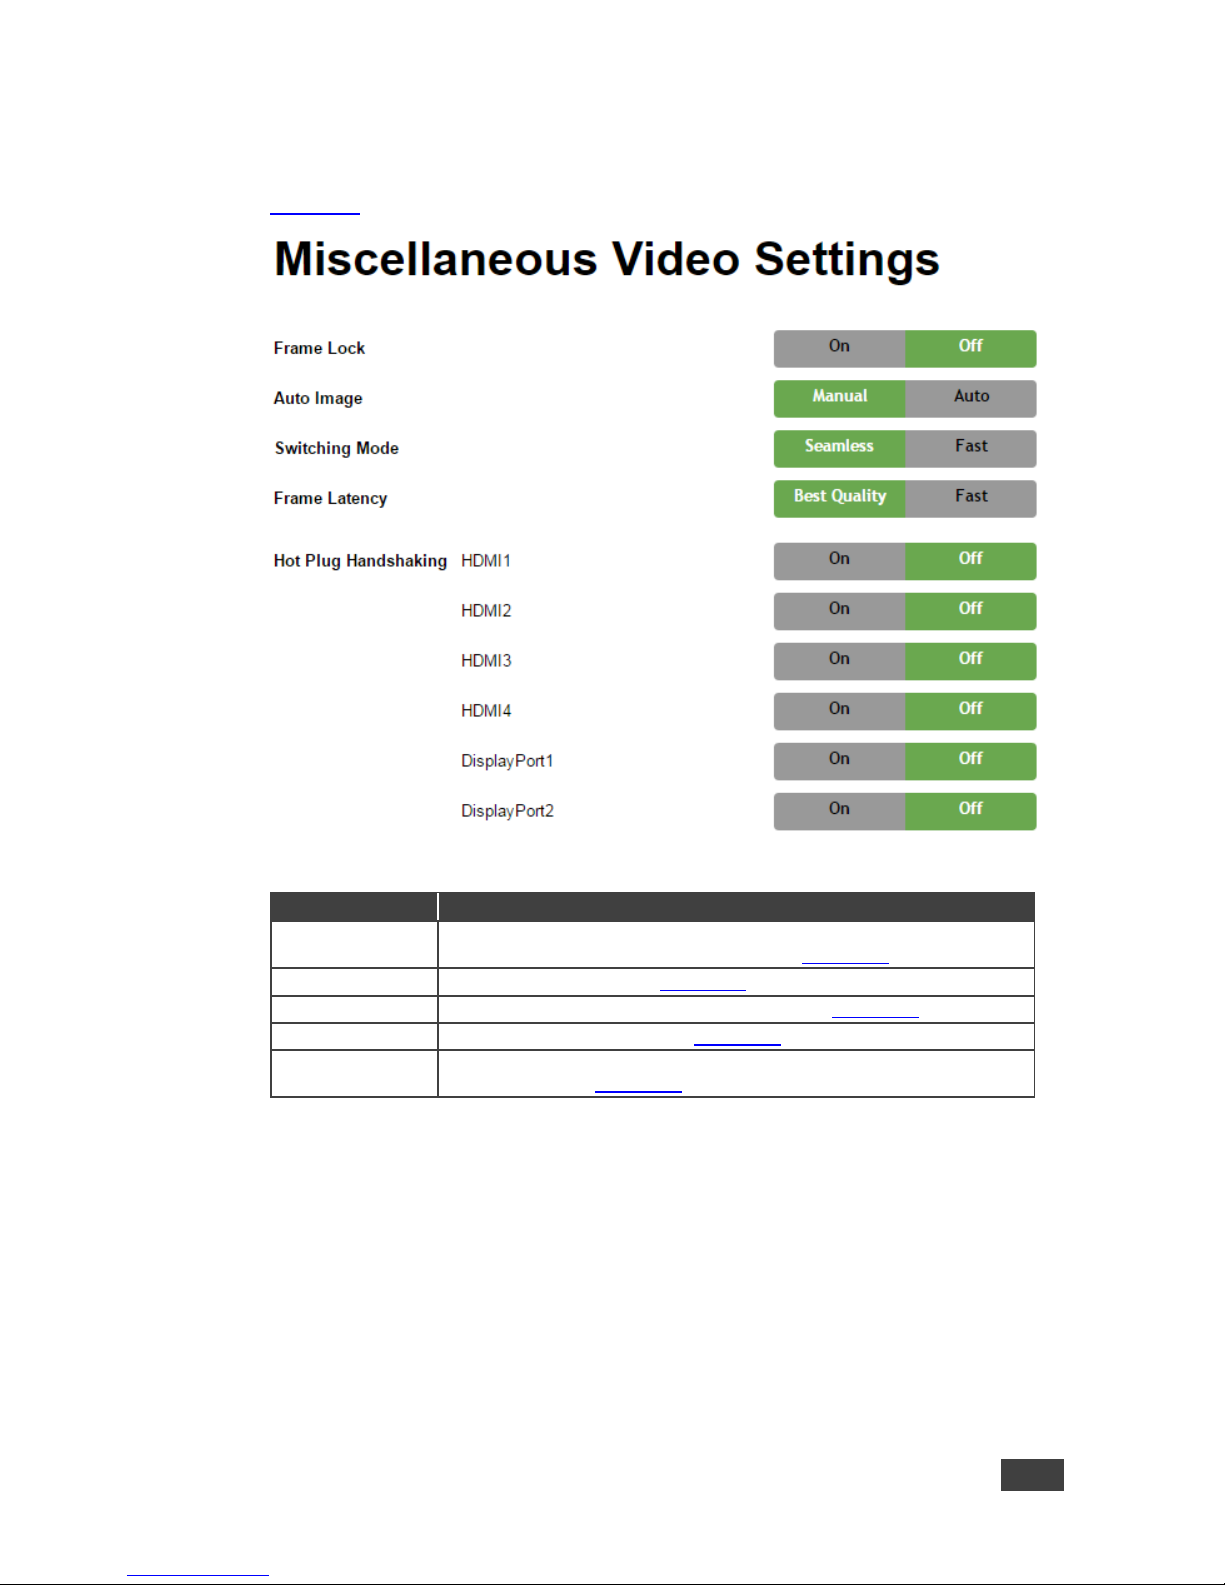
VP-732 – Using the Embedded Web Pages
61
9.7 The Miscellaneous Video Settings Page
Figure 45 shows the Miscellaneous Video Settings page.
Figure 45: The Miscellaneous Video Settings Page
Button
Function
Frame Lock
Set to On or Off to lock the vertical refresh rate of the output to that of the
input (locks only 50Hz or 60Hz/59.94Hz), see Section 7.6
Auto Image
Set to Manual or Auto, see Section 7.6
Switching Mode
Select Seamless switching or Fast switching, see Section 7.6
Frame Latency
Set to Best Quality or Fast, see Section 7.6
Hot Plug
Handshaking
Set Hot Plug On or Off for HDMI1 to HDMI 4, DisplayPort 1 and
DisplayPort 2, see Section 7.6
Page 68
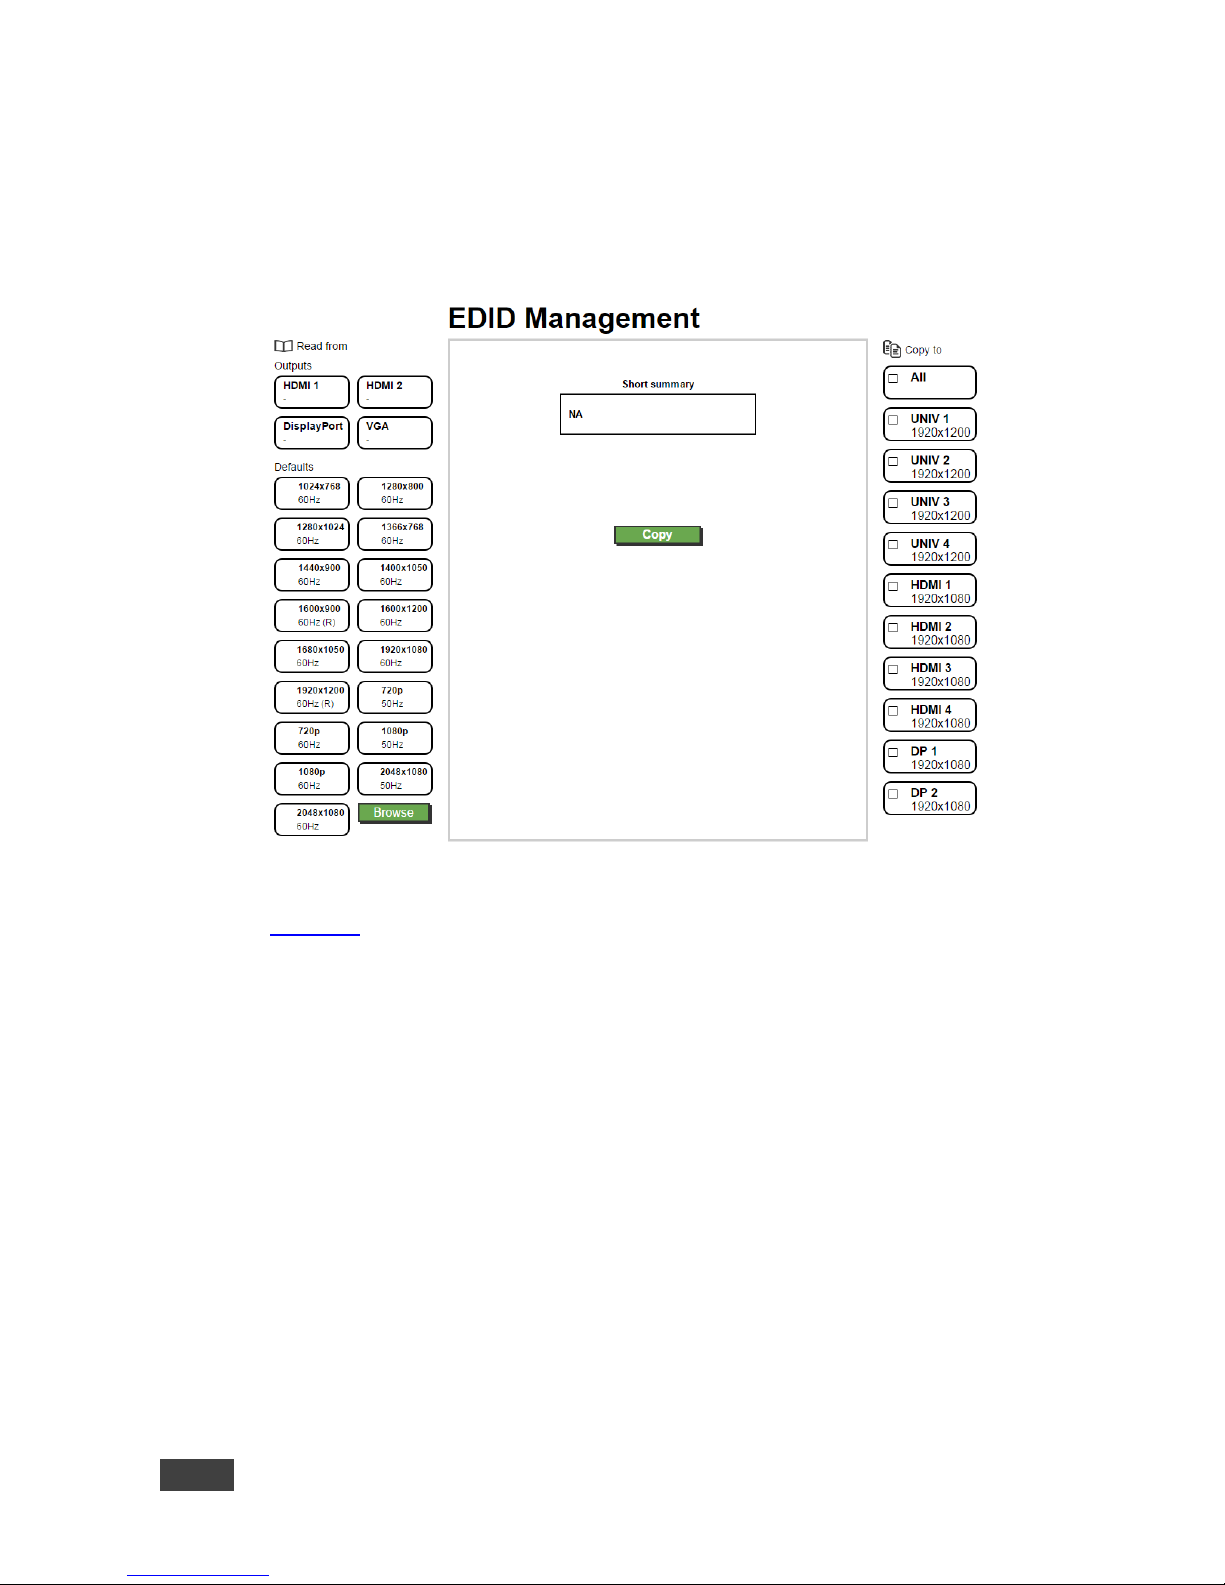
62
VP-732 - Using the Embedded Web Pages
9.8 The EDID Management Page
The EDID page lets you read the EDID from any of the outputs (HDMI 1, HDMI 2,
DP and VGA), from a list of default resolutions or from a file in your PC (Browse).
The selected EDID can be copied to a selected input.
Figure 46: The EDID Page
Figure 47 shows how to select a resolution from the list and select an input:
Page 69
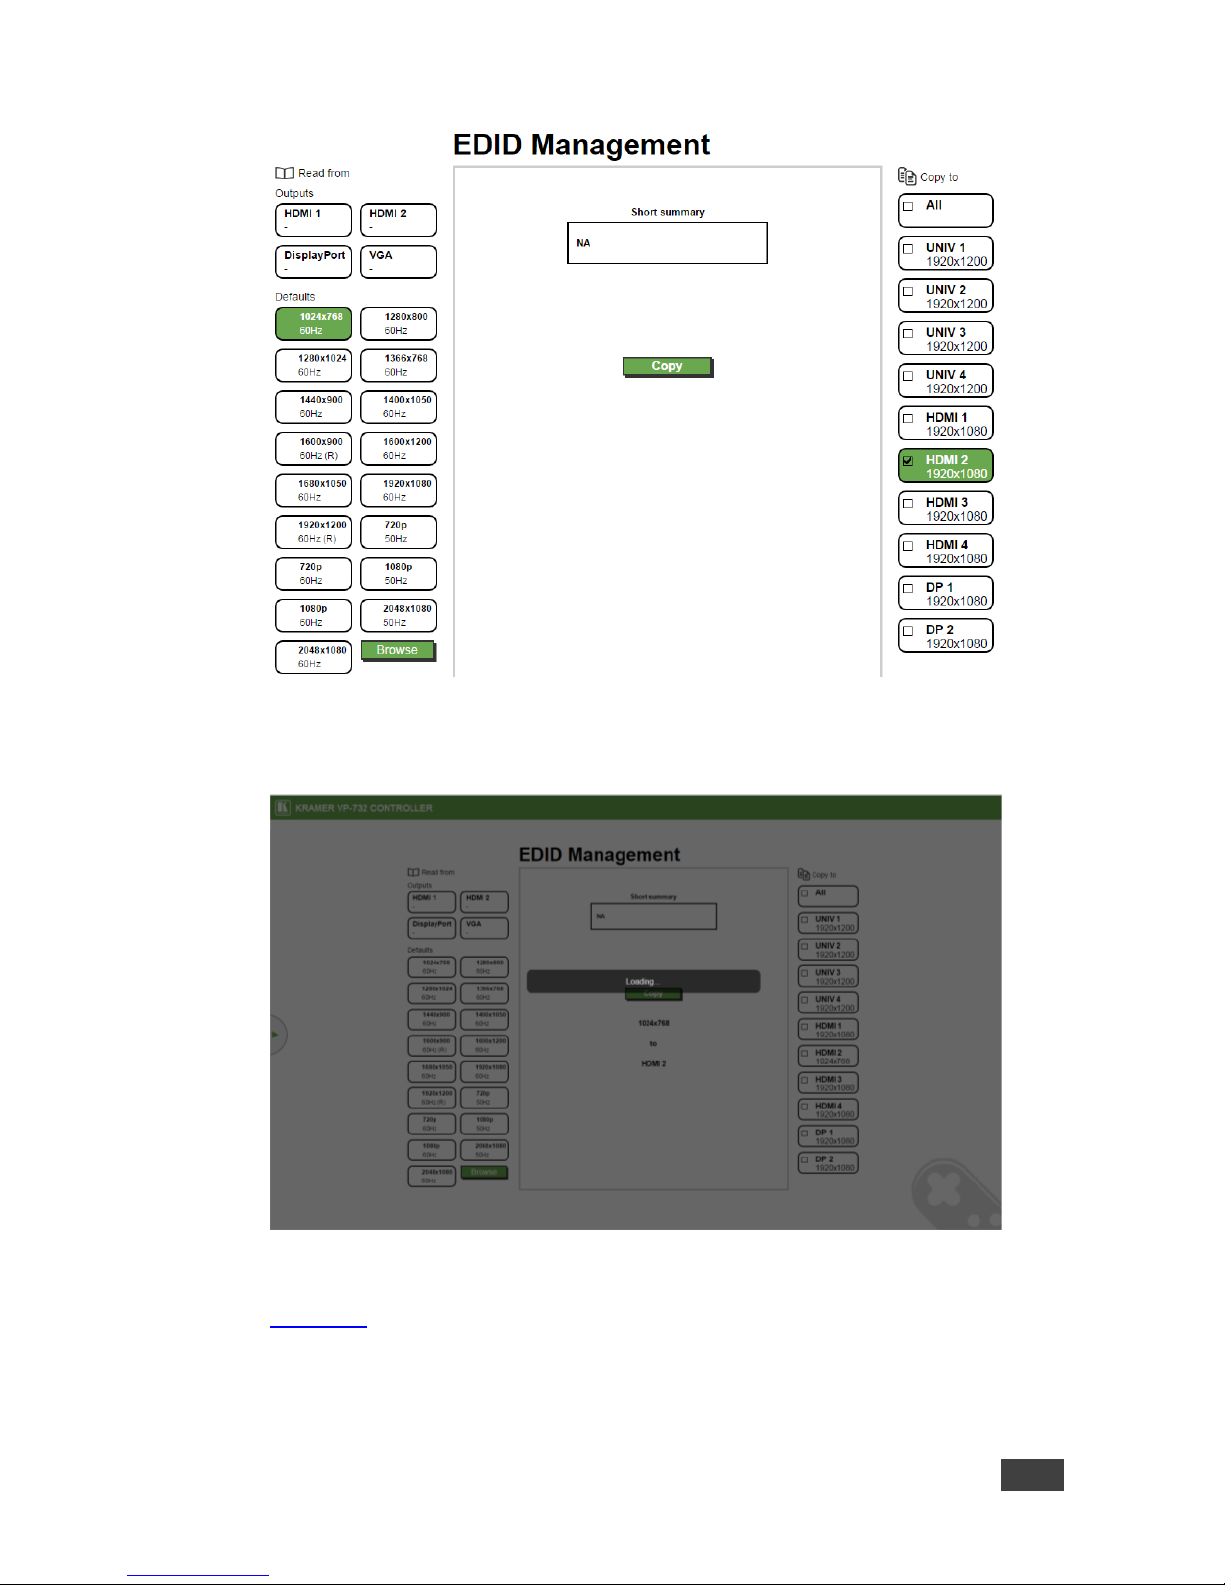
VP-732 – Using the Embedded Web Pages
63
Figure 47: The EDID Page – Selecting a Resolution to copy to an Input
To copy, click the Copy button:
Figure 48: The EDID Page – Copying the EDID
Figure 47 shows how to select one of the outputs from the list and select an input.
To copy, click the Copy button:
Page 70
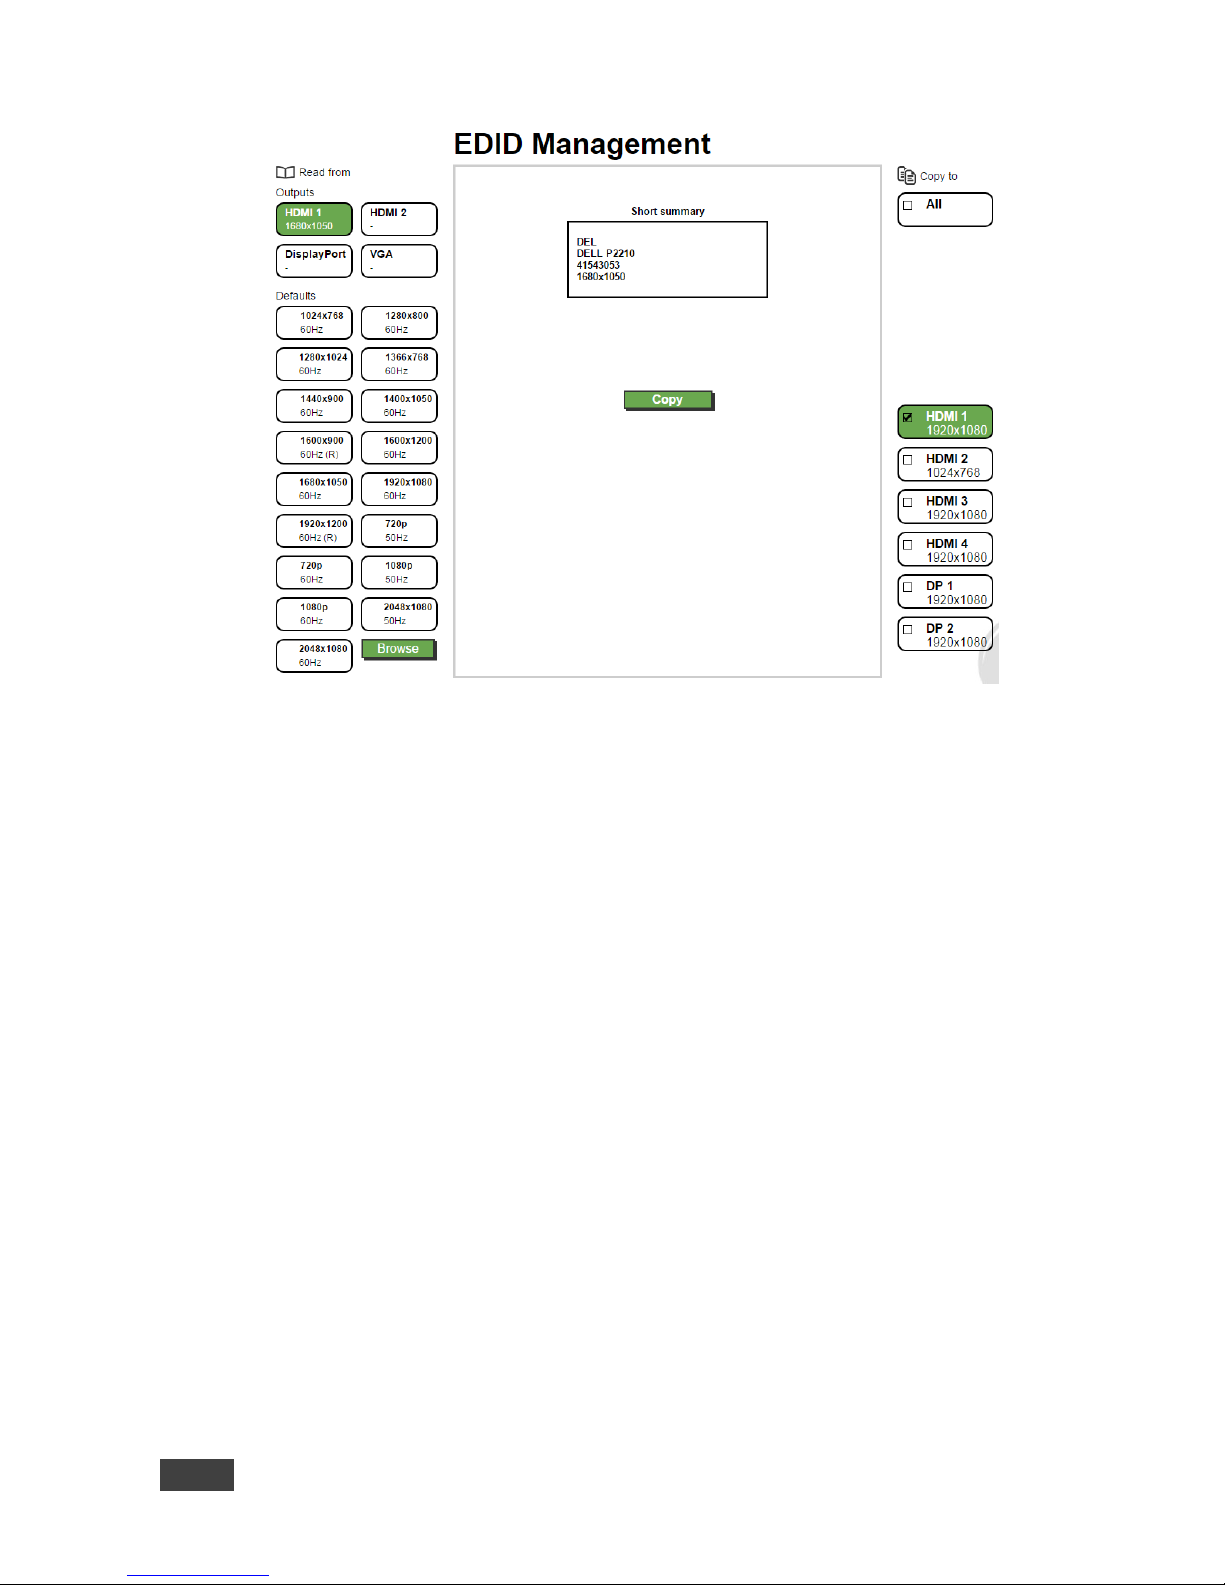
64
VP-732 - Using the Embedded Web Pages
Figure 49: The EDID Page – Copying from an output
Page 71
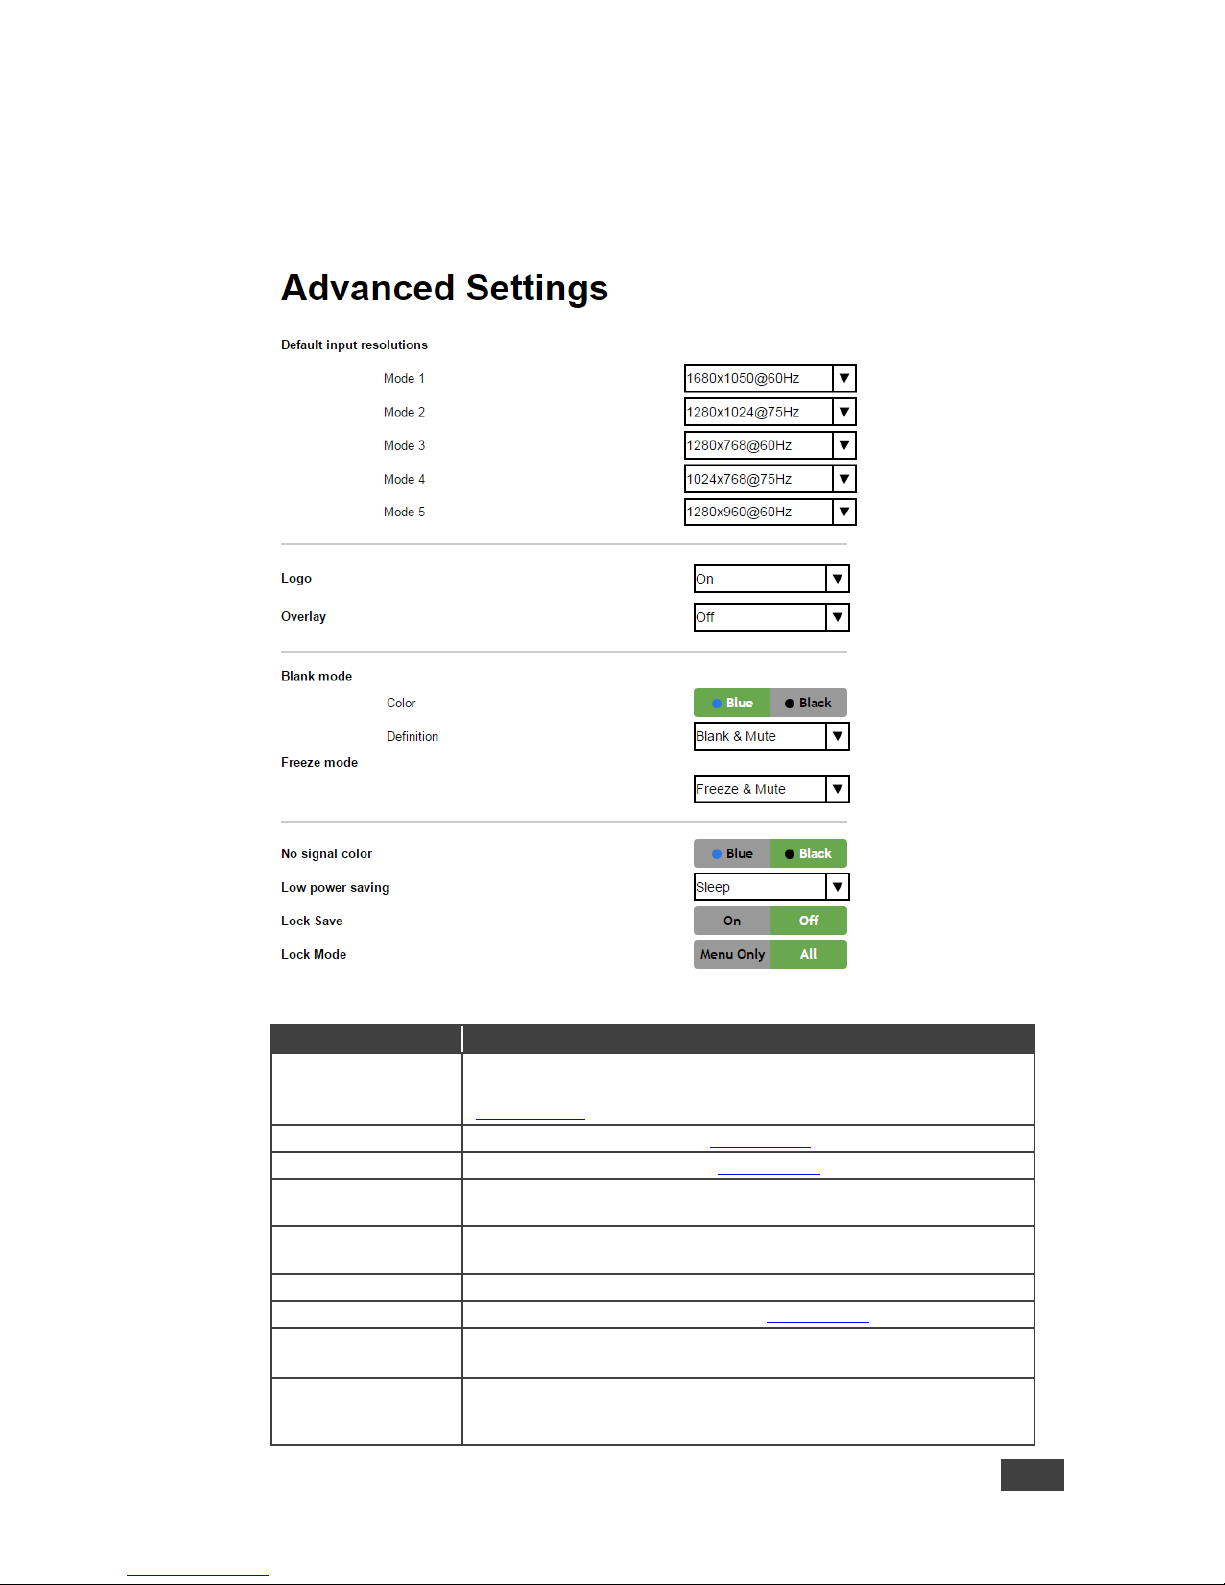
VP-732 – Using the Embedded Web Pages
65
9.9 The Advanced Settings Page
The HDCP settings page summarizes additional machine settings and lets you
change them.
Figure 50: The Advanced Settings Page
Button
Function
Default Input
Resolution
Define the desired input resolution modes and refresh rate when
the system cannot distinguish between similar resolutions, see
Section 7.6.1
Logo
Select On, Off or Custom, see Section 7.6.3
Overlay
Select to Off, Text or Logo, see Section 7.6.3
Blank mode
Select Blank & Mute, Blank or Mute to determine the behavior of the
BLANK front panel button
Freeze mode
Select Freeze & Mute, Freeze or Mute to determine the behavior of the
FREEZE front panel button
No signal color
Select a Blue or Black background
Low power saving
Select Off, Sleep or Power-down, see Section 7.6.3
Lock Save
Select On or Off
Set to On to save the lock status when the machine is powered down
Lock Mode
Select MENU ONLY (locks only the menu) so you can still use the
INPUT buttons on the front panel even when the lock button is on.
select ALL to also lock the INPUT buttons
Page 72
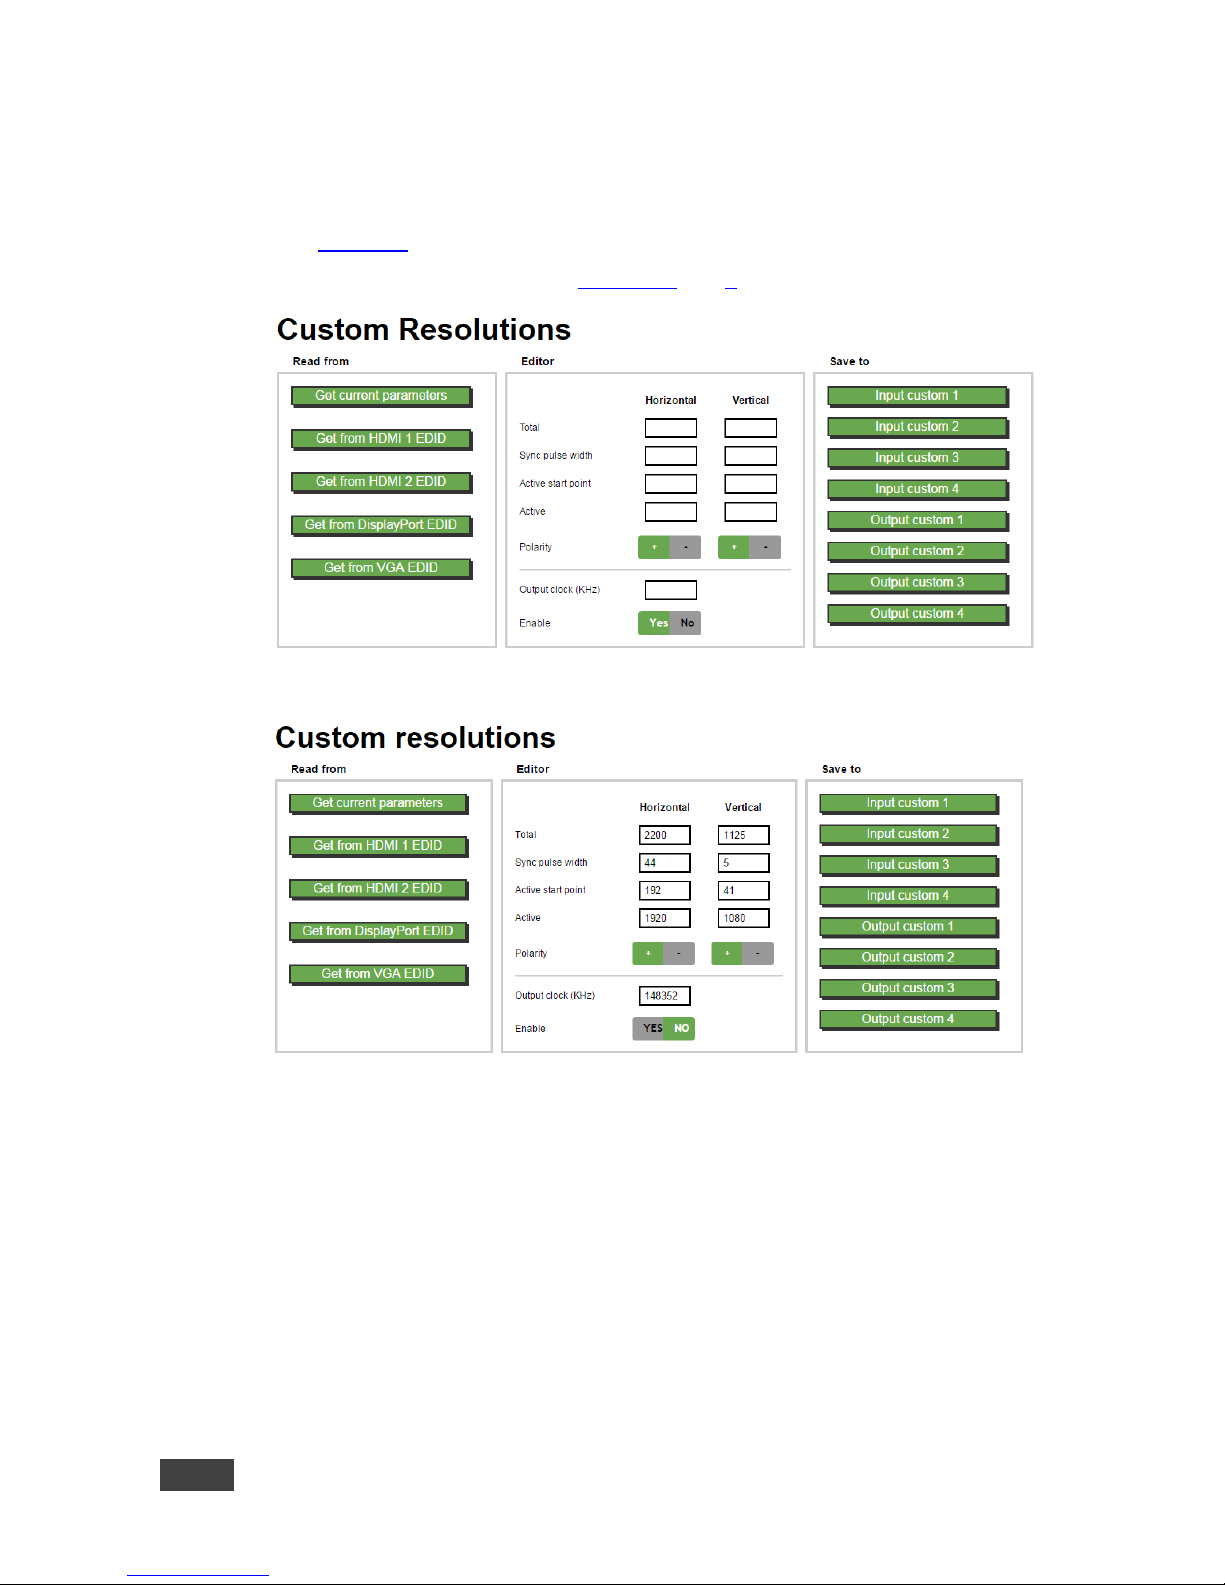
66
VP-732 - Using the Embedded Web Pages
9.10 The Custom Resolutions Page
The Custom Resolutions page lets you set the parameters from different sources
(see Figure 52) or type it in manually. You can save up to four custom settings each
for the input and the output (see Sections 0 and 0).
Figure 51: The Custom Resolutions Page
Figure 52: The Custom Resolutions Page – Current Parameters
Page 73
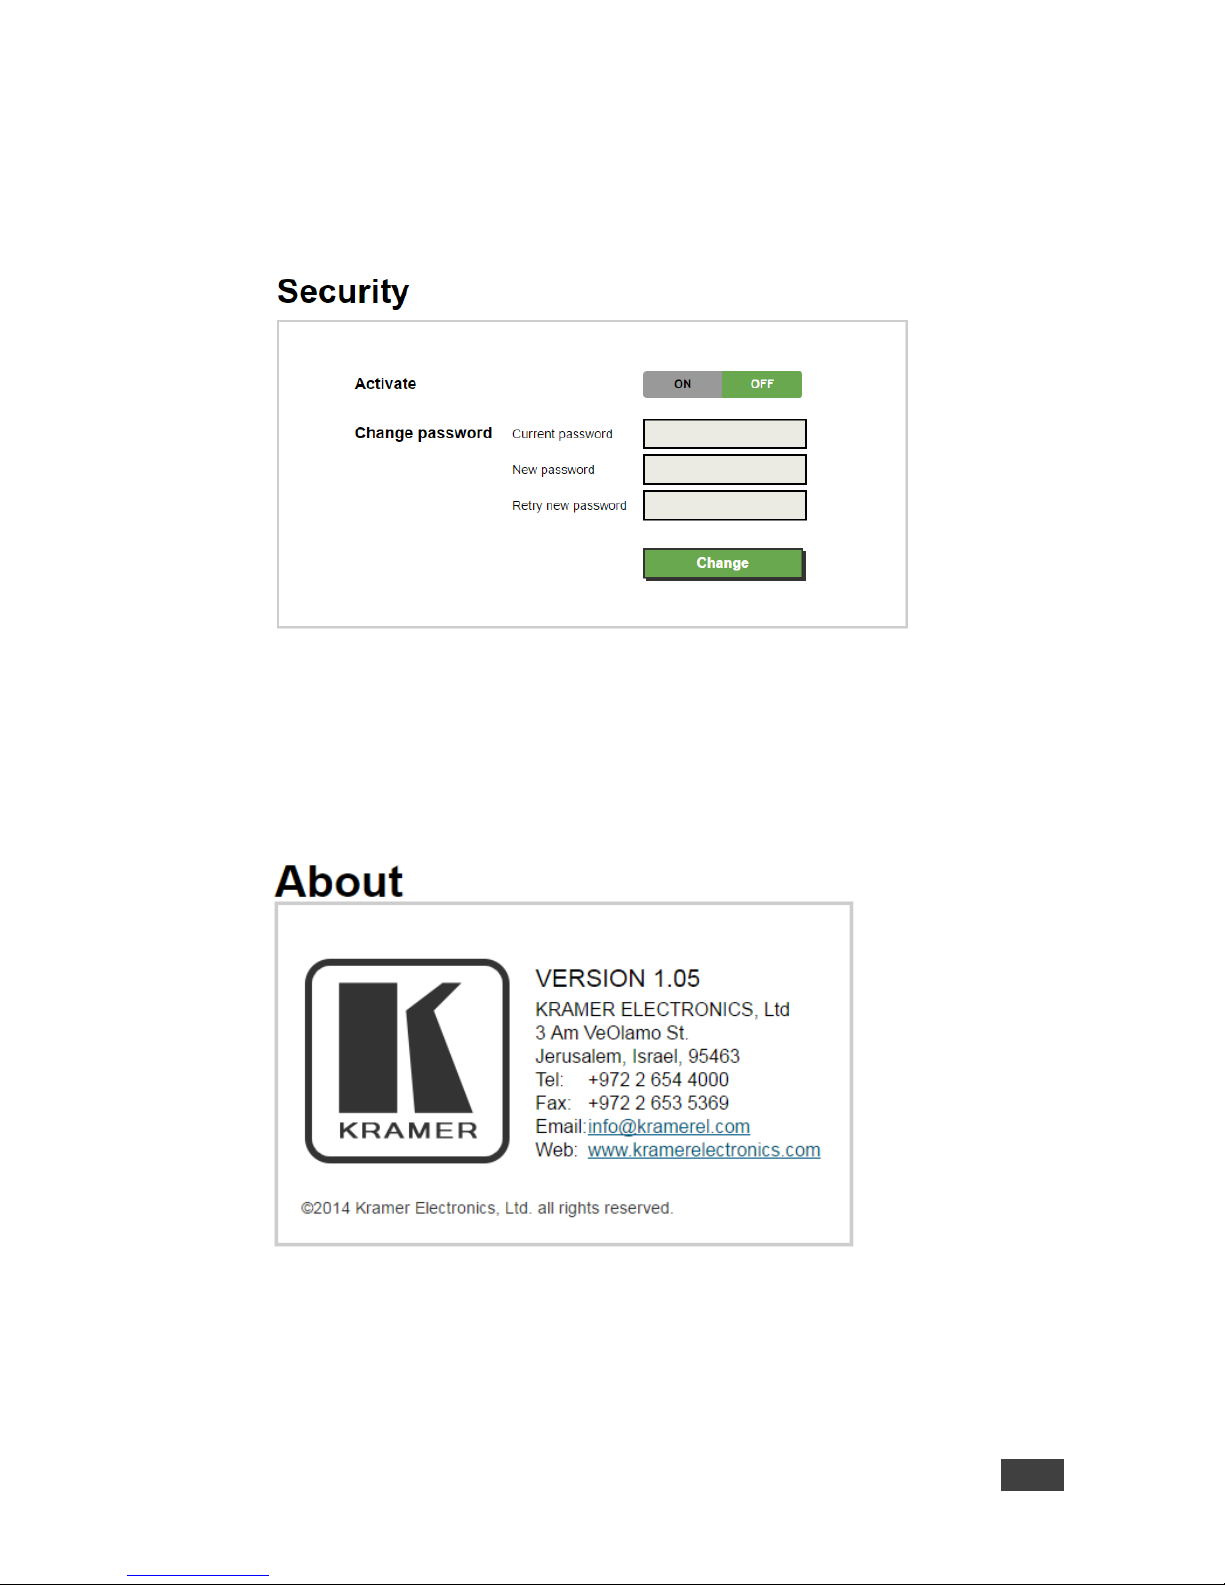
VP-732 – Using the Embedded Web Pages
67
9.11 The Security Page
Use the Security page to activate/deactivate the security measures as well as
change the password.
Figure 53: The Security Page
9.12 The About Page
The VP-732 About page lets you view the Web page version and Kramer
Electronics Ltd details.
Figure 54: The About Page
Page 74
68
VP-732 - Technical Specifications
10 Technical Specifications
INPUTS:
4 x HDMI connectors
4 x universal (composite, s-Video, computer graphics and component) on 15-pin
HD connectors
2xDP connectors
1 S/PDIF on an RCA connector
10 unbalanced stereo audio on 3.5mm mini jacks
OUTPUTS:
2 HDMI connectors
1 DP connector
1 PC (computer graphics) on a 15-pin HD connector
1 balanced audio stereo output on a 5-pin terminal block (+4dBu nominal)
1 stereo speaker output, 10W per channel into 8Ω, on a 4-pin terminal block
connector
1 digital S/PDIF output on an RCA connector
PORTS
1 x USB connector
1 x RS-232 on a 9-pin D-sub connector
1 x Ethernet on an RJ-45 connector
COMPLIANCE WITH
HDMI STANDARD:
Supports HDMI and HDCP
OUTPUT
RESOLUTIONS:
PROGRAM:
Native HDMI1, Native HDMI2, Native DP, Native VGA, 640x480x60Hz,
640x480x75Hz, 800x600x50Hz, 800x600x60Hz, 800x600x75Hz, 1024x768x50Hz,
1024x768x60Hz, 1024x768x75Hz, 1280x768x50Hz, 1280x768x60Hz,
1280x720x60Hz, 1280x800x60Hz, 1280x1024x50Hz, 1280x1024x60Hz,
1280x1024x75Hz, 1366x768x50Hz, 1366x768x60Hz, 1400x1050x50Hz,
1400x1050x60Hz, 1600x900x60Hz ( R ), 1600x1200x50Hz, 1600x1200x60Hz,
1680x1050x60Hz, 1920x1080x60Hz, 1920x1200x60Hz (R), 2048x1080x50Hz,
2048x1080x60Hz, 3840x2160@24Hz, 3840x2160@25Hz, [email protected],
3840x2160@30Hz, 4096x2160@24Hz, 480px60Hz, 576px50Hz, 720px50Hz,
720px60Hz, 1080i/1080px50Hz, 1080i/1080px60Hz, 1080px50Hz, 1080px60Hz,
1080px24Hz, 480px59.94Hz, 720px59.94Hz, 1080i/1080px59.94Hz, 1080px23.98,
1080px29.97, 1080px59.94, Custom 1 to Custom 4
PREVIEW:
Single Picture, 640x480x60Hz, 640x480x75Hz, 800x600x50Hz, 800x600x60Hz,
800x600x75Hz, 1024x768x50Hz, 1024x768x60Hz, 1024x768x75Hz,
1280x768x50Hz, 1280x768x60Hz, 1280x720x60Hz, 1280x800x60Hz,
1280x1024x50Hz, 1280x1024x60Hz, 1280x1024x75Hz, 480px60Hz, 576px50Hz,
720px50Hz, 720px60Hz, 480px59.94Hz, 720px59.94Hz, Custom 1 to Custom 4
CONTROL:
Front panel buttons / OSD, IR remote control, RS-232 on a 9-pin D-sub connector,
Ethernet
ADDITIONAL
CONTROLS:
Picture-In-Picture, Picture-and-Picture or Split Screen (two images side-by-side);
separate program/preview freeze and zoom, different selectable vertical refresh
rates, Video and Audio ProcAmp control, output image scaling and aspect ratio
change, EDID capture
POWER SOURCE:
100-240V AC, 50/60Hz, 49VA
OPERATING
TEMPERATURE:
0° to +40°C (32° to 104°F)
STORAGE
TEMPERATURE:
-40° to +70°C (-40° to 158°F)
HUMIDITY:
10% to 90%, RHL non-condensing
DIMENSIONS:
19" (W), 9.3" (D) 1U (H) rack mountable
WEIGHT:
2.45kg (5.4lbs) approx.
INCLUDED
ACCESSORIES:
rack “ears”, IR remote control, 2 sets of C-SF/2RVM-0.5 cables, power cord
Specifications are subject to change without notice
For the most updated resolution list, go to our Web site at http://www.kramerelectronics.com
Page 75
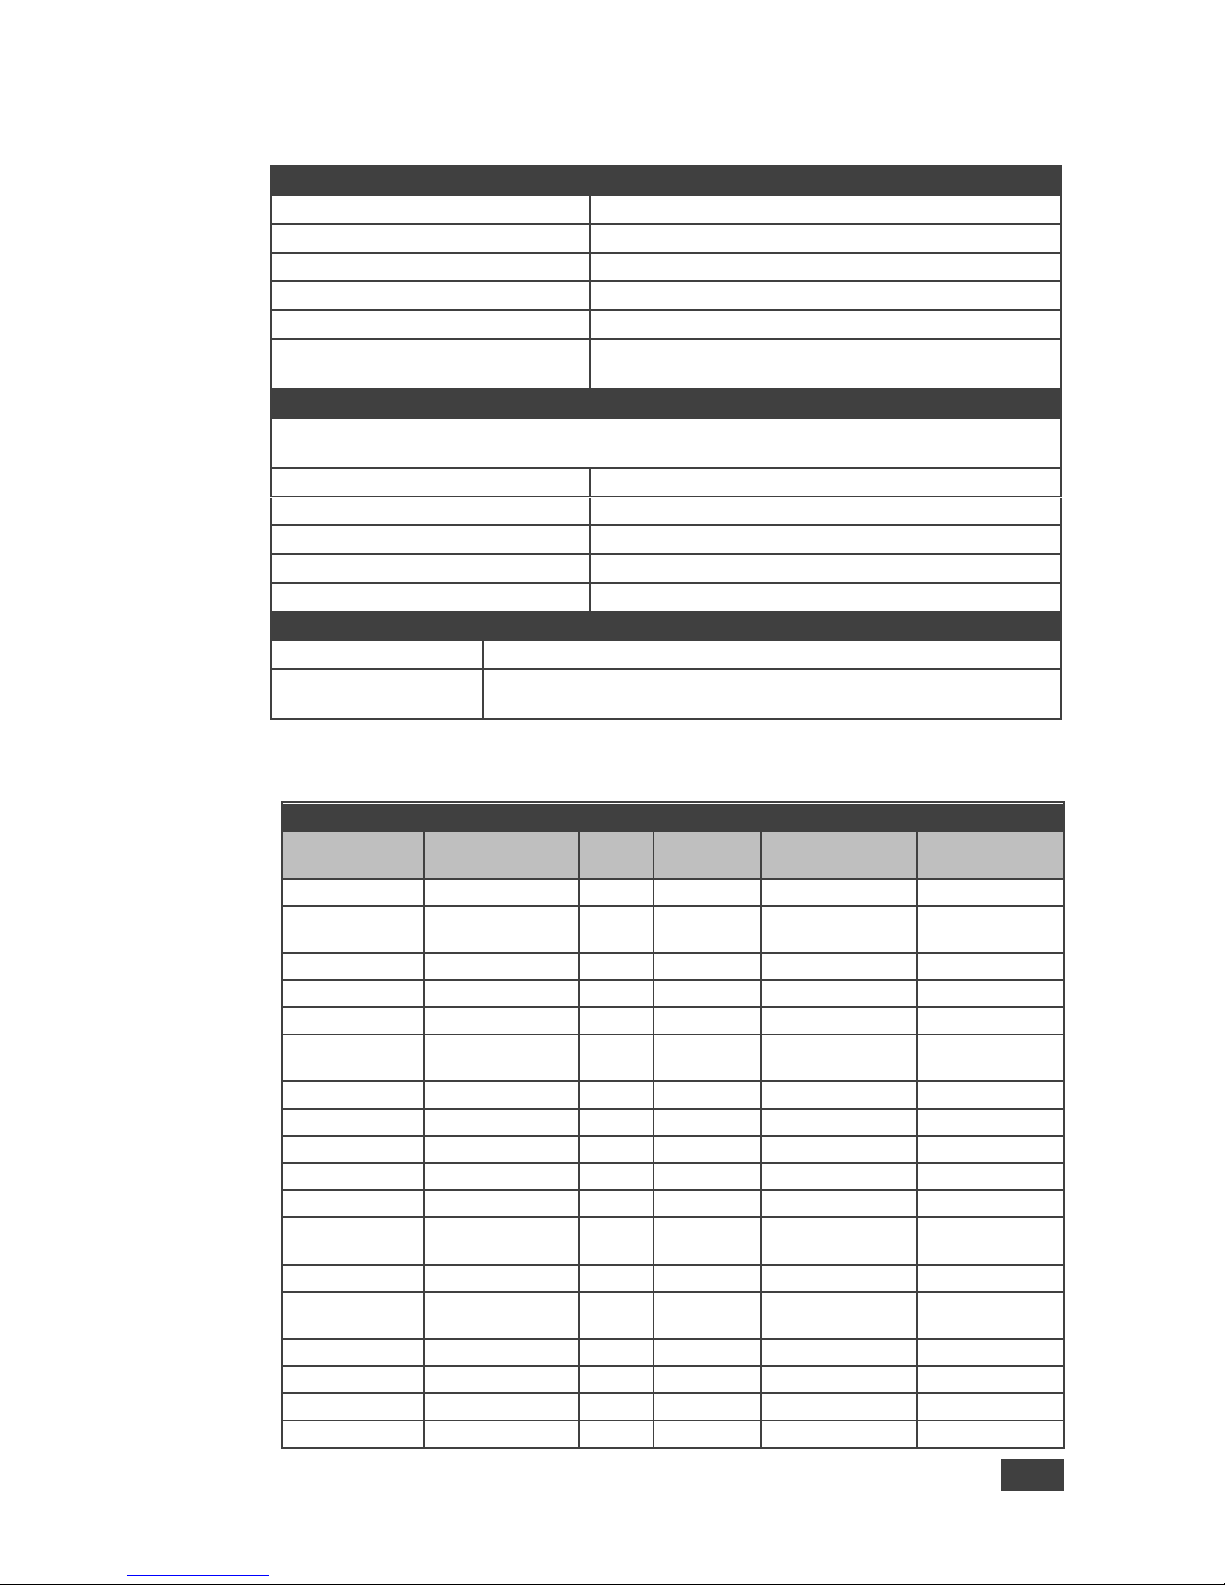
VP-732 – Technical Specifications
69
10.1 Default Communication Parameters
RS-232
Baud Rate:
115,200
Data Bits:
8
Stop Bits:
1
Parity:
None
Command Format:
ASCII
Example (switch PIP input to
UNIV3):
Y 0 92 2<CR>
Ethernet
To reset the IP settings to the factory reset values go to : Menu->Setup -> Factory Reset
->Change the option to Confirm and press Enter
IP Address:
192.168.1.39
Subnet mask:
255.255.255.0
Default gateway:
192.168.1.254
Default TCP Port #:
80
Maximum TCP Ports:
1
Full Factory Reset
OSD
Go to : Menu-> Setup -> Factory Reset -> press Enter to Confirm
Front panel buttons
Press the Reset to XGA/720p Button while plugging the power to
reset the machine
10.2 Tables of Supported Input Resolutions
Technical Specifications of the RGBHV/RGBS(PC)/RGsB(PC) Input Signal
Resolution
Vertical Frequency
(Hz)
Notes
Resolution
Vertical Frequency
(Hz)
Notes
640x480
60
VESA
1280x720
60
VESA
640x480
67
Mac13
1280x800
60
VESA Reduced
blanking
640x480
72
VESA
1280x800
60
VESA
640x480
75
VESA
1280x960
60
VESA
640x480
85
VESA
1280x960
85
VESA
720x400
70 1280x768
60
VESA Reduced
blanking
720x400
85
VESA
1280x768
60
VESA
800x600
56
VESA
1280x1024
60
VESA
800x600
60
VESA
1280x1024
75
VESA
800x600
72
VESA
1280x1024
76
Sun
800x600
75
VESA
1280x1024
85
VESA
800x600
85
VESA
1366x768
60
VESA Reduced
blanking
832x624
75
Mac16
1366x768
60
VESA
1024x768
60
VESA
1440x900
60
VESA Reduced
blanking
1024x768
70
VESA
1440x900
60
VESA
1024x768
75
VESA
1400x1050
60
VESA
1024x768
75
Mac19
1400x1050
75
VESA
1024x768
85
VESA
1600x900
60
VESA
Page 76
70
VP-732 - Technical Specifications
Technical Specifications of the RGBHV/RGBS(PC)/RGsB(PC) Input Signal
Resolution
Vertical Frequency
(Hz)
Notes
Resolution
Vertical Frequency
(Hz)
Notes
1024x800
84
Sun
1600x1200
60
VESA
1152x864
75
VESA
1680x1050
60
VESA Reduced
blanking
1152x870
75
Mac21
1680x1050
60
VESA
1152x900
66
Sun
1920x1080
60
VESA
1152x900
76
Sun
1920x1200
60
VESA Reduced
blanking
Technical Specifications of the Y/C, Video Signal (for Program and
Preview/PIP)
Standard
NTSC, NTSC4.43, PAL, PAL-M, PAL-N, SECAM, PAL-60
Technical Specifications of the HDMI Input Signal (for RGB or YUV
Colorspace) (for Program and Preview/PIP)
Resolution
Vertical Frequency (Hz)
Remark
1080i
60
YPbPr
1080i
50
YPbPr
1080p
60
YPbPr
1080p
50
YPbPr
1080p
24
YPbPr
720p
60
YPbPr
720p
50
YPbPr
480i
60
YPbPr
480p
60
YPbPr
576i
50
YPbPr
576p
50
YPbPr
Technical Specifications of the Component Input Signal
(for Program and Preview/PIP)
Resolution
Vertical Frequency (Hz)
Remark
1080i
60
YPbPr
1080i
50
YPbPr
1080p
60
YPbPr
1080p
50
YPbPr
720p
60
YPbPr
720p
50
YPbPr
480i
60
YPbPr
480p
60
YPbPr
576i
50
YPbPr
576p
50
YPbPr
Page 77
VP-732 – Technical Specifications
71
Technical Specifications of the DVI Input Signal (for RGB Colorspace) (for
Program and Preview/PIP)
Resolution
Vertical Frequency
(Hz)
Notes
Resolution
Vertical Frequency
(Hz)
Notes
640x480
60
VESA
1280x800
60
VESA
640x480
67
Mac13
1280x800
60
VESA
640x480
72
VESA
1280x960
60
VESA
640x480
75
VESA
1280x960
85
VESA
640x480
85
VESA
1280x768
60
VESA
720x400
70 1280x768
60
VESA
720x400
85
VESA
1280x1024
60
VESA
800x600
56
VESA
1280x1024
75
VESA
800x600
60
VESA
1280x1024
76
Sun
800x600
72
VESA
1280x1024
85
VESA
800x600
75
VESA
1366x768
60
VESA
800x600
85
VESA
1366x768
60
VESA
832x624
75
Mac16
1440x900
60
VESA
1024x768
60
VESA
1440x900
60
VESA
1024x768
70
VESA
1400x1050
60
VESA
1024x768
75
VESA
1400x1050
75
VESA
1024x768
75
Mac19
1600x900
60
VESA
1024x768
85
VESA
1600x1200
60
VESA
1024x800
84
Sun
1680x1050
60
VESA
1152x864
75
VESA
1680x1050
60
VESA
1152x870
75
Mac21
1920x1080
60
VESA
1152x900
66
Sun
1920x1200
60
VESA
1152x900
76
Sun
2048x1080
50 1280x720
60
VESA
2048x1080
60
10.3 Tables of Supported Output Resolutions
Technical Specifications of the RGBHV/RGBS(PC)/RGsB(PC) Output Signal
Resolution
Vertical
Frequency (Hz)
Notes
Resolution
Vertical
Frequency (Hz)
Notes
640x480
60
VESA
1600x1200
50 640x480
75
VESA
1600x1200
60
VESA
800x600
50 1920x1080
60
VESA
800x600
60
VESA
1920x1200
60
VESA
Reduced
blanking
800x600
75
VESA
1680x1050
60
VESA
1024x768
50 1080i
60
Comp/YPbPr
1024x768
60
VESA
1080i
50
1024x768
75
VESA
720p
60
1280x720
60
VESA
720p
50 1280x768
50 480p
60 1280x768
60
VESA
576p
50
1280x800
60
VESA
1080p
50
1280x1024
50 1080p
60
Page 78
72
VP-732 - Technical Specifications
Technical Specifications of the RGBHV/RGBS(PC)/RGsB(PC) Output Signal
Resolution
Vertical
Frequency (Hz)
Notes
Resolution
Vertical
Frequency (Hz)
Notes
1280x1024
60
VESA
480p
59.94
Comp/YPbPr
1280x1024
75
VESA
720p
59.94
1366x768
50 1080i
59.94
1366x768
60
VESA
1080p
23.98
1400x1050
50 1080p
24 1400x1050
60
VESA
1080p
29.97
1600x900
60
VESA
1080p
59.94
Technical Specifications of the HDMI/DVI/RGB Output Signal
Resolution
Vertical
Frequency (Hz)
Notes
Resolution
Vertical
Frequency (Hz)
Notes
640x480
60
VESA
1680x1050
60
VESA
640x480
75
VESA
2048x1080
50 800x600
50 2048x1080
60 800x600
60
VESA
3840x2160
24 800x600
75
VESA
3840x2160
25 1024x768
50 3840x2160
29.97
1024x768
60
VESA
3840x2160
30 1024x768
75
VESA
4096x2160
24 1280x720
60
VESA
1080i
60
HDMI
1280x768
50 1080i
50 1280x768
60
VESA
720p
60 1280x800
60
VESA
720p
50 1280x1024
50 480p
60
1280x1024
60
VESA
576p
50
1280x1024
75
VESA
1080p
50
1366x768
50 1080p
60 1366x768
60
VESA
480p
59.94
1400x1050
50 720p
59.94
1400x1050
60
VESA
1080i
59.94
1600x900
60
VESA
1080p
23.98
1600x1200
50 1080p
24 1600x1200
60
VESA
1080p
29.97
1920x1080
60
VESA
1080p
59.94
1920x1200
60
VESA
Reduced
blanking
Page 79

VP-732 – VP-732 Communication Protocol
73
11 VP-732 Communication Protocol
Serial Configuration:
Baud rate: 115200 (Bits per second)
Data bits: 8bits
Parity: None
Stop bits: 1bit
Communication confirmation:
Send: CR
Reply: CRLF>
Set Command:
Send: YControl_TypeFunctionParamChkSumCR
Reply: ZControl_TypeFunctionParamChkSumCRLF>
Get Command:
Send: YControl_TypeFunctionChkSumCR
Reply: ZControl_TypeFunctionParamChkSumCRLF>
Example: set Input 1 Source Type to Component
Send: Y0102CR
Reply: Z010CRLF>
Example: get current Input 1 Source Type
Send: Y113CR
Reply: Z1103CRLF >
Definition:
: ASCII Code 0x20
CR: Ascii Code 0x0D
CRLF : Ascii Code 0x0D+0x0A
Go to http://www.kramerav.com/downloads/VP-732 to check for the
latest VP-732 communication protocol.
Page 80
74
VP-732 - VP-732 Communication Protocol
11.1 Command list
Control Type
Function
Parameter1
Description
Set
Get
0 - 0
N/A
Menu
0 - 1
N/A
Top
0 - 2
N/A
Down
0 - 3
N/A
Left 0 - 4 N/A
Right
0 - 5
N/A
Enter
0 - 6
0:Reset 720P
1:Reset XGA
2:Factory Reset
Reset program output resolution to XGA / 720P
/Factory reset
0 1 7
0: Off
1: On
Panel lock key function
0 1 8
0: UNIV 1
1: UNIV 2
2: UNIV 3
3: UNIV 4
4: HDMI 1
5: HDMI 2
6: HDMI 3
7: HDMI 4
8: DP 1
9: DP 2
Program source
0 1 9
N/A
Program Blank key function
1. PIP mode: only blank the Program source (PIP still
turned on)
2. Dual resolution mode :blank the Program source
0 1 10
N/A
Program Freeze key function
1. PIP mode: only freeze the Program source ( PIP still
turned on)
2. Dual resolution mode:freeze the Program source
0 1 11
0: UNIV 1
1: UNIV 2
2: UNIV 3
3: UNIV 4
4: HDMI 1
5: HDMI 2
6: HDMI 3
7: HDMI 4
8: DP 1
9: DP 2
Preview/PIP Key function (Keypad)
PIP Off
1. Turn on PIP and change PIP source
PIP On
2. Change PIP source
Preview On
3. Change Preview source
0 1 12
N/A
Preview Blank key function
1. PIP mode: turn off PIP
2. Dual resolution mode :blank the Preview source
0 1 13
N/A
Preview Freeze key function
1. PIP mode: only freeze the PIP source
2. Dual resolution mode: freeze the Preview source
0 1 14
N/A
Preview Mute key function
0 1 15
0: Off
1: On
Preview key function
If PIP is On, Preview will turn off PIP
0 - 16
0: Off
1: On
Power
0 1 17
N/A
Program Mute key function
0 - 18
N/A
Save key --- Open / Close Setup page
0 - 19
N/A
Recall key --- Open / Close Setup page
Page 81
VP-732 – VP-732 Communication Protocol
75
Control Type
Function
Parameter1
Description
Set
Get
0 1 20
N/A
Logo key
0 - 21
N/A
Info key --- Open / Close Info page
0 - 22
N/A
Picture key --- Open / Close Picture page
0 - 23
N/A
Audio key --- Open / Close Audio page
0 - 24
N/A
Auto image key
0 1 32
0: Off
1: On
Input Auto Switch
0 1 33
0: VGA
1: Component
2: YC
3: Video
UNIV 1 Source Type
0 1 34
0: VGA
1: Component
2: YC
3: Video
UNIV 2 Source Type
0 1 35
0: VGA
1: Component
2: YC
3: Video
UNIV 3 Source Type
0 1 36
0: VGA
1: Component
2: YC
3: Video
UNIV 4 Source Type
0 1 37
0: Auto
1: RGB
2: YUV
Input Color Format
0 1 38
0: Auto
1: NTSC
2: PAL
3: PAL-M
4: PAL-N
5: NTSC 4.43
6: SECAM
7: PAL-60
Input Video Standard
0 1 40
1 ~ N
Input H-Position (Enabled for VGA Input)
N: Unfixed, changed with Input Mode
0 1 41
2 ~ N
Input V-Position (Enabled for VGA Input)
N: Unfixed, changed with Input Mode
0 1 42
0 ~ N
Input Frequency (Enabled for VGA Input)
N: Unfixed, changed with Input Mode
0 1 43
0 ~ 63
Input Phase (Enabled for VGA Input)
0 - 44
N/A
Input Auto Image (Enabled for VGA Input)
0 1 50
0~100
Picture Brightness
0 1 51
0~100
Picture Contrast
0 1 52
0~100
Picture Color
0 1 53
0~360
CVBS/YC
Picture Hue
0~240
HDMI/VGA/Component
0 1 54
0~100
Picture Sharpness
0 1 55
0: Off
1: Low
2: Medium
3: High
Picture Temporal NR
HDMI input is disabled.
Analog input, if pixel output > 74.25MHz will be
disabled
Page 82
76
VP-732 - VP-732 Communication Protocol
Control Type
Function
Parameter1
Description
Set
Get
0 1 56
0: Off
1: Low
2: Medium
3: High
Picture Mosquito NR
0 1 57
0: Off
1: On
Picture Block NR
0 1 65
0: Native HDMI1
1: Native HDMI2
2: Native DP
3: Native VGA
4: 640x480@60Hz
5: 640x480@75Hz
6: 800x600@50Hz
7: 800x600@60Hz
8: 800x600@75Hz
9: 1024x768@50Hz
10: 1024x768@60Hz
11: 1024x768@75Hz
12: 1280x768@50Hz
13: 1280x768@60Hz
14: 1280x720@60Hz
15: 1280x800@60Hz
16: 1280x1024@50Hz
17: 1280x1024@60Hz
18: 1280x1024@75Hz
19: 1366x768@50Hz
20: 1366x768@60Hz
21: 1400x1050@50Hz
22: 1400x1050@60Hz
23: 1600x900@60Hz(R)
24: 1600x1200@50Hz
25: 1600x1200@60Hz
26: 1680x1050@60Hz
27: 1920x1080@60Hz
28: 1920x1200@60Hz(R)
29: 2048x1080@50Hz
30: 2048x1080@60Hz
31: 3840x2160@24Hz
32: 3840x2160@25Hz
33: 3840x2160@29_97Hz
34: 3840x2160@30Hz
35: 4096x2160@24Hz
36: 480p@60Hz
37: 576p@50Hz
38: 720p@50Hz
39: 720p@60Hz
40: 1080i@50Hz
41: 1080i@60Hz
42: 1080p@50Hz
43: 1080p@60Hz
44: 1080p@24Hz
45: [email protected]
46: [email protected]
47: [email protected]
48: [email protected]
49: [email protected]
Program Output Resolution
Page 83
VP-732 – VP-732 Communication Protocol
77
Control Type
Function
Parameter1
Description
Set
Get
0 1 66
0 : Single Picture
1 : 640x480@60Hz
2 : 640x480@75Hz
3 : 800x600@50Hz
4 : 800x600@60Hz
5 : 800x600@75Hz
6 : 1024x768@50Hz
7 : 1024x768@60Hz
8 : 1024x768@75Hz
9 : 1280x768@50Hz
10: 1280x768@60Hz
11: 1280x720@60Hz
12: 1280x800@60Hz
13: 1280x1024@50Hz
14: 1280x1024@60Hz
15: 1280x1024@75Hz
16: 480p@60Hz
17: 576p@50Hz
18: 720p@50Hz
19: 720p@60Hz
20: [email protected]
21: [email protected]
22: Custom1
23: Custom2
24: Custom3
25: Custom4
Preview(VGA) Output Resolution
0 1 67
0: Follow Program
1: Follow Preview
HDMI1 output
0 1 68
0: Auto
1: HDMI
2: DVI
Output HDMI Type
0 1 69
0: Best Fit
1: Letterbox
2: Follow Output
3: Virtual Wide
4: Follow Input
5: Custom
Aspect Ratio
Zoom != 100% is disabled
P+P or Split ON is disabled
0 1 70
-16 ~ 16
Aspect Ratio Custom H-Pan
Zoom != 100% is disabled
Aspect Ratio should be Custom
Aspect Ratio Custom H-Zoom can’t be 0
0 1 71
-16 ~ 16
Aspect Ratio Custom V-Pan
Zoom != 100% is disabled
Aspect Ratio should be Custom
Aspect Ratio Custom H-Zoom can’t be 0
0 1 72
-8 ~ 8
Aspect Ratio Custom H-Zoom
Zoom != 100% is disabled
Aspect Ratio should be Custom
0 1 73
-8 ~ 8
Aspect Ratio Custom V-Zoom
Zoom != 100% is disabled
Aspect Ratio should be Custom
0 1 74
0: 100%
1: 150%
2: 200%
Zoom
(Aspect ratio = Custom is disabled)
Page 84
78
VP-732 - VP-732 Communication Protocol
Control Type
Function
Parameter1
Description
Set
Get
3: 225%
4: 250%
5: 275%
6: 300%
7: 325%
8: 350%
9: 375%
10: 400%
11: Custom
0 1 75
0 ~ 32
Custom Zoom
Aspect ratio = Custom is disabled
Zoom = Custom is disabled
0 1 76
0 ~ 32
Zoom H-Pan (Aspect ratio = Custom is disabled)
0 1 77
0 ~ 32
Zoom V-Pan (Aspect ratio = Custom is disabled)
0 1 78
0: Off
1: Color bar
2: SMPTE
3: Grey scale
4: Picture Border
5: Multiburst
6: Ramps
7: H-pattern
8: Setup
Test Pattern
0 1 79
0: Auto
1: HDMI
2: DVI
Output HDMI2 Type
0 1 80
0 ~ A
Program Output Positioning – H Start
0 1 81
A ~ B
Program Output Positioning – H End
0 1 82
0 ~ A
Program Output Positioning – H Position
0 1 83
A ~ B
Program Output Positioning – H Size
0 1 84
0 ~ A
Program Output Positioning – V Start
0 1 85
A ~ B
Program Output Positioning – V End
0 1 86
0 ~ A
Program Output Positioning – V Position
0 1 87
A ~ B
Program Output Positioning – V Size
0 1 90
0: Off
1: On
PIP On/Off
0 1 91
0: PIP
1: P+P
2: Split
PIP Type (Enabled as PIP On)
0 1 92
0: UNIV 1
1: UNIV 2
3: UNIV 3
4: UNIV 4
5: HDMI 1
6: HDMI 2
7: HDMI 3
8: HDMI 4
9: DP 1
10: DP 2
PIP Source (Enabled as PIP On)
0 1 93
0: 1/25
1: 1/16
2: 1/9
3: 1/4
4: Custom
PIP Size
PIP On is enabled
Pip Type = PIP is enabled
0 1 94
0 ~ 128
PIP H-Position (available when PiP is On and PIP
Type=PIP)
Page 85
VP-732 – VP-732 Communication Protocol
79
Control Type
Function
Parameter1
Description
Set
Get
0 1 95
0 ~ 128
PIP V-Position (available when PiP is On and PIP
Type=PIP)
0 1 96
1 ~ 255
PIP H-Size is available when :
PIP Type = PIP, and PIP Size = Custom
PIP Type = P+P or PIP Type = Split
0 1 97
1 ~ 255
PIP V-Size Enabled when:
PIP is On
PIP Type = PIP
Pip Size = Custom
0 1 100
-22~0~+22
Audio Program Input Volume
0 1 101
-100~24
Audio Program Output Volume
0 1 102
-24~0~+24
Audio Program Bass
0 1 103
-24~0~+24
Audio Program Treble
0 1 104
-10~10
Audio Program Balance
0 1 105
0: Off
1: On
Audio Program Loudness
0 1 106
0: Dynamic
1: User Define
Audio Program Delay
1 107
0~170 (step 2)
Program User Delay (when User Define is selected in
Audio Program Delay)
0 1 108
0: Analog1
1: Analog2
2: Analog3
3: Analog4
4: Analog5
5: Analog6
6: Analog7
7: Analog8
8: Analog9
9: Analog10
10: S/PDIF
11: Embedded
Audio Program Input Source (Universal 1~4 video
inputs cannot select an Embedded audio source)
0 1 109
0: Off
1: On
Program Audio Follow-Video
0 1 111
-22~0~+22
Audio Preview Input Volume is available when the:
Preview (VGA) output resolution is NOT set to Single
Picture.
HDMI1 output is set to Follow Preview
0 1 112
-100~24
Audio Preview Input Volume is available when the:
Preview (VGA) output resolution is NOT set to Single
Picture.
HDMI1 output is set to Follow Preview
0 1 113
-24~0~+24
Audio Preview Input Volume is available when the:
Preview (VGA) output resolution is NOT set to Single
Picture.
HDMI1 output is set to Follow Preview
0 1 114
-24~0~+24
Audio Preview Input Volume is available when the:
Preview (VGA) output resolution is NOT set to Single
Picture.
HDMI1 output is set to Follow Preview
0 1 115
-10~10
Audio Preview Input Volume is available when the:
Preview (VGA) output resolution is NOT set to Single
Picture.
HDMI1 output is set to Follow Preview
Page 86
80
VP-732 - VP-732 Communication Protocol
Control Type
Function
Parameter1
Description
Set
Get
0 1 116
0: Off
1: On
Audio Preview Input Volume is available when the:
Preview (VGA) output resolution is NOT set to Single
Picture.
HDMI1 output is set to Follow Preview
0 1 117
0: Dynamic
1: User Define
Audio Preview Delay is available when the:
Preview (VGA) output resolution is NOT set to Single
Picture.
HDMI1 output is set to Follow Preview
1 118
0~70(step 2)
Preview User Delay is available when the:
Preview (VGA) output resolution is NOT set to Single
Picture.
HDMI1 output is set to Follow Preview.
Audio Preview Delay is set to User Define.
0 1 119
0: Analog1
1: Analog2
2: Analog3
3: Analog4
4: Analog5
5: Analog6
6: Analog7
7: Analog8
8: Analog9
9: Analog10
10: S/PDIF
11:Embedded
Audio Preview Delay is available when the:
Preview (VGA) output resolution is NOT set to Single
Picture.
HDMI1 output is set to Follow Preview
Note that Universal1~4 video inputs cannot select
embedded audio source
0 1 120
0: Off
1: On
Audio Preview Delay is available when the:
Preview (VGA) output resolution is NOT set to Single
Picture.
HDMI1 output is set to Follow Preview
0 - 122
0: Profile 1
1: Profile 2
2: Profile 3
3: Profile 4
4: Profile 5
5: Profile 6
6: Profile 7
7: Profile 8
8: USB
Setup - Save Setting
0 - 123
0: Profile 1
1: Profile 2
2: Profile 3
3: Profile 4
4: Profile 5
5: Profile 6
6: Profile 7
7: Profile 8
8: USB
Setup - Recall Setting
0 1 124
0: Off
1: On
Setup - Frame Lock
0 1 125
0: Manual
1: Auto
Setup - Auto Image
0 1 126
0: Seamless
1: Fast
Setup - Switching Mode
0 1 127
0: Best Quality
1: Fast
Setup - Frame Latency
Page 87
VP-732 – VP-732 Communication Protocol
81
Control Type
Function
Parameter1
Parameter2
Description
Set
Get
0 1 128
0:First Priority
1:Second Priority
2:Third Priority
3:4th Priority
4:5th Priority
5:6th Priority
6:7th Priority
7:8th Priority
8:9th Priority
9:10th Priority
0: UNIV 1
1: UNIV 2
2: UNIV 3
3: UNIV 4
4: HDMI 1
5: HDMI 2
6: HDMI 3
7: HDMI 4
8: DP 1
9: DP 2
10: Off
Auto switch Priority (Parameter *5 )
0 1 129
0: Off
1: On
N/A
Setup - Hot Plug HDMI1
0 1 130
0: Off
1: On
N/A
Setup - Hot Plug HDMI2
0 1 131
0: Off
1: On
N/A
Setup - Hot Plug HDMI3
0 1 132
0: Off
1: On
N/A
Setup - Hot Plug HDMI4
0 1 133
0: Off
1: On
N/A
Setup - Hot Plug DP1
0 1 134
0: Off
1: On
N/A
Setup - Hot Plug DP2
0 1 135
0: Off
1: On
N/A
Setup - HDMI1 Input HDCP
0 1 136
0: Off
1: On
N/A
Setup - HDMI2 Input HDCP
0 1 137
0: Off
1: On
N/A
Setup - HDMI3 Input HDCP
0 1 138
0: Off
1: On
N/A
Setup - HDMI4 Input HDCP
0 1 139
0: Off
1: On
N/A
Setup - DP1 Input HDCP
0 1 140
0: Off
1: On
N/A
Setup - DP2 Input HDCP
0 - 141
0: Profile 1
1: Profile 2
2: Profile 3
3: Profile 4
4: Profile 5
5: Profile 6
6: Profile 7
7: Profile 8
N/A
Setup - Erase
0 1 150
0: Off
1: On
N/A
Setup - DHCP
Set
Get
Function
IP1
IP2
IP3
IP4
Parameter *7, Reboot after setting IP Address /
Subnet /Gateway
0 1 151
0~255
0~255
0~255
0~255
Setup - IP Address(DHCP = Off)
0 1 152
0~255
0~255
0~255
0~255
Setup - Subnet Mask(DHCP = Off)
0 1 153
0~255
0~255
0~255
0~255
Setup - Gateway(DHCP = Off)
Page 88
82
VP-732 - VP-732 Communication Protocol
Set
Get
Function
Parameter1
Description Control Type
0 - 154
N/A
Setup - Factory Reset
0 - 155
N/A
Factory Reset ( Ethernet related settings are not
included)
0 1 200
0: 1400x1050x60
1: 1680x1050x60
Advanced Mode Set – Mode 1
0 1 201
0: 1280x1024x75
1: 1280x1024x76
Advanced Mode Set – Mode 2
0 1 202
0: 1280x768x60
1: 1366x768x60
2: 1366x768x60(R)
Advanced Mode Set – Mode 3
0 1 203
0: 1024x768x75
1: 1024x768x75-Mac
Advanced Mode Set – Mode 4
0 1 204
0: 1280x960x60
1: 1600x900x60(R)
Advanced Mode Set – Mode 5
0 1 266
0: Program
1: Preview
Advanced OSD – OSD Position
0 1 267
0: Center
1: Top Left
2: Top Right
3: Bottom Left
4: Bottom Right
Advanced OSD – Menu Position
0 1 268
0: 5 sec
1: 10 sec
2: 20 sec
3: 30 sec
4: 60 sec
5: 90 sec
6: Off
Advanced OSD – Time Out(sec.)
0 1 270
0: Off
1: On
2: Custom
Advanced Misc – Logo
0 1 271
0: Blue
1: Black
Advanced Misc –Blank Color
0 1 272
0: Blue
1: Black
Advanced Misc – Background
0 1 273
0: Off
1: Sleep
2: Power down
Advanced Misc –Low Power Saving
0 1 274
0: Off
1: On
Advanced Misc – Save Lock
0 1 275
0: Off
1: On
Advanced Misc – Input Lock
0 1 276
0: Blank & Mute
1: Blank
2: Mute
Advanced Misc –Blank
0 1 277
0: Freeze & Mute
1: Freeze
2: Mute
Advanced Misc – Freeze
0 1 281
0: Follow Output
1: Follow Input
Advanced Misc – HDCP
0 1 282
0: Off
1: On
Advanced Misc – Overscan
0 1 283
0: Off
Advanced Misc – Overlay text and logo should follow
Page 89
VP-732 – VP-732 Communication Protocol
83
Set
Get
Function
Parameter1
Description Control Type
1: Text
2: Logo
these below:
Text: you need to have a “TextOvl.ini” file in the USB
flash drive and ensure it is connected.
Logo: you need to have a “Txtlogo.bmp” file in the USB
flash drive and ensure it is connected.
0 1 300
0:Custom1
1:Custom2
2:Custom3
3:Custom4
Advance Input Mode: Custom Input
0 1 301
512~3071
Advance Input Mode: HT(temp value, unless to run the
Input mode save)
0 1 302
32~(HS-48)
Advance Input Mode: HW(temp value, unless to run the
Input mode save)
0 1 303
80~(HT-HA-12)
Advance Input Mode: HS(temp value, unless to run the
Input mode save)
0 1 304
640~1920
<= (HT-92)
Advance Input Mode: HA(temp value, unless to run the
Input mode save)
0 1 305
0: Negative polarity
1: Positive polarity
Advance Input Mode: HP(temp value, unless to run the
Input mode save)
0 1 306
384~2047
Advance Input Mode: VT(temp value, unless to run the
Input mode save)
0 1 307
2~(HS-13)
Advance Input Mode: VW(temp value, unless to run the
Input mode save)
0 1 308
15~(VT-VA-1)
Advance Input Mode: VS(temp value, unless to run the
Input mode save)
0 1 309
480~1200
<= (VT-16)
Advance Input Mode: VA(temp value, unless to run the
Input mode save)
0 1 310
0: Negative polarity
1: Positive polarity
Advance Input Mode: VP(temp value, unless to run the
Input mode save)
0 1 311
25000 < OCLK <= 297000
Advance Input Mode: OCLK
Temp value, unless to run the Input mode save
The three bytes of high byte is integer; the three bytes
of low byte is the decimal place.
The unit is KHz
0 1 312
0: Off
1: On
Advance Input Mode: Enable
0 - 313
N/A
Advance Input Mode: Save
0 1 320
0:Custom1
1:Custom2
2:Custom3
3:Custom4
Advance Output Mode: Custom Output
0 1 321
512~3071
Advance Output Mode: HT(temp value, unless to run
the Output mode save)
0 1 322
32~(HS-48)
Advance Output Mode: HW(temp value, unless to run
the Output mode save)
0 1 323
80~(HT-HA-12)
Advance Output Mode: HS(temp value, unless to run
the Output mode save)
0 1 324
640~1920
<= (HT-92)
Advance Output Mode: HA(temp value, unless to run
the Output mode save)
0 1 325
0: Negative polarity
1: Positive polarity
Advance Output Mode: HP(temp value, unless to run
the Output mode save)
0 1 326
384~2047
Advance Output Mode: VT(temp value, unless to run
the Output mode save)
0 1 327
2~(HS-13)
Advance Output Mode: VW(temp value, unless to run
the Output mode save)
Page 90
84
VP-732 - VP-732 Communication Protocol
Set
Get
Function
Parameter1
Description Control Type
0 1 328
15~(VT-VA-1)
Advance Output Mode: VS(temp value, unless to run
the Output mode save)
0 1 329
480~1200
<= (VT-16)
Advance Output Mode: VA(temp value, unless to run
the Output mode save)
0 1 330
0: Negative polarity
1: Positive polarity
Advance Output Mode: VP(temp value, unless to run
the Output mode save)
0 1 331
25000 < OCLK <= 297000
Advance Output Mode: OCLK
Temp value, unless to run the Output mode save
The three bytes of high byte is integer; the three bytes
of low byte is the decimal place.
The unit is KHz
0 - 332
N/A
Advance Output Mode: Save
0 - 333
N/A
Advance Output Mode: Set Current (temp value, unless
to run the Output mode save)
0 - 334
N/A
Advance Output Mode: Read HDMI1 EDID
0 - 335
N/A
Advance Output Mode: Read HDMI2 EDID
0 - 336
N/A
Advance Output Mode: Read DP EDID
0 - 337
N/A
Advance Output Mode: Read VGA EDID
0 - 400
0: Advance Input EDID:
HDMI1 Default
1: Advance Input EDID:
HDMI1 Copy HDMI1 Out
2: Advance Input EDID:
HDMI1 Copy HDMI2 Out
3: Advance Input EDID:
HDMI1 Copy DP Out
Advance Input EDID: HDMI1
0 - 401
0: Default
1: 1024x768 60
2: 1280x800 60
3: 1280x102 60
4: 1366x4768 60
5: 1440x900 60
6: 1400x1050 60
7: 1600x900 60
8: 1600x1200 60
9: 1680x1050 60
10: 1920x1080 60
11: 1920x1200 60(RB)
12: 720P 50
13:720P 60
14:1080P 50
15:1080p 60
16:2K 50
17:2K 60
Advance Input EDID: HDMI1 Select Modeline
0 - 405
0: Advance Input EDID:
HDMI2 Default
1: Advance Input EDID:
HDMI2 Copy HDMI1 Out
2: Advance Input EDID:
HDMI2 Copy HDMI2 Out
3: Advance Input EDID:
HDMI2 Copy DP Out
Advance Input EDID: HDMI2
0 - 406
0: Default
1: 1024x768 60
2: 1280x800 60
Advance Input EDID: HDMI2 Select Modeline
Page 91
VP-732 – VP-732 Communication Protocol
85
Set
Get
Function
Parameter1
Description Control Type
3: 1280x1024 60
4: 1366x4768 60
5: 1440x900 60
6: 1400x1050 60
7: 1600x900 60
8: 1600x1200 60
9: 1680x1050 60
10: 1920x1080 60
11: 1920x1200 60(RB)
12: 720P 50
13:720P 60
14:1080P 50
15:1080p 60
16:2K 50
17:2K 60
0 - 410
0: Advance Input EDID:
HDMI3 Default
1: Advance Input EDID:
HDMI3 Copy HDMI1 Out
2: Advance Input EDID:
HDMI3 Copy HDMI2 Out
3: Advance Input EDID:
HDMI3 Copy DP Out
Advance Input EDID: HDMI3
0 - 411
0: Default
1: 1024x768 60
2: 1280x800 60
3: 1280x1024 60
4: 1366x4768 60
5: 1440x900 60
6: 1400x1050 60
7: 1600x900 60
8: 1600x1200 60
9: 1680x1050 60
10: 1920x1080 60
11: 1920x1200 60(RB)
12: 720P 50
13:720P 60
14:1080P 50
15:1080p 60
16:2K 50
17:2K 60
Advance Input EDID: HDMI3 Select Modeline
0 - 415
0: Advance Input EDID:
HDMI4 Default
1: Advance Input EDID:
HDMI4 Copy HDMI1 Out
2: Advance Input EDID:
HDMI4 Copy HDMI2 Out
3: Advance Input EDID:
HDMI4 Copy DP Out
Advance Input EDID: HDMI4
0 - 416
0: Default
1: 1024x768 60
2: 1280x800 60
3: 1280x1024 60
4: 1366x4768 60
5: 1440x900 60
6: 1400x1050 60
7: 1600x900 60
8: 1600x1200 60
Advance Input EDID: HDMI4 Select Modeline
Page 92
86
VP-732 - VP-732 Communication Protocol
Set
Get
Function
Parameter1
Description Control Type
9: 1680x1050 60
10: 1920x1080 60
11: 1920x1200 60(RB)
12: 720P 50
13:720P 60
14:1080P 50
15:1080p 60
16:2K 50
17:2K 60
0 - 420
0: Advance Input EDID:
DP1 Default
1: Advance Input EDID:
DP1 Copy HDMI1 Out
2: Advance Input EDID:
DP1 Copy HDMI2 Out
3: Advance Input EDID:
DP1 Copy DP Out
Advance Input EDID: DP1
0 - 421
0: Default
1: 1024x768 60
2: 1280x800 60
3: 1280x1024 60
4: 1366x4768 60
5: 1440x900 60
6: 1400x1050 60
7: 1600x900 60
8: 1600x1200 60
9: 1680x1050 60
10: 1920x1080 60
11: 1920x1200 60(RB)
12: 720P 50
13:720P 60
14:1080P 50
15:1080p 60
16:2K 50
17:2K 60
Advance Input EDID: DP1 Select Modeline
0 - 425
0: Advance Input EDID:
DP2 Default
1: Advance Input EDID:
DP2 Copy HDMI1 Out
2: Advance Input EDID:
DP2 Copy HDMI2 Out
3: Advance Input EDID:
DP2 Copy DP Out
Advance Input EDID: DP2
0 - 426
0: Default
1: 1024x768 60
2: 1280x800 60
3: 1280x1024 60
4: 1366x4768 60
5: 1440x900 60
6: 1400x1050 60
7: 1600x900 60
8: 1600x1200 60
9: 1680x1050 60
10: 1920x1080 60
11: 1920x1200 60(RB)
12: 720P 50
13:720P 60
14:1080P 50
Advance Input EDID: DP2 Select Modeline
Page 93
VP-732 – VP-732 Communication Protocol
87
Set
Get
Function
Parameter1
Description Control Type
15:1080p 60
16:2K 50
17:2K 60
0 - 430
0: Advance Input EDID:
UNIV1 Default
1: Advance Input EDID:
UNIV1 Copy PC output
Advance Input EDID: UNIV1
0 - 431
0: Default
1: 1024x768 60
2: 1280x800 60
3: 1280x1024 60
4: 1366x4768 60
5: 1440x900 60
6: 1400x1050 60
7: 1600x900 60
8: 1600x1200 60
9: 1680x1050 60
10: 1920x1080 60
11: 1920x1200 60(RB)
Advance Input EDID: UNIV1 Select Modeline
0 - 435
0: Advance Input EDID:
UNIV2 Default
1: Advance Input EDID:
UNIV2 Copy PC output
Advance Input EDID: UNIV2
0 - 436
0: Default
1: 1024x768 60
2: 1280x800 60
3: 1280x1024 60
4: 1366x4768 60
5: 1440x900 60
6: 1400x1050 60
7: 1600x900 60
8: 1600x1200 60
9: 1680x1050 60
10: 1920x1080 60
11: 1920x1200 60(RB)
Advance Input EDID: UNIV2 Select Modeline
0 - 440
0: Advance Input EDID:
UNIV3 Default
1: Advance Input EDID:
UNIV3 Copy PC output
Advance Input EDID: UNIV3
0 - 441
0: Default
1: 1024x768 60
2: 1280x800 60
3: 1280x1024 60
4: 1366x4768 60
5: 1440x900 60
6: 1400x1050 60
7: 1600x900 60
8: 1600x1200 60
9: 1680x1050 60
10: 1920x1080 60
11: 1920x1200 60(RB)
Advance Input EDID: UNIV3 Select Modeline
0 - 445
0: Advance Input EDID:
UNIV4 Default
1: Advance Input EDID:
UNIV4 Copy PC output
Advance Input EDID: UNIV4
Page 94
88
VP-732 - VP-732 Communication Protocol
Set
Get
Function
Parameter1
Description Control Type
0 - 446
0: Default
1: 1024x768 60
2: 1280x800 60
3: 1280x1024 60
4: 1366x4768 60
5: 1440x900 60
6: 1400x1050 60
7: 1600x900 60
8: 1600x1200 60
9: 1680x1050 60
10: 1920x1080 60
11: 1920x1200 60(RB)
Advance Input EDID: UNIV4 Select Modeline
0 1 450
-100 ~ 24
Program Max Volume Limit
0 1 451
-100 ~ 24
Preview Max Volume Limit
- 1 460
0: 640x480 60
1: 640x480 67(Mac13)
2: 640x480 72
3: 640x480 75
4: 640x480 85
5: 720x400 70
6: 720x400 85
7: 800x600 56
8: 800x600 60
9: 800x600 72
10: 800x600 75
11: 800x600 85
12: 832x624 75 Mac16
13: 1024x768 60
14: 1024x768 70
15: 1024x768 75
16: 1024x768 75 Mac19
17: 1024x768 85
18: 1024x800 84 Sun
19: 1152x864 75
20: 1152x870 75 Mac21
21: 1152x900 66 Sun
22: 1152x900 76 Sun
23: 1280x720 60
24: 1280x800 60 R
25: 1280x800 60
26: 1280x960 60
27: 1280x960 85
28: 1280x768 60 R
29: 1280x768 60
30: 1280x1024 60
31: 1280x1024 75
32: 1280x1024 76 Sun
33: 1280x1024 85
34: 1366x768 60 R
35: 1366x768 60
36: 1440x900 60 R
37: 1440x900 60
38: 1400x1050 60
39: 1400x1050 75
40: 1600x900 60 R
41: 1600x1200 60
42: 1680x1050 60 R
Program Input status
Page 95
VP-732 – VP-732 Communication Protocol
89
Set
Get
Function
Parameter1
Description Control Type
43: 1680x1050 60
44: 1920x1080 60
45: 1920x1200 60 R
46: 2048x1080 50
47: 2048x1080 60
48: 3840x2160@24Hz
49: 3840x2160@25Hz
50: 3840x2160@29_97Hz
51: 3840x2160@30Hz
52: 4096x2160@24Hz
100: Custom1
101: Custom2
102: Custom3
103: Custom4
150: 480i 60
151: 480p 60
152: 576i 50
153: 576p 50
154: 720p 50
155: 720p 60
156: 1080i 50
157: 1080i 60
158: 1080p 24
159: 1080p 50
160: 1080p 60
200: NTSC
201: PAL
202: PAL-M
203: PAL-N
204: NTSC 4.43
205: SECAM
206: PAL-60
250: No Input detected
251: Not supported
- 1 461
0: 640x480 60
1: 640x480 67(Mac13)
2: 640x480 72
3: 640x480 75
4: 640x480 85
5: 720x400 70
6: 720x400 85
7: 800x600 56
8: 800x600 60
9: 800x600 72
10: 800x600 75
11: 800x600 85
12: 832x624 75 Mac16
13: 1024x768 60
14: 1024x768 70
15: 1024x768 75
16: 1024x768 75 Mac19
17: 1024x768 85
18: 1024x800 84 Sun
19: 1152x864 75
20: 1152x870 75 Mac21
21: 1152x900 66 Sun
22: 1152x900 76 Sun
Preview Input status
Page 96
90
VP-732 - VP-732 Communication Protocol
Set
Get
Function
Parameter1
Description Control Type
23: 1280x720 60
24: 1280x800 60 R
25: 1280x800 60
26: 1280x960 60
27: 1280x960 85
28: 1280x768 60 R
29: 1280x768 60
30: 1280x1024 60
31: 1280x1024 75
32: 1280x1024 76 Sun
33: 1280x1024 85
34: 1366x768 60 R
35: 1366x768 60
36: 1440x900 60 R
37: 1440x900 60
38: 1400x1050 60
39: 1400x1050 75
40: 1600x900 60 R
41: 1600x1200 60
42: 1680x1050 60 R
43: 1680x1050 60
44: 1920x1080 60
45: 1920x1200 60 R
46: 2048x1080@50Hz
47: 2048x1080@60Hz
100: Custom1
101: Custom2
102: Custom3
103: Custom4
150: 480i 60
151: 480p 60
152: 576i 50
153: 576p 50
154: 720p 50
155: 720p 60
156: 1080i 50
157: 1080i 60
158: 1080p 24
159: 1080p 50
160: 1080p 60
200: NTSC
201: PAL
202: PAL-M
203: PAL-N
204: NTSC 4.43
205: SECAM
206: PAL-60
250: No Input detected
251: Not supported
- 1 462
0: 640x480 60
1: 640x480 67(Mac13)
2: 640x480 72
3: 640x480 75
4: 640x480 85
5: 720x400 70
6: 720x400 85
7: 800x600 56
PIP Input status
Page 97
VP-732 – VP-732 Communication Protocol
91
Set
Get
Function
Parameter1
Description Control Type
8: 800x600 60
9: 800x600 72
10: 800x600 75
11: 800x600 85
12: 832x624 75 Mac16
13: 1024x768 60
14: 1024x768 70
15: 1024x768 75
16: 1024x768 75 Mac19
17: 1024x768 85
18: 1024x800 84 Sun
19: 1152x864 75
20: 1152x870 75 Mac21
21: 1152x900 66 Sun
22: 1152x900 76 Sun
23: 1280x720 60
24: 1280x800 60 R
25: 1280x800 60
26: 1280x960 60
27: 1280x960 85
28: 1280x768 60 R
29: 1280x768 60
30: 1280x1024 60
31: 1280x1024 75
32: 1280x1024 76 Sun
33: 1280x1024 85
34: 1366x768 60 R
35: 1366x768 60
36: 1440x900 60 R
37: 1440x900 60
38: 1400x1050 60
39: 1400x1050 75
40: 1600x900 60 R
41: 1600x1200 60
42: 1680x1050 60 R
43: 1680x1050 60
44: 1920x1080 60
45: 1920x1200 60 R
46: 2048x1080@50Hz
47: 2048x1080@60Hz
100: Custom1
101: Custom2
102: Custom3
103: Custom4
150: 480i 60
151: 480p 60
152: 576i 50
153: 576p 50
154: 720p 50
155: 720p 60
156: 1080i 50
157: 1080i 60
158: 1080p 24
159: 1080p 50
160: 1080p 60
200: NTSC
201: PAL
Page 98
92
VP-732 - VP-732 Communication Protocol
Set
Get
Function
Parameter1
Description Control Type
202: PAL-M
203: PAL-N
204: NTSC 4.43
205: SECAM
206: PAL-60
250: No Input detected
251: Not supported
- 1 463
0: Native HDMI1
1: Native HDMI2
2: Native DP
3: Native VGA
4: 640x480 60
5: 640x480 75
6: 800x600 50
7: 800x600 60
8: 800x600 75
9: 1024x768 50
10: 1024x768 60
11: 1024x768 75
12: 1280x768 50
13: 1280x768 60
14: 1280x720 60
15: 1280x800 60
16: 1280x1024 50
17: 1280x1024 60
18: 1280x1024 75
19: 1366x768 50
20: 1366x768 60
21: 1400x1050 50
22: 1400x1050 60
23: 1600x900 60 R
24: 1600x1200 50
25: 1600x1200 60
26: 1680x1050 60
27: 1920x1080 60
28: 1920x1200 60 R
29: 2048x1080 50
30: 2048x1080 60
31: 3840x2160@24Hz
32: 3840x2160@25Hz
33: 3840x2160@29_97Hz
34: 3840x2160@30Hz
35: 4096x2160@24Hz
100: 480P 60
101: 576P 50,
102: 720P 50,
103: 720P 60,
104: 1080i 50,
105: 1080i 60,
106: 1080P 50,
107: 1080P 60,
108: 1080P 24,
109: 480P 59.94
110: 720P 59.94
111: 1080i 59.94
112: 1080P 23.98
113: 1080P 29.97
Program output status
Page 99
VP-732 – VP-732 Communication Protocol
93
Set
Get
Function
Parameter1
Description Control Type
114: 1080P 59.94
150: Custom1
151: Custom2
152: Custom3
153: Custom4
- 1 464
0: Single Picture
1: 640x480 60
2: 640x480 75
3: 800x600 50
4: 800x600 60
5: 800x600 75
6: 1024x768 50
7: 1024x768 60
8: 1024x768 75
9: 1280x768 50
10: 1280x768 60
11: 1280x720 60
12: 1280x800 60
13: 1280x1024 50
14: 1280x1024 60
15: 1280x1024 75
60: 480P 60
61: 576P 50
62: 720P 50
63: 720P 60
64: 480P 59.94
65: 720P 59.94
90: Custom1
91: Custom2
92: Custom3
93: Custom4
Preview output status
- 1 465
0: Follow Program
1: Follow Preview
HDMI1 output status
- 1 466
0: Free Run
1: Frame Lock
Sync Mode status
- 1 467
N/A
Firmware Revision
- 1 500
N/A
Program blank / freeze / blank status
0 : Program off
1 : Program Blank & Mute
2 : Program Blank
3 : Program Mute
4 : Program Freeze & Mute
5 : Program Freeze
6 : Program Blank & Freeze & Mute
7 : Program Blank & Freeze
- 1 501
N/A
Preview blank / freeze/ blank status
0 : Preview off
1 : Preview Blank & Mute
2 : Preview Blank
3 : Preview Mute
4 : Preview Freeze & Mute
5 : Preview Freeze
6 : Preview Blank & Freeze & Mute
7 : Preview Blank & Freeze
0
1
520
0: Best Fit
1: Letterbox
Preview Aspect Ratio
Page 100
94
VP-732 - VP-732 Communication Protocol
Set
Get
Function
Parameter1
Description Control Type
2: Follow Output
3: Virtual Wide
4: Follow Input
5: Custom
0 1 521
-16 ~ 16
Preview Aspect Ratio Custom H-Pan
0 1 522
-16 ~ 16
Preview Aspect Ratio Custom V-Pan
0 1 523
-8 ~ 8
Preview Aspect Ratio Custom H-Zoom
0 1 524
-8 ~ 8
Preview Aspect Ratio Custom V-Zoom
0 1 525
0: 100%
1: 150%
2: 200%
3: 225%
4: 250%
11: Custom
Preview Zoom
0 1 526
0 ~ 24
Preview Custom Zoom
0 1 527
0 ~ 32
Zoom H-Pan(Disabled when aspect ratio = Custom)
0 1 528
0 ~ 32
Zoom V-Pan(Disabled when aspect ratio = Custom)
0 1 529
0 ~ A
Preview Output Positioning – H Start
0 1 530
A ~ B
Preview Output Positioning – H End
0 1 531
0 ~ A
Preview Output Positioning – H Position
0 1 532
A ~ B
Preview Output Positioning – H Size
0 1 533
0 ~ A
Preview Output Positioning – V Start
0 1 534
A ~ B
Preview Output Positioning – V End
0 1 535
0 ~ A
Preview Output Positioning – V Position
0 1 536
A ~ B
Preview Output Positioning – V Size
 Loading...