

Kramer VP-1201 User Manual

Kramer Electronics, Ltd.
USER MANUAL
Model:
VP-1201
12x1 XGA Switcher / Scanner

Contents
i
Contents
1
Introduction 1
2
Getting Started 1
3
Overview 1
4
Your VP-1201 12x1 XGA Switcher / Scanner 2
5
Connecting a VP-1201 12x1 XGA Switcher / Scanner 5
5.1
Connecting a Single Unit or Multiple VP-1201 Units 5
5.2
Controlling via RS-232 (for example, using a PC) 7
5.3
Controlling via RS-485 8
5.4
Setting the ETHERNET Port and Utilities 9
5.4.1 Connecting the VP-1201 Ethernet Port 9
5.4.2 Installing and Running the XPort Configuration Software 11
5.4.3 Configuring the ETHERNET Port 13
5.4.4 Using the Web Manager Page 14
5.4.5 Controlling a Machine using the Com Port Redirector 18
5.4.6 Using the Com Port Redirector 23
5.5
Connecting Several VP-1201 Machines 24
5.5.1 Connecting Several VP-1201 Units – Individual Control Configuration 24
5.5.2 Connecting Several VP-1201 Units – Input Expansion Configuration 26
5.6
Control Configuration via the ETHERNET Port 27
5.7
Setting the Dipswitches 28
5.7.1 MACH. ADDR. (Machine Address) Dipswitches Setup 29
5.7.2 MACH. # (Machine Number) Dipswitches Setup 29
5.7.3 SCAN Dipswitch Setup 30
5.7.4 DWELL TIME Dipswitches Setup 30
5.7.5 VALID ONLY Dipswitch Setup 30
5.7.6 FLASH PROG Dipswitch Setup 31
5.8
Resetting the Unit 31
6
Operating the VP-1201 31
6.1
Switching between Modes 31
6.2
The VP-1201 Input Buttons 32
7
Firmware Upgrading 33
7.1
Downloading from the Internet 33
7.2
Connecting the PC to the RS-232 Port 33
7.3
Upgrading Firmware 33
8
Technical Specifications 38
9
Table of Hex Codes for Serial Communication 38
10
Kramer Protocol 2000 39

KRAMER: SIMPLE CREATIVE TECHNOLOGY
Contents
ii
Figures
Figure 1: VP-1201 12x1 XGA Switcher / Scanner 3
Figure 2: VP-1201 Underside Panel 4
Figure 3: Connecting the VP-1201 6
Figure 4: Connecting a PC without using a Null-modem Adapter 7
Figure 5: Controlling via RS-485 (for example, using an RC-3000) 8
Figure 6: Local Area Connection Properties Window 10
Figure 7: Internet Protocol (TCP/IP) Properties Window 10
Figure 8: XPort™ Installer Main Dialog Box 12
Figure 9: Device Found on the Network 12
Figure 10: IP Address Assignment Dialog Box 13
Figure 11: ETHERNET Port Web-Manager 14
Figure 12: Server Configuration in the Unit Configuration Window 15
Figure 13: Port Configuration in the Unit Configuration Window 16
Figure 14: Server Properties in the Unit Configuration Window 16
Figure 15: Serial Port Settings Window 17
Figure 16: Dedicated Connection Window 17
Figure 17: Flush Mode Input Buffer Window 17
Figure 18: Com Port Redirector Welcome Screen 18
Figure 19: Setup Complete Dialog Box 19
Figure 20: Com Port Redirector Configuration Window 19
Figure 21: Port Setup Window 20
Figure 22: IP Service Setup Dialog Box 21
Figure 23: Port Settings Window 22
Figure 24: Silent Mode Checked in the RDCfg Window 23
Figure 25: Connecting VP-1201 Machines – Individual Control Configuration 25
Figure 26: Connecting VP-1201 Machines – Input Expansion Configuration 27
Figure 27: VP-1201 Dipswitches 28
Figure 28: VP-1201 Input Buttons Illuminated (I) 32
Figure 29: VP-1201 Input Buttons Illuminated (II) 32
Figure 30: Splash Screen 34
Figure 31: Atmel – Flip Window 34
Figure 32: Device Selection Window 34
Figure 33: Selecting Device from Selection Window 35
Figure 34: Loading the Hex 35
Figure 35: RS-232 Window 36
Figure 36: Atmel – Flip Window (Connected) 36
Figure 37: Atmel – Flip Window (Operation Completed) 37

Contents
iii
Tables
Table 1: Front Panel VP-1201 12x1 XGA Switcher / Scanner Features 4
Table 2: Rear Panel VP-1201 12x1 XGA Switcher / Scanner Features 4
Table 3: VP-1201 Underside Panel Features 5
Table 4: Crossover Cable RJ-45 PINOUT 9
Table 5: Straight-through Cable RJ-45 PINOUT 11
Table 6: Web Manager Window Buttons 14
Table 7: Port Settings Description 22
Table 8: Dipswitch Settings 28
Table 9: MACH. ADDR. Dipswitch Settings 29
Table 10: MACH. # Dipswitch Settings 29
Table 11: DWELL TIME Dipswitch Settings 30
Table 12: Technical Specifications of the VP-1201 38
Table 13: VP-1201 Hex Codes for Switching via RS-232/RS-485 38
Table 14: VP-1201 Hex Codes for Valid Input Detection Request 38
Table 15: Protocol Definitions 39
Table 16: Instruction Codes for Protocol 2000 40

Introduction
1
1 Introduction
Welcome to Kramer Electronics (since 1981): a world of unique, creative and
affordable solutions to the infinite range of problems that confront the video,
audio and presentation professional on a daily basis. In recent years, we have
redesigned and upgraded most of our line, making the best even better! Our
350-plus different models now appear in 8 Groups1, which are clearly defined
by function.
Congratulations on purchasing your Kramer VP-1201 12x1 XGA Switcher /
Scanner, which is ideal for the following typical applications:
Any professional system requiring a 12x1 switcher / scanner
Production studios
Security, CCTV, and home theater systems
The package includes the following items:
VP-1201 12x1 XGA Switcher / Scanner
Power cord and Null-modem adapter
Windows®-based Configuration Manager XPort software and Com Port
Redirector
Windows®-based Kramer control software
This user manual2
2 Getting Started
We recommend that you:
Unpack the equipment carefully and save the original box and packaging
materials for possible future shipment
Review the contents of this user manual
Use Kramer high performance high resolution cables3
3 Overview
The high performance VP-1201 12x1 XGA Switcher / Scanner is a true
switcher / scanner, routing up to 12 sources to one output.
1 GROUP 1: Distribution Amplifiers; GROUP 2: Video and Audio Switchers, Matrix Switchers and Controllers; GROUP 3:
Video, Audio, VGA/XGA Processors; GROUP 4: Interfaces and Sync Processors; GROUP 5: Twisted Pair Interfaces;
GROUP 6: Accessories and Rack Adapters; GROUP 7: Scan Converters and Scalers; and GROUP 8: Cables and Connectors
2 Download up-to-date Kramer user manuals from our Web site at http://www.kramerelectronics.com
3 The complete list of Kramer cables is on our Web site at http://www.kramerelectronics.com

KRAMER: SIMPLE CREATIVE TECHNOLOGY
Your VP-1201 12x1 XGA Switcher / Scanner
2
The VP-1201 features:
A bandwidth of 400MHz for RGB signals
Input signal detection
Manual switching or automatic scanning of inputs (or Valid-Only inputs)
Signal switching delay time, ranging from 1 to 16 seconds
Control the VP-1201 using the front panel buttons, or remotely via:
RS-485 or RS-232 serial commands transmitted by a touch screen system,
PC, or other serial controller
ETHERNET
The Kramer RC-IR1 Infra-Red Remote Control Transmitter1
The VP-1201 is dependable, rugged and fits into one vertical space (1U) of a
standard 19" rack.
To achieve the best performance:
Connect only good quality connection cables, thus avoiding interference,
deterioration in signal quality due to poor matching, and elevated noiselevels (often associated with low quality cables)
Avoid interference from neighboring electrical appliances and position
your Kramer VP-1201 away from moisture, excessive sunlight and dust
4 Your VP-1201 12x1 XGA Switcher / Scanner
Figure 1 illustrates the front and rear panels of the VP-1201. Table 1 and
Table 2 define the front and rear panels of the VP-1201, respectively.
1 Previously known as the IR-1/IR-1-01

Your VP-1201 12x1 XGA Switcher / Scanner
3
Figure 1: VP-1201 12x1 XGA Switcher / Scanner
KRAMER: SIMPLE CREATIVE TECHNOLOGY
Your VP-1201 12x1 XGA Switcher / Scanner
4
Table 1: Front Panel VP-1201 12x1 XGA Switcher / Scanner Features
# Feature Function
1 IR Receiver The red LED is illuminated when receiving signals from the
Kramer Infra-Red remote control transmitter
2 POWER Switch Illuminated switch supplying power to the unit
3 INPUT SELECTOR Buttons1 Select the input to switch to the output (from 1 to 12):
The blue LED illuminates when a signal is detected on the input
The red LED illuminates when the input is routed to the output
but no signal is detected on the input
Both the blue and red LEDs illuminate (creating purple) when a
signal is transmitted to the output
Table 2: Rear Panel VP-1201 12x1 XGA Switcher / Scanner Features
# Feature Function
4 HD15F Input Connectors Connect to the video sources (IN1 through IN12)
5 HD15F BUS Connector
Bus connector for cascading VP-1201 units
6 HD15F BUS LOOP Connector Loop for bus connector
7 BUS TERM Button Press for BUS termination
8 HD15F OUTPUT Connector Connects to the output acceptor
9 Setup Dipswitches For machine setup (see section 5.7)
10 ETHERNET Connector Connects to the PC or other controller through computer
networking
11 RS-232 DB 9F Connector Connects to the PC or other Serial Controller
12 RS-485 Connector Used for bi-directional communication with another unit
13 Power Connector with Fuse AC connector enabling power supply to the unit
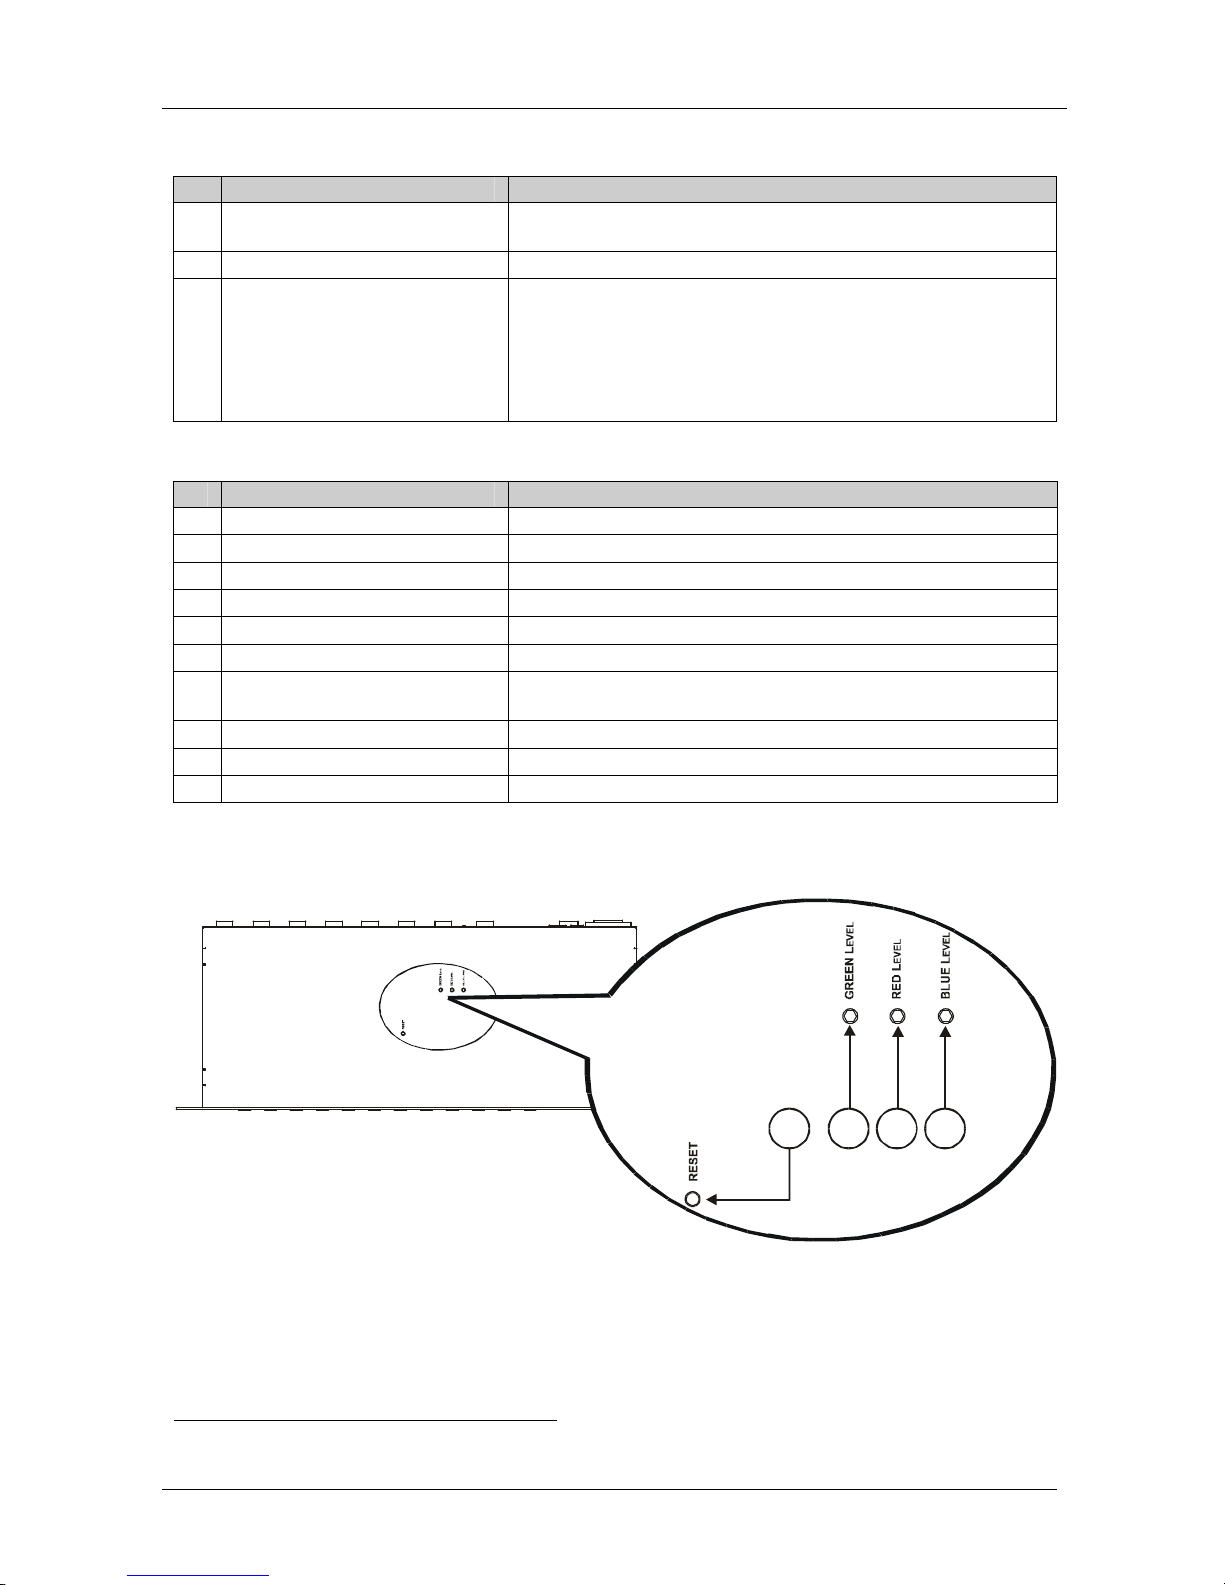
Figure 2 illustrates the underside of the VP-1201 unit and Table 3 defines the
underside features.
Enlarged View
432
1
Figure 2: VP-1201 Underside Panel
1 The INPUT SELECTOR buttons are also used to set the highest machine number (see section 5.5.2)
Connecting a VP-1201 12x1 XGA Switcher / Scanner
5
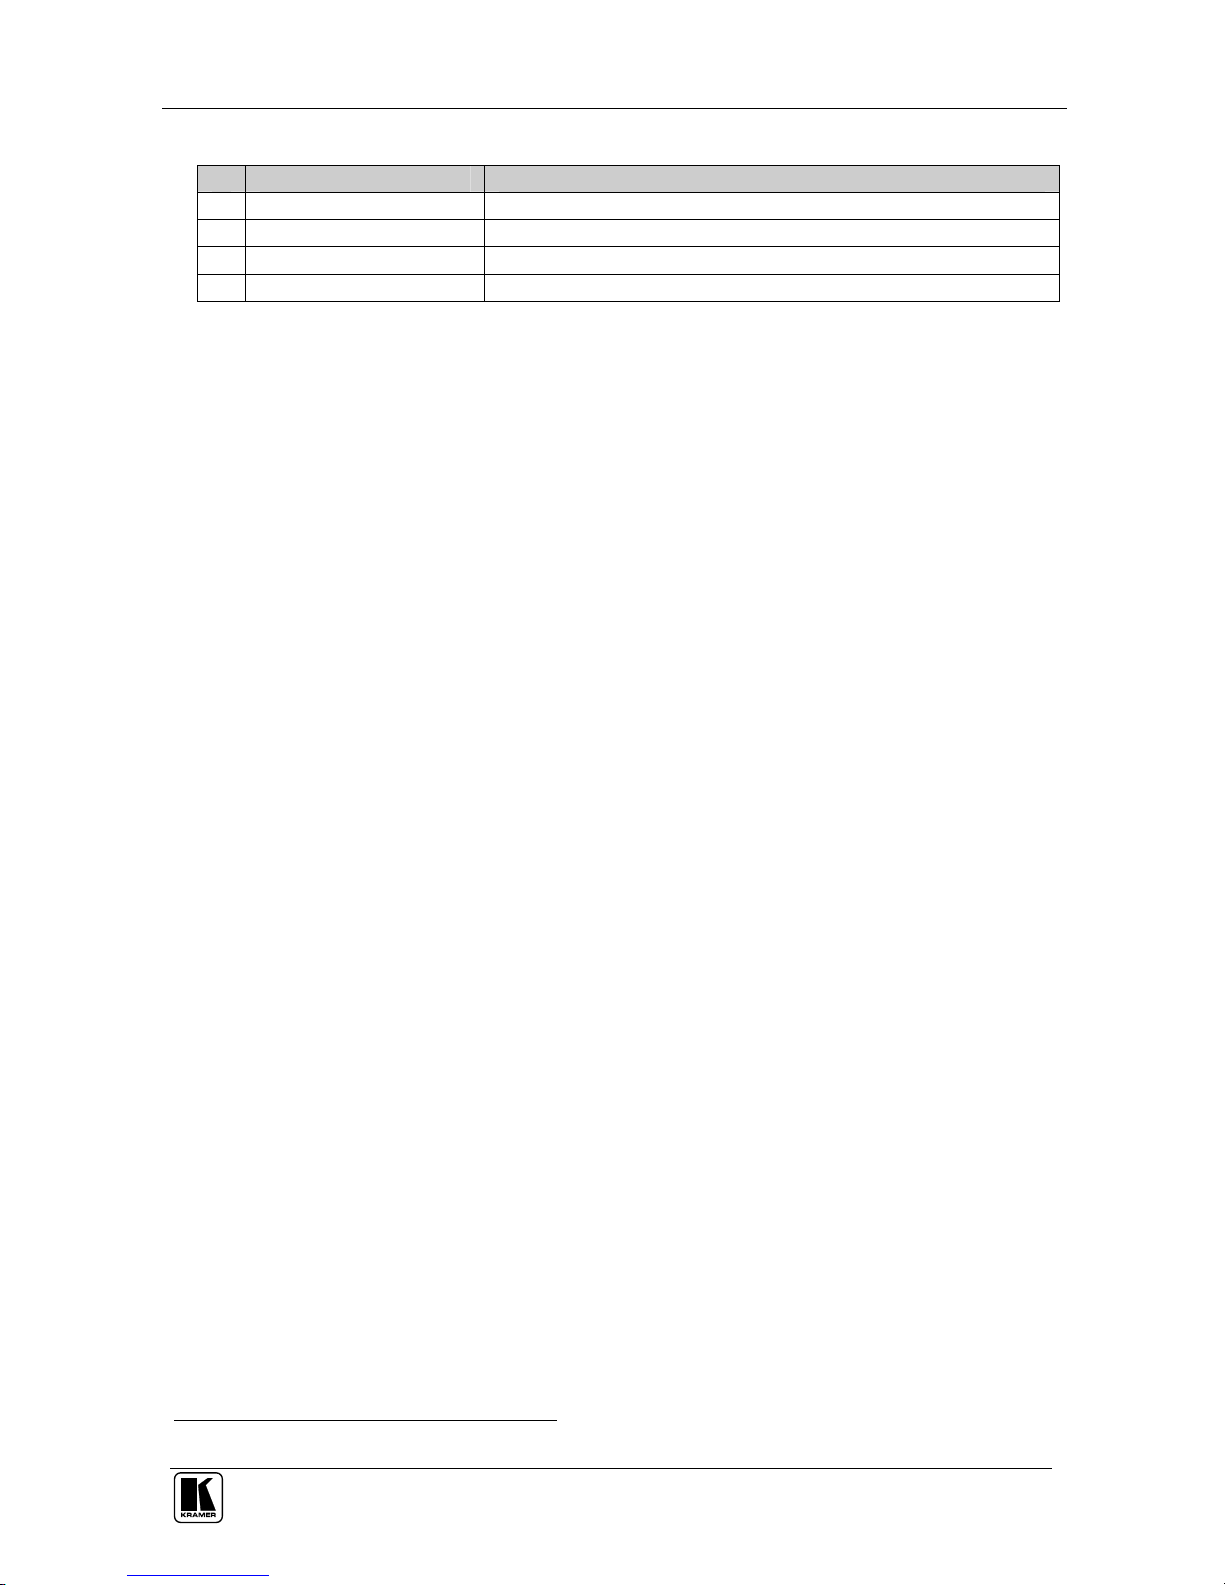
Table 3: VP-1201 Underside Panel Features
# Feature Function
1 RESET Button Press to reset the unit prior to a firmware upgrade (see section 5.8)
2 GREEN LEVEL Trimmer Adjusts the green level1
3 RED LEVEL Trimmer Adjusts the red level1
4 BLUE LEVEL Trimmer Adjusts the blue level1
5 Connecting a VP-1201 12x1 XGA Switcher / Scanner
This section describes how to:
Connect the VP-1201 unit (see section 5.1)
Connect the VP-1201 to a controlling device via:
RS-232 (see section 5.2)
RS-485 (see section 5.3)
ETHERNET (see sections 5.4 and 5.6)
Connect several VP-1201 machines (see section 5.5)
Set the dipswitches (see section 5.7)
Reset the unit (see section 5.8)
5.1 Connecting a Single Unit or Multiple VP-1201 Units
To connect the VP-1201 12x1 XGA Switcher / Scanner, do the following:
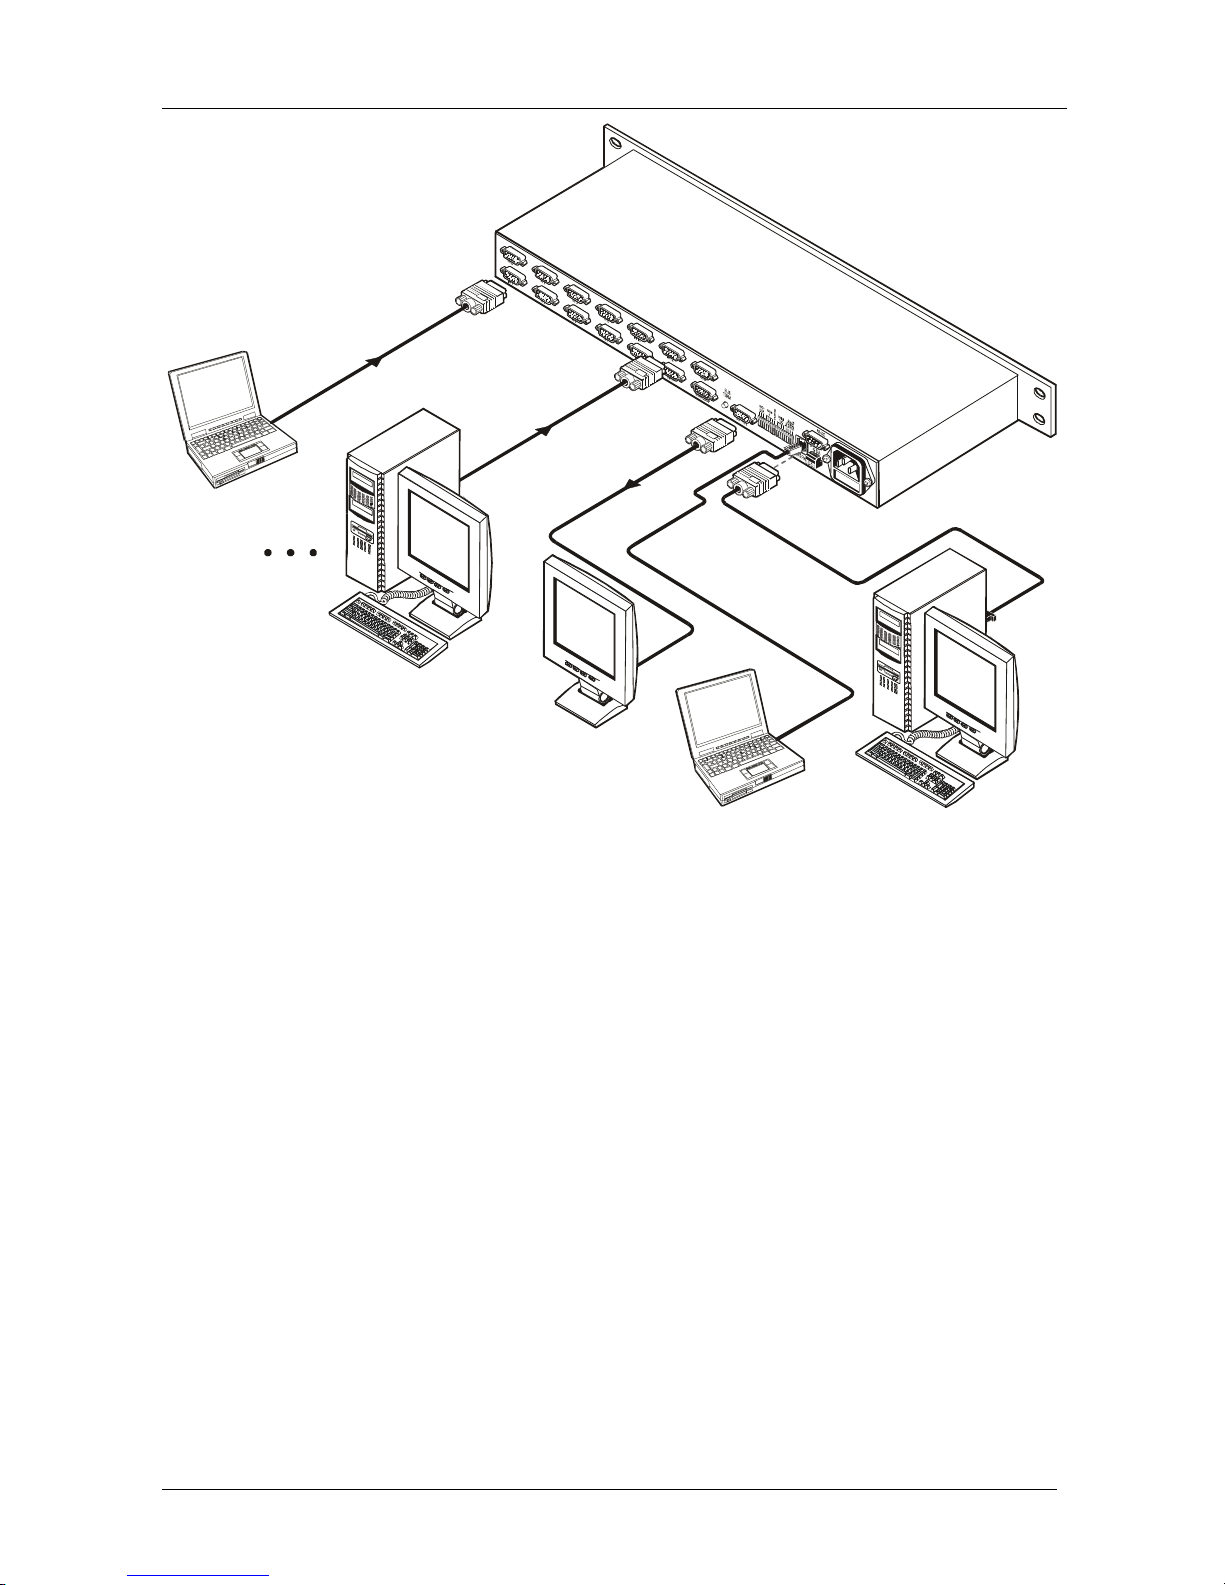
1. Connect the following to the rear panel:
Video sources (see Figure 3)
Output acceptor
Power cord
2. Connect to a controlling device (optional – see sections 5.2, 5.3 and 5.4).
3. Connect the RS-485 port to additional units (optional – see sections
5.5.1 and 5.5.2).
4. Connect the BUS ports to additional units (optional – see section 5.5.2).
5. Set the dipswitches (see section 5.7).
1 Insert a screwdriver into the small hole and carefully rotate it to adjust the level
KRAMER: SIMPLE CREATIVE TECHNOLOGY
Connecting a VP-1201 12x1 XGA Switcher / Scanner
6
Computer Graphic
Source 1
Display
Computer Graphic
Source 12
RS-232
Figure 3: Connecting the VP-1201

Connecting a VP-1201 12x1 XGA Switcher / Scanner
7
5.2 Controlling via RS-232 (for example, using a PC)
To connect a PC to the VP-1201 unit1, using the Null-modem adapter
provided with the machine (recommended):
Connect the RS-232 DB9 rear panel port on the VP-1201 unit to the
Null-modem adapter and connect the Null-modem adapter with a 9-wire
flat cable2 to the RS-232 DB9 port on your PC
To connect a PC to the VP-1201 unit1, without using a Null-modem adapter:
Connect the RS-232 DB9 port on your PC to the RS-232 DB9 rear panel
port on the VP-1201 unit, as Figure 4 illustrates2 (depending on whether
the PC has a 9-pin or 25-pin connector)
Figure 4: Connecting a PC without using a Null-modem Adapter
1 When connecting a single VP-1201 unit via RS-232, set the MACH. # dipswitches to MACHINE # 1, according to Table 10
2 Up to 50 feet of cabling may be used for the RS-232 connection
KRAMER: SIMPLE CREATIVE TECHNOLOGY
Connecting a VP-1201 12x1 XGA Switcher / Scanner
8
5.3 Controlling via RS-485
You can control a VP-1201 unit via an RS-485 controller1, for example, a PC
(equipped with an RS-485 interface) or a Master Programmable Remote
Control system, such as the Kramer RC-30002.
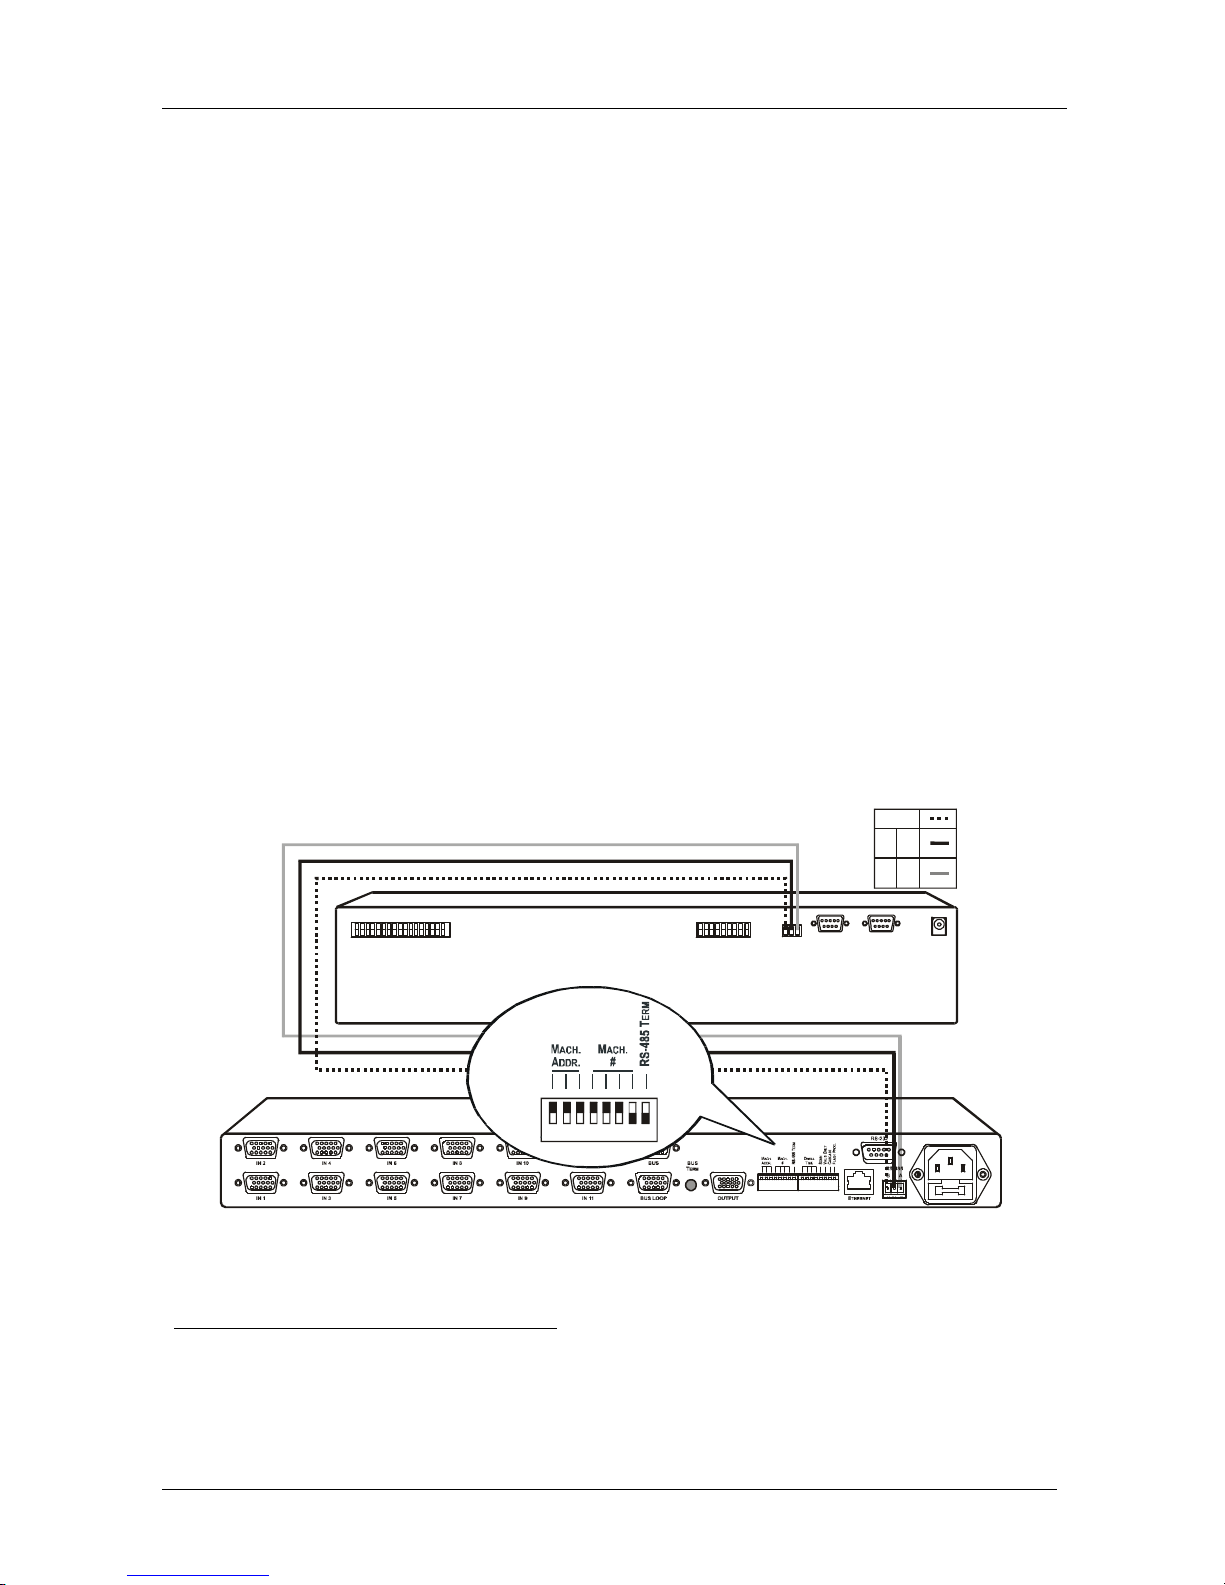
To connect an RC-3000 to a single VP-1201 unit (see Figure 5):
1. Connect the RS-485 terminal block port on the RC-3000 to the RS-485
port on the VP-1201 unit, as follows:
Connect the “A” (+) PIN on the RS-485 rear panel port of the RC-3000
to the “A” (+) PIN on the RS-485 rear panel port of the VP-1201 unit
Connect the “B” (-) PIN on the RS-485 rear panel port of the RC-3000
to the “B” (-) PIN on the RS-485 rear panel port of the VP-1201 unit
If shielded twisted pair cable is used, the shield may be connected to the
“G” (Ground) PIN on one of the units (for example, on the RC-3000)
2. Set the MACH. # dipswitches on the VP-1201 unit to Machine # 2 (or
any other number other than 1), according to Table 10.
Do not set as Machine # 1 (the Master).
3. Terminate the RS-485 line on both the VP-1201 unit3 (when a single
unit is connected) and the RC-30004.
KEYBOARD EXTENSION REMOTE CON TACT
RS-485 RS-232 IN RS-232 OUT
12 VDC
1 2 1 2 3 4 5 6 7 8 G4 6 8 103 5 7 9 1112 14 16
OUT
13 15
IN
RS-485 PINOUT
G
B
A_+
1
ON
OFF
2 3 4 5 6 7 8
Figure 5: Controlling via RS-485 (for example, using an RC-3000)
1 RS-485 can be used for control even for distances exceeding 1km
2 Previously known as the VS-3000
3 To terminate RS-485 line on the VP-1201, set dipswitch 8 to ON (see section 5.7)
4 Refer to the RC-3000 user manual for details of how to terminate the RS-485 line
Connecting a VP-1201 12x1 XGA Switcher / Scanner
9
5.4 Setting the ETHERNET Port and Utilities
To control your VP-1201 via the ETHERNET, do the following:
1. Connect the Ethernet port of the VP-1201 to the LAN port of your PC
(see section 5.4.1).
2. Install and configure your ETHERNET Port (see sections 5.4.2 through
5.4.4).
3. Install the COM Port Redirector to control the VP-1201 (see
section 5.4.5).
5.4.1 Connecting the VP-1201 Ethernet Port
You can connect the ETHERNET port either via a crossover cable (see
section 5.4.1.1) or a straight through cable (see section 5.4.1.2).
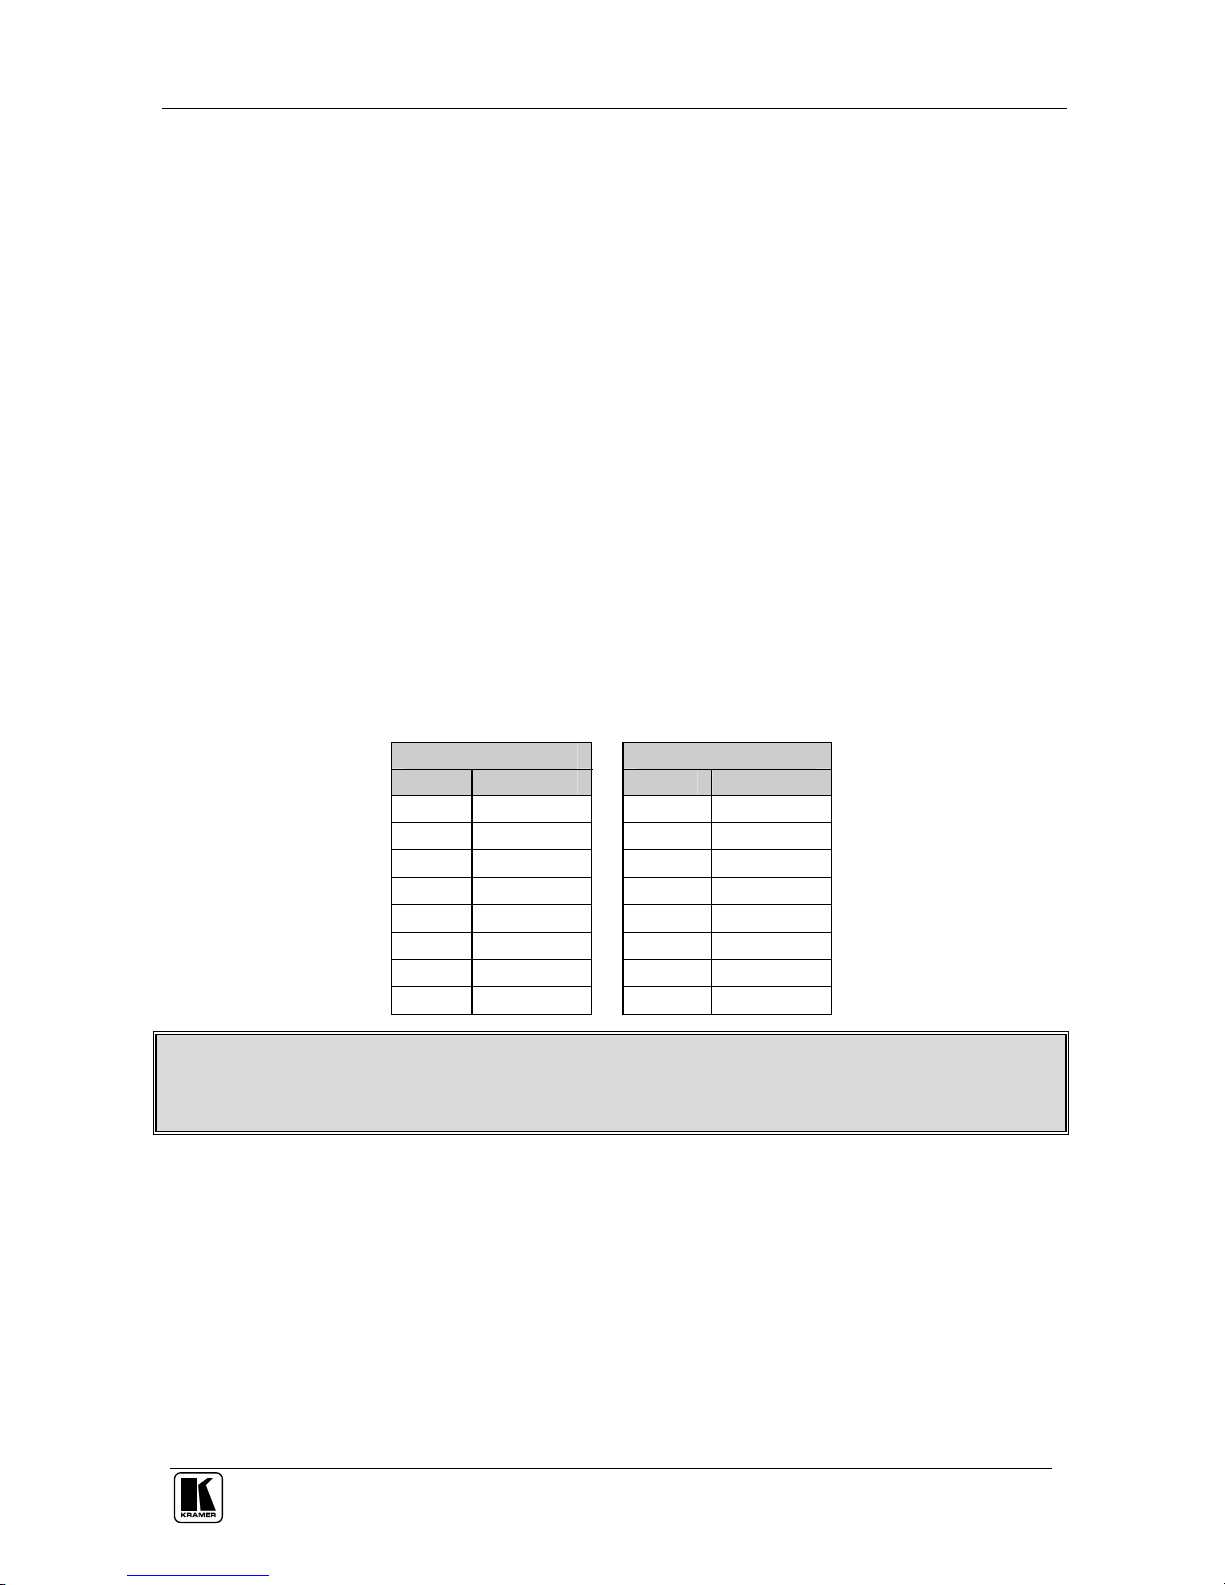
5.4.1.1 Connecting via a Crossover Cable
Connect the ETHERNET port of the VP-1201 to the LAN port on your PC,
via a crossover cable with RJ-45 connectors, as Table 4 defines.
Table 4: Crossover Cable RJ-45 PINOUT
Side 1 Side 2
PIN Wire Color PIN Wire Color
1 White-orange
1 White-green
2 Orange 2 Green
3 White-green 3 White-orange
4 Blue 4 Blue
5 White-blue 5 White-blue
6 Green 6 Orange
7 White-brown 7 White-brown
8 Brown
8 Brown
This type of connection is recommended for identification of the factory default
IP Address of the VP-1201 during the initial configuration
After connecting the ETHERNET port, configure your PC as follows:
1. Right-click the My Network Places icon on your desktop.
2. Select Properties.
3. Right-click Local Area Connection Properties.
4. Select Properties.
The Local Area Connection Properties window appears.

KRAMER: SIMPLE CREATIVE TECHNOLOGY
Connecting a VP-1201 12x1 XGA Switcher / Scanner
10
5. Select the Internet Protocol (TCP/IP) and click the Properties Button
(see Figure 6).
Figure 6: Local Area Connection Properties Window
6. Select Use the following IP Address, and fill in the details as shown in
Figure 7.
7. Click OK.
Figure 7: Internet Protocol (TCP/IP) Properties Window
Connecting a VP-1201 12x1 XGA Switcher / Scanner
11
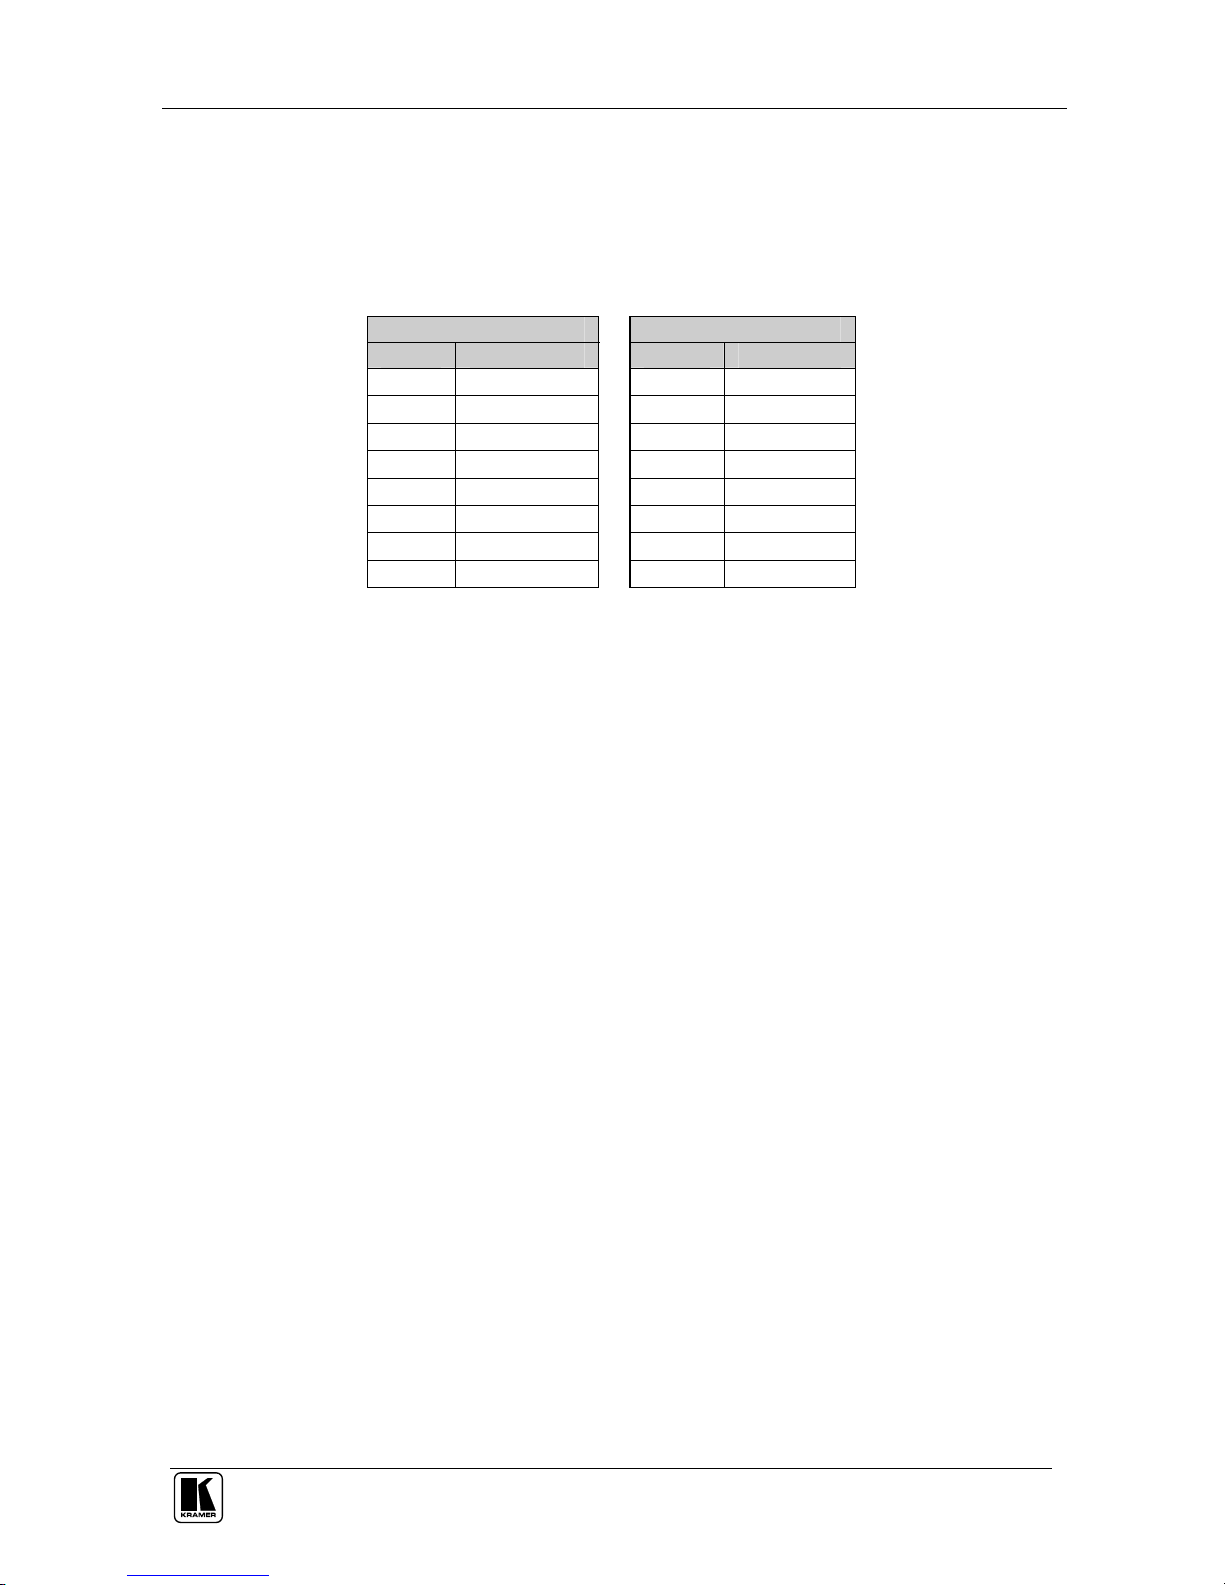
5.4.1.2 Connecting via a Straight-Through Cable
If connecting the ETHERNET port of the VP-1201 to the LAN port on a
network hub or network router, use a straight-through cable with RJ-45
connectors, as Table 5 defines:
Table 5: Straight-through Cable RJ-45 PINOUT
Side 1 Side 2
PIN Wire Color PIN Wire Color
1 White-orange 1 White-orange
2 Orange 2 Orange
3 White-green 3 White-green
4 Blue 4 Blue
5 White-blue 5 White-blue
6 Green 6 Green
7 White-brown 7 White-brown
8 Brown
8 Brown
5.4.2 Installing and Running the XPort Configuration Software
To configure the ETHERNET Port, you have to install and run the XPort
configuration software.
It is important to consider the following points before logging into and
configuring the ETHERNET Port:
The VP-1201 IP address must be configured before a network connection
is available
Only one person at a time may be logged into the network port. This
eliminates the possibility of several people simultaneously attempting to
configure the Device Server
Network port logins can be disabled. The system manager will not be able
to access the unit. This port can also be password protected
5.4.2.1 Install XPort™ Installer
To install the XPort™ Installer, do the following:
1. Insert the product CD into your CD-ROM drive.
2. Run the XPort installer setup.
3. Respond to the installation wizard prompts.
4. Restart your system.
5.4.2.2 Run XPort™ Installer
Click the Start button on the Task Bar and select Programs\XPort
Installer\XPort Installer. The XPort™ Installer main dialog box displays
(Figure 8).
 Loading...