

VM
-3DT Quick Start (P/N: 2900-300796QS REV 1)
P/N:
2900- 300796QS
Rev:
1
Scan for full manual
VM-3DT Quick Start Guide
This guide helps you install and use your VM-3DT for the first time.
Go to www.kramerav.com/downloads/VM-3DT to download the latest user manual and check if firmware
upgrades are available.
Step 1: Check what’s in the box
VM-3DT
1:3 HDBT Distributor 1 Power supply (5V DC)
1 Quick start guide
4 Rubber feet
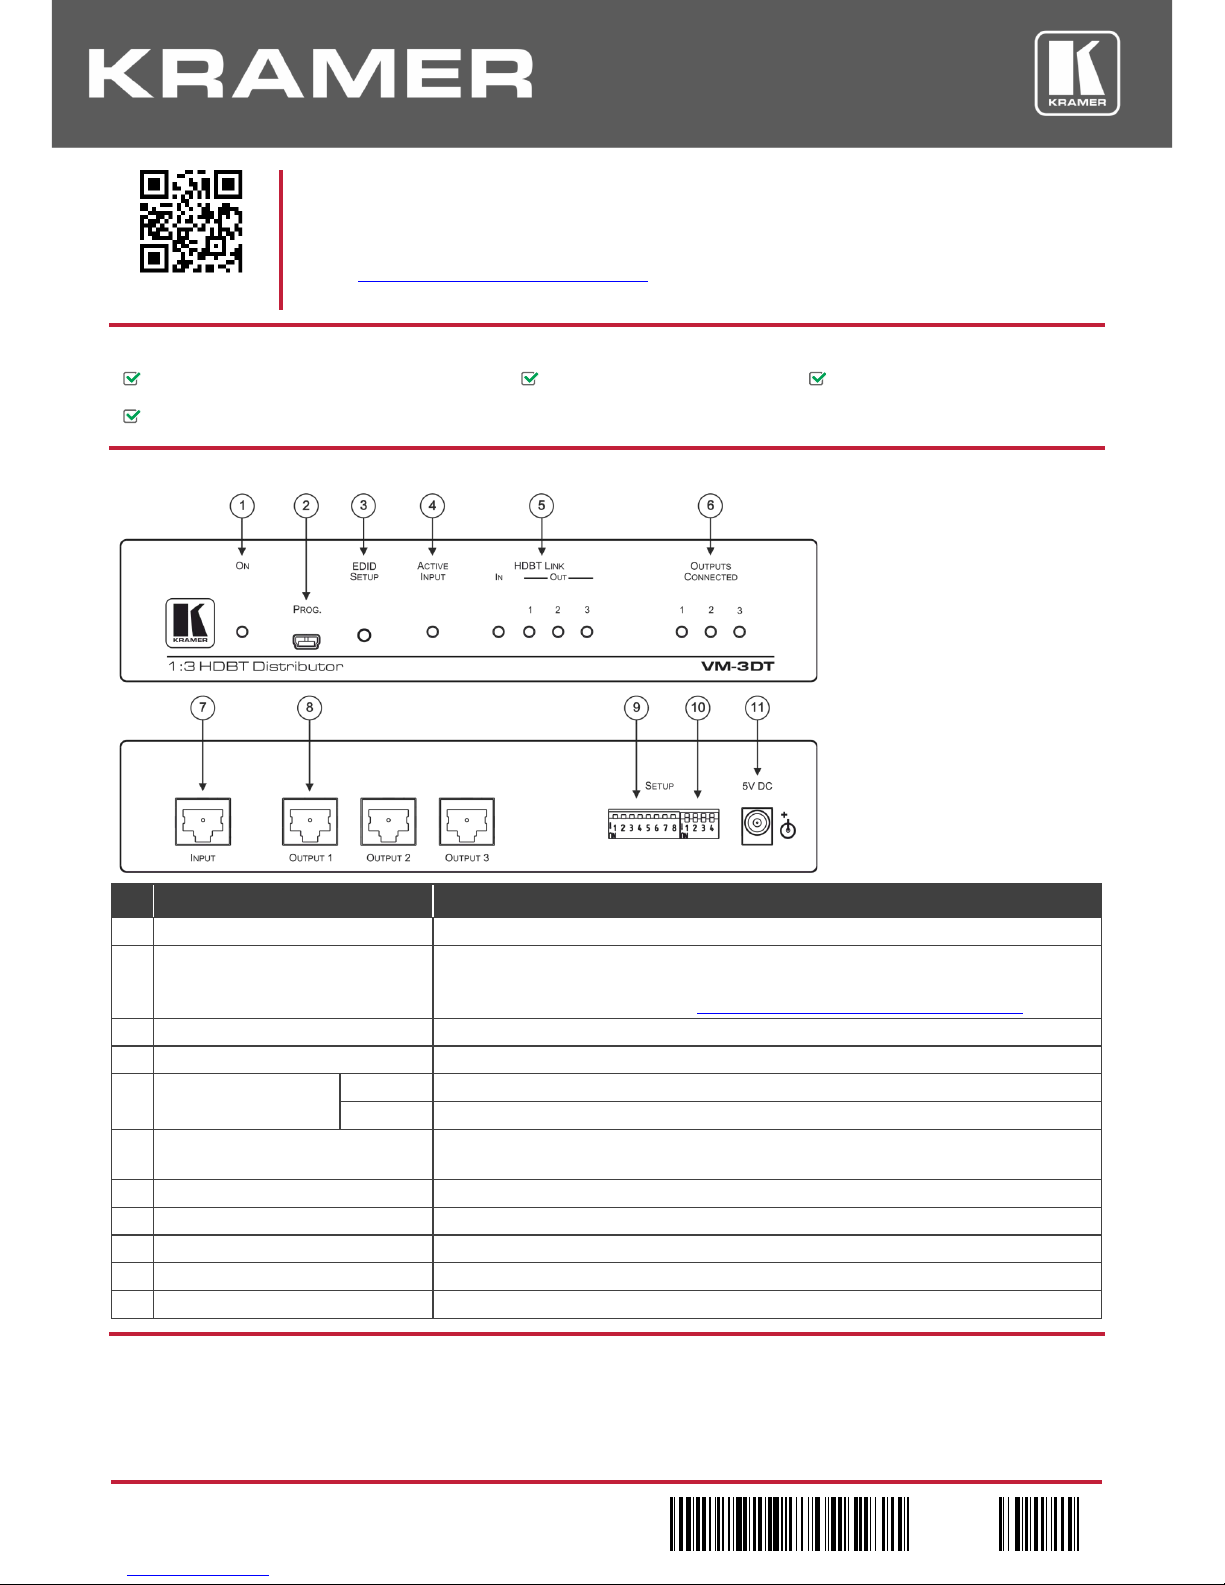
Step 2: Get to know your VM-3DT
# Feature Function
1 ON LED Lights green when the unit receives power
2 PROGRAM Mini USB Connector Use to send RS-232 commands. Connect to a PC to perform firmware upgrades (via
K-Upload) and work with the EDID Designer. K-Upload and EDID Designer can be
downloaded from our Web site at:www.kramerav.com/manual/EDID Designer
3
EDID SETUP Button
Press to capture the input EDID, force RGB mode or select the default EDID
4 ACTIVE INPUT LED Lights green when an HDMI signal is embedded on the HDBaseT input
HDBT LINK LEDs IN Lights green when a link is established with the HDBaseT transmitter
5
OUT
Lights green when a link is established with the HDBaseT receiver (1 to 3)
6 OUTPUTS CONNECTED LEDs Lights green when an acceptor (sink) is detected on the HDBaseT receiver connected
to the output (from 1 to 3)
7 INPUT HDBT Connector Connects to an HDBaseT source, for example
VS-44DT
8 HDBT OUT Connectors Connect to an HDBaseT acceptor (from 1 to 3), for example
TP-580R
9
SETUP 8-way DIP-switches
Use to set IR (DIP-switches 1-3) and RS-232 (DIP-sw itch e s 5-7) command behavior
10
SETUP 4-way DIP-switch
For future use
11 5V DC +5V DC connector for powering the unit
Step 3: Install the VM-3DT
To mount the VM-3DT in a rack, use an RK-1 rack adapter. Alternatively, attach the rubber feet to the underside of the VM-3DT and
place it on a table.
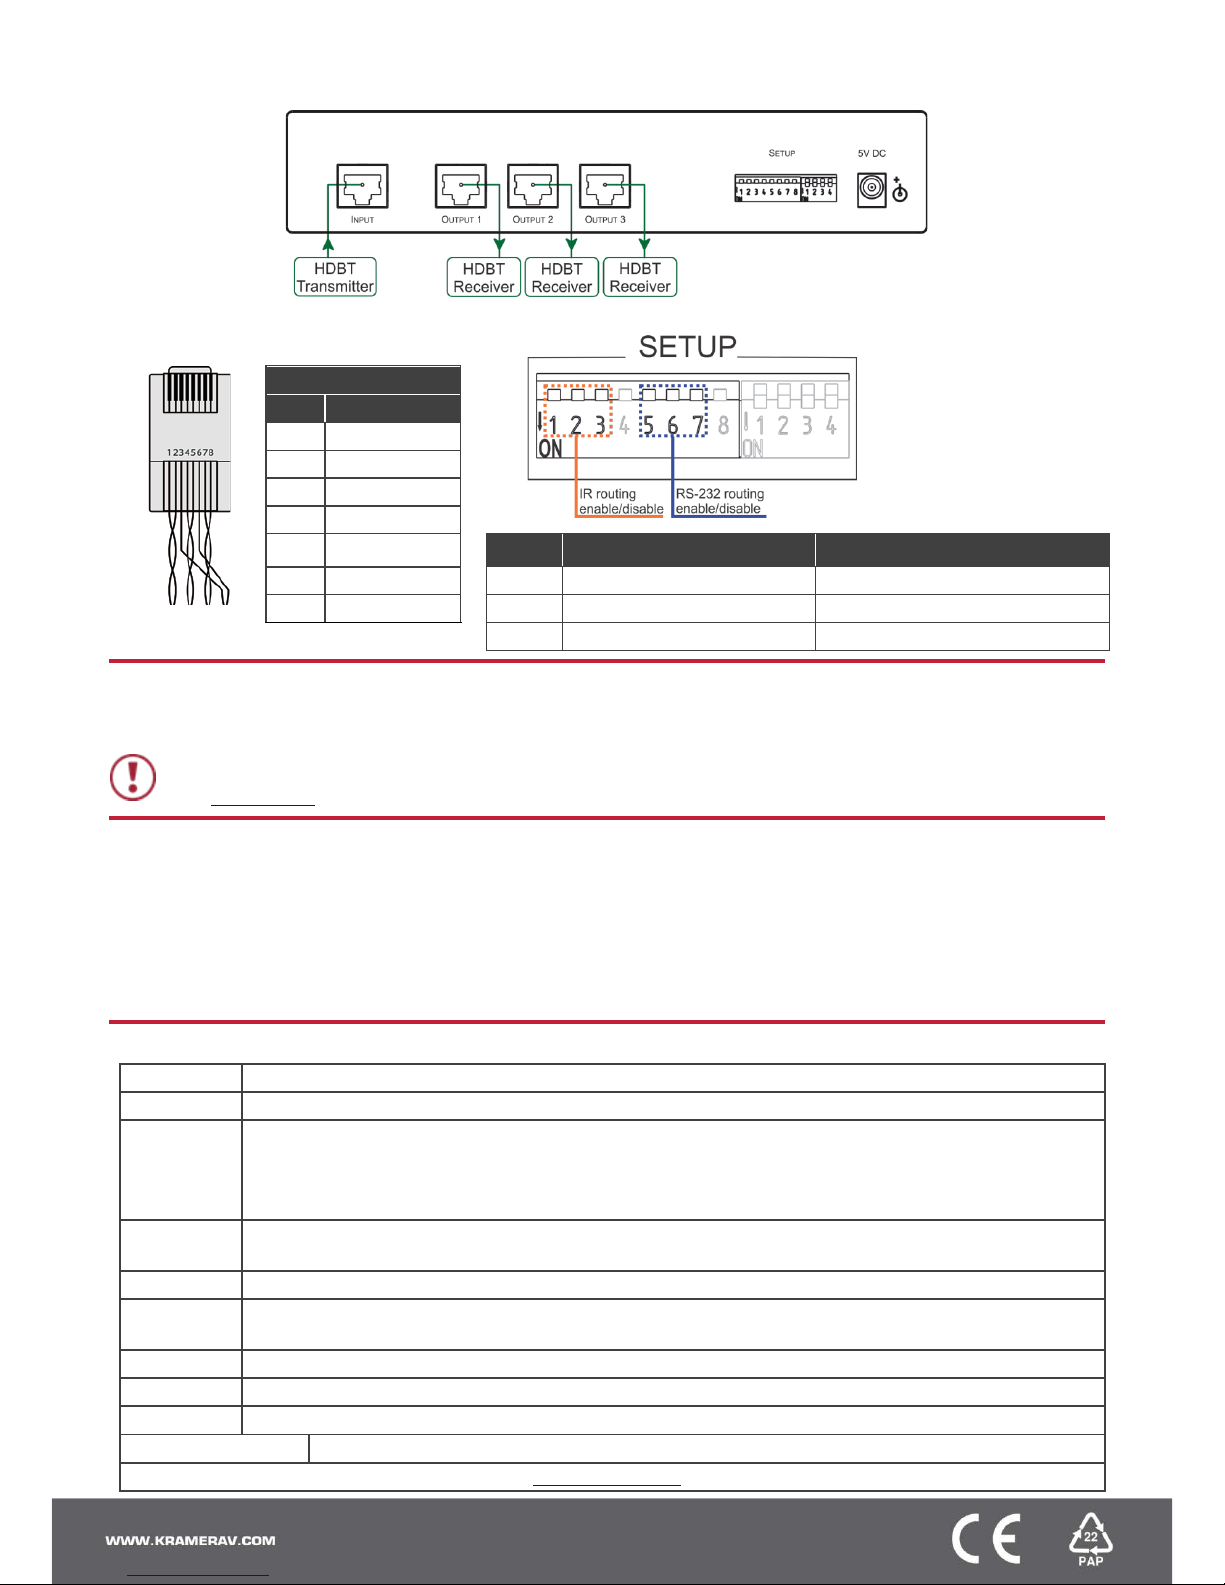
Step 4: Connect the inputs and outputs
Always switch OFF the power on each device before connecting it to your VM-3DT. For best results, we recommend that you
always use Kramer high-performance cables to connect AV equipment to the VM-3DT.
RJ-45 Pinout:
DIP-Switch Setup:
For HDBaseT connectors:
Note: DIP-switches 4 and 8
are reserved for future use.
By default, all DIP-switches
are set to OFF (up).
PIN EIA /TIA 568B
PIN Wire Color
1 Orange / White
2
Orange
3
Green / White
4 Blue
5 Blue / White
Out # IR Routing is enabled when: RS-232 Routing is enabl ed when:
6
Green
OUT 1
DIP 1 – OFF (up)
DIP 5 – OFF (up)
7
Brown / White
OUT 2
DIP 2 – OFF (up)
DIP 6 – OFF (up)
OUT 3 DIP 3 – OFF (up) DIP 7 – OFF (up)
Step 5: Connect the power
Connect the power adapter to the VM-3DT and plug the adapter into the mains electricity.
Safety Instructions
Caution:
There are no operator serviceable parts inside the unit.
Warning:
Use only the Kramer Electronics power supply that is provided with the unit.
Warning:
Disconnect the power and unplug the unit from the wall before installing.
See www.KramerAV.com for updated safety information.
Step 6: Acquire the EDID
To acquire an EDID, press the EDID SETUP button as follows:
1. Press the EDID SETUP button once.
The OUTPUTS CONNECTED LEDs flash to indicate the current EDID used: 1, 2, or 3, or all if the default EDID is currently used.
2. Press the EDID SETUP button again to enter the EDID read mode and then press repeatedely to cycle through the EDID source
options until the desired EDID source is reached: OUT 1 -> OUT 2 -> OUT 3 -> all LEDs flash (for a default EDID).
3. Wait a few seconds for the VM-3DT to read the EDID. When complete, all LEDs display the present output connection status.
Technical Specifications
Input: 1 HDBT on an RJ-45 female connector
Outputs: 3 HDBT on RJ-45 female connectors
Extension
Line / Range:
HDBaseT 1.0 compliant.
Up to 40m (130ft) at 4K@60Hz (4:2:0); Up to 70m (230ft) at full HD (1080p@60Hz 36bpp).
Note: When using Kramer HDBaseT cables. This reach applies to each IN and OUT port separately, the total
end-to-end reach is the sum of all ports’ reach.
Video: Up to 4K@60Hz (4:2:0) resolution; Up to 10.2Gbps (3.4Gbps per graphic channel) data rate; Complies with
HDMI 2.0 and HDCP 1.4
Controls: EDID SETUP button; Indicator LEDs: OUTPUTS CONNECTED 1-3, HDBT LINK 1-3, ACTIVE INPUT, ON
Operating
Conditions:
Operating Temperature: 0° to +40°C (32° to 104°F); Storage Temperature: -40° to +70°C (-40° to 158°F);
Humidity: 10% to 90%, RHL non-condensing
Power: Power Source: 5.2V/4A; Power Consumption: 5V DC, 3.2A
Dimensions: 21.5cm x 16.3cm x 4.4cm (8.4” x 6.4” x 1.8"); Shipping: 35.1cm x 21.2cm x 7.2cm (13.8” x 8.3” x 2.8") (W, D, H)
Weight: 0.53kg (1.17lb); Shipping Weight: 1.29kg (2.84lb)
Included Accessories: Power supply
Specifications are subject to change without notice at www.kramerav.com
 Loading...