


USER MANUAL
MODEL:
VM-2UHD
1:2 HDMI DA
P/N: 2900-300481 Rev 1
www.kramerAV.com

VM-2UHD – Contents
i
Contents
1 Introduction 1
2 Getting Started 2
2.1 Achieving the Best Performance 2
2.2 Safety Instructions 2
2.3 Recycling Kramer Products 3
3 Overview 4
3.1 Defining the VM-2UHD 1:2 HDMI DA 5
4 Connecting the VM-2UHD 6
4.1 Acquiring an EDID 8
5 Default EDID 9
6 Technical Specifications 11
7 Protocol 3000 12
7.1 Syntax 12
7.2 Kramer Protocol 3000 Commands 16
8 Packet Protocol Structure 26
8.1 Using the Packet Protocol 26
8.2 Calculating the CRC 27
9 Parameters 28
9.1 Stage 28
9.2 EDID Source 28
9.3 Signal Validation 28
9.4 HDCP Types 28
Figures
Figure 1: VM-2UHD 1:2 HDMI DA 5
Figure 2: Connecting the VM-2UHD 1:2 HDMI DA 7

VM-2UHD – Introduction
1
1 Introduction
Welcome to Kramer Electronics! Since 1981, Kramer Electronics has been
providing a world of unique, creative, and affordable solutions to the vast
range of problems that confront video, audio, presentation, and broadcasting
professionals on a daily basis. In recent years, we have redesigned and
upgraded most of our line, making the best even better!
Our 1,000-plus different models now appear in 14 groups that are clearly
defined by function: GROUP 1: Distribution Amplifiers; GROUP 2: Switchers
and Routers; GROUP 3: Control Systems; GROUP 4: Format/Standards
Converters; GROUP 5: Range Extenders and Repeaters; GROUP 6: Specialty
AV Products; GROUP 7: Scan Converters and Scalers; GROUP 8: Cables and
Connectors; GROUP 9: Room Connectivity; GROUP 10: Accessories and
Rack Adapters; GROUP 11: Sierra Video Products; GROUP 12: Digital
Signage; GROUP 13: Audio; and GROUP 14: Collaboration.
Congratulations on purchasing your Kramer VM-2UHD 1:2 HDMI DA, which is
ideal for the following typical applications:
Boardrooms and meeting rooms
Presentation and multimedia applications
Home theater
Rental and staging
2
VM-2UHD - Getting Started
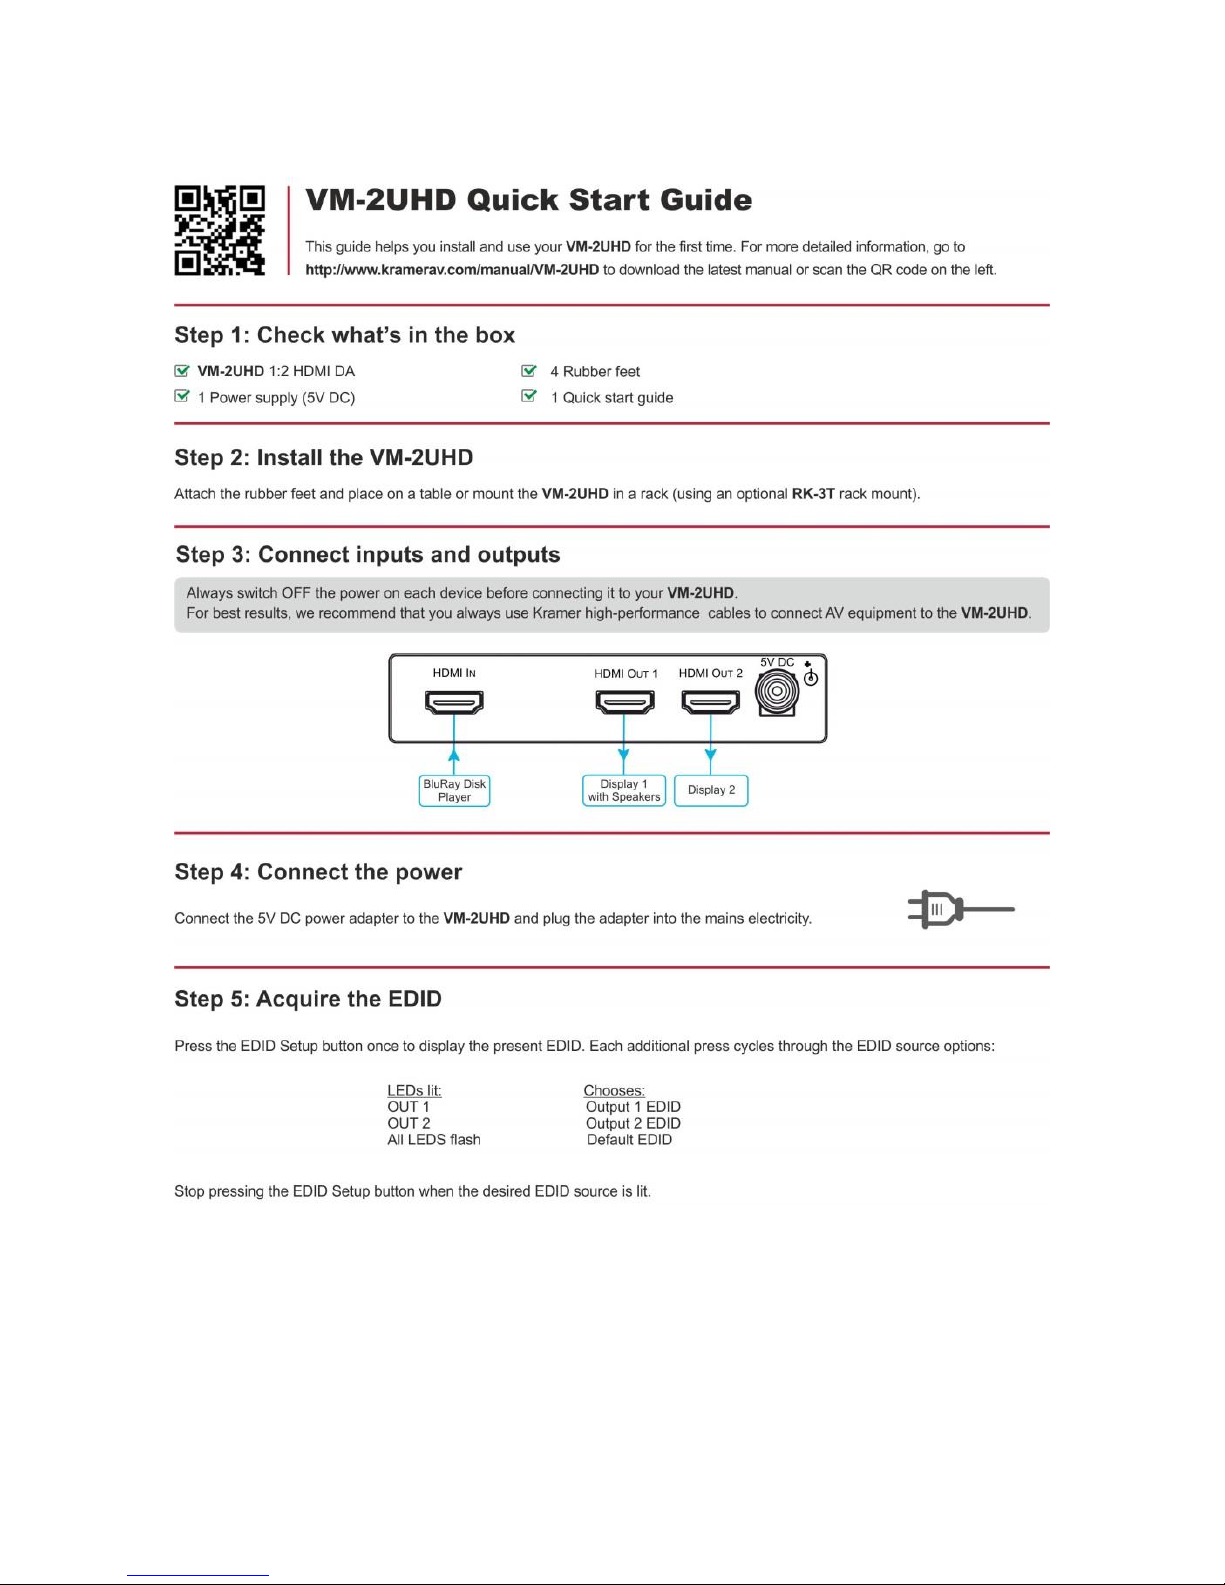
2 Getting Started
We recommend that you:
Unpack the equipment carefully and save the original box and packaging
materials for possible future shipment
Review the contents of this user manual
Go to www.kramerav.com/downloads/VM-2UHD to check for up-to-date
user manuals, application programs, and to check if firmware upgrades are
available (where appropriate).
2.1 Achieving the Best Performance
To achieve the best performance:
Use only good quality connection cables (we recommend Kramer high-
performance, high-resolution cables) to avoid interference, deterioration in
signal quality due to poor matching, and elevated noise levels (often
associated with low quality cables)
Do not secure the cables in tight bundles or roll the slack into tight coils
Avoid interference from neighbouring electrical appliances that may
adversely influence signal quality
Position your VM-2UHD away from moisture, excessive sunlight and dust
This equipment is to be used only inside a building. It may only be
connected to other equipment that is installed inside a building.
2.2 Safety Instructions
Caution:
There are no operator serviceable parts inside the unit
Warning:
Use only the Kramer Electronics power supply that is
provided with the unit
Warning:
Disconnect the power and unplug the unit from the wall
before installing

VM-2UHD – Getting Started
3
2.3 Recycling Kramer Products
The Waste Electrical and Electronic Equipment (WEEE) Directive 2002/96/EC
aims to reduce the amount of WEEE sent for disposal to landfill or incineration
by requiring it to be collected and recycled. To comply with the WEEE
Directive, Kramer Electronics has made arrangements with the European
Advanced Recycling Network (EARN) and will cover any costs of treatment,
recycling and recovery of waste Kramer Electronics branded equipment on
arrival at the EARN facility. For details of Kramer’s recycling arrangements in
your particular country go to our recycling pages at
http://www.kramerelectronics.com/support/recycling/.

4
VM-2UHD - Overview
3 Overview
The Kramer TOOLS® VM-2UHD is a high-quality 1:2 HDMI distributor that takes
one HDMI input, equalizes and reclocks the signal and distributes it to two
identical outputs. The VM-2UHD distributes signals having resolutions up to
4Kx2K and including WUXGA and 1080p.
In particular, the VM-2UHD features:
A maximum data rate of 10.2Gbps (3.4Gbps per graphic channel)
HDMI support for Deep Color, x.v.Color™, Lip Sync, HDMI
Uncompressed Audio Channels, Dolby TrueHD, DTS-HD, CEC
HDCP compliance
Kramer Equalization & re-Klocking™ Technology that rebuilds the digital
signal integrity to travel longer distances
I-EDIDPro™ Kramer Intelligent EDID Processing™, an intelligent EDID
handling and processing algorithm that ensures Plug and Play operation
for HDMI systems
A default EDID for fast and efficient connection of the unit
The default EDID feature lets you connect the VM-2UHD without having to connect
a display to the output
3D pass-through
A USB port for firmware upgrading
Software support for Protocol 3000, EDID Designer and K-Upload
A compact TOOLS® enclosure with a 5V DC power source
VM-2UHD – Overview
5
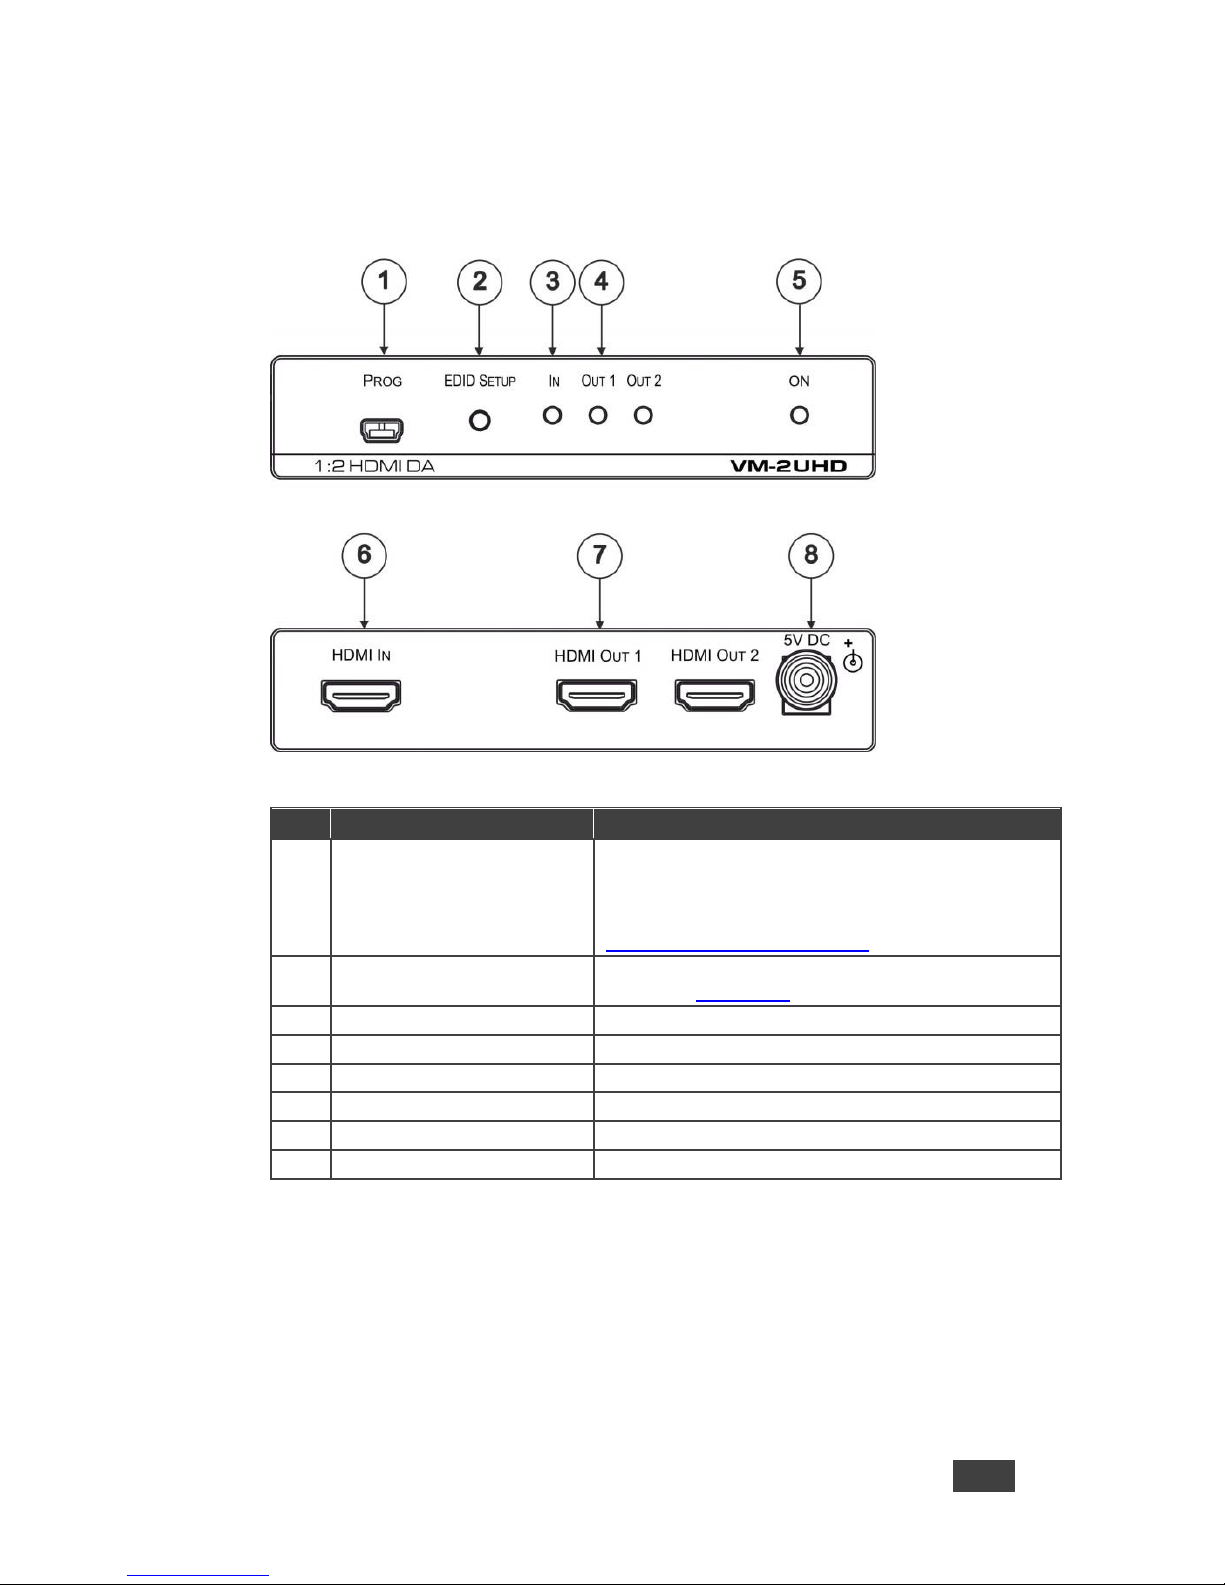
3.1 Defining the VM-2UHD 1:2 HDMI DA
This section defines the VM-2UHD.
Figure 1: VM-2UHD 1:2 HDMI DA
#
Feature
Function
1
PROGRAM USB Connector
Connect to a PC to perform firmware upgrades (via
K-Upload) and work with the EDID Designer
K-Upload and EDID Designer can be downloaded
from our Web site at:
www.kramerav.com/downloads/)
2
EDID SETUP Button
Press to capture the input EDID or select the default
EDID (see Section 4.1)
3
IN LED
Lights when an active input signal is detected
4
OUT 1-2 LEDS
Lights when an active output acceptor is detected
5
ON LED
Lights when the device is powered on
6
HDMI IN Connector
Connects to the HDMI source
7
HDMI OUT 1-2 Connectors
Connect to up to 2 HDMI acceptors
8
5V DC Connector
Connects to the 5V DC power supply

6
VM-2UHD - Connecting the VM-2UHD
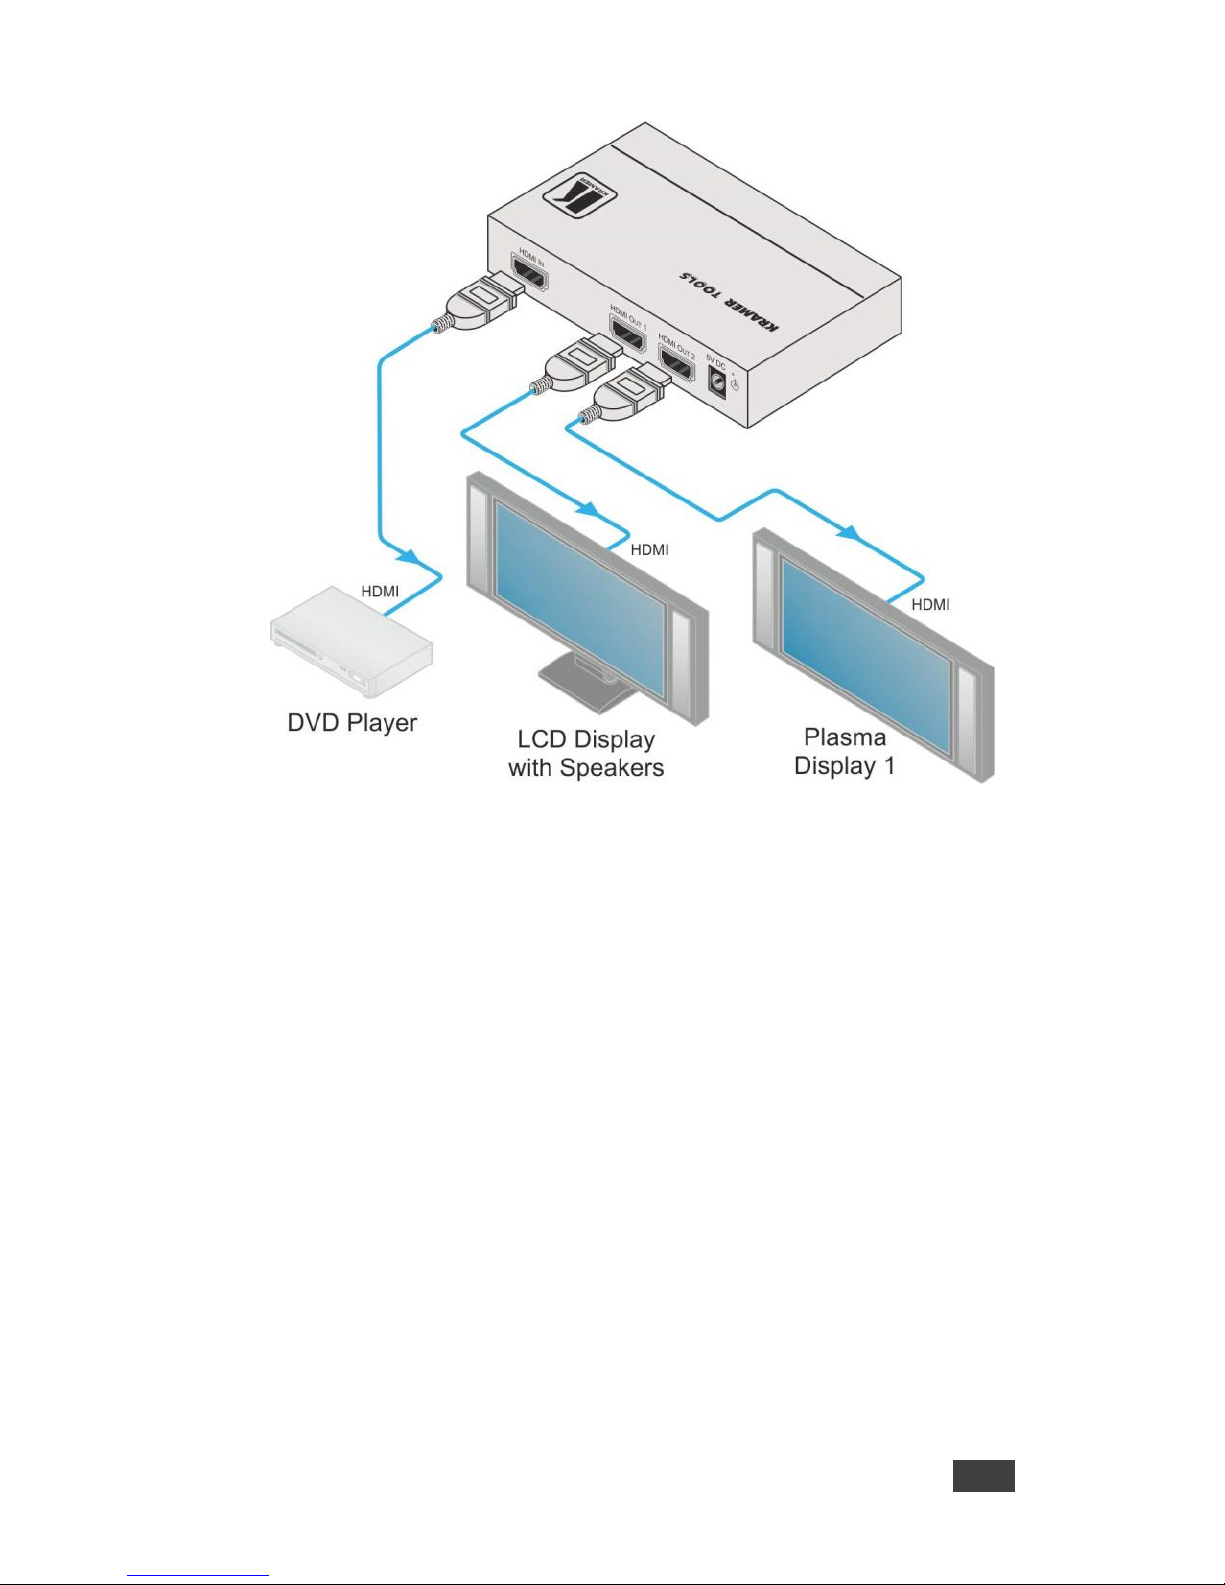
4 Connecting the VM-2UHD
Always switch off the power to each device before connecting it to
your VM-2UHD. After connecting your VM-2UHD, connect its power
and then switch on the power to each device.
You do not have to connect all the inputs and outputs, connect only
those that are required.
Connect the VM-2UHD as illustrated in the example in Figure 2:
1. Connect an HDMI input source (for example, a DVD player) to the
HDMI IN connector.
2. Connect the two OUTPUT connectors to up to two HDMI acceptors, as
follows:
Not all outputs need to be connected.
HDMI OUT 1 connector to HDMI acceptor 1 (for example, an LCD
TV)
HDMI OUT 2 connector to HDMI acceptor 2 (for example, plasma
display 1)
3. Connect the 5V DC power adapter to the power socket unit and then
connect the adapter to the mains electricity (not shown in Figure 2).
The ON LED lights.
VM-2UHD – Connecting the VM-2UHD
7
Figure 2: Connecting the VM-2UHD 1:2 HDMI DA
 Loading...