

Page 1

P/N: 2900-301064 Rev 1 www.kramerAV.com
USER MANUAL
MODEL:
VIA Connect PLUS
Wired and Wireless Presentation and
Collaboration Solution
(For Firmware Version 2.4)
Page 2

Kramer Electronics Ltd.
VIA Connect PLUS – Contents
i
Contents
Introduction 1
Getting Started 1
Overview 2
Defining VIA Connect PLUS Wired and Wireless Presentation and Collaboration Solution 4
For Installer: Installing in a Rack 5
For Installer: Connecting VIA Connect PLUS 6
Connecting Main Display 7
For Web Administrator: Configuring Settings – Embedded Web Pages 8
Logging in to Embedded Web Pages 9
Configuring VIA Gateway Settings 10
Managing Network Settings 20
Managing User Access 23
Managing VIA Features 30
Customizing Main Display Look and Feel 39
Maintaining Your VIA Unit 46
Configuring Digital Signage 51
For Web Administrator: Configuring Settings – Gateway Dashboard 61
Logging in to Gateway Dashboard Settings 61
Changing LAN Settings 62
Accessing System Controls 63
For User: Running Kramer VIA App 64
Running the Kramer VIA App for PC and Mac 64
Running the Kramer VIA App for Tablets & Smartphones and for Chromebooks/Chrome Web Browser 65
Running the Kramer VIA App Using an Installation File 65
For User: Participating in a VIA Meeting 66
Logging In to a VIA Meeting 66
Mirroring Your Device Screen 71
Collaborating on Main Display 77
Streaming Video 85
Communicating with Participants 92
Mirroring Main Display on Your Device 98
Managing Room Names 100
Advanced Meeting Functions 102
Technical Specifications 109
Page 3

Kramer Electronics Ltd.
VIA Connect PLUS – Introduction
1
Introduction
Welcome to Kramer Electronics! Since 1981, Kramer Electronics has been providing a world
of unique, creative, and affordable solutions to the vast range of problems that confront the
video, audio, presentation, and broadcasting professional on a daily basis. In recent years, we
have redesigned and upgraded most of our line, making the best even better!
Our 20,000-plus different models now appear in 15 groups that are clearly defined by
function: GROUP 1: Distribution Amplifiers; GROUP 2: Switchers and Routers; GROUP 3:
Control Systems; GROUP 4: Format & Standards Converters; GROUP 5: Range Extenders &
Repeaters; GROUP 6: Specialty AV Products; GROUP 7: Scalers; GROUP 8: Cables and
Connectors; GROUP 9: Room Connectivity; GROUP 10: Mounting and Rack Adapters;
GROUP 11: Sierra Video; GROUP 12: Digital Signage; GROUP 13: Audio; GROUP 14:
Collaboration; and GROUP 15: KM & KVM Switches.
Getting Started
We recommend that you:
• Unpack the equipment carefully and save the original box and packaging materials for
possible future shipment.
• Review the contents of this user manual.
Go to www.kramerav.com/downloads/VIA Connect PLUS to check for up-to-date user
manuals, application programs, and to check if firmware upgrades are available (where
appropriate).
Achieving the Best Performance
• Use only good quality connection cables (we recommend Kramer high-performance,
high-resolution cables) to avoid interference, deterioration in signal quality due to poor
matching, and elevated noise levels (often associated with low quality cables).
• Do not secure the cables in tight bundles or roll the slack into tight coils.
• Avoid interference from neighboring electrical appliances that may adversely influence
signal quality.
• Position your Kramer VIA Connect PLUS away from moisture, excessive sunlight and
dust.
This equipment is to be used only inside a building. It may only be connected to other
equipment that is installed inside a building.
Page 4

Kramer Electronics Ltd.
VIA Connect PLUS – Introduction
2
Safety Instructions
Caution: There are no operator serviceable parts inside the unit
Warning: Use only the Kramer Electronics power supply that is provided with the unit
Warning: Disconnect the power and unplug the unit from the wall before installing
Recycling Kramer Products
The Waste Electrical and Electronic Equipment (WEEE) Directive 2002/96/EC aims to reduce
the amount of WEEE sent for disposal to landfill or incineration by requiring it to be collected
and recycled. To comply with the WEEE Directive, Kramer Electronics has made
arrangements with the European Advanced Recycling Network (EARN) and will cover any
costs of treatment, recycling and recovery of waste Kramer Electronics branded equipment on
arrival at the EARN facility. For details of Kramer’s recycling arrangements in your particular
country go to our recycling pages at www.kramerav.com/support/recycling.
Overview
Congratulations on purchasing your Kramer VIA Connect PLUS Wired and Wireless
Presentation and Collaboration Solution. VIA Connect PLUS provides simultaneous wired
and wireless presentation and collaboration for a variety of spaces with no need for any
additional hardware. This cost−effective solution includes all the benefits of VIA Connect PRO
together with an HDMI input. With any laptop or mobile device, meeting participants can
display or stream full uninterrupted HD video (up to 1080p60), images and documents, or
share any size file. The whiteboard feature lets you annotate, sketch out ideas or edit shared
documents on the main display from your device.
VIA Connect PLUS features mirroring for iOS (MacBook, iPad and iPhone), Lollipop OS 5.0
or newer (Android), and Chromebook. You can show up to four user screens on a single main
display.
Key Features
• HDMI Wired Input – Enables hard–wiring your computer or other HDMI compatible
device such as a camera, multimedia player or computer.
• 60fps Streaming Multimedia – Share HD wireless video streaming (using the VIA app
Multimedia feature).
• Wireless Connection for up to 254 Devices – Utilizing Compatible External Wireless
Network.
• iOS and Android Mirroring.
• Wireless Device Connectivity – No dongle needed.
• DHCP Support.
• Graphic Output Formats – Outputs to either an HDMI or Mini DisplayPort display.
Does not support graphic output to both the HDMI and Mini Display Port
simultaneously.
Page 5

Kramer Electronics Ltd.
VIA Connect PLUS – Introduction
3
• Cloud–Based File Sharing – Drag and drop files to the internal VIA cloud storage
(30GB).
• Whiteboard Support.
• Control – Give a participant control over a presenter’s PC for true collaboration.
• Chat – Send an instant message to another user.
• iCloud, OneDrive, Google Drive and Dropbox Integration.
• Seamless Integration with VIA Site Management (VSM) Software & the VIA Pad.
• Multilingual Support – Experience VIA in your language.
Typical Applications
VIA Connect PLUS is ideal for the following typical applications:
• Boardrooms
• Conference rooms
• Presentation rooms
• Collaboration areas
• Classrooms and training rooms
Supported Devices
The following user devices are supported by the VIA Connect PLUS Wired and Wireless
Presentation and Collaboration Solution:
• Windows 7/8/10® (32-bit/64-bit) computer
• Macintosh® computer, using OSX 10. 8. x or newer
• Chromebook
• iPad/iPhone® tablet/smartphone (iPad 2 or later, iOS 9 or later)
When using the Airplay service, no Kramer VIA application is needed. However, we
recommend using iOS11 or Sierra OS X for a better experience.
• Android® OS 5. x tablet/smartphone
The minimum system requirement for using the Kramer VIA mirroring feature for
an Android device is Android 5. 1.
Page 6

Kramer Electronics Ltd.
VIA Connect PLUS – Defining VIA Connect PLUS Wired and Wireless Presentation and Collaboration Solution
4
Defining VIA Connect PLUS Wired and Wireless Presentation and Collaboration Solution
This section defines VIA Connect PLUS.
Figure 1: VIA Connect PLUS Wired and Wireless Presentation and Collaboration Solution
#
Feature
Function
USB 3.0 Connectors
Connect to up to two USB devices.
Audio Output 3. 5mm Mini
Jack
Connect to earphones or powered speakers.
Security Slot
Connect to a security lock cable.
Power Connector
Connect to the 19V DC power adapter.
HDMI OUT Connector
Connect to an HDMI acceptor.
HDMI IN Connector
Connect to an HDMI source (for example, a laptop).
Mini DisplayPort
Connector
Connect to a Mini DisplayPort acceptor.
LAN RJ-45 Connector
Connect to a LAN network or to a wireless router.
USB 3.0 Connectors
Connect to up to two USB devices.
Page 7

Kramer Electronics Ltd.
VIA Connect PLUS – For Installer: Installing in a Rack
5
For Installer: Installing in a Rack
This section provides instructions for rack mounting VIA Connect PLUS. Before installing in a
rack, verify that the environment is within the recommended range:
• Operation temperature – 0 to 40C (32 to 104F).
• Storage temperature – -40 to +70C (-40 to +158F).
• Humidity – 10% to 90%, RHL non-condensing.
When installing in a 19" rack, avoid hazards by taking care that:
It is located within recommended environmental conditions. Operating ambient
temperature of a closed or multi-unit rack assembly may exceed ambient room
temperature.
Once rack mounted, there is enough air flow around VIA Connect PLUS.
VIA Connect PLUS is placed upright in the correct horizontal position.
To rack-mount VIA Connect PLUS:
• Use the optional RK-CONNECT-PRO rack adapter; see the RK-CONNECT-PRO Quick
Start guide for installation instructions, available at:
www.kramerav.com/downloads/VIA Connect PLUS
You can also install VIA Connect PLUS using one of the following methods:
• Install the mounting plate on a wall with the 4 screws, insert the 2 hand-tightened screws
into the bottom of the device, and mount the device on the mounting plate using the 2
screws.
• Place the device on a flat surface.
Page 8

Kramer Electronics Ltd.
VIA Connect PLUS – For Installer: Connecting VIA Connect PLUS
6
For Installer: Connecting VIA Connect PLUS
Always switch off the power to each device before connecting it to your VIA Connect PLUS.
After connecting your VIA Connect PLUS, connect its power and then switch on the power to
each device.
Figure 2: Connecting to the VIA Connect PLUS Rear Panel
To connect VIA Connect PLUS as illustrated in Figure 2:
1. Connect the keyboard and mouse to the USB 3.0 Connectors on the back panel.
2. Connect one of the following to be used as the main display for the meeting
(see Connecting Main Display on page 7):
▪ HDMI display to the HDMI OUT Connector
▪ DisplayPort display to the Mini DisplayPort Connector
Only one display can be connected at a time.
3. Connect a laptop or other HDMI source to the HDMI IN Connector .
4. Connect one of the following to the LAN RJ-45 Connector using a LAN (Local Area
Network) cable:
▪ Your local network
▪ A wireless router for connecting to VIA Connect PLUS with Wi-Fi
For full functionality, VIA Connect PLUS must be connected to a local area network
(LAN). The default IP setting is DHCP that assigns an automatic IP address to your unit.
This enables easy Plug and Play setup when connecting your VIA Connect PLUS to the
network. To assign a static IP address, (see Changing LAN Settings on page 62).
Page 9

Kramer Electronics Ltd.
VIA Connect PLUS – For Installer: Connecting VIA Connect PLUS
7
5. Connect the 19V DC power adapter to the Power Connector and plug it into the
mains electricity.
Do not turn the device on before connecting the LAN port to the network.
6. Connect via Wi-Fi with any of the following types of devices:
To enable participation in a collaborative session (send and receive content), all
participant devices (PCs/ MACs/ smartphones/tablets) must be connected to the same
network (LAN - wired/wireless) as the VIA Connect PLUS.
▪ A Windows 7/8/10® (32-bit/64-bit) computer
▪ A Macintosh® computer, using OSX 10. 8. x or newer
▪ An iPad/iPhone® tablet/smartphone with the VIA app installed (iPad 2 or later, iOS 9
or later)
When using the Airplay service, no application is needed. However, we recommend
using iOS 11 or Sierra OS X for a better experience.
▪ An Android® OS 4. 4. x tablet/smartphone with the VIA app installed.
For using the Android mirroring feature, a device equipped with Android 5. 1
minimum is required.
7. Connect a USB device one of to the USB 3.0 Connectors on the front panel.
8. Connect headphones or a powered speaker to the Audio Output 3. 5mm Mini Jack
on the front panel.
The USB 3.0 Connectors and Audio Output 3. 5mm Mini Jack are not shown in
Figure 2.
Connecting Main Display
The main display is the display screen connected directly to VIA Connect PLUS. When VIA
Connect PLUS is booted up, the VIA gateway screen appears on the main display. All
collaboration activity is then displayed here. VIA Connect PLUS enables connecting one of
the following types of displays:
• HDMI – The HDMI OUT Connector connects to any compatible projection or directview display, such as an LCD monitor. This connection can be routed and switched.
• DisplayPort – The Mini DisplayPort Connector connects to a DisplayPort display or
to a VGA display by means of a mini DP to VGA adapter cable.
VIA Connect PLUS’s internal video card reads the EDID (Extended Display Identification
Data) for any connected display and sets the optimum display resolution and image refresh
rate automatically through the HDMI and DisplayPort jacks.
Page 10

Kramer Electronics Ltd.
VIA Connect PLUS – For Web Administrator: Configuring Settings – Embedded Web Pages
8
For Web Administrator: Configuring Settings – Embedded Web Pages
VIA Connect PLUS enables users with Web Administrator access to configure settings for
your VIA Connect PLUS unit.
VIA Connect PLUS enables you to do the following:
• Logging in to Embedded Web Pages on page 9.
• Configuring VIA Gateway Settings on page 10.
• Managing Network Settings on page 20.
• Managing User Access on page 23.
• Managing VIA Features on page 30.
• Customizing Main Display Look and Feel on page 39.
• Maintaining Your VIA Unit on page 46.
• Configuring Digital Signage on page 51.
Page 11

Kramer Electronics Ltd.
VIA Connect PLUS – For Web Administrator: Configuring Settings – Embedded Web Pages
9
Logging in to Embedded Web Pages
The embedded web pages enable you to configure your VIA Connect PLUS unit. The
embedded web pages are accessed from any computer through the internet or your local
network.
To log in the VIA Connect PLUS embedded web pages:
1. Open a Web browser and go to the IP address for your VIA Connect PLUS unit.
The embedded web pages Welcome page appears.
Figure 3: Embedded Web Pages Welcome Page
2. Click Manage Gateway Settings in the upper right corner.
The Administrator Login page appears.
Figure 4: Embedded Web Pages – Administrator Login Page
3. Type a Web Administrator Username (default = su) and Password (default = supass).
You must log in as a user with Web Administrator user role to access settings through the
embedded web pages (see Creating New Users on page 23).
4. Type the two Captcha Text “words” with a space between them in the text box.
You can change the Captcha Text by clicking the refresh button to the right of the text box.
Page 12

Kramer Electronics Ltd.
VIA Connect PLUS – For Web Administrator: Configuring Settings – Embedded Web Pages
10
5. Click Login.
The Home page appears.
Figure 5: Embedded Web Pages Home > System Information Page
Click the tabs in the navigation pane on the left to display the VIA web pages.
After changing a setting, click Reset VIA Session for changes to take effect.
For settings that display the Apply or Apply Settings button, click Apply or Apply Settings to
save the changes and then click Reset VIA Session for changes to take effect.
Configuring VIA Gateway Settings
VIA Connect PLUS enables you to configure settings that apply to the VIA Connect PLUS
unit such as power, time, file format and management settings:
• Verifying System Settings on page 10.
• Configuring Automatic Power Settings on page 14.
• Changing the Web Pages Language on page 11.
• Configuring Date and Time Settings on page 12.
• Configuring VIA Connect PLUS to be Managed by VSM on page 16.
• Defining Advanced Settings on page 18.
Verifying System Settings
VIA Connect PLUS enables you to verify system settings such as firmware version, date,
uptime, disk space, iOS Mirroring status, Chrome status, Miracast® enabled status, VSM
connectivity, and LAN parameters.
Page 13

Kramer Electronics Ltd.
VIA Connect PLUS – For Web Administrator: Configuring Settings – Embedded Web Pages
11
To verify system settings:
• Click Home > System Information on the navigation page.
The System Information page appears (Figure 5).
Changing the Web Pages Language
To change the embedded web pages language:
1. Click VIA Management > VIA Settings on the navigation pane (Figure 5).
The VIA Settings page appears.
Figure 6: VIA Management > VIA Settings > System & iOS Tab
2. Click Display.
Page 14
Kramer Electronics Ltd.
VIA Connect PLUS – For Web Administrator: Configuring Settings – Embedded Web Pages
12
The Display tab appears.
Figure 7: VIA Management > VIA Settings > Display Tab
3. Under Language, select the relevant language from the Select Language drop-down.
After rebooting the unit, the web pages language changes to the selected one.
Configuring Date and Time Settings
VIA Connect PLUS enables you to change the date format displayed on the embedded web
pages, set the time zone for the VIA Connect PLUS unit and add an NTP server.
Changing the Date Format
To change the date format for the embedded web pages:
1. Click VIA Management > VIA Settings on the navigation pane (Figure 5).
The VIA Settings page appears (Figure 6).
2. Click Date & Time.
Page 15

Kramer Electronics Ltd.
VIA Connect PLUS – For Web Administrator: Configuring Settings – Embedded Web Pages
13
The Date & Time tab appears.
Figure 8: VIA Management > VIA Settings > Date & Time Tab
3. In the Date and Time Format for Web Interface section, select a format from the Date
and Time Format drop-down.
4. In the VIA Gateway Timezone Configuration section, select the 24 hours format
checkbox to display time in 24 hour format or clear the checkbox to display the time in
12 hour format.
Setting the Time Zone
To set the time zone for VIA Connect PLUS:
1. Click VIA Management > VIA Settings navigation pane (Figure 5).
The VIA Settings page appears (Figure 6).
2. Click Date & Time.
The Date & Time tab appears (Figure 8).
3. In the VIA Gateway Timezone Configuration section, select the required time zone from
the Set Time Zone drop-down.
Page 16

Kramer Electronics Ltd.
VIA Connect PLUS – For Web Administrator: Configuring Settings – Embedded Web Pages
14
Adding an NTP Server
VIA Connect PLUS enables you to add an NTP (Network Time Protocol) server to synchronize
your VIA gateway time.
To add an NTP server:
1. Click VIA Management > Global Settings on the navigation pane (Figure 5).
The Global Settings page appears with the NTP tab open.
Figure 9: VIA Management > Global Settings > NTP Tab
2. In the Enter Server Name field, enter the address of the NTP server.
3. Click Save.
The new NTP server is saved and appears in the NTP Server table.
To edit an NTP server name, click the icon in the Edit column.
To delete an NTP server name, click the icon in the Delete column.
Configuring Automatic Power Settings
VIA Connect PLUS enables you to configure automatic power settings for resetting your VIA
Connect PLUS unit and saving on power usage.
Configuring Auto Reboot
VIA Connect PLUS enables you to define a time of day that the unit automatically reboots.
To configure auto reboot:
1. Click VIA Management > VIA Settings on the on the navigation pane (Figure 5).
The VIA Settings page appears (Figure 6).
Page 17

Kramer Electronics Ltd.
VIA Connect PLUS – For Web Administrator: Configuring Settings – Embedded Web Pages
15
2. Click Power.
The Power tab appears.
Figure 10: VIA Management > VIA Settings > Power Tab
3. In the Auto Reboot Timing section, click ON.
4. Select the Hours (24-hour format) and Minutes for the time of day for the VIA Connect
PLUS to automatically reboot every day.
5. Click Reset VIA Session for settings to take effect.
Configuring Auto Power Off
VIA Connect PLUS enables you to define a time of day that the unit automatically powers off.
To configure auto power off:
1. Click VIA Management > VIA Settings on the navigation pane (Figure 5).
The VIA Settings page appears (Figure 6).
2. Click Power.
The Power tab appears (Figure 10).
3. In the Auto Power Off Timing, click ON.
4. Select the Hours (24 hour format) and Minutes for the time of day for the VIA Connect
PLUS to automatically shut off every day.
Page 18

Kramer Electronics Ltd.
VIA Connect PLUS – For Web Administrator: Configuring Settings – Embedded Web Pages
16
Activating Energy Saver Mode
Energy saver mode automatically sends your VIA Connect PLUS unit into sleep mode after 1
minute of inactivity.
To activate energy saver mode:
1. Click VIA Management > VIA Settings on the navigation pane (Figure 5).
The VIA Settings page appears with the System & IOS tab open (Figure 6).
2. Select the Activate Energy Saver Mode checkbox.
Defining Default Volume Level
VIA Connect PLUS enables you to set a default volume level for the VIA unit. After
rebooting the unit, resetting a session, or all users logging off, the volume returns to the
defined level.
To define the default volume level:
1. Click VIA Management > VIA Settings on the navigation pane (Figure 5).
The VIA Settings page appears (Figure 6).
2. Click Advanced.
The Advanced tab appears. (Figure 12).
3. In the Default Audio Level section, select the desired volume level.
Configuring VIA Connect PLUS to be Managed by VSM
VSM (VIA Site Management) is an optional, web-based software application (subject to a
separate pricing) that enables an administrator to monitor and make changes to all VIA
gateways connected to the network. VIA Connect PLUS enables you to activate VSM
management for a VIA gateway and define which gateway functions are managed by VSM.
Contact your regional sales representative for more details about this solution.
If VIA discovery is enabled and configured at VSM side, your VIA device will be automatically
added under VSM supervision.
To configure VIA Connect PLUS to be managed by VSM when VIA Discovery is not
activated:
1. Click VIA Management > VIA Site Management on the navigation pane (Figure 5).
Page 19

Kramer Electronics Ltd.
VIA Connect PLUS – For Web Administrator: Configuring Settings – Embedded Web Pages
17
The VIA Site Management page appears.
Figure 11: VIA Management > VIA Site Management Page
2. In the Step 1: Server Settings section, enter the VSM Server IP.
3. Enter the Gateway ID that was defined in VSM for this gateway.
4. Click Validate and Save.
Changes take effect immediately.
VIA Connect PLUS must be able to connect to VSM while validating is in progress.
-OR-
Click Save for changes to be saved with no validation from VSM.
Since validation is not made immediately, any error entered at this stage –like duplication of
ID must be corrected manually at a later stage.
5. In the Step 2: Configuration section, select From VIA Site Management for all functions
to be managed by VSM.
-ORSelect All From VIA Site Management (VSM) to manage all functions from VSM.
After clicking Apply and Reset, changes take 30 minutes to 1 hour to take effect, to allow time
to communicate with VSM.
Page 20

Kramer Electronics Ltd.
VIA Connect PLUS – For Web Administrator: Configuring Settings – Embedded Web Pages
18
Defining Advanced Settings
VIA Connect PLUS enables you to define advanced settings for your VIA Connect PLUS
gateway.
Defining Automatic End of Meeting Actions
VIA Connect PLUS enables you to define what happens when all meeting participants have
disconnected from VIA Connect PLUS.
To define end of meeting actions:
1. Click VIA Management > VIA Settings on the navigation pane (Figure 5).
The VIA Settings page appears (Figure 6).
2. Click Advanced.
The Advanced tab appears.
Figure 12: VIA Management > VIA Settings > Advanced Tab
Page 21

Kramer Electronics Ltd.
VIA Connect PLUS – For Web Administrator: Configuring Settings – Embedded Web Pages
19
3. In the End of Meeting Settings section, select the desired options for When all
participants have disconnected from VIA:
▪ Clean the Cloud – delete all files from the VIA cloud (see Managing VIA Cloud
Files on page 94).
▪ Close Whiteboard and Auto Save – Close the Whiteboard on the main display and
save the current page to the VIA cloud.
▪ Close Whiteboard and Discard – Close the Whiteboard on the main display and
discard the current page.
▪ Do not Close the Whiteboard – leave the Whiteboard open on the main display.
Defining Audio Output Format
VIA Connect PLUS enables you to define the audio output format for the Audio Output 3.
5mm Mini Jack .
To define the audio output format:
1. Click VIA Management > VIA Settings on the navigation pane (Figure 5).
The VIA Settings page appears (Figure 6).
2. Click Advanced.
The Advanced tab appears. (Figure 12).
3. In the VIA Gateway Audio Output section, select the required type of audio output from
the drop-down.
Defining File Sharing Formats
VIA Connect PLUS enables you to define which types of files may be shared among
participants during a meeting (see Sharing Files on page 93).
To define the file sharing formats:
1. Click VIA Management > VIA Settings on the navigation pane (Figure 5).
The VIA Settings page appears (Figure 6).
2. Click Advanced.
The Advanced tab appears. (Figure 12).
3. In the File Sharing Settings section, click Selected Files.
The file format selector window appears.
4. Under File Extension, select or clear file extensions as required.
5. Click Apply.
File format changes are applied.
6. Under Add Extension, enter a new file extension.
7. Click Add.
The new file extension is added to the File Extension list.
Page 22

Kramer Electronics Ltd.
VIA Connect PLUS – For Web Administrator: Configuring Settings – Embedded Web Pages
20
Defining API Security
To define API security settings:
1. Click VIA Management > VIA Settings on the navigation pane (Figure 5).
The VIA Settings page appears (Figure 6).
2. Click Advanced.
The Advanced tab appears. (Figure 12).
3. In the API Setting Command section, select one of the following:
▪ Secure – API commands can be sent to the VIA gateway securely over a TLS port.
▪ Non-Secure – API commands can be sent to the VIA gateway on a non-secure,
plain text port. Select this option if your controller does not support TLS.
Managing Network Settings
VIA Connect PLUS enables you to change the IP address of your VIA Connect PLUS unit
and upload a custom SSL certificate:
• Changing the Unit IP Address on page 20.
• Uploading SSL Certificate on page 21.
Changing the Unit IP Address
The default IP setting is DHCP that assigns an automatic IP address to your unit. This
enables easy Plug and Play setup when connecting your VIA Connect PLUS to the network.
The following explains how to change a static IP address.
When changing these settings, make sure they are correct. Incorrect values can cause a loss
of communication.
Page 23

Kramer Electronics Ltd.
VIA Connect PLUS – For Web Administrator: Configuring Settings – Embedded Web Pages
21
To change the IP address of your VIA Connect PLUS unit:
1. Click VIA Management > Network Settings.
The Network Settings page appears.
Figure 13: VIA Management > Network Settings Page
2. Under IP Configuration, select Static.
3. In the Network Information table, change the IP settings.
4. Click Apply Settings.
Uploading SSL Certificate
VIA Connect PLUS enables you to upload a custom SSL certificate to better provide for the
security needs of your organization.
To prevent damage to the system, make sure you upload files that can be used by the
system. If you are unsure of how to use this feature, contact technical support.
For information on how to create a certificate, see Creating an SSL Certificate for VIA,
available at: www.kramerav.com/product/VIA Connect PLUS
After obtaining your certificate, you must install it on the VIA.
The uploaded files must stay in the format of “server.crt” & “server.key”.
To upload an SSL certificate:
1. Click VIA Management > Global Settings on the navigation pane (Figure 5).
The Global Settings page appears.
Page 24
Kramer Electronics Ltd.
VIA Connect PLUS – For Web Administrator: Configuring Settings – Embedded Web Pages
22
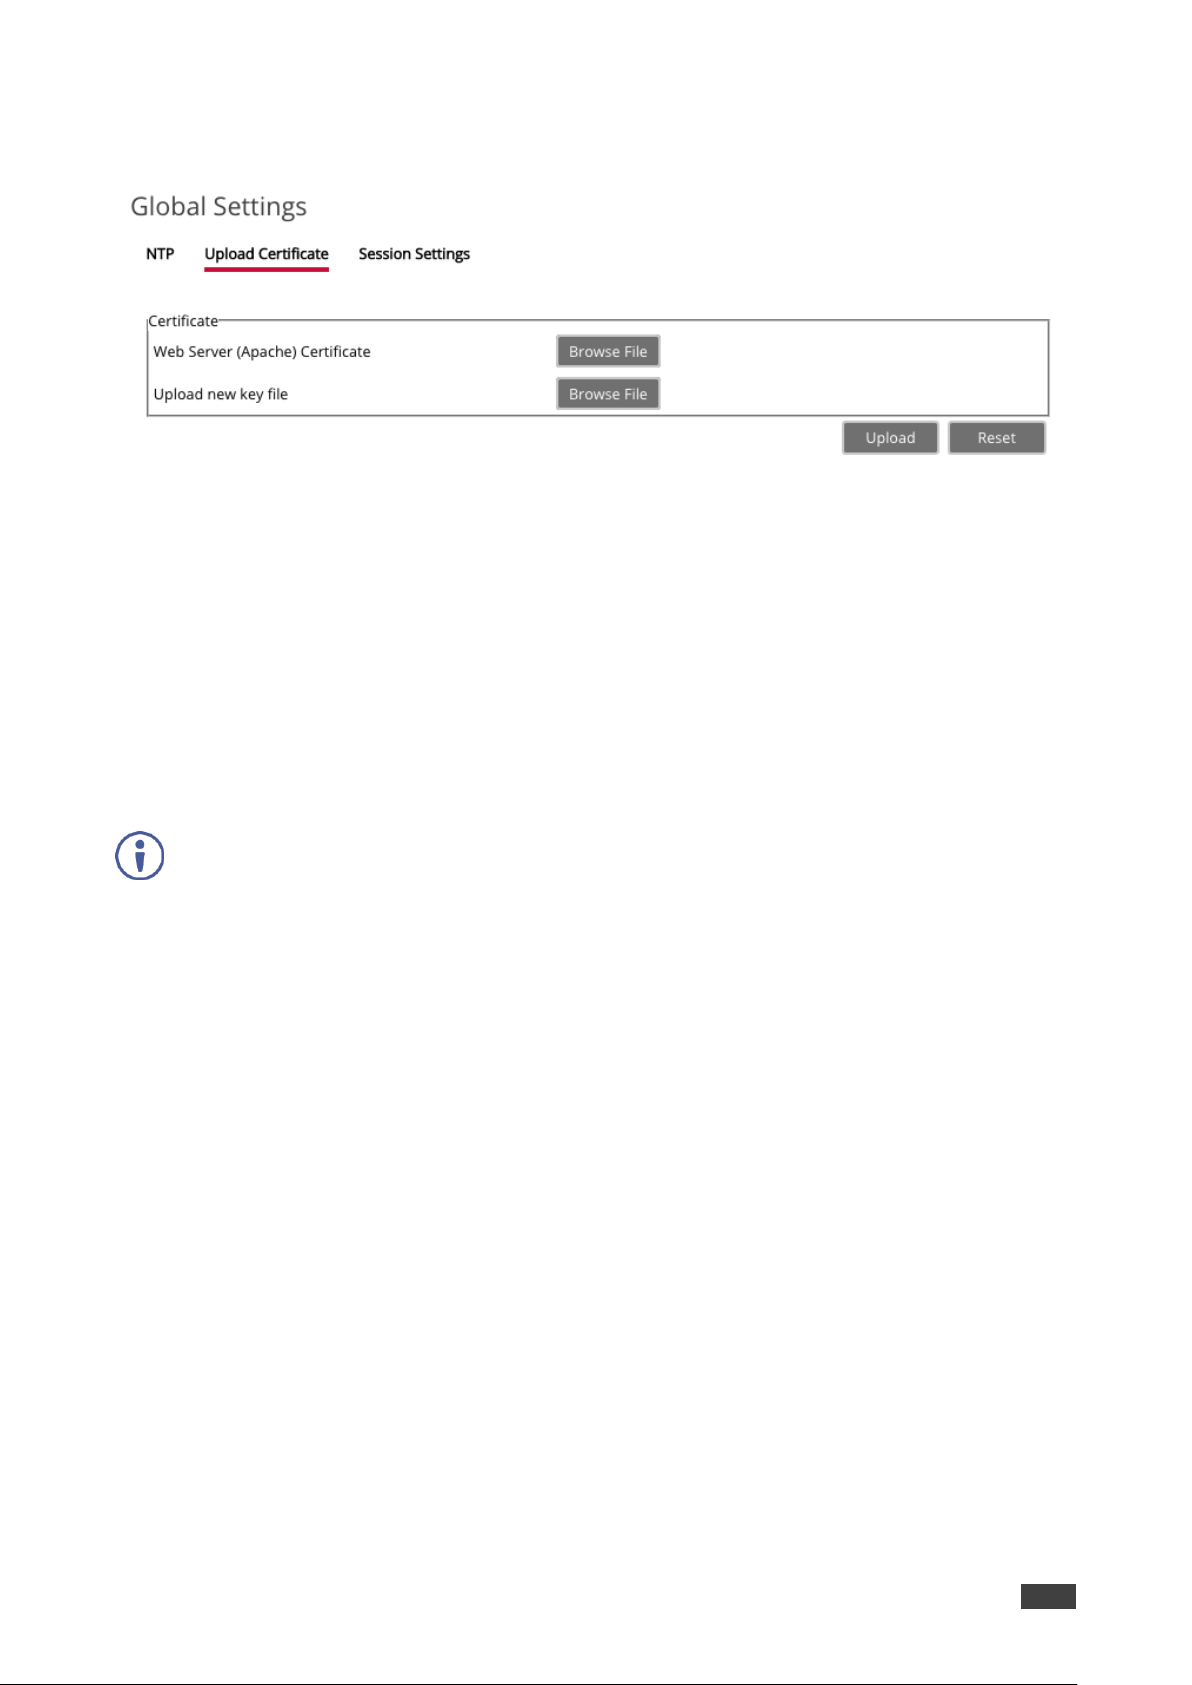
2. Click Upload Certificate.
The Upload Certificate tab appears.
Figure 14: VIA Management > Global Settings – Upload Certificate Tab
3. Click Browse File for Upload new signed Certificate.
A file browser appears.
4. Open the relevant certificate file.
5. Click Upload.
6. Click Browse File for Upload new key file.
A file browser appears.
7. Open the relevant key file.
8. Click Upload.
Do not upload the key file until the certificate file is finished uploading.
9. Restart your device.
Page 25

Kramer Electronics Ltd.
VIA Connect PLUS – For Web Administrator: Configuring Settings – Embedded Web Pages
23
Managing User Access
VIA Connect PLUS enables you to create new users and define their level of access to
features and settings:
• Creating New Users on page 23.
• Configuring Moderator Mode on page 26.
Creating New Users
VIA Connect PLUS enables you to create new users and define their level of access to
system settings and whether or not they can become a moderator while participating in a
meeting.
There are two default users available to log in to VIA Connect PLUS:
• Super User – Web Administrator access to all features and settings; this user cannot be
deleted. However, it’s password can be changed (recommended). It also can become a
moderator:
▪ Default user name: su
▪ Default password: supass
• User – limited access to settings – Participant access to features and settings; cannot
become a moderator:
▪ Default user name: user
▪ Default password: userpass
To create a new user:
1. Click User Management > Add User on the navigation pane (Figure 5).
The Add User page appears.
Figure 15: User Management > Add User Page
2. Type the new Username, Password and Confirm Password.
3. Under User Role, select from the following administrative levels:
▪ Web Administrator – access to change all system settings, including Digital Signage.
Page 26

Kramer Electronics Ltd.
VIA Connect PLUS – For Web Administrator: Configuring Settings – Embedded Web Pages
24
▪ Digital Signage – able to configure the Digital Signage (see Configuring Digital
Signage on page 51).
4. Select one of the following participation levels:
▪ Moderator – user is able to become a moderator and has access to features such as
Streaming a Meeting Session (see page 105).
Moderator Mode must be activated to enable becoming a Moderator during a meeting
(see Configuring Moderator Mode on page 26).
▪ Participant – user participates in a meeting, but cannot access moderator features.
5. Click Save.
A new user is added and the User List tab appears with the new user added to the list.
Figure 16: User List Page
Editing Users
VIA Connect PLUS enables you to edit the password and permissions of users that are
saved on your VIA Connect PLUS.
To edit a user:
1. Click User Management > User List on the navigation pane (Figure 5).
The User List page appears (Figure 16).
2. Click the icon in the Edit column for the relevant user.
Page 27

Kramer Electronics Ltd.
VIA Connect PLUS – For Web Administrator: Configuring Settings – Embedded Web Pages
25
The Edit User page appears.
Figure 17: Edit User Page
3. Change the password and User Role definitions, as needed.
4. Click Update.
The changes are applied and the User List page appears.
Changing Your Password
VIA Connect PLUS enables you to change your own password.
To change your own password:
1. Click User Management > Change Password on the navigation pane (Figure 5).
The Change Password page appears.
Figure 18: Change Password Page
2. Click Reset to clear all the fields.
3. Type your Old Password, New Password, and Confirm Password.
4. Click Update.
The changes are applied and you are logged out of the embedded web pages.
Page 28

Kramer Electronics Ltd.
VIA Connect PLUS – For Web Administrator: Configuring Settings – Embedded Web Pages
26
Configuring Moderator Mode
VIA Connect PLUS enables you to activate and configure Moderator Mode. You can define
how users access Moderator Mode and enable some of the moderator features like disabling
chat.
For more information about how a user becomes a moderator during a meeting,
see Becoming Meeting Moderator on page 95.
To configure Moderator Mode:
1. Click VIA Management > Moderator Mode on the navigation pane (Figure 5).
The Moderator Mode page appears.
Figure 19: VIA Management > Moderator Mode Page
2. Select the Activate Moderator Mode checkbox.
3. Select one of the Moderator Mode types:
▪ Basic – allows anyone to log into a meeting without a username and password and
to become moderator with a password defined by the Web Administrator.
▪ Databased – only users created by the Web Administrator (see Creating New
Users on page 23) can log into a meeting.
▪ Active Directory – see Configuring Active Directory Moderator Mode on page 27.
4. If you selected Basic, type a password and click Apply.
5. If required, select from the following:
▪ Moderator can enable/disable Chat feature during a session – See Chatting with
Participants on page 92
▪ Allow Participants to confirm start of Presentation – See Showing Participant Screen
on Main Display on page 97
6. If you selected Active Directory, see Configuring Active Directory Moderator
Mode on page 27.
Page 29

Kramer Electronics Ltd.
VIA Connect PLUS – For Web Administrator: Configuring Settings – Embedded Web Pages
27
Configuring Active Directory Moderator Mode
Groups grant access to resources. Organizational units (OUs) control objects and delegate
group policy settings. VIA Connect PLUS seamlessly integrates with Active directories (ADs)
to avoid the hassle of creating users from VIA Connect PLUS’s Web UI.
VIA Connect PLUS Gateway contains the following groups that must be mapped with Active
Directory groups or organizational units:
• Moderator: A user with meeting moderator rights i. e. this user can directly display his
screen on a VIA Connect PLUS Gateway and can allow a participant requesting for
presentation on the main display.
• Participant: A participant in a presentation session who can join the meeting room, but
cannot project their desktop without the moderator’s permission.
Active directory must have groups or OUs like the above Moderator-Participant hierarchy. Do
not use groups which have any employee in common.
If there is no such group or OU, create them in such a way that an employee is not in the
moderator and the participant group at the same time.
To configure Active Directory Moderator Mode:
1. Click VIA Management > Moderator Mode on the navigation pane (Figure 5).
The Moderator Mode page appears (Figure 19).
All connecting devices must be governed through this AD or they cannot login.
1. Click Activate Moderator Mode.
2. Click Active Directory under Moderator Mode.
The Active Directory options appear.
Figure 20: VIA Management > Moderator Mode Page with Active Directory Options
Page 30

Kramer Electronics Ltd.
VIA Connect PLUS – For Web Administrator: Configuring Settings – Embedded Web Pages
28
3. Under Active Directory Settings, type in the Active Directory name in Active Directory
Domain text box.
4. Select the Group Based or OU Based radio button as per your Active Directory
configuration.
5. Based on the above selection, type the name of Moderator and Participant Group/OU in
their respective boxes.
VIA Connect PLUS does not discover and connect to the Active Directory; rather it relies on
you to correctly enter the details. If there is a typographical error in any of fields, the users
(Moderators and Participants) cannot log in.
For further details, refer to Kramer’s white paper “VIA Integration into DNS and Microsoft
Active Directory”.
Defining Web Pages Timeout
VIA Connect PLUS enables you to define how long the timeout period is for the embedded
web pages. One minute before the time out period is over, a warning message appears,
giving the user the option of extending the session before it ends.
Figure 21: Embedded Web Pages Session Expiration (Timeout) Warning
To define the web pages timeout period:
1. Click VIA Management > Global Settings on the navigation pane (Figure 5).
The Global Settings page appears with the NTP tab open (Figure 9).
2. Click Session Settings.
The Sessions Settings tab opens.
Figure 22: Global Settings > Session Settings Tab
3. Under Session Timeout, select the desired timeout period.
Page 31

Kramer Electronics Ltd.
VIA Connect PLUS – For Web Administrator: Configuring Settings – Embedded Web Pages
29
Disabling the Captcha Test
VIA Connect PLUS enables you to disable the Captcha test that is required when logging
into the embedded web pages (Figure 4).
To disable the Captcha test:
1. Click VIA Management > Global Settings on the navigation pane (Figure 5).
The Global Settings page appears with the NTP tab open (Figure 9).
2. Click Session Settings.
The Sessions Settings tab opens (Figure 22).
3. Under Captcha, click OFF.
Page 32

Kramer Electronics Ltd.
VIA Connect PLUS – For Web Administrator: Configuring Settings – Embedded Web Pages
30
Managing VIA Features
VIA Connect PLUS enables you to manage VIA features:
• Rearranging Features Menu on page 30.
• Configuring VIA Pad Settings on page 32.
• Configuring iOS Mirroring Settings on page 33.
• Enabling Chrome Support on page 34.
• Activating Do Not Disturb Mirroring Feature on page 34.
• Configuring the Display Controller on page 35.
Rearranging Features Menu
VIA Connect PLUS enables you to rearrange the position of features in the menu and hide
features from the menu. Each of the following web pages enables managing a different
features menu:
• Gateway Features – menu available on the main display
• Client Features – menu available on meeting participant laptops and tablets
• Mobile Features – menu available on meeting participant smartphones
To rearrange the gateway, client or mobile feature menu:
1. Click VIA Management > Gateway /Client /Mobile Features on the navigation pane
(Figure 5).
The selected Features page appears.
Figure 23: VIA Management > Client Features Page
Page 33

Kramer Electronics Ltd.
VIA Connect PLUS – For Web Administrator: Configuring Settings – Embedded Web Pages
31
2. Click and drag a feature icon.
The icon docks in the new position.
3. Click x on the upper right corner of the feature icon.
The feature is hidden.
Figure 24: VIA Management > Client Features Page with Hidden Feature
To show a feature that was hidden, click + in the upper right corner of a hidden feature frame.
Page 34

Kramer Electronics Ltd.
VIA Connect PLUS – For Web Administrator: Configuring Settings – Embedded Web Pages
32
Using VIA Pad
VIA Pad is an optional touch-pad accessory that enables meeting participants to instantly join
a VIA meeting with their Mac or PC laptop:
• Configuring VIA Pad Settings on page 32.
• Configuring iOS Mirroring Settings on page 33.
Configuring VIA Pad Settings
VIA Connect PLUS enables you to configure VIA Pad settings that define how a VIA Pad
device operates when paired with your VIA Connect PLUS unit.
To configure VIA Pad settings:
1. Click VIA Management > VIAPad Configuration on the navigation pane (Figure 5).
The VIAPad Configuration page appears.
Figure 25: VIA Management > VIAPad Configuration Page
2. In the VIAPad Configuration section, select the following as required:
▪ Guest – Participant can Present by touching the VIA Pad device; the Kramer VIA
app dashboard is not available.
▪ VIA Pad overrides Room Code – Participant can log in to a meeting without entering
the room code.
Room Name is automatically populated; it reflects the name of your VIA Connect PLUS unit.
Page 35

Kramer Electronics Ltd.
VIA Connect PLUS – For Web Administrator: Configuring Settings – Embedded Web Pages
33
3. In the Wifi Configuration section, select the Auto Connect to Wi-Fi checkbox, to
configure VIA Pad to automatically connect to the meeting room Wi-Fi network.
The auto connect parameters appear.
4. Define the following for the meeting room Wi-Fi network:
a. SSID – Name of the network
Make sure that you write it EXACTLY as defined. This parameter is case sensitive.
b. Authentication Mode – Security used by your Wi-Fi access point. Select from the pre-
set options: WEP Open, WEP Shared, WPA Personal, WPA2 Personal.
c. Encryption – Type of encryption key used by your router.
d. Key – Password required to join your network (up to 50 characters max).
After clicking Apply Settings, the configuration is saved, there is no need to reboot your unit.
Pairing a VIA Pad Device
Each VIA Pad device must be paired to your VIA Connect PLUS unit before being used by a
meeting participant.
To pair a VIA Pad device to your VIA Connect PLUS unit:
• Follow the directions below:
Configuring iOS Mirroring Settings
VIA Connect PLUS enables you to configure iOS mirroring settings for using AirPlay to
present on the main display.
To configure iOS mirroring settings:
1. Click VIA Management > VIA Settings on the navigation pane (Figure 5).
The VIA Settings page appears with the System & IOS tab open (Figure 6).
2. In the iOS Mirroring section, click ON for Mirroring.
3. If desired, type a new Mirror Name. This is the name that appears when you look for
AirPlay devices on your iOS device.
4. Select the maximum number of mirrored iOS devices that can be used simultaneously.
Page 36

Kramer Electronics Ltd.
VIA Connect PLUS – For Web Administrator: Configuring Settings – Embedded Web Pages
34
Enabling Miracast Mirroring
VIA Connect PLUS enables you provide Miracast mirroring for meeting participants. This
feature requires installation of the optional VIAcast dongle (sold separately).
To enable Miracast mirroring:
1. Connect the VIAcast dongle to one of the USB ports of VIA Connect PLUS.
2. Turn on or reboot VIA Connect PLUS.
3. Log in to your VIA device embedded web pages with a Web Administrator username.
The embedded web pages appear (Figure 5).
4. On the VIA embedded web pages, click VIA Management > VIA Settings on the
navigation pane.
The VIA Settings page appears with the System & IOS tab open (Figure 6).
5. In the Miracast Settings section, click ON.
6. Click Reset VIA Session
VIA Connect PLUS is enabled and the VIA Connect PLUS communication LED flashes
slowly.
Enabling Chrome Support
VIA Connect PLUS enables you to activate support for Chrome browser and Chrome Book.
This activation is required to allow Chrome Authentication Server connection.
To enable Chrome support:
1. Click VIA Management > VIA Settings on the navigation pane (Figure 5).
The VIA Settings page appears with the System & IOS tab open (Figure 6).
2. In the Chrome Setting section, click ON.
Chrome support is activated after rebooting the unit.
Activating Do Not Disturb Mirroring Feature
VIA Connect PLUS enables you to activate the Do Not Disturb mirroring feature that enables
any participant that is mirroring on the main display to prevent other participants from
mirroring (see Mirroring Without Being Interrupted on page 75).
To activate the Do Not Disturb mirroring feature:
1. Click VIA Management > VIA Settings on the navigation pane (Figure 5).
The VIA Settings page appears with the System & IOS tab open (Figure 6).
2. Select the Do Not Disturb checkbox.
Do Not Disturb is enabled after the next reboot.
Page 37

Kramer Electronics Ltd.
VIA Connect PLUS – For Web Administrator: Configuring Settings – Embedded Web Pages
35
Enabling/Disabling User Session Reset Option
VIA Connect PLUS enables you to enable or disable the Session Reset option that appears
in the user taskbar menu. (Figure 79). The Session Reset feature enables you to reset the
VIA session without rebooting VIA Connect PLUS.
Figure 26: Kramer VIA Taskbar Menu with Session Reset Feature Enabled
By default, this feature does not appear in the user taskbar menu.
To enable or disable the user Reset VIA Session option:
1. Click VIA Management > VIA Settings on the navigation pane (Figure 5).
The VIA Settings page appears (Figure 6).
2. Click Advanced.
The Advanced tab appears. (Figure 12).
3. In the Reset Session section, click ON to enable and OFF to disable.
Configuring the Display Controller
VIA Connect PLUS enables you to use your VIA Connect PLUS to control a display screen
that is connected to your network.
This feature enables you to configure one of the following actions:
• When the first person logs into VIA, the main display will power on and when the last
person logs off VIA, the main display will power off
• Send switch ON / switch OFF command
To configure your VIA Connect PLUS as a display controller:
1. Connect the display to be controlled to the same network as your VIA Connect PLUS.
2. Click VIA Management > Display Controller on the navigation pane (Figure 5).
Page 38

Kramer Electronics Ltd.
VIA Connect PLUS – For Web Administrator: Configuring Settings – Embedded Web Pages
36
The Display Controller tab appears.
Figure 27: VIA Settings > Display Settings > Display Controller
3. Select the Activate Control checkbox.
4. Enter the Display IP address and Control IP Port of the display screen to be controlled.
5. For Source 1, enter the command to send when someone first logs into VIA (for
example, power on the display).
6. For Source 2, enter the command you want the VIA to send when the last participant
logs off VIA (for example, power off display).
7. Select whether the display accepts commands in ASCII or HEX format.
Refer to the User Manual for your display for the correct format of the commands.
Showing Room Schedule on Main Display
VIA Connect PLUS enables you to display scheduled meeting information on the main
display home screen. VIA automatically retrieves information about meetings scheduled in the
room where the VIA device resides This feature is available for a room that has been added in
Office 365 Admin Center or in Google Admin console for G Suite.
Before configuring this feature in the VIA embedded web pages, you must add the room in
either Office 365 Admin Center or Google Admin console for G Suite. See Configuring Third
Party Apps for VIA Calendar Integration available for download at:
www.kramerav.com/downloads/VIA Connect PLUS.
Page 39

Kramer Electronics Ltd.
VIA Connect PLUS – For Web Administrator: Configuring Settings – Embedded Web Pages
37
Showing Room Schedule for Office 365 Calendar
To show the room schedule for Office 365 Calendar:
1. Click VIA Management > Calendar on the navigation pane (Figure 5).
The Calendar page appears.
Figure 28: VIA Management > Calendar Page with Office 365 Calendar Selected
2. Select the Show Calendar on VIA checkbox.
3. Under Account, select Office 365 Basic Auth from the Calendar Type drop down.
4. Enter the following for the room where this VIA gateway resides:
▪ Username – the email address assigned to the room
▪ Password – password associated with the room Username
Showing Room Schedule for Google Calendar
To show the room schedule for Google Calendar:
1. Click VIA Management > Calendar on the navigation pane (Figure 5).
The Calendar page appears (Figure 28).
2. Select the Show Calendar on VIA checkbox.
Page 40

Kramer Electronics Ltd.
VIA Connect PLUS – For Web Administrator: Configuring Settings – Embedded Web Pages
38
3. Under Account, select Google from the Calendar Type drop down.
The Google Calendar controls appear.
Figure 29: VIA Management > Calendar Page with Google Calendar Selected
4. Click Click here to get code.
Google sign in page appears.
5. Sign-in with the Google account where the shared space calendar was created.
6. Allow access to VIA-Calendar.
An integration code appears.
Figure 30: Google Integration Code
7. Copy the integration code from the Google sign in page and paste it into the Step 2 field
on the VIA Calendar page.
8. Click Get Calendar.
9. Under Step 3, select the calendar associated with the room.
Page 41

Kramer Electronics Ltd.
VIA Connect PLUS – For Web Administrator: Configuring Settings – Embedded Web Pages
39
10. Click Associate.
The room username appears on the Calendar page.
Click Reset to disassociate the calendar account.
Customizing Main Display Look and Feel
VIA Connect PLUS enables you to customize the look and feel of the main display home
screen.
Defining Main Display Wallpaper
VIA Connect PLUS enables you to define the main display wall paper. This feature allows
you to customize the main display to match your branding and in-room equipment usage
instructions.
Wallpaper image files must be jpeg, png, or bmp format and a maximum size of 2 MB.
If the wallpaper image resolution does not match VIA's output resolution, the image may not
display accurately. For best results, use a wallpaper image that matches the output resolution
of VIA.
Page 42

Kramer Electronics Ltd.
VIA Connect PLUS – For Web Administrator: Configuring Settings – Embedded Web Pages
40
To define the main display wallpaper:
1. Click VIA Management > Wallpaper on the navigation pane (Figure 5).
The Wallpaper page appears.
Figure 31: VIA Management > Wallpaper Page
2. Click Click Here to Upload to upload a new image from your system
OR
Click Set under one of the already uploaded images.
To delete one of the saved images, click Delete.
3. Click Reset VIA Session.
The main display wallpaper changes.
Customizing Main Display Text
VIA Connect PLUS enables you to customize the appearance of the Date Time, Room Name
and Room Code that are shown on the main display. You can define the position, color,
format (Date Time) and refresh time (for Room Code) of these elements. In addition, you can
display a customized DNS (Domain Name System) name instead of the default room name, if
local DNS services are supported by the network and a DNS server is defined (see Changing
LAN Settings on page 62).
To customize the main display text:
1. Click VIA Management > VIA Settings on the navigation pane (Figure 5).
The VIA Settings page appears (Figure 6).
2. Click Display.
The Display tab appears (Figure 7).
3. Click Customize Gateway Screen in the Wallpaper, Room Code, Room Name Settings
section.
Page 43

Kramer Electronics Ltd.
VIA Connect PLUS – For Web Administrator: Configuring Settings – Embedded Web Pages
41
The Customize Gateway Screen appears
Figure 32: Customize Gateway Screen
4. Click and drag any of the red boxes (Date Time, Room Name, Room Code) on the
Home screen preview to change their position.
5. Click any of the red boxes.
Formatting controls for the box appear in the Properties section.
6. Change any of the properties of the selected text, as required.
7. Click Apply.
The changes are saved and shown after resetting the session.
Each type of text enables different types of customization, as follows:
Page 44

Kramer Electronics Ltd.
VIA Connect PLUS – For Web Administrator: Configuring Settings – Embedded Web Pages
42
Customizing Date Time Display
Figure 33: Date Time Text Properties
To customize the date/time text:
• In the Properties section, define the following:
▪ Name – name of the text box for the Properties section (does not appear on the main
display)
▪ Show Date Time on wallpaper – select/clear the checkbox to show/hide the date/time
text
▪ Date Time Color – click to select a new text color
▪ 24 hours format – select/clear the checkbox to show time in 24/12 hour format
Customizing Room Name Display
Figure 34: Room Name Display Properties
Page 45

Kramer Electronics Ltd.
VIA Connect PLUS – For Web Administrator: Configuring Settings – Embedded Web Pages
43
To customize the Room Name text:
• In the Properties section, define the following:
▪ Name – name of the text box for the Properties section (does not appear on the main
display)
▪ Show Room Name on wallpaper – select the checkbox to always show the Room
Name on the main display text, clear the checkbox to display the room name only
when a participant is logging in.
▪ Custom Room Name – By default, this is defined as the IP address of the VIA unit.
Alternatively, you can type the DNS (Domain Name System) name, if local DNS
services are supported by the network and a DNS server is defined (see Changing
LAN Settings on page 62).
▪ Room Name Color – click to select a new text color.
▪ Room Name Overlay – shows the room name as an overlay on top of participant
content or on top of a Digital Signage campaign:
Activate – activates the Room Name overlay.
Auto Hide – Define the number of seconds the Room Name overlay is visible on
top of participant content.
Customizing Room Code Display
Figure 35: Room Code Properties
To customize the Room Code text:
• In the Properties section, define the following:
▪ Name – Name of the text box for the Properties section (does not appear on the
main display).
▪ Activate – Activates the room name display. Clear this checkbox if you never want to
display the Room Code.
▪ Always Show on wallpaper – When Room Code is activated, select the checkbox to
always show the Room Code on the main display text; clear the checkbox to display
the room name only when a participant is logging in.
▪ Room Code Color – Click to select a new text color.
▪ Room Code Refresh Time –Define how often the room code is changed to a different
number.
Page 46

Kramer Electronics Ltd.
VIA Connect PLUS – For Web Administrator: Configuring Settings – Embedded Web Pages
44
Showing Room Name and Code on Main Display
VIA Connect PLUS enables you define whether or not to show the Room Name and Code on
the main display. The Room Name and Code are sometimes needed to log in to a VIA
meeting. In some circumstances, a meeting administrator may not want to show the Room
Name and Code on the main display, to prevent unauthorized entrance into the meeting.
To show the Room Name and Code on the main display:
▪ Click ON in the Room Name Overlay section to display the Room Name persistently
during presentation and select a value in the Auto Hide field to set the amount of time
the Room Name is displayed.
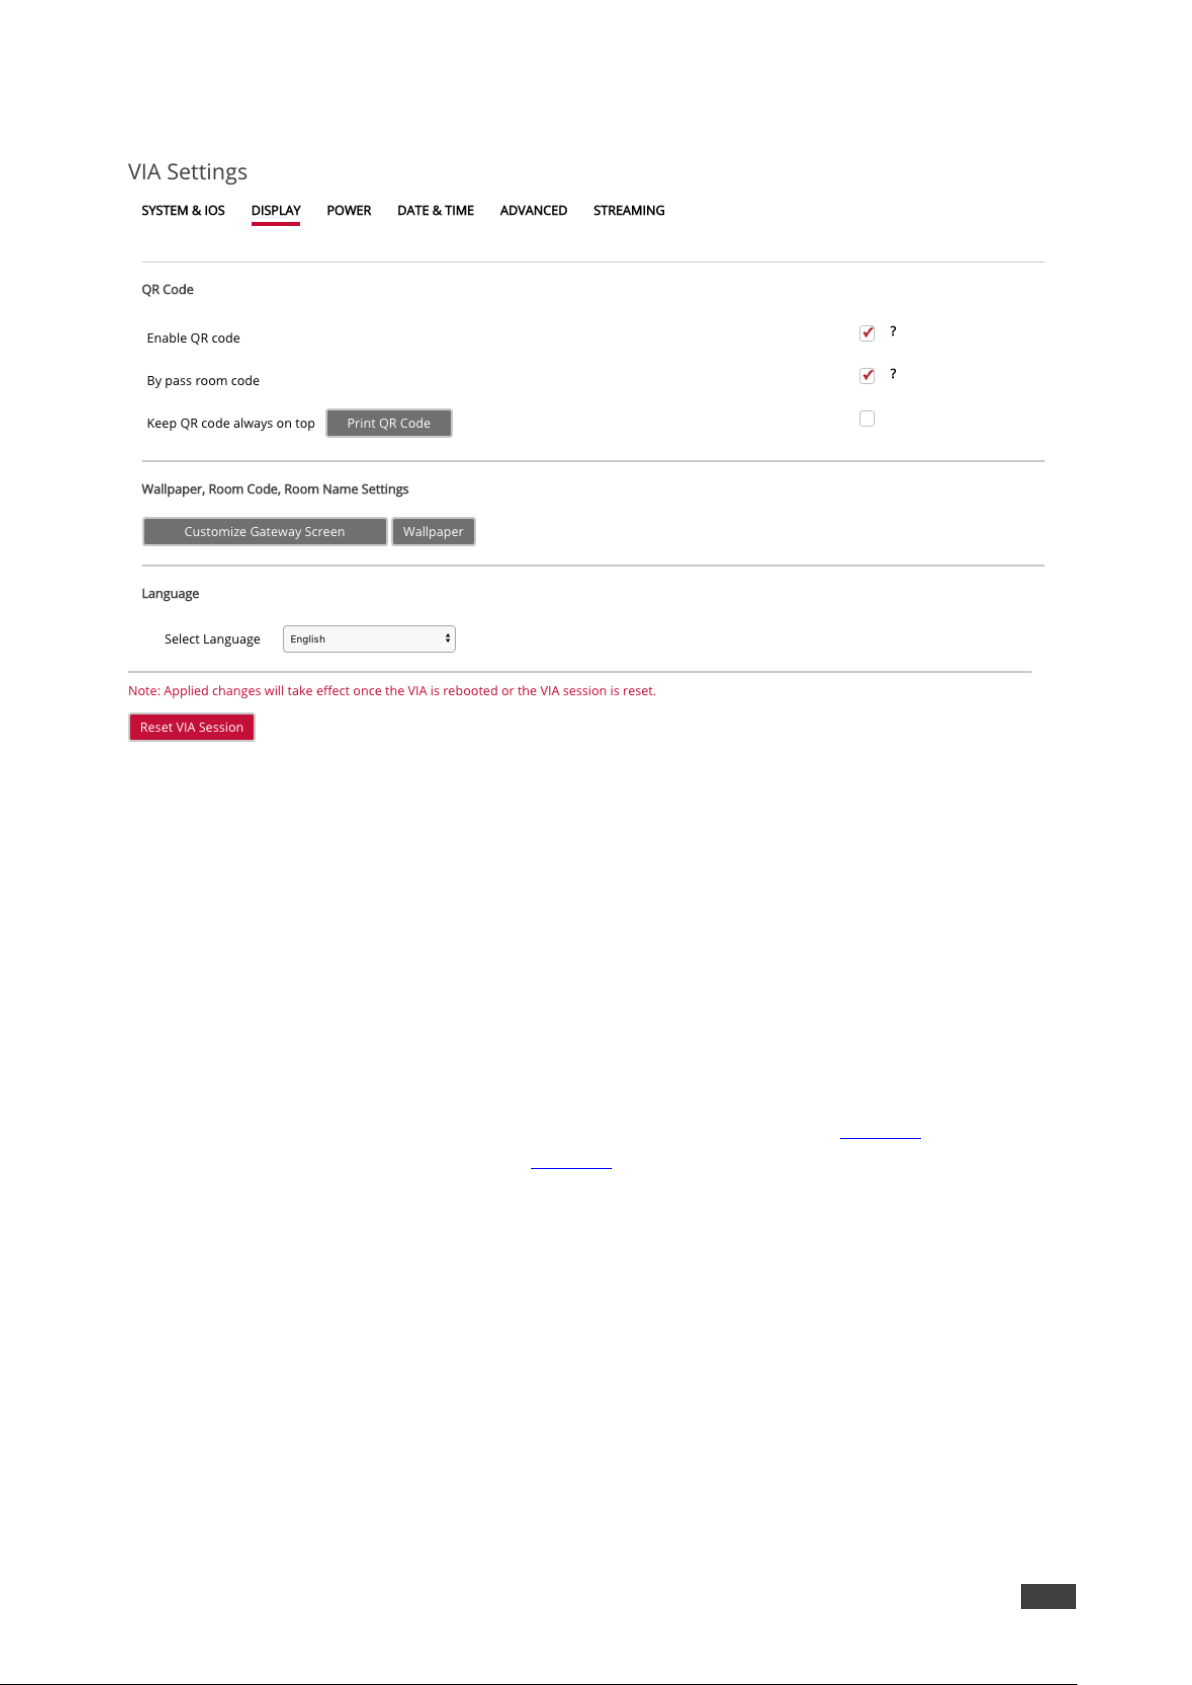
Displaying a QR Login Code
VIA Connect PLUS enables you to display a QR code on the main display that enables
participants to log in to the meeting by scanning the code.
To display a QR login code:
1. Click VIA Management > VIA Settings on the navigation pane (Figure 5).
The VIA Settings page appears (Figure 6).
2. Click Display.
The Display tab appears (Figure 7).
3. Select the Enable QR code checkbox.
4. If required, select the Bypass room code checkbox, to enable login with the QR code
without requiring the participant to enter the room code.
5. If required, select the Keep QR code always on top checkbox to allow the QR code to be
visible on top of any content presented on the main display.
Click Print QR Code to get a hard copy of the QR code to post in the room.
Page 47

Kramer Electronics Ltd.
VIA Connect PLUS – For Web Administrator: Configuring Settings – Embedded Web Pages
45
6. Click Reset VIA Session.
The QR code appears in the lower right corner of the main display.
Figure 36: Main Display
7. Click and drag the QR code to move it to another location on the main display.
8. Click and drag the corner of the QR code to enlarge the QR code.
Scaling Gateway Dashboard for Large Screens
VIA Connect PLUS enables you to enlarge the gateway dashboard on the main display when
using a large, high resolution screen.
To scale the dashboard for large screens:
1. Click VIA Management > VIA Settings on the navigation pane (Figure 5).
The VIA Settings page appears (Figure 6).
2. Click Display.
The Display tab appears (Figure 7).
3. In the VIA Gateway User Interface Scaling section, select Large from the User Interface
Scaling option box.
4. Click Reset VIA Session.
Page 48

Kramer Electronics Ltd.
VIA Connect PLUS – For Web Administrator: Configuring Settings – Embedded Web Pages
46
Defining VIA Menu Icon Visibility on Main Display
VIA Connect PLUS enables you to define if participant content presented on the main display
hides the VIA menu icon or if the VIA menu icon remains on top of participant content and
visible.
To define VIA menu icon visibility on the main display:
1. Click VIA Management > VIA Settings on the navigation pane (Figure 5).
The VIA Settings page appears with the System & IOS tab open (Figure 6).
2. Select/clear the VIA Minimized Icon on Gateway – Always On Top checkbox.
Maintaining Your VIA Unit
Using Gateway Activity Log
VIA Connect PLUS embedded web pages provide a log of gateway activities such as logins,
presentation and VIA features usage to aid in diagnosing a problem or tracking participant
usage.
Activating Gateway Activity Log
To activate the gateway activity log:
1. Click VIA Management > VIA Settings on the navigation pane (Figure 5).
The VIA Settings page appears with the System & IOS tab open (Figure 6).
2. Select the Activate System Log check box.
The gateway activity log is activated.
Page 49

Kramer Electronics Ltd.
VIA Connect PLUS – For Web Administrator: Configuring Settings – Embedded Web Pages
47
Searching Gateway Activity Log
To search the gateway activity log:
1. Click Utilities > Webadmin Activity Log on the navigation pane (Figure 5).
The Webadmin Activity Log page appears.
Figure 37: Utilities – Webadmin Activity Log
2. Select the Start Date and the End Date to define the date range of log entries to be
displayed.
3. Click the Username drop-down to filter log entries according to a particular user.
4. Click the Action Taken drop-down to filter log entries according to actions such as login,
logout or activate.
5. Click Search.
The filtered search results appear in the table at the bottom of the page.
Click Export to PDF or Export to CSV to save a file of the log table on your computer.
Page 50

Kramer Electronics Ltd.
VIA Connect PLUS – For Web Administrator: Configuring Settings – Embedded Web Pages
48
Updating Firmware
VIA Connect PLUS enables you to update your VIA Connect PLUS firmware.
If you are running a firmware version lower than 2.3, please install the 2.3.0418.960 release
before updating your device to the latest release. In this case, use ONLY the .rpm file
available for download from our technical support web page: www. kramerav.
com/support/downloads. asp.
The upload process and then the unit reboot may take a few minutes.
To update your VIA Connect PLUS firmware:
1. Click Utilities > Update Firmware on the navigation pane (Figure 5).
The Update Firmware page appears.
Figure 38: Utilities > Update Firmware Page
2. When using an update file saved on your computer:
a. Click Browse File.
A file browser appears.
b. Select the relevant firmware update file.
c. Click Upload.
The new firmware is uploaded to the unit and the FW is updated.
When using an update file on the website, and you have an internet connection:
a. Click Check for Update.
A message appears telling whether there is an update available.
Check for Updates is also available on the System Information Page (Figure 5).
b. If an update is available, confirm the download.
The new firmware is downloaded to your computer.
c. Click Browse File.
A file browser appears.
d. Select the relevant firmware update file.
Page 51

Kramer Electronics Ltd.
VIA Connect PLUS – For Web Administrator: Configuring Settings – Embedded Web Pages
49
e. Click Upload.
The new firmware is uploaded to the unit and the FW is updated.
3. Upon completion of the update process, reboot the unit.
Page 52

Kramer Electronics Ltd.
VIA Connect PLUS – For Web Administrator: Configuring Settings – Embedded Web Pages
50
Resetting Default Settings
VIA Connect PLUS enables you to reset VIA Connect PLUS to factory defaults.
Resetting Digital Signage removes the DSS license from the unit.
Resetting Calendar Settings removes the calendar settings from the unit and credentials will
be required to renew synchronization to your calendar.
To reset default settings:
1. Click Utilities > Maintenance on the navigation pane (Figure 5).
The Maintenance page appears.
Figure 39: Maintenance Page
Page 53

Kramer Electronics Ltd.
VIA Connect PLUS – For Web Administrator: Configuring Settings – Embedded Web Pages
51
2. Select the default configurations you would like to reset or click Select All to select all
settings.
3. Click Apply.
Selected settings are reset.
Running Setup Wizard
VIA Connect PLUS enables you to run the Setup Wizard on the next reboot of the VIA
Connect PLUS unit.
To run the setup wizard:
1. Click Utilities > Maintenance on the navigation pane (Figure 5).
The Maintenance page appears (Figure 39).
2. Select the Show setup wizard on next reboot checkbox.
3. Click Apply.
The setup wizard runs on the next reboot.
Configuring Digital Signage
Digital Signage is an optional feature available through separate licensing and pricing.
Contact your local Kramer office for more details.
VIA Connect PLUS enables you to configure digital signage. The Digital Signage feature
enables you to use VIA Connect PLUS to display dynamic content and information on the
main display when there is no meeting in progress. Use a predefined template or create your
own display configuration with up to three frames of content that appear simultaneously.
Then, schedule campaigns (contact configurations) to run automatically at specific dates and
times.
Configuring digital signage includes the following steps:
• Creating and Uploading Digital Signage Media on page 51.
• Adding and Managing Digital Signage Templates on page 55.
• Configuring a Digital Signage Campaign on page 57.
Creating and Uploading Digital Signage Media
VIA Connect PLUS enables you to create a library of media content to be displayed through
the digital signage feature. The types of media that can be displayed are:
• URL – Live web page
• Scrolling Text – Custom text message that scroll across the screen
• Image – Static image (allowed file extensions: jpg, jpeg, bmp, gif, png)
• Video (allowed file extensions: avi, mpeg, wmv, mpg, mov, vob, mkv, mp4, m4v)
• RSS feed –Live RSS feed
Page 54

Kramer Electronics Ltd.
VIA Connect PLUS – For Web Administrator: Configuring Settings – Embedded Web Pages
52
To create and upload digital signage media:
1. Click Digital Signage > Manage Content on the navigation pane (Figure 5).
The Upload Media File page appears.
Figure 40: Digital Signage > Upload Media File Page
2. Create and upload media, as required:
▪ Adding Web URL on page 52.
▪ Creating Scrolling Text on page 53.
▪ Uploading Media Files on page 54.
▪ Adding RSS Feed on page 54.
Adding Web URL
To create a web url for digital signage:
1. On the Upload Media File page (Figure 40), click Create Web URL.
The Create URL window appears.
Figure 41: Digital Signage Create URL Window
Page 55

Kramer Electronics Ltd.
VIA Connect PLUS – For Web Administrator: Configuring Settings – Embedded Web Pages
53
2. Type the URL address and File Name (name that will appear on the
Existing Media list) and click Save.
The new URL is added to the Existing Media list.
3. Select the Auto Refresh checkbox to display a URL with dynamic content
OR
Clear the Auto Refresh checkbox to display a URL as a static page.
Creating Scrolling Text
1. On the Upload Media File page (Figure 40), click Create Scroller.
The Scroll Text Editor window appears.
Figure 42: Digital Signage Scroll Text Editor Window
2. Type the text to be displayed in the box at the top of the window.
3. Type a name for the scroller in the File Name text box.
4. In the Options area of the window, select the scrolling speed and click Font
Color/Background Color to pick the text and background color.
5. Click Preview.
A preview of the scroller appears at the top of the window.
6. Click Save.
The new Scroller is added to the Existing Media list.
Page 56

Kramer Electronics Ltd.
VIA Connect PLUS – For Web Administrator: Configuring Settings – Embedded Web Pages
54
Uploading Media Files
1. On the Upload Media File page (Figure 40), click Upload Media.
A file browser window appears.
Figure 43: Digital Signage Upload Media File Browser
2. Select an image or video file and click Open.
The file is added to the Existing Media list.
Adding RSS Feed
1. On the Upload Media File page (Figure 40), click Create RSS.
The RSS Text Editor window appears.
Figure 44: Digital Signage RSS Text Editor Window
2. Under RSS URL, enter the RSS feed URL address.
3. Click Get tags.
The Select a tag drop-down list appears.
4. Select the required tag from the drop-down list.
5. Under File Name, enter the name that will appear on the Existing Media list.
Page 57

Kramer Electronics Ltd.
VIA Connect PLUS – For Web Administrator: Configuring Settings – Embedded Web Pages
55
6. Click Preview to view a preview of the RSS feed.
7. Under options, select the speed, display style, font, font color and background color for
the RSS feed.
8. Click Save.
The new RSS feed is added to the Existing Media list (Figure 40).
Adding and Managing Digital Signage Templates
VIA Connect PLUS enables you to preview, edit, delete and add digital signage templates.
To add and manage digital signage templates:
1. Select Digital Signage > Template Manager on the navigation pane (Figure 5).
The Template Manager page appears.
Figure 45: Digital Signage > Template Manager Page
Page 58

Kramer Electronics Ltd.
VIA Connect PLUS – For Web Administrator: Configuring Settings – Embedded Web Pages
56
2. Click the name of a template.
A window opens, showing a preview of the selected template.
Figure 46: Digital Signage Template Preview Window
3. Click Add Template.
The template builder screen appears.
Figure 47: Digital Signage Template Builder Screen
4. Type a name for the new template in the Template Name text box.
5. Click Add Frame.
A new frame appears in the black preview box.
Figure 48: Digital Signage Template Builder Screen – New Frame
Page 59

Kramer Electronics Ltd.
VIA Connect PLUS – For Web Administrator: Configuring Settings – Embedded Web Pages
57
6. Type a name for the frame in the Frame Properties area.
7. Click and drag the box to move and resize it.
8. Type a name for the frame in the Frame Properties area.
9. Select the Audio checkbox to play audio from the selected frame.
10. Repeat steps 5 – 9 to add up to two more frames.
When two frames overlap, the one created last appears on top.
11. Click Save.
The new template appears in the Template Manager list ().
12. Click Edit to open the template builder screen and edit the selected template.
13. Click Delete to delete the selected template.
Configuring a Digital Signage Campaign
The Schedule Playlist tab enables defining:
• What is displayed in each frame of a digital signage display
• When a digital signage display appears
To define a digital signage campaign:
1. On the left side of the embedded web pages, select Digital Signage > Schedule
Playlist.
The Schedule Playlist page appears.
Figure 49: Digital Signage > Schedule Playlist Page
Page 60

Kramer Electronics Ltd.
VIA Connect PLUS – For Web Administrator: Configuring Settings – Embedded Web Pages
58
2. Click Add Schedule.
The Schedule Playlist WHEN To Play tab appears.
Figure 50: Digital Signage > Schedule Playlist WHEN to Play Tab
3. Enter a Campaign Name.
4. Select a Priority level for the Campaign.
When two Campaign schedules overlap, VIA plays the one with the higher priority level.
5. Select a Start Date on the first calendar and an End Date on the second calendar.
6. Select the checkbox next to Start (hh:mm) to define a start time for the first day of the
campaign and an end time for the last day of the campaign.
Page 61

Kramer Electronics Ltd.
VIA Connect PLUS – For Web Administrator: Configuring Settings – Embedded Web Pages
59
7. Click WHAT to Play.
The Schedule Playlist WHAT to Play tab appears.
Figure 51: Digital Signage > Schedule Playlist WHAT to Play Tab
8. In the Template View section on the right side, select a template.
A preview of the selected template appears in the Template View section.
Figure 52: WHAT to Play Tab
Page 62

Kramer Electronics Ltd.
VIA Connect PLUS – For Web Administrator: Configuring Settings – Embedded Web Pages
60
9. Click one of the frames in the template preview, select one or more media objects from
the media section and click Add to Playlist.
All selected media for the selected frame appears in the Schedule Details area.
10. Click the Advanced button to set the running time for a web page (URL).
Figure 53: Set Running Time for Web page
11. Click Save.
The new campaign is saved, and it appears on the Schedule Playlist page.
Figure 54: Scheduled Campaign displayed in the Schedule Playlist Page
To delete a campaign, select the relevant campaign and click Delete Schedule.
Page 63

Kramer Electronics Ltd.
VIA Connect PLUS – For Web Administrator: Configuring Settings – Gateway Dashboard
61
For Web Administrator: Configuring Settings – Gateway Dashboard
VIA Connect PLUS enables users with Web Administrator access to configure LAN settings
and access system controls.
Logging in to Gateway Dashboard Settings
The gateway dashboard Settings can be accessed by connecting a mouse and keyboard
directly to the VIA gateway unit (see For Installer: Connecting VIA Connect PLUS on page 6)
or through an external device that is logged in to the meeting and in Collaboration mode
(see Collaborating on Main Display on page 77).
To log in to the Gateway Dashboard Settings:
1. Click the VIA icon in the upper right of the main display (Figure 36).
The gateway dashboard appears.
Figure 55: VIA Connect PLUS Gateway Dashboard
2. Click Features > Settings.
The login window appears.
Figure 56: Settings Login Window
3. Type an administrator user name and password (default user name = su, default
password = supass).
Page 64

Kramer Electronics Ltd.
VIA Connect PLUS – For Web Administrator: Configuring Settings – Gateway Dashboard
62
The Settings screen appears with the LAN Settings tab open.
Figure 57: Gateway Dashboard – Settings Screen
Changing LAN Settings
VIA Connect PLUS enables you to change the IP address, DNS server and default gateway
of your VIA Connect PLUS unit.
The default IP setting is DHCP that assigns an automatic IP address to your unit. This
enables easy Plug and Play setup when connecting your VIA Connect PLUS to the network.
The following explains how to change a static IP address.
When changing these settings, make sure they are correct. Incorrect values can cause a loss
of communication.
To change the LAN settings:
1. On the Gateway Dashboard Settings Screen (Figure 57), under IP Configuration, select
Static.
2. Enter, as required, the Host Name, IP Address, Subnet Mask, Default Gateway,
DNS Server.
3. Click Apply Settings.
4. Click OK in the Confirmation Message.
The system reboots with the new settings.
Page 65

Kramer Electronics Ltd.
VIA Connect PLUS – For Web Administrator: Configuring Settings – Gateway Dashboard
63
Accessing System Controls
VIA Connect PLUS enables you to access VIA Connect PLUS operating system controls
such as the control panel, audio settings, display settings, task manager, system health. You
can also view log files and activate your VIA Connect PLUS unit.
The log folder is only available if system logging is activated (see Using Gateway Activity
Log on page 46).
The VIA Connect PLUS unit is pre-activated by Kramer. In case your license has been
revoked, you can activate it here.
To access system controls:
1. On the Gateway Dashboard Settings Screen (Figure 57), click System Controls.
The System Controls tab appears.
Figure 58: System Control Screen
2. Click the required icon.
Page 66

Kramer Electronics Ltd.
VIA Connect PLUS – For User: Running Kramer VIA App
64
For User: Running Kramer VIA App
Kramer VIA app enables you to use VIA Connect PLUS for collaborative meetings. Before
moderating or joining a meeting, run the Kramer VIA app on your device using one of the
following methods:
• Running the Kramer VIA App for PC and Mac on page 64.
• Running the Kramer VIA App for Tablets & Smartphones and for Chromebooks/Chrome
Web Browser on page 65.
• Running the Kramer VIA App Using an Installation File on page 65.
Participants using an Apple device can mirror their screen on the main display using the
Apple AirPlay service without running the Kramer VIA app (see Mirroring Apple Laptops and
iPhones Using iOS/OS X Airplay Service on page 72).
If a VIAcast dongle is connected to your VIA device, participants using a Windows 10 laptop
or a Miracast-supported Android device can mirror their screen using the Projection feature
without running the Kramer VIA app (see Mirroring Windows 10 Laptops and Android
Devices Using Miracast on page 75)
Running the Kramer VIA App for PC and Mac
To run Kramer VIA, for PC and Mac computers:
1. Open your Web browser and enter the IP address for your VIA Connect PLUS unit.
Your Web browser recognizes your operating system (MAC/Windows) and directs you to
the correct client software.
The embedded web pages Welcome page appears (Figure 3).
2. Click one of the following two options:
▪ Run VIA – runs Kramer VIA virtually, without installing it on your computer.
Once downloaded, locate the file on your computer (under “Downloads”) and click it
to launch. The VIA Connect PLUS login screen appears.
▪ Install VIA – installs Kramer VIA on your computer. After the .exe file is downloaded
to your computer, a confirmation message appears. Click Yes and follow the Setup
Wizard instructions.
The Kramer VIA app is saved to the KRAMER folder on your C:/ProgramFiles
directory drive by default and a desktop shortcut is created for easy access.
However, you can select a different target folder in the Setup Wizard.
Page 67

Kramer Electronics Ltd.
VIA Connect PLUS – For User: Running Kramer VIA App
65
Running the Kramer VIA App for Tablets &
Smartphones and for Chromebooks/Chrome Web
Browser
To run Kramer VIA for tablets and smartphones:
• Download Kramer VIA from the App Store (iOS) or Google Play (Android).
To run Kramer VIA for Chromebook or the Chrome Browser:
1. Open your Chrome browser and type the name of your VIA Connect PLUS device as it
is shown on the main display.
The embedded web pages Welcome page appears (Figure 3).
2. Click the chrome web store link in the lower right corner.
You are redirected to the Kramer VIA app page in the Chrome web store.
3. Click Add to Chrome.
The app is added to your Chrome browser and a confirmation message appears.
Running the Kramer VIA App Using an Installation File
For easy deployment and installation of Kramer VIA app on participant devices, IT managers
can use the msi file (Windows) or dmg file (Apple) available at:
www.kramerav.com/product/VIA Connect PLUS
Page 68

Kramer Electronics Ltd.
VIA Connect PLUS – For User: Participating in a VIA Meeting
66
For User: Participating in a VIA Meeting
This section explains how to participate in a collaborative meeting using VIA Connect PLUS
and your personal device.
VIA Connect PLUS enables you to do the following:
• Logging In to a VIA Meeting on page 66.
• Managing Room Names on page 100.
• Mirroring Your Device Screen on page 71.
• Collaborating on Main Display on page 77.
• Streaming Video on page 85.
• Communicating with Participants on page 92.
• Mirroring Main Display on Your Device on page 98.
• Advanced Meeting Functions on page 102.
Logging In to a VIA Meeting
Participants can log in to a VIA meeting in the following ways:
• Logging In to a VIA Meeting Manually on page 66.
• Logging in to a VIA Meeting using QR Code on page 69.
• Logging In to a VIA Meeting Using a VIA Pad on page 70.
• Logging In to a VIA Meeting Using a VIA NFC Tag for Android on page 70.
• Managing Room Names on page 100.
Logging In to a VIA Meeting Manually
VIA Connect PLUS enables you to manually enter credentials for logging in to a VIA meeting.
To log in to a VIA meeting manually:
1. Connect your device to the same network that VIA Connect PLUS is connected to.
Page 69

Kramer Electronics Ltd.
VIA Connect PLUS – For User: Participating in a VIA Meeting
67
2. Run the Kramer VIA app.
The Kramer VIA login screen appears.
Figure 59: Kramer VIA Login Screen
Figure 60: VIA Gateway Home Screen
3. Type a Nick Name (username) for your device (it can be any combination of letters and
numbers). This is the name that appears on the main display when you collaborate.
4. Type the Code, as it appears in the lower left corner of the VIA Home screen (if
activated).
The Code can only be seen by those present in the meeting room and the Code changes
regularly. This is a security feature that ensures that only those present in the room can
participate in the presentation.
You may be required to type a user name and password if Databased Moderator mode is
activated (see Configuring Moderator Mode on page 26). For more information, ask your
meeting Web Administrator.
5. Click Login.
You are logged into the VIA meeting.
The VIA Dashboard (and taskbar icon for laptops) appears on your device screen.
The following section may not present all current VIA Connect PLUS features. For a
complete, updated list of available features go to:
www. true-collaboration. com/products. html#
Page 70

Kramer Electronics Ltd.
VIA Connect PLUS – For User: Participating in a VIA Meeting
68
Some features only appear when the user is in Moderator Mode
Figure 61 VIA Connect PLUS User Dashboard
The User Dashboard main menu includes:
• Features – Display all available features of VIA Connect PLUS.
• Present / Stop Presenting – Mirror or mirroring your screen on the main display.
• Participants – Display a list of all participants in the session.
• Volume Control – Control the volume of speakers connected to VIA Connect PLUS.
Page 71

Kramer Electronics Ltd.
VIA Connect PLUS – For User: Participating in a VIA Meeting
69
Logging in to a VIA Meeting using QR Code
VIA Connect PLUS enables you to scan a QR code that appears on the main display to log
into a VIA meeting.
The following instructions are for iOS and Android users.
To log in to a VIA Meeting using the QR Code:
1. Connect your device to the same network as the VIA Connect PLUS and run the
Kramer VIA app on your device.
The Kramer VIA login screen appears.
Figure 62: VIA Login Screen with QR Code Icon
2. Tap the QR code icon in the lower right corner of the login screen.
A capture screen appears on your device.
3. Scan the QR code that appears in lower right corner of the VIA main display (Figure 36).
You are automatically logged in to the VIA meeting.
The VIA Dashboard and taskbar appear on your device screen (Figure 61).
Page 72

Kramer Electronics Ltd.
VIA Connect PLUS – For User: Participating in a VIA Meeting
70
Logging In to a VIA Meeting Using a VIA Pad
VIA Connect PLUS you to log in to a VIA meeting using a VIA Pad.
Make sure that your VIA Pad has been paired with your VIA Connect PLUS unit before using
it (see Configuring VIA Pad Settings on page 32).
The following instructions are for Windows and Mac OS users.
To log in to VIA Connect PLUS using a VIA Pad:
1. Connect your VIA Pad to a USB connector on your laptop.
2. Open the VIA Pad folder and double-click the VIA Pad app.
The Kramer VIA login window appears.
3. If necessary, type in your room name.
4. Click Login.
Your VIA Pad lights blue when ready.
The VIA Dashboard and taskbar appear on your device screen (Figure 61).
5. Use VIA Pad to present:
▪ Press once – Starts presenting or stops presenting your screen on the main display.
When you are presenting, the VIA Pad LED banner lights green. When you stop
presenting, the LED banner lights blue.
▪ Press twice while presenting – Freezes or unfreezes your screen. When your screen
is frozen, the VIA Pad LED banner flashes green.
▪ Long press – Displays your screen in full screen mode on the main display,
displacing any other participant screen.
Logging In to a VIA Meeting Using a VIA NFC Tag for Android
VIA Connect PLUS enables you to log in to a VIA meeting using a VIA NFC Tag for Android.
Writing an NFC Tag
To write an NFC tag:
1. Download the free VIA NFC Writer file from the Kramer Website (www. kramerav.
com/support/download. asp?f=50898&pname=via%20nfc%20writer) and install it on
your Android device.
Page 73

Kramer Electronics Ltd.
VIA Connect PLUS – For User: Participating in a VIA Meeting
71
2. Open VIA NFC Writer.
The Home screen appears.
3. Type the room name that you want to program and click Write tag.
4. When prompted, touch the Android device to the writable tag.
A message appears, confirming that the tag was successfully written.
Logging in Using the NFC Tag
The Kramer VIA app must be installed on your device to log in using the NFC tag (see For
User: Running Kramer VIA App on page 64).
To log in to a VIA meeting using the NFC tag:
1. Enable the NFC feature on your Android device.
2. Touch the Android device to the tag.
You are automatically logged into VIA Connect PLUS. The room code is bypassed.
The VIA Dashboard and taskbar appear on your device screen (Figure 61).
Mirroring Your Device Screen
VIA Connect PLUS enables you to mirror your device screen on the main display using either
Kramer VIA app, Apple Air Play Service (when using an Apple device), or Miracast (when
using a Windows 10 laptop or Android device and the VIAcast dongle).
The Present feature can be used to present static images or video. However, for highresolution video, we recommend using the Multimedia streaming feature (see Streaming
Through Kramer VIA App on page 85).
Mirror your device screen on the main display using one of the following methods:
• Mirroring Laptops and Android Mobile Devices Using Kramer VIA on page 71.
• Mirroring Apple Laptops and iPhones Using iOS/OS X Airplay Service on page 72.
• Mirroring Windows 10 Laptops and Android Devices Using Miracast on page 75.
You can also use the following features when mirroring via Kramer VIA app:
• Mirroring with Extended Desktop on page 75.
• Mirroring Without Being Interrupted on page 75.
Mirroring Laptops and Android Mobile Devices Using Kramer VIA
Laptops and Android mobile devices must have the Kramer VIA app installed to mirror their
screen. Your mobile device must support Android version 5. 1 as a minimum. The latest
Android OS version is recommended.
Android mirroring does not support audio. Audio is heard from your device and not from the
output of the VIA device.
Page 74

Kramer Electronics Ltd.
VIA Connect PLUS – For User: Participating in a VIA Meeting
72
To mirror your Laptop or Android device screen using Kramer VIA:
1. Connect your laptop or Android device to the network that VIA Connect PLUS is
connected to.
2. Log in to Kramer VIA (see Logging In to a VIA Meeting on page 66)
3. Click Present.
A confirmation message appears (Android only).
Figure 63: Presenting (Mirroring) Confirmation Message
4. Click START NOW to confirm.
Mirroring starts, and your screen appears on the main display.
5. Minimize Kramer VIA app by clicking the minimize icon on the window or by clicking the
Home button of your Android device and open any content on your device to share it on
the main display.
To stop mirroring your screen, re-open Kramer VIA app and click Stop Presenting.
To pause mirroring (continue to display your screen but stop updating it on the main display),
click the pause button to the left of the Stop Presenting button.
Figure 64: Pause Presenting Button
Mirroring Apple Laptops and iPhones Using iOS/OS X Airplay Service
All participants in a meeting using an Apple device can mirror their screen on the main display
using the Apple AirPlay service. No application is required to activate this mode. However, an
administrator must enable the iOS mirroring feature in the VIA Connect PLUS embedded
webpages (see Configuring iOS Mirroring Settings on page 33).
Minimum requirements for mirroring using Airplay services are:
• iPhone or iPad/Mini iPad – Minimum version iOS 10 (iOS 12 is recommended)
• Mac Books and Apple Computers – Minimum version OS X 10. 11 (Mojave is
recommended).
Page 75

Kramer Electronics Ltd.
VIA Connect PLUS – For User: Participating in a VIA Meeting
73
To mirror your screen using AirPlay Services:
1. Connect your Apple device to the network that VIA Connect PLUS is connected to.
2. For iPhone or iPad/Mini iPad: Swipe up from the upper right corner to reveal the Control
Center and click Screen Mirroring.
Figure 65: iPhone Control Center
For Mac Books and Apple Computers: Click the AirPlay menu on the Apple Menu Bar,
located in the top right corner of the screen, near the clock.
Figure 66: Mac Books/Apple AirPlay Menu
Page 76

Kramer Electronics Ltd.
VIA Connect PLUS – For User: Participating in a VIA Meeting
74
The Screen Mirroring list appears.
Figure 67: iPhone Screen Mirroring List
3. Select VIA Connect PLUS’s AirPlay device name (default = VIA_AirMirror_XXXX,
where XXXX is a random combination of letters and numbers).
If the room code is enabled, a message appears asking you to enter the code.
4. Type the code that appears on the VIA Connect PLUS main display (if activated).
Mirroring starts, and your screen appears on the main display.
To properly disconnect iPhone or iPad/Mini iPad and stop mirroring:
1. Swipe up from the upper right corner to reveal the Control Center.
Figure 68: Apple AirPlay Toggle
2. Click Stop Mirroring.
Mirroring stops.
3. Click iPhone/iPad.
Page 77

Kramer Electronics Ltd.
VIA Connect PLUS – For User: Participating in a VIA Meeting
75
Mirroring Windows 10 Laptops and Android Devices Using Miracast
VIA Connect PLUS enables you to use the native Miracast feature on your Windows 10
laptop or Android device to mirror your screen on the main display. This feature requires
installation of the optional VIAcast dongle (sold separately), and must be enabled by the VIA
Web Administrator (see Enabling Miracast Mirroring on page 34).
For more information see: www.kramerav.com/downloads/VIA Connect PLUS
Mirroring with Extended Desktop
VIA Connect PLUS enables users to use the main display as an extension of their device
desktop to present content. The user’s primary screen is not mirrored, allowing the user to
keep their notes private on their laptop while mirroring.
This feature is available on Windows only and only after installation of the required drivers.
When using this feature for the first time, the system asks you to install the drivers. Please
accept and follow the on-screen instructions. Once the drivers are installed, reboot your PC to
enable the feature.
To mirror with the Extended Desktop feature:
1. Click the VIA icon in your computer taskbar.
The taskbar menu appears (Figure 79).
2. From the taskbar menu, select Display > Secondary.
3. Drag content up and past the top of your screen.
The content is displayed on the main display.
Mirroring Without Being Interrupted
VIA Connect PLUS enables you to mirror content on the main display while preventing
other participants from mirroring.
To use the Do Not Disturb feature, it must first be enabled by the Web Administrator using the
embedded web pages (see Activating Do Not Disturb Mirroring Feature on page 34).
To mirror without being interrupted:
1. Become the meeting moderator (see Becoming Meeting Moderator on page 95).
2. On the VIA dashboard, click Present.
You are presenting.
Figure 69: User Dashboard with Do Not Disturb Deactivated
3. Click the gray icon to the right of the Stop Presenting icon.
Page 78

Kramer Electronics Ltd.
VIA Connect PLUS – For User: Participating in a VIA Meeting
76
The icon turns yellow and you enter Do Not Disturb mode.
Figure 70: User Dashboard with Do Not Disturb Activated
You have full access to all features. The other participants see a modified user dashboard that only
allows access to the Participants list. Other icons are disabled.
4. Click the yellow icon.
Do Not Disturb is deactivated and the other participants return to full functionality.
Page 79

Kramer Electronics Ltd.
VIA Connect PLUS – For User: Participating in a VIA Meeting
77
Collaborating on Main Display
VIA Connect PLUS provides state-of-the-art collaboration functionality, enabling meeting
participants to interact with content displayed on the main display, annotate shared content,
take control of another participants computer and more. It enables up to 254 meeting
participants to collaborate – utilizing a compatible external wireless network.
Interacting with Main Display
VIA Connect PLUS enables participants to interact with the main display as if it were a part of
their own device screen, using their own mouse, keyboard and touch screen.
To interact with the main display for a device with a mouse and keyboard:
Figure 71: VIA Dashboard – Features > Start Collaboration
1. On the VIA dashboard, click Features > Start Collaboration.
A red check appears and the icon changes to Stop Collaboration.
Figure 72: Stop Collaboration in the Dashboard Features
A floating Stop Collaboration icon also appears in the upper right corner of your screen.
Figure 73: Floating Stop Collaboration Icon
Click and drag the floating Stop Collaboration icon to another location on your screen, if necessary.
Page 80

Kramer Electronics Ltd.
VIA Connect PLUS – For User: Participating in a VIA Meeting
78
2. Move your cursor past the top of your device screen.
Your cursor appears on the main display with your nickname next to it.
Figure 74: Collaboration Cursor on the Main Display
3. Use your cursor as a pointer or operate any of the features from the main display
dashboard and use your keyboard to type text on the main display, when necessary.
4. To use your cursor to control your own device, move your cursor past the bottom of the
main display until it appears on your device screen.
To interact with the main display for a device with a touch screen:
For laptops with touchscreens, you must enable the touch screen for collaboration
(see Enabling Touch Screen Collaboration on page 83).
1. On the VIA dashboard (Figure 72), click Features > Start Collaboration.
A virtual touchpad appears on your device screen.
Figure 75: Virtual Touchpad
2. Use the top section of the touchpad to move the mouse.
3. Tap the bottom right and bottom left sections for right-click and left-click.
4. Tap the yellow Lock button to lock the left-click in pressed position and move the cursor
using the top section of the touchpad for dragging or selecting.
The left-click button turns red and remains locked until you remove your finger from the
touchpad.
Page 81

Kramer Electronics Ltd.
VIA Connect PLUS – For User: Participating in a VIA Meeting
79
To stop collaborating:
• For a laptop: Click Stop Collaboration in the dashboard Features or the floating icon.
Collaboration stops and your cursor disappears from the main display or the virtual
touchpad disappears from your screen (when using a touchscreen).
• For a mobile device: Click your device’s Features button.
Collaboration stops and the virtual touchpad disappears from your screen.
Using Whiteboard Feature
VIA Connect PLUS enables you to use a virtual whiteboard on the main display. Multiple
participants can use the whiteboard simultaneously to draw, present images, and annotate
content.
Starting the Whiteboard Feature
To start the Whiteboard feature:
• On the VIA dashboard, click Features > Whiteboard.
A whiteboard session starts on the main display.
Joining a Whiteboard Session
VIA Connect PLUS enables any meeting participant to join a whiteboard session via their
own device and contribute by using the whiteboard tools. Multiple users can simultaneously
interact with the whiteboard content on the main display.
To join a Whiteboard session:
1. On the VIA dashboard, click Features > Whiteboard.
The whiteboard appears on the main screen and your Collaboration feature starts.
2. Drag the cursor past the top of your screen to the main display
3. Start annotating with the whiteboard tools.
Page 82

Kramer Electronics Ltd.
VIA Connect PLUS – For User: Participating in a VIA Meeting
80
Whiteboard Tools
Figure 76: Whiteboard Toolbar
Icon
Action
Pen
Draw on the whiteboard. Click icon corner to select pen color and thickness.
Eraser
Erase annotations. Click icon corner to select eraser thickness and to erase the entire
whiteboard.
Capture
Area
Select an area and paste in onto the current whiteboard page or a new page.
Arrow
Select, drag, resize an annotation, image or text box.
Text
Add a text box. Click the lower right corner to select the font.
Font
Format the currently selected text box.
Shapes
Draw a line, rectangle, or circle. Click the lower right corner to select the shape, color and line
thickness.
Highlighter
Highlight text or objects on the whiteboard in yellow.
Create
Notes
Type notes that are attached to the current whiteboard page.
Keyboard
Open a virtual keyboard to insert text into a text box.
New Page
Create a new whiteboard page.
Current
Page
Shows the number of the currently displayed page. Click the lower right corner to move to the
previous or next page.
Save
Save all your whiteboard pages in PDF or JPEG format.
Show
desktop
Displays the main display with all running applications. The user can also annotate any
content on the main display and add it to a whiteboard page (see Show Desktop on page 81).
Close
Close the Whiteboard.
The whiteboard toolbar can be moved to the bottom (and back to top) of the display by
clicking the small arrows on the right side of the toolbar
Page 83

Kramer Electronics Ltd.
VIA Connect PLUS – For User: Participating in a VIA Meeting
81
Show Desktop
Show Desktop allows you to hide the whiteboard and to navigate freely on the VIA desktop. A
toolbar is available for making annotations on the VIA desktop and capturing an object. For
example, capture an area of the screen and add it as an object in the current Whiteboard
page.
Icon
Name
Action
Pencil
Draw on the whiteboard. Click the lower right corner to change the color and
the line thickness.
Shapes
Draw a line, rectangle, or circle. Click the lower right corner to select the
shape, color and line thickness.
Eraser
Erases what you have drawn on the whiteboard. Click the lower right corner
to change the eraser thickness.
Highlighter
Highlight text or objects on the main display in yellow.
Selection
Select and move an object.
Window Capture
Capture a screenshot of the active window.
Area Capture
Click and drag the mouse to capture a rectangular screenshot.
Save
Save your activity in either. jpg or. pdf format
Show/Hide
Show/Hide annotations.
Whiteboard
Switch to full screen whiteboard mode.
Exit
Exit the whiteboard.
Page 84

Kramer Electronics Ltd.
VIA Connect PLUS – For User: Participating in a VIA Meeting
82
Showing Content from External Wired Device
VIA Connect PLUS enables you to show content on the main display from an external device
connected to the HDMI IN connector. The HDMI input can be used for a stand-alone device,
switcher with multiple sources or wireless transmitter hub that enables you to show content
wirelessly from a mobile device, like the VIAcast dongle.
To show content from an external wired device:
1. Connect the device to the VIA Connect PLUS HDMI IN Connector .
2. On the VIA dashboard (Figure 61), click Features > HDMI Input.
A check appears on the HDMI Input icon and the content from the connected device
appears on the main display as one user screen.
Figure 77: HDMI Input Feature Icon Enabled
Click HDMI Input again to stop showing the content.
Enabling Control
VIA Connect PLUS enables the admin to take control of a participant's computer (Windows
or Mac OS). (In our example, Figure 78, user Dave has stepped in and the Admin has taken
control of Dave):
The admin can work on Dave's system as he has taken control. (Admin can play media or
work on a document or presentation file collaboratively with Dave).
Any other participant who wants to take control or collaborate with Dave's system can click
the Start Collaboration icon and drag his laptop mouse to the top and off their local screen.
Page 85

Kramer Electronics Ltd.
VIA Connect PLUS – For User: Participating in a VIA Meeting
83
That cursor now moves to the VIA Connect PLUS unit and appears on the main display of
Dave. Buttons are shown in the picture below:
Figure 78: Enable Control
Enabling Touch Screen Collaboration
VIA Connect PLUS enables you to use the touchscreen on your laptop for collaboration
(see Collaborating on Main Display on page 77).
To enable laptop touch screen collaboration:
1. Click the VIA icon in your computer taskbar.
The taskbar menu appears.
Figure 79: Kramer VIA Taskbar Menu
Page 86

Kramer Electronics Ltd.
VIA Connect PLUS – For User: Participating in a VIA Meeting
84
2. Click Settings.
The Client Preferences screen appears.
Figure 80: Client Preferences Screen
3. Select the Use touch screen for collaboration checkbox.
Touch screen collaboration is enabled.
Collaboration Scenario
For simplicity, a scenario with only two users is described in the description below.
In the following scenario:
• User #1 is showing content from their device.
• User #2 is collaborating with User #1’s content.
The scenario proceeds as follows:
1. Collaboration begins when User #1 presents content on the main display.
2. With content being shown, User #1 then selects Enable Control from the dashboard
Features. At this point, all connected users have full control of User #1’s computer.
3. Once Enable Control is selected, a red check mark appears on the upper-right of the
icon.
Figure 81: Enable Control Icon with Check
At any time, User #1 can click Enable Control again to stop other users from controlling their
computer.
Page 87

Kramer Electronics Ltd.
VIA Connect PLUS – For User: Participating in a VIA Meeting
85
4. User #2, who can now see User #1’s content on the main display, clicks Start
Collaboration from the dashboard Features.
Figure 82: Clicking Start Collaboration
5. User #2 moves her cursor to the top of their own screen (as if VIA’s main display was an
extended desktop) onto the main display.
An additional cursor with User #2’s nickname and a unique color appears on the screen.
6. At this point, User #2 can access and make changes to the content displayed from User
#1’s computer.
User #2 has complete access to User #1’s computer, even beyond the content currently
being displayed.
7. Once the collaborative session has ended, User #1 saves the content to his hard drive. If
desired, User #1 can use the dashboard File Transfer feature to share the edited
document with all participants.
8. User #1 now clicks the Enable Control icon, denying access for other participants to
control or modify his content or device.
Streaming Video
VIA Connect PLUS provides the following options for streaming video from your device to the
main display:
• Streaming Through Kramer VIA App on page 85 .
• RTSP Streaming Through VLC on page 87.
• RTP Streaming Through VLC on page 91.
Streaming Through Kramer VIA App
VIA Connect PLUS enables users to stream video to the main display at a full HD
1080p/60fps rate. The video is obtained from the client device without being transferred to
VIA Connect PLUS.
VIA Connect PLUS features a 10Mbps maximum video bitrate for 30fps or 60fps videos and
handles video files of up to 8GB.
Page 88

Kramer Electronics Ltd.
VIA Connect PLUS – For User: Participating in a VIA Meeting
86
The default encoding format is H.264. If your device operating system does not support H.264
encoding, enable JPEG encoding (see Defining Encoding Format on page 104).
Stream video from your device to VIA Connect PLUS using one of the following methods:
Streaming a Media File Using the Multimedia Feature:
1. Click Multimedia in the features menu of your VIA dashboard (Figure 61).
The Multimedia player window appears.
2. Click Add Media.
A system file browser appears.
3. Select the relevant video file and click Open.
The file appears in the My Media table.
4. Double-click the media file in the table or click the play button.
The video plays on the main display.
Dragging and Dropping Media to the VIA Dashboard Logo:
▪ Drag a media file from your device to the small VIA logo on the upper left of your VIA
dashboard (Figure 61).
The video plays on the main display.
The video must be dragged directly onto the logo, not to the left, right, below or
above the logo.
Streaming from YouTube:
1. Click YouTube in the features menu of your VIA dashboard (Figure 61).
The YouTube player window appears.
Figure 83: YouTube Player Window
2. In the URL Name field, enter a name for the video.
Page 89

Kramer Electronics Ltd.
VIA Connect PLUS – For User: Participating in a VIA Meeting
87
3. In the URL Path field, enter the web address for the YouTube video.
The name and path of the URL are added to the table above.
4. Click the URL in the table or the play button.
The video plays on the main display.
When showing videos through the Kramer VIA app, the video is not transferred from your
device to the VIA unit. All videos are encoded directly on your device through the app and
then streamed from your device to the VIA unit. The VIA unit then decodes the streamed file
for playback.
Video files can also be shared from your device to the main display by using a native media
player such as QuickTime and/or Windows Media Player and the Present feature (see
Mirroring Your Device Screen on page 71). However, when using this method, you may
experience lower frame rates, inconsistent playback and increased latency, depending on
your laptop system performance.
RTSP Streaming Through VLC
The Real Time Streaming Protocol (RTSP) is a network control protocol designed for use in
entertainment and communications systems to control streaming media servers. The protocol
establishes and controls media sessions between end points. Clients of media servers issue
commands like play and pause, to facilitate real-time control of playback of media files from
the server.
VIA Connect PLUS supports RTSP. Media played locally on a computer can be streamed on
VIA Connect PLUS, provided the computer and VIA Connect PLUS are on connected
networks.
To Configure RTSP Streaming using VLC Media Player:
1. Open VLC Media Player.
Figure 84: VLC Media Menu
Page 90

Kramer Electronics Ltd.
VIA Connect PLUS – For User: Participating in a VIA Meeting
88
2. Click Media > Stream.
The Open Media window appears.
Figure 85: Open Media Window
3. Click Add and select a file to stream and click Stream.
The Stream Output/Source window appears.
Figure 86: Stream Output/Source Window
Page 91

Kramer Electronics Ltd.
VIA Connect PLUS – For User: Participating in a VIA Meeting
89
4. Click Next.
The Stream Output/Destination Setup window appears.
Figure 87: Stream Output/Destination Setup Window
5. Select RTSP from the New Destination drop down and click Add.
The RTSP tab appears.
Figure 88: Stream Output/Destination Setup RTSP Tab
Page 92

Kramer Electronics Ltd.
VIA Connect PLUS – For User: Participating in a VIA Meeting
90
6. Type a short name to be used as a Path and click Next.
The Stream Output/Transcoding Options window appears.
Figure 89: Stream Output/ Transcoding Options Window
7. Clear the Activate Transcoding checkbox and click Next.
The Stream Output/Option Setup window appears.
Figure 90: Stream Output/Option Setup Window
8. Select Stream all elementary streams and click Stream.
Page 93

Kramer Electronics Ltd.
VIA Connect PLUS – For User: Participating in a VIA Meeting
91
9. On the VIA dashboard, click Features > Multimedia > Streaming Player.
The Streaming Player appears.
Figure 91: Streaming Player Screen
10. Type a URL name in the following format:
rtsp://<local computer IP address>:8554/<name mentioned in step 6>.
11. Click Add Media.
12. Select RTSP stream and click the play button to stream this media on VIA Connect
PLUS.
RTP Streaming Through VLC
The Real-time Transport Protocol (RTP) is a network protocol for delivering audio and video
over IP networks. RTP is used extensively in communication and entertainment systems that
involve streaming media, such as telephony, video teleconference applications, television
services and Web-based push-to-talk features.
VIA Connect PLUS supports RTP. Media can stream on a VIA Connect PLUS unit, provided
the computer and VIA Connect PLUS are on connected networks.
To stream RTP using VLC:
1. Open VLC.
2. Click Media > Stream.
Page 94

Kramer Electronics Ltd.
VIA Connect PLUS – For User: Participating in a VIA Meeting
92
3. Click Add and select a file to stream and click Stream.
4. Click Next on the next screen.
5. Choose RTP/MPEG Transport Stream from the New Destination drop down and click
Add.
6. Enter VIA Connect PLUS unit’s IP address and click Stream.
7. Open VIA Connect PLUS client and click Features > Multimedia > Streaming Player.
8. Type a name as the URL name.
9. The URL path takes the form: Rtp: //<VIA Connect PLUS IP address>:5004.
10. Click Add Media.
11. Select the RTSP stream and click the play button to stream this media on VIA Connect
PLUS.
If a URL is already resent in the streaming list above, VIA client generates a warning for both
modes - RTP and RTSP.
Communicating with Participants
VIA Connect PLUS enables you to communicate with participants through chat, file sharing
and becoming moderator of the meeting.
Chatting with Participants
VIA Connect PLUS enables you to exchange text messages with other meeting participants.
To chat with another meeting participant:
1. Click Participants on the Kramer VIA app dashboard.
The Participants list appears.
Figure 92: Kramer VIA app Dashboard Participants List
If there is a meeting moderator with enable/disable chat access (see Configuring Moderator
Mode on page 26), verify that Chat is selected in the upper right corner of the Participants list.
Page 95

Kramer Electronics Ltd.
VIA Connect PLUS – For User: Participating in a VIA Meeting
93
2. Click the chat icon for the desired participant.
The chat window appears.
3. Type your message at the bottom of the window and click SEND.
The selected participant receives your message.
Figure 93: Chat Window
You can check for active chat sessions by clicking Features > .
Sharing Files
VIA Connect PLUS enables you to share files from your device or from the VIA Cloud
(see Managing VIA Cloud Files on page 94) with other meeting participants.
Sharing Files from Your Device
To share a file from your device:
1. On the VIA Dashboard, click Participants or click the File Transfer feature icon.
The Participants list opens.
2. Click the file transfer icon for the desired participant with whom you wish to share a
file.
A file browser appears.
Page 96

Kramer Electronics Ltd.
VIA Connect PLUS – For User: Participating in a VIA Meeting
94
3. Select the relevant file.
A progress bar appears showing the file transfer progress as it is saved to the VIA
Cloud.
Figure 94: Admin File Sharing
4. The target participant receives notification of the shared file and selects a location to
save the file.
The file is transferred and saved on the receiving participant’s device.
Figure 95: User File Sharing
The receiving participant can view and cancel a file that is in the process of being transferred
by clicking the File Transfer icon on the Dashboard.
Sharing Files from the VIA Cloud
VIA Connect PLUS enables you to share files from the VIA Cloud (see Managing VIA Cloud
Files on page 94) with other meeting participants.
To share files from the VIA Cloud:
1. On the Dashboard, click Features > Files.
A dialog box appears.
2. Select one of the following options.
• Share the file just to VIA – Opens it locally on VIA Connect PLUS to view and edit (only
for PNG and PDF files)
• Share the selected file with all connected participants.
Managing VIA Cloud Files
VIA Connect PLUS enables you to save files to a central directory so that they can be
accessed by and shared among participants in a VIA meeting. This directory is referred to as
the VIA Cloud and is located in the VIA Connect PLUS internal memory.
Page 97

Kramer Electronics Ltd.
VIA Connect PLUS – For User: Participating in a VIA Meeting
95
To manage VIA Cloud files:
• On the Dashboard, click the Files feature icon.
The VIA Cloud window appears.
Figure 96: Shared Files on the Cloud
• To delete a single file from the VIA Cloud directory, click the delete icon and confirm the
permanent deletion warning message.
• To delete all files from the VIA Cloud directory, click Clean Directory and confirm the
permanent deletion warning message.
Becoming Meeting Moderator
VIA Connect PLUS enables any authorized meeting participant to become a moderator
(see Configuring Moderator Mode on page 26). A meeting moderator has control over certain
VIA functions that affect other participants, such as:
• Streaming Video on page 85
• Disabling Chat on page 96.
• Showing Participant Screen on Main Display on page 97.
Moderator Mode must be activated to enable becoming a Moderator during a meeting
(see Configuring Moderator Mode on page 26).
To become the meeting moderator:
1. Click Participants on the Dashboard.
Page 98

Kramer Electronics Ltd.
VIA Connect PLUS – For User: Participating in a VIA Meeting
96
The Participants tab appears.
Figure 97: VIA Dashboard Participants Tab with Basic Moderator Mode Activated
2. Click Become Moderator.
3. When Basic Moderator Mode is active, type the password and click Apply.
You are now the moderator.
To stop being the moderator, click Leave Moderation.
Disabling Chat
VIA Connect PLUS enables the moderator of a meeting to disable the chat feature during a
meeting.
To enable the Chat checkbox, see Configuring Moderator Mode on page 26).
To disable chat:
1. Become the moderator of the meeting (see Becoming Meeting Moderator on page 95).
Figure 98: Kramer VIA app Dashboard participant’s list
2. Clear the Chat checkbox at the top of the Participants list.
Chat is disabled.
Page 99

Kramer Electronics Ltd.
VIA Connect PLUS – For User: Participating in a VIA Meeting
97
Showing Participant Screen on Main Display
The moderator of a meeting can push a participant’s screen onto the main display by clicking
the Display Status icon of the participant in the Participant tab of the dashboard.
To show a participant screen on the main display:
1. Become the moderator of the meeting (see Becoming Meeting Moderator on page 95).
2. In the Participants list, click the icon in the Display Status column of the relevant
participant.
The selected participant’s screen is mirrored on the main display.
To add a message that enables the participant to either approve or deny permission to
present their screen (see Configuring Moderator Mode on page 26).
Figure 99: Participant’s Screen with Presentation Request Confirmation Message
Allowing a Participant to Mirror on Main Display
The moderator of a meeting must give permission to any meeting participant who wants to
mirror their screen on the main display.
To allow a participant to mirror on the main display:
1. The participant clicks Present.
VIA Connect PLUS sends a presentation request to the moderator. A preview of the
participant’s screen is displayed (for MAC/Windows users) to help the moderator accept
or deny the request:
2. The moderator clicks Allow full screen or Allow (Auto Position).
The participant’s presentation appears on the main display.
Page 100

Kramer Electronics Ltd.
VIA Connect PLUS – For User: Participating in a VIA Meeting
98
The participant receives the following message and their screen is mirrored on the main
display
.
The moderator can present at any time without permission.
Mirroring Main Display on Your Device
VIA Connect PLUS enables you to mirror a live view of the main display on your device to
obtain a closer look at the presentation and to add personal annotations to the content being
presented.
You must stop presenting and/or streaming video to start the View Main Display feature.
View Main Display is designed for visual reinforcement and is displayed at a reduced frame
rate in an effort to reduce bandwidth usage.
To mirror the main display on your device:
1. Click the View Main Display icon on the Features menu of the VIA user dashboard
(Figure 61).
A new window with a live representation of the main display and a toolbar (on the bottom
for mobile devices or the left for laptops) appear on your screen.
Figure 100: View Main Display Window on a Laptop
2. Zoom in and out of the image using one of the following methods:
▪ On touchscreens: Pinch the screen.
▪ On PCs & Macs: Click the +/- magnification icons in the upper right corner of your
View Main Display window.
3. Use the tool bar to perform the following basic whiteboarding activities:
 Loading...