

Page 1

USER MANUAL
MODEL:
Configuring Third Party Apps for VIA
Calendar Integration
P/N: 2900-301165 Rev 1 www.kramerAV.com
Page 2

Configuring Third Party Apps for VIA Calendar Integration – Contents
i
Contents
Kramer Electronics Ltd.
Introduction
Configuring Office 365 for VIA Calendar Integration
Adding Meeting Room
Creating Calendar Event
Configuring Google Calendar for VIA Calendar Integration
Adding a Building
Adding Audio, Video, or other Features
Adding Room
Create a Group
Create Group Calendar 8
1
2
2
4
7
7
7
8
8
Page 3

Kramer Electronics Ltd.
Configuring Third Party Apps for VIA Calendar Integration – Introduction
1
Introduction
VIA devices enable you to display scheduled meeting information on the main display home
screen. VIA automatically retrieves information about meetings scheduled in the room where
the VIA device resides. This feature is available for a room that has been added in Office
365® Admin Center or in Google Admin console for G Suite®.
You can associate either Office 365 or Google Calendar, not both.
Following are instructions for configuring third party calendar apps. For instructions for using
the VIA Calendar feature, see your VIA device user manual, available at
www.kramerav.com/downloads/.
All brands, product names and trademarks are the property of their respective owners.
Kramer takes no responsibility for the accuracy of information and instructions regarding third party products. This information is
intended for instructional purposes only and may change without notice.
Page 4

Kramer Electronics Ltd.
Configuring Third Party Apps for VIA Calendar Integration – Configuring Office 365 for VIA Calendar
Integration
2
Configuring Office 365 for VIA Calendar Integration
Adding Meeting Room
Meeting rooms in Office 365 are like users, in that meeting rooms have their own email addresses for
creating invitations.
Only an Office 365 administrator can create a new meeting room.
To add a meeting room in Office 365:
1. Click Office 365 Menu > Admin.
2. In Admin Center, click Resources > Rooms & equipment.
3. Click Meeting Rooms listed in the left pane.
If a room has been created earlier, it appears on the right with an email address
next to it.
Page 5

Kramer Electronics Ltd.
Configuring Third Party Apps for VIA Calendar Integration – Configuring Office 365 for VIA Calendar
Integration
3
4. Click ‘+’
The Add a meeting room window appears.
Figure 1. Add a meeting room and assign an email address
5. Fill in the details.
Fields marked * are mandatory.
6. Click Create.
When a meeting is scheduled, this room appears as a venue.
Page 6

Kramer Electronics Ltd.
Configuring Third Party Apps for VIA Calendar Integration – Configuring Office 365 for VIA Calendar
Integration
4
Creating Calendar Event
1. Launch https://www.office.com
2. Use a valid username and password to login.
The welcome page appears.
Figure 2. Office 365 welcome page
3. Click Calendar.
Your calendar appears.
Figure 3. Calendar 365 interface
Page 7
Kramer Electronics Ltd.
Configuring Third Party Apps for VIA Calendar Integration – Configuring Office 365 for VIA Calendar
Integration
5
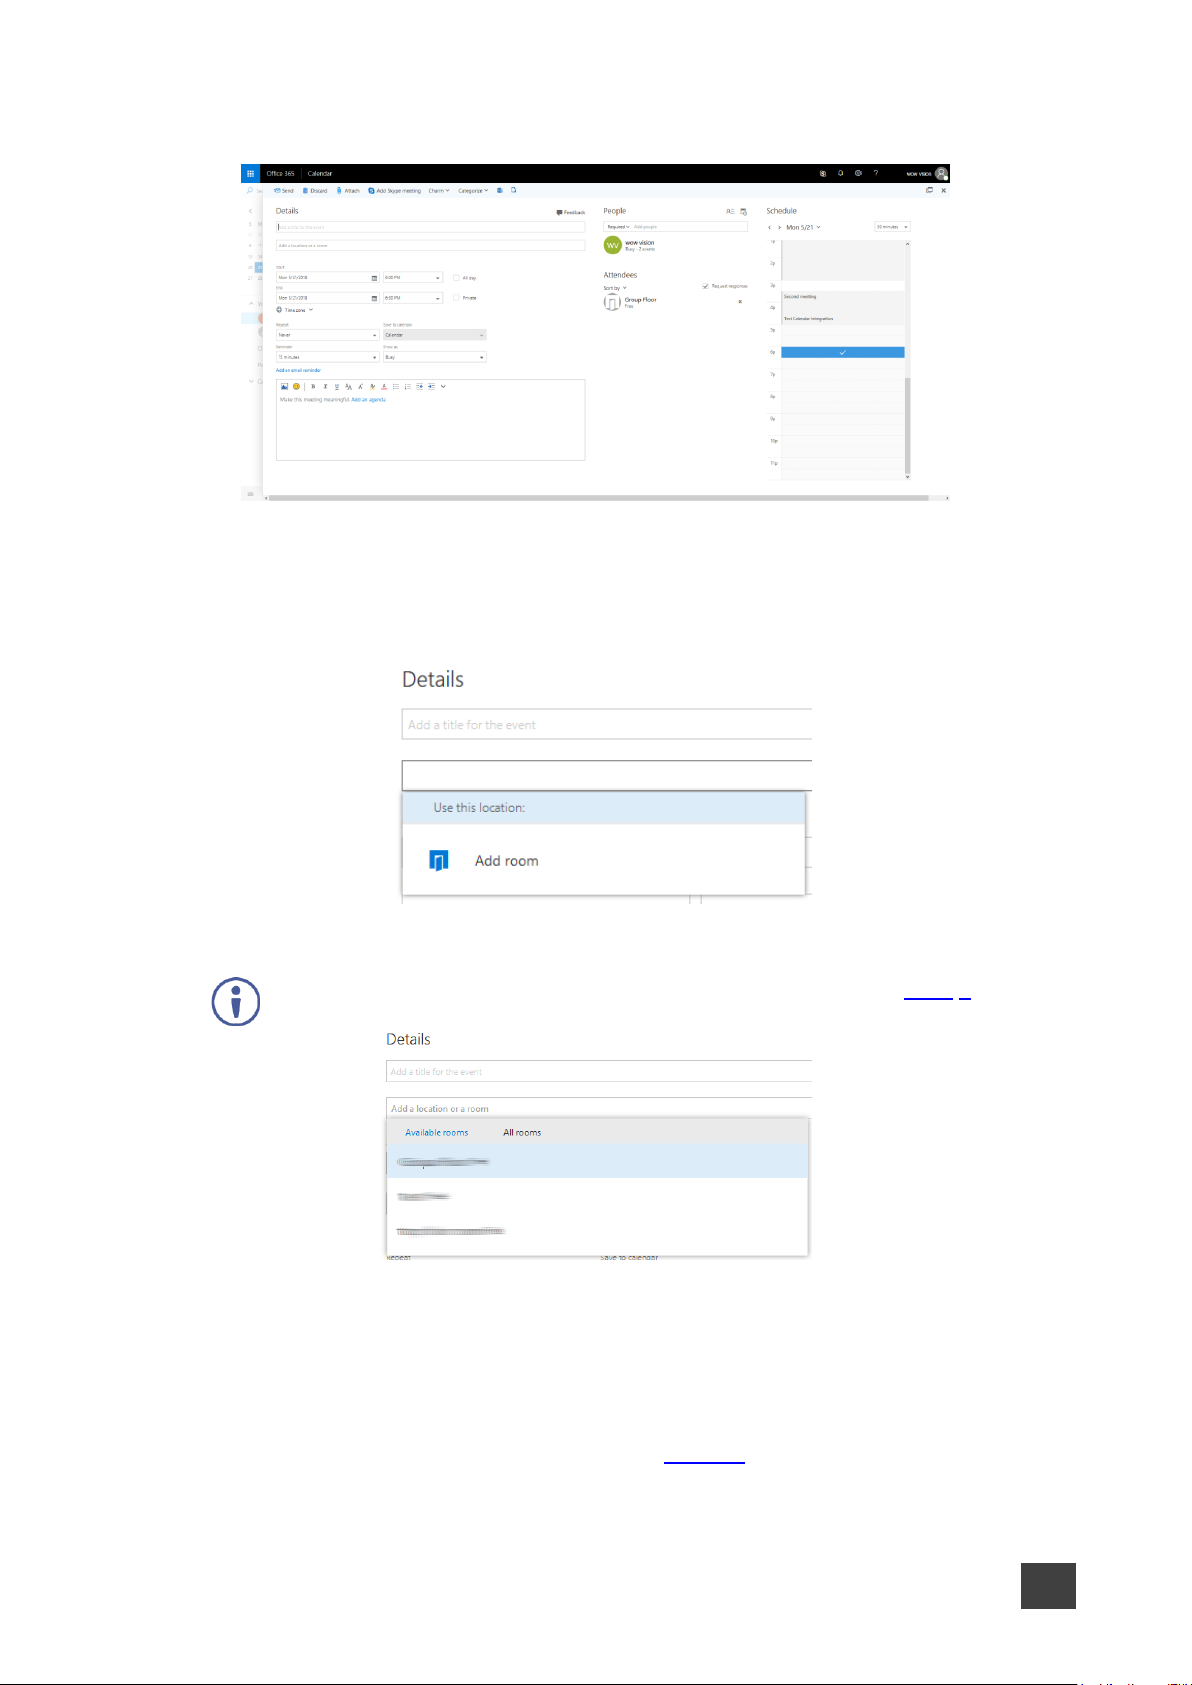
4. Click New > Calendar.
The new calendar event window appears.
Figure 4. Details of a calendar event
5. Add a Title for the event.
6. Click the field Add a Location.
A drop down appears with the option to add room.
7. Click Add Room and choose the intended room from the list of options.
If the intended room is not listed, see Adding Meeting Room on page 2.
8. Select a start date and a start time of the event.
9. Select an end date and an end time of the event.
10. If the meeting is to be set for the entire day and has no start and end time, select the All
Day checkbox.
11. On the calendar event window, under People (Figure 4), select the attendees for this
meeting.
Page 8

Kramer Electronics Ltd.
Configuring Third Party Apps for VIA Calendar Integration – Configuring Office 365 for VIA Calendar
Integration
6
12. Click Send.
The calendar is now added and shows on the your page (Figure 3).
Page 9

Kramer Electronics Ltd.
Configuring Third Party Apps for VIA Calendar Integration – Configuring Google Calendar for VIA Calendar
Integration
7
Configuring Google Calendar for VIA Calendar Integration
As a G Suite administrator, you can create calendars to share with people in your
organization.
Before you begin: If you don’t want to share the calendar with everyone in your
organization, create a group that contains only the people you want to share with.
Adding a Building
Details like the building, the floor where a room is located and the key features such as video
conferencing equipment or whiteboards can be shared with employees.
To add a building:
1. In your Google Admin console (at admin.google.com) go to Buildings and resources >
Edit resources.
2. At the bottom of the page, click Manage Buildings.
3. Point to and click Add new building.
4. Enter the building information.
5. Click Add Building.
A building is added.
Adding Audio, Video, or other Features
To add features:
1. In your Google Admin console (at admin.google.com) go to Buildings and resources >
Edit resources.
2. Click Manage
3. Click Add Feature.
4. Enter the feature name and choose the one of the following types:
▪ Audio: Audio communication equipment (for example, a phone)
▪ Video: Video communication equipment (for example, a VC or Cisco conferencing
unit)
▪ None: Equipment that is not video or audio (for example, Whiteboard, Wheelchair
accessible, or External guests)
5. Click Save.
The feature is added.
Page 10

Configuring Third Party Apps for VIA Calendar Integration – Configuring Google Calendar for VIA Calendar
Integration
8
Adding Room
If you do not see Groups, expand More Controls and drag Groups to the Home
page.
To add a room:
1. In your Google Admin console (at admin.google.com) go to Buildings and resources >
Edit resources.
2. Click Add .
3. Enter the resource information and select Conference room.
4. Click Add Resources.
The room is added.
Create a Group
1. Sign in to the Google Admin console (admin.google.com)
2. From the dashboard, click Groups.
Kramer Electronics Ltd.
3. Click at the bottom of the page.
4. Enter the following details in the Create new group box:
▪ A name for the group. See support.google.com/a/answer/33386 for name and
password guidelines.
▪ An email address for your new group. If your organization's Google account has
multiple domains, select the appropriate domain from the drop-down list.
▪ Optionally, add a description for your group. You can use this description to help
users determine the purpose of the group and rules, if any, to follow.
▪ Choose an Access Level from the drop-down list.
▪ Optionally, check the box that adds all users in the organization to your new group.
5. Click Create.
The group's page in the Admin console appears.
Create Group Calendar
To create a group calendar:
1. Sign in with your G Suite administrator account and open Google Calendar.
2. On the left, above My Calendars, click Add other calendars New calendar.
3. Add a name, description, and time zone for your calendar.
4. Click Create Calendar.
5. On the left, click the name of the new calendar.
Page 11

Kramer Electronics Ltd.
Configuring Third Party Apps for VIA Calendar Integration – Configuring Google Calendar for VIA Calendar
Integration
9
6. If you want to share the calendar with everyone in your organization, do the following
under Access permissions:
a. Check the Make available for your domain box.
b. In the Permissions box, click and choose an option.
7. If you want to share the calendar with a specific group of people, do the following under
Share with specific people:
a. Click Add People.
b. Add the email address of the group you want to share the calendar with or add
individual email addresses.
c. In the Permissions box, click and choose an option.
d. Click Send.
The settings under Access permissions override the Share with specific people
settings.
Add New Users
If you add new users to the group, give them the calendar address so they can add it.
To add new users:
1. Sign in with your G Suite administrator account and open Google Calendar.
2. Under My calendars, find the shared calendar.
3. Point to the shared calendar and click Settings and sharing.
4. Scroll down to the Integrate calendar section and copy the Calendar ID (it will be long).
5. Send the Calendar ID to new users with instructions to paste it into the Add a coworker’s
calendar box and click Enter.
The calendar shows up in the new users’ Other calendars list.
Page 12

www.KramerAV.com
info@KramerAV.com
P/N:
2900-301165
Rev:
1
For the latest information on our products and a list of Kramer distributors, visit our Web site where
updates to this user manual may be found.
We welcome your questions, comments, and feedback.
 Loading...