

USER MANUAL
MODEL:
VIA Campus
Collaboration Device for Education
and Training Environments
P/N: 2900-300558 Rev 1
www.kramerAV.com

VIA Campus – Contents
i
Contents
1 Introduction 1
2 Getting Started 2
2.1 Achieving the Best Performance 2
2.2 Safety Instructions DC 2
2.3 Recycling Kramer Products 3
3 Overview 4
3.1 Applications & Features 5
3.2 Defining the VIA Campus Collaboration Device 6
4 Setting Up VIA Campus 7
4.1 Connecting VIA Campus to a Display 8
4.2 Downloading and Running VIA Campus Software 9
4.3 Using an .msi File 11
4.4 Logging In to VIA Campus 11
4.5 Logging to the VIA Campus using a VIA Pad 12
4.6 Using iOS /Android Mirroring to Share your Screen 12
5 VIA Campus Functions Defined 16
6 Using VIA Campus 20
6.1 VIA Campus User’s Main Menu 20
6.2 Enabling Control 22
6.3 Chatting with Participants 23
6.4 File Transfer 24
6.5 Multimedia 26
6.6 View Main Display 31
6.7 Start Collaboration 32
6.8 Cloud 35
6.9 Whiteboard Collaboration 36
6.10 Whiteboard Functions 36
6.11 Calling with Skype 39
6.12 Using GoToMeeting 40
6.13 Using WebEx 40
6.14 Using Microsoft Lync 40
6.15 Accessing a Web Page 41
6.16 Settings Menu 41
6.17 Managing Settings from the VIA Web Management Interface 57
6.18 User Experience 73
7 Technical Specifications 78
8 VIA Campus Upgrade Procedure 79
8.1 Downloading the Upgrade File 79
8.2 Upgrading your VIA Campus 79
8.3 Verifying a Correct Installation 79
8.4 Updating your Computer Client Applications (Windows and MAC) 80
8.5 Updating the Mobile Applications 80

ii
VIA Campus - Contents
Figures
Figure 1: VIA Campus Collaboration Device 6
Figure 2: Connecting the VIA Campus Collaboration Device 8
Figure 3: VIA Campus Admin Features 16
Figure 4: VIA Campus Main User Screen 18
Figure 5: The Participant List 21
Figure 6: Enable Control 23
Figure 7: Chat Window 24
Figure 8: Admin File Sharing 25
Figure 9: User File Sharing 25
Figure 10: Shared Files on the Cloud 35
Figure 11: Whiteboard Toolbar 36
Figure 12: Wide Desktop 38
Figure 13: Multiple Screen 38
Figure 14: Settings Screen 42
Figure 15: LAN Settings Screen 43
Figure 16: Room/Name Code Screen 44
Figure 17: Configurations Screen 45
Figure 18: System Control Screen 46
Figure 19: Wallpaper Screen 47
Figure 20: Third Party Apps Screen 48
Figure 21: Setting Application Name 49
Figure 22: Authentication Screen 51
Figure 23: Moderator Mode 52
Figure 24: Login Screen When Moderator Mode is Active 53
Figure 25: VIA Management - Network Settings 58
Figure 26: VIA Site Management 62
Figure 27: VIA Management – Authentication 68
Figure 28: VIA Management – Gateway Features 69
Figure 29: VIA Management – Client Features (MAC/Windows) 70
Figure 30: VIA Management – Client Features (Mobile) 70
Figure 31: Samsung Galaxy 75
Figure 32: iPhone/iPad 76
Figure 33: PC 77

VIA Campus - Introduction
1
1 Introduction
Welcome to Kramer Electronics! Since 1981, Kramer Electronics has been
providing a world of unique, creative, and affordable solutions to the vast range of
problems that confront video, audio, presentation, and broadcasting professionals
on a daily basis. In recent years, we have redesigned and upgraded most of our
line, making the best even better!
Our 1,000-plus different models now appear in 14 groups that are clearly defined by
function: GROUP 1: Distribution Amplifiers; GROUP 2: Switchers and Routers;
GROUP 3: Control Systems; GROUP 4: Format/Standards Converters; GROUP 5:
Range Extenders and Repeaters; GROUP 6: Specialty AV Products; GROUP 7:
Scan Converters and Scalers; GROUP 8: Cables and Connectors; GROUP 9:
Room Connectivity; GROUP 10: Accessories and Rack Adapters; GROUP 11:
Sierra Video Products; GROUP 12: Digital Signage; GROUP 13: Audio; and
GROUP 14: Collaboration.
Congratulations on purchasing your Kramer VIA Campus Collaboration Device.
This product, that incorporates HDMI™ technology, is ideal for:
· Projection systems in conference rooms, classrooms, training rooms,
boardrooms, auditoriums and hotels
· Creating a collaborative environment in the previous venues
2
VIA Campus - Getting Started
2 Getting Started
We recommend that you:
· Unpack the equipment carefully and save the original box and packaging
materials for possible future shipment
· Review the contents of this user manual
Go to
www.kramerav.com/downloads/VIA Campus to check for up-to-
date
user manuals, application programs, and to check if firmware upgrades are
available (where appropriate).
2.1 Achieving the Best Performance
To achieve the best performance:
· Use only good quality connection cables (we recommend Kramer high-
performance, high-resolution cables) to avoid interference, deterioration in
signal quality due to poor matching, and elevated noise levels (often
associated with low quality cables)
· Do not secure the cables in tight bundles or roll the slack into tight coils
· Avoid interference from neighbouring electrical appliances that may adversely
influence signal quality
· Position your VIA Campus away from moisture, excessive sunlight and dust
This equipment is to be used only inside a building. It may only be
connected to other equipment that is installed inside a building.
2.2 Safety Instructions DC
Caution:
There are no operator serviceable parts inside the unit
Warning:
Use only the Kramer Electronics power supply that is
provided with the unit
Warning:
Disconnect the power and unplug the unit from the wall
before installing

VIA Campus - Getting Started
3
2.3 Recycling Kramer Products
The Waste Electrical and Electronic Equipment (WEEE) Directive 2002/96/EC aims
to reduce the amount of WEEE sent for disposal to landfill or incineration by
requiring it to be collected and recycled. To comply with the WEEE Directive,
Kramer Electronics has made arrangements with the European Advanced
Recycling Network (EARN) and covers any costs of treatment, recycling and
recovery of waste Kramer Electronics branded equipment on arrival at the EARN
facility. For details of Kramer’s recycling arrangements in your particular country go
to our recycling pages at http://www.kramerelectronics.com/support/recycling/.

4
VIA Campus - Overview
3 Overview
Welcome to VIA Campus!
Student engagement is critical to successful learning. With advanced collaboration
and engagement tools, VIA Campus maximizes the learning experience by making
Education and Corporate Training environments more interactive.
With any laptop or mobile device, students and teachers can view the main display,
edit documents together in real time, turn the main display into a digital whiteboard,
share any size file, and more. VIA Campus also lets teachers use e-polling and e-
exams to easily and instantly measure how much students are actually learning.
VIA Campus converts any display at any location into an interactive meeting point,
and it works with a wide range of presentation devices from desktop and notebook
computers to tablets and smartphones.
Each participant in a VIA Campus session can quickly view, edit, annotate,
comment and share content with other participants. Participants can share their
ideas through the primary screen, or break off with others into smaller groups
during a meeting.
The VIA Campus integrates seamlessly with any organization’s current IT
infrastructure, converting any projector or screen into a networked device that users
can share and view on their current devices. Every local connection to VIA
Campus is wireless, free of dongles, cables, and other compatibility peripherals.
Key features of VIA Campus:
· Login using conventional Wi-Fi or LAN connections, no dongle needed
· Provides true HD 1080p/60 video streaming
· Supports Windows laptops and MAC®, as well as iOS and Android mobile
operating systems
· Compatible with all common Web browsers
· Up to 255 users can be logged in simultaneously

VIA Campus - Overview
5
· Up to 12 participant screens can be displayed simultaneously on dual screens
(six on each screen).
· Supports popular third-party conferencing programs
· e-Polling and e-Exam (in Beta version only)
· Touchscreen compatible with whiteboard and full annotation controls
3.1 Applications & Features
Present, share, chat, send and receive files, hold sidebar conversations, annotate,
edit, and save copies of all your work, just as you would with a whiteboard or flip
chart…except that you can do it all from your notebook computer, tablet, and
smartphone.
Here are some of the things you can do with VIA Campus:
Multiviewing: Up to six different participant screens can be shown at the same
time. VIA Campus automatically sizes each screen to the maximum available
resolution, displaying tiles for two or more screens. Finished sharing? Tap Step-out
to disconnect.
Chat and share a file: Need to ask a meeting participant a question? Click on their
screen name and send them a text message with complete privacy. Windows and
Mac PC users can also share files between themselves or the main presenter, all at
the click of a mouse.
Control a participant’s computer: Need to access files or play back a
presentation from a participant’s PC? Simply click Enable Control on the PC, and
its cursor can be controlled remotely to launch programs and play media.
Multimedia: Sometimes it’s just easier to explain your ideas with a video. Simply
click the Multimedia tab on your device’s screen and you can load and display
JPEG images (all operating systems) and play MP4 videos from any platform. You
can also display and share PDFs from any logged-in device. VIA Campus features
a 10Mbps maximum video bitrate for 30fps or 60fps videos and handles video files
of up to 8GB.
6
VIA Campus - Overview
Device mirroring: Are you using an iOS device with no VIA application? Just
mirror your device’s screen to the main display by activating the Airplay service of
your device. Android user? Use the VIA App to start mirroring your device and its
content!
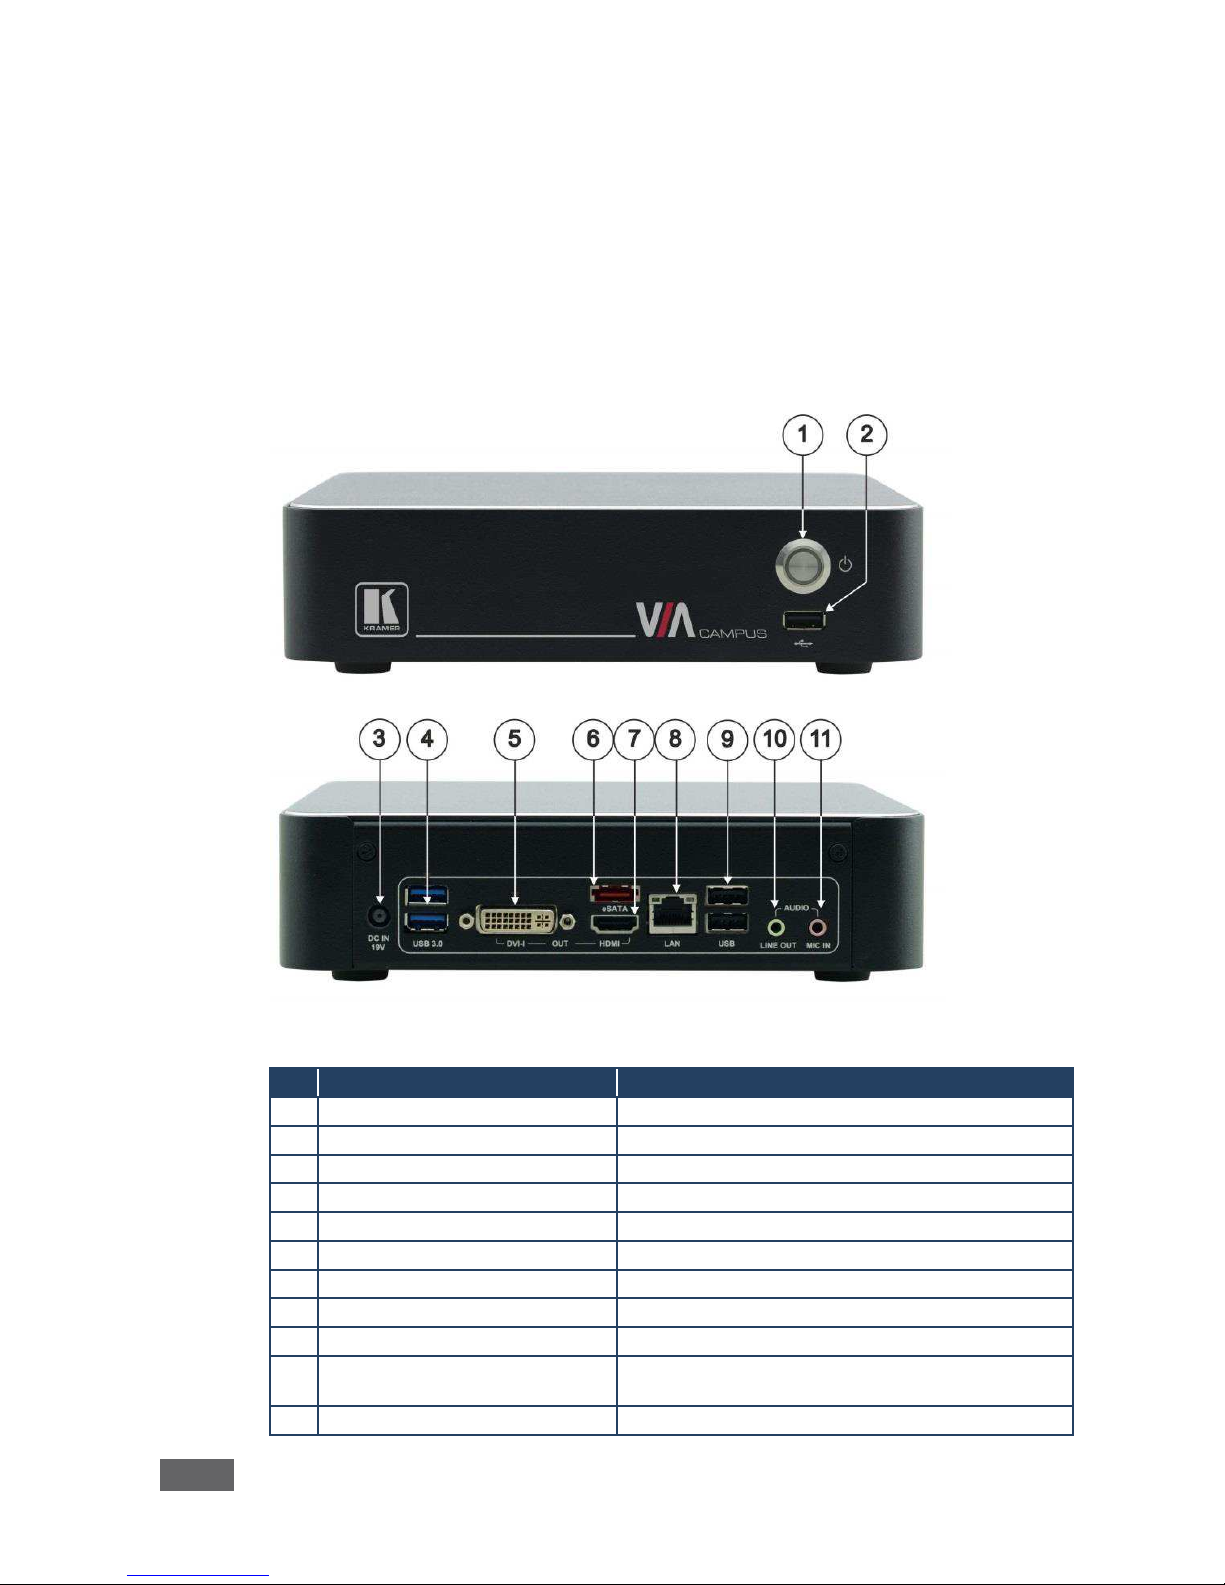
3.2 Defining the VIA Campus Collaboration Device
This section defines VIA Campus.
Figure 1: VIA Campus Collaboration Device
#
Feature
Function
1
Power Button
For turning the machine on and off
2
USB 2.0 Connector
For upgrading firmware or connecting a USB device
3
DC IN 19V Connector
Connects to the 19V DC power supply
4
USB 3.0 connectors
Connect to up to 2 USB devices
5
DISPLAY OUT DVI-I Connector
Connects to a DVI display
6
eSATA Connector
Connect an eSATA drive to expand your storage
7
DISPLAY OUT HDMI Connector
Connects to an HDMI display
8
LAN RJ-45 Connector
Connects to a wireless router or to a LAN
9
USB 2.0 Connectors
Connect to up to 2 USB devices
10
AUDIO LINE OUT 3.5mm Mini
Jack
Connects to an unbalanced stereo audio acceptor
11
MIC IN 3.5mm Mini Jack
Connects to a microphone

VIA Campus - Setting Up VIA Campus
7
4 Setting Up VIA Campus
Always switch off the power to each device before connecting it to your
VIA
Campus. After connecting VIA Campus
, connect its power and
then switch on the power to each device.
To connect the VIA Campus as illustrated in the example in Figure 2 you need:
· A VIA Campus Wireless Collaboration Hub
· A display (projector, monitor, or screen).
NOTE: A touchscreen display is best for annotation
· A Local Area Network (LAN) cable for connection to your network. For
wireless network connectivity, use a commercial wireless router
The following client devices can be used with Kramer's VIA collaboration hub:
· A Windows 7/8/10® (32-bit/64-bit) computer
· A Macintosh® computer, using OSX 10.7.x or newer
· An iPad/iPhone® tablet/smartphone with the VIA app installed (iPad 2 or later,
iOS 6.0 or later).
NOTE: When using the Airplay service, no application is needed (refer to iOS mirroring
section)
· An Android® OS 4.x tablet/smartphone with the VIA app installed
These optional add-ons can enhance your VIA Campus system:
· A USB camera for distant participants connecting through Lync®, Skype®,
GoToMeeting®, or WebEx®
· A conferencing speakerphone for remote communication as well as audio
playback of content being shared on the display
8
VIA Campus - Setting Up VIA Campus
Figure 2: Connecting the VIA Campus Collaboration Device
4.1 Connecting VIA Campus to a Display
VIA Campus is equipped with dual display output connections.
· The HDMI connection is used with any compatible projection or direct-view
display, such as an LCD monitor. This connection carries embedded audio,
that routes and switches like any other HDMI connection
· The DVI-I connection is used with compatible projection or direct-view
displays. Unlike the HDMI port, the DVI-I jack does not carry embedded audio
and requires a separate audio connection
The VIA Campus internal video card reads the Extended Display Identification
Data (EDID) for any connected display and sets the optimum display resolution and
image refresh rate automatically through the HDMI connector.
VIA Campus - Setting Up VIA Campus
9
For full functionality, VIA Campus must be connected to a local area network
(LAN). You may assign a fix IP address to the VIA Campus. However, your VIA
Campus is set on DHCP mode by default.
NOTE: To allow participation in a collaborative session (send and receive content), connect
the VIA Campus hub and all participant devices (PCs/ MACs/ smartphones/tablets) to the
same network (LAN - wired/wireless).
The VIA Campus hub receives user’s display/screen information and multimedia
files from their device (laptop/tablet/smartphone) and sends them to the
collaboration display (the display connected directly to VIA Campus hub unit).
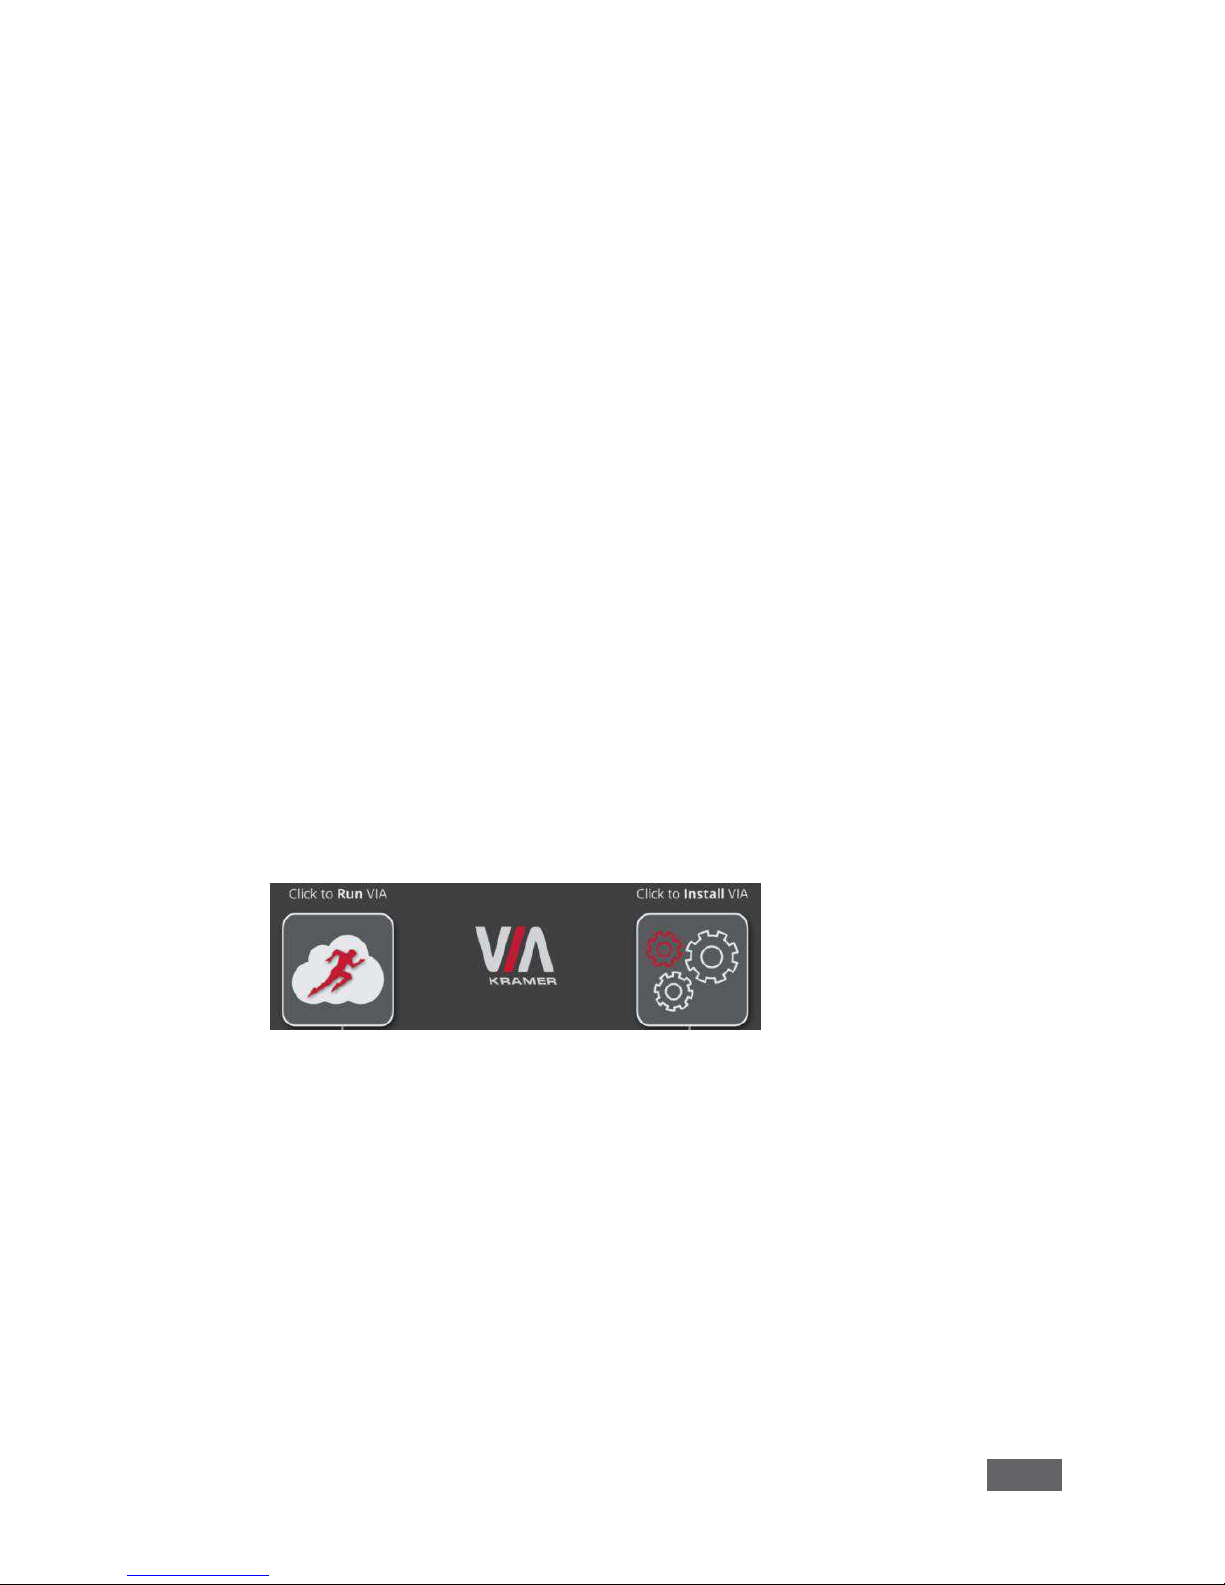
4.2 Downloading and Running VIA Campus Software
All participants in a meeting must download and run either the Kramer VIA
executable file (PC, Mac) or the appropriate Android/iOS app.
To access the PC and Mac executable files:
· Open your Web browser and enter the IP address for your VIA Campus unit
· Your Web browser recognizes your OS (MAC/Windows) and directs you to
the correct client software
· Choose from the following two options:
· To run the VIA app virtually (without installing on your computer), select “Click
to Run VIA”. Once downloaded, locate the file on your computer (under
“Downloads”) and click to launch it. The VIA Campus login screen appears
· To permanently install the VIA app, select “Click to Install VIA”. It downloads
an .exe file to your computer and asks if you want to run this file. Click Yes
and follow the Setup instructions. The VIA app is saved to the KRAMER
folder on your C: drive. It creates a shortcut on the desktop for easy access.

10
VIA Campus - Setting Up VIA Campus
For tablets and smartphones, find the Kramer VIA app in the App Store (iOS) and
Google Play (Android).
Alternatively, open your Web browser on your mobile device and enter the IP
address for your VIA Campus unit.
· Choose from the following two options:
· Download the app to your tablet/phone and install. When the app is run, the
following screen appears:

VIA Campus - Setting Up VIA Campus
11
4.3 Using an .msi File
IT managers can use the VIA .msi file for easy deployment and installation of the
VIA application on the user’s clients.
To find the .msi file:
1. Browse your unit for (make sure you are on the same network):
http://<ip of box>/files/VIAApp.msi.
2. Replace "<ip of box>" by the valid Room Name.
3. Save the file on your PC.
4.4 Logging In to VIA Campus
Windows and Mac OS
1. Choose a username (nickname) for your device (any mix of letters and
numbers) then enter it on the login screen.
2. Next, enter the room code (if enabled), seen on the lower right part of the
screen. This accesses VIA Campus.
iOS and Android
1. First, enter the IP address for the VIA Campus (found on the main display
screen in the lower left).
2. Next, choose a username (nickname) for your device (it can be any mix of
letters and numbers) then enter it on the login screen of your device.
3. Finally, enter the room code (if enabled) as seen on the lower right part of
the screen. This accesses VIA Campus.
12
VIA Campus - Setting Up VIA Campus
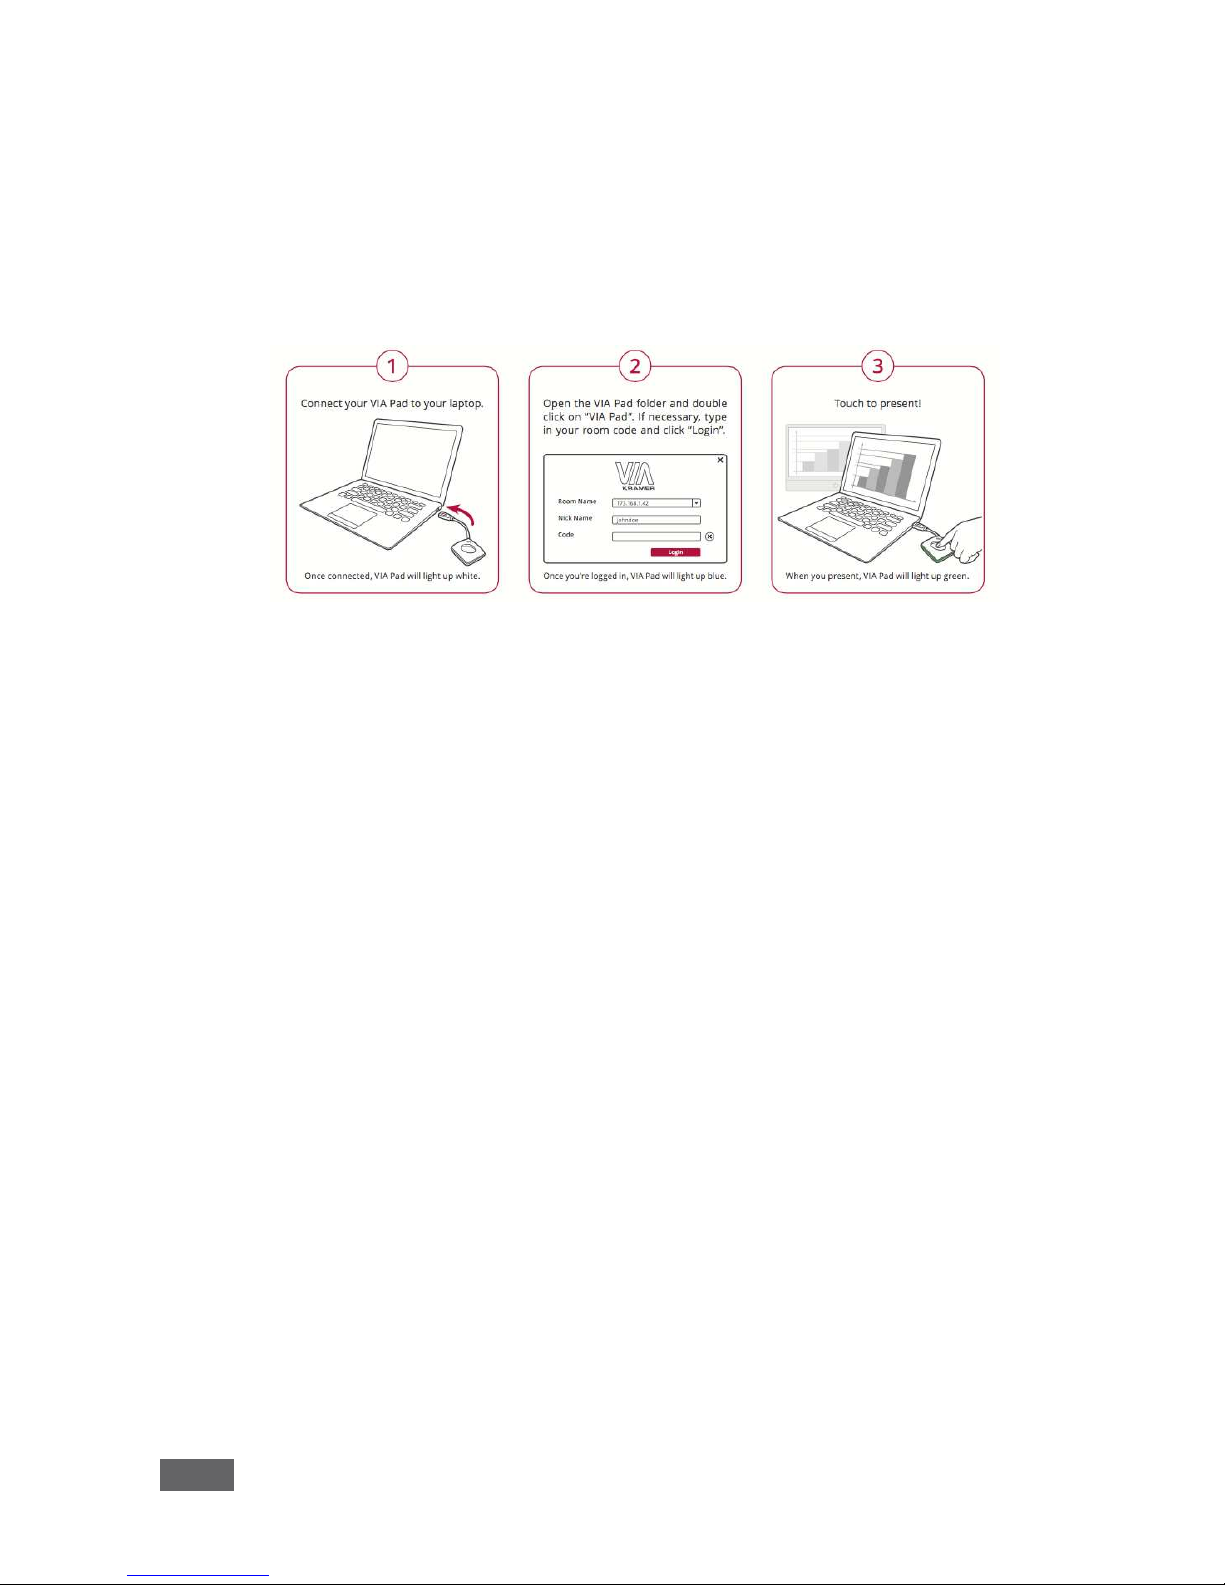
4.5 Logging to the VIA Campus using a VIA Pad
Windows and Mac OS
· Press once: This steps you in (When you start, the LED banner on the device
is blue. After stepping in, it changes to green)
· Press twice: This freezes your screen (the banner on the device changes
from green to flashing green). To unfreeze and resume, press twice again
· Press once again: This steps you out
4.6 Using iOS /Android Mirroring to Share your Screen
All participants in a meeting using an Apple device can mirror their screen by using
the Airplay service. No application is required to activate this mode. However, the
VIA Campus unit must run firmware version 1.8 or later and iOS mirroring feature
must be enabled (see the “settings” section for more details).
4.6.1 From your iOS Device (iPhone or iPad/Mini iPad)
1. Connect your Apple device to the network where the VIA Campus resides.
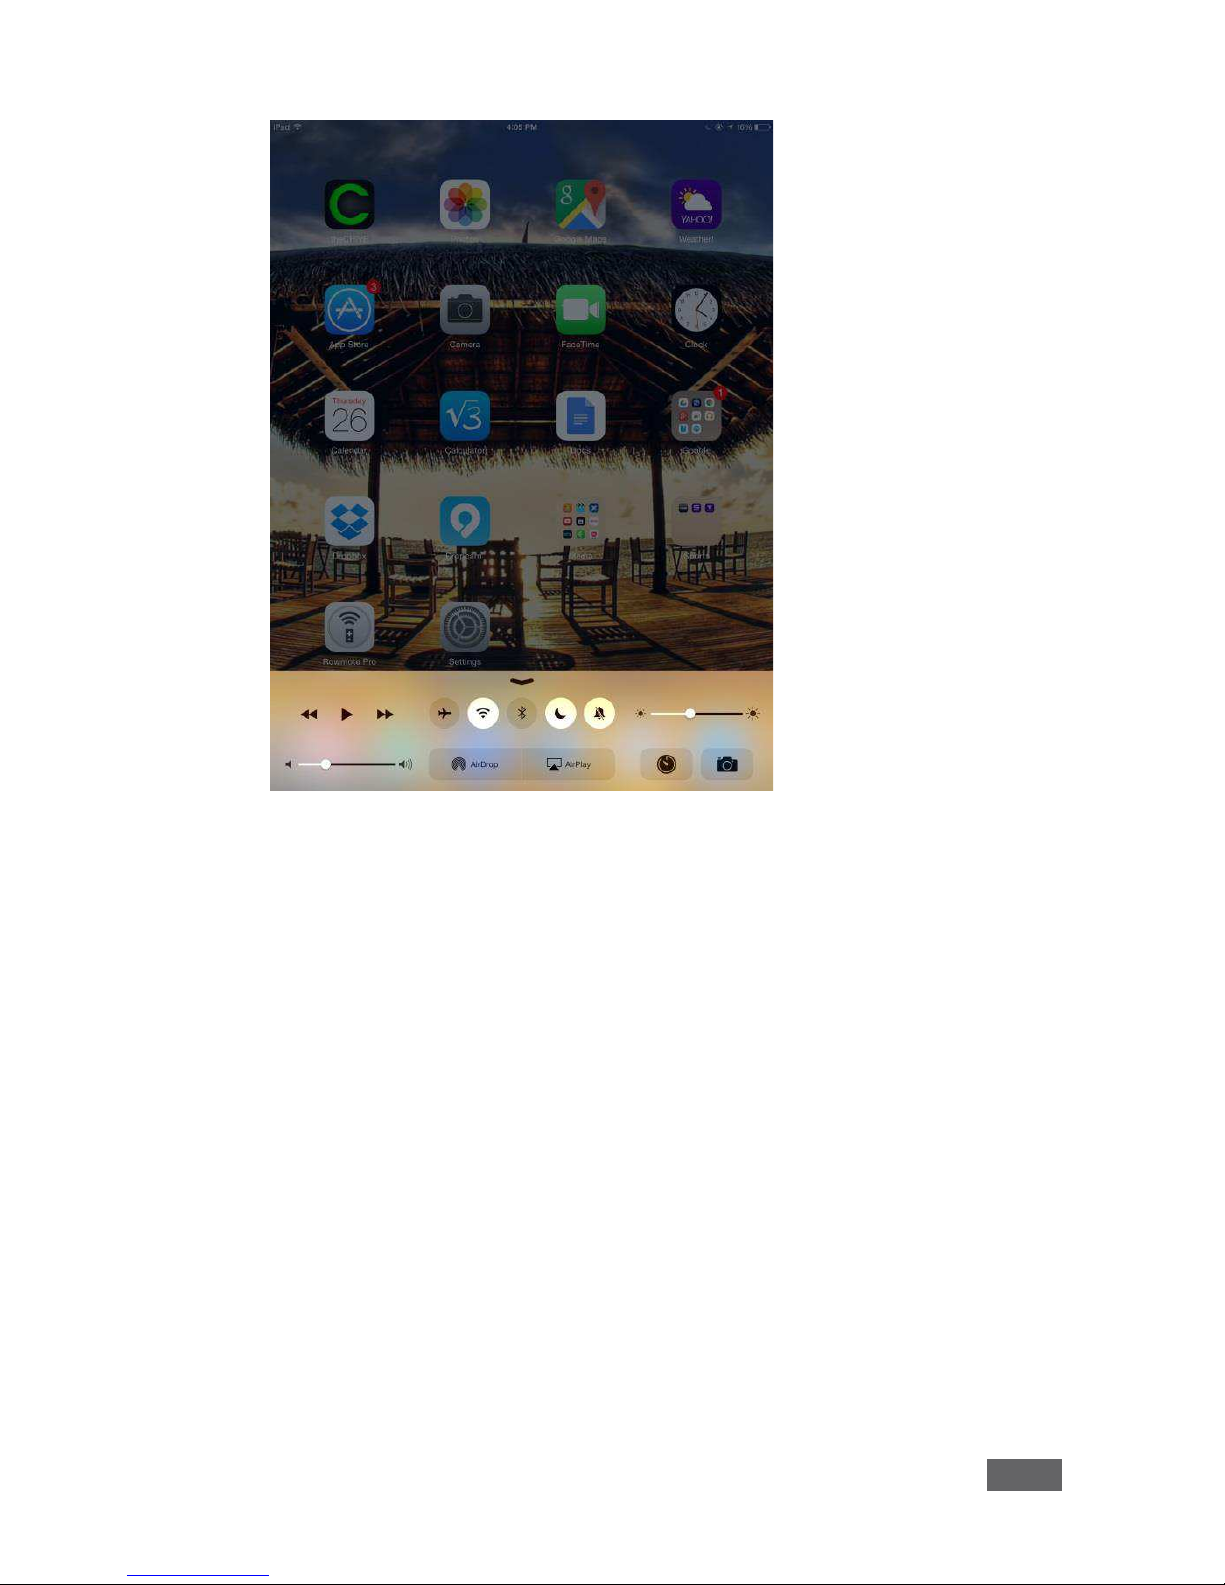
2. Swipe up from the bottom of the iPad or iPhone to reveal the Control Center.
VIA Campus - Setting Up VIA Campus
13
3. Click AirPlay and choose the VIA Campus’s AirPlay device name. By
default the VIA’s AirPlay device is named VIA_AirMirror_XXXX, where
XXXX is a random combination of letters and numbers.
Note: If the room code is enabled on the VIA Campus, you are prompted to enter the
same 4-digit security code when attempting to mirror you iOS device. This code appears
on the main screen of the VIA Campus.

14
VIA Campus - Setting Up VIA Campus
4.6.2 MacBooks and Apple Computers
1. Connect your Apple device to the network where the VIA Campus resides.
2. Click the AirPlay menu on the Apple Menu Bar, located in the top-right
corner of the screen near the clock.
3. Choose the AirPlay device name of the VIA Campus.
By default, the VIA’s AirPlay device is named VIA_AirMirror_XXXX, where
XXXX is a random combination of letters and numbers.
VIA Campus - Setting Up VIA Campus
15
Note: If the Room Code is enabled on the VIA Campus, you are prompted to enter the
same 4-digit security code when attempting to mirror you iOS device. This code appears
on the main screen of the VIA Campus.
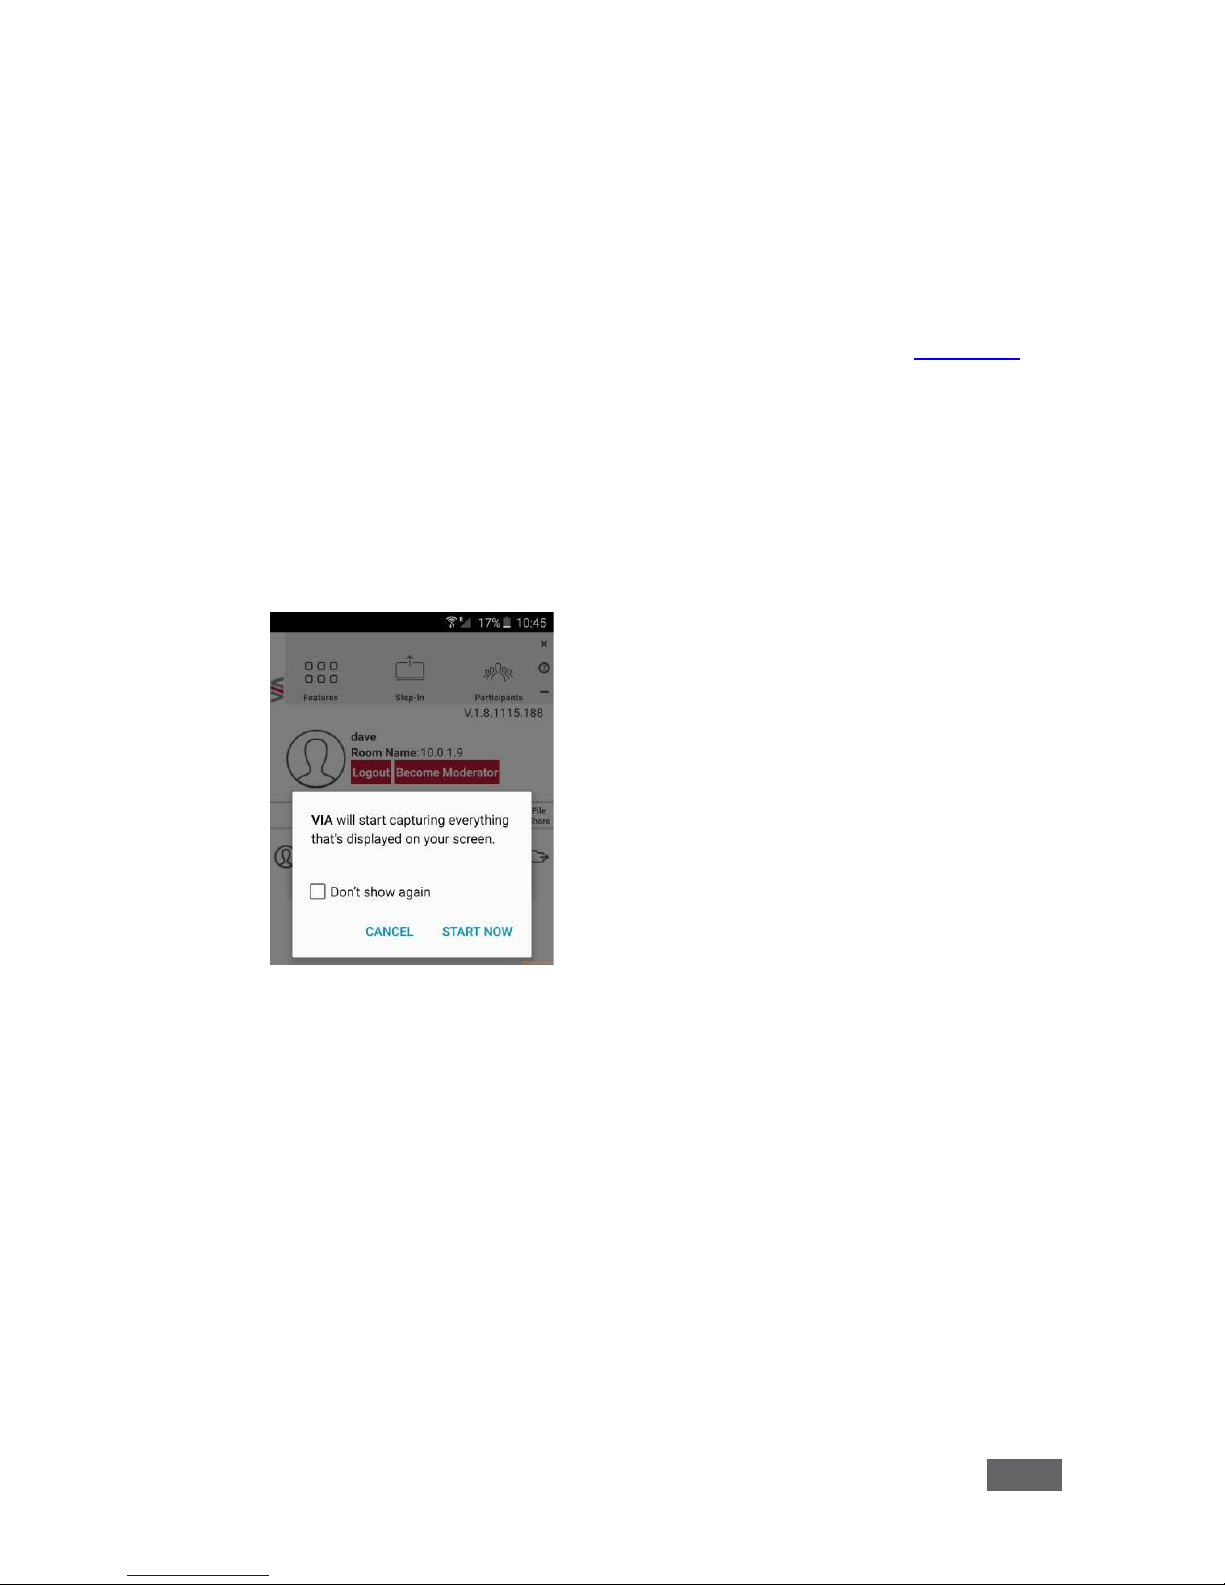
4.6.3 Android Device Mirroring
1. Your device must support Android 5.0 version as a minimum.
2. Make sure the VIA application is installed on your device. See
Section 4.2
for details.
3. Connect your Android device to the network where the VIA Campus
resides.
4. Log in to the application by entering the Room Name and Nickname fields (+
room code if enabled).
5. Click on Step-In. The device shows this message: “VIA will start capturing
everything that’s displayed on your screen.” Please accept by clicking on
“START NOW”.
6. You can now minimize the VIA app by clicking on the “Home” button of your
device. Your screen is mirrored on the main display.
7. To stop sharing your screen, re-open the VIA application and click on
Step-out.
16
VIA Campus - VIA Campus Functions Defined
5 VIA Campus Functions Defined
VIA Campus presents two types of screens depending upon whether it is being
used by the Admin or by a User. The following screen shots illustrate both types.
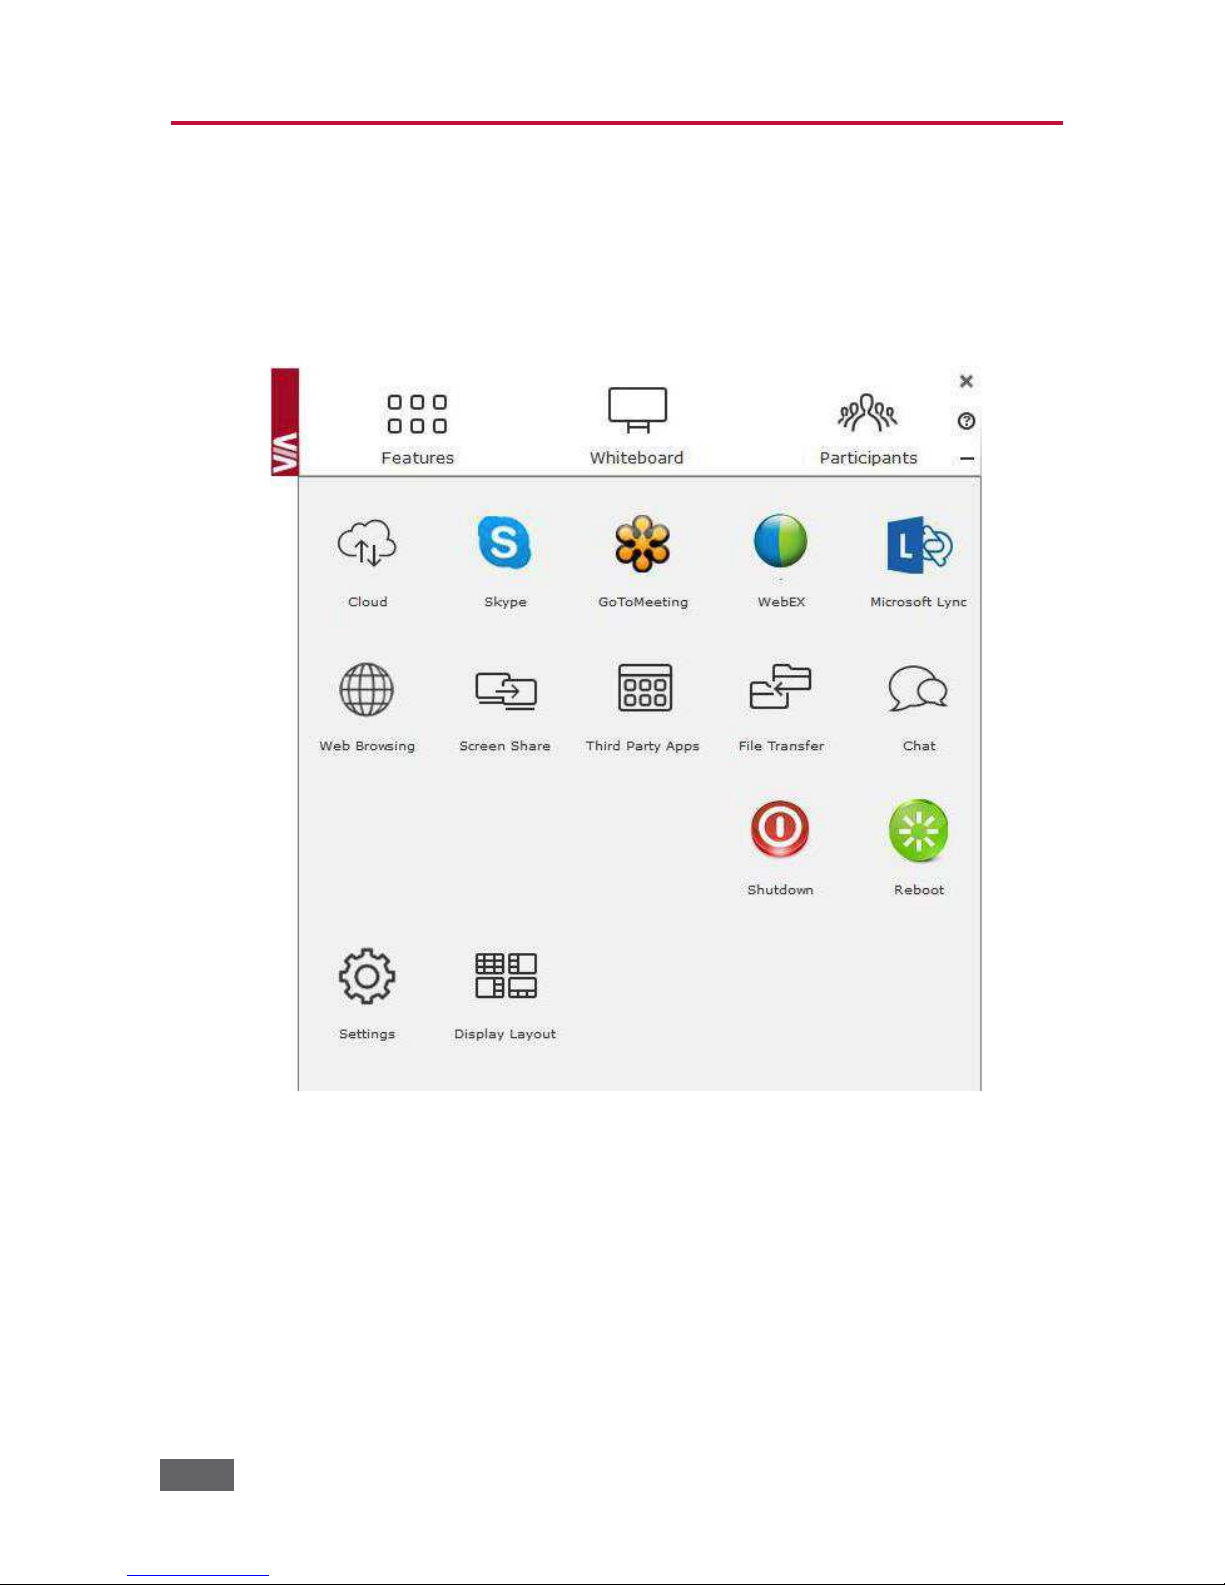
The illustration below shows the VIA Campus main Admin screen and its functions:
Figure 3: VIA Campus Admin Features
1
2
3
4
5
6
7
8
9
10
11
12
13
14
15
16
17
VIA Campus - VIA Campus Functions Defined
17
Item
Icon
Action
1
Features
Allows the user to see and access all available features of VIA
Campus
2
Whiteboard
Opens a canvas to annotate, draw, and update document
collaboratively over a live stream
3
Participants
Provides a list of all participants in the session
4
Cloud
Open the Cloud and all the files that are saved or shared
between participants
5
Skype
Starts the Skype video conferencing tool
6
Go to Meeting
Starts a GoToMeeting session
7
WebEx
Starts a WebEx session
8
Microsoft Lync
Opens Lync client for audio and video conferencing
9
Web Browser
Opens the browser at the VIA Campus gateway to present
any content directly from the Web site
10
Screen Share
Pushes a mirror of the VIA Campus collaboration display on
the user’s devices (laptop, iPAD, Mac
Book, Android tablet).
The user can see all the activities of the
VIA Campus
collaboration display on his system (this feature is called "View
Main Display" in the Client menu)
11
Third Party
Apps
Shows third-party applications installed and integrated with
VIA Campus
12
File Transfer
Shares files between the available participants during the
session
13
Chat
Allows the sending of chat messages among available
participants during that session
14
Shut Down
Shuts down the VIA Campus system
15
Reboot
Reboots the VIA Campus System
16
Settings
Performs settings on the LAN, configurations related to room
code, room name third-party apps, system controls, wallpaper
streaming configuration and activation center
17
Display Layout
Allows selecting the layout when several participants are
stepped-in (thumbnail view or dynamic view)
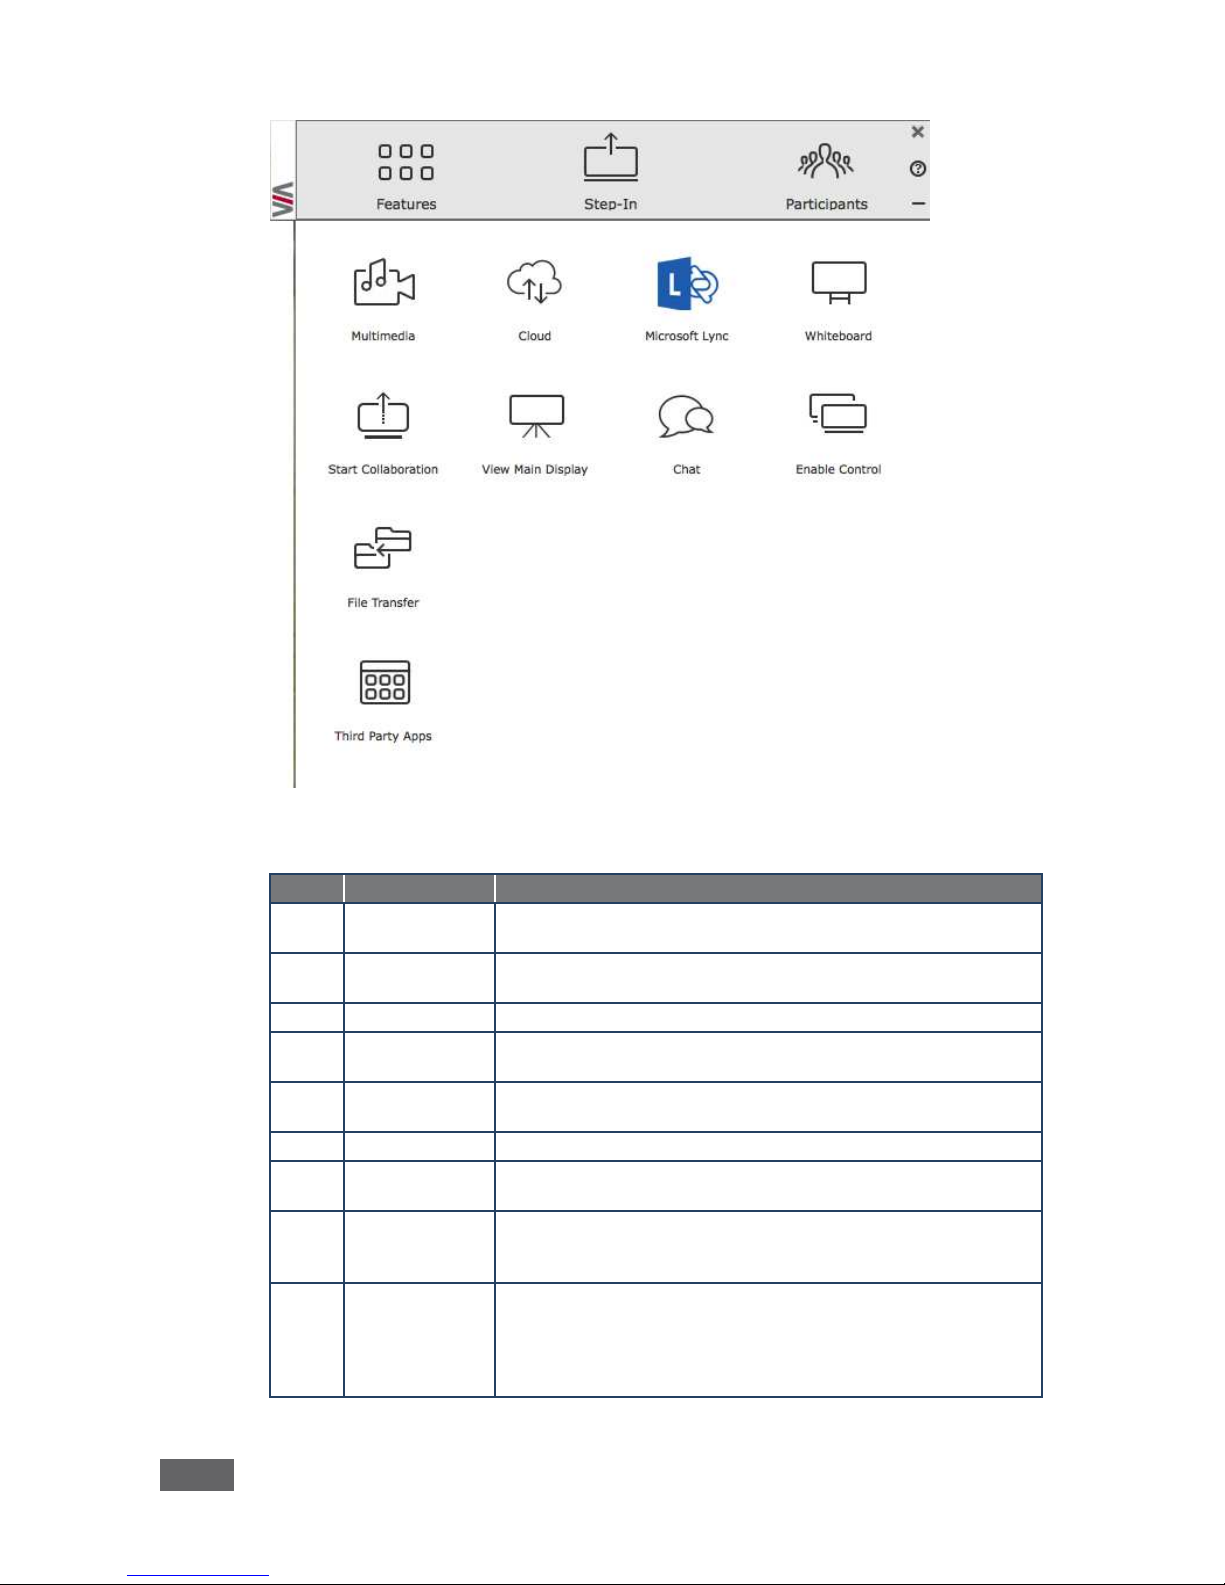
The illustration below shows the VIA Campus main User screen and its functions:
18
VIA Campus - VIA Campus Functions Defined
Figure 4: VIA Campus Main User Screen
Item
Icon
Action
1
Features
Allows user to see and access all available features of VIA
Campus
2
Step-In/
Step-Out
Allows the user to show his device's screen on the main
display, or to step out
3
Participants
Provides a list of all participants in the session
4
Multimedia
Supports video formats: avi, vob, mp4, mov, mpx (ex. mpg).
Shares smooth full-motion video (up to 1080p/60) and photos
5
Cloud
Drag and drop files to the cloud to share instantly with
everyone in the session
6
Microsoft Lync
Opens Lync client for audio and video conferencing
7
Whiteboard
Opens a canvas to annotate, draw, and update document
collaboratively over a live stream
8
Start
Collaboration
Click to collaborate through a common display using your own
device. Multiple users can interact and control the main display
at the same time
9
View Main
Display
Shows a mirror of the VIA Campus collaboration display on
the user’s devices (laptop, iPAD, MacBook, Android tablet).
The user can see all the activities of the
VIA Campus
collaboration display on his s
ystem (this feature is called
"Screen Share" in the Admin menu)
1
2
3
4
5
6
7
8
9
10
11
12
13
VIA Campus - VIA Campus Functions Defined
19
Item
Icon
Action
10
Chat
Allows sending chat messages among available participants
during that session
11
Enable Control
Gives participants control over the presenters Mac or PC
laptop
12
File Transfer
Shares files between the available participants during the
session
13
3rd Party Apps
Open the third-party applications installed and integrated with
VIA Campus

20
VIA Campus - Using VIA Campus
6 Using VIA Campus
VIA Campus is a powerful and versatile collaboration hub that gives participants a
wide selection of presentation tools. This section describes each of the tools and
how they work.
6.1 VIA Campus User’s Main Menu
This section refers to the user's experience. Once you have logged in to VIA, the
Parent Dashboard displays on your home-screen. This Parent Dashboard provides
basic navigation through VIA. The Parent Dashboard displays your main navigation
icons, “Features,” “Step-In” and “Participants.” Each one of these three icons
represents the core functionality of VIA. The section below identifies and defines
each icon.
· Clicking the Features tab on the main menu allows the user to see and
access all available functions of VIA Campus
· Clicking the Step-In tab on the main menu displays your PC/device screen on
the main screen. After selecting the icon, the “Step-In” button will
automatically change its displayed name to “Step-Out.” Once you have
finished sharing/displaying your content, you select “Step-Out” to remove your
desired content from the display
· Clicking the Participant List tab reveals a list of all participants in the session.
It also opens the capability for “Chat” and “File-Sharing” functionality with the
other participants
VIA Campus - Using VIA Campus
21
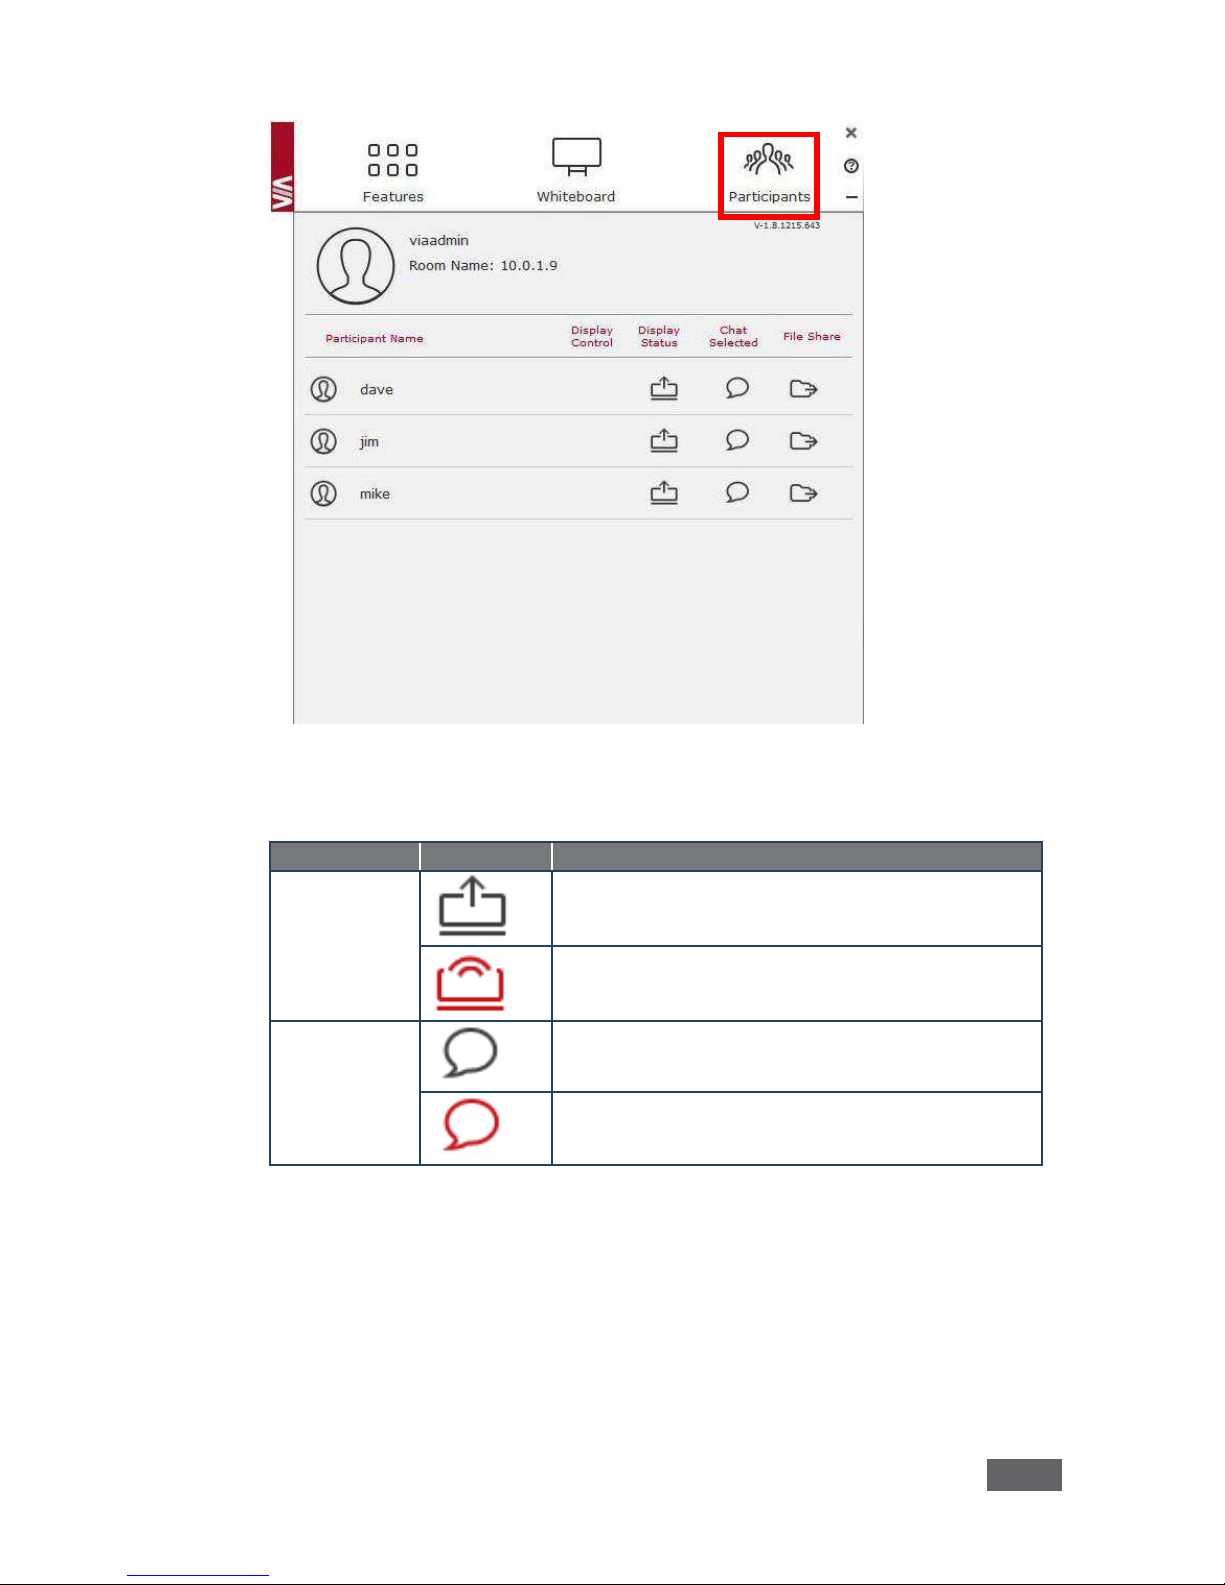
Figure 5: The Participant List
Under Participants, the following icons are used:
Item
Icon
Meaning
Display Status
Start a presentation at a display
The user is currently presenting
Chat Status
Start a chat session with any available participants
The participant is currently chatting with you. Click to
open the chat sessi
on
22
VIA Campus - Using VIA Campus
Item
Icon
Meaning
File Transfer
Start a file transfer with another participant
File transfer is already active with that participant
Enable
Control
Take control of any user while the user is displaying
Admin has the control of that user
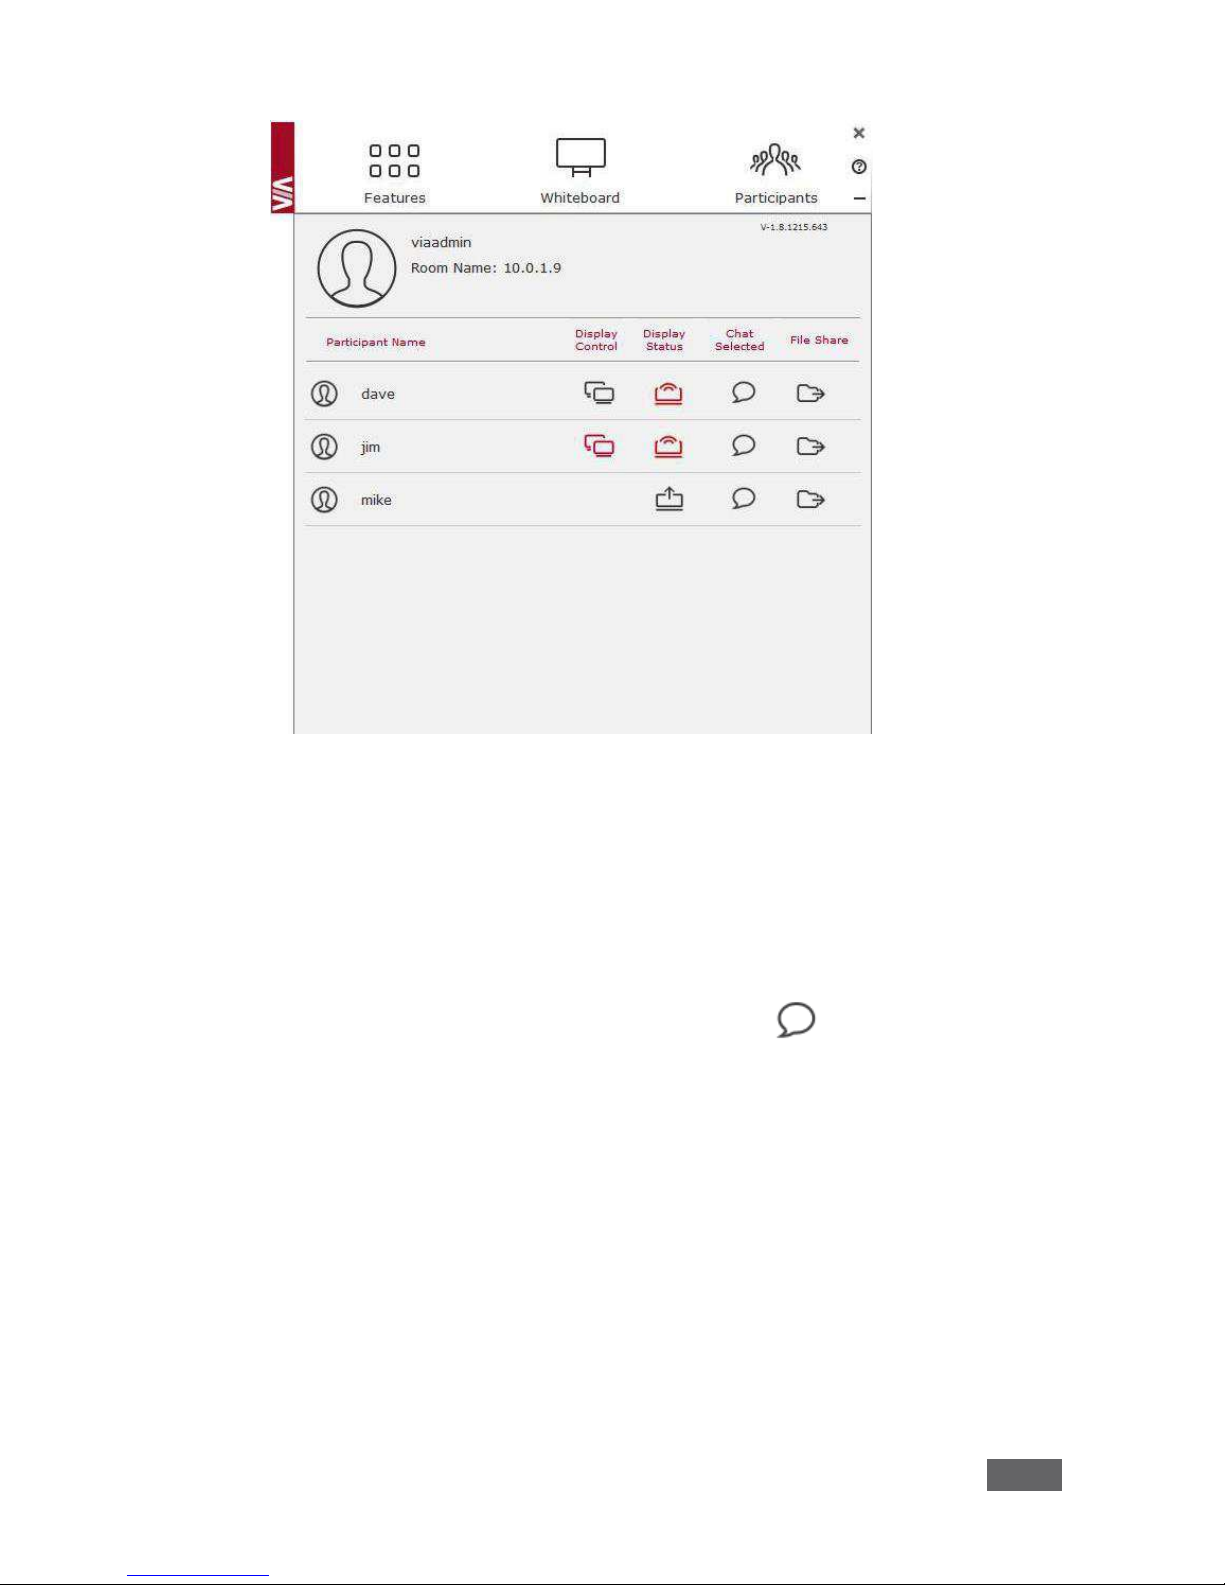
6.2 Enabling Control
This function allows the admin to take control of a participant's PC (Windows or
Mac OS). (In our example,
Figure 6, user Jim has stepped in and the Admin has
taken control of Jim):
The admin can work on Jim’s system as he has taken control. (Admin can play
media or work on a document or presentation file collaboratively with Jim).
Any other participant who wants to take control or collaborate with Jim’s system can
click on the Start Collaboration icon and drag his laptop mouse to the top and off
their local screen. That cursor now moves to the VIA Campus unit and appears on
the main display of Jim. Buttons are shown in the picture below:
VIA Campus - Using VIA Campus
23
Figure 6: Enable Control
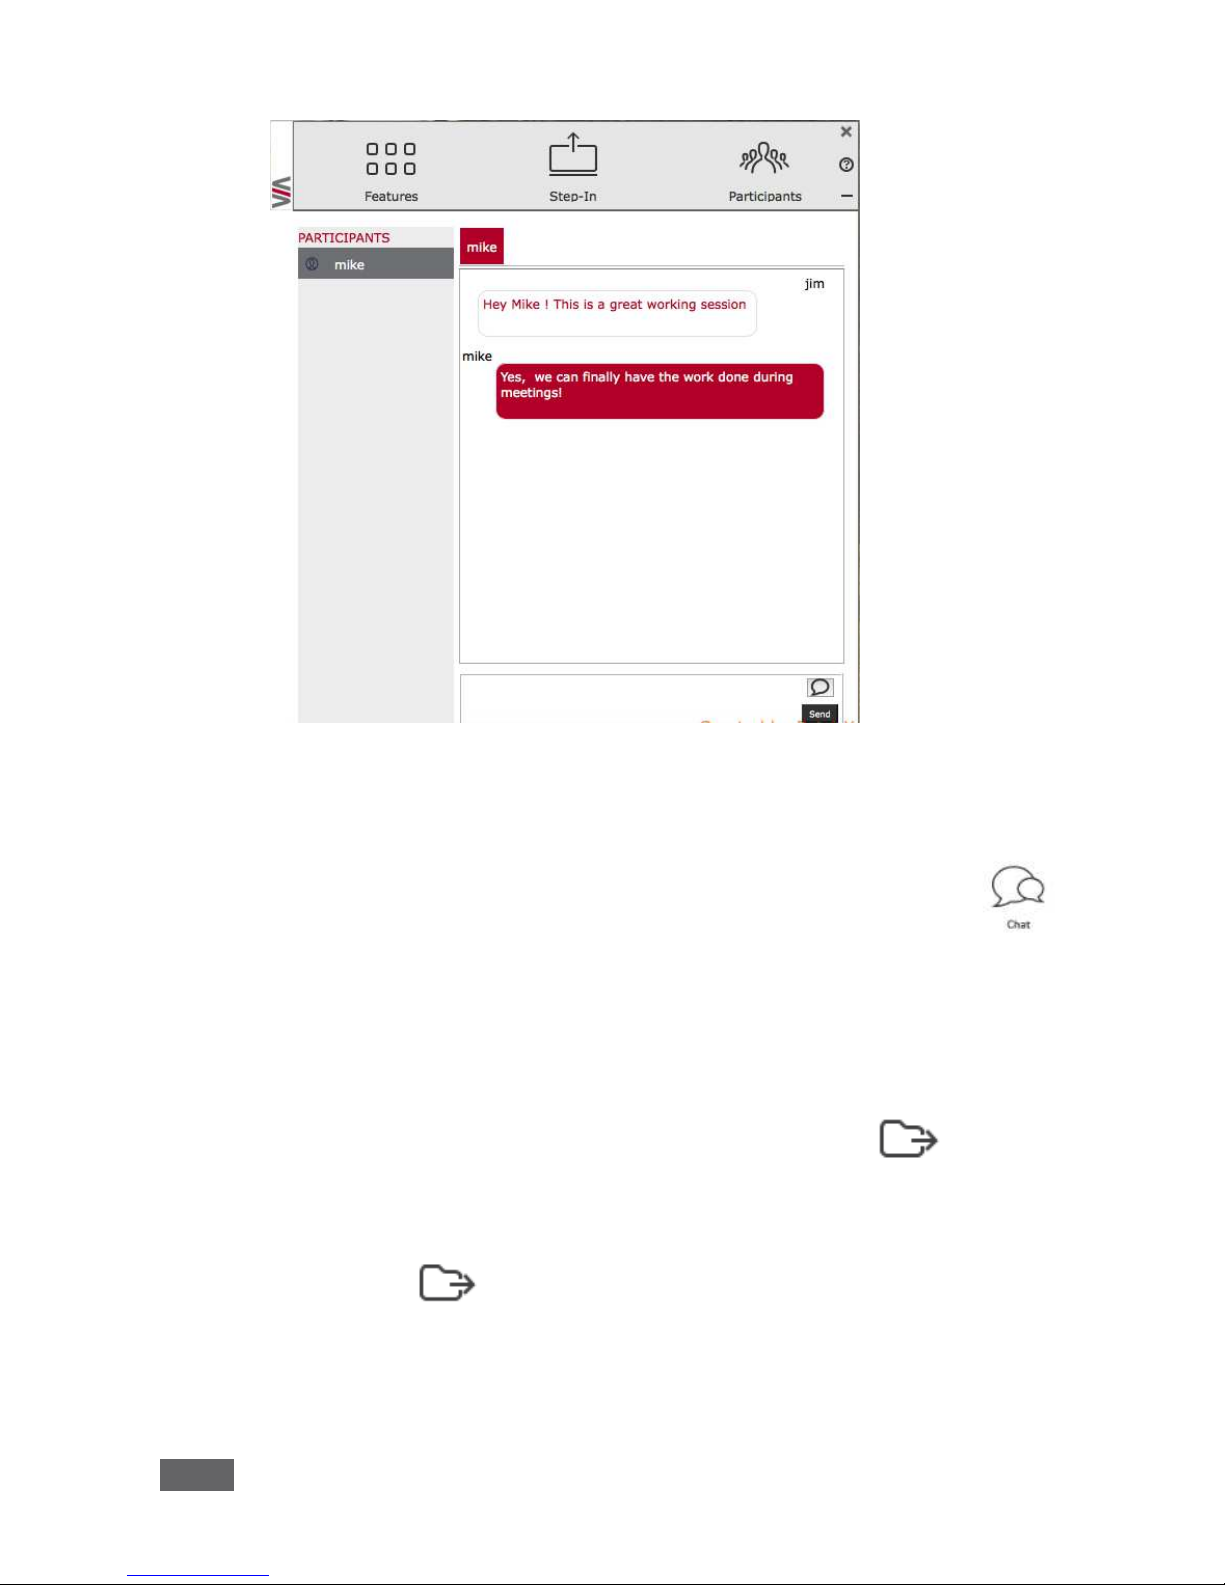
6.3 Chatting with Participants
The admin or user can start a chat session to exchange text messages between
users.
To initiate a chat session:
· Go to the participant list and click the chat icon for the desired
participant. The chat window opens and you can chat with selected
participant:
24
VIA Campus - Using VIA Campus
Figure 7: Chat Window
In the chat window, the participant’s name is at the left side of the window and your
chat messages are on the right side.
The user can check for active chat sessions by going to Features > Chat.
6.4 File Transfer
VIA Campus can transfer files between PC/Mac/Mobile Devices logged in users.
To share a file:
· Go to the participant list and click on the file share icon
for the desired participant with whom you wish to share a file
· In the cloud directory, select the desired file on your device. Then, click Share
 Loading...