

Page 1

KRAMER ELECTRONIC S LTD.
USER MANUAL
MODEL:
RC-4 3T
Remote Controller
P/N: 2900-300301 Rev 3
Page 2
Page 3

RC-43T – Contents
i
Contents
1 Introduction 1
2 Getting Started 2
2.1 Achieving the Best Performance 2
2.2 Safety Instructions 3
2.3 Recycling Kramer Products 3
3 Overview 4
4 Defining the RC-43T Remote Controller 5
5 Connecting the RC-43T 8
5.1 K-NET Wiring 9
5.2 Terminating the K-NET Bus 10
5.3 Installing the Configuration Software 10
6 Installing the RC-43T 11
6.1 Installing the Front Panel Buttons 11
6.2 Installing the RC-43T in the Wall Mounting Box 12
7 Technical Specifications 13
Figures
Figure 1: RC-43T Remote Controller Front Panel 5
Figure 2: RC-43T Remote Controller Rear View 6
Figure 3: RC-43T Remote Controller Exploded Rear View 7
Figure 4: Connecting the RC-43T Remote Controller 8
Figure 5: RC-43T K-Net Wiring 9
Figure 6: RC-43T K-Net Bus Termination Switch 10
Figure 7: Mounting the RC-43T in a Wall Box 12
Page 4

RC-43T - Introduction
1
1 Introduction
Welcome to Kramer Electronics! Since 1981, Kramer Electronics has been
providing a world of unique, creative, and affordable solutions to the vast range of
problems that confront the video, audio, presentation, and broadcasting
professional on a daily basis. In recent years, we have redesigned and upgraded
most of our line, making the best even better!
Our 1,000-plus different models now appear in 13 groups that are clearly defined
by function: GROUP 1: Distribution Amplifiers; GROUP 2: Switchers and Routers;
GROUP 3: Control Systems; GROUP 4: Format/Standards Converters; GROUP 5:
Range Extenders and Repeaters; GROUP 6: Specialty AV Products; GROUP 7:
Scan Converters and Scalers; GROUP 8: Cables and Connectors; GROUP 9:
Room Connectivity; GROUP 10: Accessories and Rack Adapters; GROUP 11:
Sierra Video Products; GROUP 12: Digital Signage; and GROUP 13: Audio.
Congratulations on purchasing your Kramer RC-43T which lets you control an A/V
system with ease in applications such as, multimedia classrooms or conference
rooms.
Page 5
2
RC-43T - Getting Started
Go to http://www.kramerelectronics.com/support/product_downloads.asp
to check for up-to-date user manuals, application programs, and to check if
firmware upgrades are available (where appropriate).
This equipment is to be used only inside a building. It may only be
connected to other equipment that is installed inside a building
i
!
2 Getting Started
We recommend that you:
Unpack the equipment carefully and save the original box and packaging
materials for possible future shipment
Review the contents of this user manual
This user manual is written for the end user and does not contain details regarding
installation and configuration. This information can be found in the K-Config
Configuration Guide, available from http://www.kramerelectronics.com.
2.1 Achieving the Best Performance
To achieve the best performance:
Use only good quality connection cables (we recommend Kramer high-
resolution, high performance cables) to avoid interference, deterioration in
signal quality due to poor matching, and elevated noise levels (often
associated with low quality cables)
Do not secure the cables in tight bundles or roll the slack into tight coils
Avoid interference from neighboring electrical appliances that may adversely
influence signal quality
Position your Kramer RC-43T away from moisture, excessive sunlight and
dust
Page 6

RC-43T - Getting Started
3
Caution:
There are no operator serviceable parts inside the unit
Warning:
Use only the power cord that is supplied with the unit
Warning:
Do not open the unit. High voltages can cause
electrical shock! Servicing by qualified personnel only
Warning:
Disconnect the power and unplug the unit from the wall
before installing
!
2.2 Safety Instructions
2.3 Recycling Kramer Products
The Waste Electrical and Electronic Equipment (WEEE) Directive 2002/96/EC
aims to reduce the amount of WEEE sent for disposal to landfill or incineration by
requiring it to be collected and recycled. To comply with the WEEE Directive,
Kramer Electronics has made arrangements with the European Advanced
Recycling Network (EARN) and will cover any costs of treatment, recycling and
recovery of waste Kramer Electronics branded equipment on arrival at the EARN
facility. For details of Kramer’s recycling arrangements in your particular country
go to our recycling pages at http://www.kramerelectronics.com/support/recycling/.
Page 7

4
RC-43T - Overview
3 Overview
The RC-43T is a remote control keypad with six touch-sensitive, backlit buttons. It
is designed to be used in conjunction with room controllers, such as the SL-1.
Using the Kramer K-Config software, each button on the RC-43T can be
programmed on the room controller with a function, where each function can
comprise multiple individual actions.
Page 8

RC-43T - Defining the RC-43T Remote Controller
5
#
Feature
Description
1
Six Touch-sensitive
Buttons
Program the button functions on the connected room
controller
2
Six LEDs
Flashes yellow when the button is touched. The LED can
also be custom programmed to light on specific actions
4 Defining the RC-43T Remote Controller
Figure 1 shows the six, touch-sensitive, backlit buttons on the front panel of the
RC-43T.
Figure 1: RC-43T Remote Controller Front Panel
Page 9

6
RC-43T - Defining the RC-43T Remote Controller
#
Feature
Description
1
Mounting Holes
Attach the RC-43T to the wall mounting box with the
screws provided (see Section 6.2)
2
Front Panel
Cosmetic panel that covers the PC Board and houses the
removable buttons
3
PC Board Frame
Mounting panel that houses the PC Board
4
PC Board
5
SW7 K-NET
Termination Switch
Use to set the K-NET bus termination (see Section 5.2)
6
KNET 4-pin Captivescrew Terminal Block
Connect to a master room controller or to another auxiliary
device (see Section 5.1). Note: The RC-43T is always
device ID 2 on the K-NET bus. This cannot be changed
7
PC Board Frame
Alignment Tongue
Align this tongue with the cutout in the front panel when
mounting the PC Board frame to the front panel
Figure 2: RC-43T Remote Controller Rear View
Page 10

RC-43T - Defining the RC-43T Remote Controller
7
Figure 3 shows an exploded rear view using the same identification table as
Figure 2.
Figure 3: RC-43T Remote Controller Exploded Rear View
Page 11

8
RC-43T - Connecting the RC-43T
Always switch off the power to each device before connecting it to
your RC-43SL. After connecting your RC-43SL, connect its power
and then switch on the power to each device.
You do not have to connect all the inputs and outputs, connect only
those that are required.
Do not connect the power to the unit until after the front plate is
mounted.
!i!
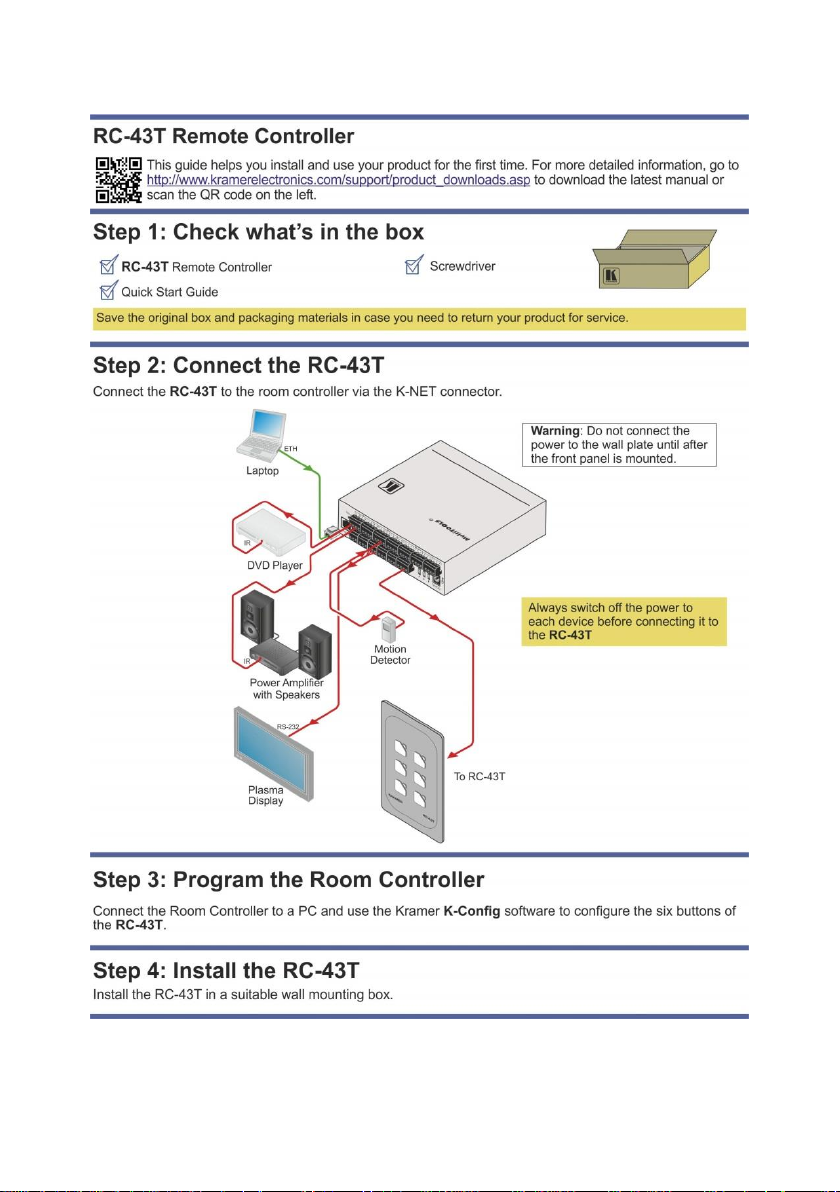
5 Connecting the RC-43T
Figure 4: Connecting the RC-43T Remote Controller
Page 12

RC-43T - Connecting the RC-43T
9
Each time the front panel is removed and remounted you must
recalibrate it by powering off and powering on the unit.
Do not connect the power to the unit until after the front plate is
mounted.
!
!
To connect the RC-43T as illustrated in the example in Figure 4:
Connect the RC-43T to a room controller, (for example, the SL-1) via the
K-NET 4-pin, (see Section 5.1) terminal block on the rear panel of the
RC-43T
5.1 K-NET Wiring
The K-NET connector on the RC-43T must be connected to a room controller via a
four wire cable as shown in Figure 5.
Figure 5: RC-43T K-Net Wiring
Note: The RC-43T is always device ID 2 on the K-NET bus and cannot be
changed.
To connect the RC-43T to a room controller:
Connect pin 1 on the K-NET connector to pin 1 on the room controller K-NET
connector (+12V to +12V)
Connect pin 2 on the K-NET connector to pin 2 on the room controller K-NET
connector (A to A)
Connect pin 3 on the K-NET connector to pin 3 on the room controller K-NET
connector (B to B)
Connect pin 4 on the K-NET connector to pin 4 on the room controller K-NET
Page 13

10
RC-43T - Connecting the RC-43T
connector (G to G)
5.2 Terminating the K-NET Bus
The devices at both ends of the K-NET bus must be terminated.
Figure 6: RC-43T K-Net Bus Termination Switch
To terminate the K-NET bus on the RC-43T:
Slide SW7 (see SW7) into the position shown in Figure 6
5.3 Installing the Configuration Software
Download the K-Config configuration software from our Web site and install it
(refer to the K-Config User Manual).
Page 14

RC-43T - Installing the RC-43T
11
6 Installing the RC-43T
Installing the RC-43T consists of the following steps:
Installing the required buttons (see Section 6.1)
Connecting the RC-43T to the room controller or other auxiliary devices (see
Section 5.1)
Programming the room controller for the RC-43T
Note: Programming is covered by the K-Config User Manual and therefore
not described here.
Installing the RC-43T in the wall mounting box (see Section 6.2)
6.1 Installing the Front Panel Buttons
The RC-43T is supplied with preprinted buttons from which you can choose the six
that best represent the functions you wish to assign the buttons.
To install the front panel buttons:
1. Remove the front panel (see Figure 2 and Figure 3) by carefully prying it
away from the PC Board frame using a small screwdriver being careful not to
damage it.
2. Remove the stock buttons from the front panel.
3. Remove the six required buttons from the plastic tree.
4. Insert the buttons into the front panel taking care to insure that they are
5. Place the PC Board and frame onto the front panel insuring that the
6. Press the front panel and PC Board frame together securely.
oriented correctly.
mounting orientation tongue is in line with the cutout on the front panel.
Page 15

12
RC-43T - Installing the RC-43T
6.2 Installing the RC-43T in the Wall Mounting Box
Figure 7: Mounting the RC-43T in a Wall Box
To install the RC-43T in the wall mounting box:
1. Remove the front panel of the RC-43T.
2. Insert the RC-43T into the wall mounting box and secure it using the two
M3 x 10mm screws supplied.
3. Replace the front panel of the RC-43T.
Page 16

RC-43T - Technical Specifications
13
PORT:
1 K-NET on a 4-pin removable terminal block
POWER CONSUMPTION:
12V DC, 100mA
OPERATING TEMPERATURE:
0° to +40°C (32° to 104°F)
STORAGE TEMPERATURE:
–40° to +70°C (–40° to 158°F)
HUMIDITY:
10% to 90%, RHL non-condensing
DIMENSIONS:
6.9cm x 1.6cm x 11.4cm (2.72" x 0.63" x 4.5") W, D, H
WEIGHT:
0.3kg (0.66lbs) approx.
INCLUDED ACCESSORIES:
Four 6/32x1/2” screws
One white faceplate
One black faceplate
OPTIONS:
K-NET cable
Specifications are subject to change without notice at http://www.kramerelectronics.com
7 Technical Specifications
Page 17

Page 18

For the latest information on our products and a list of Kramer distributors,
visit our Web site where updates to this user manual may be found.
We welcome your questions, comments, and feedback.
Web site: www.kramerelectronics.com
E-mail: info@kramerel.com
P/N:
2900-300301
Rev:
3
!
SAFETY WARNIN G
Disconnect the unit from the power
supply before opening and servicing
 Loading...