

Page 1
691 Quick Start (P/N: 2900-300523QS REV 5)
P/N:
2900- 300523QS
Rev:
5
Scan for full manual
691 Quick Start Guide
This guide helps you install and use your 691 for the first time.
Go to www.kramerav.com/downloads/691 to download the latest user manual and check if firmware
upgrades are available.
Step 1: Check what’s in the box
691 HDBT 2.0 Optical Transmitter
4 Rubber feet
1 Power adapter (12V DC)
1 Quick start guide
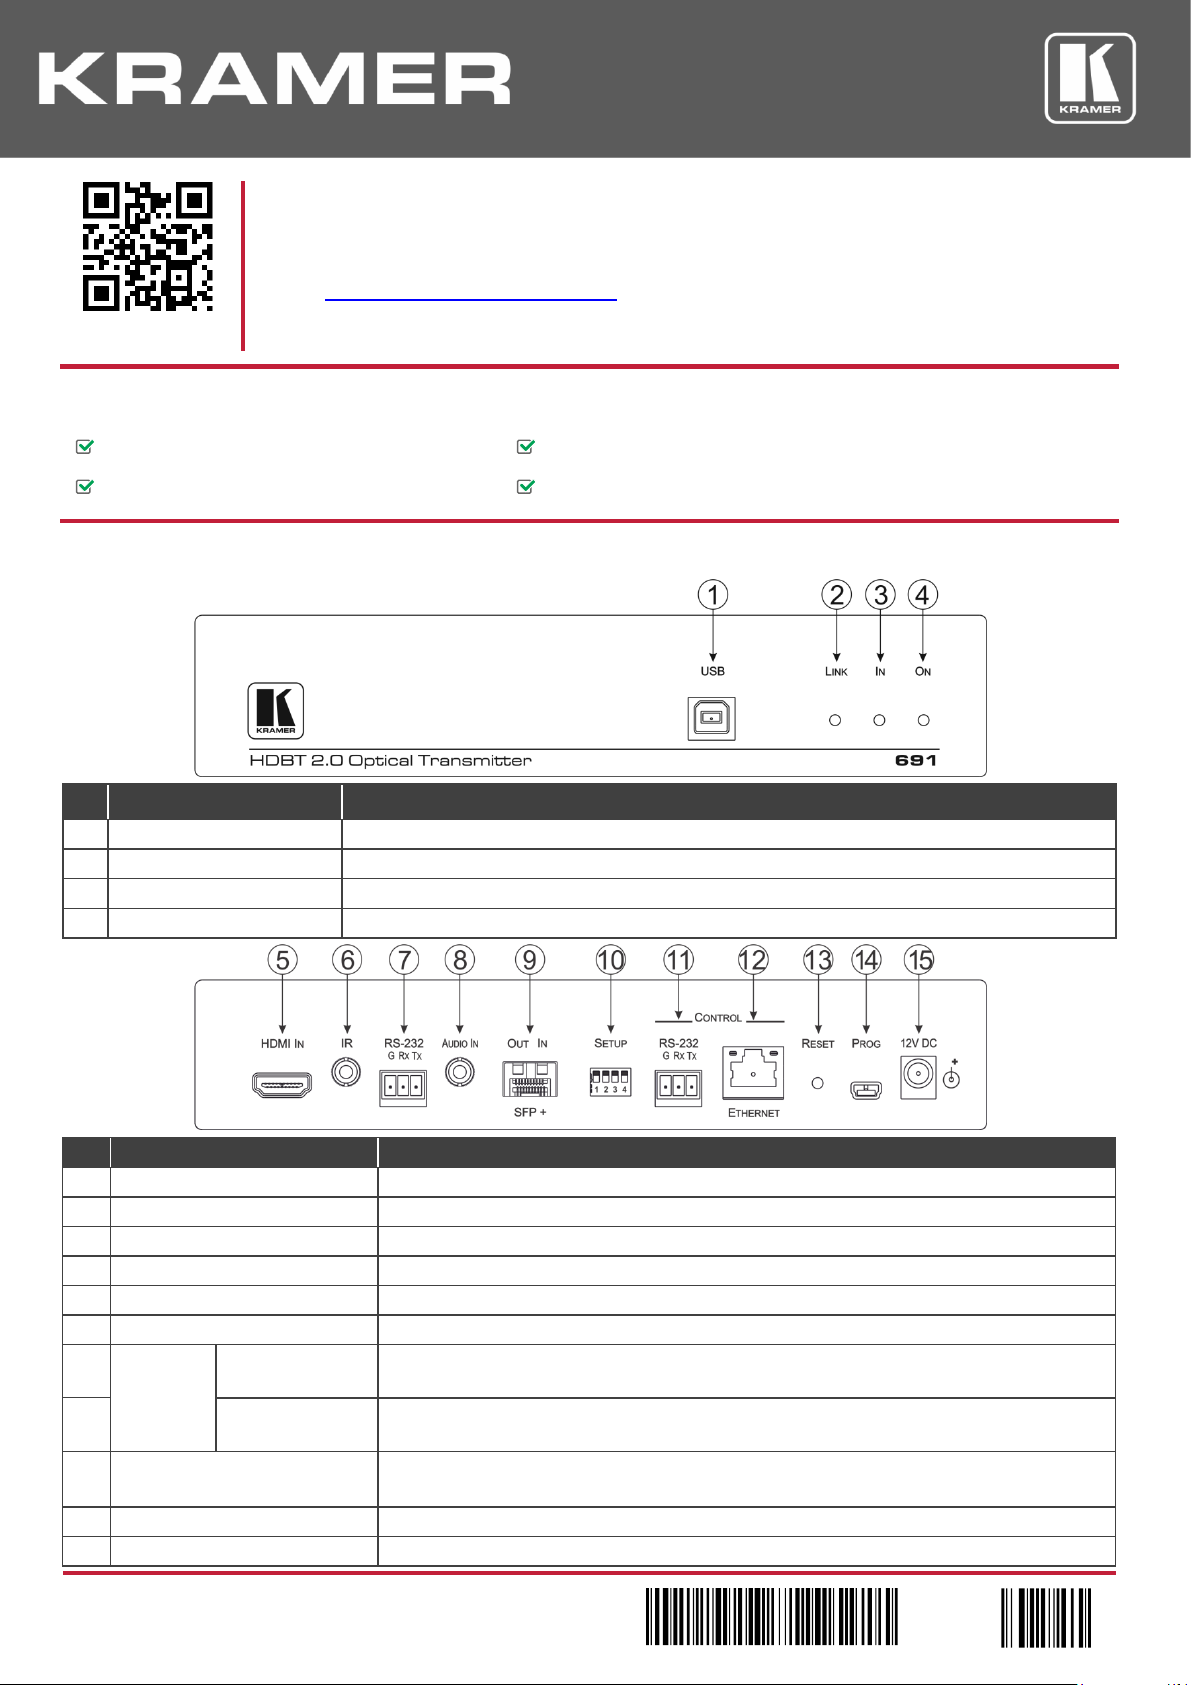
Step 2: Get to know your 691
#
Feature
Function
1
USB Connector
Connect to the USB host for traffic extension, (for example, a laptop)
2
LINK LED
Lights green when the HDBT link is valid
3
IN LED
Lights green when an HDMI active signal device is connected
4
ON LED
Lights green when the device receives power
#
Feature
Function
5
HDMI IN Connector
Connect to the HDMI source
6
IR 3.5mm Mini Jack Connector
Connect to an external infrared transmitter or sensor for traffic extension
7
RS-232 3-pin Terminal Block
Connect to an RS-232 controller for traffic extension (for example, a PC to control the projector)
8
AUDIO IN 3.5mm Mini Jack
Connect to the stereo, analog audio source
9
OUT IN SFP+ Connector
Connect the fiber optic cable to the OUT IN SFP+ LC connector
10
SETUP 4-way DIP-switch
Sets the device behavior
11
CONTROL
RS-232 3-pin
Terminal Block
Connect to the serial controller to control this device
12
ETHERNET RJ-45
Connector
Connect to the Ethernet controller to control this device or to a LAN to extend network traffic to
the receiver
13
RESET Switch
Press and hold for 5 seconds to reset the device to factory default settings.
Press and immediately release to power-cycle the device (Reset).
14
PROG Mini USB Connector
Connect to a PC to perform firmware upgrades
15
12V DC Power Connector
Connect to the supplied power adapter
Page 2
Step 3: Install the 691
To mount the 691 in a rack, use an RK-1 rack adapter. Alternatively, attach the rubber feet to the underside of the 691 and place it
on a table.
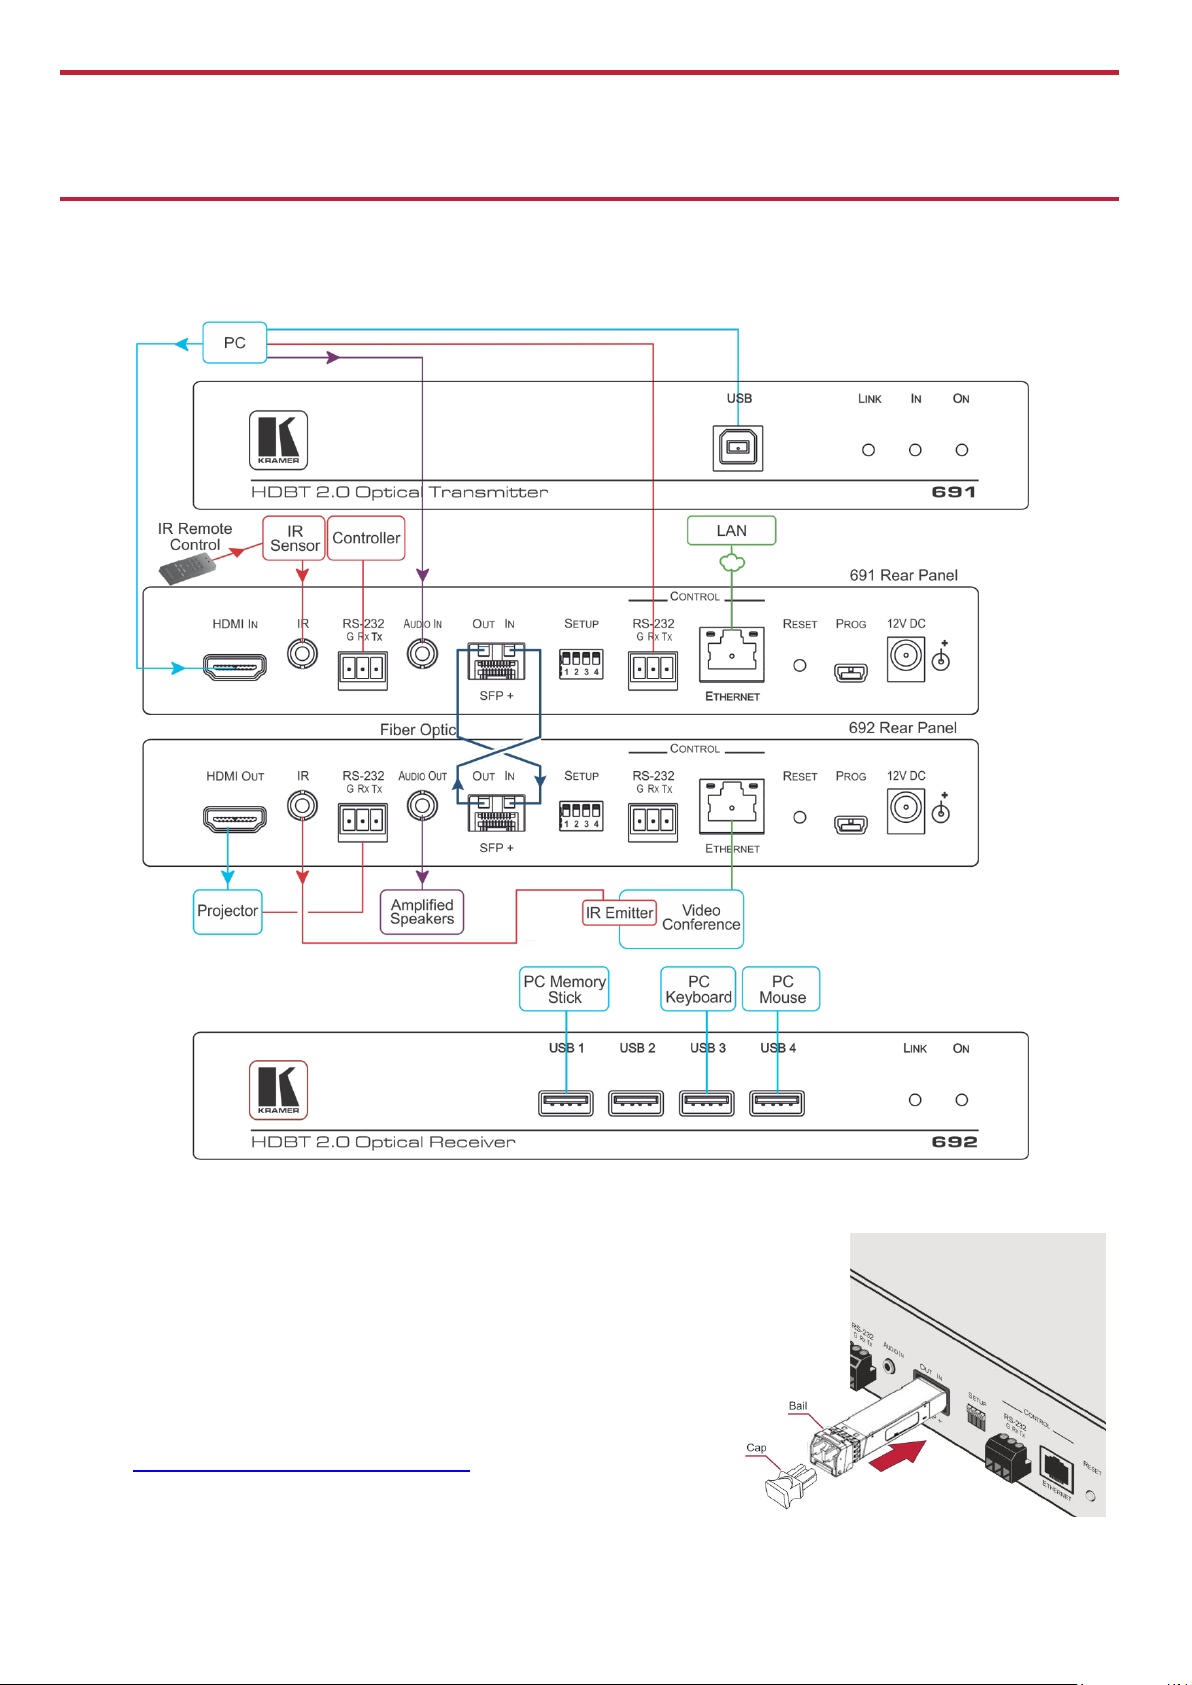
Step 4: Connect the inputs and outputs
Always switch OFF the power on each device before connecting it to your 691. For best results, we recommend that you always use
Kramer high-performance cables to connect AV equipment to the 691.
Always cross-connect the fiber connections, Rx OUT to Tx IN and Rx IN to Tx OUT, as transmission is carried
on simplex fiber strands.
To install the OSP SFP+ transceiver:
1. Make sure the bail is pushed up, in the closed position.
2. Insert the OSP SFP+ transceiver into the relevant optical device SFP+
slot and push it in until it clicks.
Remove the protective cap and store it in a safe place for future use.
Warning: Connecting the OSP SFP+ connector to an LC(APC) fiber
connector may cause poor performance and damage the connector!
Refer to www.kramerav.com/downloads/OSP-MM1 for more information.
Page 3

Warning: Class 1 Laser Product
• Invisible laser radiation present.
• Avoid long-term viewing of laser.
• Avoid the use of magnifying viewing aids or instruments (such as binoculars, telescopes, microscopes and magnifying
lenses, but not spectacles or contact lenses).
• Avoid placing optical devices in the emitted beam that could cause the concentration of the laser radiation to be
increased.
RJ-45 Pinout:
SETUP DIP-Switches
For the Ethernet connectors, see the proper
wiring diagram
A DIP-switch that is down is on, up is off. Changes to the DIP-switches only take
effect on power-up. After changing a switch, reboot the device.
PIN EIA /TIA 568B
PIN
Wire Color
# Function
Status
1
Orange / White
1 For future use
2 Orange
2
Audio source priority
Off—Embedded audio (factory default)
On—Analog audio
3
Green / White
4 Blue
3
EDID lock
Off—Automatic EDID acquisition (factory default)
On—Lock (locks the current EDID so that changes
on the output do not result in changes to the EDID)
5
Blue / White
6 Green
7 Brown / White
4
Audio mode selection
Off—Auto (factory default)
On—Manual
8
Brown
Step 5: Connect the power
Connect the power adapter to the 691 and plug the adapter into the mains electricity.
Safety Instructions
Caution:
There are no operator serviceable parts inside the unit
Warning:
Use only the Kramer Electronics power supply that is provided with the unit
Warning:
Disconnect the power and unplug the unit from the wall before installing
See www.KramerAV.com for updated safety information.
Step 6: Control the 691 via the:
Embedded Web pages:
RS-232 and Ethernet:
RS-232
Protocol 3000
Baud Rate:
115,200
Stop Bits:
1
Data Bits:
8
Parity:
None
Command format:
ASCII
Example (get device model name):
#model?<cr>
TCP/IP Parameters
IP Address:
192.168.1.39
UDP Port #:
50000
Subnet mask:
255.255.000.000
TCP Port #:
5000
Default gateway:
192.168.0.1
Full Factory Reset
Rear panel button:
Press and hold for 5 seconds to reset the device to factory default settings.
P3K command:
#factory<cr>
Embedded Web
pages:
Select Device Settings page and click Factory reset
Default Parameters
Value
Name:
KRAMER_
Model:
691 Audio delay input switching on new signal:
Immediate
Audio delay input switching on signal loss (leave 5V on):
5 seconds
Audio delay input switching on cable unplug:
Immediate
Video delay power off 5V on signal loss:
15 minutes
HDCP:
Follow output
Web Logon credentials:
Name: Admin; Password: Admin
Page 4

Technical Specifications
Inputs
1 HDMI
On a female HDMI connector
1 Stereo Analog Unbalanced Audio
2Vrms / 10kΩ, on a 3.5mm mini jack
Outputs
1 Fiber Optic
On 2 LC connectors
Ports
1 IR
On a 3.5mm mini jack for IR link extension
1 USB
On a female USB-B connector for USB link extension
1 RS-232
On a 3-pin terminal block for serial link extension
1 RS-232
On a 3-pin terminal block for device control
1 100BaseT Ethernet
On an RJ-45 female connector for device control and LAN extension
Extension Line
Compliance
HDBaseT 2.0
Optical Fiber
Multi-mode (MM) or single-mode (SM)
Fiber Line
2 simplex strands
Optical Module
10Gbps SFP+ IEEE 802.3ae compliant
Multi-mode Line
Compliance
G.651.1 OFNR fiber
Nominal Peak Wavelength
850nm
Max Data Rate
10.2Gbps
Typical Optical Transmission Power
-2.5dBm
Typical Optical Maximum Loss Budget
8.6dB
Max Reach over OM3 MM Fiber
3km (1.86 miles)
Single-mode Line
Compliance
G.652D OFNR fiber
Nominal Peak Wavelength
1310nm
Max Data Rate
10.2Gbps
Typical Optical Transmission Power
-2.5dBm
Typical Optical Maximum Loss Budget
11.9dB
Max Reach over OS1 SM Fiber
33km (20.5 miles)
Video
Max Bandwidth
10.2Gbps (3.4Gbps per graphic channel)
Max Resolution
4K UHD @60Hz (4:2:0) 24bpp resolution
Compliance
HDMI 2.0 and HDCP 1.4
Analog Audio
Max Vrms Level
1
THD + NOISE
0.03% @1kHz at nominal level
Extended USB
Host Compliance
1.1 and 2.0
Max Extended Line Rate Bandwidth
127Mbps (out of max 480 USB)
Max Devices
7
Max Hubs
2
Max Ports per Hub
8
Extended Ethernet
Max Transmission Bandwidth
100Mbps
Extended RS-232
Baud Rate
300 to 115200
Control RS-232
Baud Rate
115200
Supported PC Web
Browsers
Windows 7 and Higher
Internet Explorer (32/64 bit) version 10
Firefox version 30
Chrome version 35
MAC
Chrome version 35
Firefox version 30
Safari version 7
Minimum Browser Window Size
1024 x 768
Power
Consumption
12V DC, 1300mA
Source
12V DC, 2A
Cooling
Convection Ventilation
Environmental
Conditions
Operating Temperature
0° to +40°C (32° to 104°F)
Storage Temperature
-40° to +70°C (-40° to 158°F)
Humidity
10% to 90%, RHL non-condensing
Regulatory Compliance
Safety
CE, UL
Environmental
RoHs, WEEE
Enclosure
Size
Half 19” 1U
Type
Aluminum
General
Net Dimensions (W, D, H)
21.46cm x 16.3 cm x 4.36cm
(8.45" x 6.42" x 1.7")
Shipping Dimensions (W, D, H)
35.1cm x 21.2cm x 7.2cm
(13.82" x 8.35" x 2.8")
Net Weight
0.95 kg (2.1lbs)
Shipping Weight
1.45 kg (3.2lbs) approx.
Accessories
Included
Power supply
Optional
For optimum range and performance use the recommended USB,
Ethernet, serial and IR Kramer cables available at
www.kramerav.com/product/691
Specifications are subject to change without notice at www.kramerav.com
 Loading...