

Page 1
Installation Instructions
MODELS:
612T, 612R
4K60 4:4:4 DP Tx/Rx over Extended-Reach
Multi-Mode Fiber Optic Cable
SAFETY WARNING
Disconnect the unit from the power supply before opening and servicing
For the latest information on our products and a list of Kramer distributors, visit our Web site where
updates to this user manual may be found.
We welcome your questions, comments, and feedback.
www.KramerAV.com
info@KramerAV.com
P/N:
2900-301019
Rev:
2
Page 2
612T, 612R 4K60 4:4:4 DP Tx/Rx over Extended-Reach Multi-Mode Fiber Optic Cable
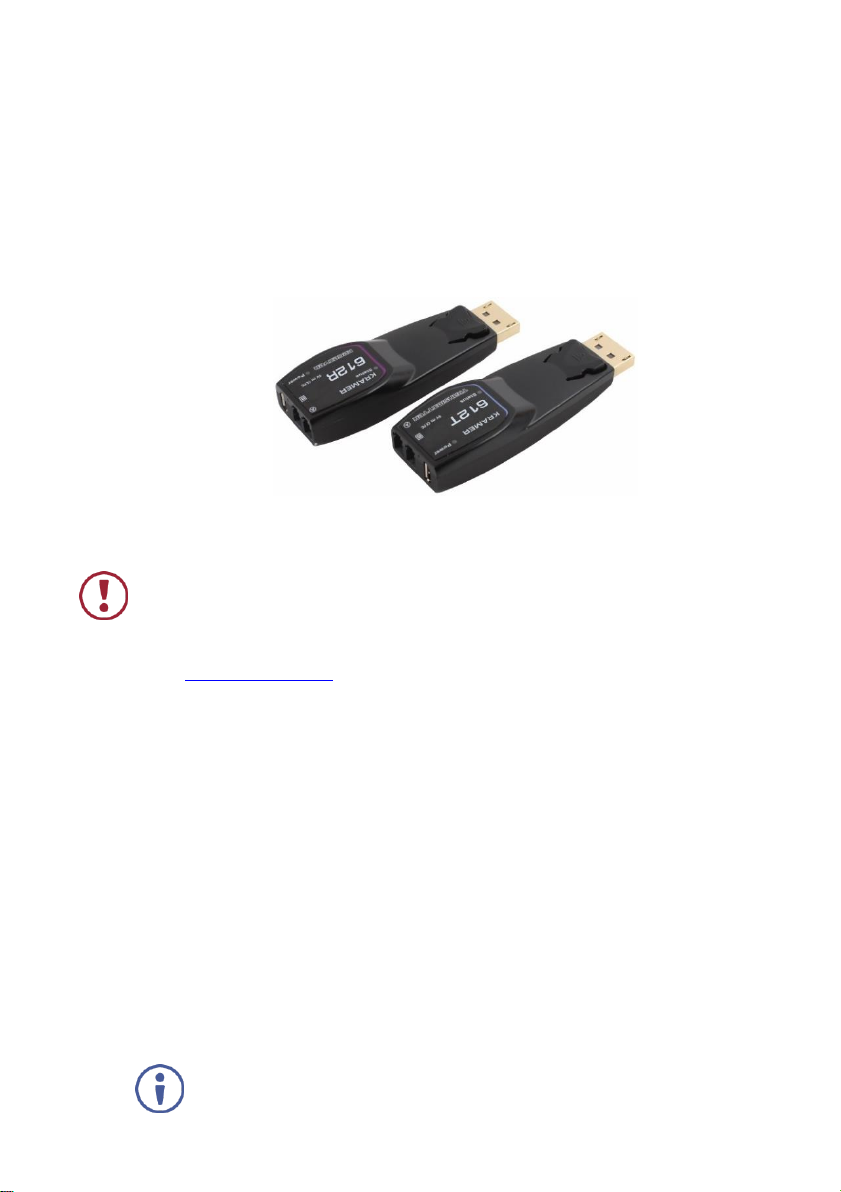
Congratulations on purchasing your Kramer 612T and 612R Plug and Play active 4K60 4:4:4 DP
Tx/Rx over Extended-Reach Multi-Mode (MM) Fiber Optic cable. 612T and 612R extend signals of
up to 4096x2160 @60Hz, over a distance of up to 200m (656ft) without signal scaling or data
compression, providing a maximum data rate of 21.6Gbps (5.4Gbps per lane). 612T and 612R are
easily and securely connected via a 2LC fiber connector and can be powered either from the USB
connector or from the DisplayPort interface (pin #20).
Figure 1: 612T Transmitter and 612R Receiver
Safety
Caution:
There are no operator serviceable parts inside the unit.
Warning:
Disconnect the power and unplug the unit from the wall before installing.
Warning:
Avoid direct eye exposure into the optic connectors when powered,
although this product is regulated strictly enough to operate under the
Laser Class 3R for eye safety.
See www.KramerAV.com for updated safety information.
Installation
To install 612T and 612R:
1. Unpack the contents of the package with care.
We recommend that you save the original box and packaging materials for possible future
shipment.
2. Turn on the power to the DisplayPort source (for example, a laptop) and acceptor (for
example, a display).
3. Power the 612T and 612R:
• Connect the micro USB connector on each device to a USB cable (supplied).
• Connect the USB cable either to the wall-mount power adapter (supplied) and to the
mains, or to a USB port.
The POWER LED lights and the STATUS LED flashes three times.
Although the transmitter and receiver can be powered via pin #20 on the
DisplayPort interface, we recommend that you use the USB power adapters
on both sides.
Page 3

4. Connect the two LC optical fibers between 612T and 612R.
Connect (A) to (A) and (B) to (B). Make sure that the duplex connectors are connected
properly.
The STATUS LED flashes.
Do not look directly into the LC connectors on the 612T (the transmitter side)
when it’s powered.
This product operates under LASER Class I, classified by CDRH/FDA for eye
safety.
We recommend that you avoid using intermediate cables or adapters. Using
them may affect the transmission quality.
5. Connect 612T to the DisplayPort on the source side and 612R on the acceptor side.
Make sure that the 612T is always connected to the source side and the
612R is connected to the acceptor side.
If you cannot connect the 612R directly to the display, we recommend that
you use the DisplayPort (M) to-(F) extension cable supplied with the package.
Once the system is connected the Status LEDs on both 612T and 612R flash.
Troubleshooting
If the display appears black:
• Check that the source and display devices are both switched on.
• Check that the power source adapters are properly connected on both sides.
• Make sure that both DisplayPort connector heads are fully plugged into the devices.
• Reset the system by disconnecting and then reconnecting the 612T or 612R, or by
disconnecting and then reconnecting the power adapters.
• Reboot the system.
Page 4

If the image appears distorted and/or there is background noise:
• Go to the display properties and check the settings. Make sure that the resolution is set below
4096x2160 at a 60Hz refresh ratio to check if the graphic resolution is properly defined.
• Reset the system by disconnecting and then reconnecting the 612T or 612R, or by
disconnecting and then reconnecting the power adapters.
It is important to connect the devices correctly as marked: 612T to the source side and
612R to the acceptor side.
Specifications
Video
Max. Resolution
4K @60Hz 4:4:4 (4096x2160)
Data Rate
Maximum 21.6 Gbps (HBR2)
Compliance
Supports HDCP 2.2, EDID and DPCP
DisplayPort Support
Dual-mode DP (DP++)
Ports
612T (source end)
Male DisplayPort gold plated
612R (display end)
Male DisplayPort gold plated
612T (source end)
Micro USB (for power supply)
612R (display end)
Micro USB (for power supply)
Power
5V
Via USB source
Via external source
From DisplayPort PIN #20
Recommended
Cable
Structure
Dual Multi-mode OM3 (50/125um) glass fiber
Optical Connectors
Duplex LC connectors
Max. Fiber Cable Attenuation
(λ=850nm)
2.5dB/KM
Max. Skew
0.4ns Max. Insertion Attenuation
0.5dB
Total Optical Attenuation
1dB max @ 656ft/200m extension
Maximum Length
200m (656ft)
Environmental
Conditions
Operating Temperature
0° to +50°C (32° to 122°F)
Storage Temperature
-30° to +70°C (-22° to 158°F)
Operating Humidity
0 to 85%
Standard
Compliance
CE
EN 55032:2012/AC: 2013 (Class A),
EN 61000-3-2:2014, EN 61000-3-3:2013,
EN 55024:2010, EN 609501:2006+A11:2009+A1:2010+A12:2011+A2:2013
FCC
CFR 47 part 15 SUBPART B, Section 15.101
Environmental
RoHS (2011/65/ EU)
General
Net Dimensions (W, D, H), each
2.6cm x 7.2cm x 1.5cm
(1" x 2.8" x 0.6")
Shipping Dimensions (W, D, H)
19.3cm x 25.3cm x 62cm
(7.6" x 10" x 24.4")
Net Weight, each
0.12kg (0.3bs) approx.
Shipping Weight
1.48kg (3.3lbs) approx.
Accessories
Included
2 Micro USB to USB type-A cables, 2 Wall-mount
power adaptors, 1 20cm DisplayPort (M) to (F)
copper extension cable
 Loading...