

Page 1
Art. 32108
Instruction Manual
Cordless drill/driver 18 V 2000 mAh
EN
DO NOT attempt to operate the tool until you have read and
understood all instructions and safety rules contained in this
manual. Failure to comply may result in accidents involving fire,
electric shock, or serious personal injury. Save this owner’s
manual for future reference and review it frequently for safe
operation.
WARNING:
1 h
Li-Ion
18 V
2000 mAh
45
1.6
kg
0-400/
0-1400
1 min.
Ø mm
2-13
Page 2
2
Page 3
3
Art. 32108
KRAFTWERK
25, rue du Stade
F - 67870 Bischoffsheim
www.kraftwerktools.com
Page 4

4
Page 5
5
Page 6
6
Page 7
7
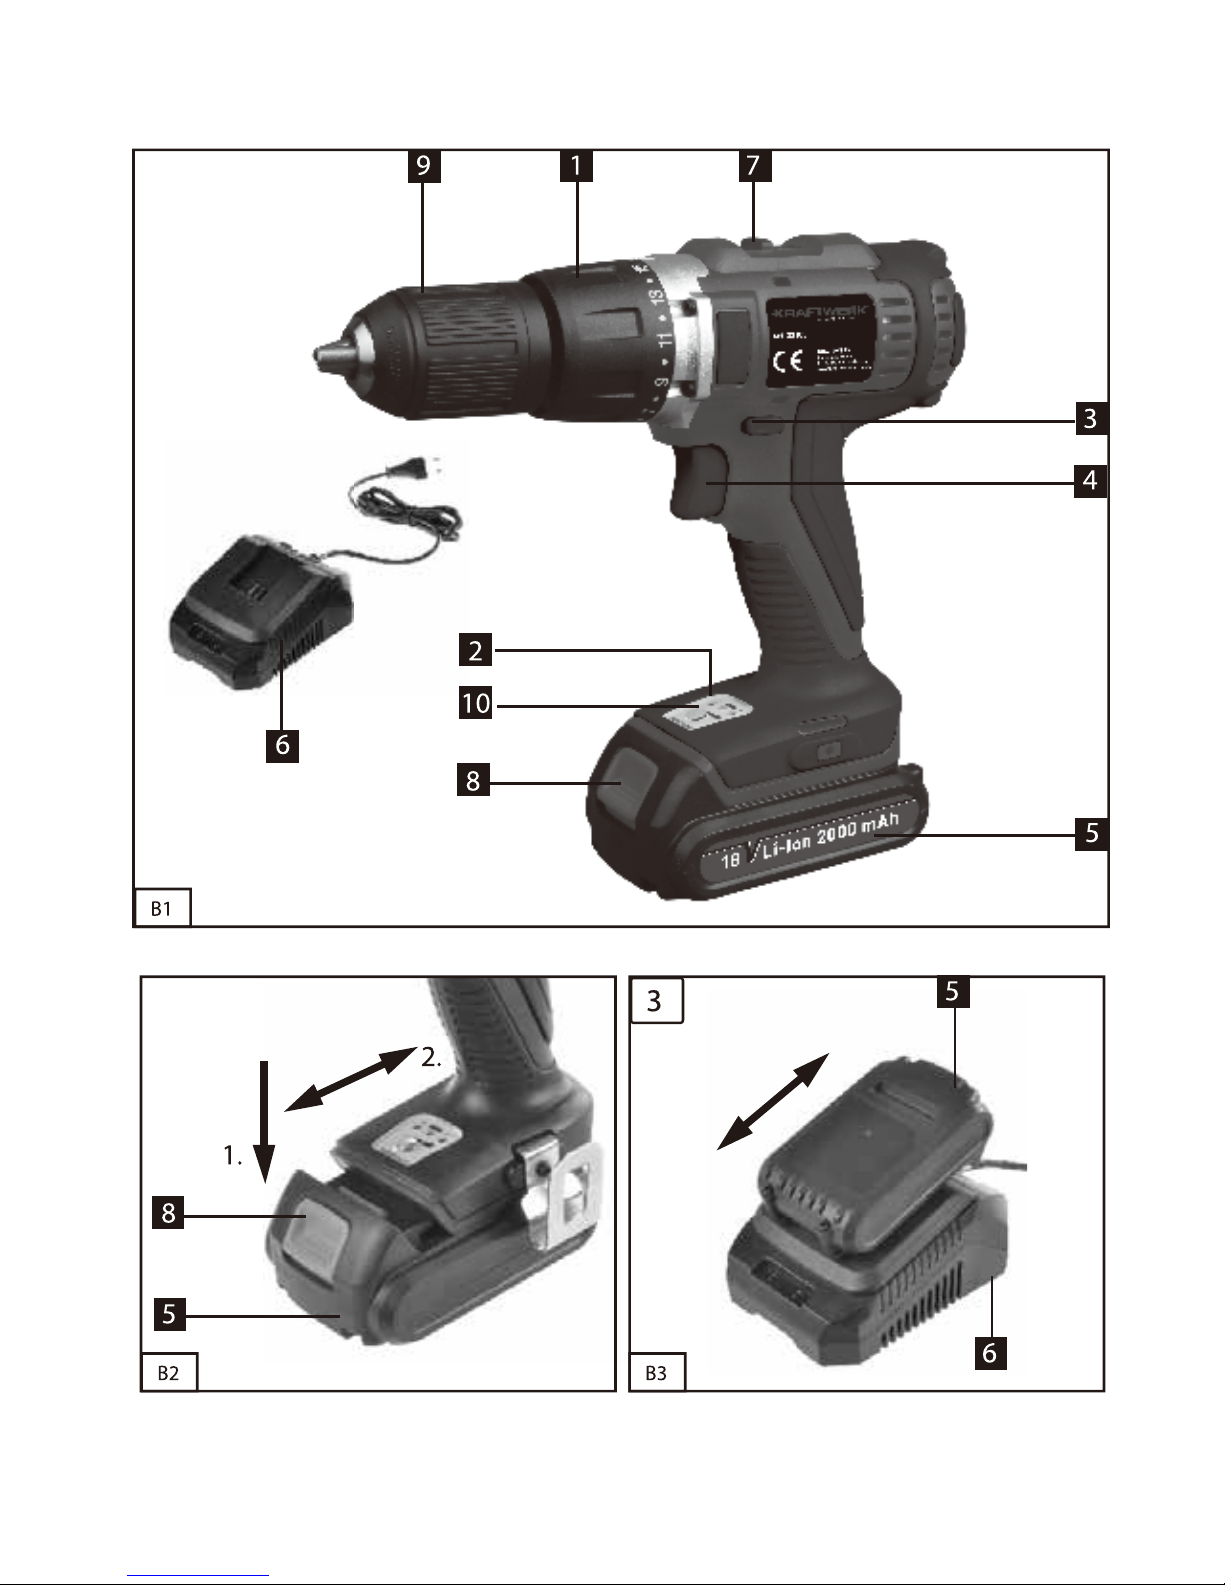
8.1 Charging the battery pack (Fig. 2/3)
1. Remove the battery pack (5) from the handle,
pressing the pushlock buttons (8) downwards to
do so.
2. Check that your mains voltage is the same as
that marked on the rating plate of the battery
charger. Plug the mains plug of the charger (6)
into the mains socket outlet.
3. Push the battery pack onto the battery charger.
The ashing red LED will come on to indicate
that the battery pack is being charged. When the
charging process is nished, the red LED will be
1. Torque selector
2. Battery capacity indicator
3. Changeover switch
4. ON/OFF switch
5. Li-Ion-Battery pack
6. Battery charger
7. Selector switch for 1st/2nd gear
8. Pushlock button
9. Quick-change drill chuck
10. LED lamp
Page 8

8
permanently lit. The time it takes to fully recharge
an empty battery is approximately 1 hour.
4. The temperature of the battery pack may rise
slightly during the charging operation. This is
normal. If the green LED extinguishes during
charging, the temperature is either above or
below the perfect charging temperature. In this
case, pull the plug of the charger and charge
the battery in an environment in which the
temperature is either warmer or colder.
If the battery pack fails to become charged,
please check
• whether there is voltage at the socket-outlet
• whether there is proper contact at the charging
contacts on the charger.
If the battery still fails to become charged, please
return
• the charger
• the battery pack
to our Customer Service Department.
To ensure that the battery pack provides long
service you should take care to recharge it
promptly.
You must recharge the battery pack when you
notice that the power of the cordless screwdriver
drops.
Never fully discharge the battery pack. This will
cause the battery pack to develop a defect.
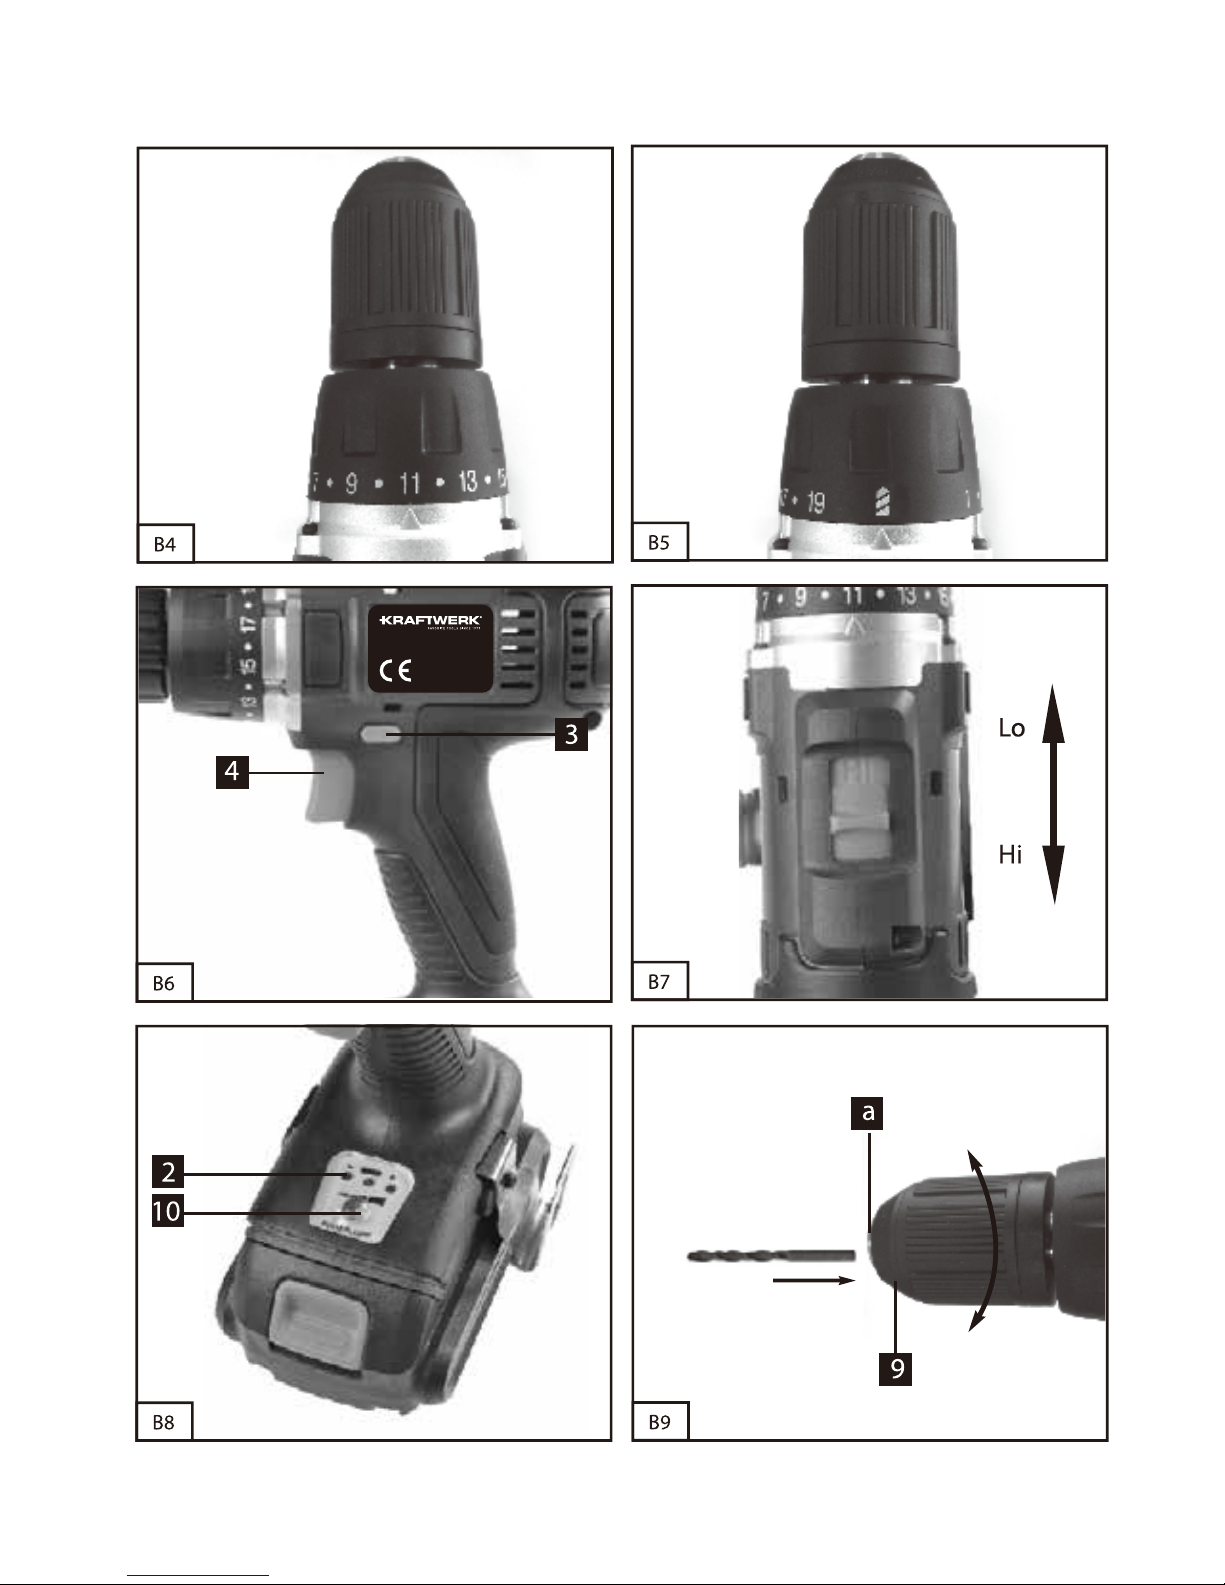
8.2 Torque setting (Fig. 4 / Item 1)
The cordless screwdriver is tted with a
mechanical torque selector.
The torque for a specic size of screw is selected
with the set-collar (1). The correct torque
depends on several factors:
· on the type and hardness of material in question
· on the type and length screws used
· on the requirements needing to be met by the
screwed joint.
The clutch disengages with a grating sound to
indicate when the set torque is reached.
Important! The tool must be at a standstill when
you set the torque with the setting ring.
8.3 Drilling (Fig. 5 / Item 1)
For drilling purposes, move the set-collar to the
last step „Drill“. In this setting the slip clutch is
inactive.
The maximum torque is available in drilling
mode.
8.4 Forward/Reverse switch (Fig. 6 / Item 3)
With the slide switch above the On/O switch you
can select the direction of rotation of the
batterypowered drill/screwdriver and secure it
against being switched on accidentally. You can
choose between clockwise and anticlockwise
rotation. To avoid causing damage to the gearing
it is advisable to change the direction of rotation
only when the tool is at a standstill. The On/
O switch is blocked when the slide switch is in
centre position.
8.5 On/O switch (Fig. 6 / Item 4)
Innitely variable speed control is possible with
the On/O switch. The further you press the
switch, the higher the speed of the batterypowered
drill/screwdriver.
8.6 Changing over from 1st gear to 2nd gear
(Fig. 7/ Item 7)
You can work at a higher or lower speed
depending on the position of the selector switch.
To avoid damaging the gear unit you should only
change over gears when the tool has stopped.
8.7 Battery capacity indicator (Fig. 8– Item 2)
The 3 color LEDs will indicate the status of battery
capacity as soon as you press the ON/OFF switch
(4).
All LEDs illuminate:
The battery is fully charged.
The yellow and red LED illuminate:
The battery has an adequate remaining charge.
Red LED:
The battery is empty, recharge the battery.
8.8 LED lamp (Fig. 8)
The LED lamp (10) can be used in poor lighting
conditions to illuminate the area where you want
Page 9

9
to drill or screw. The LED lamp (10) will be lit
automatically as soon as you press the ON/OFF
switch (4).
8.9 Changing the tool (Fig. 9)
Important. Set the changeover switch (3) to its
centre position whenever you carry out any work
(for example changing the tool, maintenance
work, etc.) on the cordless screwdriver.
• The cordless screwdriver is tted with a
quickaction chuck (9) with an automatic spindle
stop.
• Open the chuck (9). The chuck opening (a) must
be large enough to hold the tool (drill bit or
screwdriver bit).
• Select the suitable tool. Push the tool as far as
possible into the chuck opening (a).
• Tighten the chuck (9) and then check that the
tool is secure.
8.10 Screwdriving
We recommend using self-centering screws (e.g.
Torx screws, recessed head screws) designed for
reliable working. Be sure to use a bit that matches
the screw in shape and size. Set the torque, as
described elsewhere in these operating
instructions, to suit the size of screw.
9. Technical data
Voltage supply: 18 V d.c. / 2.0 Ah Li-Ion
Idling speed: 0-400/0-1400 rpm
Torque settings: 19+1
Max. torque: 45 Nm
Forward and reverse rotation: yes
Chuck clamping width: 2-13 mm
Battery charging voltage: 21 V d.c.
Battery charging current: 2200 mA
Mains voltage for charger: 220-240 V~/50-60 Hz
Charging time: 1 h
Weight: 1.74 kg
Sound and vibration
Sound and vibration values were measured in
accordance with EN 60745.
LpA: sound pressure level 71.5 dB(A)
KpA: uncertainty 3 dB
LWA: sound power level 82.5 dB(A)
KWA: uncertainty 3 dB
Wear ear-mus.
The impact of noise can cause damage to hearing.
Total vibration values (vector sum of three
directions) determined in accordance with EN
60745.
Drilling in metal
Vibration emission value ah = 3.8 m/s
2
K uncertainty = 1.5 m/s
2
Screwing without hammer action
Vibration emission value ah <2.5 m/s
2
K uncertainty = 1.5 m/s
2
Important!
The vibration value changes according to the area
of application of the electric tool and may exceed
the specied value in exceptional circumstances.
10. Cleaning and maintenance
Always pull out the mains power plug before
starting any cleaning work.
10.1 Cleaning
• Keep all safety devices, air vents and the motor
housing free of dirt and dust as far as possible.
Wipe the equipment with a clean cloth or blow it
with compressed air at low pressure.
• We recommend that you clean the device
immediately each time you have nished using it.
• Clean the equipment regularly with a moist
cloth and some soft soap. Do not use cleaning
agents or solvents; these could attack the plastic
parts of the equipment. Ensure that no water can
seep into the device.
10.2 Maintenance
There are no parts inside the equipment which
require additional maintenance.
Page 10

10
11. Repairs
Only use accessories and spare parts
recommended by the manufacturer.
If the equipment should fail some day in spite of
our quality controls and your maintenance, only
have it repaired by an authorized electrician.
If the supply cord of the appliance is damaged,
this has to be done by the manufacturer or his
agent or electrician in order to avoid a safety
hazard.
12. Environmental protection
End of life electrical equipment must not
be placed in household waste. Please take
it to a return point. Find out about your
nearest return point from your council or
sales outlet.
Page 11

11
DECLARATION OF CONFORMITY
Model: 32108
Cordless drill/driver 18 V 2000 mAh
KRAFTWERK Sàrl,
25 rue due Stade, F-67870 Bischoffsheim
Declares under sole responsibility that the product to which this declaration relates is in conformity with the following
standard(s) or other normative document(s):
Following the provisions of Directive(s)
Machinery Directive:
Bischoffsheim, 28/03/2018
EN 55014-1: 2006+A1/2009+A2/2011
EN 55014-2: 1997+A1/2001+A2/2008
EN 60745-1: 2009+A11/2010
EN 60745-2-1: 2010
EN 60745-2-2: 2010
EN 60335-1: 2012+A11/2014
EN 60335-2-29: 2004+A2/2010
EN 62233: 2008
2014/30/EU
2006/42/EC
2014/35/EU
WARRANTY
We do not take responsibility for any damage caused by misuse or any use that is not in
compliance with the safety standards described herein.
CUSTOMER SERVICES
Contact your local importer of your specialized dealer to obtain address of our service
department.
FROM DATE OF PURCHASE RECEIPT
2 YEAR GUARANTEE
ON MATERIAL OR PRODUCTION DEFECTS
Alexander Pieper
CEO
Page 12

www.kraftwerktools.com
KRAFTWERK Europe AG
Mettlenbachstrasse 23
CH-8617 Mönchaltorf
Switzerland
Tel. +41-44 949 40 50
KRAFTWERK Sàrl.
25, rue du Stade
F – 67870 Bischoffsheim
France
Tel. +33-388 48 64 50
 Loading...