

Kraemer Automotive Systems KR1 J6 User Manual
CLASSIC INFOTAINMENT
SYSTEM
EN | DE


CLASSIC INFOTAINMENT
SYSTEM
EN

Introduction
IMPRINT
Jaguar Land Rover Limited,
Abbey Road,
Whitley,
Coventry
CV8 3LF
Great Britain
ABOUT THIS HANDBOOK
Please take the time to read all the user documentation delivered with your Classic
Infotainment System as quickly as possible.
The information contained in this publication was correct at the time of going to print.
Subsequent modifications/updates to the unit may mean that descriptions in the
handbook may no longer be entirely in accordance with the status of the unit.
In the interest of progress we reserve the right to change the specifications, the
design or the documentation at any time without notice and without any obligation.
This publication or parts of this publication are not allowed to be copied or translated
without our approval. Errors and omissions excepted.
SYMBOLS USED
Safety instructions either provide a procedure that must be followed exactly, or
information that should be considered with great care to prevent the possibility
of injury.
Precautionary measures either provide a procedure that must be followed exactly,
or information that should be considered with great care to prevent the possibility
of damage to your vehicle.
All rights reserved. Published by © Jaguar Land Rover Limited 2018.
2

Introduction
UNIT PART NUMBER
BD11017, BD11018, BD11019, BD11020,
BD11021, BD11022, LR114720, LR115044,
LR117489, LR117490
STATUS
Status 08/2018, handbook version 1.0
SUPPORT
Contact number:
+44 (0) 2476-565708
Email:
Jaguar:
Jclassic@jaguarlandrover.com
Land Rover:
Lclassic@jaguarlandrover.com
Copyrights:
© JAGUAR LAND ROVER LIMITED 2018
Address:
Jaguar Land Rover Classic Works
DC1 Imperial Road
Prologis Park
Ryton-on-Dunsmore
Coventry CV8 3LF
Great Britain
website: www.jaguarclassicparts.com
SAFETY
The Classic Infotainment System is the
central control unit for the radio, media
functions, iPod, external audio sources,
sound settings, navigation and Bluetooth
telephony. To ensure you do not put
yourself or others at risk or cause yourself
or others harm while using your Classic
Infotainment System, you must pay
attention to the following points:
doubt, stop and operate the Classic
Infotainment System with the
vehicle stationary. The navigation
system is only intended as an
aid for the driver and provides a
suggestion for the route. This aid
does not relieve you of your sole
responsibility to drive correctly to
suit the road trac, to comply with
the highway code as well as other
applicable provisions in relation
to how to act in road trac. As a
driver you must assess the current
trac situation. You remain solely
responsible for driving your vehicle
safely. Continue to pay attention to
the trac situation.
INTENDED USE
The Classic Infotainment System is used
for the reception of radio stations, for
playing back audio files on memory
cards and other data carriers, for making
telephone calls via Bluetooth® and for
navigation.
COPYRIGHT
All the programs and terms mentioned
in this document may be registered
marks or trademarks of the related
manufacturers and are not allowed to be
used commercially or for other purposes.
Without the express written permission
of the originator, no part of this
documentation is allowed to be copied or
transmitted for any purpose, independent
of the manner or the means, electronic
or mechanical, with which this action is
taken. All rights reserved.
Risk of accident. Due to distraction,
you could lose control of the
vehicle. Only operate your Classic
Infotainment System if you can
control your vehicle safely and the
road trac situation permits. If in
3

Contents
Contents
Imprint ................................................................. . 2
About this handbook .................................... . 2
Symbols used ................................................... . 2
Unit part number ............................................ . 3
Status................................................................... . 3
Support ............................................................... . 3
Safety .................................................................. . 3
Intended use ..................................................... . 3
Copyright ........................................................... . 3
Controls .............................................................. . 7
Menu structure ................................................. . 8
Basic functions ................................................. . 8
Selecting operating mode ........................... . 8
Switching on and o the unit ..................... . 8
Volume control ................................................ . 8
Muting ................................................................. . 8
Touchscreen operation ................................. .8
Tone ...................................................................... . 9
Equalizer ............................................................. . 9
Loudness ............................................................ . 9
Balance ............................................................... . 9
Fader .................................................................... . 9
Time format, date and time ........................ .9
Time format ....................................................... .9
Date ...................................................................... 10
Time ..................................................................... 10
Time synchronisation .................................... 10
Standby time .................................................... 10
Button sound .................................................... 10
AM tuner on/o ............................................... 10
Choose radiozone ........................................... .11
Day/night mode............................................... .11
Language ........................................................... .11
Volume of the audio sources ...................... .11
Version information ........................................ 12
Factory settings .............................................. 12
Restarting Classic Infotainment System 12
TUNER main menu ......................................... 13
Activating tuner ............................................... 13
Setting station .................................................. 13
Setting frequency band ................................ 13
Setting station manually .............................. 13
Setting station using station search ........ 13
Setting station via list of stations ............. 13
Setting station via saved stations............. 13
Saving stations ................................................. 14
Saving current station ................................... 14
Saving station from list of stations .......... 14
Alternative frequency (AF) on/o ........... 14
Trac messages (TA) on/o ...................... 14
MEDIA main menu .......................................... 15
Activating MEDIA ........................................... 15
Audio playback from
USB sticks and SD cards .............................. 15
Connecting USB stick.................................... 15
Inserting and removing SD card ............... 15
Inserting SD card ............................................ 15
Removing SD card .......................................... 15
Audio playback from a Bluetooth®
device (A2DP) .................................................. 16
Audio playback from iPod® or iPhone® ... 16
Audio playback via the AUX port ............. 16
File formats supported ................................. 17
Information on Bluetooth® ........................... 17
PHONE main menu ........................................ 17
Making telephone calls ................................. 17
Requirements for making
telephone calls ................................................. 17
Dropped calls while driving ........................ 17
Answering call .................................................. 18
Rejecting call .................................................... 18
Ending call ......................................................... 18
Making call ......................................................... 18
Re-dialling .......................................................... 18
Automatically accept call on/o .............. 18
Direct dialling ................................................... 18
Functions during a call ................................. 18
Changing microphone .................................. 18
List of contacts ................................................ 19
Transferring list of contacts ........................ 19
Sorting list of contacts ................................. 19
Calling contact ................................................. 19
Finding contact ............................................... 19
Deleting list of contacts ............................... 19
Call lists ............................................................... 19
Displaying call lists ......................................... 19
Calling telephone number
from a call list ................................................... 19
Bluetooth® settings ........................................ 19
Bluetooth® function on/o .......................... 19
Coupling Bluetooth® device ........................20
Coupling via Classic Infotainment
System ................................................................20
Coupling via mobile phone ........................20
Connecting coupled Bluetooth®
devices ...............................................................20
Manual connection ........................................20
Closing Bluetooth® connection .................20
4

Contents
Uncoupling mobile phone ..........................20
Changing pairing code ................................. 21
Changing Bluetooth® name ......................... 21
The navigation system .................................. 21
Switching on navigation ..............................22
Entering the destination..............................22
Possible ways of entering an address .... 22
Entering address ............................................22
Choosing town/city centre
as destination .................................................. 22
Information without complete
address...............................................................22
Destination from points of interest ......... 23
Destination from saved places .................23
Destination from history .............................23
Destination from saved routes ..................23
Destination via coordinates .......................23
Destination from all destination types ..23
Destination via map ......................................24
Saving destination .........................................24
Routes ................................................................24
Entering new route ........................................24
Saving route .....................................................24
Saving active route .......................................24
Renaming route ..............................................24
Changing route ...............................................24
Changing order of destinations................24
Deleting individual destination .................25
Adding interim point ....................................25
Avoiding specific sections on the
route ....................................................................25
Avoiding specific roads on a route .........25
Avoiding stretch of road ahead ................25
Restoring original route ...............................25
Displaying alternative routes ..................... 25
Interrupting navigation ................................25
Deleting next interim point ........................26
Deleting active route ....................................26
Deleting individual saved route ................ 26
Deleting all saved routes ............................. 26
Defining new starting point .......................26
Deleting new starting point .......................26
Starting route simulation ............................26
Jumping back to last turning ....................26
Jumping forward to next turning ............26
Interrupting simulation ................................26
Increasing simulation speed ...................... 27
Ending simulation .......................................... 27
During navigation .......................................... 27
Repeating navigation announcements ..27
Display during navigation ...........................27
Turning ............................................................... 27
Lane recommendation .................................27
Trac messages on the map ....................28
Displaying useful information ...................28
Navigation settings .......................................28
Setting vehicle profile ..................................28
Adding new profile ........................................29
Setting route planning method ................29
Setting navigation mode ............................29
Setting road types .........................................29
Setting volume for sounds .........................29
Switching on or o sounds ....................... 30
Setting the level of detail of the voice
instructions ...................................................... 30
Reading out road names ............................ 30
Settings warnings for road speed
limits................................................................... 30
Settings warnings for warning points ..... 31
Types of warnings ........................................... 31
Settings zoom and angle of the map ...... 31
Settings map day/night view ..................... 31
Setting map colours .....................................32
Enabling or disabling the display of
3D objects on the map ................................ 32
Enabling or disabling route
recording ...........................................................32
Enabling or disabling the display of point
of interest symbols on the map ...............32
Setting data fields on the map ................. 32
Displaying progress bar for the route .... 32
Providing motorway information .............33
Displaying points of interest close to
motorway journeys........................................33
Automatic overview ...................................... 33
Displaying road signs ...................................33
Displaying junction overview ....................33
Displaying tunnel view .................................33
Providing trac jam avoidance on
motorways ........................................................33
Providing real-time route alternatives ...33
Providing information on car parks
in the vicinity ................................................... 34
Providing suggestions on variations ......34
Map view and map alignment ...................34
Setting language for the user
interface............................................................. 34
Setting language for voice outputs ........34
5

Contents
Setting units and formats ...........................34
Setting time zone automatically ..............35
Setting time zone manually .......................35
Setting summer time .................................... 35
Menu animation ..............................................35
Trac messages/real-time trac
messages (TMC).............................................35
Reception of trac messages .................35
Choosing data sources for real-time
trac messages .............................................35
Real-time trac messages .........................35
Displaying trac information ...................36
Displaying free flow of trac ....................36
Setting time saving for route
recalculation ....................................................36
Prompting for route recalculation ...........36
Journey overview ...........................................36
Starting configuration wizard ...................36
Updating digital map ...................................37
Important safety instructions on
installation ........................................................37
Installation ........................................................38
Fine adjustment of the installation
depth ..................................................................38
Removal .............................................................38
Connection of accessories .........................39
Installation of the hands-free
microphone ......................................................39
Installation of the GPS antenna ................39
Installation of the antenna signal
splitter ................................................................39
Connection diagram .................................... 40
Technical data .................................................. 41
System ................................................................. 41
Tuner/digital radio .......................................... 41
Bluetooth® .......................................................... 41
Navigation software ....................................... 41
Dimensions/weight ........................................ 41
Items supplied .................................................. 41
6
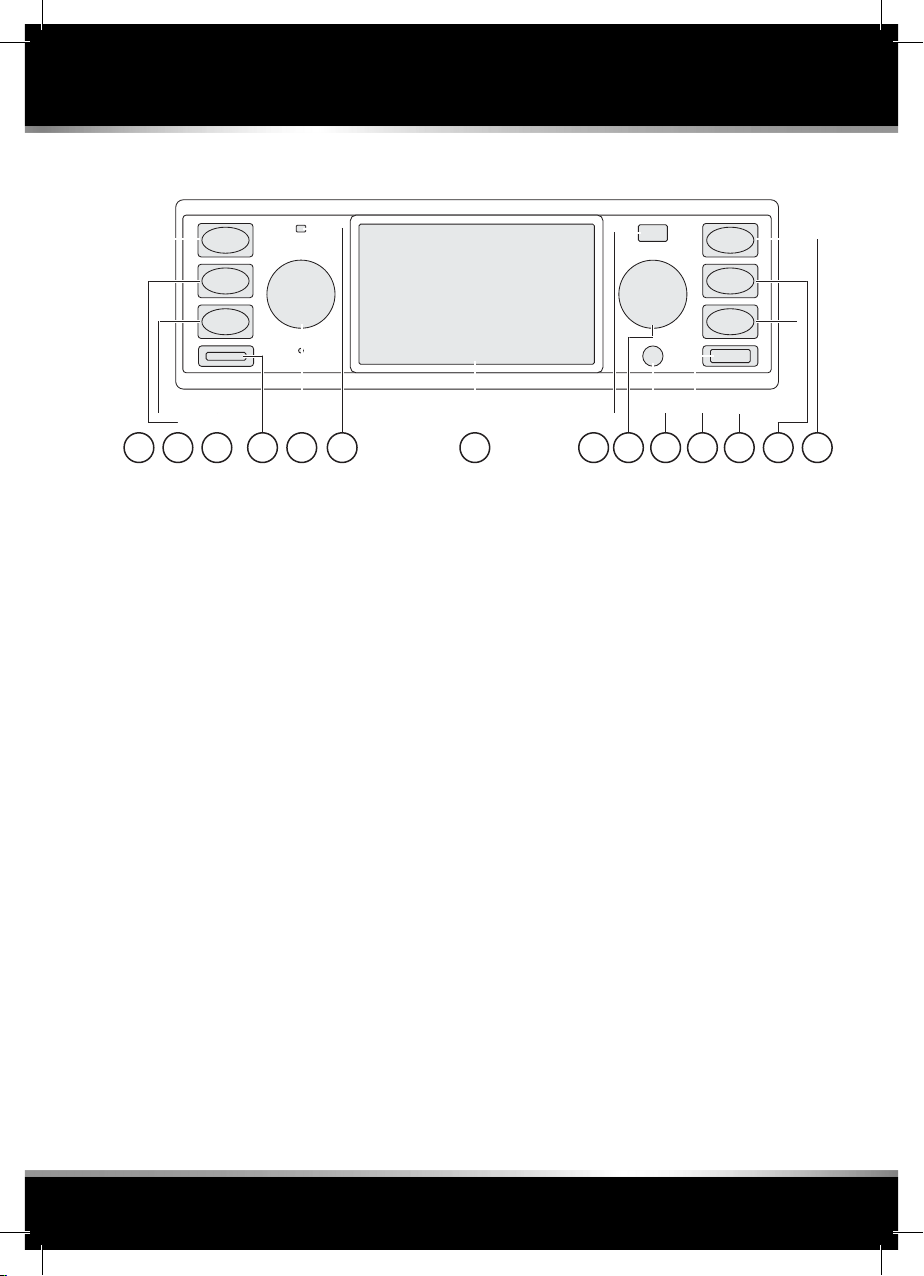
CONTROLS
Basic operation
TUNER
MEDIA
PHONE
14
13
12
11
10
1
1. Microphone for hands-free system
2. Light sensor for display brightness
NAVI (navigation mode)
MAP (map view) and repeat
last announcement
Back button
USB port
Aux in
Rotary knob/push button
Turn: change frequency/change value/
change menu command
Press: next station/save station/
choose menu command
Display with touchscreen function
NAVI
MAP
BACK
9
5 36782
On/O knob
Long press: switch on/o Classic
Infotainment System
Turn: adjust volume
Short press: mute on/o/interrupt
trac message
microSDHC card slot
PHONE/choose telephone
MEDIA/choose media source
iPod®/iPhone®
Play back from USB stick
Play back from microSDHC card
Play back from Bluetooth®
audio source
Aux in
TUNER/choose frequency band
(AM/FM/DAB+)
Note: The DAB+ function is only available
in Europe.
Note: The SD card function is only available for Land Rover devices.
4
7
Basic operation
MENU STRUCTURE
1 2 34 5
1. Status bar
2. Main display
EQ/sound settings
System settings
Options for tuner
BASIC FUNCTIONS
Selecting operating mode
Press the TUNER, MEDIA, PHONE, NAVI
and MAP buttons to change between the
various operating modes of the Classic
Infotainment System.
To prevent distraction or startling
due to a sudden tra c message or
navigation announcement, ensure
the volume is always reasonable.
Muting
Press On/O knob briefl y. The sound is
switched on or o .
Note: Muting also interrupts the incoming
tra c messages.
Touchscreen operation
To operate the unit using the touchscreen
display, follow these steps:
1. Touch the touchscreen using your
fi nger.
2. Move your fi nger over the touchscreen
to the left/right/top/bottom with light
pressure.
The selection on the touchscreen display
moves depending on the direction.
In this way you can navigate through lists
or menus. To accept a selection, tap the
touchscreen display with your fi nger.
A menu is opened, an option is chosen or
a function is run.
Switching on and o the unit
The Classic Infotainment System is
switched on and o together with the
ignition. Alternatively, you can switch on
and o the Classic Infotainment System
manually. For this purpose press the On/
O knob for a few seconds.
Volume control
Turn the On/O knob to adjust the
volume. Depending on the operating
mode selected, you change the volume
for the active audio source, a tra c
message, a navigation announcement, the
telephone ring sound or the telephone
call.
8
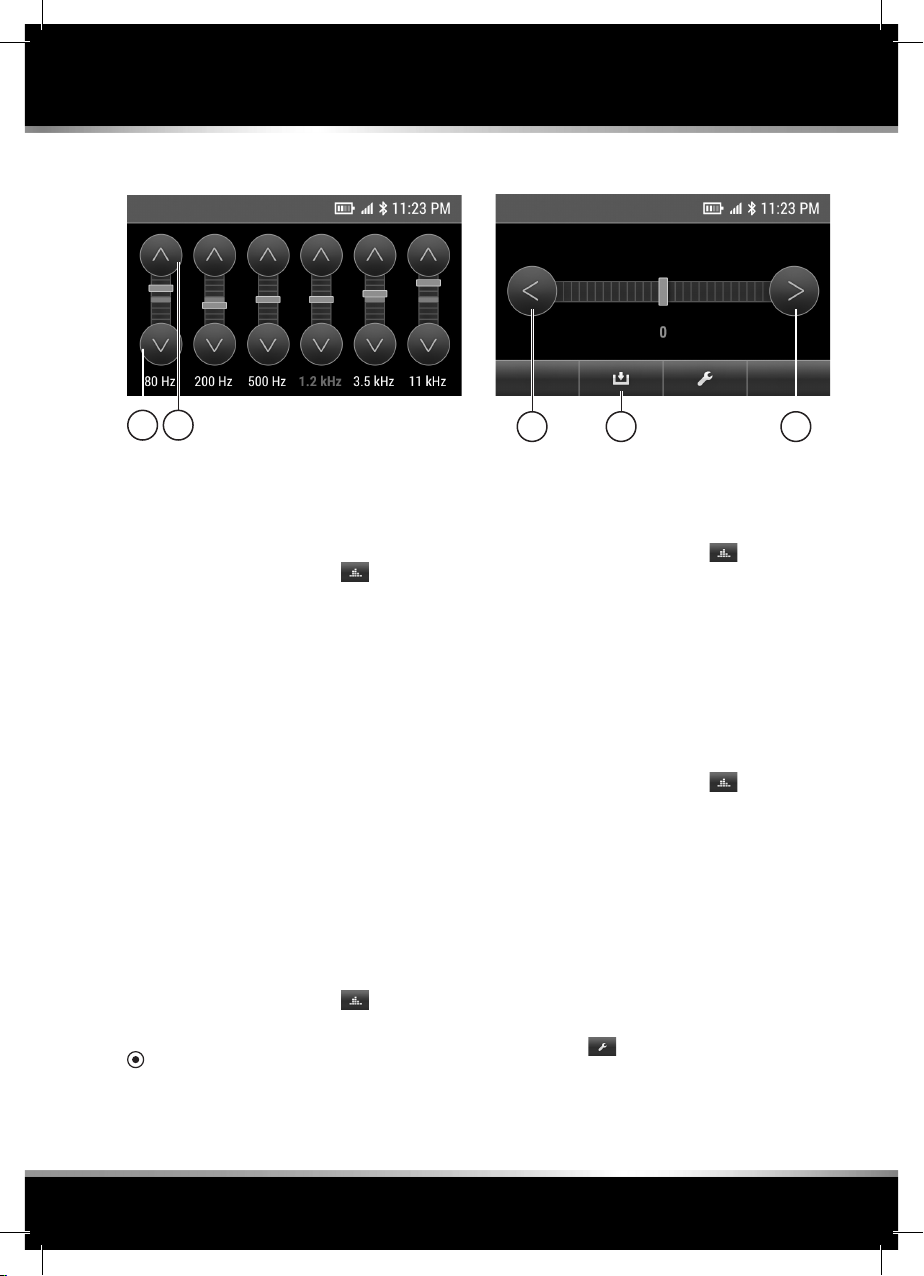
TONE
System settings
1 1
Equalizer
Using the Equalizer you can adjust the
treble, mid-range and bass. You can also
select pre-defined EQ presets. To set,
follow these steps:
1. Choose sound settings
2. Choose Equalizer.
3. Choose required EQ preset:
• Pop
• Rock
• Classic
• Jazz
• Custom
Choose Custom to set your own personal
EQ settings.
Set the required values using the arrows
(1).
Loudness
High and low frequencies in the sound
spectrum are enhanced by activating the
Loudness function. To set, follow these
steps:
1. Choose sound settings
2. Choose Loudness
The option field shows whether the
function is activated or deactivated.
.
.
21 1
Balance
Using the Balance you can move the
sound within the vehicle to the right or
left. To set, follow these steps:
1. Choose sound settings
2. Choose Balance.
3. Set the required value using the
arrows (1).
4. Save the setting: choose (2).
Fader
Using the Fader you can move the sound
within the vehicle to the front or back. To
set, follow these steps:
1. Choose sound settings
2. Choose Fader.
3. Set the required value using the
arrows (1).
4. Save the setting: choose (2).
.
.
TIME FORMAT, DATE AND TIME
To set the time format, date and time,
follow these steps:
Time format
1. Choose
2. Choose Date/time.
3. Choose 12h mode or 24h mode.
Depending on the setting already
.
9

System settings
active, the setting changes to 24h
mode or 12h mode. The setting
displayed is activated.
Date
1. Choose
2. Choose Date/time.
3. Choose Date.
4. Set the date using the arrows
Time
1. Choose
2. Choose Date/time.
3. Choose Time.
4. Set the time using the arrows
.
.
TIME SYNCHRONISATION
The following options are available to
synchronise the time:
• RDS: if this function is activated, the
time is regularly synchronised with the
time in the RDS signal.
• GPS: if this function is activated, the
time is regularly synchronised with the
time signal in the GPS signal.
• Manually: if this function is activated,
the time you set manually is used.
To set the time synchronisation, follow
these steps:
1. Choose
2. Choose Time synchronizing.
3. Choose required option.
The option fi eld shows whether the
function is activated or deactivated.
.
STANDBY TIME
If the standby time function is activated,
after switching o the ignition the
Classic Infotainment System remains
in the standby mode for the time you
have selected. If you switch back on the
ignition within the time set, the navigation
is active again immediately, for example.
To set the standby time, follow these
steps:
1. Choose
2. Choose Standby.
3. Choose required setting 5 minutes, 15
minutes, 30 minutes or O .
The option fi eld indicates the function
activated.
.
BUTTON SOUND
To activate or deactivate the button
sound, follow these steps:
1. Choose
2. Choose Key tone.
The option fi eld shows whether the
function is activated or deactivated.
.
AM TUNER ON/OFF
To select the AM frequency band, the AM
tuner must be activated in the system
settings. To activate the AM band, follow
these steps:
1. Activate/deactivate AM: choose
2. Choose AM-Tuner.
The option fi eld shows whether the
function is activated or deactivated.
.
DAB+ ON/OFF
To select the digital radio function DAB+,
the DAB tuner must be activated in the
system settings. To set, follow these steps:
1. Activate/deactivate DAB+:
choose
2. Choose DAB+.
The option fi eld shows whether the
function is activated or deactivated.
.
10

System settings
CHOOSE RADIOZONE
To select the european or american
frequency band, follow these steps:
1. Choose
2. Choose Choose radiozone.
The option fi eld indicates the function
EU or US activated.
Note: When activating the US frequency
band, the DAB function is not available.
.
DAY/NIGHT MODE
The Classic Infotainment System can
adjust the brightness of the display
depending on the ambient light levels. To
set, follow these steps:
1. Choose
2. Choose Day/night mode.
3. Choose between the automatic set-
ting Auto (light sensor) and Custom.
The option fi eld indicates the function
activated.
After you select Custom a scale for the
day mode is displayed.
1. Set the required value using the
arrows or .
2. To save, choose
After you have saved the day mode, a
scale for the night mode is displayed.
3. Set the required value using the
arrows or .
4. To save, choose
.
.
.
CONTROLLER SETTING
You can defi ne the function of the rotarypushbutton control using the Controller
setting menu command. The following
options are available:
• Zoom map
• Jump to the next or previous station
or track
To set, follow these steps:
1. Choose
2. Choose Controller setting.
The option fi eld indicates the function
activated.
Note: If the Change station/title function
is active and navigation is running in the
background, it is only possible to zoom
the map using the touchscreen display.
.
LANGUAGE
To set the menu language, follow these
steps:
1. Choose
2. Choose Language.
3. The available menu languages are
displayed.
4. Choose required language.
The option fi eld indicates the language
activated.
Note: If you change the menu language,
the navigation software will restart
to apply the language. In some
circumstances the navigation software
contains various other languages that are
not available on the device menu.
To select a separate language within the
navigation, change the language setting
on the menu for the navigation software.
.
VOLUME OF THE AUDIO
SOURCES
Using the Volume menu command you
can regulate separately the volume for
the individual media sources, e.g. tra c
messages, Aux input or navigation
announcements. To set the volume, follow
these steps:
1. Choose
2. Choose Volume.
.
11

System settings
3. Choose the required audio source.
4. Set the required value using the
arrows or .
5. To save, choose
To prevent distraction or startling
due to a sudden tra c message or
navigation announcement, ensure
the volume is always reasonable.
.
VERSION INFORMATION
Using the Version info menu command
you can retrieve the fi rmware version
states. To display the version information,
follow these steps:
1. Choose
2. Choose Version info.
Note: To retrieve the version states for
the navigation software, change to the
separate menu for the navigation.
.
FACTORY SETTINGS
Using the Factory reset menu command
you can reset the Classic Infotainment
System to its state as delivered. All
settings you have made will be deleted.
To reset to the factory settings, follow
these steps:
1. Choose
2. Choose Factory reset.
3. Choose YES. The Classic Infotainment
System is reset to the factory settings.
.
To restart the Classic Infotainment
System, follow these steps:
1. Remove all the media sources
connected to the Classic Infotainment
System.
2. Press the On/O knob for fi ve
seconds until the system restarts.
Note: If the Classic Infotainment System
has a RESET button on the front, you can
also restart the unit using this button.
RESTARTING CLASSIC
INFOTAINMENT SYSTEM
In a few exceptional cases it may
be necessary to restart the Classic
Infotainment System:
• General malfunction of the Classic
Infotainment System
• Incorrect positioning on the map
12
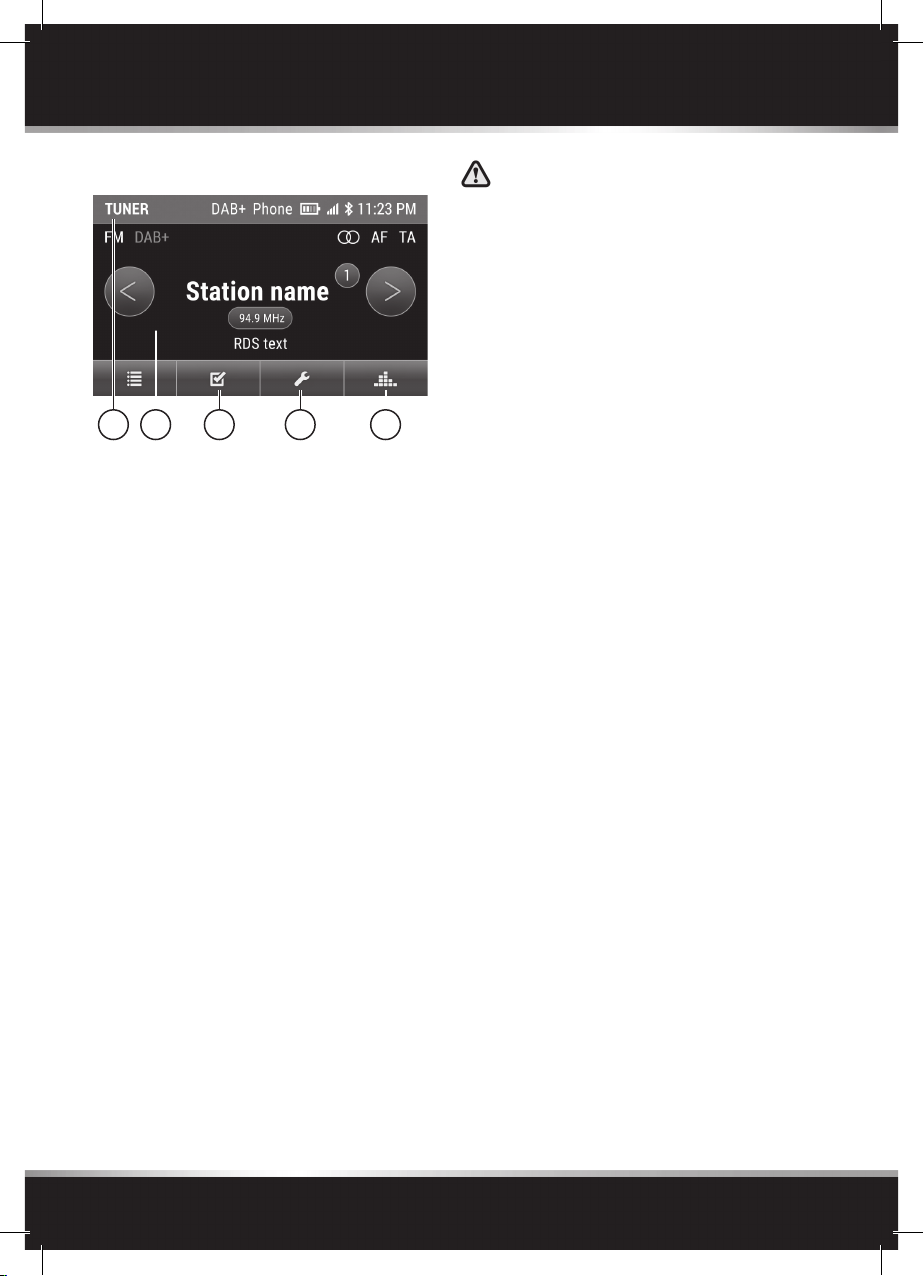
Tuner
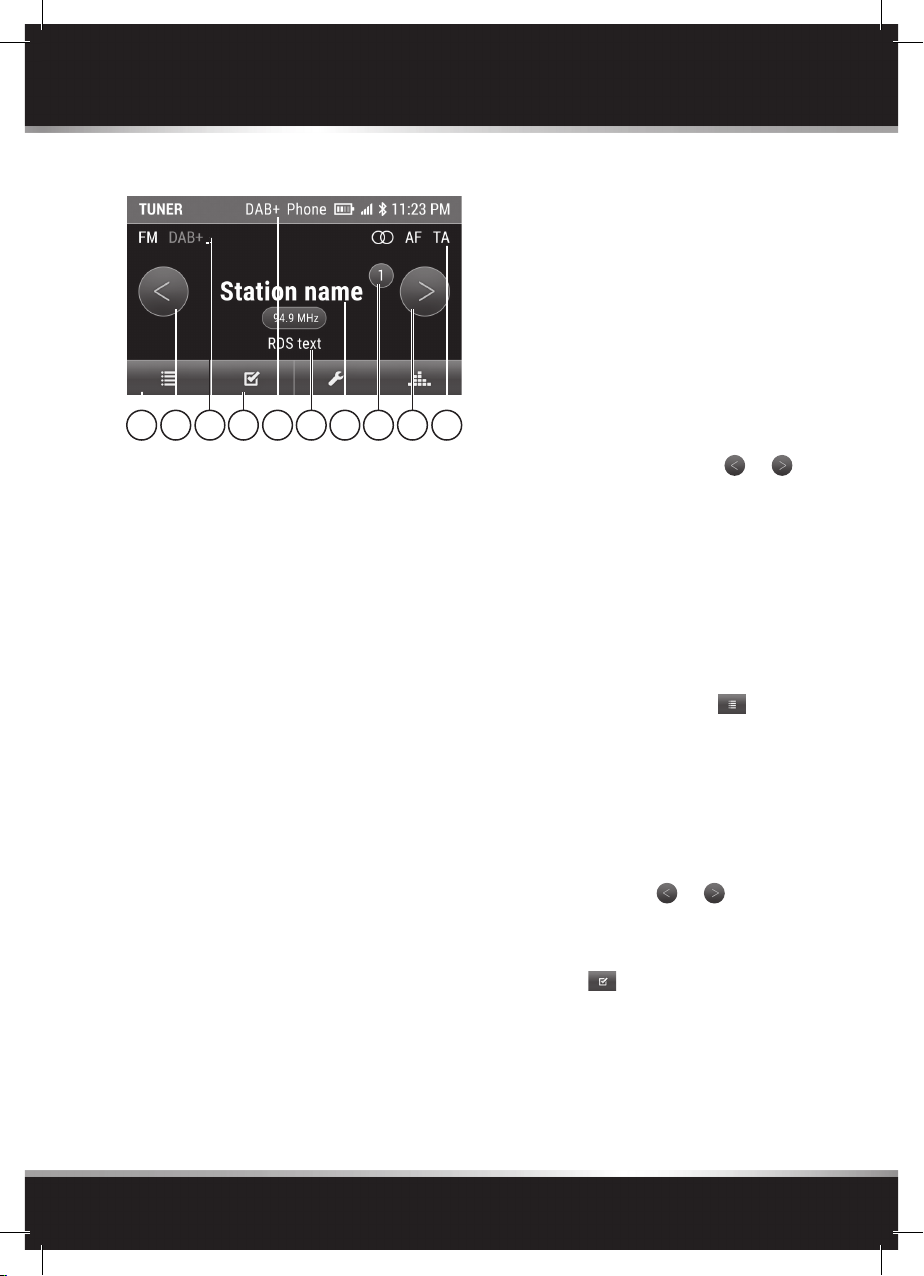
TUNER MAIN MENU
4 59 4 32 6 871
1. Frequency band (AM/FM/DAB)
2. DAB reception active
3. Stereo, AF and TA
4. Change between saved stations or
activate search with a long press
5. Preset
6. Radio text
7. Options
8. Station name
9. List of stations
ACTIVATING TUNER
To activate the radio function, follow
these steps: press the TUNER button.
The tuner mode is displayed. The last
station selected is played.
SETTING STATION
Setting frequency band
To set the required frequency band,
press the TUNER button several times
and choose between FM band, AM
band and DAB+.
Note: The DAB+ function is only available
in Europe.
Note: To be able to select the AM band
and DAB+, you must activate these
functions in the settings for the Classic
Infotainment System.
Setting station manually
To set, follow these steps:
1. Choose the frequency band using the
TUNER button.
2. Turn the right rotary knob counter
clockwise or clockwise and change
the station frequency in steps.
Setting station using station search
To set, follow these steps:
1. Choose the frequency band using the
TUNER button.
2. Press the right rotary knob or use a
long press on the arrows
search for the next station that can be
received.
Setting station via list of stations
The list of stations is generated
automatically by the tuner and shows all
the stations currently available. To open
the list of stations, follow these steps:
1. Choose the frequency band using the
TUNER button.
2. Open the list of stations
3. Choose station from the list of
stations.
Setting station via saved stations
To set, follow these steps:
1. Choose the frequency band using the
TUNER button.
2. Press briefl y the
choose a station already saved.
Alternatively:
2. Choose
3. Choose Presets.
4. Choose station from the list of
stations saved.
Note: In both cases, there must be one or
more stations in the list of saved stations.
.
or arrows to
or to
.
13
 Loading...