

Kpnetworks KPWL0300 User Manual

KPWL-0300
Kpnetworks Ltd.
[USER'S MANUAL] VERSION 1.0 (LATEST VERSION 2016/1/13)
This manual is a collection of the information and knowledge necessary to install the KPWL-0300 Wireless Access
Point from Kpnetworks, which allows you to "Create a Wireless LAN area by just setting it down".
With this manual you can do a basic or custom installation of the KPWL-0300 without any further specialized
knowledge of wireless networks.

1 Introduction ................................................................................................................................................................ 3
1.1 Precautions ........................................................................................................................................................ 3
1.2 Warnings ............................................................................................................................................................ 4
1.3 Prohibitions ........................................................................................................................................................ 4
1.4 Precautions Regarding Electromagnetic Radiation ........................................................................................... 5
1.5 Precautions Regarding Security ........................................................................................................................ 5
2 Checking the Packing List Against the Contents of the Package .............................................................................. 6
Image of Content of Package .................................................................................................................................... 6
3 Exterior View and Names of Parts ............................................................................................................................. 7
Main Unit .................................................................................................................................................................... 7
Attachment Bracket .................................................................................................................................................... 8
4 How to Assemble the Main Unit ................................................................................................................................. 9
5 Installation Method ................................................................................................................................................... 10
Step
1: Prepare the necessary equipment ................................................................................................................. 10
Step
2: Check the access on the internet circuit ........................................................................................................ 10
Step
3: Assemble the product .................................................................................................................................... 11
Step
4: Temporarily set up a KPWL-0300 that is connected to the internet .............................................................. 11
Step
5: Check the core and slave unit links (connections) ......................................................................................... 12
Step
6: Connect to the internet using a Wi-Fi terminal ............................................................................................... 13
Step
7: Perform final installation ................................................................................................................................. 14
Step
8: Expand the wireless LAN area ....................................................................................................................... 14
6 Changing Settings .................................................................................................................................................... 15
6.1 Procedure to Change Settings ......................................................................................................................... 16
Step
1: Prepare the necessary equipment ................................................................................................................. 16
Step
2: Connect the KPWL-0300 unit to the computer .............................................................................................. 16
Step
3: Use the computer's browser to display the KPWL setting screen ................................................................. 17
Step
4: Configure KPWL settings ............................................................................................................................... 18
6.2 Initializing Settings ........................................................................................................................................... 19
6.3 Remote Settings .............................................................................................................................................. 20
Accessing the KPWL-0300 with an IPv6 Address ................................................................................................... 21
6.4 List of Setting Items ......................................................................................................................................... 23
Items that can be set in the "Access Point" tab ....................................................................................................... 23
Items that can be set in the "Wireless Backhaul Network" tab ................................................................................ 27
Items that can be set in the "Management" tab ....................................................................................................... 30
7 Upgrading the Version of the Firmware ................................................................................................................... 32
Step
1: Prepare the necessary equipment ................................................................................................................. 32
Step
2: Prepare the firmware...................................................................................................................................... 32
Step
3: Confirm the current version ............................................................................................................................ 33
Step
4: Upgrade the firmware..................................................................................................................................... 33
Step
5: Confirm the version ........................................................................................................................................ 34
Step
6: Do a reroute ................................................................................................................................................... 34
8 Building a Wireless LAN Area with the KPWL-0300: Basics ................................................................................... 35
8.1 Mesh and AP ................................................................................................................................................... 35
8.2 Core and Slave Units ....................................................................................................................................... 35
8.3 Optimal Route Building and Rerouting ............................................................................................................ 36
8.4 Network Separation ......................................................................................................................................... 37
8.5 Signal Connectability ....................................................................................................................................... 38
8.6 Antennas .......................................................................................................................................................... 38
8.7 Importance of Temporary Installation .............................................................................................................. 40
8.8 Checking the Wireless Conditions of the Access Circuits ............................................................................... 40
8.9 Checking the Wireless Conditions of the Relay Circuit ................................................................................... 41
9 Building a Wireless LAN Area with the KPWL-0300: Application ............................................................................ 42
9.1 About Channels ............................................................................................................................................... 42
How to Search for Overlapping Channels ............................................................................................................... 43
9.2 DFS .................................................................................................................................................................. 45
KPWL-0300 User's Manual 1

Startup Behavior ...................................................................................................................................................... 45
Behavior during Use ................................................................................................................................................ 46
9.3 About Wired Backhaul ..................................................................................................................................... 47
About the Setting Procedure and LEDs ................................................................................................................... 48
9.4 About Measuring the Speed of Communications ............................................................................................ 49
About the Areas to Measure .................................................................................................................................... 49
Measuring Using an Internet Site ............................................................................................................................ 49
Measuring Using Data Transmission Software ........................................................................................................ 50
9.5 Multi SSID and VLAN ....................................................................................................................................... 52
Setting Procedure .................................................................................................................................................... 52
9.6 802.1 Authentication ........................................................................................................................................ 55
802.1 Authentication Process .................................................................................................................................. 55
Network Configuration ............................................................................................................................................. 56
Setting Procedure .................................................................................................................................................... 57
10 Building a Wireless LAN Area with the KPWL-0300: Expert ............................................................................... 58
10.1 Communication between Terminals ................................................................................................................ 58
Setting Procedure .................................................................................................................................................... 59
10.2 Relay Circuit Radio Wave Intensity ................................................................................................................. 61
10.3 Checking the Relay Route ............................................................................................................................... 62
10.4 Updating Firmware from the Webpage ............................................................................................................ 63
10.5 If You Forget Your Login Password ................................................................................................................. 63
11 Main Specifications .............................................................................................................................................. 64
KPWL-0300 User's Manual 2

1 Introduction
1.1 Precautions
Kpnetworks holds the copyrights for this manual. Reproduction, reprinting, or modification of this manual in
whole or part without the permission of Kpnetworks is prohibited.
Improvements may result in the specifications, designs, and other information in this manual being changed
without notice. Some parts of the product you have purchased may be different.
We have taken great care in producing the content of this manual. If anything in it is unclear or there are
mistakes, please contact Kpnetworks.
This device is intended to be used as an IT device in general commercial environments or households. Note
that Kpnetworks bears no responsibility for damages that may occur due to use in environments other than
these.
Do not use the product for purposes that demand a high level of safety, such as use in medical facilities or use
in systems related to human life, either directly or indirectly.
The purchaser must take responsibility for the adequacy of the installation as regards troubles, such as
malfunctions and safety designs, if the product is used in a system environment that requires a level of safety
or reliability higher than normal.
This device is produced on the premise that it be used only in the country in which it was sold. Do not use it
anyplace other than the country in which it was sold. Kpnetworks has not established technical support or
maintenance for anyplace other than where the device is sold.
Use this device according to the methods described in this manual. Specifically, be sufficiently aware of the
precautions and warnings and do not use the product in such ways.
If the device malfunctions, Kpnetworks will repair or replace it under certain conditions, however, there is no
guarantee regarding the loss or corruption of stored data. If you are connecting to a memory device, such as
the device's hard disk, to use or record data, use the equipment based on the contract you establish separately.
Also note that operations when doing this are not guaranteed.
Liability for damages caused by interaction with the device, except for willful intent or gross negligence by
Kpnetworks, is limited to the cost to purchase the device.
If an unknown defect exists in the device, Kpnetworks, given that it recognizes such necessity, will repair the
defect or replace the device with an equivalent product. However, in doing so, Kpnetworks accepts no liability
for compensation of damages based on said defect.
This manual was produced using the latest version of the firmware (version 1.0.0) that was available during
production. Note that some items are not supported by versions older than this.
Attention: This product is professional install device that should be installed by technicalist.
KPWL-0300 User's Manual 3
1.2 Warnings
Do not use the device in very damp locations. Do not allow it to become wet or touch it with anything that is wet.
Do not install the device in a location that is always hot.
Do not install it in an electronic product or near a device that is expected to generate heat.
Install cables and connectors so they do not cross over cables from other devices and do not get wet.
Do not modify, disassemble, or repair the device yourself.
If you notice any unusual sounds, smells, or smoke, promptly unplug the device's power plug separate it from
peripheral devices and turn off the power.
Do not drop the device or subject it to extreme shock. If it is dropped or subjected to extreme shock, promptly
unplug its power plug.
If liquid or foreign matter gets inside the device, promptly unplug its power plug.
Regarding the AC adapter
1. Do not modify, overheat, or repair it.
2. Do not install it between walls or shelves.
3. Do not stretch it or place heavy weights on it.
4. Do not overheat it by bringing hot tools near it.
5. Always hold the plug when you unplug the power cable.
6. Do not excessively bend the connectors or other parts of the cables.
7. Do not move the device while it is connected.
8. Connect it only to a 100 - 240 VAC electric outlet.
9. Confirm that the AC adapter is securely and fully inserted into the electric outlet.
10. Connect only the AC adapter provided with the device.
Do not allow contact with static electricity from people or other devices.
Be sure to remove any dust or dirt from the device and the power cable.
Do not stretch or hook the cables connected to the device.
When disposing of the device, observe the regulations of your local government.
1.3 Prohibitions
Do not store or install the device in the following locations. Doing so could cause a fire or have an adverse effect on the
product.
Locations where static electricity or strong magnetic fields are generated
Locations subject to vibrations
On walls from which there is a risk the product may fall if the installation is not strong enough
Locations where people are walking
Locations exposed to direct sunlight
Near open flames, devices that generate hot air, or locations where hot air collects
Locations at risk of water leaks or electric faults
Locations that are very dusty
KPWL-0300 User's Manual 4

1.4 Precautions Regarding Electromagnetic Radiation
The device is technically certified as a wireless radio station in various countries and regions. Therefore, a radio station
license is not needed to use this product. Also, the device can only be used in countries for which it has received
certification.
The device is technically certified as a wireless radio station in various countries and regions, so disassembly,
modification, or removal of certification labels is prohibited.
Use of IEEE802.11a/na/ac W52, W53 (36ch - 64ch) is prohibited outdoors depending on the radio laws of the
region in which it is used.
The device supports IEEE802.11b/g/n, so do not use it in locations where static electricity is generated, near
microwave ovens, or near equipment that uses electricity near the 2.4 GHz range.
The wireless channels of products that support IEEE802.11b/g/n are used for some industrial, scientific, and
medical equipment, indoor radio stations, and special low-power radio stations.
IEEE802.11b/g/n may cause radio wave interference with the equipment and radio stations described above,
so be careful to not bring them too close.
In addition, usage must be according to the radio laws of the country in which it is used.
1.5 Precautions Regarding Security
A wireless LAN uses radio waves to connect to terminals, such as computers and wireless access points (hereafter AP)
to exchange information. Therefore, compared to using LAN cables, it is remarkably more convenient and people can
connect to the network from any place that is within the range of the radio waves.
On the other hand, it is possible to connect from any place within range of the radio waves, even if there are
obstructions, for example. Because of this, if you do not do the security settings, there is a risk that the following
problems may occur.
Your communications could be intercepted. A malevolent third party could purposefully intercept your radio
transmissions and see your personal information, emails, and other communications.
They could gain unauthorized access. There is a risk of leaking information, such as secret information or
personal information, if they get unauthorized access to the network. There is also a risk of fraudulent
information being released through identity fraud. Also, there is a possibility that the intercepted data could be
falsified and then released or it could be infected with a virus.
Nevertheless, the APs used for wireless communications support security systems that are engineered to handle these
problems. So, it is possible to eliminate almost all risk of problems developing by doing the security settings before
using the devices.
For some devices, the security settings have not been done at the default level. Therefore, the users must do the
settings before using them as an AP to avoid security related risks. Furthermore, please note that when you use the
device, there is a possibility that the security settings may be circumvented using some special methods.
Note that Kpnetworks has no liability for compensation in regard to losses due to wireless interception, regardless of
whether or not the security settings were done.
KPWL-0300 User's Manual 5
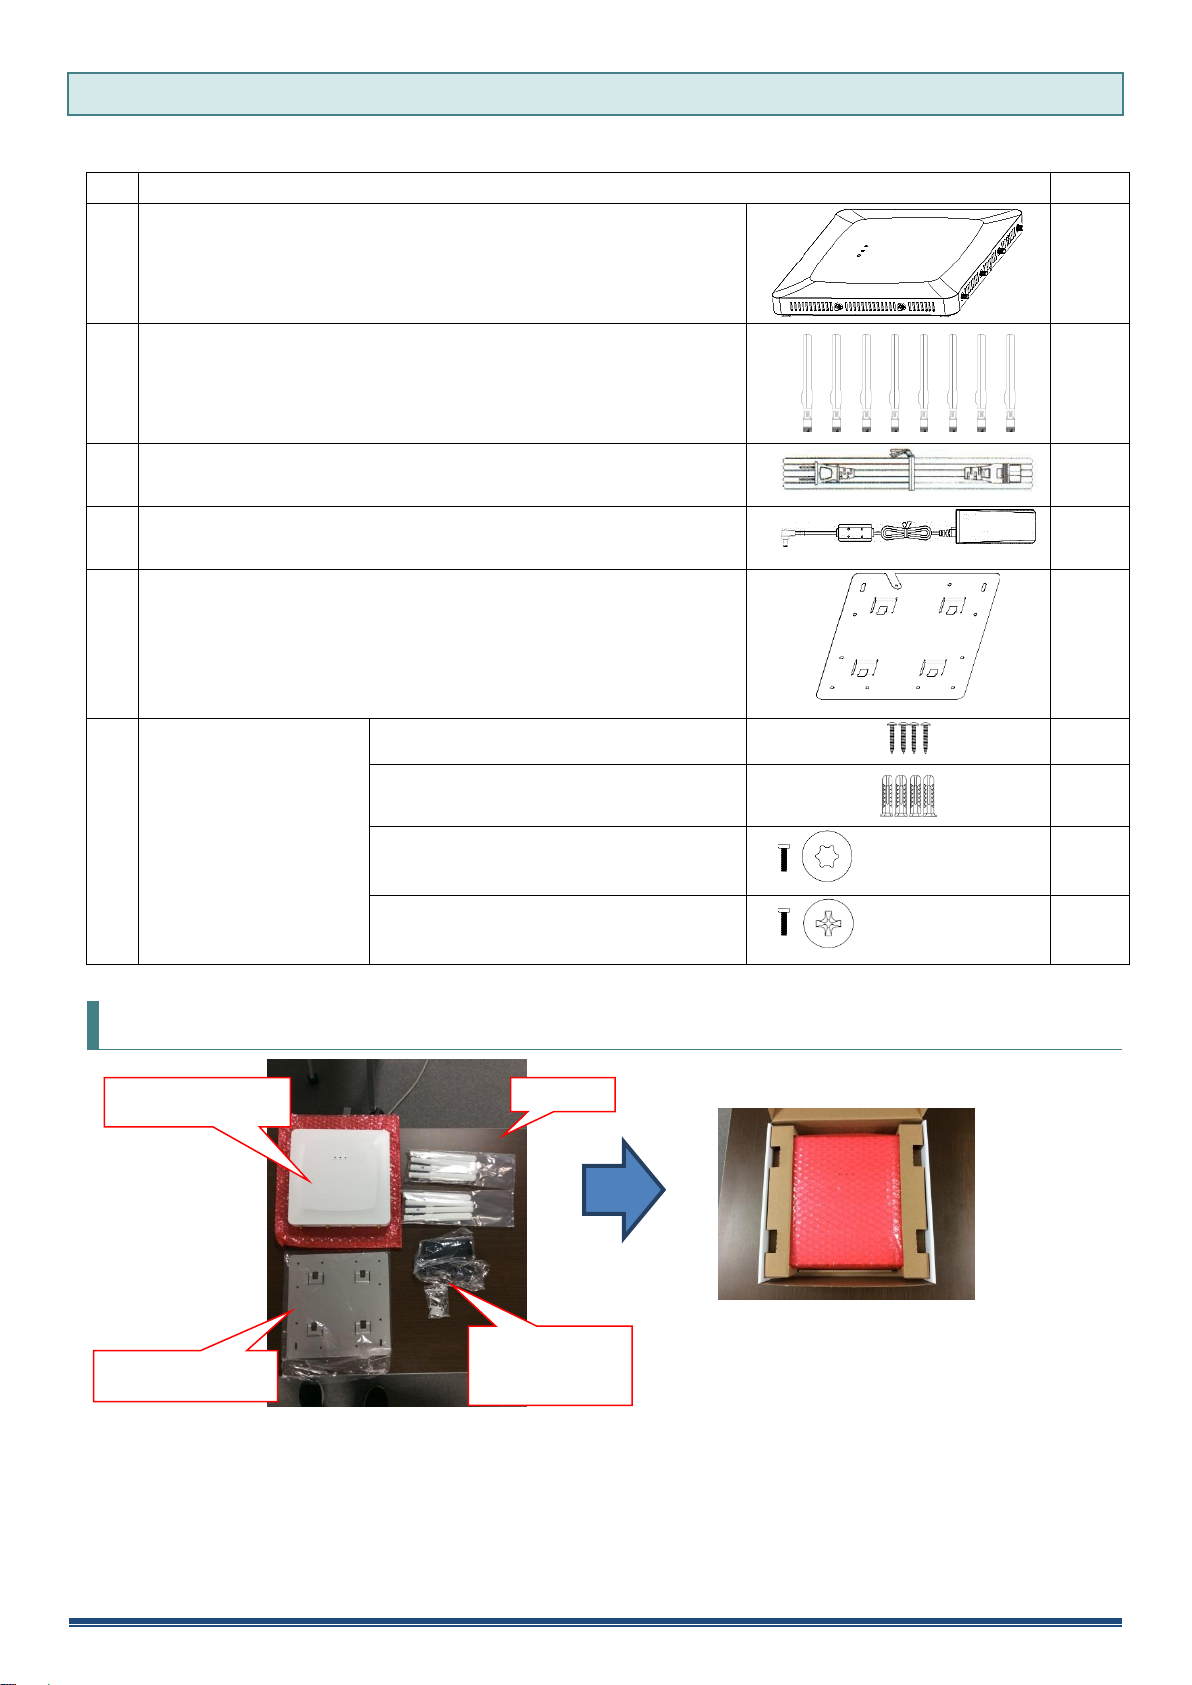
2 Checking the Packing List Against the Contents of the Package
Contents of the package
Count
1
KPWL-0300 main unit
1
2
Antennas (both relay circuits and access circuits)
8
3
AC cord
1
4
AC adapter
1
5
Attachment for wall mounting
1
6
Types of screws
Screws for wall mounting
4
Anchors for wall mounting
4
Screws for mounting attachment
(Security screws)
← Head of screw
1
Screws for mounting attachment
(Philips screw)
← Head of screw
1
AC adapter
AC cord
Set of screws
KPWL-0300 main
unit
Attachment for wall
mounting
Antennas
Thank you for purchasing this product. Check the contents of the package before using the product. If anything
happens to be missing, contact Kpnetworks or your retailer.
Image of Content of Package
In order from below, the attachment for wall mounting, antennas, AC adapter, AC cord, and set of screws are in
the small box, and the KPWL-0300 main unit is in the packing box.
KPWL-0300 User's Manual 6
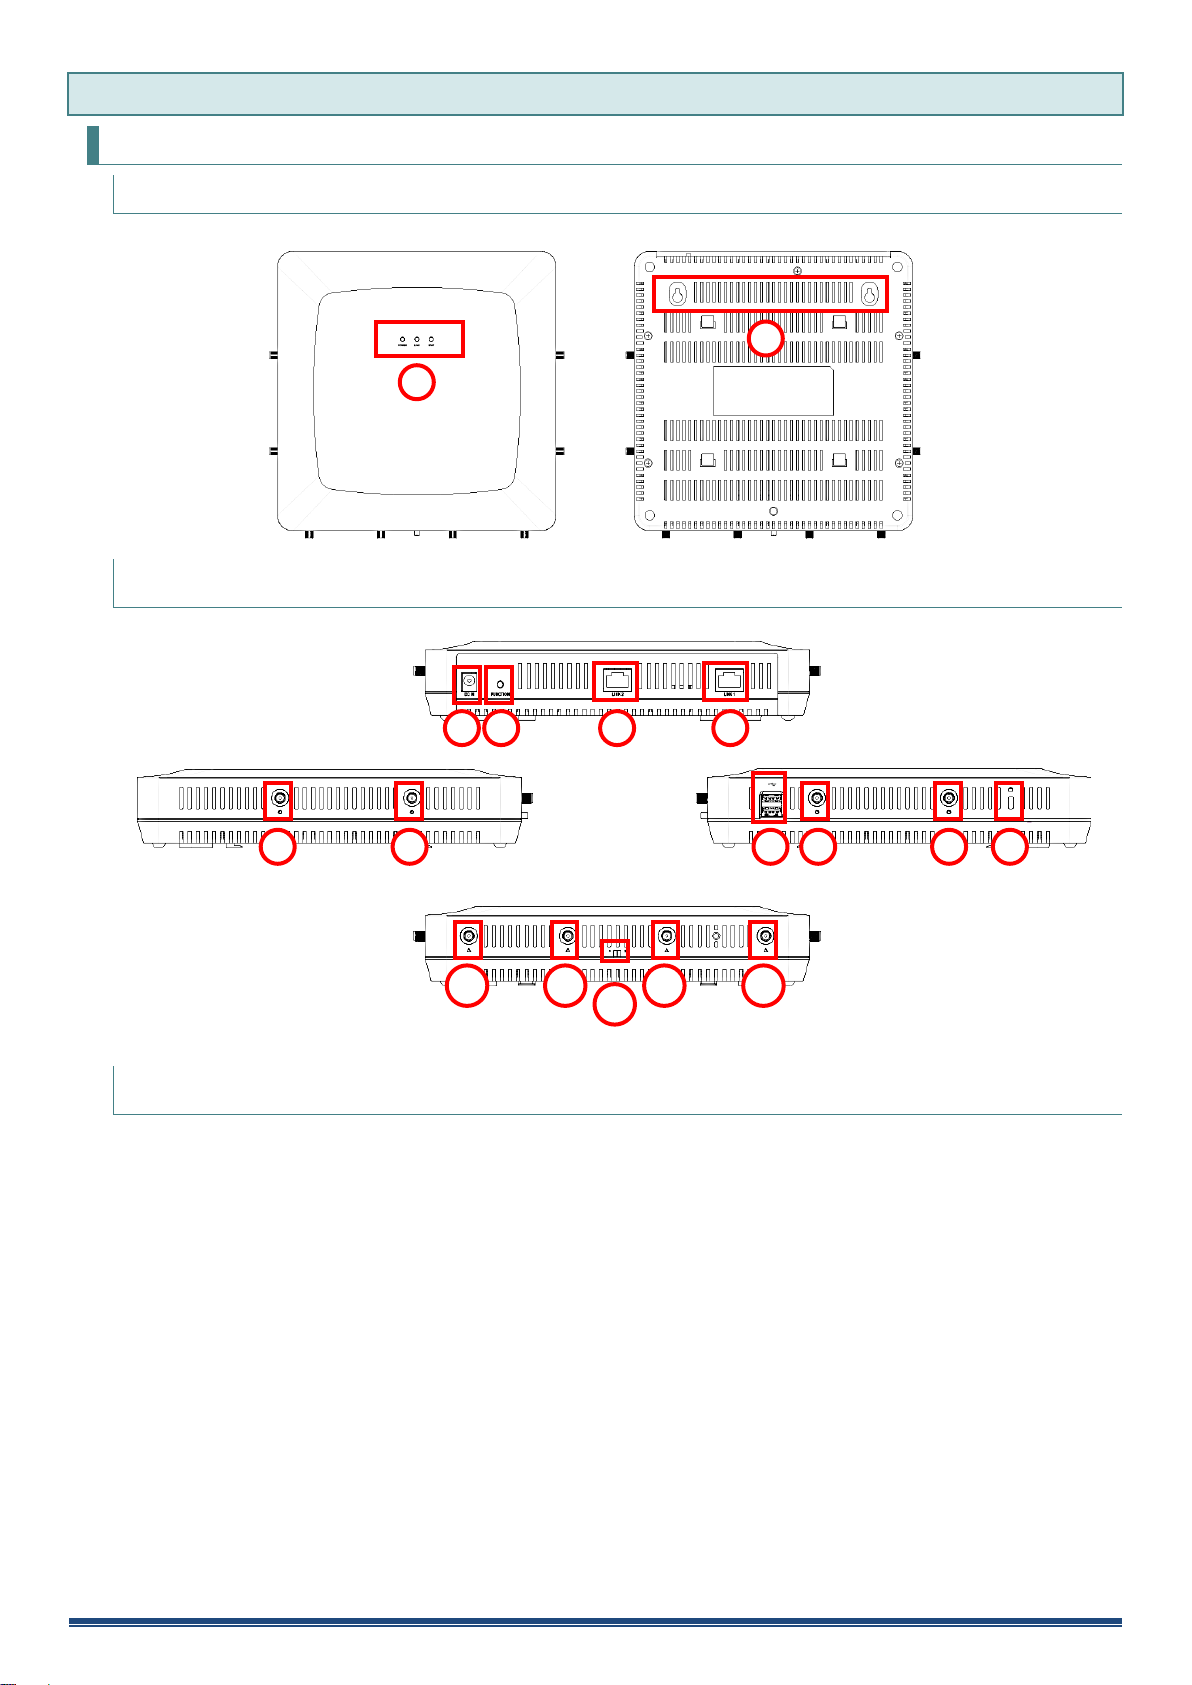
3 Exterior View and Names of Parts
1
2
[Main unit front view and rear view]
(1) LED lamps
(2) Hole for attachment for wall mounting
[Main unit top view]
(3) AC power cable inlet
(4) Reroute button
(5) LAN port (LINK2)
(6) LAN port (LINK1)
[Left view/right view]
(7) Antenna connectors (for access circuits)
(8) USB port
(9) Security slot
[Bottom view]
(10) Antenna connectors (for relay circuits)
(11) Mode switch
3 4 5 6 7 7 7 7 8
9
10
10
10
10
11
Main Unit
Main unit front view and rear view
Main unit views (top, left, right, and bottom)
Names of parts
KPWL-0300 User's Manual 7

Attachment Bracket
KPWL-0300 User's Manual 8
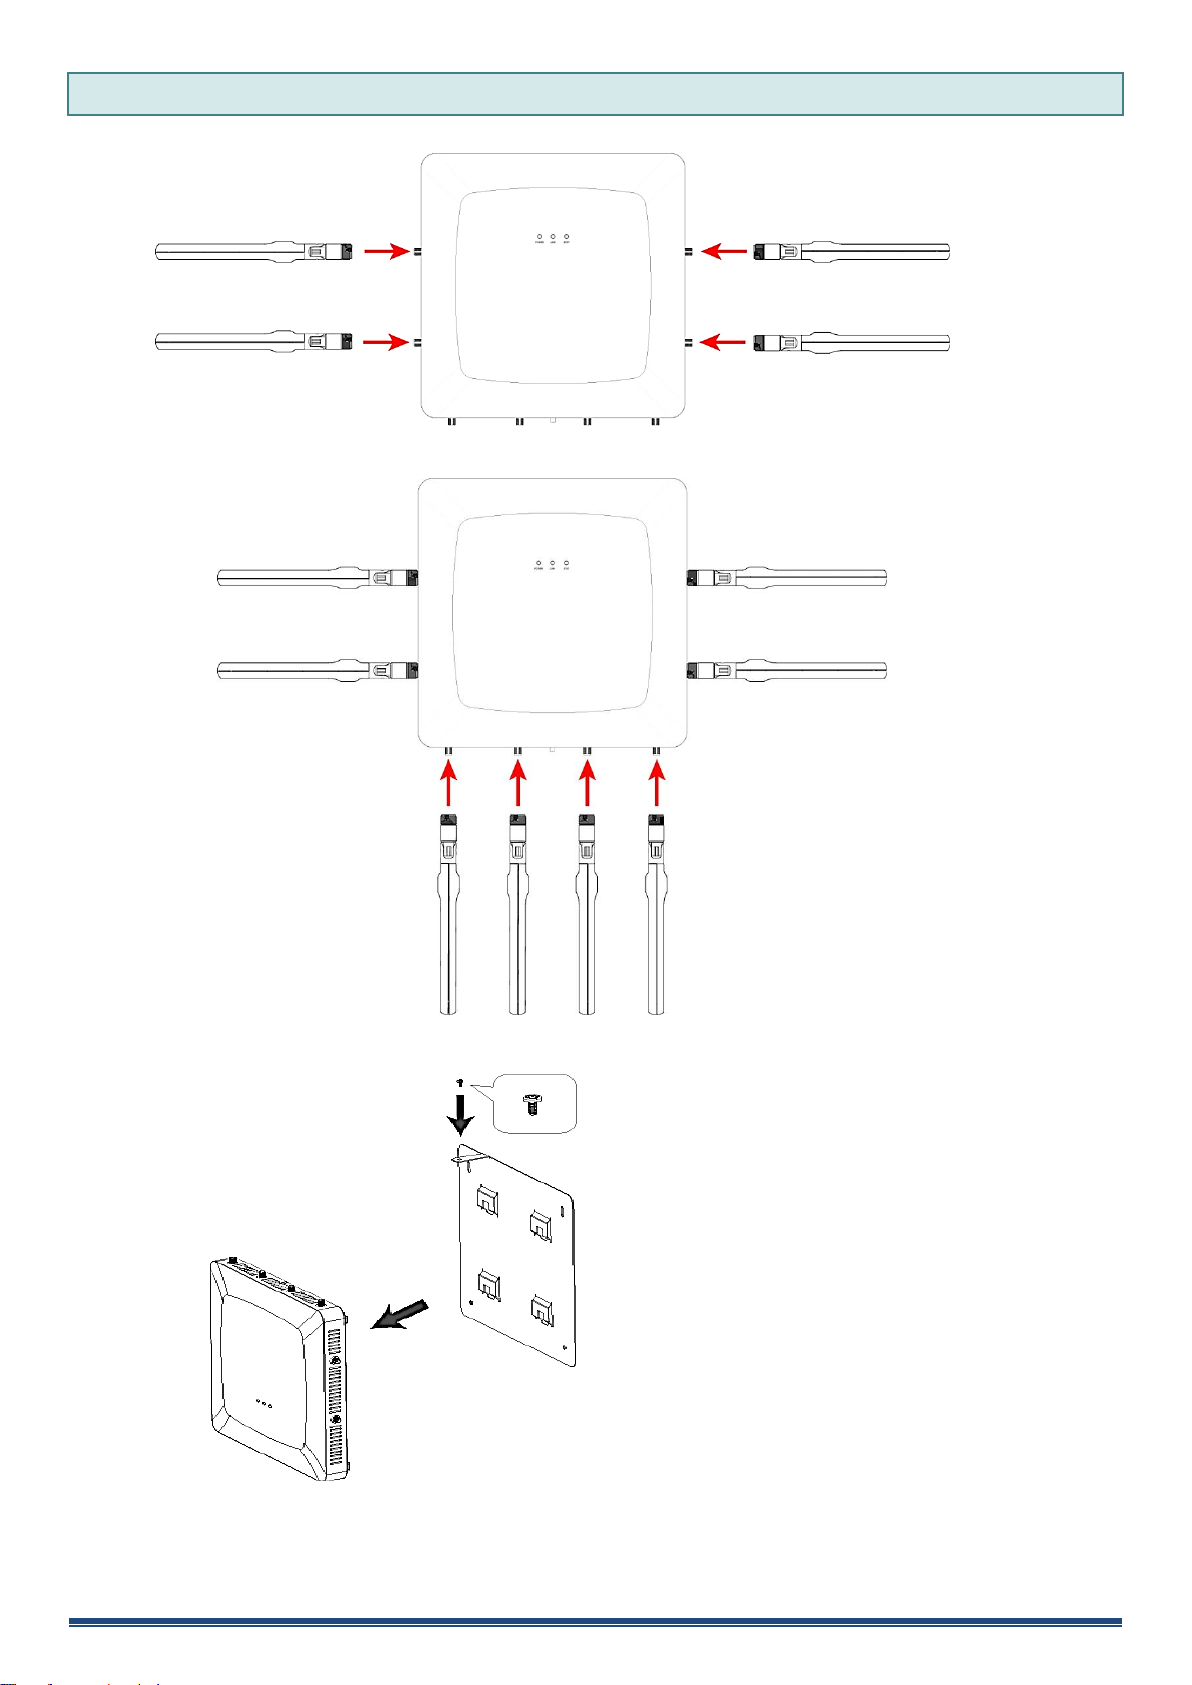
4 How to Assemble the Main Unit
(1) Attach the antennas for access circuits. Insert them into the plugs on the left and right sides of the main unit.
(2) Attach the antennas for relay circuits. Insert them into the plugs on the bottom side of the main unit.
(3) Attach the attachment for wall mounting.
KPWL-0300 User's Manual 9
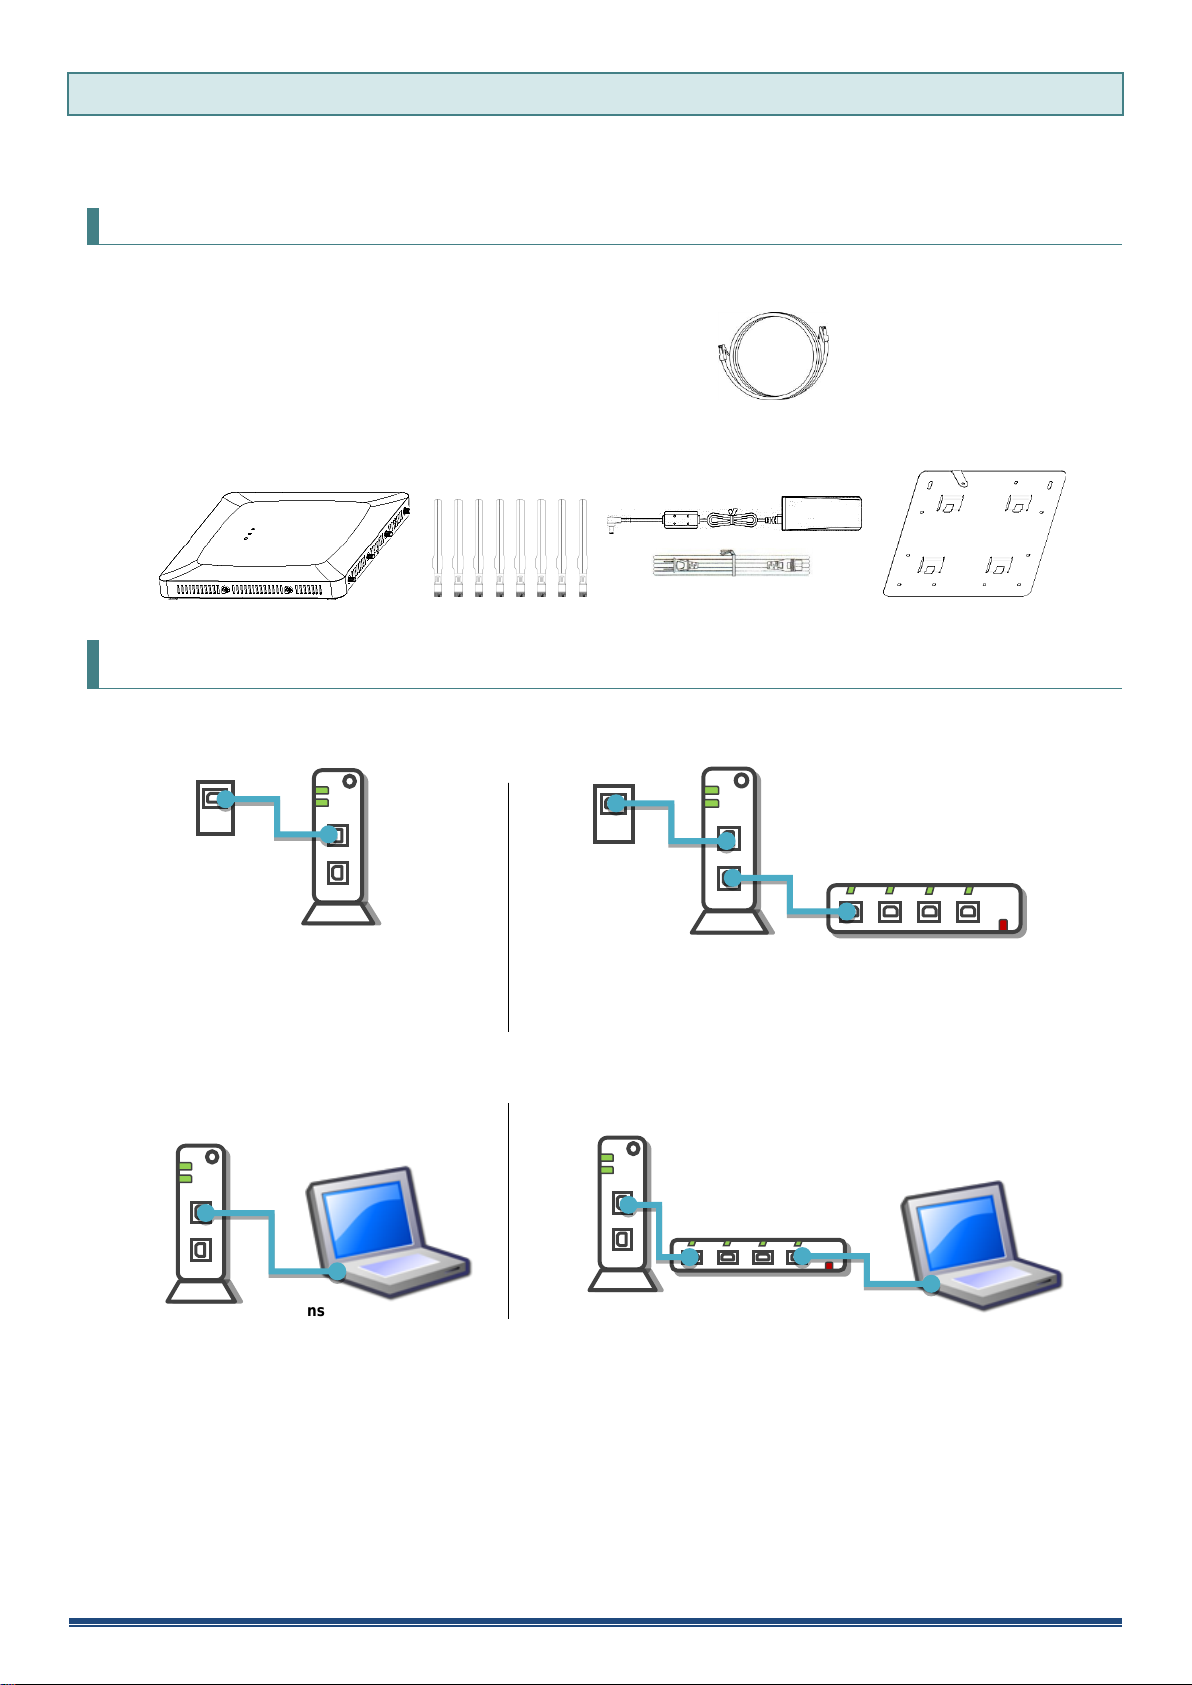
5 Installation Method
Telecommunications
equipment
Such as an ADSL modem
or optical fiber terminal
Internet
connection
Telecommunications
equipment
Such as an ADSL modem or
optical fiber terminal
Internet
connection
Such as a wired
router or hub
Telecommunications
equipment
Such as an ADSL modem or optical
fiber terminal
Telecommunications
equipment
Such as an ADSL modem or
optical fiber terminal
Such as a wired router
or hub
This section explains the installation method when installing the units as they are shipped. If you want to change the
settings, refer to "How to change the settings" to change the settings.
Step
1: Prepare the necessary equipment
□ Internet accessible environment
You need one LAN port for the KPWL on a device (such as a router or a hub) that is connected to the internet.
□ LAN cable ………… 1
You need a cable to connect the KPWL to the internet.
□ Computer with a built-in LAN port
* If a there is no wired LAN port, use a USB-wired LAN adapter.
□ Wi-Fi compatible terminal, such as a computer or iPhone, with a built-in LAN port
□ One set KPWL
Main unit, 8 antennas, AC power cable, AC adapter, mounting bracket (screw)
Step
2: Check the access on the internet circuit
Confirm that it is possible to connect to the internet, in advance.
1. Confirm that you have telecommunications equipment (such as a modem) that you rent or purchase from a
telecommunications carrier or provider with whom you have contracted for internet access.
2. Connect the computer to telecommunications equipment or a wired router with a LAN cable.
3. Confirm that it is possible to connect to the internet under these conditions.
Ex) For a computer running Windows, go to [Local Area Connections] in [Network Connections] to confirm that the IP
address can be correctly acquired, and then start a browser and confirm you can display a site on the internet.
4. When you have confirmed connectivity, remove the LAN cable and proceed to the next step.
KPWL-0300 User's Manual 10
Step
Telecommunications equipment
Such as an ADSL modem or optical fiber terminal
Telecommunications equipment
Such as an ADSL modem or optical fiber terminal
Such as a wired router
3: Assemble the product
Refer to "How to assemble the main unit" above to assemble the product.
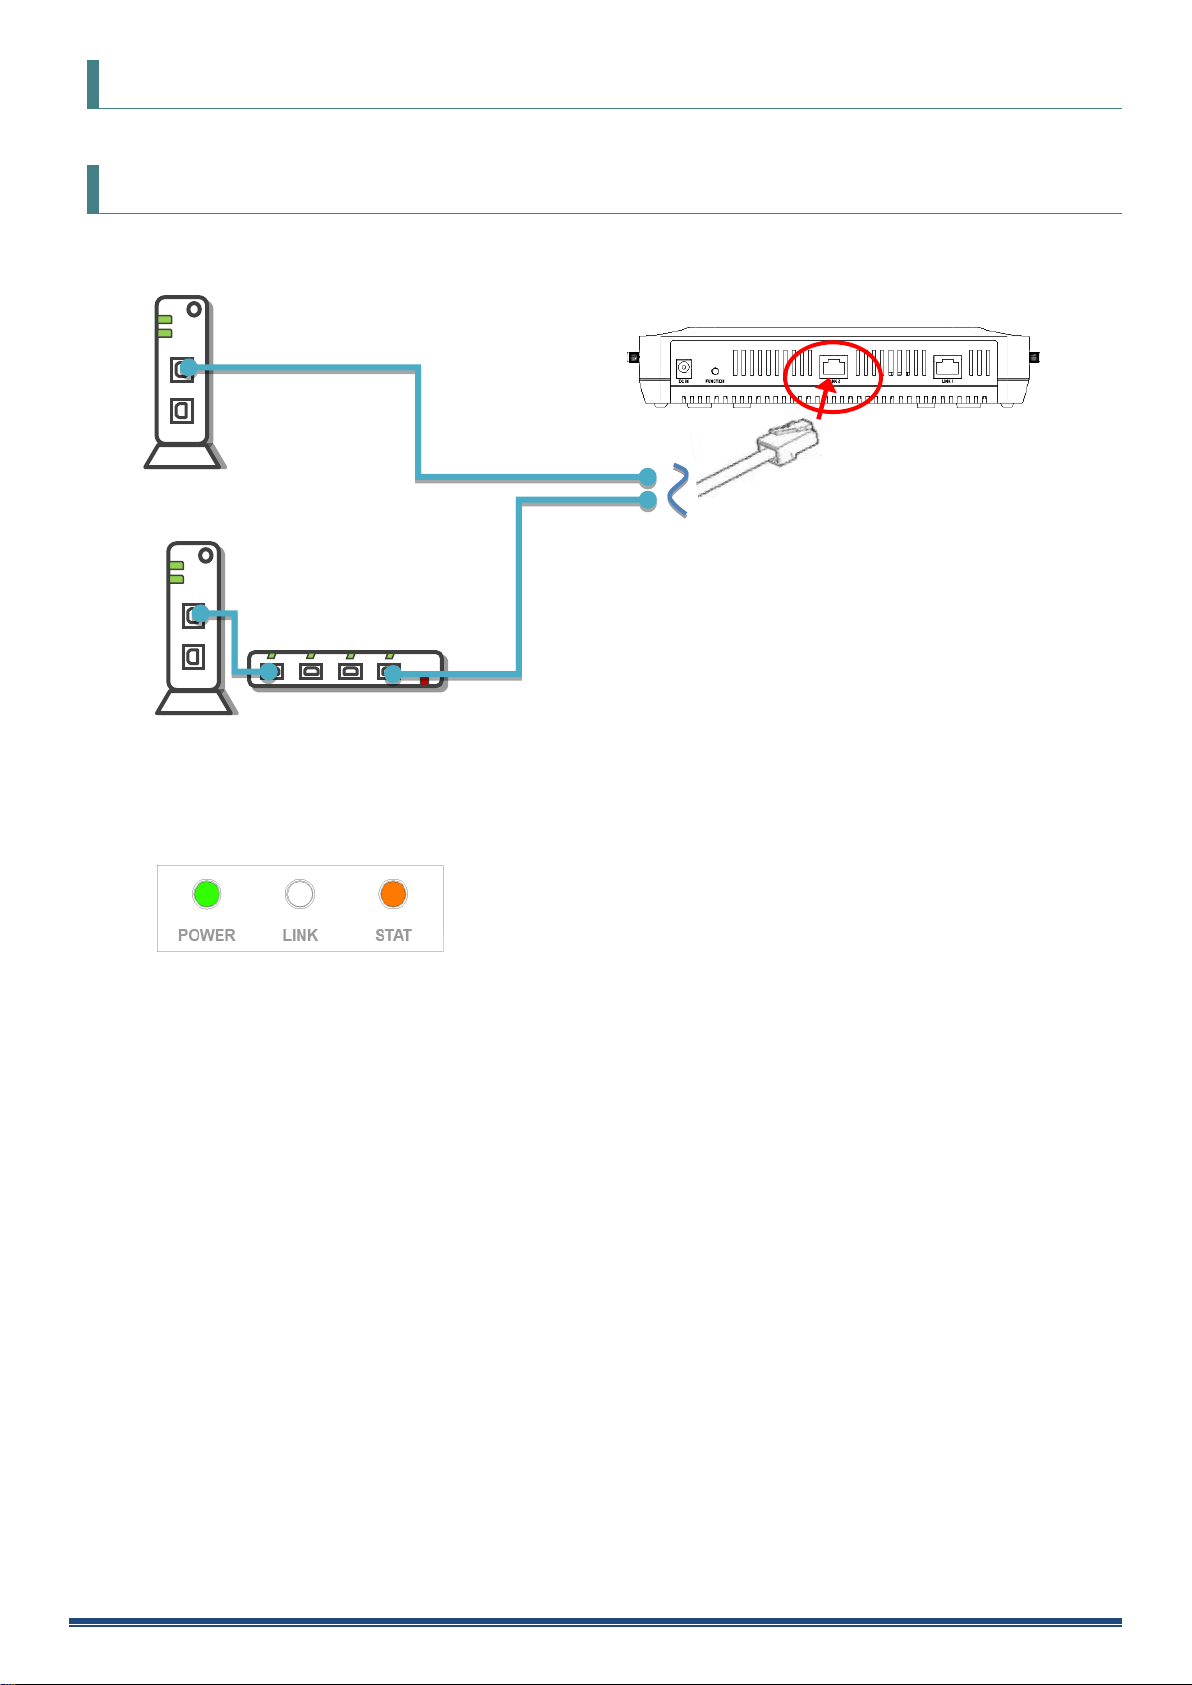
Step
4: Temporarily set up a KPWL-0300 that is connected to the internet
1. Connect one end of the LAN cable you have prepared to the LAN port on the KPWL and connect the other end to the
telecommunications equipment or router that is connected to the internet.
2. Turn on the power. The power turns on automatically when you plug one end of the AC power cable into the KPWL and
the other end into the electric outlet. There is no power switch. The power up operation is complete when the POWER
LED lamp (green) and/or STAT lamp (orange) turns on. * Behavior at startup depends on which channel (W52 or W56) is
being used by the relay circuit. For details, refer to "DFS" later in this manual.
3. Select an installation location. Do not immediately perform final installation work. First be sure to do a temporary
installation and check radio wave conditions and communication conditions. For information about installation
locations, refer to "Signal Connectability" later in this manual.
4. If you purchased multiple KPWL units, use the web setting screen to configure the second and subsequent units as
slave units.
For information about how to display the web setting screen, refer to "How to change settings." For information about
how to configure settings, refer to "Backhaul Mode" in the "List of setting items."
KPWL-0300 User's Manual 11

Step
5: Check the core and slave unit links (connections)
1. Press the Reroute button of the KPWL unit that is the furthest from the core unit.
* Actually, you could press any KPWL Reroute button. Even if there are multiple KPWL units, pressing the Reroute button on only
one of them will result in intercommunication among all units.
2. A short while after you press the Reroute button, the LINK LED will flash a number of times, and then remain lit.
If you can confirm that the LINK LED is on, that KPWL is enabled for use. The LED flashes one to four times to indicate the
strength of the link (more flashes mean a stronger link).
If the LED flashes twice or less, there is the danger that communication quality (including speed) may be
low due to a weak connection.
If the LED does not light, it means that DPWL interconnection (linking) failed.
For information about installation locations, refer to " Signal Connectability " and consider changing or modifying
the installation location.
3. Note how many times the LINK LED lamp flashes on all of the installed KPWL slave units.
KPWL-0300 User's Manual 12

Step
6: Connect to the internet using a Wi-Fi terminal
Actually try to connect to the internet using a Wi-Fi terminal. Connect in accordance with the connection method of the applicable
equipment.
For Windows (Windows 7)
* This is the procedure for connections if the operating environment you are using is a computer with a built-in
wireless LAN running on Windows 7.
* Some computers use their own independent wireless connection software. If this is the case, refer to the manual for that
software.
1. Open the Control Panel
2. Click [Network and Internet], and then click [Network connections] in the Network and Sharing Center.
3. Select "KPWL-0300-******_G" or "KPWL-0300-******_A" (the ****** are the last 6 digits of the MAC address) from the wireless network
connections, and then click the [Connect] button. You do not need to input a security key or passphrase because the prescribed values
have not been encrypted. If you are going to use encryption for security, do the settings according to the procedures in the separate
"Easy Customization" manual.
4. Confirm that your system is connected. Click the wireless network connection icon in the system tray in the bottom right of the screen,
and confirm that "Connected" appears to the side of "KPWL-0300-******_G" or "KPWL-0300-******_A" (the ****** are the last 6 digits of
the MAC address).
5. Start your browser and access the internet, such as by displaying a web page, to confirm the connection.
For iPad, iPhone, iPod touch, etc.
* This is the connection procedure for iPad version 4.2.1, but other systems can be connected in almost the same way.
1. Tap [Settings]
2. Tap [Wi-Fi]
3. Select "KPWL-0300-******_G" or "KPWL-0300-******_A" (the ****** are the last 6 digits of the MAC address) from the wireless network
selections. You do not need to input a security key or passphrase because the prescribed values have not been encrypted. If you are
going to use encryption for security, do the settings according to the procedures in the separate "Easy Customization" manual.
4. Return to the top page, tap [safari], and display a page on the internet to confirm the connection.
For Nintendo DS, DS Lite, DSi, and DSi LL
* This is the procedure for connecting on a Nintendo DSi.
1. Touch [Main Unit Settings]
2. On the third page, touch [Internet]
3. Touch [Connection Settings]
4. Select a connection from 1 to 3, and then touch [Not connected] (or [Change])
5. Touch [Search for an access point]
6. Touch "KPWL-0300-******_G" or "KPWL-0300-******_A" (the ****** are the last 6 digits of the MAC address) in the list that appears
7. "Do you want to save this content" appears, to confirm touch [OK]
8. "Settings were saved. Connection test will start" appears, touch [OK]
9. If "Connection test was successful" appears, connection is complete.
KPWL-0300 User's Manual 13

For Sony PlayStation Portable (PSP)
1. Select [Network settings] in [Settings]
2. Select [Infrastructure mode]
3. Select [New connection settings]
4. Select [Scan]
5. Select "KPWL-0300-******_G" or "KPWL-0300-******_A" (the ****** are the last 6 digits of the MAC address) in the list that appears
6. Leave the SSID as it is, and go to the next step (→ key)
7. Leave the wireless LAN security setting as [None], and then go to the next step
8. Leave the address setting as [Easy], and then go to the next step
9. Input any connection name in "Enter the connection name". The SSID becomes the connection name if you do not change it. Go to the
next step.
10. This displays the list of settings, so just go to the next step
11. Press the ○ button to save the settings
12. After [Save is complete.] appears, select [Test Connection]. After [Connecting to access point...] → [Obtaining IP Address...] →
[Testing internet connection] appear, and then the connection name and the signal strength appear, the connection is complete.
Step
7: Perform final installation
After confirming connection of the KPWL, perform final installation.
The position and the height of a temporary installation and the final installation may change somewhat. Press the
Reroute button to confirm that the link is good following final installation.
Step
8: Expand the wireless LAN area
If you want to expand the wireless LAN area, you will need to purchase an additional KPWL-0300 unit. Perform
steps 3 through 7 of this procedure on the purchased KPWL-0300 unit.
KPWL-0300 User's Manual 14

6 Changing Settings
Though you can easily build and expand a wireless LAN area using the factory setup, you can also modify settings in
order to improve user friendliness, operability, and performance in cases like the ones described below.
When you want to set up security (the security is not set up when shipped from the factory)
When you want to use an SSID with the name of the shop or service ("KPWL-0300-******_G" or
"KPWL-0300-******_A" (the ****** are the last 6 digits of the MAC address) is set shipped from the factory)
When you want to separate the SSIDs for each access point (when you want separate SSIDs for the conference
rooms and offices, for example)
When there are other wireless LAN access points or wireless LAN routers in the building or on your floor
(interference may degrade performance)
When you want to separate networks (such as for employees and customers, for example)
In the above cases, you can easily change the settings by using the KPWL web setting screen.
When you want to set security:
Access the web setting screen, go to the "Access Point" tab > "Security" > "Authentication Method" and select
WEP or WPA-PSK, and then set a security key (encryption key or pre-shared key).
Regarding the setting items, refer to "Setting Item List", explained later. Regarding the setting methods, refer to
"How to change settings" later in this manual.
When you want to use an SSID with the name of the shop or service:
Access the web setting screen, go to the "Access Point" tab > "Basic Settings" > "SSID" and set an arbitrary text
string. Regarding the setting items, refer to "Setting Item List", explained later. Regarding the setting methods,
refer to "How to change settings" later in this manual.
When you want to separate the SSIDs for each access point:
For each of the KPWL-0300s, access the web setting screen, go to the "Access Point" tab > "Basic Settings" >
"SSID" and set different arbitrary text strings for each one. Regarding the setting items, refer to "Setting Item
List", explained later. Regarding the setting methods, refer to "How to change settings" later in this manual.
When interference from other wireless LAN access points or wireless LAN routers degrades performance:
Access the web setting screen, go to the "Access Point" tab > "Basic Settings" and change the "Channel"
settings. Detailed information about channels is given in "About channels" later in this manual. Regarding the
setting items, refer to "Setting Item List", explained later. Regarding the setting methods, refer to "How to change
settings" later in this manual.
When you want to separate networks:
You can separate the network by accessing the web setting screen for each of the KPWL-0300s on the
"Wireless Backhaul Network" tab > "Basic Settings" and specifying a "Channel" and "SafeKey". Information
about separating networks is given in "Separating networks" later in this manual. Regarding the setting items,
refer to "Setting Item List", explained later. Regarding the setting methods, refer to "How to change settings"
later in this manual.
KPWL-0300 User's Manual 15

6.1 Procedure to Change Settings
IP Address
192.168.3.x (x = 2 to 255)
Subnet Mask
255.255.255.0
This section explains how to change settings using the KPWL-0300 web screen.
Step
1: Prepare the necessary equipment
□ LAN cable (cross cable) ………… 1
A cross cable is required to connect the KPWL to a computer.
(If the computer you are using supports Auto-MDI, connection using a standard straight LAN
cable is also supported.)
□ KPWL unit and its AC power cable
* Installation of an antenna is not required just to configure settings. Install an antenna for
connection testing and to check the radio wave intensity.
□ Computer for configuring settings: Use a computer that has a wired LAN port* and web browsing capabilities.
* If a there is no wired LAN port, use a USB-wired LAN adapter, etc.
* The explanation here uses a computer running Windows 7, with
the Internet Explorer 8.0 web browser.
Step
2: Connect the KPWL-0300 unit to the computer
(1) Power up the KPWL unit (connect the AC power cable). Next, connect one end of the LAN cable to the
computer's LAN port and then connect the other end to the KPWL unit's LAN port.
(2) Configure the computer's internet settings.
1. In Control Panel, click "Network and Internet" and then click "Network and Sharing Center."
2. Click "Local Area Connection." On the Local Area Connection Status dialog box that appears, click [Properties].
3. In the list that appears, select "Internet Protocol Version 4 (TCP/IPv4)" and then click [Properties].
4. Select the "Use the following IP address:" option and then input the IP address and subnet mask shown below.
* Take a screen shot of or otherwise record the original IP address and subnet mask settings so you can restore them when
necessary.
5. After inputting the settings, click [OK] to close the dialog box.
6. Click [Cancel] on the Local Area Connection Properties dialog box, and then click [Close] on the Local Area Connection
Status dialog box.
KPWL-0300 User's Manual 16
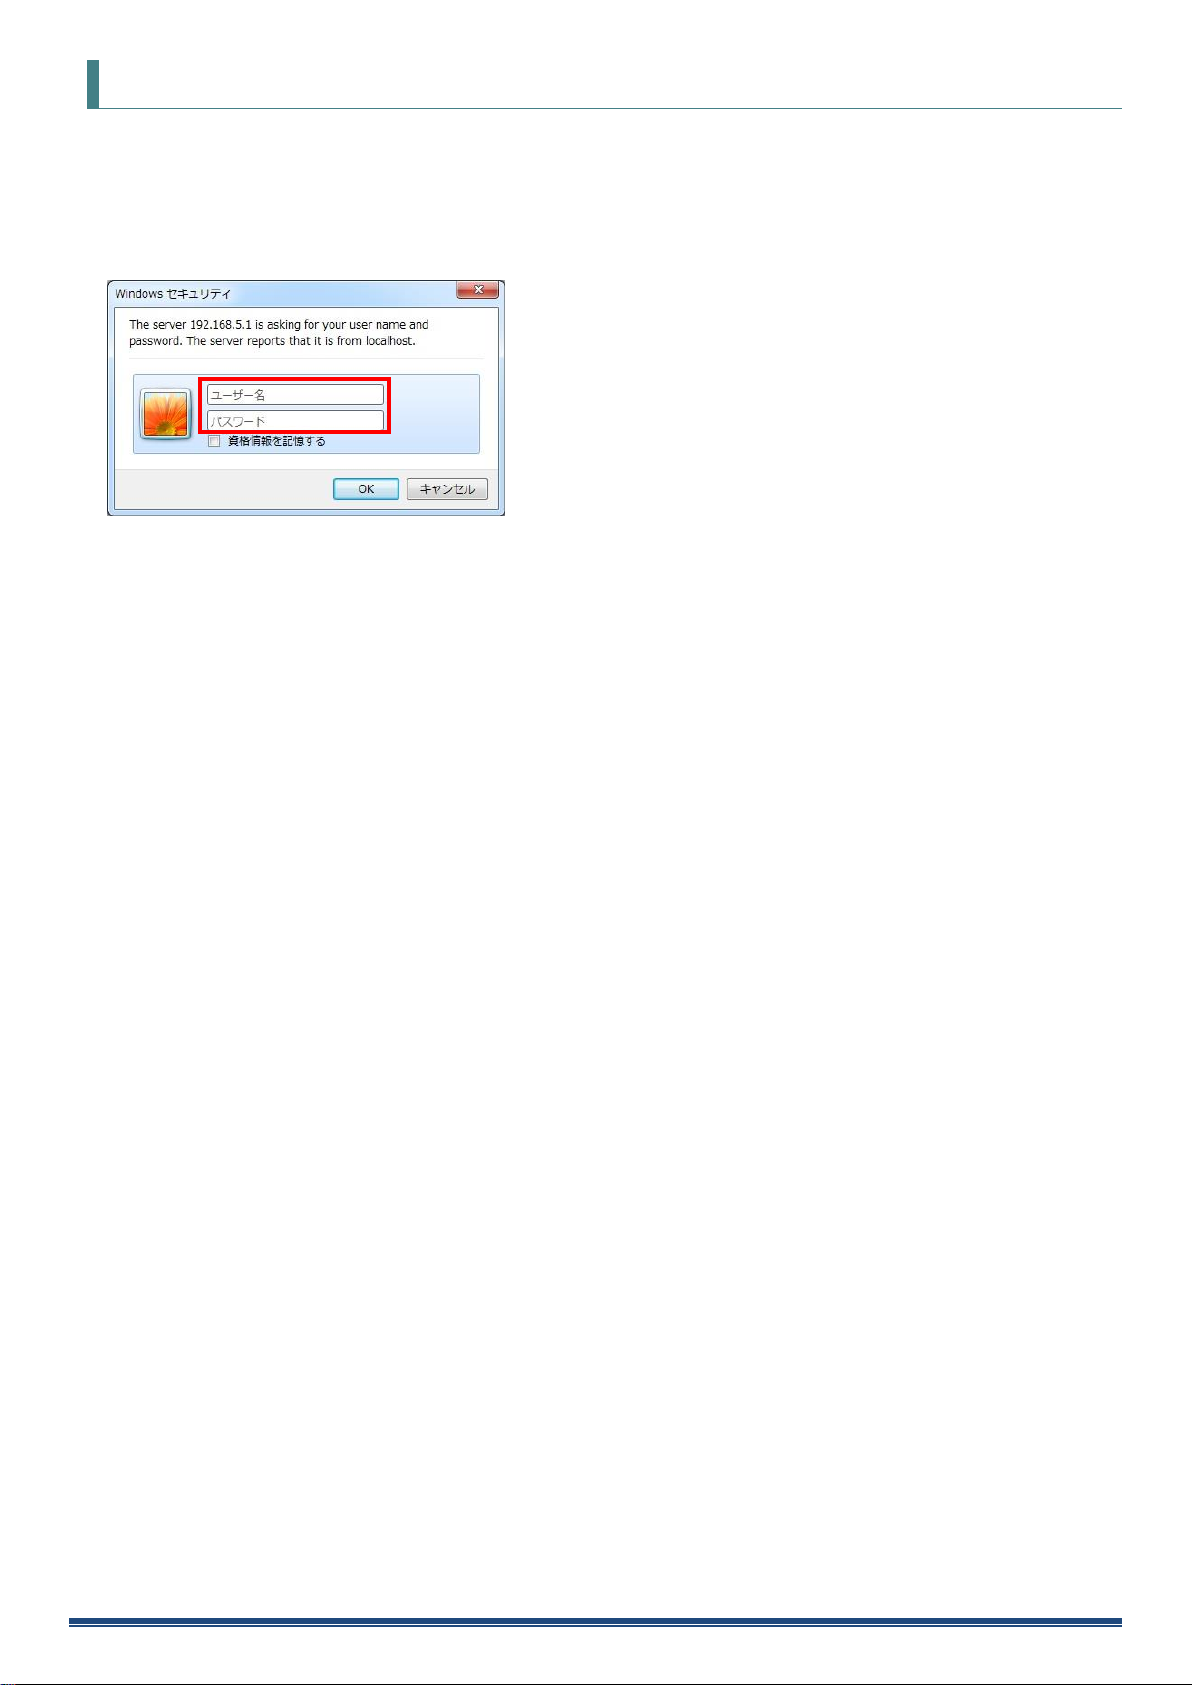
Step
3: Use the computer's browser to display the KPWL setting screen
KPWL has access point function settings and relay function settings, both of which can be viewed and configured using
a web browser.
(1) In the browser address bar, input "192.168.3.1". This displays an authentication dialog box.
(2) Input "admin" for both the user name and password, and then click [OK].
This displays the web setting screen.
You can change the user name and password with the "Admin Account Settings" on the [Management] tab of the
web setting screen.
KPWL-0300 User's Manual 17
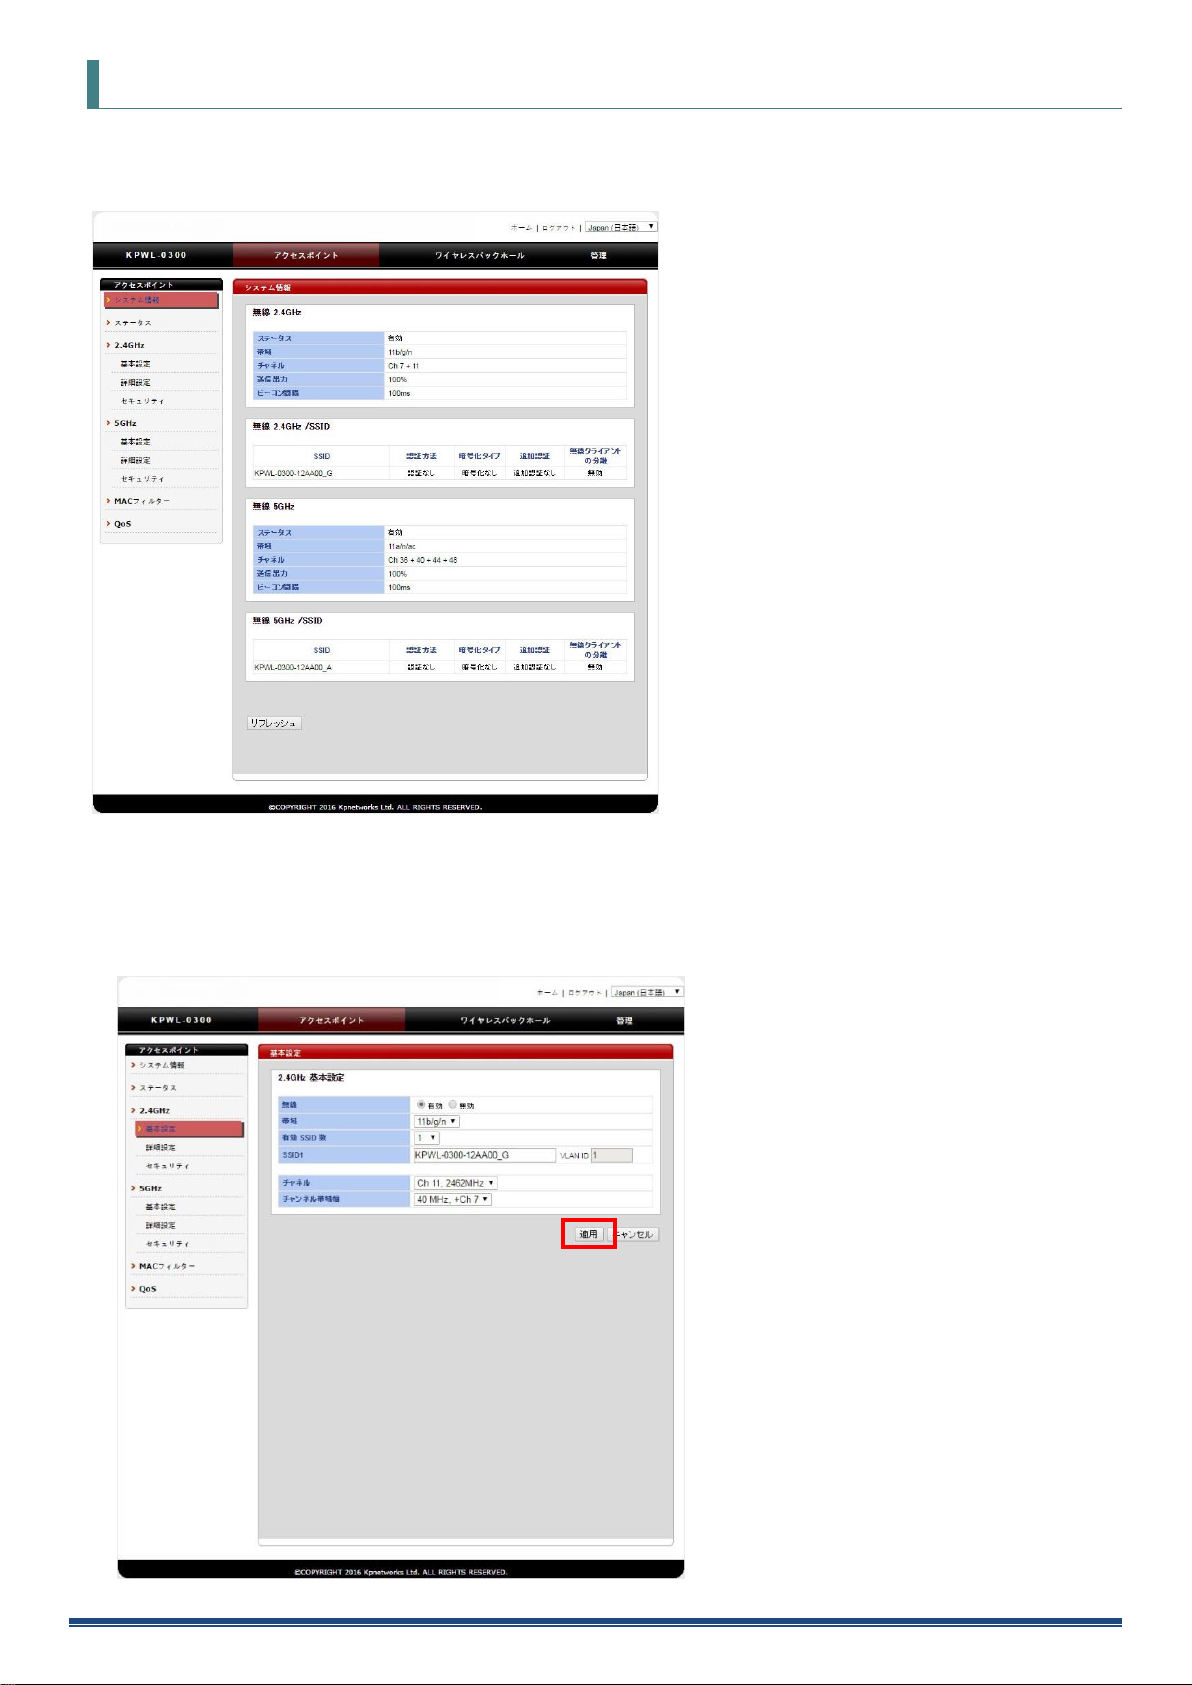
Step
4: Configure KPWL settings
Displaying the web setting screen with a browser will display System Information.
You can use the System Information screen to view current settings.
Use the menu on the left side of the screen to select a category (page name), and the applicable setting items will
appear. For information about the meaning of each setting, available settings, and more, refer to the " List of setting
items " later in this manual.
After all the settings are the way you want, click [Apply].
KPWL-0300 User's Manual 18
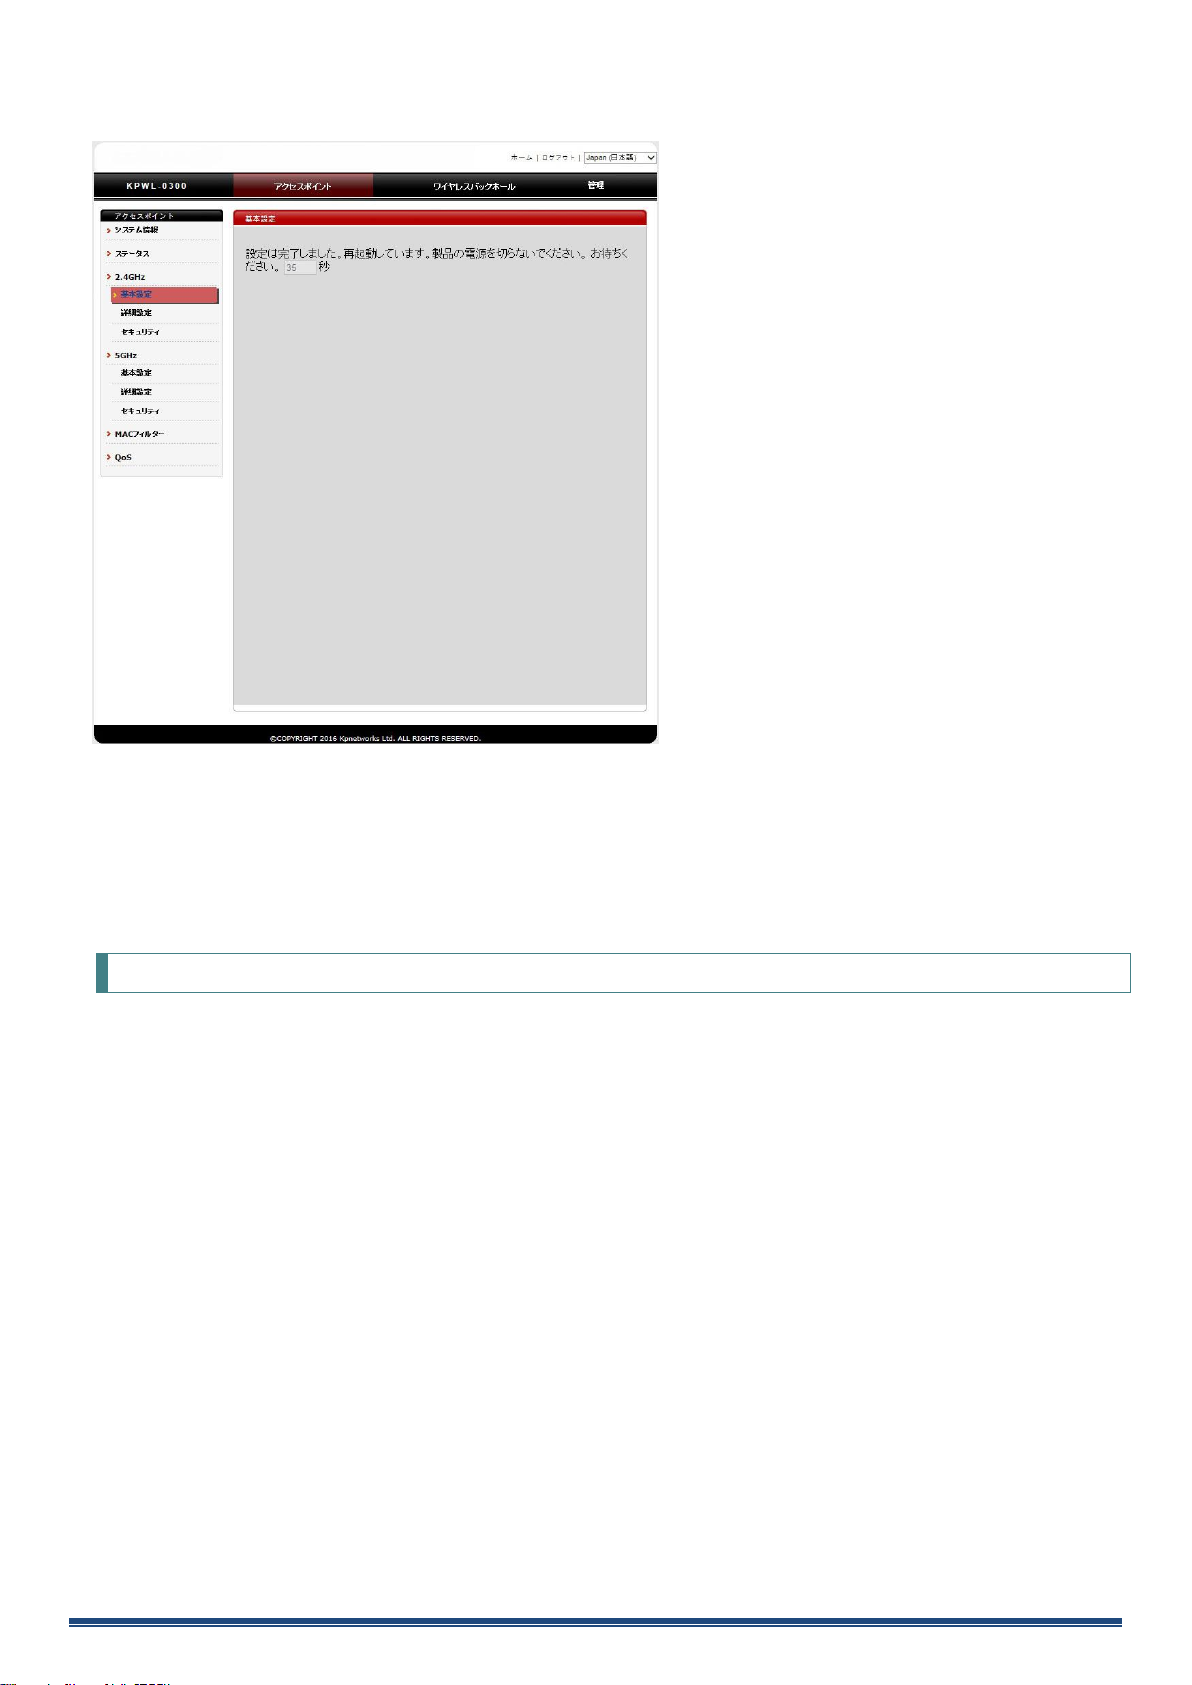
The screen shown below will be displayed while reboot is in progress. The setup page will appear after reboot is
complete.
If you do not click [Apply] after updating settings, they will not be saved.
For information about the settings you can configure on this page, refer to the "List of setting items" later in this manual.
In addition to configuring settings, you can also reboot the KPWL unit and perform a reroute operation (the same
operation performed when the Reroute button is pressed) on the web setting screen.
6.2 Initializing Settings
You can use the web setting screen to initialize settings.
(1) Click the [Management] tab. Next, on the side menu, click "Factory Defaults."
(2) Click "Factory Defaults."
You can also initialize settings from the KPWL-0300 unit.
(1) Hold down the Reroute button for about 10 seconds and then release it.
(2) Confirm that the LED lamps turn off momentarily, and then all lamps turn back on.
(3) Confirm that the LINK light is turned off.
Furthermore, if PicoManager is registered, the settings can be initialized from PicoManager also. Refer to the
PicoManager manual regarding the operating procedure.
Note that initializing settings causes all settings to be initialized.
KPWL-0300 User's Manual 19
 Loading...