

Kozumi KR-403P User Manual

4-Port Cable/DSL Broadband Router
User’s Guide
KR-403P

4-Port Cable/DSL Broadband Router Use’s Guide
2
1 Introduction ····························································································································· 4
1.1 Features··································································································································· 4
1.2 Package Contents ···················································································································· 4
2 Appearance Illustration ·········································································································· 6
2.1 Panel ······································································································································· 6
2.1.1 Light Panel ·················································································································· 6
2.1.2 Rear Panel ··················································································································· 6
2.2 Illustration ······························································································································· 6
2.3 W orking envi ronm ent ·············································································································· 7
3 Setup your computer ·············································································································· 7
3.1 Connect the Router ·················································································································· 7
3.2 Windows 98/Me ······················································································································ 8
3.3 Windows 2000························································································································· 9
3.4 Windows XP ·························································································································· 11
4 Configuring the Router ········································································································· 14
4.1 Status ···································································································································· 16
4.1.1 Statistics ···················································································································· 17
4.2 WAN Setup ··························································································································· 17
4.2.1 For Dynamic IP Setting ······························································································ 18
4.2.2 For PPPoE Setting ····································································································· 18
4.2.3 For Static IP Setting ··································································································· 19
4.2.4 For PPTP Setting ······································································································· 20
4.3 LAN Setup ···························································································································· 21
4.4 Routing ································································································································· 22
4.5 NAT ······································································································································ 23
4.5.1 DMZ Host Setup ········································································································ 23
4.5.2 FTP Private Port ········································································································ 23
4.5.3 Virtual Server Setup ··································································································· 24
4.5.4 Port Triggering··········································································································· 25
4.6 Fire W all ······························································································································· 26
4.6.1 MAC Filtering Configuration ····················································································· 26
4.6.2 Connection Filtering Configuration ············································································ 27
4.6.3 URL Filteri ng Configurati on ······················································································ 28
4.7 DDNS Setup ························································································································· 29
4.8 MISC Configuration ·············································································································· 29
4.8.1 Login ID & Password Setup ······················································································· 29
4.8.2 Remote Management ································································································· 30
4.8.3 UPnP Setup················································································································ 30
4.8.4 System Time Setup ···································································································· 31
4.8.5 WAN Link Status & Setup ························································································· 31
4.8.6 Restore Default / Restart System ················································································ 31
4.8.7 Firmware Upgrade ····································································································· 32
5 Troubleshooting ···················································································································· 33
5.1 Forget Password (Reset the Router without Login) ································································· 33

4-Port Cable/DSL Broadband Router Use’s Guide
3
5.2 Problems Related to Connection with Cable Modem ······························································ 33
5.3 Problems Related to Connection with DSL Modem ································································ 35
5.4 How to Setup Your Computer to Get IP Address Manually ····················································· 35
6 Technical Specifications ······································································································· 39

4-Port Cable/DSL Broadband Router Use’s Guide
4
1 Introduction
This router is a 4-port Cable/DSL Broadband Router. It provides you an easy and
stable way to share your Cable/DSL high speed Internet connection. The built-in
NAT technology can act as a firewall to protect your internal network against outside
hackers. The 4-port Broadband Router is compatible with most popular operating
systems, such as Windows, Linux, Macintosh, etc. However, this manual is
designed to help users to connect their computers with the Internet under Windows
systems. For other operating systems, please check the related materials before
you use this Router.
The User Manual ex plains how to setup an d use the rou ter i n de t ail s. It als o pr ov ides
some quick introductions to the related network technologies. Please read it
carefully before c on nec ting the R outer to the Intern et an d alw ay s consul t it firs t w hen
you meet problems with the Router.
1.1 Features
Complies with the IEEE802.3 and IEEE802.3u standards
One 10M/100M auto-negotiation WAN port allows you to connect the Router
with Cable/DSL modem or other Ethernet devices, such as router, switch, hub,
etc
Built-in 4-port 10/100Mbps auto-negotiation Fast Ethernet switch allows you to
share the single Internet connection with up to 50 computers or network devices
Supports different Internet connecting modes: PPPoE, DHCP Client and Static
IP
All ports support auto MDI/MDIX function which allows you to connect the
devices with the Router by either parallel or cross-over Ethernet cables
Supports UPnP, Windows XP can find the Router in the network automatically
Built-in NAT (Network Address Transfer) technology acts as a firewall to protect
internal sources against outside hackers
Simple, intelligent, web-based management and configuration interface
Supports Proxy DNS
Supports DHCP server, all networked computers can retrieve T CP/IP settings
automatically from the Router
Supports virtual server which makes LAN services (such as FTP, WWW, DNS,
etc) to be accessible to the Internet user s
LED indicators for simple diagnostics and management
1.2 Package Contents
4-port Cable/DSL Broadband Router 1pc
Power Adapter 1pc

4-Port Cable/DSL Broadband Router Use’s Guide
5
User Manual 1pc
NOTE:
1. If any of the above items are missing, please contact your reseller.
2. Please check the voltage of your power supply before using the power adapter.
Different input voltage may damage the power adapter.
4-Port Cable/DSL Broadband Router Use’s Guide
6
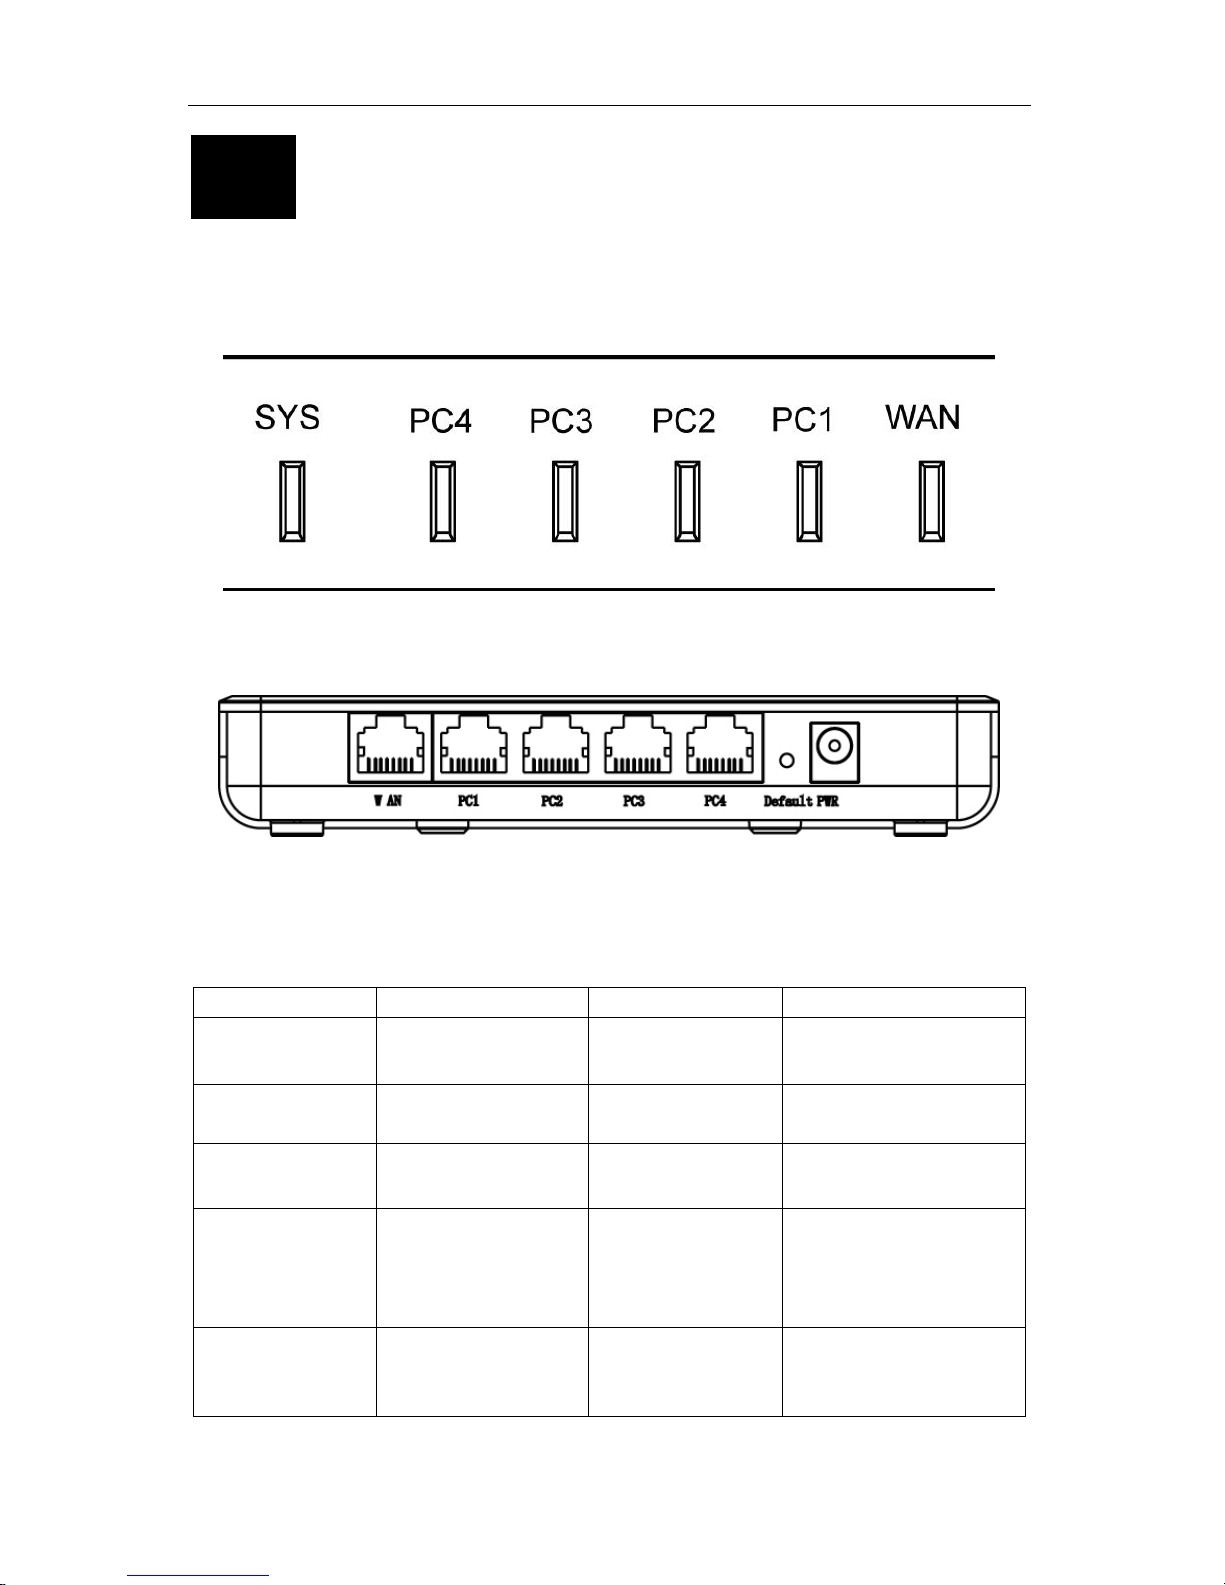
2 Appearance I llustration
2.1 Panel
2.1.1 Light Panel
Figure 2-1
2.1.2 Rear Panel
Figure 2-2
Notice: the defult button beside the machine
2.2 Illustration
No. in Figures
Name on Router
Description
Remark
1
SYS
Power Status
Indicator
Refer to 5 Illustration
of Indicators
2 WAN WAN Interface
Status Indicator
Refer to 5 Illustration
of Indicators
3 PC1/PC2/PC3/PC4 LAN Interface
Status Indicators
Refer to 5 Illustration
of Indicators
4 WAN WAN Port Connect to
Cable/DSL mo de m or
other Ethernet
devices
5 PC1/PC2/PC3/PC4 LAN Ports Connect to LAN
computers and
devices
4-Port Cable/DSL Broadband Router Use’s Guide
7
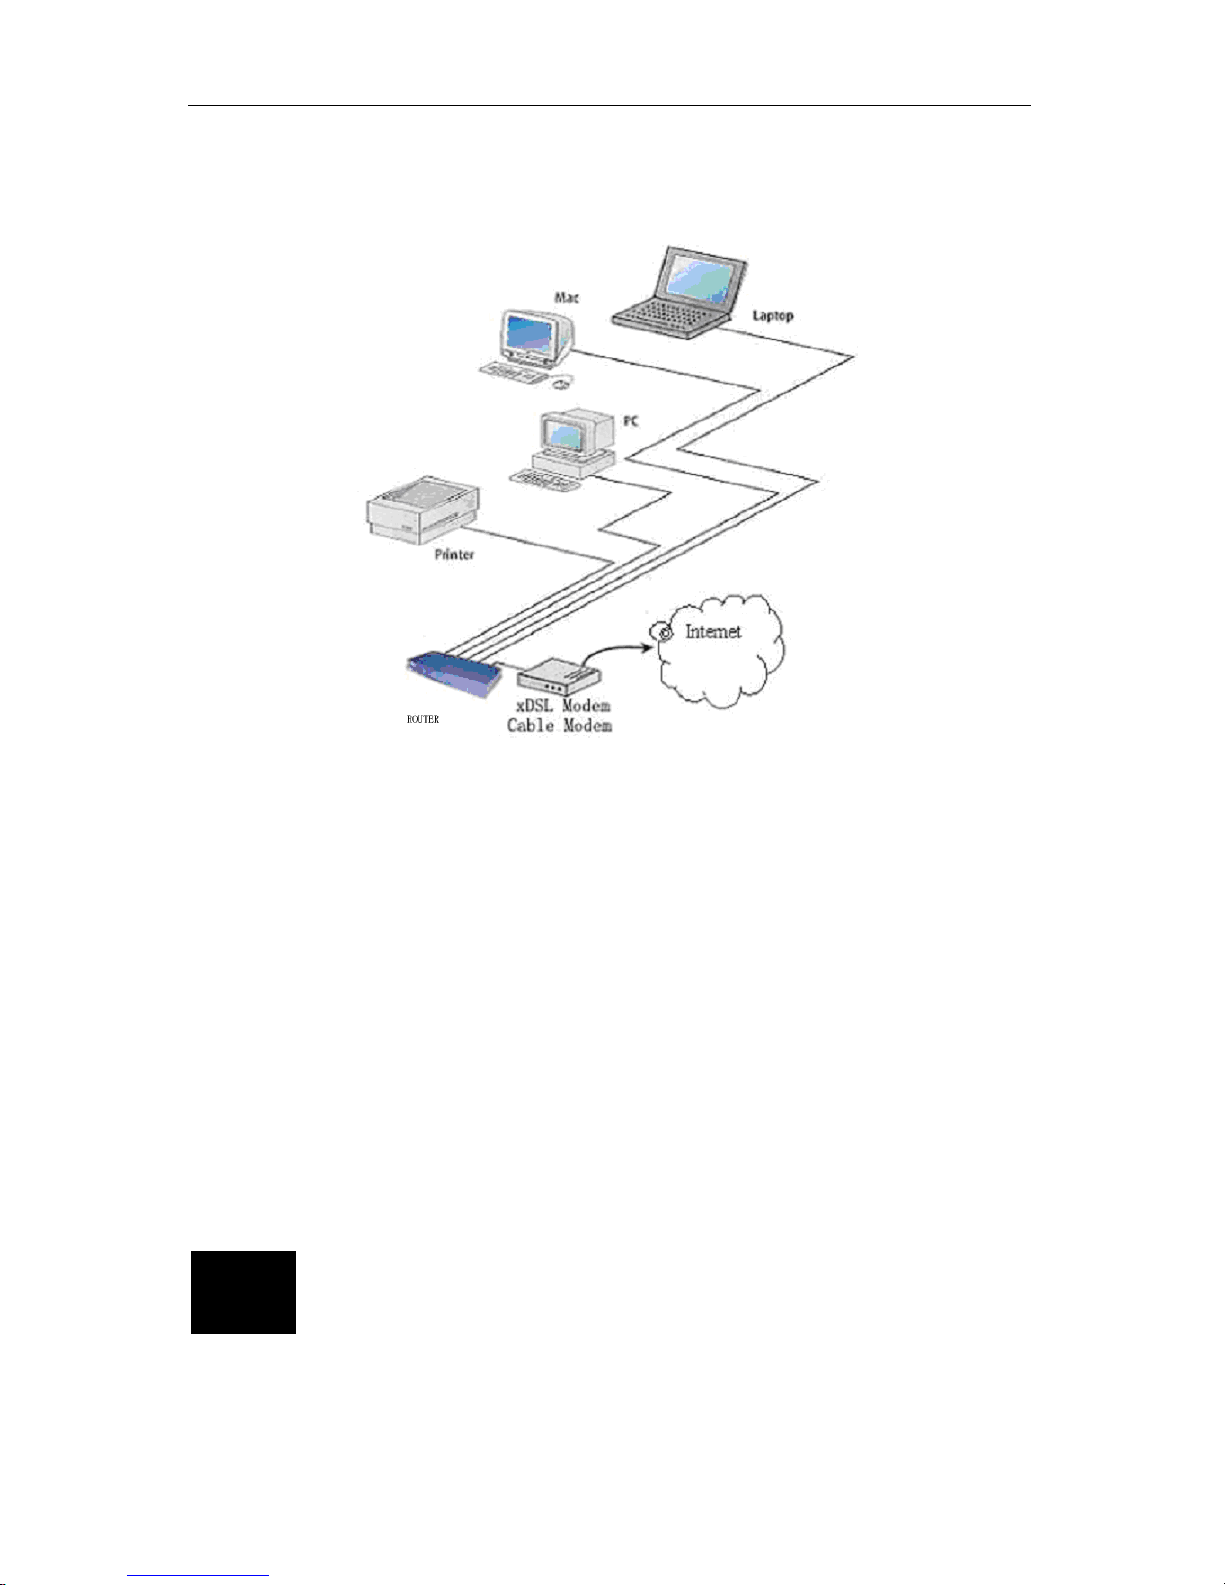
2.3 Working environment
Figure 2-3
As the above figure shows, Router could be connected with four LAN (local area
network) computers directly. In addition, users can expand their network by
connecting other Ethernet devices (such as Hub, Switch, etc) with the Router. In thi s
way, users can connect as many as 50 computers with router.
This router supports three kinds of connection modes which allow the users to hook
up with the Internet through either Cable modem or DSL modem
3 Setup your co mputer
3.1 Connect the Router
Please follow the steps below to connect the modem and your computers with the
4-Port Cable/DSL Broadband Router Use’s Guide
8
Router:
1. Make sure that all network devices are powered off, including the Router, PCs,
switches, cable or DSL modem, and peripherals.
2. Connect the modem with the WAN port of the Router by one CAT 5 Ethernet
cable.
3. Connect your computers with the LAN ports (1x/2x/3x/4x) of the Router by CAT 5
Ethernet cables. One computer connects to one port by one cable.
4. Power on the cable or DSL modem.
5. Plug in the power of the Router. The Power LED on the Router’s front panel will
light up as soon as the power adapter is connected properly.
6. Power on your PC(s).
NOTE:
Please refer to 4 APPEARANCE ILLUSTRATION for the port name and position.
Please setup your computer according to the operating system in your computer. In
this chapter, we only introduce how to setup your computer for Windows 98/Me,
Windows 2000.and Windows XP. We recommend customers to setup their
computers to obtai n IP address automatically, which we will introduce in thi s cha pter.
However, for some advanced users, or the users who cannot get the IP address
through the following configuration, please refer to 11.4 How to Setup Your
Computer to Get IP Address Manually.
3.2 Windows 98/Me
Please follow the steps below to setup your computer:
1. Go to St art Settings Control Panel.
2. Find and double-click the Network icon. The Network dialog box appears.
3. Click the Configuration label and ensure that you have network card.
4. Select TCP/IP. If TCP/IP appears more than once, please select the item that has
an arrow “” pointing to the network card installed on your computer. DO NOT
choose the instance of TCP/IP with the words “Dial Up Adapter” beside it.
5. Click Properties. The TCP/IP Properties dialog box appears.
6. Ensure the Obtain IP Address Automatically is checked.
7. From the WINS C o n fig ur ati o n dialog box, Ensure that Disable WINS Resoluti on is
checked.
8. From the Gateway dialog box, remove all entries from the Installed gateways by
selecting them and clicking Remove.
9. From the DNS Configuration dialog box, remove all entries from the DNS Server
Search Order box by selecting them and clicking Remove. Remove all entries from
the Domain Suffix Search Order box by selecting them and clicking Remove. Click
Disable DNS.
10. Click OK, back to Network Configuration dialog box
4-Port Cable/DSL Broadband Router Use’s Guide
9
11. Click OK, if prompted to restart, click YES.
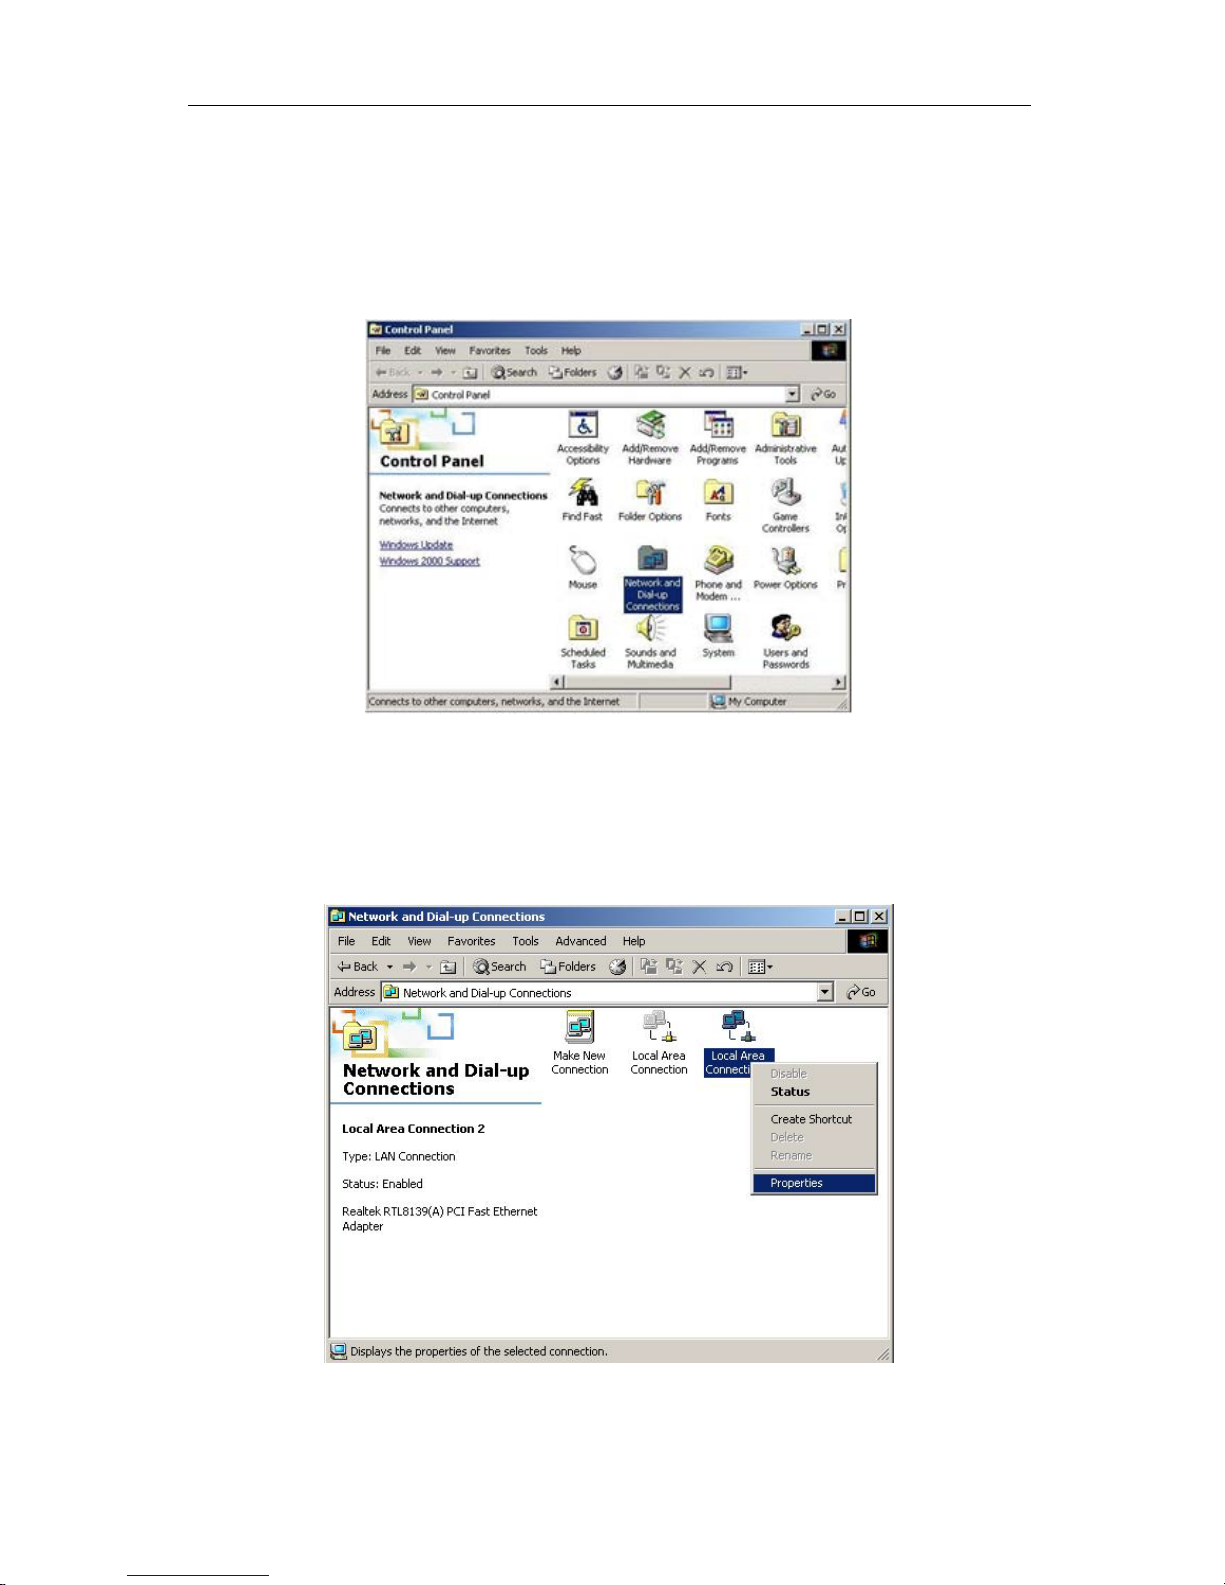
3.3 Windows 2000
Please follow the steps below to setup your computer:
1. Go to Start Settings Control Panel
Figure 3-1
2. Double click the icon Network and Dial-up Connections
3. Highlight the icon Local Area Connection, right click your mouse, click
Properties
Figure 3-2
4-Port Cable/DSL Broadband Router Use’s Guide
10
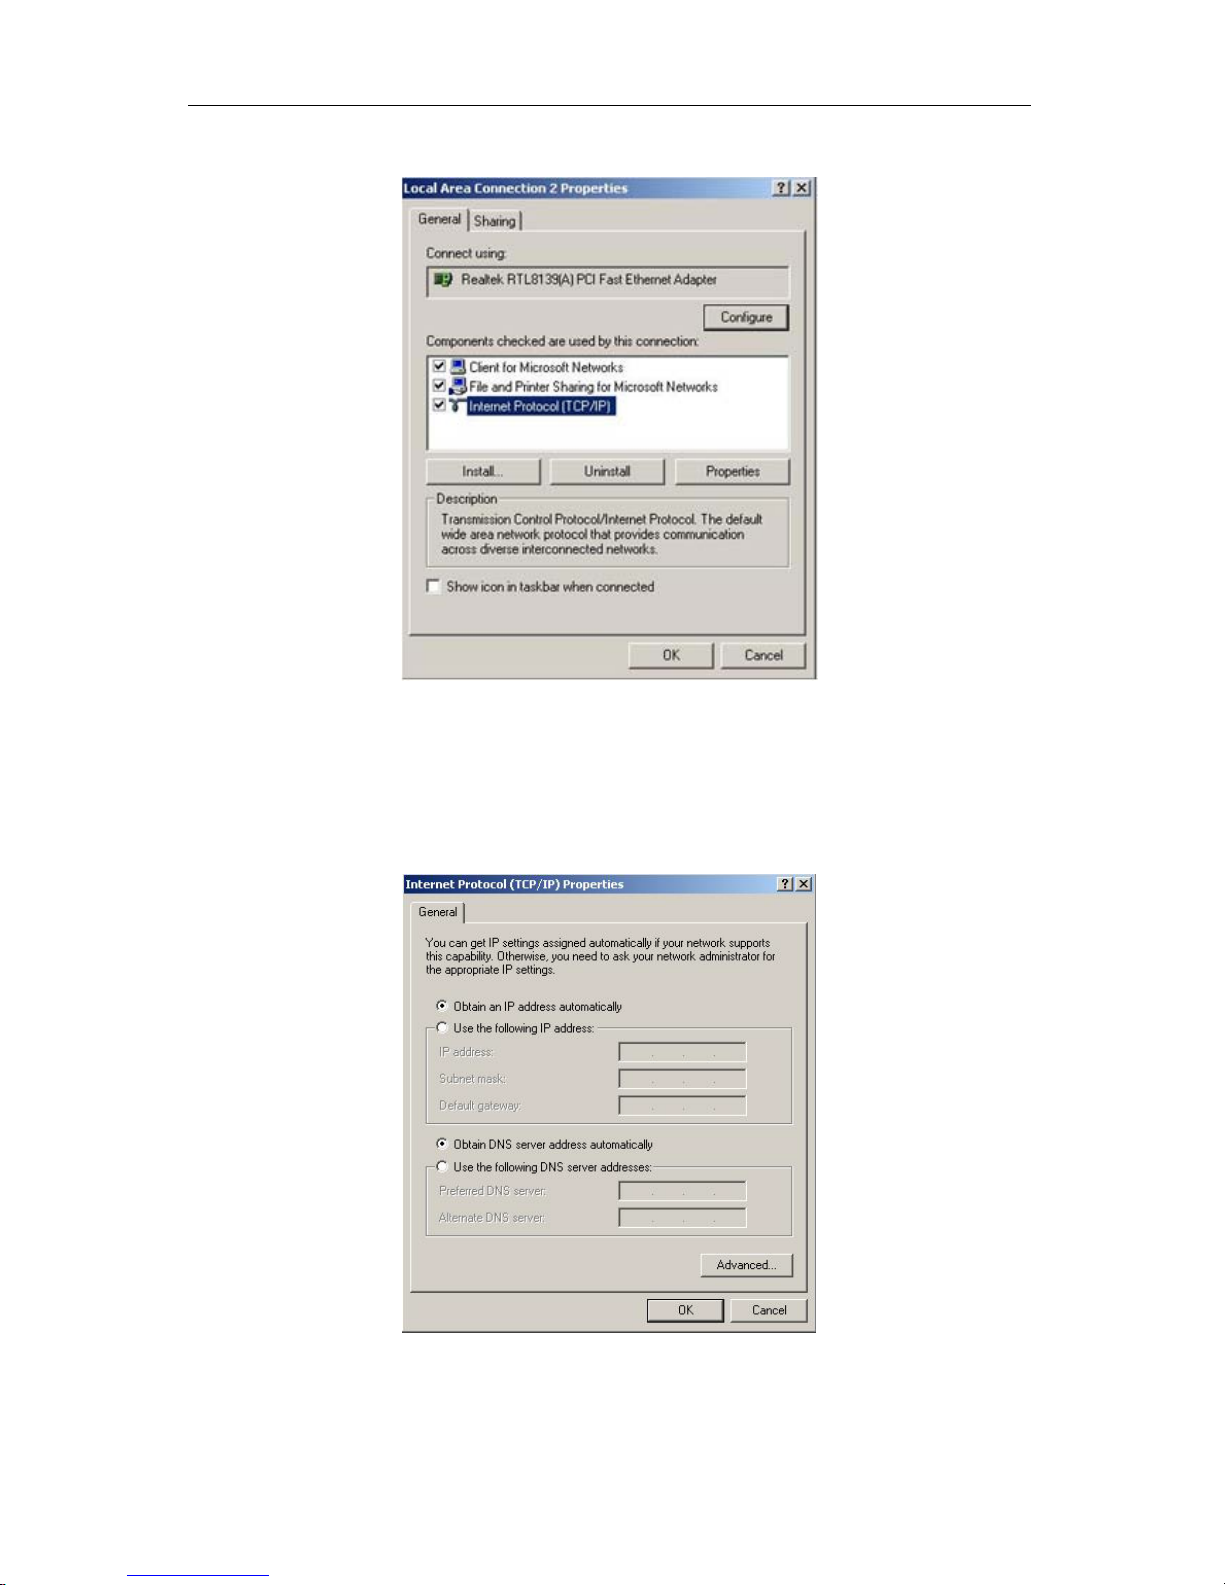
4. Highlight Internet Protocol (TCP/IP), and then press Properties button
Figure 3-3
5. Choose Obtain an IP address automatically and Obtain DNS server address
automatically, and then press OK to close the Internet Protocol (TCP/IP)
Properties window
Figure 3-4

4-Port Cable/DSL Broadband Router Use’s Guide
11
6. Press OK to close the Local Area Connection Properties window
Figure 3-5
3.4 Windows XP
Please follow the steps below to setup your computer:
1. Go to Start Settings Control Panel
2. Click Network and Internet Connections
Figure 3-6

4-Port Cable/DSL Broadband Router Use’s Guide
12
3. Click Network Connections
Figure 3-7
4. Highlight the icon Local Area Connection, right click your mouse, click
Properties
Figure 3-8
5. Highlight Internet Protocol (TCP/IP), and then press Properties button
 Loading...