

Kozumi air force one 2 lite User Manual

User Manual
V1.0
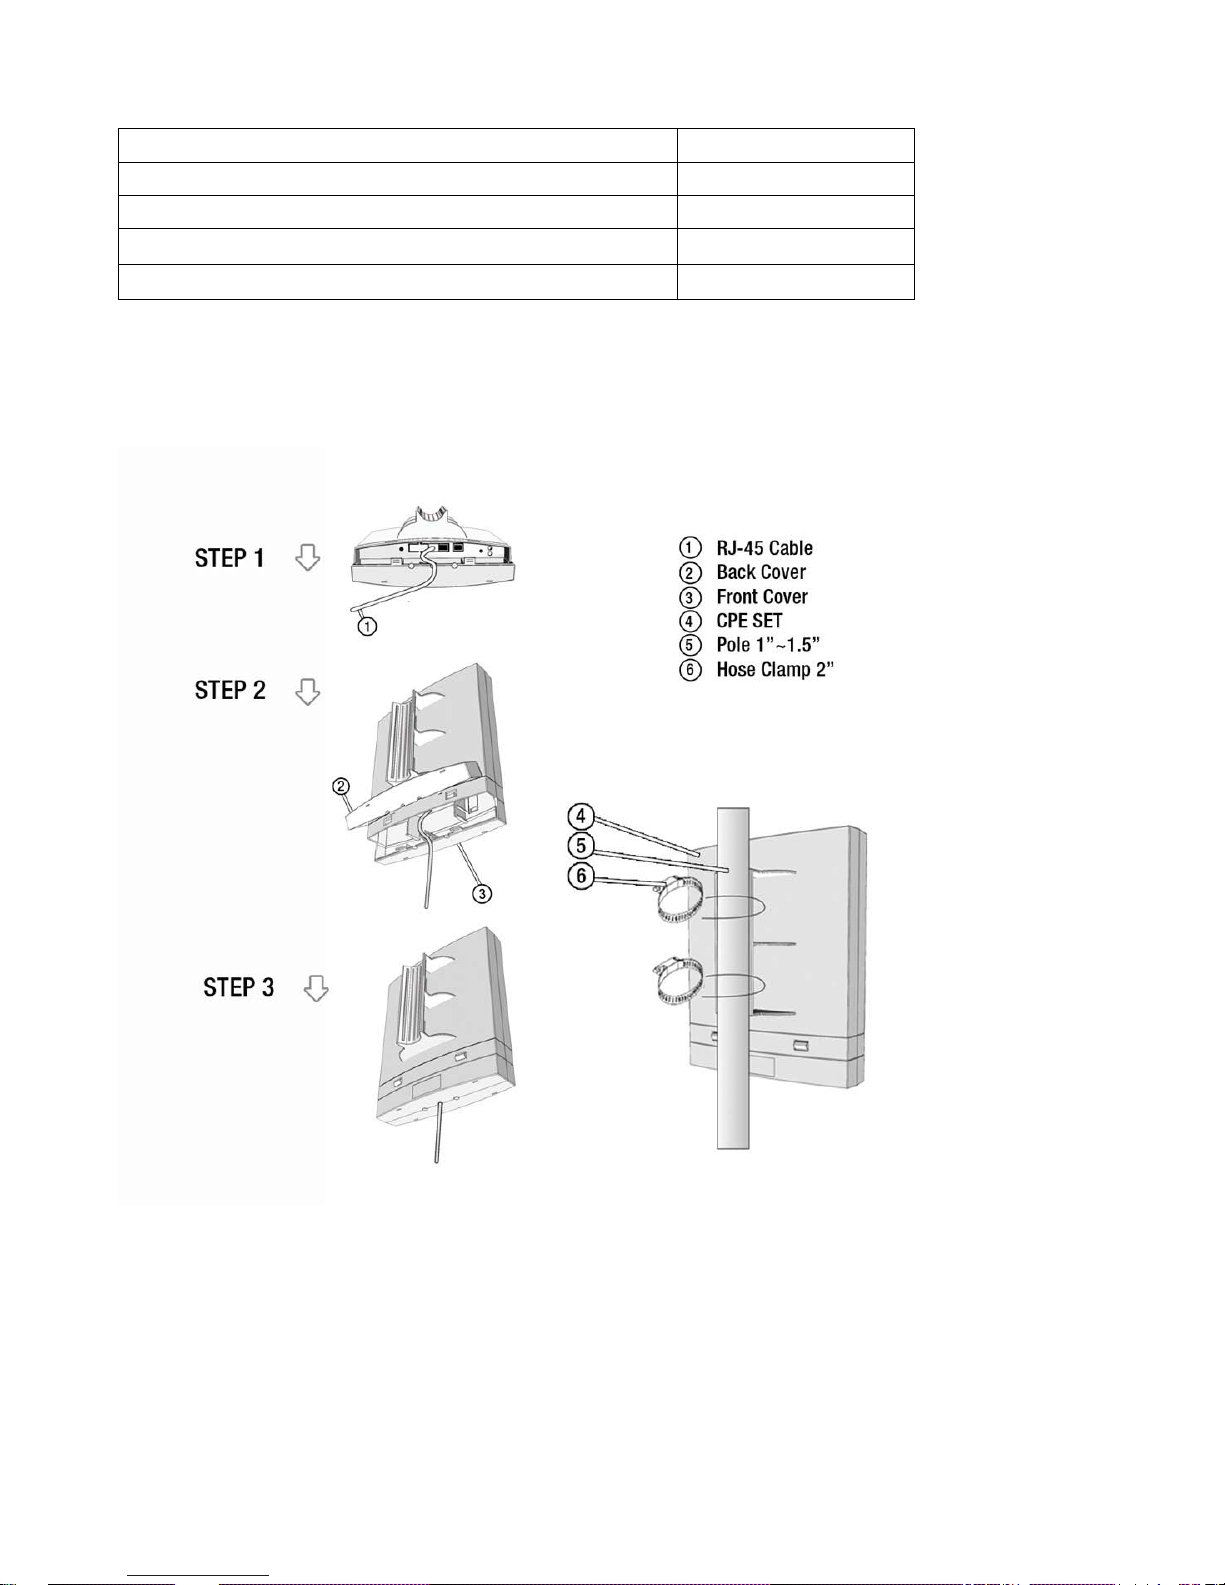
1. Check the parts in your box
CPE SET
1
PoE Injector
1
Hose Clamps
2
12V DC Power Adapter
1
CD user manual
1
2. Hot to fix the CPE on the Pole (1”- 1.5”)
(For better water resistance please wrap the RJ45 connector)
Software Installation
There are no software drivers, patches or utilities installation needed, but only the configuration
setting.
Notice: It will take about 55 seconds to complete the boot up sequence after powered on the
WLAN Access Point; Power LED will be active, and after that the WLAN Activity LED will be
flashing to show the WLAN interface is enabled and working now.
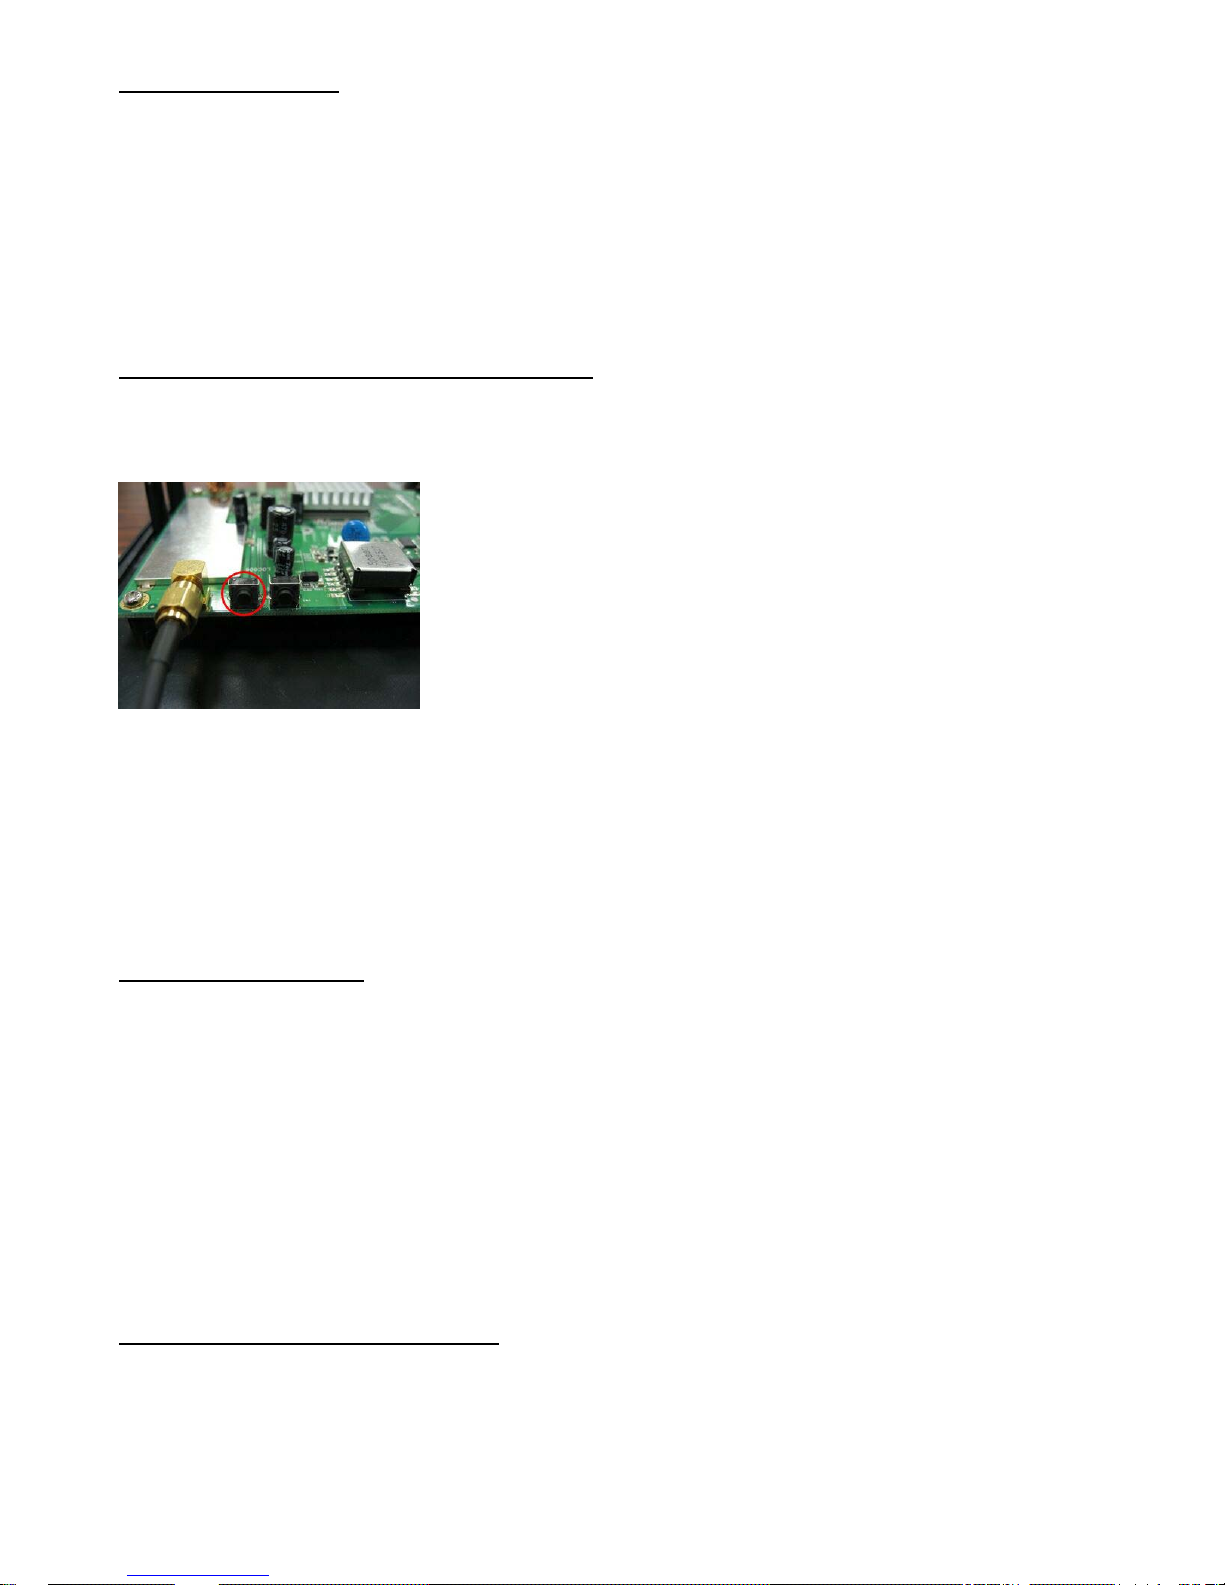
Resetting the AP to Factory Default Settings
After you have tried other methods for troubleshooting your network, you may choose to Reset the
Access Point to the factory default settings.
To hard-reset the Access Point to Factory Default Settings,please do the following:
Notes: Access Point status:Power on
Locate the Reset button on the back of the Access Point PCB
Press the Reset button
Hold for about 5 seconds and then release
After the Access Point reboots (this may take a few minutes) it will be reset to the factory
default settings.
Software configuration
There are web based management and configuration functions allowing you to have the jobs done
easily.
The WLAN Access Point is delivered with the following factory default parameters on the Ethernet
LAN interfaces.
Default IP Address: 192.168.1.254
Default IP subnet mask: 255.255.255.0
WEB login User Name: <empty>
WEB login Password: <empty>
Connect to the WLAN Access Point
This product can be set up using any current web browser, i.e., Internet Explorer 6 or
Netscape Navigator 6.2.3.

Open a WEB browser, i.e. Microsoft Internet Explore, then enter 192.168.1.254 on the URL to
connect the WLAN Access Point.
Prepare your PC to configure the WLAN Access Point
For OS of Microsoft Windows 95/ 98/ Me:
1. Click the Start button and select Settings, then click Control Panel. The Control Panel window
will appear.
Note: Windows Me users may not see the Network control panel. If so, select View all Control
Panel options on the left side of the window
2. Move mouse and double-click the right button on Network icon. The Network window will
appear.
3. Check the installed list of Network Components. If TCP/IP is not installed, click the Add button to
install it; otherwise go to step 6.
4. Select Protocol in the Network Component Type dialog box and click Add button.
5. Select TCP/IP in Microsoft of Select Network Protocol dialog box then click OK button to install
the TCP/IP protocol, it may need the Microsoft Windows CD to complete the installation. Close and
go back to Network dialog box after the TCP/IP installation.
6. Select TCP/IP and click the properties button on the Network dialog box.
7. Select Specify an IP address and type in values as following example.
IP Address: 192.168.1.1, any IP address within 192.168.1.1 to 192.168.1.253 is good to
connect the Wireless LAN Access Point.
IP Subnet Mask: 255.255.255.0
8. Click OK and reboot your PC after completes the IP parameters setting.
For OS of Microsoft Windows 2000, XP:
1. Click the Start button and select Settings, then click Control Panel. The Control Panel window
will appear.
2. Move mouse and double-click the right button on Network and Dial-up Connections icon. Move
mouse and double-clic k the Loc al Area Connection icon. The Local Area Connection window will
appear. Click Properties button in the Local Area Connection window.
3. Check the installed list of Network Components. If TCP/IP is not installed, click the Add button to
install it; otherwise go to step 6.
4. Select Protocol in the Network Component Type dialog box and click Add button.
5. Select TCP/IP in Microsoft of Select Network Protocol dialog box then click OK button to install
the TCP/IP protocol, it may need the Microsoft Windows CD to complete the installation. Close and
go back to Network dialog box after the TCP/IP installation.
6. Select TCP/IP and click the properties button on the Network dialog box.
7. Select Specify an IP address and type in values as following example.
IP Address: 192.168.1.1, any IP address within 192.168.1.1 to 192.168.1.253 is good to
connect the Wireless LAN Access Point.
IP Subnet Mask: 255.255.255.0
8. Click OK to completes the IP parameters setting.
For OS of Microsoft Windows NT:
1. Click the Start button and select Settings, then click Control Panel. The Control Panel window
will appear.
2. Move mouse and double-click the right button on Network icon. The Network window will appear.
Click Protocol tab from the Network window.

3. Check the installed list of Network Protocol window. If TCP/IP is not installed, click the Add
button to install it; otherwise go to step 6.
4. Select Protocol in the Network Component Type dialog box and click Add button.
5. Select TCP/IP in Microsoft of Select Network Protocol dialog box then click OK button to install
the TCP/IP protocol, it may need the Microsoft Windows CD to complete the installation. Close and
go back to Network dialog box after the TCP/IP installation.
6. Select TCP/IP and click the properties button on the Network dialog box.
7. Select Specify an IP address and type in values as following example.
IP Address: 192.168.1.1, any IP address within 192.168.1.1 to 192.168.1.253 is good to
connect the Wireless LAN Access Point.
IP Subnet Mask: 255.255.255.0
8. Click OK to complete the IP parameters setting.
Management and configuration
Status
This page shows the current status and some basic settings of the device, includes system,
wireless, and Ethernet LAN configuration information.
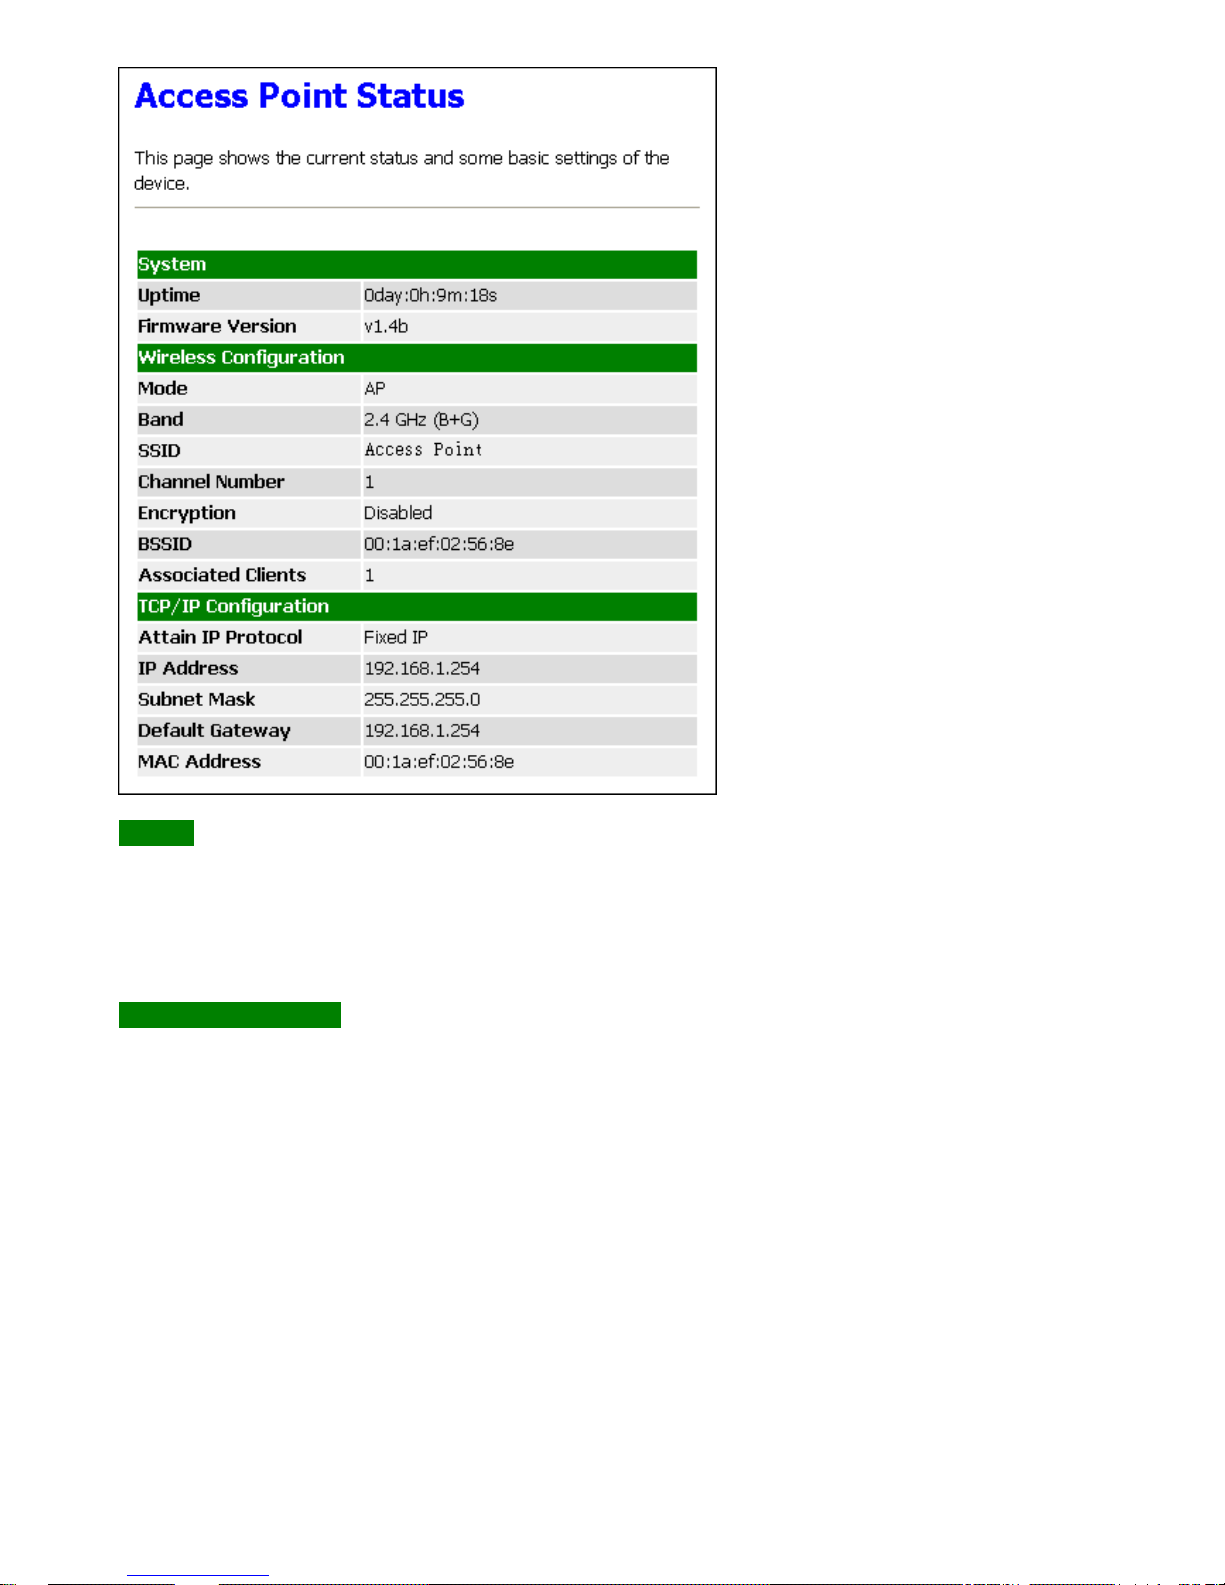
System
[Uptime]
It shows the duration since WLAN Access Point is powered on.
[Firmware version]
It shows the firmware version of WLAN Access Point.
Wireless configuration
[Mode]
It shows wireless operation mode
[Band]
It shows the current wireless operating frequency.
[SSID]
It shows the SSID of this WLAN Access Point.
The SSID is the unique name of WLAN Access Point and shared among its service area, so
all devices attempts to join the same wireless network can identify it.
[Channel Number]
It shows the wireless channel connected currently.
[Encryption]
It shows the status of encryption function.
[Associated Clients]
It shows the number of connected clients (or stations, PCs).
[BSSID]
It shows the BSSID address of the WLAN Access Point. BSSID is a six-byte address.
[Associated Clients]
It shows total numbers of WLAN clients connected,
TCP/IP Configuration
[Attain IP Protocol]
It shows how the WLAN Access Point gets the IP address. The IP address can be set
manually to a fixed one or set dynamically by DHCP server.
[IP Address]
It shows the IP address of WAN interface of WLAN Access Point.
[Subnet Mask]
It shows the IP subnet mask of LAN interface of WLAN Access Point.
[Default Gateway]
It shows the default gateway setting for outgoing data packets.
[MAC Address]
It shows the MAC address of WLAN Access Point.
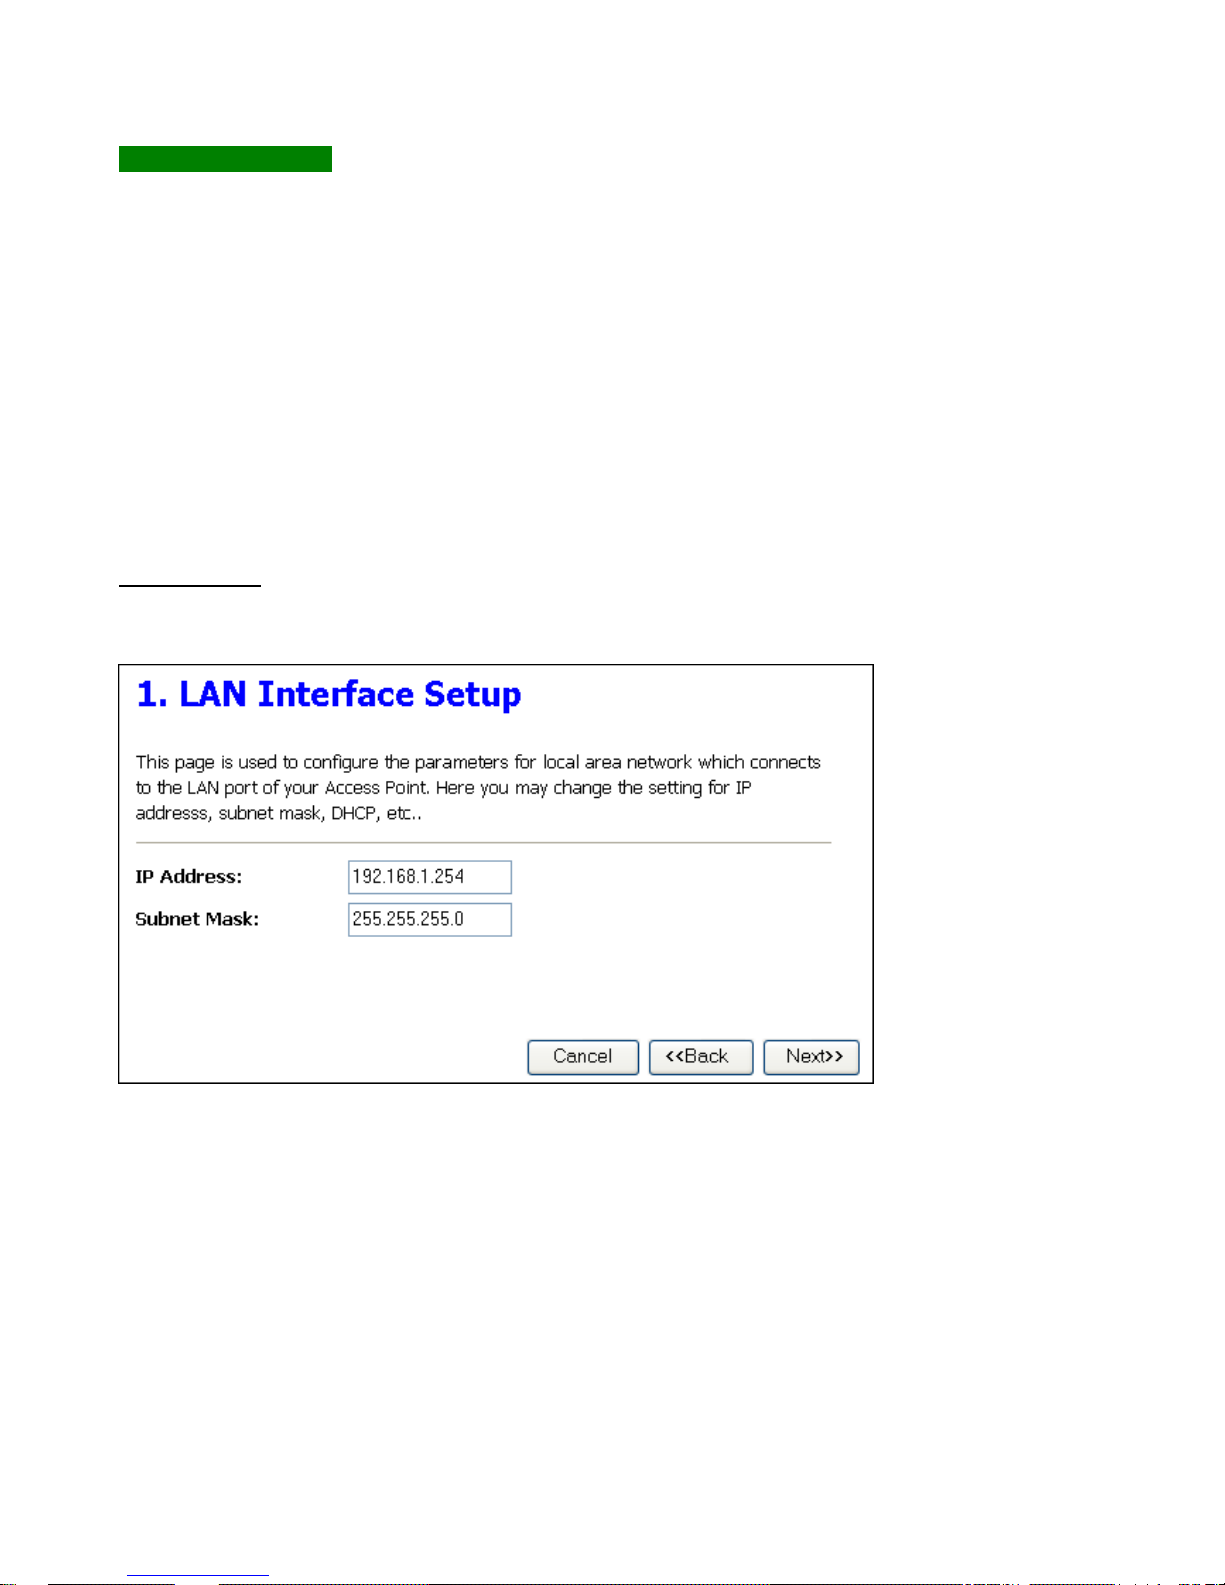
Setup Wizard
This page guides you to configure wireless Access Point for first timeEnter topic text here.
1.LAN Interface Setup
This page is used to configure local area network IP address and subnet mask
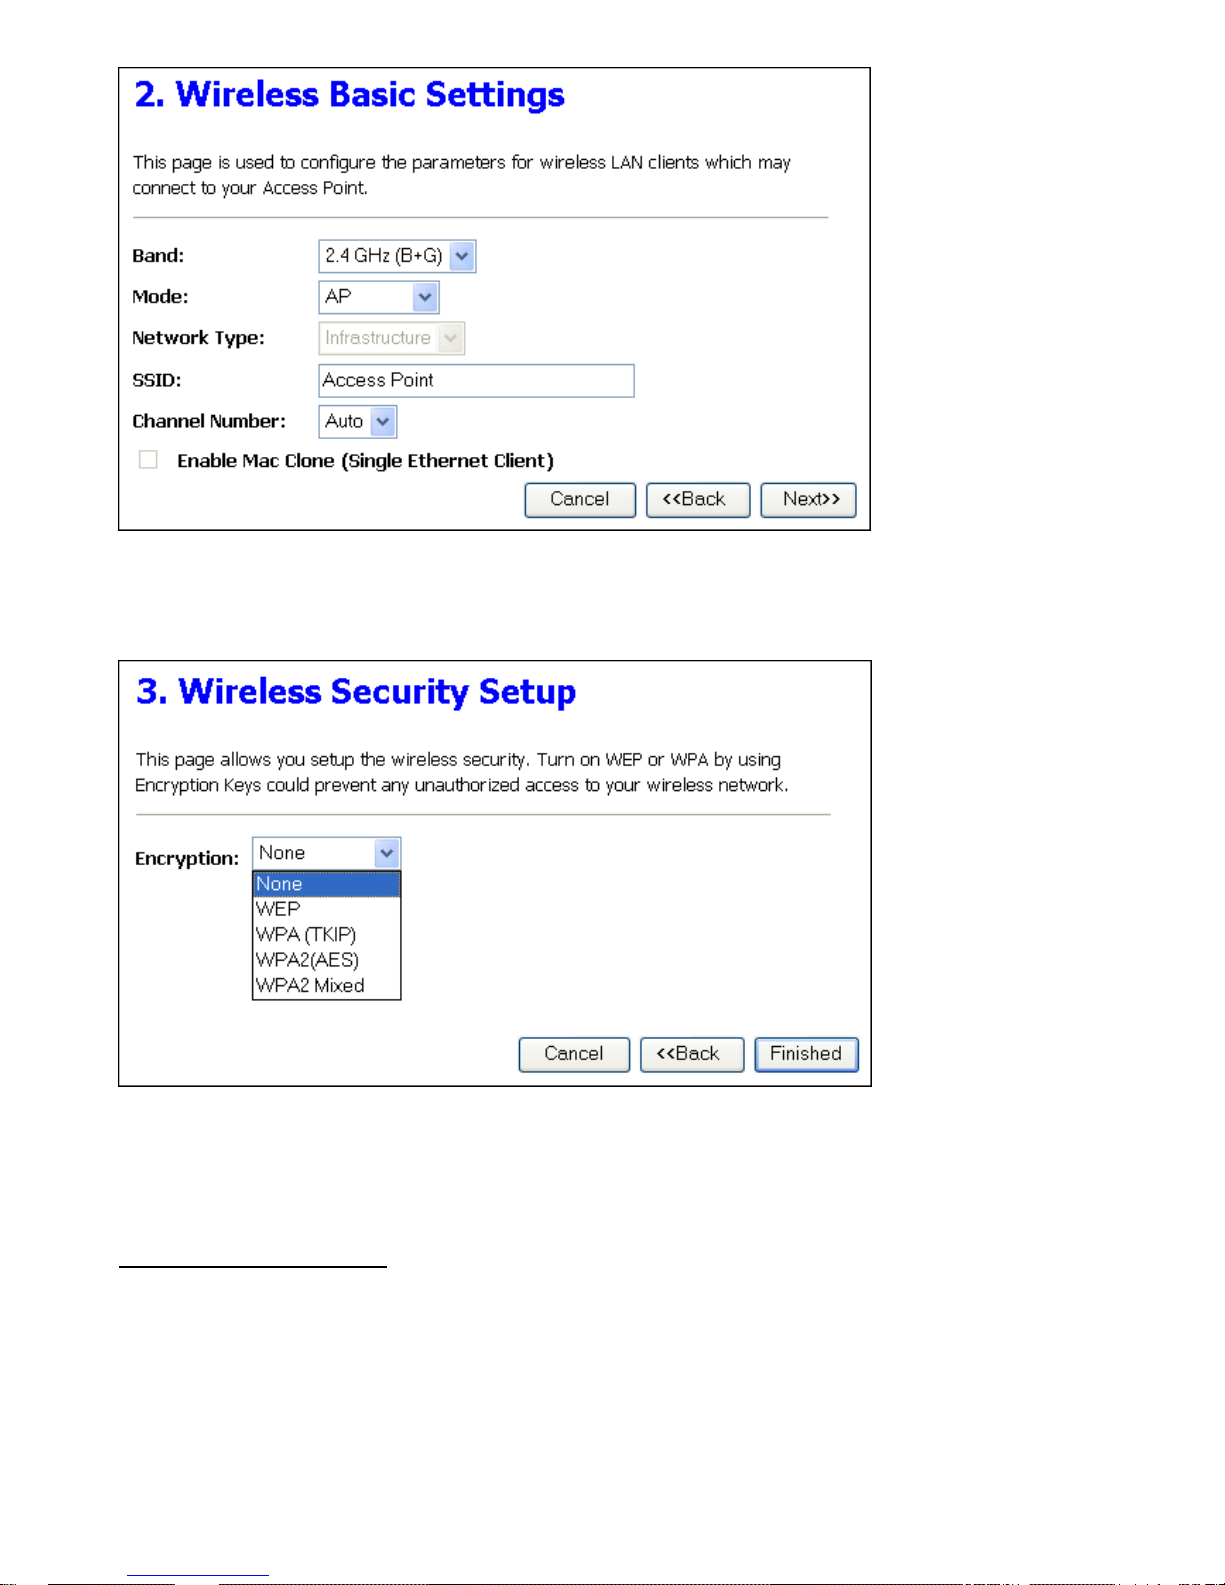
2.Wireless Basic Settings
This page is used to configure basic wireless parameters like Band, Mode, Network Type SSID,
Channel Number, Enable Mac Clone(Single Ethernet Client)
3.Wireless Security Setup
This page is used to configure wireless security
Wireless - Basic Settings
This page is used to configure the parameters for wireless LAN clients that may connect to your
Access Point. Here you may change wireless encryption settings as well as wireless network
parameters.
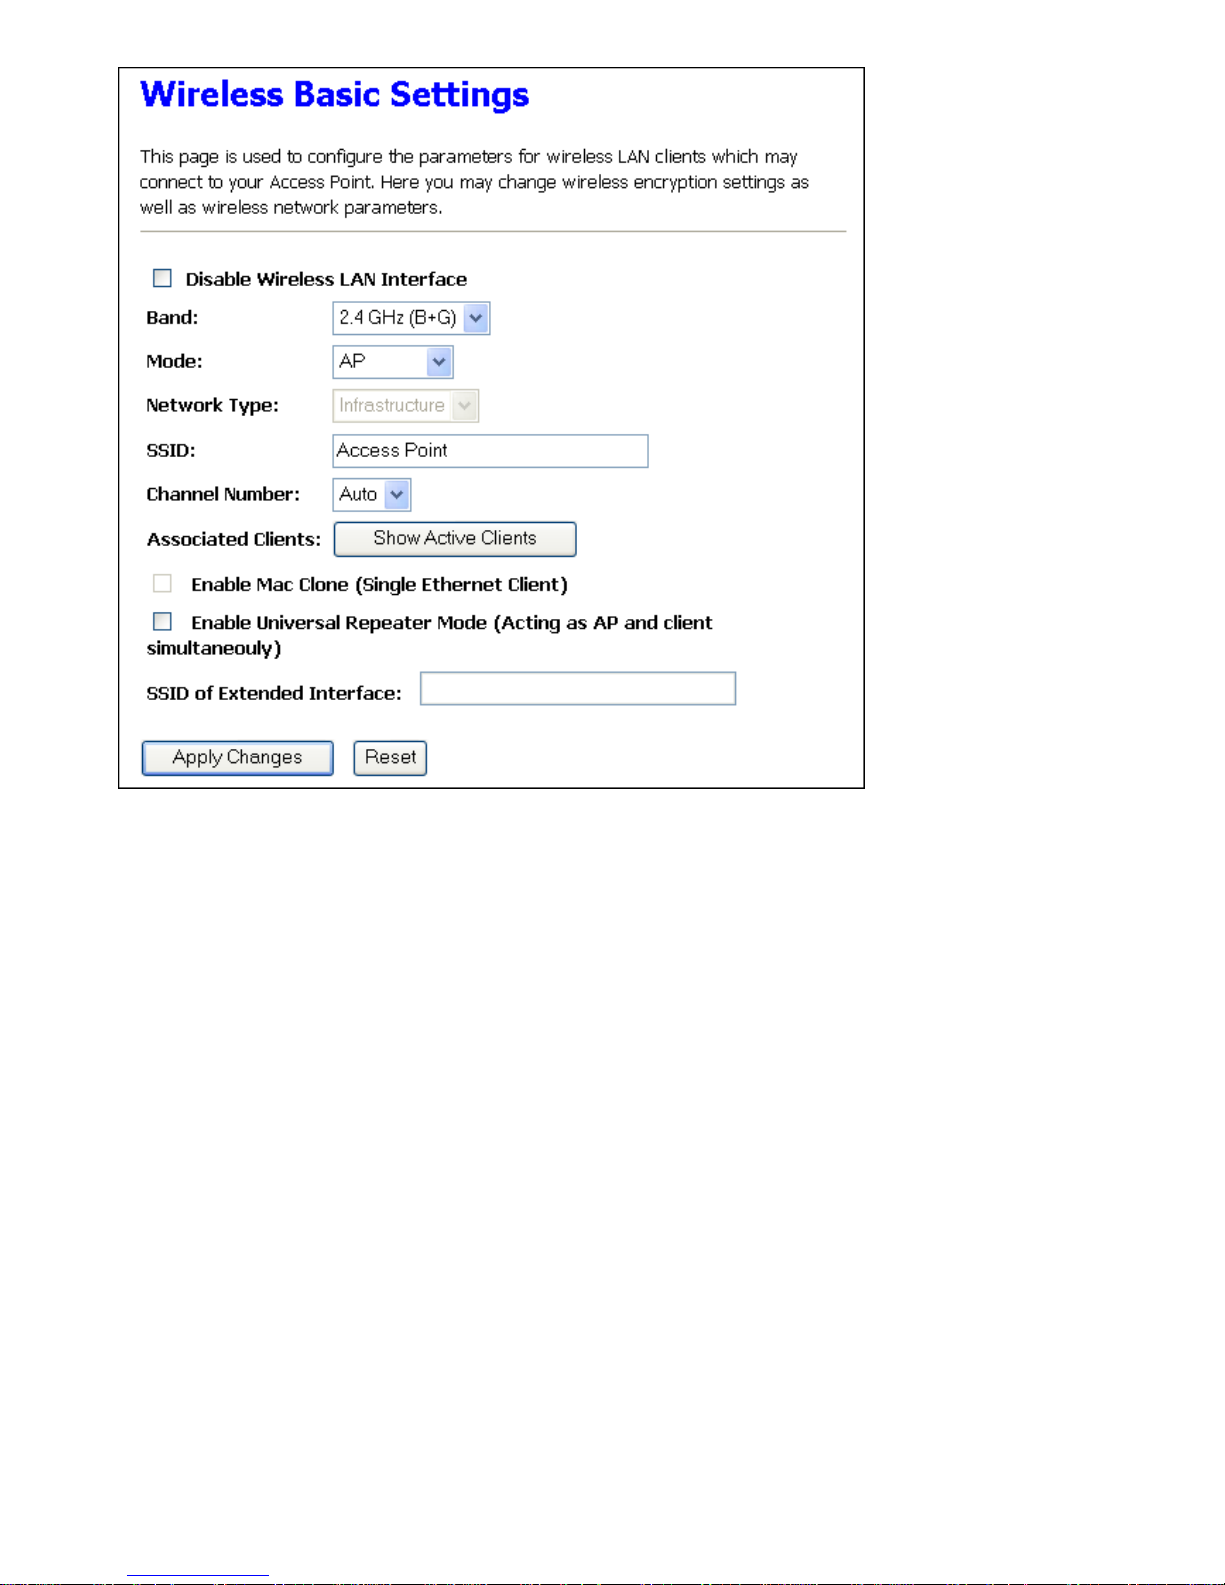
Disable Wireless LAN Interface
Click on to disable the wireless LAN data transmission.
Band
Click to select 2.4GHz(B) / 2.4GHz(G) / 2.4GHz(B+G)
Mode
Click to select the WLAN AP / Client / WDS / AP+WDS wireless mode.
Site Survey
The Site Survey button provides tool to scan the wireless network. If any Access Point or IBSS is
found, you could choose to connect it manually when client mode is enabled.
SSID
It is the wireless network name. The SSID can be 32 bytes long.
Channel Number
Select the wireless communication channel from pull-down menu.
Associated Clients
Click the Show Active Clients button to open Active Wireless Client Table that shows the MAC
address, transmit-packet, receive-packet and transmiss ion-rate for each associated wireless client.
Enable Mac Clone (Single Ethernet Client)
Take Laptop NIC MAC address as wireless client MAC address. [Client Mode only]
Enable Universal Repeater Mode
Click to enable Universal Repeater Mode
SSID of Extended Interface
Assign SSID when enables Universal Repeater Mode.
Apply Changes
Click the Apply Changes button to complete the new configuration setting.
Reset
Click the Reset button to abort change and recover the previous configuration setting.
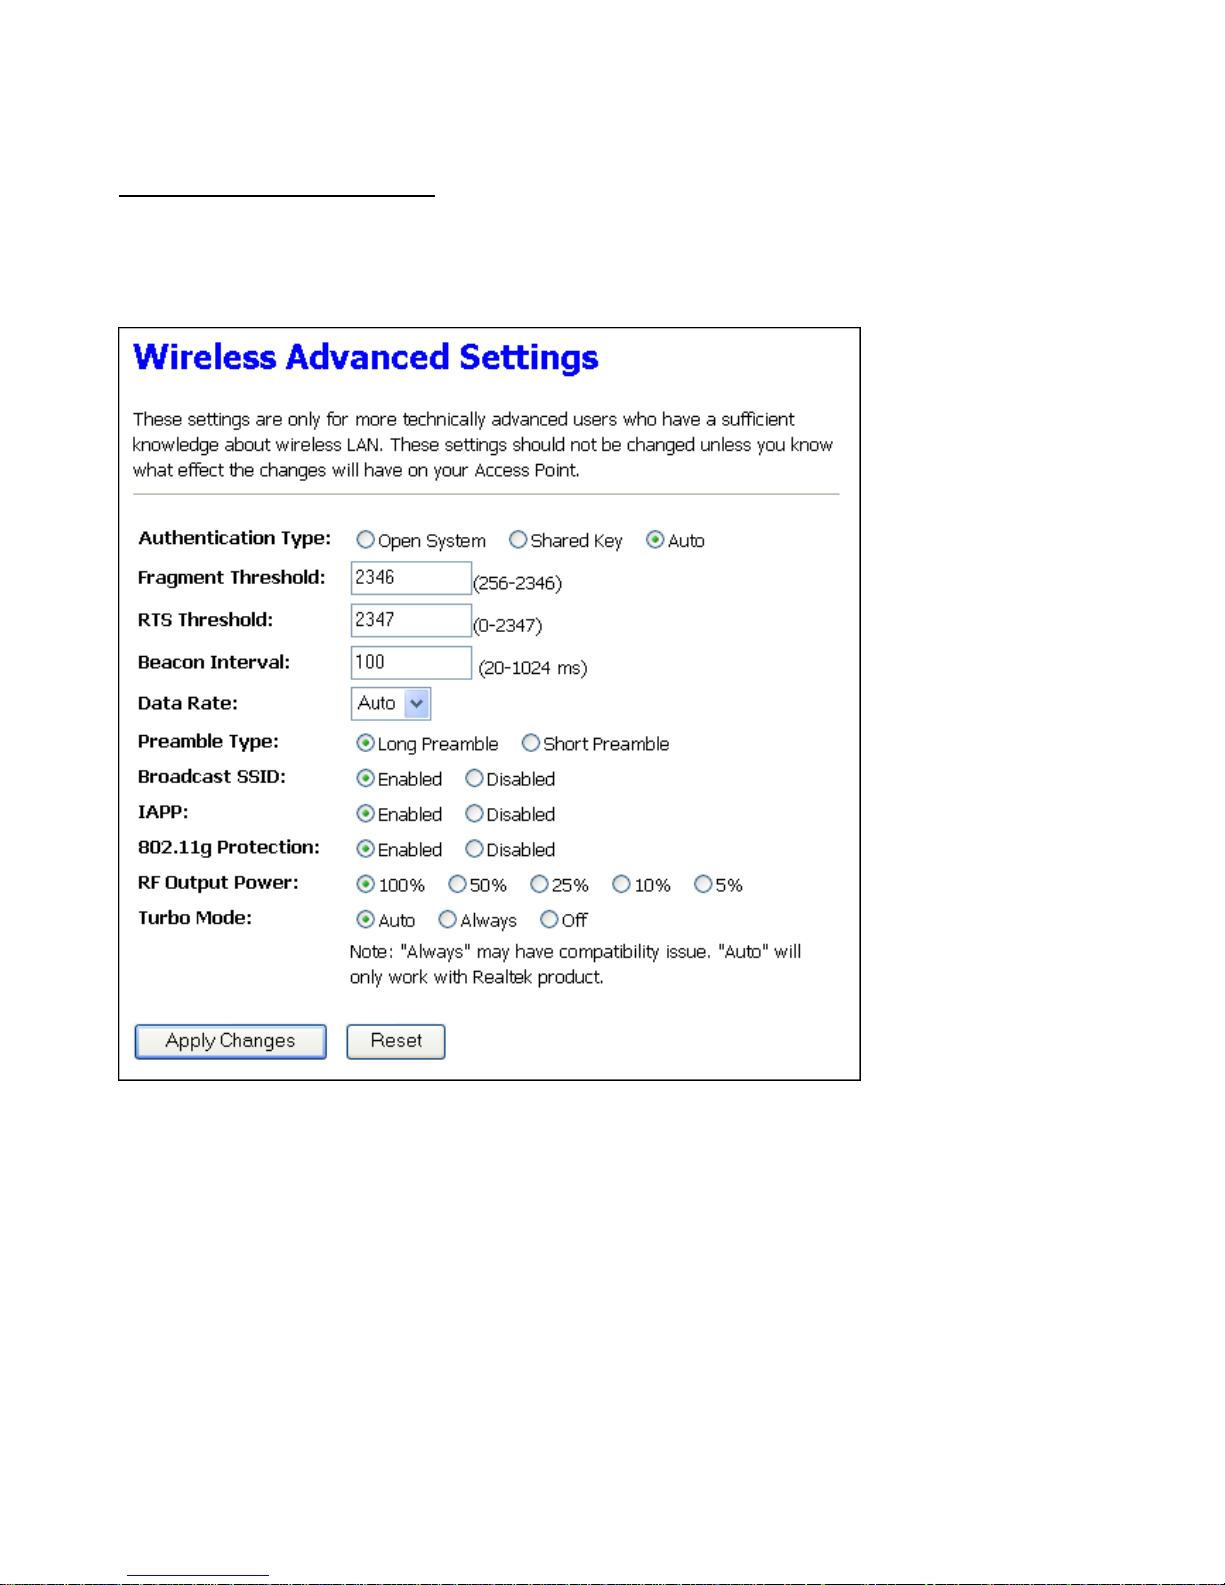
Wireless - Advanced Settings
These settings are only for more technically advanced users who have a sufficient knowledge
about wireless LAN. These settings should not be changed unless you know what effect the
changes will have on your WLAN Access Point.
Authentication Type
Click to select the authentication type in Open System, Shared Key or Auto selection.
Fragment Threshold
Set the data packet fragm entati on thr eshold, value can be writte n betw ee n 256 and 2346 by tes .
RTS Threshold
Set the RTS Threshold, value can be written between 0 and 2347 bytes.
Beacon Interval
Set the Beacon Interval , value can be wr i tte n between 20 and 1024 ms.
Data Rate
Select the transmission data rate from pull-down menu. Data rate can be auto-select, 11M, 5.5M,
2M or 1Mbps.
Preamble Type
Click to select the Long Preamble or Short Preamble support on the wireless data packet
transmission.
Broadcast SSID
Click to enable or disable the SSID broadcast function.
IAPP
Click to enable or disable the IAPP function.
802.11g Protection
Protect 802.11b user.
RF Output Power
To adjust transmission power level.
Turbo Mode
Click to enable/disable turbo mode.(Only apply to WLAN IC of Realtek).
Apply Changes
Click the Apply Changes button to complete the new configuration setting.
Reset
Click the Reset button to abort change and recover the previous configuration setting.
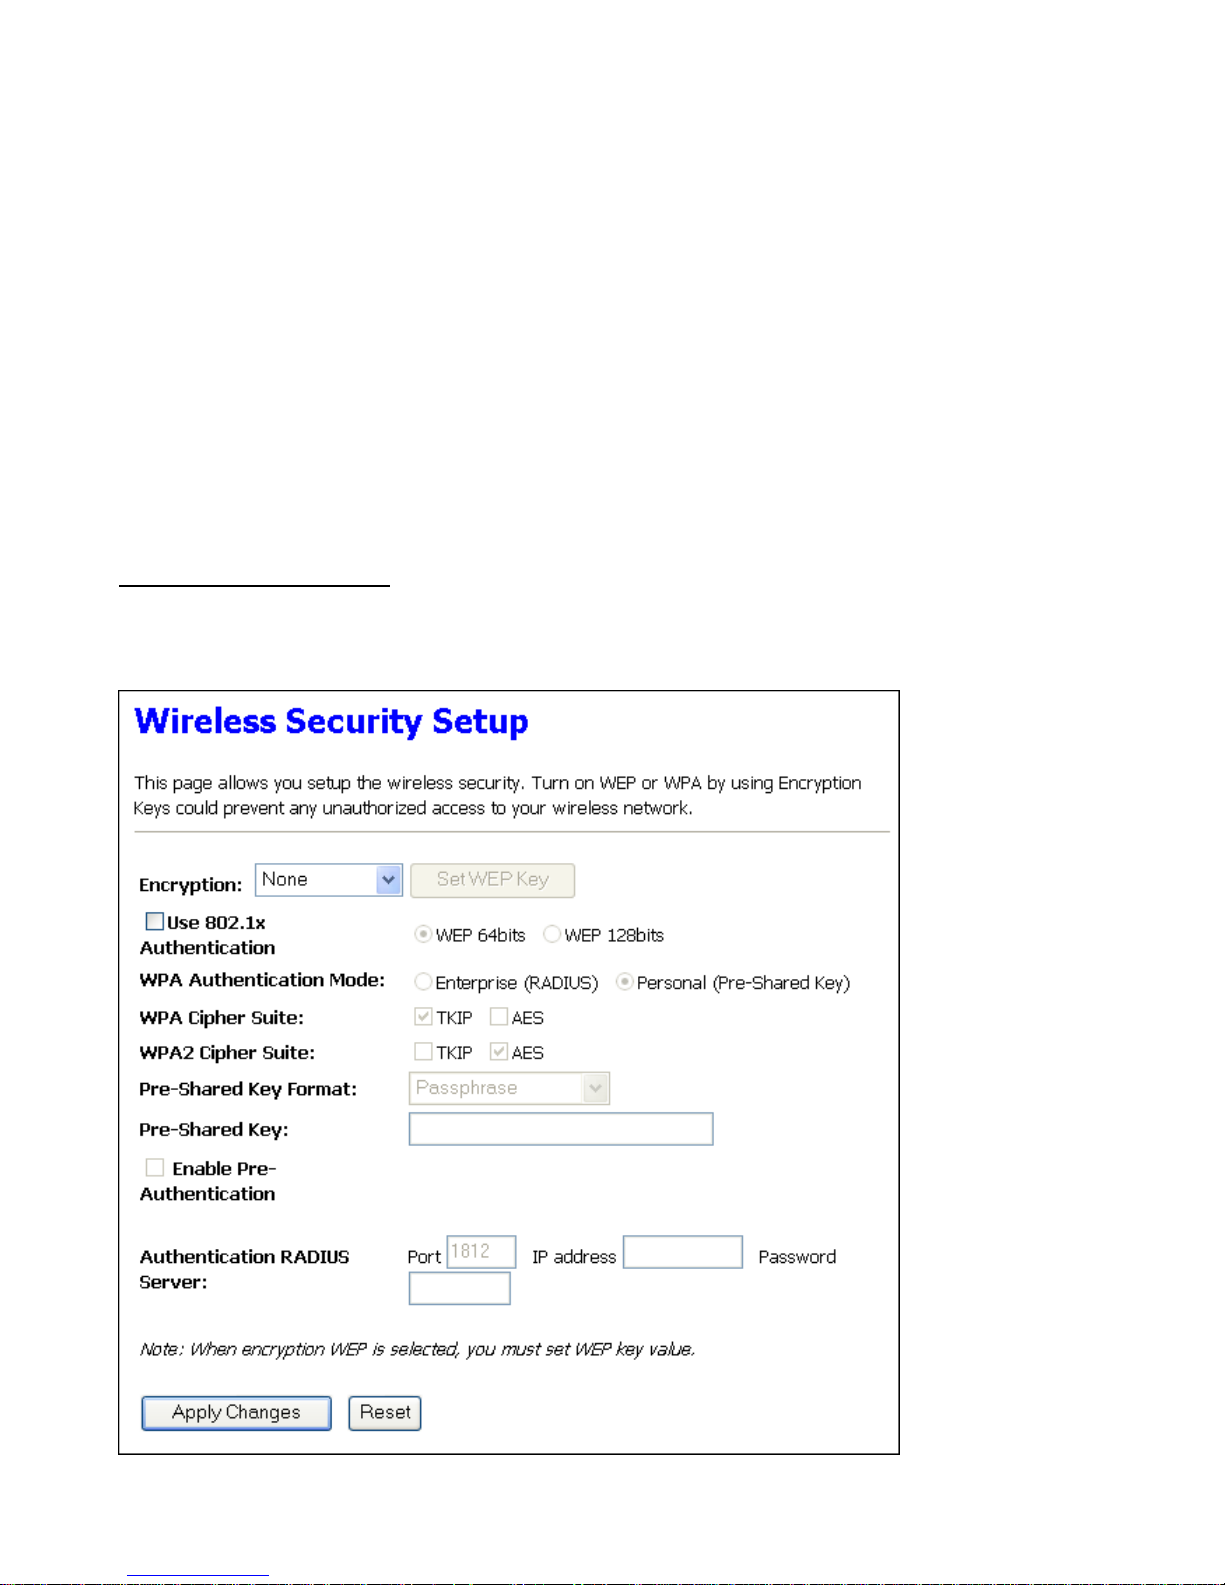
Wireless - Security Setup
This page allows you setup the wireless security. Turn on WEP, WPA, WPA2 by using encryption
keys could prevent any unauthorized access to your wireless network.
 Loading...