


Vehicle type
Note:
1.New feature 2.Fuel Sender Resistor kit needs to be new version(PN 72545-08) 3.Need to install fuel sensor kit(PN 61200008A)
4.[Fuel Type] Please set as CUSt (user define), and follow the procedure t o learn the fuel position for 0% (E), 33%, 66%, and 100% (F).
5.Set the vehicle fuel tank volume in the [fuel volume settings].
Sportster
Dyna
Softail
2004 ~ 2006
2007
2008 ~ 2013
2004 ~ 2007
2008
2009 ~ 2011
2008 ~ 2010
Feature
Gear Low fuel level warning Fuel Level Remaining millage
-
-
- - -
YES (1)
YES (2)
YES
YES (1) (3)
YES (1) (3)
YES (1) (3) (5)
YES (1) (3) (5)
- YES YES (1) (4) YESYES (1) YES (1) (4) -
YES (1) YES YES (1) (4) YES (5)
YES (1) YES YES (1) (4) YES (5)
●To avoid a short circuit from occuring do not pull or modify the wires during installation.
●Any damages caused by faulty installation shall be imputed to the users.
●Opening and dissassembling this unit will void any warranty.
●Maintenance and repairs should be executed by our professionals only.
◎Symbol description:
Notice
LCD Meter
X1
NOTE
NOTE
Warning!
Accessories
Contact your local distributor if the items received are not the same as the items listed above.
11
2
3
1
12
7
5
6
4
8
9
10
1
5
10
2
7
4
8
9
13
6
11
12
14
15
Speedometer Components: XL Single Gauge Models Except XL 883C/XL 1200C
Installation Diagram
Millage maintenance user settings (closable)
●Display range : user adjustable (500 ~ 16,000km /
300 ~ 10,000 mile) ~ -999 mile, automatic decrease
according to the increase of total millage.
●Display unit : 1 km (mile)
Remaining millage
●Display range : 0 ~ 9,999 km (mile), when millage is
lower than 16 km (10 mile) will display LO RNG
Average fuel consumption
●Display range : L/100km, km/L, MPG (US-spec.),
MPG (UK-spec.)
Time
●Display range : 12 / 24 hour format
Engine temperature
●Setting range : -40 ~ 215°C (-40 ~ 419 °F)
Voltmeter
●Display range : 8~18V
Speedometer
●
Display range : 0 ~ 360 km (0 ~ 255 mile)
●
Display unit : 1 km (mile)
Fuel meter
●
Display Range : 6 Levels
Odometer
●Display range
:
0 ~ 999,999 km (mile)
return to zero upon exceed
●Display unit
: 1
km (mile)
Distance meter A,B
●Display range
:
0 ~ 9,999.9 km (mile)
returns to zero upon exceed
●Display unit
:
1km (mile)
Indicator
●RPM shift light
●low fuel warning light
●Engine warning light
●low voltage warning light
●security light
●Constant speed light
●ABS light
Tachometer
●
Display Range : 0 ~ 8,000 RPM
Features and settings description
○Display interval
○Trip meter A,B
●Speedometer
Display range : 0 ~ 360 km (0 ~ 255 mile) switchable
Display unit : 1 km (mile)
●Gear meter
○Tire circumference
Setting unit : 1 %
Setting range : 50 ~ 210 %
Display range :
off, highest gear, N and highest
gear, show all (N / 1 ~ 6)
●Tachometer
○Max. RPM warning mode
Display Range : 0 ~ 8,000 RPM
Setting range : 2,000 ~ 8,000 RPM
Setting range : F-OFF (Lit.), F-ON (blink)
Setting unit : 100 RPM
●Engine temperature
Setting range : -40 ~ 215 °C (-40 ~ 419 °F)
●Fuel meter
○Fuel tank volume
Setting range : OFF/ 1.0 ~ 9.9 US gallons
○Average fuel consumption
Display range
:
OFF、L/100km、km/L、
MPG (US spec.)、MPG (UK spec)
●Clock
Setting range
: 12 / 24 hour format
●Voltmeter Display range : 8 ~ 18 V
Setting range : 1 / 5 (darkest) ~ 5 / 5 (brightest)
●Backlight brigntness
○Backlight color
Setting unit : 100 km (mile)
RPM shift light (Red light)
Low fuel warning light (Yellow light)
Engine warning light (Yellow light)
Low voltage warning light (Red light)
●Operating voltage
●Temperature range
●Meter Weight
●Meter Size
●Specifications
●Indication light
D94.7 X 55.8 mm
165 grams
DC 12 V
JIS D 0203 (S2)
-10 ~ +60 °C
Security light (Red light)
Constant speed light (Orange / Green light)
ABS light
(Yellow light)
○Internal and external
odometer
Display unit : 1
km (mile)
Display unit : 0.1
km (mile)
Display range : off,original fuel kit
(PN 6120008A), Sportster fuel switch
Warning lights on when exceed setting value
(including).
Display range :
0 ~ 999,999 km (mile)
return to zero upon exceed
Display range :
0 ~ 9,999.9 km (mile)
returns to zero upon exceed Setting range : Off. 500 ~ 16,000 km
(300 ~ 10,000 mile)
●Millage maintenance
Setting range : red, orange, yellow, green,
blue, light blue, purple, white
Application List
Ove rview
3-1
●
Thank you for purchasing KOSO's HD-04 meter. This product is a multifunction meter that has a digital liquid crystal display (LCD) with a back light
design, and is easy to install. Before using, please read the instructions carefully and retain them for future reference.
1
1
Some procedures must be followed in order to avoid faulty installation
Some procedures must be followed in order to avoid damages from occuring to yourself and others.
Some procedures must be followed in order to avoid damages from occuring to the vehicle.
Caution!
LIGHT ON
FLASH
HOLD THE
BUTTON ONE
TIME
HOLD THE
BUTTON 3
SECONDS
2
9. Reset switch boot
10. Speedometer harness connector [39B]
11. Indicator lamp module
12. Instrument harness connector [20A]
13. Speedometer housing / handlebar clamp
14. XL 1200L / XL 1200N
15. All other single gauge XL models except XL 883C / XL 1200C
1. Speedometer
2. Front gasket
3. Instrument housing / bracket
4. Back gasket
5. Back plate
6. Vent hole
7. Screw (2)
8. Trip odometer reset switch
NOTE
Design and specification may change without further notice.
NOTE
For installation on "Dyna" or "Softail", follow the procedure according to y our Harley-Davidson Service Manual.
NOTE
Gear meter
●Display range
:
off, highest gear, N and highest
gear, show all (N / 1 ~ 6)
3-2
<0.5 second
○
RPM shift light
3-3
Fuel feature notes
●To enable fuel level and fuel range functionality, Sportster models require separate purchase of Fuel Sensor kit (PN 6120008A). If fuel sensor kit is not
installed, 2007 Sportster models require separate purchase of Fuel Sender Resistor kit (PN 72545-08.)
●The Sportster Fuel Sensor kit (PN 61200008A) is not compatible wit Sportster Fuel Gauge kits (PN 75031-09 PN 75338-9). The motorcycle cannot
support mulitiple electrical fuel gauges. If Fuel Gauge kit (PN 75031-09 or PN 75338-09) is equipped, it must be disabled or the Fuel Sensor kit
(PN 61200008A) cannot be installed and the fuel function of this meter kit will not function.
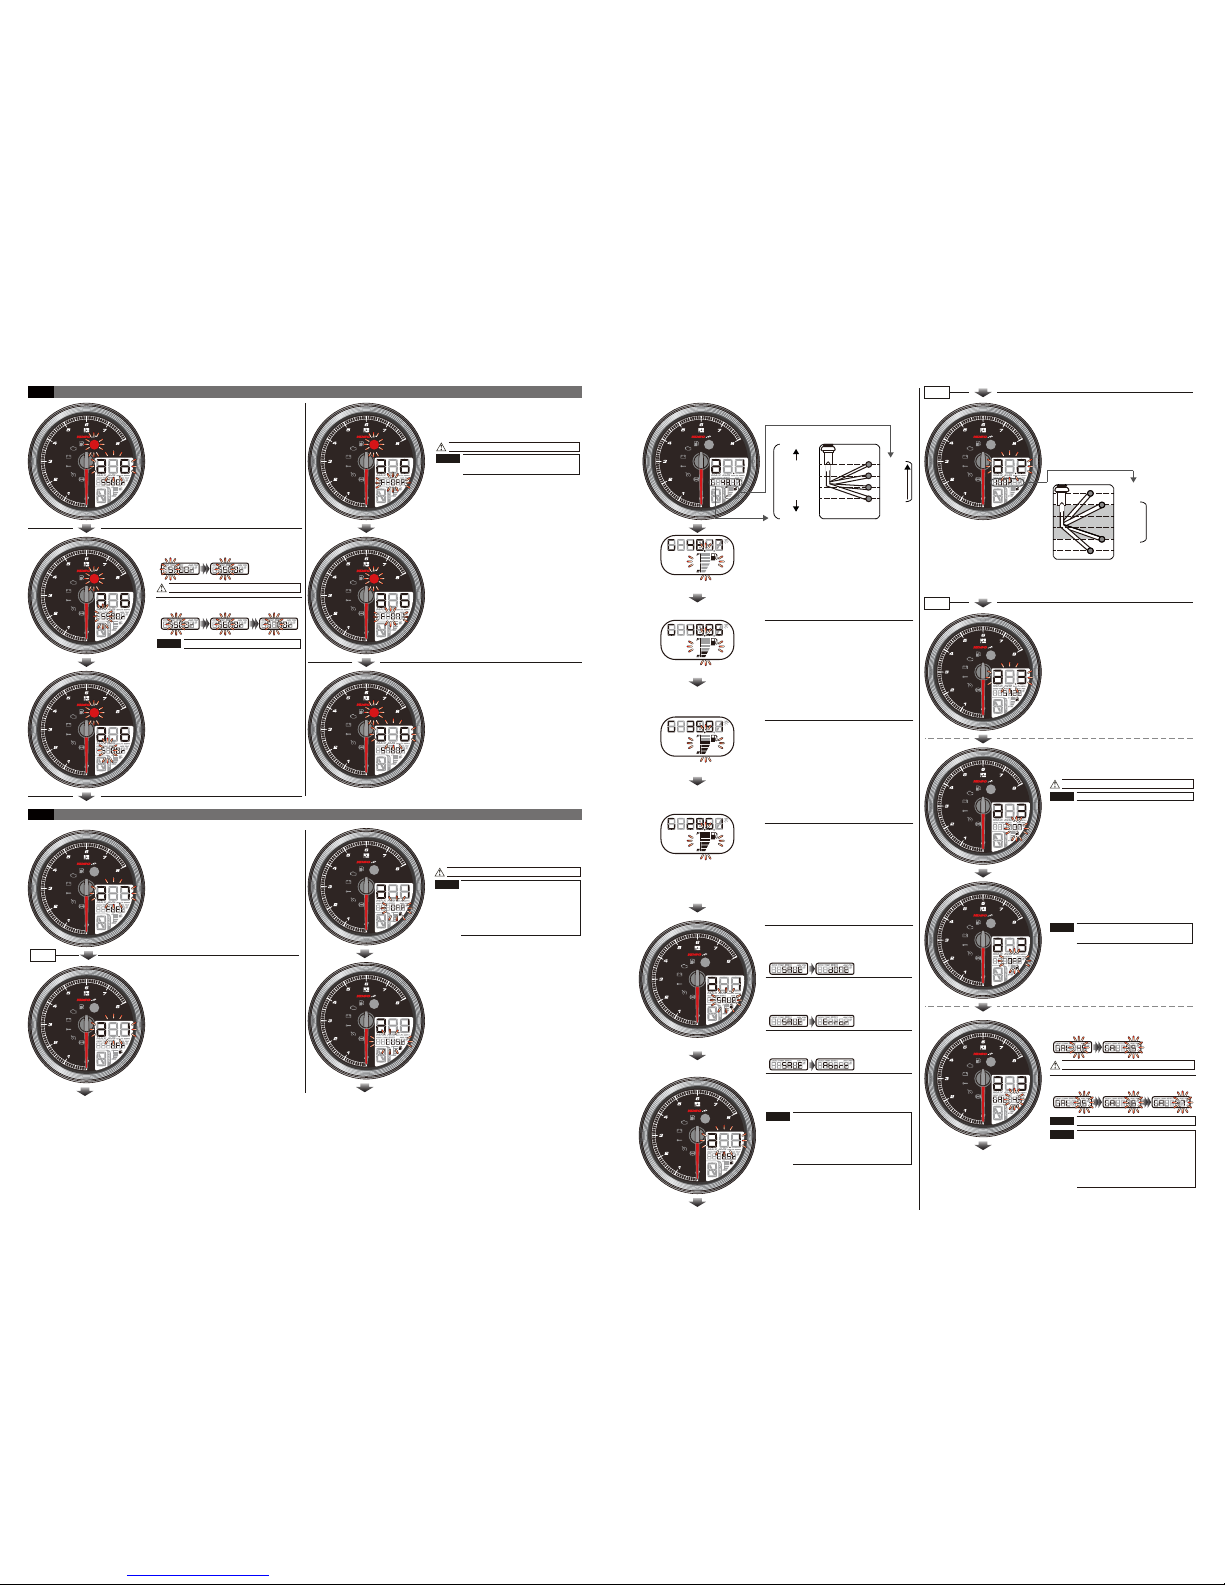
3-4
wh051ba11a P6-1

●In the total millage screen, press the
button once to switch to Trip A screen.
●When the engine switch is OFF, hold the
button for 3 seconds to enter into the
settings screen.
Main menu functions
3-5
●Trip A screen, Press the button once to
switch to Trip B screen.
●Hold the button for 3 seconds to clear
the Trip A recordings.
●Trip B screen, Press the button once to
switch to the millage maintenance screen.
●Hold the button for 3 seconds to clear
the Trip B recordings.
NOTE
Display can be switch off
(please refer to setting 4-8-1)
●In the millage maintenance screen, Press
the button once to switch to the
remaining millage screen.
●Millage maintenance will count down
from setting value, when it reaches 0, the
screen will blink to indicate millage reached.
●When reminding feature is activated, it
will automatic return to millage
maintenance screen if the millage
maintenance value is reached.
●When reminding feature is activated, it
will automatically switch to millage
maintenance screen during startup if
remaining millage value is reached.
●Hold the button for 3 seconds to
switch to inform function switch.
It will not display if it's not
supported in engine computer.
NOTE
●Hold the button for 10 seconds to clear
the millage maintenance recordings.
○In the 0 second, start
holding the button.
○In the 3rd second, the
inform feature will blink
once.
○In the 5th second, inform
feature will switch back,
millage display will begin
blinking.
○During the 6~9th seconds
, if release button, will
cancel the process
○On the 10th second,
the millage maintenance
record is cleared.
Display can be switch off
(refer to setting 4-9)
NOTE
●In the remaining millage screen, Press the
button once to switch to the average fuel
consumption screen.
●Remaining millage is lower than 16 km
(10mile), will display " LO RNG " to
inform users.
●Hold the button for 3 seconds to
switch to inform feature switch
●The following situation will result
displaying "r----" or no display at all.
○Abnormal fuel sensor (short / open
circuit)
○Engine computer does not support this
feature
●Fuel related settings will affect this
value's precision
●When reminding feature is activated, it
will automatic return to the remaining
millage screen, if remaining millage is
too low.
●When reminding feature is activated, it
will automatic switch to the remaining
millage screen during startup, if
remaining millage is too low.
NOTE
It will not display if it's not
supported in engine computer.
NOTE
Display can be switched off
(refer to setting 4-7-3)
●In the average fuel consumption screen,
press the button once to switch to the
clock screen.
Display can be switched off
(refer to settings 4-7-4)
NOTE
Display can be switch off
(refer to settings 4-1)
NOTE
Display can be switch off
(refer to settings 4-8-2)
NOTE
It will not display if it's
incompatible in engine computer.
NOTE
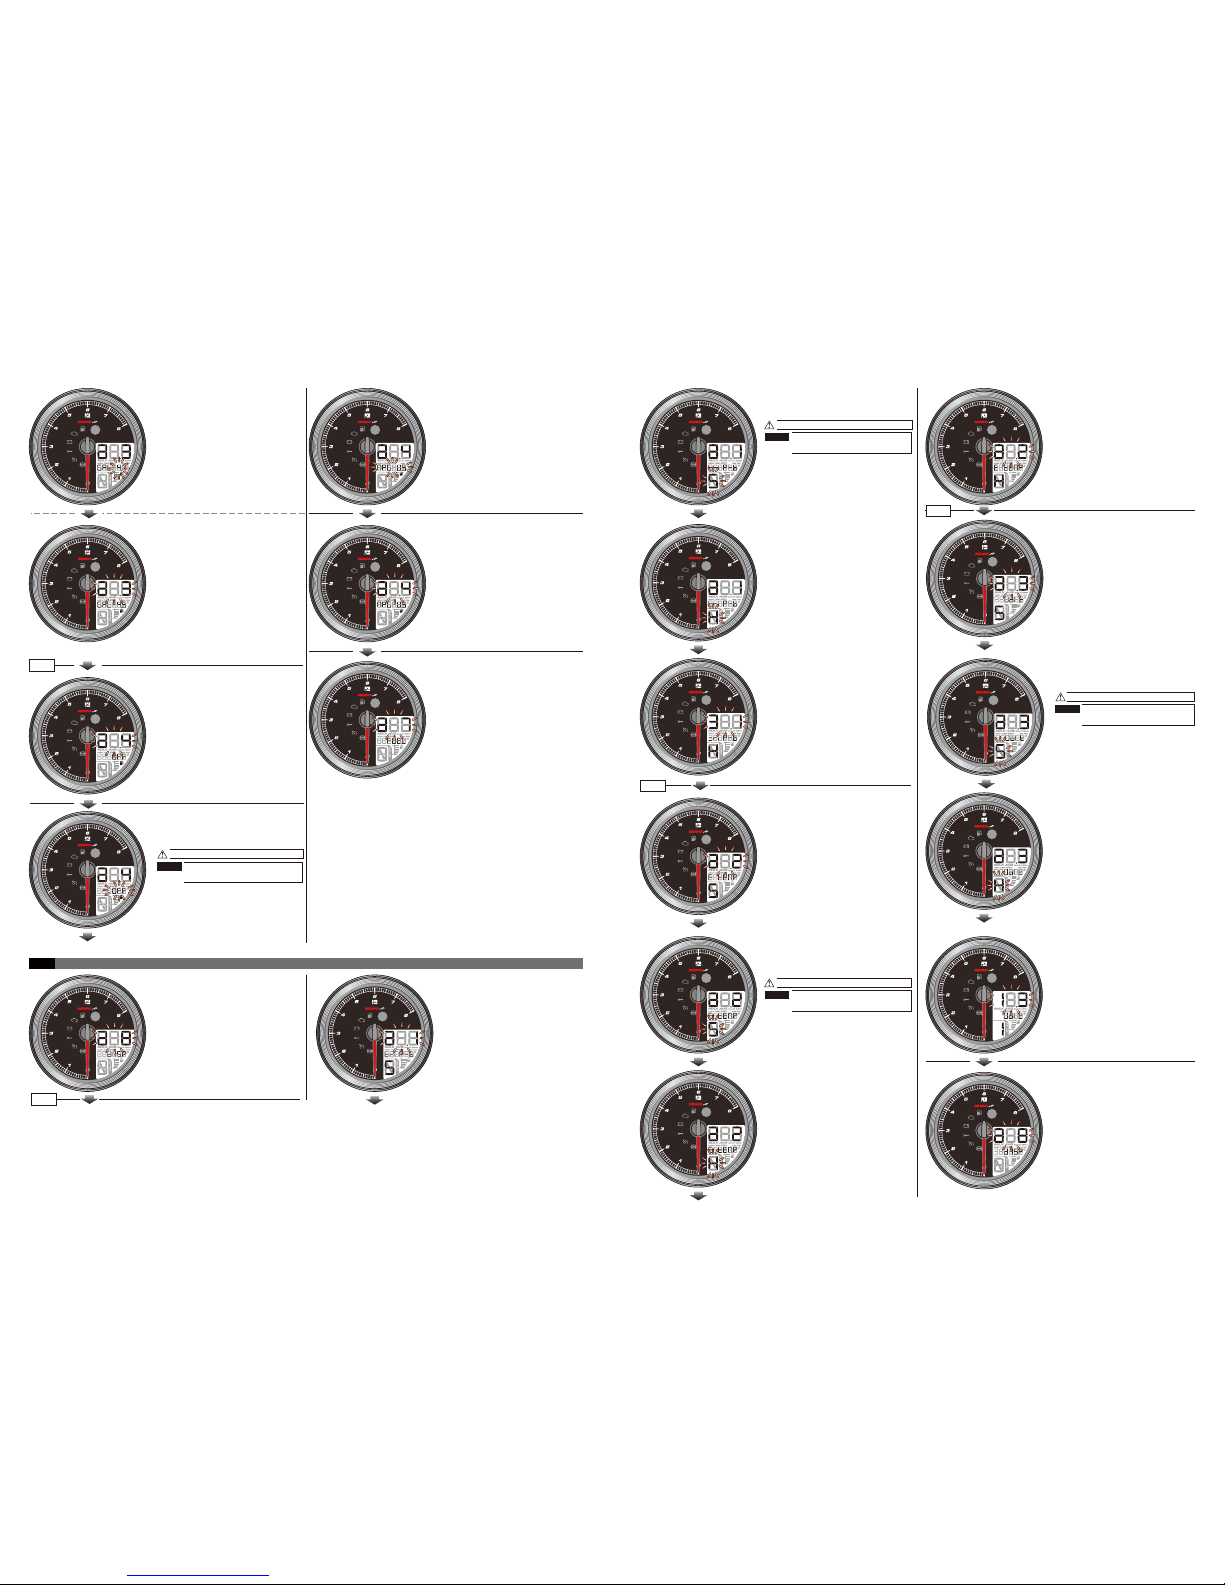
●In the clock screen,
once to switch to the engine temperature
screen.
press the button once
●In the engine temperature screen,
thebutton once to switch to the voltage
screen.
press
4-1
Clock settings
●In the voltage screen, press the button
once to return to total millage screen.
Display can be switch off
(please refer to setting 4-8-3)
NOTE
Setting range : 12/24 hours
format.
NOTE
Settings and features index screen
4
●When the engine switch is OFF,
hold the button for 3 seconds
to enter settings.
├ a 1.Time(time format, time adjustment) - refer to procedure
├ a 2.Unit(speed unit, temperature unit)- refer to procedure
├ a 3.Back light(back light color, brightness)- refer to procedure
├ a 4.Tire(tire ratio percentage)- refer to procedure
├ a 5.Gear(gear indicating mode)- refer to procedure
├ a 6.Warning light(overspeed warning)-refer to procedure
├ a 7.Fuel - refer to procedure
│ ├ .1.Fuel sensor type
│ ├ .2.Fuel test display
│ ├ .3.Fuel tank volume
│ └ .4.Fuel consumption display
├ a 8.Feature display- refer to procedure
│ ├ .1.Millage B display switch
│ ├ .2.Engine temperature display switch
│ └ .3.Voltage display switch
├ a 9.Millage maintenance - refer to procedure
├ a10.Total millage-refer to procedure
│ ├ .1.Unable to adjust internal millage
│ └ .2.Able to adjust external millage
Exit settings
●Features index screen
4-1
4-2
4-3
4-4
4-5
4-6
4-7
4-7-1
4-7-2
4-7-3
4-7-4
4-8
4-8-1
4-8-2
4-8-3
4-9
4-10
4-10-1
4-10-2
●Example:Set time settings from
12 hours format to 24 hours format.
●Hold the button for 3 seconds to
enter time into the (hour) settings
screen.
Now the setting value will blink.
●EX
:
If want to set time to 24 hours
format.
●Press the button once to select desired
setting value.
●In the clock settings screen, hold the
button for 3 seconds to enter into
the setting screen.
●Example:Set clock settings from
1:00 to 1:05.
●Hold the button for 3 seconds to
return to the clock settings main screen.
●Clock settings main screen.
●Press the button once to enter next
setting.
wh051ba11a P6-2

4-2
Speed, temperature unit settings
4-3
Backlight brightness settings
●Example:Set speed unit from
km/h, km to MPH, mile.
●Hold the button for 3 seconds to
enter into the temperature unit settings
screen.
●In the speed, temperature unit settings
main screen, hold the button for 3
seconds to enter into the main screen.
Total millage and distance
meter unit will vary according
to the speed unit.
Now the setting value will blink.
Settings range :km/h, KM and
MPH, mile.
●EX:To set speed unit to MPH(mile).
●Press the button once to select the
desired value.
NOTE
NOTE
Now the setting value will blink.
●Example:Set temperature unit.
from ℃ (Celsius) to ℉ (Fahrenheit).
●Hold the button for 3 seconds to
return to the speed,temperature unit
settings main screen.
●EX:To set the temperature unit to ℉
●Press the button once to select the
desired value.
●In the temperature unit settings main
screen.
●Press the button once to enter into the
next settings screen.
Setting range:℃ (Celsius) and
℉ (Fahrenheit).
NOTE
●In the backlight (color / brightness)
settings main screen, hold the button
for 3 seconds to enter into the settings
screen .
●EX:To set the backlight (color) to blue
●Press the button once to select the
desired value.
●Example:Set the backlight (brightness)
from 3 / 5 (60%) to 5 / 5 (100%).
●Hold the button for 3 seconds to
return to the backlight (Color / Brightness)
settings main screen.
●EX:To set the backlight (brightness) to
5/5 (100%).
●Press the button once to select the
desired value.
Settings range :
1 / 5 (darkest) ~ 5 / 5 (brightest)
Setting unit : Each stage about
20% brightness.
Back light brightness changes
as soon as setting value changes.
●Backlight (color/brightness) settings
main screen.
●Hold the button once to enter into the
next settings screen.
●EX:changing backlight color from
white(w) to blue(bl).
●Hold the button for 3 seconds to enter
into the backlight (brightness) settings
screen.
Now the setting value will blink.
Now the setting value will blink.
Settings range:Red (rE),
Orange light (Or), Yellow (YE),
Green (Gr), Blue (bl),
Blue light (ln), Purple (Pu),
White (W).
NOTE
NOTENOTE
4-4
4-5
The tire circumference settings
Gear display settings
●In the tire circumference setting, hold
the button for 3 seconds to enter into
the settings screen .
Now the setting value will blink.
●Hold the button for 3 seconds to
select the desired value.
●Hold the button for 3 seconds to move
the cursor to the desired settings level.
NOTE
Setting range : 50 ~ 210%.
●In the gear settings screen, hold the
button for 3 seconds to enter into the
settings screen.
Now the setting value will blink.
Setting range:
On (show all N / 1 ~ 6), OFF,
tG (highest gear),
n-tG(N and highest gear).
●Highest gear is learned during
traveling.
●To relearn the gear level,
detach the meter's
main power for 30 seconds
then reconnect it again.
●EX:To set gear as n-tG (N and
highest gear).
●Press button once to select desired
setting value.
NOTE
NOTE
●Example:Set gear from On
(show all N / 1 ~ 6) to n-tG (N and
highest gear).
●Hold the button for 3 seconds to
return to the gear settings main screen.
●In the Gear settings main screen.
●Press the button once to enter into
the next settings screen.
●Example:Set Set tire percentage
from 100 % to 150 %.
●Hold the button for 3 seconds to
return to the tire circumference main
screen.
●Tire percentage settings main screen.
●Hold the button once to enter into the
next setting screen.
wh051ba11a P6-3
4-6
4-7
4-7-1
wh051ba11a P6-4
The RPM shift light warning settings
Fuel settings
●In the RPM shift light warning settings
main screen, hold the button for 3
seconds to enter into the settings
screen.
●Example:Set RPM shift light
warning from 5,500 r to 5,700 r.
●Hold the button for 3 seconds to
enter into the
Max. RPM warning mode
screen.
●Hold the button for 3 seconds to move
the cursor to the desired settings level.
●Hold the button to select desired value.
Now the setting value will blink.
Settings range:2,000 ~ 8,000
NOTENOTE
●Example:Set Max. RPM warning
warning mode from F-OFF (Lit.) to
F-ON (blink).
●Hold the button for 3 seconds to
return to the overspeed warning settings
screen.
●Overspeed settings main screen.
●Press the button once to enter into
the next settings screen.
●EX:To set the
Max. RPM warning
mode to F-ON (blink).
●Press the button once to select
desired value.
Now the settings value will blink.
Settings range:F-OFF (Lid.),
F-ON (blink).
NOTENOTE
●In the fuel settings main screen, hold
the button for 3 seconds to enter into
the sub settings screen.
●In the fuel type screen, hold the button
for 3 seconds to enter into the fuel type
settings screen.
●EX:To set the fuel type to CUSt
(user define).
●Press the button once to select the
desired value.
●Example:To set fuel type from
OFF (off) to CUSt (user define).
●Hold the button for 3 seconds to enter
into the user define mode.
Settings range:
1.OFF (Fuel display. off)
2.SPo SU (Sporster fuel volume
switch)
3.F-KIT (Fuel Kit PN.6120008A)
4.CUSt (User define)
NOTENOTE
Now the setting value will blink.
●User define mode
Needs to learn the position of 0% (E),
33%, 66%, 100% (F) fuel volume.
66%
0%
100%
33%
Fuel tank
Fuel sensor
Learn
G 0.00
G 100.00
position
parameters,
represent
maximum
learning range.
●Fuel volume 0% position learning screen.
●confirm that there it is low fuel
before learning.
●Allow the vehicle to be still for 10 ~ 15
seconds in order to steady the liquid
surface.
●Press the button once to learn the current
fuel position.
●Hold the button for 3 seconds ro enter
into the next fuel volume position learning
screen.
●Fuel volume 33% position learning
screen.
●confirm that there is 1/3 fuel
volume in fuel tank before learning.
●Allow the vehicle to be still for 10 ~ 15
seconds in order to steady the liquid
surface.
●Press the button once to learn current
fuel position.
●Hold the button for 3 seconds ro enter
into the next fuel volume position learning
screen.
●Fuel volume 66% position learning
screen.
●confirm that there is 1/3 fuel
volume in fuel tank before learning.
●Allow the vehicle to be still for 10 ~ 15
seconds in order to steady the liquid
surface.
●Press the button once to learn current
fuel position.
●Hold the button for 3 seconds to enter
into the next fuel volume position learning
screen.
●Fuel volume 100% position learning
screen.
●confirm that there is 1/3 fuel
volume in fuel tank before learning.
●Allow the vehicle to be still for 10 ~ 15
seconds in order to steady the liquid
surface.
●Press the button once to learn current
fuel position.
●Hold the button for 3 seconds to enter
into the next fuel volume position learning
screen.
●Learning conformation screen.
●Hold the button once to save the current
learning results, then automatic return to
fuel type settings screen.
●If an error occurs in the learning process,
it will display ‘’error’’ when saving. Then
abandon this learning and return to fuel
type screen.
●Hold the button for 3 seconds to
renounce current learning result and
return to the sub settings screen.
●In the Fuel type settings screen.
●Press the button once to enter the next
setting.
4-7-2
4-7-3
●Press the button to enter fuel volume
settings.
●Fuel position indicator.
●This screen will display the current liquid
surface position, if it exceeds the range
it is recommended to reset
the fuel volume parameters to acquire
more precise fuel volume and range
information.
66%
0%
<0%
100%
>100%
33%
Fuel tank
Fuel sensor
Exceeded settings
range(learned)
100% position .
Below settings
range (learned)
0% position .
Between settings
range (learned).
●In fuel tank volume settings screen,
hold the button for 3 seconds to
enter into the settings screen.
Currently setting value will blink.
Setting range:ON,OFF.
●EX:To set fuel volume as ON.
●Hold button once to select desired
setting value.
●Example:Set fuel volume from
OFF to ON.
●Hold the button for 3 seconds to
enter the fuel volume settings screen.
When set to OFF, will return to
sub setting screen.
●Hold the button for 3 seconds to
move the cursor to desired setting level.
Now the setting value will blink.
●Hold the button to select desired value.
Setting range:1.0 ~ 9.9 gallons
Volume calculation method checks
for the total volume of the fuel tank
and low fuel indicating volume in
the user manual of vehicle, then
substitutes it into the equation below:
total vol. - (low fuel vol. / 2) = setting value.
Then enter the result into the setting value.
Setting range:
●When set to OFF or SPo SU,
will return to fuel type settings
screen.
●When set to other settings, will
enter next setting option.
NOTE
NOTE
NOTE
NOTE
NOTE
4-8
4-7-4
Features display settings
4-8-1
●Example:Set fuel volume value
from 4.5 to 4.8.
●Hold the button for 3 seconds to return
to fuel volume settings screen.
●Fuel volume settings main screen.
●Press the button once to enter into the
next settings screen.
●To enter sub-settings screen, hold the
button for 3 seconds
to enter fuel
consumption
settings screen.
●EX:To set fuel consumption unit as
MPG (US).
●Press the button once to select the
desired settings value.
Now the setting value will blink.
Settings range:OFF, L/100 km,
km/L, MPG (US), MPG (UK).
●In Trip B display settings main screen,
hold the button for 3 seconds to
enter into the settings screen.
●In the display settings main screen,
hold the button for 3 seconds to enter
into the sub settings screen.
wh051ba11a P6-5
●Example:To set fuel consumption
unit from OFF to MPG (US).
●Hold the button for 3 seconds to
return to the fuel consumption unit (a.4)
settings screen.
●In the features display settings main
screen.
●Press the button once to enter into the
next settings screen.
●In the fuel consumption unit (a.4)
settings screen.
●Press the button once to return to the
features display settings screen.
4-8-2
Now the setting value will blink.
●EX:To hide (H) trip B display.
●Press the button once to select desired
setting value.
●Example:Set trip B display from
show (S) to hidden (H).
●Hold the button for 3 seconds to
return to trip B display setting main
screen.
●Trip B display settings main screen.
●Press the button once to enter into the
engine temperature display settings main
screen.
●In the engine temperature display
settings main screen, hold the button
for 3 seconds to enter into the settings
screen.
●EX:To hide (H) the engine temperature
display.
●Press the button once to select desired
setting value.
●Engine temperature display settings
main screen.
●Press the button once to enter into
the voltage display settings main screen.
Now the setting value will blink.
4-8-3
●Voltage display settings main screen.
●Press the button once to enter into the
feature display settings main screen.
●Feature display settings main screen.
●Press the button once to enter to the
next setting.
●Example:Set voltage display from
show (S) to hidden (H).
●Hold the button for 3 seconds to
return to the voltage display settings
main screen.
●EX:To hide (H) voltage display.
●Press the button once to select the
desired setting value.
●Engine temperature display settings
main screen.
●Press the button once to enter into the
voltage display settings main screen.
Now the setting value will blink.
●In the voltage display settings main
screen, hold the button for 3 seconds
to enter into the settings screen.
NOTE
Setting range:Hidden (H) ,
Show (S).
NOTE
Setting range:Hidden (H) ,
Show (S).
NOTE
Setting range:Hidden (H) ,
Show (S).
NOTE

4-10
4-9
Millage maintenance settings
Total internal and external millage settings
4-10-1
4-10-2
Now the setting value will blink.
When is set to OFF, will directly
return to millage maintenance
main screen.
●EX:To set millage maintenance to
(ON).
●Press the button once to select the
desired settings value.
●In millage maintenance settings main
screen, hold the button for 3 seconds
to enter into the settings screen.
●Example:Set millage maintenance
from OFF to ON.
●Hold the button for 3 seconds to enter
into the millage maintenance main screen.
Display range:ON, OFF.
NOTE
NOTE
●Example:Set the millage maintenance
from 500 to 1,500.
●Hold the button for 3 seconds to return
to millage maintenance main screen.
●Hold the button for 3 seconds to move
the cursor to the desired setting level.
Now the setting value will blink.
●Press the
value.
button to select the desired
Settings range:500 ~ 16,000 km
(300 ~ 10,000 mile)
NOTE
●Millage maintenance settings main
screen.
●Press the button once to enter into the
next settings screen.
●In the total external millage settings main
screen, hold the button for 3 seconds
to enter into the settings screen.
●In the total millage settings main
screen, hold the button for 3 seconds
to enter into the sub settings screen.
●EX:Current total internal millage
display is 5 km.
●Press the button once to enter into the
total external millage settings screen.
User unable to adjust or remove
total internal millage.
Display range:0 ~ 999,999 km
(mile).
NOTE
●Hold the button for 3 seconds to move
the cursor to the desired settings level.
Now the setting value will blink.
●Press the button to select desired value.
Display range:0 ~ 999,999 km
(mile).
NOTE
5
●
→
→
The power doesn't supply to the meter.
Please make sure the wiring is connected. The wiring and fuse are not broken.
The battery is broken or the battery is too old to supply enough power make the meter work.DC 12V to
Trouble shoot ing
The foll owing situat ion does not indi cate malfunc tion of the met er. Please chec k the followin g points, before taki ng it in for repai rs.
※If the probl ems persist after viewing the steps abo ve, please co nt
act your local dis tributor.
The mete r doesn't wor k
when the p ower is on.
Trouble
Check it em
●Total millage setting main screen.
●Press the button once
to return to startup
screen.
●
Example:To set the total external
millage from 0 to 5000 km.
●Hold the
button for 3 seconds
to move
the cursor to the desired setting level.
●Total external millage
settings main
screen.
●Press the button once to
return to to tal
millage settings main screen.
wh051ba11a P6-6
 Loading...