

Page 1

ȼɫɬɪɨɟɧɧɵɣ
ɞɭɯɨɜɨɣ ɲɤɚɮ
ɂɧɫɬɪɭɤɰɢɹ ɩɨɥɶɡɨɜɚɬɟɥɹ
Built-in oven
User’s manual
Page 2

ɋɨɞɟɪɠɚɧɢɟ
Ɉɛɳɢɟ ɭɤɚɡɚɧɢɹ 2
Ɍɟɯɧɢɱɟɫɤɢɟ ɯɚɪɚɤɬɟɪɢɫɬɢɤɢ 4
ɍɫɬɚɧɨɜɤɚ 4
ɍɩɪɚɜɥɟɧɢɟ ɞɭɯɨɜɵɦ ɲɤɚɮɨɦ 6
Ɍɚɛɥɢɰɵ ɞɥɹ ɜɵɩɟɤɚɧɢɹ 7
Ɉɩɢɫɚɧɢɟ ɢ ɢɫɩɨɥɶɡɨɜɚɧɢɟ ɩɪɢɧɚɞɥɟɠɧɨɫɬɟɣ 9
ɑɢɫɬɤɚ ɢ ɭɯɨɞ 15
Ɉɛɳɢɟ ɭɤɚɡɚɧɢɹ
ɍɬɢɥɢɡɚɰɢɹ ɭɩɚɤɨɜɨɱɧɵɯ ɦɚɬɟɪɢɚɥɨɜ
ɇɟ ɜɵɛɪɚɫɵɜɚɣɬɟ ɭɩɚɤɨɜɤɭ ɨɬ ɩɪɢɛɨɪɚ ɜ
ɦɭɫɨɪɧɨɟ ɜɟɞɪɨ, ɪɚɫɫɨɪɬɢɪɭɣɬɟ ɟɟ (ɧɚɩɪɢɦɟɪ, ɮɨɥɶɝɚ,ɤɚɪɬɨɧ, ɩɟɧɨɩɥɚɫɬ) ɢ ɩɨɦɟɫɬɢɬɟ
ɜ ɤɨɧɬɟɣɧɟɪɵ ɩɨ ɫɛɨɪɭ ɭɬɢɥɹ ɜ ɫɨɨɬɜɟɬɫɬɜɢɢ
ɫ ɫɭɳɟɫɬɜɭɸɳɢɦɢ ɩɪɚɜɢɥɚɦɢ ɭɬɢɥɢɡɚɰɢɢ..
Ⱦɚɧɧɵɣ ɩɪɢɛɨɪ ɫɨɨɬɜɟɬɫɬɜɭɟɬ ɫɥɟɞɭɸɳɢɦ
ɩɪɟɞɩɢɫɚɧɢɹɦ ȿɋ:
- 2006/95 EEC “ɉɪɟɞɩɢɫɚɧɢɹ ɩɨ ɧɢɡɤɨɦɭ ɧɚɩɪɹɠɟɧɢɸ”
- 2004/108 EEC “ɉɪɟɞɩɢɫɚɧɢɹ ɩɨ
ɷɥɟɤɬɪɨɦɚɝ
- 89/109 EEC “ɉɪɟɞɩɢɫɚɧɢɹ ɩɨ
ɢ ɢɡɞɟɥɢɹɦ, ɤɨɧɬɚɤɬɢɪɭɸɳɢɦ ɫ ɩɢɳɟɜɵɦɢ
ɩɪɨɞɭɤɬɚɦɢ “
ȼɧɢɦɚɬɟɥɶɧɨ ɨɡɧɚɤɨɦɶɬɟɫɶ ɫ ɢɧɫɬɪɭɤɰɢ-
ɟɣ, ɩɪɟɞɫɬɚɜɥɟɧɧɨɣ ɜ ɞɚɧɧɨɦ ɛɭɤɥɟɬɟ. ȼ ɧɟɣ
ɫɨɞɟɪɠɢɬɫɹ ɜɚɠɧɚɹ ɢɧɮɨɪɦɚɰɢɹ, ɤɚɫɚɸɳɚɹɫɹ ɛɟɡɨɩɚɫɧɨɣ ɭɫɬɚɧɨɜɤɢ, ɷɤɫɩɥɭɚɬɚɰɢɢ ɢ
ɬɟɤɭɳɟɝɨ ɨɛɫɥɭɠɢɜɚɧɢɹ ɩɪɢɛɨɪɚ, ɚ ɬɚɤɠɟ
ɩɨɥɟɡɧɵɟ ɪɟɤɨɦɟɧɞɚɰɢɢ ɩɨ ɩɨɥɶɡɨɜɚɧɢɸ
ɧɢɬɧɨɣ ɫɨɜɦɟɫɬɢɦɨɫɬɢ”
ɦɚɬɟɪɢɚɥɚɦ
ɞɭɯɨɜɵɦ ɲɤɚɮɨɦ. ɋɨɯɪɚɧɢɬɟ ɞɚɧɧɭɸ ɢɧɫɬɪɭɤɰɢɸ ɧɚ ɛɭɞɭɳɟɟ.
ɉɪɨɢɡɜɨɞɢɬɟɥɶ ɨɫɬɚɜɥɹɟɬ ɡɚ ɫɨɛɨɣ ɩɪɚɜɨ
ɜɧɨɫɢɬɶ ɧɟɨɛɯɨɞɢɦɵɟ
ɛɚ ɞɥɹ ɛɟɡɨɩɚɫɧɨɫɬɢ ɢ ɮɭɧɤɰɢɨɧɚɥɶɧɵɯ ɤɚɱɟɫɬɜ ɩɪɢɛɨɪɚ.
ɉɨɫɥɟ ɪɚɫɩɚɤɨɜɤɢ ɩɪɨɜɟɪɶɬɟ ɩɪɢɛɨɪ ɧɚ
ɧɚɥɢɱɢɟ ɩɨɜɪɟɠɞɟɧɢɣ. ɇɟ ɨɫɬɚɜɥɹɣɬɟ ɭɩɚɤɨɜɨɱɧɵɟ ɦɚɬɟɪɢɚɥɵ (ɩɨɥɢɦɟɪɧɭɸ ɩɥɟɧɤɭ,
ɩɟɧɨɩɥɚɫɬ) ɜ ɞɨɫɬɭɩɧɨɦ ɞɥɹ ɞɟɬɟɣ ɦɟɫɬɟ,
ɩɨɫɤɨɥɶɤɭ ɞɚɧɧɵɟ ɦɚɬɟɪɢɚɥɵ ɦɨɝɭɬ ɩɪɟɞɫɬɚɜɥɹɬɶ ɞɥɹ ɧɢɯ ɨɩɚɫɧɨɫɬɶ. ȼȺɀɇɈ: ɞɭɯɨɜɨɣ ɲɤɚɮ ɧɟɥɶɡɹ ɩɟɪɟɧɨɫɢɬɶ ɡɚ ɪɭɱɤɭ
ɞɜɟɪɰɵ
ɤɨɜɤɢ).
ɬɟɥɶɧɨ ɞɥɹ ɩɪɢɝɨɬɨɜɥɟɧɢɹ ɩɢɳɢ.
ɡɧɚɱɟɧɢɸ (ɧɚɩɪɢɦɟɪ, ɞɥɹ ɨɛɨɝɪɟɜɚ ɩɨɦɟɳɟ-
(ɧɚɩɪɢɦɟɪ,
ȼȺɀɇɈ
Ⱦɚɧɧɵɣ ɩɪɢɛɨɪ ɩɪɟɞɧɚɡɧɚɱɟɧ ɢɫɤɥɸɱɢ-
ɂɫɩɨɥɶɡɨɜɚɧɢɟ ɩɪɢɛɨɪɚ ɩɨ ɞɪɭɝɨɦɭ ɧɚ-
ɢɡɦɟɧɟɧɢɹ ɛɟɡ ɭɳɟɪ-
ɩɪɢ ɢɡɜɥɟɱɟɧɢɢ ɢɡ ɭɩɚ-
2
Page 3
ɧɢɹ) ɧɟɞɨɩɭɫɬɢɦɨ ɢ ɨɩɚɫɧɨ.
ɉɪɨɢɡɜɨɞɢɬɟɥɶ ɧɟ ɧɟɫɟɬ ɨɬɜɟɬɫɬɜɟɧɧɨɫɬɢ
ɡɚ ɥɸɛɨɣ ɭɳɟɪɛ, ɩɪɢɱɢɧɟɧɧɵɣ ɢɫɩɨɥɶɡɨɜɚɧɢɟɦ ɩɪɢɛɨɪɚ ɧɟ ɩɨ ɧɚɡɧɚɱɟɧɢɸ.
ɉɪɢ ɪɚɛɨɬɟ ɫ ɞɭɯɨɜɵɦ ɲɤɚɮɨɦ ɫɥɟɞɭɟɬ
ɫɨɛɥɸɞɚɬɶ ɫɥɟɞɭɸɳɢɟ ɩɪɚɜɢɥɚ ɛɟɡɨɩɚɫɧɨɝɨ ɨɛɪɚɳɟɧɢɹ ɫ ɷɥɟɤɬɪɨɩɪɢɛɨɪɚɦɢ:
Ɉɬɤɥɸɱɚɣɬɟ ɩɪɢɛɨɪ ɨɬ ɢɫɬɨɱɧɢɤɚ ɩɢɬɚɧɢɹ
ɩɟɪɟɞ ɬɪɚɧɫɩɨɪɬɢɪɨɜɤɨɣ, ɱɢɫɬɤɨɣ ɢɥɢ ɥɸ-
ɛɨɣ ɨɩɟɪɚɰɢɟɣ ɩɨ ɭɯɨɞɭ.
ɇɟ ɜɵɧɢɦɚɣɬɟ ɲɬɟɩɫɟɥɶ ɢɡ ɪɨɡɟɬɤɢ, ɞɟ-
ɪɠɚɫɶ ɡɚ ɲɧɭɪ
ɇɟ ɩɪɢɤɚɫɚɣɬɟɫɶ ɤ ɩɪɢɛɨɪɭ, ɟɫɥɢ ɜɚɲɢ
ɪɭɤɢ ɢɥɢ ɧɨɝɢ ɦɨɤɪɵɟ ɢɥɢ ɜɥɚɠɧɵɟ
ɇɟ ɩɨɥɶɡɭɣɬɟɫɶ ɩɪɢɛɨɪɨɦ, ɟɫɥɢ ɜɵ ɛɟɡ
ɨɛɭɜɢ
ȼ ɫɥɭɱɚɟ ɧɟɛɪɟɠɧɨɝɨ ɨɛɪɚɳɟɧɢɹ ɫ ɞɟ-
ɪɠɚɬɟɥɹɦɢ ɞɜɟɪɰɵ ɜɵ ɦɨɠɟɬɟ ɩɨɜɪɟɞɢɬɶ
ɪɭɤɢ
ȼ ɫɥɭɱɚɟ ɩɨɥɨɦɤɢ ɢɥɢ ɧɟɢɫɩɪɚɜɧɨɫɬɢ ɩɪɢ-
ɛɨɪɚ ɨɬɤɥɸɱɢɬɟ ɟɝɨ ɢ ɧɟ ɩɪɢɤɚɫɚɣɬɟɫɶ ɤ
ɧɟɦɭ.
Ɋɟɦɨɧɬ ɩɪɢɛɨɪɚ ɞɨɥɠɟɧ ɩɪɨɢɡɜɨɞɢɬɶɫɹ
ɬɨɥɶɤɨ ɤɜɚɥɢɮɢɰɢɪɨɜɚɧɧɵɦ ɫɩɟɰɢɚɥɢɫɬɨɦ
ɫɟɪɜɢɫɧɨɣ ɫɥɭɠɛɵ. Ɍɪɟɛɭɣɬɟ ɢɫɩɨɥɶɡɨɜɚɧɢɹ
ɬɨɥɶɤɨ ɨɪɢɝɢɧɚɥɶɧɵɯ ɡɚɩɚɫɧɵɯ ɱɚɫɬɟɣ.
ɉɪɟɧɟɛɪɟɠɟɧɢɟ ɪɟɤɨɦɟɧɞɚɰɢɹɦɢ, ɞɚɧɧɵɦɢ ɜɵɲɟ, ɦɨɠɟɬ ɧɟɝɚɬɢɜɧɨ ɩɨɜɥɢɹɬɶ ɧɚ
ɛɟɡɨɩɚɫɧɭɸ ɪɚɛɨɬɭ ɩɪɢɛɨɪɚ.
ɍɛɟɞɢɬɟɫɶ, ɱɬɨ, ɤɨɝɞɚ ɩɪɢɛɨɪ ɧɟ ɢɫɩɨɥɶɡɭɟɬɫɹ, ɜɫɟ ɟɝɨ
ɩɟɪɟɤɥɸɱɚɬɟɥɢ ɧɚɯɨɞɹɬɫɹ ɜ
ɩɨɥɨɠɟɧɢɢ «0».
ɇɚ ɨɬɤɪɵɬɭɸ ɞɜɟɪɰɭ ɞɭɯɨɜɨɝɨ ɲɤɚɮɚ
ɧɟ ɫɥɟɞɭɟɬ ɫɚɞɢɬɶɫɹ ɢɥɢ ɫɬɚɜɢɬɶ ɬɹɠɟɥɵɟ
ɜɟɳɢ.
ȼɨ ɜɪɟɦɹ ɪɚɛɨɬɵ ɩɪɢɛɨɪ ɧɚɝɪɟɜɚɟɬɫɹ. ɇɟ
ɩɪɢɤɚɫɚɣɬɟɫɶ ɤ ɝɨɪɹɱɢɦ ɩɨɜɟɪɯɧɨɫɬɹɦ ɜɧɭɬɪɢ ɞɭɯɨɜɨɝɨ ɲɤɚɮɚ.
Ɂɚɩɪɟɳɚɟɬɫɹ ɞɨɩɭɫɤɚɬɶ ɤ ɪɚɛɨɬɟ ɫ ɞɭɯɨɜɵɦ ɲɤɚɮɨɦ ɥɸɞɟɣ ɫ ɨɝɪɚɧɢɱɟɧɧɵɦɢ ɮɢɡɢɱɟɫɤɢɦɢ, ɫɟɧɫɨɪɧɵɦɢ ɢɥɢ ɭɦɫɬɜɟɧɧɵɦɢ
ɜɨɡɦɨɠɧɨɫɬɹɦɢ, ɧɟ ɢɦɟɸɳɢɯ ɞɨɫɬɚɬɨɱɧɨɝɨ
ɨɩɵɬɚ ɜ ɪɚɛɨɬɟ ɫ ɷɥɟɤɬɪɨɩɪɢɛɨɪɚɦɢ, ɚ ɬɚɤɠɟ
ɞɟɬɟɣ ɜ ɫɥɭɱɚɟ, ɟɫɥɢ ɢɯ ɪɚɛɨɬɚ ɫ ɩɪɢɛɨɪɨɦ
ɧɟ ɤɨɧɬɪɨɥɢɪɭɟɬɫɹ ɥɢɰɚɦɢ, ɨɬɜɟɬɫɬɜɟɧɧɵɦɢ
ɡɚ ɢɯ ɛɟɡɨɩɚɫɧɨɫɬɶ.
Ɂɚɩɪɟɳɚɟɬɫɹɞɨɩɭɫɤɚɬɶɦɚɥɨɥɟɬɧɢɯ ɞɟɬɟɣ
ɤ ɪɚɛɨɬɟ ɫ ɞɭɯɨɜɵɦ ɲɤɚɮɨɦ ɛɟɡ ɩɪɢɫɦɨɬɪɚ
ɪɨɞɢɬɟɥɟɣ. ɉɪɨɢɡɜɨɞɢɬɟɥɶ ɨɫɬɚɜɥɹɟɬ ɡɚ ɫɨɛɨɣ ɩɪɚɜɨ ɜɧɨɫɢɬɶ ɢɡɦɟɧɟɧɢɹ, ɤɨɬɨɪɵɟ ɫɨɱɬɟɬ ɧɟɨɛɯɨɞɢɦɵɦɢ ɢ ɩɨɥɟɡɧɵɦɢ, ɛɟɡ ɭɳɟɪɛɚ
ɞɥɹ
ɛɟɡɨɩɚɫɧɨɫɬɢ ɢ ɪɚɛɨɱɢɯ ɫɜɨɣɫɬɜ ɩɪɢɛɨɪɚ. ɉɪɨɢɡɜɨɞɢɬɟɥɶ ɧɟ ɧɟɫɟɬ ɨɬɜɟɬɫɬɜɟɧɧɨɫɬɶ ɡɚ ɜɨɡɦɨɠɧɵɣ ɭɳɟɪɛ, ɩɪɢɱɢɧɟɧɧɵɣ
ɧɟɩɪɚɜɢɥɶɧɨɣ ɭɫɬɚɧɨɜɤɨɣ ɢɥɢ ɷɤɫɩɥɭɚɬɚɰɢɟɣ ɩɪɢɛɨɪɚ.
ɋɟɪɜɢɫɧɚɹ ɫɥɭɠɛɚ ɢ ɡɚɩɚɫɧɵɟ ɱɚɫɬɢ
ȼ ɫɥɭɱɚɟ ɧɟɢɫɩɪɚɜɧɨɫɬɢ ɧɟ ɩɵɬɚɣɬɟɫɶ
ɫɚɦɨɫɬɨɹɬɟɥɶɧɨ ɩɪɨɢɡɜɨɞɢɬɶ ɪɟɦɨɧɬ ɩɪɢɛɨɪɚ. Ɋɟɦɨɧɬ, ɜɵɩɨɥɧɹɟɦɵɣ ɥɢɰɚɦɢ,
ɧɟ
ɢɦɟɸɳɢɦɢ ɧɟɨɛɯɨɞɢɦɨɣ ɤɜɚɥɢɮɢɤɚɰɢɢ,
ɦɨɠɟɬ ɧɚɧɟɫɬɢ ɫɟɪɶɟɡɧɵɣ ɭɳɟɪɛ ɢ ɩɪɢɜɟɫɬɢ
ɤ ɧɟɫɱɚɫɬɧɵɦ
ɫɥɭɱɚɹɦ. ɉɪɟɠɞɟ ɜɫɟɝɨ, ɩɨɥɶɡɭɣɬɟɫɶ ɞɚɧɧɨɣ ɢɧɫɬɪɭɤɰɢɟɣ. ȿɫɥɢ ɜɵ ɧɟ
ɦɨɠɟɬɟ ɧɚɣɬɢ ɧɟɨɛɯɨɞɢɦɭɸ ɢɧɮɨɪɦɚɰɢɸ,
ɫɜɹɠɢɬɟɫɶ ɫ ɛɥɢɠɚɣɲɢɦ ɫɟɪɜɢɫ-ɰɟɧɬɪɨɦ.
Ʌɸɛɵɟ ɪɟɦɨɧɬɧɵɟ ɪɚɛɨɬɵ ɩɪɢɛɨɪɚ ɞɨɥɠɧɵ
ɩɪɨɢɡɜɨɞɢɬɶɫɹ ɚɜɬɨɪɢɡɨɜɚɧɧɵɦ ɫɟɪɜɢɫɧɵɦ
ɰɟɧɬɪɨɦ. ȼɫɟɝɞɚ ɬɪɟɛɭɣɬɟ ɢɫɩɨɥɶɡɨɜɚɧɢɹ
ɨɪɢɝɢɧɚɥɶɧɵɯ ɡɚɩɚɫɧɵɯ ɱɚɫɬɟɣ.
ɉɪɢɛɨɪ ɦɚɪɤɢɪɨɜɚɧ ɜ ɫɨɨɬɜɟɬɫɬɜɢɢ ɫ Ⱦɢɪɟɤɬɢɜɨɣ ȿɋ 2002/96/ȿɋ ɩɨ ɨɬɯɨɞɚɦ ɷɥɟɤɬɪɢɱɟɫɤɨɝɨ ɢ ɷɥɟɤɬɪɨɧɧɨɝɨ ɨɛɨɪɭɞɨɜɚɧɢɹ.
ɋɨɛɥɸɞɚɹ ɩɪɚɜɢɥɚ ɭɬɢɥɢɡɚɰɢɢ ɢɡɞɟɥɢɹ, ȼɵ
ɦɨɠɟɬɟ ɩɪɟɞɨɬɜɪɚɬɢɬɶ ɭɳɟɪɛ ɨɤɪɭɠɚɸɳɟɣ
ɫɪɟɞɟ ɢ ɡɞɨɪɨɜɶɸ ɥɸɞɟɣ, ɤɨɬɨɪɵɣ ɜɨɡɦɨɠɟɧ
ɜ ɫɥɭɱɚɟ ɧɟɩɪɚɜɢɥɶɧɨɣ ɭɬɢɥɢɡɚɰɢɢ.
ɋɢɦɜɨɥ ɧɚ ɢɡɞɟɥɢɢ ɢɥɢ ɧɚ ɫɨɩɪɨɜɨɞɢɬɟɥɶɧɨɣ ɞɨɤɭɦɟɧɬɚɰɢɢ ɨɡɧɚɱɚɟɬ, ɱɬɨ ɨɧɨ ɧɟ
ɩɨɞɥɟɠɢɬ ɭɬɢɥɢɡɚɰɢɢ ɜ ɤɚɱɟɫɬɜɟ ɛɵɬɨɜɵɯ
ɨɬɯɨɞɨɜ. ȼɦɟɫɬɨ ɷɬɨɝɨ ɟɝɨ ɫɥɟɞɭɟɬ ɫɞɚɬɶ ɜ
ɫɨɨɬɜɟɬɫɬɜɭɸɳɢɣ ɩɭɧɤɬ ɩɪɢɟɦɤɢ ɷɥɟɤɬɪɨɧɧɨɝɨ ɢ ɷɥɟɤɬɪɨɨɛɨɪɭɞɨɜɚɧɢɹ ɞɥɹ
ɩɨɫɥɟɞɭɸɳɟɣ ɭɬɢɥɢɡɚɰɢɢ. ɍɬɢɥɢɡɚɰɢɹ ɞɨɥɠɧɚ
ɩɪɨɢɡɜɨɞɢɬɶɫɹ ɜ ɫɨɨɬɜɟɬɫɬɜɢɢ ɫ ɦɟɫɬɧɵɦ
ɩɪɢɪɨɞɨɨɯɪɚɧɢɬɟɥɶɧɵɦ ɡɚɤɨɧɨɞɚɬɟɥɶɫɬɜɨɦ. Ɂɚ ɛɨɥɟɟ ɩɨɞɪɨɛɧɨɣ ɢɧɮɨɪɦɚɰɢɟɣ ɨ
ɩɨɪɹɞɤɟ ɭɬɢɥɢɡɚɰɢɢ ɩɪɢɛɨɪɚ ɩɪɨɫɶɛɚ ɨɛɪɚɳɚɬɶɫɹ ɤ ɦɟɫɬɧɵɦ ɜɥɚɫɬɹɦ, ɜ ɫɥɭɠɛɭ ɩɨ
ɜɵɜɨɡɭ ɢ ɭɬɢɥɢɡɚɰɢɢ ɨɬɯɨɞɨɜ ɢɥɢ ɜ ɦɚɝɚɡɢɧ,
ɜ ɤɨɬɨɪɨɦ ȼɵ ɩɪɢɨɛɪɟɥɢ ɢɡɞɟɥɢɟ.
RU
3
Page 4

Ɍɟɯɧɢɱɟɫɤɢɟ ɯɚɪɚɤɬɟɪɢɫɬɢɤɢ
Ⱦɭɯɨɜɨɣ ɲɤɚɮ Ɇɨɳɧɨɫɬɶ
Ɋɚɡɦɟɪɵ (ɦɦ)
ȾɥɢɧɚxȽɥɭɛɢɧɚxȼɵɫɨɬɚ 595x538x593 Ⱦɭɯɨɜɤɚ (ɤȼɬ) 2,1
Ɉɛɴɟɦ ɞɭɯɨɜɨɝɨ ɲɤɚɮɚ (ɥ) 60 ɥ Ʉɨɧɜɟɤɰɢɨɧɧɵɣ ɜɟɧɬɢɥɹɬɨɪ (ɤȼɬ) 2,1
Ƚɪɢɥɶ (ɤȼɬ) 2,4
ɉɨɬɪɟɛɥɹɟɦɵɣ ɬɨɤ 230 ȼ
ɍɫɬɚɧɨɜɤɚ
ɉɨɫɥɟ ɪɚɫɩɚɤɨɜɤɢ ɭɛɟɞɢɬɟɫɶ ɜ ɨɬɫɭɬɫɬɜɢɢ
ɩɨɜɪɟɠɞɟɧɢɣ ɩɪɢɛɨɪɚ ɢ ɷɥɟɤɬɪɢɱɟɫɤɨɝɨ ɤɚɛɟɥɹ. ɉɪɢ ɧɚɥɢɱɢɢ ɩɨɜɪɟɠɞɟɧɢɣ ɫɜɹɠɢɬɟɫɶ
ɫ ȼɚɲɢɦ ɩɨɫɬɚɜɳɢɤɨɦ, ɩɪɟɠɞɟ ɱɟɦ ɢɫɩɨɥɶɡɨɜɚɬɶ ɩɪɢɛɨɪ.
ȼȺɀɇɈ
ȼɨ ɢɡɛɟɠɚɧɢɟ ɧɟɫɱɚɫɬɧɵɯ ɫɥɭɱɚɟɜ ɧɟ
ɨɫɬɚɜɥɹɣɬɟ ɭɩɚɤɨɜɨɱɧɵɟ ɦɚɬɟɪɢɚɥɵ (ɩɨɥɢɦɟɪɧɭɸ ɩɥɟɧɤɭ, ɩɟɧɨɩɥɚɫɬ) ɜ ɞɨɫɬɭɩɧɨɦ ɞɥɹ
ɞɟɬɟɣ ɦɟɫɬɟ, ɩɨɫɤɨɥɶɤɭ ɞɚɧɧɵɟ ɦɚɬɟɪɢɚɥɵ
ɦɨɝɭɬ ɩɪɟɞɫɬɚɜɥɹɬɶ ɞɥɹ ɧɢɯ ɨɩɚɫɧɨɫɬɶ.
ɍɫɬɚɧɨɜɤɚ ɞɨɥɠɧɚ ɩɪɨɢɡɜɨɞɢɬɶɫɹ ɬɨɥɶɤɨ
ɤɜɚɥɢɮɢɰɢɪɨɜɚɧɧɵɦ ɫɩɟɰɢɚɥɢɫɬɨɦ ɜ ɫɨɨɬɜɟɬɫɬɜɢɢ ɫ ɢɧɫɬɪɭɤɰɢɟɣ.
ɉɪɨɢɡɜɨɞɢɬɟɥɶ ɧɟ ɧɟɫɟɬ ɧɢɤɚɤɨɣ ɨɬɜɟɬɫɬɜɟɧɧɨɫɬɢ ɡɚ ɥɸɛɨɣ ɭɳɟɪɛ, ɩɪɢɱɢɧɟɧɧɵɣ
ɥɸɞɹɦ, ɠɢɜɨɬɧɵɦ ɢɥɢ ɩɪɟɞɦɟɬɚɦɢ
ɲɢɣ ɜ ɪɟɡɭɥɶɬɚɬɟ ɧɟɩɪɚɜɢɥɶɧɨɣ ɭɫɬɚɧɨɜɤɢ
ɩɪɢɛɨɪɚ.
ɢ ɜɨɡɧɢɤ-
ȁȟȠȎțȜȐȘȎ ȝȞȖȏȜȞȎ
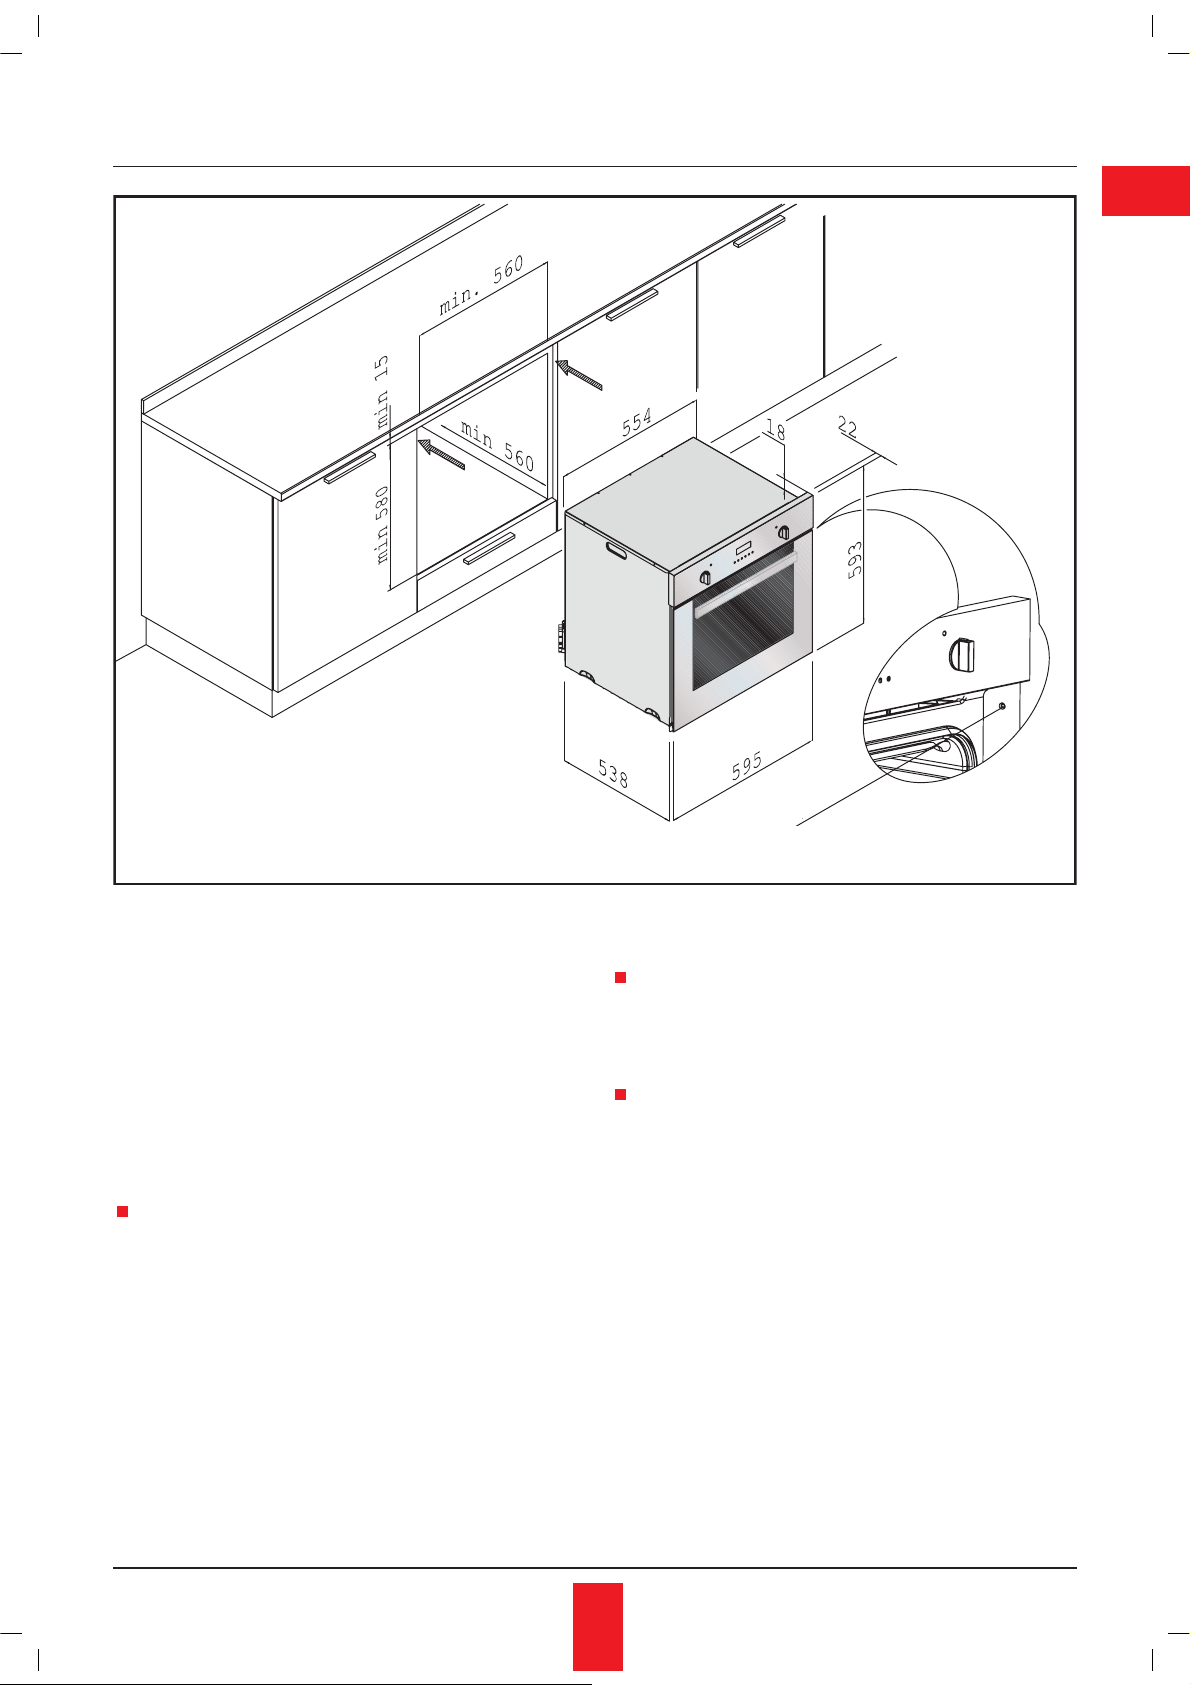
Ⱦɥɹ ɫɜɨɛɨɞɧɨɣ ɰɢɪɤɭɥɹɰɢɢ ɜɨɡɞɭɯɚ ɞɭɯɨɜɨɣ ɲɤɚɮ ɧɟɨɛɯɨɞɢɦɨ ɭɫɬɚɧɚɜɥɢɜɚɬɶ ɜ
ɫɨɨɬɜɟɬɫɬɜɢɢ ɫ ɪɚɡɦɟɪɚɦɢ, ɭɤɚɡɚɧɧɵɦɢ ɧɚ
ɪɢɫ. 2.
ȁȟȠȎțȜȐȘȎ ȝȞȖȏȜȞȎ
ɍɫɬɚɧɨɜɢɬɟ ɩɪɢɛɨɪ ɜ ɩɪɟɞɧɚɡɧɚɱɟɧɧɨɟ
ɦɟɫɬɨ (ɩɨɞ ɪɚɛɨɱɭɸ ɩɨɜɟɪɯɧɨɫɬɶ ɢɥɢ ɧɚɞ
ɞɪɭɝɢɦ ɩɪɢɛɨɪɨɦ), ɡɚɤɪɟɩɢɜ ɜɢɧɬɚɦɢ ɜ ɞɜɭɯ
ɨɬɜɟɪɫɬɢɹɯ ɧɚ ɜɧɟɲɧɟɦ ɨɛɨɞɟ ɞɭɯɨɜɨɝɨ
ɲɤɚɮɚ. Ɉɬɜɟɪɫɬɢɹ ɞɥɹ ɜɢɧɬɨɜ ɜɢɞɧɵ ɩɪɢ ɨɬɤɪɵɬɨɣ ɞɜɟɪɰɟ ɞɭɯɨɜɨɝɨ ɲɤɚɮɚ (ɪɢɫ. 2)
ȼȺɀɇɈ
Ɇɟɛɟɥɶ, ɜ ɤɨɬɨɪɭɸ ɜɫɬɪɚɢɜɚɟɬɫɹ ɞɭɯɨɜɨɣ ɲɤɚɮ, ɞɨɥɠɧɚ ɛɵɬɶ ɠɚɪɨɩɪɨɱɧɨɣ. ȼ
ɱɚɫɬɧɨɫɬɢ, ɨɛɥɢɰɨɜɨɱɧɨɟ ɩɨɤɪɵɬɢɟ ɦɟɛɟɥɢ
ɞɨɥɠɧɨ ɛɵɬɶ
(100° ɋ). ȿɫɥɢ ɨɛɥɢɰɨɜɨɱɧɨɟ ɩɨɤɪɵɬɢɟ ɢɥɢ
ɤɥɟɣ ɧɟ ɨɛɥɚɞɚɸɬ ɞɨɫɬɚɬɨɱɧɨɣ ɠɚɪɨɩɪɨɱɧɨɫɬɶɸ, ɩɨɤɪɵɬɢɟ ɦɨɠɟɬ ɞɟɮɨɪɦɢɪɨɜɚɬɶɫɹ
ɢɥɢ ɨɬɨɣɬɢ.
ȼ ɰɟɥɹɯ ɬɟɯɧɢɤɢ ɛɟɡɨɩɚɫɧɨɫɬɢ ɩɪɢɛɨɪ ɞɨɥɠɟɧ ɛɵɬɶ ɭɫɬɚɧɨɜɥɟɧ ɬɚɤɢɦ ɨɛɪɚɡɨɦ, ɱɬɨɛɵ
ɨɛɟɫɩɟɱɢɬɶ ɡɚɳɢɬɭ ɨɬ ɫɥɭɱɚɣɧɨɝɨ ɫɨɩɪɢɤɨɫɧɨɜɟɧɢɹ ɫ ɟɝɨ ɷɥɟɤɬɪɢɱɟɫɤɢɦɢ ɱɚɫɬɹɦɢ.
ȼɫɟ ɡɚɳɢɬɧɵɟ ɱɚɫɬɢ ɞɨɥɠɧɵ ɛɵɬɶ ɡɚɤɪɟɩɥɟɧɵ ɬɚɤɢɦ ɨɛɪɚɡɨɦ,
ɫɧɹɬɶ ɛɟɡ ɩɨɦɨɳɢ ɢɧɫɬɪɭɦɟɧɬɚ.
ɩɪɢɤɥɟɟɧɨ ɠɚɪɨɫɬɨɣɤɢɦ ɤɥɟɟɦ
ɱɬɨɛɵ ɢɯ ɧɟɥɶɡɹ ɛɵɥɨ
ǽȜȒȘșȬȥȓțȖȓ
Ș ȟȓȠȖ ȝȓȞȓȚȓțțȜȑȜ ȠȜȘȎ
ɉɨɞɤɥɸɱɟɧɢɟ ɤ ɫɟɬɢ ɩɟɪɟɦɟɧɧɨɝɨ ɬɨɤɚ
ɞɨɥɠɧɨ ɛɵɬɶ ɜɵɩɨɥɧɟɧɨ ɜ ɫɨɨɬɜɟɬɫɬɜɢɢ ɫ
ɦɟɫɬɧɵɦɢ ɩɪɚɜɢɥɚɦɢ. ɉɟɪɟɞ ɩɨɞɤɥɸɱɟɧɢɟɦ ɧɟɨɛɯɨɞɢɦɨ ɩɪɨɜɟɪɢɬɶ ɫɥɟɞɭɸɳɟɟ:
ɧɚɩɪɹɠɟɧɢɟ ɜ ɫɟɬɢ ɢ ɪɨɡɟɬɤɟ ɫɨɨɬɜɟɬɫ-
ɬɜɭɸɬ ɦɚɤɫɢɦɚɥɶɧɨɣ ɦɨɳɧɨɫɬɢ ɞɭɯɨɜɨɝɨ
ɲɤɚɮɚ (ɫɦɨɬɪɢ ɬɚɛɥɢɱɤɭ ɬɟɯɧɢɱɟɫɤɢɯ ɞɚɧ-
ɧɵɯ ɧɚ ɩɪɢɛɨɪɟ);
ɉɊȿȾɍɉɊȿɀȾȿɇɂȿ: ɉɪɢɛɨɪ ɞɨɥɠɟɧ
ɛɵɬɶ ɡɚɡɟɦɥɟɧ. ɷɥɟɤɬɪɢɱɟɫɤɚɹ ɛɟɡɨɩɚɫ-
4
Page 5
RU
Ɋɢɫ. 2 Ɉɬɜɟɪɫɬɢɟ ɞɥɹ ɜɢɧɬɚ
ɧɨɫɬɶ ɩɪɢɛɨɪɚ ɝɚɪɚɧɬɢɪɭɟɬɫɹ ɬɨɥɶɤɨ ɜ
ɫɥɭɱɚɟ ɩɪɚɜɢɥɶɧɨɝɨ ɩɨɞɤɥɸɱɟɧɢɹ ɤ ɧɚɞɟɠɧɨ ɡɚɡɟɦɥɟɧɧɨɦɭ ɢɫɬɨɱɧɢɤɭ ɩɢɬɚɧɢɹ,
ɤɚɤ ɭɤɚɡɚɧɨ ɜ ɩɪɚɜɢɥɚɯ ɷɥɟɤɬɪɢɱɟɫɤɨɣ ɛɟɡɨɩɚɫɧɨɫɬɢ;
ȼɚɠɧɨ: ɩɪɨɢɡɜɨɞɢɬɟɥɶ ɧɟ ɧɟɫɟɬ ɧɢɤɚɤɨɣ
ɨɬɜɟɬɫɬɜɟɧɧɨɫɬɢ ɡɚ ɥɸɛɨɣ ɭɳɟɪɛ, ɧɚɧɟɫɟɧɧɵɣ ɥɸɞɹɦ ɢɥɢ ɩɪɟɞɦɟɬɚɦ ɜ ɫɜɹɡɢ ɫ
ɧɟɧɚɞɥɟɠɚɳɢɦ ɡɚɡɟɦɥɟɧɢɟɦ ɩɪɢɛɨɪɚ;
ɞɥɹ ɩɨɞɤɥɸɱɟɧɢɹ ɤ ɢɫɬɨɱɧɢɤɭ ɩɢɬɚɧɢɹ ɧɢ
ɜ ɤɨɟɦ ɫɥɭɱɚɟ ɧɟ ɢɫɩɨɥɶɡɭɣɬɟ ɪɟɞɭɤɬɨɪɵ,
ɩɟɪɟɯɨɞɧɢɤɢ ɢɥɢ ɬɪɨɣɧɢɤɢ.
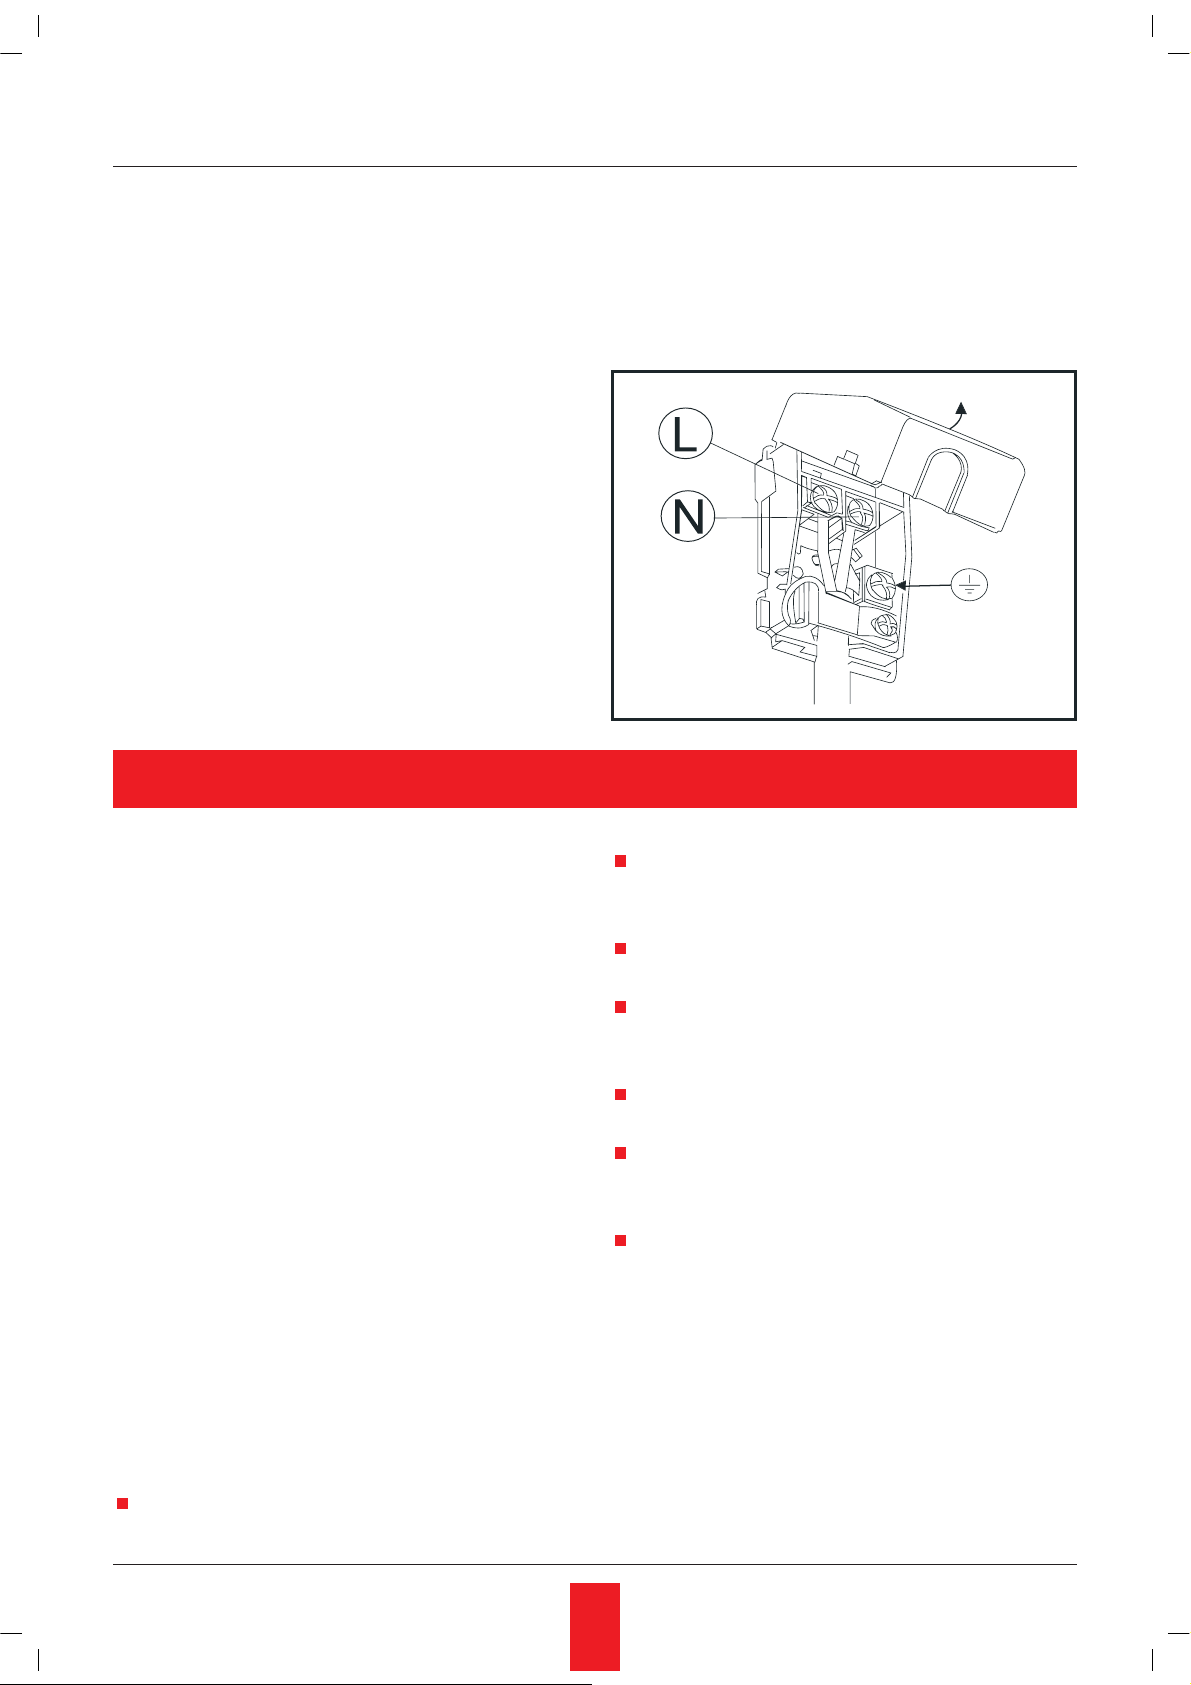
ǽȜȒȘșȬȥȓțȖȓ
Ⱦɥɹ ɷɬɨɝɨ ȼɚɦ ɧɟɨɛɯɨɞɢɦɨ:
ɩɨɞɤɥɸɱɢɬɶ ɤɚɛɟɥɶ ɤ ɫɨɟɞɢɧɢɬɟɥɶɧɨɣ
ɩɥɚɬɟ (ɪɢɫ. 3), ɩɪɢ ɷɬɨɦ ɤɚɛɟɥɶ ɡɚɡɟɦɥɟ-
ɧɢɹ ɞɨɥɠɟɧ ɛɵɬɶ ɧɚ 3 ɫɦ ɞɥɢɧɧɟɟ, ɱɟɦ
ɚɤɬɢɜɧɵɟ ɩɪɨɜɨɞɚ (ɮɚɡɚ/ɧɨɥɶ).
ɋɨɟɞɢɧɢɬɟ ɩɪɨɜɨɞɚ ɤɚɛɟɥɹ ɫɥɟɞɭɸɳɢɦ
ɨɛɪɚɡɨɦ:
L = (ɮɚɡɚ) ɤɨɪɢɱɧɟɜɵɣ ɢɥɢ ɤɪɚɫɧɵɣ
N = (ɧɨɥɶ) ɫɢɧɢɣ
Ũ = (ɡɟɦɥɹ) ɠɟɥɬɵɣ/ɡɟɥɟɧɵɣ.
ɉɨɦɧɢɬɟ: ɷɥɟɤɬɪɨɩɪɨɜɨɞɤɚ ɞɨɥɠɧɚ ɛɵɬɶ
ɪɚɫɩɨɥɨɠɟɧɚ ɬɚɤɢɦ ɨɛɪɚɡɨɦ, ɱɬɨɛɵ ɨɧɚ ɧɟ
ɧɚɝɪɟɜɚɥɚɫɶ ɛɨɥɟɟ ɱɟɦ ɧɚ 50°ɋɜɵɲɟɤɨɦɧɚɬɧɨɣ ɬɟɦɩɟɪɚɬɭɪɵ.
ȟȜȓȒȖțȖȠȓșȪțȜȑȜ ȘȎȏȓșȭ
ȿɫɥɢ ɜ ɤɨɦɩɥɟɤɬ ɩɨɫɬɚɜɤɢ ɩɪɢɛɨɪɚ ɧɟ ɜɯɨɞɢɬ ɫɨɟɞɢɧɢɬɟɥɶɧɵɣ ɤɚɛɟɥɶ, ɧɟɨɛɯɨɞɢɦɨ
ɢɫɩɨɥɶɡɨɜɚɬɶ ɤɚɛɟɥɶ H05RR-F ɢɥɢ H05RNF 3 x 1.5 ɦɦ2. ɫɨɨɬɜɟɬɫɬɜɭɸɳɟɝɨ ɫɟɱɟɧɢɹ,
ɤɨɬɨɪɵɣ ɫɥɟɞɭɟɬ ɩɪɢɫɨɟɞɢɧɢɬɶ ɤ ɤɥɟɦɦɧɨɣ
ɤɨɥɨɞɤɟ.
ǽȜȒȘșȬȥȓțȖȓ
Ș ȟȠȎțȒȎȞȠțȜȗ ȞȜȕȓȠȘȓ
ɉɨɞɫɨɟɞɢɧɢɬɟ ɫɨɟɞɢɧɢɬɟɥɶɧɵɣ ɤɚɛɟɥɶ
ɤ ɫɬɚɧɞɚɪɬɧɨɣ ɜɢɥɤɟ. ɫɨɨɬɜɟɬɫɬɜɭɸɳɟɣ
ɧɚɩɪɹɠɟɧɢɸ, ɭɤɚɡɚɧɧɨɦɭ ɧɚ ɬɚɛɥɢɱɤɟ ɬɟɯɧɢɱɟɫɤɢɯ ɞɚɧɧɵɯ. ɉɨɫɥɟ ɬɨɝɨ, ɤɚɤ ɞɭɯɨɜɨɣ
5
Page 6
ɲɤɚɮ ɜɫɬɪɨɟɧ ɢ ɩɨɞɤɥɸɱɟɧ, ɭɛɟɞɢɬɟɫɶ, ɱɬɨ
ɤ ɜɢɥɤɟ ɟɫɬɶ ɞɨɫɬɭɩ.
ǽȞȭȚȜȓ ȝȜȒȘșȬȥȓțȖȓ
Ș ȖȟȠȜȥțȖȘȡ
ȝȓȞȓȚȓțțȜȑȜ ȠȜȘȎ
ȿɫɥɢ ɜ ɤɨɦɩɥɟɤɬ ɩɨɫɬɚɜɤɢ ɭɫɬɪɨɣɫɬɜɚ ɧɟ
ɜɯɨɞɢɬ ɤɚɛɟɥɶ ɩɢɬɚɧɢɹ ɢ ɜɢɥɤɚ, ɷɥɟɤɬɪɨɩɢɬɚɧɢɟ ɨɛɟɫɩɟɱɢɜɚɟɬɫɹ ɩɪɹɦɵɦ ɩɨɞɤɥɸɱɟɧɢɟɦ ɤ ɢɫɬɨɱɧɢɤɭ ɩɟɪɟɦɟɧɧɨɝɨ ɬɨɤɚ ɫ ɩɨɦɨɳɶɸ
ɫɩɟɰɢɚɥɶɧɨɝɨ ɭɫɬɪɨɣɫɬɜɚ, ɩɨɡɜɨɥɹɸɳɟɝɨ
ɨɬɤɥɸɱɚɬɶ ɩɪɢɛɨɪ ɨɬ ɫɟɬɢ ɩɨ ɜɫɟɦ ɩɨɥɸɫɚɦ
ɧɚ ɲɢɪɢɧɭ ɪɚɡɦɵɤɚɧɢɹ ɤɨɧɬɚɤɬɨɜ ɜ ɫɨɨɬɜɟɬɫɬɜɢɢ ɫ ɤɚɬɟɝɨɪɢɟɣ ɩɟɪɟɧɚɩɪɹɠɟɧɢɹ III,
ɫɨɝɥɚɫɧɨ ɬɪɟɛɨɜɚɧɢɹɦ ɞɚɧɧɨɣ ɢɧɫɬɪɭɤɰɢɢ.
ɀɟɥɬɨ-ɡɟɥɟɧɵɣ ɤɚɛɟɥɶ ɡɚɡɟɦɥɟɧɢɹ
ɞɨɥɠɟɧ ɤɨɧɬɪɨɥɢɪɨɜɚɬɶɫɹ ɷɬɢɦ ɨɬɤɥɸɱɚɸɳɢɦ ɭɫɬɪɨɣɫɬɜɨɦ.
ɧɟ
ɍɩɪɚɜɥɟɧɢɟ ɞɭɯɨɜɵɦ ɲɤɚɮɨɦ
ȼɇɂɆȺɇɂȿ: ȿɫɥɢ ɤɚɛɟɥɶ ɩɢɬɚɧɢɹ ɩɨɜ-
ɪɟɠɞɟɧ, ɬɨ ɜɨ ɢɡɛɟɠɚɧɢɟ ɥɸɛɨɝɨ ɪɢɫɤɚ
ɫɥɟɞɭɟɬ ɨɛɪɚɬɢɬɶɫɹ ɤ ɩɪɨɢɡɜɨɞɢɬɟɥɸ, ɜɚɜɬɨɪɢɡɨɜɚɧɧɵɣ ɫɟɪɜɢɫɧɵɣ ɰɟɧɬɪ ɢɥɢ ɤ ɫɩɟɰɢɚɥɢɫɬɭ.
Ɋɢɫ. 3
Ɂɚɩɨɦɧɢɬɟ: ɍɫɬɚɧɨɜɤɚ ɬɚɣɦɟɪɚ, ɱɚɫɨɜ
ɢɥɢ ɩɪɨɝɪɚɦɦɚɬɨɪɚ (ɫɦɨɬɪɢ ɪɚɡɞɟɥ ɧɚ
ɫɬɪɚɧɢɰɟ 6) ɩɪɨɢɡɜɨɞɢɬɫɹ ɜ ɪɭɱɧɨɦ ɪɟɠɢɦɟ.
ɉɪɢ ɩɟɪɜɨɦ ɢɫɩɨɥɶɡɨɜɚɧɢɢ ɞɭɯɨɜɨɝɨ ɲɤɚɮɚ ɜɨɡɦɨɠɧɨ ɜɨɡɧɢɤɧɨɜɟɧɢɟ ɧɟɩɪɢɹɬɧɨɝɨ
ɡɚɩɚɯɚ ɢɡ-ɡɚ ɫɝɨɪɚɧɢɹ ɡɚɳɢɬɧɵɯ ɦɚɫɟɥ..
ɉɟɪɟɞ ɢɫɩɨɥɶɡɨɜɚɧɢɟɦ ɩɪɨɝɪɟɣɬɟ ɞɭɯɨɜɨɣ ɲɤɚɮ ɧɚ ɦɚɤɫɢɦɚɥɶɧɨɦ ɭɪɨɜɧɟ ɩɪɢɛɥɢɡɢɬɟɥɶɧɨ ɜ ɬɟɱɟɧɢɟ ɱɚɫɚ.
ɉɨɫɥɟ ɩɟɪɜɢɱɧɨɝɨ ɩɪɨɝɪɟɜɚɧɢɹ ɞɚɣɬɟ ɞɭɯɨɜɨɦɭ ɲɤɚɮɭ
ɜɨɞɨɣ ɫ ɞɨɛɚɜɥɟɧɢɟɦ ɦɨɸɳɟɝɨ ɫɪɟɞɫɬɜɚ.
ɉɟɪɟɞ ɢɫɩɨɥɶɡɨɜɚɧɢɟɦ ɜɵɦɨɣɬɟ ɜɫɟ ɚɤɫɟɫɫɭɚɪɵ ɞɥɹ ɝɪɢɥɹ, ɮɨɪɦɭ ɞɥɹ ɜɵɩɟɱɤɢ ɢ ɩɪɨɬɢɜɧɢ.
Ɂɚɩɨɦɧɢɬɟ: ɩɟɪɟɞ ɦɵɬɶɟɦ ɨɬɤɥɸɱɢɬɟ
ɩɪɢɛɨɪ ɨɬ ɢɫɬɨɱɧɢɤɚ ɩɢɬɚɧɢɹ.
ɨɫɬɵɬɶ ɢ ɜɵɦɨɣɬɟ ɟɝɨ ɬɟɩɥɨɣ
ǼȏȧȎȭ ȖțȢȜȞȚȎȤȖȭ
Ȗ ȚȓȞȩ ȝȞȓȒȜȟȠȜȞȜȔțȜȟȠȖ
Ȑ ȝȜșȪȕȜȐȎțȖȖ:
ȼɨ ɜɪɟɦɹ ɪɚɛɨɬɵ ɩɪɢɛɨɪɚ ɟɝɨ ɞɜɟɪɰɚ
ɞɨɥɠɧɚ ɛɵɬɶ ɡɚɤɪɵɬɚ.
Ⱦɥɹ ɬɨɝɨ, ɱɬɨɛɵ ɨɬɤɪɵɬɶ ɞɜɟɪɰɭ ɞɭɯɨɜɨɝɨ
ɲɤɚɮɚ, ɜɫɟɝɞɚ ɛɟɪɢɬɟɫɶ ɡɚ ɪɭɱɤɭ ɩɨ ɰɟɧɬɪɭ.
Ɉɫɬɟɪɟɝɚɣɬɟɫɶ ɝɨɪɹɱɟɝɨ ɩɚɪɚ, ɤɨɝɞɚ ɨɬɤɪɵ-
ɜɚɟɬɟ ɞɜɟɪɰɭ ɞɭɯɨɜɨɝɨ ɲɤɚɮɚ.
ɉɨɥɶɡɭɣɬɟɫɶ ɫɩɟɰɢɚɥɶɧɵɦɢ ɡɚɳɢɬɧɵɦɢ
ɩɟɪɱɚɬɤɚɦɢ, ɤɨɝɞɚ ɩɨɦɟɳɚɟɬɟ ɩɢɳɭ ɜ ɞɭɯɨɜɨɣ ɲɤɚɮ ɢɥɢ ɜɵɧɢɦɚɟɬɟ ɟɟ.
ɂɫɩɨɥɶɡɭɣɬɟ ɩɨɫɭɞɭ, ɭɫɬɨɣɱɢɜɭɸ ɤ ɬɟɦɩɟ-
ɪɚɬɭɪɚɦ, ɭɤɚɡɚɧɧɵɦ ɧɚ ɬɟɪɦɨɫɬɚɬɟ.
ɉɨɫɥɟ ɢɫɩɨɥɶɡɨɜɚɧɢɹ ɞɭɯɨɜɨɝɨ ɲɤɚɮɚ
ɭɛɟɞɢɬɟɫɶ, ɱɬɨ ɜɫɟ ɩɟɪɟɤɥɸɱɚɬɟɥɢ ɧɚɯɨɞɹɬɫɹ ɜ ɧɟɣɬɪɚɥɶɧɨɦ ɩɨɥɨɠɟɧɢɢ.
ɇɟ ɜɵɩɟɤɚɣɬɟ ɢ ɧɟ ɠɚɪɶɬɟ ɩɪɨɞɭɤɬɵ ɧɟ-
ɩɨɫɪɟɞɫɬɜɟɧɧɨ ɧɚ ɞɧɟ ɞɭɯɨɜɨɝɨ ɲɤɚɮɚ.
6
Page 7
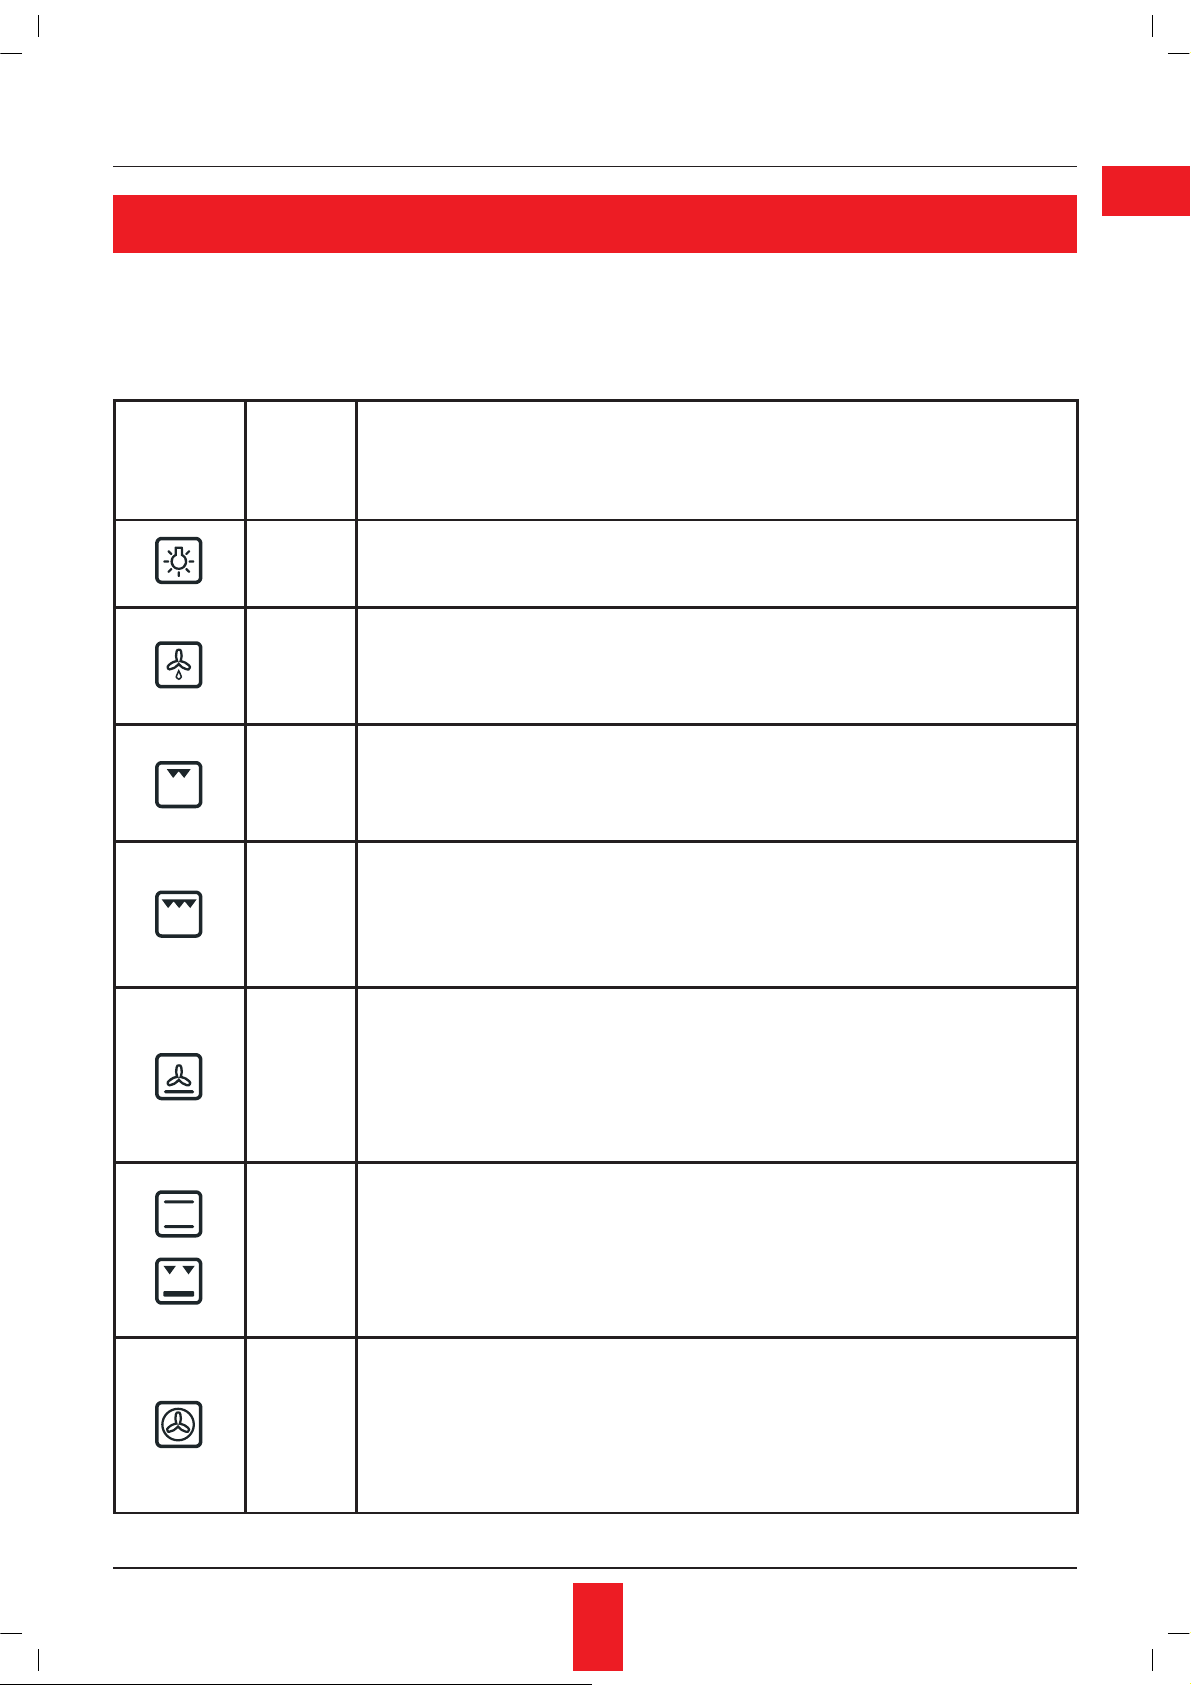
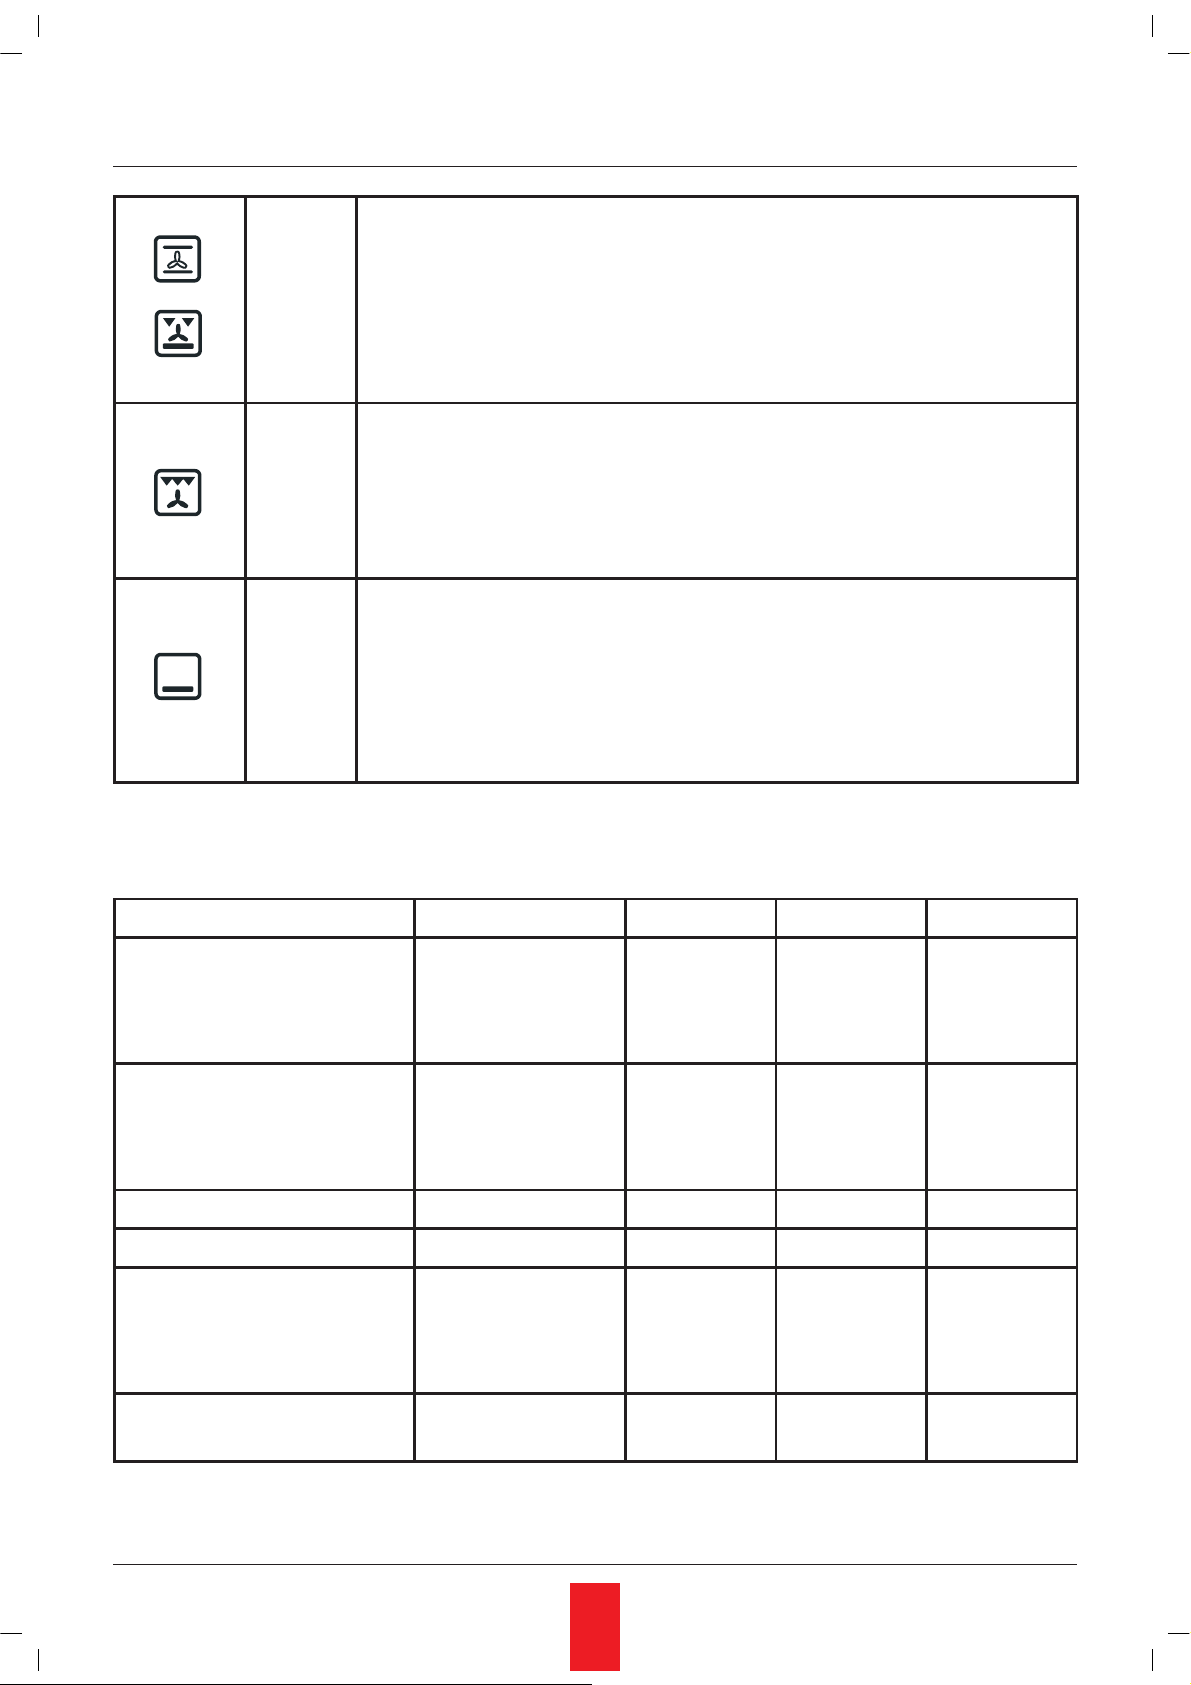
Ɋɟɠɢɦɵ ɩɪɢɝɨɬɨɜɥɟɧɢɹ ɩɢɳɢ
ɉɊɂɆȿɑȺɇɂȿ: Ɉɛɨɡɧɚɱɟɧɢɹ ɧɚ ɪɭɱɤɟ ɜɵɛɨɪɚ ɮɭɧɤɰɢɢ ɪɚɡɥɢɱɚɸɬɫɹ ɜ ɡɚɜɢɫɢɦɨɫɬɢ ɨɬ
ɦɨɞɟɥɢ ɩɪɢɛɨɪɚ. ȼɵ ɦɨɠɟɬɟ ɜɵɛɪɚɬɶ ɫɥɟɞɭɸɳɢɟ ɮɭɧɤɰɢɢ.
RU
ɂɧɞɢɤɚɬɨɪ
ɮɭɧɤɰɢɣ
ɞɭɯɨɜɨɝɨ
ɲɤɚɮɚ
Ɍɟɦɩ. °C
min 60
max 260
60 * 260 ɋɪɟɞɧɢɣ ɝɪɢɥɶ
60 * 200 Ȼɨɥɶɲɨɣ ɝɪɢɥɶ
60*260 ɇɚɝɪɟɜ ɫɧɢɡɭ + ɝɨɪɹɱɢɣ ɜɨɡɞɭɯ
60*260 ȿɫɬɟɫɬɜɟɧɧɚɹ ɤɨɧɜɟɤɰɢɹ
60*260 Ƚɨɪɹɱɢɣ ɜɨɡɞɭɯ
ɉɪɢɦɟɱɚɧɢɟ: ɜɨ ɜɪɟɦɹ ɪɚɛɨɬɵ ɞɭɯɨɜɨɝɨ ɲɤɚɮɚ ɟɝɨ ɞɜɟɪɰɚ ɞɨɥɠɧɚ
ɛɵɬɶ ɡɚɤɪɵɬɚ. Ɏɭɧɤɰɢɹ ɡɚɞɚɟɬɫɹ ɬɨɥɶɤɨ ɩɨɫɥɟ ɬɨɝɨ, ɤɚɤ ɪɭɱɤɚ ɬɟɪɦɨɫɬɚɬɚ ɭɫɬɚɧɨɜɥɟɧɚ ɧɚ ɠɟɥɚɟɦɭɸ ɬɟɦɩɟɪɚɬɭɪɭ
ɉɪɢ ɩɟɪɟɤɥɸɱɟɧɢɢ ɜɵɛɨɪɚ ɪɟɠɢɦɚ ɜɤɥɸɱɚɟɬɫɹ
ɩɨɞɫɜɟɬɤɚ ɞɭɯɨɜɨɝɨ ɲɤɚɮɚ ɧɚ ɜɪɟɦɹ
ɜɫɟɯ ɩɨɫɥɟɞɭɸɳɢɯ ɨɩɟɪɚɰɢɣ.
Ɋɚɡɦɨɪɚɠɢɜɚɧɢɟ
ȼɧɭɬɪɢ ɞɭɯɨɜɨɝɨ ɲɤɚɮɚ ɩɪɢ ɩɨɦɨɳɢ ɜɟɧɬɢɥɹɬɨɪɚ ɨɫɭɳɟɫɬɜɥɹɟɬɫɹ
ɩɪɢɧɭɞɢɬɟɥɶɧɚɹ ɰɢɪɤɭɥɹɰɢɹ
ɭɫɤɨɪɹɟɬ ɪɚɡɦɨɪɚɠɢɜɚɧɢɟ ɩɪɨɞɭɤɬɚ, ɧɟ ɜɥɢɹɹ ɧɚ ɤɚɱɟɫɬɜɨ..
ɗɬɨ ɮɭɧɤɰɢɹ ɩɪɢɝɨɬɨɜɥɟɧɢɹ ɩɢɳɢ ɫ ɩɨɦɨɳɶɸ ɬɟɩɥɨɜɨɝɨ ɢɡɥɭɱɟɧɢɹ,
ɫɨɡɞɚɜɚɟɦɨɝɨ ɰɟɧɬɪɚɥɶɧɵɦ ɧɚɝɪɟɜɚɬɟɥɟɦ, ɪɚɫɩɨɥɨɠɟɧɧɵɦ ɧɚɞ
ɝɨɬɨɜɹɳɢɦɫɹ ɛɥɸɞɨɦ
ɗɬɨ ɮɭɧɤɰɢɹ ɩɪɢɝɨɬɨɜɥɟɧɢɹ ɩɢɳɢ ɫ ɩɨɦɨɳɶɸ ɬɟɩɥɨɜɨɝɨ ɢɡɥɭɱɟɧɢɹ,
ɫɨɡɞɚɜɚɟɦɨɝɨ ɞɜɭɦɹ ɧɚɝɪɟɜɚɬɟɥɹɦɢ, ɪɚɫɩɨɥɨɠɟɧɧɵɦɢ ɧɚɞ ɝɨɬɨɜɹɳɢɦɫɹ ɛɥɸɞɨɦ. ɗɬɚ ɮɭɧɤɰɢɹ ɢɫɩɨɥɶɡɭɟɬɫɹ ɩɪɢ ɬɟɦɩɟɪɚɬɭɪɧɨɦ
ɪɟɠɢɦɟ ɨɬ 60 ɞɨ 200°C.
ȼɨɡɞɭɯ, ɧɚɝɪɟɜɚɟɦɵɣ ɧɢɠɧɢɦ ɧɚɝɪɟɜɚɬɟɥɟɦ, ɪɚɜɧɨɦɟɪɧɨ ɰɢɪɤɭɥɢɪɭɟɬ ɩɨ ɞɭɯɨɜɨɦɭ ɲɤɚɮɭ ɛɥɚɝɨɞɚɪɹ ɜɟɧɬɢɥɹɬɨɪɭ, ɢ ɬɚɤɢɦ ɨɛɪɚɡɨɦ
ɨɛɟɫɩɟɱɢɜɚɟɬɫɹ ɪɚɜɧɨɦɟɪɧɵɣ ɩɪɨɝɪɟɜ ɞɭɯɨɜɨɝɨ ɲɤɚɮɚ ɨɬ 60 ɞɨ
260°C. ɗɬɭ ɮɭɧɤɰɢɸ ɦɨɠɧɨ ɢɫɩɨɥɶɡɨɜɚɬɶ ɞɥɹ ɫɬɟɪɢɥɢɡɚɰɢɢ ɫɬɟɤɥɹɧɧɵɯ ɛɚɧɨɤ.
Ɉɛɚ ɧɚɝɪɟɜɚɬɟɥɹ (ɜɟɪɯɧɢɣ ɢ ɧɢɠɧɢɣ) ɪɚɛɨɬɚɸɬ ɨɞɧɨɜɪɟɦɟɧɧɨ. ɗɬɨ
ɪɟɠɢɦ ɨɛɵɱɧɨɣ
ɛɢɫɤɜɢɬɨɜ, ɡɚɩɟɤɚɧɢɹ ɹɛɥɨɤ ɢ ɩɪɢɝɨɬɨɜɥɟɧɢɹ ɩɪɨɞɭɤɬɨɜ ɫ ɯɪɭɫɬɹɳɟɣ ɤɨɪɨɱɤɨɣ. ɂɞɟɚɥɶɧɨ ɩɨɞɯɨɞɢɬ ɞɥɹ ɜɵɩɟɤɚɧɢɹ ɧɚ ɪɟɲɟɬɤɟ ɩɪɢ
ɬɟɦɩɟɪɚɬɭɪɟ 260°C.
ȼɟɧɬɢɥɹɬɨɪ ɢ ɧɚɝɪɟɜɚɬɟɥɶ ɪɚɛɨɬɚɸɬ ɨɞɧɨɜɪɟɦɟɧɧɨ. Ƚɨɪɹɱɢɣ
ɜɨɡɞɭɯ
ɲɤɚɮɚ. Ɏɭɧɤɰɢɹ ɢɞɟɚɥɶɧɨ ɩɨɞɯɨɞɢɬ ɞɥɹ ɩɪɢɝɨɬɨɜɥɟɧɢɹ ɪɚɡɥɢɱɧɵɯ
ɜɢɞɨɜ ɩɪɨɞɭɤɬɨɜ (ɦɹɫɨ, ɪɵɛɚ)
ɚɪɨɦɚɬɚ. ɉɪɟɞɧɚɡɧɚɱɟɧɚ ɬɚɤɠɟ ɞɥɹ ɜɵɩɟɤɚɧɢɹ ɧɟɠɧɨɝɨ ɬɟɫɬɚ.
, ɨɬ 60 ɞɨ 260°C, ɪɚɜɧɨɦɟɪɧɨ ɰɢɪɤɭɥɢɪɭɟɬ ɜɧɭɬɪɢ ɞɭɯɨɜɨɝɨ
ɝɨɬɨɜɤɢ, ɩɨɞɯɨɞɹɳɢɣ ɞɥɹ ɠɚɪɤɢ ɦɹɫɚ, ɜɵɩɟɱɤɢ
ɜɨɡɞɭɯɚ ɤɨɦɧɚɬɧɨɣ ɬɟɦɩɟɪɚɬɭɪɵ, ɱɬɨ
ɫ ɫɨɯɪɚɧɟɧɢɟɦ ɜɤɭɫɨɜɵɯ ɤɚɱɟɫɬɜ ɢ
7
Page 8
60 * 260 ȿɫɬɟɫɬɜɟɧɧɚɹ ɤɨɧɜɟɤɰɢɹ + ɝɨɪɹɱɢɣ ɜɨɡɞɭɯ
Ɉɞɧɨɜɪɟɦɟɧɧɨ ɪɚɛɨɬɚɸɬ ɜɟɪɯɧɢɣ ɢ ɧɢɠɧɢɣ ɧɚɝɪɟɜɚɬɟɥɢ, ɚ ɬɚɤɠɟ
ɜɟɧɬɢɥɹɬɨɪ. Ⱦɚɧɧɵɣ ɦɟɬɨɞ ɬɪɚɞɢɰɢɨɧɧɨɣ ɬɟɩɥɨɜɨɣ ɨɛɪɚɛɨɬɤɢ
ɩɪɟɤɪɚɫɧɨ ɩɨɞɯɨɞɢɬ ɞɥɹ ɩɪɢɝɨɬɨɜɥɟɧɢɹ ɪɚɡɥɢɱɧɵɯ ɛɥɸɞ. Ⱦɚɟɬ ɩɪɟɤɪɚɫɧɵɟ ɪɟɡɭɥɶɬɚɬɵ ɩɪɢ ɝɨɬɨɜɤɟ ɧɚ ɨɞɧɨɦ ɭɪɨɜɧɟ ɩɪɢ ɪɚɜɧɨɦɟɪɧɨɦ
ɪɚɫɩɪɟɞɟɥɟɧɢɢ ɬɟɦɩɟɪɚɬɭɪɵ ɜ ɞɭɯɨɜɨɦ ɲɤɚɮɭ ɨɬ 60 ɞɨ 260°C
(ɢɞɟɚɥɶɧɨ ɩɨɞɯɨɞɢɬ ɞɥɹ ɛɢɫɤɜɢɬɨɜ, ɬɨɪɬɨɜ ɢ ɤɚɧɚɩɟ).
60*200 Ɍɟɪɦɨɝɪɢɥɶ
ȼɨɡɞɭɯ ɧɚɝɪɟɜɚɟɬɫɹ ɧɚɝɪɟɜɚɬɟɥɹɦɢ ɝɪɢɥɹ, ɚ ɜɟɧɬɢɥɹɬɨɪ ɩɨɞɞɟɪɠɢɜɚɟɬ ɟɝɨ ɩɨɫɬɨɹɧɧɭɸ ɰɢɪɤɭɥɹɰɢɸ, ɪɟɝɭɥɢɪɭɹ, ɬɚɤɢɦ ɨɛɪɚɡɨɦ, ɬɟɦɩɟɪɚɬɭɪɭ ɦɟɠɞɭ 60 and 200°C. Ƚɪɢɥɶ ɫ ɝɨɪɹɱɢɦ ɜɨɡɞɭɯɨɦ ɩɪɟɤɪɚɫɧɨ
ɡɚɦɟɧɹɟɬ ɜɟɪɬɟɥ. Ɇɨɠɧɨ ɞɨɛɢɬɶɫɹ ɩɪɟɤɪɚɫɧɵɯ ɪɟɡɭɥɶɬɚɬɨɜ ɞɚɠɟ
ɩɪɢ ɩɪɢɝɨɬɨɜɥɟɧɢɢ ɛɨɥɶɲɢɯ ɨɛɴɟɦɨɜ ɩɬɢɰɵ, ɫɨɫɢɫɨɤ, ɫɵɪɨɝɨ ɦɹɫɚ.
60 * 260 ɇɚɝɪɟɜ ɫɧɢɡɭ
ɗɬɚ ɮɭɧɤɰɢɹ ɫɩɟɰɢɚɥɶɧɨ ɩɪɟɞɧɚɡɧɚɱɟɧɚ ɞɥɹ ɩɪɢɝɨɬɨɜɥɟɧɢɹ ɛɥɸɞ
ɩɭɬɟɦ ɩɨɫɬɟɩɟɧɧɨɝɨ ɩɪɨɝɪɟɜɚɧɢɹ ɩɪɨɞɭɤɬɨɜ ɫɧɢɡɭ
ɩɪɨɞɭɤɬɨɜ ɢɥɢ ɫɬɟɪɢɥɢɡɚɰɢɢ ɫɬɟɤɥɹɧɧɵɯ ɛɚɧɨɤ. Ɉɧɚ ɬɚɤɠɟ ɩɨɞɯɨɞɢɬ ɞɥɹ ɩɪɢɝɨɬɨɜɥɟɧɢɹ ɛɥɸɞ, ɬɪɟɛɭɸɳɢɯ ɞɥɢɬɟɥɶɧɨɝɨ ɢ ɦɟɞɥɟɧɧɨɝɨ ɜɵɩɟɤɚɧɢɹ, ɧɚɩɪɢɦɟɪ ɞɥɹ ɛɥɸɞ, ɩɪɢɝɨɬɨɜɥɟɧɧɵɯ ɜ ɝɨɪɲɨɱɤɚɯ.
Ɍɟɦɩɟɪɚɬɭɪɧɵɣ ɪɟɠɢɦ ɮɭɧɤɰɢɢ ɨɬ 60 ɞɨ 260°C.
, ɪɚɡɨɝɪɟɜɚɧɢɹ
ȀȎȏșȖȤȎ Ȓșȭ ȐȩȝȓȘȎțȖȭ
Ɏɭɧɤɰɢɹ ɍɪɨɜɟɧɶ °C Ɇɢɧɭɬɵ
Ɇɹɫɧɵɟ ɢɡɞɟɥɢɹ
ɀɚɪɟɧɚɹ ɬɟɥɹɬɢɧɚ
ɀɚɪɟɧɚɹ ɫɜɢɧɢɧɚ
Ɏɢɥɟ
ɉɬɢɰɚ
ɀɚɪɟɧɚɹ ɤɭɪɢɰɚ Ƚɪɢɥɶ ɫ
Ʌɟɩɟɲɤɢ Ƚɨɪɹɱɢɣ ɜɨɡɞɭɯ 3/5 190 20/22
ɏɥɟɛ Ƚɨɪɹɱɢɣ ɜɨɡɞɭɯ 4 180 25/30
Ʉɨɧɞɢɬɟɪɫɤɢɟ ɢɡɞɟɥɢɹ
ɉɟɱɟɧɶɟ
Ȼɢɫɤɜɢɬ
Ɍɨɪɬ
Ɍɨɪɬɵ
əɛɥɨɱɧɵɣ ɩɢɪɨɝ Ƚɨɪɹɱɢɣ ɜɨɡɞɭɯ 4 190 45
Ƚɨɪɹɱɢɣ ɜɨɡɞɭɯ
Ƚɨɪɹɱɢɣ ɜɨɡɞɭɯ
Ƚɪɢɥɶ
ɢɫɩɨɥɶɡɨɜɚɧɢɟɦ
ɜɟɪɬɟɥɚ
Ƚɨɪɹɱɢɣ ɜɨɡɞɭɯ
Ƚɨɪɹɱɢɣ ɜɨɡɞɭɯ
Ƚɨɪɹɱɢɣ ɜɨɡɞɭɯ
4
4
5
2 230 85/90
3/5
4
4
190
190
230
200
150
160
130
130
6+6
15
20
25
ɍɤɚɡɚɧɧɵɟ ɜ ɬɚɛɥɢɰɟ ɜɟɥɢɱɢɧɵ (ɬɟɦɩɟɪɚɬɭɪɚ ɢ ɜɪɟɦɹ ɩɪɢɝɨɬɨɜɥɟɧɢɹ) ɹɜɥɹɸɬɫɹ ɩɪɢɛɥɢɡɢɬɟɥɶɧɵɦɢ ɢ ɦɨɝɭɬ ɦɟɧɹɬɶɫɹ ɜ ɡɚɜɢɫɢɦɨɫɬɢ ɨɬ ɜɢɞɚ ɦɹɫɚ ɢ ɟɝɨ ɬɨɥɳɢɧɵ.
8
Page 9
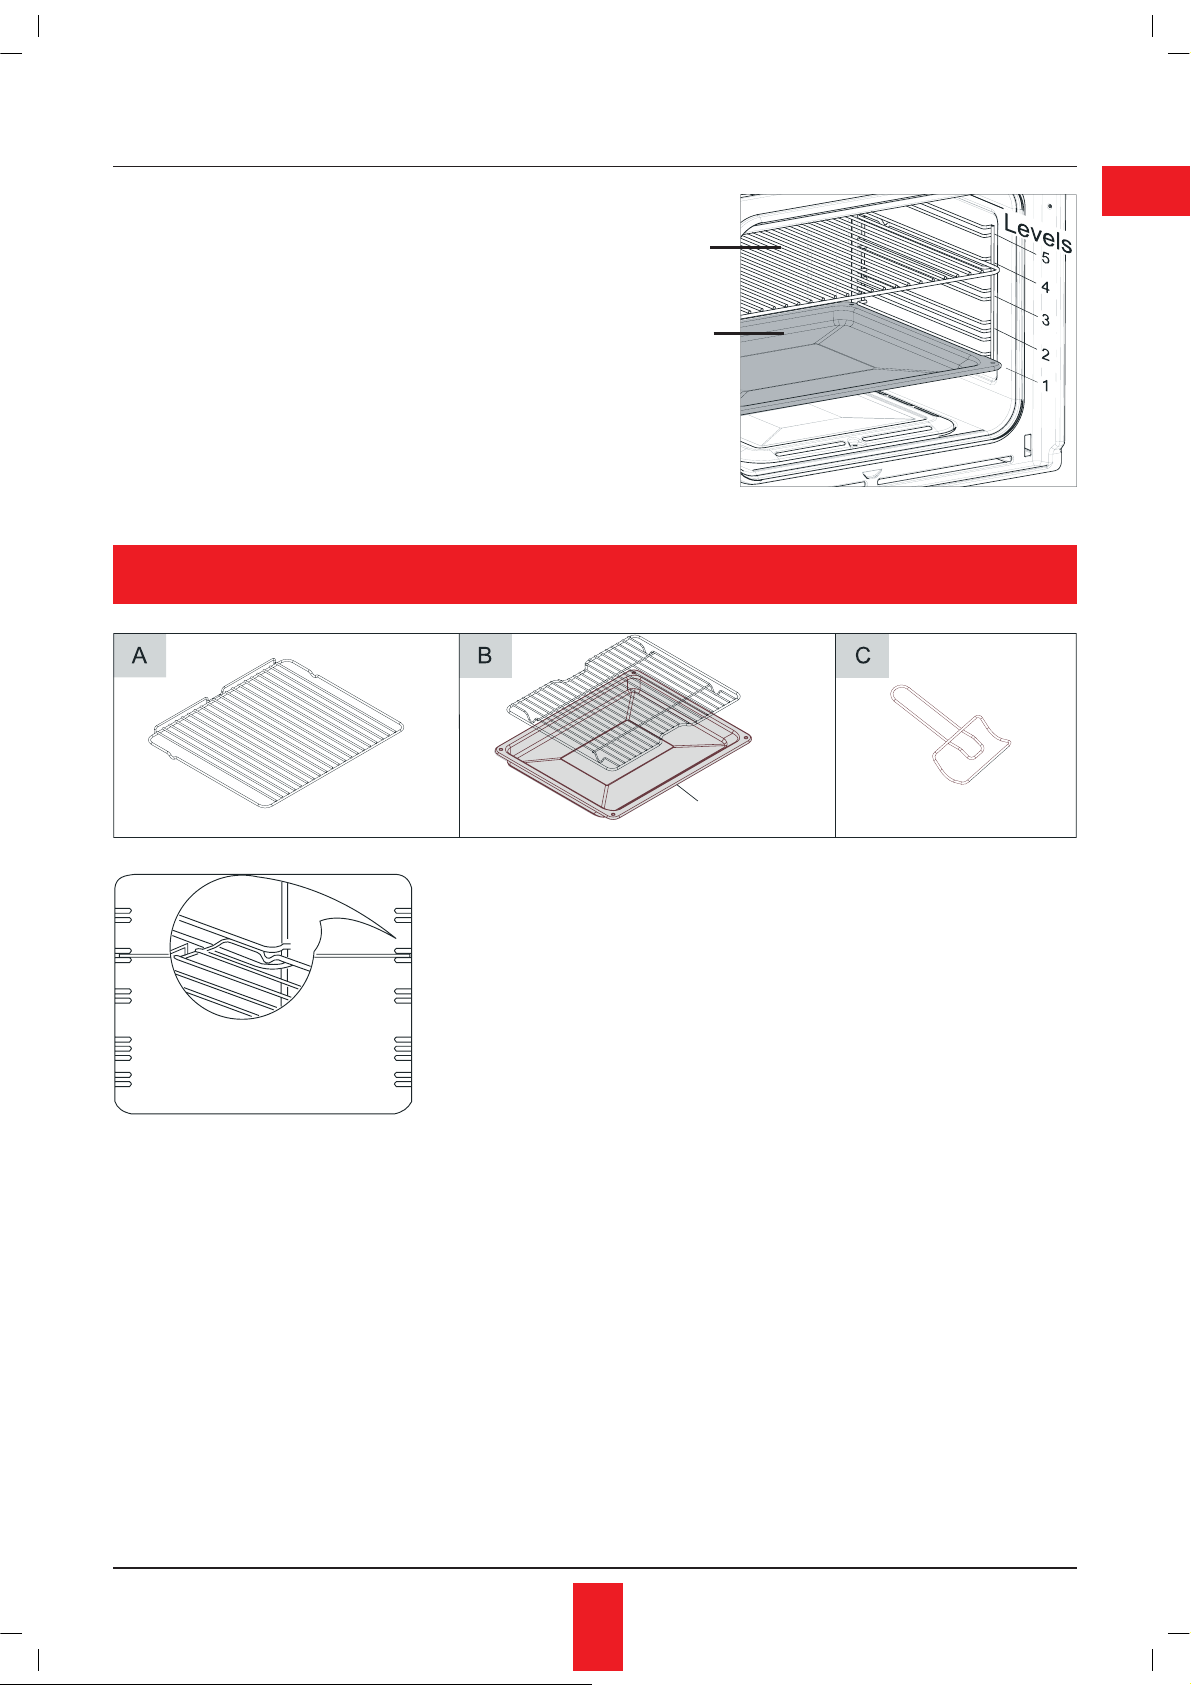
Ɉɩɢɫɚɧɢɟ ɩɪɢɧɚɞɥɟɠɧɨɫɬɟɣ
RU
Ɋɟɲɟɬɤɚ
Ƚɥɭɛɨɤɢɣ
ɩɪɨɬɢɜɟɧɶ
ɞɥɹ ɫɛɨɪɚ
ɫɨɤɚ ɢɥɢ
ɤɚɩɚɸɳɟɝɨ ɠɢɪɚ
Ɋɢɫ. 4
A = Ɋɟɲɟɬɤɚ
B = Ƚɥɭɛɨɤɢɣ ɩɪɨɬɢɜɟɧɶ ɞɥɹ ɫɛɨɪɚ ɫɨɤɚ
ɢɥɢ ɤɚɩɚɸɳɟɝɨ ɠɢɪɚ
D = Ʉɨɦɩɥɟɤɬ ɞɥɹ ɜɵɩɟɤɚɧɢɹ ɧɚ ɝɪɢɥɟ
ɉɪɢɦɟɱɚɧɢɟ: Ɋɟɲɟɬɤɭ ɢ ɩɪɨɬɢɜɟɧɶ ɧɟɨɛɯɨɞɢɦɨ ɭɫɬɚ-
ɧɚɜɥɢɜɚɬɶ ɜ ɝɨɪɢɡɨɧɬɚɥɶɧɵɟ ɩɚɡɵ ɧɚ ɜɧɭɬɪɟɧɧɢɯ ɫɬɟɧɤɚɯ ɞɭɯɨɜɨɝɨ ɲɤɚɮɚ. Ɋɟɲɟɬɤɚ ɭɫɬɚɧɚɜɥɢɜɚɟɬɫɹ ɩɪɢɩɨɞɧɹɬɨɣ ɱɚɫɬɶɸ ɤ ɡɚɞɧɟɣ ɫɬɟɧɤɟ ɞɭɯɨɜɨɝɨ ɲɤɚɮɚ (ɪɢɫ. 4).
ǼȣșȎȔȒȎȬȧȖȗ ȐȓțȠȖșȭȠȜȞ
ɇɟɤɨɬɨɪɵɟ ɦɨɞɟɥɢ ɨɛɨɪɭɞɨɜɚɧɵ ɬɚɧɝɟɧɰɢɚɥɶɧɵɦ ɨɯɥɚɠɞɚɸɳɢɦ ɜɟɧɬɢɥɹɬɨɪɨɦ
9
Page 10
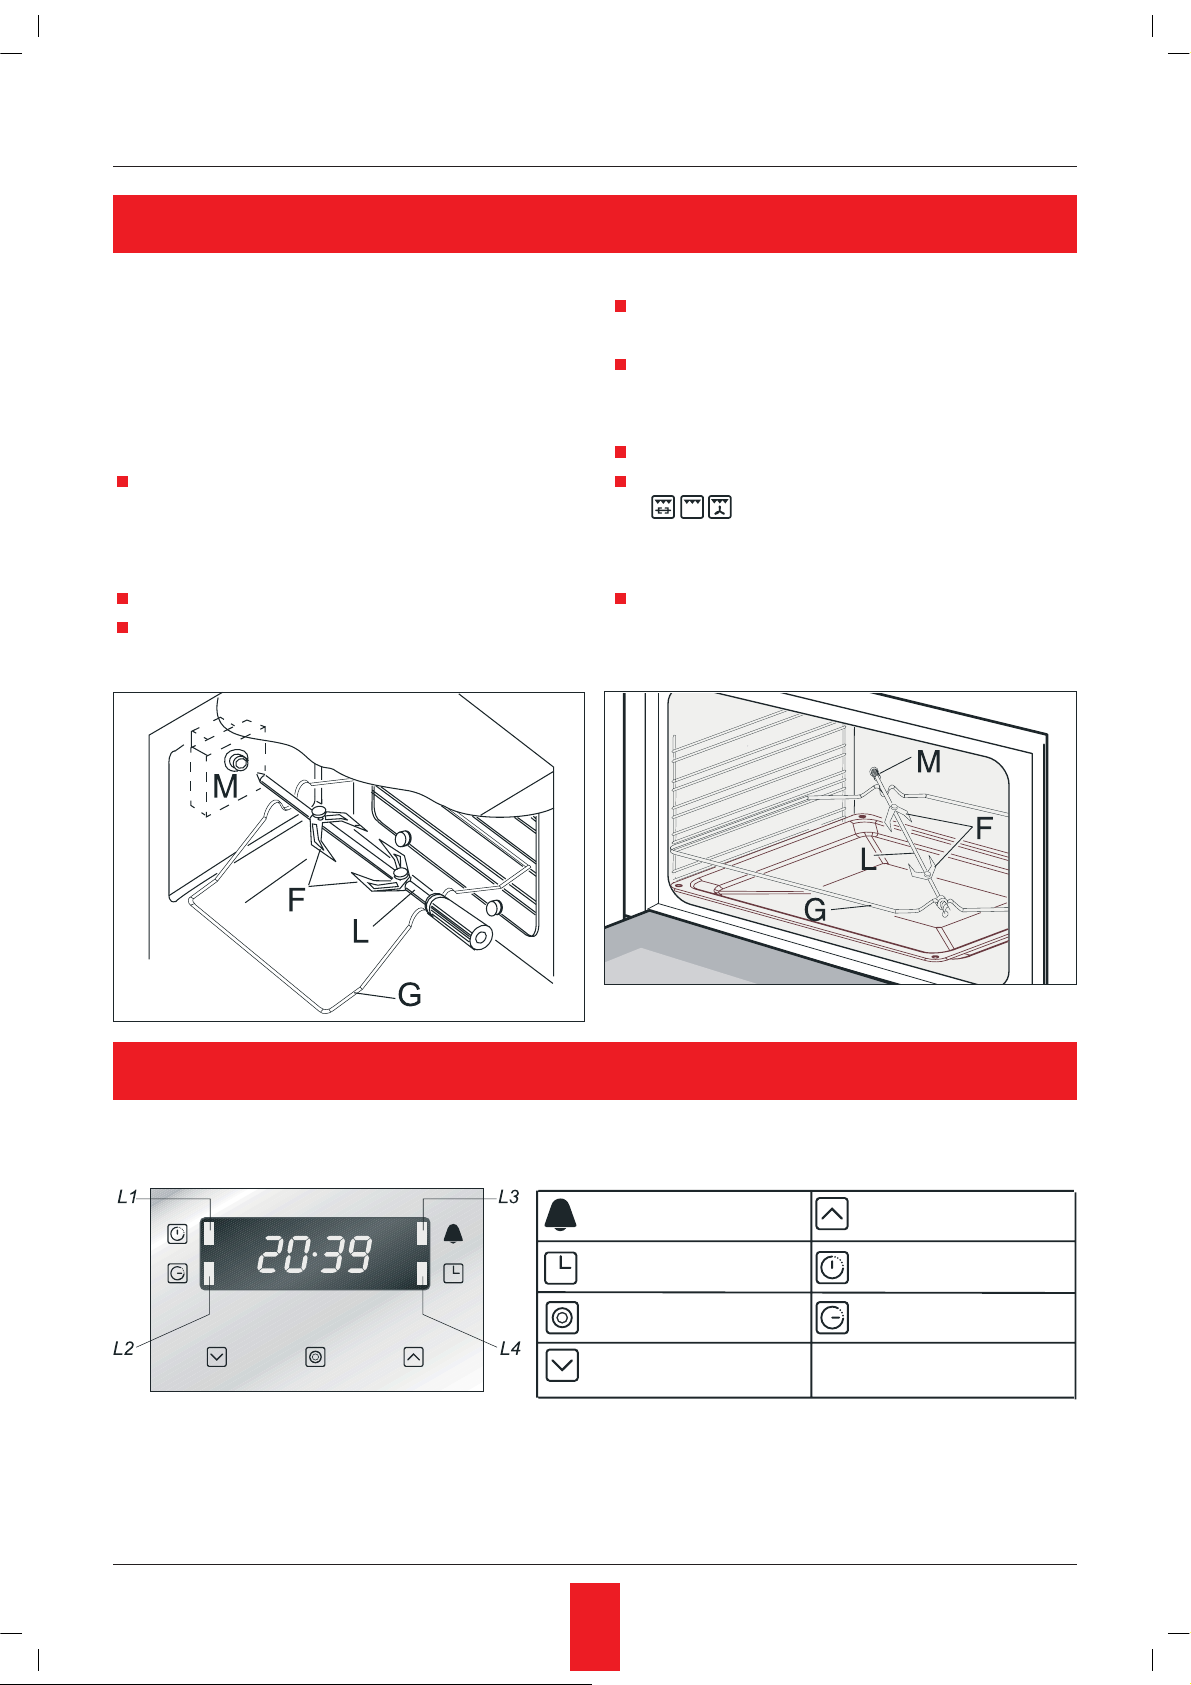
ȼɟɪɬɟɥ (ɨɩɰɢɹ)
ȼɟɪɬɟɥ ɹɜɥɹɟɬɫɹ ɧɟɨɛɹɡɚɬɟɥɶɧɨɣ ɩɪɢɧɚɞɥɟɠɧɨɫɬɶɸ, ɞɨɫɬɭɩɧɨɣ ɜ ɧɟɤɨɬɨɪɵɯ ɦɨɞɟɥɹɯ. ɐɟɧɬɪɚɥɶɧɵɣ ɝɪɢɥɶ - ɫɦɨɬɪɢ ɪɢɫ. 5.
Ⱦɢɚɝɨɧɚɥɶɧɵɣ ɝɪɢɥɶ - ɫɦɨɬɪɢ ɪɢɫ. 5A.
ǶȟȝȜșȪȕȜȐȎțȖȓ ȐȓȞȠȓșȎ
ɇɚɧɢɠɢɬɟ ɤɭɪɢɰɭ ɢɥɢ ɤɭɫɨɱɤɢ ɦɹɫɚ ɞɥɹ
ɠɚɪɤɢ ɧɚ ɧɢɠɧɢɣ ɜɟɪɬɟɥ L, ɭɛɟɞɢɬɟɫɶ ɜ
ɬɨɦ, ɱɬɨ ɩɪɨɞɭɤɬɵ ɧɚɞɟɠɧɨ ɡɚɤɪɟɩɥɟɧɵ
ɦɟɠɞɭ ɞɜɭɦɹ ɡɚɠɢɦɚɦɢ F (ɪɢɫ. 5).
ɉɨɥɨɠɢɬɟ ɜɟɪɬɟɥ ɧɚ ɩɨɞɫɬɚɜɤɭ G
ɉɨɦɟɫɬɢɬɟ ɩɨɞɫɬɚɜɤɭ G ɩɨɥɧɨɫɬɶɸ ɜ ɞɭɯɨ-
ɜɨɣ ɲɤɚɮ.
Ɂɚɤɪɟɩɢɬɟ ɤɨɧɟɰ ɜɟɪɬɟɥɚ ɜ ɦɭɮɬɟ ɦɨɬɨɪɚ
M ɧɚ ɡɚɞɧɟɣ ɫɬɟɧɤɟ ɞɭɯɨɜɨɝɨ ɲɤɚɮɚ
ɉɨɦɟɫɬɢɬɟ ɝɥɭɛɨɤɢɣ ɩɪɨɬɢɜɟɧɶ ɫ ɧɟɛɨɥɶ-
ɲɢɦ ɤɨɥɢɱɟɫɬɜɨɦ ɜɨɞɵ ɜ ɫɚɦɵɣ ɧɢɡ ɞɭɯɨ-
ɜɨɝɨ ɲɤɚɮɚ.
Ɂɚɤɪɨɣɬɟ ɞɜɟɪɰɭ ɞɭɯɨɜɨɝɨ ɲɤɚɮɚ.
ɉɨɜɟɪɧɢɬɟ ɪɭɱɤɭ ɜ ɩɨɥɨɠɟɧɢɟ Ƚɪɢɥɶ
(
ɜ ɡɚɜɢɫɢɦɨɫɬɢ ɨɬ ɦɨɞɟɥɢ) ɞɥɹ
ɬɨɝɨ, ɱɬɨɛɵ ɩɪɢɜɟɫɬɢ ɜ ɞɜɢɠɟɧɢɟ ɦɨɬɨɪ
ɝɪɢɥɹ.
Ⱦɥɹ ɬɨɝɨ, ɱɬɨɛɵ ɢɡɜɥɟɱɶ ɝɪɢɥɶ, ɩɨɬɹɧɢɬɟ
ɡɚ ɩɨɞɫɬɚɜɤɭ G. ɉɨɥɶɡɭɣɬɟɫɶ ɤɭɯɨɧɧɨɣ
ɩɪɢɯɜɚɬɤɨɣ
Ɋɢɫ. 5 Ɋɢɫ. 5Ⱥ
ɂɧɫɬɪɭɤɰɢɢ ɩɨ ɩɨɥɶɡɨɜɚɧɢɸ ɷɥɟɦɟɧɬɚɦɢ
ɭɩɪɚɜɥɟɧɢɹ ɞɭɯɨɜɵɦ ɲɤɚɮɨɦ (ɜ ɡɚɜɢɫɢɦɨɫɬɢ ɨɬ ɦɨɞɟɥɢ)
ɉɪɨɝɪɚɦɦɢɪɭɟɦɵɟ ɱɚɫɵ ɫ ɫɟɧɫɨɪɧɵɦ ɭɩɪɚɜɥɟɧɢɟɦ (Ɋɢɫ. 6)
ɂɧɬɟɪɜɚɥɶɧɵɣ ɬɚɣɦɟɪ
ɑɚɫɵ
ȼɵɛɨɪ ɪɟɠɢɦɚ
ɍɦɟɧɶɲɟɧɢɟ ɜɪɟɦɟɧɢ
Ɋɢɫ. 6
ɍɜɟɥɢɱɟɧɢɟ ɜɪɟɦɟɧɢ
Ⱦɥɢɬɟɥɶɧɨɫɬɶ
ɩɪɢɝɨɬɨɜɥɟɧɢɹ
Ⱥɜɬɨɦɚɬɢɱɟɫɤɨɟ
ɨɬɤɥɸɱɟɧɢɟ
L1-L2-L3-L4 ɫɜɟɬɨɞɢɨɞɧɵɟ ɢɧɞɢɤɚɬɨɪɵ
10
Page 11
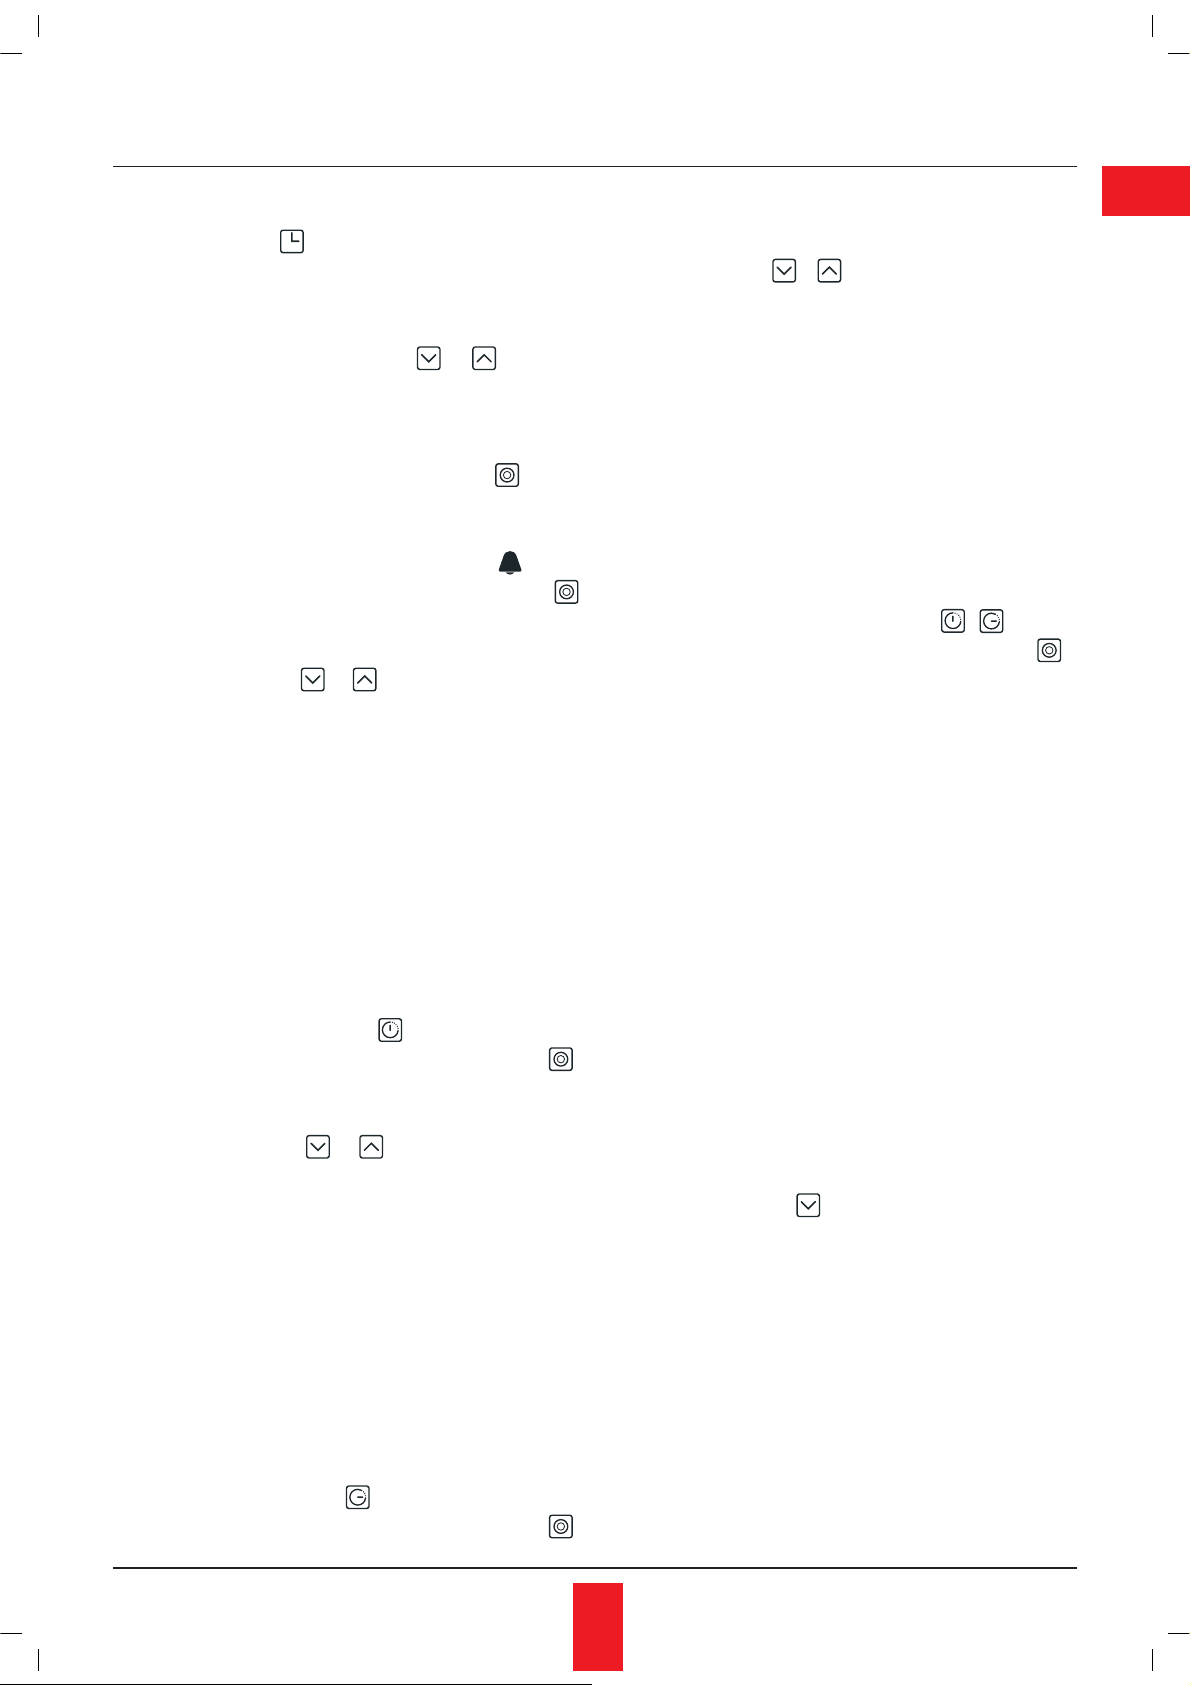
ȁȟȠȎțȜȐȘȎ ȠȓȘȡȧȓȑȜ
ȐȞȓȚȓțȖ
ɉɨɫɥɟ ɩɨɞɤɥɸɱɟɧɢɹ ɩɪɢɛɨɪɚ ɤ ɷɥɟɤɬɪɨɫɟɬɢ
ɞɢɫɩɥɟɣ ɩɨɤɚɡɵɜɚɟɬ 12.00 ɢ ɫɜɟɬɨɞɢɨɞɧɵɣ
ɢɧɞɢɤɚɬɨɪ L4 ɦɢɝɚɟɬ. ɍɫɬɚɧɨɜɢɬɟ ɜɪɟɦɹ ɩɭɬɟɦ
ɧɚɠɚɬɢɹ ɤɧɨɩɨɤ ɭɩɪɚɜɥɟɧɢɹ
ɩɹɬɶ ɫɟɤɭɧɞ ɭɫɬɚɧɨɜɥɟɧɧɨɟ ɜɪɟɦɹ ɫɨɯɪɚɧɢɬɫɹ ɢ ɢɧɞɢɤɚɬɨɪ L4 ɨɬɤɥɸɱɢɬɫɹ. ȼ ɞɚɥɶɧɟɣɲɟɦ
ɞɥɹ ɬɨɝɨ, ɱɬɨɛɵ ɢɡɦɟɧɢɬɶ ɜɪɟɦɹ, ɭɞɟɪɠɢɜɚɣɬɟ ɧɚɠɚɬɨɣ ɤɧɨɩɤɭ «ȼɵɛɨɪ ɪɟɠɢɦɚ»
ɧɟ ɡɚɝɨɪɢɬɫɹ ɢɧɞɢɤɚɬɨɪ L4.
ɢ , ɫɩɭɫɬɹ
, ɩɨɤɚ
ǶțȠȓȞȐȎșȪțȩȗ ȠȎȗȚȓȞ
ɇɚɠɢɦɚɣɬɟ ɤɧɨɩɤɭ «ȼɵɛɨɪ ɪɟɠɢɦɚ»
, ɩɨɤɚ ɧɟ ɡɚɝɨɪɢɬɫɹ ɢɧɞɢɤɚɬɨɪ L3, ɡɚɬɟɦ ɭɫ-
ɬɚɧɨɜɢɬɟ ɠɟɥɚɟɦɨɟ ɜɪɟɦɹ ɩɪɢɝɨɬɨɜɥɟɧɢɹ,
ɢɫɩɨɥɶɡɭɹ ɤɧɨɩɤɢ
ɜɢɬɶ ɜɪɟɦɹ ɜ ɩɪɟɞɟɥɚɯ ɨɬ 0,01 ɞɨ 2,30 ɱ. ɇɚ
ɞɢɫɩɥɟɟ ɨɬɨɛɪɚɡɢɬɫɹ ɭɫɬɚɧɨɜɥɟɧɧɨɟ ɜɪɟɦɹ,
ɢ ɢɧɞɢɤɚɬɨɪ L3 ɩɪɨɞɨɥɠɢɬ ɝɨɪɟɬɶ. ɉɨ ɢɫɬɟɱɟɧɢɢ ɭɫɬɚɧɨɜɥɟɧɧɨɝɨ ɜɪɟɦɟɧɢ ɞɭɯɨɜɨɣ ɲɤɚɮ
ɨɬɤɥɸɱɢɬɫɹ ɚɜɬɨɦɚɬɢɱɟɫɤɢ, ɪɚɡɞɚɫɬɫɹ ɡɜɭɤɨɜɨɣ ɫɢɝɧɚɥ (2 ɫɢɝɧɚɥɚ ɤɚɠɞɵɟ 2 ɫɟɤɭɧɞɵ) ɢ
ɡɚɦɢɝɚɟɬ ɢɧɞɢɤɚɬɨɪ L3. Ⱦɥɹ ɬɨɝɨ, ɱɬɨɛɵ ɩɪɟɪɜɚɬɶ ɡɜɭɤɨɜɨɣ ɫɢɝɧɚɥ ɢ ɨɬɤɥɸɱɢɬɶ ɢɧɞɢɤɚɬɨɪ
L3, ɧɚɠɦɢɬɟ ɥɸɛɭɸ ɤɧɨɩɤɭ
ɢ . ȼɨɡɦɨɠɧɨ ɭɫɬɚɧɨ-
.
DzșȖȠȓșȪțȜȟȠȪ
ȝȞȖȑȜȠȜȐșȓțȖȭ
ɇɚɠɢɦɚɣɬɟ ɤɧɨɩɤɭ «ȼɵɛɨɪ ɪɟɠɢɦɚ» ,
ɩɨɤɚ ɧɟ ɡɚɝɨɪɢɬɫɹ ɢɧɞɢɤɚɬɨɪ L1. ɍɫɬɚɧɨɜɢɬɟ ɠɟɥɚɟɦɭɸ ɞɥɢɬɟɥɶɧɨɫɬɶ ɩɪɢɝɨɬɨɜɥɟɧɢɹ,
ɢɫɩɨɥɶɡɭɹ ɤɧɨɩɤɢ
ɧɨɜɢɬɶ ɜɪɟɦɹ ɜ ɩɪɟɞɟɥɚɯ ɨɬ 0.01 ɞɨ 10.00ɱ):
ɫɩɭɫɬɹ ɩɹɬɶ ɫɟɤɭɧɞ ɜɪɟɦɹ ɫɨɯɪɚɧɢɬɫɹ ɢ
ɢɧɞɢɤɚɬɨɪ L1 ɩɪɨɞɨɥɠɢɬ ɝɨɪɟɬɶ. ɉɨ ɢɫɬɟɱɟɧɢɢ ɭɫɬɚɧɨɜɥɟɧɧɨɝɨ ɜɪɟɦɟɧɢ ɞɭɯɨɜɨɣ ɲɤɚɮ
ɨɬɤɥɸɱɢɬɫɹ ɚɜɬɨɦɚɬɢɱɟɫɤɢ, ɪɚɡɞɚɫɬɫɹ ɡɜɭɤɨɜɨɣ ɫɢɝɧɚɥ (4 ɫɢɝɧɚɥɚ ɤɚɠɞɵɟ 2 ɫɟɤɭɧɞɵ)
ɢ ɡɚɝɨɪɢɬɫɹ ɢɧɞɢɤɚɬɨɪ L1. Ⱦɥɹ ɬɨɝɨ, ɱɬɨɛɵ
ɩɪɟɪɜɚɬɶ ɡɜɭɤɨɜɨɣ ɫɢɝɧɚɥ ɢ ɨɬɤɥɸɱɢɬɶ ɢɧɞɢɤɚɬɨɪ L1, ɧɚɠɦɢɬɟ ɥɸɛɭɸ ɤɧɨɩɤɭ.
ɢ , (ɜɨɡɦɨɠɧɨ ɭɫɬɚ-
ɩɨɤɚ ɧɟ ɡɚɝɨɪɢɬɫɹ ɢɧɞɢɤɚɬɨɪ L2. ɍɫɬɚɧɨɜɢɬɟ
ɧɭɠɧɨɟ ɜɪɟɦɹ ɨɤɨɧɱɚɧɢɹ ɩɪɢɝɨɬɨɜɥɟɧɢɹ, ɢɫɩɨɥɶɡɭɹ ɤɧɨɩɤɢ
23.59): ɫɩɭɫɬɹ ɩɹɬɶ ɫɟɤɭɧɞ ɜɪɟɦɹ ɨɤɨɧɱɚɧɢɹ
ɩɪɢɝɨɬɨɜɥɟɧɢɹ ɫɨɯɪɚɧɢɬɫɹ, ɢ ɢɧɞɢɤɚɬɨɪ L2
ɩɪɨɞɨɥɠɢɬ ɝɨɪɟɬɶ. ȼ ɭɫɬɚɧɨɜɥɟɧɧɨɟ ɜɪɟɦɹ
ɞɭɯɨɜɨɣ ɲɤɚɮ ɨɬɤɥɸɱɢɬɫɹ ɚɜɬɨɦɚɬɢɱɟɫɤɢ,
ɪɚɡɞɚɫɬɫɹ ɡɜɭɤɨɜɨɣ ɫɢɝɧɚɥ (4 ɫɢɝɧɚɥɚ ɤɚɠɞɵɟ 2 ɫɟɤɭɧɞɵ) ɢ ɡɚɦɢɝɚɟɬ ɢɧɞɢɤɚɬɨɪ L2.
Ⱦɥɹ ɬɨɝɨ, ɱɬɨɛɵ ɩɪɟɪɜɚɬɶ ɡɜɭɤɨɜɨɣ ɫɢɝɧɚɥ
ɢ ɨɬɤɥɸɱɢɬɶ ɢɧɞɢɤɚɬɨɪ L2, ɧɚɠɦɢɬɟ ɥɸɛɭɸ
ɤɧɨɩɤɭ.
ɢ (ɦɚɤɫɢɦɚɥɶɧɨɟ ɜɪɟɦɹ
ǮȐȠȜȚȎȠȖȥȓȟȘȜȓ ȐȘșȬȥȓțȖȓ Ȗ ȐȩȘșȬȥȓțȖȓ
ɇɚɠɢɦɚɣɬɟ ɤɧɨɩɤɭ «ȼɵɛɨɪ ɪɟɠɢɦɚ» ,
ɩɨɤɚ ɧɟ ɡɚɝɨɪɢɬɫɹ ɢɧɞɢɤɚɬɨɪ L1. ɍɫɬɚɧɨɜɢɬɟ
ɠɟɥɚɟɦɨɟ ɜɪɟɦɹ ɩɪɢɝɨɬɨɜɥɟɧɢɹ, ɤɚɤ ɨɩɢɫɚɧɨ ɜ ɪɚɡɞɟɥɟ “Ⱦɥɢɬɟɥɶɧɨɫɬɶ ɩɪɢɝɨɬɨɜɥɟ-
ɧɢɹ”. ɇɚɠɢɦɚɣɬɟ ɤɧɨɩɤɭ «ȼɵɛɨɪ ɪɟɠɢɦɚ»,
ɩɨɤɚ ɧɟ ɡɚɝɨɪɢɬɫɹ ɢɧɞɢɤɚɬɨɪ L2, ɡɚɬɟɦ ɭɫɬɚɧɨɜɢɬɟ ɠɟɥɚɟɦɨɟ ɜɪɟɦɹ ɨɤɨɧɱɚɧɢɹ ɩɪɢɝɨɬɨɜɥɟɧɢɹ, ɤɚɤ ɨɩɢɫɚɧɨ ɜ ɪɚɡɞɟɥɟ “Ⱥɜɬɨ-
ɦɚɬɢɱɟɫɤɨɟ ɨɬɤɥɸɱɟɧɢɟ”. Ⱦɭɯɨɜɨɣ ɲɤɚɮ
ɚɜɬɨɦɚɬɢɱɟɫɤɢ ɜɤɥɸɱɢɬɫɹ ɜ ɧɭɠɧɨɟ ɜɪɟɦɹ,
ɢɫɯɨɞɹ ɢɡ ɫɥɟɞɭɸɳɟɝɨ
ɱɚɧɢɹ ɩɪɢɝɨɬɨɜɥɟɧɢɹ ɦɢɧɭɫ ɞɥɢɬɟɥɶɧɨɫɬɶ
ɩɪɢɝɨɬɨɜɥɟɧɢɹ. ɇɚɩɪɢɦɟɪ, ɟɫɥɢ ɜɪɟɦɹ ɨɤɨɧɱɚɧɢɹ ɩɪɢɝɨɬɨɜɥɟɧɢɹ ɭɫɬɚɧɨɜɥɟɧɨ ɧɚ 12.00,
ɚ ɞɥɢɬɟɥɶɧɨɫɬɶ ɩɪɢɝɨɬɨɜɥɟɧɢɹ ɫɨɫɬɚɜɥɹɟɬ
1.30, ɞɭɯɨɜɨɣ ɲɤɚɮ ɜɤɥɸɱɢɬɫɹ ɜ 10.30 ɢɜɵɤɥɸɱɢɬɫɹ ɜ 12.00.
ɪɚɫɱɟɬɚ: ɜɪɟɦɹ ɨɤɨɧ-
ǼȠȚȓțȎ ȕȎȒȎțțȩȣ
ȝȞȜȑȞȎȚȚ
ɉɪɨɝɪɚɦɦɚ ɦɨɠɟɬ ɛɵɬɶ ɜ ɥɸɛɨɟ ɜɪɟɦɹ
ɨɬɦɟɧɟɧɚ, ɟɫɥɢ ɟɳɟ ɪɚɡ ɜɵɛɪɚɬɶ ɧɭɠɧɭɸ
ɮɭɧɤɰɢɸ ɢ ɩɟɪɟɭɫɬɚɧɨɜɢɬɶ ɜɪɟɦɹ ɧɚ 0, ɢɫɩɨɥɶɡɭɹ ɤɧɨɩɤɢ.
ȼɨ ɜɪɟɦɹ ɪɚɛɨɬɵ ɡɚɞɚɧɧɨɣ ɩɪɨɝɪɚɦɦɵ
ɞɭɯɨɜɨɝɨ ɲɤɚɮɚ ɧɟɥɶɡɹ ɭɫɬɚɧɚɜɥɢɜɚɬɶ ɬɟɤɭɳɟɟ ɜɪɟɦɹ.
RU
ǮȐȠȜȚȎȠȖȥȓȟȘȜȓ
ȜȠȘșȬȥȓțȖȓ
ɇɚɠɢɦɚɣɬɟ ɤɧɨɩɤɭ «ȼɵɛɨɪ ɪɟɠɢɦɚ» ,
11
Page 12

ɉɪɨɝɪɚɦɦɢɪɭɟɦɵɟ ɱɚɫɵ ɫ ɬɪɟɦɹ ɤɧɨɩɤɚɦɢ (Ɋɢɫ. 7)
Ɍɟɤɭɳɟɟ ɜɪɟɦɹ
Ȼɥɨɤɢɪɨɜɤɚ ɤɧɨɩɨɤ
Ɂɚɳɢɬɧɨɟ ɨɬɤɥɸɱɟɧɢɟ
ɂɧɬɟɪɜɚɥɶɧɵɣ ɬɚɣɦɟɪ
ɉɪɨɰɟɫɫ ɩɪɢɝɨɬɨɜɥɟɧɢɹ
ȼɢɞ ɫɩɟɪɟɞɢ:
(Ɋ1) Ʉɧɨɩɤɚ «Ɇɢɧɭɫ»
(Ɋ2) Ʉɧɨɩɤɚ «ȼɵɛɨɪ ɪɟɠɢɦɚ»
(Ɋ3)Ʉɧɨɩɤɚ «ɉɥɸɫ»
ȁȟȠȎțȜȐȘȎ ȠȓȘȡȧȓȑȜ
ȐȞȓȚȓțȖ
ɉɪɢɦɟɱɚɧɢɟ: Ɍɟɤɭɳɟɟ ɜɪɟɦɹ ɦɨɠɧɨ ɭɫɬɚ-
ɧɨɜɢɬɶ, ɟɫɥɢ ɪɭɱɤɚ ɜɵɛɨɪɚ ɮɭɧɤɰɢɢ ɞɭɯɨɜɨɝɨ ɲɤɚɮɚ ɧɚɯɨɞɢɬɫɹ ɜ ɩɨɥɨɠɟɧɢɢ «0»! ɉɨɫɥɟ
ɜɤɥɸɱɟɧɢɹ ɞɭɯɨɜɨɝɨ ɲɤɚɮɚ ɜ ɫɟɬɶ ɧɚ ɞɢɫɩɥɟɟ ɩɨɹɜɢɬɫɹ “12.00” ɢ ɡɚɝɨɪɢɬɫɹ ɢɧɞɢɤɚɬɨɪ
ɬɟɤɭɳɟɝɨ ɜɪɟɦɟɧɢ
ɳɟɝɨ ɜɪɟɦɟɧɢ ɢɫɩɨɥɶɡɭɣɬɟ ɤɧɨɩɤɢ “ɩɥɸɫ” ɢ
“ɦɢɧɭɫ”, (ɤɚɠɞɨɟ ɧɚɠɚɬɢɟ ɢɡɦɟɧɹɟɬ ɜɪɟɦɹ
ɧɚ ɨɞɧɭ ɦɢɧɭɬɭ). Ɍɟɩɟɪɶ ɜɪɟɦɹ ɨɬɫɱɢɬɵɜɚɟɬɫɹ ɫ ɬɨɱɧɨɫɬɶɸ ɞɨ ɫɟɤɭɧɞ. ɋ ɷɬɨɝɨ ɦɨɦɟɧɬɚ
ɬɚɣɦɟɪ ɞɨɫɬɭɩɟɧ ɜ “ɪɭɱɧɨɦ” ɪɟɠɢɦɟ.
ɉɪɢɦɟɱɚɧɢɟ: ȿɫɥɢ ɜɩɨɫɥɟɞɫɬɜɢɢ ȼɚɦ
ɩɨɬɪɟɛɭɟɬɫɹ ɢɡɦɟɧɢɬɶ ɜɪɟɦɹ, ɧɚɠɦɢɬɟ ɤɧɨɩɤɭ ”ȼɵɛɨɪ ɪɟɠɢɦɚ”, ɱɬɨɛɵ ɡɚɝɨɪɟɥɫɹ ɢɧɞɢɤɚɬɨɪ
ɩɪɨɞɟɥɚɣɬɟ ɭɤɚɡɚɧɧɨɟ ɜɵɲɟ.
ɬɟɤɭɳɟɝɨ ɜɪɟɦɟɧɢ
. Ⱦɥɹ ɭɫɬɚɧɨɜɤɢ ɬɟɤɭ-
ɢ ɩɨɫɥɟ ɷɬɨɝɨ
ȁȟȠȎțȜȐȘȎ ȖțȠȓȞȐȎșȪțȜȑȜ
ȠȎȗȚȓȞȎ
Ɍɚɣɦɟɪ ɦɨɠɧɨ ɭɫɬɚɧɨɜɢɬɶ ɧɚ ɥɸɛɨɟ ɜɪɟɦɹ ɨɬ 0:00 ɞɨ 23:59.
ɇɚɠɢɦɚɣɬɟ ɤɧɨɩɤɭ “ȼɵɛɨɪ ɪɟɠɢɦɚ”, ɩɨɤɚ
ɧɟ ɡɚɝɨɪɟɥɫɹ ɢɧɞɢɤɚɬɨɪ ɢɧɬɟɪɜɚɥɶɧɨɝɨ ɬɚɣɦɟɪɚ
ɉɪɢɦɟɱɚɧɢɟ: ȿɫɥɢ ɜ ɬɟɱɟɧɢɟ 5 ɫɟɤɭɧɞ ȼɵ
ɧɟ ɜɜɟɞɟɬɟ ɧɭɠɧɨɟ ɜɪɟɦɹ, ɧɚ ɞɢɫɩɥɟɟ ɫɧɨɜɚ
.
Ɉɤɨɧɱɚɧɢɟ ɩɪɢɝɨɬɨɜɥɟɧɢɹ
Ɋɢɫ. 7
ɨɬɨɛɪɚɡɢɬɫɹ ɬɟɤɭɳɟɟ ɜɪɟɦɹ. Ⱦɥɹ ɜɜɟɞɟɧɢɹ
ɧɟɨɛɯɨɞɢɦɨɝɨ ɡɧɚɱɟɧɢɹ ɢɫɩɨɥɶɡɭɣɬɟ ɤɧɨɩɤɢ
“ɩɥɸɫ” ɢ “ɦɢɧɭɫ” (ɤɚɠɞɨɟ ɧɚɠɚɬɢɟ ɢɡɦɟɧɹɟɬ
ɜɪɟɦɹ ɧɚ ɨɞɧɭ ɦɢɧɭɬɭ), ɞɥɹ ɩɨɞɬɜɟɪɠɞɟɧɢɹ
ɜɜɟɞɟɧɧɨɝɨ ɡɧɚɱɟɧɢɹ ɧɚɠɦɢɬɟ ɤɧɨɩɤɭ “ȼɵɛɨɪ ɪɟɠɢɦɚ”, ɧɚ ɞɢɫɩɥɟɟ ɫɧɨɜɚ ɩɨɹɜɢɬɫɹ
ɬɟɤɭɳɟɟ ɜɪɟɦɹ. ɇɚ ɞɢɫɩɥɟɟ ɬɚɤɠɟ
ɢɧɞɢɤɚɬɨɪ ɢɧɬɟɪɜɚɥɶɧɨɝɨ ɬɚɣɦɟɪɚ
ɢɫɬɟɱɟɧɢɢ ɭɫɬɚɧɨɜɥɟɧɧɨɝɨ ɜɪɟɦɟɧɢ ɪɚɡɞɚɫɬ-
ɫɹ ɡɜɭɤɨɜɨɣ ɫɢɝɧɚɥ (.. ..) (ɬɨ ɟɫɬɶ ɩɚɭɡɚ ɩɨɫɥɟ
ɤɚɠɞɵɯ ɞɜɭɯ ɫɢɝɧɚɥɨɜ). ɂɧɞɢɤɚɬɨɪ ɬɚɣɦɟɪɚ
ɧɚ ɞɢɫɩɥɟɟ ɧɚɱɧɟɬ ɦɢɝɚɬɶ. Ɂɜɭɤɨɜɨɣ ɫɢɝɧɚɥ ɩɪɟɤɪɚɬɢɬɫɹ ɩɪɢɦɟɪɧɨ ɱɟɪɟɡ 1 ɦɢɧɭɬɭ,
ɧɨ ɢɧɞɢɤɚɬɨɪ ɬɚɣɦɟɪɚ
Ⱦɥɹ ɬɨɝɨ, ɱɬɨɛɵ ɜɵɣɬɢ ɢɡ ɷɬɨɝɨ ɪɟɠɢɦɚ, ɧɚɠɦɢɬɟ ɥɸɛɭɸ ɤɧɨɩɤɭ. ȼɵ ɬɚɤɠɟ ɦɨɠɟɬɟ ɩɪɟɪɜɚɬɶ ɡɜɭɤɨɜɨɣ ɫɢɝɧɚɥ, ɧɚɠɚɜ ɥɸɛɭɸ ɤɧɨɩɤɭ.
ɩɪɨɞɨɥɠɢɬ ɦɢɝɚɬɶ
ɡɚɝɨɪɢɬɫɹ
. ɉɨ
ȁȟȠȎțȜȐȘȎ ȝȞȜȑȞȎȚȚ
ȝȞȖȑȜȠȜȐșȓțȖȭ ȝȖȧȖ.
ɉɪɨɰɟɫɫ ɩɪɢɝɨɬɨɜɥɟɧɢɹ
Ⱦɚɧɧɚɹ ɩɪɨɝɪɚɦɦɚ ɩɨɡɜɨɥɹɟɬ, ɚɜɬɨɦɚɬɢɱɟɫɤɢ ɜɤɥɸɱɢɬɶ ɞɭɯɨɜɨɣ ɲɤɚɮ ɧɚ ɭɫɬɚɧɨɜɥɟɧɧɵɣ ɩɟɪɢɨɞ ɜɪɟɦɟɧɢ ɩɭɬɟɦ ɫɦɟɧɵ ɬɚɣɦɟɪɨɜ.
ɉɪɢɦɟɱɚɧɢɟ: ȼɪɟɦɹ ɪɚɛɨɬɵ ɞɭɯɨɜɨɝɨ
ɲɤɚɮɚ ɦɨɠɧɨ ɭɫɬɚɧɨɜɢɬɶ, ɟɫɥɢ ɪɭɱɤɚ ɜɵɛɨɪɚ ɮɭɧɤɰɢɢ ɧɚɯɨɞɢɬɫɹ ɜ ɩɨɥɨɠɟɧɢɢ “0”! ȿɫɥɢ
12
Page 13

RU
ɜɨ ɜɪɟɦɹ ɜɵɩɨɥɧɟɧɢɹ ɩɪɨɝɪɚɦɦɵ ɩɪɢɝɨɬɨɜɥɟɧɢɹ ɩɢɳɢ ɜɵ ɩɟɪɟɜɟɞɟɬɟ ɪɭɱɤɭ ɜɵɛɨɪɚ
ɮɭɧɤɰɢɢ ɜ ɩɨɥɨɠɟɧɢɟ “0”, ɭɛɟɞɢɬɟɫɶ, ɱɬɨ ɜɫɟ
ɜɜɟɞɟɧɧɵɟ ɞɚɧɧɵɟ ɨɬɦɟɧɟɧɵ!
Ɇɨɠɧɨ ɡɚɞɚɬɶ ɜɪɟɦɹ ɩɪɢɝɨɬɨɜɥɟɧɢɹ ɨɬ
0:00 ɞɨ 23:59. Ⱦɥɹ ɭɫɬɚɧɨɜɤɢ ɩɪɨɝɪɚɦɦɵ
“ɉɪɨɰɟɫɫ ɩɪɢɝɨɬɨɜɥɟɧɢɹ” ɜɵɩɨɥɧɢɬɟ ɫɥɟɞɭ-
ɸɳɟɟ:
ɇɚɠɦɢɬɟ ɢ ɭɞɟɪɠɢɜɚɣɬɟ ɤɧɨɩɤɭ “ȼɵɛɨɪ
ɪɟɠɢɦɚ”
, ɩɨɤɚ ɧɟ ɡɚɝɨɪɢɬɫɹ ɢɧɞɢɤɚɬɨɪ
“ɉɪɨɰɟɫɫ ɩɪɢɝɨɬɨɜɥɟɧɢɹ”. ɇɚ ɞɢɫɩɥɟɟ ɜɦɟɫ-
ɬɨ ɬɟɤɭɳɟɝɨ ɜɪɟɦɟɧɢ ɩɨɹɜɢɬɫɹ 0:00.
ɉɪɢɦɟɱɚɧɢɟ: ɟɫɥɢ ɜ ɬɟɱɟɧɢɟ 5 ɫɟɤɭɧɞ ȼɵ
ɧɟ ɜɜɟɞɟɬɟ ɧɭɠɧɨɟ ɜɪɟɦɹ, ɧɚ ɞɢɫɩɥɟɟ ɫɧɨɜɚ
ɨɬɨɛɪɚɡɢɬɫɹ ɬɟɤɭɳɟɟ ɜɪɟɦɹ.
Ⱦɥɹ ɭɫɬɚɧɨɜɤɢ ɧɭɠɧɨɝɨ ɩɟɪɢɨɞɚ ɜɪɟɦɟɧɢ ɢɫɩɨɥɶɡɭɣɬɟ ɤɧɨɩɤɢ “ɩɥɸɫ” ɢ “ɦɢɧɭɫ”,
(ɤɚɠɞɨɟ ɧɚɠɚɬɢɟ ɢɡɦɟɧɹɟɬ ɜɪɟɦɹ ɧɚ ɨɞɧɭ
ɦɢɧɭɬɭ). ɂɧɞɢɤɚɬɨɪ ɜɪɟɦɟɧɢ
ɪɚɛɨɬɵ
ɩɪɨɞɨɥɠɢɬ ɝɨɪɟɬɶ. ɉɨɞɬɜɟɪɞɢɬɟ ɜɜɨɞ ɧɚɠɚɬɢɟɦ
ɤɧɨɩɤɢ “ȼɵɛɨɪ ɪɟɠɢɦɚ”.
ɉɨ ɢɫɬɟɱɟɧɢɢ ɭɫɬɚɧɨɜɥɟɧɧɨɝɨ ɜɪɟɦɟɧɢ,
ɪɚɡɞɚɟɬɫɹ ɡɜɭɤɨɜɨɣ ɫɢɝɧɚɥ (ɬ.ɟ. ɩɚɭɡɚ ɩɨɫɥɟ
ɤɚɠɞɵɯ ɱɟɬɵɪɟɯ ɫɢɝɧɚɥɨɜ). Ⱦɭɯɨɜɨɣ ɲɤɚɮ
ɜɵɤɥɸɱɢɬɫɹ. ɇɚ ɞɢɫɩɥɟɟ ɨɬɨɛɪɚɡɢɬɫɹ “0:00”
ɢ ɡɚɦɢɝɚɟɬ ɢɧɞɢɤɚɬɨɪ “ɉɪɨɰɟɫɫ ɩɪɢɝɨɬɨɜɥɟɧɢɹ”
. Ɂɜɭɤɨɜɨɣ ɫɢɝɧɚɥ ɩɪɟɤɪɚɬɢɬɫɹ ɩɪɢɦɟɪɧɨ ɱɟɪɟɡ 1 ɦɢɧɭɬɭ, ɧɨ ɢɧɞɢɤɚɬɨɪ “ɉɪɨɰɟɫɫ ɩɪɢɝɨɬɨɜɥɟɧɢɹ”
ɩɪɨɞɨɥɠɚɟɬ ɦɢɝɚɬɶ.
Ⱦɥɹ ɬɨɝɨ, ɱɬɨɛɵɜɵɣɬɢɢɡɬɟɤɭɳɟɝɨɫɨɫɬɨɹɧɢɹ ɢɥɢ ɩɪɟɪɜɚɬɶ ɡɜɭɤɨɜɨɣ ɫɢɝɧɚɥ, ɧɚɠɦɢɬɟ
ɥɸɛɭɸ ɤɧɨɩɤɭ.
Ɉɤɨɧɱɚɧɢɟ ɩɪɢɝɨɬɨɜɥɟɧɢɹ (Ɍɢɩ ɩɪɨɝɪɚɦɦɵ: ɉɪɨɰɟɫɫ ɩɪɢɝɨɬɨɜɥɟɧɢɹ/Ɉɤɨɧɱɚɧɢɟ ɩɪɢɝɨɬɨɜɥɟɧɢɹ)
Ⱦɚɧɧɚɹ ɩɪɨɝɪɚɦɦɚ ɩɨɡɜɨɥɹɟɬ ɡɚɞɚɬɶ
ɬɨɱɧɨɟ ɜɪɟɦɹ ɨɤɨɧɱɚɧɢɹ ɪɚɛɨɬɵ ɫ ɭɱɟɬɨɦ
ɜɪɟɦɟɧɢ ɩɪɢɝɨɬɨɜɥɟɧɢɹ ɜ ɫɥɭɱɚɟ, ɟɫɥɢ ɞɥɢɬɟɥɶɧɨɫɬɶ ɩɪɢɝɨɬɨɜɥɟɧɢɹ ɭɠɟ ɭɫɬɚɧɨɜɥɟɧɚ
(ɭɫɬɚɧɨɜɤɚ ɩɪɨɝɪɚɦɦ ɩɪɢɝɨɬɨɜɥɟɧɢɹ
ɩɢɳɢ >
ɩɪɨɰɟɫɫ ɩɪɢɝɨɬɨɜɥɟɧɢɹ).
ɉɪɢɦɟɱɚɧɢɟ: ȼɪɟɦɹ ɨɤɨɧɱɚɧɢɹ ɪɚɛɨɬɵ
ɦɨɠɧɨ ɭɫɬɚɧɨɜɢɬɶ (ɍɫɬɚɧɨɜɤɚ ɩɪɨɝɪɚɦɦ ɩɪɢɝɨɬɨɜɥɟɧɢɹ ɩɢɳɢ > ɉɪɨɰɟɫɫ ɩɪɢɝɨɬɨɜɥɟɧɢɹ)
ɬɨɥɶɤɨ, ɟɫɥɢ ɢɫɩɨɥɶɡɭɟɬɫɹ ɬɚɣɦɟɪ ɫɨɨɬɜɟɬɫɬɜɭɸɳɟɝɨɬɢɩɚ ɢ ɟɫɥɢ ɪɭɱɤɚ ɜɵɛɨɪɚ ɮɭɧɤɰɢɢ
ɞɭɯɨɜɨɝɨ ɲɤɚɮɚ ɧɚɯɨɞɢɬɫɹ ɜ ɩɨɥɨɠɟɧɢɢ “0”.
ȿɫɥɢ ɩɪɨɝɪɚɦɦɚ ɩɪɢɝɨɬɨɜɥɟɧɢɹ ɩɢɳɢ ɡɚɩɭɳɟɧɚ, ɩɨɠɚɥɭɣɫɬɚ, ɩɪɢ ɩɟɪɟɜɟɞɟɧɢɢ ɪɭɱɤɢ
ɜɵɛɨɪɚ ɮɭɧɤɰɢɢ ɜ ɩɨɥɨɠɟɧɢɟ «0» ɭɛɟɞɢɬɟɫɶ, ɱɬɨ
ɜɫɟ ɜɜɟɞɟɧɧɵɟ ɞɚɧɧɵɟ ɨɬɦɟɧɟɧɵ!
ɇɚɠɢɦɚɣɬɟ ɤɧɨɩɤɭ “ȼɵɛɨɪ ɪɟɠɢɦɚ”, ɩɨɤɚ
ɧɟ ɡɚɝɨɪɢɬɫɹ ɢɧɞɢɤɚɬɨɪ “Ɉɤɨɧɱɚɧɢɟ ɩɪɢɝɨɬɨɜɥɟɧɢɹ”. ɇɚ ɞɢɫɩɥɟɟ ɨɬɨɛɪɚɡɢɬɫɹ ɬɟɤɭɳɟɟ
ɜɪɟɦɹ.
ɉɪɢɦɟɱɚɧɢɟ: ȿɫɥɢ ɜ ɬɟɱɟɧɢɟ 5 ɫɟɤɭɧɞ ȼɵ
ɧɟ ɜɜɟɞɟɬɟ ɧɭɠɧɨɟ ɜɪɟɦɹ, ɬɚɣɦɟɪ ɜɟɪɧɟɬɫɹ ɤ
ɜɵɩɨɥɧɟɧɢɸ ɡɚɞɚɧɧɨɣ ɩɪɨɝɪɚɦɦɵ.
ɇɚɱɢɧɚɹ ɨɬ ɚɤɬɭɚɥɶɧɨɝɨ ɜɪɟɦɟɧɢ, ɭɫɬɚɧɨɜɢɬɟ ɠɟɥɚɟɦɨɟ ɜɪɟɦɹ ɨɤɨɧɱɚɧɢɹ ɪɚɛɨɬɵ,
ɢɫɩɨɥɶɡɭɹ ɤɧɨɩɤɢ
“ɩɥɸɫ” ɢ
“ɦɢɧɭɫ” (ɤɚɠɞɨɟ
ɧɚɠɚɬɢɟ ɢɡɦɟɧɹɟɬ ɜɪɟɦɹ ɧɚ ɨɞɧɭ ɦɢɧɭɬɭ).
ɉɨɤɚ ɧɟ ɧɚɱɢɧɚɟɬɫɹ ɩɪɨɰɟɫɫ ɜɵɩɟɤɚɧɢɹ,
ɢɧɞɢɤɚɬɨɪ “Ɉɤɨɧɱɚɧɢɟ ɩɪɢɝɨɬɨɜɥɟɧɢɹ” ɨɫɬɚɟɬɫɹ ɝɨɪɟɬɶ. Ɉɬɫɱɟɬ ɜɪɟɦɟɧɢ ɧɚɱɚɥɚ ɜɵɩɟɤɚɧɢɹ ɩɪɨɢɡɜɨɞɢɬɫɹ ɩɭɬɟɦ ɜɵɱɢɬɚɧɢɹ ɞɥɢɬɟɥɶɧɨɫɬɢ ɩɪɢɝɨɬɨɜɥɟɧɢɹ ɢɡ ɜɪɟɦɟɧɢ ɨɤɨɧɱɚɧɢɹ
ɪɚɛɨɬɵ. ȼ ɷɬɨɬ ɦɨɦɟɧɬ ɬɚɣɦɟɪ ɩɟɪɟɯɨɞɢɬ ɜ
ɪɟɠɢɦ “ɉɪɨɰɟɫɫ ɩɪɢɝɨɬɨɜɥɟɧɢɹ”. ɂɧɞɢɤɚɬɨɪ
“Ɉɤɨɧɱɚɧɢɟ ɩɪɢɝɨɬɨɜɥɟɧɢɹ” ɜɵɤɥɸɱɢɬɫɹ ɢ
ɜɦɟɫɬɨ ɧɟɝɨ
ɡɚɝɨɪɚɟɬɫɹ ɢɧɞɢɤɚɬɨɪ “ɉɪɨɰɟɫɫ
ɩɪɢɝɨɬɨɜɥɟɧɢɹ” ɢ ɨɫɬɚɜɲɟɟɫɹ ɜɪɟɦɹ ɨɬɨɛɪɚɠɚɟɬɫɹ ɧɚ ɞɢɫɩɥɟɟ.
Ɍɟɤɭɳɚɹ ɩɪɨɝɪɚɦɦɚ ɦɨɠɟɬ ɬɚɤɠɟ ɛɵɬɶ
ɜɵɡɜɚɧɚ ɧɚɠɚɬɢɟɦ ɤɧɨɩɤɢ ɜɵɛɨɪɚ ɪɟɠɢɦɚ
ɗɬɨ ɩɨɡɜɨɥɹɟɬ ɩɪɨɜɟɪɢɬɶ ɢ, ɜɨɡɦɨɠɧɨ, ɢɡɦɟɧɢɬɶ ɜɧɟɫɟɧɧɵɟ ɞɚɧɧɵɟ, ɢɫɩɨɥɶɡɭɹ ɧɭɠɧɵɟ
ɤɧɨɩɤɢ. ȼɨ ɢɡɛɟɠɚɧɢɟ ɨɲɢɛɨɤ ɬɟɤɭɳɟɟ ɜɪɟɦɹ ɧɟɥɶɡɹ ɢɡɦɟɧɢɬɶ ɜɨ ɜɪɟɦɹ ɜɵɩɨɥɧɟɧɢɹ
ɩɪɨɝɪɚɦɦɵ. ɉɨ ɢɫɬɟɱɟɧɢɢ ɭɫɬɚɧɨɜɥɟɧɧɨɝɨ
ɜɪɟɦɟɧɢ ɪɚɡɞɚɫɬɫɹ
ɡɜɭɤɨɜɨɣ ɫɢɝɧɚɥ (ɬ.ɟ.
ɩɚɭɡɚ ɩɨɫɥɟ ɤɚɠɞɵɯ ɱɟɬɵɪɟɯ ɫɢɝɧɚɥɨɜ).
Ⱦɭɯɨɜɨɣ ɲɤɚɮ ɨɬɤɥɸɱɢɬɫɹ. ɇɚ ɞɢɫɩɥɟɟ ɡɚɦɢɝɚɟɬ ɢɧɞɢɤɚɬɨɪ “ɉɪɨɰɟɫɫ ɩɪɢɝɨɬɨɜɥɟɧɢɹ”
ɢ ɨɬɨɛɪɚɠɚɟɬɫɹ 0:00. Ɂɜɭɤ ɩɪɟɤɪɚɳɚɟɬɫɹ ɚɜɬɨɦɚɬɢɱɟɫɤɢ ɫɩɭɫɬɹ 1 ɦɢɧɭɬɭ, ɢɧɞɢɤɚɬɨɪ “ɉɪɨɰɟɫɫ ɩɪɢɝɨɬɨɜɥɟɧɢɹ” ɩɪɨɞɨɥɠɚɟɬ
ɦɢɝɚɬɶ. Ⱦɥɹ ɬɨɝɨ, ɱɬɨɛɵɜɵɣɬɢɢɡɬɟɤɭɳɟɝɨ
ɫɨɫɬɨɹɧɢɹ ɧɚɠɦɢɬɟ ɥɸɛɭɸ ɤɧɨɩɤɭ. ɉɪɟɪɜɚɬɶ
13
Page 14

ɡɜɭɤɨɜɨɣ ɫɢɝɧɚɥ ɦɨɠɧɨ, ɧɚɠɚɜ ɥɸɛɭɸ ɤɧɨɩɤɭ
ɢɥɢ ɩɨɜɟɪɧɭɜ ɪɭɱɤɭ ɜɵɛɨɪɚ ɮɭɧɤɰɢɢ ɜ ɩɨɥɨɠɟɧɢɟ “0”.
ǯșȜȘȖȞȜȐȘȎ ȘțȜȝȜȘ
ɉɪɢ ɚɤɬɢɜɚɰɢɢ ɛɥɨɤɢɪɨɜɤɢ ɤɧɨɩɨɤ ɭɫɬɚɧɨɜɤɚ ɩɪɨɝɪɚɦɦ ɢ ɜɪɟɦɟɧɢ ɫ ɩɨɦɨɳɶɸ ɬɚɣɦɟɪɚ ɫɬɚɧɨɜɢɬɫɹ ɧɟɜɨɡɦɨɠɧɨɣ. ɇɢ ɬɟɤɭɳɟɟ
ɜɪɟɦɹ, ɧɢ ɭɫɬɚɧɨɜɤɚ ɬɚɣɦɟɪɚ, ɧɢ ɢɡɦɟɧɟɧɢɟ
ɬɟɤɭɳɟɣ ɩɪɨɝɪɚɦɦɵ ɩɪɢɝɨɬɨɜɥɟɧɢɹ ɩɢɳɢ ɧɟ
ɦɨɝɭɬ ɛɵɬɶ ɢɡɦɟɧɟɧɵ.
Ⱦɥɹ ɭɫɬɚɧɨɜɤɢ ɛɥɨɤɢɪɨɜɤɢ ɤɧɨɩɨɤ ɜɵɩɨɥɧɢɬɟ ɫɥɟɞɭɸɳɟɟ:
Ɉɞɧɨɜɪɟɦɟɧɧɨ ɧɚɠɦɢɬɟ ɢ ɭɞɟɪɠɢɜɚɣɬɟ ɜ
ɬɟɱɟɧɢɟ 3 ɫɟɤɭɧɞ ɤɧɨɩɤɢ “ɩɥɸɫ” ɢ ɦɢɧɭɫ”. ɇɚ
ɞɢɫɩɥɟɟ
ɤɧɨɩɨɤ”
ɜɨɥɹɟɬ ɬɨɥɶɤɨ ɨɬɤɥɸɱɢɬɶ ɡɜɭɤɨɜɨɣ ɫɢɝɧɚɥ
ɨɤɨɧɱɚɧɢɹ ɪɚɛɨɬɵ ɧɚɠɚɬɢɟɦ ɥɸɛɨɣ ɤɧɨɩɤɢ.
ȼɫɟ ɨɫɬɚɥɶɧɵɟ ɮɭɧɤɰɢɢ ɨɫɬɚɸɬɫɹ ɧɟɞɨɫɬɭɩɧɵɦɢ.
ɡɚɝɨɪɢɬɫɹ ɢɧɞɢɤɚɬɨɪ “Ȼɥɨɤɢɪɨɜɤɚ
. ȼɤɥɸɱɟɧɧɚɹ ɛɥɨɤɢɪɨɜɤɚ ɩɨɡ-
ǺȓȣȎțȖȥȓȟȘȖȗ ȠȎȗȚȓȞ
(Ɋɢɫ. 8)
ɉɨɜɟɪɧɢɬɟ ɪɭɱɤɭ ɬɚɣɦɟɪɚ ɩɪɨɬɢɜ ɱɚɫɨɜɨɣ
ɫɬɪɟɥɤɢ, ɱɬɨɛɵ ɭɫɬɚɧɨɜɢɬɶ ɧɟɨɛɯɨɞɢɦɭɸ
ɞɥɢɬɟɥɶɧɨɫɬɶ ɩɪɢɝɨɬɨɜɥɟɧɢɹ. Ɍɚɣɦɟɪ ɩɨɡɜɨɥɹɟɬ ɭɫɬɚɧɨɜɢɬɶ ɞɥɢɬɟɥɶɧɨɫɬɶ ɩɪɢɝɨɬɨɜɥɟɧɢɹ ɨɬ 1 ɞɨ 60 ɦɢɧɭɬ. Ɂɜɭɤɨɜɨɣ ɫɢɝɧɚɥ ɢɡɜɟɫɬɢɬ ɜɚɫ ɨ ɬɨɦ, ɱɬɨ ɭɫɬɚɧɨɜɥɟɧɧɨɟ ɜɪɟɦɹ
ɢɫɬɟɤɥɨ.
ǽȎțȓșȪ ȡȝȞȎȐșȓțȖȭ
ȐȞȓȚȓțȓȚ ȕȎȐȓȞȦȓțȖȭ
ȞȎȏȜȠȩ
Ⱦɥɹ ɪɭɱɧɨɝɨ ɭɩɪɚɜɥɟɧɢɹ ɩɪɨɝɪɚɦɦɚɦɢ
ɩɨɜɟɪɧɢɬɟ ɪɭɱɤɭ ɩɪɨɬɢɜ ɱɚɫɨɜɨɣ ɫɬɪɟɥɤɢ ɞɨ
ɡɧɚɱɤɚ
ɬɨɜɥɟɧɢɹ ɩɨɜɨɪɨɬɨɦ ɪɭɱɤɢ ɩɨ ɱɚɫɨɜɨɣ ɫɬɪɟɥɤɟ. ȼɵɛɟɪɢɬɟ ɧɭɠɧɨɟ ɜɪɟɦɹ ɩɪɢɝɨɬɨɜɥɟɧɢɹ
ɧɚ ɫɨɨɬɜɟɬɫɬɜɭɸɳɟɣ ɰɢɮɪɟ (ɦɚɤɫɢɦɭɦ 120
ɦɢɧɭɬ). Ⱦɭɯɨɜɨɣ ɲɤɚɮ ɜɵɤɥɸɱɢɬɫɹ ɚɜɬɨɦɚɬɢɱɟɫɤɢ ɩɨ ɡɚɜɟɪɲɟɧɢɢ ɩɪɨɰɟɫɫɚ ɩɪɢɝɨɬɨɜɥɟɧɢɹ ɩɢɳɢ.
(Ɋɢɫ. 9)
. ɍɫɬɚɧɨɜɢɬɟ ɞɥɢɬɟɥɶɧɨɫɬɶ ɩɪɢɝɨ-
Ⱦɥɹ ɫɧɹɬɢɹ ɛɥɨɤɢɪɨɜɤɢ ɤɧɨɩɨɤ ɩɪɨɞɟ-
ɥɚɣɬɟ ɫɥɟɞɭɸɳɟɟ:
Ɉɞɧɨɜɪɟɦɟɧɧɨ ɧɚɠɦɢɬɟ ɢ ɭɞɟɪɠɢɜɚɣɬɟ ɜ
ɬɟɱɟɧɢɟ 3 ɫɟɤɭɧɞ ɤɧɨɩɤɢ “ɩɥɸɫ” ɢ “ɦɢɧɭɫ”.
ɇɚ ɞɢɫɩɥɟɟ ɩɨɝɚɫɧɟɬ ɢɧɞɢɤɚɬɨɪ ɛɥɨɤɢɪɨɜɤɢ
ɤɧɨɩɨɤ
Ɉɫɨɛɚɹ ɮɭɧɤɰɢɹ ɬɚɣɦɟɪɚ – ɡɚɳɢɬɧɨɟ
ɨɬɤɥɸɱɟɧɢɟ
ȿɫɥɢ ɪɭɱɤɚ ɜɵɛɨɪɚ ɮɭɧɤɰɢɢ ɧɚɯɨɞɢɬɫɹ ɧɟ
ɜ ɩɨɥɨɠɟɧɢɢ “0”, ɬɨ ɟɫɬɶ ɩɨɞɤɥɸɱɟɧɧɨɟ ɤ ɩɢɬɚɧɢɸ ɭɫɬɪɨɣɫɬɜɨ ɜɤɥɸɱɟɧɨ ɢ ɟɫɥɢ ɬɚɣɦɟɪ
ɧɟ ɢɫɩɨɥɶɡɭɟɬɫɹ ɞɥɹ ɭɫɬɚɧɨɜɤɢ ɩɪɨɝɪɚɦɦ ɜ
ɬɟɱɟɧɢɟ 3 ɱɚɫɨɜ, ɬɚɣɦɟɪ ɚɜɬɨɦɚɬɢɱɟɫɤɢ ɨɬɤɥɸɱɚɟɬ ɪɚɛɨɬɚɸɳɢɣ ɩɪɢɛɨɪ. ɗɬɨ ɩɨɦɨɝɚɟɬ
ɩɪɟɞɨɬɜɪɚɬɢɬɶ ɩɟɪɟɝɪɟɜ ɞɭɯɨɜɨɝɨ ɲɤɚɮɚ.
ȼ ɫɥɭɱɚɟ ɡɚɳɢɬɧɨɝɨ ɨɬɤɥɸɱɟɧɢɹ ɧɚ ɞɢɫɩɥɟɟ
ɡɚɝɨɪɚɟɬɫɹ ɢɧɞɢɤɚɬɨɪ “Ɂɚɳɢɬɧɨɟ ɨɬɤɥɸɱɟɧɢɟ”
ɨɬɤɥɸɱɟɧɢɹ ɩɪɨɞɟɥɚɣɬɟ ɫɥɟɞɭɸɳɟɟ:
1. ɉɨɜɟɪɧɢɬɟ ɪɭɱɤɭ ɜɵɛɨɪɚ ɮɭɧɤɰɢɢ ɜ ɩɨ-
ɥɨɠɟɧɢɟ “0”.
.
. Ⱦɥɹ ɜɵɯɨɞɚ ɢɡ ɪɟɠɢɦɚ ɡɚɳɢɬɧɨɝɨ
ǮțȎșȜȑȜȐȩȓ ȥȎȟȩ ȟȜ ȐȞȓȚȓțȓȚ ȕȎȐȓȞȦȓțȖȭ ȝȞȖȑȜȠȜȐșȓțȖȭ
Ⱦɥɹ ɬɨɝɨ ɱɬɨɛɵ ɭɫɬɚɧɨɜɢɬɶ ɱɚɫɵ, ɧɚɠɦɢɬɟ
ɧɚ ɪɭɱɤɭ ɢ ɩɨɜɟɪɧɢɬɟ ɩɪɨɬɢɜ ɱɚɫɨɜɨɣ ɫɬɪɟɥɤɢ.
Ⱦɥɹ ɬɨɝɨ, ɱɬɨɛɵ ɭɫɬɚɧɨɜɢɬɶ ɞɥɢɬɟɥɶɧɨɫɬɶ
ɩɪɢɝɨɬɨɜɥɟɧɢɹ, ɩɨɜɟɪɧɢɬɟ ɪɭɱɤɭ ɩɨ ɱɚɫɨɜɨɣ
ɫɬɪɟɥɤɟ, ɧɟ ɧɚɠɢɦɚɹ ɧɚ ɧɟɟ. ȼɪɟɦɹ ɨɤɨɧɱɚɧɢɹ ɩɪɢɝɨɬɨɜɥɟɧɢɹ ɨɛɨɡɧɚɱɚɟɬɫɹ ɡɜɨɧɤɨɦ,
ɤɨɬɨɪɵɣ ɦɨɠɧɨ ɨɬɤɥɸɱɢɬɶ, ɩɨɜɟɪɧɭɜ ɪɭɱɤɭ ɜ
ɩɨɥɨɠɟɧɢɟ
ɩɨɫɬɚɜɶɬɟ ɪɭɱɤɭ ɜ ɩɨɥɨɠɟɧɢɟ
(Ɋɢɫ. 10)
. Ⱦɥɹ ɪɟɝɭɥɢɪɨɜɚɧɢɹ ɜɪɭɱɧɭɸ,
.
14
Page 15

Ɋɢɫ. 8 Ɋɢɫ. 9 Ɋɢɫ. 10
ɑɢɫɬɤɚ ɢ ɭɯɨɞ
RU
ɉɟɪɟɞ ɬɟɦ ɤɚɤ ɧɚɱɚɬɶ ɱɢɫɬɤɭ, ɩɨɞɨɠɞɢɬɟ,
ɩɨɤɚ ɩɪɢɛɨɪ ɩɨɥɧɨɫɬɶɸ ɧɟ ɨɫɬɵɧɟɬ.
Ɉɬɤɥɸɱɢɬɟ ɟɝɨɨɬɢɫɬɨɱɧɢɤɚ ɩɢɬɚɧɢɹ,ɥɢɛɨ,
ɜɵɬɚɳɢɜ ɜɢɥɤɭ ɢɡ ɪɨɡɟɬɤɢ, ɥɢɛɨ ɨɬɤɥɸɱɢɜ
ɷɥɟɤɬɪɨɷɧɟɪɝɢɸ ɜ ɫɟɬɢ ɩɟɪɟɦɟɧɧɨɝɨ ɬɨɤɚ.
ɉɪɢɦɟɱɚɧɢɟ: ɇɟ ɢɫɩɨɥɶɡɭɣɬɟ ɩɚɪɨɨɱɢɫ-
ɬɢɬɟɥɢ ɞɥɹ ɱɢɫɬɤɢ ɞɭɯɨɜɨɝɨ ɲɤɚɮɚ.
ɗɦɚɥɢɪɨɜɚɧɧɵɟ, ɯɪɨɦɢɪɨɜɚɧɧɵɟ ɢ ɨɤɪɚɲɟɧɧɵɟ ɱɚɫɬɢ ɩɪɢɛɨɪɚ ɦɨɣɬɟ ɬɟɩɥɨɣ ɜɨɞɨɣ
ɫ ɦɵɥɨɦ ɢɥɢ ɧɟɪɚɡɴɟɞɚɸɳɢɦ
ɳɢɦ ɫɪɟɞɫɬɜɨɦ.
Ⱦɥɹ ɱɢɫɬɤɢ ɱɚɫɬɟɣ ɢɡ ɧɟɪɠɚɜɟɸɳɟɣ ɫɬɚɥɢ
ɢɫɩɨɥɶɡɭɣɬɟ ɢɦɟɸɳɢɟɫɹ ɜ ɩɪɨɞɚɠɟ ɫɩɟɰɢɚɥɶɧɵɟ ɱɢɫɬɹɳɢɟ ɫɪɟɞɫɬɜɚ ɫ ɦɟɬɢɥɨɜɵɦ
ɫɩɢɪɬɨɦ.
Ⱦɥɹ ɱɢɫɬɤɢ ɚɥɸɦɢɧɢɟɜɵɯ ɱɚɫɬɟɣ ɢɥɢ ɭɝɥɨɜ
ɢɫɩɨɥɶɡɭɣɬɟ ɜɚɬɭ ɢɥɢ ɦɹɝɤɭɸ ɬɤɚɧɶ, ɨɛɦɚɤɧɭɜ ɟɟ ɜ ɜɚɡɟɥɢɧ ɢɥɢ ɪɚɫɬɢɬɟɥɶɧɨɟ ɦɚɫɥɨ.
ɉɨɫɥɟ ɱɢɫɬɤɢ ɩɪɨɣɞɢɬɟɫɶ ɩɨ ɩɨɜɟɪɯɧɨɫɬɹɦ
ɫɪɟɞɫɬɜɨɦ ɫ ɦɟɬɢɥɨɜɵɦ ɫɩɢɪɬɨɦ.
ɇɢɤɨɝɞɚ
ɜɨɝɨ ɲɤɚɮɚ ɚɛɪɚɡɢɜɧɵɟ ɢɥɢ ɪɚɡɴɟɞɚɸɳɢɟ
ɦɨɸɳɢɟ ɫɪɟɞɫɬɜɚ, ɨɬɛɟɥɢɜɚɬɟɥɢ ɢɥɢ ɤɢɫɥɨɬɭ.
ɇɟ ɨɫɬɚɜɥɹɣɬɟ ɪɚɡɴɟɞɚɸɳɢɟ ɢɥɢ ɫɨɞɟɪɠɚɳɢɟ ɤɢɫɥɨɬɭ ɜɟɳɟɫɬɜɚ (ɧɚɩɪɢɦɟɪ, ɥɢɦɨɧɧɭɸ ɤɢɫɥɨɬɭ, ɭɤɫɭɫ ɢ ɬ.ɞ.) ɧɚ ɷɦɚɥɢɪɨɜɚɧɧɵɯ,
ɨɤɪɚɲɟɧɧɵɯ ɢɥɢ ɱɚɫɬɹɯ ɢɡ ɧɟɪɠɚɜɟɸɳɟɣ
ɫɬɚɥɢ.
ɧɟ ɢɫɩɨɥɶɡɭɣɬɟ ɞɥɹ ɱɢɫɬɤɢ ɞɭɯɨ-
ɠɢɞɤɢɦ ɦɨɸ-
ǿțȭȠȖȓ ȒȐȓȞȤȩ ȒȡȣȜȐȜȑȜ
ȦȘȎȢȎ
Ⱦɥɹ ɨɛɥɟɝɱɟɧɢɹ ɩɪɨɰɟɫɫɚ ɱɢɫɬɤɢ ɞɜɟɪɰɭ
ɞɭɯɨɜɨɝɨ ɲɤɚɮɚ ɦɨɠɧɨ ɫɧɹɬɶ ɫɥɟɞɭɸɳɢɦ
ɨɛɪɚɡɨɦ:
1) Ɉɬɤɪɨɣɬɟ ɞɜɟɪɰɭ ɧɚɩɨɥɨɜɢɧɭ ɢ ɫɧɢɦɢɬɟ
ɮɢɤɫɚɬɨɪɵ ɫɬɟɤɥɚ A, ɩɪɨɮɢɥɶ B (ɤɚɤ ɩɨɤɚɡɚɧɨ ɧɚ ɪɢɫ. 11) ɢɫɬɟɤɥɨ C, ɤɚɤ ɩɨɤɚɡɚɧɨ ɧɚ ɪɢɫ. 11 A.
2) ɉɨɥɧɨɫɬɶɸ ɨɬɤɪɨɣɬɟ ɞɜɟɪɰɭ ɞɭɯɨɜɨɝɨ
ɲɤɚɮɚ.
3) ɉɨɜɟɪɧɢɬɟ ɞɜɟɪɧɵɟ ɤɪɸɤɢ “A” ɧɚɪɭɠɭ ɞɨ
ɳɟɥɱɤɚ (ɫɦ. ɪɢɫ. 11B).
4) Ɇɟɞɥɟɧɧɨ ɡɚɤɪɵɜɚɣɬɟ ɞɜɟɪɰɭ ɞɭɯɨɜɨɝɨ
ɲɤɚɮɚ
ɤɚɦɢ “A”, ɭɛɟɞɢɬɟɫɶ, ɱɬɨ ɨɧɢ ɩɪɨɱɧɨ ɡɚɤɪɟɩɥɟɧɵ ɜ ɩɚɡɚɯ ɞɜɟɪɰɵ ɞɭɯɨɜɨɝɨ ɲɤɚɮɚ B, ɤɚɤ ɩɨɤɚɡɚɧɨ ɧɚ ɪɢɫ. 11C.
5) Ɉɛɟɢɦɢ ɪɭɤɚɦɢ ɫɥɟɝɤɚ ɬɨɥɤɧɢɬɟ ɞɜɟɪɰɭ
ɞɭɯɨɜɨɝɨ ɲɤɚɮɚ ɜɧɭɬɪɶ, ɱɬɨɛɵ ɞɜɟɪɧɵɟ
ɤɪɸɤɢ “C” ɜɵɲɥɢ ɢɡ ɩɚɡɨɜ “D” (ɫɦ. ɪɢɫ.
11D) ɢ ɩɨɬɹɧɢɬɟ ɞɜɟɪɰɭ ɧɚ ɫɟɛɹ, ɩɨɤɚ ɧɟ
ɜɵɬɚɳɢɬɟ ɟɟ ɢɡ
ɉɨɫɥɟ ɱɢɫɬɤɢ ɜɫɬɚɜɶɬɟ ɞɜɟɪɰɭ ɧɚ ɦɟɫɬɨ,
ɩɨɜɬɨɪɢɜ ɜɵɲɟɭɤɚɡɚɧɧɵɟ ɞɟɣɫɬɜɢɹ ɜ ɨɛɪɚɬɧɨɦ ɩɨɪɹɞɤɟ ɢ ɩɨɜɟɪɧɭɜ ɞɜɟɪɧɵɟ ɤɪɸɤɢ
Ⱥ ɜɧɭɬɪɶ ɞɨ ɳɟɥɱɤɚ, ɩɪɟɠɞɟ ɱɟɦ ɡɚɤɪɨɟɬɟ
ɞɜɟɪɰɭ ɞɭɯɨɜɨɝɨ ɲɤɚɮɚ (ɪɢɫ. 11E).
, ɩɨɤɚ ɨɧɚ ɧɟ ɫɨɩɪɢɤɨɫɧɟɬɫɹ ɫ ɤɪɸ-
ɞɭɯɨɜɨɝɨ ɲɤɚɮɚ.
15
Page 16

Ɋɢɫ. 11
Ɋɢɫ. 11A
ȼɇɂɆȺɇɂȿ:
ɇɟ ɢɫɩɨɥɶɡɭɣɬɟ ɝɪɭɛɵɟ ɢɥɢ
ɚɛɪɚɡɢɜɧɵɟ ɦɚɬɟɪɢɚɥɵ, ɚ
ɬɚɤɠɟ ɨɫɬɪɵɟ ɦɟɬɚɥɥɢɱɟɫɤɢɟ
ɫɤɪɟɛɤɢ ɞɥɹ ɱɢɫɬɤɢ ɫɬɟɤɥɹɧɧɨɣ ɞɜɟɪɰɵ ɞɭɯɨɜɨɝɨ ɲɤɚɮɚ,
ɬɚɤ ɤɚɤ ɨɧɢ ɦɨɝɭɬ ɩɨɰɚɪɚɩɚɬɶ
ɩɨɜɟɪɯɧɨɫɬɶ ɢ ɜ ɪɟɡɭɥɶɬɚɬɟ
ɫɬɟɤɥɨ ɦɨɠɟɬ ɪɚɡɛɢɬɶɫɹ.
Ɋɢɫ. 11B Ɋɢɫ. 11C
Ɋɢɫ. 11D Ɋɢɫ. 11E
16
Page 17

ȁȟȠȎțȜȐȘȎ ȒȐȓȞȤȩ, ȜȠȘȞȩȐȎȬȧȓȗȟȭ ȐȏȜȘ.
ɉɨɦɧɢɬɟ: ɇɚɩɪɚɜɥɟɧɢɟ ɨɬɤɪɵɜɚɧɢɹ ɞɜɟɪ-
ɰɵ (ɜɩɪɚɜɨ ɢɥɢ ɜɥɟɜɨ) ɦɨɠɟɬ ɛɵɬɶ ɢɡɦɟɧɟɧɨ.
ɉɪɟɞɭɩɪɟɠɞɟɧɢɟ: ɞɚɧɧɚɹ ɨɩɟɪɚɰɢɹ ɞɨɥɠ-
ɧɚ ɜɵɩɨɥɧɹɬɶɫɹ ɤɜɚɥɢɮɢɰɢɪɨɜɚɧɧɵɦ ɫɩɟɰɢɚɥɢɫɬɨɦ ɜɨ ɜɪɟɦɹ ɫɛɨɪɤɢ.
1) Ɉɬɤɪɨɣɬɟ ɞɜɟɪɰɭ ɞɭɯɨɜɨɝɨ ɲɤɚɮɚ ɢ ɨɬɜɟɪ-
ɧɢɬɟ ɞɜɚ ɜɢɧɬɚ ɜ ɞɟɬɚɥɢ A (ɫɦ. ɪɢɫɭɧɨɤ 12).
(ɉɨɦɧɢɬɟ: ɤɨɝɞɚ ɞɟɬɚɥɶ A ɨɬɜɢɧɱɟɧɚ, ɞɧɨ
ɞɜɟɪɰɵ ɩɨɥɧɨɫɬɶɸ ɨɫɜɨɛɨɠɞɚɟɬɫɹ. Ɍɚɤɢɦ
ɨɛɪɚɡɨɦ, ɞɥɹ ɜɵɩɨɥɧɟɧɢɹ ɞɚɧɧɨɣ ɨɩɟɪɚ
ɰɢɢ ɬɪɟɛɭɟɬɫɹ ɞɜɚ ɱɟɥɨɜɟɤɚ: ɨɞɢɧ ɞɨɥɠɟɧ
ɤɪɟɩɤɨ ɞɟɪɠɚɬɶ ɞɜɟɪɰɭ, ɜ ɬɨ ɜɪɟɦɹ ɤɚɤ ɜɬɨɪɨɣ ɨɬɤɪɭɱɢɜɚɟɬ ɜɢɧɬɵ).
2) ɉɨɫɬɚɜɶɬɟ ɞɜɟɪɰɭ ɞɭɯɨɜɨɝɨ ɲɤɚɮɚ ɧɚ ɧɭɠɧɭɸ ɫɬɨɪɨɧɭ, ɢɫɩɨɥɶɡɭɣɬɟ ɧɨɜɭɸ ɞɟɬɚɥɶ A
(ɧɚɯɨɞɢɬɫɹ ɜ ɚɤɫɟɫɫɭɚɪɚɯ, ɩɨɫɬɚɜɥɹɟɦɵɯ
ɫ ɩɪɢɛɨɪɨɦ) ɢ ɩɨɜɬɨɪɢɬɟ ɜɵɲɟɭɤɚɡɚɧɧɵɟ
ɢɧɫɬɪɭɤɰɢɢ ɜ ɨɛɪɚɬɧɨɦ ɩɨɪɹɞɤɟ.
RU
-
Ɋɢɫ. 12
ǽȜȒȟȐȓȠȘȎ
ȒȡȣȜȐȜȑȜ ȦȘȎȢȎ
(ɜ ɡɚɜɢɫɢɦɨɫɬɢ ɨɬ ɦɨɞɟɥɢ) ɪɢɫ. 13-14.
Ⱦɥɹ ɞɭɯɨɜɨɝɨ ɲɤɚɮɚ ɧɟɨɛɯɨɞɢɦɚ ɫɩɟɰɢɚɥɶɧɚɹ ɥɚɦɩɨɱɤɚ, ɭɫɬɨɣɱɢɜɚɹ ɤ ɜɵɫɨɤɢɦ
ɬɟɦɩɟɪɚɬɭɪɚɦ. Ɂɚɦɟɧɹɟɬɫɹ ɫɥɟɞɭɸɳɢɦ ɨɛ-
Ɋɢɫ. 13 Ɋɢɫ. 14
ȼɚɠɧɨ: ɟɫɥɢ ɞɭɯɨɜɨɣ ɲɤɚɮ ɛɨɥɶɲɟ ɧɟ ɛɭɞɟɬ ɢɫɩɨɥɶɡɨɜɚɬɶɫɹ, ɟɝɨ ɧɟɨɛɯɨɞɢɦɨ ɩɪɢɜɟɫɬɢ
ɜ ɧɟɪɚɛɨɱɟɟ ɫɨɫɬɨɹɧɢɟ, ɜɵɬɚɳɢɜ ɢɡ ɩɪɢɛɨɪɚ ɤɚɛɟɥɶ ɩɨɫɥɟ ɨɬɤɥɸɱɟɧɢɹ ɟɝɨ ɨɬ ɢɫɬɨɱɧɢɤɚ
ɩɢɬɚɧɢɹ ɞɥɹ ɬɨɝɨ, ɱɬɨɛɵ ɧɟ ɞɨɩɭɫɬɢɬɶ ɜɤɥɸɱɟɧɢɹ ɩɪɢɛɨɪɚ ɞɟɬɶɦɢ.
ɪɚɡɨɦ: ɨɬɤɥɸɱɢɬɟ ɞɭɯɨɜɨɣ ɲɤɚɮ ɨɬ ɢɫɬɨɱɧɢɤɚ ɩɢɬɚɧɢɹ, ɥɢɛɨ, ɜɵɧɶɬɟ ɜɢɥɤɭ ɢɡ ɪɨɡɟɬɤɢ,
ɥɢɛɨ ɨɬɤɥɸɱɢɬɟ ɧɚɩɪɹɠɟɧɢɟ; ɜɵɬɚɳɢɬɟ ɡɚɳɢɬɧɨɟ ɫɬɟɤɥɨ (A) ɢ ɡɚɦɟɧɢɬɟ ɩɟɪɟɝɨɪɟɜɲɭɸ
ɥɚɦɩɨɱɤɭ ɧɨɜɨɣ ɬɚɤɨɝɨ ɠɟ ɬɢɩɚ. ȼɫɬɚɜɶɬɟ ɧɚ
ɦɟɫɬɨ
ɡɚɳɢɬɧɨɟ ɫɬɟɤɥɨ.
17
Page 18

ДУХОВКА С САМООЧИЩАЮЩИМИСЯ ПАНЕЛЯМИ
В некоторых моделях боковые стенки духовки покрыты особыми пористыми панелями, которые при
нормальном температурном режиме приготовления преобразуют жир в незначительный налет. Этот налет
следует удалять влажной губкой, после того как духовка остынет. Это следует делать, чтобы пористая
поверхность не забилась, и ее очищающее действие оставалось максимально эффективным.
Самоочищающиеся панели и держатели противней могут легко сниматься. Держатели противней
укреплены на трех стержнях.
16 - 17 - 18 - 19).
(
Fig . 16 Fig. 17
ɗɥɟɤɬɪɨɫɯɟɦɚ ɞɭɯɨɜɨɝɨ ɲɤɚɮɚ
Fig . 18
Fig . 19
Ɇɨɞɟɥɶ
ɫɬɚɰɢɨɧɚɪɧɨɝɨ
ɞɭɯɨɜɨɝɨ ɲɤɚɮɚ
18
Page 19

ɗɥɟɤɬɪɨɫɯɟɦɚ ɞɭɯɨɜɨɝɨ ɲɤɚɮɚ
RU
Ɇɨɞɟɥɶ
ɞɭɯɨɜɨɝɨ ɲɤɚɮɚ
ɫɜɟɧɬɢɥɹɬɨɪɨɦ
ɗɥɟɤɬɪɨɫɯɟɦɚ ɞɭɯɨɜɨɝɨ ɲɤɚɮɚ
Ɇɨɞɟɥɶ ɦɧɨɝɨɮɭɧɤɰɢɨɧɚɥɶɧɨɝɨ
ɞɭɯɨɜɨɝɨ ɲɤɚɮɚ
19
Page 20

INDEX
General warnings 20
Technical features 21
Installation 22
How to cook 24
Tables for the bakings 24
Description and use of accessories 26
Cleaning and maintenance 31
GENERAL WARNINGS
Waste packsging
Do not throw the packaging of your appliance
into the dustbin, but pick out the different
materials (e.g. foil, paperboard, polystyrene)
according to the local rules for rubbish
elimination.
This appliance complies with the following
Community Directives:
- 2006/95 EEC “Low Voltage”
- 2004/108 EEC “Electromagnetic disturbances”
- 89/109 EEC “Materials in contact with foods”
Read carefully all the instructions contained in this booklet. It provides you with
important information regarding the safe
installation, use and maintenance of the appliance as well as useful advice for getting
the best out of your oven. Keep this booklet
in a safe place for future reference.
The manufacturer reserves the right to make
modifi cations that may be necessary and use-
ful, without prejudicing essential safety and
working features.
After removing the packing, check that the
appliance is not damaged in any way. Be careful not to leave the packing materials (plastic
sheeting, expanded polystyrene etc.) where
children can get at them, as they can be dangerous.
door handle to move the appliance, such as
to remove it from the packaging.
IMPORTANT: do not use the oven
IMPORTANT
This appliance must be used exclusively for
cooking food and not for any other purpose.
Any other use of the appliance (such as heat-
ing a room) is improper and therefore
dangerous.
The manufacturer will not accept responsibil-
ity for any damage caused by the improper
and unreasonable use of the appliance.
There are certain basic rules which must be
observed when using any electrical
appliance, i.e.:
disconnect the appliance from the electric
mains supply before carrying out any cleaning or maintenance operation.
never try to remove a plug from the mains
supply socket by pulling on the cable
never touch an appliance if your hands or feet
are wet or damp
never operate an appliance if you are bare-
foot
in case of negligent use near the oven door
hinges, you could hurt your hands
if the appliance breaks down and/or does not
work properly, switch off and do not tamper
with it.
All repairs should be carried out only by an
approved service agent. You should insist
that only original spare parts are used.
Failure to follow the above advice can affect
20
Page 21

the safety of your appliance.
Make sure that the knobs are on “0”
(closed) when the appliance is not in use.
Keep from sitting and put heavy objects on
the oven door when it is open.
When in use the appliance becomes very
hot. Do not touch the heated elements inside
the oven.
The appliance must not be used by people (including children) with limited physical, sensory or mental abilities, or without
experience or expertise, unless they have
received instructions for using it from those
responsible for their safety.
Young children should be supervised to
ensure they not play with the appliance. The
manufacturer reserves the right to make
modifi cations that may be necessary and
useful, without prejudicing essential safety
and working features. The manufacturer can
not be considered responsible for possible
damages arising from a wrong installation
or incorrect use of the appliance.
After-sales service and spare parts
In the event of malfunction, do not attempt to
repair the appliance yourself. Repairs carried out
by unqualifi ed individuals may cause damage
and accidents. The fi rst thing to do is to consult
this user handbook. If you cannot fi nd the information required, contact your nearest after-sales
service. Any work on the appliance must be carried out by an authorized service centre. Always
insist on the use of original spare parts.
This appliance is marked according to the
Europeandirective 2002/96/EC on Waste Electricaland Electronic Equipment (WEEE).By ensuring this product is disposed of correctly,you
will help prevent potential negativeconsequences for the environment and humanhealth, which
could otherwise be caused byinappropriate
waste handling of this product.
The symbol 5 on the product, or on thedocuments accompanying the product, indicatesthat
this appliance may not be treated ashousehold
waste. Instead it shall be handedover to the applicable collection point for therecycling of electrical and electronic equipment.Disposal must
be carried out in accordance withlocal environmental regulations forwastedisposal.For more
detailed information about treatment.recovery
and recycling of this product, pleasecontact
your local city offi ce, your householdwaste disposal service or the shop where youpurchased
the product.
UK
TECHNICAL FEATURES
OVEN OVEN ELEMENT POWER
Working sizes (mm) LxPxH 595x538x593 Static oven (kW) 2,1
Oven capacity (I) 60 It Fan oven (kW) 2,1
Grill (kW) 2,4
Supply voltage 230 V-
21
Page 22

INSTALLATION
After removing the appliance from the packaging, make sure that it is undamaged and that
the electrical lead is in perfect condition. Otherwise, contact your dealer before putting the
appliance into operation.
IMPORTANT
Be careful not to leave the packing materials
(plastic sheeting, expanded polystyrene etc.)
where children can get at them, as they can be
dangerous.Installation should be carried out according to the instructions by a professionally
qualifi ed person.The manufacturer declines all
responsibility for any damage to persons, animals or things due to a wrong installation.
Installing the appliance
For the most effi cient air circulation, the oven
should be fi tted according to the dimensions
shown in fi g. 2.
Fitting the appliance
Fit the appliance into its surround (beneath a
work-top or above another appliance) by inserting screws into the 2 holes that can be seen in
the frame of the oven when the door is open
(fi g. 2).
IMPORTANT
The panels of the adjoining furniture should
be heat resistant. Particularly when the adjoining furniture is made of veneered wood, the adhesives should be able to withstand
a temperature of 100°C. Plastic materials or
adhesive which cannot withstand this temperature will become deformed or unstuck.
To comply with safety regulations, once the
appliance has been fi tted it should not be possible to make contact with the electrical parts.
All parts which offer protection should be fi xed
in such a way that they cannot be removed
without the use of a tool.
Electrical connection
Electric connection has to be done according
to rules and law provisions in force. Before doing the connection, check the following:
The electric power and sockets are suitable to
maximum power of the oven (See data plate
on the appliance).
WARNING: THIS APPLIANCE MUST BE
EARTHED.
The appliance’s electrical safety can only be
guaranteed when it has been correctly connected to a properly earthed power supply, as laid
down in the regulations for electrical safety.
Important: the manufacturer cannot be held
responsible for any damage to persons or objects due to the lack of an earth connection.
Never use reducers, adaptors or branches for
connections.
Connecting of feeding cable
If apparatus is not fi tted with feeding cable,
use cable Mod. H05RR-F or H05RN-F 3 x 1.5
sq. mm. stating suitable section of the cable
which has to be connected to terminal.
To obtain that you have to:
Connect the supply cable to the terminal strip
of the oven (fi g. 3), keeping the earth wire 3
cm. longer than the active conductors (live/
neutral) .
Connect cable’s wires as follows:
L = (live) brown or red wire
N = (neutral) blue wire
± = (earth) yellow - green wire.
N.B. the power supply lead must be positioned so that it does not reach a temperature 50°C above the room temperature in any
point.
Connection to normal socket
Connect feeding cable a normal plug suitable to the load stated on data plate. When the
cooker has been built-in household check that
the plug is accesible.
22
Page 23

UK
Direct connection
to electric supply
If an appliance is not equipped with supply
cable and plug, the power supply must be fi tted
with a disconnect switch in which the distance
between contacts permits total disconnection
in accordance with overvoltage category III, as
required by installation regulations.
The yellow/green earth wire should not be
controlled by the switch..
ATTENTION: If the supply cable is damaged,
it must be replaced by the manufacturer or by
his after-sales service, or by a similar qualifi ed
person, in order to prevent any risk.
23
Page 24

HOW TO COOK
N.B. Set any timer, clock or programmer
to manual mode (see section on page 6).
At the fi rst use of the oven, it’s normal to
smeel the protective oils used in manufacture
burning off.
Leave oven on maximum setting for approximately one hour before use.
At the end of the initial heating, let the oven
cool down and clean the inside with detergent
and warm water. Before using, wash all grid accessories, baking-pan and trays.
N.B. Before carryng out cleaning, disconnect the appliance from electrical supply.
General information
and use precautions
The oven must be used with the door closed.
Always hold the handle in the middle, to
open the oven door.
When you open the oven door, beware hot
vapour.
Use protective gloves to insert or to extract
containers from the oven.
Use containers resistant to the temperatures
indicated on the thermostat knob.
After use of the oven, be sure that all con-
trols are in the off position..
Never roast or bake on the oven base.
COOKING FUNCTIONS
NOTE: The symbols on the selector knob vary from one model to another. The oven selector
knobs can be used to select the following functions.
Cooking
Indicators
Temp. °C
min60
max 260
60 * 260 Medium grill
60 * 200 Large grill
60 * 260 Lower heating element + fan
Note: the oven must be used with the door closed.
Functions are only activated once the thermostat knob has been set to
the desired temperature
Oven light
When you turn the control knob to position ɒ the light will be on for all
the following operations.
Defrosting with fan
Ambient temperature air is distributed inside the oven to defrost food
more quickly without protein adulteration.
Selecting this function switches on the central upper heating element for
direct radiation of heat over food.
Selecting this function switches on the two upper heating elements
for direct radiation of heat over food. This function can be used with
temperatures from 60 to 200°C.
The air which is heated by the lower heating element is circulated by
the fan and so helps to distribute the heat between 60 and 260°C. This
function can be used for sterilizing glass jars.
24
Page 25

60 * 260 Natural convection
Both the lower and upper heating elements operate together. This is the
traditional cooking, very good for roasting joints, ideal for biscuits, baked
apples and crisping food. You obtain very good results when cooking
on a shelf adjusting the temperature 260°C.
60 * 260 Fan oven
Both the fan and the circular heating element operate together. The hot
air adjustable between 60 and 260°C is evenly distributed inside the
oven. This is ideal for cooking several types of food (meat, fi sh) at the
same time without affecting taste and smell. It is indicated for delicate
pastries.
60 * 260 Fan-assisted natural convection
Both the top and bottom elements are on, as is the fan. This is the
conventional cooking method, excellent for a variety of foods. It
produces good results for cooking on one level - ideal for biscuits, cakes
and canapes - with the temperature adjustable from 60 to 260°C.
60 * 200 Fan assisted total grill
The air which is heated by the grill heating element is circulated by the
fan and so helps to distribute the heat between 60 and 200°C. The fan
assisted grill replaces perfectly the turnspit. You can obtain very good
results also with large quantities of poultry, sausage, red meat.
60 * 260 Lower heating element
This function is particularly indicated for cooking from the bottom,
warming up food or sterilizing glass jars. It is also indicated for food
requiring long and slow cookings, i.e. casserole. This function can be
used between 60 and 260°C.
UK
Oven cooking chart
Function Level °C Minutes
Meats
Roast veal
Roast pork
FNet
Poultry
Roast chicken Grill per qir 2 230 85/90
Scones Fan oven 3/5 190 20/22
Bread Fan oven 4 l80 25/30
Pastres
Biscuits
Spongecake
Small cake
Cakes
Apple-pie Fan oven
Fan oven
Fan oven
GriN
Fan oven
Fan oven
Fan oven
4
4
5
3/5
4
4
|
4 190 45
190
190
230
200
150
160
130
130
6 + 6
15
50
25
25
Page 26

DESCRIPTIONS OF ACCESSORIES
NOTE: Install the grids, by placing them on the horizontal
slides inside the oven wall. The raised part of the grid must be
in face of the oven rear wall (fi g. 4).
Cooling motor
Some models are equipped with tangential cooling motor.
TURNSPIT (optional)
The turnspit is an optional available only in
some models. Central turnspit see fi gure 5. Diagonal turnspit see fi gure 5A.
Use of the turnspit.
Thread the chicken or the cubes of meat for
roasting on below spit L, ensuring that
it is gripped safely between the two forks F
(fi g. 5).
Put the spit on support G, .
Put support G completely into the oven.
Fit the end of the spit into the motor M at the
back of the oven
Place the oven tray with a little water on the
lowest shelf of the oven.
Close the oven door.
Turn the knob to position grill (
cording to the models) to start up the motor.
When removing the spit, wear oven mitts
and pull out support G.
ac-
26
Page 27

Instructions for use of control devices (depending on model)
TOUCH-CONTROL PROGRAMMER CLOCK (Fig. 6)
UK
Setting the time of day
When the oven is fi rst connected to the power supply, the display shows 12.00 and the led
indicator (L4) fl ashes. Press the touch control
buttons
fi ve seconds the time is stored and L4 switches
off. To change the time at a later stage, press
the mode selector button
and to set the time of day: after
until L4 fl ashes.
Minute minder
Press the mode button until L3 fl ashes,
then set the desired cooking time using the
and buttons. The setting range is from
0.01 to 2.30 h. The display will show the set
time and L3 will remain lit. At the end of the
set time, an acoustic signal sounds (two
signals every two seconds) and L3 fl ashes.
Press any button to stop the acoustic signal
and switch off L3.
Cooking time
Press the mode buttonII until L1 fl ashes.
Set the desired cooking time using the
buttons (the setting range is from 0.01 to
10.00h): after fi ve seconds the cooking time is
stored and L1 remains lit. After the set time has
elapsed the oven switches off automatically, an
acoustic signal sounds (four signals every two
seconds) and L1 fl ashes. Press any button to
stop the acoustic signal and switch off L1.
and
Cooking end time
Press the mode button until L2 fl ashes.
Set the desired cooking end time (max. 23.59)
using buttons
time is stored and L2 remains lit. At the set time
the oven switches off automatically, an acoustic
signal sounds (four signals every two seconds)
and L2 fl ashes. Press any button to stop the
acoustic signal and switch off L2.
and after fi ve seconds the
27
Page 28

Cooking time and cooking
end time
Press the mode button until L1 fl ashes.
Set the desired cooking time as described at
“COOKING TIME”. Press the mode button until L2 fl ashes then set the desired cooking end
time as described in the paragraph “COOKING
END TIME”. The oven will begin cooking based
on the calculation of cooking end time minus
cooking time. For example, if cooking end time
PROGRAMMER CLOCK 3 BUTTONS (Fig. 7)
is set at 12.00 and a cooking time of 1.30h is
set, the oven will begin cooking at 10.30 and will
switch off at 12.00.
Cancelling programmes
Programmes can be cancelled at any time by
re-selecting the previously selected functions
and resetting the time to zero using button
The time of day cannot be set while an automatic programme is in progress.
Setting the Time of Day
NOTICE: The time of Day can only be set if
the oven selector switch is in zero position! After you have applied voltage to the oven, 12:00
appears on the display and the
time of day fl ashes. To use the minus and plus
buttons to set the time of day in steps of minutes. The time of day now displayed elapses
accurately to the second. The timer is now
operational and in “manual” mode. NOTICE:
If you want to set the time of day during later
operation, press the mode button until the
dicator for time of day fl ashes and subsequently
proceed as described above.
indicator for
in-
Setting the Minute Minder
The setting range of the minute minder is
from 0:00 to 23:59.
Press the mode button until the
for the minute minder fl ashes.
Note: If you do not make an input in the next
5 seconds, the timer returns to the time of day
display. To use the minus and plus buttons to
set the desired period in steps of 1 minute after confi rming with the mode button, the time of
day reappears on the display.
The
nated on the display.
After the set time has elapsed, a signal
sounds (.. ..) (i.e. a pause follows after two sig-
nals). On the display, the
The signal ends automatically after approx. 1
minute while the
Press any button to exit the current mode.
You can also manually stop the signal indicating the end of time by pressing any button.
28
indicator for minute minder is illumi-
indicator fl ashes.
indicator continues to fl ash.
indicator
Page 29

Setting the Cooking
Programme
Operation Period
This programme enables to e.g. automatically turn on the oven for a preset period via the
relay of the timer.
NOTICE: An operation period can only be set
if the oven selector switch is not in zero position!
Please also observe that all inputs are cancelled
if you move the oven selector switch to zero position during an active cooking programme!
The setting range of the operation period is
from 0:00 to 23:59. Proceed as follows:
Press the mode button until the
for operation period fl ashes. On the display, the
time “0:00” is displayed instead of the time of
day.
Note: If you do not make an input in the next
5 seconds, the timer returns to the time of day
display.
Use the minus and plus button to set the desired period in steps of 1 minute. The
tor for operation period is illuminated.
You can also confi rm the input with the mode
button.
After the set time has elapsed, a signal
sounds (.... ....) (i.e. a pause follows after four
signals). The oven swiches off. On the display,
the
the time “0:00” is displayed. The signal ends automatically after approx. 1 minute while the
indicator continues to fl ash. Press any button to
exit the current mode or to stop the signal indicating the end of time.
(see Setting the Cooking Programme > Operation Period), this programme enables you to
shift the operation end forward with regard to
time, i.e. to delay it.
if a timer of the type (Operation Period and
Operation End) is used and if the oven selector switch is not in zero position. If the cooking
indicator for operation period fl ashes and
Operation End
(Type Operation Period/Operation End)
In case of a previously set operation period
NOTICE: An operation end can only be set
indicator
indica-
programme is active, please also observe that
all inputs are cancelled if you move the oven
selector switch to zero position!
Press the mode button until the
for operation end fl ashes. The current time of
day is displayed on the display.
Note: If you do not make an input in the next
5 seconds, the timer returns to the currently active operation period programme.
Starting from the current time of day, use the
plus button to set the desired end in steps of 1
minute.
The
illuminated until the baking process starts. This
occurs at the time “operation end minus operation period”. At this moment, the timer changes
to operation period mode. The
operation end is extinguished, the
for operation period is illuminated and the remaining operation period is displayed instead.
The running programme can also be called
with the mode button while it is active. This
enables to check and possibly correct the set
data using the set buttons. To avoid errors, it is
not possible to reset the time of day while a programme is active.
After the set time has elapsed, a signal
sounds (.... ....) (i.e. a pause follows after four
signals). The oven swiches of. On the display,
the
and the time “0:00” is displayed. The signal
ends automatically after approx. 1 minute while
the
button to exit the current mode.
You can also manually stop the signal indicating of the end of the time by pressing any
button or move the oven selector switch to the
zero position.
indicator for operation end remains
indicator for operation period fl ashes
indicator continues to fl ash. Press any
indicator
indicator for
indicator
Setting The Key Lock
If you activate the key lock, the timer can
no longer be operated with regard to time and
programme. Neither the time of day nor an
elapsing minute minder nor an active cooking
programme can be modifi ed. However, the set
functions will operate accurately.
UK
29
Page 30

Proceed as follows
to activate the key lock:
Simultaneously press the minus and plus
button for approx. 3 seconds. On the display,
the
Merely the signalling of the end of the time
after the end of a cooking programme can be
terminated by pressing any button. All other
functions cannot be operated.
Proceed as follows
to deactivate the key lock:
simultaneously press the minus and plus button for approx. 3 seconds. On the display, the
indicator for key lock is extinguished.
Special Function
of the Timer-Automatic Cut off
If the oven selector switch is not in zero position, i.e. if the connected appliance is switched
on and if the timer is not operated for a period
of three hours, the timer switches off the connected appliance. This has the advantage that
an overheating in the connected appliance cannot occur.
In the event of an automatic cut off, the
indicator for automatic cut off fl ashes on the display. Proceed as follows to deactivate the automatic cut off: 1. Return the oven selector switch
to zero position.
indicator for key lock is illuminated.
Minutes counters
(Fig. 8)
Turn the knob clockwise to set the desired
cooking time. The minutes minder can be adjusted from 1 to 60 minutes. A sound signal will
inform you that the chosen time is up.
Programmer with
cooking end time
(Fig. 9)
For a manual operation of the programmer,
turn the knob anticlockwise to
cooking time by turning the knob clockwise.
Select the cooking time with the relevant knob
(max.120 min.). The oven will switch off automatically when the cooking is up.
. Adjust the
Analog clock with
cooking end time
(Fig. 10)
To set the clock press the knob and turn anticlockwise.
To adjust cooking time, turn the knob clockwise without pressing it in. The end of cooking
time is announced by an alarm bell, which is
cancelled by turning the knob to position
For manual connection, turn the knob to position
.
.
30
Page 31

CLEANING AND MAINTENANCE
Wait until the appliance has cooled down be-
fore attempting to clean it.
Disconnect it from the power supply, either by
pulling the plug out or switching off the power
supply at the mains.
NOTE: Do not use steam cleaners to clean
the oven.
Clean enamelled, chromed or painted parts
with warm water and soap, or non-corrosive
liquid detergent. Clean stainless steel parts using methylated spirit of a suitable commercially
produced solution. Clean aluminium panels or
edges with cotton wool or with a cloth soaked in
vaseline or a seed-based oil. Clean and then go
over it with methylated spirit.
Never use abrasives, corrosive detergents,
bleaches or acids for cleaning the oven.
Do not leave corrosive or acidic substances
(lemon juice, vinegar, etc.) on enamelled, painted or stainless steel parts.
UK
Removal of oven door
To make cleaning easier, remove the oven
door as follows:
1) open the door halfway and remove the glass
stoppers A, the profi le ȼ (as shown in fi g. 11)
and the glass C, as shown in fi g. 11 A.
2) open the oven door completely.
3 ) fl ip the hinge hooks “A” outwards (see fi g.
11B).
4) shut the oven door slowly until it reaches
hooks “A”, making sure these are locked
into slots “ȼ” of the oven door, as shown in
fi g. 110
5) Using both hands, push the oven door
lightly inwards, toenable the door hinges “C”
to come away from the slots “D” (see fi g.
11D) and pull the door towards you until it
is released from the oven. After cleaning it,
reposition it correctly following the abovesteps in the reverse order and fl ipping hooks
“A” inwardsbefore you shut the oven door
(fi g. 11E).
31
Page 32

CAUTION: Do not use rough
or abrasive materials or sharp
metal scrapers to clean the glass
doors of the oven since they may
scratch the surface and cause
the glass to break.
32
Page 33

Side opening door.
N.B.: The door’s opening direction (right-
hand or left-hand) can be changed.
Warning: this operation must be carried
out by skilled staff during assembly.
1) Open the oven door and undo the two
screws in the block A (see fi gure 12). (N.B.:
when block A is unscrewed, the bottom of
RU
the door is left completely free. Two people
are therefore needed for this operation, one
to hold the door fi rmly while the screws are
undone).
2) Reassemble the door on the required side
of the oven, use the new block A (accessory
supplied with the appliance) and reverse the
above instructions.
Oven light
(depending on model)
The oven bulb is a special kind which is resistant to high temperatures. Replace it as
follows: disconnect the oven from the power
Important: if the oven is no longer to be used, it should be made inoperable by cutting the
power supply cable, after unplugging it from the power supply. Disused appliances can be a safety
risk as children often play with them. For this reason it is advisable to make the oven safe.
fi g. 13-14.
supply by removing the plug or switching off
the power supply at the mains; remove the protective glass (A) and replace the burnt-out bulb
with one of the same type. Replace the protective glass.
33
Page 34

Self-cleaning panels
If th e ov en is fitted with self-cleaning panels, at normal cookin g tem p eratures the catalytic en am el h elp s tran s form grease
splashes into a light dus t. This dus t can be rem ov ed with a dam p sponge when the oven has cooled down . T h is h elp s keep
the surface of th e en am el porous an d en s ures maximum cleaning efficien cy.T h e s e lf-cleaning panels and the shelves fram e
are very easy to rem ov e (s ee fig . 16 - 17 - 18 - 19).
Fig . 16 Fig. 17
Fig . 18
Fig . 19
34
Page 35

UK
35
Page 36

538081
 Loading...