


S
E
n
e
r
o
h
A
o
f
0
t
a
d
H
N
n
s
t
b
K
a
e
h
s
e
a
w
e
o
W
M
e
N
c
o
n
a
C
f
n
p
a
r
a
f
f
h
e
9
M
a
i
t
n
0
]
v
t
E
L
n
]
o
w
5
r
n
e
O
M300
Serie
Oper
tion
anual
Versio
n 2.0 (
March
2, 201
)
Usi
g a cross h
eries. Press
batt
Slid
the rear b
1)P
ess and hol
If y
u are using
ead or flat
he RESET
ttery comp
the CHEC
PIT3000 Tr
bladed scre
utton locat
artment off
key 5 sec
nsmitter, pr
driver, rem
d on the re
the Display
nds on the
ss [SET] bu
ove the Se
ar of the Tr
Unit. Insert
rear of the
tton at the
der Unit b
nsmitter
3 AA batte
RT3000 Tr
ront side o
ttery comp
ies in the D
nsmitter un
PIT3000 u
rtment co
isplay Unit.
il the red L
til the red
er and inse
D flashes.
ED flashes.
t 3C
2)C
eck the [C
not,
Press [ME
[CH
NNEL] key
3)N
w you can
4)A
ter synchro
key.
ANNEL] k
U] key to c
on hearing
see below
ization, th
y located o
ange [SET]
a short bee
ymbol NO
screen dis
n the botto
-> [CHAN
p.
ENERGY s
play as bel
m right ha
EL]. Press a
reen on To
w: If your
d side of t
nd hold th
e left side.
are using
e SEM300
[CHANNEL
9V, please
Display U
key 3 sec
change it
it is showi
nds, Releas
ith [UP][D
g. If
the
WN]

5)P
r
e
h
s
U
p
s
d
o
-
s
r
A
e
w
o
o
A
s
t
w
p
o
e
n
p
n
U
s
e
e
d
h
n
a
y
p
R
W
m
e
m
i
i
o
o
m
d
t
H
e
d
a
n
e
t
a
t
s
w
r
O
e
r
p
“
c
e
t
s
e
a
R
a
o
(
n
g
w
n
s
$
h
n
m
y
b
y
r
a
a
n
l
e
o
e
1
m
ess the [CH
Th
radio wav
NGE] key
icon, in th
f Display u
top left h
it for to st
nd corner
re.
f the main
creen, will
how radio
ave power
strength.
The
in t
You
con
YO
two units
e top left
can positi
truction).
R DISPL
ill now con
f the scree
n the Dis
Y UNIT H
nect. Please
will be full
lay Unit u
AS 6” SC
note, this
illuminate
to 40 me
EEN WIT
ay take up
and a “0”
ers away f
5 SECTI
to 2 minut
ill be displ
om the C
N.
s. Once co
yed in the
T3000 Tran
nected the
main displa
smitter (su
radio wave
.
ject to bui
icon
ding
The
top section
dis
lay for tran
2nd
ection disp
k.
mar
itionally it a
Ad
sec
nds. Addi
Top
left side sh
is 4
step tiered
3rd
ection sho
ene
gy consum
shows Rad
mitter and
lays Now E
lso shows
ionally it al
ows the en
tariff rate s
s History
tion in kW
io Icon, Cha
receiver eac
ergy with
p, Down sy
o shows th
rgy billing
lection “2”
ata like th
. The right
nnel numb
.
att unit an
bol mark
energy co
ethod sel
s special ra
s day (tod
hand side, i
(1-10), 4-
1 Month
nd the ene
sumption
ction from
e tariff sele
y), this we
shows the
different Al
stimated C
gy increase
ercentage
0” to “2”.
tion.
k, this mo
actual ener
rm Display
st with \,
and decrea
%) vs mont
“0” is the si
th and 1
y cost of it
and Batter
, €, ¥, £ cu
se differenc
ly target.
gle tariff r
onth (31d
with curre
power str
rency symb
on every
te selection
ys) accumu
cy symbol
ngth
l
2
. “1”
lated
ark.
Un
d
s
A
i
r
e
r
r
f
M
H
D
M
r
A
r
r
r
:
w
r
w
C
s
w
W
A
y
y
n
G
T
y
e
G
O
k
W
N
y
s
s
o
c
o
y
,
m
w
t
o
k
W
k
W
A
s
y
e
e
W
o
d
u
t
d
S
b
e
,
m
p
m
S
o
e
t
j
M
W
o
y
d
e
s
u
T
a
j
H
o
s
f
e
d
n
s
t
s
n
(
y
g
n
o
r
o
T
h
E
m
o
erneath of i
th
4
ection sho
tem
perature (°
t, it shows t
s channel
. °F) and C
oday graph
number, ti
2 emission
and this w
e, date, w
display.
ek graph si
eek, month
ultaneousl
and year
.
isplay. Th
right han
side, it s
ows
th
5
ection sho
[CH
NGE], [DO
sett
ngs accurat
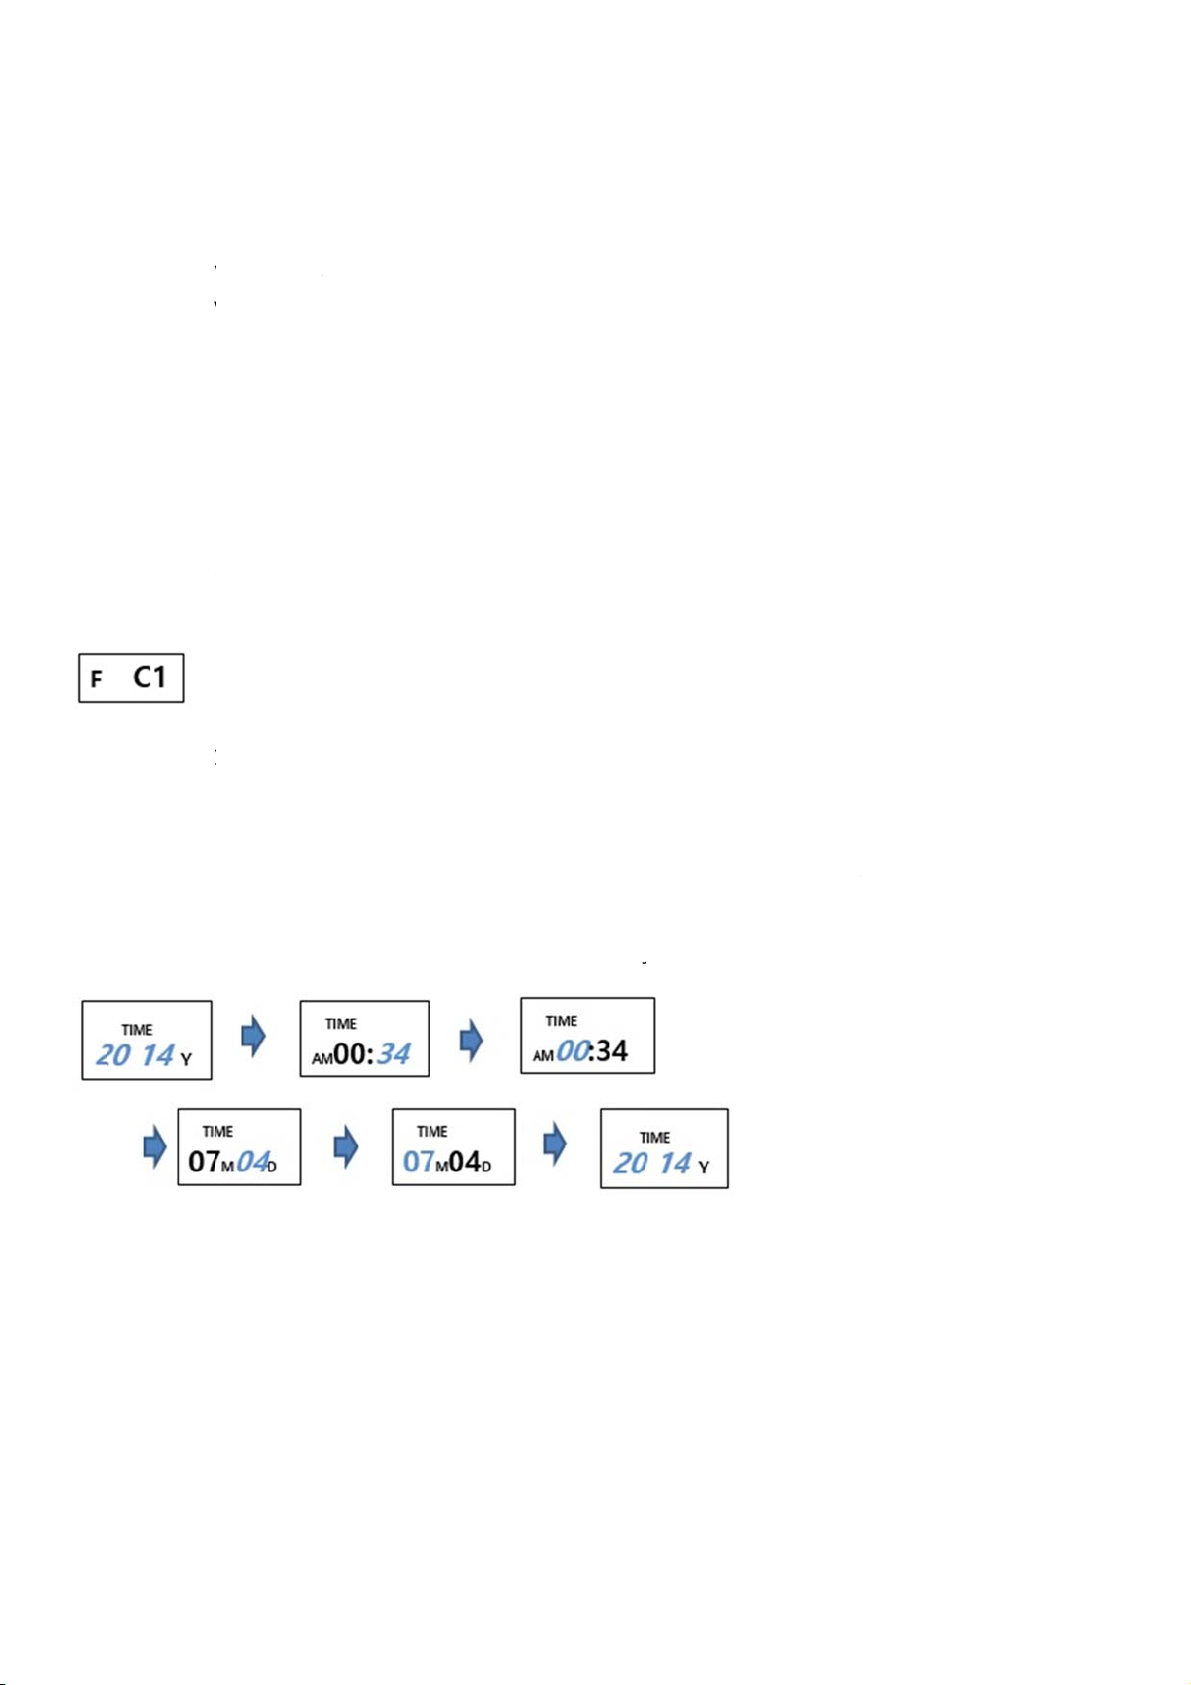
IME/CLOCK:
A. T
ess and ho
1)P
inst
ad of [CH
2)P
ess [SET] ke
3)P
ess [SET] ke
con
irm.
4)[
INUTE] is b
ws touch
N], [UP],
ely.
[C1]
ld the [ME
NNEL].
3 seconds
y to see [F]
linking. Pre
eys. . You
[CHANNEL]
U] key un
and you c
[YEAR] blin
s [UP][DO
ill hear a
and [SET].
il you hear
uld see bel
ing. Press [
N] key to a
short bee
e recom
a beep. [
w symbol
UP][DOWN]
just the co
every tim
end you u
ET] icon wi
n NOW EN
key to adj
rect [MINU
you press
e the soun
ll appear i
RGY:
st the corre
E] and pre
one of th
d to help
bottom ri
ct [YEAR] a
s [SET] to c
e keys, [M
ou progra
ht hand c
d press [SE
nfirm.
NU],
the
rner
T] to
5)[
OUR] is bli
6)[
AY] is blinki
7)[
ONTH] is b
ess [CHAN
8)P
B. T
RIFF SELEC
ess [MENU]
1)P
ess the [SE
2)P
3)P
ess [SET] ke
king. Press
ng. Press [U
linking. Pre
E] key to st
TION: [C2]
key for to
] key 3 sec
to see [F]
[UP][DOWN
P][DOWN]
s [UP][DO
re.
hange [CH
nds to see
blinking to
] key to adj
ey to adjus
N] key to a
NNEL] -> [
F] [C1] sym
ee [0]. Pr
st the corr
the correc
just the ad
ET]
bol. Press [
ss [UP][DO
ct [HOUR]
[DAY] and
ust [MONT
ENU] key
N] key to
nd press [S
ress [SET]
] and pres
nce to cha
elect [0] ->
ET] to confi
o confirm.
[SET] to c
ge [C1] –>
[2] .
m.
nfirm.
[C2].
[0]
Single Rat
for
eekdays +
ess [CHAN
4)P
(Flat Rate)
weekend
E] to go no
[1]: 4-step
rmal displa
Tiered Rate
[2]: Time
f Use Rate
or all week
7 Day) [3]
ime of Use
Rate

C. TARIFF RATE FOR SINGLE (FLAT) RATE: [C3]
1)Press [MENU] key for to change [CHANNEL] -> [SET]
2)Press the [SET] key 3 seconds to see [F] [C1] symbol. Press [MENU] key 2 times to change [C1] –> [C3].
3)Press [SET] key to see [F] blinking. Press [SET] key again to see Single (Flat) rate [$0.20] on COST screen.
4)Move cursor to proper position using [MENU] key.
5)Press [UP][DOWN] key to adjust the correct value.
6)Press [MENU] to move next position and adjust the correct value. Change all the correct value continuously.
7)Press [CHANGE] to store.
D. TARIFF RATE FOR 4-STEP TIERED RATE: [C4]
TIER No. TIER1 TIER2 TIER3
BASE BILLING $0
THRESHOLD 0 ~ 1300kwh 1300~2300kwh 2300kwh over
RATE $0.10/kwh $0.16/kwh $0.24/kwh
1)Press [MENU] key for to change [CHANNEL] -> [SET]
2)Press the [SET] key 3 seconds to see [F] [C1] symbol. Press [MENU] key 3 times to change [C1] –> [C4].
3)Press [SET] key to see [F] blinking. Press [SET] key again to see 1-STEP Tiered rate [$0.10] on COST screen.
4)Move cursor to proper position using [MENU] key.
5)Press [UP][DOWN] key to adjust the correct value.
6)Press [MENU] to move next position and adjust the correct value. Change all the correct value continuously.
7)Press [SET] to see 1-THRESHOLD Range [1300KWh].
8)Press [MENU] to move next position. And adjust the correct value Change all the value continuously.
9)Press [MENU] key to see [F] [1300kWh] blinking. Press [UP] key to change the [Tier 2] and you can see [2300
KWh].
10)You can see [$0.16] If it is okay, press [UP] key to see [$0.24] If it is okay, press [SET] key to see [00000 KWh]
11)Press change to store.
E. SET TARIFF TIME OF USE WEEK BILLING RATE: [C5]
BILLING RATE
OFF PEAK $0.10/KWh WEEK DAYS MO ~ FR
MID PEAK $0.16/KWh WEEK ENDS SUNDAY, SATURDAY
ON PEAK $0.24/KWh
.
1)Press [MENU] key for to change [CHANNEL] -> [SET]
2)Press the [SET] key 3 seconds to see [F] [C1] symbol. Press [MENU] key to change [C1] –> [C5].

3]Press [SET] key to see [MON][TUE][WED][THU][FRI] and [F][COST] is blinking. Please change the [MID PEAK
COST $0.16/KWh]. Press [SET] to change [ON PEAK COST $0.24/KWh]
4)Press [SET] key to change [OFF PEAK COST $0.10/KWh]
5)Press [SET] key to see [SUN][SAT] and [OFF PEAK COST $0.10/KWh]. Press [SET] to change [MID PEAK COST
$016/KWh]
6)Press [CHANGE] to save it.
F. SELECT TARIFF TIME OF USE WEEK SELECTION & BILLING RATE: [C6]
1)Press [MENU] key for to change [CHANNEL] -> [SET]
2)Press the [SET] key 3 seconds to see [F] [C1] symbol. Press [MENU] key 5 times to change [C1] –> [C6].
3)Press [SET] key to see [F] blinking. Press [SET] key again to see "00:" on TIME screen.
4)Move cursor to proper position using [SET] key.
5)Press [UP][DOWN] key to adjust the Tier level, Time, Rate.
6)Press [SET] to move next position and adjust the correct value. Change all the correct value continuously.
7)Press [CHANGE] to store.
G. TARIFF RATE FOR BASIC RATE: [C7]
1)Press [MENU] key for to change [CHANNEL] -> [SET]
2)Press the [SET] key 3 seconds to see [F] [C1] symbol. Press [MENU] key 6 times to change [C1] –> [C7].
3)Press [SET] key to see [F] blinking. Press [SET] key again to see Basic rate [$0.00] on COST screen.
4)Move cursor to proper position using [MENU] key.
5)Press [UP][DOWN] key to adjust the correct value.
6)Press [MENU] to move next position and adjust the correct value. Change all the correct value continuously.
7)Press [CHANGE] to store.
H. MONTHLY KWH TARGET SETTING: [C8]
Your default setting is 300KWh.
This is useful if your household is running on a monthly budget and you need to monitor costs closely.
1)Press [MENU] key for to change [CHANNEL] -> [SET]
2)Press the [SET] key 3 seconds to see [F] [C1] symbol. Press [MENU] key to change [C1] –> [C8].
3)Press [SET] key to see [F] blinking. Press [MENU] [UP][DOWN] key to adjust the correct wattage (W).
4)Press [CHANGE] to store.
I. VOLTAGE SETTING: [C9]

Your default setting is 110 Volts.
1)Press [MENU] key for to change [CHANNEL] -> [SET]
2)Press the [SET] key 3 seconds to see [F] [C1] symbol. Press [MENU] key 8 times to change [C1] –> [C9].
3)Press [SET] key to see [F] blinking and [0 V]. Press [UP] key continuously until you reach [110V = AUTO V].
4)Press [CHANGE] to store.
*If you are using Channel 2 – 10 with PIT3000, Your CRT3000 Channel (e.g. No.1) will get the Voltage value from
PIT3000 automatically when you set the Voltage as [AUTO].
J. TEMPERATURE: [C10]
Your default setting is Centigrade, shown as °C. You can choose to display the temperature in Fahrenheit, shown
as °F.
1)Press [MENU] key for to change [CHANNEL] -> [SET]
2)Press the [SET] key 3 seconds to see [F] [C1] symbol. Press [MENU] key 9 times to change [C1] –> [C10]
3)If you want to select °C, you must select [CELSI 0]
4)If you want to select °F, you must select [FARRE 1]
5)Press [CHANGE] to save it.
K. SELECT SYMBOL for the MONEY UNIT FOR EACH COUNTRY: [C11]
1)Press [MENU] key for to change [CHANNEL] -> [SET]
2)Press the [SET] key 3 seconds to see [F] [C1] symbol. Press [MENU] key to change [C1] –> [C11].
3)Press [SET] key to see [F] blinking. Press [MENU] [UP][DOWN] key to adjust symbol for the money unit.
4)Press [CHANGE] to store. It takes 20 seconds.
L. ERASE THE KWh MEMORY (FACTORY DEFAULT SETTING): [C12]
1)Press [MENU] key for to change [CHANNEL] -> [SET]
2)Press the [SET] key 3 seconds to see [F] [C1] symbol. Press [MENU] key to change [C1] –> [C12].
3)Press [SET] key to see [F] blinking. Press [MENU] [UP][DOWN] key to adjust the correct number [0] ->[1]
4)Press [CHANGE] to store. It takes 20 seconds.
5)if you do not want to erase the kWh memory, please change [1] -> [0] and press [CHANGE].
M. GREEN HOUSE GAS UNITS:
Your SEM3000 can calculate the amount of CO2 emissions per unit of electricity used.
Existing setting: 0.42kg/kwh

N. TO REVIEW YOUR SETTINGS
1)Press [MENU] key for to change [CHANNEL] -> [SET]
2)Press the [SET] key 3 seconds to see [F] [C1] symbol. Press [MENU] key to scroll through your settings [C1] –>
[C9].
3)After review all the settings, press [MENU] to change [SET] -> [CHANNEL]
O. CALIBRATION STOP
If you do not want to save the calibration data or made mistake during the calibration procedure, please do this:
Press [MENU] key continuously and you could see normal display state without calibration.
Ide
n
k
a
t
n
h
e
s
n
m
b
h
A
e
o
s
h
o
e
c
n
t
u
e
t
e
t
t
b
a
a
r
t
s
a
n
t
y
p
h
d
r
h
t
n
a
s
o
e
c
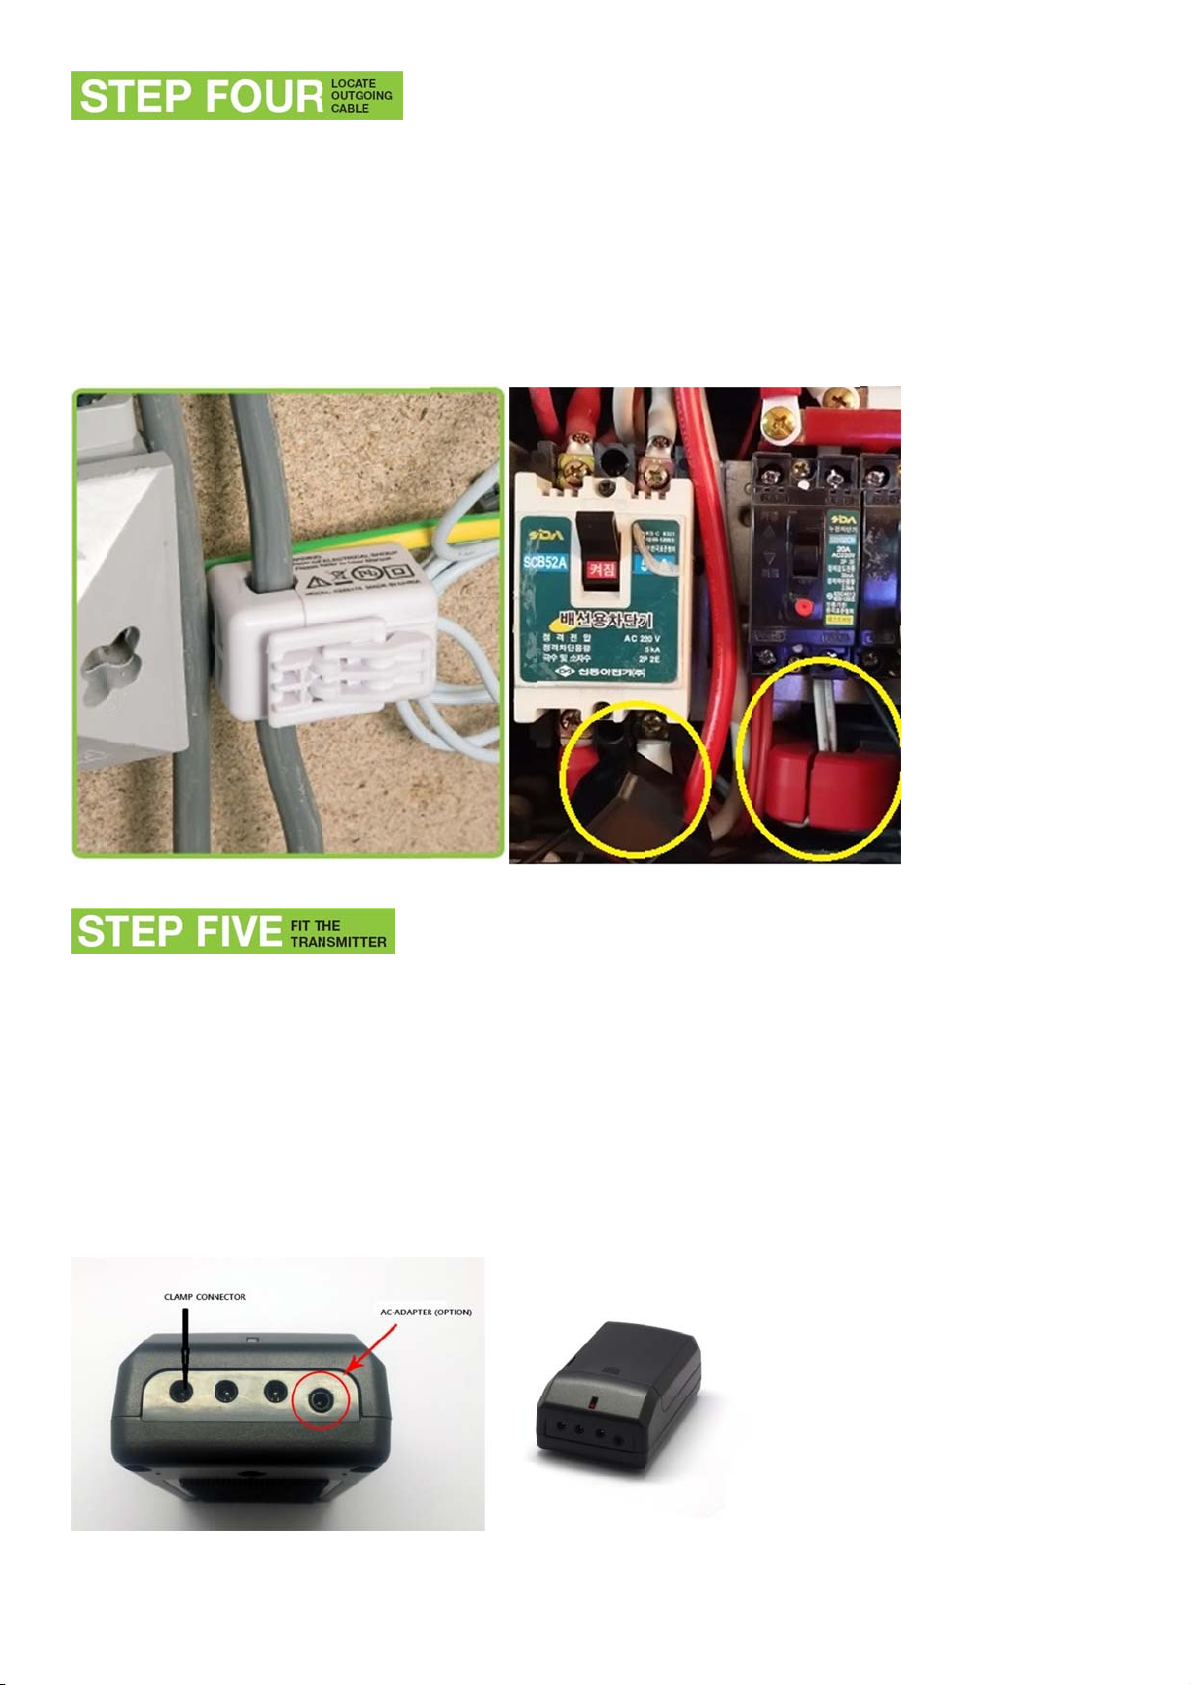
tify live out
loo
at the met
Unc
lip the Sen
righ
t).
Ple
se Note: It i
going suppl
r).
or and fit a
s normal fo
y cable to
round live
r the sensor
lectricity m
able. Snap
to be loos
ter (usually
he clip shu
fit or be a
grey, red o
to fasten
le to slide
brown and
ecurely in
long the ca
located on
lace (see t
ble.
the right a
e images t
you
the
Fix
he mounti
or
earby.
the Trans
Slot
loca
ted on the
The
photograp
of t
e meter an
g bracket (
itter into it
ase of the
on the rig
d the Sens
ptional) to
bracket a
unit.
t shows a
r fitted aro
the wall or
d connect
ypical instal
nd the live
the basebo
the Sensor
lation, with
electricity c
rd used to
cable to a
the Transmi
ble (usuall
mount your
y one of t
ter mounte
grey, red o
meter, nex
e three Tra
d on it’s br
r brown).
to the fus
smitter so
cket to the
box
kets,
right
CO
NGRATUL
TIONS

You
a
p
a
e
n
o
a
l
n
a
y
r
6
r
m
h
o
o
t
h
o
d
o
a
m
e
o
s
s
r
h
n
m
d
7
a
d
o
w
o
r
m
m
m
s
o
m
c
m
g
s
g
7
0
m
0
m
e
a
r
y
c
m
d
d
m
a
y
f
o
0
l
f
a
a
u
h
o
c
c
d
e
r
e
y
f
o
e
b
e
r
o
b
n
e
a
v
t
g
c
s
h
o
d
m
y
1
a
a
m
m
e
o
have now
ple
se turn ove
Kee
the equip
set up and
this sheet
ent out of
installed y
or visit ww
the reach
ur SEM300
.smartwatt
f children,
successfu
eter.com
specially in
ly. For Trou
ants.
bleshooting
and additi
nal inform
tion
Inst
llation of t
Do
ot install y
wat
r source. D
The
equipment
Avo
id extreme
Do
ot attempt
equipment
The
Bef
re using thi
LCD screen
The
Ple
se take spe
hea
th.
Do
ot cover t
is product
ur equipm
not expos
and all as
emperature
to open, di
contains a
s equipmen
is made of
cial care w
e ventilatio
ust be car
nt in a hu
e the equip
ociated co
. Store awa
sassemble
adio trans
t in a medi
glass and
en handlin
holes on t
ied out by
id room (b
ent to mo
ponents a
from sour
r repair the
itter, which
al environ
ay break if
a damage
he equipme
dults only
athroom, la
isture, splas
e for indo
es of heat,
equipment,
may affect
ent, always
dropped.
Display s
nt.
nd if there
ndry, kitch
es or spra
r use and
ignition or
other than
the operati
seek the ad
reen, as th
is any dou
n etc.) or i
.
in normal t
ire.
to change t
n of medic
ice of a qu
liquid crys
t, a qualifie
close prox
emperature
he batteries
al or emerg
alified medi
als may be
electrician
imity to a t
conditions
.
ency equip
cal expert.
harmful to
.
p or
only.
ent.
your
Ple
se ensure y
If O
WL+USB is
ma
be impaire
Ko
ins Inc.
Rm
08, Dunch
Tel:
+82-31-777
Kori
ns Inc. guar
u read this
used in a
.
n-daero #4
-1588 Fax:
ntees that
Installation
anner not
4, Junwon-
+82-31-77
the SEM30
and Progra
pecified by
u, Seongn
-1587 h
0 will work
mming Gui
2 Save En
m City, 462
h@korins.k
for a minim
e carefully
rgy Ltd, th
-725 Korea
www.sma
m period
efore usin
protection
twattmeter.
f 12 month
the equip
provided b
com
s from date
ent.
the equip
of purchas
ent
and
that
it will be
free from
efects in
aterials, w
rkmanship
or design.
If during t
is limited
year peri
d of

gua
u
o
f
tWar
r
c
e
r
o
a
o
c
s
o
A
m
e
n
n
t
S
y
l
E
g
5
m
m
d
u
o
t
u
o
p
n
e
s
p
o
e
y
t
g
o
a
t
o
o
P
s
d
n
u
a
e
s
h
s
c
e
e
c
r
e
1
c
.
u
a
g
m
e
s
e
v
q
o
a
l
e
o
e
q
v
e
v
o
S
e
e
p
h
t
m
p
o
a
r
o
y
r
m
t
m
b
n
o
o
e
rantee, fro
date of p
rchase, you
find that t
e equipme
nt is not w
rking prop
rly, you m
y return it
o us
and
we will repl
Kori
ns Inc. will
mis
se or failur
If y
u return a
per
ect working
pos
age costs i
ranty condi
To
eturn your
Inc.
will issue
pur
hase we wi
CO
MPLIANC
ace, or, (at
not accept
to follow
y equipme
order, to r
curred. Thi
ions only a
EM3000 c
ou a form
l commenc
ur discreti
any liability
roduct or s
t as faulty,
turn it to y
does not a
ply where
ntact hyh@
and refere
the return
n) repair it,
for defect
afety instru
Korins Inc.
u. In this
ffect your l
roof of Pur
korins.kr to
nce numbe
process.
free of char
arising fro
tions.
reserves th
vent, Korin
gal rights r
hase is pro
report the
r. O nce we
e.
fair wear
right to te
Inc. reserv
lating to e
ided.
ssue and r
have recei
and tear, a
t the equi
s the right
uipment, w
ason for re
ed the co
ccidental o
ment and i
to charge f
hich is fault
urning you
pleted for
willful da
f found to
r any testi
.
product. K
m and pro
age,
e in
g or
orins
f of
The
CE markin
Dir
ctive 1999/
Req
uest.
You
Korins Inc.
If s
mething is
Th
nk you fo
Foll
w these si
Cal
ulate the a
certifies th
/EC. A cop
is manufac
missing, ple
r choosin
ple steps t
ount of p
at this pro
of the sig
ured under
ase contact
the SEM
set up yo
ower being
uct meets t
ed and dat
an ISO 900
us: hyh@ko
3000.
r SEM3000
used, the
he main re
d Declarati
Quality M
rins.kr
and you wi
ost of that
uirements
n of Confo
nagement
l be able to
power, the
f the Euro
mity is avai
ystem.
amount of
ean Parlia
lable on
associated
ent and C
greenhous
uncil
gas
emi
sions and
Bef
re setting
Bef
re you s
1.
n electricity
ownload re
p your SEM
art install
bill with de
corded dat
3000, pleas
tion plea
ails of your
to your PC
ensure yo
e ensure
tariff and r
carefully r
you have:
tes
ad the Saf
ty Precauti
ns.

2.
A
U
p
i
-
d
d
-
c
B
p
t
T
e
B
e
e
c
y
o
u
o
o
t
n
r
h
n
d
e
b
o
h
h
o
TCr1a(2n Crp
C(AicyssR
o
S
e
n
n
r
t
f
e
h
t
c
e
o
h
t
0
r
d
e
c
e
n
e
r
t
y
o
y
e
l
p
small cross
head or fla
bladed scr
wdriver
E
ISS
Dis
lay is blank
“0”
s displayed
“•”“
---” are dis
Rea
ings appea
Rea
ings appea
layed
r high
r low
POSSI
Batteri
No cur
Batteri
Tariff
incorre
Sensor
LE CAUSE
s
rent detecte
s or lost sy
or voltage
t
not closed
d
chronizati
settings
properly
may be
RY THIS
heck they
eplace batt
. Check Se
nd closed
SEE STEP 5)
. Check Se
heck batte
eplace ba
rocess.
heck your
see overlea
lthough th
f it is a tig
lose prope
our cable
tandard se
are corre
ries
sor is corr
properly
sor is conn
ies are corr
teries or
tariff and
) and reset
e sensor cli
t fit then t
rly. Check
(up to 1
nsors and
tly installe
ctly attach
ver Live
cted to Se
ectly install
start full
voltage set
if necessar
maybe cl
e core ma
he diamet
mm cable
7mm for
or
d to
able
der
d or
eset
ings
sed,
not
r of
for
arge
“---
” in display
hronization
Syn
2
fails in S
EP
Displa
radio
synchr
In the
fails y
back t
unit’s
instruc
Unit & T
link and
nize units
nlikely eve
u will nee
factory s
memory
ions:
ansmitter
repeating
as failed
t that sync
to reset y
ttings and
y followin
ave lost
STEP 2
ronizing
ur OWL
clear the
g these
ensor).
eposition
f cable.
ee [STEP 2]
he clip on
for the pai
a straight
ing resettin
iece
g.
US
RATING
5Vdc 5
00mA

IN
S
o
a
P
6
o
m
o
H
h
d
a
e
y
S
-
b
e
0
R
p
u
u
E
f
e
e
D
o
I
p
&
i
F
a
i
o
v
e
s
c
n
s
W
o
N
y
T
o
f
e
A
d
m
k
s
n
t
T
A
a
n
a
f
d
n
o
t
o
u
V
k
e
d
v
r
s
e
n
m
a
e
e
o
o
o
w
a
l
n
o
m
c
t
TALLING
If y
u have a 3
size
of your ca
cabl
es using th
Inst
lling SEM3
3-
HASE WI
EM3000
phase sup
les. Fitting
informatio
00 in USA
ING COD
N A 3-PH
ly you will
the sensor
n below:
JAPAN :
ES
SE SUPP
eed two a
is the sa
e supply 2
LY
ditional Se
e process
clamps for
sors and p
s above b
00V ~ 120
ssibly larg
t you will
measure
r sensors d
eed to id
ent.
pending o
ntify the c
the
rrect
UK
200
Eur
pe (incl
UK)
fro
April 2006
If y
u are uns
info
rmation
W
AT IS TH
We
have 3 di
1)T
e alarm fun
. This is use
rate
2)M
onthly targ
until A
L1
ril Red
de Brown
re about
ALARM
fferent al
ction is des
ul if your h
t setting o
L2
Yell
Blac
nstallation
UNCTIO
rm displa
gned to wa
usehold is
er alarm.
w
please con
?
.
rn you whe
running on
his is usefu
L3
Blue
Grey
ult a quali
your pre-
a budget a
l if your h
Neut
Blac
Blue
ied electric
etermined
d you nee
usehold is
ral
ian or visit
lectricity us
to monitor
unning on
Earth
Green/yell
(green on
Green/yell
www.theo
age peaks
costs close
a monthly
w striped
ld installati
w striped
l.com for
bove a spe
y.
budget and
ons)
ore
ified
you
nee
to monito
3)Bl
ck out tim
UN
DERSTAN
Elec
tricity suppl
diff
rent times
on
our electric
r costs clos
alarm. Thi
ING TARI
iers sell ele
f the night
ity bill.
ly.
is useful f
FFS AND
tricity at di
or day. Th
r to suppor
IERED T
ferent rates
rate you p
the power
RIFFS
to differen
ay for your
plant & go
people ac
electricity i
ernment.
oss the cou
called a “t
ntry. Rates
riff” and is
may also va
clearly iden
ry at
ified

Some electricity users will have primary/secondary rates based on usage. To make use of this data you will need
to calculate an average based on usage and enter this figure into tariff 1.
CAN I MONITOR APPLIANCE LEVEL?
The Sensor is unable to detect current flow when clipped an appliance lead with earth, neutral and live cables.
The sensor will only work when clipped over a live phase cable.
HOW MUCH DATA CAN BE STORED ON MY SEM3000?
Data is stored for the last 1800 days as hourly value of electricity used, cost of electricity used based on Tariff
rates entered for that day, and amount of CO2 emissions based on conversion factor for that day. This data is
accessible by connecting pc-cable and software.
Data is also stored every 12 seconds for the last 1 day and
function of the software application supplied with the Display Unit.
this is accessed using the automatic download
INSTALLING THE SOFTWARE APPLICATION TO DOWNLOAD THE DATA TO PC?
Please read the User Manual on the Software Application file supplied with SEM3000. Install the software
following the installation guide in the user manual.
Follow the Getting Started section of the User Manual, to get the New Hardware installed, and to add the USB as
a “Connected To” device in the software.
HOW DO I DOWNLOAD THE DATA TO MY PC?
Simply connect the port of the Display Unit to the PC with specially made mini-USB cable, and the last 30 days
data (or number days data stored if less than 30 days) will automatically download to the software database.
HOW OFTEN DO I NEED TO DOWNLOAD THE DATA TO MY PC?
Data should be downloaded every 30days since last data download or sooner.
If 30 days is exceeded since last download, then the data for the days between the last 30 days and last
download of data will be overwritten in the monitor, hence there will be no data saved for those days in the

dat
a
hpow
a
-
m
y
e
c
@
o
e
t
D
o
p
a
r
r
2
Rec
base.
argeable A
lkaline Batt
ries can be
used to op
erate your
isplay Unit
only few d
ys. Therefo
e please us
e AC
er adapter
Ple
se Note: If
777
1588 or e
ainly.
ou are con
mail hyh
erned or c
korins.kr
nfused by
he installati
n process
lease call c
ustomer se
vices on _8
FCC ID: 2AD97-CRT3000
FCC Part 15.19
This device complies with part 15 of the FCC Rules. Operation is subject to the following two conditions: (1) This
device may not cause harmful interference, and (2) this device must accept any interference received, including
interference that may cause undesired operation.
FCC Part 15.21
Any changes or modifications (including the antennas) to this device that are not expressly approved by the
manufacturer may void the user's authority to operate the equipment.
FCC Part 15.105 (B)
-31-
Note : This equipment has been tested and found to comply with the limits for a Class B digital device,
pursuant to part 15 of the FCC Rules. These limits are designed to provide reasonable protection against
harmful interference in a residential installation This equipment generates, uses and can radiate radio
frequency energy and, if not installed and used in accordance with the instructions, may cause harmful
interference to radio communications, However, there is no guarantee that interference will not occur in a
particular installation. If this equipment does cause harmful interference to radio or television reception,
which can be determined by turning the equipment off and on, the user is encouraged to try to correct the
interference by one or more of the following measures:
- Reorient or relocate the receiving antenna.
- Increase the separation between the equipment and receiver.
- Connect the equipment into an outlet on a circuit different from that to which the receiver is connected.
- Consult the dealer or an experienced radio/TV technician for help.
Modifications not expressly approved by the manufacturer could void your authority to operate the
equipment under FCC rules.
 Loading...