

Korenix JetNet 5710G Quick Installation Manual

JetNet 5710G
Industrial 8PoE +2G Managed High Power
IEEE802.3at PoE Switch
Quick Installation Guide
www.korenix.com
V1.1
Introduction
JetNet 5710G, the revolutionary Gigabit Managed Industrial PoE Switch, is designed
exclusively for highly critical PoE applications such as real time IP video surveillance with
high resolution quality and the evolving demands of wireless communications such as Wimax
and 802.11 a/b/g/n Access Points. By software configuration or by LLDP auto detection, the
8 10/100 TX PoE injector ports can deliver 15.4W by IEEE 802.3af or 30W by the latest High
Power PoE IEEE 802.3at standard. The total power budget is up to 200W per unit to fulfill
local increasing PoE demands. The two Gigabit Ethernet ports provide high speed uplink
to connect with higher level backbone switches with Korenix MSR
TM
network redundancy
technology. Korenix RSR
TM
can recover the network failure in less than 5 ms. JetNet 5710G
is compliant with the EMC requirements of EN 50121-3-2 railway standard and has -40~70oC
wide operating temperature range to work under vibrating and shock environments in rolling
stock applications.
This document will give you a brief introduction of device installation and powering. For more
detailed instructions, please download user manual from Korenix web site at www.korenix.
com.
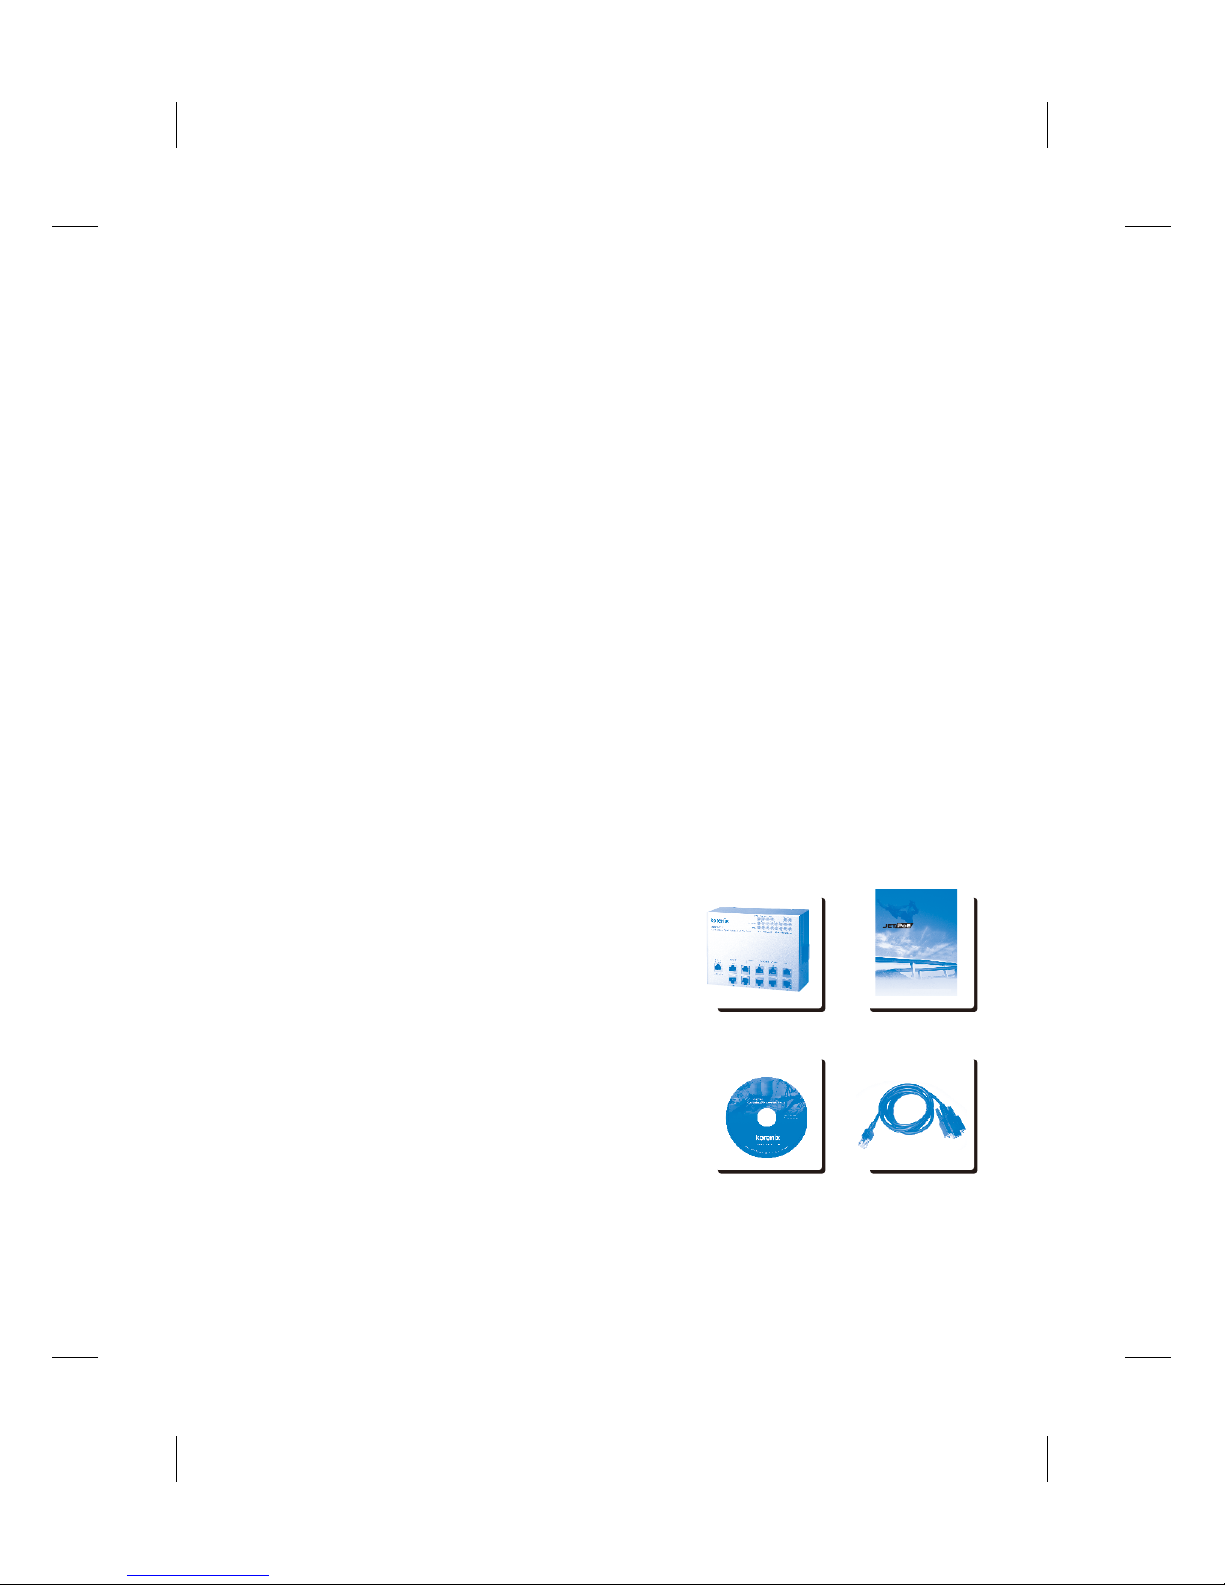
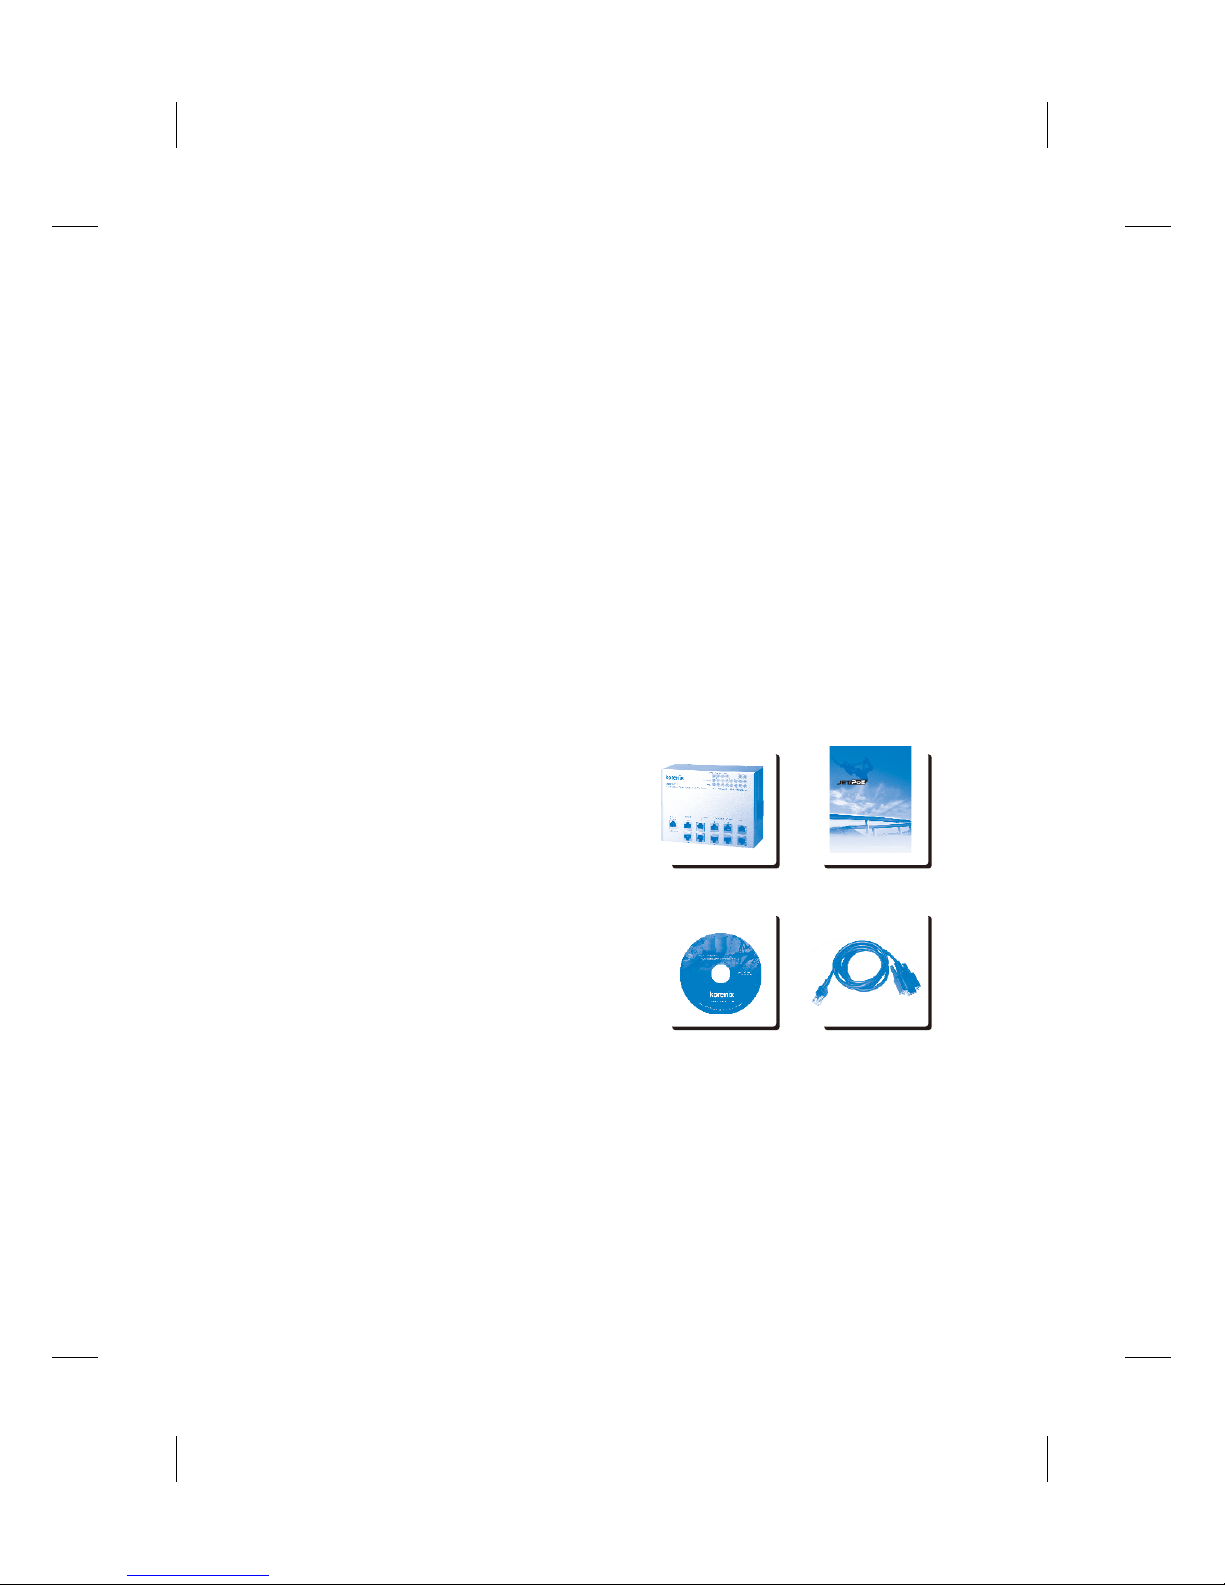
Package Checklist
Unpack the box and you will find
4JetNet 5710G
4Quick Installation Guide
4CD User Manual
4Wall /Panel Mounting kits with screw x 1 set
JetNet 5710G
Industrial 8PoE +2G Managed High Power
IEEE802.3at PoE Switch
Quick Installation Guide
www.korenix.com
V1.0
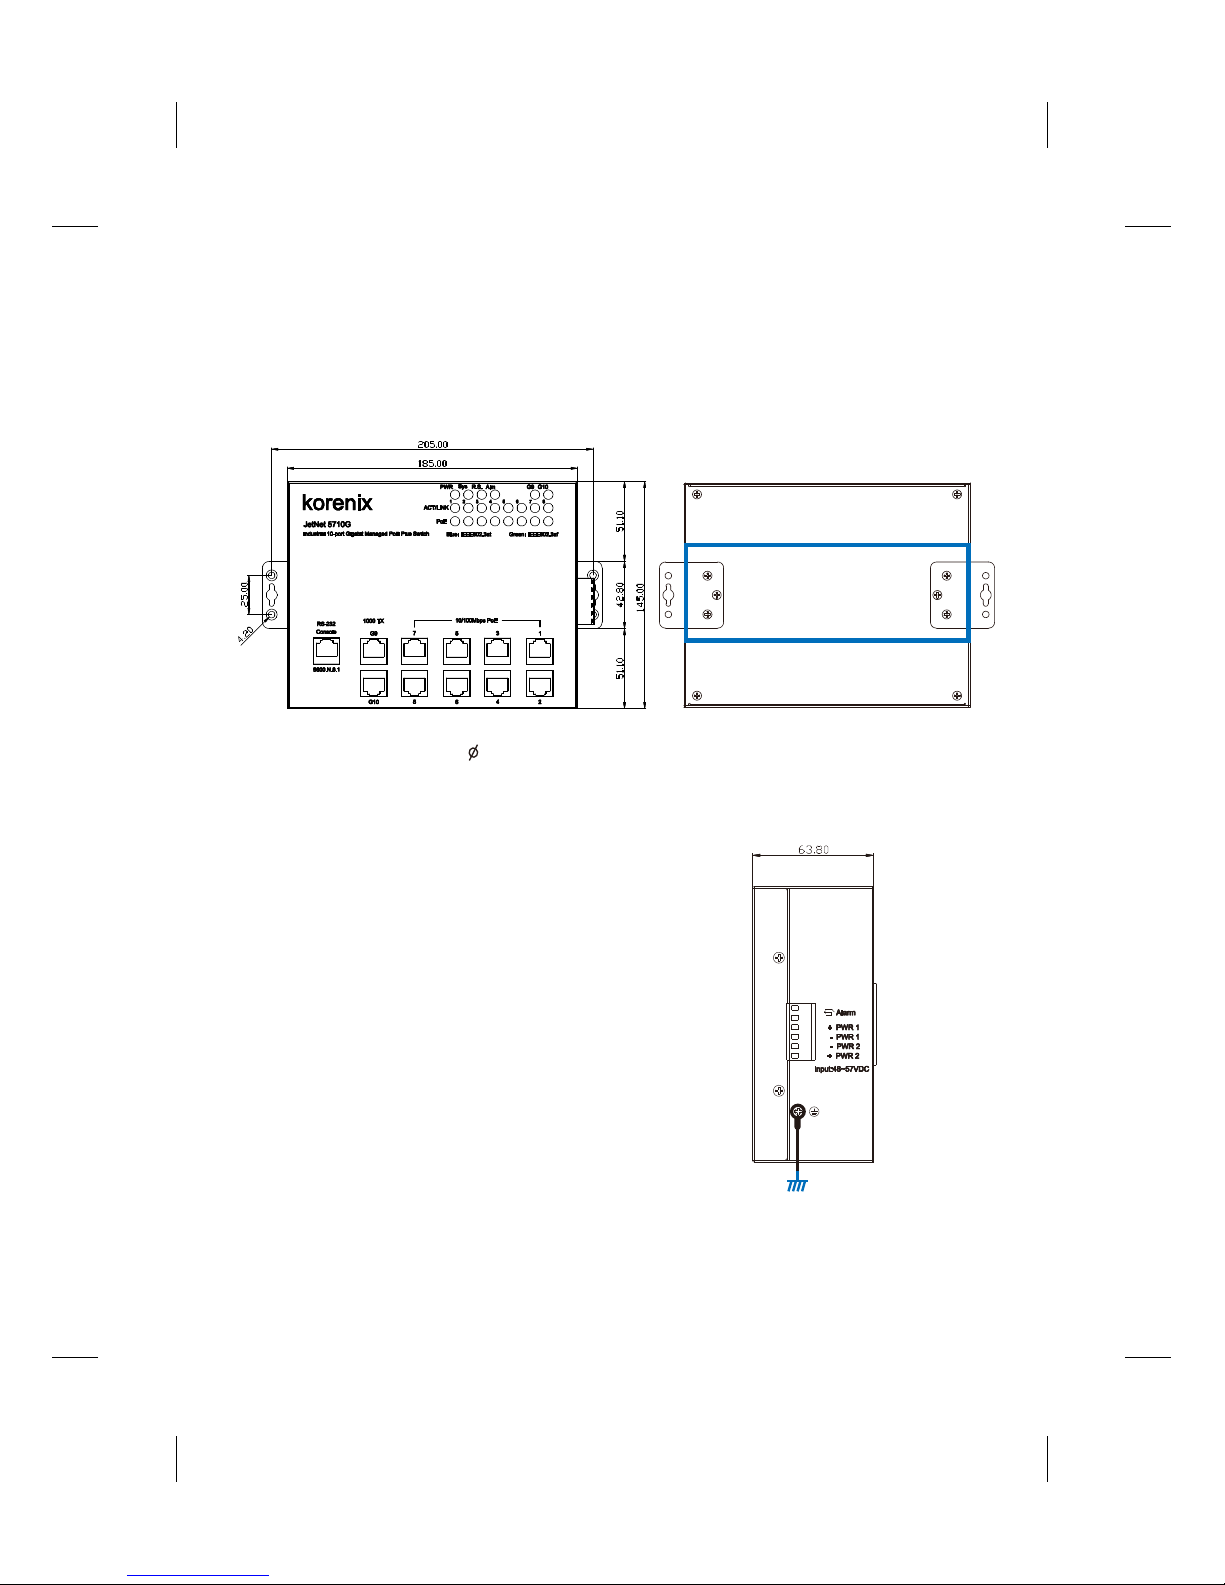
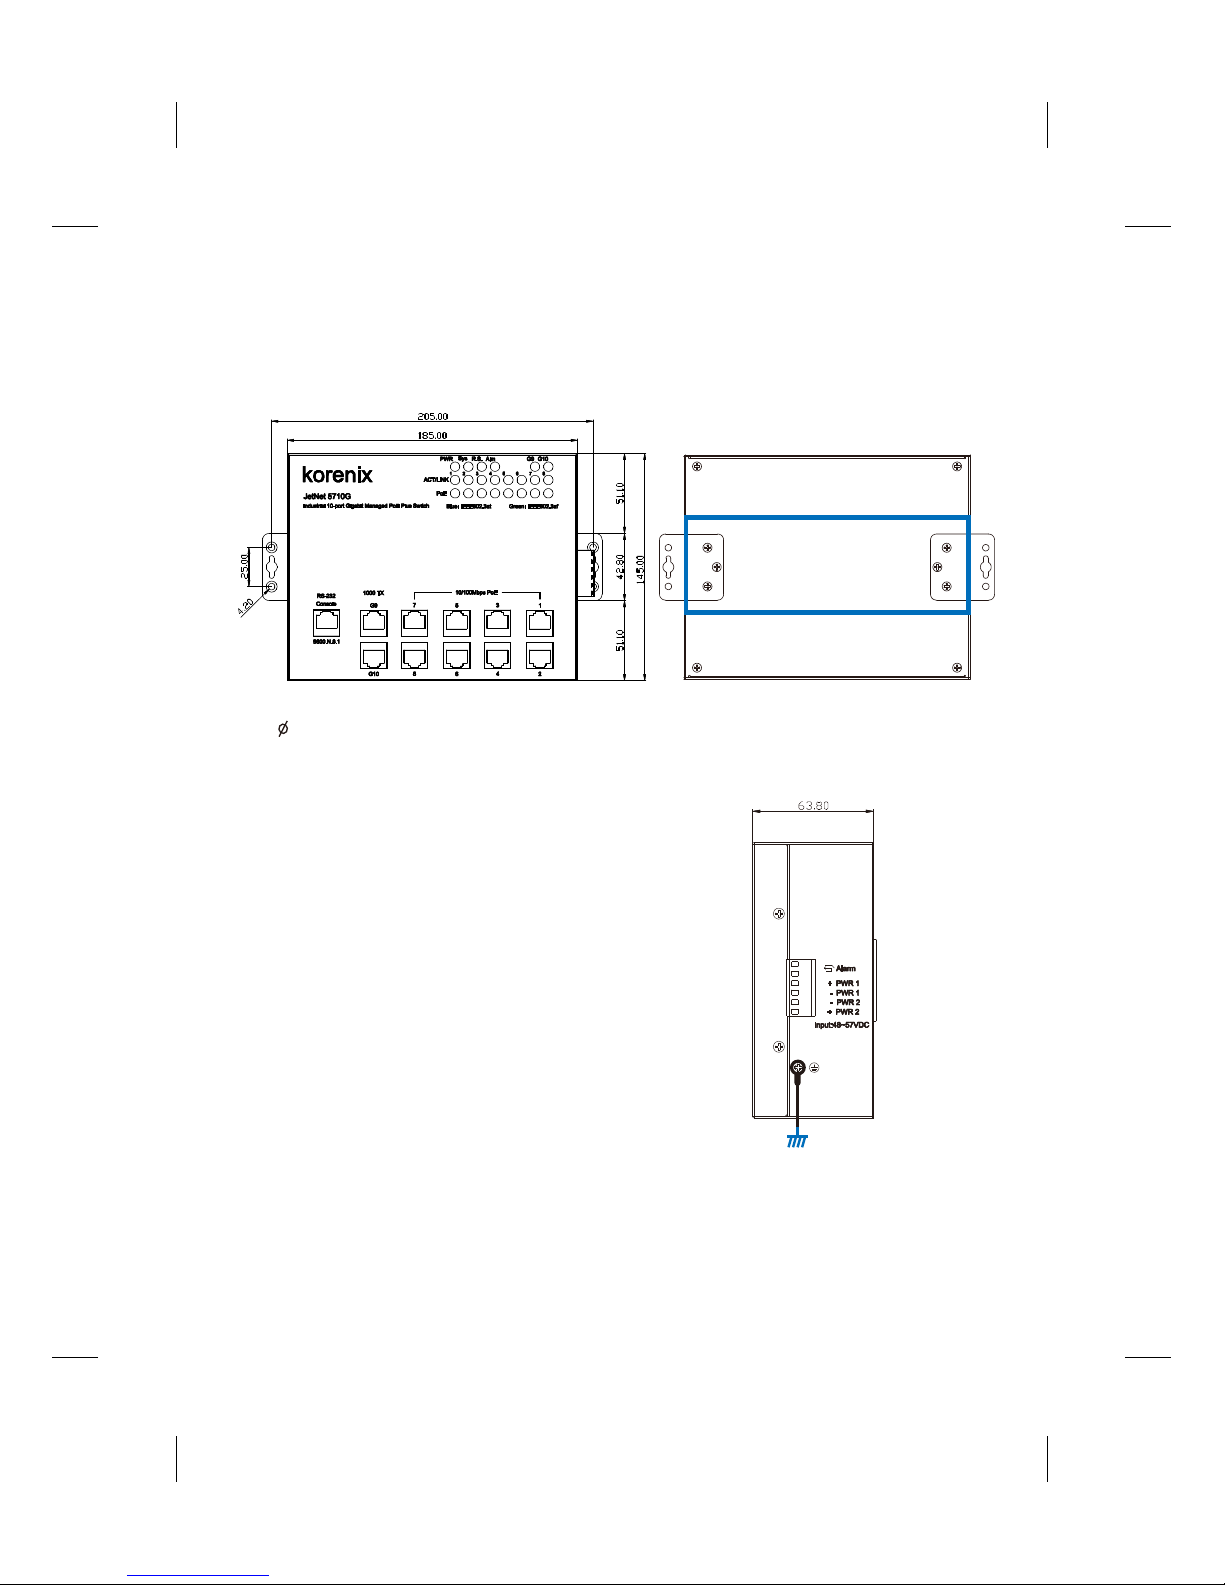
Grounding JetNet 5710G
There is one grounding screw on the right side of JetNet
5710G. Connect the frame grounding of JetNet 5710G
to the grounding surface to ensure safety and prevent
noise for communication interference.
JetNet 5710G supports wall-mounting only. There are 6 screw holes on the rear side of the
JetNet 5710G for fixing the mounting plate. Use the screws from the package to lock the
plates as shown in the Figure-A and Figure-B.
Use appropriate screw with 4.2mm nut to lock the device on wall or panel where with good
heat dissipation.
Wall mounting the Unit
Chassis Earth Ground
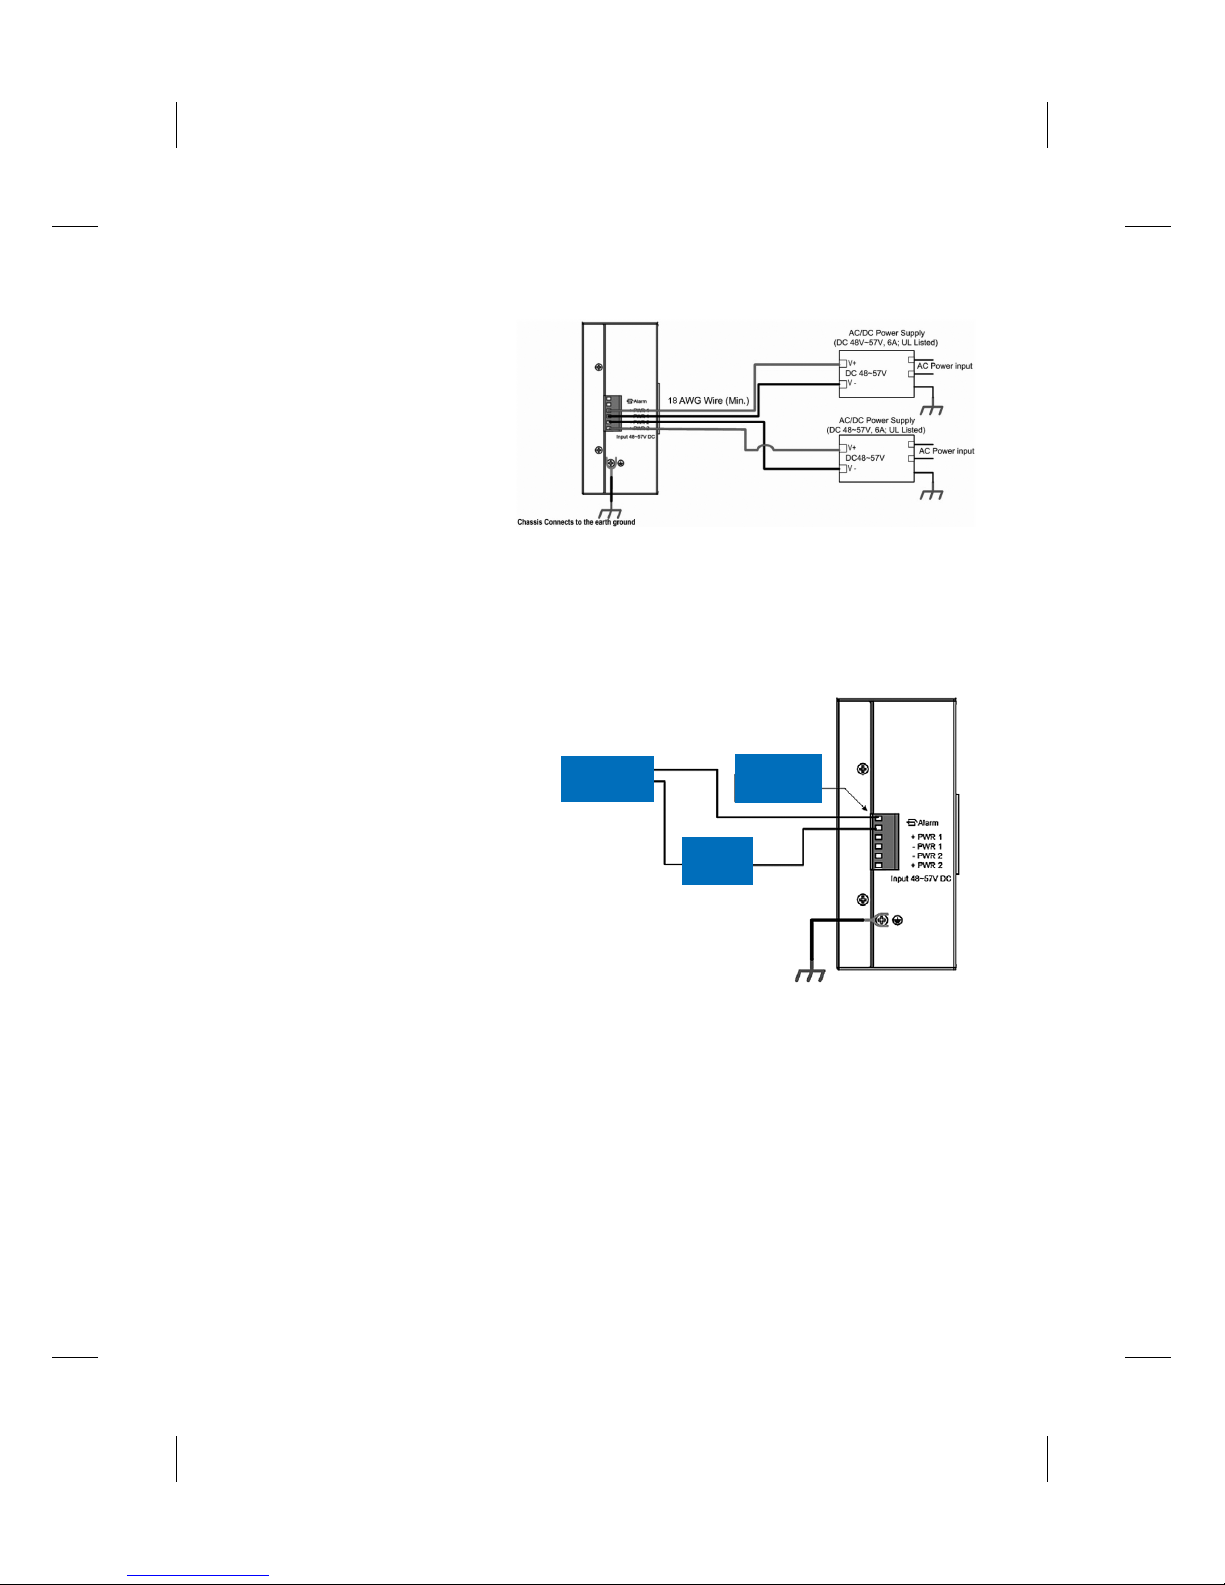
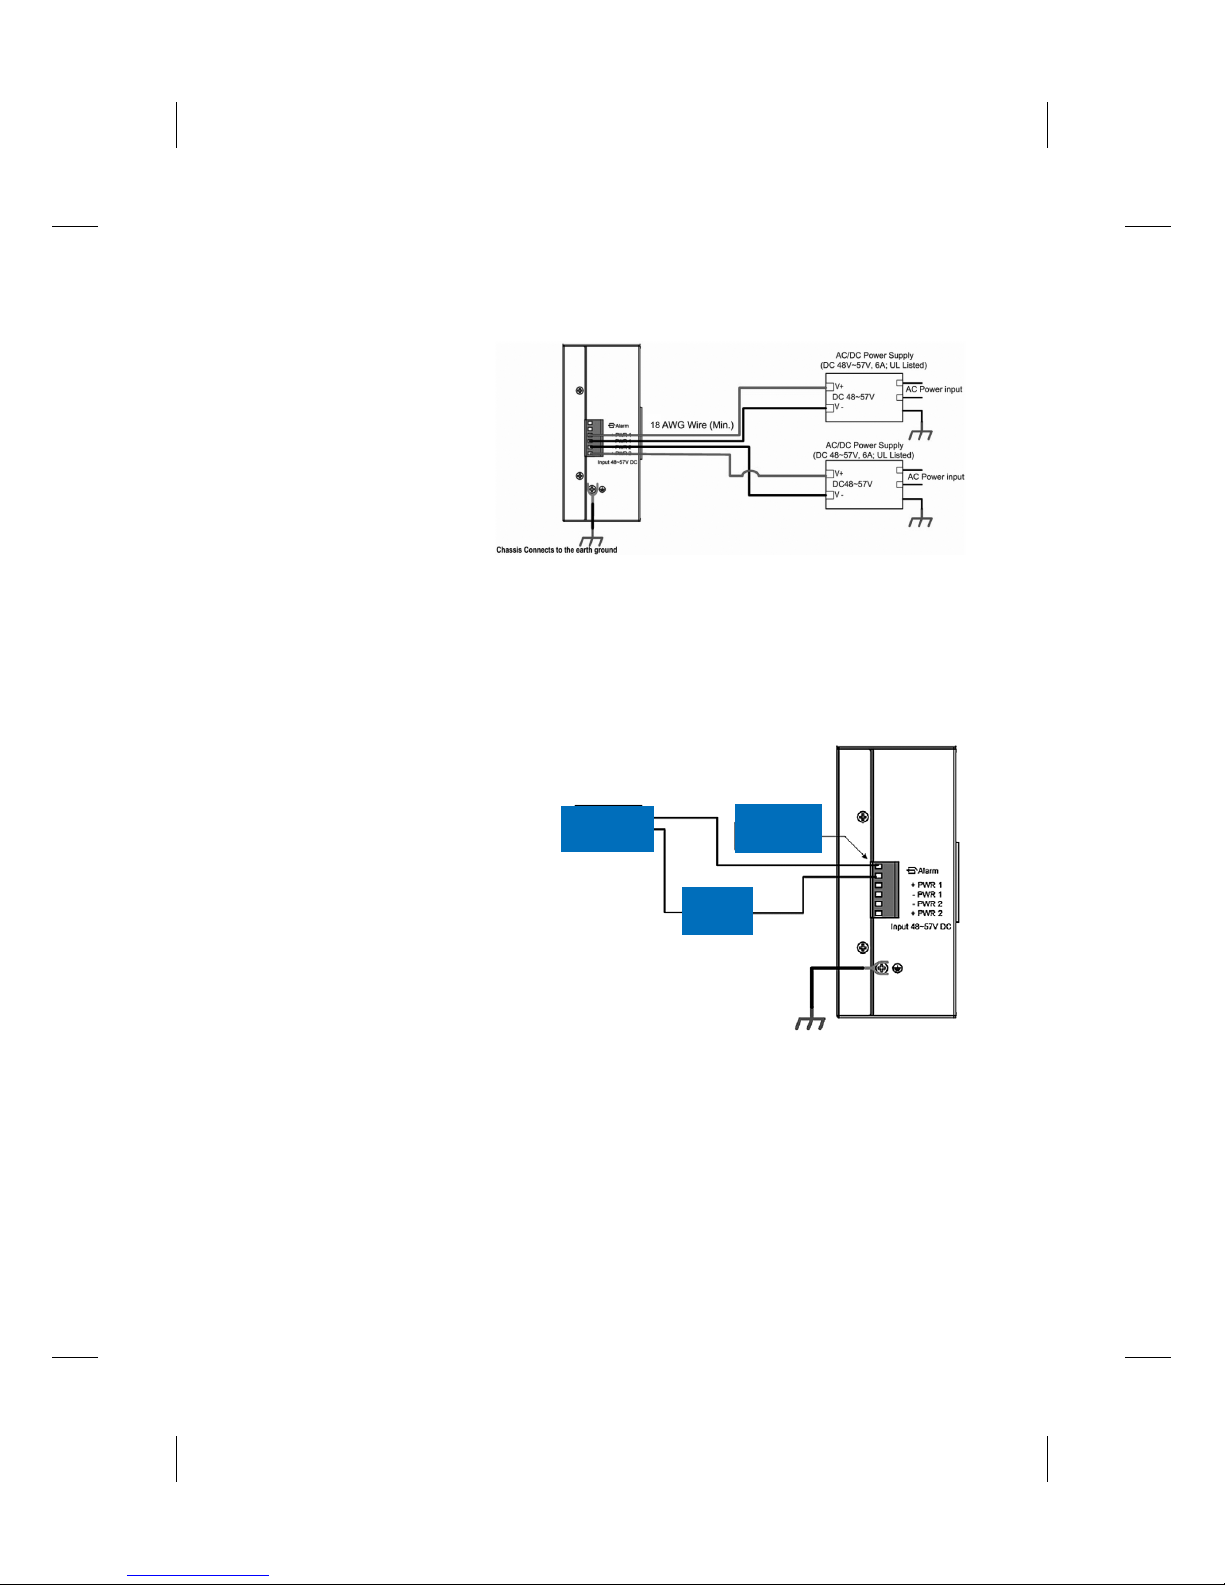
Wiring the Power Inputs
Wiring the Relay Output (DO)
Connecting to Network
1. Insert the positive and negative
wires into the V+ and V- contact
on the terminal block connector.
2. Tighten the wire-clamp screws
to prevent the power wires from
being loosened.
The relay output contacts are in the
bottom side as shown in Figure-C.
The relay output (DO) is controlled
by the pre-defined operating rules.
To activate relay output function,
please refer to the User’s Manual for
a detailed Relay Output information.
1. Connecting the Ethernet Port: Connect the Ethernet port of JetNet 5710G with the
other Ethernet device by Cat-5/Cat-6 UTP or STP cable, and then the LNK/ACT LED will
turn on and start flashing to indicate that the communication is occurred between 2 devices.
Notes: The recommended working voltage is DC48V (Input range: DC48~ 57V),
maximum system power consumption will be 250 watts with 8 port 30W PD loading.
Note: The relay contact only supports 1A current, DC 24V. It is not recommended to
apply higher voltage and current that exceeds these specifications.
Extra alarm
power source
Relay carry
current 1A/
DC 24V
Alert
Device
Dry Relay Alarm Output
Simulate Diagram
Earth Ground

Device Management
JetNet 5710G Industrial Managed Switch provides both in-band and out-band configuration
methods. You can configure the switch via the RS232 console with the attached console
cable. Or you can remotely manage the switch via network, using Telnet/SSH or Web/
HTTPS management.
1. Preparation for Console Management: Attach the RS-232 DB9 connector to your PC’s
COM port. Connect the RJ-45 connector to the console port of the JetNet 5710G.
Go to Start -> Program -> Accessories -> Communication -> Hyper Terminal.
Give a name to the new console connection.
Choose the COM name, and select the correct serial settings. The serial port settings of
JetNet 5710G are as below: 9600bps, No parity check, 8 Data bits, 1 stop bit
After connected, you will see the Switch login request. Type the username and password to
login. The default username is “admin”, password is “admin”.
Follow the manual to configure the software features.
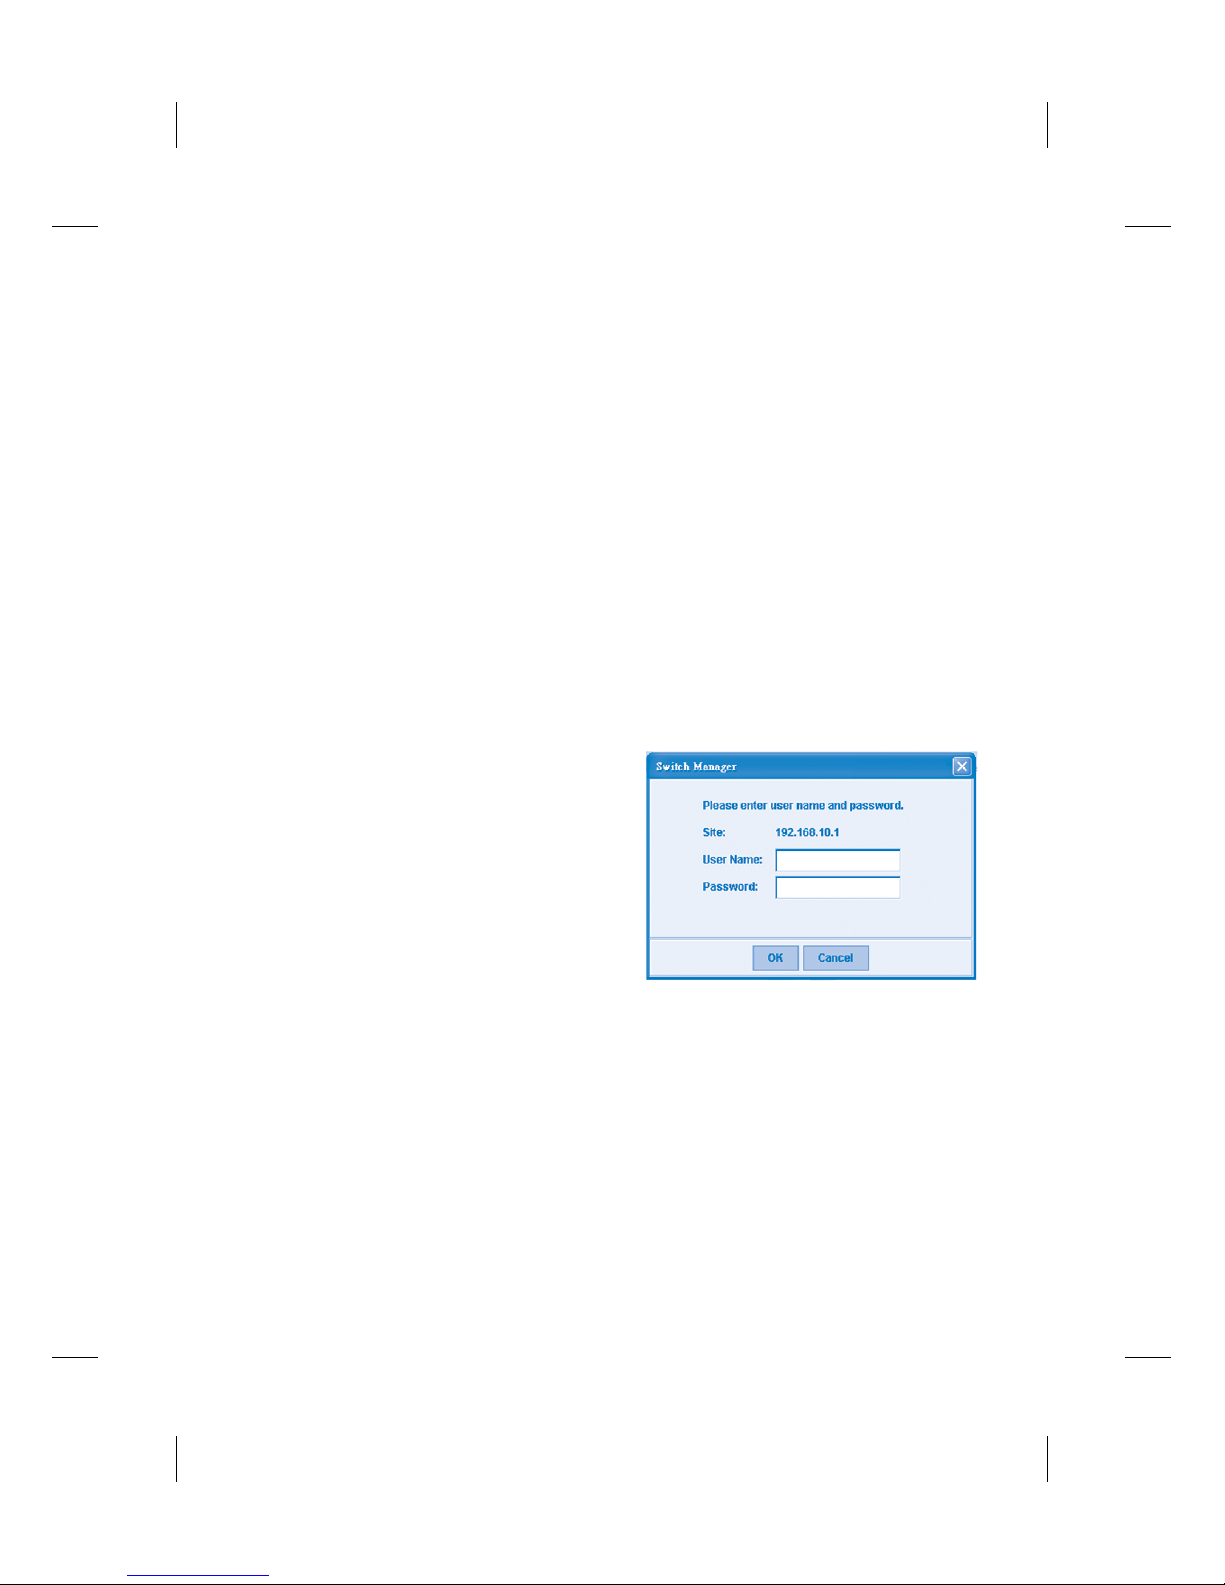
Type http://5710G_IP_Address (The default IP address is 192.168.10.1.), then press Enter.
The login screen will appear next.
Type in the user name and password and click “OK” button. The welcome page of the Web-
Based management interface will appear shortly. The default user name and password is
admin/admin
2. Preparation for Web Management:
Before you attempt to use the embedded web
interface to manage switch operation, verify
that JetNet 5710G is properly installed on your
network and that every PC on this network
can access the switch via the web browser.
Launch the web browser (Internet Explorer or
Mozilla Firefox) on the PC.
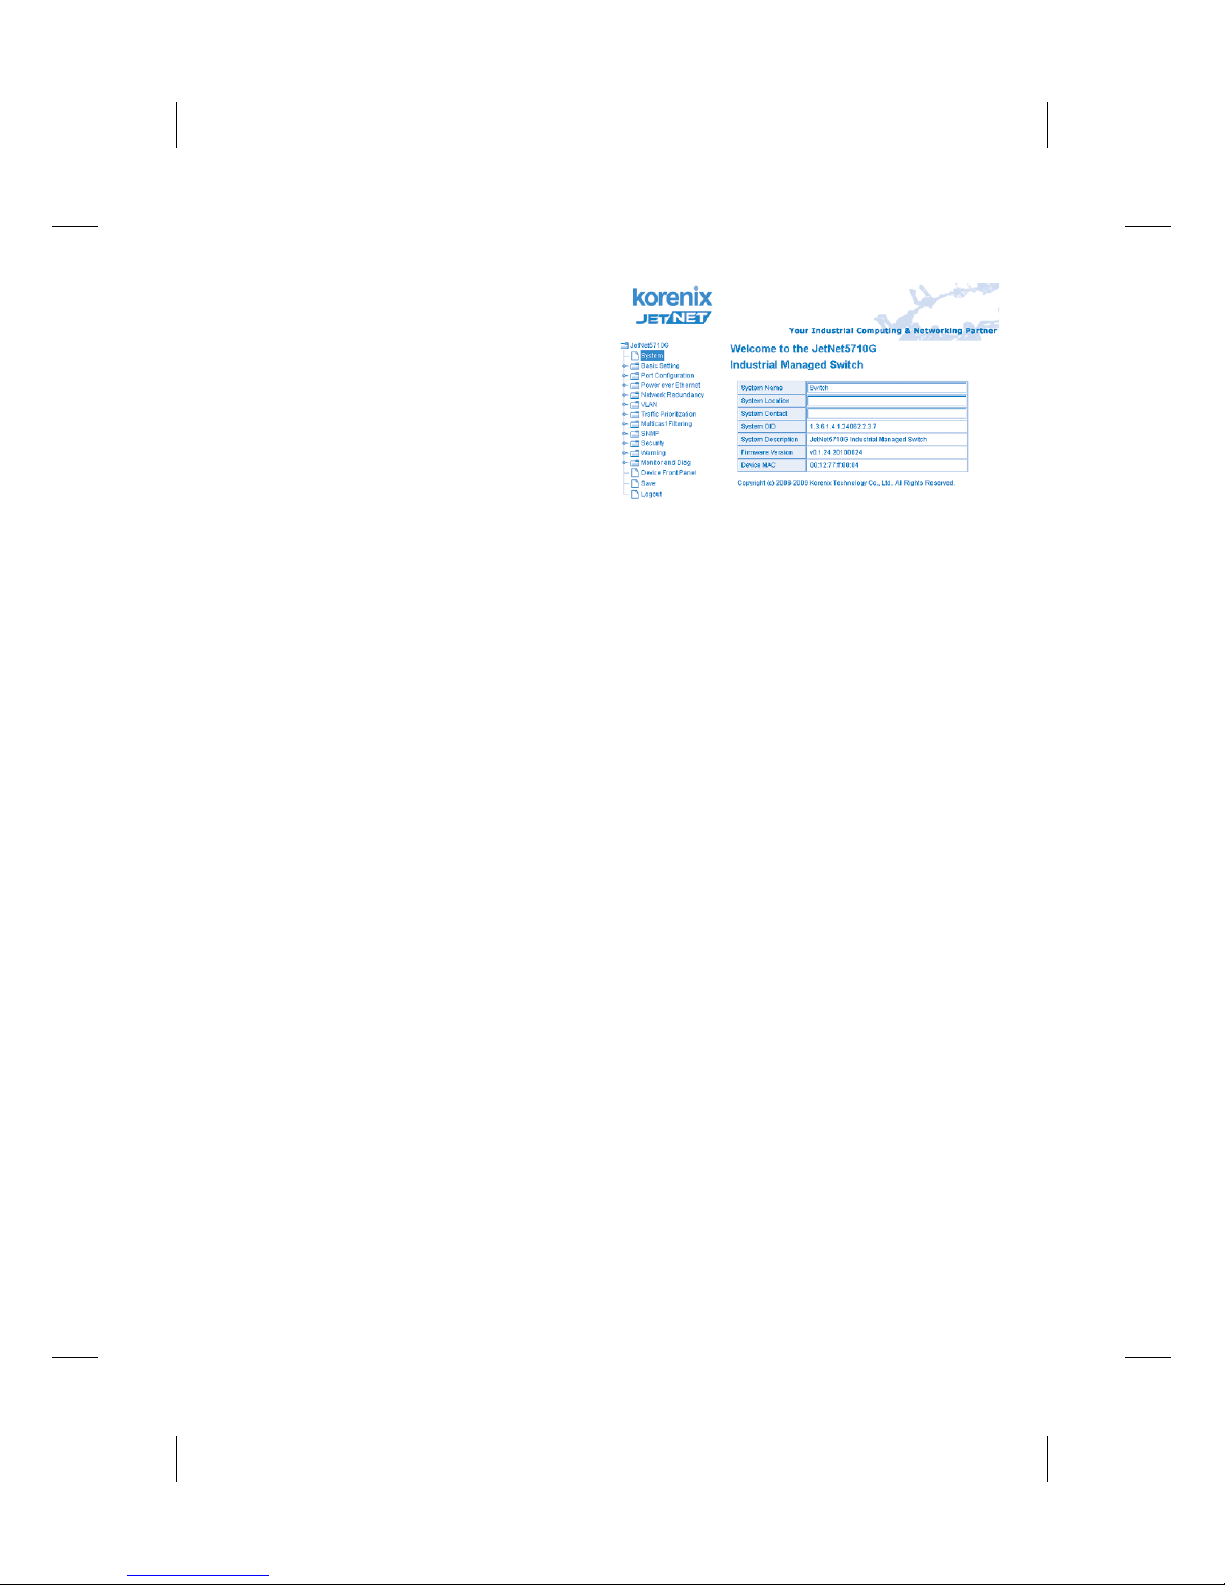
At the left column of the web management
interface are listed the software features.
Ring column will list the available settings.
For more detailed instructions, please refer
to the Users’ manual of JetNet 5710G
included in the packing or download it from
the Korenix Web site at www.korenix.com.
Korenix Customer Service
KoreCARE is Korenix Technology’s global service center, where our professional staffs are
ready to answer your questions at any time.
Korenix global service center’s e-mail is KoreCARE@korenix.com
ὖ䗄
JetNet 5710Gᰃϔℒ߯ᮄⱘܚ㔥ㅵൟPoEҹ㔥ѸᤶᴎˈϧЎ催ޚ催㽕∖ⱘPoEᑨ⫼㗠䆒
䅵ˈ՟བᅲᯊⱘIP㾚乥ⲥ㋏㒳ˈӮ⍝ঞ䇌བWimaxঞ802.11a/b/g/nㄝܜ䖯ⱘ催ࡳ⥛催ᏺᆑⱘ
᮴㒓䆒ܹDŽ⫼᠋ৃ䗮䖛䕃ӊ䆒㕂LLDP㞾ࡼẔ㋶ࡳ㛑ˈ䅽8Ͼ10/100 TX PoEկ⬉ッষᦤ
կ⒵䎇IEEE 802.3afޚⱘ15.4Wⱘ⬉䞣ˈҹঞ⒵䎇IEEE 802.3atޚⱘ30W催⬉䞣DŽᴎ᳔
催䕧ߎࡳ⥛ৃ䖒200Wˈ㛑⒵䎇᮹Ⲟ䭓ⱘᴀഄPoE䆒㗫⬉䳔∖DŽϸϾܚҹ㔥ষᦤկ催
䗳Ϟ㘨䗮䘧ˈ䖲⒵䎇Korenix MSRϧ߽ݫԭᡔᴃⱘ催ሖЏᑆѸᤶᴎDŽKorenix RSRᡔᴃৃҹ
5msПݙ໘⧚㔥㒰Ёᮁᘶ䗮䆃DŽJetNet 5710G⒵䎇EN 50121-3-2䪕䘧EMCᑨ⫼ޚˈᬃ
ᣕ-40~70
o
Cᆑ⏽Ꮉ⏽ᑺˈᣕ㓁ᤃࡼކߏⱘᵕッᙊࡷ⦃๗ЁˈᦤկӬ䋼ৃ䴴ⱘ㔥䏃䗮䆃
᳡ࡵDŽ
ℸ᭛ḷЎᙼᦤկϔϾ䆒ᅝ㺙ঞկ⬉ⱘㅔ㽕ҟ㒡ˈ乘њ㾷Փ⫼㒚㡖ˈ䇋ⱏᔩKorenix㔥キ
ϟ䕑⫼᠋ݠ˖www.korenix.com.
䆒⏙
ᠧᓔࣙ㺙Ẕᶹ䜡ӊ
4JetNet 5710G
4ᖿ䗳ᅝ㺙ᇐ
4⫼᠋ݠܝⲬ
4ຕᣖ/ᑇ䴶ᅝ㺙䜡ӊϔ㒘㶎ϱ
CH
JetNet 5710G
Industrial 8PoE +2G Managed High Power
IEEE802.3at PoE Switch
Quick Installation Guide
www.korenix.com
V1.0
JetNet 5710G䆒ഄ
JetNet 5710Gᴎ䑿েջ᳝ϔϾഄ㶎↡DŽᇚഄ㒓㶎↡
ഄˈ⹂ֱ䆒ᅝܼˈ䰆ℶ⬉⇨ᑆᡄDŽ
JetNet 5710Gҙᬃᣕຕᣖᅝ㺙ˈ݊㚠䴶᳝6Ͼ㶎ᄨ⫼Ѣᅮຕᣖᅝ㺙䜡ӊDŽ䇋ᣝ✻-Aˈ-B
ᦤ⼎ˈᇚᅝ㺙䜡ӊ⫼㶎ϱᅮᴎ䑿ϞDŽ
Փ⫼ 4.2mm㾘Ḑⱘ㶎ϱᇚ䆒ᅮᬷ⛁ᗻ㡃དⱘᑇᵓຕϞDŽ
ຕᣖᅝ㺙
Chassis Earth Ground
⬉⑤䖲
Relay Output (DO)㒻⬉఼䄺䖲
㔥㒰䖲
1. ᇚ⬉⑤ⱘℷ䋳ᵕᓩ㒓ߚ߿
ܹ䆒েջ⬉⑤㒓ῑⱘV+
V-ッষDŽ
2. ᢻ㋻㶎ϱˈ䰆ℶ⬉⑤㒓㜅㨑
བ-C᠔⼎ˈ㒻⬉఼䄺㾺⚍ԡѢᴎ
䑿েջDŽRelay Output (DO)㒻⬉఼
䄺ৃḍ乘ᅮНⱘϡৠ᪡ᴹ㾺থDŽ
བԩࡼ㒻⬉఼䄺ࡳ㛑ˈ䇋খⳟ⫼
᠋ݠ㒻⬉఼䄺ࡳ㛑䆺㾷DŽ
1. 䖲ҹ㔥ッষ: ⫼Cat-5/Cat-6ሣ㬑䴲ሣ㬑ঠ㒲㒓䖲JetNet 5710Gⱘ㔥ষ݊ᅗҹ
㔥䆒ˈ߭LNK/ACT LEDᣛ⼎♃Ӯ҂䍋ᑊ䮾⚕ˈ㸼⼎ϸϾ䆒П䯈ℷ䗮䆃DŽ
⊼˖㤤Ꮉ⬉ЎDC48V (䕧ܹ⬉⑤㣗ೈ: DC48~ 57 V)ˈᔧ8Ͼッষഛ᳝30W催ࡳ⥛PD
⒵䕑ˈᭈᴎ᳔ࡳ㗫Ў250WDŽ
⊼: 㒻⬉఼䄺㾺⚍ҙᬃᣕ1A⬉⌕ˈDC 24V⬉DŽ䇋࣓Փ⫼催Ѣℸ㾘Ḑⱘⱘ⬉ঞ⬉⌕DŽ
Extra alarm
power source
Relay carry
current 1A/
DC 24V
Alert
Device
Dry Relay Alarm Output
Simulate Diagram
Earth Ground
-C
䆒ㅵ⧚
JetNet 5710G 㔥ㅵൟᎹϮҹ㔥Ѹᤶᴎᬃᣕᏺݙ(in-band)ঞᏺ(out-band)䆒㕂ᓣDŽ⫼
᠋ৃҹ䗮䖛RS232ࠊッষᇍѸᤶᴎ䖯㸠䆒㕂ˈ䗮䖛㔥㒰䖯㸠䖰ㅵ⧚DŽᙼ䖬ৃҹ䗝ᢽ
Telnet/SSH, Web/HTTPS⾡ㅵ⧚⬠䴶DŽ
1. Consoleㅵ⧚ⱘޚᎹ: ᇚRS-232 DB9༈ッ䖲ࠄԴ䅵ㅫᴎⱘCOMষˈᇚRJ-45ッᦦ
ܹJetNet 5710GⱘconsoleッষDŽ
䖤㸠Start(ࡼ) -> Program(ᑣ) -> Accessories(䰘ӊ) -> Communication(䗮䆃) -> Hyper
Terminal(䍙㑻㒜ッ)DŽ
Ўᮄ䖲ৡ䗝ᢽCOMッষোˈ䆒ᅮℷ⹂ⱘІষখ᭄DŽJetNet 5710GⱘІষখ᭄䆒ᅮབϟ
⊶⡍⥛˖9600bpsˈ偠ԡ˖᮴ˈ᭄ԡ˖8ˈذℶԡ˖1
䖲ৢˈӮߎ⦄Ѹᤶᴎⱘⱏᔩᦤ⼎DŽ䬂ܹ⫼᠋ৡঞᆚⷕৃⱏᔩDŽ咬䅸⫼᠋ৡᰃĀadmināˈ
ᆚⷕᰃĀadminā䇋ḍ⫼᠋ݠ䖯㸠ࡳ㛑䆒㕂DŽ
2. Webㅵ⧚ⱘޚᎹ: Փ⫼ݙ㕂Web⬠
䴶ᇍѸᤶᴎᅲᮑㅵ⧚Пࠡˈ䇋ܜ偠䆕JetNet
5710GᏆ㒣ℷ⹂ܹ㔥㒰ˈϨ㔥㒰Ёⱘӏᛣ䅵
ㅫᴎ䛑ৃҹ䗮䖛Web⌣㾜఼䆓䯂ѸᤶᴎDŽ
ࡼ䅵ㅫᴎϞⱘ⌣㾜఼ (IE⌣㾜఼Mozila
Firefox) ഄഔ䬂ܹ http://5710GⱘIPഄഔ
(咬䅸ⱘIPഄഔᰃ192.168.10.1.)✊ৢಲ䔺
Ӯߎ⦄ⱏᔩにষDŽ䬂ܹ⫼᠋ৡᆚⷕⱏᔩѸᤶ
ᴎDŽ咬䅸ⱘ⫼᠋ৡᆚⷕᰃadmin/adminDŽ
⚍ߏOKˈ߭Ӯߎ⦄webㅵ⧚⬠䴶ⱘЏ义DŽ
 Loading...