

Korenix JetBox9500 series, JetBox9400 series, JetBox5400 series, JetCard5400 User Manual

JetOS95
User Manual
www.korenix.com

2
Overview | Korenix
Copyright Notice
Copyright© 2011 Korenix Technology Co., Ltd.
All rights reserved.
Reproduction without permission is prohibited.
Information provided in this manual is intended to be accurate and reliable. However, the
original manufacturer assumes no responsibility for its use, or for any infringements upon the
rights of third parties that may result from its use.
The material in this document is for product information only and is subject to change without
notice. While reasonable efforts have been made in the preparation of this document to assure
its accuracy, Korenix assumes no liabilities resulting from errors or omissions in this document,
or from the use of the information contained herein.
Korenix reserves the right to make changes in the product design without notice to its users.
Acknowledgments
Korenix is a registered trademark of Korenix Technology Co., Ltd.
All other trademarks or registered marks in the manual belong to their respective
manufacturers.

Table of Content
Copyright Notice .................................................................................................................... 2
Acknowledgments.................................................................................................................. 2
Table of Content .................................................................................................................... 3
Chapter 1 Overview ........................................................................................................................ 6
1-1 Applied Models .............................................................................................................. 6
Chapter 2 Getting Start ................................................................................................................... 7
2-1 System login ................................................................................................................... 7
2-1-1 Serial Console ......................................................................................................... 7
2-1-2 Telnet Console ....................................................................................................... 8
2-1-3 SSH Console............................................................................................................ 9
2-2 Configure Ethernet Interface ....................................................................................... 10
2-2-1 Modifying Network Settings with the Serial Console .......................................... 10
2-2-2 Static and Dynamic IP address ............................................................................. 12
2-2-3 Modifying Network Settings over the Network ................................................... 12
2-3 Test Program Developing – Hello.c .............................................................................. 13
2-3-1 Installing the Toolchain (Linux) ............................................................................ 14
2-3-2 Compiling Hello.c ................................................................................................. 14
2-3-3 Uploading “test” to JetBox9500 and Running the Program ................................ 15
Chapter 3 System Feature ............................................................................................................ 17
3-1 System Version............................................................................................................. 17
3-2 Enable/Disable Daemons ............................................................................................. 17
3-3 Setting Run-Level ......................................................................................................... 19
3-4 Setting System Time..................................................................................................... 19
3-5 Adjust System Time...................................................................................................... 20
3-5-1 NTP Client ............................................................................................................. 20
3-5-2 NTP Server ............................................................................................................ 21
3-6 Cron Daemon (Schedule jobs) ..................................................................................... 21
3-7 Connect Peripherals ..................................................................................................... 22
Chapter 4 Network Feature .......................................................................................................... 24
4-1 Telnet ........................................................................................................................... 24
4-2 sshd .............................................................................................................................. 24
4-3 FTP ................................................................................................................................ 25
4-4 DNS ............................................................................................................................... 25
4-5 Web Server ................................................................................................................... 26
4-6 IPTABLES....................................................................................................................... 27
4-7 NAT ............................................................................................................................... 29
4-8 Dail-up Service ............................................................................................................. 30

4
Overview | Korenix
4-9 PPPoE ........................................................................................................................... 30
4-10 NFS ............................................................................................................................... 32
4-11 E-Mail ........................................................................................................................... 32
4-12 SNMP ............................................................................................................................ 33
4-13 OpenVPN ...................................................................................................................... 33
4-14 OpenSwan .................................................................................................................... 34
4-15 PPTP Client ................................................................................................................... 35
4-16 PPTP Server .................................................................................................................. 37
4-17 Routing -- Zebra Daemon ............................................................................................. 37
4-18 Ser2net ......................................................................................................................... 40
4-19 fastpath ........................................................................................................................ 41
4-20 keepalived .................................................................................................................... 42
4-21 PTPD ............................................................................................................................. 47
4-22 PTPDv2 ......................................................................................................................... 48
Chapter 5 Korenix Feature ............................................................................................................ 51
5-1 Ethertool ...................................................................................................................... 51
5-2 Vconfig ......................................................................................................................... 52
5-3 Diocfg ........................................................................................................................... 53
5-4 Poecfg ........................................................................................................................... 54
Chapter 6 Programmer’s Guide .................................................................................................... 55
6-1 Toolchain Introduction ................................................................................................ 55
6-1-1 Compiling Applications and Libraries................................................................... 56
6-1-2 Tools Available in the Host Environment ............................................................. 56
6-2 Device API .................................................................................................................... 57
6-3 RTC ............................................................................................................................... 57
6-4 Watch Dog Timer ......................................................................................................... 58
Chapter 7 Appendix ...................................................................................................................... 60
7-1 Firmware Upgrade ....................................................................................................... 60
7-2 JetView ......................................................................................................................... 60
7-2-1 Overview .............................................................................................................. 60
7-2-2 JetView for JetBox 9500 ....................................................................................... 60
7-3 USB Driver for GSM modems ....................................................................................... 61
7-4 Change RS485 mode on JetCard 1608 ......................................................................... 61
7-5 Software Specification ................................................................................................. 62
7-6 Busybox command ....................................................................................................... 64
7-7 Ser2net Manual ............................................................................................................ 69
7-8 Revision history ............................................................................................................ 73
7-9 Customer Service ......................................................................................................... 73

Korenix | Overview
5

6
Overview | Korenix
Chapter 1 Overview
The advantage of adopting Korenix JetBox series is ready-to-use. Korenix is devoted
to improve the usability of embedded computer in industrial domain. Besides
operating system, Korenix provides device drivers, protocol stacks, system utilities,
supporting services and daemons to make system integration simple. Further,
Korenix provides application development toolkits for users to build up their own
applications easily.
The stylish JetBox 9500 series is an industrial layer-3 router with
power-over-Ethernet technology and Linux computing. It is a gateway to connect
different network groups (Ethernet, fieldbus, serial or IO control) in a complex
networking architecture and manage peripherals at the front-end site through its
Linux programs or Java applications. It is reliable (network redundancy, system
recovery) and robust (passive cooling, protected against the dusts and spills, shock &
vibration resistance) to adopt in severe industrial vertical markets, such as
transportation, substation, or hazardous environment.
1-1 Applied Models
JetBox9500 series
JetBox9400 series
JetBox5400 series
JetCard5400
Note: SW features might be different according to different products

Korenix | Getting Start
7
Chapter 2 Getting Start
2-1 System login
Users can enter the JetBox Linux environment via the user name: root and no
password is required.
login : root
password : (none)
2-1-1 Serial Console
The serial console port gives users a convenient way of connecting to JetBox console utility.
This method is particularly useful when using JetBox for the first time. The signal is
transmitted over a direct serial connection, so you do not need to know either of JetBox’s
IP address in order to connect to the serial console utility.
Use the serial console port settings shown below.
Baud rate
115200bps
Parity
None
Data bits
8
Stop bits
1
Flow Control
None
Serial console port setting
Once the connection is established, the following windows will open.

8
Getting Start | Korenix
Serial console screen
To log in, type the Login name and password as requested. The default values as
following.
Login: root
Password: none
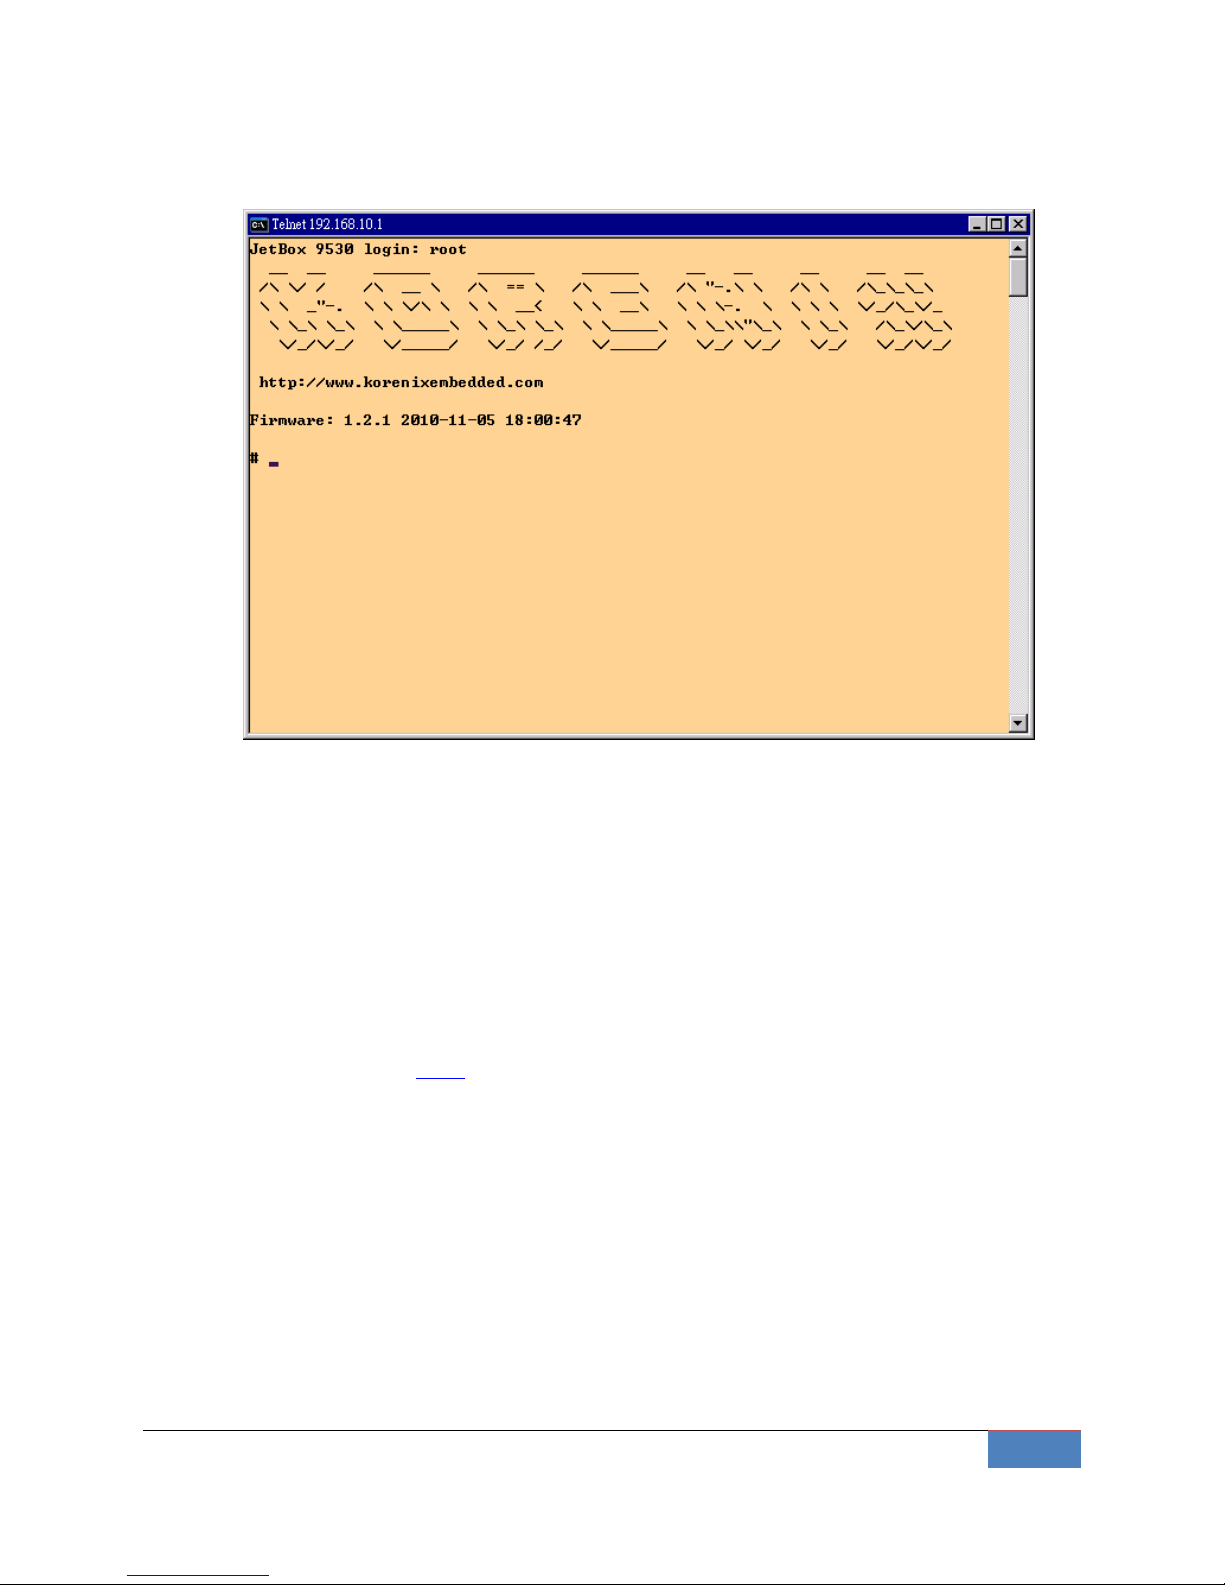
2-1-2 Telnet Console
If you know IP addresses and netmasks, then you can use Telnet to connect to JetBox9500.
The default IP address and Netmask for each port is given below:
Default IP address
Netmask
LAN
192.168.10.1
255.255.255.0
WAN
DHCP
Default IP address and Netmask
Use a cross-over Ethernet Cable to connect directly from your PC to JetBox 8100. You
should first modify your PC’s IP address and netmask so that your PC is on the same
subnet as JetBox.
To connect to a hub or switch connected to your local LAN, use a straight-through
Ethernet cable. The default IP address and netmasks are shown above. To login, type the
Login name and password as requested. The default values as following:
Korenix | Getting Start
9
Login: root
Password: none
Telnet console screen
You can proceed with the configuration of JetBox9500’s network settings when you reach
the bash command shell. Configuration instructions are given in the next section.
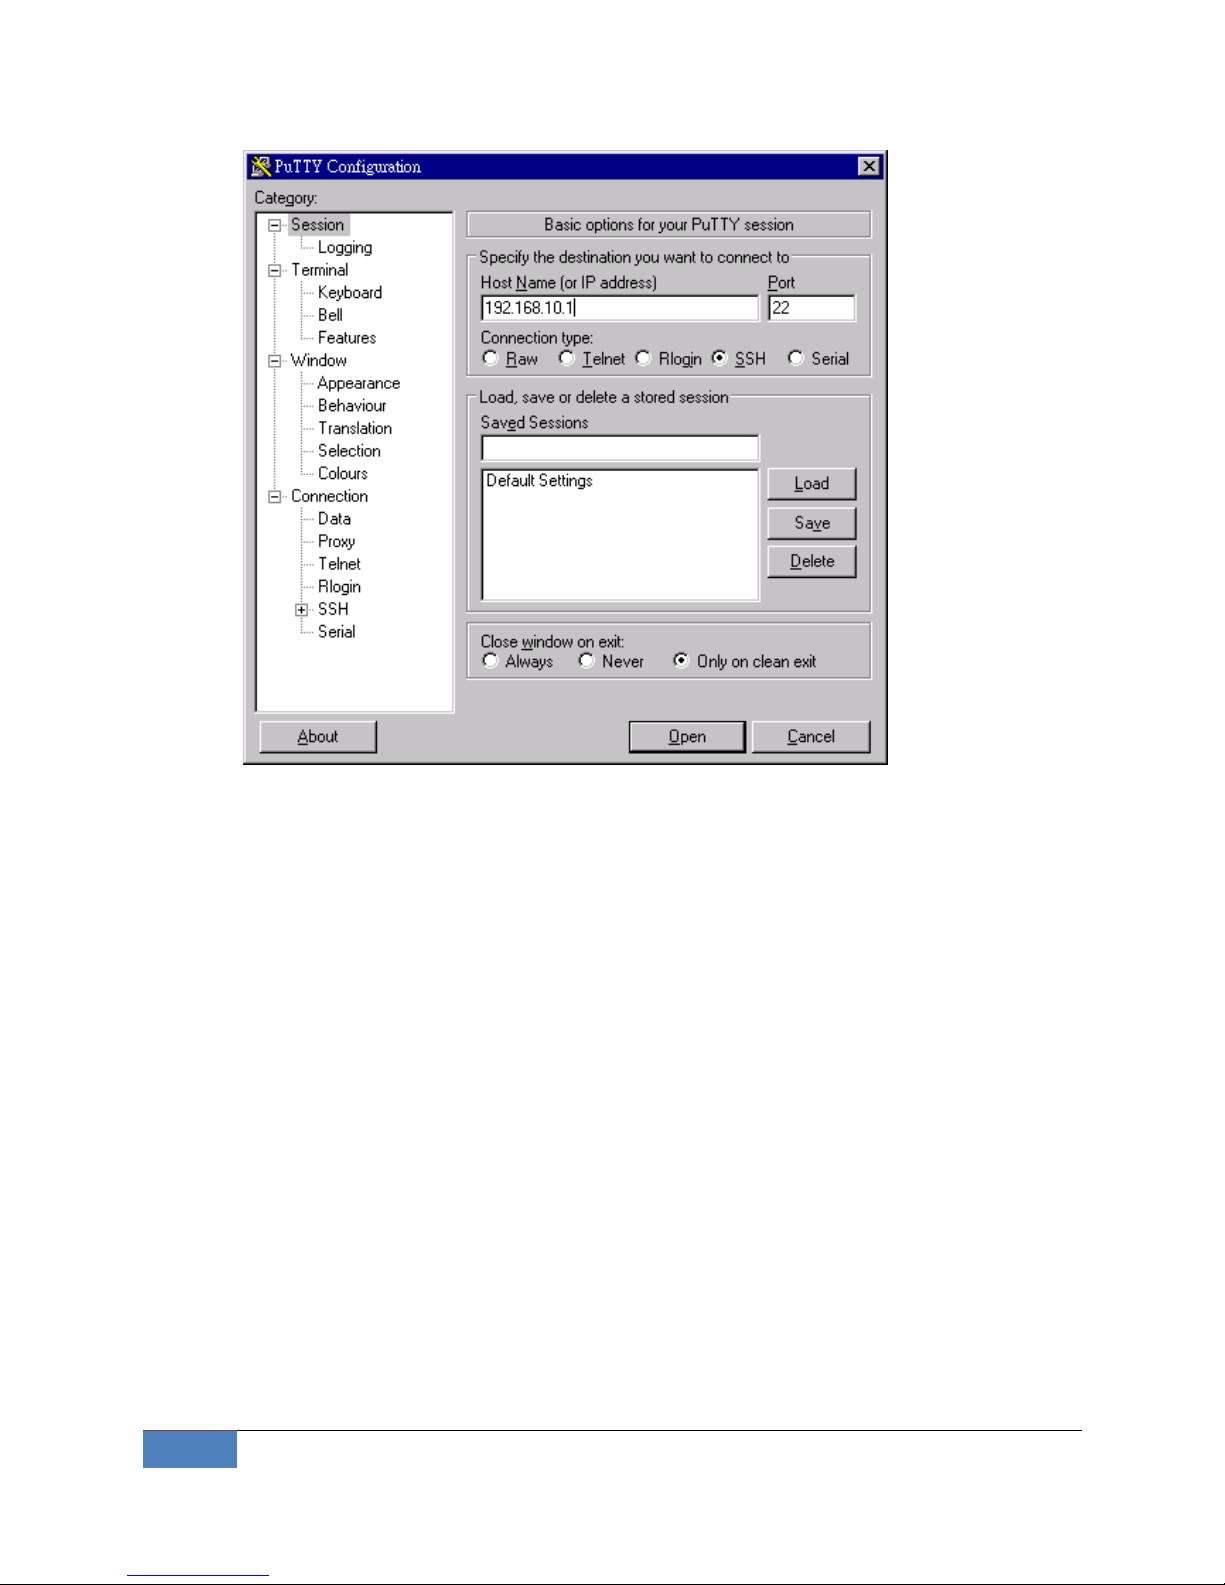
2-1-3 SSH Console
Start from firmware v1.3, JetBox9500 supports an SSH Console to offer users with better
security options.
Click on the link putty to download PuTTy(freeware) and set up an SSH console for
JetBox 9500 in a Windows environment. The following figure shows an example of the
configuration that is required.
10
Getting Start | Korenix
Windows PuTTy setting
2-2 Configure Ethernet Interface
JetBox9500 network setting can be modified with the serial console, or over the network.
2-2-1 Modifying Network Settings with the Serial Console
In this section, we use the serial console to modify JetBox9500’s network settings
Change Network Configuration
Follow the instructions given in a previous section to access JetBox9500’s Console
Utility via the serial Console port, and then type 'vi /etc/network/interfaces' to edit
network configuration file with vi editor.

Korenix | Getting Start
11
Edit Network configuration file
Static and Dynamic IP address
Static IP address:
As shown in below, 4 fields must be modified: address, netmask, broadcast and
network. The default IP addresses are 192.168.10.1.
iface lan inet static
address 192.168.10.1
netmask 255.255.255.0
broadcast 192.168.10.255
network 192.168.10.0
Dynamic IP addresses:
By default, the Jetbox9500 is configured for “static” IP addresses on LAN port and

12
Getting Start | Korenix
dhcp on WAN interface. To configure LAN port to request an IP address dynamically,
remove the original settings and add the following line.
iface lan inet dhcp
Default setting for LAN port
Default setting for WAN port
iface lan inet static
address 192.168.10.1
netmask 255.255.255.0
broadcast 192.168.10.255
network 192.168.10.0
iface wan inet dhcp
Default Gateway:
When static IP Address setting is used, add a default gateway is to set another
keyword “gateway”. For example:
iface wan inet static
address 192.168.1.2
netmask 255.255.255.0
broadcast 192.168.1.255
network 192.168.1.0
gateway 192.168.1.1 # This will set default gateway to
#192.168.1.1 on WAN port
2-2-2 Static and Dynamic IP address
After the /etc/network/interfaces file have been modified, issue the following command
to apply the network settings immediately:
/etc/init.d/network restart
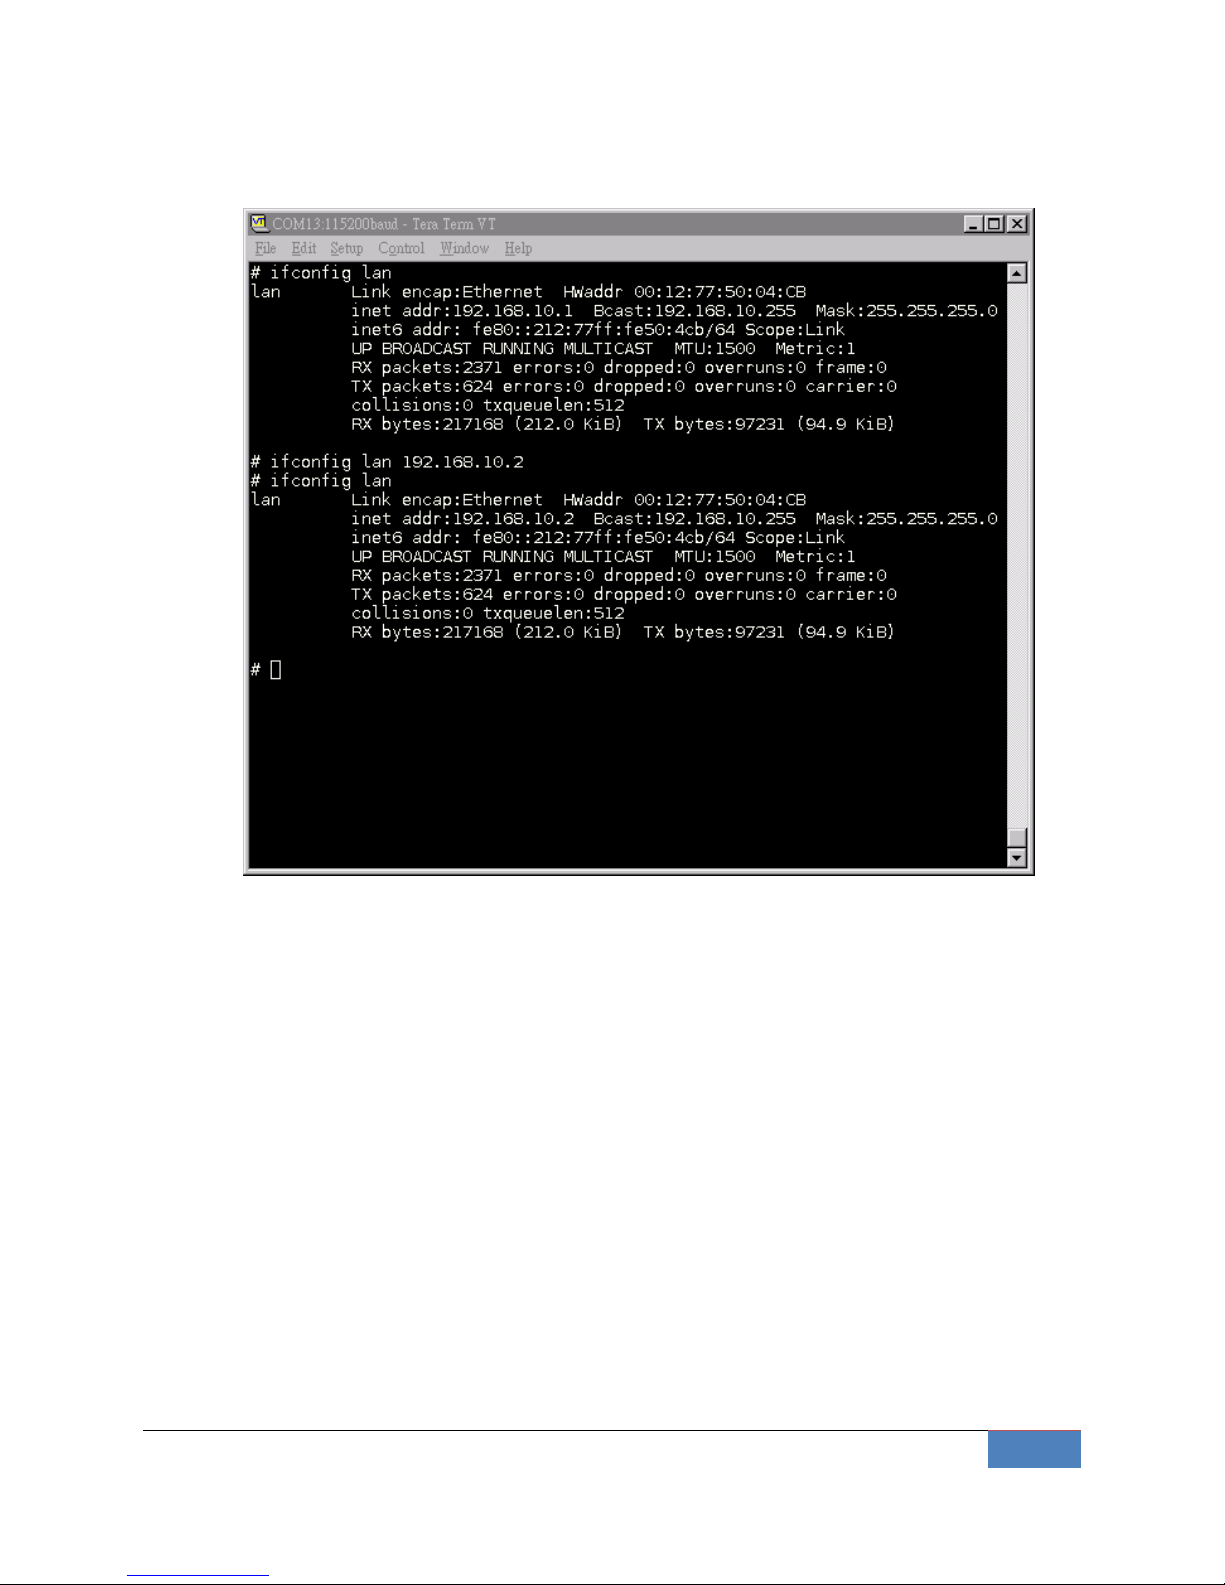
2-2-3 Modifying Network Settings over the Network
Same the previous section, IP settings can be modified over the network, too. There is
another way to change the IP address without modifying the file /etc/network/interfaces,
but the new settings will not be saved to the flash disk.
Korenix | Getting Start
13
For example, type the command #ifconfig lan 192.168.10.2 to change the IP address of
LAN interface to 192.168.10.2.
Network Setting over the Network
2-3 Test Program Developing – Hello.c
In this section, we use the standard “Hello” programming example to illustrate how to develop
a program for the JetBox9500. In general, program development involves the following seven
steps.
Step 1:
Connect the JetBox9500 to a Linux PC.
Step 2:
Install Toolchain on the Linux PC.
Step 3:
Set the cross compiler and PATH environment variables.
Step 4:
Code and compile the program.
14
Getting Start | Korenix
Step 5:
Download the program to the JetBox9500 via FTP.
Step 6:
Debug the program
If bugs are found, return to Step 4.
If no bugs are found, continue with Step 7.
Step 7:
Back up the user directory (distribute the program to additional JetBox9500 units if needed).
2-3-1 Installing the Toolchain (Linux)
The Linux Operating System must be pre-installed in the PC before installing the
JetBox9500 Toolchain. Fedora core or compatible versions are recommended. The
Toolchain requires approximately 208 MB of hard disk space on your PC. The JetBox9500
Toolchain is included with JetBox9500 SDK, which can download from Korenix web site.
To install the Toolchain, it is simply a matter of extracting a tarball at the proper place:
tar jxvf jetbox9500-toolchains.tar.bz2 –C /
NOTE
To install the Toolchain, you must grant root permission.
Toolchains used to not be relocatable! You must install them in the
location they were built for.
Install toolchain is simple, just extract to the /opt directory with the command.
We have include the /opt dir in the tarball, so just uncompress it to /. Next, set up the
PATH environment variable, add the toolchain path with export command. The PATH is a
variable of your current SHELL. This is also the default search path of Linux command.
export PATH=/opt/korenix/toolchains/armeb-linux/usr/bin/:$PATH
Setting the PATH allows you to run the compiler from any directory.
2-3-2 Compiling Hello.c
If you have been compiling a program on X86, then you will find the only difference is the GCC
command is start with armeb-linux-.
That is because we want to differentiate with the stand GCC compiler, and the prefix also tell
Korenix | Getting Start
15
you – it is for arm, big-endian platform program.
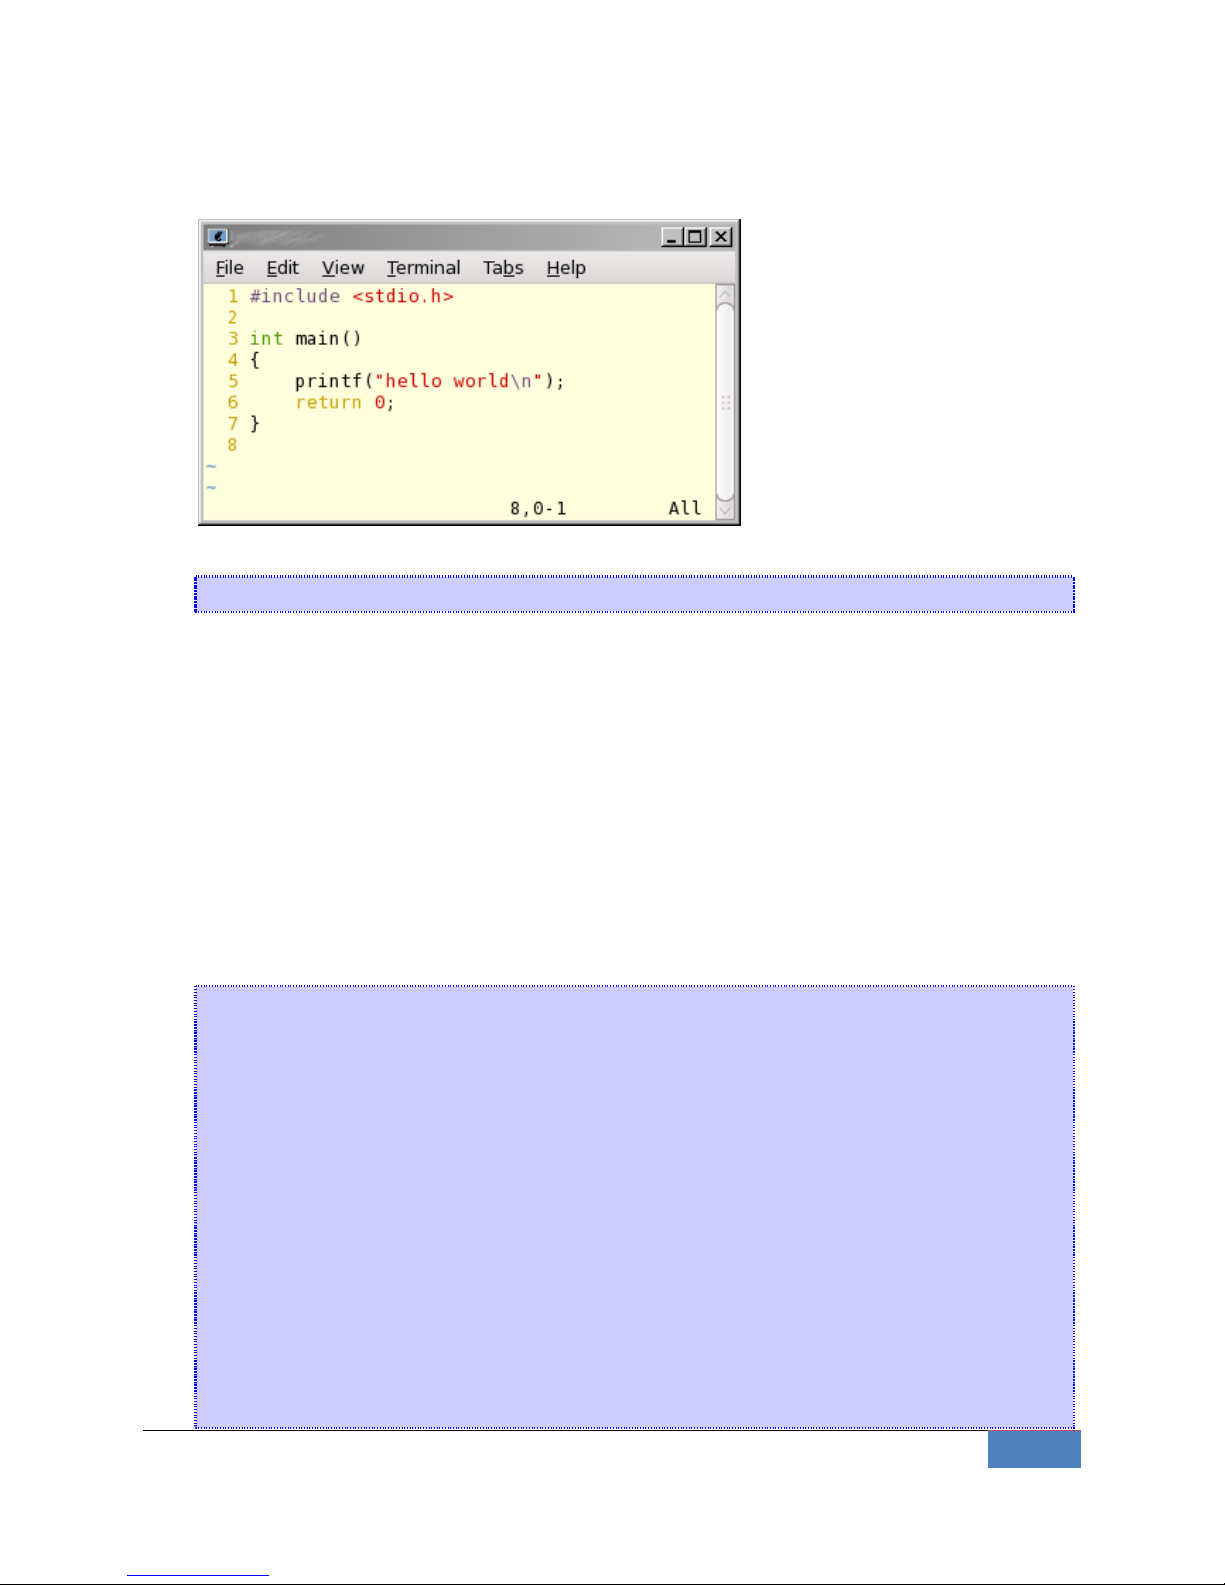
Below is a simple hello.c program:
To compile the helo.c, use our Toolchain to compile the hello.c:
armeb-linux-gcc hello.c -o helloworld
The output executable file is the helloworld.
2-3-3 Uploading “test” to JetBox9500 and Running the Program
Use the following command to upload helloworld to the JetBox9500 via FTP.
1. From the PC, type:
# ftp xxx.xxx.xxx.xxx
2. Use bin command to set the transfer mode to Binary mode, and the put command to initiate
the file transfer:
ftp> bin
ftp> put test
[root@server ~]# ftp 192.168.10.1
Connected to 192.168.10.1 (192.168.10.1).
220 ProFTPD 1.3.1 Server (ProFTPD TEST Installation) [::ffff:192.168.10.1]
Name (192.168.10.1:root): root
331 Password required for root
Password:
230 User root logged in
Remote system type is UNIX.
Using binary mode to transfer files.
ftp> cd /home/
250 CWD command successful
ftp> put helloworld
local: helloworld remote: helloworld
16
Getting Start | Korenix
227 Entering Passive Mode (192,168,1,176,19,6).
150 Opening BINARY mode data connection for helloworld
226 Transfer complete
4455 bytes sent in 4.1e-05 secs (108658.54 Kbytes/sec)
ftp> exit
221 Goodbye.
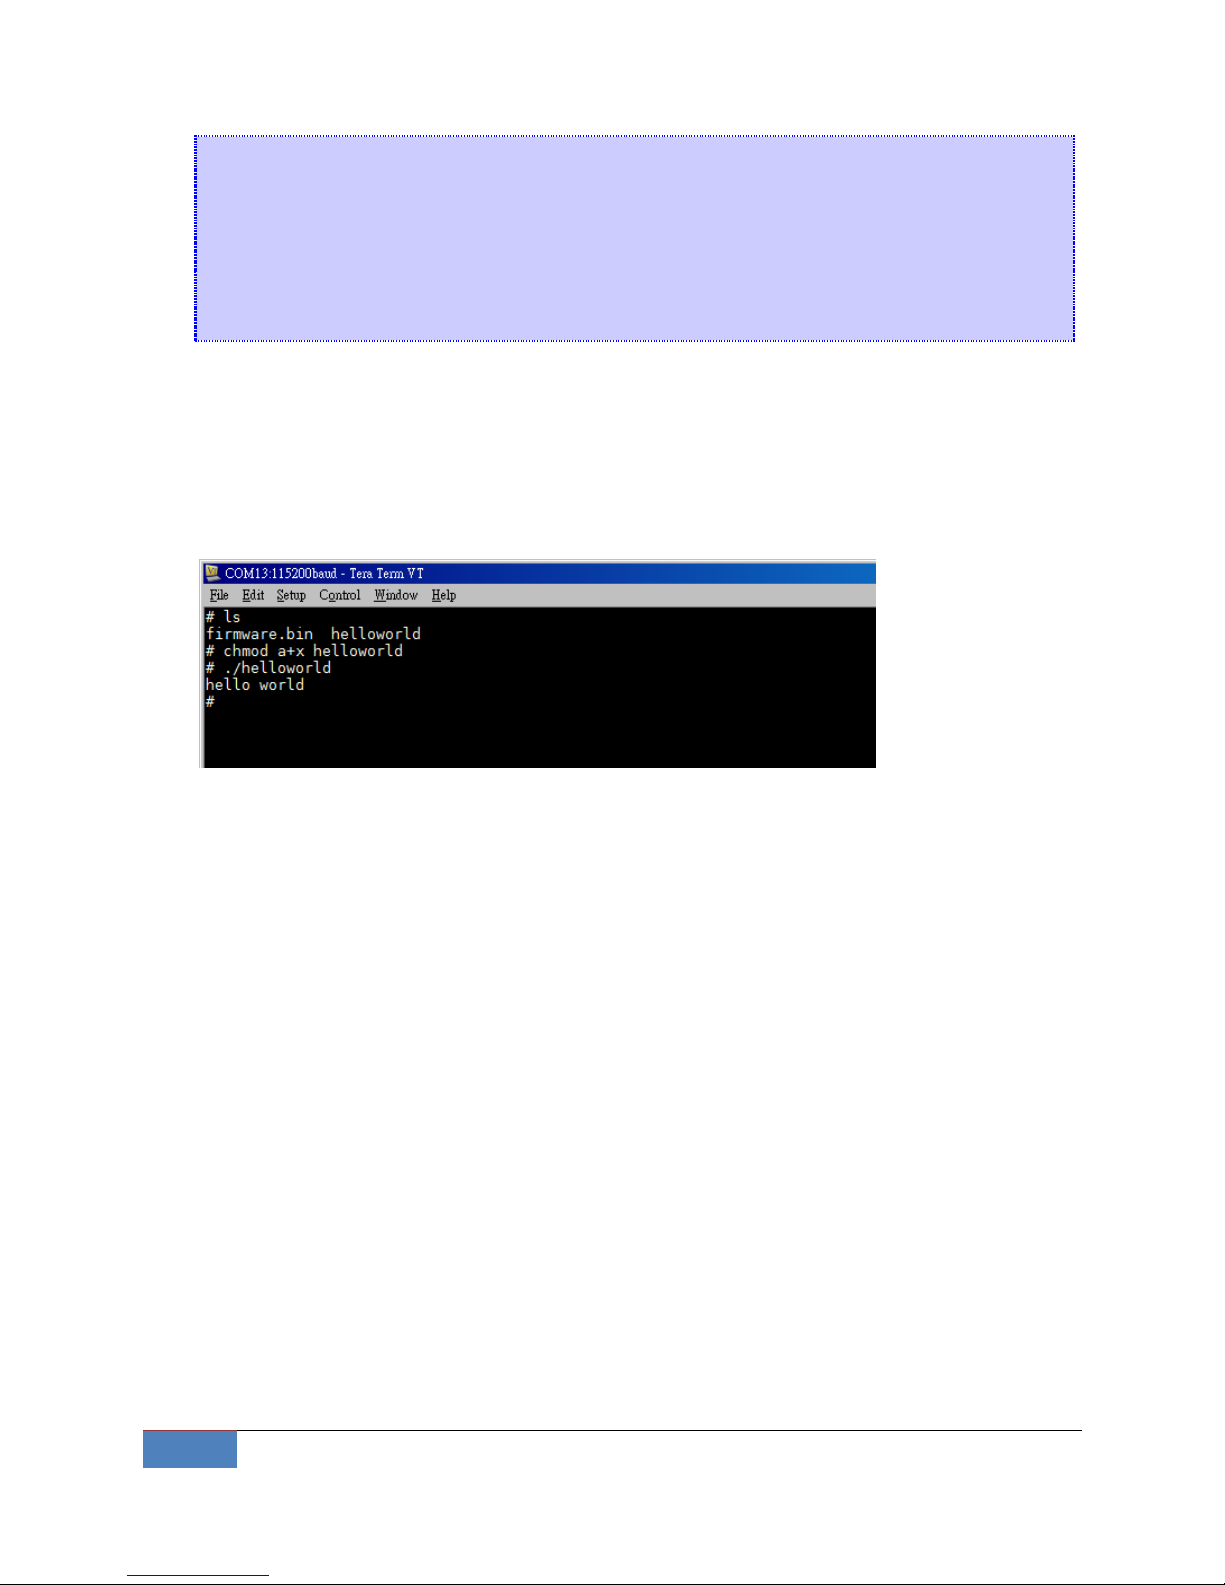
3. From the JetBox9500 console, type:
# chmod +x helloworld
# ./helloworld
The word hello world will be printed on the screen.
Please read Chapter 6 for more detail about Toolchain.
Chapter 3 System Feature
This chapter includes information about version control, deployment, updates, and peripherals.
The information in this chapter will be particularly useful when you need to run the same
application on several JetBox units.
3-1 System Version
To determine the hardware capability of your JetBox, and what kind of software functions are
supported, check the version numbers of your JetBox’s hardware, kernel, and user file system.
Contact Korenix to determine the hardware version. You will need the Production S/N (Serial
number), which is located on the JetBox9500’s back label.
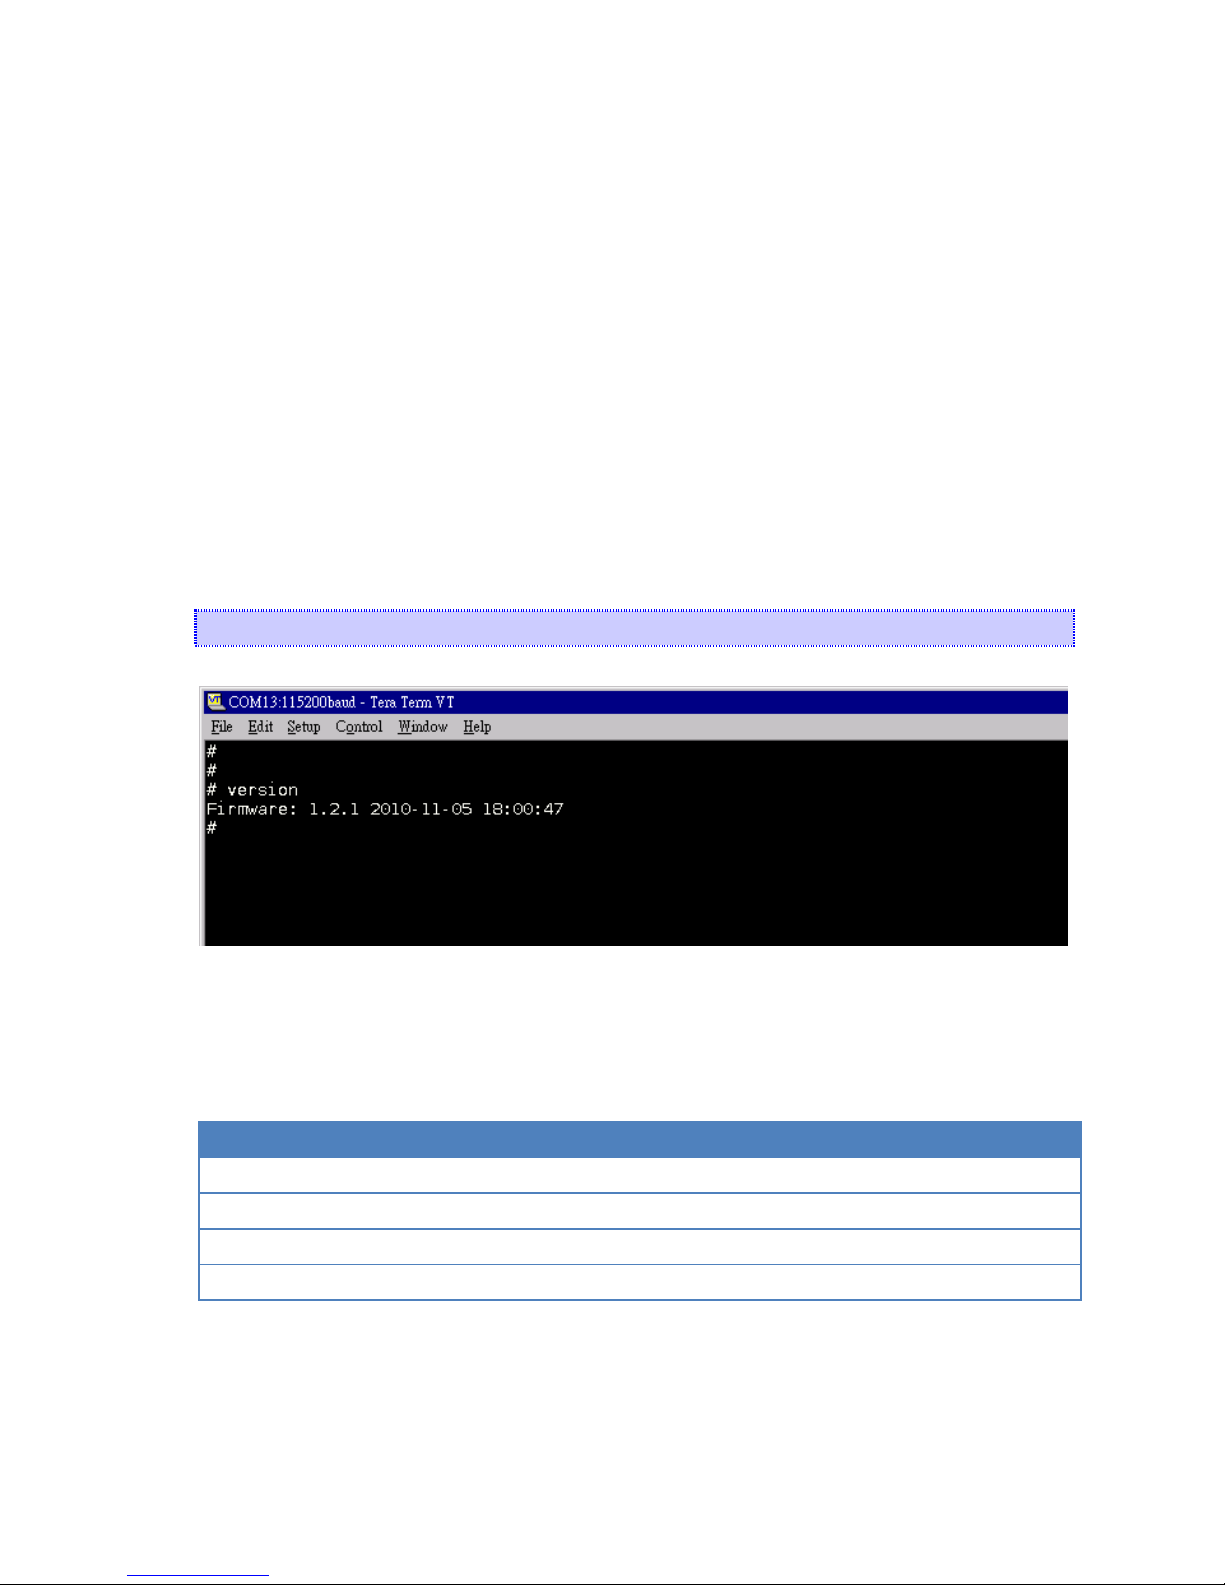
To check the firmware version, type:
# version
Figure 3-1 Firmware version
3-2 Enable/Disable Daemons
The following daemons are enabled when the JetBox 9500 boots up for the first time.
Service name
Description
inetd
internet daemons
telnetd
telnet daemon
sshd
secure shell daemon
crond
schedule jobs daemon
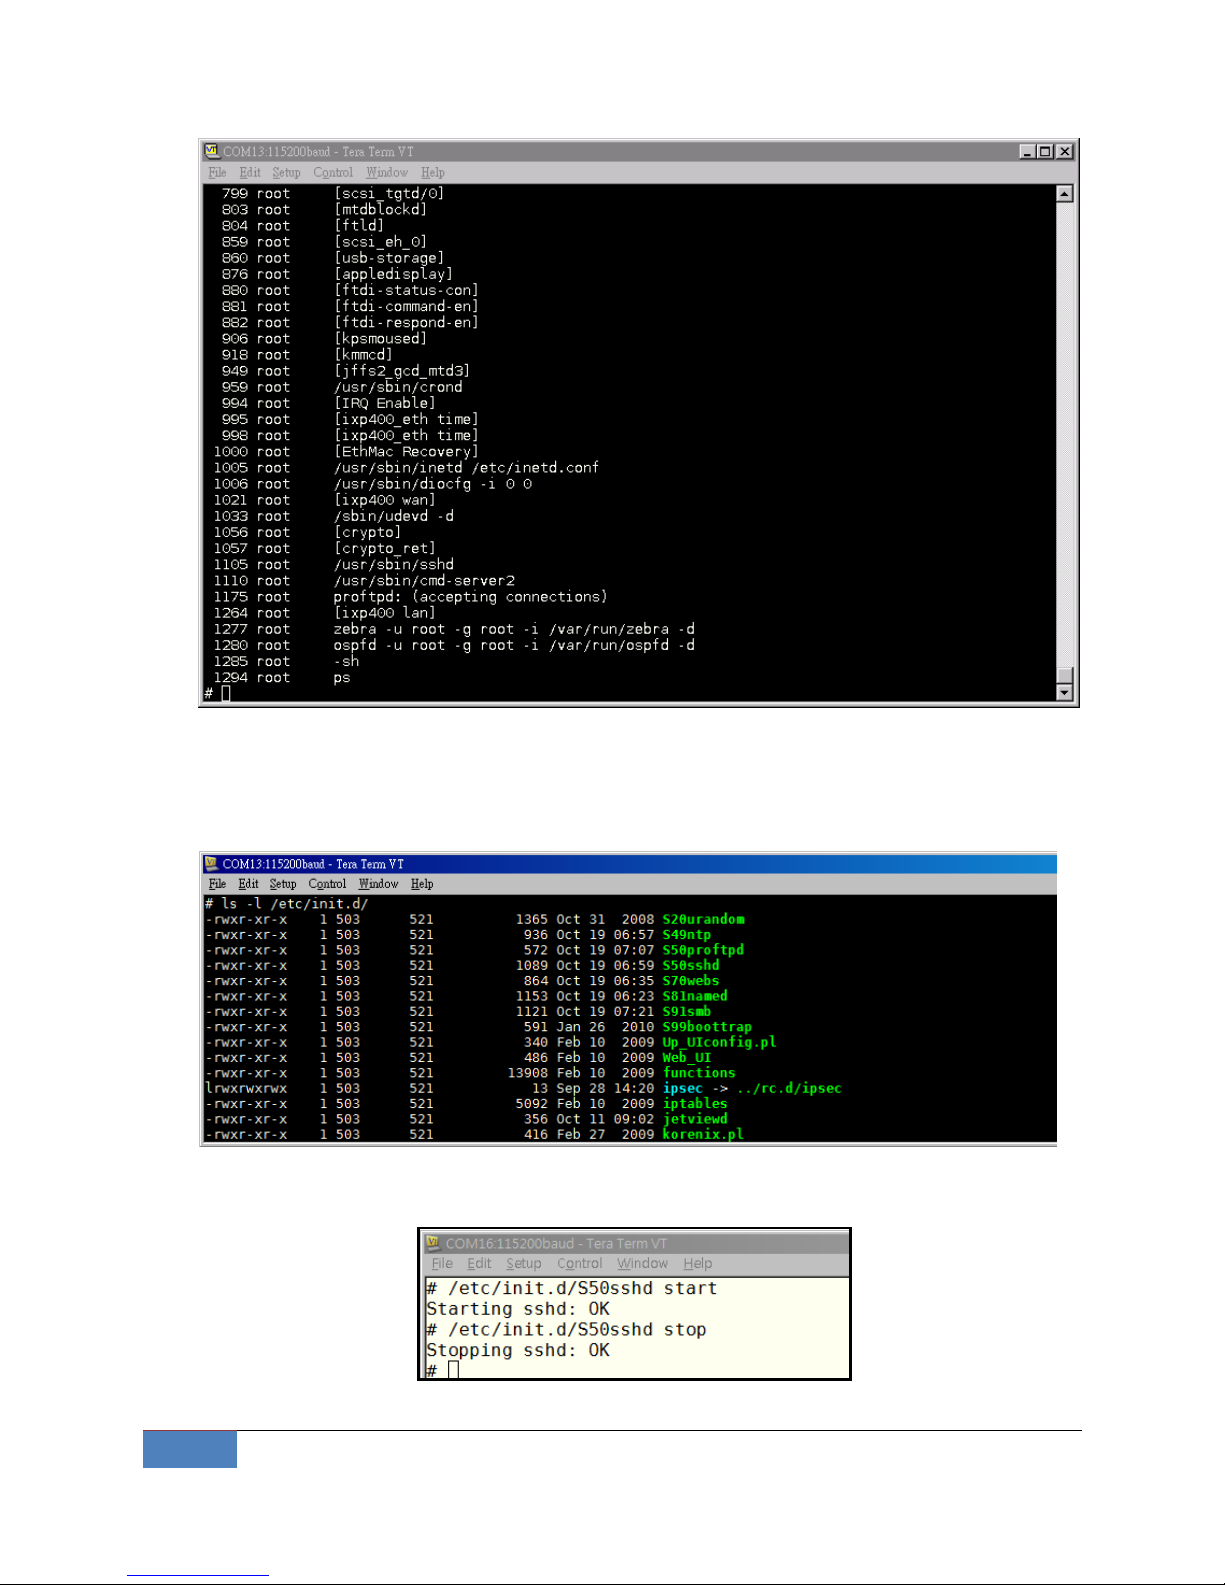
Type the command “ps” to list all processes currently running.
18
System Feature | Korenix
daemons status
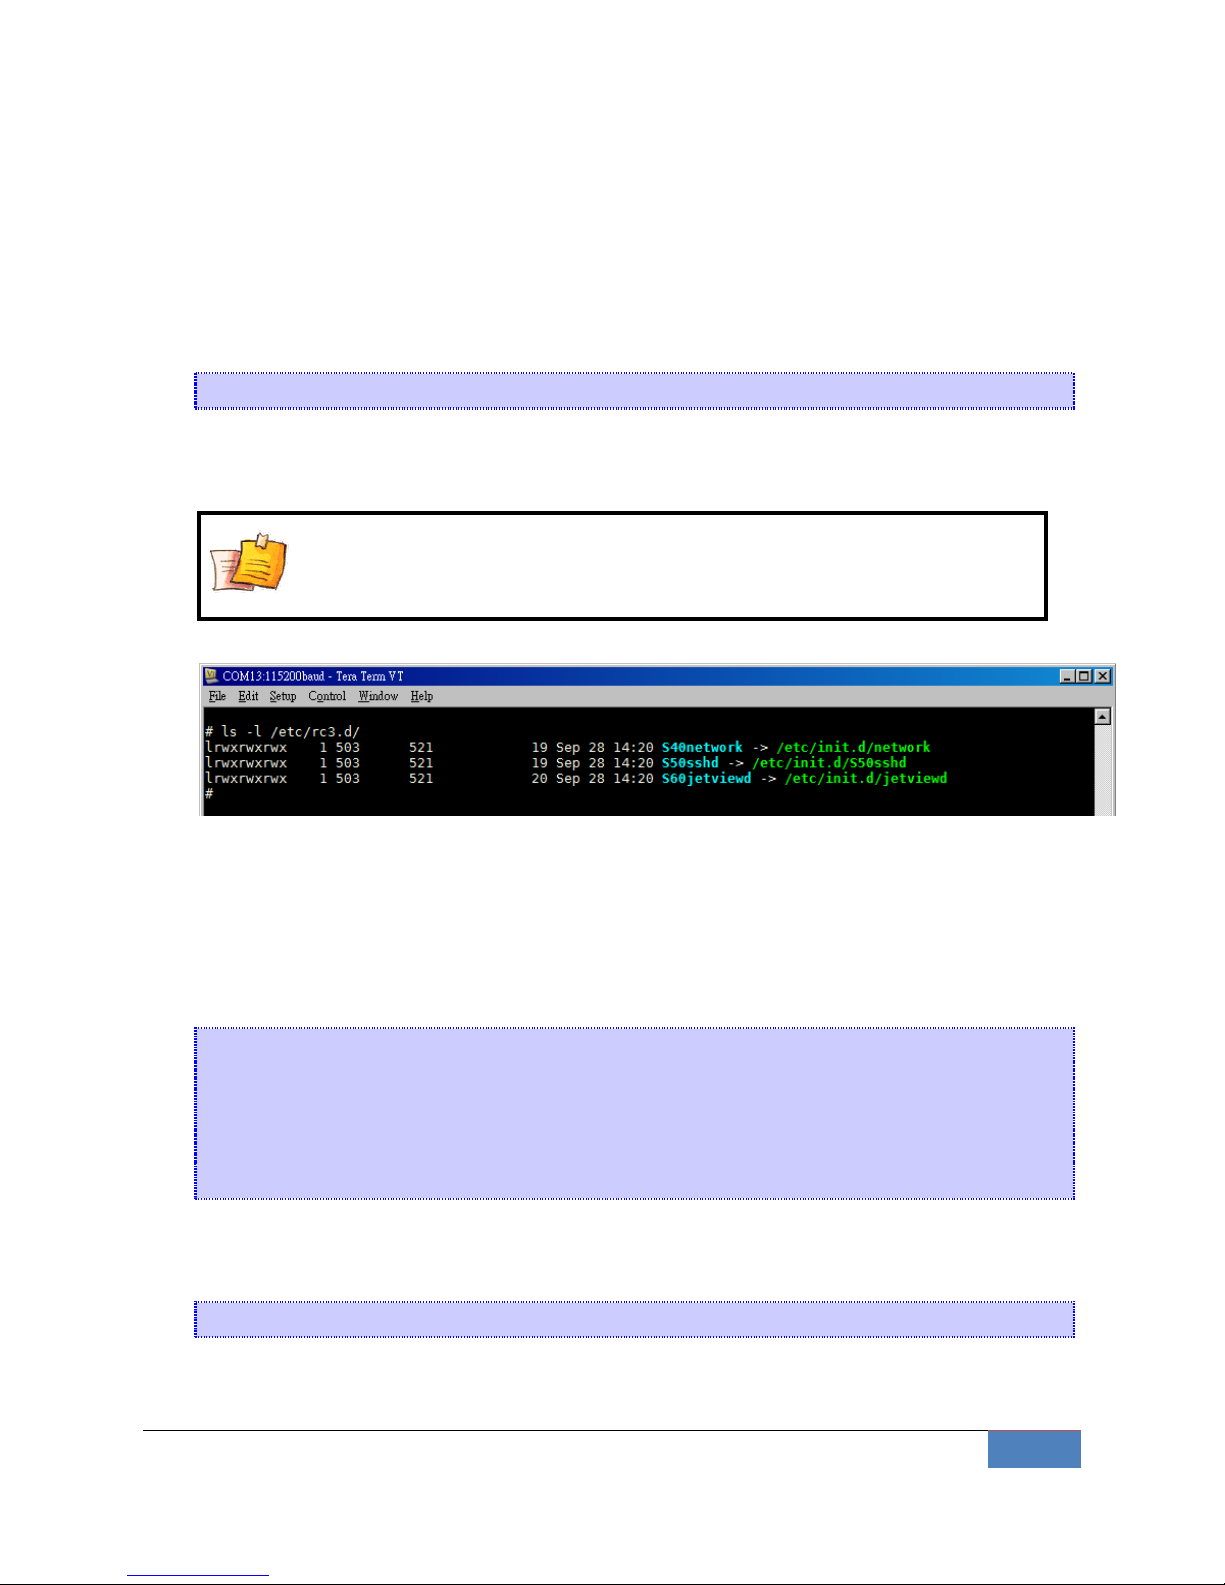
The /etc/init.d directory is the repository for all available init scripts. The
/etc/rc<n>.d/ only contains links to the /etc/init.d/.
Here is an example of starting and stopping the ssh daemon:
You can start the service by adding the first argument start, and stop the service by adding the
Korenix | System Feature
19
first argument stop
3-3 Setting Run-Level
The “run level” setting can be configuring at the file /etc/inittab. Conventionally, seven
runlevels exist, numbered from zero to six; though up to ten, from zero to nine, may be used.
You can change the number to boot JetBox into different runlevel.
id:3:initdefault:
In this example, runlevel 3 is the default and the scripts that define runlevel 3 can be found in
/etc/rc3.d/.
NOTE
Scripts are run in file name lexical order. Just use ls -l to find out the start
order.
3-4 Setting System Time
The JetBox9500 has two time settings. One is the system time, and the other is the RTC (Real
Time Clock) time kept by the JetBox9500’s hardware.
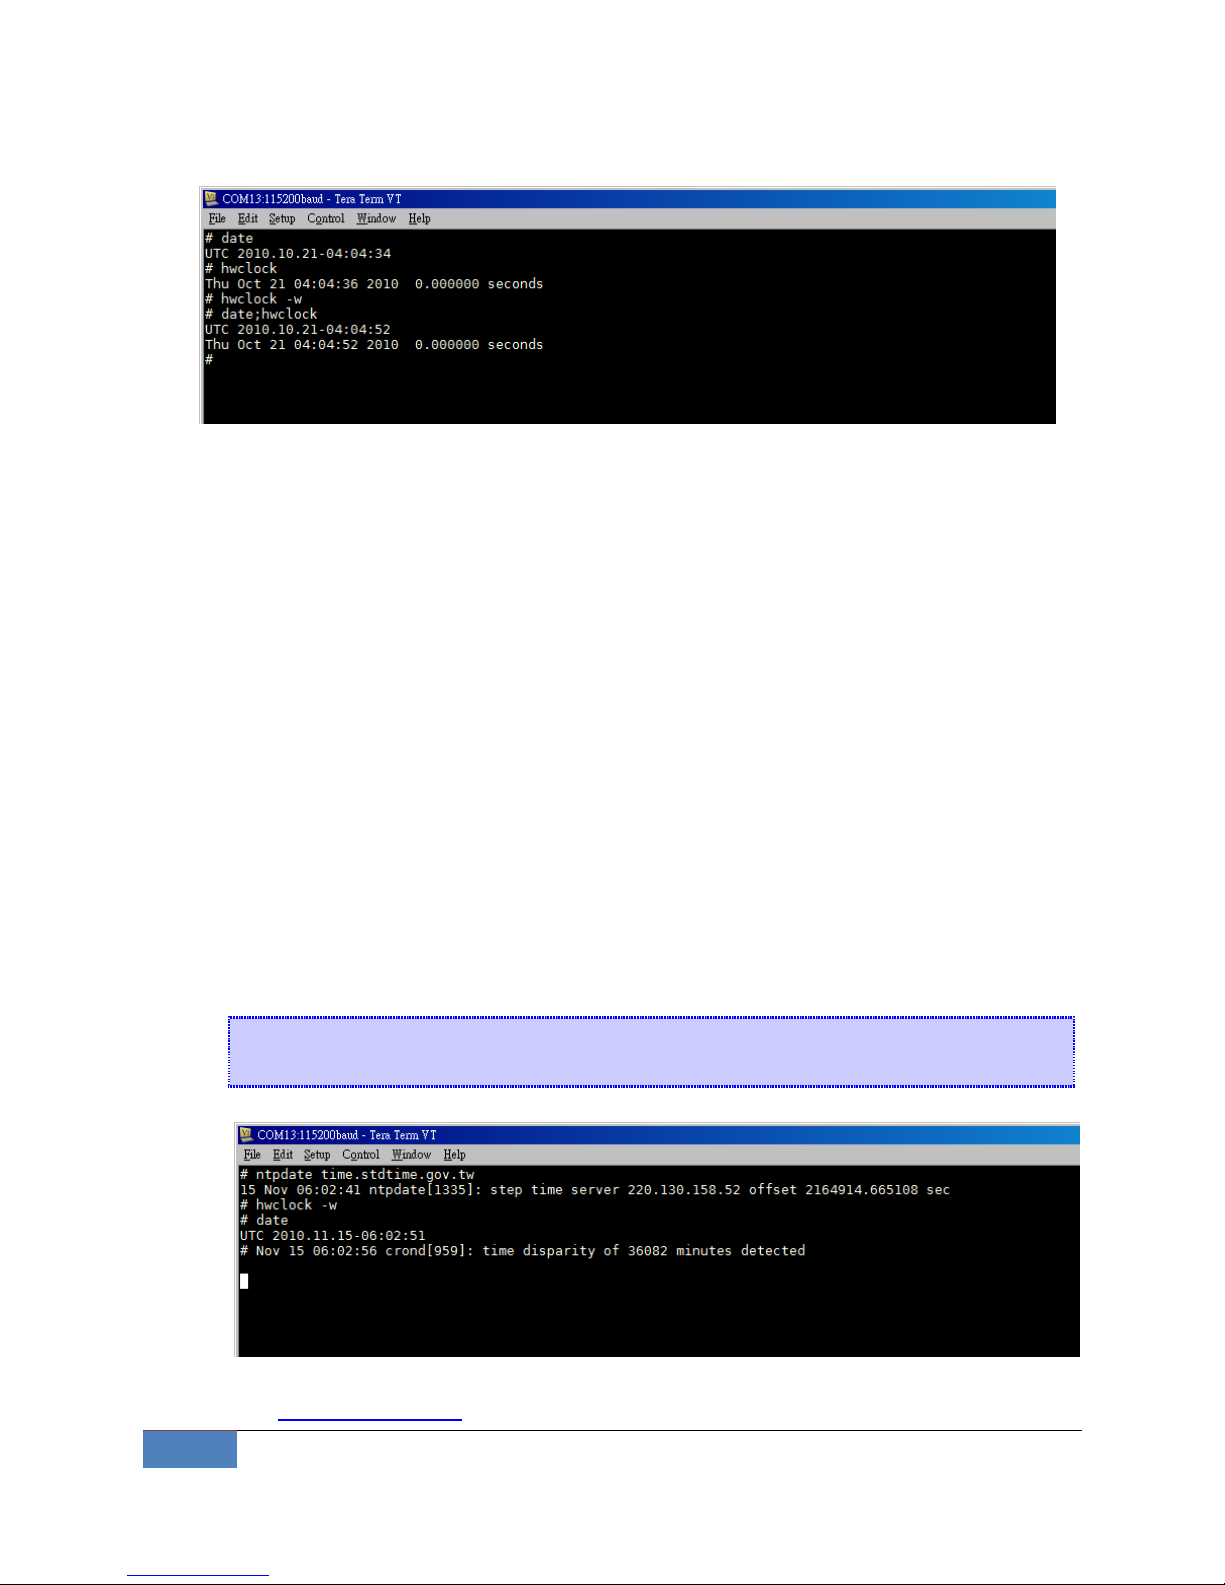
Use the #date command to query the current system time or set a new system time.
#date MMDDhhmmYYYY
MM = Month
DD = Date
hhmm = hour and minute
YYYY = Year
Use #hwclock to query the current RTC time
Use the following command to set system time from hardware clock:
#hwclock -s
The following figure illustrates how to update the system time and set the RTC time.
20
System Feature | Korenix
Setting the Time Manually
3-5 Adjust System Time
If you only wish to synchronize your clock when the device boots up, you can use ntpdate. This
may be appropriate for some devices which are frequently rebooted and only require
infrequent synchronization.
Using ntpdate at boot time is also a good idea for devices that run ntpd. The ntpd program
changes the clock gradually, whereas ntpdate sets the clock, no matter how great the
difference between a device's current clock setting and the correct time.
3-5-1 NTP Client
The JetBox has a built-in NTP (Network Time Protocol) client that is used to initialize a time
request to a remote NTP server.
Use #ntpdate to update the system time.
#ntpdate time.stdtime.gov.tw
#hwclock –w
NTP client request
Visit http://www.ntp.org for more information about NTP and NTP server addresses.

Korenix | System Feature
21
NOTE
Before using the NTP client utility, check your IP and DNS settings to
make sure that an Internet connection is available.
3-5-2 NTP Server
NTP is configured by the /etc/ntp.conf file. Here is a simple example:
server time.stdtime.gov.tw
driftfile /var/db/ntp.drift
The server option specifies which servers are to be used, with one server listed on each
line. The driftfile option specifies which file is used to store the system clock's frequency
offset. The ntpd program uses this to automatically compensate for the clock's natural drift,
allowing it to maintain a reasonably correct setting even if it is cut off from all external
time sources for a period of time.
To start the server, execute the command:
# ntpd
To check the server status, execute the command:
# ntpq –p 127.0.0.1
For more information, read the following links about setting up a NTP server:
http://www.freebsd.org/doc/handbook/network-ntp.html
3-6 Cron Daemon (Schedule jobs)
Cron is a daemon to execute scheduled commands. Cron wakes up every minute, examining
the /etc/crontab, checking each command to see if it should be run in the current minute.
Crontab syntax :
A crontab file has five fields for specifying day, date and time followed by the command to be
run at that interval.
* * * * * command to be executed
- - - - -
| | | | |
22
System Feature | Korenix
| | | | +----- day of week (0 - 6) (Sunday=0)
| | | +------- month (1 - 12)
| | +--------- day of month (1 - 31)
| +----------- hour (0 - 23)
+------------- min (0 - 59)
Crontab example :
A line in crontab file like below removes the tmp files from /tmp each day at 6:30 PM.
30 18 * * * rm /tmp/*
3-7 Connect Peripherals
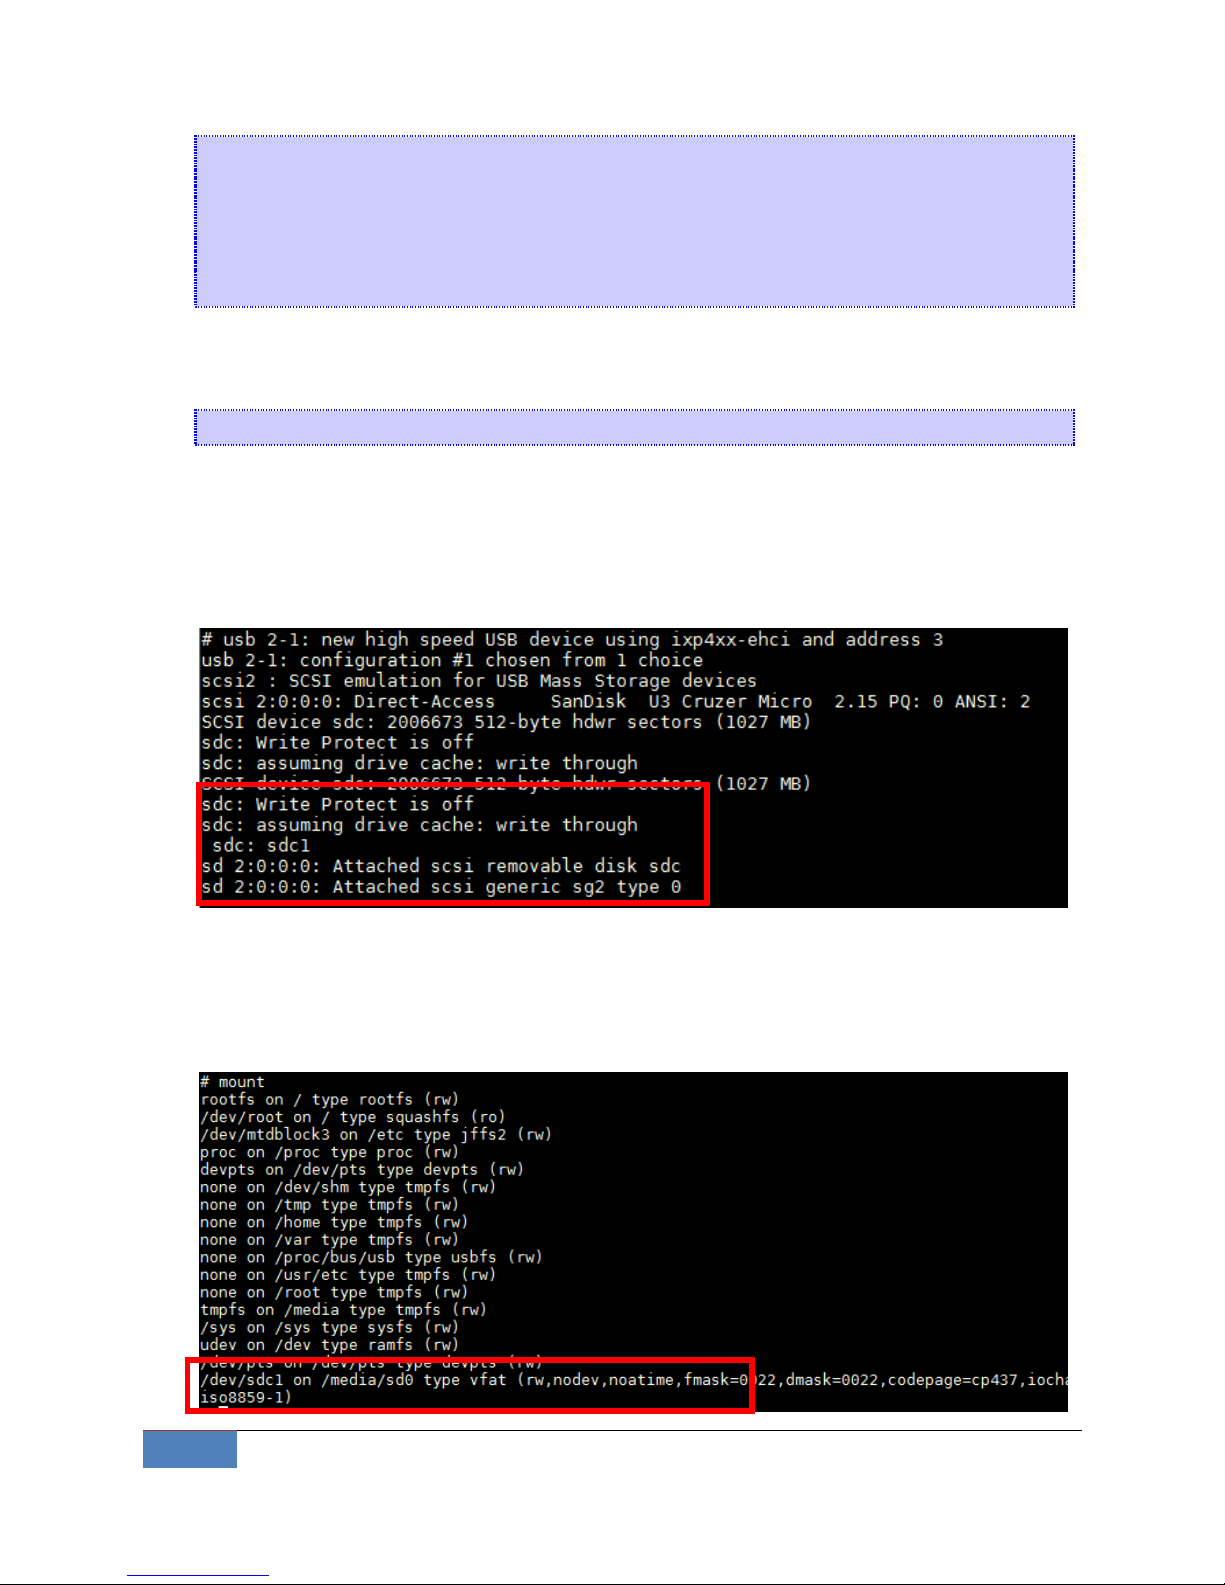
While plug-in a USB mass storage or a SD card, use #dmesg command can help showing
USB-storage device status.
usb-storage device scan status
JetBox9500 support auto-mount external storage, just use mount command to check the
mount point.
 Loading...