

Koolspace chillR 100, chillR 900, chillR 300, chillR 600 Operation Manual
Koolspace Wine Cooling System
100 - 300 - 600 - 900
INSTALLATION & OPERATION MANUAL

~3~
READ BEFORE YOU START
Koolspace wine cooling units must be installed precisely as directed in the Manual.
DO NOT attempt to install this unit before reading the Manual!
1.
NEVER Install this unit through an exterior wall, NEVER to OUTDOORS! (Units must ventilate to an adjacent
INTERIOR space, Warm air vents must be completely unobstructed).
2.
DO NOT modify or handle the digital Sensor (incased in vinyl cap on back of unit). The Sensor will read and
respond to changes in AIR temperature in the enclosure. DO NOT attempt to modify the sensor to read liquid
temperature.
3.
Install the unit in an enclosure where ALL surfaces (walls, oor and ceiling) are insulated to R-20 and protected
by vapor barrier on both sides.
4.
Uninsulated concrete oors will radiate heat and humidity during summer months, forcing the unit to work
harder than necessary, the life of unit will be shortened, and will produce EXCESS CONDENSATION.
5.
Install the unit in a location where the condenser (warm side) coil is accessible for periodic vacuuming of the
condensor coil. (See troubleshooting for details.)
6.
Outlet power must be a DEDICATED separately fused and grounded 15-Amp 115 Volt line. Line must not be
shared with any other outlet or appliance. (Insufcient voltage will cause the unit not to run, compressor may
not start, and the LED display may be corrupted).
7.
Extension cord must be must be rated for at least 15 Amps if one is required.
8.
Electronic controller must also be protected against sudden power surges. Koolspace wine cooling systems may
be damaged by power surges or spikes, sudden interruptions or prolonged low-voltage conditions.
9.
You must monitor your unit DAILY. If unit is in “Alarm”, unplug the unit immediately. Always check for any water (condensate) leaks. (Check troubleshooting section)
10.
Koolspace TM will not be liable or responsible for incidental or consequential damages. (See Warranty).
11.
This unit is not designed for COMMERCIAL USE. Such usage will void any warranty. In addition, Third party servicing of these units during the warranty period will void the warranty.
12.
Select a suitable area, sized appropriate to the model’s capacity, in a location where ambient temperature will
not exceed the desired storage temperature by more than 25ºF (14ºC).
13.
This appliance is for INDOOR USE ONLY, and must not be vented into a laundry closet or similar room which traps
warm air.
14.
The unit must vent to an adjacent INTERIOR VENTILATED SPACE CLOSE TO THE CEILING. Exhaust air must not be
obstructed in any way.
15.
The temperature of the air in the immediate area where the unit vents its warm air must never exceed 80ºF
with 70% R.H. (non-condensing). Operating temperatures are: Outside of wine cellar: min. 65ºF (18ºC) Max. 80ºF
(26ºC) / Inside of wine cellar: min. 52ºF (11ºC) Max. 70ºF (21ºC)
WARNING: Lower SET TEMPERATURE FROM DEFAULT 57ºF (14ºC) only if ambient conditions allow. A lower set temp
can cause water overow in high humidity conditions.
SPECIAL NOTE: THIS COOLING UNIT IS CONSTRUCTED FOR INSTALLATION IN WALLS UP TO 7 1/2” INCHES
THICK. IF YOU INSTALL IT IN A THICKER WALL YOU WILL HAVE TO CUT OUT AN AREA AROUND THE AIR VENTS
IN ORDER NOT TO BLOCK THE AIRFLOW.
SILICONE CAULKING
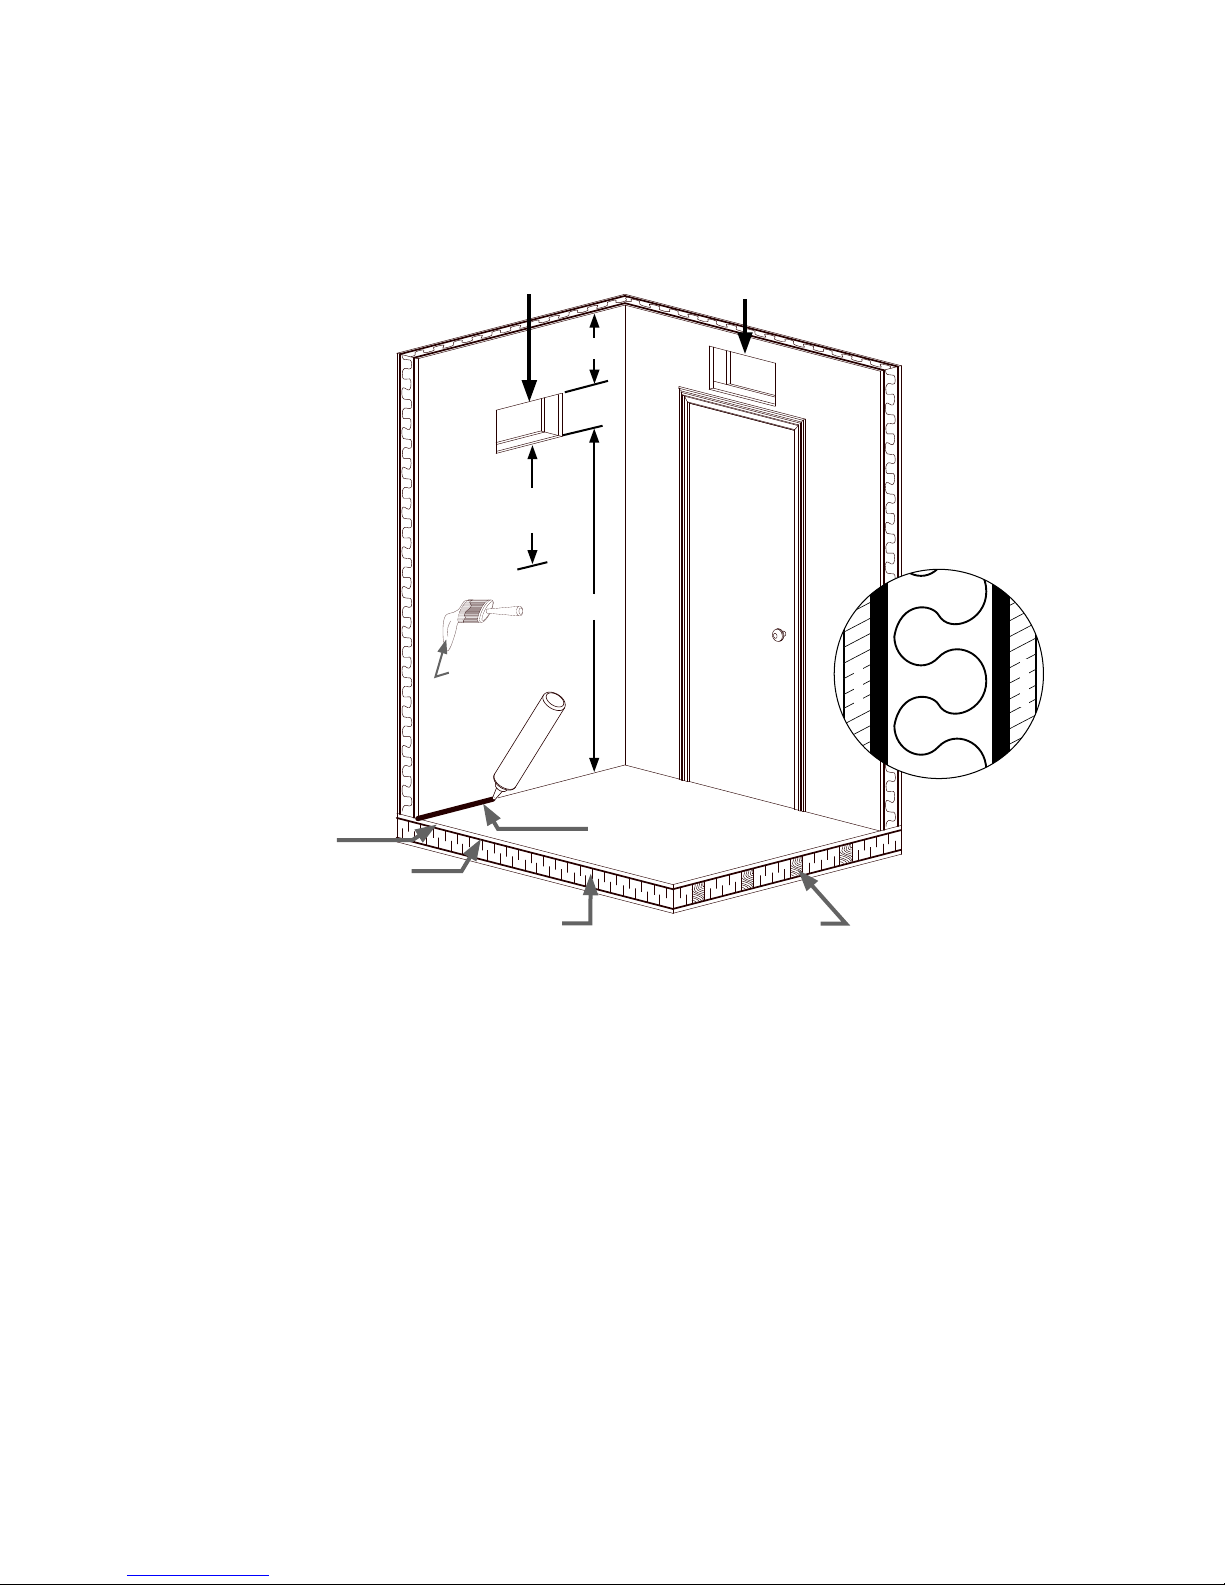
PREPARING FOR INSTALLATION
Koolspace chillR is the only unit that allows for isolating the studs against noise and vibration when installed as directed.
RECOMMENDED
OVER THE DOOR
SEAL
Seal corners, joints, gaps,
vents, electrical outlets and
switches, and especially
around door and frame.
Pack larger gaps with insulation. Seal all with silicone
caulking.
ALTERNATIVE
WALL CUTOUT (B)
Min 5”
Min 2’
space
lear
c
Min 6’
CUTOUT (A)
DOOR
WITH
AIRTIGHT
SEAL
Seal drywall with odorless
waterproof paint.
PLYWOOD
FLOOR
BARRIER
VAPOR BARRIER
All surfaces of the enclosure
must be protected by a proper
vapor barrier, ideally on both
inside and outside of wine cellar.
VAPOR
ODORLESS
WATERPROOF
PAINT
INSULATION
(MIN R-20)
INSULATION
( MINIMUM R-20 )
DRYWALL
VAPOR BARRIER
SEAL ALL
JOINTS
SUB-FLOOR
(STUD LUMBER)
INSULATION
Floor, ceiling and all walls of the enclosure must be
insulated to minimum R-20 rating, although R-30 is
recommended.
Best material is foil-backed urethane foam, sealed at
all joints with thermal tape.
Build a proper sub-oor with vapor barrier, and insulate
to at least R-20, especially if oor is concrete.
DRYWALL
VAPOR BARRIER
POWER SUPPLY:
This appliance must be installed in accordance with national wiring regulations.
Do not use if power cord is damaged; it must be replaced by the manufacturer or its service agent or by a qualied
person to avoid a hazard. Plug must remain accessible after installation.
Electrical service must be a dedicated, separately fused and grounded 15 Amp, 115V line.
Do not share the circuit with any other appliance. If extension cord must be used, it must be rated for 15 Amps. Test line
voltage BEFORE operating, and do not use if line voltage is less than 105V. The unit must be protected against power surges
and spikes: use a good quality surge suppressor.
~3~
~5~
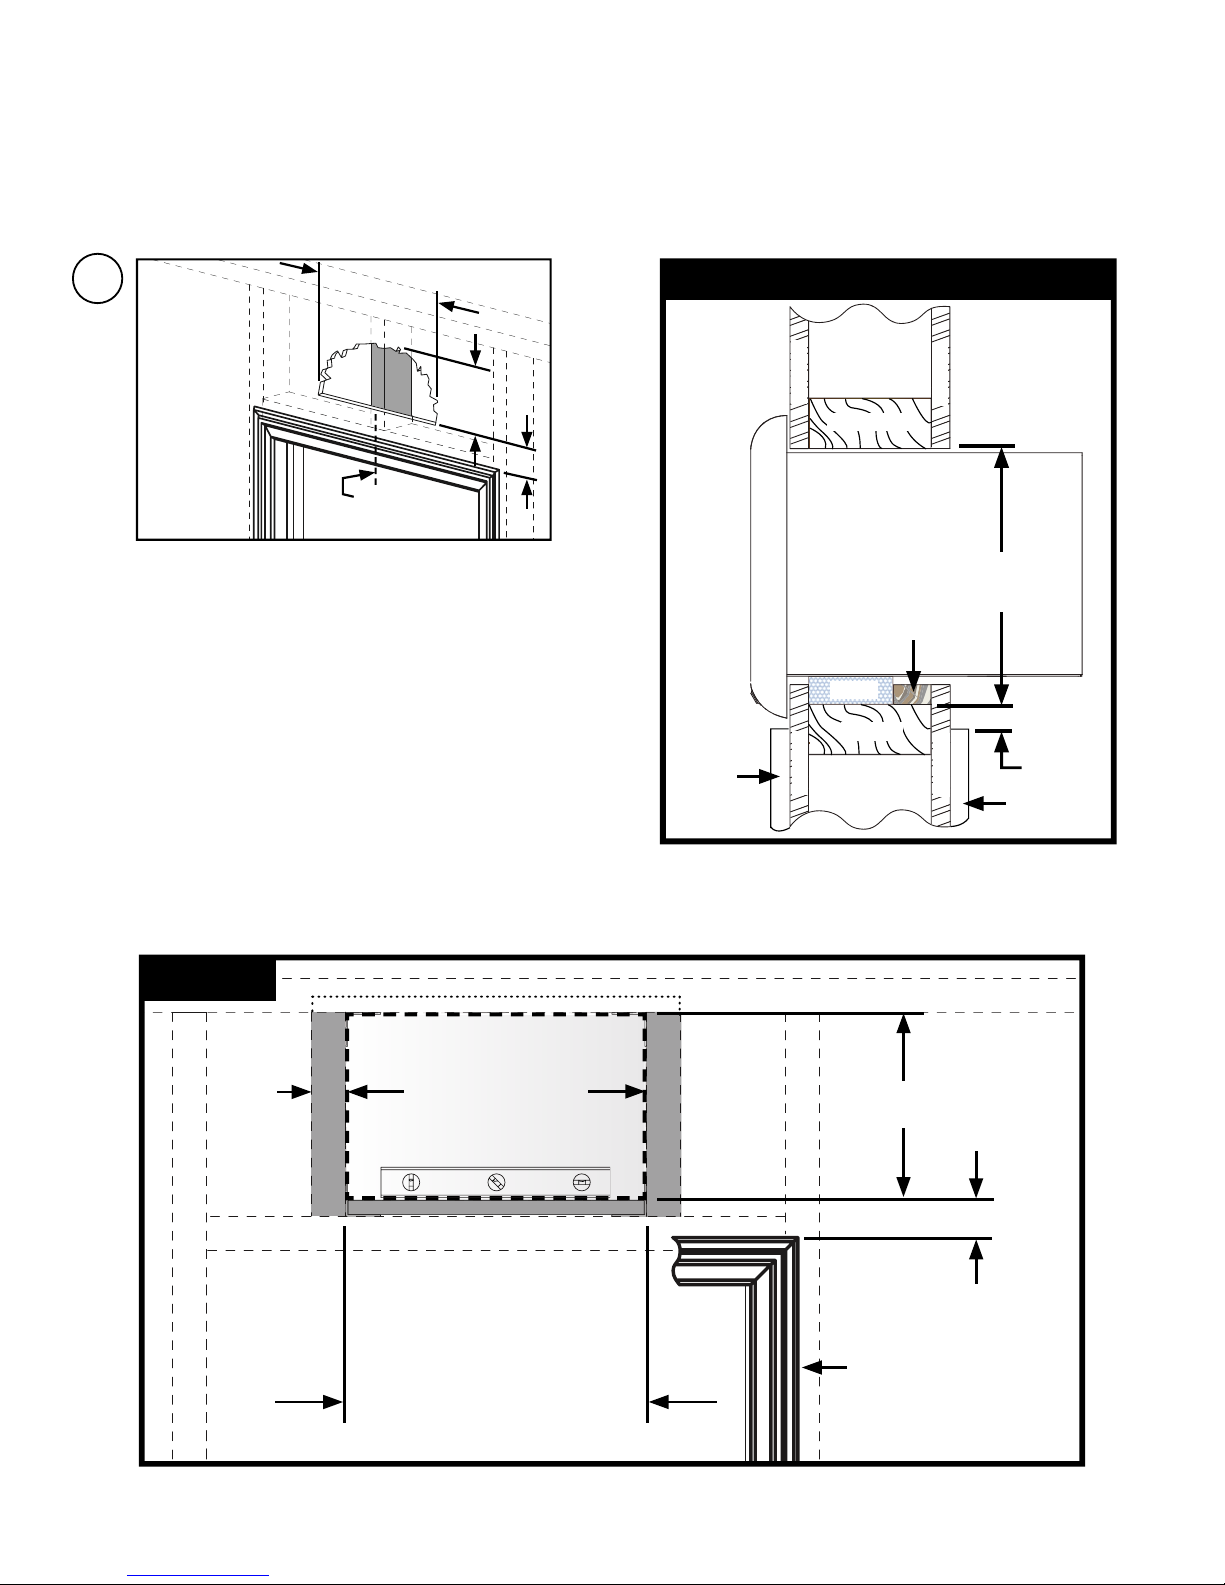
PREPARE FOR OVER THE DOOR CUTOUT (A)
This manual is only a guide, house structure may vary. (For high ceilings install an upper horizontal brace)
START ON THE WARM SIDE
1
HEADER
Open drywall on warm side. Measure distance
from HEADER to TOP PLATE and MOLDING. Follow
the typical installation described in STEPS 2-6 if
clearance is 10” and the HEADER is at least 3/8”
higher than the molding. (SEE PROFILE)
THE FOLLOWING STEPS ARE COMMON FOR 8’ FOOT CEILINGS
max 14”
TOP PLATE
DOOR
CENTER
6”
2”
PROFILE OF INSTALLED UNIT
WARM
SIDE
Drywall
TOP PLATE
Drywall
COOL
SIDE
10”
1/2” WOOD SPACER
FOAM
ONLY if clearance conditions are not met, customize the installation, assure the required dimensions indicated in the DETAIL.
TIP: - Replace FOAM isolator with Shim (plywood).
- Increase headroom (cut TOP PLATE with
utility saw)
DETAIL
11/2”
Cripple Stud
King Stud
DRYWALL CUT-OUT
MUST BE LEVELED!
SHIM
HEADER
Door
Molding
TOP PLATE
Cripple Stud
HEADER
Drywall
Drywall
Molding
H = 9 3/8”
King Stud
Min.1”from molding
3/8”
Door
W =
100-300 Series use :
W = 16”
600-900 Series use :
19 3/8”
DOOR FRAME MOLDING
~4~
 Loading...