


1
Koolbreeze
Climateasy 12R2
Portable Air Conditioner
User Manual and Operator Guide (EN)
For Model: P12HCR2 (2019 Model Year)
Please read this manual carefully before using the product for the first time
Please retain all packaging until end of warranty period
2
This instruction manual and specifications that it contains are for guidance and do not form
part of a contract. We reserve the right to make technical changes without prior notice. Due to
continuous product development the machine illustrated in the following pages may look
slightly different to one that you have purchased.
Amendment History
Version No
Date
Comment
1.0
26/10/2018
Initial version for new 12R2 model
Please send any corrections or suggested amendments to sales@koolbreeze.co.uk.
Table of Contents
Amendment History .................................................................................................................................. 2
Table of Contents ...................................................................................................................................... 2
Usage and Safety Considerations .............................................................................................................. 3
Getting to Know Your New Air Conditioner ................................................................................................ 6
Operator Panel ......................................................................................................................................... 7
Remote Control ......................................................................................................................................... 8
Preparing the Unit for Use......................................................................................................................... 9
Operating the Unit ................................................................................................................................... 11
Maintenance and Cleaning ...................................................................................................................... 14
Troubleshooting....................................................................................................................................... 15
Warranty ................................................................................................................................................. 17
Appendix A. Product Technical Specifications ........................................................................................ 18
Appendix B. Window Kit Usage Specifications ....................................................................................... 18
FR, DE, ES, IT versions of the manual are available to download from www.koolbreeze.co.uk
FR, DE, ES, IT versiones del manual están disponibles en www.koolbreeze.co.uk
FR, DE, ES, IT des versions du manuel sont disponibles à partir de www.koolbreeze.co.uk
FR, DE, ES, IT Versionen des Handbuchs können von hier heruntergeladen werden www.koolbreeze.co.uk
FR, DE, ES, IT versioni del manuale sono disponibili da www.koolbreeze.co.uk

3
Usage and Safety Considerations
IMPORTANT!
Please do not install, use or operate your new portable air conditioner before you have
carefully read this manual. Please retain this instruction manual for future reference.
Safety and Usage Considerations for Units Containing R290 Refrigerant
Koolbreeze Climateasy xxR2 models contain R290 refrigerant. R290 is a natural refrigerant that has
a low environmental footprint with regards to any impact on the ozone layer as well as having a low
potential to cause global warming (GWP). Because of the properties of R290 when used as a
refrigerant it is important to read and understand the information given in this section before using
your new air conditioner.
1. Do not use any methods to accelerate the defrosting process or to clean the unit, other than
those recommended by the manufacturer.
2. Do not pierce, puncture, burn, strike or subject to shock either the unit itself or any of its internal
components.
3. Be aware the refrigerant used in the unit may not produce any odor or smell if released.
4. Depending on the capacity of the unit it should be installed, operated and stored in a room with a
floor area larger than X m2. (X=10.1 for ,12000 Btu/h)
5. When defrosting and cleaning the unit, do not use any tools or cleaning products other than those
recommended by the manufacturer.
6. The appliance must be stored and used in an area without any continuous sources of ignition (for
example: open flames, gas or electrical appliances).
7. Each unit contains a quantity of R290 refrigerant gas. Please refer to the rating plate or
specification table in this manual for details regarding quantity used in each model.
8. R290 is a refrigerant gas that complies with the EU directives on the environment.
9. Do not puncture any part of the refrigerant circuit.
10. If the appliance is installed, operated or stored in a non-ventilated area, the room must be
designed to prevent to the accumulation of refrigerant in the event of a leak.
11. When not in use the unit must be stored in such a way as to prevent mechanical failure or the risk
of accidental damage.

4
12. Maintenance of the unit and the internal refrigeration circuit should only be undertaken by
individuals who have the appropriate certification issued by an accredited organization.
13. Repairs to the unit should only be undertaken by the manufacturer or an approved service agent.
Where repair work is required to the refrigeration circuit this should only be undertaken by
individuals with the appropriate certification/qualifications issued by an accredited organization.
General Usage and Safety Considerations
1. The appliance is designed for indoor use only.
2. Always position the unit on a flat level surface.
3. Ensure the unit is properly connected an electrical supply of the appropriate rating and that the
power cord, socket/outlet and plug are not damaged.
4. Do not use the unit with an extension lead or multi-way adapter plug
5. Do not use the unit:
a) Near to a source of fire.
b) In an environment where it is likely to come into contact with oil or solvents.
c) In an area where it is exposed to direct sunlight.
d) In an area where it is likely to come into contact with water such as near a bath, a laundry
facility, a shower or a swimming pool.
6. Never insert your fingers or other items into the air inlet or outlet. Take special care to warn
children of these dangers.
7. Always keep the unit upright while transporting and when in storage.
8. Before cleaning the air conditioner, always ensure it is turned off and disconnected from the
power supply.
9. When moving the air conditioner, always turn off and disconnect the power supply first. Move the
unit slowly and avoid dropping the unit or subjecting it to shock.
10. Do not cover the unit when in operation.
11. Only connect the unit to electrical outlets or sockets with the correct rating that are compliant with
the local electric safety requirements.
12. Children must be supervised at all times to ensure that they do not play with the appliance.
13. Do not use the unit if the power cord is damaged. A damaged power cord must be replaced by the
manufacturer or authorized service agent.
14. This appliance can be used by children aged from 8 years and above and persons with reduced
physical, sensory or mental capabilities or lack of experience and knowledge if they have been
given supervision or instruction concerning use of the appliance in a safe way and understand the
hazards involved. Children must not play with the appliance. Cleaning and user maintenance
must not be undertaken by children without supervision.
15. The appliance must be installed in accordance with national wiring regulations.
16. Details of type and rating of fuses:T, 250V AC,2A.

5
17. Recycling
This marking indicates that this product should not be disposed of in normal household waste
throughout the EU. To prevent possible harm to the environment or human health from
uncontrolled waste disposal, recycle it responsibly at the end of its useful life. To dispose of your
unit, please use the local and collection and disposal services provided by the relevant local
authorities/agency or contact the retailer where the product was purchased for details of any
collection and disposal services they provide.
18. Do not pull, deform, stretch or modify the power supply cord, or immerse it in water. Mistreatment
of the power supply cord can result in damage to the unit and lead to a risk of electrical shock.
19. During use and when being disposed of, compliance with national refrigerant gas regulations
must be observed.
20. Keep any ventilation openings on the unit clear of any obstructions.
21. Any person who is involved with working on or disconnecting any part of the refrigerant circuit
should hold a current valid certificate from an industry-accredited assessment authority, to ensure
that they are competent to handle refrigerants safely in accordance with the appropriate
regulations and industry requirements.
22. Servicing should only be performed as recommended by the equipment manufacturer.
23. Maintenance and repairs requiring the assistance of other skilled personnel should be carried out
under the supervision of the person competent in the use of flammable refrigerants.
24. Do not operate or stop the unit by inserting or pulling out the power plug. Use the operator panel
on the unit to switch the unit on/off before removing the plug.
25. Switch off and disconnect the unit from the power supply if it produces any abnormal noise, smell,
or emits smoke.
26. When the unit has not been used for an extended period check the unit for damage prior to
starting use.
27. If the unit is damaged during operation discontinue use, disconnect from power supply and
contact the reseller for advice
28. When the air inlet cover is removed to gain access to any of the filters do not touch the exposed
cooling coil fins with your hands or any tools/implements.

6
Getting to Know Your New Air Conditioner
Fig 1
Fig.2
Continuous drain
outlet
End of season
drain outlet

7
Operator Panel
Fig.3
Operator Panel Buttons
Indicators
POWER BUTTON
Switches unit ON/OFF
MODE BUTTON
Selects Operating Mode E.g.
Heating/Cooling/Fan etc.
TIMER BUTTON
Enables Timer Mode
SPEED BUTTON
Selects Fan Speed
UP BUTTON
Increase Temperature
DOWN BUTTON
Decrease Temperature
SLEEP BUTTON
Night operation selector
SWING BUTTON
Automatic air flow direction ON/OFF
POWER LED
Power on
SPEED LED
Indicates selected fan speed
MODE LED
Indicates selected operating mode
TIMER LED
Indicates Timer Mode active
SWING LED
Indicates Auto Swing active
SLEEP LED
Indicates Night Mode Active
W.F. LED
Indicates the internal water tank is full
Wi-Fi LED
Indicates Wi-Fi enabled (solid) or
waiting configuration (blinking)
8
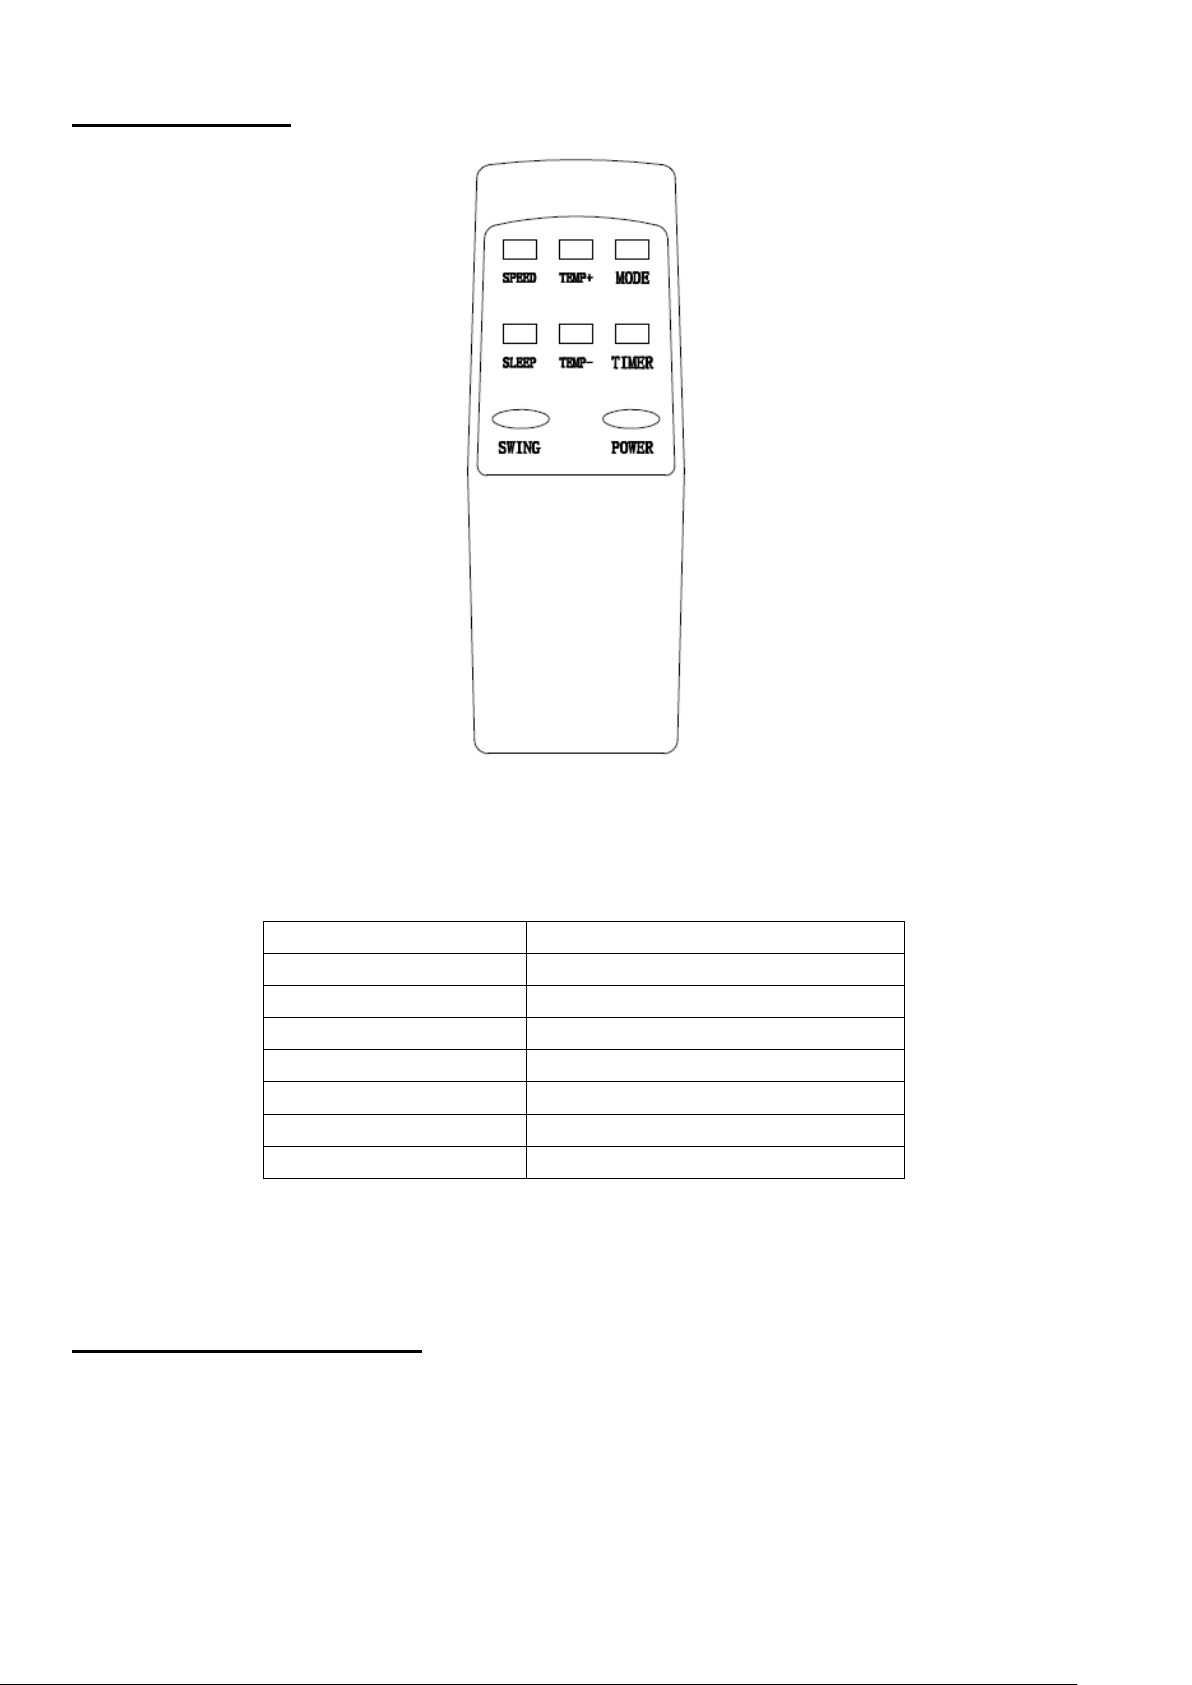
Remote Control
Fig.4
POWER
On/Off switch
MODE
MODE selector
TIMER
Hourly programming
SPEED
Fan speed selector
TEMP+
Increase Temperature
TEMP-
Decrease Temperature
SLEEP
Night operation selector
SWING
Auto air flow selector
Remote Control Batteries
The supplied remote control (Fig 4) requires 2 x AAA (LR03) batteries which are not supplied with the
unit. Please obtain 2 x AAA batteries and install in the battery compartment in the back of the remote
control noting the correct orientation. It is advisable for the batteries to be removed from the remote
control if it will be unused for an extended period of time.

9
Wi-Fi Support
The Climateasy P12R2 model is Wi-Fi enabled and can be managed using a tablet or phone with an
optional Andorid or iOS App. Installation, configuration and use of the P12R2 Wi-Fi feature is
documented in a separate manual which is available for download from www.koolbreeze.co.uk
Preparing the Unit for Use
1) Locate a suitable power socket or outlet.
2) If the unit will be used in an EU country remove the UK converter plug (requires a screwdriver)
Fig 5a
3) Attach the exhaust hose to the unit (Fig 5b)
a) Twist both ends of the exhaust hose into the supplied end connectors (Fig 2).
Fig 5b
10
b) Attach the machine end connector to the outlet at the back of the air conditioner (Fig.5b).
c) The end of the exhaust hose should be vented through a window or through a hole of the
correct diameter in a wall if not using the supplied window kit.
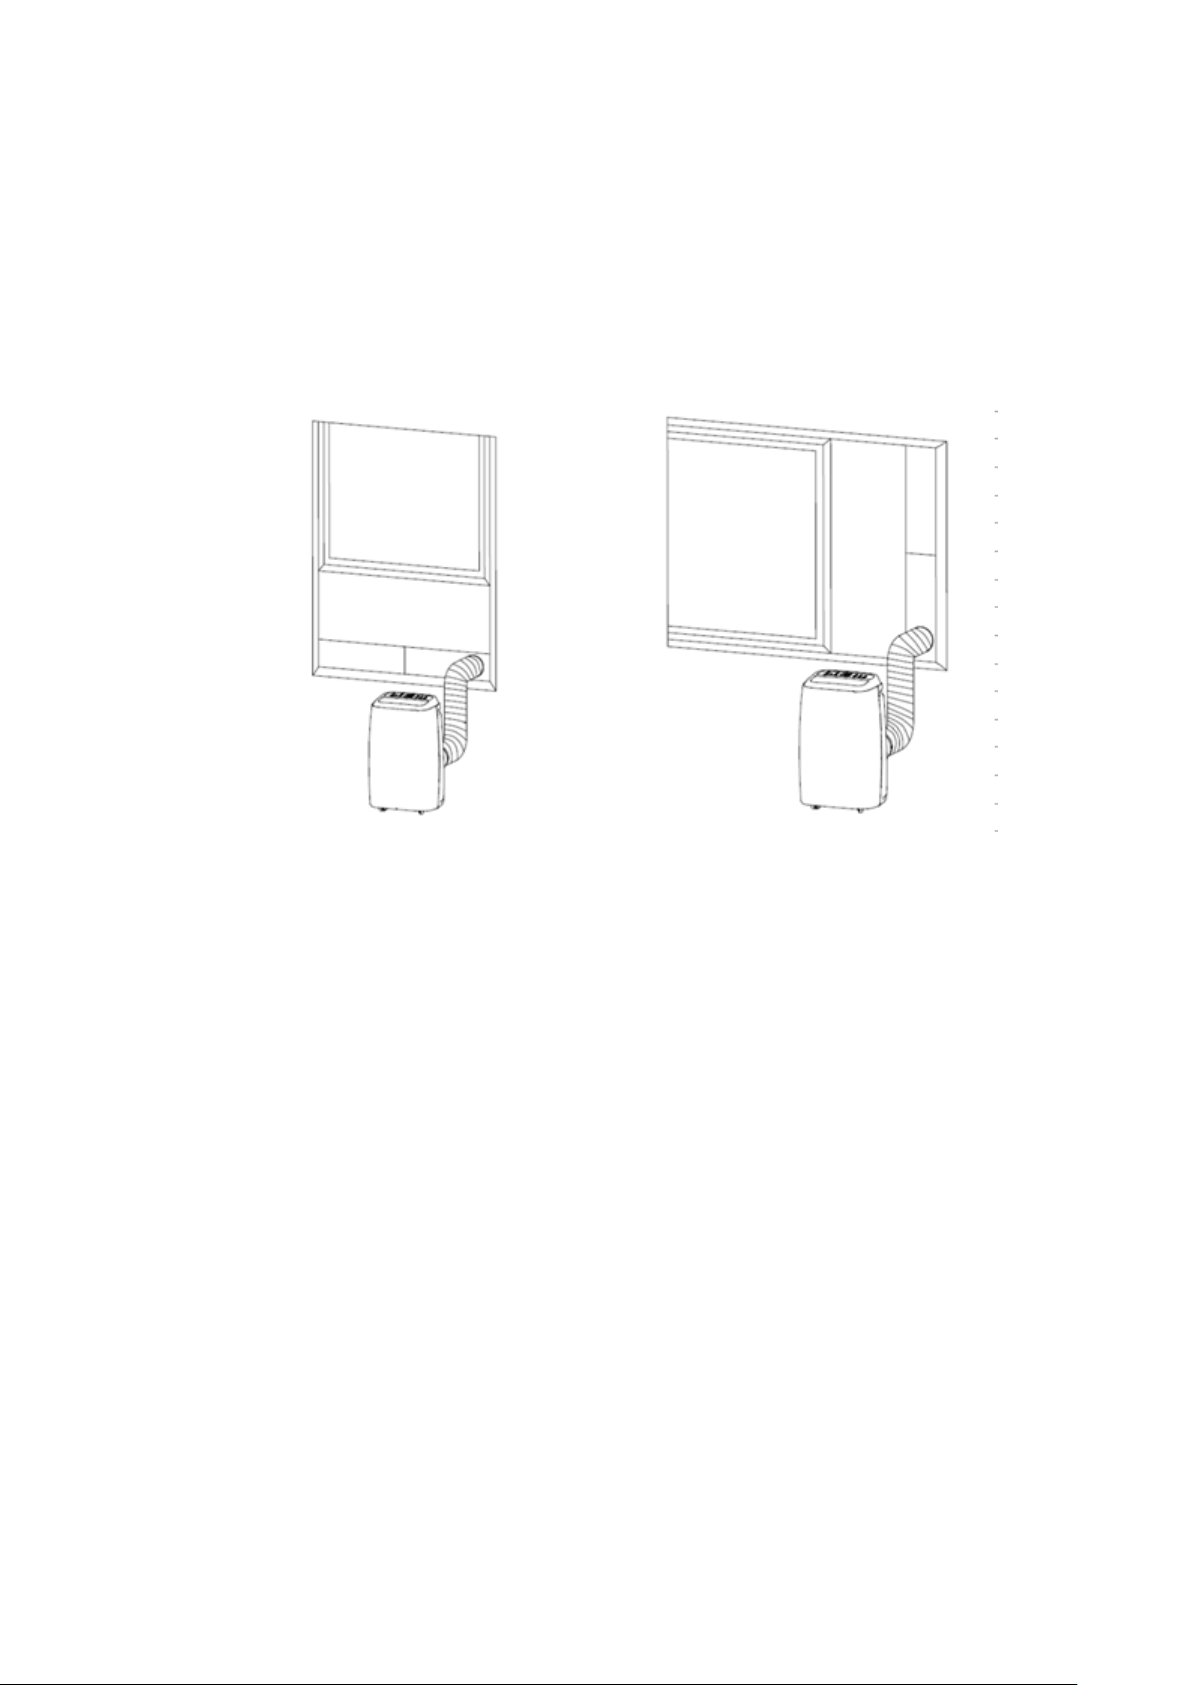
4) If using the supplied window kit Fig.5c and Fig 5d place the window kit slide plate either
horizontally or vertically in the window aperture, attach exhaust hose window end connector to
the window kit slide plate and adjust the window position.
Fig 5c Fig 5d
5) Insert the power cord into a grounded AC220-240V/50Hz socket.
6) If required connect a drain hose to the continuous drain outlet which is situated on the rear of the
machine approximately half way down the unit. If not using the continuous drain facility make
sure that the rubber bung is fully inserted into the drain outlet.
7) Check the end of season drain plug at the rear bottom of the unit is fitted and secure (Fig 6a)
8) Keep the hose as straight as possible and avoid dips where the moisture from the exhaust air can
condense and fill the tube with water. Do not allow the hose to be crushed or kinked (Fig 6b)
9) The supplied exhaust hose can be extended up to 1.5m long, but the shorter it is the more
efficiently the CLIMATEASY xxR2 model will operate. Do not extend the hose or replace it with
another type of unapproved hose.
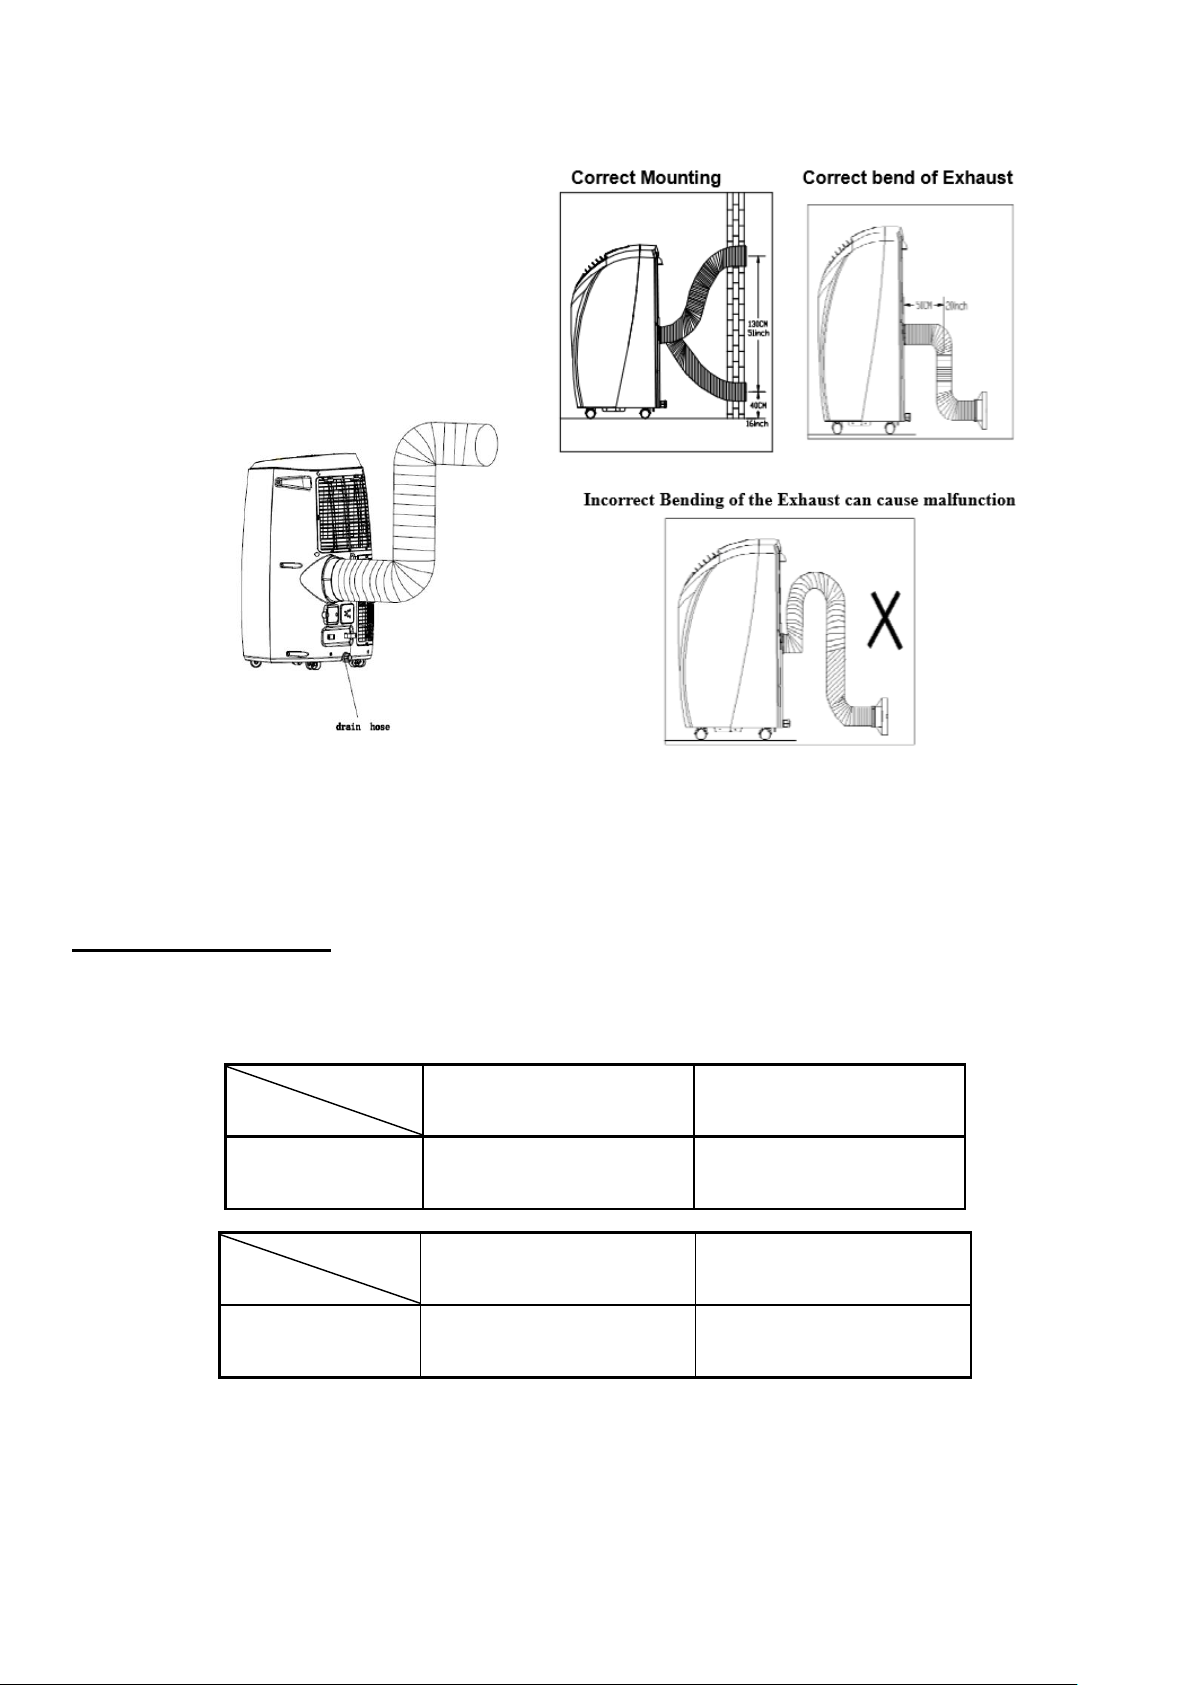
11
Fig.6a Fig 6b
Operating the Unit
The unit has the following operational temperature range for cooling and heating:
.
Maximum cooling
Minimum cooling
DB/WB(℃) 35/24
18/12
Maximum heating
Minimum heating
DB/WB(℃) 27/---
7/---

12
1. Cooling and dehumidifying operation considerations:
a) When switching between cooling and dehumidifying modes, leave at least 3 minutes between
each ON/OFF cycle.
b) Confirm the power supply meets the unit requirements and is for AC use. Required power
supply is AC220--240V,50Hz
c) Do not use a multi-way adapter plug to share the socket being used for the unit with other
appliances.
d) Check whether the exhaust hose has been connected properly.
Press the POWER button to turn on the air-conditioner and select the desired operational
mode as described below
2. Auto mode
a) Depending on the room temperature, the unit automatically selects the operational mode e.g.
cooling, dehumidifying or heating (see Table 1).
Table 1
Room Temperature
(Tr)
Tr <23 ℃
23℃≤Tr <26℃
Tr ≥26℃
Mode
Heating
Dehumidify
Cooling
Set Temperature
21℃
23℃
25℃
3. Cooling mode
a) Press the “Mode” button until the “Cool” LED illuminates.
b) Press the “DOWN” or “UP” button to select the desired room temperature. (16℃-31℃)
c) Press the “Fan Speed” button to select required fan speed.
4. Dehumidifying mode
Press the “Mode” button until the “Dehumidify” LED illuminates.
a) Automatically sets the selected temperature to current room temperature minus 2℃. (16℃-31℃)
b) Automatically sets the fan motor to LOW fan speed.
5. Fan mode
a) Press the “Mode” button until the “Fan” LED illuminates.
b) Press the “Fan Speed” button to select the required fan speed.
6. Heating mode (this function is only available on models that support heat and cooling)
a) Press the “Mode” button until the “Heat” LED illuminates.
b) Press the “DOWN” or “UP” button to select a desired room temperature. (16℃-31℃)
c) Press the “Fan Speed” button to select the required fan speed

13
7. Timer operation
Timer ON setting:
a) When the air conditioner is OFF, press the “Timer” button and select a desired ON time through the
temperature and time setting buttons.
b) “Pre-set ON Time” is displayed on the operation panel.
c) ON time can be set to any time in the range 0-24 hours.
Timer OFF setting:
a) When the air-conditioner is ON, press the “Timer” button and select a desired OFF time through the
temperature and time setting buttons.
b) “Pre-set OFF Time” is displayed on the operation panel.
c) OFF time can set to any time in the range 0-24 hours.
8. Swing (air flow direction)
Press this button after the unit has been switched on. The louvres will swing continuously left and
right. The function can be deactivated by pressing the button a second time.
9.Sleep Control Function
a) While in cooling mode, press the SLEEP button to set the temperature. It increases by 1 ℃ after an
hour and by 2 ℃ after 2 hours.
b) While in heating mode, press the SLEEP button to set the temperature. It decreases by 1 ℃ after an
hour and by 2 ℃ after 2 hours.
c) Press the SLEEP button again to cancel the setting.
10. Drainage
Internal Tank Water Full Alarm Function
When operating in cooling mode unwanted water is removed from the air. The majority of this
extracted water is re-used to cool the unit. In conditions of very high humidity an amount of water
may accumulate in the internal water tank in the bottom of the machine. The internal water tank in
the air conditioner is equipped with water level safety switches, which control the water level. When
the water level reaches pre-determined height, the water full indicator lamp on the operator panel
illuminates. When the internal water tank is full the compressor will switch off but the fan will
continue to operate.
If the water full indicator illuminates, empty the internal water tank using the following steps:
a) Turn the unit off and disconnect it from the power supply. To avoid any spillage avoid moving
the unit while the tank is full.
b) Place a suitable drain pan under the drainage port/outlet on the bottom of the rear of the unit
c) Carefully unscrew the drain port cover and remove any internal bung found in the port taking
care to ensure that the drain pan is positioned correctly to catch both the initial outflow of
water and any reduced flow as the tank empties.
d) Once the flow of water stops replace any internal bung and/or replace the screw cover on the
drain outlet making sure it is firmly seated.
Please note that when operating in heating mode the unit will still produce water that may need
periodically emptying from the machine.

14
Continuous Drainage
It is possible to eliminate the requirement to empty the internal water tank by using the optional
continuous drain facility. To use this facility, remove the bung from the black drain outlet located
half way down the rear of the unit and attach a suitably sized pipe/hose to direct any water into a
container or waste water drain. You can also use this facility when the unit is operating in HEAT
mode. Should the water pump in the unit become damaged the continuous drain facility can be
used, to allow the unit to continue to operate.
Maintenance and Cleaning
1) Before cleaning, be sure to disconnect the unit from any electric supply outlet;
2) Do not use gasoline or other chemicals to clean the unit;
3) Do not wash the unit directly or immerse the unit in water
4) If the unit is damaged during cleaning, please contact the dealer or authorised service agent
Cleaning the Air Filter
If the air filter becomes clogged with dust/dirt, the air filter should be cleaned once every two weeks.
1) Removing
Open the air inlet grille and take off air filter.
2) Cleaning
Clean the air filter with neutral detergent in lukewarm water(40℃), Dry out of direct sunlight.
3) Refitting
Refit the air filter into the inlet grille and replace the components as originally fitted.
Cleaning the Air Conditioner Casing
First clean the surface with a neutral detergent and damp cloth, then wipe it with a clean dry cloth.
End of Season Storage.
Before putting the unit into storage all remaining water should be drained from the internal tank using
the same drain procedure as when the water tank full indicator is illuminated. After emptying run the
appliance in "fan only" mode for a few hours to dry the inside thoroughly. Clean the filter, unplug the
mains cable and store the appliance in its original box in an upright position. Be sure to refit the drain
plug securely.

15
Troubleshooting
Basic Fault Finding
Unit stops running:
Mains supply is disconnected or has failed
Target temperature has been reached.
Timer has been set.
Water tank is full (WATER FULL indicator will illuminate)
In cooling mode, no cool air is produced:
Room temperature is lower than set temperature
The unit is defrosting (this will take a few minutes and afterwards it will resume operation)
Filter is blocked
Cooling is poor on hot days:
Too much direct sunshine is heating the room
Windows or doors are open allowing hot air into the room
A large number of people present in the room
Electrical equipment in the room producing heat
Heating is poor on cold days:
The heat pump can only heat effectively when the outdoor temperature is above 7 °C.
The unit is not intended as a primary means of heating premises
Remote control does not work:
Check batteries are correctly installed and are not exhausted.
Make sure that the remote control is pointed towards the main unit when being used.
Detailed Fault Symptoms and Error Codes
Symptom
Possible Causes
Suggested Remedies
1. Unit does not start when
pressing on/off button
Water full indicator lamp blinks
and water tank is full.
Dump the water out of the water
tank.
Room temperature is higher
than the setting temperature.
(Electric heating mode)
Reset the temperature
Room temperature is lower than
the setting temperature.
(Cooling mode)
Reset the temperature

16
2. Not cool enough
The doors or windows are not
closed.
Make sure all the windows and
doors are closed.
There are other heat sources
inside the room.
Remove the heat sources if
possible
Exhaust air hose is not
connected or blocked.
Connect or clean the exhaust
air hose.
Temperature setting is too high.
Reset the temperature
Air inlet is blocked.
Clean the air inlet.
3. Auto Power-Off in heating
mode
Heating protection, when the
temperature at the air outlet
exceeds 70℃, the unit will
power off automatically.
Restart the unit when the room
temperature is lower.
4. Noisy
The surface is not level or not
flat enough
Place the unit on a flat, level
surface if possible
The sound comes from the
flowing of the refrigerant inside
the air conditioner
This is normal
5. E0 Code
Room temperature sensor
failed
Replace room temperature
sensor (the unit can operate
without replacement.)
6. E3 Code
Pipe temperature sensor failed
Replace pipe temperature
sensor (the unit can operate
without replacement.)
7. E2 /E4 Code
Internal Water tank full
Please empty the water tank.

17
Warranty
SERVICE WARRANTY
Cottage Stores LLP guarantees the product free from defects in materials and
workmanship for a period of twelve months. Should this unit be operated under
conditions other than those recommended, at voltages other than the voltage indicated
on the unit, or any attempts made to service or modify the unit, then the warranty will be
rendered void.
Please note any attempt to extend the exhaust hose will invalidate the warranty. The
product you buy may sometimes differ slightly from illustrations.
This warranty is in addition to, and does not affect, your statutory rights.
If you have any problems with this product, please in the first instance contact the
retailer/reseller from whom you originally purchased it.
Please retain all packaging until end of the warranty period.
Cottage Stores LLP
Koolbreeze Division
7 Harris Drive
Rugby
CV22 6DX
UK
sales@koolbreeze.co.uk

18
Appendix A. Product Technical Specifications
Model
Climateasy 12R2
Dimensions (mm)
W440 x H715x D335
Net Weight
26kg
Voltage
220-240V~ 50Hz
Power Consumption (Cooling)
1345W
Power Consumption (Heating)
1391W
Operating Current (Cooling)
6.0A
Operating Current (Heating)
Heating Capacity
Cooling Capacity
Dehumidifying Capacity
Working Temp Range (Cooling)
Working Temp Range (Heating)
Air Flow
Refrigerant
EER Class
6.3A
12000 Btu/3500W
11000 Btu/3200W
1.3 L/h
18-35 oC
7-27 oC
340m3/h
R290 (210g)
A
Appendix B. Window Kit Usage Specifications
 Loading...