

Page 1
Chipset Cooler Installation Guide (Motherboard)
The chipset cooler is used for both motherboard northbridge and video card
chipsets. If installed, the motherboard must be partially removed from the chassis
in order to install the chipset cooler . (The mounting screws are inserted from the
back side of the board.)
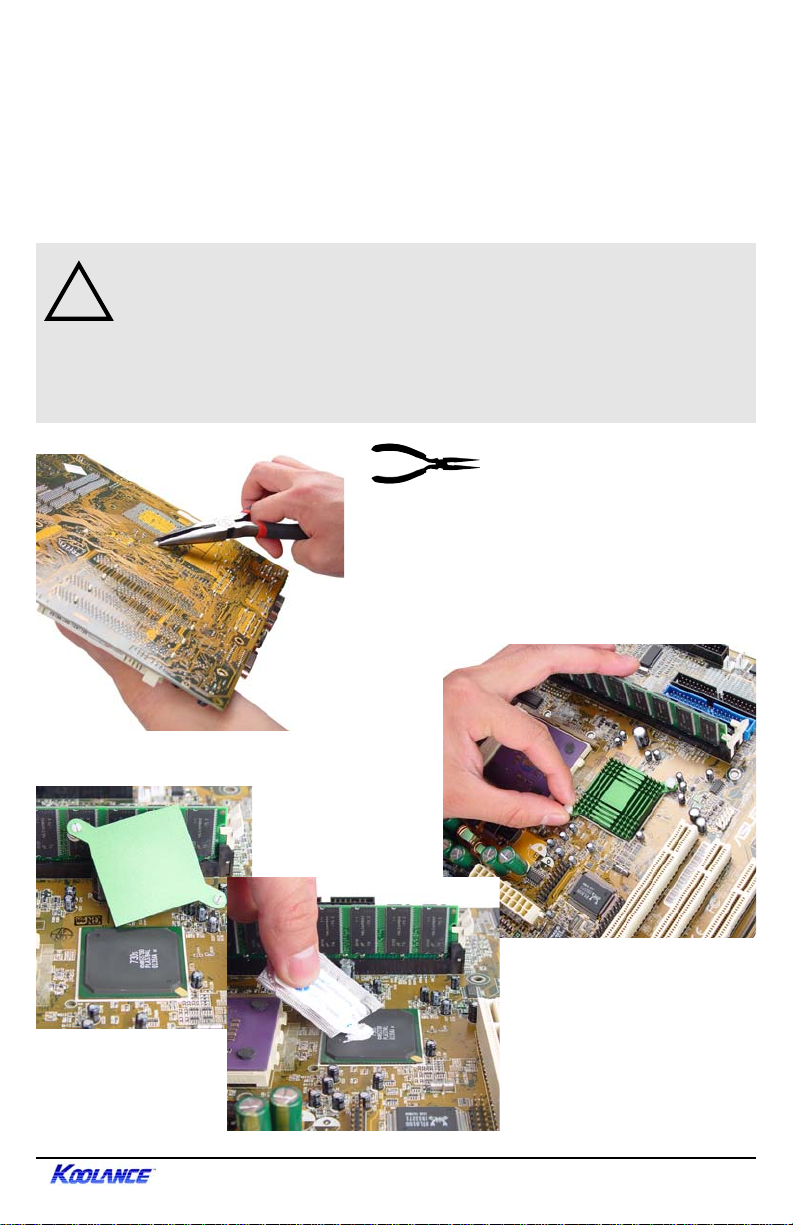
CAUTION: Removal of the original heatsink my void your
!
manufacturer’s hardware warranty . Please consult the manufacturer if
unsure, and keep all original parts in case of a return/RMA. Koolance
does not recommend using a liquid cooler on video cards or
motherboards that lack standard mounting holes, or have heat sinks
that are attached with only an adhesive (rather than screws or bolts).
Beneath the motherboard, the plastic tabs
must be squeezed together with needlenose pliers in order to free the original heat
sink. (Some tabs have locking center pins
which must first be removed from the top.)
Chipset Cooler Installation Guide
Once loosened, remove
the original heat sink.
Apply a thin layer of
thermal interface
compound onto the
chipset if necessary .
v 2.00
Page 2

Remove the protective tape from the bottom
of the chipset cooler .
Through the original motherboard mounting holes,
insert both plastic mounting screws from the back
of the board.
T o help keep them secure, place rubber washers
over the plastic screws from above the board.
Use the metal attachment nuts to fasten the
mounting bracket chipset to the motherboard.
Hand-tighten all motherboard components.
Chipset Cooler Installation Guide
v 2.00
Page 3

Chipset Cooler Installation Guide (Video Card)
The chipset cooler is used for both motherboard northbridge and video card
chipsets. If installed, the video card should be removed from the chassis in order
to install the chipset cooler . (The mounting screws are inserted from the back side
of the board.)
CAUTION: Removal of the original heatsink my void your
!
manufacturer’s hardware warranty . Please consult the manufacturer if
unsure, and keep all original parts in case of a return/RMA. Koolance
does not recommend using a liquid cooler on video cards or
motherboards that lack standard mounting holes, or have heat sinks
that are attached with only an adhesive (rather than screws or bolts).
Beneath the motherboard, the plastic tabs
must be squeezed together with needle-nose
pliers in order to free the original heat sink.
(Some tabs have locking center pins which
must first be removed from the top.)
Once loosened, remove the original heat
sink. Apply a thin layer of thermal
interface compound onto the chipset if
necessary.
Chipset Cooler Installation Guide
v 2.00
Page 4

Remove the protective
tape from the bottom
of the chipset cooler .
Through the original
mounting holes, insert
both plastic mounting
screws from the back
of the video card.
T o help keep them secure, place rubber washers on
the plastic screws above the board.
If required, use the bracket extension tabs to reach
the chipset’s mounting holes. The extensions are
highly-adjustable for proper alignment.
Use the metal attachment nuts to fasten the
mounting bracket to the video card chipset.
Hand-tighten all video card components.
Chipset Cooler Installation Guide
v 2.00
 Loading...