

Wireless 8-Button Arcade Pad
G
Wireless 2.4 GHz
INSTRUCTION MANUAL
MANUAL DE INSTRUCCIONES
GUIDE D’UTILISATION
UIDE D’UTILISAT ION
@retrobitgaming
For more information, please visit www.retro-bit.com
Retro-Bit is a registered trademark of Kool Brands, LLC. SEGA is registered in the U.S. Patent and Trademark Office.
SEGA, the SEGA logo, SATURN, and GENESIS are either registered trademarks or trademarks of SEGA Holdings
Co., Ltd. or its affiliates. All other mentioned trademarks are either trademarks or registered trademarks of their
respective owners. This product is licensed by SEGA of America, Inc.
NA
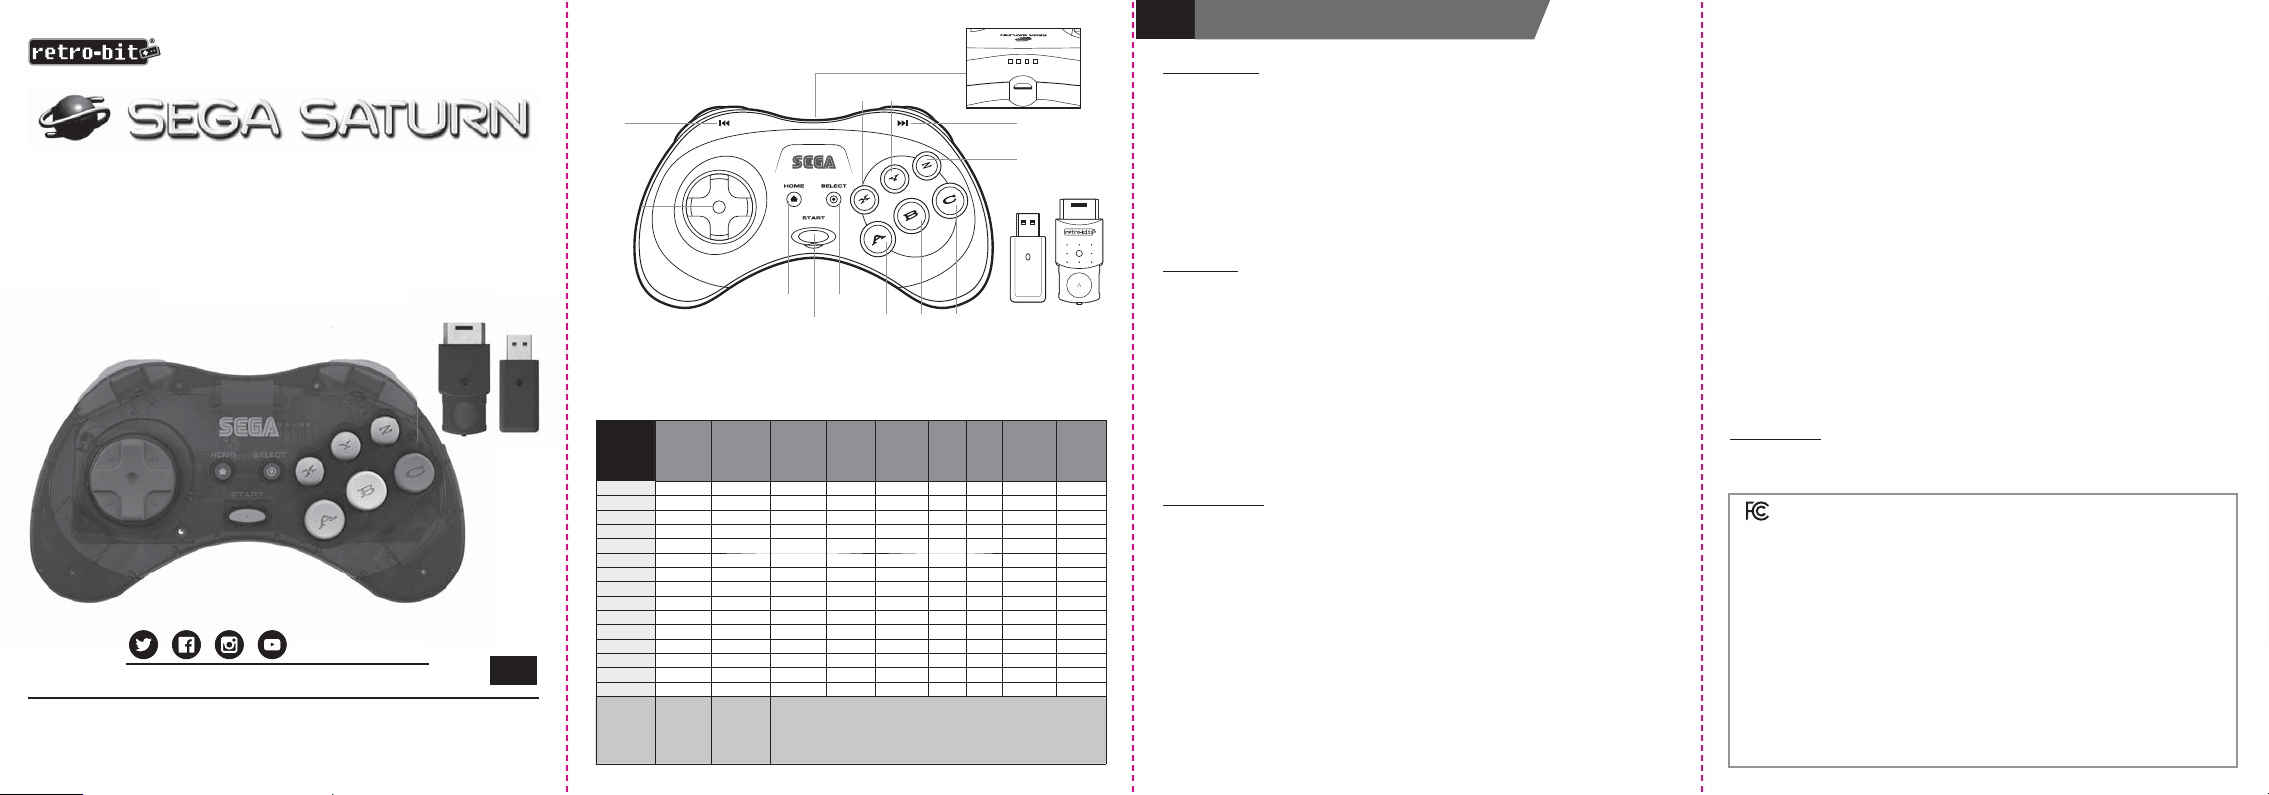
LAYOUT DIAGRAM
Micro USB
®
port
X
LR
INSTRUCTION MANUALEN
FEATURES
• 2.4 GHz officially-licensed wireless controller
• Compatible with SEGA Saturn®, SEGA Genesis® Mini, PC/Mac®, PS3®, and Switch
• Includes both SEGA Saturn® port and USB® port receivers
• Rechargeable 500mAh Li-Ion battery
Z
• Includes 3.3 ft charging cable
• Up to 30 ft gaming range
D-Pad
• Sleep mode after 5 minutes of inactivity
• Includes instruction manual & exclusive SEGA® case for controller, receivers and cable
storage.
PAIRING
• Connect the appropriate receiver into the console’s controller port.
Home
Includes controller, Micro USB® Cable for charging, Original Port & USB
Start
Select
• Once connected, the LED on the receiver will blink to indicate it is in search mode.
A
BYC
®
Receivers, Deluxe storage
• Press Start on the controller. The LED on the controller will blink as well.
• Press and hold the Sync button on the receiver.
• Release the Sync button once both the receiver and controller’s LED remain solid.
case and instruction manual.
DEFAULT BUTTON MAPPING
SEGA
SEGA
(not
SEGA
PC
®
Genesis
Mini
D-InputPCX-Input
7
8
®
®
®
Mac
PS3®Android®Switch
Y-
Ĺ
X+
ĺ
Y+
Ļ
X-
ĸ
▲
■
9 Back Select -
10 Start Start +
USB® Receiver
Y-
Ĺ
X+
ĺ
Y+
Ļ
X-
ĸ
XX
YY
Controller
ĹĹĹĹĹAnalog Ĺ
ĺĺĺĺĺAnalog ĺ
ĻĻĻĻĻAnalog Ļ
ĸĸĸĸĸAnalog ĸ
AAAA213AA
BBBB322XBB
XXXX134
YYYY441
C C C C 5 Z Axis - 8 R2 L1 ZR
Z Z Z Z 6 Z Axis + 7 L2 R1 ZL
L-L-755L1-L
R-R-866R1-R
Select Mode - Menu 9
Start Start Start Start 10
Home - - - - - 13 - - Home
Connection
SEGA
Genesis
SEGA
Genesis
Receiver
®
Saturn
Saturn
®
Receiver
included)
If you encounter an issue while pairing, you can reset the controller in one of two ways:
• Press and Hold Start + R for 4 seconds
• Inserting a thin metal wire (an unbent paperclip for example) into the small hole on the
back of the controller. Gently press and hold until the LED stops glowing. Then restart the
pairing process.
CHARGING
When the controller’s battery is low, plug in the Micro USB® charge cable into the controller and the
USB® end into a powered slot on the console. Once fully charged, the LED will stay on.
SEGA GENESIS®
• The controller’s LED will be red to indicate it is in 6-Button Mode and blue if it is in 3-Button
mode. To switch between the two modes, press and hold Start + B until it changes color.
SEGA GENESIS® MINI
• If the LED on the controller is blue, press and hold Start + B until it changes to red. The
controller will not function on the console if it is blue.
SEGA SATURN®
• If the LED on the controller is blue, press and hold Start + B until it changes to red. The
controller will not function on the console if it is blue.
SWITCH
• If the LED on the controller is blue, press and hold Start + B until it changes to red. The
controller will not function on the Switch if it is blue.
• To set the DPad to Left Analog mode, press and hold Left + Start for 3 seconds
• To set the DPad to Right Analog mode, press and hold Right + Start for 3 seconds
• To set the DPad to back to normal, press and hold Up + Start for 3 seconds
• To flip the face buttons A/B & X/Y, press and hold Down + Start for 3 seconds
PC / ANDROID®
• The controller’s LED indicates the input mode it is in. To switch between the modes, press
and hold Start + B until it changes color.
» Red indicates it is in D-Input mode.
» Blue indicates it is in X-Input mode.
MAC®
• If the LED on the controller is blue, press and hold Start + B until it changes to red. The
controller will not function on the console if it is blue.
PS3®
• If the LED on the controller is blue, press and hold Start + B until it changes to red. The
controller will not function on the console if it is blue.
SUPPORT
To stay up to date with the latest news, manuals, and firmware updates, visit www.retro-bit.com/
support.
FCC WARNING
This device complies with Part 15 of the FCC Rules. Operation is subject to the following two conditions:
(1) This device may not cause harmful interference, and (2) this device must accept any interference received,
including interference that may cause undesired operation.
NOTE 1: This equipment has been tested and found to comply with the limits for a Class B digital device, pursuant to
part 15 of the FCC Rules. These limits are designed to provide reasonable protection against harmful interference in
a residential installation. This equipment generates uses and can radiate radio frequency energy and, if not installed
and used in accordance with the instructions, may cause harmful interference to radio communications. However,
there is no guarantee that interference will not occur in a particular installation. If this equipment does cause harmful
interference to radio or television reception, which can be determined by turning the equipment off and on, the user is
encouraged to try to correct the interference by one or more of the following measures:
- Reorient or relocate the receiving antenna.
- Increase the separation between the equipment and receiver.
- Connect the equipment into an outlet on a circuit different from that to which the receiver is connected.
- Consult the dealer or an experienced radio/TV technician for help.
NOTE 2: Any changes or modifications to this unit not expressly approved by the party responsible for compliance
could void the user’s authority to operate the equipment.

GUIDE D’UTILISATIONMANUAL DE INSTRUCCIONES FRES
CARACTERÍSTICAS
• Mando inalámbrico de 2,4 GHz con licencia oficial
• Compatible con SEGA Genesis®, SEGA Genesis® Mini, PC/Mac®, PS3® y Switch
• Incluye ambos conectores-receptores: para el puerto de SEGA Saturn® y para el puerto
USB®
• Batería recargable de ion-litio de 500 mAh.
• Incluye un cable de recarga de 1 m
• Alcance para juego de hasta 9 m
• Modo de espera tras 5 minutos de inactividad
• Incluye el manual de instrucciones y un estuche de SEGA® exclusivo donde guardar el
mando, los conectores-receptores y el cable.
EMPAREJAMIENTO
• Conecta el conector-receptor apropiado en el puerto del mando de la consola.
• Una vez conectado, el LED en el conector-receptor parpadeará para indicar que está en
modo búsqueda.
• Pulsa START en el mando. El LED del mando también parpadeará.
• Mantén pulsado el botón de sincronización en el conector-receptor.
• Suelta el botón de sincronización cuando ambos LED, el del mando y el del conectorreceptor, se queden permanentemente encendidos.
Si encuentras cualquier incidencia cuando los emparejes, puedes reiniciar el mando de una de
estas dos maneras:
• Mantén pulsados START + R durante 4 segundos.
• Insertando un alambre de metal fino (por ejemplo, un clip enderezado) en el agujero
pequeño que está en la parte trasera del mando. Manteniendo pulsado suavemente hasta
que el LED deje de estar iluminado. Entonces reinicia el procedimiento de emparejamiento.
CARG A
Cuando la batería del mando esté baja, conecta un extremo del cable Micro USB® al mando,
y el otro extremo del USB® a una ranura de alimentación de la consola. Una vez que esté
completamente cargado, el LED permanecerá encendido.
SEGA GENESIS®
• El LED del mando aparecerá en rojo para indicar que está en modo para seis botones, y
en azul si está en modo para tres botones. Para cambiar entre los dos modos, mantén
pulsados Start + B hasta que cambie de color.
SEGA GENESIS® MINI
• Si el LED del mando está de color azul, mantén pulsados Start + B hasta que cambie a
rojo. El mando no funcionará en la consola si está de color azul.
SEGA SATURN®
• Si el LED del mando está de color azul, mantén pulsados Start + B hasta que cambie a
rojo. El mando no funcionará en la consola si está de color azul.
SWITCH
• Si el LED del mando está de color azul, mantén pulsados Start + B hasta que cambie a
rojo. El mando no funcionará en la Swicth si está de color azul.
• Para pasar de la cruceta a la Izquierda en modo analógico, mantén pulsados Izquierda +
Start durante 3 segundos.
• Para pasar de la cruceta a la Derecha en modo analógico, mantén pulsados Derecha +
Start durante 3 segundos.
• Para pasar de la cruceta al modo normal, mantén pulsados Arriba + Start durante 3
segundos.
• Para cambiar los botones frontales A/B y X/Y, mantén pulsados Abajo + Start durante 3
segundos.
PC / ANDROID®
• El LED del mando indica el modo de entrada en el que está. Para cambiar entre los
diferentes modos, mantén pulsados Start + B hasta que cambie de color.
» El color rojo indica que está en modo de entrada D.
» El color azul indica que está en modo de entrada X.
MAC®
• Si el LED del mando está de color azul, mantén pulsados Start + B hasta que cambie a
rojo. El mando no funcionará en la consola si está de color azul.
PS3®
• Si el LED del mando está de color azul, mantén pulsados Start + B hasta que cambie a
rojo. El mando no funcionará en la consola si está de color azul.
ATENCIÓN AL CLIENTE
Para estar al día de las últimas noticias, manuales y actualizaciones de firmware, visita
www.retro-bit.com/support.
CARACTÉRISTIQUES
• Manette sans fil 2,4 GHz sous licence officielle
• Compatible avec SEGA Saturn®, SEGA Genesis® Mini, PC/Mac®, PS3® et Nintendo
Switch
• Comprend un port pour SEGA Saturn® et des récepteurs pour port USB®
• Batterie lithium-ion 500 mAh rechargeable
• Câble de charge de 1 mètre inclus
• Jusqu'à 9 mètres de portée
• Passage en mode veille au bout de 5 minutes d'inactivité
• Inclus : mode d'emploi et boîter SEGA® exclusif pour la manette, les récepteurs et les
câbles
APPAIRAGE
• Branchez le récepteur approprié dans le port manette de la console.
• Une fois branché, le voyant LED du récepteur clignotera. Ce clignotement signifie que le
récepteur est mode recherche.
• Appuyez sur Start sur la manette. Le voyant LED de la manette clignotera également.
• Maintenez le bouton Sync du récepteur.
• Relâchez le bouton Sync une fois que les voyants LED du récepteur et de la manette ne
clignoteront plus.
Si vous rencontrez des difficultés lors de l'appairage, il existe deux manières de réinitialiser la
manette :
• Maintenez Start + R pendant 4 secondes
• Insérez un fin fil métallique (par exemple un trombone déplié) dans le petit orifice se
trouvant à l'arrière de la manette. Appuyez délicatement jusqu'à ce que le voyant LED
s'éteigne. Vous pourrez ensuite redémarrer le processus d'appairage.
CHARGEMENT
Lorsque la batterie de la manette est faible, branchez-y le câble de charge Micro USB®, puis
branchez l'extrémité USB® à la console. Une fois complètement chargé, le voyant reste allumé.
SEGA GENESIS®
• Le voyant LED est rouge lorsque la manette est en mode six boutons, et bleu en mode
trois boutons. Pour basculer entre les deux modes, maintenez Start + B jusqu'à ce que la
couleur du voyant change.
SEGA GENESIS® MINI
• Si le voyant LED de la manette est bleu, maintenez Start + B jusqu'à ce qu'il devienne
rouge. La manette ne peut pas être utilisée avec la console lorsque le voyant est bleu.
SEGA SATURN®
• Si le voyant LED de la manette est bleu, maintenez Start + B jusqu'à ce qu'il devienne
rouge. La manette ne peut pas être utilisée avec la console lorsque le voyant est bleu.
SWITCH
• Si le voyant LED de la manette est bleu, maintenez Start + B jusqu'à ce qu'il devienne
rouge. La manette ne peut pas être utilisée avec la Nintendo Switch lorsque le voyant est
bleu.
• Pour configurer la croix directionnelle en mode analogue gauche, maintenez Gauche +
Start pendant 3 secondes.
• Pour configurer la croix directionnelle en mode analogue droit, maintenez Droite + Start
pendant 3 secondes.
• Pour configurer la croix directionnelle en mode normal, maintenez Haut + Start pendant
3 secondes.
• Pour inverser les boutons avant A/B & X/Y, maintenez Bas + Start pendant 3 secondes.
PC / ANDROID®
• Le voyant LED de la manette indique le mode dans lequel elle se trouve. Pour basculer
entre les modes, maintenez Start + B jusqu'à ce que la couleur du voyant change.
» Rouge indique que la manette est en mode D-Input.
» Bleu indique que la manette est en mode X-Input.
MAC®
• Si le voyant LED de la manette est bleu, maintenez Start + B jusqu'à ce qu'il devienne
rouge. La manette ne peut pas être utilisée avec la console lorsque le voyant est bleu.
PS3®
• Si le voyant LED de la manette est bleu, maintenez Start + B jusqu'à ce qu'il devienne
rouge. La manette ne peut pas être utilisée avec la console lorsque le voyant est bleu.
ASSISTANCE
• Pour vous tenir au courant des dernières nouveautés, des manuels, et des mises à jour
logicielles, rendez-vous sur www.retro-bit.com/support.
 Loading...