

Page 1

CP390
Active PMC Carrier Board
for CompactPCI Applications
Manual ID 19976, Rev. Index 0200
Jan 00
The product described in this manual is
in compliance with all applied CE standards.
Page 2

Preface CP390
Chapter
Preface
Preface Table of Contents.............................................0 - 4
Chapt
Chapter
1. Introduction
1.1 Overview .................................................................1 - 2
1.2 Board Interfaces .....................................................1 - 3
1.3 Block Diagram ........................................................1 - 4
1.4 Board Layout ..........................................................1 - 4
1.5 Front Panels ...........................................................1 - 5
0
1
1
1.6 Technical Specifications .........................................1 - 6
1.7 Applied Standards ..................................................1 - 7
1.8 Related Publications ...............................................1 - 7
Chapter
2. Installation
2.1 Board Installation ....................................................2 - 2
2
ID 19976, Rev. 0200Page 0 - 2 ® PEP Modular Computers GmbH
Page 3

CP390 Preface
Chapter
3. Configuration
3.1 Pinouts ....................................................................3 - 2
Chapter
4. Hotswap
4.1 Technical Background of CompactPCI Hotswap ....4 - 2
4.2 Design Implementation on the CP390 ....................4 - 4
Appendix
CompactPCI System Notes
3
4
A
A System Overview ....................................................A - 2
B System Components ..............................................A - 3
ID 19976, Rev. 0200 Page 0 - 3® PEP Modular Computers GmbH
Page 4

CP390 Preface
Preface
Table of Contents......................................................... 0 - 2
Revision History........................................................... 0 - 5
Trademarks.................................................................. 0 - 5
Explanation of Symbols ............................................... 0 - 6
For Your Safety............................................................ 0 - 7
High Voltage Safety Instructions.............................. 0 - 7
Chapt
Chapter
1
0
Special Handling and Unpacking Instructions.......... 0 - 7
General Instructions on Usage................................. 0 - 8
Two Years Warranty .................................................... 0 - 9
ID 19976, Rev. 0200 Page 0 - 4® PEP Modular Computers GmbH
Page 5
Preface CP390
Revision History
Revision History
Manual/Product Title: CP390
Manual ID Number: 19976
Rev.
Index
0100 Initial Issue 1000 Apr. 99
0200 Hotswap chapter added, description of
This document contains information proprietary of PEP Modular Computers. It may not be
copied or transmitted by any means, disclosed to others or stored in any retrieval system or
media, without the prior written consent of PEP Modular Computers GmbH or one of its authorized agents.
The information contained in this document is, to the best of our knowledge, entirely correct.
However, PEP Modular Computers cannot accept liability for any inaccuracies, or the consequences thereof, nor for any liability arising from the use or application of any circuit, product,
or example shown in this document.
Brief Description of Changes Board Index
2000 Jan. 00
CompactPCI and PMC connectors added,
deletion of I/O voltage switching description
Date of
Issue
PEP Modular Computers reserve the right to change, modify, or improve this document or the
product described herein, as seen fit by PEP Modular Computers without further notice.
Trademarks
PEP Modular Computers and the PEP logo are trademarks owned by PEP Modular Computers GmbH, Kaufbeuren, Germany. In addition, this document may include names, company
logos and trademarks which are registered trademarks and are, therefore, proprietary of their
respective owners.
ID 19976, Rev. 0200Page 0 - 5 ® PEP Modular Computers GmbH
Page 6

Explanation of Symbols
!
$
CE Conformity
This symbol indicates that the item described in this manual
is in compliance with all applied CE standards. See also the
section “Applied standards” of this manual.
Caution!
This symbol and title warn you of hazards due to electrical
shocks (> 60 V) when touching products or parts of them.
The non-observance of the measures indicated and/or prescribed by the law may cause harm to your product and/or
life/health.
See also the section “High Voltage Safety Instructions”.
PrefaceCP390
ESD-Sensitive Device!
This symbol and title inform you that electronic boards and
their components are sensitive to static electricity. Therefore, care must be taken during all handling operations and
inspections of this product, in order to ensure product integrity at all times.
Please read also the section “Special Handling and Unpacking Instructions” of this manual.
Attention!
This symbol and title emphasize aspects which, if not read
through carefully by the reader, might cause hazards to
health and/or damages to material.
Note:
This symbol and title emphasize aspects the reader should
read through carefully for his or her own advantage.
PEP Advantage
This symbol and title emphasize advantages or positive
aspects of a product and/or procedure.
Troubleshooting
This symbol and title characterize a message containing
useful information on troubleshooting and problem solving.
ID 19976, Rev. 0200 Page 0 - 6® PEP Modular Computers GmbH
Page 7

CP390Preface
For your safety
Your new PEP product has been developed and carefully tested in order to provide all the features necessary to ensure full compliance with all electrical safety requirements. It has also
been designed for a long fault-free life. However, the life expectancy of your product will be
drastically reduced by improper treatment during unpacking and installation. Therefore, in the
interests of your own safety and of the correct operation of your new PEP product, you are
requested to conform with the following guidelines.
High Voltage Safety Instructions
Warning!
!
All operations on this device must be carried out by sufficiently
skilled personnel.
Caution!
The power supply must always be disconnected before installation, repair and maintenance operations are carried out on this
product. Failure to comply with this basic precaution will subject
the operator to serious electrical shock hazards. Always unplug
the power cable before such operations.
Before installing your new PEP product into a system always
ensure that your mains power is switched off. This applies also to
the installation of piggybacks.
Special Handling and Unpacking Instructions
ESD Sensitive Device!
Electronic boards and their components are sensitive to static
electricity. Therefore, care must be taken during all handling operations and inspections of this product, in order to ensure product
integrity at all times.
$ Do not handle this product while it is outside its protective enclosure while it is not used
for operational purposes, unless it is otherwise protected.
$ Whenever possible, unpack or pack this product only at EOS/ESD safe work stations.
Where safe work stations are not guaranteed, it is important for the user to be electrically discharged before touching the product with his/her hands or tools. This is most
easily done by touching a metal part of your system housing.
$ It is particularly important to observe standard anti-static precautions when changing
piggybacks, ROM devices, jumper settings etc. If the product contains batteries for RTC
or memory backup, ensure that the board is not placed on conductive surfaces, including anti-static plastics or sponges. They can cause short circuits and damage the batteries or tracks on the board.
ID 16566, Rev. 0200Page 0 - 7 ® PEP Modular Computers GmbH
Page 8

PrefaceCP390
General Instructions on Usage
$ In order to maintain PEP’s product warranty, this product must not be altered or modi-
fied in any way. Changes or modifications to the device, which are not explicitly
approved by PEP Modular Computers and described in this manual or received from
PEP Technical Support as a special handling instruction, will void your warranty.
$ This device should only be installed in or connected to systems that fulfill all necessary
technical and specific environmental requirements. This applies also to the operational
temperature range of the specific board version, which must not be exceeded. If batteries are present, their temperature restrictions must be taken into account.
$ When performing all necessary installation and application operations please follow only
the instructions supplied by the present manual.
$ Keep all the original packaging material for future storage or warranty shipments. If it is
necessary to store or ship the board please re-pack it as nearly as possible in the manner in which it was delivered.
$ Special care is necessary when handling or unpacking the product. Please consult the
special handling and unpacking instructions on the preceding page of this manual.
ID 19976, Rev. 0200 Page 0 - 8® PEP Modular Computers GmbH
Page 9

CP390Preface
Two Years Warranty
PEP Modular Computers grants the original purchaser of a PEP product a TWO YEAR LIMITED
HARDWARE WARRANTY as described in the following. However, no other warranties that may be
granted or implied by anyone on behalf of PEP are valid unless the customer has the express
written consent of PEP Modular Computers.
PEP Modular Computers warrants their own products, excluding software, to be free from
manufacturing and material defects for a period of 24 consecutive months from the date of
purchase. This warranty is not transferable nor extendible to cover any other users or longterm storage of the product. It does not cover products which have been modified, altered or
repaired by any other party than PEP Modular Computers or their authorized agents. Furthermore, any product which has been, or is suspected of being damaged as a result of negligence, improper use, incorrect handling, servicing or maintenance, or which has been
damaged as a result of excessive current/voltage or temperature, or which has had its serial
number(s), any other markings or parts thereof altered, defaced or removed will also be
excluded from this warranty.
If the customer’s eligibility for warranty has not been voided he should, in the event of any
claim, return the product at the earliest possible convenience to the original place of purchase,
together with a copy of the original document of purchase, a full description of the application
in which the product has been used and a description of the defect. Please pack the product in
such a way as to ensure safe transportation (see our safety instructions).
PEP provides for repair or replacement of any part, assembly or sub-assembly at the company’s own discretion, or to refund the original cost of purchase, if appropriate. In the event of
repair, refunding or replacement of any part, the ownership of the removed or replaced parts
reverts to PEP Modular Computers, and the remaining portion of the original guarantee, or
any new guarantee to cover the repaired or replaced items, will be transferred to cover the
new or repaired items. Any extensions to the original guarantee are considered gestures of
goodwill, and will be defined in the “Repair Report” issued by PEP with the repaired or
replaced item.
PEP Modular Computers will not accept liability for any further claims resulting directly or indirectly from any warranty claim, other than the above specified repair, replacement or refund.
In particular, all claims for damage to any system or process in which the product was
employed, or any loss incurred as a result of the product not functioning at any given time, are
excluded. The extent of PEP Modular Computers liability to the customer shall not exceed the
original purchase price of the item for which the claim exists.
PEP Modular Computers issues no warranty or representation, either explicit or implicit, with
respect to its products’ reliability, fitness, quality, marketability or ability to fulfil any particular
application or purpose. As a result, the products are sold “as is,” and the responsibility to
ensure their suitability for any given task remains that of the purchaser. In no event will PEP
be liable for direct, indirect or consequential damages resulting from the use of our hardware
or software products, or documentation, even if PEP were advised of the possibility of such
claims prior to the purchase of the product or during any period since the date of its purchase.
Please remember that no PEP Modular Computers employee, dealer or agent is authorized to
make any modification or addition to the above specified terms, either verbally or in any other
form, written or electronically transmitted, without the company’s prior consent.
ID 19976, Rev. 0200Page 0 - 9 ® PEP Modular Computers GmbH
Page 10

CP390
Introduction
Introduction
1.1 Overview ............................................................................. 1 - 2
1.2 Board Interfaces .................................................................. 1 - 3
1.3 Block Diagram ..................................................................... 1 - 4
1.4 Board Layout ....................................................................... 1 - 4
1.5 Front Panels ........................................................................ 1 - 5
1.6 Technical Specifications ...................................................... 1 - 6
1.7 Applied Standards ............................................................... 1 - 7
Chapter
1
1.7.1 CE Compliance ........................................................... 1 - 7
1.7.2 Mechanical Compliance ..............................................1 - 7
1.7.3 Environmental Tests ................................................... 1 - 7
1.8 Related Publications ............................................................ 1 - 7
1.8.1 CompactPCI Systems/Boards .................................... 1 - 7
1.8.2 PMC Add-on Modules/Carriers ................................... 1 - 7
ID 19976, Rev. 0200
Page 1 - 1® PEP Modular Computers GmbH
Page 11

CP390 Introduction
1. Introduction
1.1 Overview
PMC modules are renowned for their flexibility and versatility of use. They afford the
user wide ranging system independent solutions by means of easily interchanged or
upgraded mezzanine add-on modules. The PEP CP390 has been designed to maximize the advantages provided by PMC modules in a 3U environment. Flexibility, versatility, convenience and ease of use have been keynotes throughout the design process.
The result is a board which, although essentially a carrier for PMC modules, also
includes a wide range of important features such as a PCI-PCI bridge and (optionally
available) the ability to hotswap. Use of the hotswap version means, of course, that all
PMC modules employed on the board are effectively hotswapable.
The CP390 is a 3U non-intelligent, active CPCI carrier board with one PMC slot.
Some of the Outstanding Features of the CP390:
• active carrier with PCI-to-PCI bridge: the primary and secondary PCI busses are
capable of being operated independently of one another
• 32 Bit / 33MHz PCI Bus on the CPCI and on the PMC side
• it supports the Interrupts INTA, INTB, INTC and INTD
• software transparent: the non-hotswap version does not require a software driver.
• it supports all the signals of the PCI Bus on its connectors Jn1 (CON2),
Jn2 (CON3)
• The connectors which connect the mezzanine board with the carrier include all the
signals of a 33MHz, 32-bit, multi-master PCI bus, the power rails for 5V, 3.3V,
V(I/O) and other specialised signals for Board Detection.
• A PCI-to-PCI bridge provides for coupling of the PMC side to the CompactPCI
side, so that two independent PCI busses exist. The PCI-to-PCI bridge is the
INTEL 21150. It is software transparent and consequently a software driver is not
required to manage data transfer between the PMC module and the CPCI bus.
• The CP390 has been designed to function with all PEP CompactPCI backplanes.
Features of the PEP Modular Computers’ PMC modules
PEP Modular Computers’ PMC modules are operable in both CompactPCI and VME
systems. They offer all the key benefits of PC I/O technology, namely:
• low cost solutions
• high performance
• a processor independent local I/O bus
• a broad range of I/O peripheral devices
PEP Modular Computers’ PMC modules may be installed on a variety of different carrier
boards, including:
• CompactPCI 3U/6U: CPU CP600, CP602, CP610, CP611, CP612
• CompactPCI PMC carrier boards such as the CP390 and CP690
Customers who additionally require the functionality of the CP390 in the 6U Form
Factor are referred to PEP’s new double-height PMC Module carrier board, the
CP690, which holds two PMC modules.
ID 19976, Rev. 0200Page 1 - 2 ® PEP Modular Computers GmbH
Page 12

CP390 Introduction
1.2 Board Interfaces
CompactPCI Interface
The CompactPCI interface connector J1 (CON1) provides all the necessary signals for
data transfer as defined by PCI Specification Rev. 2.1.
The CP390 is routed to the CompactPCI backplane by means of the Intel 21150 PCI-toPCI bridge which interfaces the board with a data path width of 32-bit and a speed up to
33MHz.
PMC Interface
The PMC interface of the CP390 provides an easy way to extend a CompactPCI system
via the wide array of interfaces and functions which are available on PMC modules produced by the entire range of PMC vendors. The secondary side of the PCI-to-PCI
Bridge provides a 32-bit wide PCI data path with a speed of up to 33MHz which is
routed to the onboard connectors Jn1 and Jn2. These connectors also provide the
power supply for the PMC module. The interface has been designed to comply with the
IEEE 1386.1 specification which defines a PCI electrical interface for the CMC (Common Mezzanine Card) form factor.
Additionally, the CP390-HS (Hotswap version) has been designed to comply with the
CPCI Hotswap specification PICMG 2.1 R1.0, which means that the power supply of the
PMC modules will be ramped up and a reset generated whenever the board is plugged
into a running system.
ID 19976, Rev. 0200 Page 1 - 3® PEP Modular Computers GmbH
Page 13

CP390 Introduction
1.3 Block Diagram
Figure 1-1: Block Diagram
Hotswap Control
and
Status Register
PCI - PCI
Bridge
Hotswap
Power Control
Serial
Term
1.4 Board Layout
The CP390 has two connectors onboard which provide all the PCI signals and the
power supply for the PMC-Module.
Figure 1-2: Board Layout (Front View)
Opening for
PMC Module
Hotswap LED
Power
Controller
Hotswap Control
and Status Register
1 2
63 64
PCI - PCI
Bridge
1 2
63 64
ID 19976, Rev. 0200Page 1 - 4 ® PEP Modular Computers GmbH
Page 14

CP390 Introduction
1.5 Front Panels
HotswapStandard
CP 390
CP 390
Hot Swap
HS
The CP390 front panel is provided with a window for the insertion of a PMC module
bezel.
ID 19976, Rev. 0200 Page 1 - 5® PEP Modular Computers GmbH
Page 15

CP390 Introduction
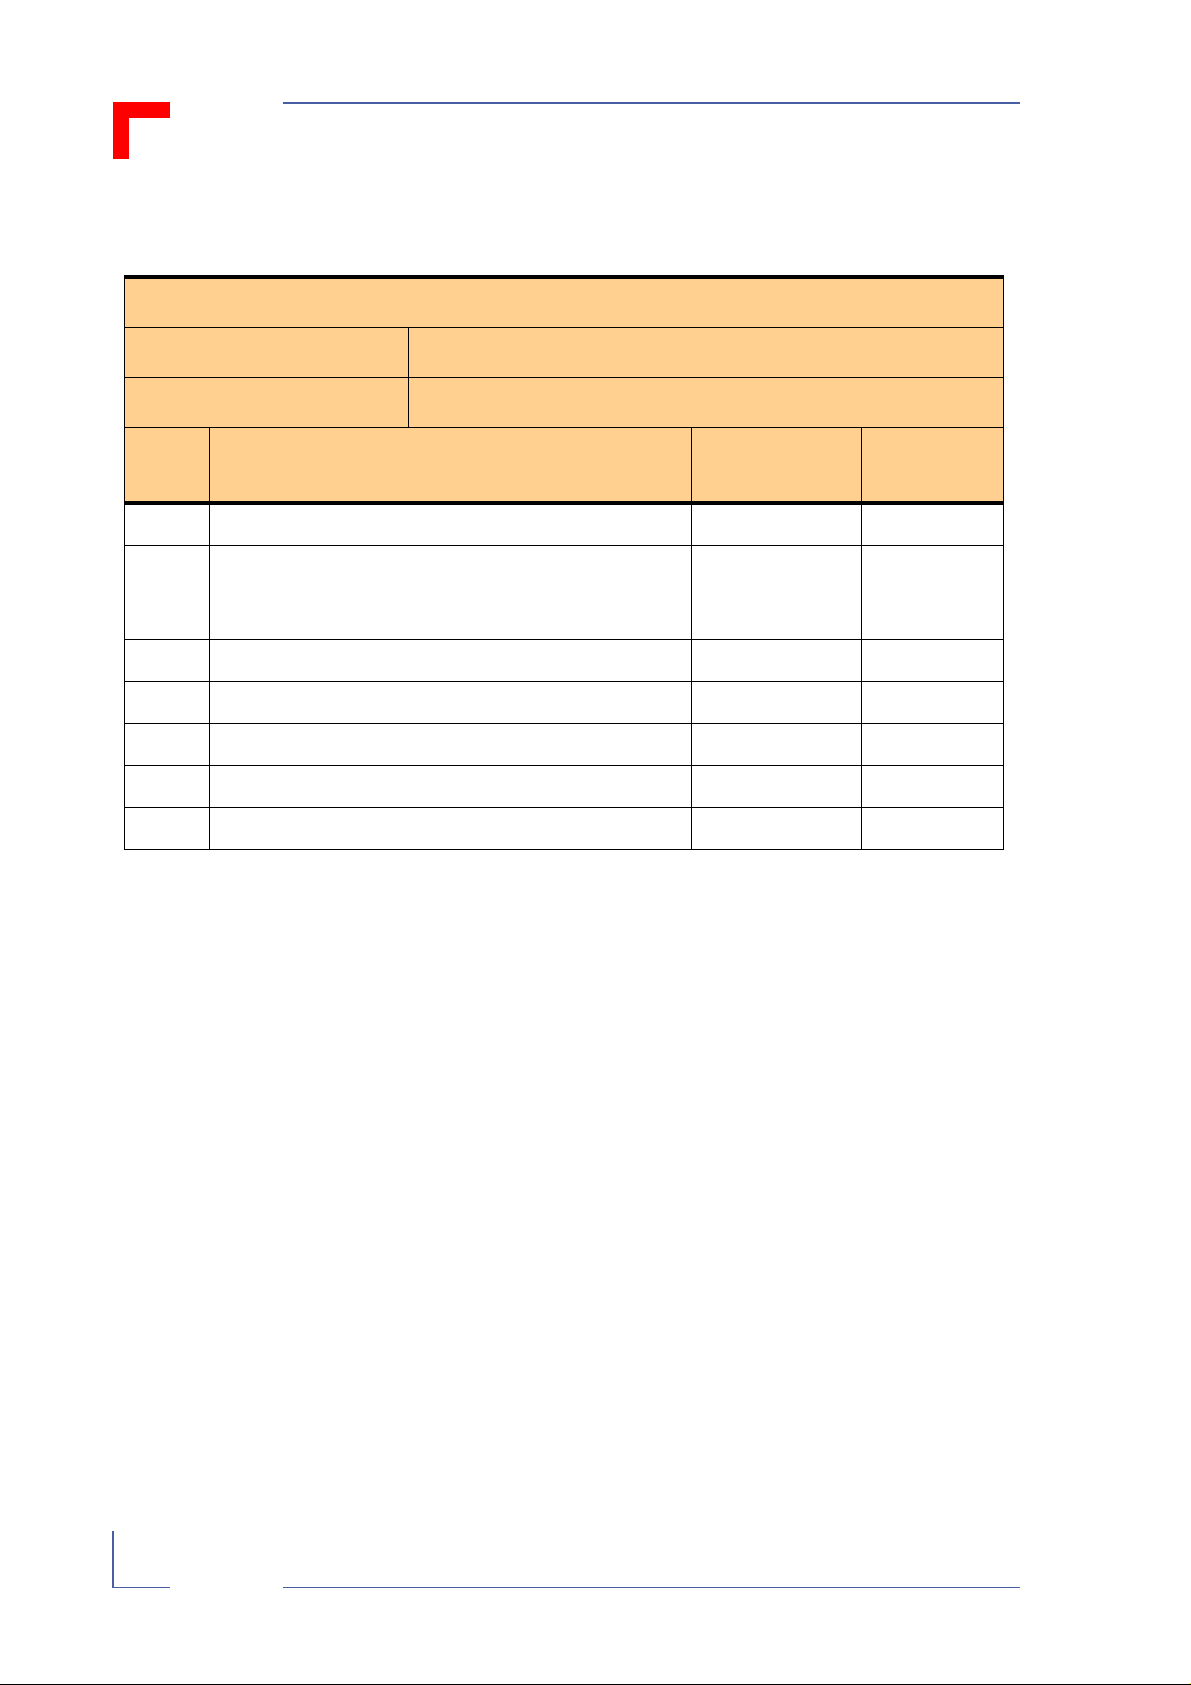
1.6 Technical Specifications
Table 1-1: CP390 Specifications
CP390 Specifications
PCI-Standard Compliant with PCI 2.1
Signaling Voltage
Driver Support A software driver is not required
Connectors PMC Jn1 (CON2) and Jn2 (CON3) connectors
Mechanical Compliance
Power 3.3V / 0.07 A (Core-Supply)
Temperature Range
Operating Humidity 5 – 95% (non condensing)
Vibrations and
Broad-Band Random Vibration
Shocks
Permanent Shocks
Single Shock
CPCI-Side: 3.3V / 5V tolerant
PMC-Side: 5V signaling
IEEE 1101.10
CMC IEEE P1386/Draft 2.0 (with minor
exceptions)
Operation:
• 0° to +60°C (standard)
• -25° to +75°C (extended)
Storage:
• -55° to +85°C
IEC68-2-6 compliant
IEC68-2-64
IEC68-2-29
IEC68-2-27
Single-height Eurocard:
Board Dimensions
Board Weight 122 grams
100 mm x 160 mm
1 x 4 HP slot
ID 19976, Rev. 0200Page 1 - 6 ® PEP Modular Computers GmbH
Page 16

CP390 Introduction
1.7 Applied Standards
1.7.1 CE Compliance
The PEP Modular Computers’ CompactPCI systems comply with the requirements of
the following CE-relevant standards:
• Emission EN50081-1
• Immission EN50082-2
• Electrical Safety EN60950
1.7.2 Mechanical Compliance
• Mechanical Dimensions IEEE 1101.10
1.7.3 Environmental Tests
• Vibration/Broad-Band IEC68-2-6
Random Vibration IEC68-2-64 (3U boards)
• Permanent Shock IEC68-2-29
• Single Shock IEC68-2-27
1.8 Related Publications
1.8.1 CompactPCI Systems/Boards
CompactPCI Specification, V. 2.0, Rev. 2.1
CompactPCI hotswap Specification, PICMG 2.1 R1.0
1.8.2 PMC Add-on Modules/Carriers
• Draft Standard for a Common Mezzanine Card Family, P1386/Draft 2.0
• Draft Standard Physical and Environment Layers for PCI Mezzanine Cards,
P1386.1/Draft 2.0
ID 19976, Rev. 0200 Page 1 - 7® PEP Modular Computers GmbH
Page 17

CP390
Installation
Installation
2.1 Board Installation ................................................................. 2 - 2
2.1.1 CPCI Signaling Voltage .............................................. 2 - 3
Chapter
2
ID 19976, Rev. 0200
Page 2 - 1® PEP Modular Computers GmbH
Page 18

CP390 Installation
$$
2. Installation
2.1 Board Installation
Caution!
If you are using the non-hotswap version of the CP390, please
switch off the target system before installing the board in a free
slot. Failure to do so could endanger your life/health and may
damage your board or system.
ESD Equipment!
Your carrier board and PMC module contain electrostatically sensitive devices. Please observe the necessary precautions to avoid
damage to your board:
• Discharge your clothing before touching the assembly. Tools
must be discharged before use.
• Do not touch components, connector-pins or traces.
• If working at an anti-static workbench with professional discharging equipment, please do not omit to use it.
PMC Module Installation
1. Place the EMC gasket on the bezel of your PMC-Module
2. Unscrew the stand-off, which is positioned at the PCI-Bridge
Note:
In order to support an active PMC carrier and, therefore, to
comply with the CPCI specification, it was necessary to
place the PCI-to-PCI bridge in the position where a socket
for mounting a stand-off would normally be (PMC specification). As a result, the second stand-off has been omitted.
3. Push the PMC bezel into the window of the front-panel of the CP390 and plug the
connectors together.
4. Use three screws (M2.5 x 6mm) to fix the board
ID 19976, Rev. 0200Page 2 - 2 ® PEP Modular Computers GmbH
Page 19

CP390 Installation
Figure 2-1: Installation Diagrams
PMC module
CP390 Front Panel
1
PMC bezel
10mm stand-off
2
CP390
3
3 *M2.5 *6mm
screws
2.1.1 CPCI Signaling Voltage
The primary side of the PCI-to-PCI bridge, i.e. the CPCI side, has buffers for 3.3V signaling but works equally well in a 5V signaling environment.
ID 19976, Rev. 0200 Page 2 - 3® PEP Modular Computers GmbH
Page 20

CP390
Configuration
Configuration
3.1 Pinouts ................................................................................ 3 - 2
3.1.1 Jn1 (CON2) Pin Assignment .......................................3 - 2
3.1.2 Jn2 (CON3) Pin Assignment .......................................3 - 3
Chapter
3
ID 19976, Rev. 0200
Page 3 - 1® PEP Modular Computers GmbH
Page 21

CP390 Configuration
3. Configuration
3.1 Pinouts
3.1.1 Jn1 (CON2) Pin Assignment
Table 3-1: Jn1, 32-bit PCI
Pin Number Signal Name Signal Name Pin Number
1 TCK -12V 2
3 Ground INTA# 4
5 INTB# INTC# 6
7 BUSMODE1# +5V 8
9 INTD# PCI-RSVD* 10
11 Ground PCI-RSVD* 12
13 CLK Ground 14
15 Ground GNT# 16
17 REQ# +5V 18
19 V(I/O) AD[31] 20
21 AD[28] AD[27] 22
23 AD[25] Ground 24
25 Ground C/BE[3]# 26
27 AD[22] AD[21] 28
29 AD[19] +5V 30
31 V(I/O) AD[17] 32
33 FRAME# Ground 34
35 Ground IRDY# 36
37 DEVSEL# +5V 38
39 Ground LOCK# 40
41 SDONE# SBO# 42
43 PAR Ground 44
45 V(I/O) AD[15] 46
47 AD[12] AD[11] 48
49 AD[09] +5V 50
51 Ground C/BE[0]# 52
53 AD[06] AD[05] 54
55 AD[04] Ground 56
57 V(I/O) AD[03] 58
59 AD[02] AD[01] 60
61 AD[00] +5V 62
63 Ground REQ64# 64
ID 19976, Rev. 0200Page 3 - 2 ® PEP Modular Computers GmbH
Page 22

CP390 Configuration
3.1.2 Jn2 (CON3) Pin Assignment
Table 3-2: Jn2, 32-bit PCI
Pin Number Signal Name Signal Name Pin Number
1 +12V TRST# 2
3 TMS TDO 4
5 TDI Ground 6
7 Ground PCI-RSVD* 8
9 PCI-RSVD* PCI-RSVD* 10
11 BUSMODE2# +3.3V 12
13 RST# BUSMODE3# 14
15 3.3V BUSMODE4# 16
17 PCI-RSVD* Ground 18
19 AD[30] AD[29] 20
21 Ground AD[26] 22
23 AD[24] +3.3V 24
25 IDSEL AD[23] 26
27 +3.3V AD[20] 28
29 AD[18] Ground 30
31 AD[16] C/BE[2]# 32
33 Ground PMC-RSVD 34
35 TRDY# +3.3V 36
37 Ground STOP# 38
39 PERR# Ground 40
41 +3.3V SERR# 42
43 C/BE[1]# Ground 44
45 AD[14] AD[13] 46
47 Ground AD[10] 48
49 AD[08] +3.3V 50
51 AD[07] PMC-RSVD 52
53 +3.3V PMC-RSVD 54
55 PMC-RSVD Ground 56
57 PMC-RSVD PMC-RSVD 58
59 Ground PMC-RSVD 60
61 ACK64# +3.3V 62
63 Ground PMC-RSVD 64
ID 19976, Rev. 0200 Page 3 - 3® PEP Modular Computers GmbH
Page 23

CP390
Hotswap
Hotswap
4.1 Technical Background of CompactPCI Hotswap ................. 4 - 2
4.1.1 Hotswap System ......................................................... 4 - 2
4.1.1.1 The Hotswap Backplane .........................................4 - 3
4.1.1.2 The System Host (System Controller) .................... 4 - 3
4.1.1.3 The Hotswap Board ................................................ 4 - 4
4.1.1.4 Software and Operating System .............................4 - 4
4.2 Design Implementation on the CP390 .................................4 - 4
Chapter
4
4.2.1 Power Ramping .......................................................... 4 - 4
4.2.2 Precharge ................................................................... 4 - 4
4.2.3 Handle Switch ............................................................. 4 - 4
4.2.4 ENUM# Interrupt ......................................................... 4 - 5
4.2.5 Hotswap Control and Status Register / Statemachine 4 - 5
4.2.6 Programming the GPIO’s ............................................4 - 7
4.1.1.1 GPIO: Output Enable Control Register - Offset 66h 4 - 7
4.1.1.2 GPIO Input Data Register - Offset 67h ................... 4 - 7
4.1.1.3 GPIO Output Data Register - Offset 65h ................ 4 - 8
ID 19976, Rev. 0200
Page 4 - 1® PEP Modular Computers GmbH
Page 24

CP390 Hotswap
4. Hotswap
4.1 Technical Background of CompactPCI Hotswap
In many modern application systems downtime is costly and/or unacceptable. Server
applications, telecommunications networks and automated systems requiring continuous monitoring call for a system design in which a single card can be inserted or
extracted without affecting the rest of the system. The ease with which a board may be
removed and replaced is dependent on the mechanical design (form factor), the possibility of deactivating the software drivers for the board (operating system) and the ability
to remove and insert the board without disturbing the signal quality on the bus.
CompactPCI hotswap is currently the most effective way to meet this need. Staggered
pins on the backplane guarantee controlled power sequencing of the board, while the
signals ENUM, BDSEL, HEALTHY and the hotswap control and status register bits may
be used to control board access from the software side.
4.1.1 Hotswap System
A hotswap system consists of a hotswap platform which comprises a hotswap backplane, the system host (CPU) with hotswap features, cooling, power supplies etc. plus
the boards to be hotswapped. Hotswapping is not possible unless the operating system
has the capability to enable and disable the board specific driver during normal operation.
ID 19976, Rev. 0200Page 4 - 2 ® PEP Modular Computers GmbH
Page 25

CP390 Hotswap
$
$
4.1.1.1 The Hotswap Backplane
The hotswap backplane has staggered pins to ensure defined power sequencing.
Figure 4-1: Illustration of Staggered Pinning on the Hotswap Backplane
BACKPLANE BOARD
Step 3
Step 2
Step 1
EARLY POWER *
BACK END POWER *
PCI SIGNALS
ENUM#
HEALTHY# *
BD_SEL#
*EARLY POWER: a part of VCC, 3.3V, V(I/O) and GND
*BACK END POWER: the main part of VCC,
*HEALTHY: only for high availability
Note:
EXPLANATORY KEY
+3.3V, V(I/O), +/-12V and GND
Some special signals (e.g. ENUM, HEALTHY, BDSEL...) have particular routing requirements.
4.1.1.2 The System Host (System Controller)
The System Controller must have the possibility to utilize the special signals defined by
the CompactPCI hotswap specification. If a high availability system is used it must additionally be able to control the hardware connection with the peripheral boards (Hardware
Connection Control).
ID 19976, Rev. 0200 Page 4 - 3® PEP Modular Computers GmbH
Page 26

CP390 Hotswap
4.1.1.3 The Hotswap Board
To ensure that a board may be removed and replaced in a working bus without
disturbing the system it requires the following additional features.
• precharge
• power ramping
• hotswap Control and status register bits
• automatic interrupt generation whenever a board is about to be removed or
replaced.
• an LED to indicate that the board may be safely removed.
4.1.1.4 Software and Operating System
No hotswap support is currently provided by Intel based operating systems. Windows
2000, which is scheduled to become available in February 2000, is expected to provide
hotswap support. Special software will require to be developed for other proprietary
systems.
In a hotswap environment the software driver and the operating system have the
following additional requirements:
• The OS must provide the possibility to initialize PCI devices during normal
operation whenever required (allocate resources).
• The OS must provide the possibility to load or unload software drivers during
normal operation whenever required.
4.2 Design Implementation on the CP390
4.2.1 Power Ramping
On the CP390, a special hotswap controller is used to ramp up the supply voltage of the
PMC modules (Back End Power). This is done to avoid transients on the 3.3V and the
5V power supplies from the Hotswap system. When the power supply is stable, the
hotswap controller generates a reset on the PMC slots to put the devices into a definite
state.
4.2.2 Precharge
Precharge is provided on the CP390 by a resistor on each signal line (PCI bus),
connected to a 1V reference voltage.
4.2.3 Handle Switch
A microswitch is situated in the extractor handle. Opening the handle initiates the
generation of the ENUM interrupt (produced by the onboard logic).
ID 19976, Rev. 0200Page 4 - 4 ® PEP Modular Computers GmbH
Page 27

CP390 Hotswap
!
4.2.4 ENUM# Interrupt
The onboard logic generates a low active interrupt signal to indicate that the board is
about to be extracted from the system or inserted into the system.
4.2.5 Hotswap Control and Status Register / Statemachine
All hotswap peripheral boards provide a HotSwap Control And Status Register which
provides information on the current state of the board. The defined bits in this register
set are named:
Table 4-1: Hotswap Control and Status Register / Statemachine
Bit Name Function
EXT Indication of extraction process
INS Indication of insertion process
LOO Led on
EIM ENUM mask bit
Due to the fact that no 64-bit transparent PCI-to-PCI bridge currently exists, which
would provide built-in hotswap status registers, another way of implementing these bits
had to be found.
The solution, therefore, is to put this information into the onboard logic.
Since on-chip registers handle read and write accesses in the same way, it is necessary
to exercise care when configuring the PCI-to-PCI GPIOs (general purpose IOs).
Table 4-2: Hotswap Register Bits
Bit Name Signal on 21150
EXT GPIO[2]
INS GPIO[3]
LOO GPIO[0]
EIM GPIO[1]
Attention!
GPIO[2:3] have to be configured as inputs. A different configuration may damage your bridge device.
ID 19976, Rev. 0200 Page 4 - 5® PEP Modular Computers GmbH
Page 28

CP390 Hotswap
Figure 4-2: Hotswap State Machine
Power on Slot empty
EXT: 0
INS: 0
ENUM#: 1
DISCONNECT#: 1
LED#: 1
HANDLE: closed
EIM: 0
LOO: 0
FFs valid: 0
Toggle
EIM and LOO
Toggle
EIM and LOO
EXT: 0
INS: 0
ENUM#: 1
DISCONNECT#: 1
Extraction armed Disconnected
LED#: 1
Handle: closed
EIM: 0
LOO: 0
FFs valid: 1
Open Handle
#: low active signal
FFs valid: PLD-internal Flip-Flops are valid.
EXT: 0
INS: 1
ENUM#: 0
DISCONNECT#: 1
LED#: 1
Handle: closed
EIM: 0
LOO: 0
FFs valid: 1
EXT: 1
INS: 0
ENUM#: 0
DISCONNECT#: 1
LED#: 1
Handle: open
EIM: 0
LOO: 0
FFs valid: 1
Insertion
Extraction
Close Handle
Toggle
EIM and LOO
followed by
Setting LOO
EXT: 0
INS: 0
ENUM#: 1
DISCONNECT#: 1
LED#: 1
Handle: open
EIM: 0
LOO: 0
FFs valid: 0
Physical
Handle
is open
Insertion:
Power
Ramping,
Handle
Physical
Extraction:
is open
EXT: 0
INS: 0
ENUM#: 1
DISCONNECT#: 0
LED#: 0
Handle: open
EIM: 0
LOO: 1
FFs valid: 1
ID 19976, Rev. 0200Page 4 - 6 ® PEP Modular Computers GmbH
Page 29

CP390 Hotswap
4.2.6 Programming the GPIO’s
This sub-chapter provides information for programming the GPIO’s (General Purpose
I/O’s) of the PCI-to-PCI bridge.
4.2.6.1 GPIO: Output Enable Control Register - Offset 66h
This section describes the GPIO for the Output Enable Control Register.
Dword address = 64h
Byte enable p_cbe_1<3:0> = x0xxb
Table 4-3: GPIO Output Enable Control Gegister - Offset 66h
Dword Bit Name R/W Description
The gpio<3:0> output enable control
write-1-to-clear. Writing 1 to any of these bits configures the corresponding gpio<3:0> pin as an input
only; that is, the output driver is tristated.
Writing 0 to this register has no effect.
When read, reflects the last value written.
19:16
GPIO output
enable
write-1-to-clear
R/W1TC
Reset value: 0 (all pins are input only).
The gpio<3:0> output enable control
write-1-to-set. Writing 1 to any of these bits configures the corresponding gpio<3:0> pin as bidirectional, that is,
enables the output driver and drives the value set in
the output data register (65h).
Writing 0 to this register has no effect.
When read, reflects the last value written.
Reset value: 0 (all pins are input only).
23:20
GPIO output
enable
write-1-to-set
R/W1TS
4.2.6.2 GPIO Input Data Register - Offset 67h
This section describes the GPIO input data register.
Dword address = 64h
Byte enable p_cbe_1<3:0> = 0xxxb
Table 4-4: GPIO Input Data Register - Offset 67h
Dword Bit Name R/W Description
27:24 Reserved R Reserved. Returns 0 when read.
This read-only register reads the state of the
31:28 GPIO input R
ID 19976, Rev. 0200 Page 4 - 7® PEP Modular Computers GmbH
gpio<3:0> pins. This state is updated on the
PCI clock cycle following a change in the gpio pins.
Page 30

CP390 Hotswap
4.2.6.3 GPIO Output Data Register - Offset 65h
This section describes the GPIO output data register.
Dword address = 64h
Byte enable p_cbe_1<3:0> = xx0xb
Table 4-5: GPIO Output Data Register - Offset 65h
Dword Bit Name R/W Description
The gpio<3:0> pin output data
write-1-to-clear. Writing 1 to any of these bits drives
the corresponding bit low on the gpio<3:0> bus if it is
programmed as bi-directional. Data is driven on the
PCI clock cycle following completion of the
configuration write to this register. Bit positions corresponding to gpio pins that are programmed as input
only are not driven.
Writing 0 to these bits has no effect.
When read, reflects the last value written.
11:8
GPIO output
enable write1-to-clear
R/W1TC
15:12
GPIO output
enable write1-to-set
R/W1TS
Reset value: 0.
The gpio<3:0> pin output data
write-1- to-set. Writing 1 to any of these bits drives
the corresponding bit high on the gpio<3:0> bus if it
is programmed as bi-directional. Data is driven on the
PCI clock cycle following completion of the
configuration write to this register. Bit positions corresponding to gpio pins that are programmed as input
only are not driven.
Writing 0 to these bits has no effect.
When read, reflects the last value written.
Reset value: 0.
ID 19976, Rev. 0200Page 4 - 8 ® PEP Modular Computers GmbH
Page 31

CP390
CompactPCI System Notes
Appendix
CompactPCI System Notes
A System Overview ..................................................................A - 2
1 Note on CompactPCI ........................................................A - 2
2 Main Features of CompactPCI Systems ...........................A - 2
B System Components .............................................................A - 3
A
ID 19976, Rev. 0200
Page A - 1® PEP Modular Computers GmbH
Page 32

CP390 CompactPCI System Notes
CompactPCI System Notes
A System Overview
The PEP Modular Computers CompactPCI systems described in this chapter operate
with the PCI bus architecture to support additional I/O and memory-mapped devices as
required by various industrial applications. In the following you will find the most important information on all system relevant CompactPCI features. For more detailed information concerning the CompactPCI standard, please consult the complete Peripheral
Component Interconnect (PCI) and CompactPCI Specifications. For further information
regarding these standards and their use, visit the homepage of the PCI Industrial Com-
puter Manufacturers Group (PICMG).
1 Note on CompactPCI
CompactPCI is an extension of the PCI specification. It has been optimized for industrial
and embedded applications that require a more robust mechanical form factor as compared to Desktop PCI. CompactPCI systems use industry standard mechanical components and high performance connector technologies to provide systems that are well
suited for rugged applications. CompactPCI stands for systems that are electrically
compatible with the PCI Specification, allowing low cost PCI components to be used.
CompactPCI is an open specification supported by PICMG.
2 Main Features of CompactPCI Systems
Some of the outstanding features of the CompactPCI systems compliant with Specification 2.0, Release 2.1 are:
• PCI signalling
• 32 and 64 bit data transfer at 66 MHz
• up to 16 (2 × 8) PCI slots per backplane
• industry standard software support
• 3U small form factor (100 mm by 160 mm)
• 6U form factor (233 mm by 160 mm)
• Eurocard packaging
• wide variety of available I/O functions
• industry support from over 350 members.
• possibility of PMC modules on some boards
PEP Advantage
PEP Modular Computers’ CompactPCI systems are designed as
open systems, able to be expanded at any time, so that their backplanes can be equipped with precisely the CPCI boards that correspond to a customer’s specific needs. However, in order to supply
you with an appropriate choice of workstations, the PEP basic
equipment is divided into pre-configured sets and custom solutions.
ID 19976, Rev. 0200Page A - 2 ® PEP Modular Computers GmbH
Page 33

CP390 CompactPCI System Notes
B System Components
PEP Modular Computers have devised their CompactPCI systems as a comprehensive
open solution for industrial environments, offering different workstation configurations
which are capable of including all the components necessary to fulfill the requirements
of virtually all existing system functionalities.
CompactPCI Backplane(s)
• 4-slot backplane;
• 6-slot backplane;
• 8-slot backplane;
• 16-slot (2 × 8) backplane.
CPU Function
PEP Modular Computers provides CPU boards corresponding in size and characteristics to the special features of the PEP systems.
Display Related Functions
Display related functions such as frame grabbing are supported by dedicated boards.
Communication
Communication boards are provided for the currently relevant industrial communication
systems such as Fast Ethernet.
Fieldbus Control
Fieldbus control boards provide data exchange with field control and automation subsystems like PEP Modular Computers’ SMART2 or VMEbus systems using up-to-date
transmission standards for example:
• CAN fieldbus control
• PROFIBUS control
Industrial I/O Functions
PEP’s CompactPCI systems support an ever increasing number of industrial I/O functionalities in the fields of:
• Digital I/O
• Analog I/O
• SERCOS
Self-Testing
A special PEP self-testing board provides a trouble-spotting capability within your PEP
system.
ID 19976, Rev. 0200 Page A - 3® PEP Modular Computers GmbH
Page 34

CP390 CompactPCI System Notes
System Hardware
The PEP CompactPCI system hardware includes housings, storage devices, power
supply units, network adapters etc. The most important system hardware elements with
which to configure your CompactPCI system are as follows:
Multiprocessor
In a CompactPCI multiprocessor system, a system controller communicates with other
CPU’s through a non-transparent PCI / PCI bridge. PEP Modular Computers’
CompactPCI system controllers, CP600/CP610, which are designed to work together
with PEP CPU’s, CP611/CP612, provide full multiprocessor solutions.
Housings
• Board cages for 19-inch cabinets or wall mounting, available in 3U/4U/6U/7U
heights and 42HP/84HP width
Mass Storage Devices
• Hard-disk drive
• Floppy-disk drive
• CD-ROM drive
Power Supply Units
Table 1-1: Power Supply Units
Form Factor Input Type
3U AC
DC
6U AC
DC
180W DIN M-Series CP3-SVE-M-180AC
235W ATX CP3-SVE-ATX-235AC
120W DIN M-Series CP3-SVE-M-120DC-V1 (-E1)
150W DIN M-Series CP3-SVE-M-150DC-V2 (-R)
250W DIN M-Series CP6-SVE-M-250AC-R
270W DIN M-Series CP6-SVE-M-270AC
250W DIN M-Series CP6-SVE-M-250DC-R
270W DIN M-Series CP6-SVE-M-270DC
Power
Output
Power
Supply
Connector
Power Supply
Unit
ID 19976, Rev. 0200Page A - 4 ® PEP Modular Computers GmbH
Page 35

CP390 CompactPCI System Notes
Form Factors
PEP Modular Computers CompactPCI boards are available in different form factors,
mainly as 3U (single-height) and 6U (double-height) boards and as 4HP (single-width),
8HP (double-width), and 12HP (triple-width) boards.
Please note that the following units of measurement are used to express the dimensions
of PEP CompactPCI card slots:
• Height: 1 U = 44.45 mm
• Width: 1 HP = 5.08 mm
On certain boards/carriers with PMC connectors, PMC add-on modules can also be
installed. Please note that the form factor currently implemented by PEP Modular Com-
puters for its PMC modules is:
• 149mm x 74mm (single-size standard).
For a detailed description of the PEP Modular Computers CompactPCI modules please
consult the specific component’s manuals or data sheets.
PEP Advantage
As the PEP Modular Computers CompactPCI system provides
comprehensive open solutions, new features and functionalities
may be added to our range. To keep abreast of the latest developments, please contact your local PEP Sales Office or visit the PEP
Web Site.
ID 19976, Rev. 0200 Page A - 5® PEP Modular Computers GmbH
Page 36

CPU
C
W
CP390 CompactPCI System Notes
Figure 1-1: Example of a PEP Modular Computers CompactPCI System
ompactPCI
orkstation
ID 19976, Rev. 0200Page A - 6 ® PEP Modular Computers GmbH
WD Timer
Add-ons
HDD
FDD
CD-ROM
COM
LPT
Keyboard
Host
Computer
Graphics
PanelLink
VGA
LVDS
Fieldbus
SERCOS
PROFIBUS
CAN
Server
Computer
Communic.
F. Ethernet
CPCI Backplane
Fast
Ethernet
Image Control
RGB
SYNC
WWW
Industrial I/O
Digital I/O
Analog I/O
Host
Computer
Multi
Processor
Add-on
Carriers
SMART2
SMART I/O
PEP9300
 Loading...